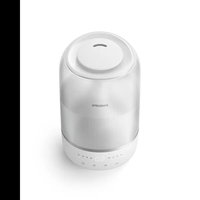
USER MANUAL HU1509 PHILIPS
English 3
Azərbaycanca 25
Čeština 48
Dansk 70
Deutsch 92
Eesti 117
Español 139
Français 162
Hrvatski 185
Italiano 208
Latviešu 231
Lietuviškai 253
Magyar 276
Nederlands 299
Norsk 322
O'zbek 344
Polski 367
Português 390
Română 414
Shqip 437
Slovenščina 460
Slovensky 483
Srpski 505
Suomi 528
Svenska 550
Türkçe 572
Türkmençe 595
Ελληνικά 618
Български 642
Кыргызча 666
Македонски 690
Русский 714
Точикй 738
Українська 762
Қазақша 786
Ruijtntu 810
งษัตย์ 835
Important
Read this important information booklet carefully before you use the appliance, and save it for future reference.
To ensure the best performance, kindly suggest the firmware of your appliance is upgraded to the latest version. You can do this upgrade via the Air+ app.
Danger
- Do not spray any flammable materials such as insecticides or fragrance around the appliance.
- Do not clean the appliance with water, any other liquid, or a (flammable) detergent to avoid electric shock and/or a fire hazard.
- The water in the water tank is not suitable for drinking. Do not drink this water and do not use it to feed animals or to water plants. When you empty the water tank, pour the water down the drain.
Warning
- Be aware that high humidity levels may encourage the growth of biological organisms in the environment.
- Do not permit the area around the humidifier to become damp or wet. If dampness occurs, turn the output of the humidifier down. If the humidifier output volume cannot be turned down, use the humidifier intermittently. Do not allow absorbent materials, such as carpeting, curtains, drapes, or tablecloths, to become damp.
- Never leave water in the reservoir when the appliance is not in use.
- Empty and clean the humidifier before storage. Clean the humidifier before next use.
- Check if the voltage indicated on the appliance corresponds to the local mains voltage before you connect the appliance.
- If the supply cord is damaged, you must have it replaced by Philips, a service center authorized by Philips, or similarly qualified persons in order to avoid a hazard.
- Do not use the appliance if the plug, the power cord, or the appliance itself is damaged.
- This appliance can be used by children aged from 8 years and above and persons with reduced physical, sensory or mental capabilities or lack of experience and knowledge if they have been given supervision or instruction concerning use of the appliance in a safeway and understand the hazards involved. Children shall not play with the appliance. Cleaning and user maintenance shall not be made by children without supervision.
- Micro-organisms that may be present in the water or in the environment where the appliance is used or stored, can grow in the water reservoir and be blown in the air causing very serious health risks when the water is not renewed and the tank is not cleaned properly every 3 days.
- Standard WiFi interface based on 802.11b/g/n/ax at 2.4GHz with a maximum output power of 64mW EIRP.
4 English
Caution
- Bluetooth version 5.2 (LE) at frequency 2.4GHz with RF output less than 10mW EIRP.
- The appliance is only intended for household use under normal operating conditions.
- Always place and use the appliance on a dry, stable, flat and horizontal surface.
- Do not place anything on top of the appliance and do not sit or stand on the appliance.
- Do not use the appliance near gas appliances, heating devices or fireplaces.
- Do not place the appliance directly below an air conditioner to prevent condensation from dripping onto the appliance.
- Do not use this appliance when you have used indoor smoke-type insect repellents or in places with oily residues, burning incense, or chemical fumes.
- Do not use the appliance in wet surroundings or in surroundings with high ambient temperatures, such as the bathroom, toilet, or kitchen, or in a room with major temperature changes.
- Do not immerse the humidifier base, power cord, or plug in water.
- Empty the water tank and refill every third day. Before refilling, clean it with fresh tap water. Remove any scale, deposits, or film that has formed on the sides of the water tank or on interior surfaces and wipe all surfaces dry.
- Always unplug the appliance when you want to move, clean appliance, fill the water, or carry out maintenance.
- Do not put any substance other than water in the water tank. Do not add essential oils or chemical substances into the water.
- Use purified, distilled water or water with low mineral content to prevent the build-up of scale and the dispersal of minerals into the air. Do not use hot water.
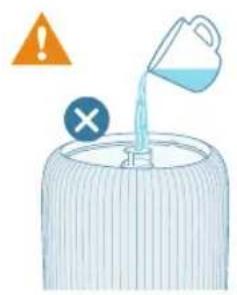
- Do not pour water into any openings except for the water tank.
- Do not cover the nozzles while the humidifier is on. Mist should be directed away from walls, furniture, bedding, and appliances.
- Remove the water tank from the base before moving the humidifier.
- Never place the product in a washing machine or dishwasher. It would be destroyed as a result.
- During the working of the humidifier, do not remove the water tank from the base, and never touch the water conduits or any components inside the reservoir.
- The essential oils are not included with the product. Please purchase and use the essential oils if needed.
- Make sure the product is disconnected with power before dropping essential oils into the aroma box.
- Do not use substances other than essential oils to the aroma box.
- Read and follow the safety and use instruction of the essential oil carefully before using it.
-
Check the ingredients information of the essential oil versus your known allergies and exclude it from use when necessary.
-
Consult and follow doctor recommendation before using the essential oil for infants, pregnant women or women in the lactation period or if you have respiratory issues
- If you feel unwell, irritation or discomfort during the use of the essential oil, please stop using it.
Electromagnetic fields (EMF)
This appliance complies with the applicable standards and regulations regarding exposure to electromagnetic fields.
Recycling

This symbol means that this product shall not be disposed of with normal household waste (2012/19/EU).
Follow your country's rules for the separate collection of electrical and electronic products. Correct disposal helps prevent negative consequences for the environment and human health.
Hereby, DAP B.V. declares that the radio equipment type HU1509/HU1510 is in compliance with Directive 2014/53/EU. The full text of the EU declaration of conformity is available at the following internet address: www.philips.com.
6 English
Your humidifier
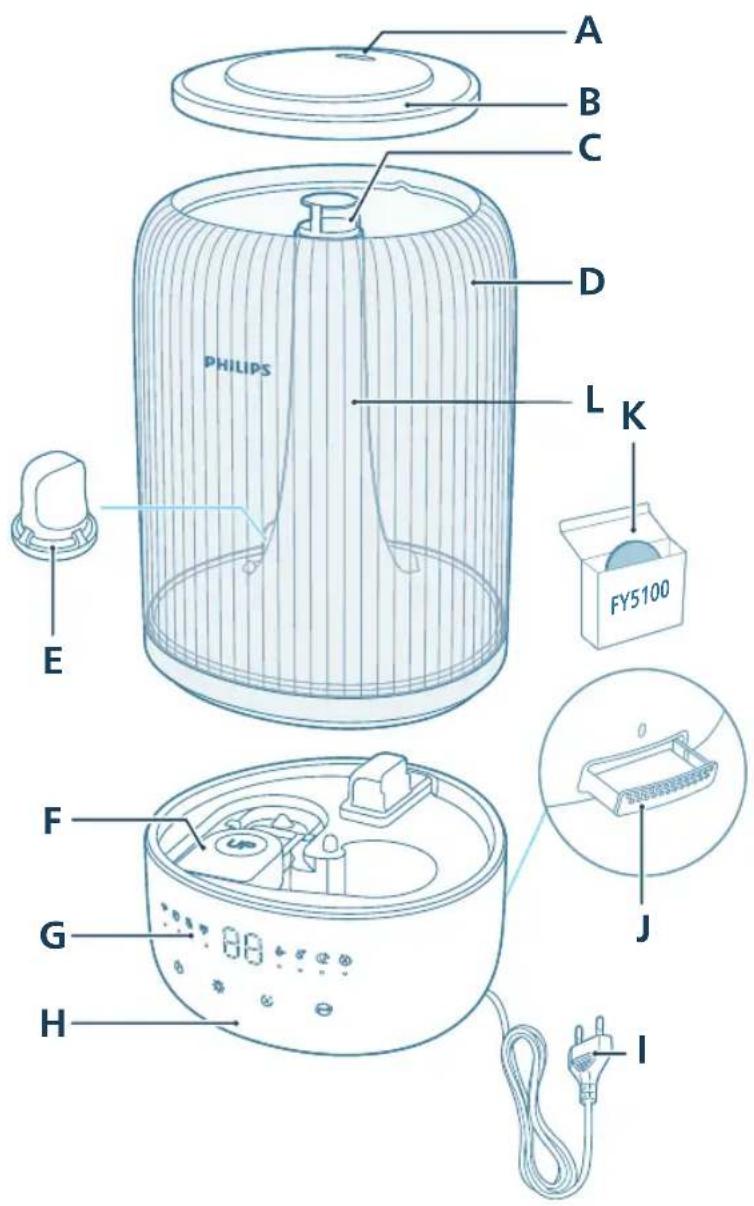
Product overview
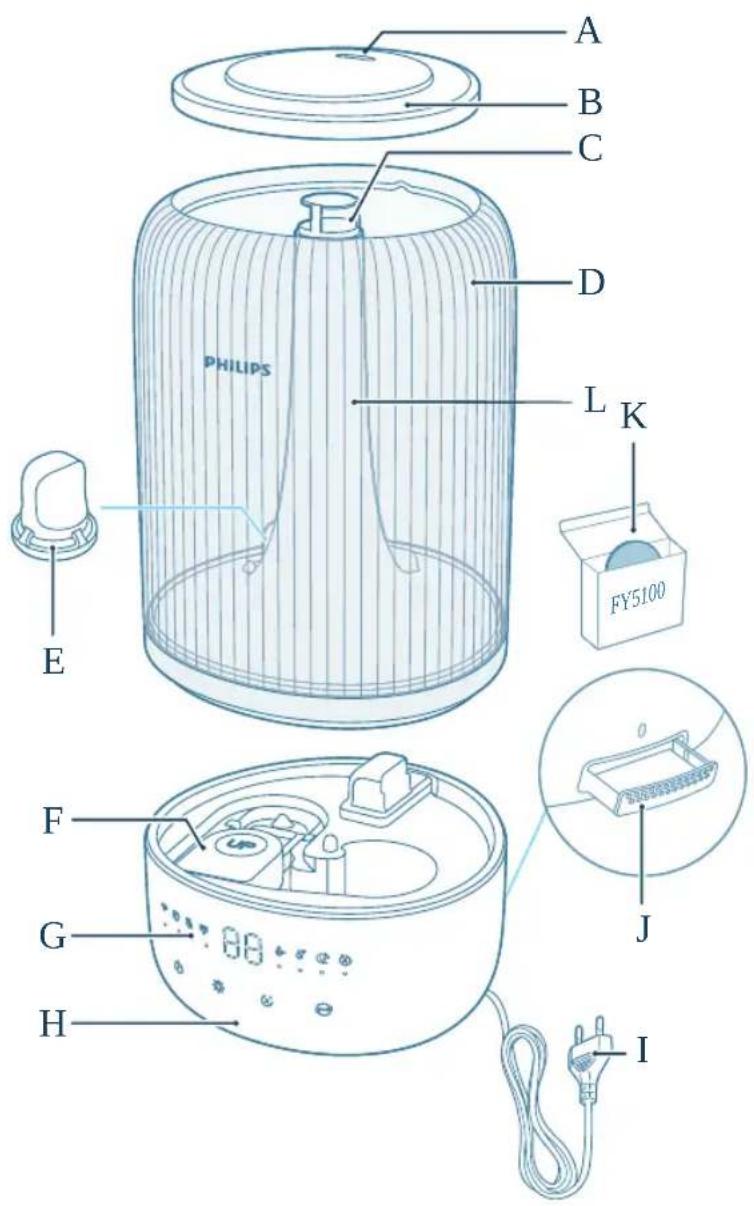
A Nozzle G Control panel
B Water tank cover H Base
C Mist outlet I Power plug
D Water tank J Aroma box
E Water filter K Aroma pads (FY5100)
F Float L Mist tube
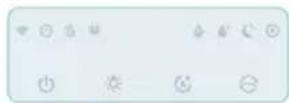
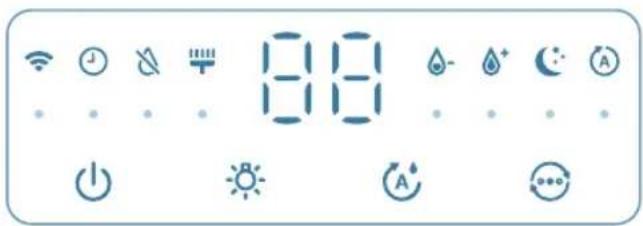
Controls overview
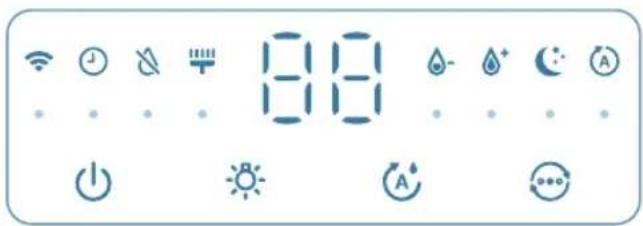
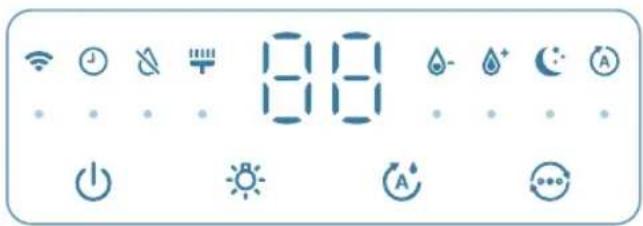
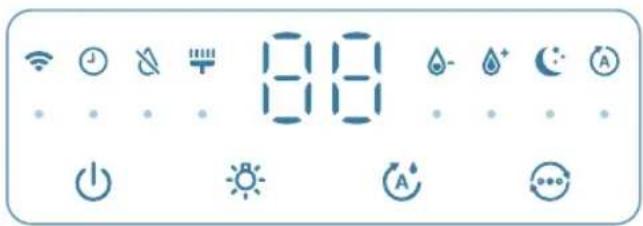
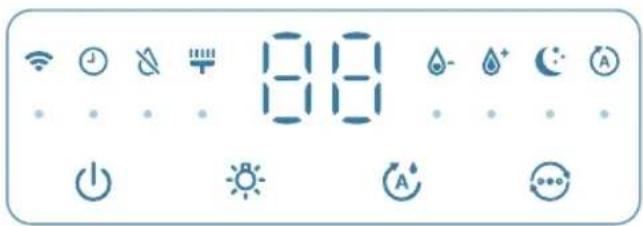
Power on/off button Light function button

Humidity setting button Mode switch

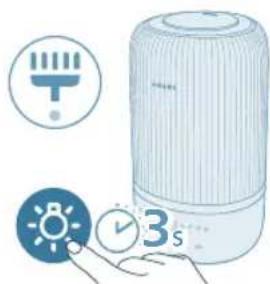
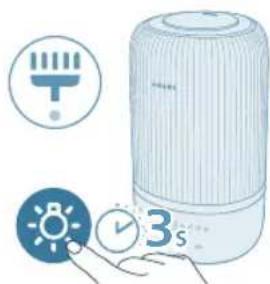
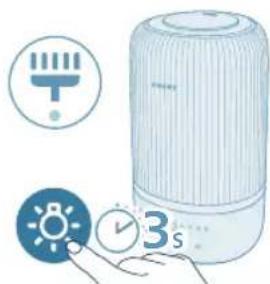
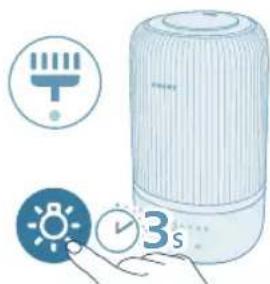
Long press the button(s) for 3 seconds:
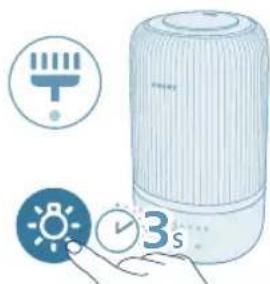
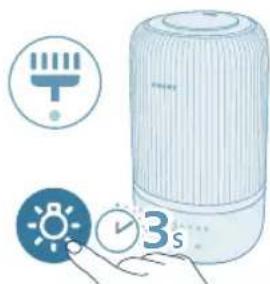
Cleaning reset Wi-Fi reset

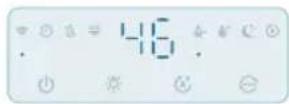
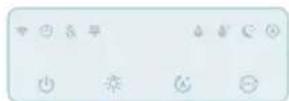
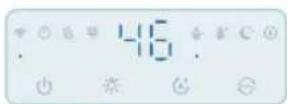
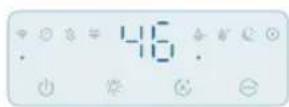
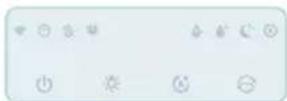
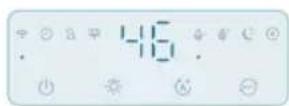
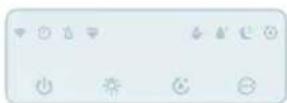
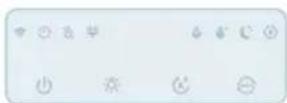
Display panel:
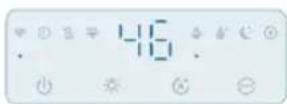
(A) Auto mode Sleep mode

WiFi indicator Medium mode

High mode Humidifier cleaning alert

Water refill indicator Timer indicator (available in the app)
Getting started
First time use
Note:
Remove all packing materials before first time use.
Take the water tank off of the base and remove all tapes.
Rinse all parts before first use.
Select a firm, flat, water-resistant surface for the humidifier, ensuring it is positioned at least 30cm away from walls.
8 English
Ensure that the mist is directed away from walls, furniture, and other appliance.
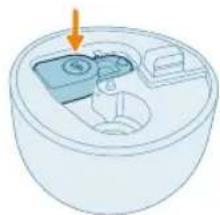
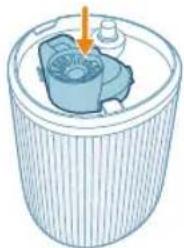
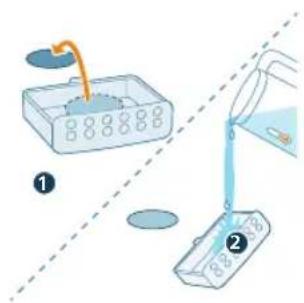
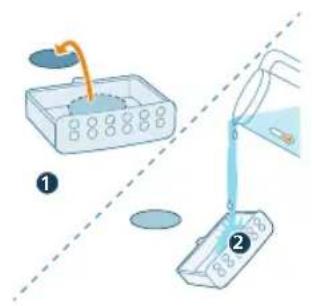
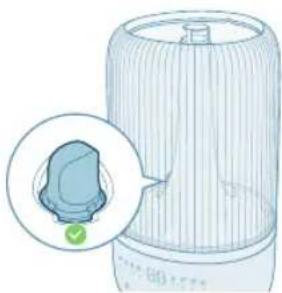
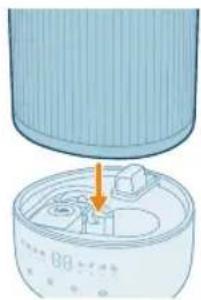
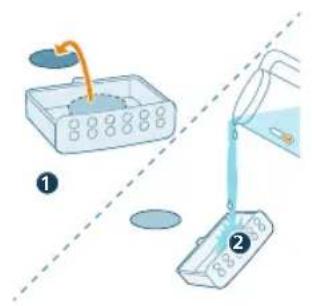
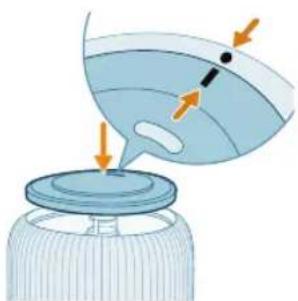
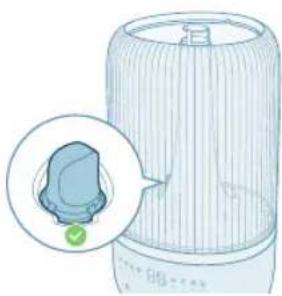
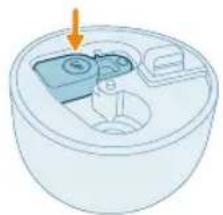
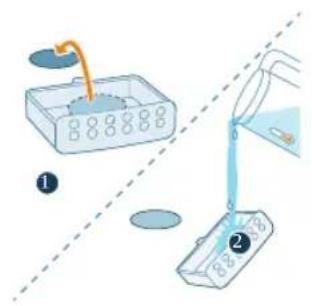
1 Make sure that the float is well in place.
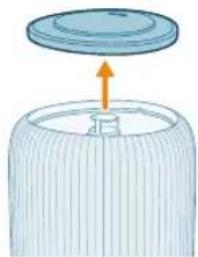
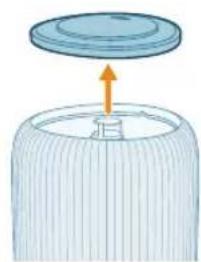
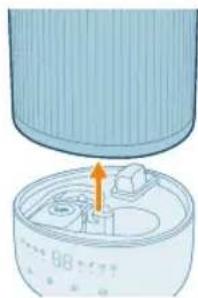
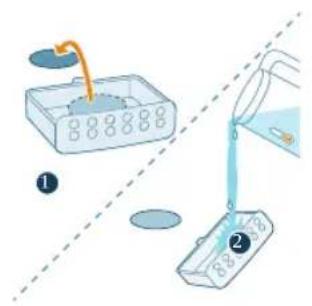
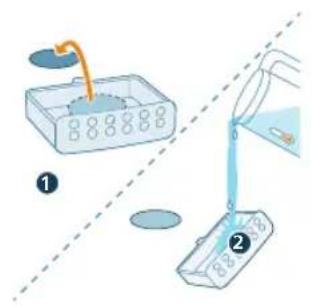
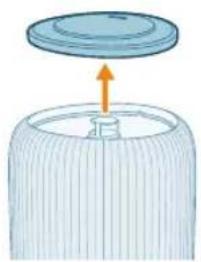
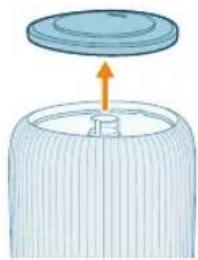
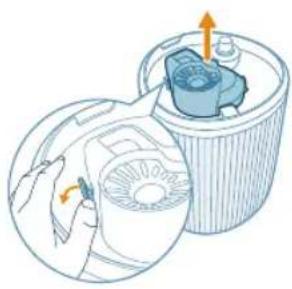
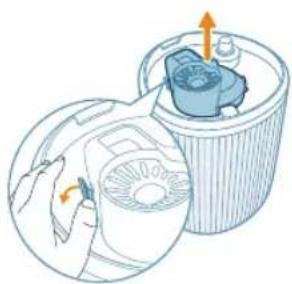
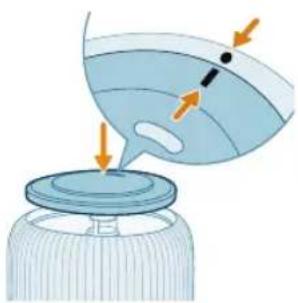
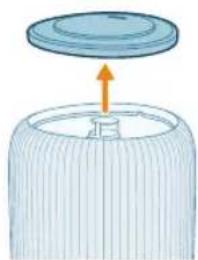
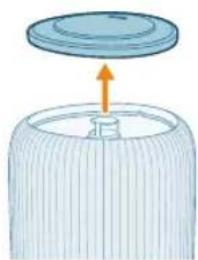
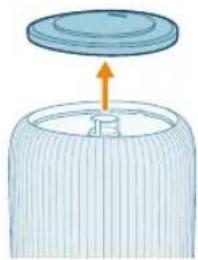
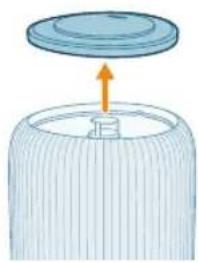
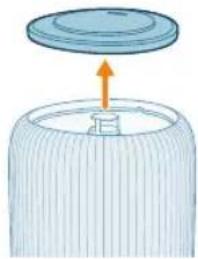
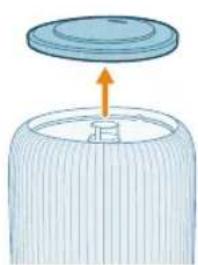
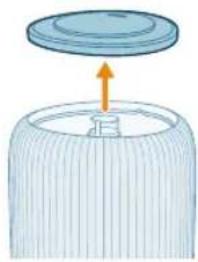
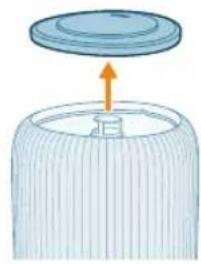
2 Remove the top cover from the water tank.
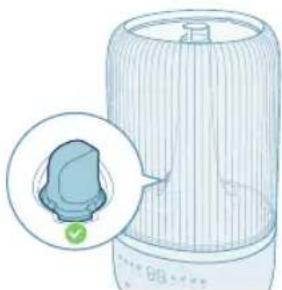
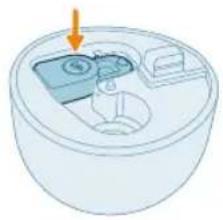
3 Make sure the water filter is attached properly.
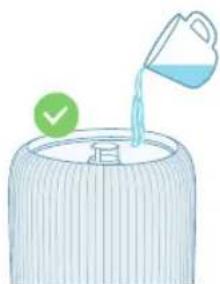
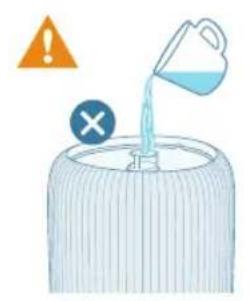
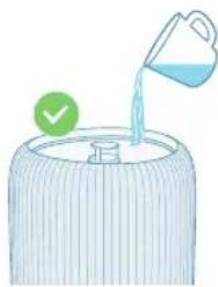
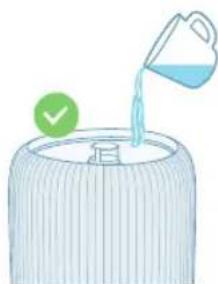
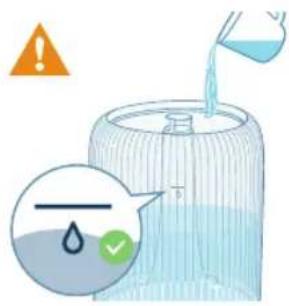
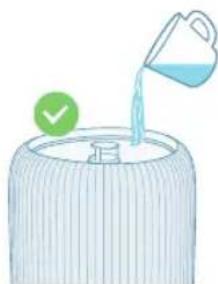
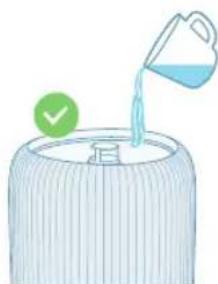
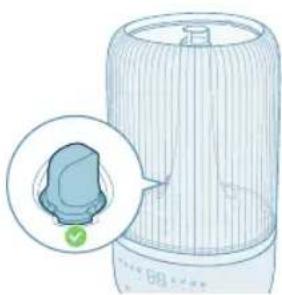
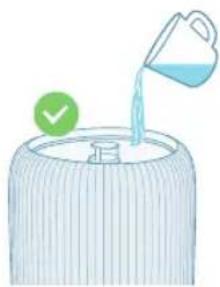
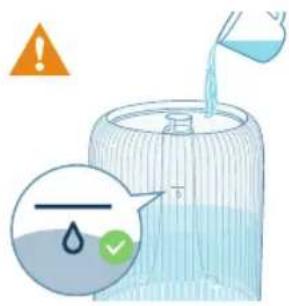
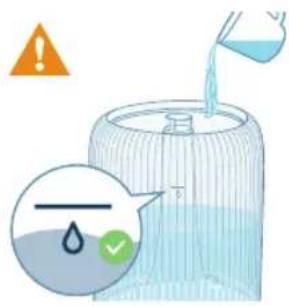
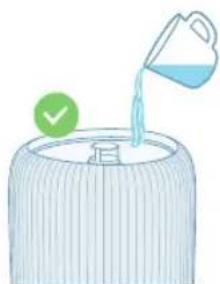
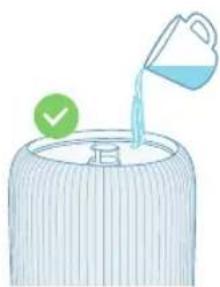
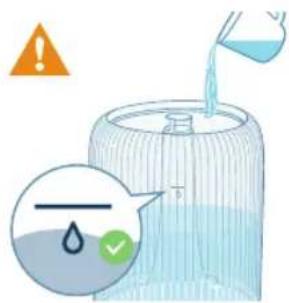
4 Fill the water tank with water. Do not fill with hot water.
Note:
Use purified, distilled water or water with low mineral content to prevent the build-up of scale and the dispersal of minerals into the air.
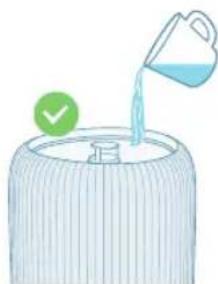
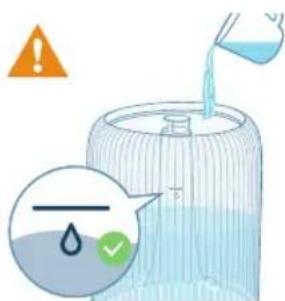
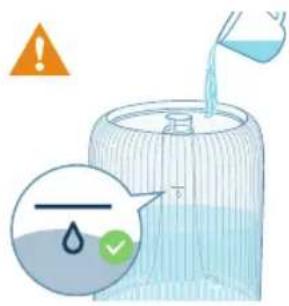
- Do not exceed the water level indication when filling water.
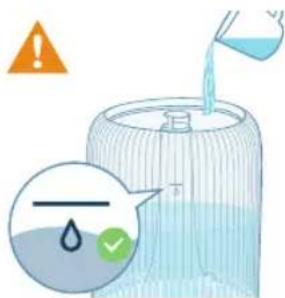
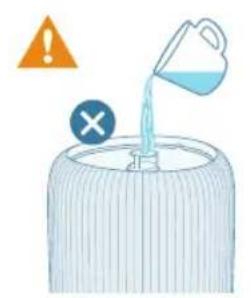
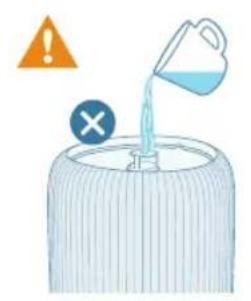
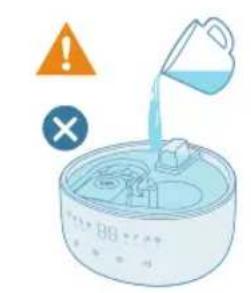
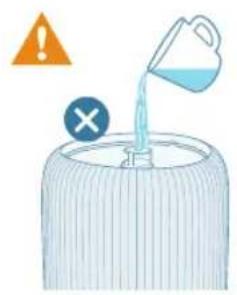
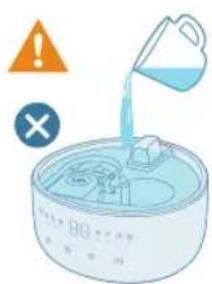
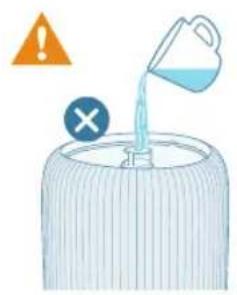
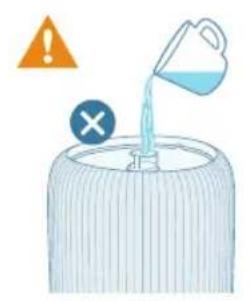
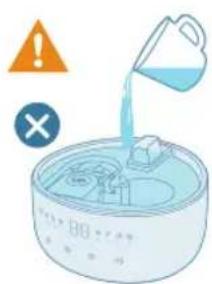
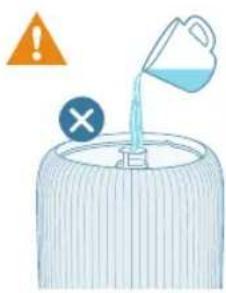
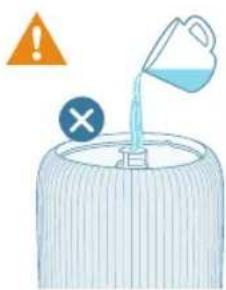
- Do not pour water through the ultrasonic mist outlet.
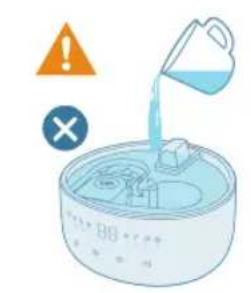
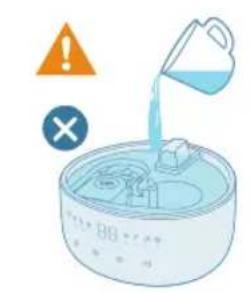
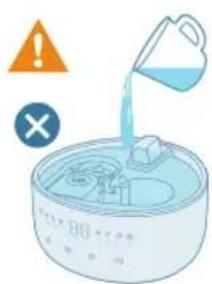
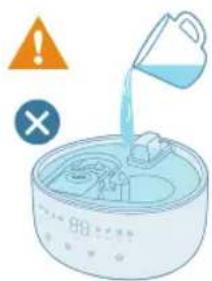
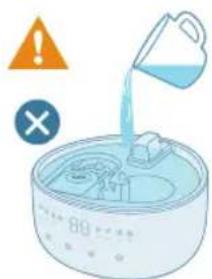
- Do not pour water directly into the base.
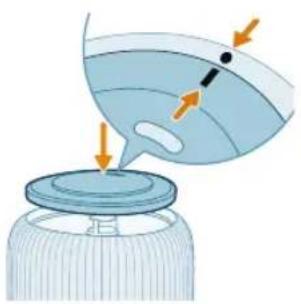
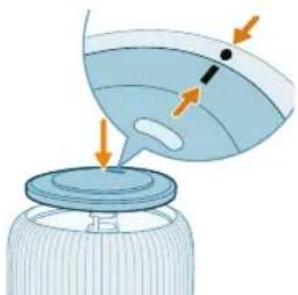
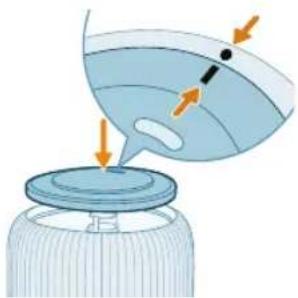
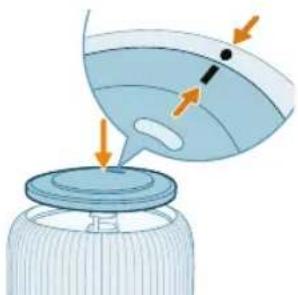
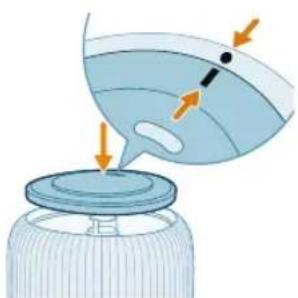
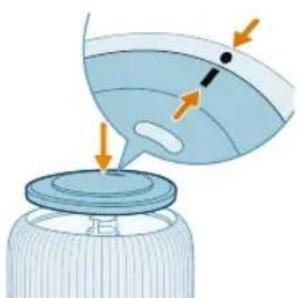
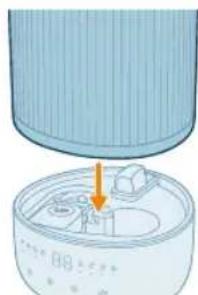
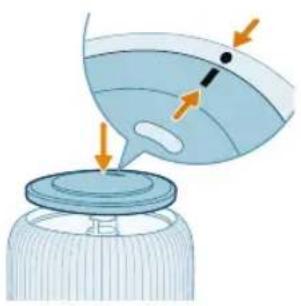
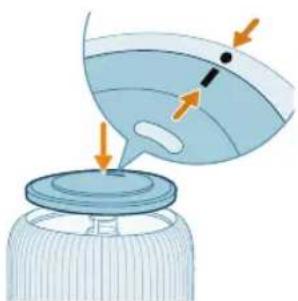
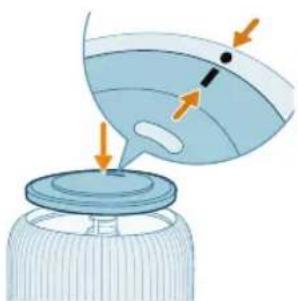
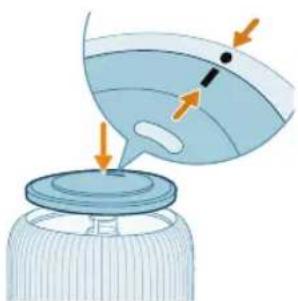
5 Reattach the top cover to the water tank.
Using the aroma function
Notes:
The essential oils are not included with the product. Please purchase and use the prescribed essential oils if needed.
Read the user manual of essential oils carefully before using the aroma function.
Make sure the product is disconnected with power before dropping essential oils into the aroma box.
Do not use substances other than essential oils.
Read and follow the safety and use instruction of the essential oil carefully before using it.
Check the ingredient information of the essential oil against your known allergies and exclude it from use when necessary.
10
English
Consult and follow your doctor's recommendation before using essential oils for infants, pregnant women, women in the lactation period, or if you have respiratory issues.
If you feel unwell, experience irritation or discomfort during the use of essential oils, please discontinue use.
Do not use the aroma function of essential oils for infants, pregnant women, or women in the lactation period.
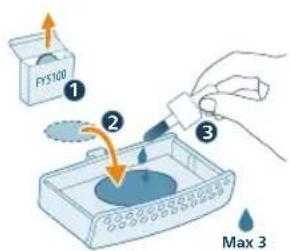
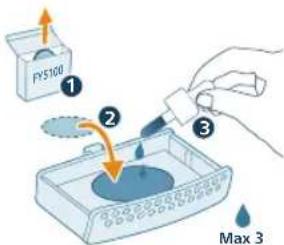
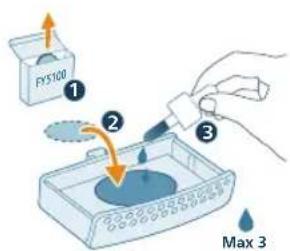
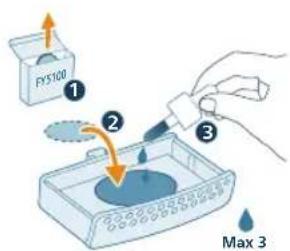
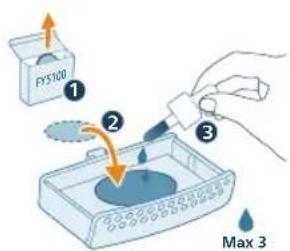
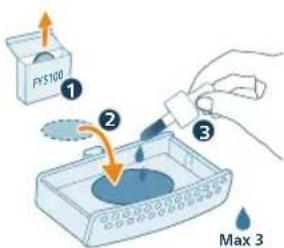
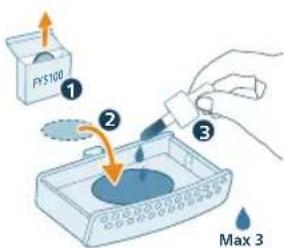
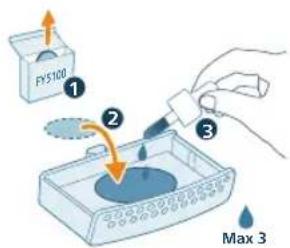
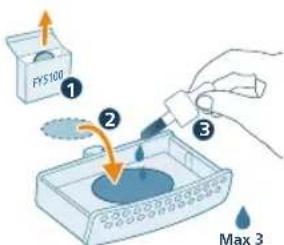
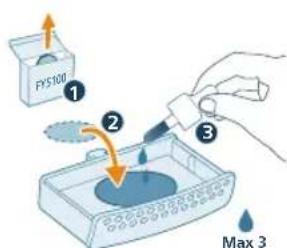
Only add essential oils directly to the aroma pad. Don't add essential oils to other parts, otherwise the parts will be damaged by the oil.
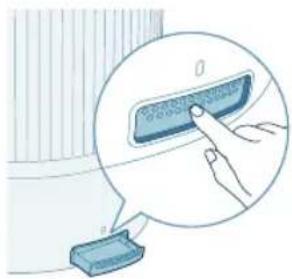
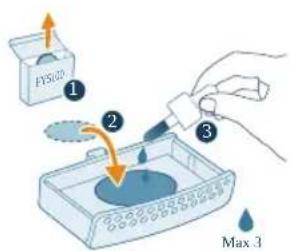
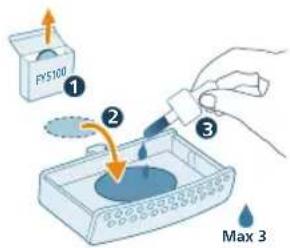
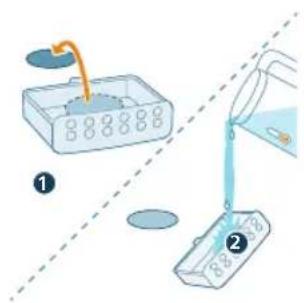
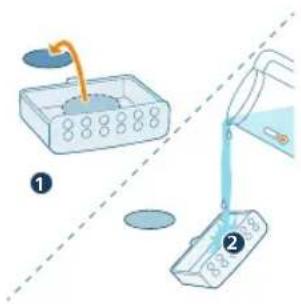
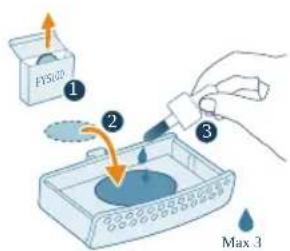
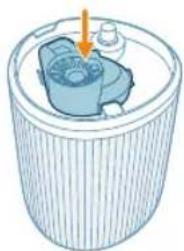
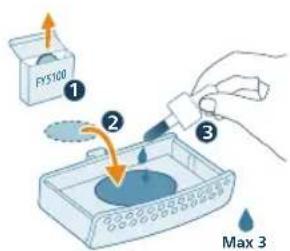
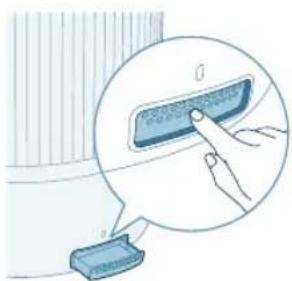
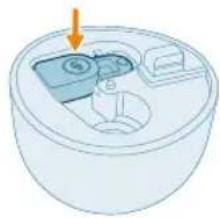
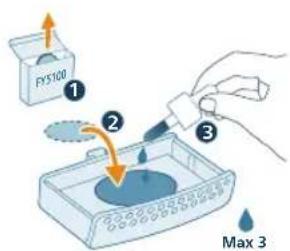
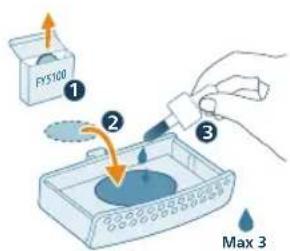
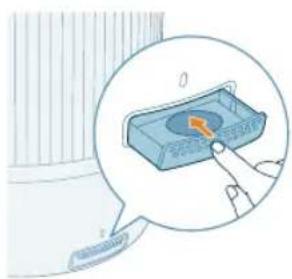
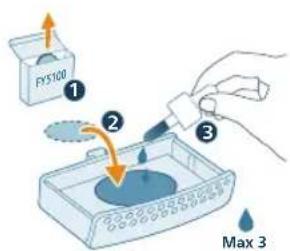
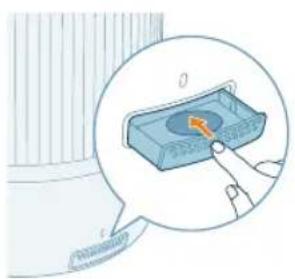
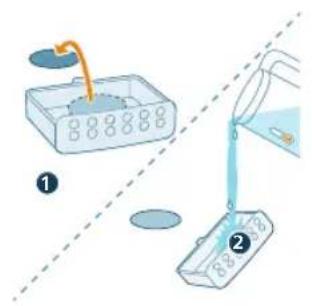
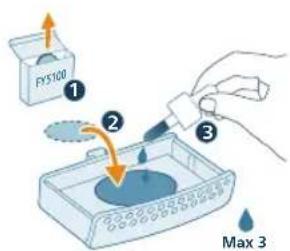
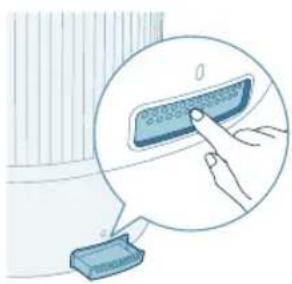
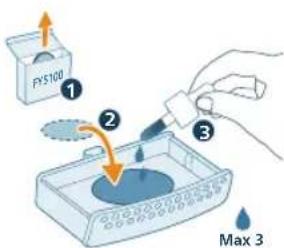
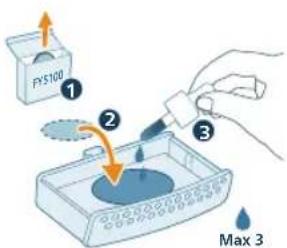
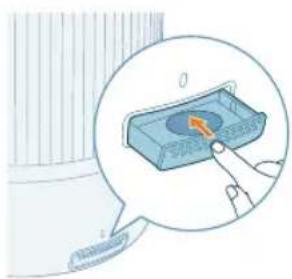
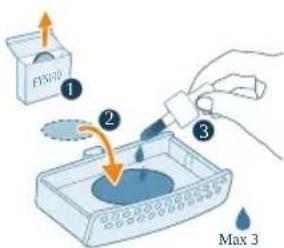
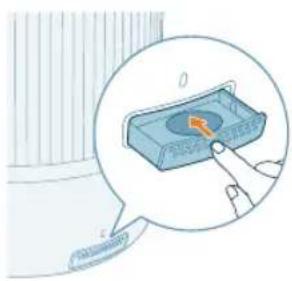
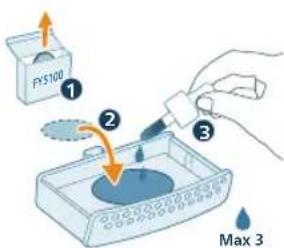
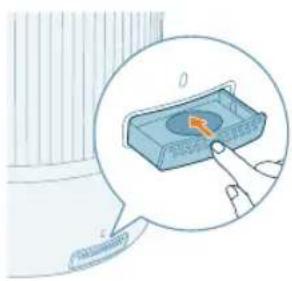
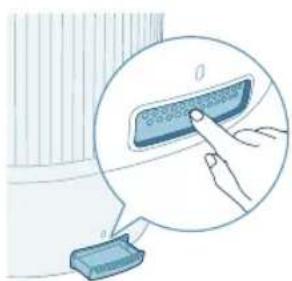
1 Push the aroma box to automatically eject it.
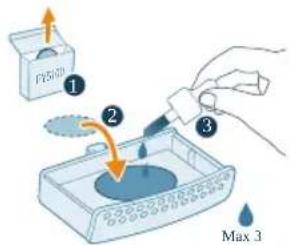
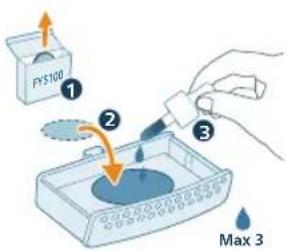
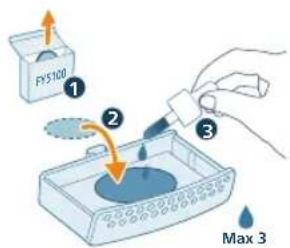
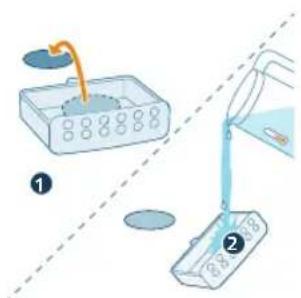
2 Drop in 2-3 drops of essential oils to the supplied aroma pad.
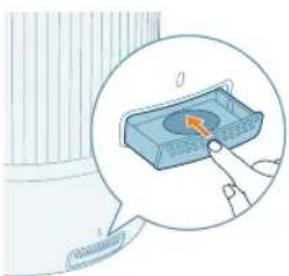
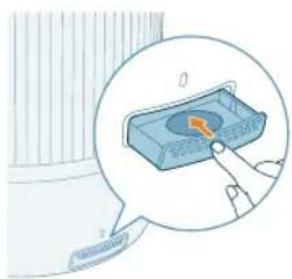
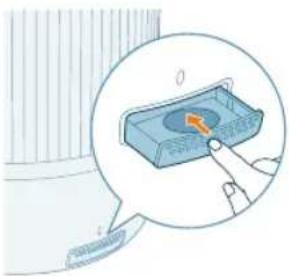
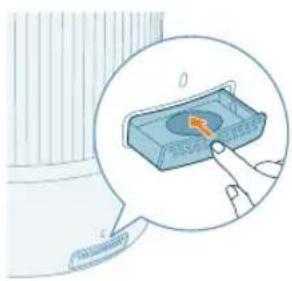
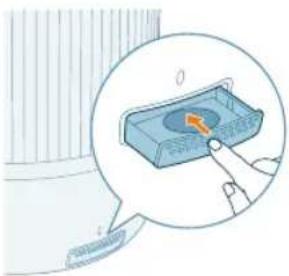
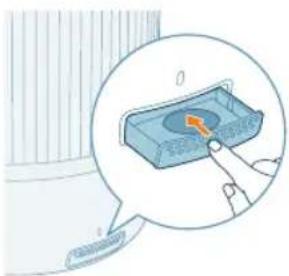
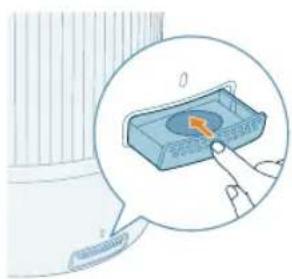
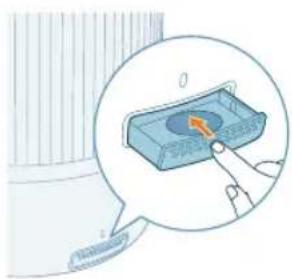
3 Push the aroma box to back into the appliance.
Understanding Wi-Fi indicator
Wi-Fi icon status Wi-Fi connection status
Blink in orange Connecting to the smart phone
Stable in orange Connected to the smart phone
Blink in white Connecting to the server
Stable in white Connected to the server
Off Wi-Fi function disabled or device lights are off
Wi-Fi connection

Setting up the Wi-Fi connection for the first time
1 Download and install the Philips "Air+" app from the App Store or Google Play.
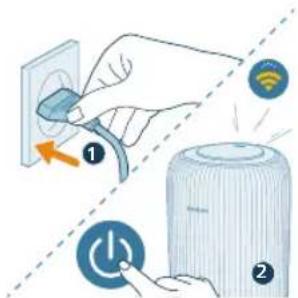
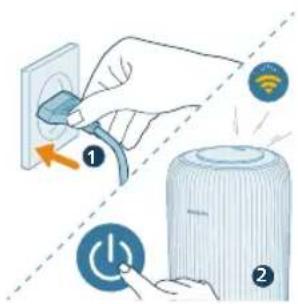
2 Put the plug of the humidifier in the power socket and press the power button to turn on the humidifier.
- The Wi-Fi indicator 📋links orange for the first time.
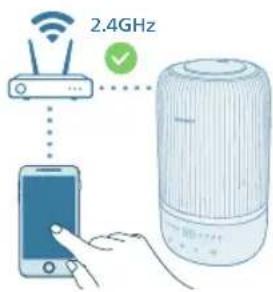
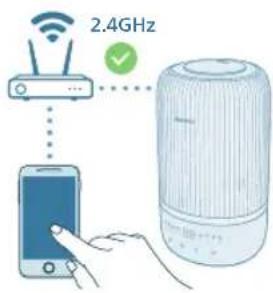
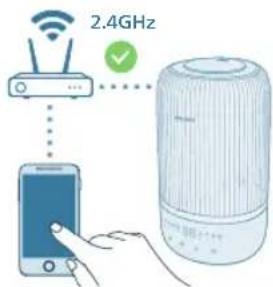
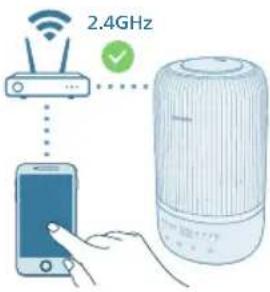
3 Make sure that your smart phone or tablet is successfully connected to your Wi-Fi network.
Note:
Enable Bluetooth feature on your smart phone to ensure the smooth pairing.
Please ensure your smartphone is connected to a 2.4GHz (home) Wi-Fi network instead of a 5GHz Wi-Fi network or public Wi-Fi. For a successful pairing, we suggest turning off your mobile data before initiating the pairing process.
![graph TD A["Mobile Device"] --> B["Wireless Sensor Network"] B --> C["Device with Checkmark"]](/content/2026/04/711152/images/b8a211c8436e054a385fbe48c6266b15fb2861d3b01012129fe8271f12a77e2f.jpg)
4 Launch the Philips "Air+" app and click on "Add a device" or press the "+" button on the screen. Follow the on-screen instructions to connect the air purifier to your network.
- After a successful connection, the Wi-Fi indicator remains steady in white.
Note:
This instruction is only valid when the humidifier is being set up for the first time. If the network has changed or the setup needs to be performed again.
If you want to connect more than one humidifier to your smart phone or tablet, you can add the humidifier in the app on additional smart phones without doing the Wi-Fi connection reset on the device.
12 English
Make sure that the distance between your smart phone or tablet and the humidifier is less than 10 m without any obstructions.
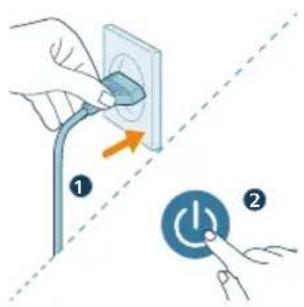
Reset the Wi-Fi connection
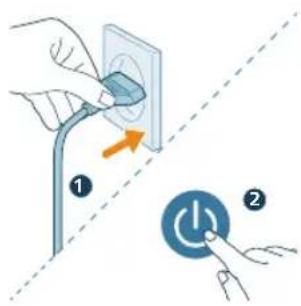
1 Put the plug of the humidifier in the power socket and press turn on the air humidifier.
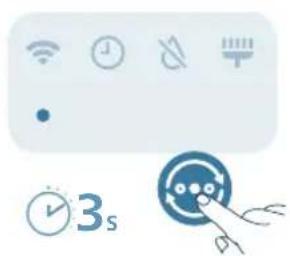
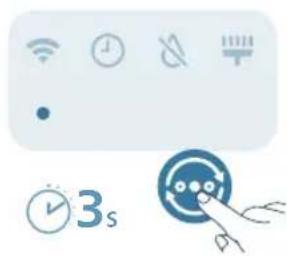
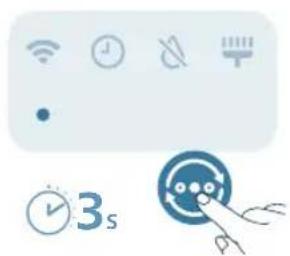
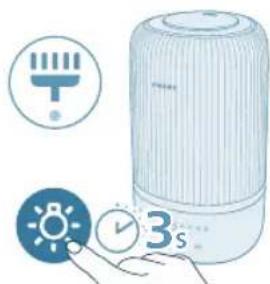
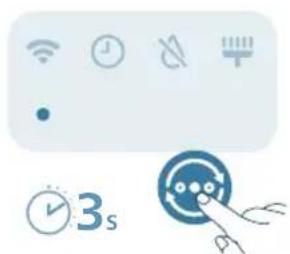
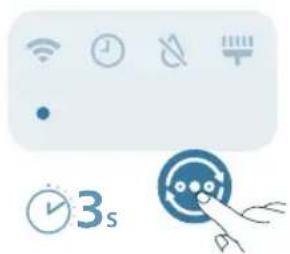
2 Long press button at the same time for 3 seconds until you hear a beep.
- The humidifier goes to pairing mode.
- The Wi-Fi indicator 📋links orange.
3 Follow the steps 3-4 in "Setting up the Wi-Fi connection for the first time" section.
Using the humidifier
Understanding the humidity light
Relative humidity represents the amount of water vapor in the atmosphere. The humidification indicator has four status levels:
The humidification light has three colors:
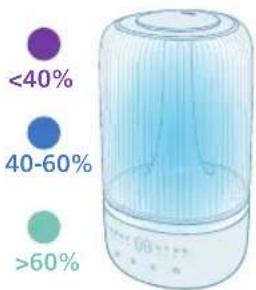
Humidification light color
Current humidity
What does it mean?
Purple <40% Dry
Blue 40-60% Comfortable humidity
Green >60% Too humidity
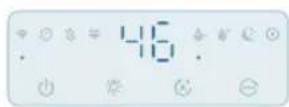
Note: The default target humidity is 50%RH, you can set the desired target humidity by pressing the humidity setting button.
Water level
When there is not enough water in the water tank, the water refill indicator is on, the humidifier stops working. The humidifier will resume work when you refill water into the water tank.
Refilling water
Note:
Empty the water tank and refill every third day.
When filling water, do not exceed the maximum water level.
Do not shake the water tank when moving it, or water might leak.
Follow the steps in "First time use" for refilling water.
Turning on and off
Note:
For optimum humidification performance, close doors and windows.
Keep curtains away from the air inlet or air outlet.
The humidifier is applicable for ambient temperature range : 5-40 °C.
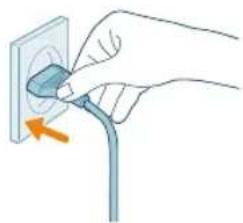
1 Put the plug of the humidifier into the power socket.
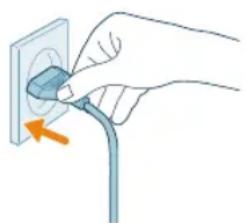
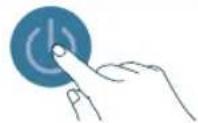
2 Press the power button to switch on the humidifier.
- The humidifier beeps.
- The humidity light chooses the appropriate color to match the surrounding humidity level.
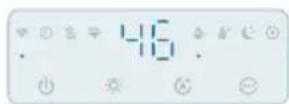
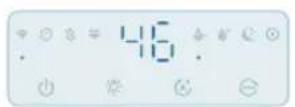
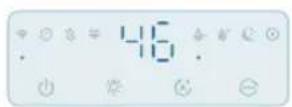
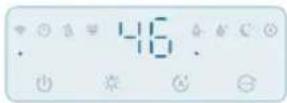
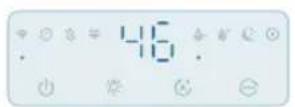
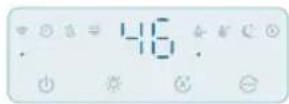
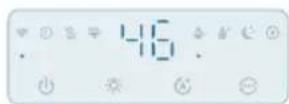
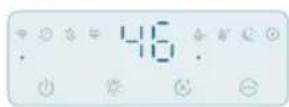
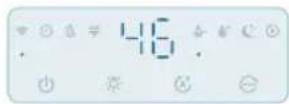
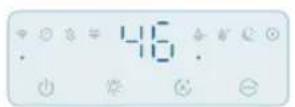
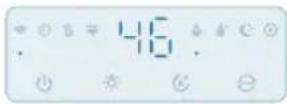
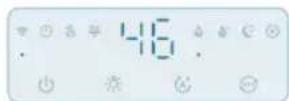
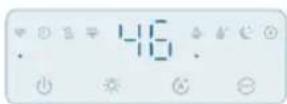
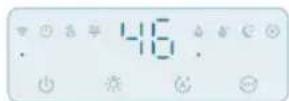
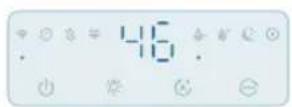
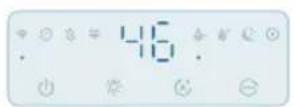
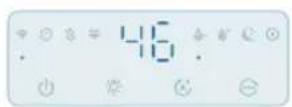
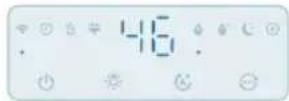
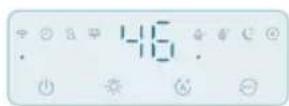
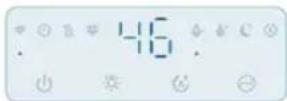
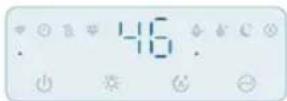
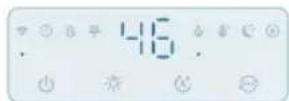
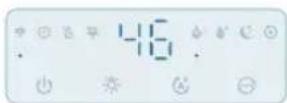
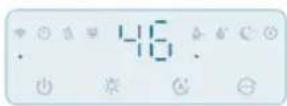
- The humidifier operates in the Medium mode with current humidity level displayed on the screen.
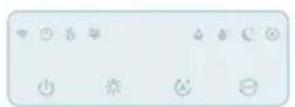
3 Press the power button again to switch off the humidifier.
Note: If the humidifier stays connected to the electrical outlet after turning OFF, it will operate under the previous settings when turned ON again.
Adjusting mist direction
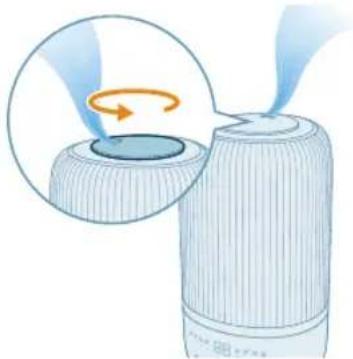
Rotate the nozzle to preferred mist direction.
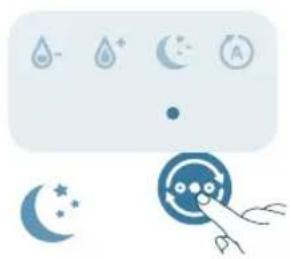
Changing the mode setting
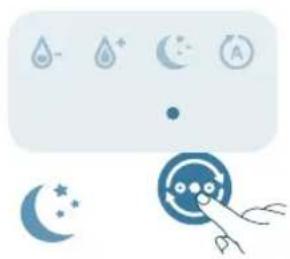
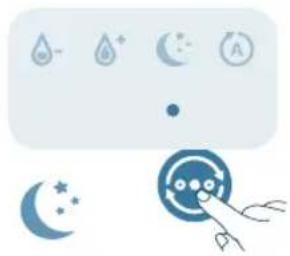
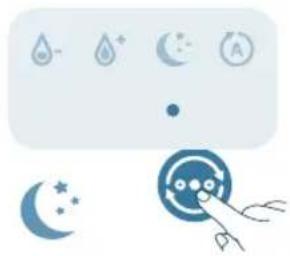
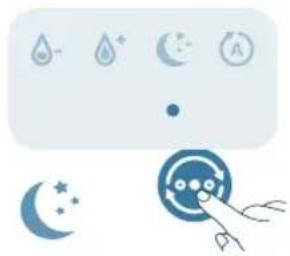
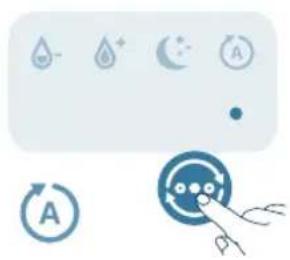
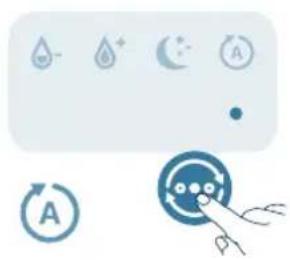
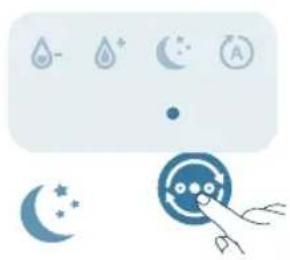
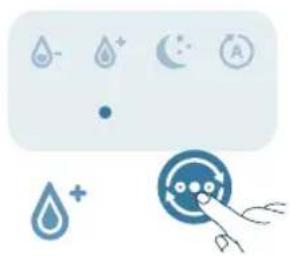
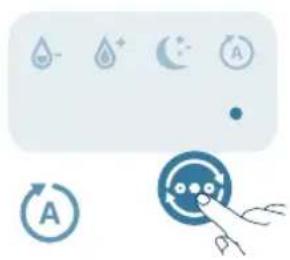
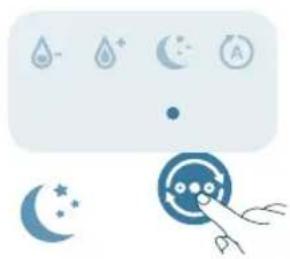
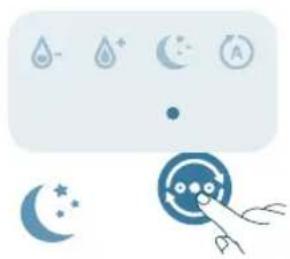
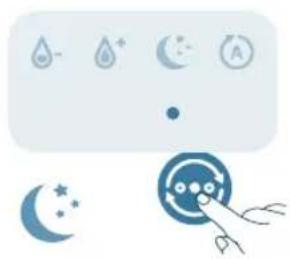
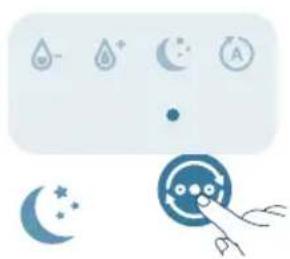
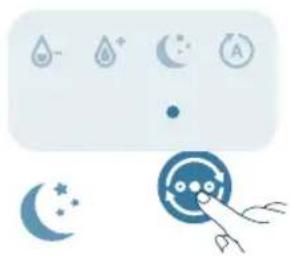
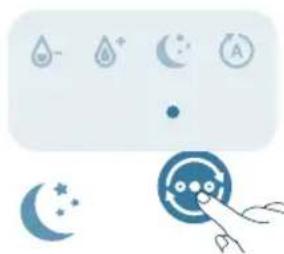
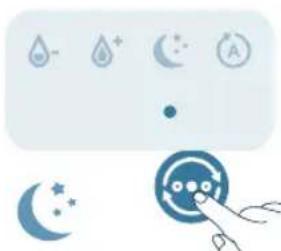
You can choose the Auto mode, the Sleep mode, the Medium mode, or the High mode by pressing the mode switch button.
Auto mode ( ): The humidifier automatically adjusts the mist level in accordance with the ambient air humidity.
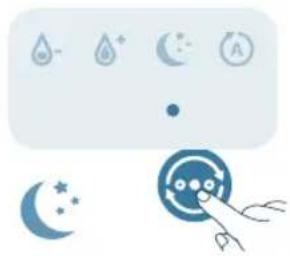
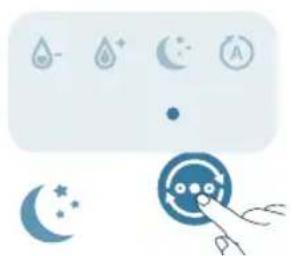
Sleep mode (♀): The humidifier operates quietly at a low mist level. After 3 seconds, the screen lights turn off.
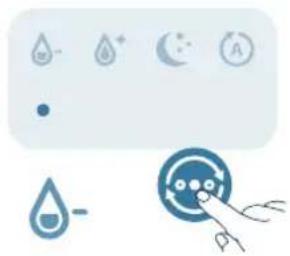
Medium mode (☐): The humidifier operates on the medium mist level.
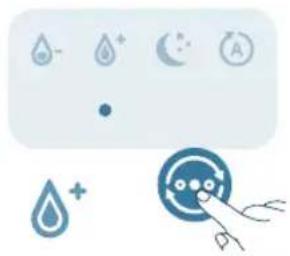
High mode ( ⚙): The humidifier operates on the highest mist level.
Setting humidity level
Note:
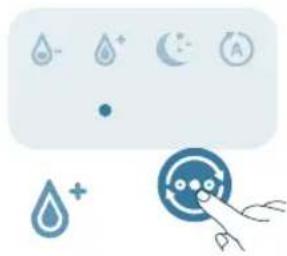
The default humidity level is 50%RH.
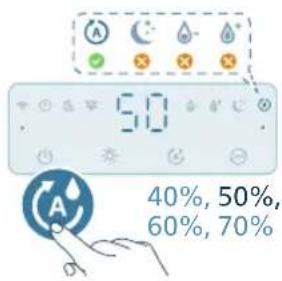
The humidity level can only be adjusted in the Auto mode.
The humidifier will change to Auto mode automatically when you set target humidity level in other modes.
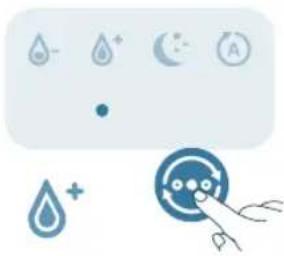
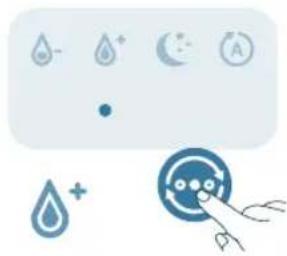
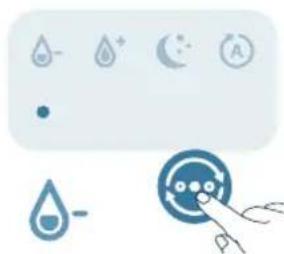
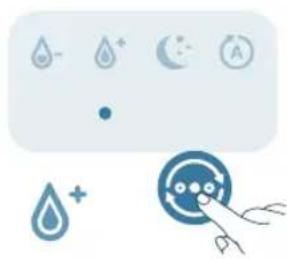
You can adjust the humidity level by pressing the humidity setting button to choose from 40%, 50%, 60%, or 70%.
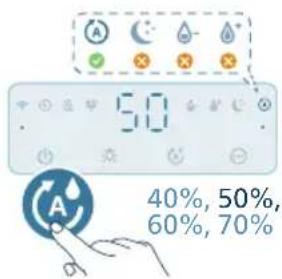
Using the light function
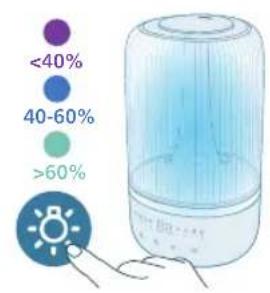
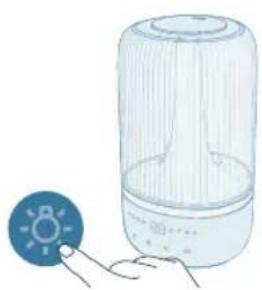
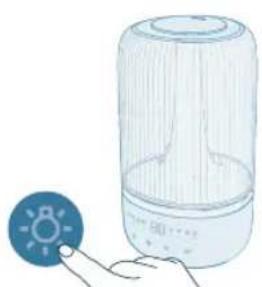
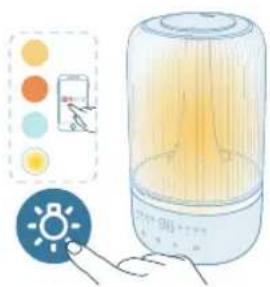
You can press the button to turn on humidity light, ambient light or turn off all lights and the control panel.
- The humidifier will turn on the humidity light by default.
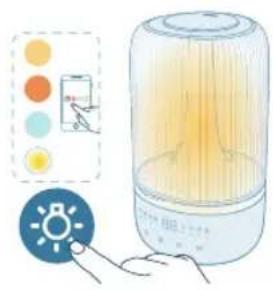
- You can press the light function button to switch to ambient light mode. Tailor the brightness and the color in the Air+ app.
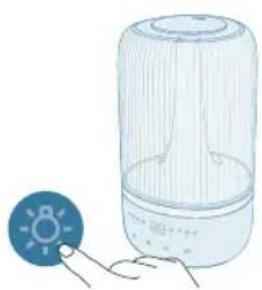
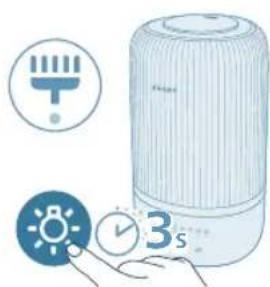
You can press the light function button to turn off all lights and the control panel. Press any button to wake up the panel first, and press the light button again to set the light mode you want in 3 seconds.
Cleaning and maintenance
Note:
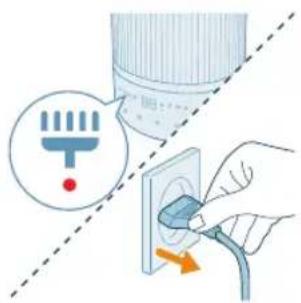
Always unplug the appliance before you clean it.
Never immerse the appliance in water or any other liquid.
Avoid pouring water through the air inlets and outlets.
Never use abrasive, aggressive, or flammable cleaning agents such as bleach or alcohol to clean any part of the appliance.
Cleaning the humidifier
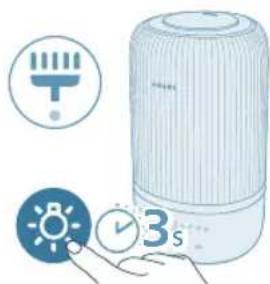
Clean the humidifier when the cleaning alert is on or every three days.
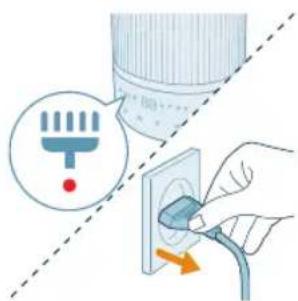
Regularly clean the inside and outside of the humidifier to prevent dust from collecting.
1 Wipe away dust with a soft dry cloth from the body of the humidifier.
2 Switch off the appliance and unplug from the power socket.
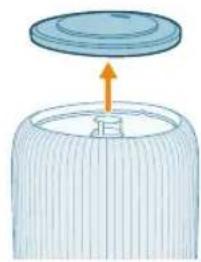
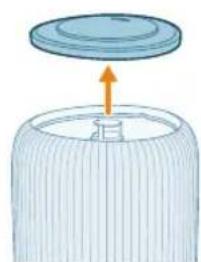
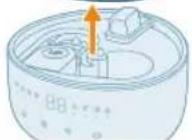
3 Remove the top cover from the water tank.
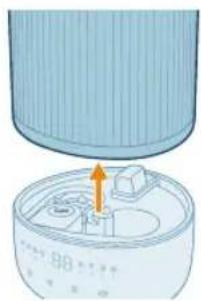
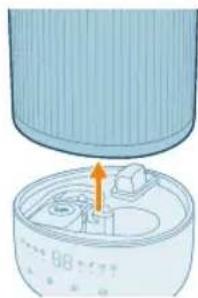
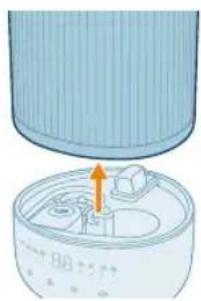
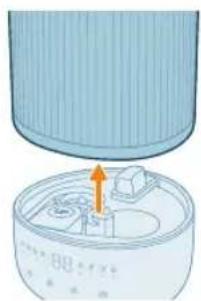
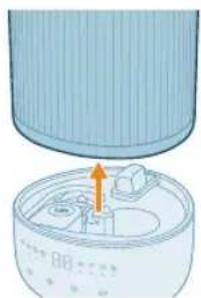
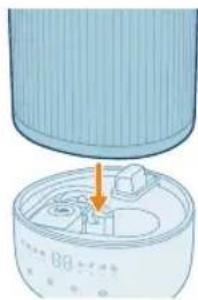
4 Remove the water tank from the base.
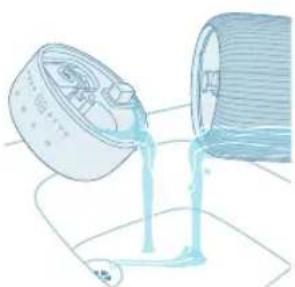
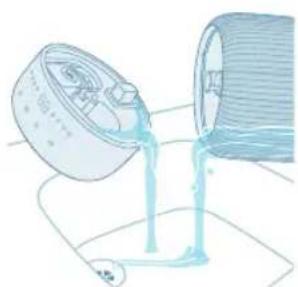
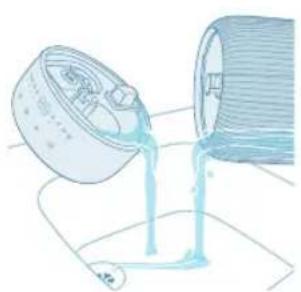
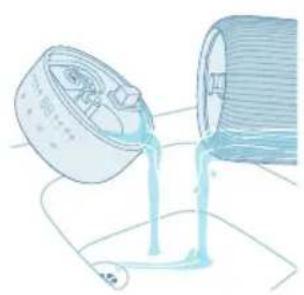
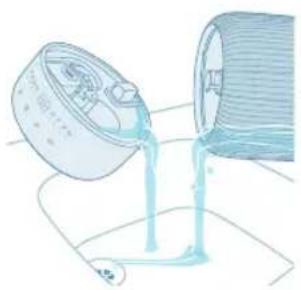
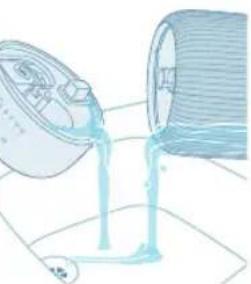
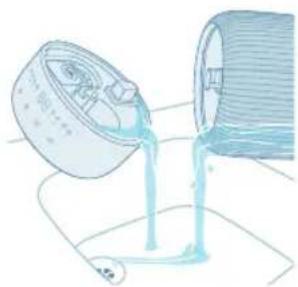
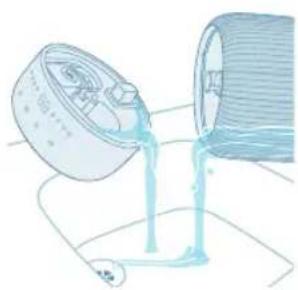
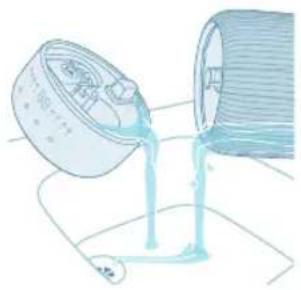
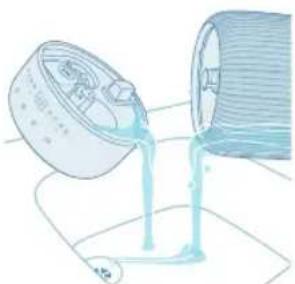
5 Pour water out from the tank and the base.
18
English
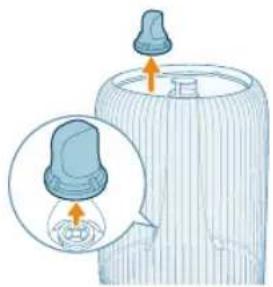
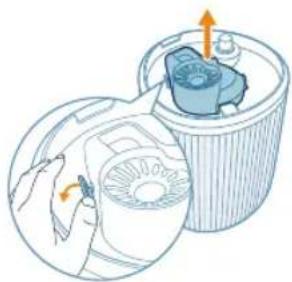
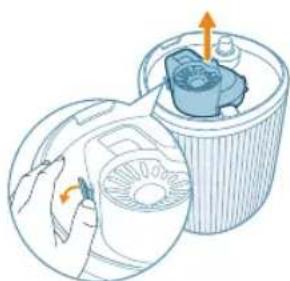
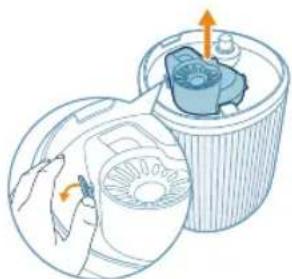
6 Remove the water filter from the water tank.
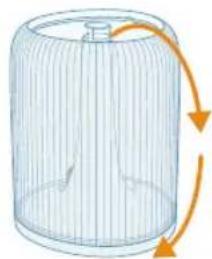
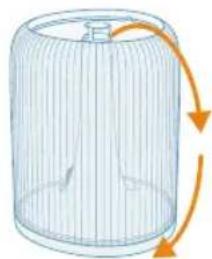
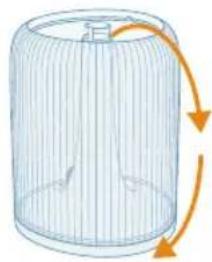
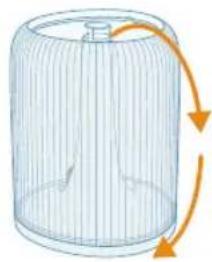
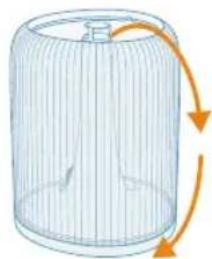
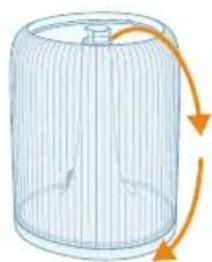
7 Turn the water tank upside down.
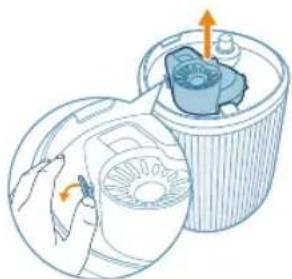
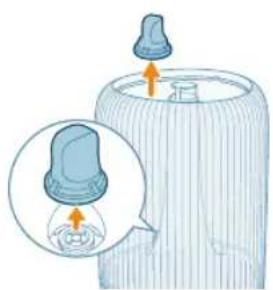
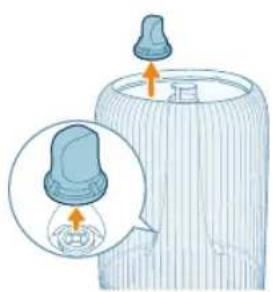
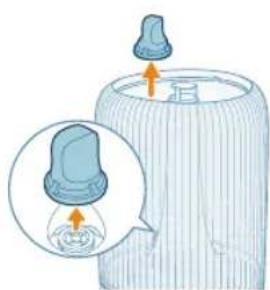
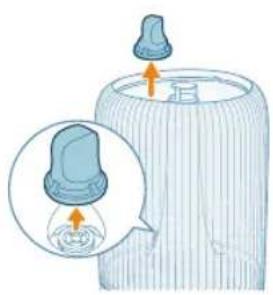
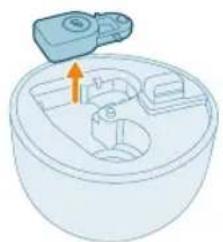
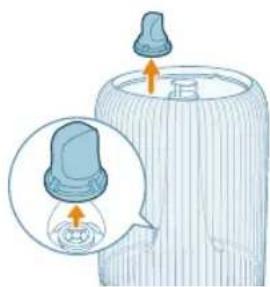
8 Remove the deafener from the bottom of the water tank.
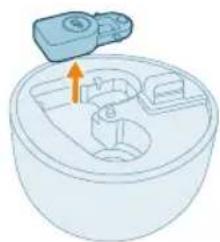
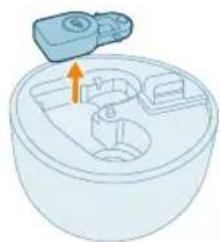
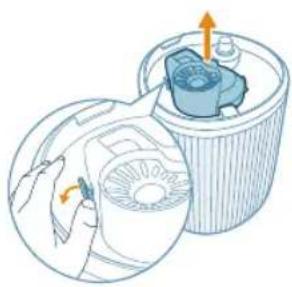
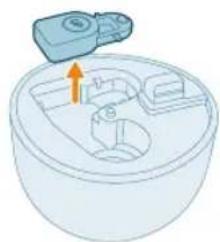
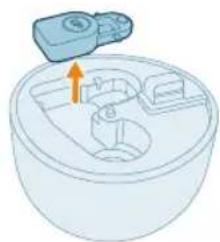
9 Remove the float from the base chamber.
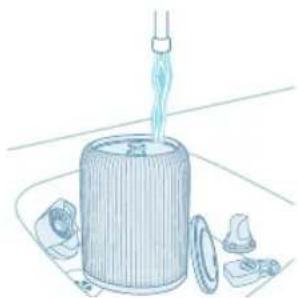
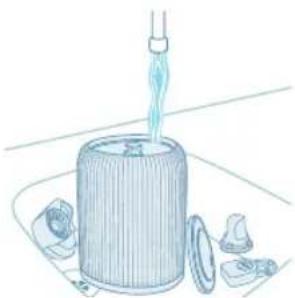
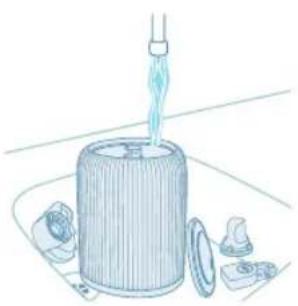
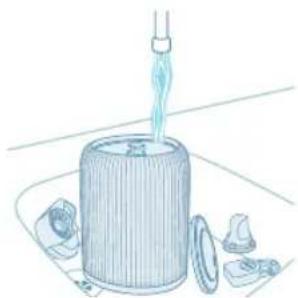
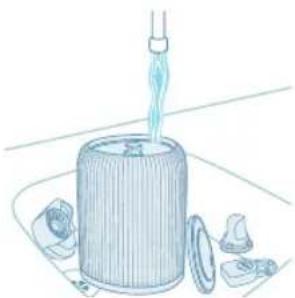
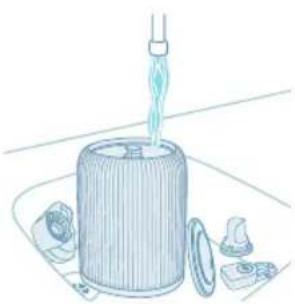
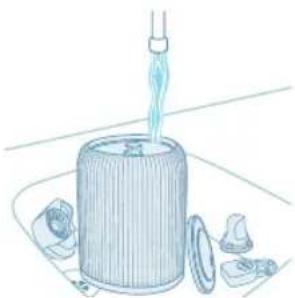
10 Rinse the water tank, top cover, float, deafener and water filter with water.
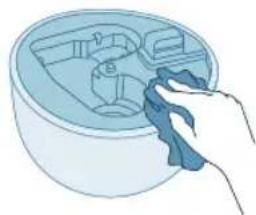
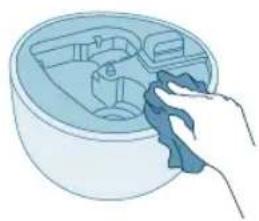
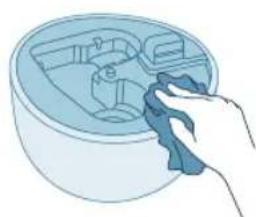
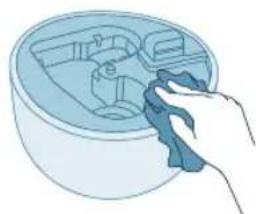
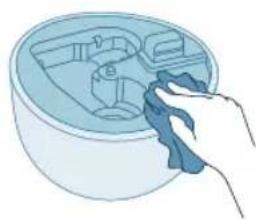
11 Wipe the base clean and dry.
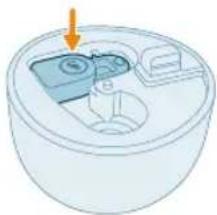
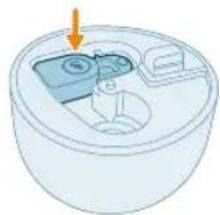
12 Put the float back to the base chamber.
13 Put the water filter back to the water tank.
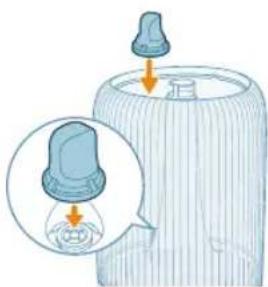
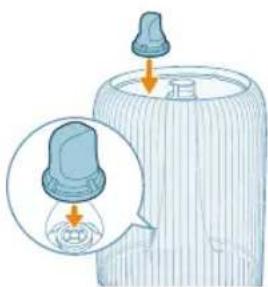
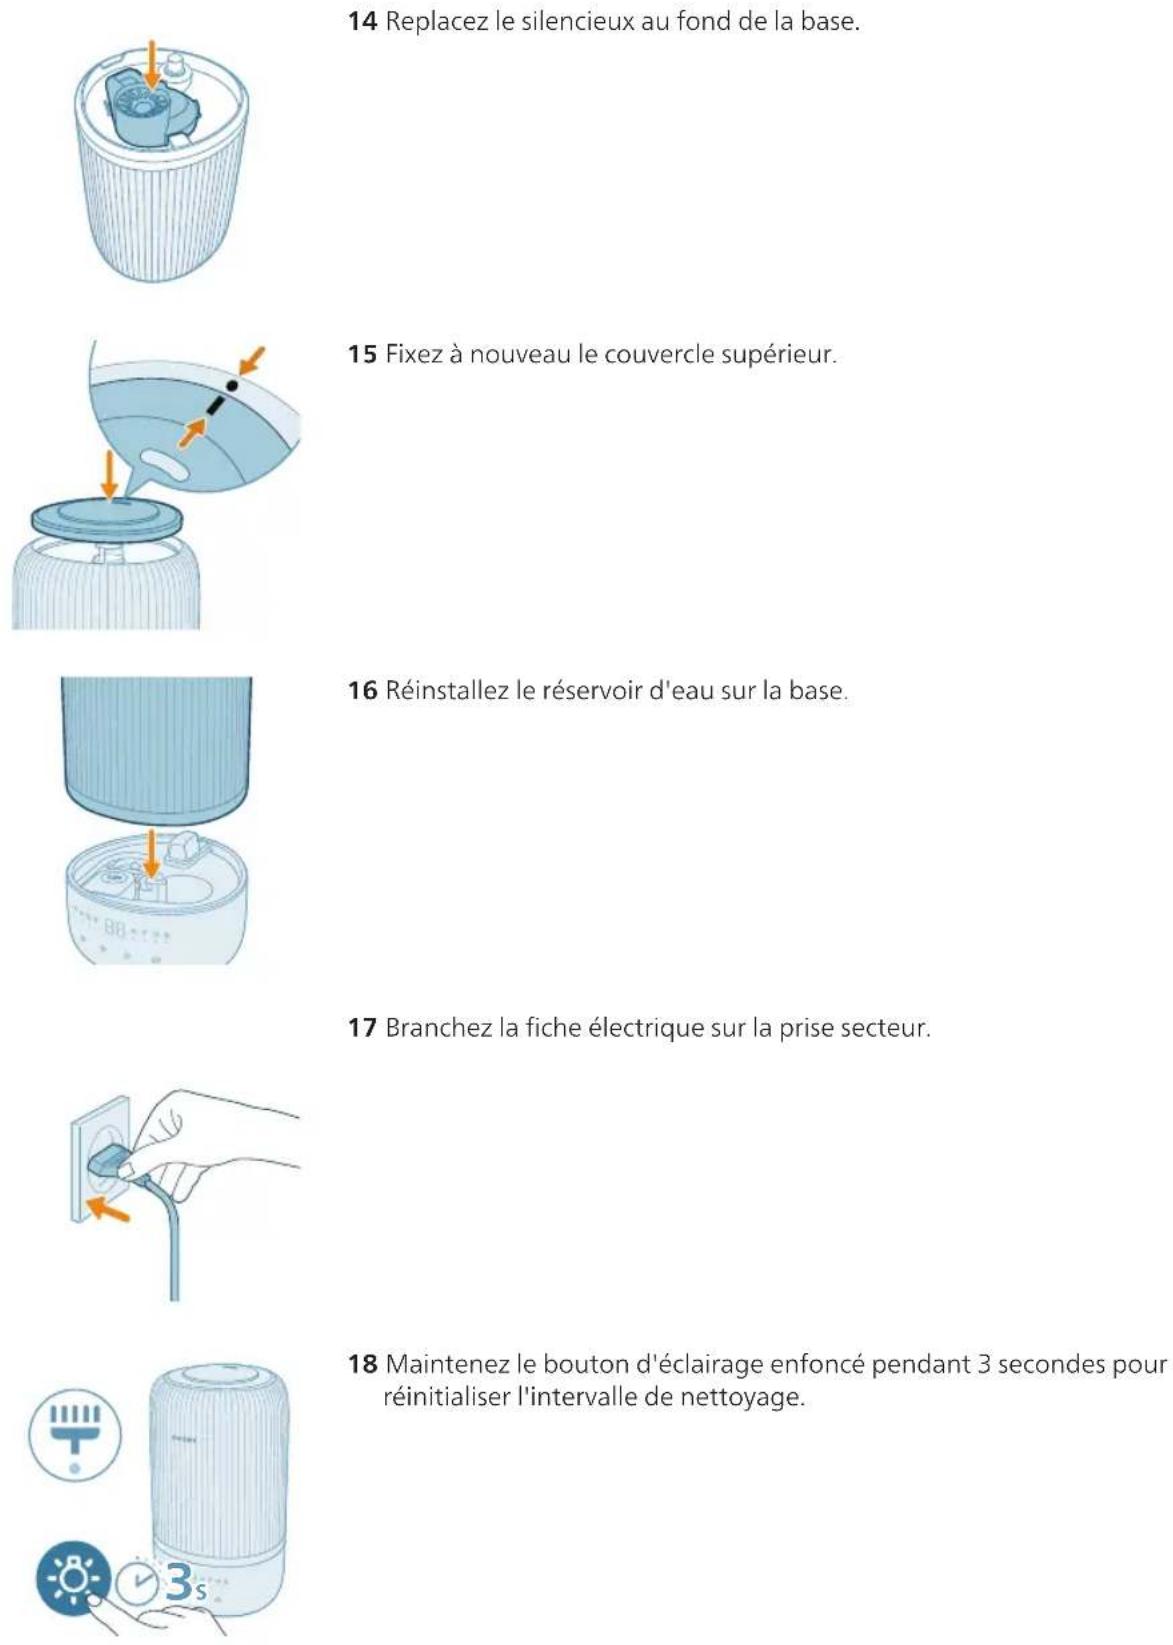
14 Put the deafener back to the bottom of the base.
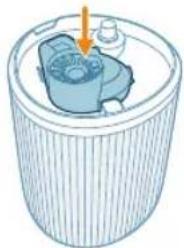
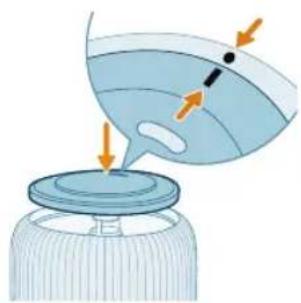
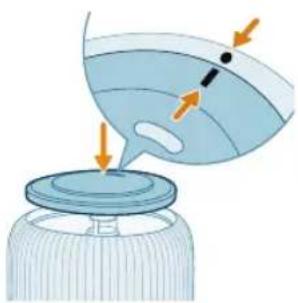
15 Reattach the top cover.
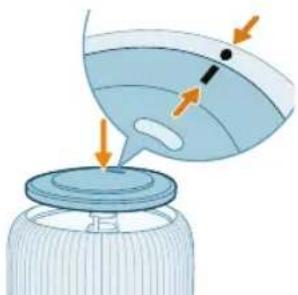
20
English
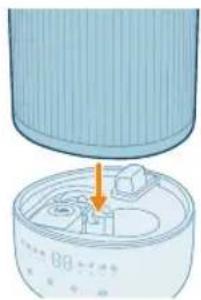
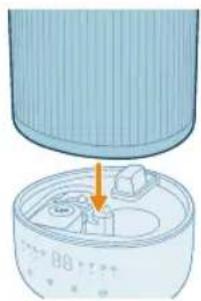
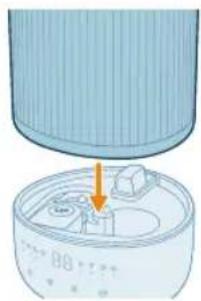
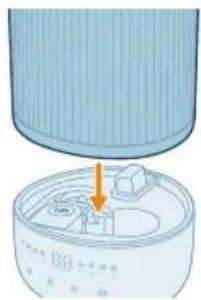
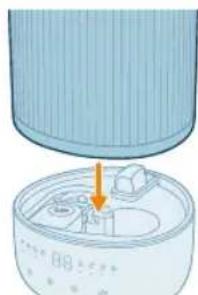
16 Re-install the water tank onto the base.
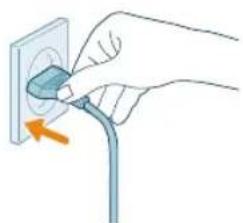
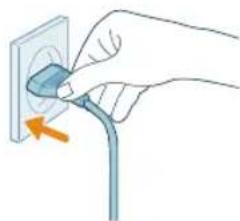
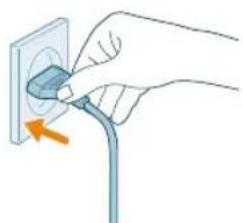
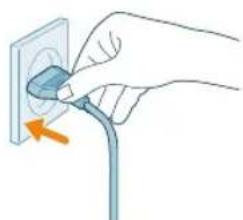
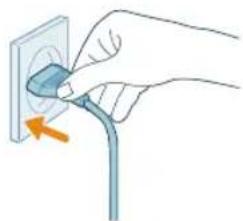
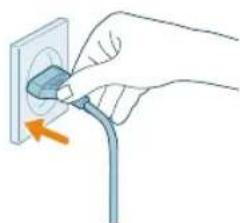
17 Put the power plug into the power socket.
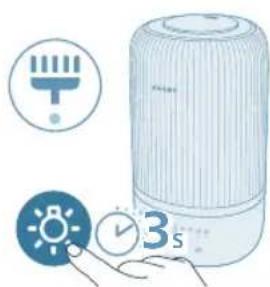
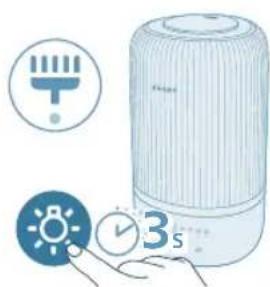
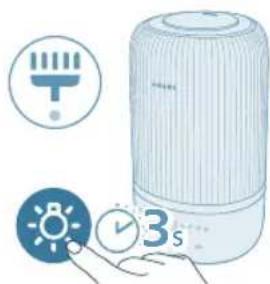
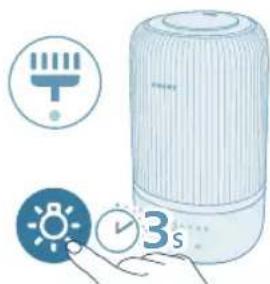
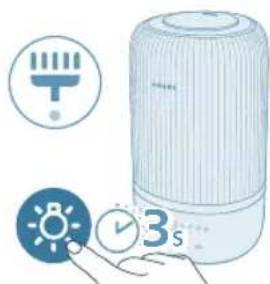
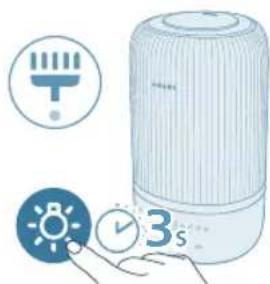
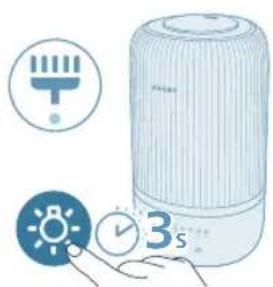
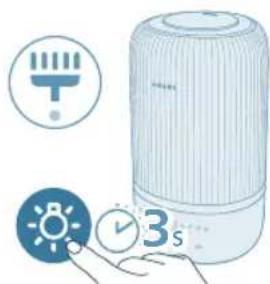
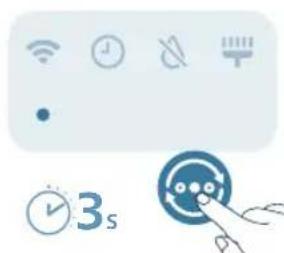
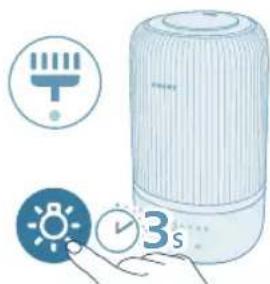
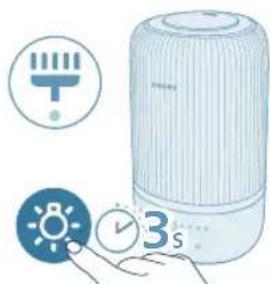
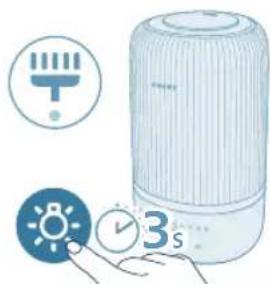
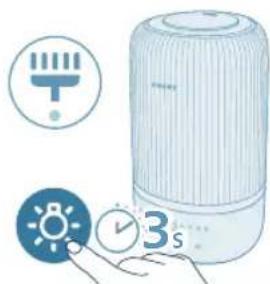
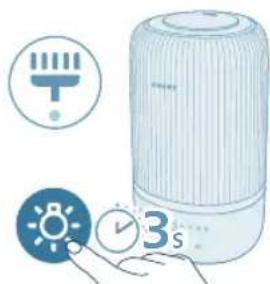
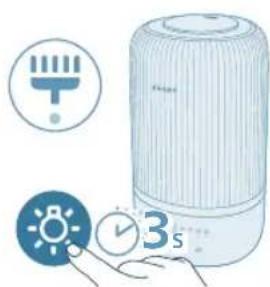
18 Press and hold light button for 3 seconds to reset the cleaning time.
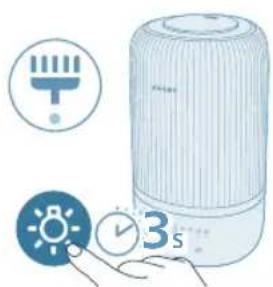
Cleaning the aroma pad and box
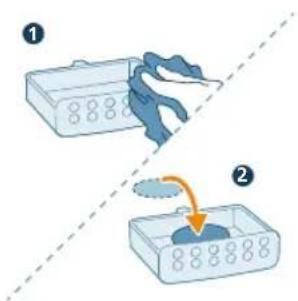
For effective aromatherapy, the aroma pad should always be cleaned before using a new essential oil blend. Do not mix essential oil blends.
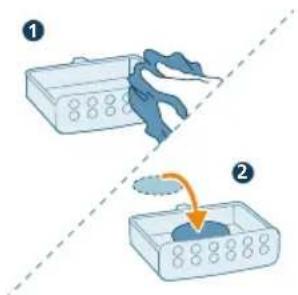
1 Remove the aroma box by pressing it in, then pulling it out.
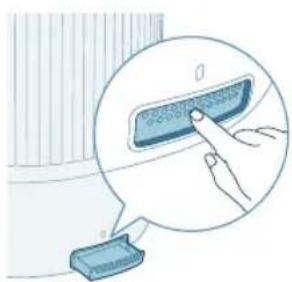
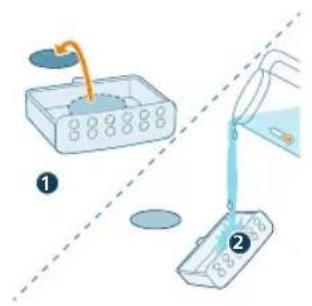
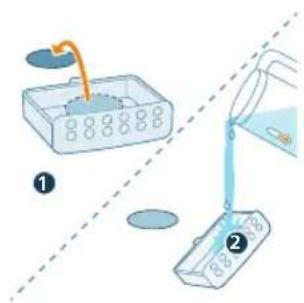
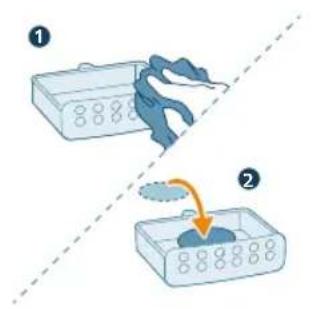
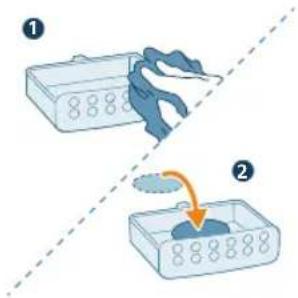
2 Remove the aroma pad and rinse the pad and the box under warm, running water.
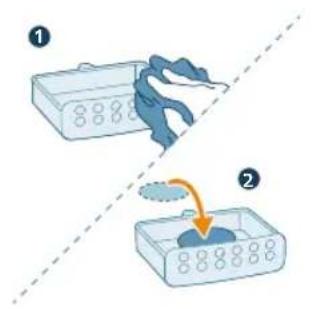
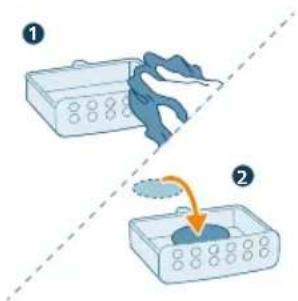
3 Dry with a clean cloth and place the pad back into the aroma box.
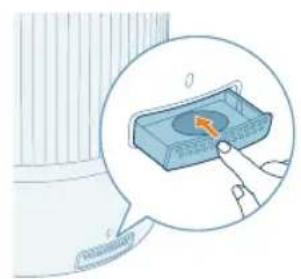
4 Place the aroma box back inside the air humidifier
Note: Do not pour liquid cleaners or detergents into the aroma pad or box.
Replacing the Aroma Pad
If the aroma pad becomes deformed or damaged after repeated washing, it may need to be replaced. To maintain the performance of your air humidifier, only use official Philips aroma pads.
Storage
1 Turn off the humidifier and unplug from the power socket.
2 Clean the humidifier (see Chapter "Cleaning and Maintenance").
3 Let all parts air dry thoroughly before storing.
4 Store the humidifier in a cool, dry location.
Troubleshooting
This chapter summarizes the most common problems you could encounter with the appliance. If you are unable to solve the problem with the information below, contact the Consumer Care Center in your country.
22 English
Problem Possible solution
| The humidifier does not work. Make sure that there is power supply to the humidifier. |
| Make sure that the water tank is filled with water and the water tank is placed properly on the base. |
| Error code "EC" displays on the screen, and all touch buttons are unresponsive. | Unplug the appliance to check for a water shortage. If there is no water shortage, verify that the float is properly installed. Once confirmed, plug the appliance back in and turn it on. If the error code "EC" persists, contact the Consumer Care Center in your country. |
| Little or no mist comes out of the mist outlet. | Put the plug of the humidifier into the power socket and switch on the humidifier. |
| It may has achieved to your target humidity rate. |
| Make sure that the water tank is filled with water and placed properly. |
| There may be too much water in the base (above the MAX reminder on the base). Empty the base chamber. Refill the water tank (not the base chamber) and place the water tank properly onto the base. |
| Make sure the bottom of the base is not blocked. The humidifier should not be set on carpet or other surfaces that may block the base. |
| Make sure the nozzle is not blocked. |
| Make sure the mist tube is not blocked or clogged. |
| Make sure the humidifier is on a level surface. |
| The water temperature may be too low. Turn the mist level to the highest setting and let the humidifier run for a while, then adjust to the desired setting. |
| I do not see the humidity level change. Your room might have too much ventilation. Please close doors and windows. |
| Your room size is too big. This humidifier is suitable for room size ≤34m2. |
| Turn the mist level to a higher setting. |
| When used in a dry environment, the moisture will be absorbed surrounding objects such as walls and furniture, which can prolong the humidification time. |
| Cleaning the humidifier (see the chapter 'Cleaning and maintenance'). |
| The humidifier stops even when i feel quite dry. | The water tank is empty, please refill with water.The humidity level around product has been achieved to target setting in auto mode, it will restart automatically once the humidity level lower than target setting. |
| Our device will stop working when the humidity level around product is higher than 70% because it may lead to diversity fungi mold growth. |
| There are some white dust around humidifier. | The white deposits are called scale and they consist of minerals from the water. |
| Use purified, distilled water or water with low mineral content to prevent the build-up of scale and the dispersal of minerals into the air. |
| We recommend using the Anti-calc cartridge (FY5133) to protect your humidifier from calc and prevent white residue on nearby surfaces. You need to replace it when necessary. |
| It is too wet around humidifier. Humidity may be too high. Turn the mist level to a lower setting. |
| There is unpleasant smell coming out from the humidifier. | The first few times you use your air humidifier, it may produce a plastic smell.This is normal and will fully disappear within a few days. |
| Clean the humidifier (see the chapter 'Cleaning and maintenance'). |
| My aroma function doesn't work well( too weak or strong). | Use proper 2-3 drops essential oil. |
| Different essential oil may has different perceived intensity. |
| It need take sometime to evaporate the smell to whole room. |
| The water tank leaks. Make sure that the humidifier is not overfilled with water. |
| Make sure that the humidifier is well assembled/connected every time after you clean it or after you remove the water tank for refilling. |
| Make sure that the water tank is properly placed. If the problem persists, contact the Consumer Care Center in your country. |
| If the humidifier is not used for a long time, How to store and reuse it? | When the humidifier is not used for a long time, bacteria and mold may grow. Please follow below steps for storage and reuse. |
| Clean the water tank and base thoroughly before storage. |
| Mould grows inside the humidifier. Clean the water tank and base regularly. |
| The Wi-Fi setup is not successful. Please ensure your smart phone is connected to a 2.4GHz (home) Wi-Fi network instead of a 5GHz Wi-Fi network or public Wi-Fi. For a successful pairing, we suggest turning off your mobile data before initiating the pairing process. |
Ensure to enable the following permissions: "Location", "Storage", "Bluetooth", and "Local Network" on your smart phone. After a successful Wi-Fi setup, you can change permission settings as desired.
Please verify that you have entered the correct Wi-Fi password. The password is case-sensitive, has a limit of 63 characters. Special symbols are not accepted.
Ensure the network name of your home Wi-Fi is correct. The network name is case-sensitive.
If you are using a VPN on your smart phone, please turn it off before starting the pairing process.
If your router has a whitelist set up to block pairing, please disable the whitelist to ensure successful connection.
Please ensure that both your device and smart phone are within 10 meters of the router.
Ensure the app has been updated to the latest version.
To ensure a strong Wi-Fi connection, avoid placing your device near other electronic devices, bright light sources, or signal stations that may cause interference. If you experience connectivity issues, move the device away from these sources and attempt to reconnect it to the Wi-Fi network.
Consult the help section in the app for extensive and up-to-date troubleshooting tips.
Warranty and support
Versuni offers a two-year warranty after purchase on this product. This warranty is not valid if a defect is due to incorrect use or poor maintenance. Our warranty does not affect your rights under law as a consumer. For more information or for invoking the warranty, please visit our website www.home.id/warranty.
Order parts or accessories
If you have to replace a part or want to purchase an additional part, go to your Philips dealer or visit www.philips.com/support.
If you have problems obtaining the parts, please contact the Philips Consumer Care Center in your country.
Vacib
Qeyd:
3 Aroma qutusunu cihaza daxil edin.

Poznámka:
1 Zatlačte na aroma box, aby se automaticky vysunul.

Poznámka:
9 Odstraňte plovák z komory základny.
A Mundstykke G Kontrolpanel
Dansk
3 Skub aromaboksen tilbage i apparatet.
Om Wi-Fi-indikator
Wi-Fi-ikonets status Wi-Fi-forbindelsesstatus
Blinker orange Opretter forbindelse til smartphonen
Konstant orange Tilsluttet smartphonen
Nulstil Wi-Fi-forbindelsen
Befugtningsindika-
torens farve

Dansk
Bemærk:
- Du kan trykke på lysfunktionsknappen for at skifte til omgivende lys. Tilpas lysstyrken og farven i Air+-appen.
Du kan trykke på lysfunktionsknappen for at slukke alt lys og kontrolpanelet. Tryk på en vilkårlig knap for at aktivere panelet først, og tryk på lysknappen igen i 3 sekunder for at indstille den ønskede lystilstand.

A Düse G Bedienfeld
Hinweis:

E Veefilter K Aroomipadjad (FY5100)
F Ujuk L Udutoru
Nuppude tutvustus
Juhtnupud:
3 Veenduge, et veefilter on korralikult kinnitatud.
3 Lükake aroomikast seadmesse tagasi.

Märkus.
Vaikimisi on niiskuse tase 50%RH.
13 Asetage veefilter tagasi veepaaki.

Remarque :


Changer de mode
2 Skinite gornji poklopac sa spremnika za vodu.
4 Napunite spremnik vodom. Nemojte ulijevati vruću vodu.

Napomena:
- Prilikom ulijevanja vode u spremnik, nemojte premašiti oznaku za razinu vode.
- Nemojte ulijevati vodu kroz ultrazvučni izlaz za maglicu.
5 Ponovno pričvrstite gornji poklopac na spremnik za vodu.
Uporaba funkcije arome
Napomene:
Esencijalna ulja ne isporučuju se s proizvodom. Po potrebi kupite i upotrijebite propisana esencijalna ulja.
Prije upotrebe funkcije arome pažljivo pročitajte korisnički priručnik za esencijalna ulja.
1 Pogurnite kutiju za arome kako biste je automatski izbacili.
3 Vratite kutiju za arome u aparat.
2 Istovremeno pritisnite gumb i zadržite pritisak 3 sekunde, sve dok ne začujete zvučni signal.
- Ovlaživač prelazi u način rada za uparivanje.
- Indikator za Wi-Fi ôljeska narančasto.
3 Pratite korake 3 – 4 u odjeljku „Prvo postavljanje veze Wi-Fi“.
Upotreba ovlaživača

Promjena postavke načina rada
Pritiskom gumba za izmjenu načina rada možete odabrati automatski način rada, način rada za spavanje, način rada Srednja ili visoki način rada. Automatski način rada (A). Ovlaživač automatski prilagodava razinu maglice sukladno vlažnosti zraka u okruženju.
Način rada Srednja (☐): Ovlaživač radi pri srednjoj razini maglice.
Visoki način rada (♂): Ovlaživač radi pri najvišoj razini maglice.
Postavljanje razine vlažnosti
Napomena:
Razinu vlažnosti možete podesiti pritiskom na gumb za postavljanje vlažnosti i odabrati vlažnost zraka od 40%, 50%, 60% ili 70%.
200 Hrvatski
6 Uklonite filtar za vodu iz spremnika za vodu.
9 Uklonite plovak iz komore podnožja.
10 Isperite spremnik za vodu, gornji poklopac, plovak, uredaj za smanjenje buke i filtar za vodu.
14 Vratite uredaj za smanjenje buke u donji dio podnožja.
202 Hrvatski
15 Vratite gornji poklopac.
1 Kako biste uklonili kutiju za arome prvo je pritisnite prema dolje, a zatim izvucite.
2 Uklonite jastučić za aromu i isperite ga zajedno s kutijom pod mlazom tople vode.
3 Jastučić osušite čistom krpom i vratite ga natrag u kutiju za arome.
4 Kutiju za arome vratite natrag u ovlaživač zraka
Napomena: Nemojte ulijevati tekuća sredstva za čišćenje ili deterdžente u jastučić ili kutiju za arome.

A Uzgalis G Vadības panelis
B Ūdens tvertnes väks H Pamatne
C Mitruma izvade I Strāvas kontaktdakša
D Üdens tvertne J Aromāta kārba
E Üdens filtrs K Aromāta spilventiņi (FY5100)
2 Nonemiet udens tvertnes augsejo vaku.
- Nelejiet üdeni caur ultraskañas mitruma izvadi.
2 Tris sekundes turiet nospiestu pogu , kiz atskan pikstiens.
242 Latviešu

Režima iestatijuma maina

244 Latviešu
4 Atvienojiet üdens tvertni no ierīces pamatnes.
5 Izlej ūdeni no tvertnes un pamatnes.
6 Izņemiet ūdens filtru no ūdens tvertnes.
246 Latviešu
7 Pagrieziet údens tvertni ar augšpusi uz leju.
16 Uzlieciet ūdens tvertni atpakal uz pamatnes.
17 lespraudiet kontaktdakšu kontaktligzdā.
4 Vandens bakelj pripildykite vandens. Nepilkite karšto vandens.
Pastaba:


7 Apverskite vandens bakelj.
Megjegyzés:

E Waterfilter K Aromapads (FY5100)
F Vlotter L Nevelbuis

E Vannfilter K Aromaputer (FY5100)
F Dupp L Tåkerør
4 Fyll vannbeholderen med vann. Ikke fyll på med varmt vann.
Merk:
328 Norsk
- Ikke hell vann gjennom den ultrasoniske täkeutgangen.
- Ikke hell vann direkte inn i sokkelen.
Tilbakestille Wi-Fi-tilkoblingen
1 Sett støpselet til luftfukteren inn i stikkontakten og berør för å slå på luftfukteren.
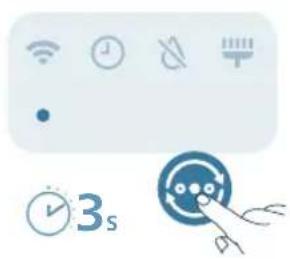
2 Trykk på og hold inne -knappen samtidig i tre sekunder til du hører en pipelyd.
- Luftfukteren går inn i sammenkoblingsmodus.
- Wi-Fi-indikatoren blinker oransje.
3 Følg trinnene 3–4 i avsnittet «Konfigurere Wi-Fi-tilkoblingen for første gang».
Bruke luftfukteren
Forstå fuktighetsindikatorens lys
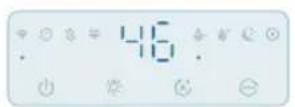

334 Norsk
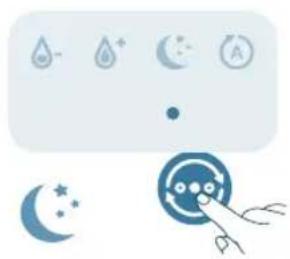
Medium-modus (A): Luftfukteren jobber på middels täkenivå.
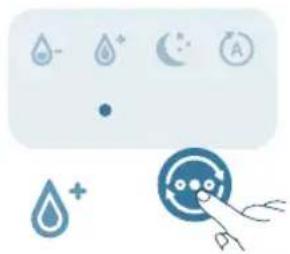
Merk:
13 Sett vannfilteret tilbake i vannbeholderen.
16 Sett vannbeholderen tilbake på sokkelen.
340 Norsk
A Uchlik G Boshqaruv paneli
B Suv baki qopqog'i H Asos
C Tuman chiqishi I Quvvat vilkasi
D Suv baki J Ifor qutisi
E Suv filtri K Ifor yostiqchalari (FY5100)
F Chayqalish L Tuman naychasi
Tugmalar sharhi
3 Suv filtri to'g'ri biriktirilganini tekshiring.
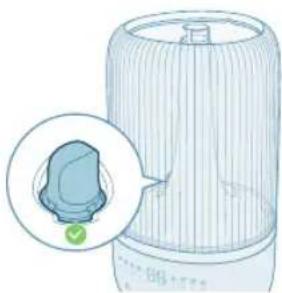
4 Suv bakini suv bilan to'ldiring. Issiq suv quymang.
Eslatma:
Chiziqlar paydo bo'lishi va minerallarning havoga uchishini oldini olish uchun tozalangan, distillangan yoki kam mineralli tarkibga ega suvdan foydalaning.
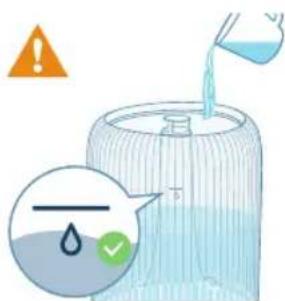
- Suv quyishda suv miqdori ko'rsatkichidan oshirib yubormang.
350 O'zbek
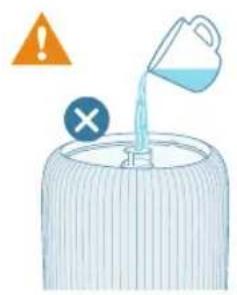
- Ultratovush par chiqishidan suv quymang.
- Asosning o'ziga suv quymang.
2 Mavjud iforlash yostiqchasiga 2-3 tomchi efir moyini oqizing.
3 Iforlash qutisini qayta uskuna ichiga itaring.
Wi-Fi indikatorini tushunish
Wi-Fi belgisi holati Wi-Fi ulanish holati
To'q sariq rangda o'chib-yonadi Smartfonga ulanish
352 O'zbek
Barqaror to'q sariq Smartfonga ulangan
Oq rangda o'chib-yonadi Serverga ulanmoqda
Barqaror oq Serverga ulangan
2 Namlagich vilkasini quvvat rozetkasiga ulang va havo namlagichni yoqish uchun yoqish/o'chirish tugmasini bosing.
- Birinchi ishlatganda Wi-Fi indikatori 📞o'q sariq rangda yonib-o'chib turadi.
3 Smartfon yoki planshetingiz Wi-Fi tarmoqqa muvaffaqiyatli ulanganini tekshiring.
Eslatma:
Uzluksiz juftlash uchun smartfoningizda Bluetooth funksiyasini yoqing.
Wi-Fi ulanishni asliga qaytarish
1 Havo namlagichni yoqish uchun uning vilkasini quvvat rozetkasiga ulang va ⏻ tugmasini bosing.
2 Signal tovushi eshitilguncha tugmasini bir vaqtda 3 soniya bosib turing.
- Havo namlagich juftlash rejimiga o'tadi.
- Wi-Fi indikatori to'q sariq rangda yonib-o'chadi.
Namlik ko'rsatkichi ranggi
Joriy namlik
Bu nimani anglatadi?
354 O'zbek
Binafsha rang <40% Quruq
Ko'k 40-60% Qulay namlik
Yashil >60% O'ta yuqori namlik
Eslatma: Standart namlik darajasi 50%RH, siz namlikni sozlash tugmasini bosish orgali istalgan namlikni o'rnatishingiz mumkin.
Suv miqdori
Suv bakida suv yetarli bo'lmasa, suv quyish ko'rsatkichi yonadi, namlantirgich ishlashdan to'xtaydi, namlantirgich suv bakiga suv quygandan keyin ishini davom ettiradi.
Qayta suv to'Idirish
Eslatma:
Suv bakini har uch kunda bo'shating va qayta to'ldiring.
Suv quyishda maksimal suv miqdoridan oshirib yubormang.
Suv bakini surganda uni chayqamang, aks holda suv sizib chiqishi mumkin.

2 Namlagichni yoqish uchun quvvat tugmasini bosing.
- Havo namlagich tovush chiqaradi.
- Atrofdagi namlik darajasiga mos rang namlik indikatorida ko'rsatiladi.
- Havo namlagich ekranda aks ettirilgan joriy namlik darajasi bilan O'rtacha rejimda ishlaydi.

3 Havo namlagichni o'chirish uchun quvvat tugmasini yana bir marta bosing.
Eslatma: Agar namlagich O'CHIRILGANDAN keyin elektr rozetkasiga ulangan holatda qoldirilsa, u YOQILGANDA avvalgi sozlamada ishlashni boshlaydi.
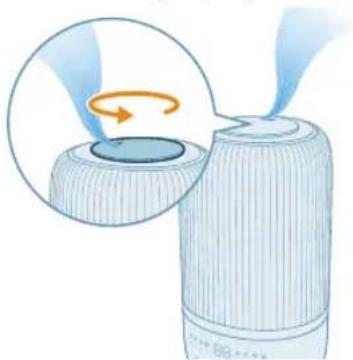
Par yo'nalishini rostlash
Uchlikni istalgan par yo'nalishiga buring.
Rejim sozlamasini o'zgartirish
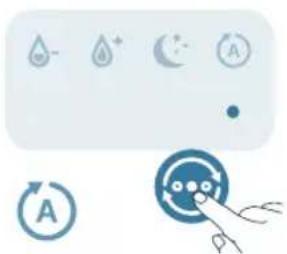
Rejimni almashtirish tugmasini bosish orqali siz Avto rejim, Uyqu rejimi, O'rtacha rejim yoki Yuqori rejim ni tanlashingiz mumkin.
Avto rejim ( )Havo namlagich tashqi havo namligiga asoslanib, par miqdorini avtomatik sozlaydi.
356 O'zbek
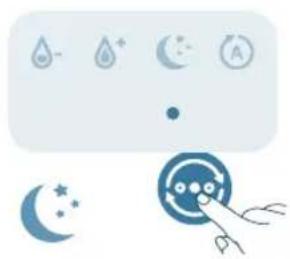
Uyqu rejimi (Q): Namlagich kichik par tezligida shovqinsiz ishlaydi. 3 soniyadan keyin ekran chiroqlari o'chadi.

O'rtacha rejim ( ): Namlagich o'rtacha par tezlikda ishlaydi.
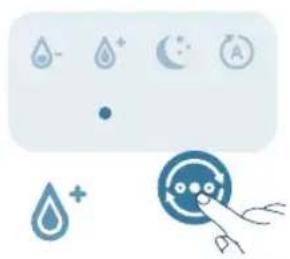
Yuqori rejim (♂): Namlagich eng yuqori par tezligida ishlaydi.
Namlik darajasini o'rnatish
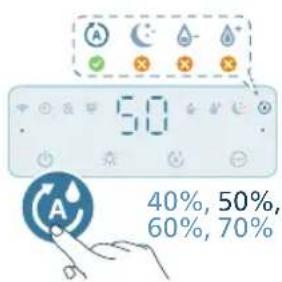
Eslatma:
Standart namlik darajasi 50%RH.
Namlik darajasi faqat Avto rejimda rostlanishi mumkin.
Namlik chirog'ini, atrof namligi chirog'ini yoqish yoki barcha chiroqlarni va boshqaruv panelini o'chirish uchun siz ushbu tugmani bosishingiz mumkin.
- Standart holatlarda namlagich namlik chirog'ini yoqadi.
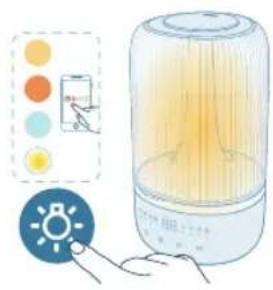
- Siz tashqi chiroq rejimiga o'tish uchun yorug'lik funksiyasi tugmasini bosishingiz mumkin. Air+ ilovasi orqali chiroq ranggi va yorqinligini moslashtirib oling.
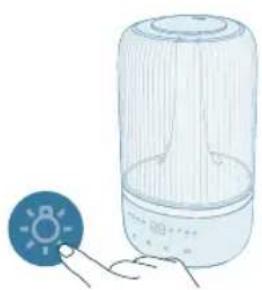
Barcha chiroqlar va boshqaruv panelini o'chirish uchun chiroq tugmasini bosishingiz mumkin. Avvaliga boshqaruv panelini faollashtirish uchun istalgan tugmani dosing va kerakli yorug'lik rejimini o'rnatish uchun 3 soniya kutib yorug'lik tugmasini dosing.
Tozalash va texnik xizmat ko'rsatish
Eslatma:
Tozalashdan oldin jihozni har doim tokdan uzing.
Chang to'planishining oldini olish uchun namlagichning ichki va tashqi qismini muntazam tozalang.
1 Namlagichning korpusidagi changni yumshoq quruq mato bilan arting.
2 Jihozni o'chiring va quvvat rozetkasidan uzing.
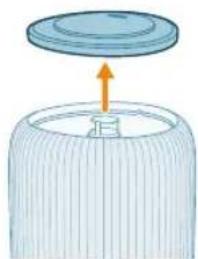
4 Suv bakini asosdan yechib oling.
5 Bak va asosdan suvni to'king.
6 Suv bakining suv filtrini yechib oling.
7 Suv bakini teskari qilib buring.
8 Suv bakining ostidagi qopqoqchani olib tashlang.
9 Asos kamerasidagi suzgich qopqoqni olib tashlang.
11 Asosni tozalab arting va quriting.
16 Suv bakini asosga qayta o'rnating.
17 Quvvat vilkasini quvvat rozetkasiga ulang.
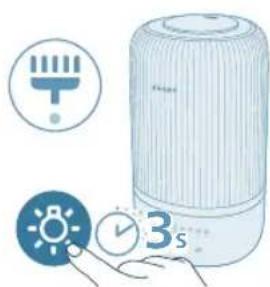
18 Birlamchi tozalash vaqtini tiklash uchun chiroq tugmasini 3 soniya bosib turing.
Iforlash yostiqchasi va qutisini tozalash
Samarador aromaterapiya olib borish uchun yangi efir moyi aralashmasini ishlatishdan oldin iforlash yostiqchasi har doim tozalanishi lozim. Efir moylarini aralashtirmang.
1 Iforlash qutisini avval bosing, keyin uni tortib oling.
362 O'zbek
2 Iforlash qutisini chiqarib oling va iforlash yostiqchasi va qutisini iliq, oqib turgan suv bilan chaying.
Uwaga:

Zmiana trybów
396 Português
2 Coloque 2–3 gotas de óleos essenciais na gaveta de aromas fornecida.
398 Português


11 Limpe e seque a base.
15 Volte a colocar a tampa superior.
Notă:
424 Română

A Gryka G Paneli i kontrollit
Shënim:
Rivendosja e lidhjes Wi-Fi

Pastrojeni lagështuesin kur aktivizohet alarmi i pastrimit ose çdo tri ditë.
6 Hiqni filtrin e ujit nga depozita.
15 Rivendosni kapakun e sipërm.
2 Odstranite zgornji pokrov s posode za vodo.
4 Posodo za vodo napolnite z vodo. Ne polnite z vročo vodo.
Opomba:
- Pri polnjenju z vodo ne presezite oznake za nivo vode.
466 Slovenščina
5 Zgornji pokrov ponovno namestite na posodo z vodo.
Uporaba funkcije arome
Opombe:
Eterična olja niso priložena izdelku. Po potrebi kupite in uporabite priporočena eterična olja.
2 Na priloženo blazinico za aromo kapnite 2–3 kapljice eteričnega olja.
3 Predalček za aromo potisnite nazaj v aparat.
2 Hkrati za 3 sekunde pridržite gumb, da zaslišite pisk.

2 Vlažilnik vklopite s pritiskom gumba za vklop.
3 Odstranite zgornji pokrov s posode za vodo.
4 Posodo za vodo odstranite iz podstavka.
5 Izlijte vodo iz posode za vodo in podstavka.
7 Posodo za vodo obrnite okoli.
8 Z dna posode za vodo odstranite glušnik.
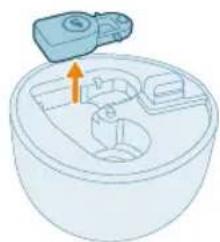
9 Odstranite plovec iz prekata podstavka.
476 Slovenščina
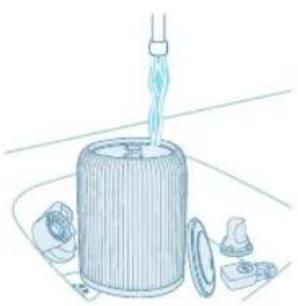
10 Posodo za vodo, zgornji pokrov, plovec, glušnik in vodni filter splaknite z vodo.
11 Podstavek obrišite do čistega in suhega.
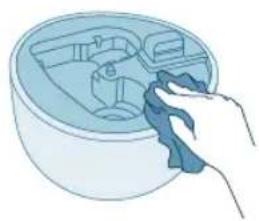
12 Plovec ponovno vstavite v prekat podstavka.
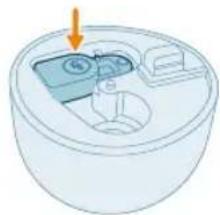
13 Vodni filter vstavite nazaj v posodo za vodo.
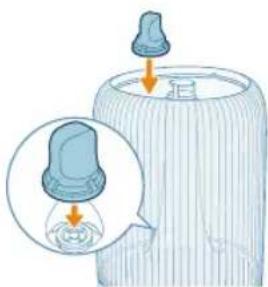
14 Glušnik ponovno vstavite na dno podstavka.
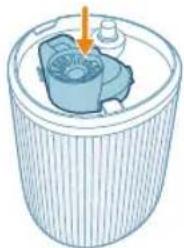
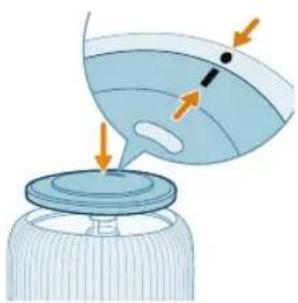
16 Posodo za vodo namestite na podstavek.
1 Predalček za aromo odstranite tako, da ga najprej potisnete navznoter in nato izvlečete.
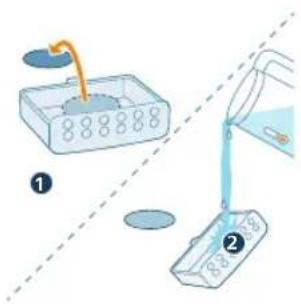
2 Aromatično blazinico odstranite ter jo skupaj s predalčkom za aromo sperite pod toplo tekočo vodo.
3 Osušite s čisto krpo in blazinico namestite nazaj v predalček za aromo.
4 Predalček za aromo namestite nazaj v vlažilnik.
3 Aromatizačný box zatlačte spät do zariadenia.
Zresetujte pripojenie Wi-Fi
1 Konektor zvlhčovača vzduchu pripojte do elektrickej zásuvky a tuknutím na ho zapnite.
Farba svetla zvlhčovania
Aktuálna vlhkost'
Čo to znamená?
Slovensky

Zmena nastavenia režimu
Zvlhčovač vzduchu čistite, ked'sa zobrazí upozornenie na čistenie alebo každé tri dni.
500 Slovensky
2 Vyberte aromatizačný box a opláchnite vložku a box pod teplou tečúcou vodou.
3 Osušte čistou handričkou a vložte vložku spät do aromatizačného boxu.
A Mlaznica G Kontrolna tabla
B Poklopac rezervoara za vodu H Baza
C Otvor za paru I Utičnica za struju
D Rezervoar za vodu J Posuda za funkciju arome
E Filter za vodu K Podloge za aromu (FY5100)
F Plovak L Cev za paru
Pregled komandi
Kontrolna dugmad:
Dugme za uključivanje/isključivanje Dugme za funkciju svetla
Dugme za postavku vlažnosti Prekidač za biranje režima rada
Pritisnite i držite dugmad 3 sekunde:
2 Skinite gornji poklopac sa rezervoara za vodu.
3 Proverite da li je filter za vodu dobro pričvršćen.
4 Napunite vodom rezervoar za vodu. Ne punite toplom vodom.
Napomena:
Koristite prečišćenu vodu, destilovanu vodu ili vodu sa niskim sadržajem minerala da biste sprečili stvaranje naslaga kamenca i disperziju minerala u vazduh.
- Nemojte da prekoračite količinu naznačenu na posudi kada sipate vodu.
- Nemojte da sipate vodu direktno u bazu.
5 Stavite gornji poklopac na rezervoar za vodu.
Korišćenje funkcije arome
Napomene:
Esencijalna ulja se ne isporučuju sa proizvodom. Kupite i koristite preporučena esencijalna ulja po potrebi.
1 Gurnite posudu za funkciju arome da biste je automatski izbacili.
2 Nakapajte 2–3 kapi esencijalnih ulja na priloženu podlogu za aromu.
3 Vratite posudu za funkciju arome u aparat.
Razumevanje Wi-Fi indikatora
Status Wi-Fi ikone Status Wi-Fi veze
Treperi narandžasto Povezivanje sa pametnim telefonom
Svetli narandžasto Uspostavljena je veza sa pametnim telefonom
Treperi belo Povezivanje na server
Svetli belo Uspostavljena je veza sa serverom
Isključen Wi-Fi funkcija je onemogućena ili su svetla uređaja isključena
Wi-Fi veza

2 Uključite utikač ovlaživača u utičnicu i pritisnite dugme za napajanje da biste uključili ovlaživač.
- Wi-Fi indikator prvi put treperi narandžasto.
Resetovanje Wi-Fi veze
1 Uključite utikač ovlaživača u strujnu utičnicu i pritisnite da biste uključili ovlaživač vazduha.
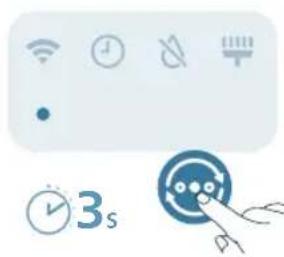
2 Pritisnite dugme 📋 zadržite 3 sekunde dok ne čujete zvučni signal.
Boja indikatora vlažnosti
Trenutna vlažnost
Šta to znači?
Ljubičasta <40% Suvo
Plavo 40 – 60 % Ugodna vlažnost
Zeleno >60% Prevelika vlažnost
Napomena: Podrazumevana ciljna vlažnost je 50% RV, a željenu ciljnu vlažnost možete da podesite pritiskom na dugme za postavku vlažnosti.
Nivo vode
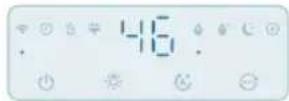

2 Pritisnite dugme za napajanje da biste uključili ovlaživač.
- Ovlaživač emituje zvučni signal.
- Indikator vlažnosti bira odgovarajuću boju koja odgovara nivou vlažnosti u okruženju.
- Ovlaživač radi u srednjem režimu dok se na ekranu prikazuje trenutni nivo vlažnosti.
3 Pritisnite ponovo dugme za napajanje da biste isključili ovlaživač.
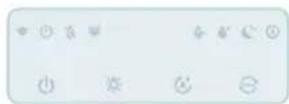

Napomena: Ako ovlaživač ostane povezan u zidnu utičnicu nakon što ga isključite, pri sledećem uključivanju će raditi sa prethodnim postavkama.
Promena postavke režima
Automatski režim (A): Ovlaživač vazduha automatski podešava nivo pare u skladu sa vlažnošću vazduha u okruženju.
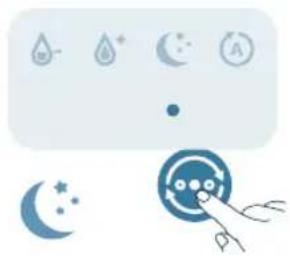
Režim za spavanje (Ovlaživač radi tiho pri malom nivou pare. Ekran se isključuje nakon 3 sekunde.
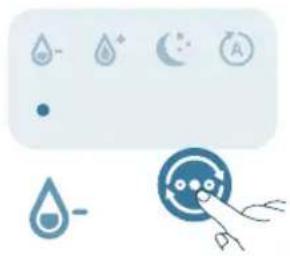
Srednji režim ( ): Ovlaživač radi pri srednjem nivou pare.
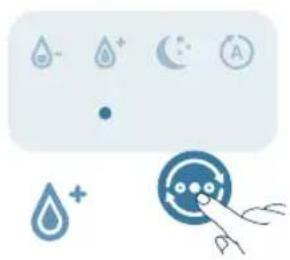
Snažni režim (♂): Ovlaživač radi pri najvećem nivou pare.
Podešavanje nivoa vlažnosti
Napomena:
Podrazumevani nivo vlažnosti 50% RV.
Nivo vlažnosti može da se podesi samo u automatskom režimu.
Ovlaživač će se automatski prebaciti na automatski režim kada podesite ciljni nivo vlažnosti u drugim režimima.
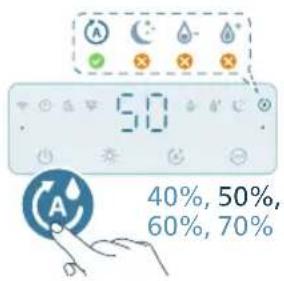
Nivo vlažnosti možete da izaberete tako što ćete pritisnuti dugme za neku od postavki vlažnosti: 40%, 50%, 60% ili 70%.
Korišćenje funkcije svetla
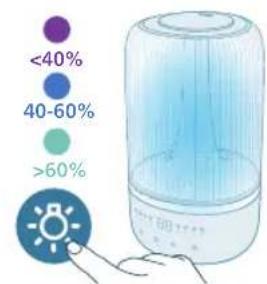
Možete da pritisnete dugme da biste uključili indikator vlažnosti, ambijentalno svetlo ili isključili sva svetla i kontrolnu tablu.
- Dugme za funkciju svetla možete da pritisnete da biste se prebacili na režim ambijentalnog svetla. Prilagodite osvetljenost i boju u aplikaciji Air+.
Možete da pritisnete dugme za funkciju svetla da biste isključili sve indikatore i kontrolnu tablu. Pritisnite bilo koje dugme da biste prvo probudili tablu, a zatim ponovo pritisnite dugme za svetlo da biste podesili režim svetla koji želite za tri sekunde.
Očistite ovlaživač kada se uključi upozorenje za čišćenje ili na svaka tri dana.
Redovno čistite unutrašnjost i spoljašnjost ovlaživača da biste sprečili sakupljanje prašine.
1 Obrišite prašinu sa kućišta ovlaživača mekom suvom krpom.
2 Isključite aparat i isključite ga iz zidne utičnice.
3 Skinite gornji poklopac sa rezervoara za vodu.
5 Prospite vodu iz rezervoara i baze.
6 Skinite filter za vodu sa rezervoara za vodu.
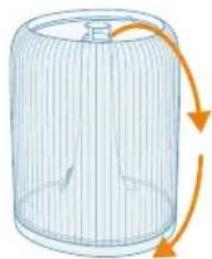
7 Okrenite rezervoar za vodu naopako.
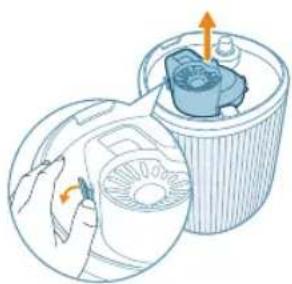
8 Uklonite prigušivač sa dna rezervoara za vodu.
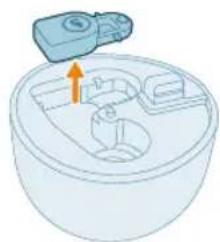
10 Isperite vodom rezervoar za vodu, gornji poklopac, plovak, prigušivač i filter za vodu.
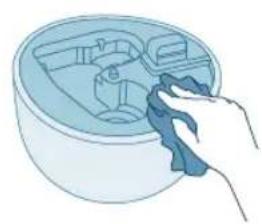
11 Obrišite bazu tako da bude čista i suva.
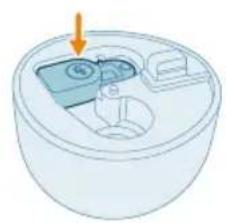
12 Vratite plovak u baznu komoru.
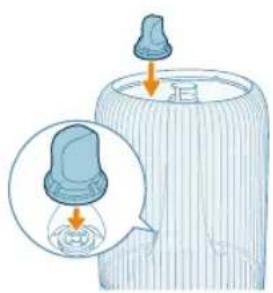
13 Vratite filter za vodu u rezervoar za vodu.
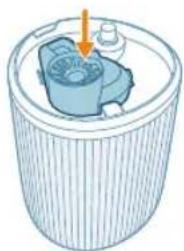
14 Vratite prigušivač u dno baze.
522 Srpski
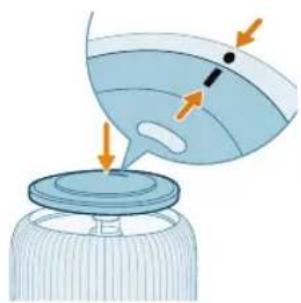
15 Vratite gornji poklopac na mesto.
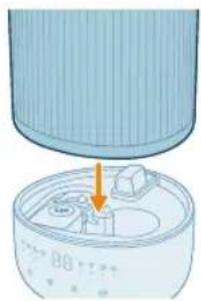
16 Vratite rezervoar za vodu na bazu.
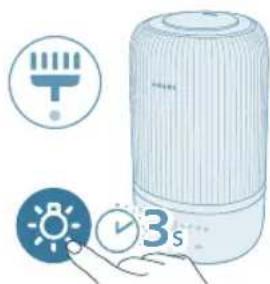
18 Pritisnite dugme za svetlo i držite 3 sekunde da biste resetovali vreme za čišćenje.
Čišćenje podloge za aromu i posude za funkciju arome
1 Uklonite posuda za funkciju arome tako što ćete je pritisnuti, a zatim je izvući.
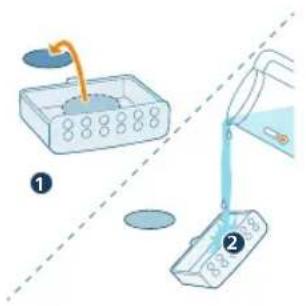
2 Uklonite podlogu za aromu i isperite podlogu i posudu pod mlazom tople vode.
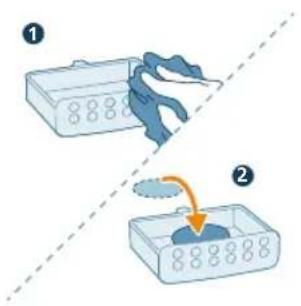
4 Vratite posudu za funkciju arome u ovlaživač vazduha.
Huomautus:
Nollaa Wi-Fi-yhteys

540 Suomi
9 Irrota kelluke jalustalokerosta.
546 Suomi
E Vattenfilter K Doftdynor (FY5100)
F Flottör L Dimrör
Obs!

562 Svenska
www.home.id/warranty.
Not:

584 Türkçe
Not:
590 Türkçe
A Nozzle G Dolandyrys paneli
B Suw gabynyň gapagy H Esas
C Mist outlet I Power plug
D Suw gaby J Ysly gutsy
E Water filter K Ysly yassyjaklar (FY5100)
F Float L Mist tube
Remove all packing materials before first time use.
Take the water tank off of the base and remove all tapes.
Rinse all parts before first use.
Select a firm, flat, water-resistant surface for the humidifier, ensuring it is positioned at least 30cm away from walls.
600 Türkmençe
Ensure that the mist is directed away from walls, furniture, and other appliance.
1 Make sure that the float is well in place.
3 Make sure the water filter is attached properly.
4 Suw gabyny suw bilen dolduryň. Do not fill with hot water.
Bellik:
- Do not exceed the water level indication when filling water.
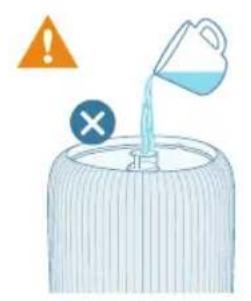
- Do not pour water through the ultrasonic mist outlet.
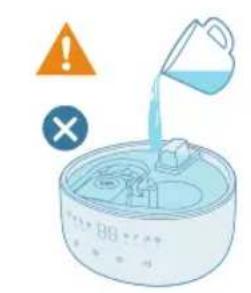
- Do not pour water directly into the base.
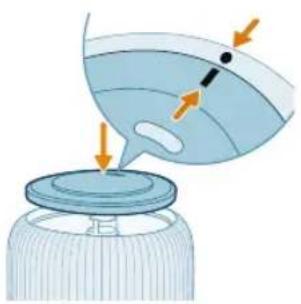
5 Reattach the top cover to the water tank.
1 Awtomatiki usulda çykarmak üçin ys gutusyny basyň.
3 Ys gutysyny yzyna enjama salyň.
2 Bip sesini eşidyänçänizm bir wagtyň özünde 3 sekuntlap basyp duruň.
Çyglylyk açyk reňk Hâzirki
çyglylyk
Nämäni aňladýar?
Mawy <40% Gury
Gök 40-60% Rahat çyglylyk
Yasyl >60% Aşa çyglylyk
Bellik: Bellenen maksat çyglylygy 50% RH, çyglylygy sazlamak düwmesine basyp, islenýän maksatly çyglylygy kesgitläp bilersiñiz.
Suwuň derejesi
When there is not enough water in the water tank, the water refill indicator is on, the humidifier stops working. The humidifier will resume work when you refill water into the water tank.
Suw guýmak
Bellik:
When filling water, do not exceed the maximum water level.
Suw bakyny hereket etdireniñizde çaykamañ, yogsam suwyñ howa girelgelerinden daşary dökülmegi mümkin.
Follow the steps in "First time use" for refilling water.
Açmak we öçürmek
Bellik:
The humidifier is applicable for ambient temperature range : 5-40 °C.
1 Howa çyglandyryjysynyň elektrik dürtgüjini elektrik rozetkasyna dakyň.

Adjusting mist direction
Rotate the nozzle to preferred mist direction.
The humidity level can only be adjusted in the Auto mode.
Beýleki tertiplerde maksatly çyglylyk derejesini kesgitläniñizde, çyglandyryjy awtomatiki usulda üytgär.
608 Türkmençe
30%, 40%, 50%, 60% ya-da 70% saylamak üçin çyglylygy sazlamak düwmesine basyp çyglylyk derejesini sazlap bilersiñiz.
- Daşky gurşaw yagtylyk re tertbine geçmek üçin yagtylyk funksiyasynyň düwmesini basyp bilersiñiz. Air+programmasyndaky yagtylygy we reňkini düzüň.
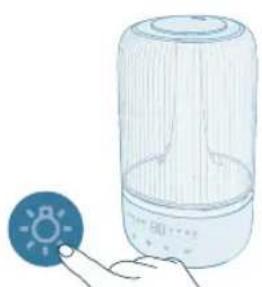
Ähli ysyklary we dolandyrys panelini öçürmek üçin yşyk düwmesini basyp bilersiniz. Ilki paneli oyarmak üçin islendik düwma basyň we isleýan ýagtylyk tertibižizi 3 sekuntda bellemek üçin yşyk düwmesine ýene basyň.
Arassalamak we abatlamak
Bellik:
Arassalamazdan ozal enjamyn dürtgüjini elektrik rozetkasyndan ayryn.
Clean the humidifier when the cleaning alert is on or every three days.
5 Pour water out from the tank and the base.
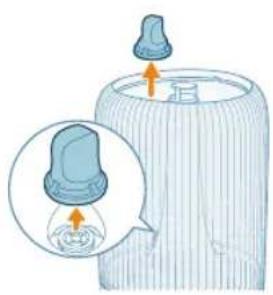
7 Turn the water tank upside down.
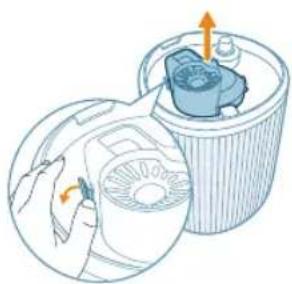
8 Remove the deafener from the bottom of the water tank.
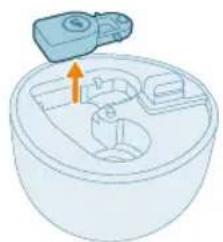
9 Remove the float from the base chamber.
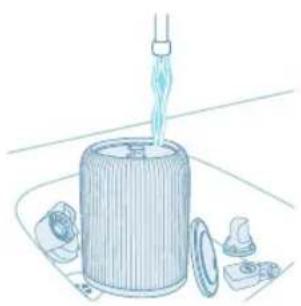
10 Rinse the water tank, top cover, float, deafener and water filter with water.
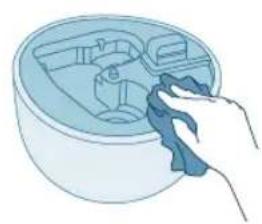
11 Wipe the base clean and dry.
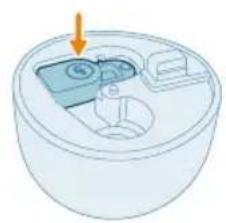
12 Put the float back to the base chamber.
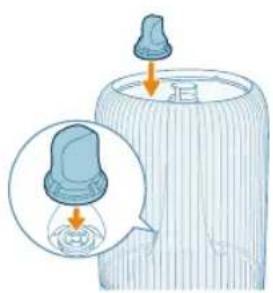
13 Çyglandyrys süzgüjini täzeden suw gabyna oturdyň.
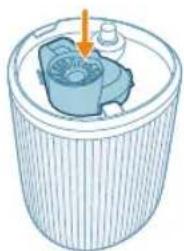
14 Put the deafener back to the bottom of the base.
612 Türkmençe
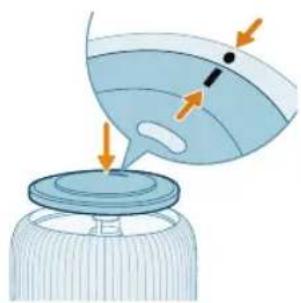
15 Öndäki örtügini yerine dakyň.
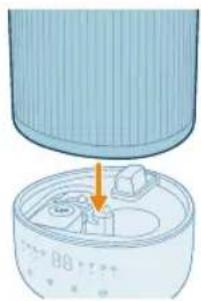
16 Suw gabyny baza dakyň.
17 Elektrik dürtgüjini rozetka dakyň.
18 Süzgüji arassalamaga wagty täzeden sazlamak üçin we düwmelerini 3 sekuntlap basyp saklaň.
Ys beriji we gutyny arassalamak
Netijeli aromaterapiya üçin, täze efir yagyny ulanmazdan ozal, ysly yassyjaklary arassalamaly. Efir yagynyň garyndysyny garyşdyrmaň.
3 Arassa mata bilen guradyň we ýassyjaklary ys gutusyna goýuň.

Забележка:
- Не наливайте вода директно в основата.

Эскертүү:

8 Суу челегинин түбүнөн үн азайткычын алып салыңыз.
3 Таза чупурек менен кургатып, жаздыкчаны кайра жыпар жыт кутусуна салыңыз.
696 Македонски


www.home.id/warranty.

2 Сарпуши болоиро аз зарфи об хорич кунед.
744 Точикй
- Обро мустакиман ба пойгох нарезед.
2 2-3 катра равгани эфириро ба кабати хушбуйкунандаи таьминшуда гузоред.
3 Куттии хушбуйкунандаро барои бозгашт ба дастгох тела дихед.
Аз нав танзим кардани пайвасти Wi-Fi
1 Сими намноккунандаи хаворо ба васлаки барк, гузоред ва барои намнок кардани хаво ☐ро пахш намоед.
2 Тугмаи про баробар ба мухлати 3 сония то шунидани садои бип пахш карда нигох доред.

Шумо метавонед байни Холати худкор, Холати Хоб, Холати миена, ё
Холати баланд -ро бо пахш кардани тугмаи гузариш интихоб кунед.
Холати худкор (●): Намноккунанда суръати туманро мувофики сифати
хавои мухити атроф ба таври худкор танзим мекунад.
Холати баланд ( ): Намноккунанда бо суръати баландтарини туман кор мекунад.
3 Сарпуши болоиро аз зарфи об хорич кунед.
10 Зарфи об, сарпўши боло, гупсар, садонишонак ва филтри обро бо об бишуед.
15 Сарпўшро дубора пайваст кунед.
16 Зарфи обро ба пойгох пайваст кунед.
17 Сими баркро ба васлаки барк гузоред.
Примітка.

4 Су ыдысына су күйыңыз. Ыстык су толтырманыз.
Ескертпе.
- Ультрадыбыстык бу шыфатын жерден су күймаңыз.
6 Су сүзгісін су ыдысынан алыңыз.
Uwnwuph punhwunin punipawqn
A 91huhy G 4wn2wylwnu5w1 uwhwuwly
B 2nh unwnwjh ywhwnhH Rhup
C 9n1nn2ni tlp I hnng
D 2nh unwpw J Fnipúniúph unnih
E 2nh \$hlunn K fnipúniúph pwnàhlyútn (FY5100)
F Lnnwù L 9n1nn2ni hunnnu5w
ЧунWWUNUWU \$niùghwùtnh pùnipawqhn
A
bunuwlnuajwluqwnwnpnuwlynawlyntdchynnhwnpwnw
2 Rwutp qnh unwnwjh ytunuh ywhwnhyn:
3 3wúnqultp, nn qnh \$hlunnǎh2un 5 untwnnnulwò:
4 2n1n 1gntap 2nh unwnwjh 3tg: Uh 1gntap 2nup 2n1n:
L2niu.
Oqunwqnnpdp uwpnluw, pnnwδ ywi guδn unlnnuwjuniŋwúp hwúpwjħu gnin' patjhiŋutph wnizgwgniún l huúpwujniŋatph onniú gnuωδniŋajniún ywiuhutni hwiūwn:
Ruijtntu
- 2nun lgutihu uhi wugtip qnh gnighzh uwhuwuwwuhn:
- 2n1n u1h lgntp niunnwawjuwjh u qnnn2ni tijph utg:
- 2ninn úh Igntp wùúhqwuytu hhúph útq:
5 4tlnh ywwwnhyn tunnhg wupwqntap qnh wnwnwj h ynw:
2 Lgntip 2-3 ywphl gatnwjhù jnintin utwnuqwò pniúniuph pwnàhyhu:
3 Fnnnunuph unnuhp tunnhg untnwnntap uwnph utg:
Wi-Fi-h gnighzh ulywnwqh
Wi-Fi wwnltytnwuh lwnqwwlhǎwyn Wi-Fi lwwgh lwnqwwlhǎwyn
@wnpnui 5 uwnugwqnyjunU Uhwnui 5 uuwnp htnwhunuhu
Чужни щWWZWQNYU Uhwgwδ ζ υύωηρα hθιωμηνυμ
@wnpaniś 5 uwhunwly qnyjūnú Uhwùniś 5 uwwuwwnlyhshù
Чужніц 乌WHUNWU UhwUNWU 5 乌WWWWNYHSHU
Uğwunluwó Wi-Fi qnnðwnnypů wùgwinluwó ʒ yuú uwnph
Injutnu wugwinluwǒ tǔ
Wi-Fi ṣμμμ

Unwghù wùqwú Wi-Fi ywwh ywnqwúnnuú
1 Utnptnutap L untwnwntp Philips-h «Air+» hwuftluwon App Store-hg ywu Google Play-hg:
2 huntuwugnighpn uhwqntp uwnnwlyhg lu utnutp uhwgüwü lynäwyn' uwnpn uhwgübini hwüwn:
- Wi-Fi-h gnighyn funwghu wuqwui uhwgutjhu tiwnugwqnju inuuwlnnniajwup pwnpenu t:
![graph TD A["WiFi Signal"] --> B["Wi-Fi Interface"] C["Smartphone"] --> D["Device Icon"] style A fill:#f9f,stroke:#333 style B fill:#bbf,stroke:#333 style C fill:#dfd,stroke:#333 style D fill:#dfd,stroke:#333](/content/2026/04/711152/images/3abbeab51d6bdf8b256b3e5854921f569094de50839fe3e79906b292d4fb2acb.jpg)
3 3wúnqultip, nn áttn uúwnpəfnün lywiú wylwiù2tunŋ hωqnηημεjωuρ úhwgulwó l óttn Wi-Fi gwùghù:
L2niú.
2tp uuwnp#nuniú úhwgntp Bluetooth qnnðwnnyjən' uwhniú qniqwynpnniú uwwwhnlbini hwúwn:
3wùnqūtp, nn àtp uìwnpàpnùn úhwguwòt 2,4 93g (unùwjù) Wi-Fi gwùghù 5 93g Wi-Fi gwùgh lywú huìnwjhu Wi-Fi-h ǔnhuwtú: Uwhniù qniquwjnnnuú uwwwhnlqīn hwiùwn útbùp wuzgwynluú bùp wǔgwuntl àtp pōgwjhù unjwùtūtn` tiwuhpuwú qniquwjnnuú uqnòpùpwgn ulyutíŋ:
4 9nnδwnltp Philips-h «Air+» hwultlquωn l u ζynwùhù utnútp «Uulglwgutl uwnp» yuuí «+» ynǎwln: hnùwllugnighen àtn gwughù úhwgutjni hwuwn htunltp ξynwùh gnignuūtphù:
- Uhwgnuhg htnn Wi-Fi-h gnighp qwnqniu t uwhunwly qnyjuni:
L2niú.
Uju hnwhwugn nich ubg t uhwj u wju ntuwpiu, tn p hunuwulwgnighsh ywnqwynnpnuutpng ywnwnpniu ti u wnwghu wuqwi: trat gwugh ywnqwynnpnuutpng ynhulti ti u wui hwnlywulp n tünphg ywnwnptl ywnqwynnpnuutpng:
tjet gwülywünui tp ühwgutl ütyhg wultih uwnptn ðtn uüwnja\$nühu lywi
wjlu2tunhu, lywnn tp uwnpu wultiwgutl inwgnighs uüwnja\$nüütnh
hwultiylwönui' wnwug uwnph Wi-Fi lywwp útpnwlywjtln:
Rwúnqúp, nn àtn uúwnépnúh yuú wúwù2tunh l u húnüwwüwgnighzh úhgú hánwúnnniŋniún zh qtpnwquwugniú 10 ú-p, l u húnzúnnnútn sylu:
Wi-Fi ywwh qltnwlywjniu
1 hunwuwgnighsh hnngn uingntap hnuwuph ywnnwyh utg la utnutap lynawyn' uwnpn uhwgutini hwuwn:
2 Uhwdwuwuwly utnutp lu wuhtp qnawlyn 3 uwjnljwuw' uhusu dwjuwjhlu wqnuw2wuw jutp:
- lunuwuwgnighzu wuguniú t qniqwulnnuwi u ndhuhù:
- Wi-Fi gnighzh nyun pwnpniu t uwnugwqnyunu:
3 Чwinwntp «Unwghù wùquú Wi-Fi lywwh lqunqwulnnu» puđuh 3-4 pujltnp:
4w1w2>60% 2w1hwqwug hun1wwu
U2niú. Gwúhuwnpnuð wúhnpudt2n hunúwulniŋniún 50% RH t, ηηρ lγωρηθι p uwhúwutí gwtúwuh wúhnpudt2n hunúwulniŋniún` utinútjnu hunúwulniŋwiù lywnquwlnnniú lynówlyp:
Ωην υωγωρημι
tnp gnh pwpniú puwluwnun gnin zhyw, gnh wutlwgúwù gnighen úhwùniú t, hunüwwuugnighen ηwnwnniú t w2huwunti: hunüwwuugnighen ünphg yulyuh w2huwunti, tnp gnin lgútp gnh pwpniú:
Ωην υυτιωμην
L2niú.


2 Utnútp uünigúwù lynǎwln` uwnpn úhwgútni hwúwn:
Ujunnuun ntchuh ywnqwlnnniwutph yhnhhunipajniu
Puh ntchu (J) lonuwugnighyu w2huwunniu t huiqhuun' qinnpni guon uwlwnnwuh ynw: 3 ywnjywuhg tynwuh inyutnu wugwnunniu tu:
Uhghù ntchū (a) tonu wugnighzù w2huwnniú 5 qinn2ni uhghù uwlqwnnwlyh ynu:
Fwnàn ntāchū (♂) lunùwùwgnighsù wzhùwinniú 5 wùtǔwpwnàn uìwùwnnwlyh yhu:
7 nip lywnn btp utnúbī lynǎwln` hunùwùnjuājwù lniún, 2ngwlyw lniún ûhwgùtīnì yhuú pnnp lnyutnù ni lyuànzuqwnúwù qwhwàwlyù wǔgwuntīnì hwúwùn:
- 4wùhuànpuìwǒ lǐtnuìn lúnùwùwgnighén úhwǔnú lǐ húnùwùniějwù línjuìh gnighén:
824 Rujtntu
Utnúbīnǔ ľnuḥ lynǎwūn` yuānn bù wùgwūntǐ pīnn ŋnyubnǚ nǐ lqwnwūlwnúwù
ywhwùwūn: Lwhluwwng, utnúbp gwùlywgud lynǎwù` ywhwùwūn úhwugtīni
hwúwn, wjùnīhtānū lynyhù utnúbp ŋnuḥ lynǎwūn` gwùlywūh niwwuīnnipāwù
nbdhún 3 yujnlywūnwǔ uwhúwūtīni hwiúwn:
Uwpnniú u unthùhlywlywù uwwuwnyniu
L2niú.
Uwpntinig wnwg úh2n hnuwúphg wǔgwntp htǔwlywjuwùn:
tnptp u'h n'lynutp uwnpn qnh ywu npu5 wjl htnnilyh utg:
buniuwhtp qnh utnpawwhwugnuhg onh ununph u tiph wugptn:
Uwnph nnu5 uwu uwpntn1 hwiun tnptp uh oqunwqnptp hnlynn, wqntuhu ywu nyinpwuwun uwppnn uhengutn, onhüwyl pinn ywu uwhnun:
Unidump hghdgnghsh uwpnniun
Uwpntp huntuwlwgnighyn, tnp úwpnúwù wqnwù2wùn úhwùniú ìyuu tnpop onp úty:
Twnptnwpwn uwpntip huniwwuqgnighp utnuhg lu nnuhg` yhn2ni lyniunwlynuhg huniwwuhtini hwúwn:
1 Unptap uhn2hù hunwulwgnighsh ynnwnluhg znn uhwuhniy yunnnnu:
2 Uügwintp uwnpn Lü Gwütp hünngwyn Gnuwüph uwnnwlyhg:
4 ζωὐτρ ὅnh υπωμὰ ἥn ὕħύρħg:
5 ɒnɪŋpəʊwhtp unwnwjhg u ɡhʊphg:
7 91huhulwjn 2ngtap 2nh unwnwu:
8 3wutp huiwgnighn qnh unwnwjh unwlqh uwwhg:
9 3wutp innwun hhuph hughyhg:
10 2nh unwpwù, utpuh ywhwnhzn, innwùn, huiwgnighzn u qnh \$hlunn luwgtp qnnl:
11 Lwyljulgtp hhuipn u snnwgntp:

12 Lnnwùn tunnhg nntp hhuíph hughyú útq:
13 2nh \$hlunn'unhg untwnntp qnh unwnwjni:
14 ひらwnighyn unnhg nntp hhúph utnpluh uwwuni:
18 Utnútp u wuhtp lnyuh lynǎwyn 3 qwjnlywù` úwpnúwù dwúwùwyn qtnwnútjni hwiún:
Enipuniuph pwndhyh u nniuh uwpnniun
Unnyniuwultun wnnuwpatpnuwwhwhj hwiwn pninpuniuph pwnohyun uh2un wttnp t uwpnuh` gtptnwjntinh unn hwnzuninn oqnwqnndtning wnwg: Uh hwnztip gtptnwjntinh hwnzuninnutnp:
1 3wùtp pnnúniùph unniùn` utnútīnul ħnw ynw u ħnīnu pw2bīnul wjù:
2 3wutp pnipunuh pwnahyu u luwgtp wju unnuh htn uhwhu hnnn unwp qnh unyu:
3 2nnwqntp úwpnín 2nnnú l u pwnàhlyn tunnhg nptp pnipúntúph unnuhh úbg:
4 Enipuniuph unnuhp unphg nptp hunuwuugnighsh utg:
L2niú. Anipúniúph pwnàhúh yuwí nniúhh úbú úh igntáp hánnily úwqnnn uìhongùtn yuwí ljuwgnq úhongùtn:
zsdmnyjbjon zsbdjgbqnnn, zsdbqnmn bysmn sb dnbjmsmjdnl qsdsmn
djd33gmmdn l djm6g bysmn, fmd osznoosb anjnmmon bsqgdnl
bsmdmjd6s pss dnbjmsmjdnl zugmfj33s 35gmdn.
842 ฟูดมิตรีน จ๖๖
- -by-mon adg3ugdunu sm gucssfmdom bymnq ombln obqn3yfmfu.
- 6y5mn sm hssubson fgbnu ymphsdgjmnnn zsdmdd3gdoon.
- 6y5mn sm hssubson 3n6qos3nm dnmdn.
5 bgtmsbms qssdsgfgon 8gws bygn bymnls mgtgfmzysm.
Wi-Fi-l n60n350m7n2 3560m700
Wi-Fi 35306001 bgsmbms 459670
2 ωησβυδι ωυσφημον ημησχύ δησαρθημησω 3 ωδόν ωδδαζμπόσόν, ωδόν σί ωυσχόν ωυσχόν.
- φυσθυβυδυδυδυδυδυδυδυδυδυδυδυδυδυδυδυδυδυδυδυδυδυδυδυδυδυδυδυδυδυδυδυδυδυδυδυδυδυδυδυδυδυδυδυδυδυδυδυδυδυδυ δυφως.
- Wi-Fi-l n6q0n3s0fmmn 5u6n6tnuq3m2o 5y0d3n0d9g0s.
3 მიკუევით მე-3 და მე-4 ნაბის სექყიაში „Wi-Fi კავმირის პირველად დაყენება”.
உதெங்காட்டு மேஞ்செ
∂ndφn6s- m5b 6nd6s3u ʒb?
m̄j
φj6n56m-
ðs
∂θδυ∂γμην <40% ∂θδυμην
40-60% 3m∂gmmΦyμn Φgδnδmòs
g0m0g0n m0d0m0g0 n g0m0 g0d0g0l0 0 g0d0m0d0g0l0.

2 00000000000000000000000000000000000000000000
4 dnhnggu6 dmbu6bou bpynlu mugm3yugmn.
7 3000000000000000000000000000000000000000
8 6ymnbl m98gfm3yu5mbl dnmnq5b sdmnqgm hsdbdamon.
9 dɔmɔn b ʒɔdʒmɔnɔs6 sɔdmɔŋɡən Φɔn3Φɔn3s.
10 fiscalon fiscal government fiscal and fiscal, fiscal, fiscal, fiscal, fiscal, fiscal, fiscal, fiscal, fiscal, fiscal, fiscal, fiscal, fiscal, fiscal, fiscal, fiscal, fiscal, fiscal, fiscal, fiscal, fiscal, fiscal, fiscal, fiscal, fiscal, fiscal, fiscal, fiscal, fiscal, fiscal, fiscal, fiscal, fiscal, fiscal, fiscal, fiscal, fiscal, fiscal, fiscal, fiscal, fiscal, fiscal, fiscal, fiscal, fiscal, fiscal, fiscal, fiscal, fiscal, fiscal, fiscal
11 356300 3563000000000000000000000000000000000
15 bghmshu qssdugngn 8gou bygn.
854 ปุทธิศน์ ๑๖๖
16 dn680 bgtm5bctn cossd3gfron byrtnl mgtgfrzgydn.
17 ∂∂∂∂∂∂∂∂∂∂∂∂∂∂∂∂∂∂∂∂∂∂∂∂∂∂∂∂∂∂∂∂∂∂∂∂∂∂∂∂∂∂∂∂∂∂∂∂∂∂∂∂∂∂∂∂∂∂∂∂∂∂∂∂∂∂∂∂∂∂∂∂∂∂∂∂∂∂∂∂∂∂∂∂∂∂∂∂∂∂∂∂∂∂∂∂∂∂∂∂∂Δ.
18 ๑๐๓๐๘๙๗ ๖๐๖๔๐๙๖๐๏๗ ๑๐๘๙๗ ๖๐๕๒๔๐๘๔ ๑๐๙ํ๘οι ๑๐ 3 ๖๐๓๙ ๖๐๕๔๐๘๘๘๘ ๑๐ 5 ๖๐๔๐๘ ๖๐๘๙๗ ๑๐๙๙๗.
###
modification of the following forms:
PHILIPS and the Philips Shield Emblem are registered trademarks of Koninklijke Philips N.V. and are used under license.
This product has been manufactured by and is sold under the responsibility of Versuni Holding B.V., and Versuni Holding B.V. is the warrantor in relation to this product.
2024 © Versuni Holding B.V.