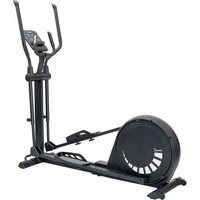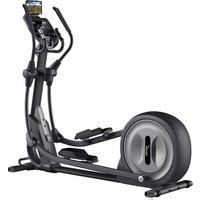
Carbon P28-R - Elliptical bike Skandika - Free user manual and instructions
Find the device manual for free Carbon P28-R Skandika in PDF.


User questions about Carbon P28-R Skandika
0 question about this device. Answer the ones you know or ask your own.
Ask a new question about this device
Download the instructions for your Elliptical bike in PDF format for free! Find your manual Carbon P28-R - Skandika and take your electronic device back in hand. On this page are published all the documents necessary for the use of your device. Carbon P28-R by Skandika.
USER MANUAL Carbon P28-R Skandika
natural_image
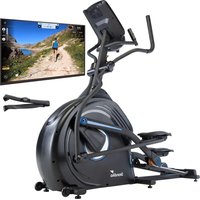
Exterior view of a modern Skapitali 2000 stationary exercise bike (no signage or text visible on the equipment body)Carbon P28-R
Inhalt
skandika.com/service
text_image
Technical diagram of a vehicle chassis with labeled components and parts, including numbered parts 1, 4, and 59.SCHRITT 3
natural_image
Line drawing of a mechanical device with a rectangular frame and articulated legs (no text or symbols)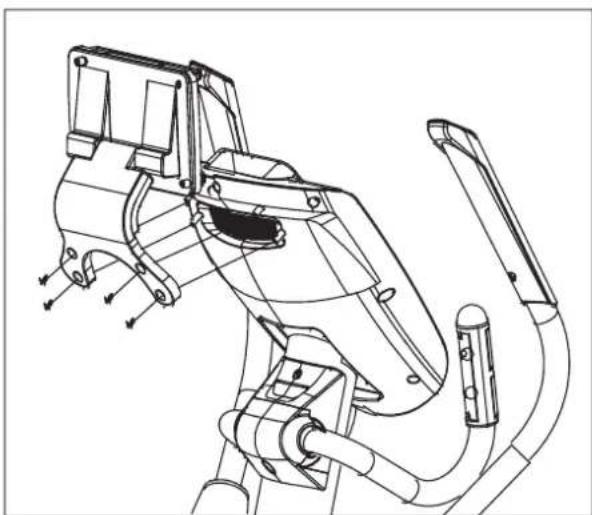
natural_image
Technical line drawing of a mechanical device with hoses and components (no text or symbols)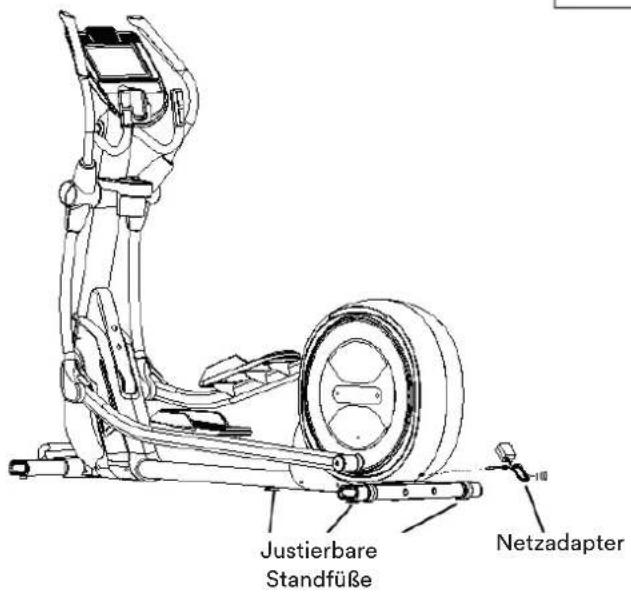
MANUELLES TRAINING (MANUAL)
text_image
Technical diagram of a vehicle's internal components with numbered parts, likely an electric scooter or motor assembly.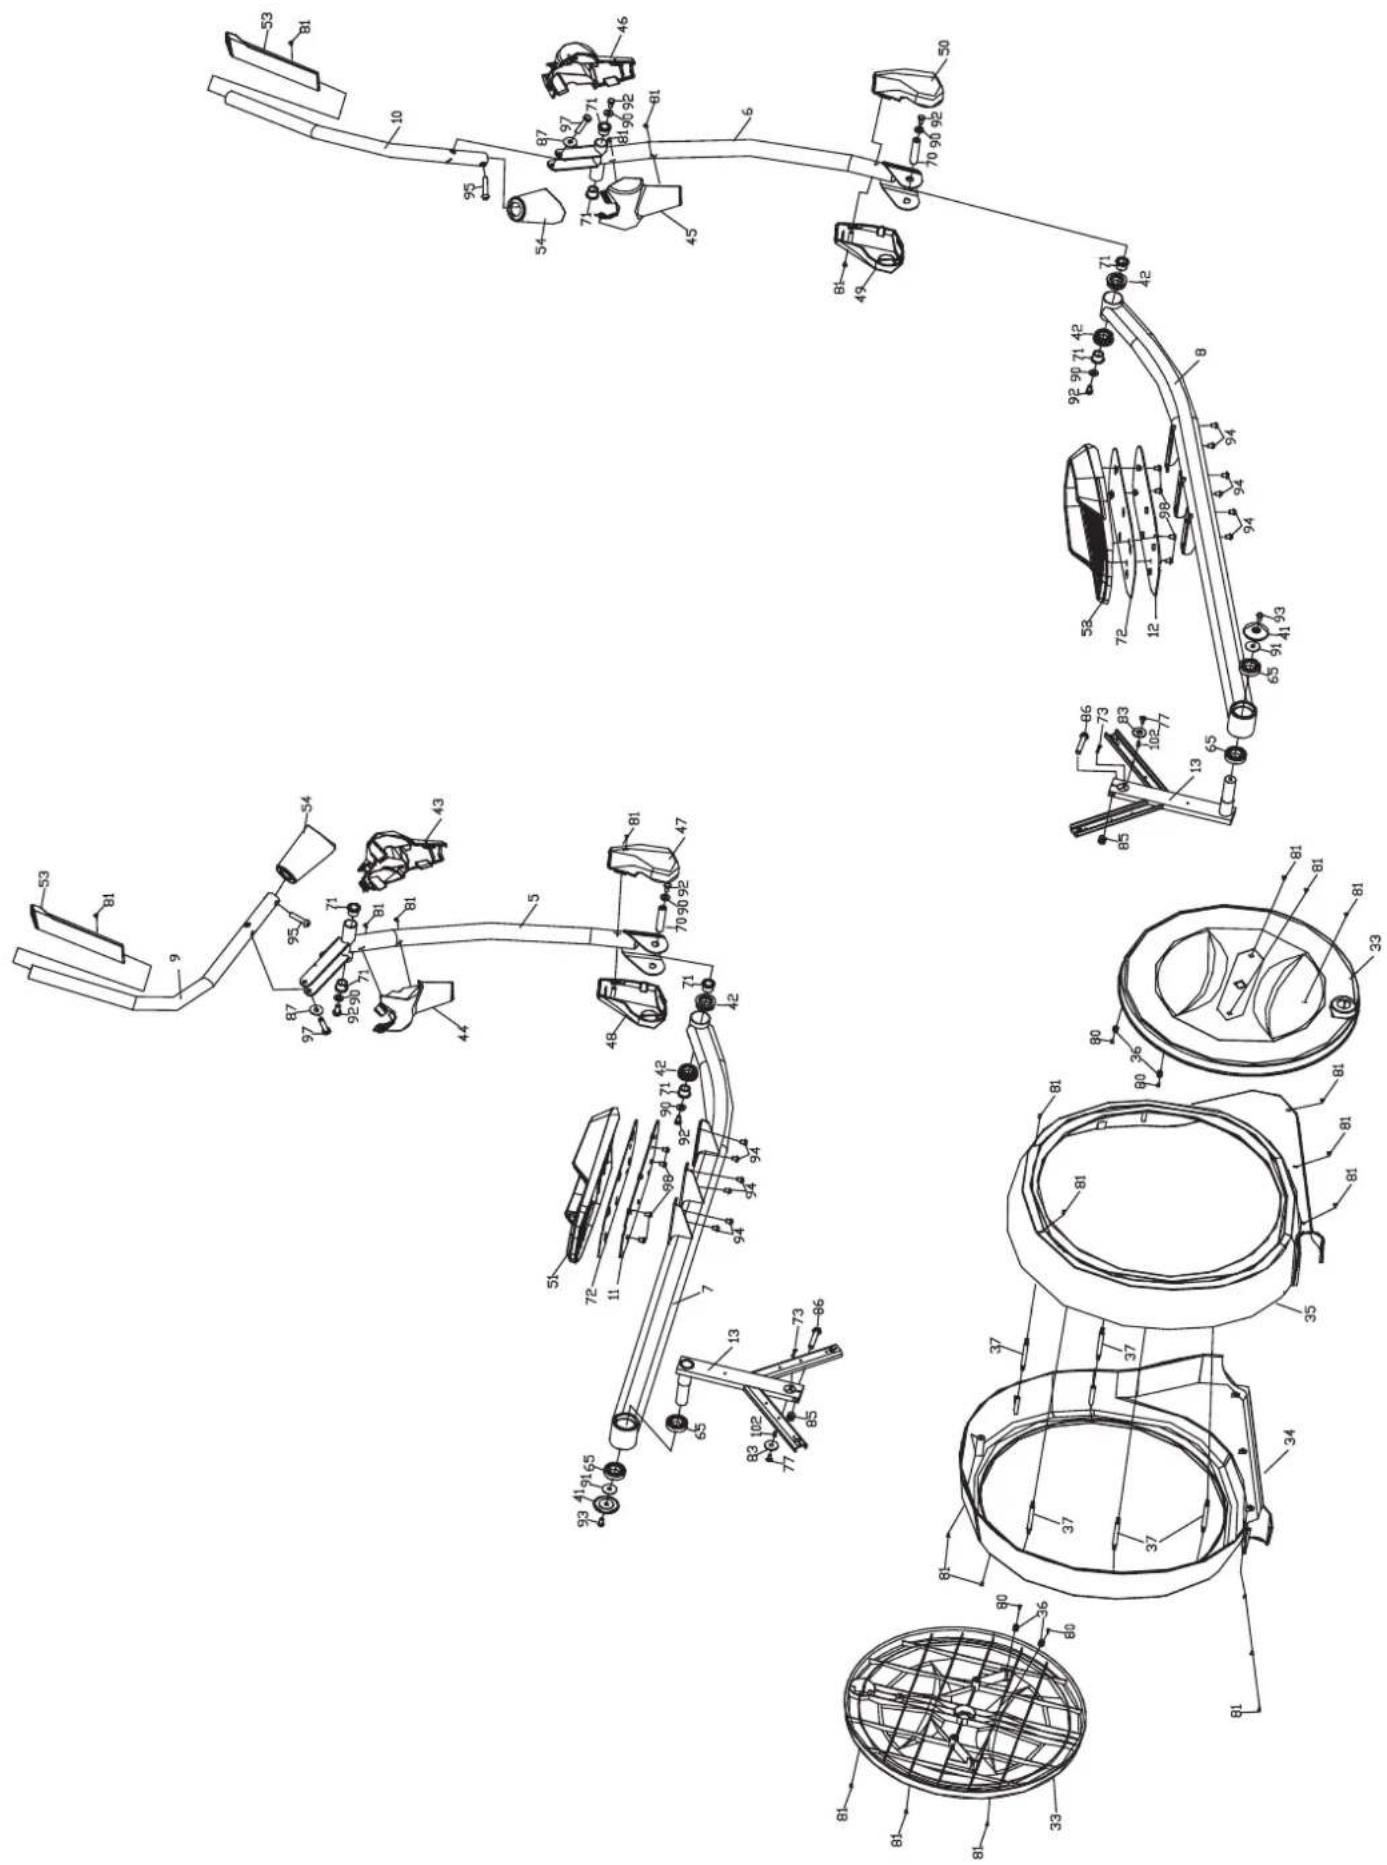
text_image
Technical diagram of a mechanical assembly with numbered components and labeled parts, likely from an engineering or manufacturing document.23 Safety precautions
24 Set-up instructions
28 Computer operation manual
33 Using a chest-belt
33 Error messages
34 Warm-up and cool-down
35 Connecting to KINOMAP app
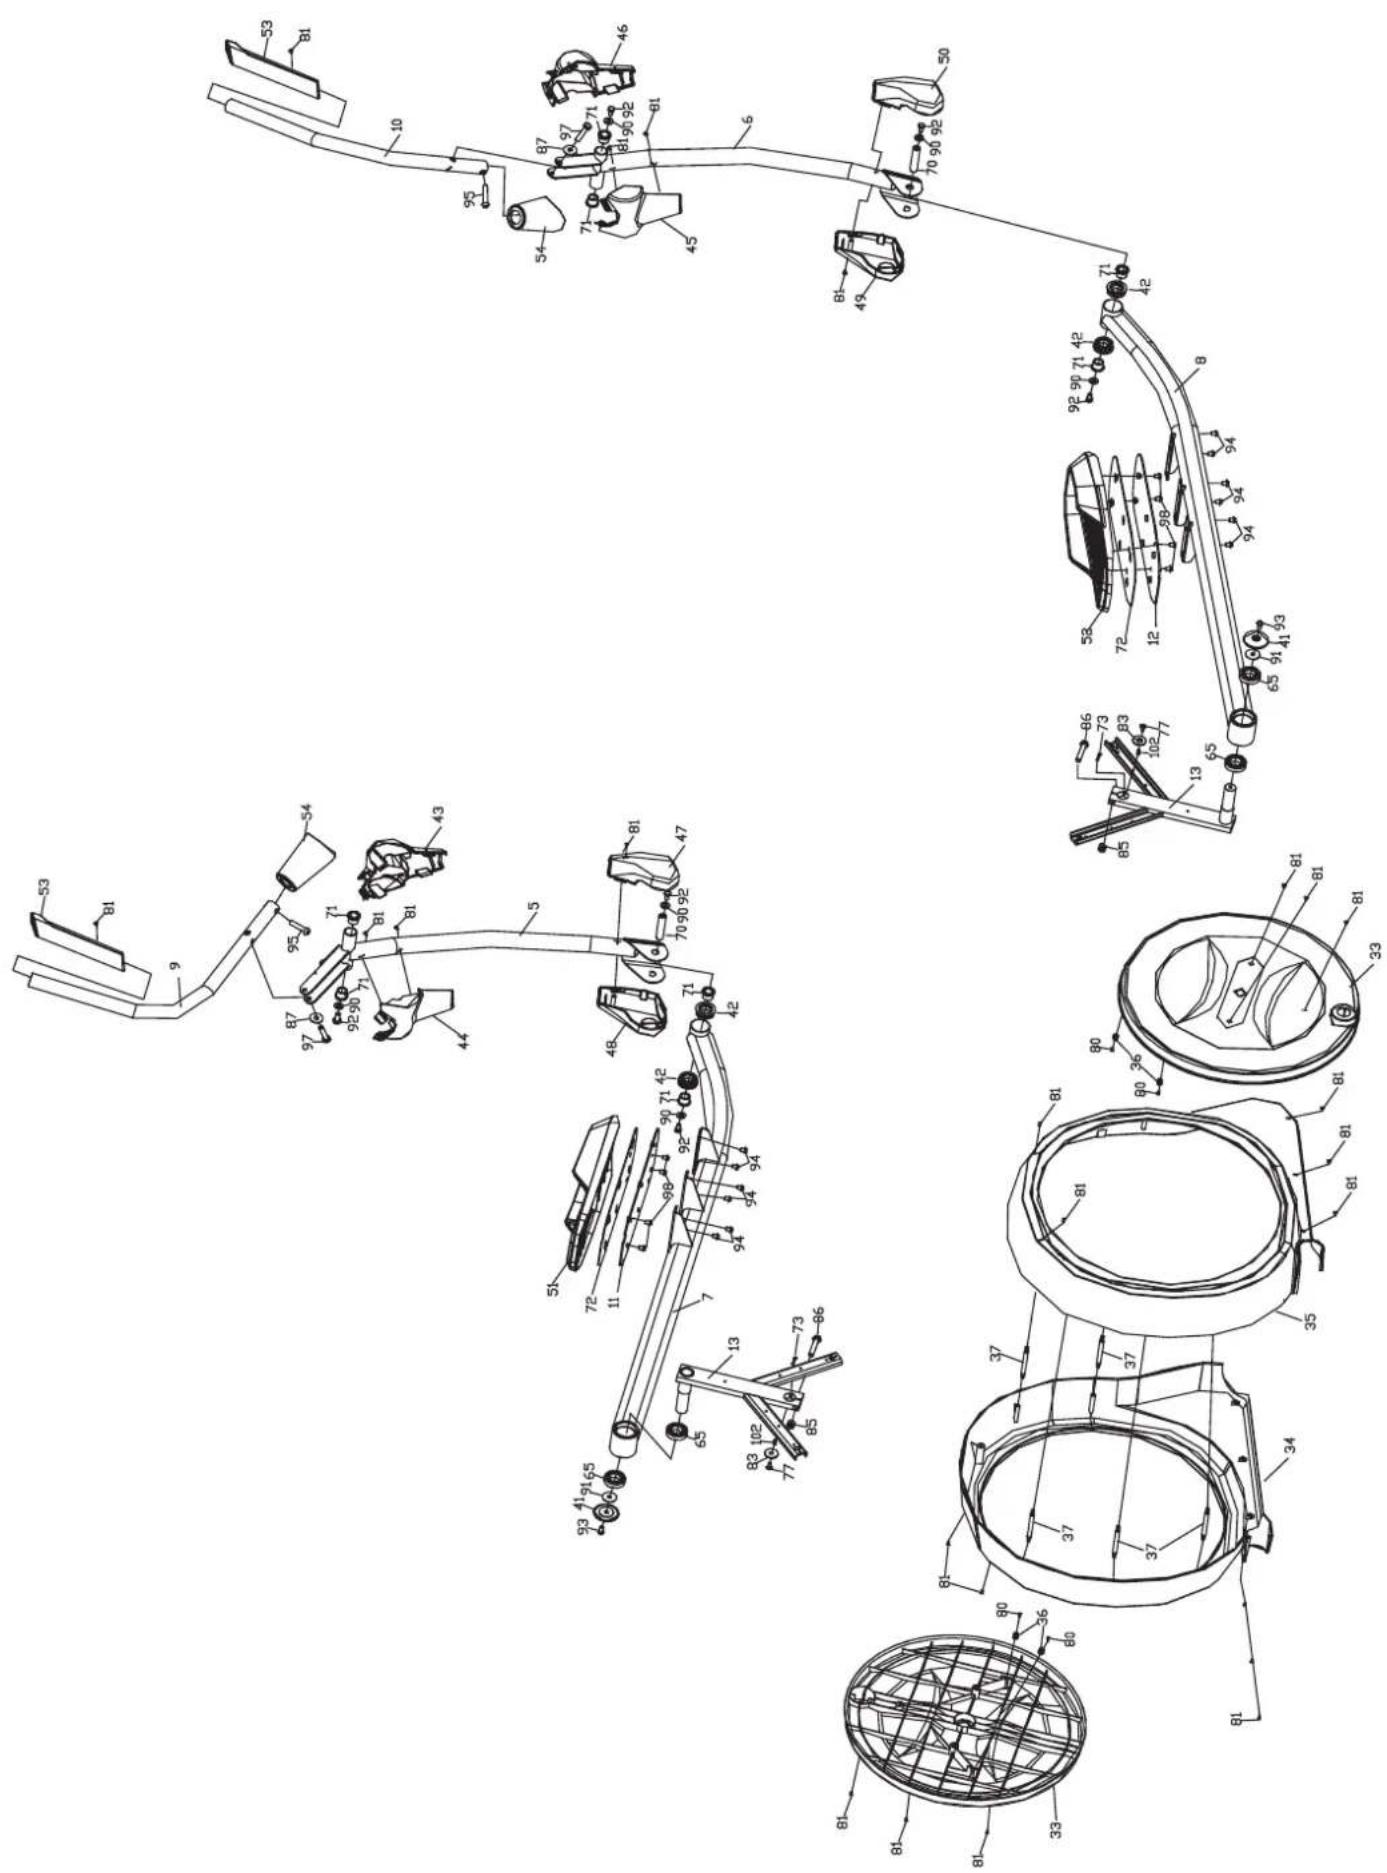
36 Explosion drawing
38 Parts list
40 Technical specifications
41 Guarantee conditions

skandika.com/service
Please visit the Skandika Service portal on our website for setup & help videos, FAQs and downloadable instructions.
For more information about Skandika, simply visit our main page www.skandika.com

WARNING
To reduce risk of injury, read and understand this instruction manual before using the device! This machine is intended for home use only in accordance with the instructions provided in this manual. Read the instruction manual carefully before using this device and keep the instruction manual for future use.
SAFETY PRECAUTIONS
- To ensure the best safety of the device, regularly check it on damages and worn parts.
- If you pass on this device to another person or if you allow another person to use it, make sure that that person is familiar with the content and instructions in these instructions.
- Only one person should use the exerciser at a time. The maximum load of this device is 150 kg. Class: HA - not suitable for therapeutically use!
- Before the first use and regularly make sure that all screws, bolts and other joints are properly tightened and firmly seated.
- Before starting an exercise programme, consult your doctor to determine if you have any health or physical conditions that could compromise your health and safety or prevent you from using the machine properly. Your doctor's advice is essential if you are taking medication that affects your heart rate, blood pressure or cholesterol levels.
- Pay attention to your body's signals. Exercising incorrectly or excessively can damage your health. Stop exercising if you experience any of the following symptoms: pain, chest tightness, irregular heartbeat, shortness of breath, lightheadedness, dizziness or feeling nauseous. If you experience one or more of these symptoms, you should first consult your doctor before continuing with your exercise programme.
- Keep small children and pets away from the exercise equipment. Never leave children under 14 years of age unattended in a room with the machine.
- Parents and other guardians should be aware of their responsibility, as due to children's natural play instinct and eagerness to experiment, situations are to be expected for which training equipment is not built.
-
Set up the unit in a dry, level place and protect it from moisture. If you want to protect the place of installation against pressure marks, dirt, etc., we recommend that you place a suitable, non-slip base under the unit. Do not use the unit near water or outdoors.
-
Always use the unit as described in this manual. If you notice any defective parts when assembling or checking the unit, or if you hear unusual noises coming from the unit during exercise, stop using the unit immediately and do not use it again until the problem is solved. Contact the customer service.
- Always wear appropriate clothing and shoes which are suitable for your workout on the device. The clothes must be designed in a way so that they will not get caught in any part of the device during the work-out due to their form (for example, length). Be sure to wear appropriate shoes which are suitable for the work-out, firmly support the feet and which are provided with a non-slip sole.
- Make sure that you and other persons never place any parts of your body (e.g. fingers) in the area of moving parts. In addition, there should be no objects in the immediate vicinity that could interfere with the training process.
- To avoid physical injury and/or damage to the product or property, the unit must be lifted and moved properly.
- This unit is intended for indoor and home use only, it is not intended for commercial use!
- This appliance is intended for use and storage in cool, dry conditions. You should avoid storing it in extremely cold, hot or humid areas as this may cause corrosion and other related problems.
- Do not work out immediately after meals!
- After finishing the workout, first make sure that the flywheel is no longer in motion before stepping down from the machine.
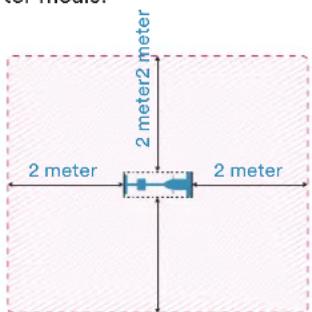
- Please only exercise with a minimum clearance area of 2 meters around the device.
Be sure to consult a physician before you start any device
text_image
2 meter 2 meter2 meter 2 meter 2 meterprogram. He may give you proper hints and advice with respect to the individual intensity of stress for you, your workout and sensible eating habits. This is especially important for individuals over the age of 35 or persons with pre-existing health problems.
SET-UP INSTRUCTIONS
Before you start assembling, we recommend that you find a place with sufficient free space and a flat surface for assembly.
Please check with the parts list whether all the necessary parts for assembly are present. Some parts may already be pre-assembled to make assembly easier.
We recommend using the enclosed tools to assemble the unit.
ATTENTION: The assembly may only be carried out hand-tight during installation. The screws should only be force-tightened once assembly is complete!
HARDWARE BAG:
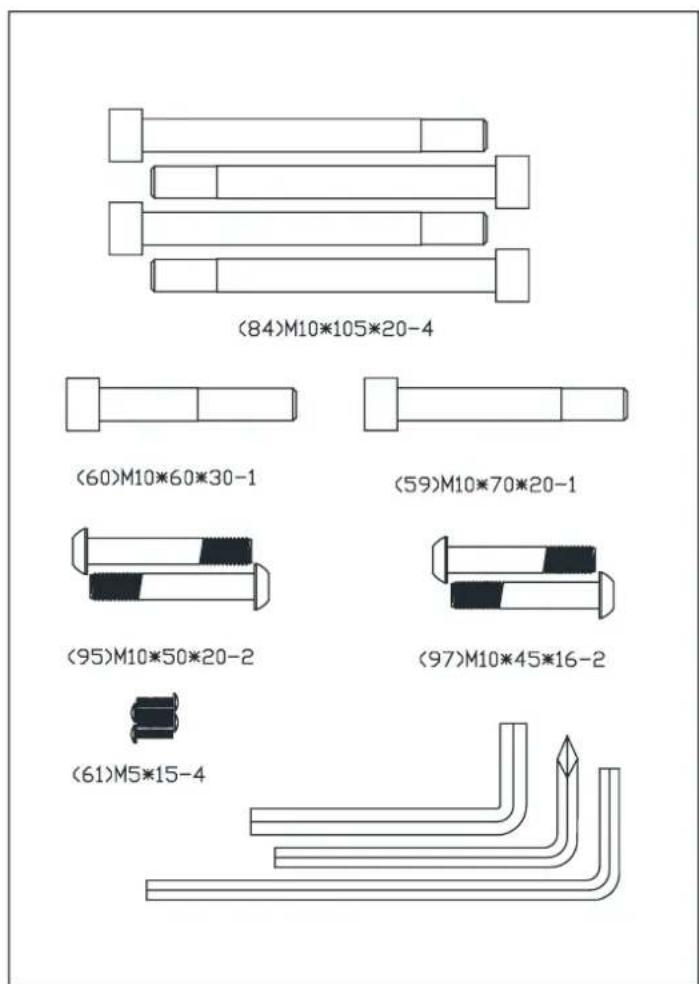
text_image
(84)M10*105*20-4 (60)M10*60*30-1 (59)M10*70*20-1 (95)M10*50*20-2 (97)M10*45*16-2 (61)M5*15-4| Part no. | Description Qty | |
| 59 | Hexagonal screw M10×70×20 1 | |
| 60 | Hexagonal screw M10×60×30 1 | |
| 61 | Screws M5×15 4 | |
| 84 | Hexagon head screws M10×105×20 4 | |
| 87 | Washers ø10 2 | |
| 95 | Hexagon head screws M10×50×20 2 | |
| 97 | Hexagon head screws M10×45×16 2 | |
| 3 x tool: Allen key set |
STEP 1
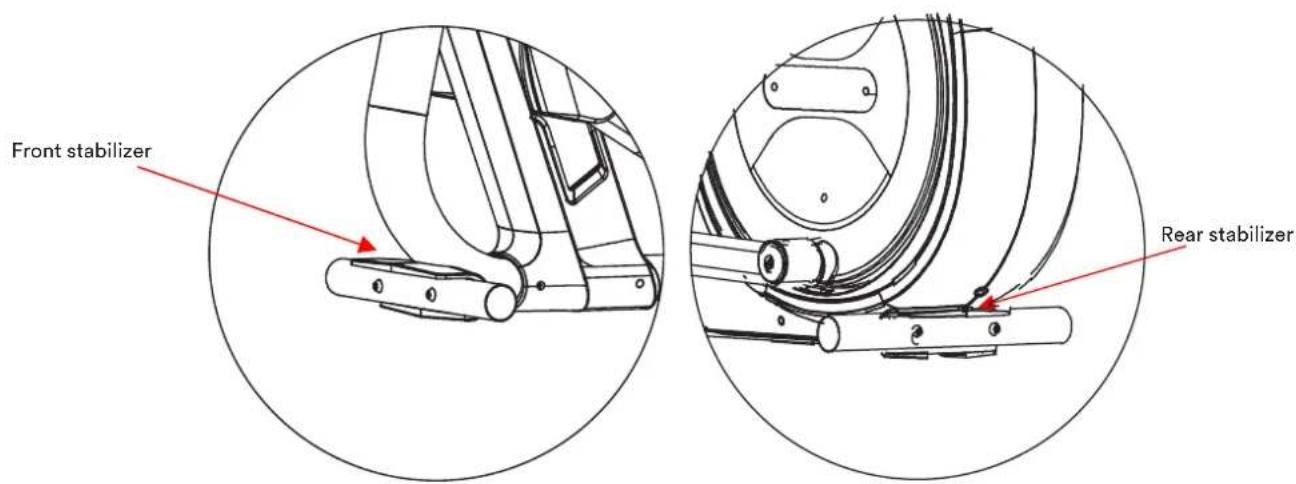
a) Remove the front stabilizer (2) from the packaging and fit it to the front end of the main frame (1) using 2 screws (84) as shown.
b) Proceed in the same way with the rear stabilizer (3).
text_image
Front stabilizer Rear stabilizer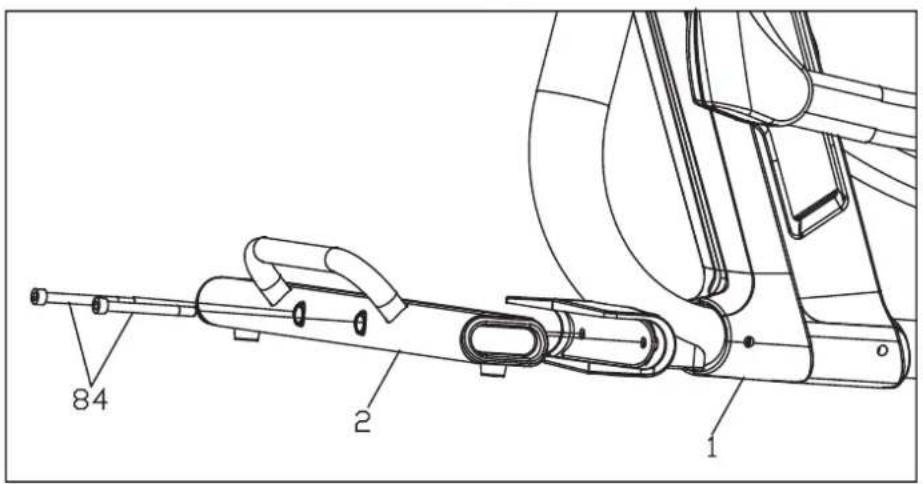
text_image
84 2 1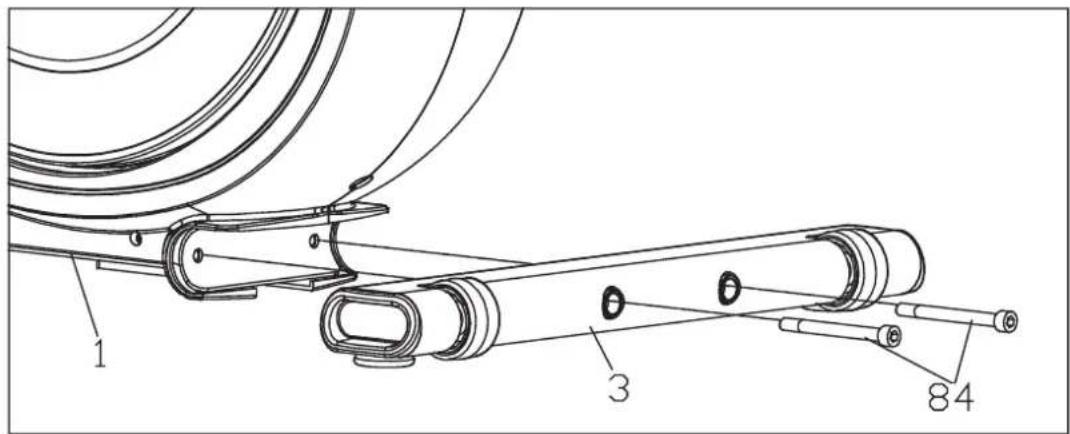
text_image
1 3 84STEP 2
Now bring the handle support (4) into an upright position as shown and secure it first with the M10×70×20 screw (59) and then with the M10×60×30 screw (60).
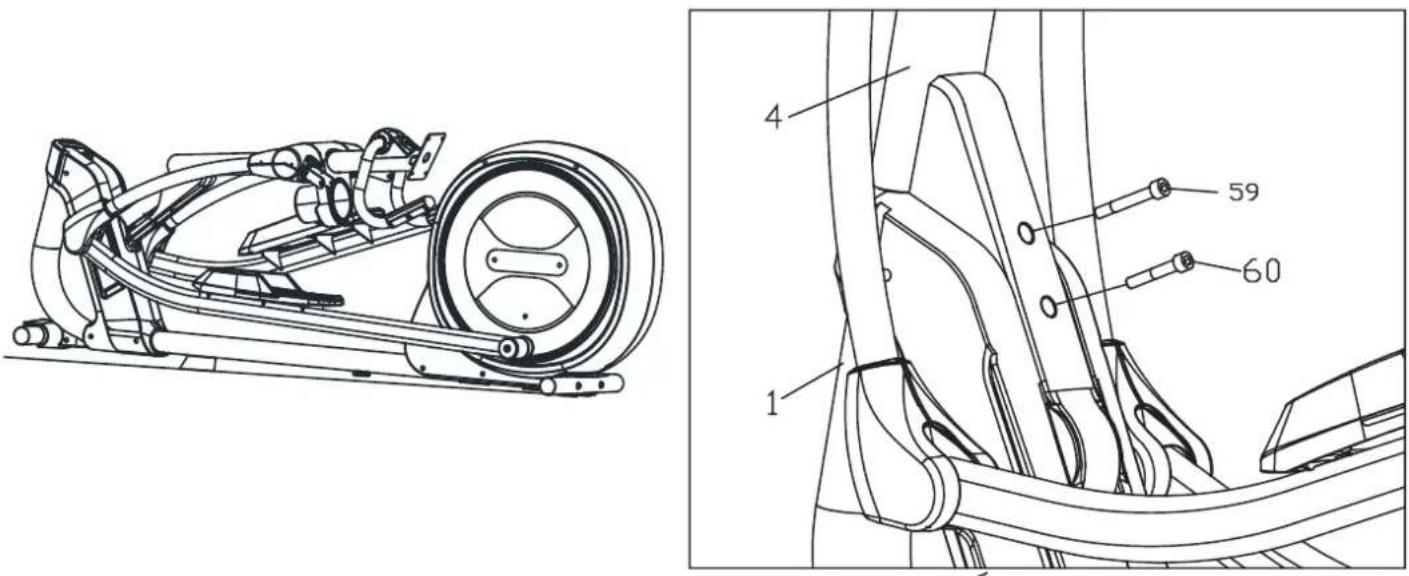
text_image
Technical diagram of a vehicle chassis with labeled components and parts, including numbered parts 1, 4, and 59.STEP 3
Now fit the two handles (9 and 10) as shown using the M10×45×16 screws (97) and washers (87), as well as the M10×50×20 screws (95). Slide the two covers (54) over the screw connections on the right and left.
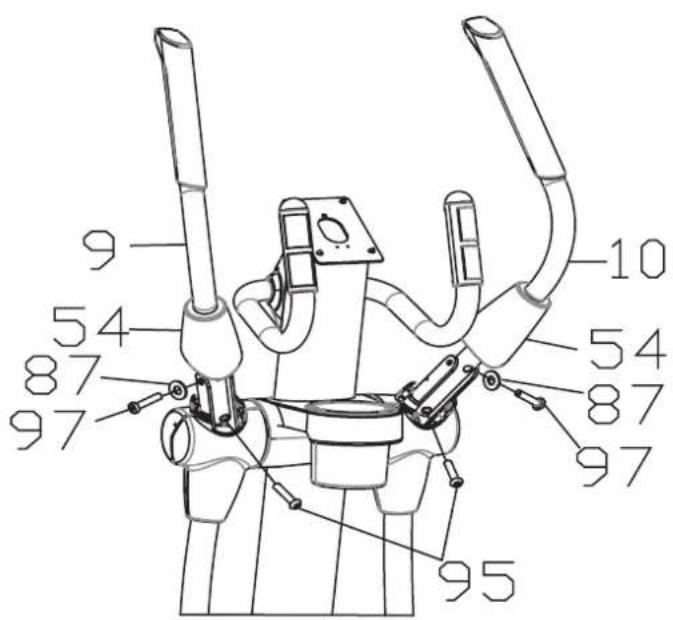
text_image
9 54 87 97 10 54 87 97 95STEP 4
Make the cable connections as shown and then fasten the computer (15) according to the drawing using 4 M5×15 screws (61).
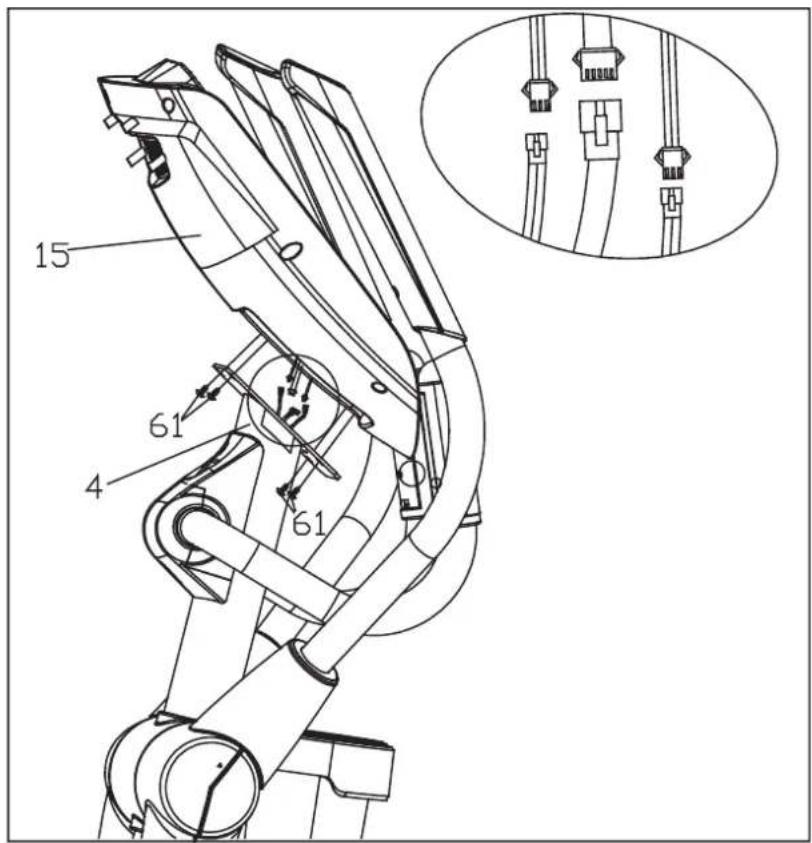
text_image
15 61 4 61STEP 5
Mount the iPad holder on the back of the computer (15) using 4 ST4×16 screws as shown.
This completes the assembly. Check again that all connections are tight, level the device on the floor (the feet can be adjusted if necessary) and connect the device to the power supply.
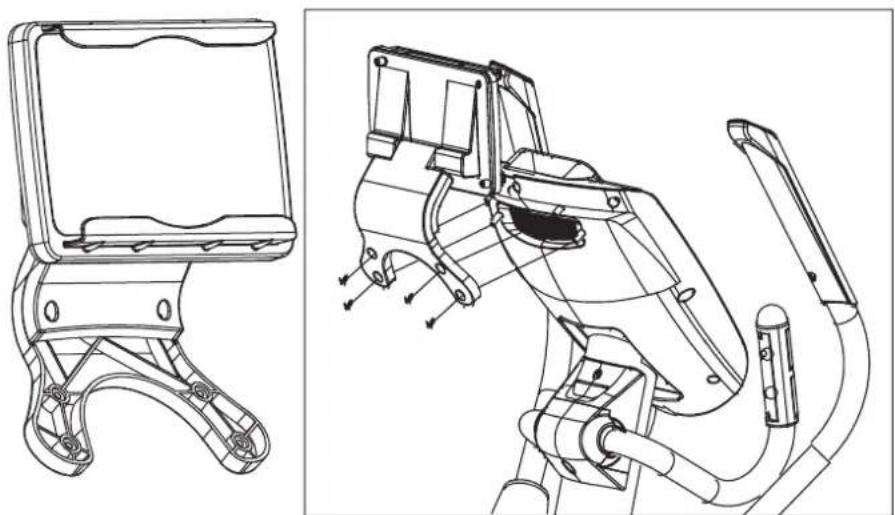
natural_image
Technical line drawing of a robotic device with articulated limbs and control panel (no text or symbols)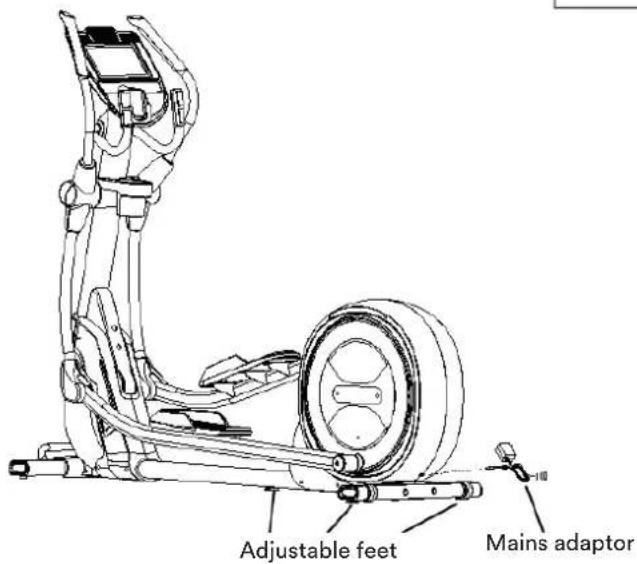
text_image
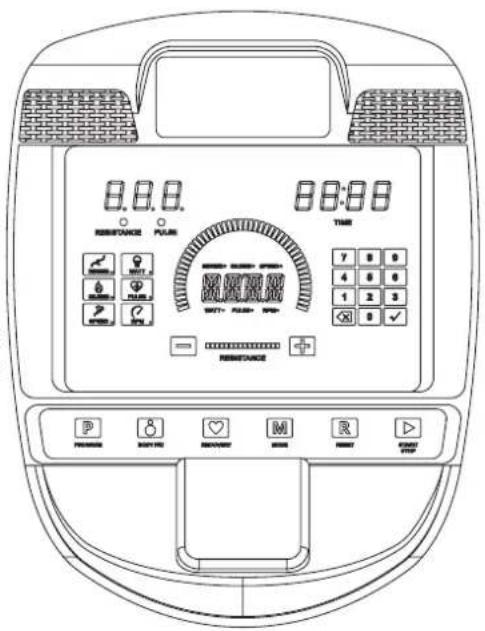
Adjustable feet Mains adaptorDISTANCE: Display of distance (0.0-999.9 km)
CALORIES: Display of burned calories (0.0-9999 kcal)
PULSE: Display of the heart rate. To enable this function, you must grasp the pulse sensors or wear a suitable chest strap. This value is not suitable for medical assessment of the heart rate (40-240 beats/min.)
RPM: Rounds per minute (0-230 rpm)
WATT: Display of Watt (0-999 W)
RESISTANCE: Display of the selected tension level (1-32)
text_image
8:00 8:00 TIME OFFICE PULSE 7 8 0 4 6 0 1 2 3 OK ✓ OFFICE +Operation modes:
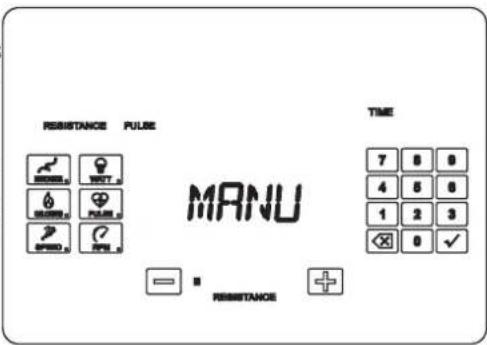
MANUAL: Manual training (resistance must be adjusted manually)
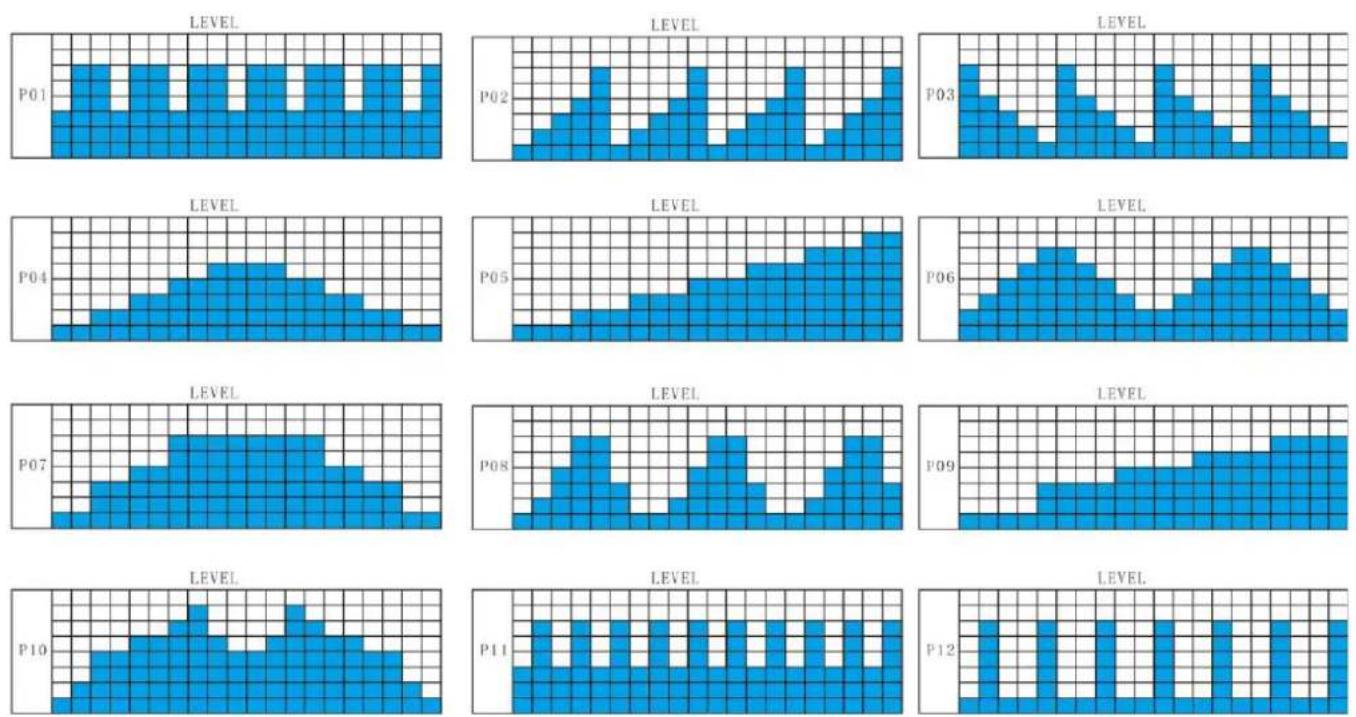
P01-P12: Programme training according to predefined profiles (resistance adjustment is automatic, but can be readjusted manually)
WATT: Workout depending on watt preset value
HRC (H01-H03): Training according to heart rate target (55% / 75% / 95% of the calculated maximum heart rate)
TAG (H04): Training according to heart rate specification (target heart rate is entered manually)
U01-U03: Training according to user-definable programmes
BODY FAT: Measurement of body fat, BMI and BMR (basal metabolic rate)
RECOVERY: Measurement of the heart recovery rate
BLUETOOTH: Connection to KINOMAP app
Kabellose Pulsmessung: The heart rate can also be measured wirelessly via an optional chest belt.
Further details and precise operation are explained on the following pages.
Button functions:
+: The „+“ button is used to adjust the resistance (increase) and to adjust the gender when measuring body fat, as well as to increase the wattage setting in watt mode.
-: The „-“ button is used to adjust the resistance (reduce) and to adjust the gender when measuring body fat, as well as to reduce the wattage setting in watt mode.
DISTANCE / WATT / CALORIES / PULSE / SPEED / RPM: The respective function value is shown in the display by pressing these buttons.
Zahlentasten-Block: This keypad is used to enter values directly, e.g. for the target value specification. Pressing „X“ removes the last entry and „√” confirms the entry.
PROGRAM: This button is used to select the operating mode.
BODYFAT / RECOVERY: Perform body fat or heart recovery rate measurement.
MODE: Press to enter target values.
RESET: Execute a reset.
START/STOP: Press to start or stop a workout.
MANUAL WORKOUT
Press START/STOP to start training. You can also set target values before starting training (with MODE and the numeric keypad for the training time / distance / calories or heart rate functions).
During training, you can adjust the resistance with „+“ and „-“. If target values have been entered, an acoustic signal sounds when they are reached - if a pulse target value has been set, a signal sounds when the value is exceeded.
Press START/STOP to end the training session.
text_image
RESISTANCE PULSE MANU TIME 7 8 9 4 6 8 1 2 3 × 0 ✓ RESISTANCEPROGRAM TRAINING (P01-P12)
Press „Program“ and select one of the programmes below (P01-P12). Then press START/STOP. During training, you can adjust the resistance with „+“ and „-“.
Press START/STOP to end the training programme.
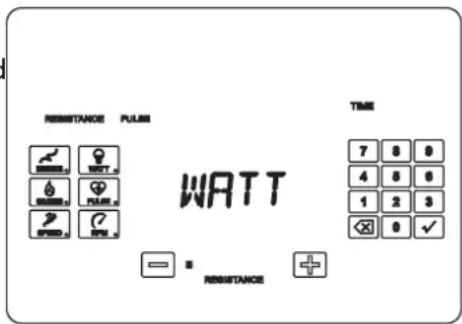
WORKOUT DEPENDING ON WATT PRESET VALUE
Press „Program“ and select „WATT“. You can now set a watt target (and other targets using „MODE“ and the numeric keypad for the training time / distance / calories or heart rate functions).
Press START/STOP to start training.
The resistance is now automatically adjusted to achieve the set watt value as accurately as possible.
Press START/STOP to end the training session.
text_image
RESISTANCE PULSE WATT TIME 7 8 0 4 5 0 1 2 3 × 0 ✓ RESISTANCETRAINING ACCORDING TO HEART RATE (HEART RATE-CONTROLLED MODE)
Press „Program“ and select „H01“ (55%), „H02“ (75%) or „H03“ (95%). The percentages indicate the value of the pulse rate from the maximum pulse rate. The maximum heart rate is calculated as follows: 220 - age.
You can also set target values before starting training (with MODE and the numeric keypad for the training time / distance / calories or heart rate functions).
Press START/STOP to start training.
The resistance is now automatically adjusted to achieve the set heart rate target value as accurately as possible. This means that the load resistance is reduced if your heart rate is above the target value. If your heart rate falls below the target value, the load resistance is increased to ensure that you maintain a relatively constant heart rate.
You must wear the hand pulse sensors (or a suitable, optional chest strap - see corresponding chapter) during the entire workout so that the computer can monitor your heart rate. Press START/STOP to end the training session.
For your information, here are a few examples of different load levels based on the heart rate level and their training effect:
| % of the maximum heart rate | Movement example Effect on | your workout |
| 50 - 60 % Jogging | with regular breathing Beginner cardio | training, hardly any fat loss,good as an everyday balance |
| 60 - 70 % Pleasant | tempo, deeper breathing,talking possible | Basic training for cardiovascular health, good body fat loss, low carbohydrate consumption |
| 70 - 80 % Moderate | speed, talking hardlypossible | Improvement of aerobic capacity, endurance training, ideal cardiovascular fitness training, average fat loss, high carbohydrate requirement |
| 80 - 90 % Very fast running | running, some breathingproblems | Increase in anaerobic capacity and personal performance, hardly any fat loss, high carbohydrate requirement |
| 90 - 100 % Sprint | not sustainable for a long time Improvement of anaerobic capacity and muscle tolerance, increase in strength, maximum carbohydrate breakdown, no fat loss |
TAG: WORKOUT WITH PRE-SET PULSE VALUE
Press „Program“ and select „H04“ - „TAG“ appears on the display.
You can set further target values in addition to the heart rate value before starting training (with MODE and the numeric keypad for the training time / distance / calories or heart rate functions).
Press START/STOP to start training.
The resistance is now automatically adjusted to achieve the set heart rate target value as accurately as possible. This means that the load resistance is reduced if your heart rate is above the target value. If your heart rate falls below the target value, the load resistance is increased to ensure that you maintain a relatively constant heart rate.
You must wear the hand pulse sensors (or a suitable, optional chest strap - see corresponding chapter) during the entire workout so that the computer can monitor your heart rate. Press START/STOP to end the training session.
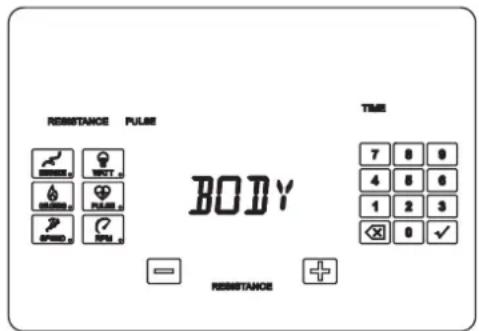
BODY FAT MEASUREMENT
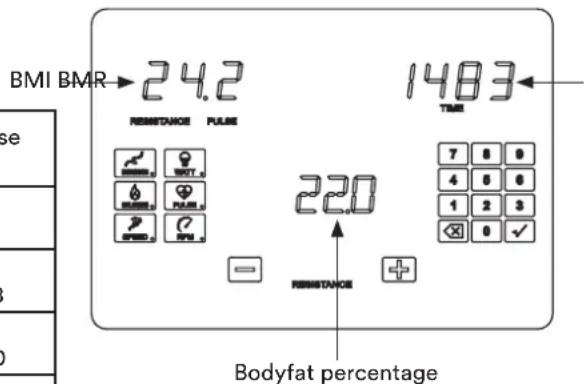
Press „Body Fat“ and set the required values for Sex (gender, M=male & F=female), Height (height), Weight (body weight) and Age (age). Press START/STOP to start the measurement. Keep your hands on the hand pulse sensors. After approx. 10 seconds, the values for BMI (body mass index), body fat percentage and BMR (basal metabolic rate in kcal) will appear.
After completing the measurement, press START/STOP to finish or „P“ to return to manual mode.
text_image
RESISTANCE PULSE BODY TIME 7 8 9 4 5 6 1 2 3 × 0 ✓ RESISTANCERefer to the tables below to categorise the results.
BMI VALUE:
| Sex / Age | Thin Normal Over-weight | Strong over-weight | Obese | ||
| male ≤ 30 <14 | 14-20 20.1 | -25 25.1-35 | >35 | ||
| male >30 | <17 | 17-23 | 23.1-28 | 28.1-38 | >38 |
| female ≤ 30 | <17 | 17-24 | 24.1-30 | 30.1-40 | >40 |
| female >30 | <20 | 20-27 | 27.1-33 | 33.1-43 | >43 |
text_image
BMI BMR → 24.2 RESISTANCE PULSE 1483 TIME 22.0 7 8 0 4 5 6 1 2 3 × 0 ✓ RESISTANCE Bodyfat percentageBODYFAT VALUE:
| low | medium | high | very high | |
| male | <13% | 13% - 25.9% | 26% - 30% | >30% |
| female | <23% | 23% - 35.9% | 36% - 40% | >40% |
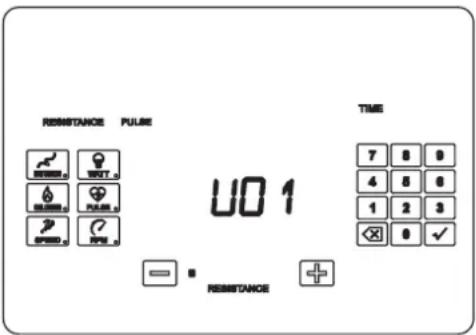
U01-U03: USER-DEFINABLE PROGRAMMES
Similar to programme training (P01-P12), you can also train according to profiles you have created yourself. You have the option of programming up to 3 different profiles. To do this, select „U01“, „U02“ or „U03“. If a programme has already been saved, you can use START/STOP to train according to this profile. If no programme has been saved or if you want to change the saved programme, press „MODE“ instead. You can then set a total of 20 segments of the programme profile individually with „+“ and „-“ (in addition to other possible target values). Once programming is complete, the computer automatically exits these settings or you can also press START/STOP.
text_image
RESISTANCE PULSE UO 1 TIME 7 8 9 4 5 6 1 2 3 × 0 ✓ RESISTANCEYou can then train according to this profile. During training, you can adjust the resistance with „+“ and ”-“.
Press START/STOP to end the training session.
HEART RECOVERY MEASUREMENT
With this special function, it is possible to determine the heart recovery rate after training, which is an indicator of the athlete's athletic and physical condition. The better the heart recovery rate (i.e. the faster the heart rate recovers to the normal heart rate), the „fitter“ the athlete is. After you have completed the workout, keep your hands on the hand pulse sensors (clasp them to ensure the best possible contact) or wear a compatible chest strap. Now press the „RECOVERY“ button. Wait 60 seconds while the computer continuously measures your heart rate. After the time has elapsed, your assessed heart recovery rate will be displayed on the computer with a scale from 1.0 (F1) to 6.0 (F6). To exit this mode, press „RECOVERY“ again.
The best way to improve your rate is to train regularly at F1! Training should always be carried out at a heart rate between 120 - 160 beats/minute.
| F1=1.0 excellent | |
| 1.0 < F2 <2.0 very good | |
| 2.0 < F3 <2.9 good | |
| 3.0 < F4 <3.9 normal | |
| 4.0 < F5 <5.9 insufficient | |
| F6=6.0 bad |
AUTO ON/OFF
If there is no training or operation for approx. 4 minutes, the computer automatically switches to standby mode to save power. Press any button or start training to wake up the computer again.
Using a chest-belt
The computer is equipped with a built-in receiver for the wireless receipt of the pulse frequency with a compatible, optionally available SKANDIKA chest-belt (frequency: 5.3 kHz). Recommended range: 100 - 150 cm.
If you want to transmit your pulse frequency via chest-belt, follow these instructions:
- Make sure, the correct battery is inserted into the chest belt (button cell of type CR-2032, 3 volts). Battery replacement: Open the battery case cover on the back side of your transmitter (you may use a coin for easier handling) and replace the old battery by a fitting new one. The „+“ symbol should point upwards. Make sure, the sealing ring is correctly placed. Close the case cover properly.
- The transmitter needs to be attached to the belt with the 2 buttons. Moisten the electrodes slightly before wearing the belt. This increases the contact sensibility and enables a better wireless signal transmitting.
- Put on the chest belt and make sure the electrodes are touching your breast directly. You may adjust the belt to a comfortable length. However, the electrodes must have contact with your skin in order to measure your heart rate correctly.
- The 5.3 kHz-chest-belt communicates with the computer via the built-in receiver. It may last up to one minute before a correct display can be seen.
Safety hint:
Do not use the chest-belt if you have a pacemaker, unless you double-checked with the producer of the pacemaker and with your doctor!
Battery-Disposal:
Batteries should not be considered as regular garbage. As consumer you are obliged to return finished batteries. The finished batteries can be returned to a collection base at your residential area or at places, where batteries can be bought.
ERROR MESSAGES
Error message E1/E2:
Motor fault, cable connection not OK or no control signal on the computer.
Motor could be wired incorrectly, check all cables from the motor to the computer.
Error message Err / no pulse display:
The computer cannot recognise the heart rate signal. Capture the hand pulse sensors as completely as possible (or wear the optional chest-belt if necessary). The wiring of the sensors may not be correct.
No display:
No power supply or wiring faulty. Please check all cable connections and whether the adapter has been plugged into the socket and is connected to the appliance.
No speed or rpm display:
The sensor cable may not be correctly connected to the computer or the sensor may be defective.
If you cannot solve the above problems, please contact customer service.
WARM-UP and COOL-DOWN
A successful exercise program consists of a warm-up, aerobic exercise and a cool-down. Exercise for at least two or preferably three times a week, resting for a day between workouts. After several months, you may increase the frequency to four or five times per week.
Warm-Up
This stage helps to improve the blood circulation and prepares the muscles for your workout. It additionally helps to reduce the risk of injury or cramps. It is recommended to do some stretching exercises as shown here below. Hold each stretching position for approximately 30 seconds. Never force or jerk yourself into a stretching position – if you feel pain, STOP immediately. Warm-up exercises may also include brisk walking, jogging, jumping jacks, jump rope exercises or running in place.
Stretching
Muscles can be stretched more easily when these are warm. This reduces the risk of injury. DO NOT BOUNCE.
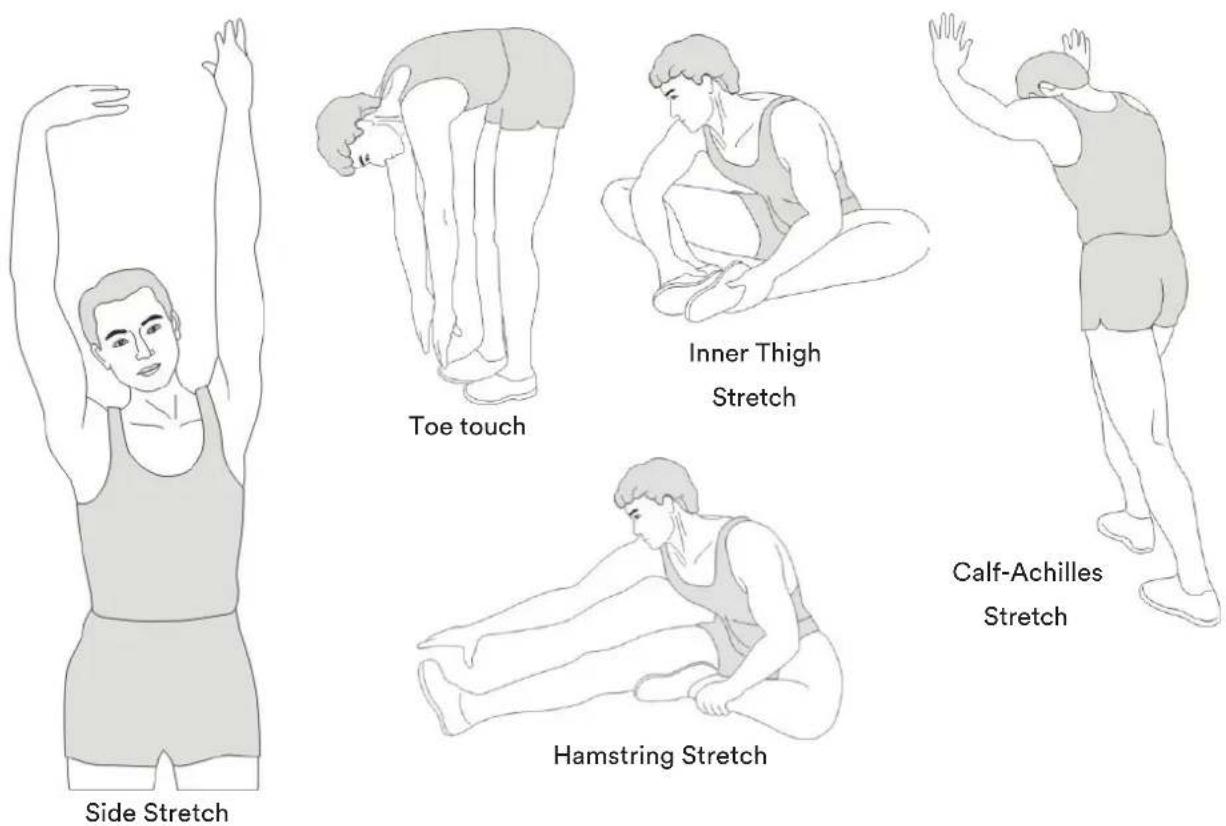
Remember always to check with your physician before starting any exercise program.
Cool-Down
This stage helps to soothe your muscles and your cardiovascular system after your workout.
At the end of your workout, reduce the speed and exercise for approximately 5 minutes at this lower speed level. Afterwards, repeat the warm-up exercises as described above.
KINOMAP
The device computer can be connected to the „KinoMap“ app via Bluetooth (frequency: 2.4 GHz). The free KinoMap app turns your device into a powerful and fun fitness product! Choose from the geotagged video on Kinomap and go! Your position is shown in the video and as icon on the map. Download the Kinomap Fitness app in the app or play store by searching for ‘Kinomap Fitness’ or follow one of the links below.
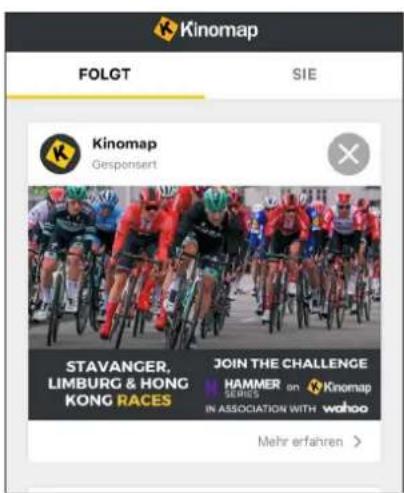
Install and open the app and register resp. log in. Activate Bluetooth. Now add the training device as follows:


text_image
Suchen Kinomap Kinomap SAS ACTUALSENSES 4.3 ★★★★☆ P53 4+ 4000000000000000000000000000000000000000000000000000000 Neue Funktionen Thanks for training on Kinomap. Our daily concern is offering you the best experience there is. Version:verlauf Ver 1 W Version 8.4.76 Vorschau
text_image
Kinomap FOLGT SIE Kinomap Gesponsert STAVANGER, LIMBURG & HONG KONG RACES JOIN THE CHALLENGE HAMMER SERIES in ASSOCIATION WITH wahoo Mehr erfahren >-
- Tap on „+“ 3. Crosstrainer
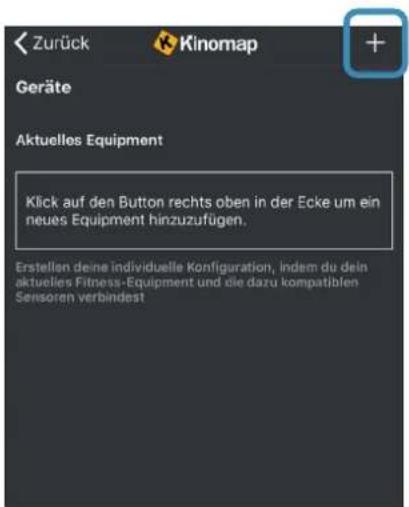
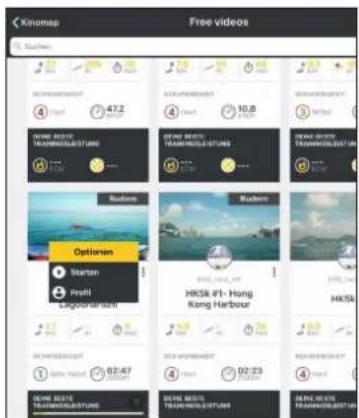
Now tap on OK and return to main menu. You can now choose a course for your exercise (depending on your type of KinoMap account maybe only some free courses). Press Start and begin to exercise!
text_image
Kinomap Free videos Suehens 47.2 10.8 Options Starten Insti Ligordianer HKS& #1- Hong Kong Harbour HKS& 02:47 02:23 02:15 02:15 02:15 02:15 02:15 02:15 02:15
text_image
Technical diagram of a vehicle's internal components with numbered parts, likely an electric scooter or motor assembly.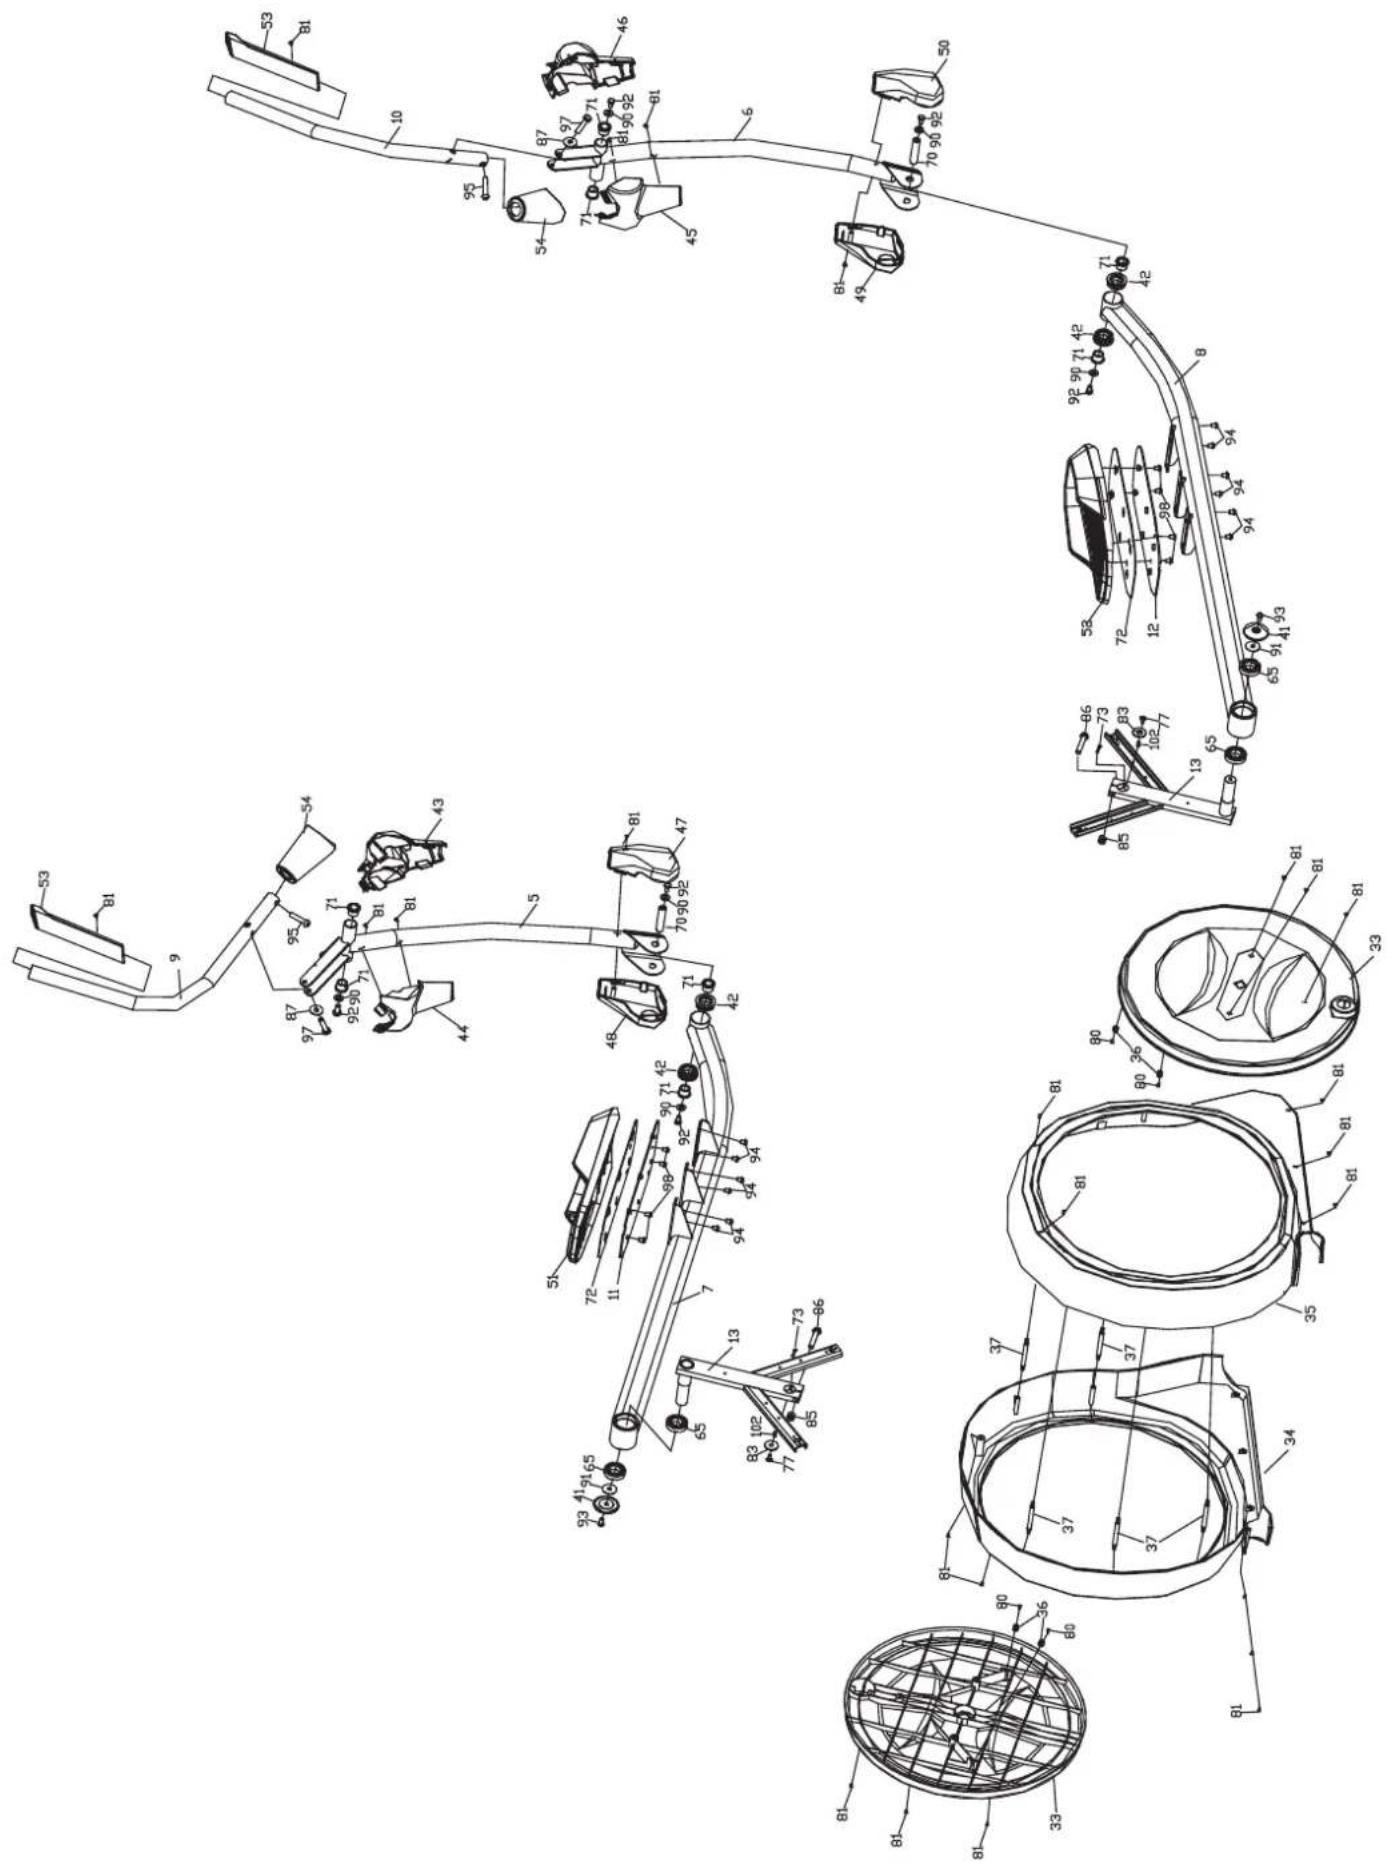
text_image
Technical diagram of a mechanical assembly with numbered components and labeled parts, likely from an engineering or manufacturing document.| Part no. | Description Specification Qty | ||
| 1 Main Frame 1 | |||
| 2 Front Stabilizer 1 | |||
| 3 Rear Stabilizer 1 | |||
| 4 Upper Upright Post 1 | |||
| 5 Lower Sway Bar Group Left 1 | |||
| 6 Lower Sway Bar Group Right 1 | |||
| 7 Left Foot Pedal Tube Set 1 | |||
| 8 Right Foot Pedal Tube Set 1 | |||
| 9 Left Upper Handrail Tube Set | 1 | ||
| 10 | Right Upper Handrail Tube Set | 1 | |
| 11 | Left Foot Pedal Fixing Plate | 1 | |
| 12 | Right Foot Pedal Fixing Plate | 1 | |
| 13 | Crank Square Iron Group | 2 | |
| 14 | Pinch Roller Set | 1 | |
| 15 | Console | 1 | |
| 16 | Handle Pulse Wire | L-800mm | 2 |
| 17 | Communication Wire 1 (Main Frame) | L-1900mm | 1 |
| 18 | Communication Wire 2 (Upright Post) | L-1250mm | 1 |
| 19 | Power Communication line | L-300mm | 1 |
| 20 | Magnetic Induction Line | L-400mm | 1 |
| 21 | Handle Pulse Set | cylindrical length 133 | 2 |
| 22 | Pulse Tube Lower Cover | 130×127×58 | 1 |
| 23 | Pulse Tube Upper Cover | 122×108×73 | 1 |
| 24 | Front Cover of Cup Holder Frame | 186×109×58 | 1 |
| 25 | Cup Holder Frame | 133.6×95×107.6 | 1 |
| 26 | Cup Holder | ø125×125 | 1 |
| 27 | Rubber Plug | ø9×ø6.1×27 | 8 |
| 28 | Middle Part of Front Cover | 403.7×32.6×110.9 | 1 |
| 29 | Left Part of Front Cover | 674×219×82 | 1 |
| 30 | Right Part of Front Cover | 674×219×82 | 1 |
| 31 | Front Stabilizer Trim Cover Left | 163×120×75 | 1 |
| 32 | Front Stabilizer Trim Cover Right | 163×123×75 | 1 |
| 33 | Disc | ø568×49.5 | 2 |
| 34 | Chain Cover Left | 741×707×110 | |
| 35 | Chain Cover Right | 741×707×110 | 1 |
| 36 | Turning Disc Rubber Buckle | ø12.4×13 | 4 |
| 37 | Long Rubber Plug | ø9×ø5.9×100 | 5 |
| 38 | Shaft Sleeve 1 | ø44.5×19.9 | 1 |
| 39 | Shaft Sleeve 2 | ø30×3.2 | 1 |
| 40 | Shaft Sleeve 3 | ø30×16.2 | 1 |
| 41 | Crank Cover | ø57.2×6.7 | 2 |
| 42 | Bushing | ø22.66×ø40.59×14.3 | 4 |
| 43 | Left sway bar upper rear trim cover | 216.9×118.2×85.6 | 1 |
| 44 | Left sway bar upper front trim cover | 204.9×118.2×71.1 | 1 |
| 45 | Right sway bar upper front trim cover | 204.9×118.2×71.1 | 1 |
| 46 | Right sway bar upper rear trim cover 216.9×118.2×85.6 | 1 | |
| 47 | Left sway bar lower interior trim cover | 160.8×112.8×58.9 | 1 |
| 48 | Left sway bar lower exterior trim cover | 160.8×112.8×46.9 1 | |
| 49 | Right lower interior trim cover | 160.8×112.8×58.9 | 1 |
| 50 | Right lower exterior trim cover | 160.8×112.8×46.9 | 1 |
| 51 | Pedal Left | 450.5×185.2×70.2 | 1 |
| 52 | Pedal Right | 450.5×185.2×70.2 | 1 |
| 53 | Handrail Tube Rubber Sleeve | 296.9×41.5×49.3 2 | |
| 54 | Armrest Cover | 85.4×127.3 | 2 |
| 55 | Magnetic Induction Mount | 1 | |
| 56 | Foot Pad (E10-76) | ø47×10.5×M10×22 | 3 |
| 57 | Round Pipe Plug | ø32×t1.5 | 2 |
| 58 | Tapered Feet Pad | ø26.92×ø23.8×ø5×12.7 | 2 |
| 59 | Hexagonal screw | M10×70×20 | 1 |
| 60 | Hexagonal screw | M10×60×30 | 1 |
| 61 | Screws M5×15 4 | ||
| 62 | Belt Pulley Shaft Group E31/∅108×184.53 1 | ||
| 63 | Belt Pulley (E28-97) ∅381×22.2 1 | ||
| 64 | Internal Magnetic Flywheel Set ∅302×40×∅32.5×31 1 | ||
| 65 | Deep Groove Ball Bearings 6005ZZ 6 | ||
| 66 | Magnetic Motor | 6V 1 | |
| 67 | Brake Cable | ∅5×∅1.2×M6 | 1 |
| 68 | Motor Belt | 520PJ6 | 1 |
| 69 | Upright Post Connecting Axis | ∅15.85×69.5 | 1 |
| 70 | Lower Sway Bar Connecting Axis | ∅15.85×71.81 | 2 |
| 71 | Powder Metallurgy Sleeve | ∅15.92×∅22.6×15.08 | 8 |
| 72 | Pedal Plate EVA | 393×160×t2.0 | 2 |
| 73 | Hexagon Head Bolt | M4×20 | 2 |
| 74 | Hexagon Head Bolt | M6×20 1 | |
| 75 | Phillips Truss Head Step bolt | M6×4.5×16.5 | 1 |
| 76 | Hexagon Head Step Bolt | M6×20 1 | |
| 77 | Hexagon Socket CSK Flat Head bolt | M6×15 2 | |
| 78 | Hexagon Head Bolt | M8×20 | 4 |
| 79 | Hexagon Head Bolt | M10×40 | 1 |
| 80 | Phillips Pan Head Forming Screw | ST4×10 | 4 |
| 81 | Phillips Truss Head Self Tapping Screw | ST4×16 | 52 |
| 82 | Flat washer | ∅6×∅20×t2.0 | 1 |
| 83 | Flat washer | ∅8×∅30×t3.0 | 2 |
| 84 | Hexagon head screws | M10×105×20 | 4 |
| 85 | Hexagon Lock Nut | M10 | 2 |
| 86 | Hexagon Head Bolt | M10×55×20 | 2 |
| 87 | Flat Washer | ∅10 | 4 |
| 88 | Hexagon Head Bolt | M10×20 | 2 |
| 89 | Phillips Pan Head Self Tapping Screw | ST3×25 | 4 |
| 90 | Flat washer | ∅8.5×∅20×t1.5 | 6 |
| 91 | Flat washer | ∅32×∅8.5×t2.0 | 2 |
| 92 | Hexagon Head Bolt | M8×15 6 | |
| 93 | Hexagon Socket Pan Head Step bolt | M8×∅10.4×17×4.3 | 2 |
| 94 | Hexagon Socket Head Cap bolt | M8×10 | 12 |
| 95 | Hexagon head screws | M10×50×20 | 2 |
| 96 | Hexagon Socket Pan Head bolt | M10×60×20 | 2 |
| 97 | Hexagon head screws | M10×45×16 | 2 |
| 98 | Hexagon Socket Pan Head bolt | M6×12 | 8 |
| 99 | Hexagon Lock Nut | M8 | 4 |
| 100 | Back Wheel | ∅63.5×35.7 | 2 |
| 101 | Oval End Cap | 50×100×t3.0 | 4 |
| 102 | Flat Key | 5×5×15 | 2 |
| 103 | Adaptor | DC9V/1.0/1.5A | 1 |
We reserve the right to make technical and design changes in the course of continuous product improvement.
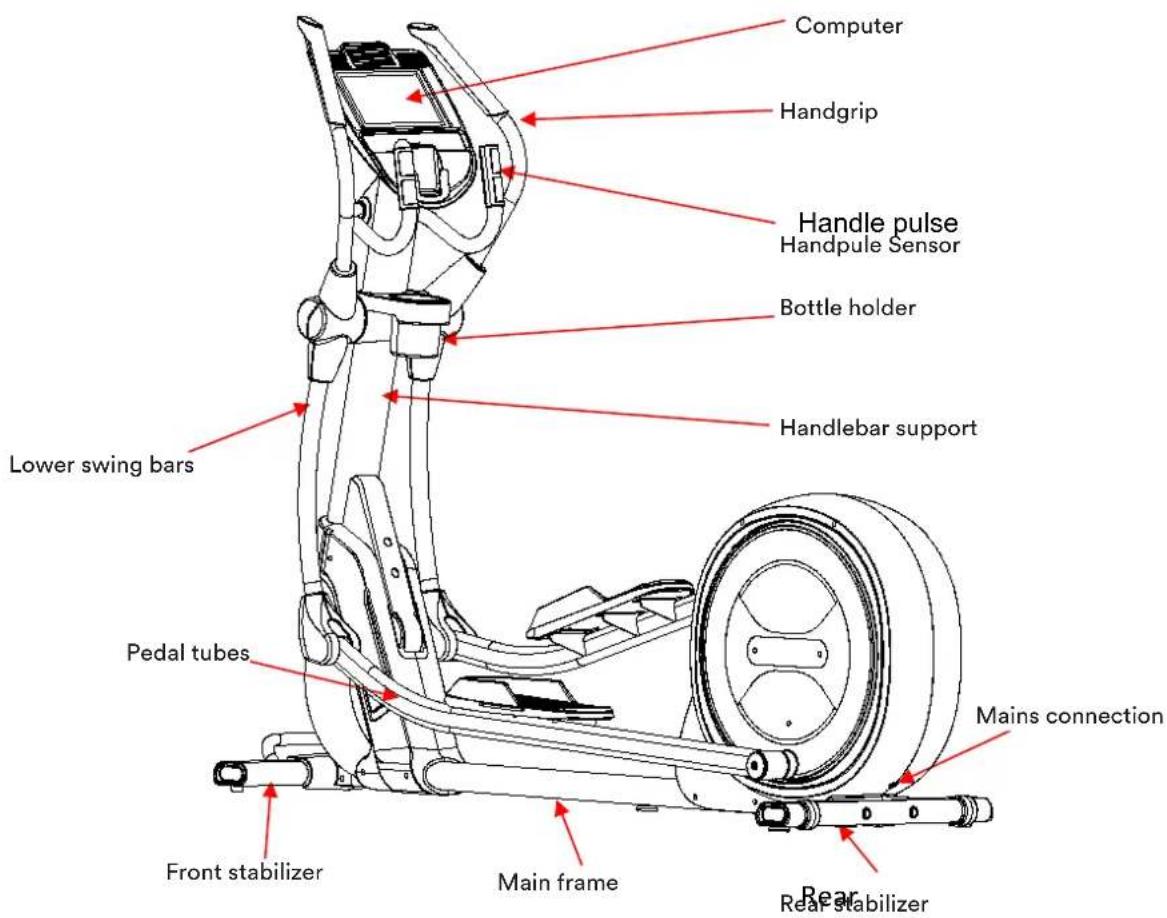
ASSEMBLIES:
text_image
Computer Handgrip Handle pulse Handpule Sensor Bottle holder Handlebar support Lower swing bars Pedal tubes Front stabilizer Main frame Mains connection Rear Rear StabilizerTECHNICAL SPECIFICATIONS
Article number: SF-3300
Dimensions assembled approx.: 2005 × 635 × 1645 mm
Speed ratio: 381:32.5
Flywheel: ∅304 mm
Resistance levels: 1-32
stride length: 19 inch (48 cm)
GUARANTEE CONDITIONS
For our devices we provide a warranty as defined below.
- In accordance with the following conditions (numbers 2-5) we repair defect or damage to the device free of charge, if the cause is a manufacturing defect. Therefore, these defects / damages need to be reported to us without delay after appearance and within the warranty period of 24 months after delivery to the end user. The warranty does not cover parts, which easily break (e.g. glass or plastic). The warranty does not cover slight deviations of the product, which are insignificant for usability and value of the device and damage caused by chemical or electrochemical effects and damages caused by penetration of water or generally force majeure damage.
- The warranty achievement is the replacement or repair of defective parts, depending on our decision. The cost of material and labor will be borne by us. Repairs at customer site cannot be demanded. The proof of purchase along with the date of purchase and / or delivery is required. Replaced parts become our property.
- The warranty is void if repairs or adjustments are made,
which are not authorized by us or if our devices are equipped with additional parts or accessories that are not adapted to our devices. Furthermore, the warranty is void if the device is damaged or destroyed by force majeure or due to environmental influences and in case of improper handling / maintenance (e.g. due to non-observance of the instruction manual) or mechanical damages. The customer service may authorize you to replace or repair defective parts after telephone consultation. In this case, the warranty is not void.
- Warranty services do not extend the warranty period nor do they initiate a new warranty period.
- Further demands, especially claims for damages which occurred outside the device, are excluded as long as a liability is not obligatory legal.
- Our warranty terms - which cover the requirements and scope of our warranty conditions - do not affect the contractual warranty obligations of the seller.
- Parts of wear and tear are not included in the warranty.
- The warranty is void if not used properly or if used in gyms, rehabilitation centers and hotels. Even if most of our units are suitable for a professional use, this requires a separate agreement.
ENVIRONMENTAL PROTECTION
At the end of its life cycle, this product must not be disposed of with household waste but must be taken to a collection unit for the recycling of electric and electronic equipment. The symbol on the product, the instructions for use or the packaging express mention of this. The basic materials can be recycled as specified on the labelling.
When recycling the materials and finding other utilisation for used equipment, you are making a significant contribution towards protecting our environment. Ask at your council about the respective local disposal sites.
In accordance with our policy of continual product improvement, we reserve the right to make technical and visual changes without notice.
Contenu
skandika.com/service
text_image
Technical diagram of a mechanical assembly with labeled parts, including numbered components 1, 4, and 59.ÉTAPE 3
natural_image
Line drawing of a mechanical device with a rectangular frame and articulated legs (no text or symbols)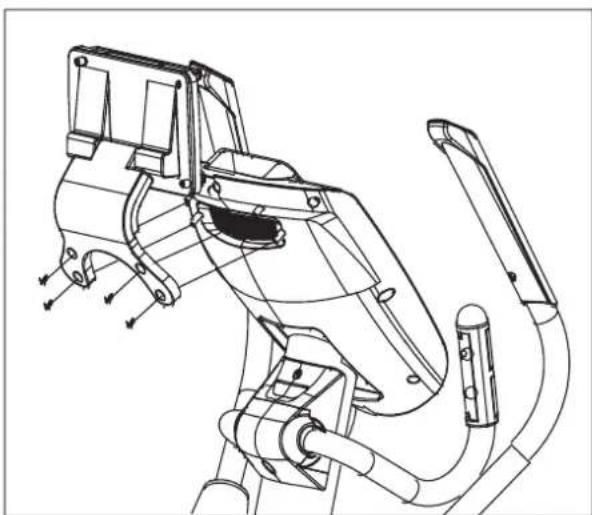
natural_image
Technical line drawing of a mechanical device with hoses and components (no text or symbols)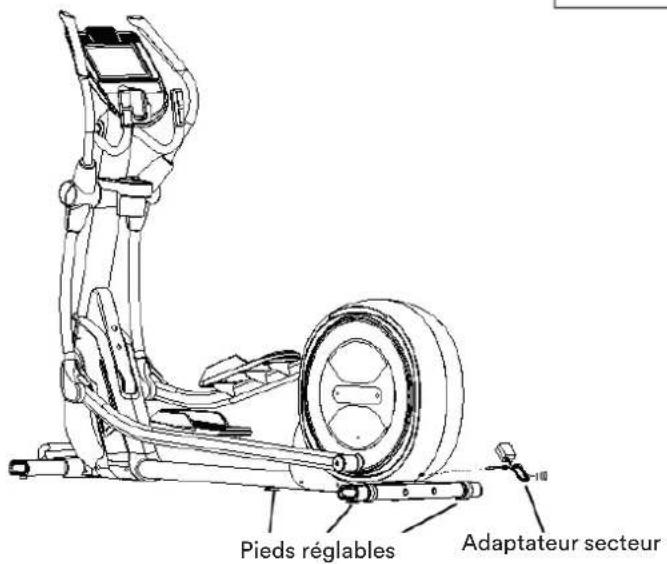
text_image
Line drawing of a car air conditioner front panel with control buttons and display settingsENTRAÎNEMENT MANUEL (MANUAL)
text_image
Technical diagram of a vehicle's internal components with numbered parts, likely an electric scooter or motor assembly.