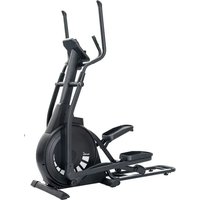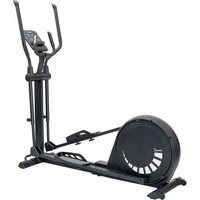
Carbon P20-R - Elliptical bike Skandika - Free user manual and instructions
Find the device manual for free Carbon P20-R Skandika in PDF.


User questions about Carbon P20-R Skandika
0 question about this device. Answer the ones you know or ask your own.
Ask a new question about this device
Download the instructions for your Elliptical bike in PDF format for free! Find your manual Carbon P20-R - Skandika and take your electronic device back in hand. On this page are published all the documents necessary for the use of your device. Carbon P20-R by Skandika.
USER MANUAL Carbon P20-R Skandika
natural_image
Exterior view of a modern stationary bike with circular gait and mounted fitness tracker (no visible text or symbols)Carbon P20-R
DE GB FR
Inhalt

skandika.com/service
text_image
Technical diagram of a stationary exercise machine with numbered components and labeled parts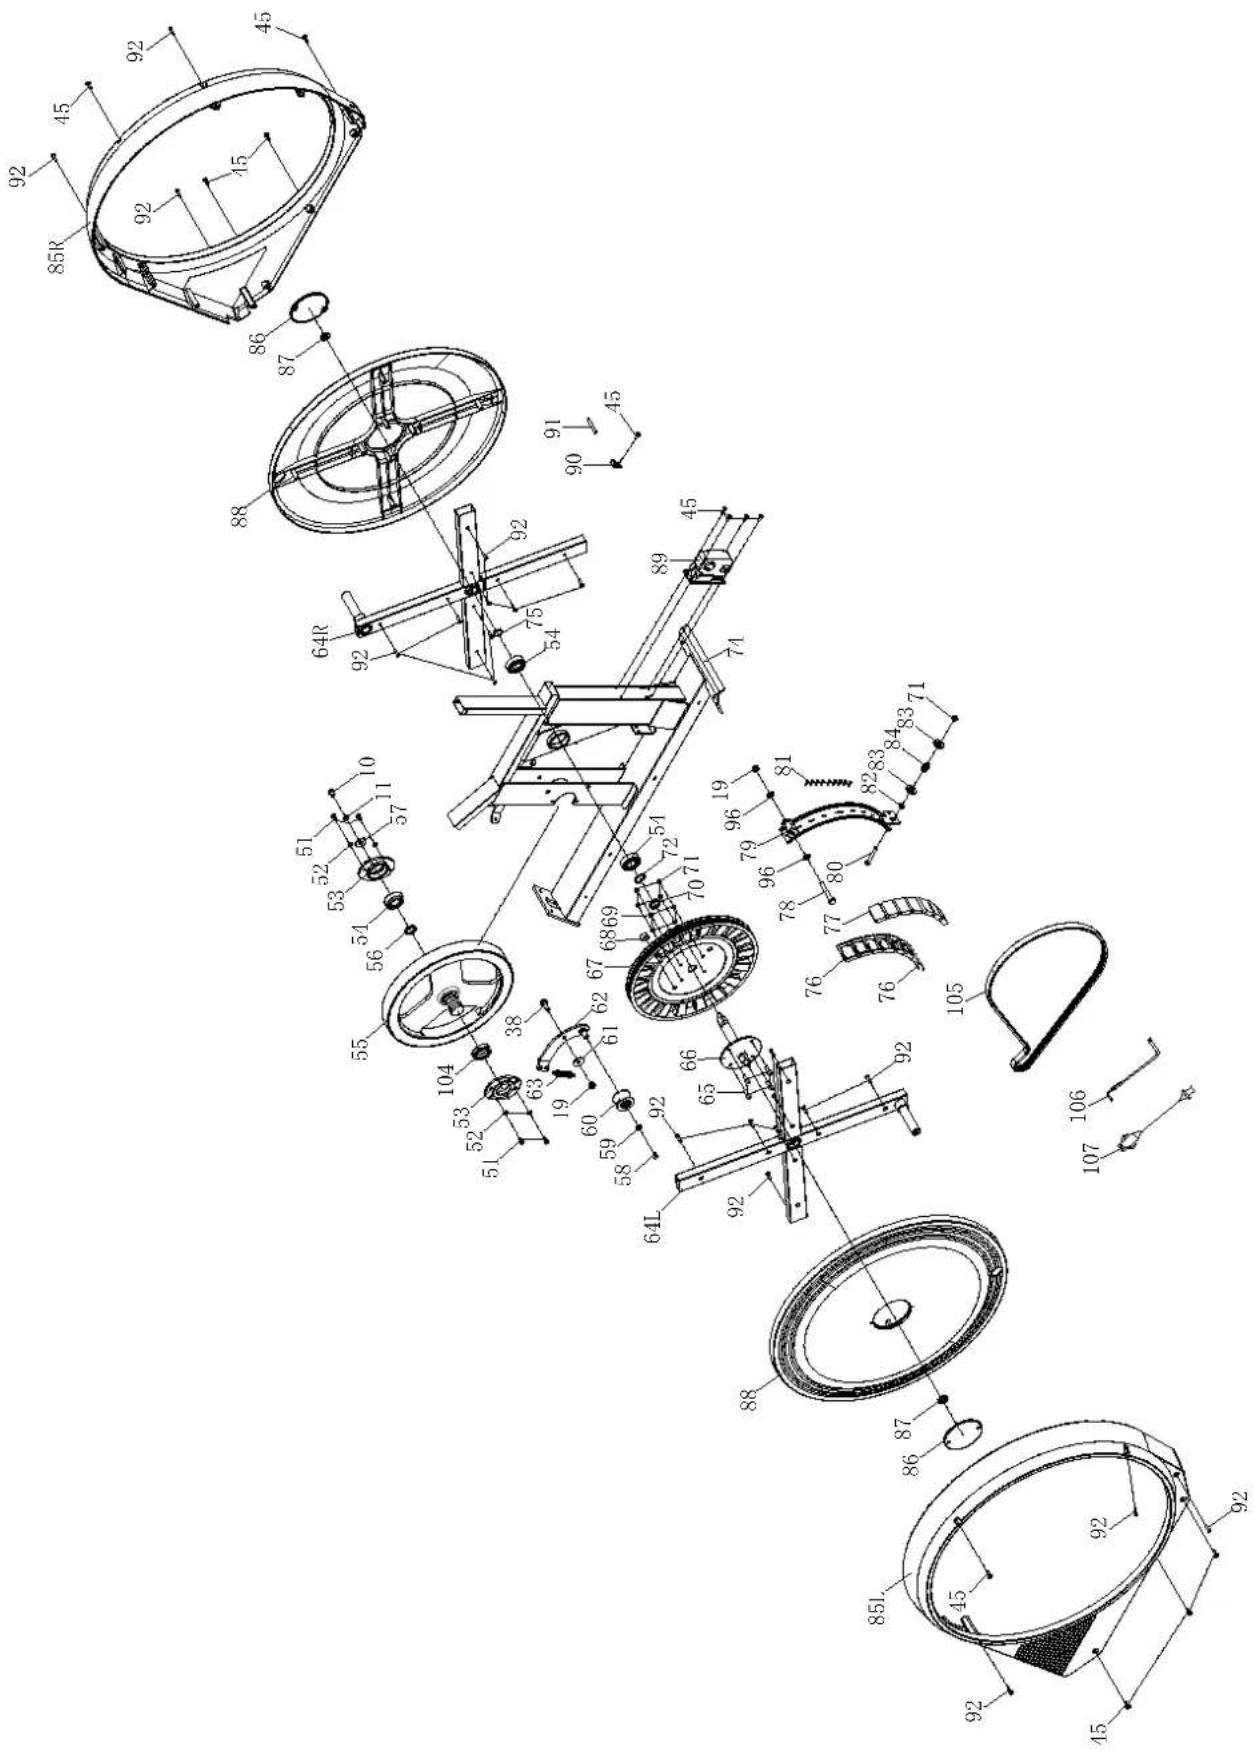
text_image
Technical diagram of a mechanical assembly with numbered components and dimension annotationstext_image
Suchen Kinomap Kinomap SAS ACTUALSENSE 4.3 ★★★★☆ P53 4+ 4000000000000000000000000000000000000000000000000000000 Neue Funktionen Thanks for training on Kinomap. Our daily concern is offering you the best experience there is. Vorschau
text_image
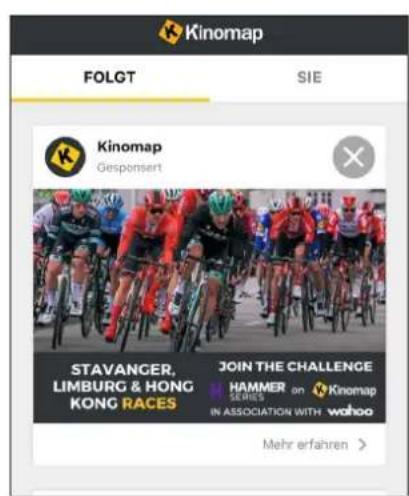
Kinomap FOLGT SIE Kinomap Gesponsert STAVANGER, LIMBURG & HONG KONG RACES JOIN THE CHALLENGE HAMMER SERIES in ASSOCIATION WITH wahoo Mehr erfahren >1.
29 Safety precautions
30 Set-up instructions
39 Adjustments
40 Transportation
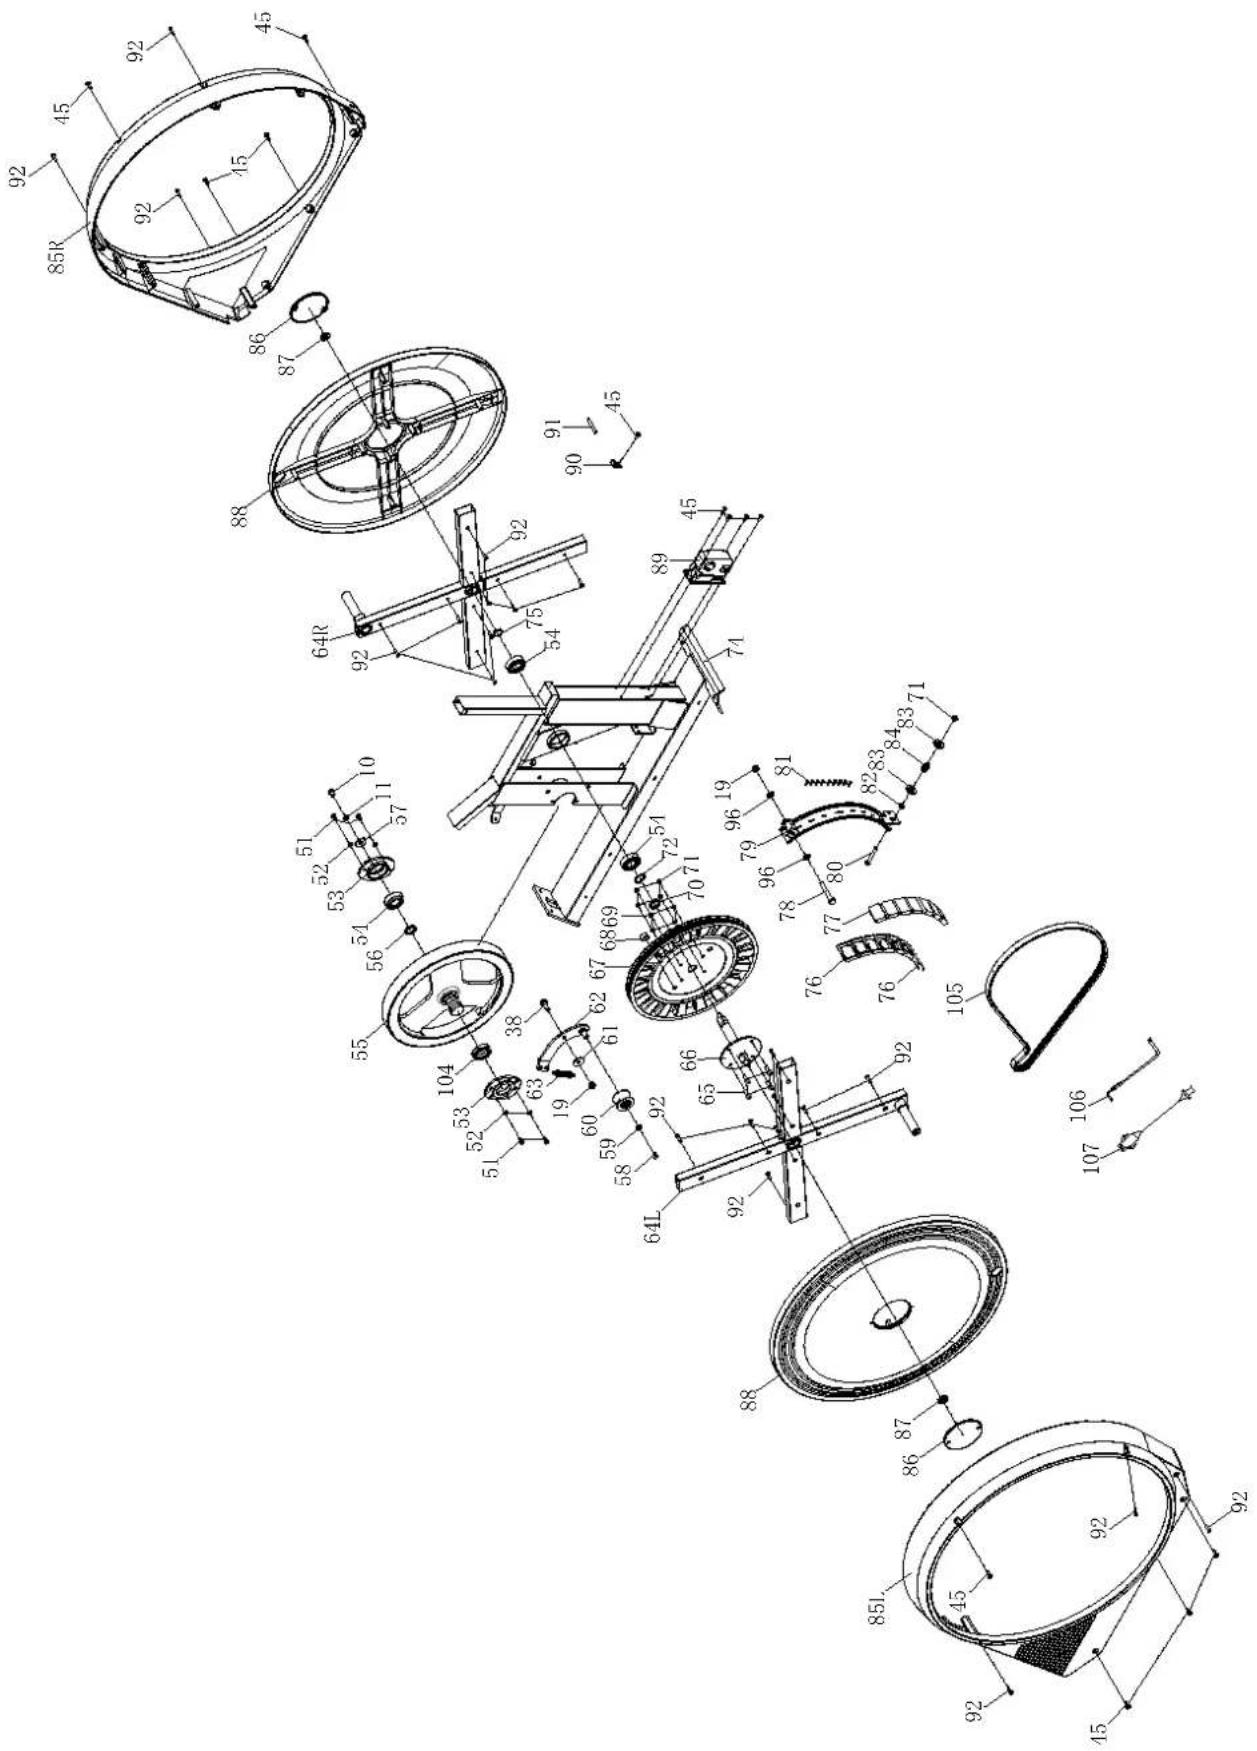
41 Parts list
42 Explosion drawing
44 Computer operation manual
49 Using a chest-belt
50 Warm-up and cool-down
51 Connecting to KINOMAP app
52 Guarantee conditions

skandika.com/service
Please visit the Skandika Service portal on our website for setup & help videos, FAQs and downloadable instructions.
For more information about Skandika, simply visit our main page www.skandika.com

WARNING
To reduce risk of injury, read and understand this instruction manual before using the device! This machine is intended for home use only in accordance with the instructions provided in this manual. Read the instruction manual carefully before using this device and keep the instruction manual for future use.
SAFETY PRECAUTIONS
- To ensure the best safety of the device, regularly check it on damages and worn parts.
- If you pass on this device to another person or if you allow another person to use it, make sure that that person is familiar with the content and instructions in these instructions.
- Only one person should use the exerciser at a time. The maximum load of this device is 135 kg. Class: HC - not suitable for therapeutically use!
- Before the first use and regularly make sure that all screws, bolts and other joints are properly tightened and firmly seated.
- Before starting an exercise programme, consult your doctor to determine if you have any health or physical conditions that could compromise your health and safety or prevent you from using the machine properly. Your doctor's advice is essential if you are taking medication that affects your heart rate, blood pressure or cholesterol levels.
- Pay attention to your body's signals. Exercising incorrectly or excessively can damage your health. Stop exercising if you experience any of the following symptoms: pain, chest tightness, irregular heartbeat, shortness of breath, lightheadedness, dizziness or feeling nauseous. If you experience one or more of these symptoms, you should first consult your doctor before continuing with your exercise programme.
- Keep small children and pets away from the exercise equipment. Never leave children under 14 years of age unattended in a room with the machine.
- Parents and other guardians should be aware of their responsibility, as due to children's natural play instinct and eagerness to experiment, situations are to be expected for which training equipment is not built.
-
Set up the unit in a dry, level place and protect it from moisture. If you want to protect the place of installation against pressure marks, dirt, etc., we recommend that you place a suitable, non-slip base under the unit. Do not use the unit near water or outdoors.
-
Always use the unit as described in this manual. If you notice any defective parts when assembling or checking the unit, or if you hear unusual noises coming from the unit during exercise, stop using the unit immediately and do not use it again until the problem is solved. Contact the customer service.
- Always wear appropriate clothing and shoes which are suitable for your workout on the device. The clothes must be designed in a way so that they will not get caught in any part of the device during the work-out due to their form (for example, length). Be sure to wear appropriate shoes which are suitable for the work-out, firmly support the feet and which are provided with a non-slip sole.
- Make sure that you and other persons never place any parts of your body (e.g. fingers) in the area of moving parts. In addition, there should be no objects in the immediate vicinity that could interfere with the training process.
- To avoid physical injury and/or damage to the product or property, the unit must be lifted and moved properly.
- This unit is intended for indoor and home use only, it is not intended for commercial use!
- This appliance is intended for use and storage in cool, dry conditions. You should avoid storing it in extremely cold, hot or humid areas as this may cause corrosion and other related problems.
- Do not work out immediately after meals!
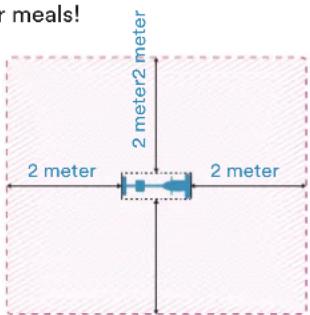
- Please only exercise with a minimum clearance area of 2 meters around the device.
text_image
meals! 2 meter 2 meter2 meter 2 meter 2 meterSET-UP INSTRUCTIONS
Before you start assembling, we recommend that you find a place with sufficient free space and a flat surface for assembly.
Please check with the parts list whether all the necessary parts for assembly are present. Some parts may already be pre-assembled to make assembly easier.
We recommend using the enclosed tools to assemble the unit.
STEP 1
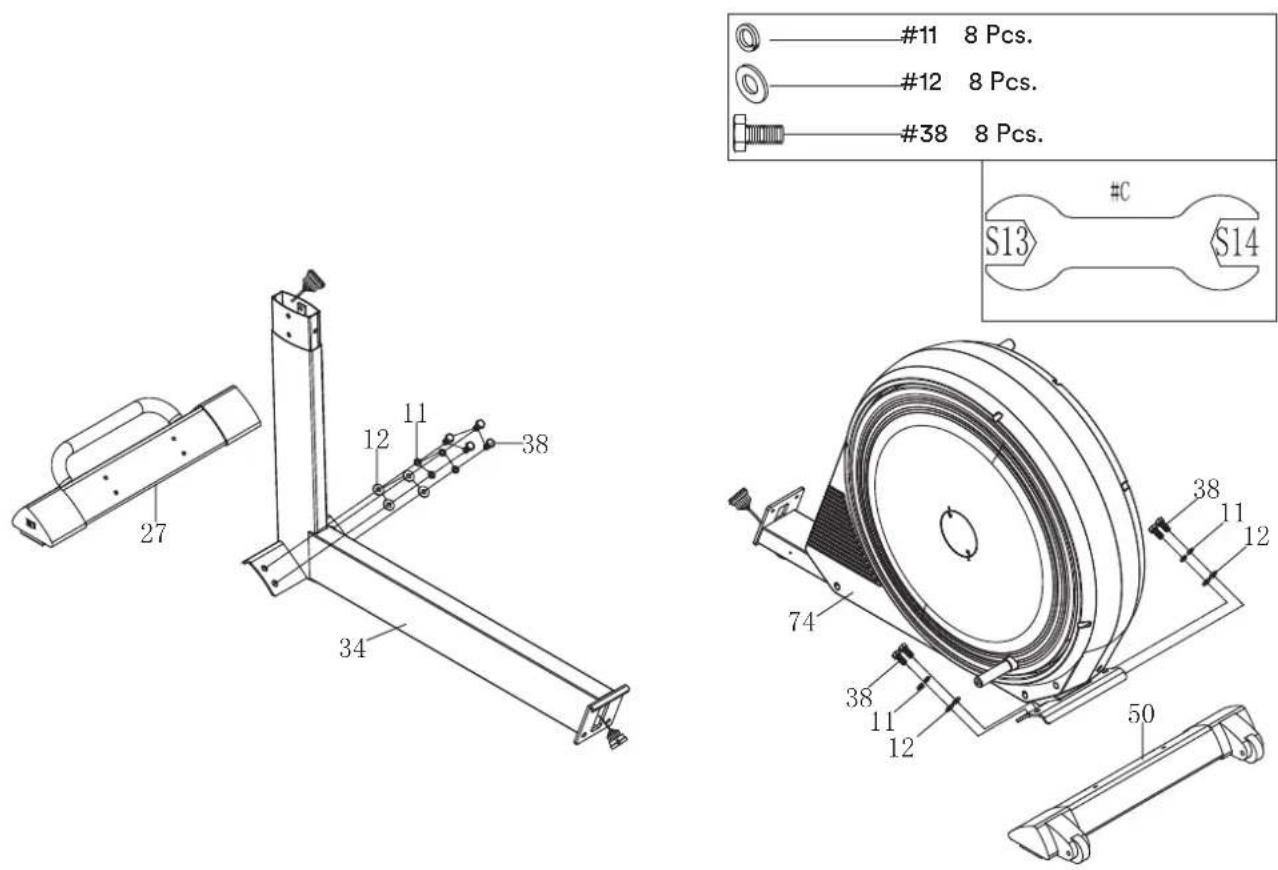
- Remove the screws (38), spring washers (11) and washers (12) from the front (27) and rear (50) stabilizer.
- Attach the two stands with the small parts to the front and rear of the main frame front section (34) and main frame rear section (74) respectively.
text_image
#11 8 Pcs. #12 8 Pcs. #38 8 Pcs. S13 S14 27 12 11 38 34 74 38 11 12 50STEP 2
- Remove the screws (38), spring washers (11), washers (96) and screws (92) from the main frame rear section (74).
- Connect the cable parts (101b) and (102b).
- Connect the two main frame parts (34) and (74) using the screws (38), spring washers (11) and washers (96).
- Assemble the two cover parts (46 L&R) to the main frame rear part (74) using the screws (92).
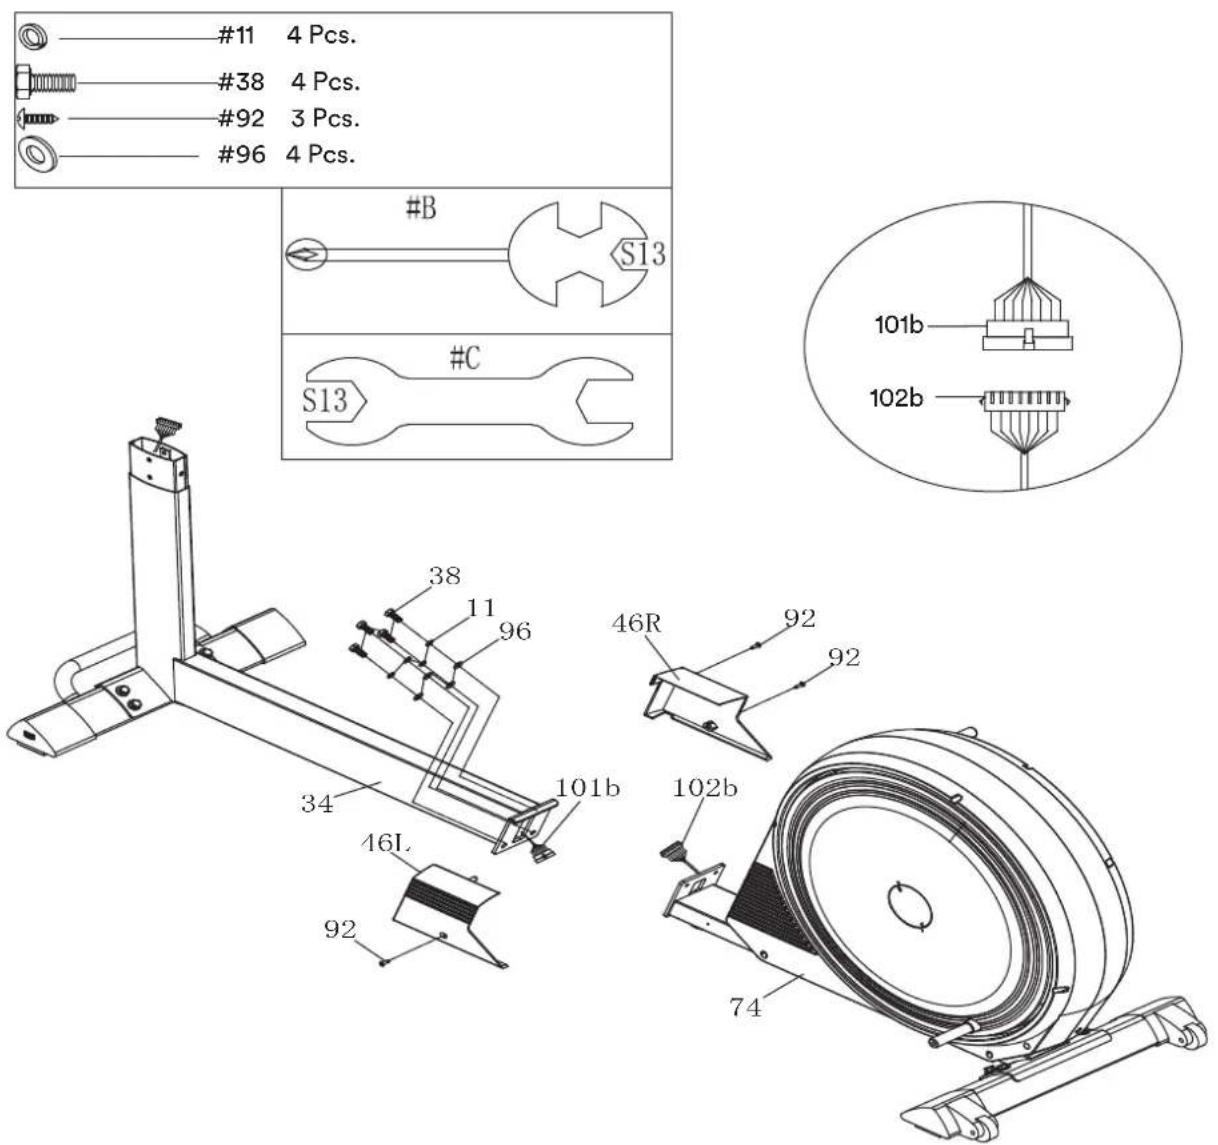
text_image
#11 4 Pcs. #38 4 Pcs. #92 3 Pcs. #96 4 Pcs. # S13 # C S13 38 11 96 34 101b 46R 92 92 102b 74 46L 92STEP 3
- Remove the screws (10), spring washers (11) and washers (12) from the main frame front part (34).
- Connect the cable parts (100b) and (101a).
- Insert the handle bar post (25) into the main frame front part (34) and fix with the screws (10), spring washers (11) and washers (12).
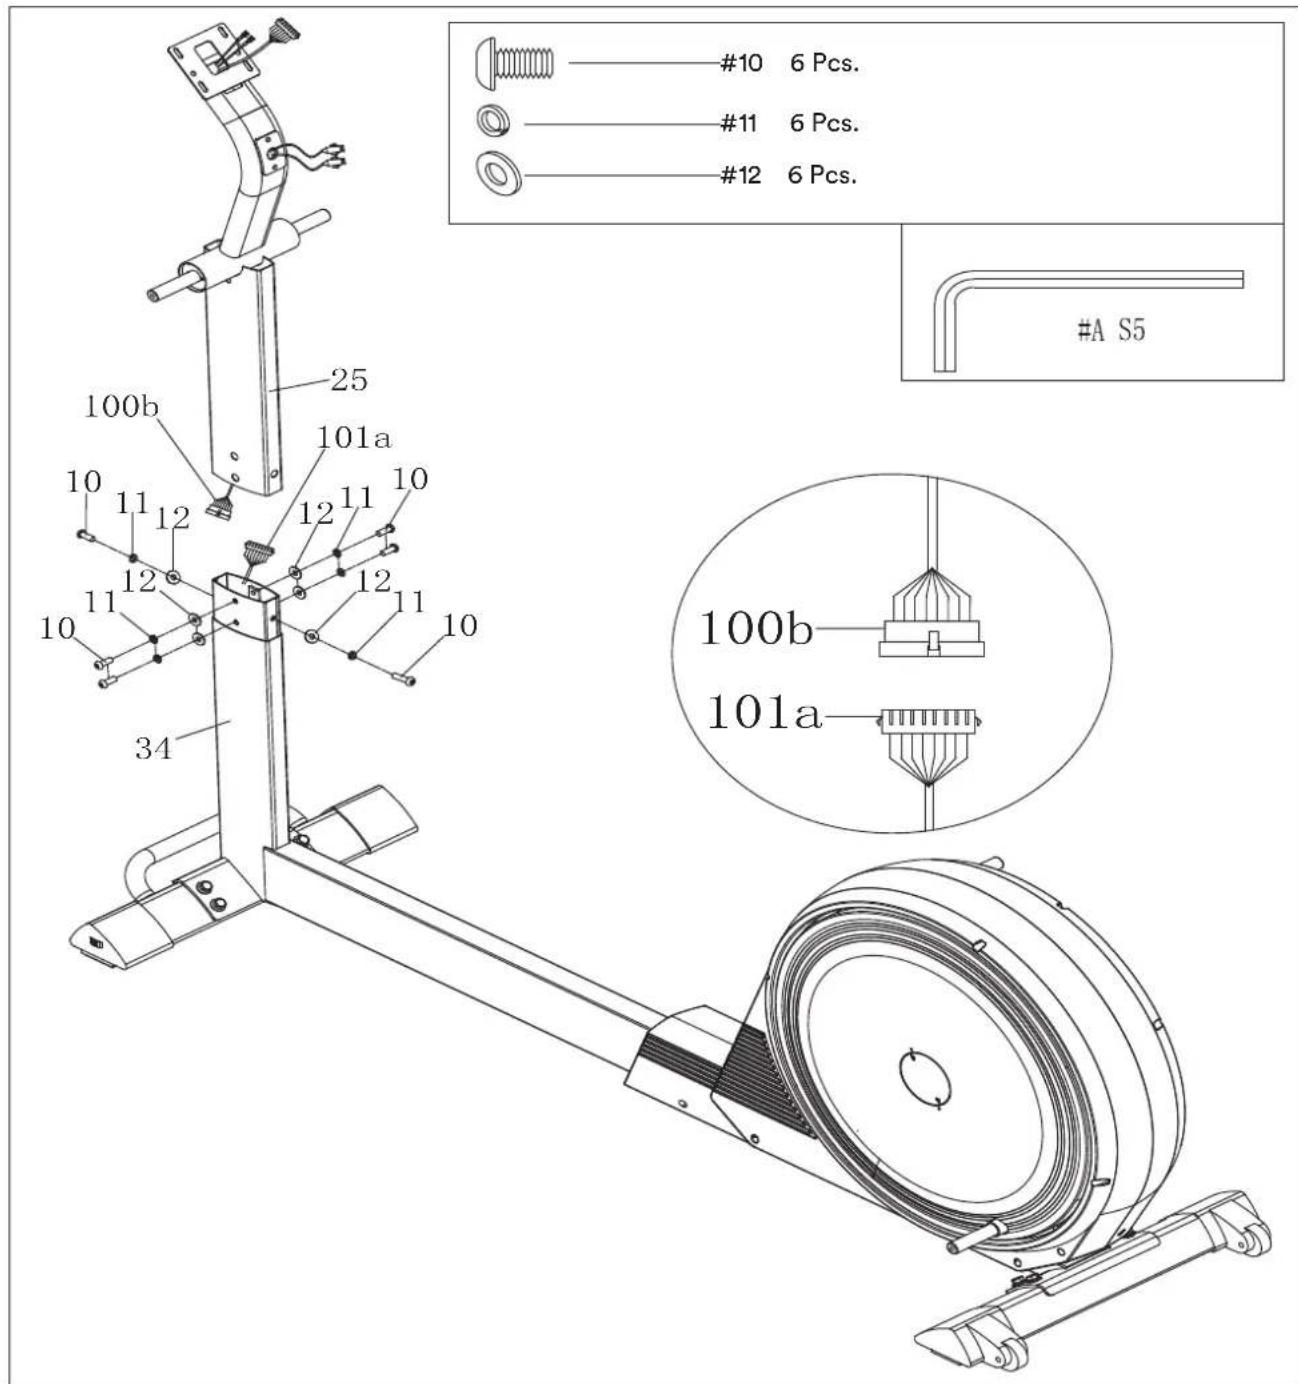
text_image
#10 6 Pcs. #11 6 Pcs. #12 6 Pcs. 100b 25 101a 10 11 12 12 11 12 11 10 34 #A S5 100b 101aSTEP 4
- Now fit the covers (24L/R) and the upper swing bars (15L/R) to the handlebar post (25) with the screws (10), spring washers (11), corrugated washers (23) and washers (29) and the spacers (5) as shown.
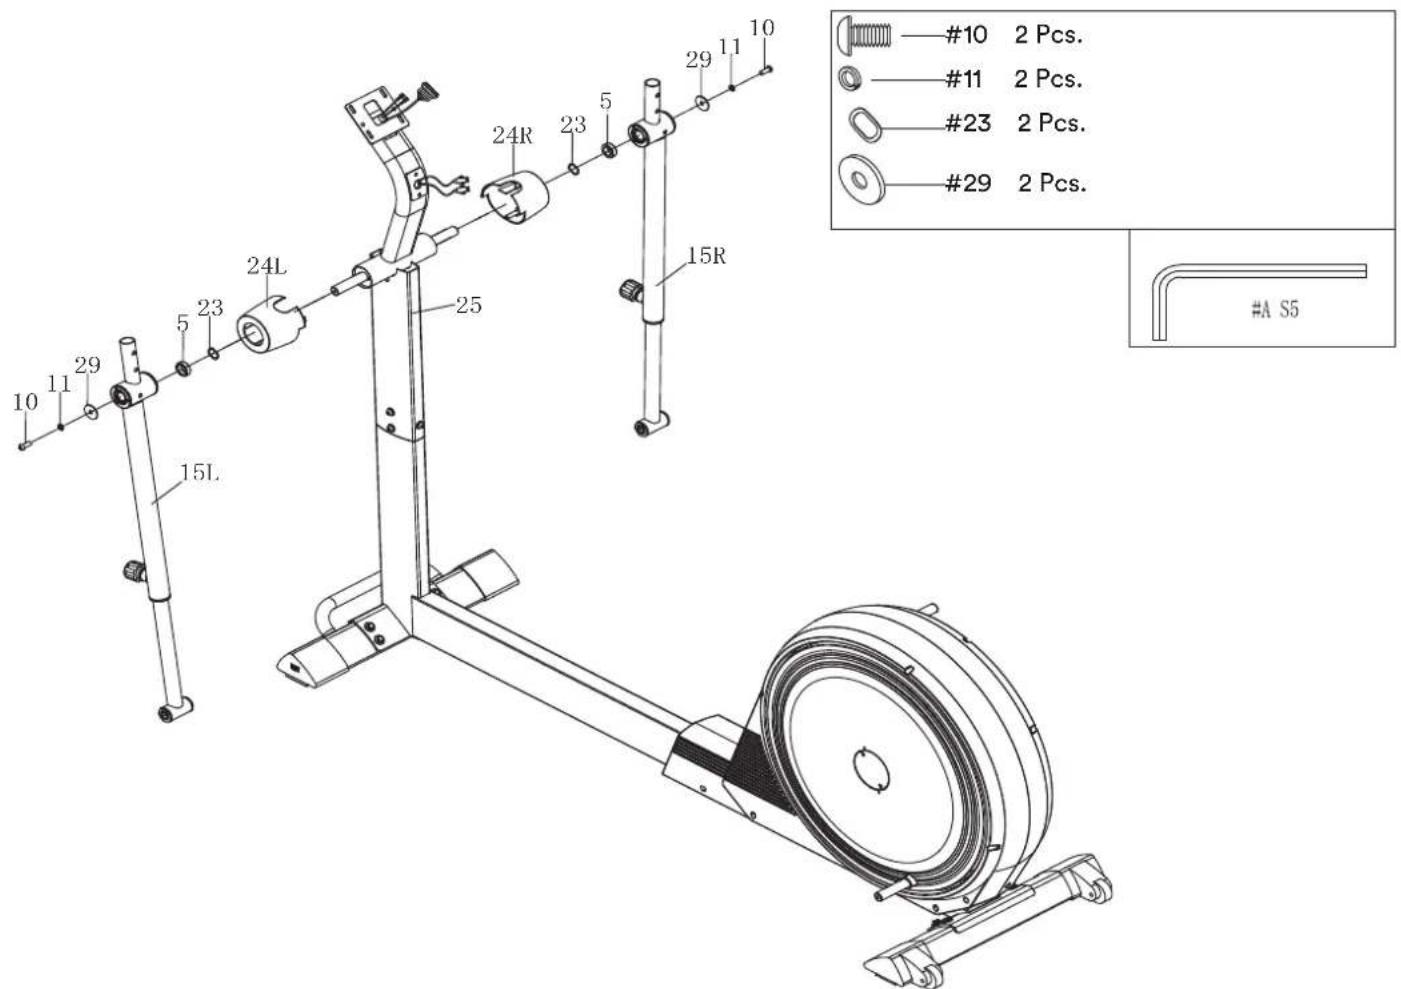
text_image
#10 2 Pcs. #11 2 Pcs. #23 2 Pcs. #29 2 Pcs. #A S5 10 11 29 5 23 24L 25 15R 15LSTEP 5
- Remove the bolts (10), spring washers (11), corrugated washers (23) and washers (29) from the pedal crank axle of the rear main frame (74).
- Place the pedal arm (42) and the corrugated washers (23) on the crank axle of the main frame rear section (74) and fix this connection with the screws (10), spring washers (11) and washers (29).
- Mount the U-bracket of the pedal arm (42) at the front on both sides to the respective lower swing bars (31L/R) using the screws (97) and (108), and the washers (59).
- Then attach the covers (40L/R) to the pedal arms (42) using the screws (93) as shown.
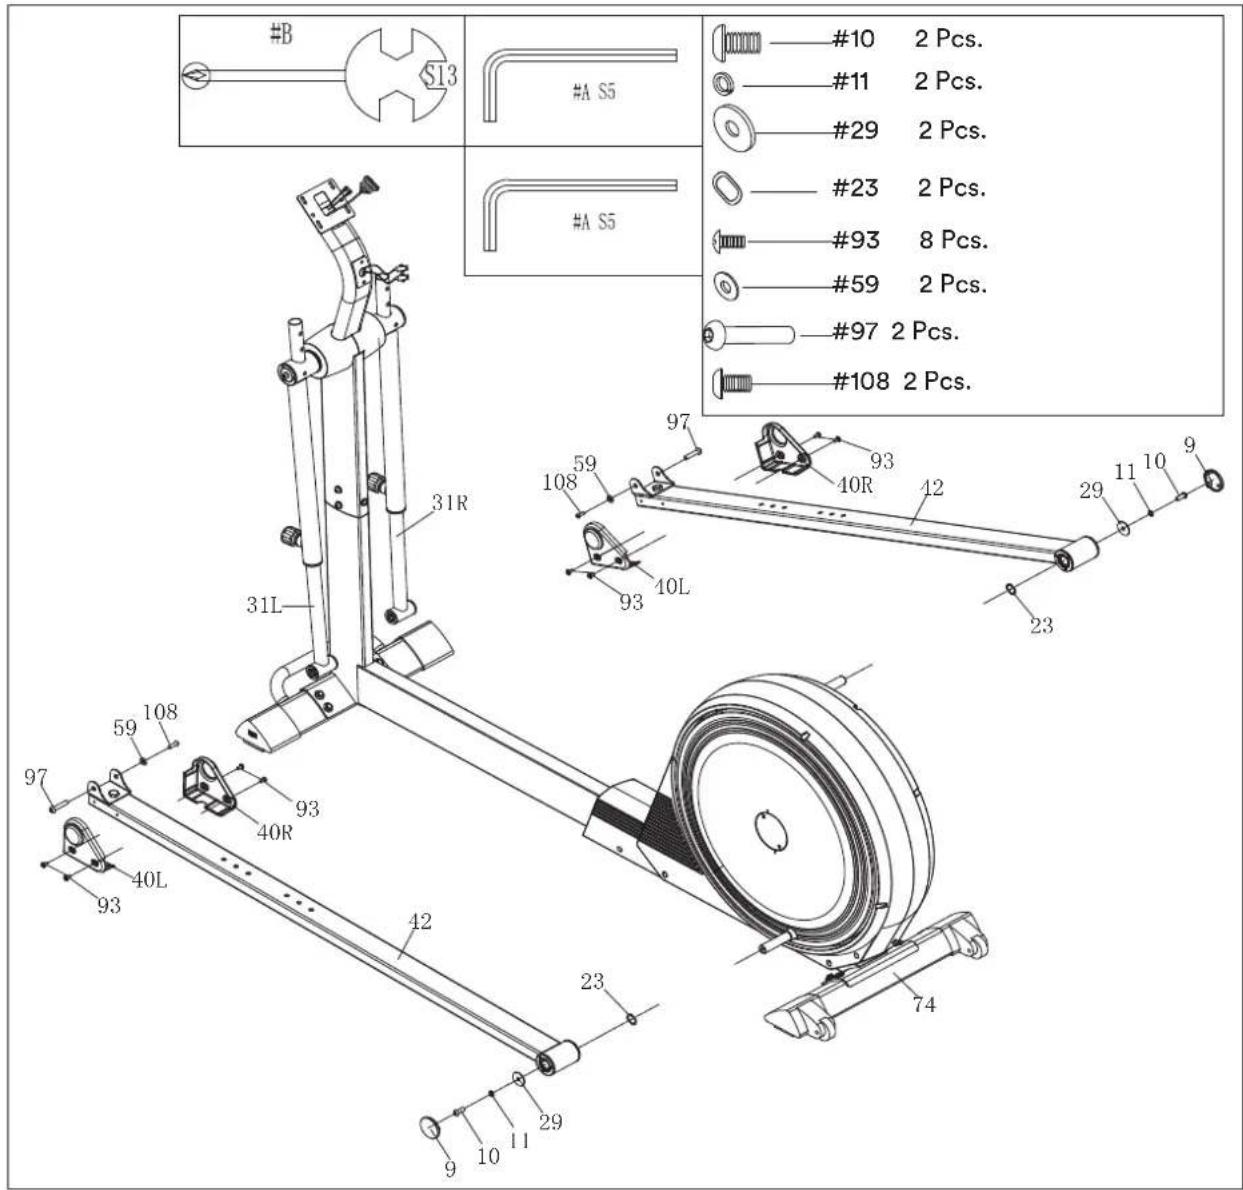
text_image
#B S13 #A S5 #A S5 #10 2 Pcs. #11 2 Pcs. #29 2 Pcs. #23 2 Pcs. #93 8 Pcs. #59 2 Pcs. #97 2 Pcs. #108 2 Pcs. 31R 31L 97 108 59 40R 93 40L 93 12 23 74 29 11 10 9 108 108 108 108 108 108 108 108 108 108 108 108 108 108 108 108STEP 6
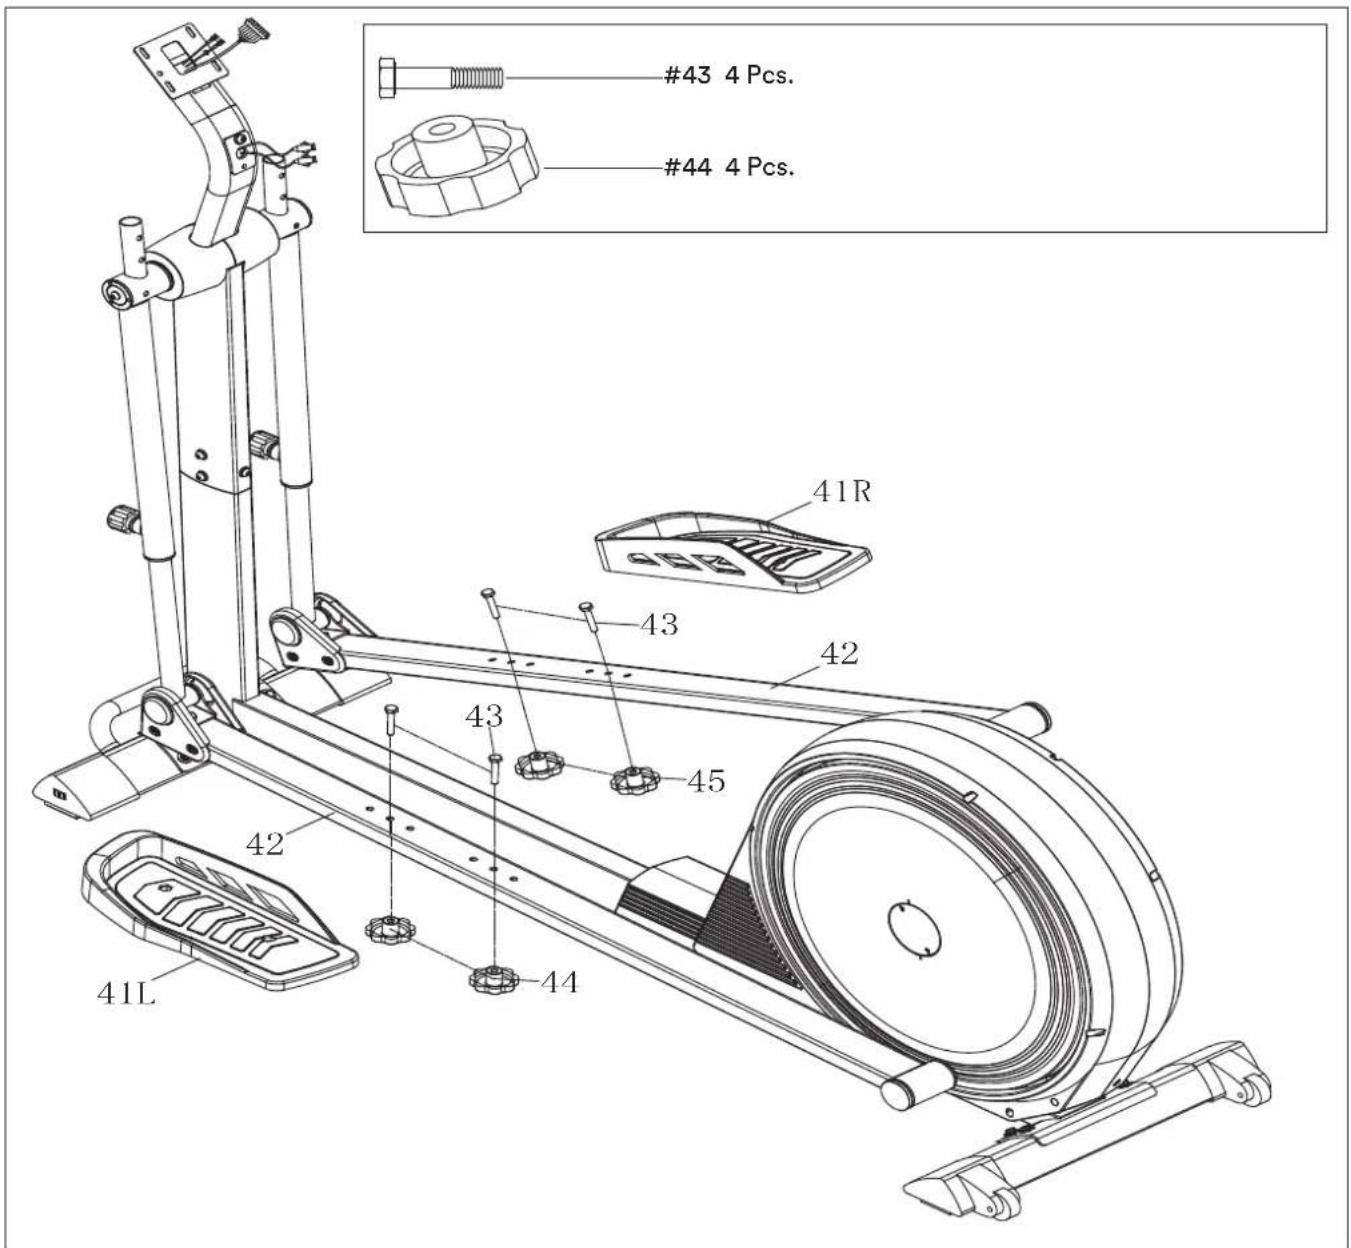
- Now attach the two pedals (41L/R) to the pedal arms (42) as shown. You will need the screws (43) and grip nuts (44) for this.
text_image
#43 4 Pcs. #44 4 Pcs. 41R 42 43 45 43 42 41L 42 44STEP 7
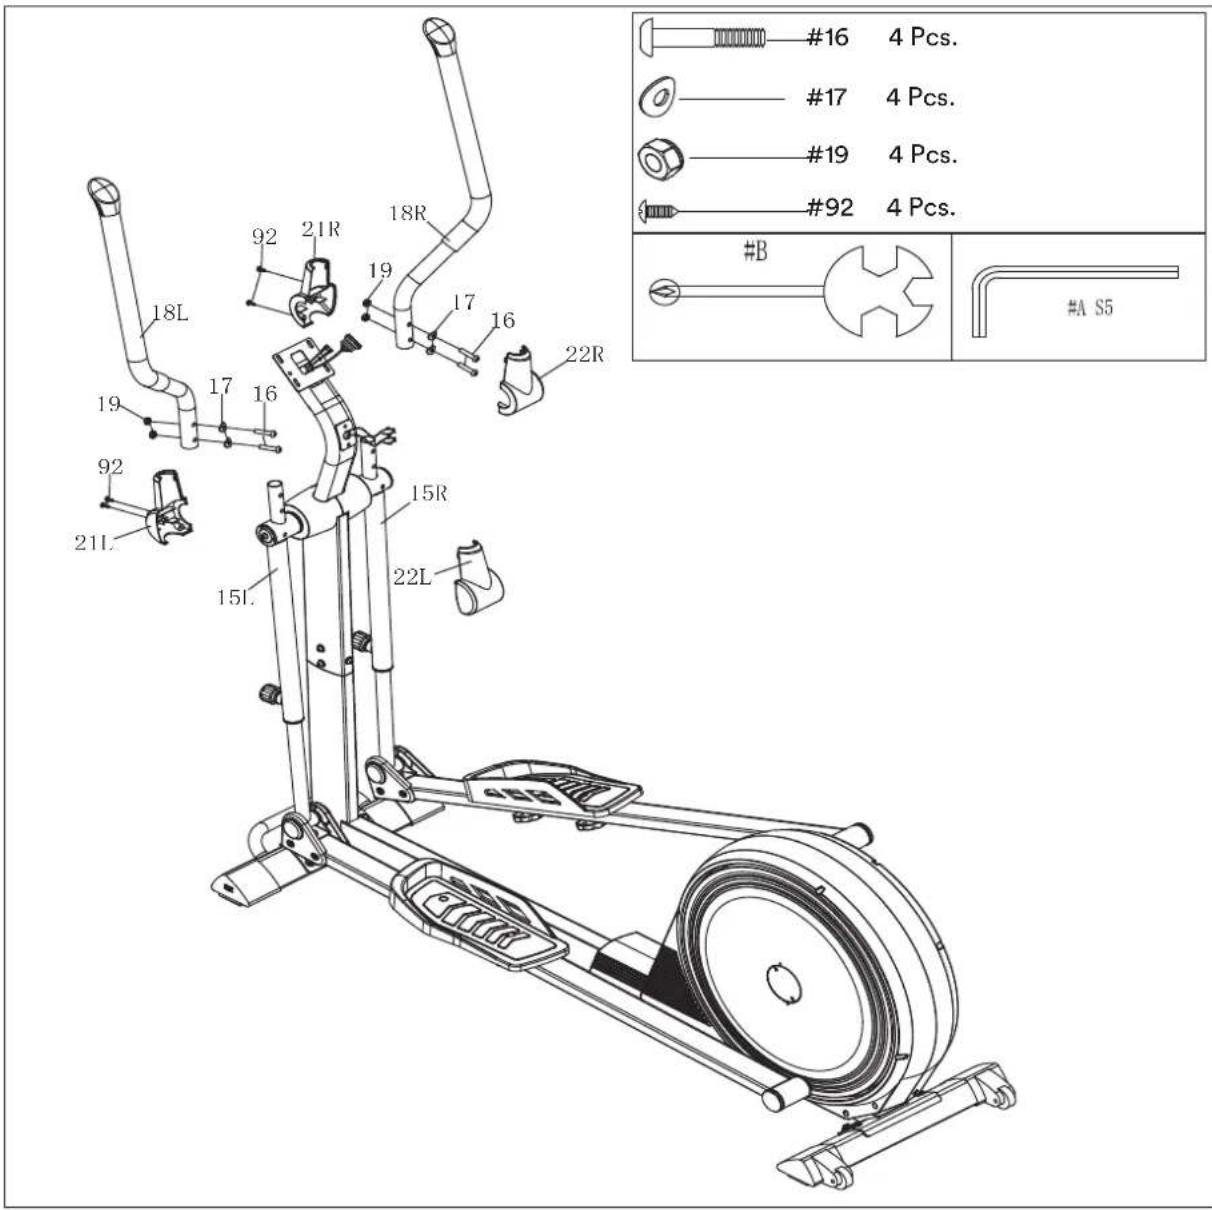
- Insert the handlebars (18L/R) into the upper swing bars (15L/R) and fix them with the screws (16), washers (17) and nuts (19).
- Fit the covers (21L/R and 22L/R) as shown with the screws (92).
text_image
Technical diagram of a stationary exercise bike with labeled components and parts, including numbered parts and part numbers.STEP 8
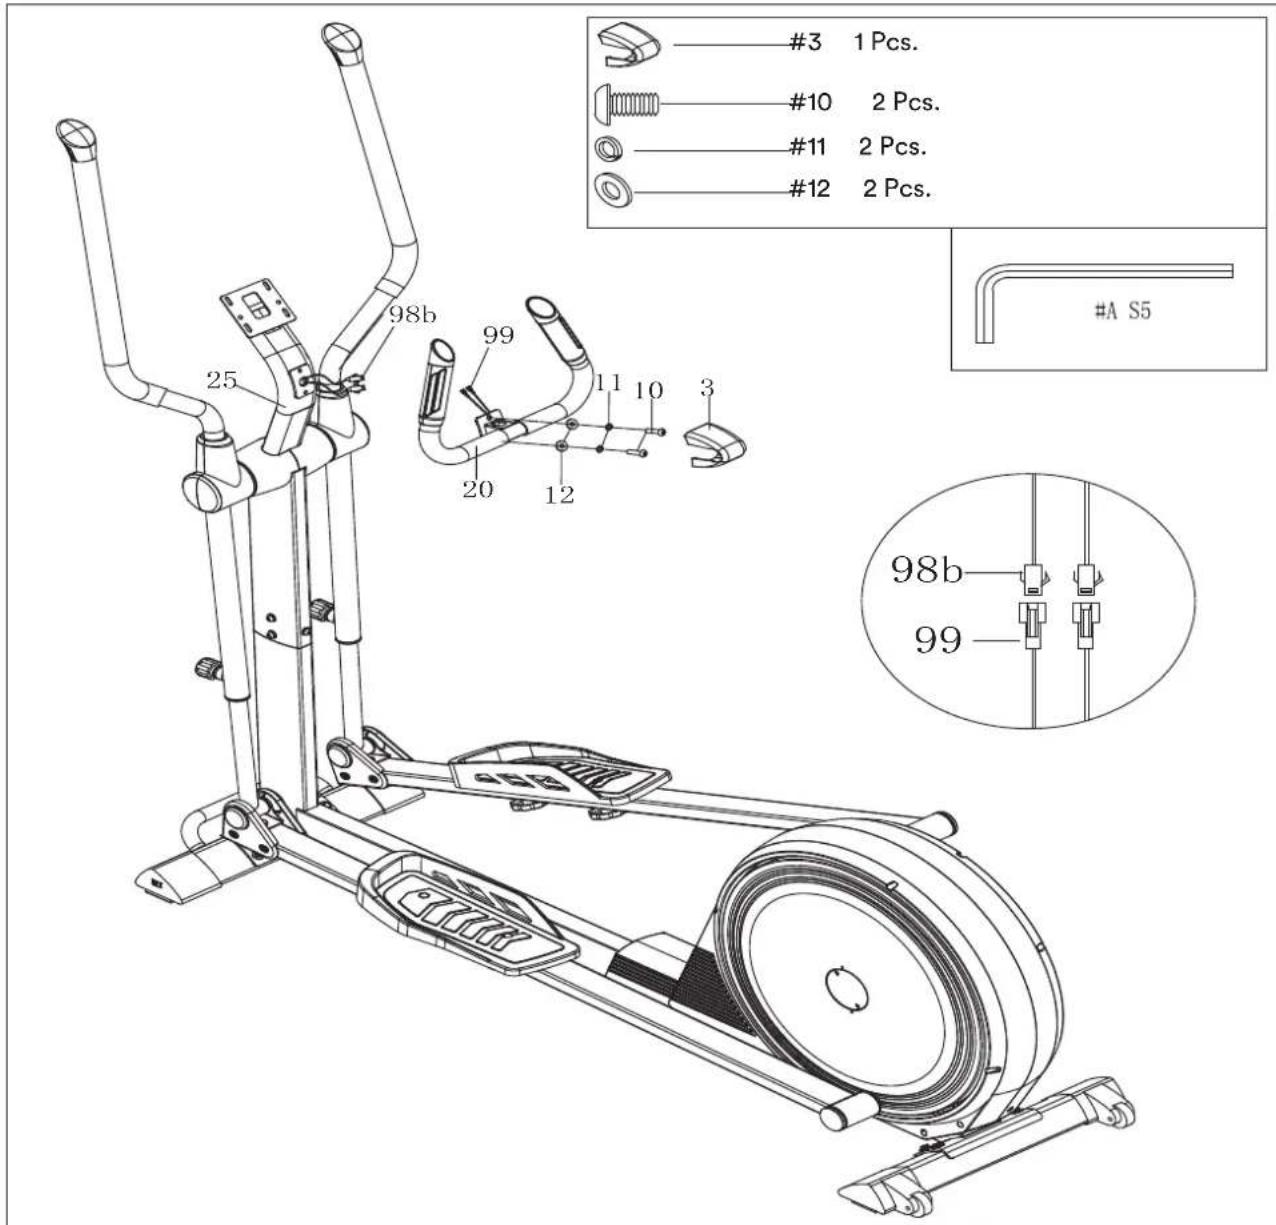
- Remove the screws (10), spring washers (11) and washers (12) from the handlebar post (25).
- Connect the cable ends (98b) and (99).
- Mount the middle handlebar (20) on the handlebar post (25) using the screws (10), spring washers (11) and washers (12) and put the cover (3) on it.
text_image
#3 1 Pcs. #10 2 Pcs. #11 2 Pcs. #12 2 Pcs. 98b 99 25 11 10 20 12 3 #A S5 98b 99STEP 9
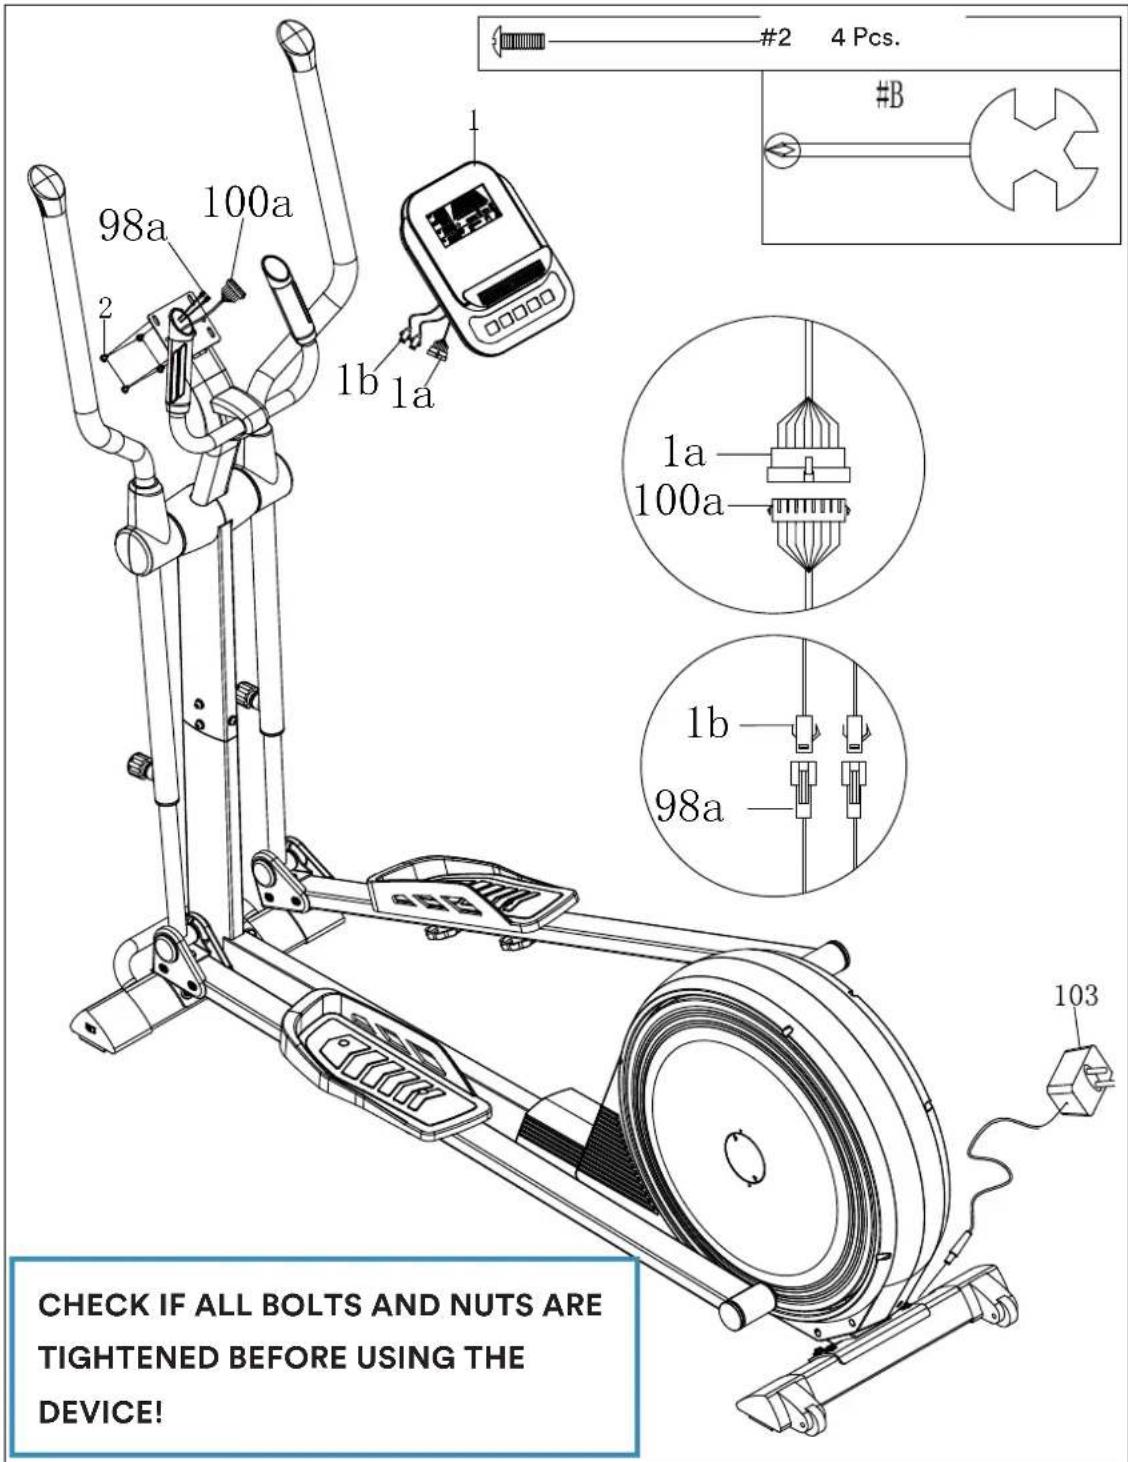
- Connect the cable ends (100a) and (1a), and (98a) and (1b).
- Remove the screws (2) from the back of the computer and use them to mount the computer (1) on the computer bracket.
- Plug the adapter cable (103) into the device socket near the rear stand and connect the power supply to a mains socket.
- Note: If you are not going to use the unit for a long time, disconnect the power supply.
text_image
#2 4 Pcs. #B 98a 100a 1b 1a 1a 100a 1b 98a CHECK IF ALL BOLTS AND NUTS ARE TIGHTENED BEFORE USING THE DEVICE! 103ADJUSTMENTS
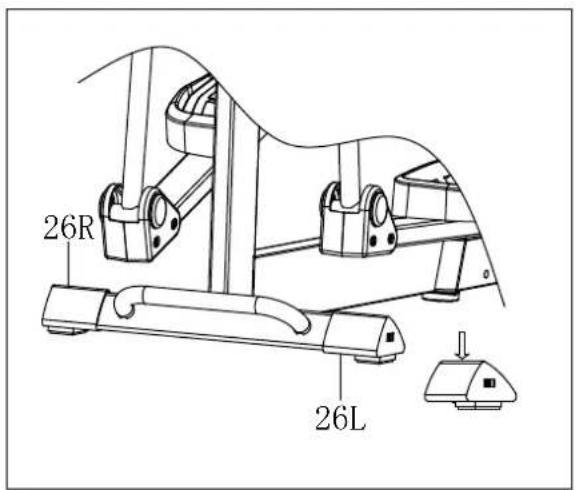
text_image
26R 26LEVEN STAND
To ensure that the unit can stand straight, adjust the two end caps (26L/R) accordingly if the stand is uneven.
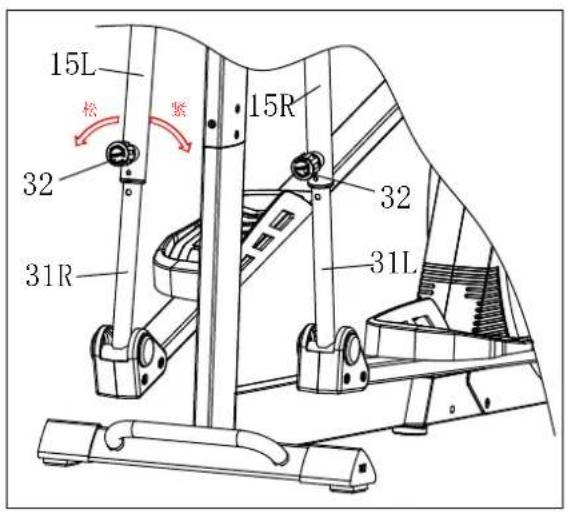
ADJUSTING THE SWING RODS
The two swing bars (31L/R) are height-adjustable. Loosen the knob (32) by turning it anticlockwise, set the desired height (3 settings/holes are given) and fasten the knob (32) again.
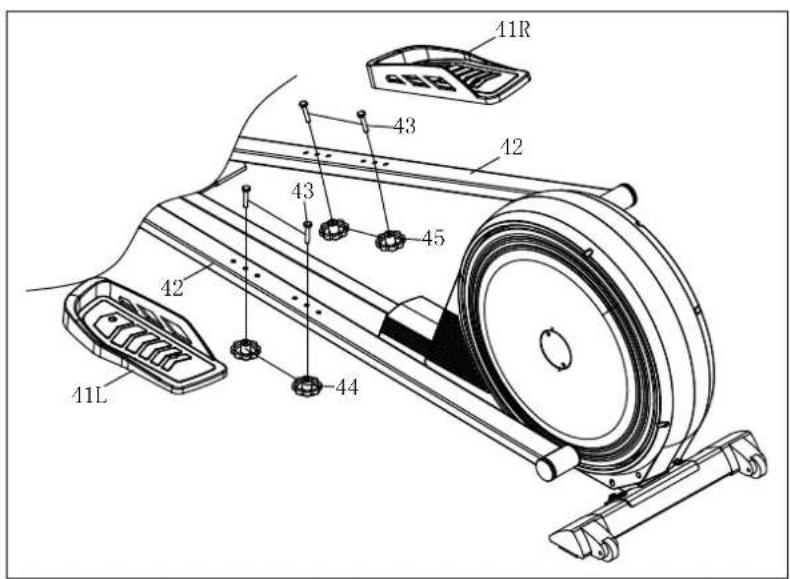
text_image
41R 43 42 45 43 42 41L 44PEDAL ADJUSTMENT
The pedals (41L/R) are adjustable in length (3 different adjustment possibilities). Loosen the grip nuts (44) and screws (43) and fix the pedals in the desired position.
TRANSPORTATION
To transport the unit, lift it by the handle of the front stabilizer (27) until the transport castors (50) on the rear main frame touch the ground. When the castors are in contact with the ground, you can comfortably transport the unit to the desired location.

text_image
27 50| Part nr. | Description Q'ty | |
| 1 Computer 1 | ||
| 2 Bolt M5*20 4 | ||
| 3 Cover 1 | ||
| 4 End cap 2 | ||
| 5 Spacer 2 | ||
| 6 Handle pulse lower cover 2 | ||
| 7 L/R Handle pulse upper cover 1/1 | ||
| 8 Grip foam 2 | ||
| 9 End cap 2 | ||
| 10 Bolt M8*20*S5 13 | ||
| 11 | D8 Spring washer | 25 |
| 12 | Washer d8*∅20*2 | 14 |
| 13 | Bushing ∅19 | 8 |
| 14 Bushing ∅50 | 8 | |
| 15 L/R | Upper swing bar | 1/1 |
| 16 Bolt M8*40*15*S5 | 4 | |
| 17 | Arc washer d8*∅20*2*R16 | 4 |
| 18 L/R | Handlebar | 1/1 |
| 19 Nylon nut M8*H7.5*S13 | 6 | |
| 20 | Middle handlebar | 1 |
| 21 L/R | Swing bar rear cover | 1/1 |
| 22 L/R | Swing bar front cover | 1/1 |
| 23 | Wave washer∅19*∅25*0.3 | 4 |
| 24 L/R | Handlebar post cover | 1/1 |
| 25 | Handlebar post | 1 |
| 26 L/R | End cap | 1/1 |
| 27 Front stabilizer | 1 | |
| 28 | End cap | 1 |
| 29 | Washer d8*∅32*2 | 4 |
| 30 | Bushing∅32 | 4 |
| 31 L/R | Lower swing bar | 1/1 |
| 32 | Knob M16 2 | |
| 33 | Bushing ø38 | 2 |
| 34 | Front main frame | 1 |
| 35 | Washer d10*∅18*2 | 2 |
| 36 | U bracket | 2 |
| 37 | Bolt M10*42*S17 | 2 |
| 38 | Bolt M8*20*S13 | 13 |
| 39 | Spacer ø14*ø8*59.5 | 2 |
| 40 L/R | Cover | 1/1 |
| 41 L/R | Pedal | 1/1 |
| 42 L/R | Pedal arm L/R | 1/1 |
| 43 | Bolt M8*45*20*S14 | 4 |
| 44 | Grip nut M8*60*30 | 4 |
| 45 | Screw ST4.2*16 | 13 |
| 46 L/R | Connect cover | 1/1 |
| 47 | Nut M8*H5.5*S14 | 1 |
| 48 | Footpad 1 | |
| 49 L/R | End cap | 1/1 |
| 50 | Rear stabilizer | 1 |
| 51 | Bolt M5*16 | 4 |
| 52 | Washer d5*∅13*1 | 4 |
| 53 | Bearing holder | 2 |
| 54 | Bearing 6004 | 3 |
| 55 | Flywheel | 1 |
| 56 | Spacer ∅30*∅25*6.5 | 1 |
| 57 | Washer d8*∅28*2 | 1 |
| 58 | Bolt M6*12*S10 | 1 |
| 59 | Washer d6*∅16*1.5 | 3 |
| Part nr. | Description Qty | |
| 60 | Idler | 1 |
| 61 Washer d8*∅25*2 | 1 | |
| 62 | Idler rod | 1 |
| 63 | Spring ∅2.0*∅12.2*60* n=19 | 1 |
| 64 L/R | Crank | 1/1 |
| 65 | Bolt M6*16*S5 | 4 |
| 66 | Axle | 1 |
| 67 | Belt plate | 1 |
| 68 | Magnet | 1 |
| 69 | Spring washer d6 | 4 |
| 70 | Spacer ∅25*∅20.2*4 | 1 |
| 71 | Nylon nut M6*H6*S10 | 5 |
| 72 Wave washer d20*ø26*0.3 | 1 | |
| 73 | Nylon nut M10*H9.5*S17 | 2 |
| 74 | Rear main frame | 1 |
| 75 Washer D20 | 1 | |
| 76 Magnetic location grid | 2 | |
| 77 | Magnet | 7 |
| 78 | Bolt M8*55*13*S14 | 1 |
| 79 | Magnetic plate | 1 |
| 80 | Bolt M6*65*S10 | 1 |
| 81 | Screw ST3.0*10 | 9 |
| 82 | Nut M6*H5*S10 | 1 |
| 83 | Washer ø6*ø18*2 | 2 |
| 84 | Tension spring ø1.2*ø15*48*N9 | 1 |
| 85 L/R | Chain cover | 1/1 |
| 86 | Crank cover | 2 |
| 87 | Nut M10*1.25*H7.5*S14 | 2 |
| 88 | Turntable | 2 |
| 89 | Motor | 1 |
| 90 | Sensor holder | 1 |
| 91 | Sensor | 1 |
| 92 | Screw ST4.2*16 | 26 |
| 93 | Bolt M5*10 | 8 |
| 94 | Screw ST3.0*25 | 4 |
| 95 | Screw ST3*19 | 4 |
| 96 | Washer d8*ø16*1.5 | 6 |
| 97 | Bolt M8*75*13*S14 | 2 |
| 98 | Trunk wire | 1 |
| 99 | Handle pulse wire | 1 |
| 100 | Trunk wire 1 | 1 |
| 101 | Trunk wire 2 | 1 |
| 102 | Trunk wire 3 | 1 |
| 103 | Adapter | 1 |
| 104 | Bearing 61905 | 1 |
| 105 | Belt | 1 |
| 106 | Tension knob | 1 |
| 107 | Power wire | 1 |
| 108 | Bolt M6*15*S5 | 2 |
| A | Spanner S5 2 | |
| B | Wrench S13-14-15 | 1 |
| C | Wrench S13-S14 | 1 |
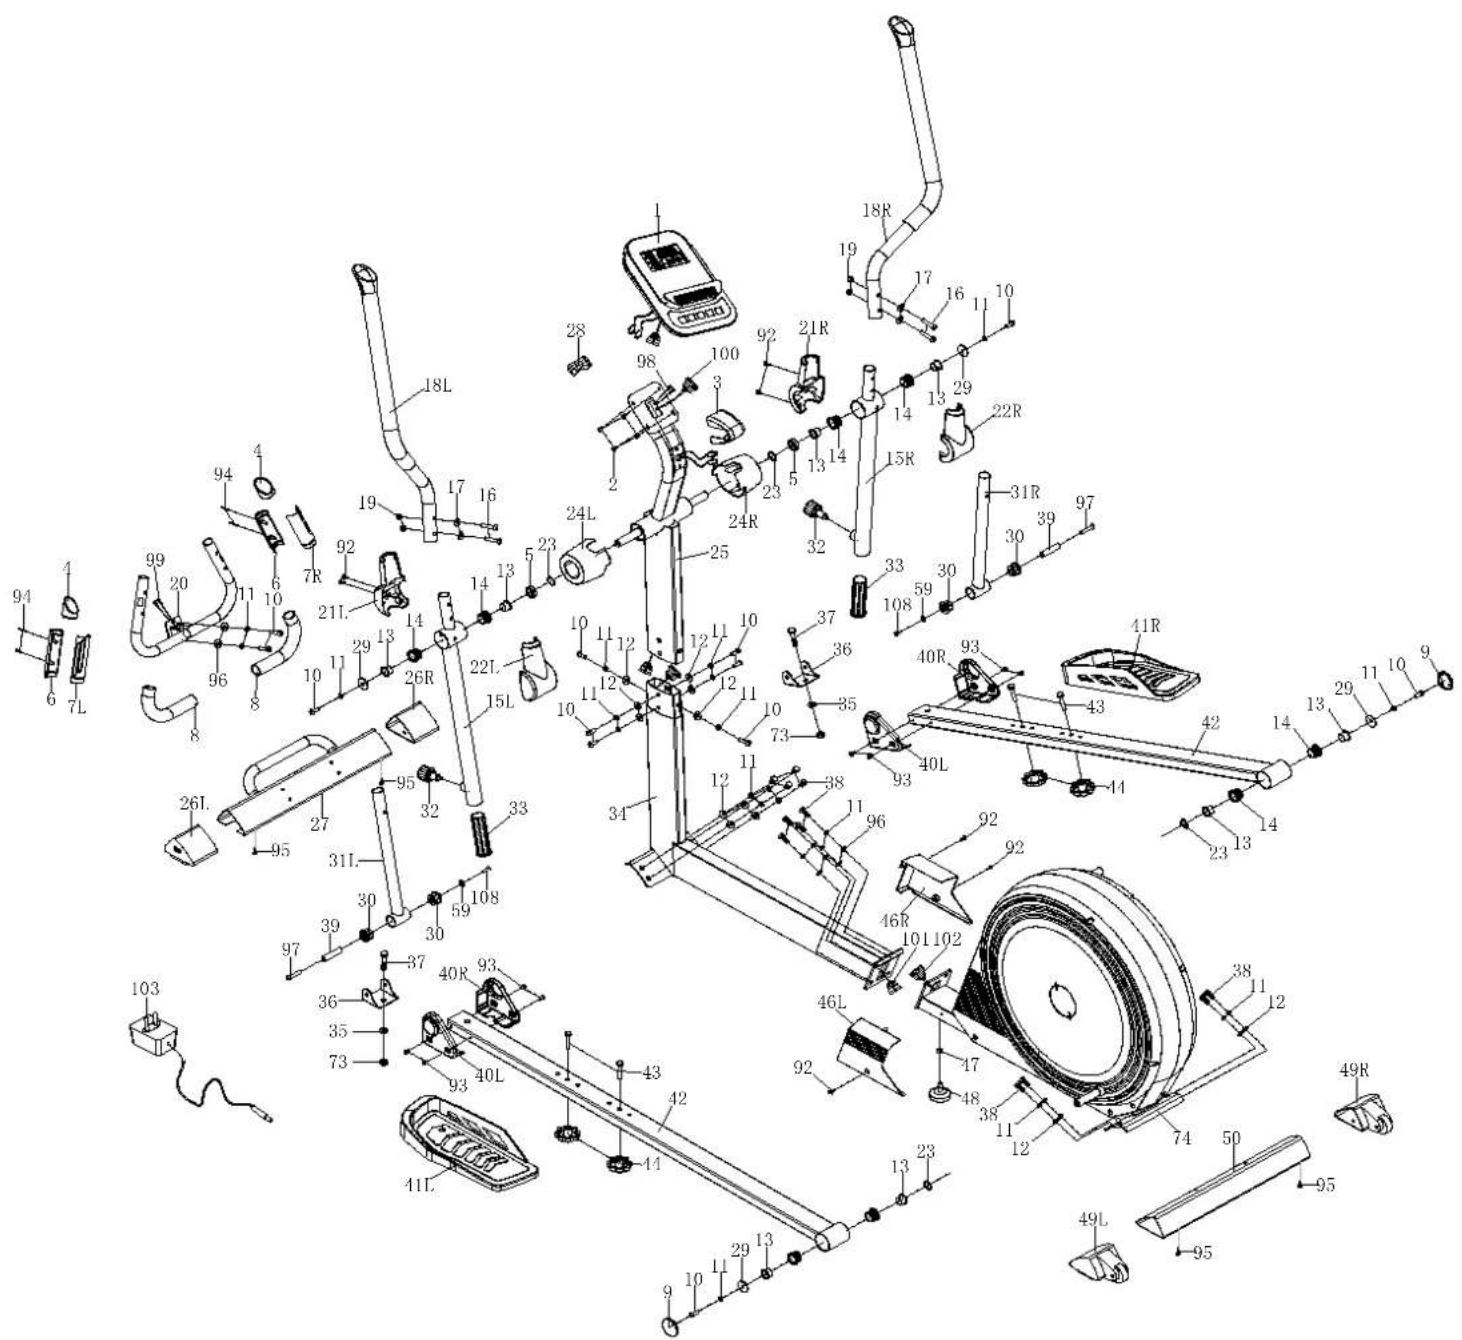
text_image
Technical diagram of a stationary exercise machine with numbered components and labeled parts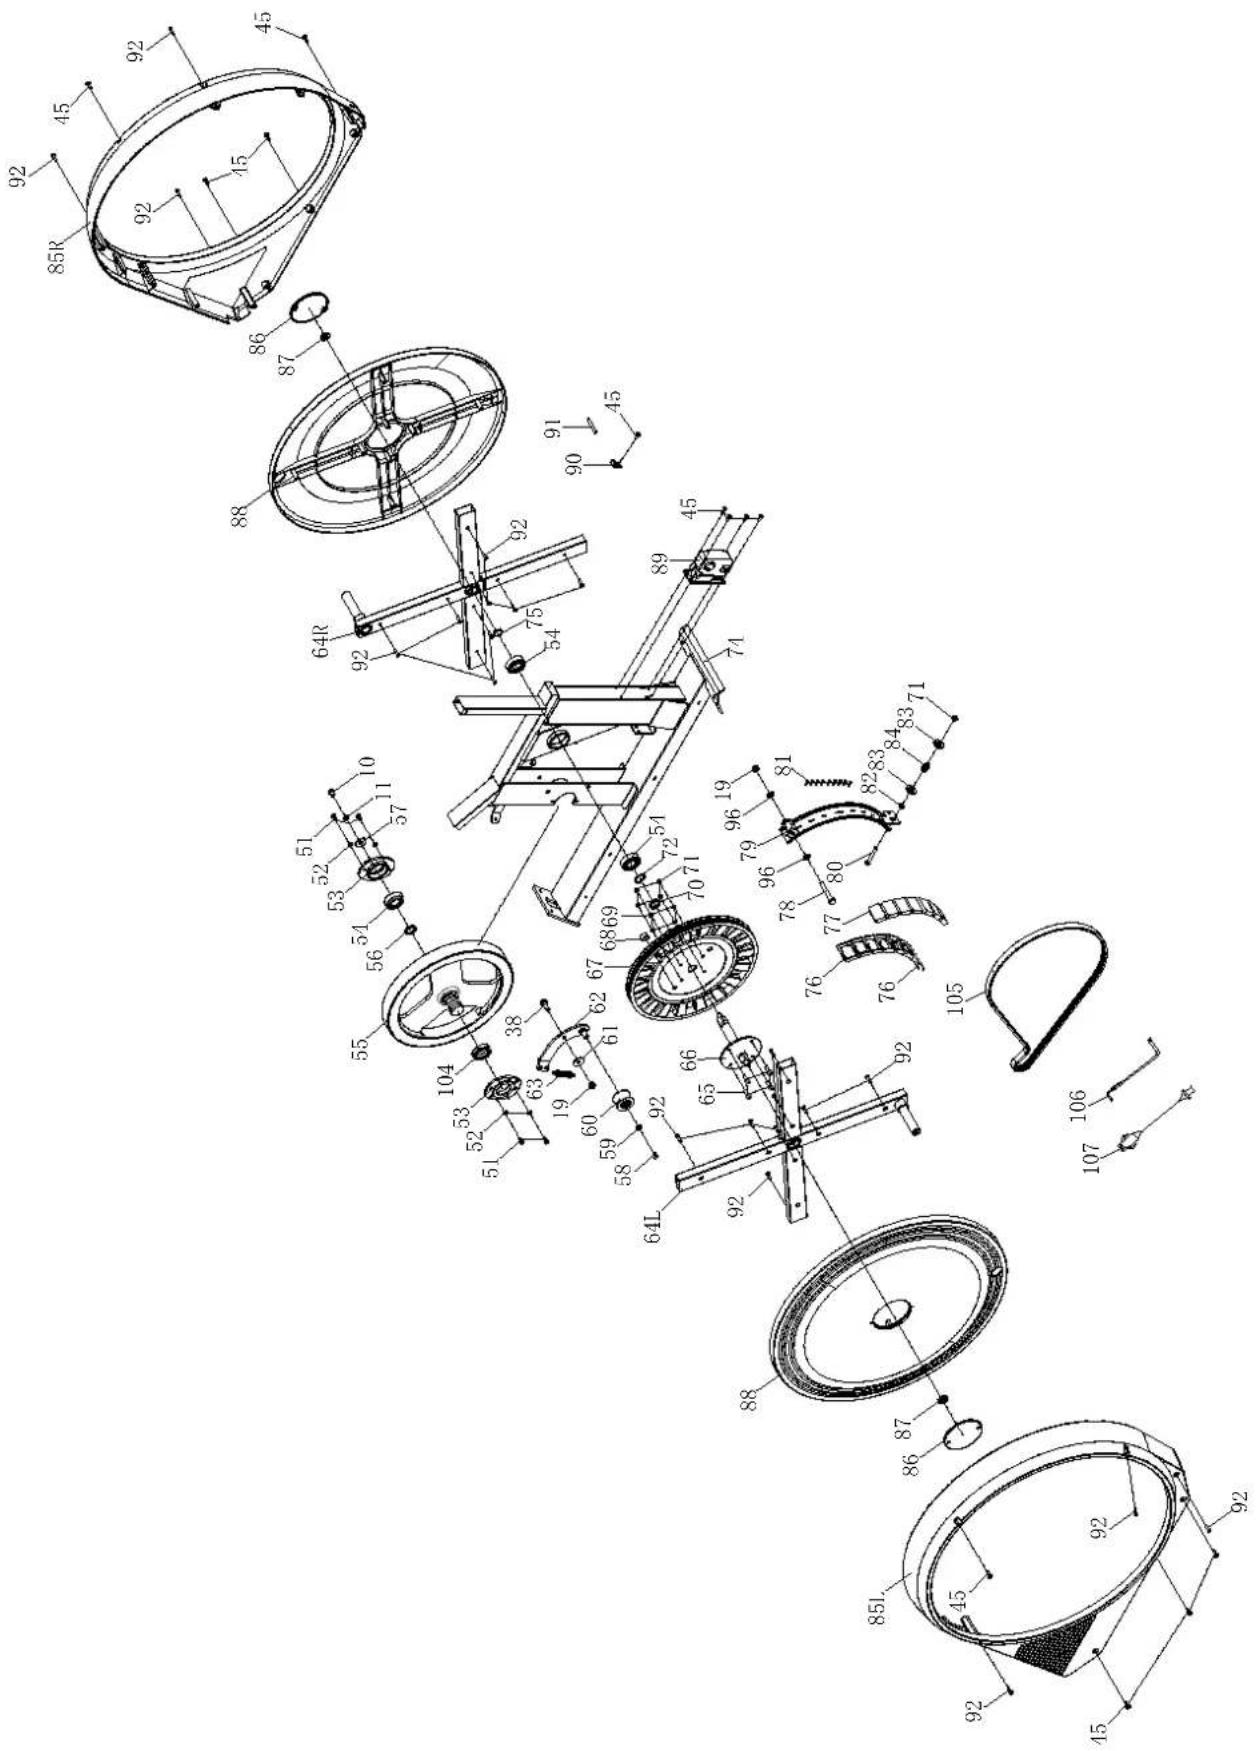
text_image
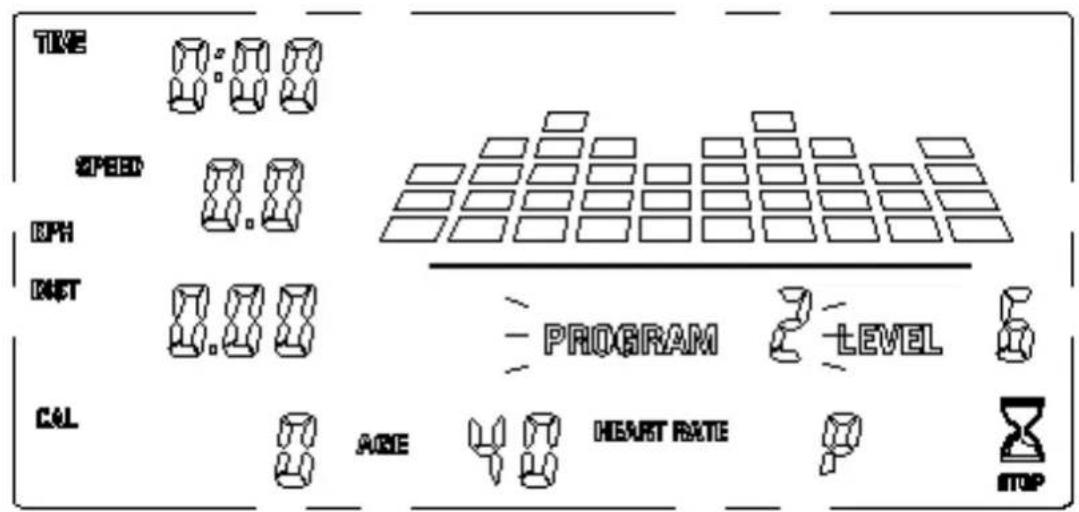
Technical diagram of a mechanical assembly with numbered components and dimension annotationsTime: Time up to 99:59 minutes:seconds. You may also preset the training time (countdown).
Height/Weight: Height (cm) and weight (kg) of the user.
Speed: Training speed up to max. 99.9 km/h (AV = average).
RPM: Rounds per minute (0 - 9999).
KPH/MPH: Unit (kilometres/hour or miles/hour).
DIST (Distance): Distance up to max. 999.9 km. You may also preset the distance.
ODO (Total distance): Total distance run with this device.
FAT%: Body fat percentage (after a body fat measurement).
CAL (Calories): Calories burned up to max. 9999 kcal. The calorie value can be pre-set if necessary.
Watt: Power display up to max. 572 watts.
BMR: (Basal Metabolism Ratio) = Basal metabolic rate (according to a body fat measurement).
THR: Target heart rate value.
AGE: Age of the user.
BMI: Body-Mass-Index (after a body fat measurement).
Heart Rate: Display from 40 to max. 240 beats/min. The pulse value can also be preset.
Body Type: Body type (after a body fat measurement).
Program/Level: Training program and resistance level.
Button functions:
ST/SP: Press to start or end a workout.
UP/DOWN: Press to select a programme, set a default value or change the resistance during the workout.
ENTER: Press to confirm values or select a value for the preset.
MODE: Press to change the display from Speed/DIST/CAL to RPM/ODO/WATT.
RECOVERY: Press to start a heart recovery rate measurement (see later in this manual for explanation).
MANUAL MODE
Press ST/SP or ENTER and (if desired) enter targets or values for Time, Dist, Cal or Age (UP/DOWN changes values, ENTER confirms them). If you do not want to make any entries, simply press ST/SP and start the training.
During the training you can change the pedalling resistance with UP/DOWN.
If you have entered a target value, an acoustic signal will sound when you reach it. Example: You have set 5 minutes - the time then counts down and a signal sounds when „0:00“ is reached. If a time is set, a distance cannot be set at the same time.
During training, press MODE to switch the display from Speed/DIST/CAL to RPM/ODO/WATT.
Press ST/SP to end the training.
PROGRAMME MODES (PROGRAMMES 2 TO 13)
You can choose between different programme profiles (programmes 2 to 13) - the respective profile is shown on the display. Select the desired profile with UP/DOWN and either press ENTER to enter additional target values (analogue to manual mode) or ST/SP to start the training.
During the training you can also change the pedalling resistance with UP/DOWN, otherwise the device adjusts the resistance according to the preset profile.
If you have entered a target value, an acoustic signal will sound when you reach it. Example: You have set 5 minutes - the time then counts down and a signal sounds when „0:00“ is reached. If a time is set, a distance cannot be set at the same time.
During training, press MODE to change the display from Speed/DIST/CAL to RPM/ODO/WATT.
Press ST/SP to end the training.
text_image
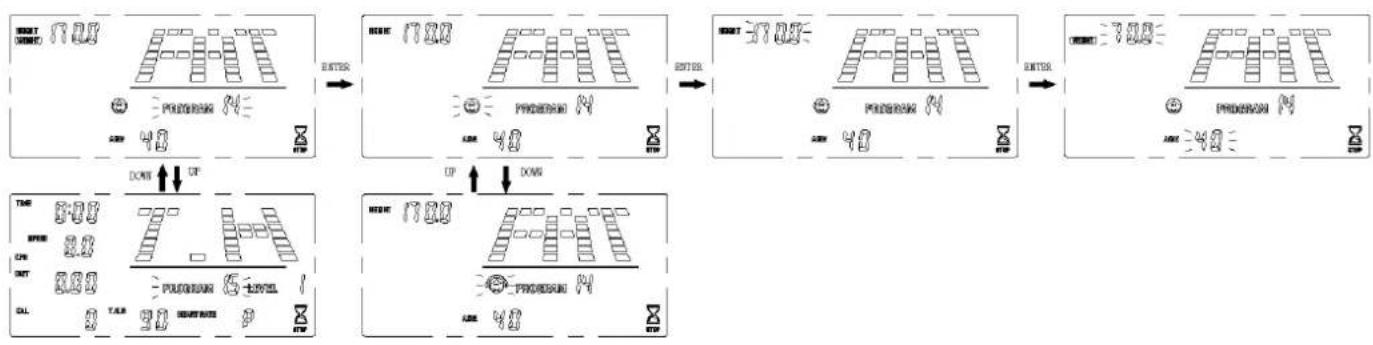
TIME 0:00 SPEED 0.8 OPH 0.8 NET PROGRAM LEVEL CAL AGE HEART RATE STOPBODYFAT MEASUREMENT (PROGRAMME 14)
To perform a body fat measurement, select programme 14 and enter the data for sex (Gender), height (Height), weight (Weight) and age (Age) using ENTER, UP and DOWN.
flowchart
graph TD
    A["START MODE"] --> B["MODE 17.00"]
    B --> C["MODE 37.00"]
    C --> D["MODE 7.00"]
    D --> E["TARE 8.00"]
    E --> F["TIME 9.00"]
    F --> G["TARE 10.00"]
    G --> H["OFF 8.00"]
    H --> I["TARE 9.00"]
    I --> J["TARE 11.00"]
    J --> K["TARE 12.00"]
    K --> L["TARE 13.00"]
    L --> M["TARE 14.00"]
    M --> N["TARE 15.00"]
    N --> O["TARE 16.00"]
    O --> P["TARE 17.00"]
    P --> Q["TARE 18.00"]
    Q --> R["TARE 19.00"]
    R --> S["TARE 20.00"]
    S --> T["TARE 21.00"]
    T --> U["TARE 22.00"]
    U --> V["TARE 23.00"]
    V --> W["TARE 24.00"]
    W --> X["TARE 25.00"]
    X --> Y["TARE 26.00"]
    Y --> Z["TARE 27.00"]
    Z --> AA["TARE 28.00"]
    AA --> AB["TARE 29.00"]
    AB --> AC["TARE 30.00"]
    AC --> AD["TARE 31.00"]
    AD --> AE["TARE 32.00"]
    AE --> AF["TARE 33.00"]
    AF --> AG["TARE 34.00"]
    AG --> AH["TARE 35.00"]
    AH --> AI["TARE 36.00"]
    AI --> AJ["TARE 37.00"]
    AJ --> AK["TARE 38.00"]
    AK --> AL["TARE 39.00"]
    AL --> AM["TARE 40.00"]
    AM --> AN["TARE 41.00"]
    AN --> AO["TARE 42.00"]
    AO --> AP["TARE 43.00"]
    AP --> AQ["TARE 44.00"]
    AQ --> AR["TARE 45.00"]
    AR --> AS["TARE 46.00"]
    AS --> AT["TARE 47.00"]
    AT --> AU["TARE 48.00"]
    AU --> AV["TARE 49.00"]
    AV --> AW["TARE 50.00"]
Press ST/SP to start the measurement - keep both hands on the hand pulse sensors so that the computer can determine the values. The measurement takes about 10 seconds. The values determined are then output:
a) BMI (Body-Mass-Index)
| Sex / Age Underweight Normal Light over- | weight | Overweight Obese | |||
| male ≤30 < 14 | 14~20 20.1~25 25.1~35 > 35 | ||||
| male >30 < 17 | 17~23 23.1~28 28.1~38 > 38 | ||||
| female ≤ 30 | < 17 | 17~24 | 24.1~30 | 30.1~40 | > 40 |
| female >30 | < 20 | 20~27 | 27.1~33 | 33.1~43 | > 43 |
b) Body fat percentage
| Sex | low | medium | slightly high | high |
| male | <13% | 13%-25.9% | 26%-30% | >30% |
| female | <23% | 23%-35.9% | 36%-40% | >40% |
c) BMR
The BMR (Basal Metabolic Rate) is the amount of energy the body requires at rest to maintain basic bodily functions (vital bodily functions such as respiration, digestion, blood circulation and thermoregulation).
d) Body type
| 1 | 2 | 3 | 4 | 5 | 6 | 7 | 8 | 9 |
| very thin | thin | lightly thin | slim | average (healthy) | slightly overweight | overweight | obese | strong obesity |
H.R.C. MODES (PROGRAMMES 15-18)
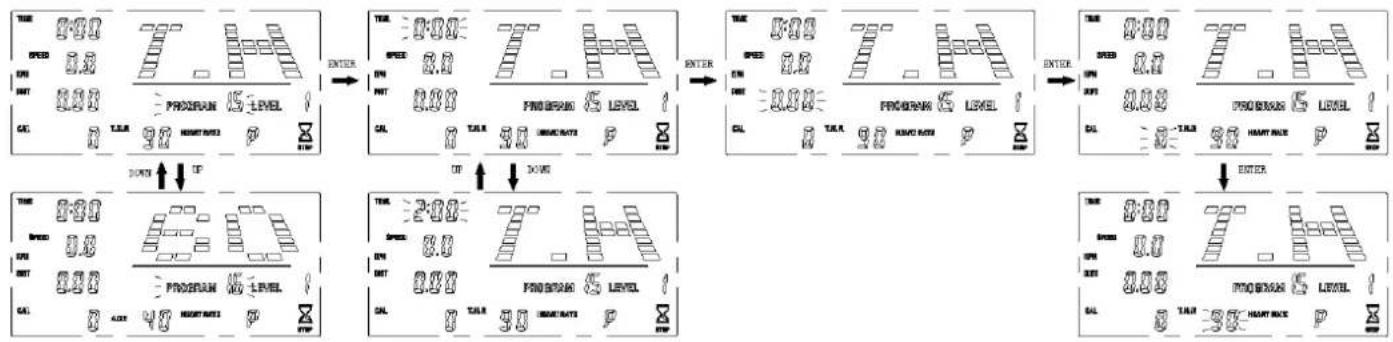
The computer offers the possibility to select heart rate controlled programmes. Here you can choose between entering your own target heart rate (programme 15) or 60% (programme 16), 75% (programme 17) or 85% (programme 18) of the maximum heart rate:
flowchart
graph TD
    A["1 Hour: 0.00"] --> B["2 Hour: 0.00"]
    B --> C["3 Hour: 0.00"]
    C --> D["4 Hour: 0.00"]
    D --> E["5 Hour: 0.00"]
    E --> F["6 Hour: 0.00"]
    F --> G["7 Hour: 0.00"]
    G --> H["8 Hour: 0.00"]
    H --> I["9 Hour: 0.00"]
    I --> J["10 Hour: 0.00"]
    J --> K["11 Hour: 0.00"]
    K --> L["12 Hour: 0.00"]
    L --> M["13 Hour: 0.00"]
    M --> N["14 Hour: 0.00"]
    N --> O["15 Hour: 0.00"]
    O --> P["16 Hour: 0.00"]
    P --> Q["17 Hour: 0.00"]
    Q --> R["18 Hour: 0.00"]
    R --> S["19 Hour: 0.00"]
    S --> T["20 Hour: 0.00"]
    T --> U["21 Hour: 0.00"]
    U --> V["22 Hour: 0.00"]
    V --> W["23 Hour: 0.00"]
    W --> X["24 Hour: 0.00"]
Select the desired programme with UP/DOWN and press ENTER to enter target values (programme 15: TIME→DISTANCE→CALORIES→TARGET HEART RATE; programmes 16-18: TIME→DISTANCE→CALORIES→AGE).
Then press ST/SP to start exercising and always keep your hands on the heart rate sensors.
During the workout, the device automatically changes the resistance so that the target heart rate can be reached. In addition, you can change the pedalling resistance manually with UP/DOWN.
If you have entered a target value, an acoustic signal will sound when it is reached. Example: You have set 5 minutes - the time then counts down and a signal sounds when „0:00“ is reached. If a time is set, a distance cannot be set at the same time.
During training, press MODE to switch the display from Speed/DIST/CAL to RPM/ODO/WATT.
Press ST/SP to end the training.
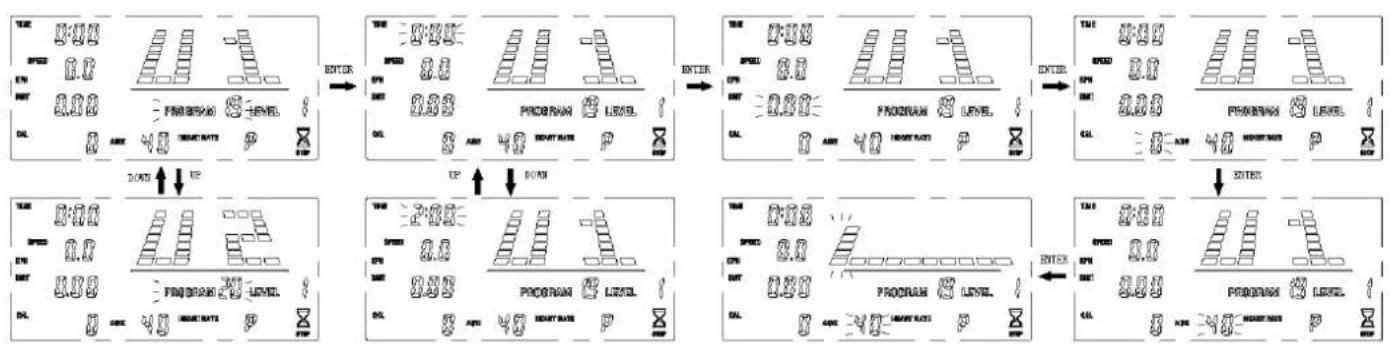
USER-DEFINED PROGRAMMES 19-22
The computer offers the ability to select 4 different user-definable programs (U1 to U4; programs 19 to 22). You can create the respective program profile yourself and then train accordingly. Use the UP/DOWN and ENTER keys to set the profiles and possible targets.
flowchart
graph TD
    A["Initial Setup"] --> B["EXP"]
    B --> C{EXP Level}
    C -->|EXP| D["Final Output"]
    D --> E["EXP"]
    E --> F{EXP Level}
    F -->|EXP| G["Final Output"]
During training, the device automatically changes the resistance according to the specified profile - you can also change the pedaling resistance manually with UP/DOWN.
If you have entered a target value, an acoustic signal will sound when it is reached. Example: You have specified 5 minutes - the time then counts down (countdown) and a signal sounds when "0:00" is reached. If a time is specified, a distance cannot be specified at the same time.
During training, use MODE to switch the display from Speed/DIST/CAL to RPM/ODO/WATT.
Press ST/SP to end exercise.
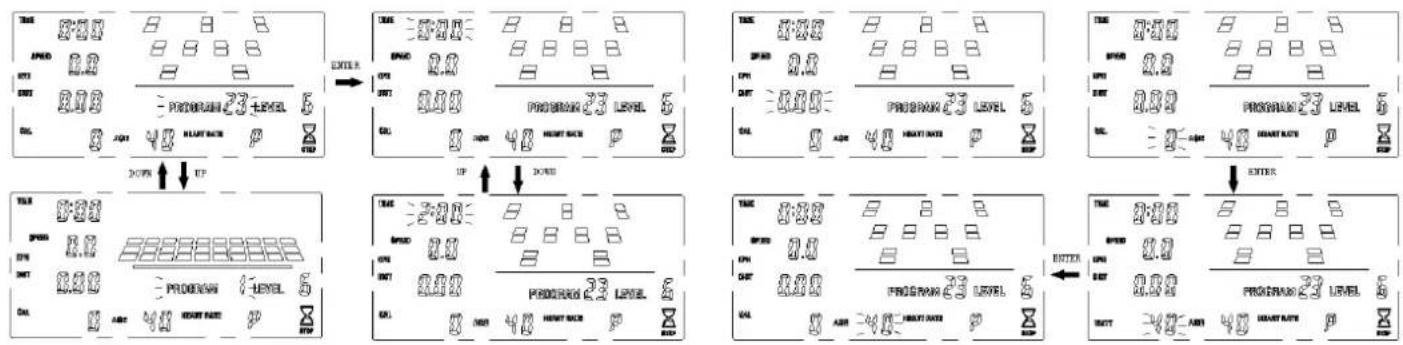
WATT MODE (PROGRAMME 23)
Select program 23 and enter the data for TIME, DISTANCE and WATT using ENTER, UP and DOWN.
flowchart
graph TD
    A["Input Signal"] --> B["Program 23 LEVEL"]
    B --> C{Decision}
    C -->|Yes| D["Program 23 LEVEL"]
    C -->|No| E["Program 23 LEVEL"]
    D --> F["Output Signal"]
    E --> G["Output Signal"]
    H["Down"] --> I["UP"]
    I --> J{Decision}
    J -->|Yes| K["Program 23 LEVEL"]
    J -->|No| L["Program 23 LEVEL"]
    K --> M["Output Signal"]
    L --> N["Output Signal"]
Then press ST/SP to start training.
During training, the device automatically changes the resistance so that the specified wattage can be achieved. You can also change the pedaling resistance manually using UP/DOWN.
If you have entered a target value, an acoustic signal will sound when it is reached. Example: You have specified 5 minutes - the time then counts down (countdown) and a signal sounds when "0:00" is reached. If a time is specified, a distance cannot be specified at the same time.
During training, use MODE to switch the display from Speed/DIST/CAL to RPM/ODO/WATT.
Press ST/SP to end exercise.
HEART RECOVERY RATE MEASUREMENT
With this special function it is possible to determine the heart recovery rate after training, which is an indicator of the athletic and physical condition of the trainee. The better the heart recovery rate (i.e. the faster the heart rate recovers to normal), the "fitter" the athlete is. After you complete the workout, please keep your hands on the hand pulse sensors (grip them to make the best possible contact) or keep a compatible chest strap on. Now press the "RECOVERY" button. Wait 60 seconds while the computer continuously measures your pulse. After the time has elapsed, your assessed cardiac recovery rate will be displayed on the computer with a scale from 1.0 (F1) to 6.0 (F6). It's best to improve your rate to F1 through regular training!
| F1=1.0 excellent | |
| 1.0 < F2 <2.0 very good | |
| 2.0 < F3 <2.9 good | |
| 3.0 < F4 <3.9 normal | |
| 4.0 < F5 <5.9 relatively poor | |
| F6=6.0 poor |
Using a chest-belt
The computer is equipped with a built-in receiver for the wireless receipt of the pulse frequency with a compatible, optionally available SKANDIKA chest-belt (frequency: 5.3 kHz). Recommended range: 100 - 150 cm.
If you want to transmit your pulse frequency via chest-belt, follow these instructions:
- Make sure, the correct battery is inserted into the chest belt (button cell of type CR-2032, 3 volts). Battery replacement: Open the battery case cover on the back side of your transmitter (you may use a coin for easier handling) and replace the old battery by a fitting new one. The „+“ symbol should point upwards. Make sure, the sealing ring ist correctly placed. Close the case cover properly.
- The transmitter needs to be attached to the belt with the 2 buttons. Moisten the electrodes slightly before wearing the belt. This increases the contact sensibility and enables a better wireless signal transmitting.
- Put on the chest belt and make sure the electrodes are touching your breast directly. You may adjust the belt to a comfortable length. However, the electrodes must have contact with your skin in order to measure your heart rate correctly.
- The 5.3 kHz-chest-belt communicates with the computer via the built-in receiver. It may last up to one minute before a correct display can be seen.
- The Bluetooth-chest-belt (included in the scope of delivery) needs to be connected via the free app and your smartphone or tablet. Please see the respective instructions in the chapter „Using the app“ on the next page.
Safety hint:
Do not use the chest-belt if you have a pacemaker, unless you double-checked with the producer of the pacemaker and with your doctor!
Battery-Disposal:
Batteries should not be considered as regular garbage. As consumer you are obliged to return finished batteries. The finished batteries can be returned to a collection base at your residential area or at places, where batteries can be bought.
WARM-UP and COOL-DOWN
A successful exercise program consists of a warm-up, aerobic exercise and a cool-down. Exercise for at least two or preferably three times a week, resting for a day between workouts. After several months, you may increase the frequency to four or five times per week.
Warm-Up
This stage helps to improve the blood circulation and prepares the muscles for your workout. It additionally helps to reduce the risk of injury or cramps. It is recommended to do some stretching exercises as shown here below. Hold each stretching position for approximately 30 seconds. Never force or jerk yourself into a stretching position – if you feel pain, STOP immediately. Warm-up exercises may also include brisk walking, jogging, jumping jacks, jump rope exercises or running in place.
Stretching
Muscles can be stretched more easily when these are warm. This reduces the risk of injury. DO NOT BOUNCE.
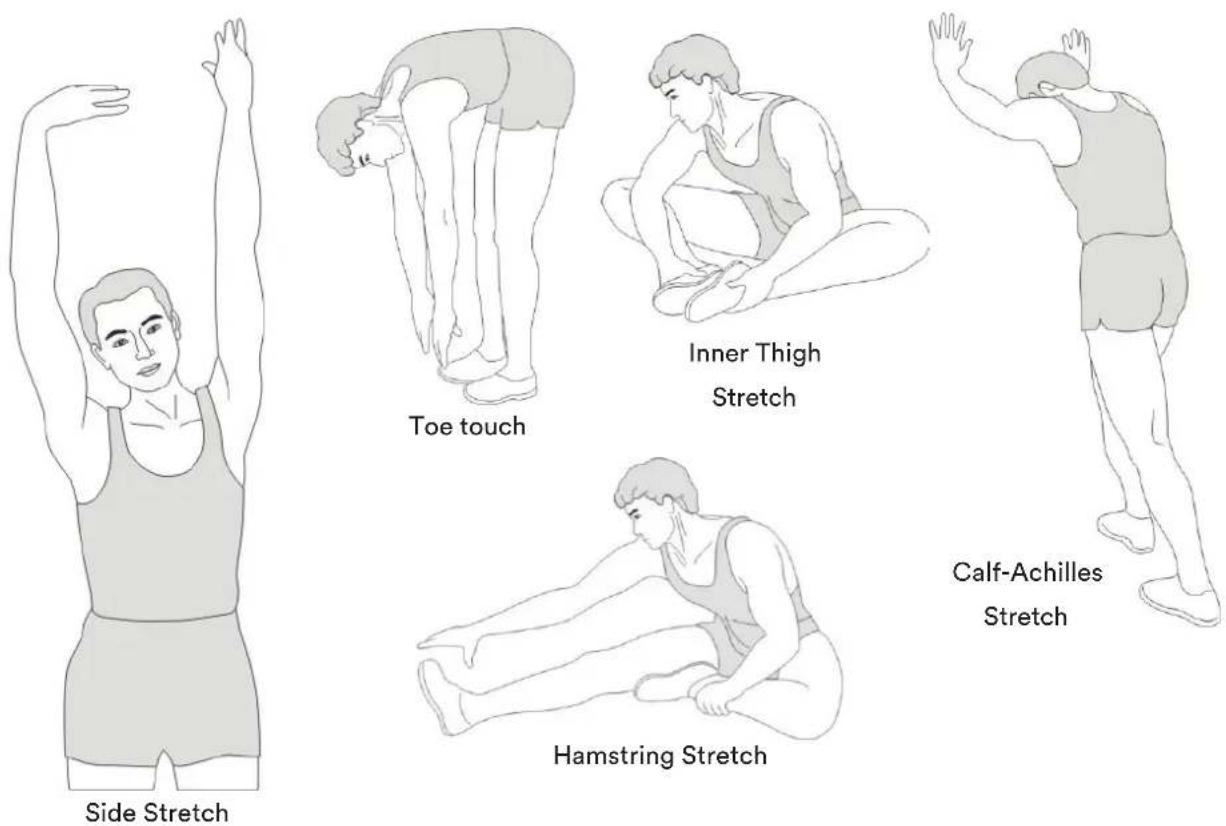
Remember always to check with your physician before starting any exercise program.
Cool-Down
This stage helps to soothe your muscles and your cardiovascular system after your workout.
At the end of your workout, reduce the speed and exercise for approximately 5 minutes at this lower speed level. Afterwards, repeat the warm-up exercises as described above.
KINOMAP
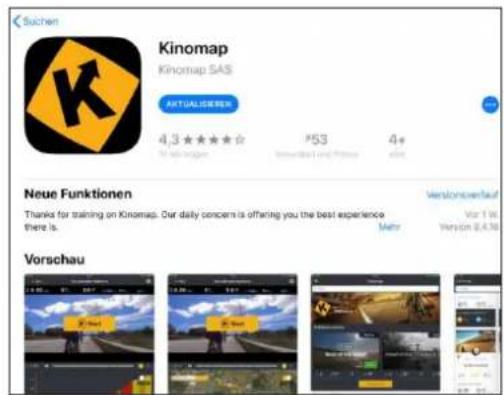
The device computer can be connected to the „KinoMap“ app via Bluetooth (frequency: 2.4 GHz). The free KinoMap app turns your device into a powerful and fun fitness product! Choose from the geotagged video on Kinomap and go! Your position is shown in the video and as icon on the map. Download the Kinomap Fitness app in the app or play store by searching for ‘Kinomap Fitness’ or follow one of the links below.
Install and open the app and register resp. log in. Activate Bluetooth. Now add the training device as follows:

text_image
Suchen Kinomap Kinomap SAS ACTUALSENSE 4.3 ★★★★☆ P53 4+ 4000000000000000000000000000000000000000000000000000000 Neue Funktionen Thanks for training on Kinomap. Our daily concern is offering you the best experience there is. Vorschau
text_image
Kinomap FOLGT SIE Kinomap Gesponsert STAVANGER, LIMBURG & HONG KONG RACES JOIN THE CHALLENGE HAMMER SERIES in ASSOCIATION WITH wahoo Mehr erfahren >-
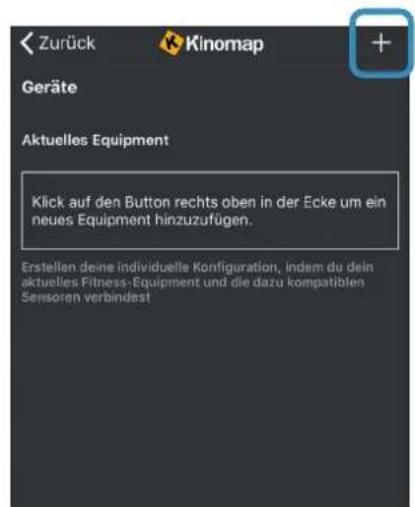
- Tap on „+“ 3. Crosstrainer
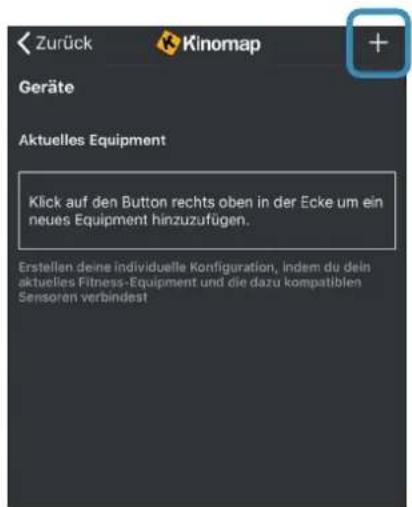
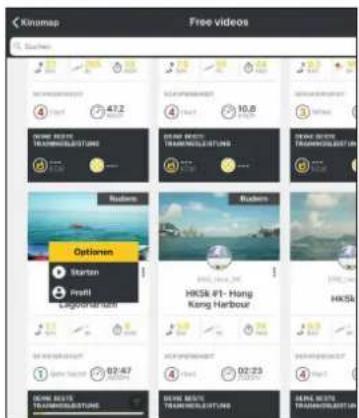
Now tap on OK and return to main menu. You can now choose a course for your exercise (depending on your type of KinoMap account maybe only some free courses). Press Start and begin to exercise!
text_image
Kinomap Free videos Suehens 47.2 10.8 Options Starten Insti Ligodarland HKS4 #1-Hong Kang Harbour HKS4 02:47 02:23 02:47 02:23 02:47 02:23 02:47 02:23GUARANTEE CONDITIONS
For our devices we provide a warranty as defined below.
-
In accordance with the following conditions (numbers 2-5) we repair defect or damage to the device free of charge, if the cause is a manufacturing defect. Therefore, these defects / damages need to be reported to us without delay after appearance and within the warranty period of 24 months after delivery to the end user. The warranty does not cover parts, which easily break (e.g. glass or plastic). The warranty does not cover slight deviations of the product, which are insignificant for usability and value of the device and damage caused by chemical or electrochemical effects and damages caused by penetration of water or generally force majeure damage.
-
The warranty achievement is the replacement or repair of defective parts, depending on our decision. The cost of material and labor will be borne by us. Repairs at customer site cannot be demanded. The proof of purchase along with the date of purchase and / or delivery is required. Replaced parts become our property.
-
The warranty is void if repairs or adjustments are made,
which are not authorized by us or if our devices are equipped with additional parts or accessories that are not adapted to our devices. Furthermore, the warranty is void if the device is damaged or destroyed by force majeure or due to environmental influences and in case of improper handling / maintenance (e.g. due to non-observance of the instruction manual) or mechanical damages. The customer service may authorize you to replace or repair defective parts after telephone consultation. In this case, the warranty is not void.
-
Warranty services do not extend the warranty period nor do they initiate a new warranty period.
-
Further demands, especially claims for damages which occurred outside the device, are excluded as long as a liability is not obligatory legal.
-
Our warranty terms - which cover the requirements and scope of our warranty conditions - do not affect the contractual warranty obligations of the seller.
-
Parts of wear and tear are not included in the warranty.
-
The warranty is void if not used properly or if used in gyms, rehabilitation centers and hotels. Even if most of our units are suitable for a professional use, this requires a separate agreement.
ENVIRONMENTAL PROTECTION

At the end of its life cycle, this product must not be disposed of with household waste but must be taken to a collection unit for the recycling of electric and electronic equipment. The symbol on the product, the instructions for use or the packaging express mention of this. The basic materials can be recycled as specified on the labelling.
When recycling the materials and finding other utilisation for used equipment, you are making a significant contribution towards protecting our environment. Ask at your council about the respective local disposal sites.
In accordance with our policy of continual product improvement, we reserve the right to make technical and visual changes without notice.
NOTES

Contenu

skandika.com/service
text_image
Technical diagram of a stationary exercise machine with numbered components and labeled parts