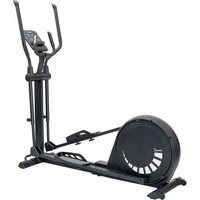
Cardiocross Carbon Pro II - Elliptical bike Skandika - Free user manual and instructions
Find the device manual for free Cardiocross Carbon Pro II Skandika in PDF.


User questions about Cardiocross Carbon Pro II Skandika
0 question about this device. Answer the ones you know or ask your own.
Ask a new question about this device
Download the instructions for your Elliptical bike in PDF format for free! Find your manual Cardiocross Carbon Pro II - Skandika and take your electronic device back in hand. On this page are published all the documents necessary for the use of your device. Cardiocross Carbon Pro II by Skandika.
USER MANUAL Cardiocross Carbon Pro II Skandika
natural_image
Exterior view of a modern stationary exercise machine (no text or symbols visible)GB Assembly instructions and user guide
text_image
Sandiko Camping Fitness Saga Fitness Spending, e.g. 100% fitness and 50% fitness is important to use the following: 200% fitness and 50% fitness is important to use the following: Spending Web articlestext_image
QR code image containing encoded data, no visible human-readable textSicherheitshinweise
Bevor Sie beginnen

2x Mutter 3/8" (#89)
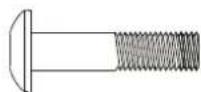
1x Linsenkopf-Inbusschraube
3/8"x1 1/2" (#155)
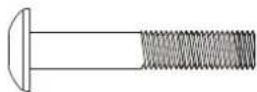
1x Linsenkopf-Inbusschraube
3/8"x2" (#156)
Schritt 4

Werkzeug
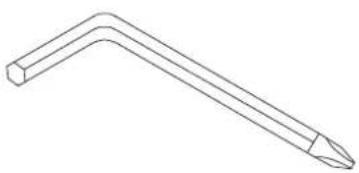
natural_image
Line drawing of a right-angle tool with a pointed tip and rectangular body (no text or symbols)natural_image
Simple line drawing of a wrench (no text or symbols)12-Maulschlüssel (#110)
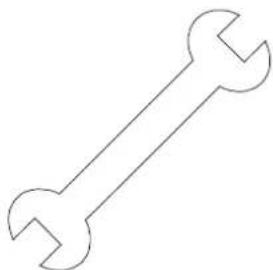
natural_image
Simple line drawing of a double-ended wrench (no text or symbols)13/14-Maulschlüssel (#111)
Montagezeichnungen
Schritt 1
text_image
Technical diagram of a mechanical device with numbered components and labeled parts, including a 108-pin wrench and 110-pin wrench.Schritt 2
text_image
Technical diagram of an exercise machine with numbered components and labeled partsMontagezeichnungen
Schritt 3
text_image
Technical diagram of a stationary exercise machine with numbered components and labeled partsSchritt 4
text_image
Technical diagram of a stationary exercise machine with numbered components and labeled partsAufbauanleitung
Montage
natural_image
Close-up of a hand holding a small white object near a black bicycle leg (no text or symbols visible)Transport
natural_image
Person using a stationary exercise machine for assistance (no text or symbols visible)Zusammenklappen
Schritt 1:
natural_image
Mechanical diagram of an exercise bike with a sensor and control panel, showing motion arrows (no text or symbols)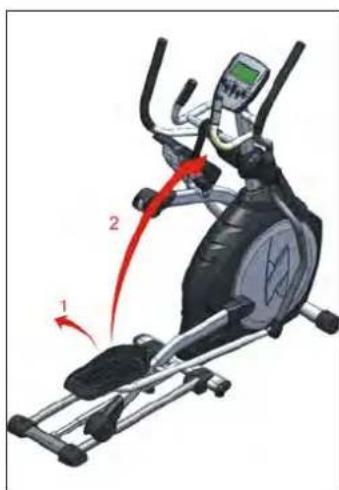
text_image
Diagram of an exercise machine with labeled motion arrows indicating movement from foot to seat and back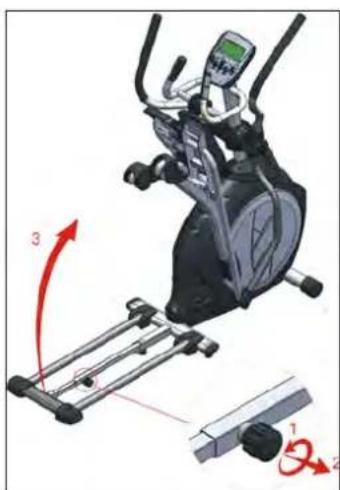
natural_image
Mechanical exercise setup with leg and arm components, showing motion arrows (no text or symbols)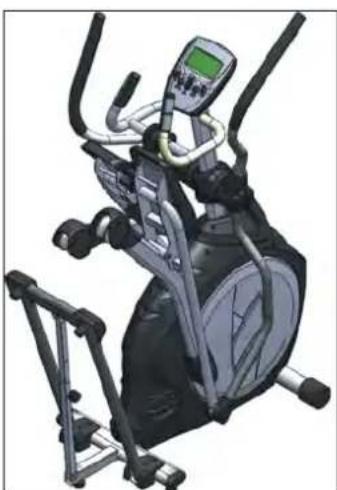
natural_image
Exterior view of a stationary exercise bike with control panel and leg mechanism (no text or symbols visible)text_image
Diagram illustrating the use of a stationary exercise bike with labeled motion arrows and components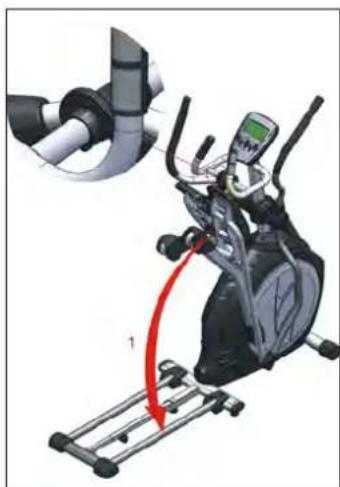
natural_image
Illustration of a person exercising on an outdoor bike with a red curved motion arrow indicating movement (no text or symbols)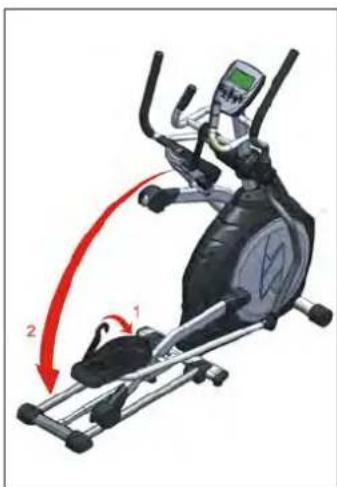
text_image
Diagram illustrating the exercise cycle of a stationary bike with labeled motion arrows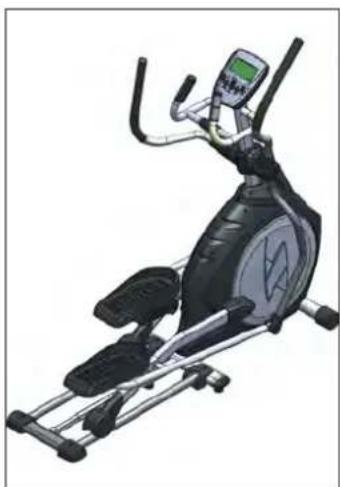
natural_image
Illustration of an exercise bike with a digital controller and motion capture device (no text or symbols)55% Max H.R.C. -- Zielherzrate = (220 - Alter) x 55%
75% Max H.R.C. -- Zielherzrate = (220 - Alter) x 75%
90% Max H.R.C. -- Zielherzrate = (220 - Alter) x 90% (s.Abb.)
text_image
Image containing a single horizontal line symbol resembling '===' or a minus sign.
text_image
日 19.5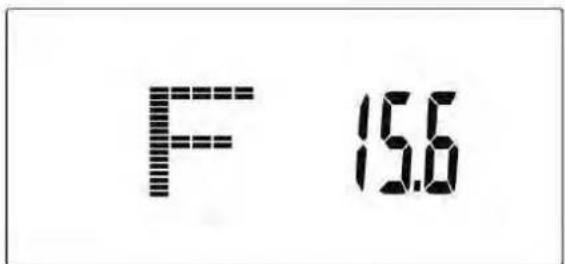
text_image
F 15.6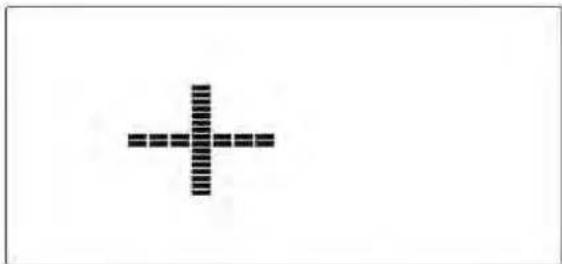
natural_image
Simple black cross symbol on white background, no text or labels presentFehlermeldungen
iPod touch* (4th generation)
iPod touch* (3rd generation)
iPhone* 4S
iPhone* 4
iPhone* 3GS
iPad* 2
iPad*
Android-Geräte:
text_image
iconsole+ QUICK START PROGRAM HRC WATTtext_image
Program Training Time 00:01 Distance 0.0 Calories 0 Heart Rate BPM WATT 41 15.3 KM/H Transmission Level 1text_image
Your workout this time Time 00:20 Distance 0.0 Calories 8 Average Speed 0.0 Airtext_image
Technical schematic diagram of a mechanical assembly with numbered components and dimension annotationsGarantiebedingungen
Assembly drawings....30
Assembly instructions....32
Maintenance, Lubrication and Transport 34
Folding mechanism 35
Computer operation 37
Use of the iConsole+ app....42
Using a chest-belt 45
Training instructions / warm-up and cool-down 45
Exploded drawing....47
Guarantee terms 48
Visit our website for further information www.skandika.com
text_image
Camping Fitness Saga Fitness Provision, support for fitness and your own body and your own body. You can't use the fitness profile or feature.Scan the QR code with your smartphone
text_image
QR code image containing encoded data, no visible human-readable textSafety notice
Before you start
Congratulations on purchasing Skandika CardioCross Carbon Pro II Elliptical!
Skandika gym equipments are high performance quality products, which assure high quality materials and professional workmanship. They are most helpful for your fitness training at home.
The Skandika cross trainer strengthens your cardio-vascular system, takes care of your joints, continuously stimulates your metabolism and gives you fitness and a feeling of well-being.
Safety instructions
- This gym equipment involves a rotational speed dependent equipment of class HA.
• The maximum load capacity is 145 kg. - Your cross trainer must be used only for the intended purpose.
- Any other use is not permissible and potentially dangerous. The dealer cannot be held responsible for the usage that is not according to the intended purpose.
Your cross-trainer has been designed and developed in compliance with the latest safety-related know-how. Following instructions help you to ensure this safety:
- Assemble the equipment properly and follow the instructions at all points so that injuries can be avoided. Toddlers and pets should be kept away from the equipment. Check for the tightness of all the screws and nuts before putting the equipment into operation.
- Before starting the workout, you should consult your doctor and get your physical fitness checked. Stop the workout if you experience dizziness or nausea.
- Do not use your cross trainer on the cushioned, voluminous or plush carpet. In doing so, the carpet as well as the cross trainer can be damaged.
- Avoid the access to the children, especially, during the workout. There is a high risk of injury due to the moving elements.
- Hands should not reach near the pedals or arms from outside. Mind your hands while folding the equipment.
- Never use your cross trainer with defective cables or defective plug connection. If the device does not function smoothly, please contact your dealer.
- Please keep the power cable away from the hot surfaces.
- Do not use the cross trainer in the surroundings with highly inflammable gases.
- The cross trainer is not suitable for outdoor operation.
- Select the training program that suits your physical ability and fitness level.
- Please ensure the proper sportswear. Wear suitable shoes that ensure stability and skid resistance.
- The equipment should be never used simultaneously by multiple users.
- Please change all the settings to "OFF" for switching off.
Please retain these instructions- Think of your safety!
Overview
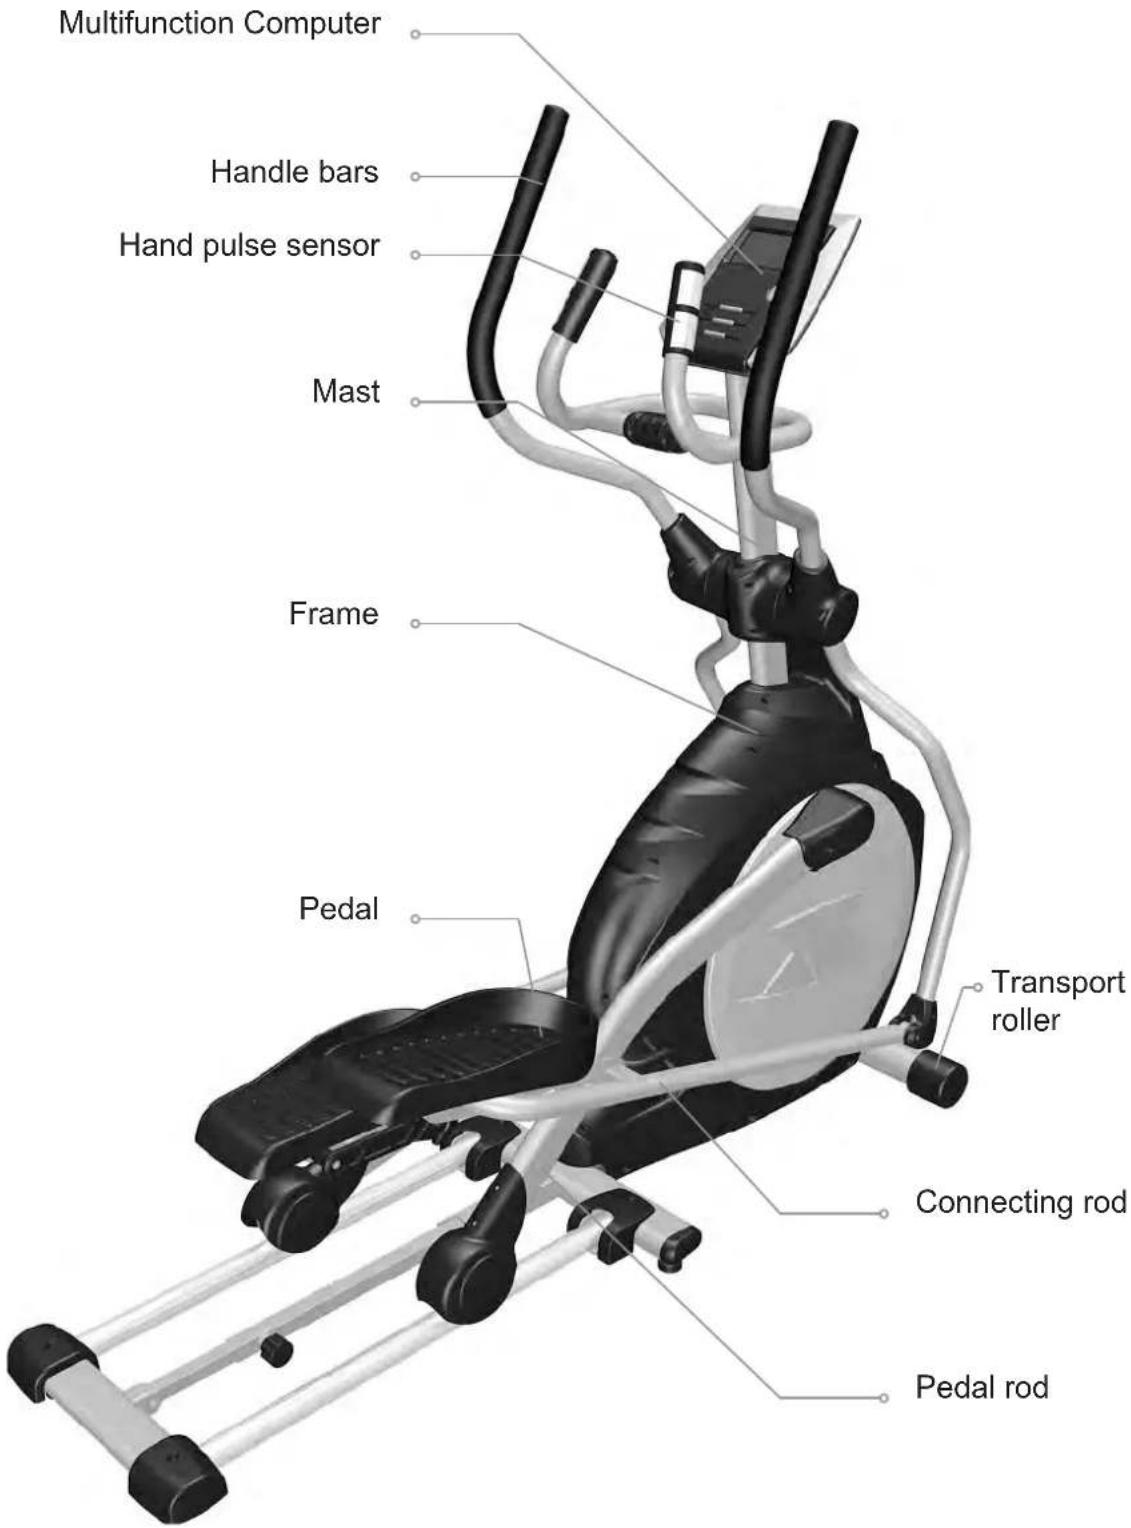
text_image
Multifunction Computer Handle bars Hand pulse sensor Mast Frame Pedal Transport roller Connecting rod Pedal rodAssembly set check list
Please check the assembly set for completeness.
Step 1
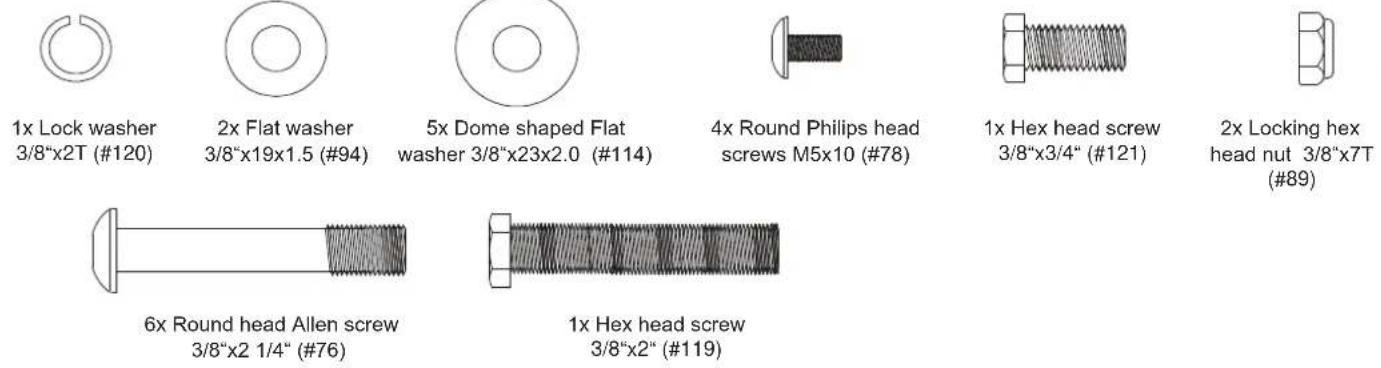
text_image
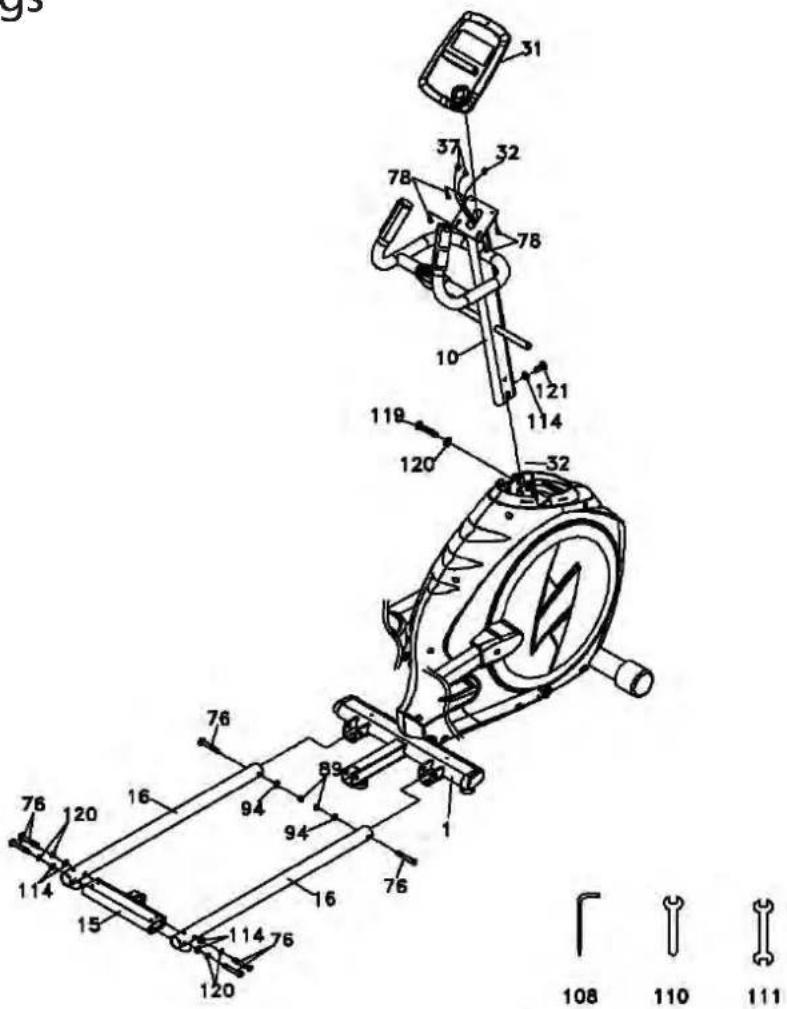
1x Lock washer 3/8"x2T (#120) 2x Flat washer 3/8"x19x1.5 (#94) 5x Dome shaped Flat washer 3/8"x23x2.0 (#114) 4x Round Philips head screws M5x10 (#78) 1x Hex head screw 3/8"x3/4" (#121) 2x Locking hex head nut 3/8"x7T (#89) 6x Round head Allen screw 3/8"x2 1/4" (#76) 1x Hex head screw 3/8"x2" (#119)Step 2

text_image
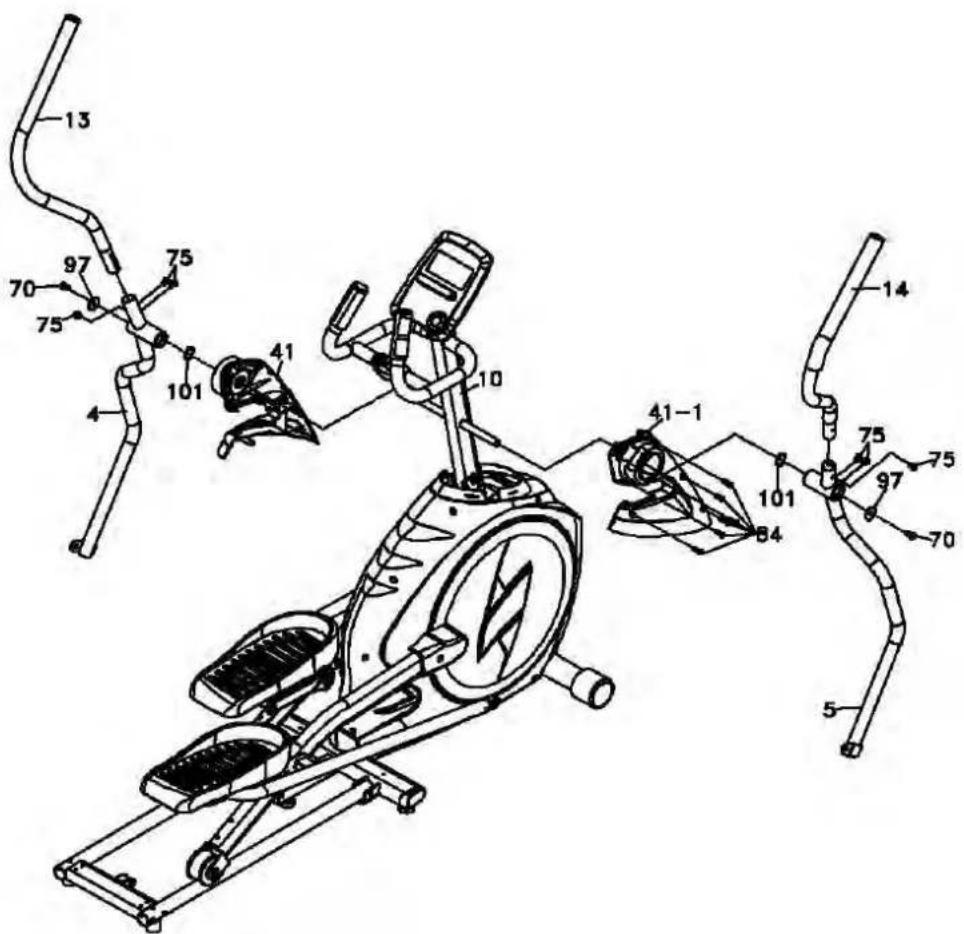
6x Round head Allen screw 5/16"x15 (#75) 6x Round Philips head tapping screw Ø3.5x12 (#84) 2x Hex head screw 5/16"x15 (#70) 2x Flat washer 5/16"x23x1.5 (#97) 2x Wave washer Ø17x23 (#101)Step 3

text_image
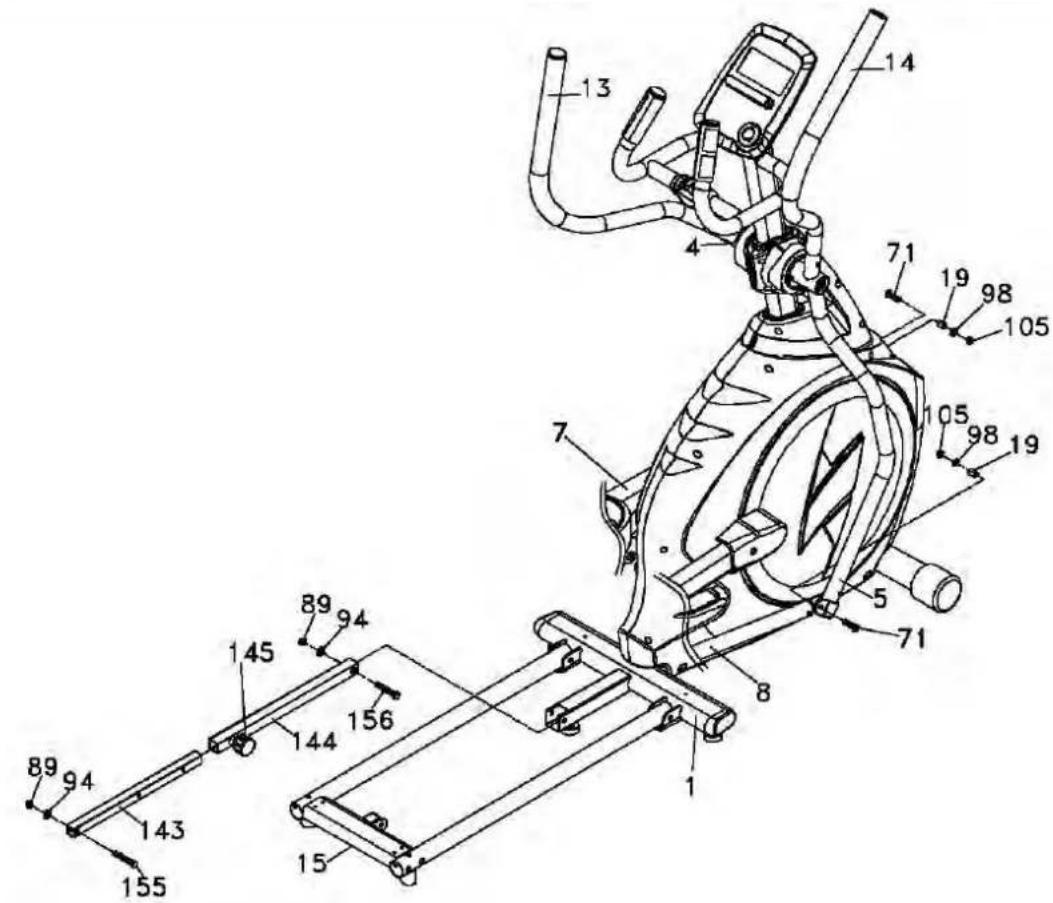
2x Flat washer 5/16"x20x1,5 (#98) 2x Flat washer 3/8"x19x1.5 (#94) 2x Hex head screw 5/16"x32 (#71) 4x Locking hex head nut 2x 5/16" (#105) 2x3/8" (#89) 1x Round head Allen screw 3/8"x1 1/2" (#155) 1x Round head Allen screw 3/8"x2" (#156)Step 4

text_image
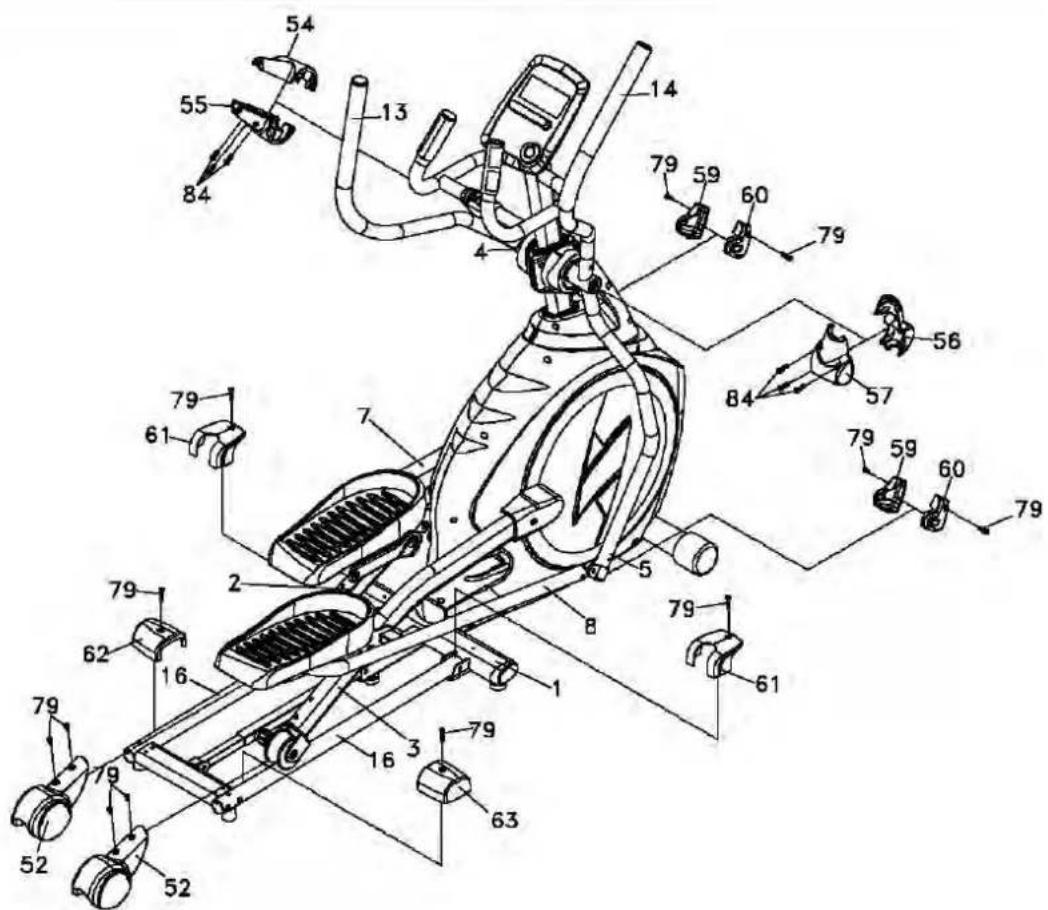
6x Round Philips head tapping screw Ø3,5x12 (#84) 12x Round Philips head tapping screws M5x15 (#79)Tools
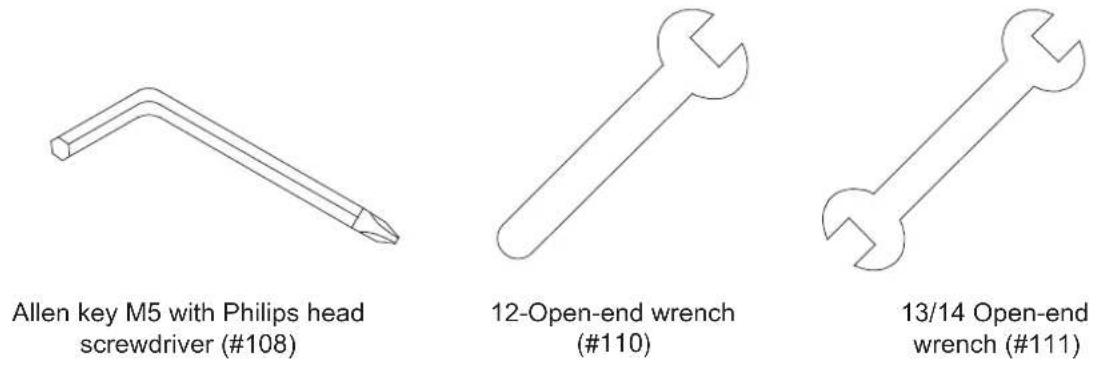
text_image
Allen key M5 with Philips head screwdriver (#108) 12-Open-end wrench (#110) 13/14 Open-end wrench (#111)Assembly drawings
Step 1
text_image
Technical diagram of a mechanical device with numbered components and exploded view, including labeled parts and part numbers.Step 2
text_image
Technical diagram of an exercise machine with numbered components and labeled partsAssembly drawings
Step 3
text_image
Technical diagram of a stationary exercise machine with numbered components and labeled partsStep 4
text_image
Technical diagram of a stationary exercise machine with numbered components and labeled partsAssembly instructions
Assembling
Unpack the gym equipment
- Take the help of another person as few parts of your new cross trainer are bulky and heavy.
- Use a box cutter to cut the cardboard box along the dotted line.
- Remove all the parts from the carton and check them for completeness and damages.
- Localize the assembly set. This is subdivided into steps. First take out the tools. Take out the parts for the specified step respectively in order to facilitate the installation.
Carry out the assembly carefully as the damages and defects which are caused due to the errors in assembly cannot be covered under warranty and guarantee. Therefore, read through the instructions in detail before assembling, maintain the sequence of the assembly steps and comply with the individual assembly steps. The assembly of the gym equipment must be carried out carefully by the adults.
Carry out the assembly of your gym equipment at a place which should be flat, clean and free from the objects obstructing the assembly. The assembly should be carried out by two people. Workout can be started only after the assembly of the gym equipment is completed.
Step 1: Assembly of the mast
-
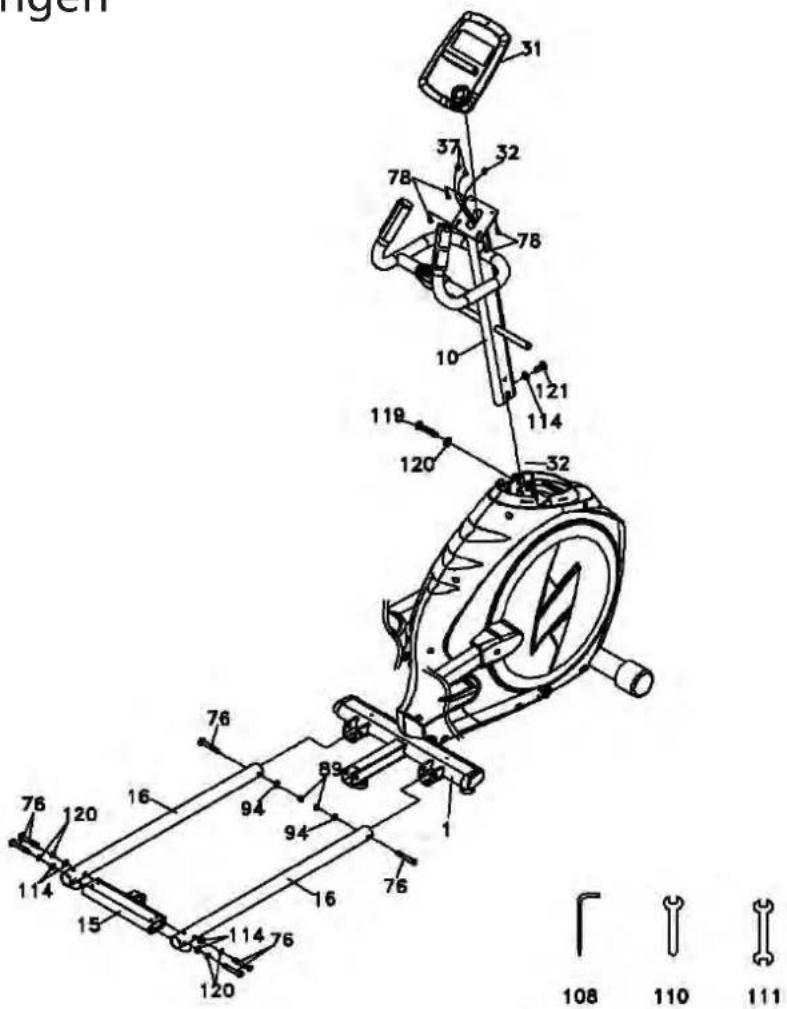
Pull the computer cable (32) with the help of the wire, which is found in the mast, through the mast (10). Insert the mast in the U-shaped base and pull out the computer cable (32). Use the hex head screw (119) with lock washer (120) and a hexagon head screw (121) with a lock washer (120) and a dome shaped washer (114) to mount the mast. Please use 13/14- open end wrench for this purpose. Caution: Take care by all means to avoid the damage to the computer cable inside the mast.
-
Connect the computer cable (32) along with the hand pulse cable (37) to the computer (31), then mount the computer on the given mounting at the end of the mast and secure it with four round head Philips screws (78).
-
Mount two guide rails (16) on the base of the frame and secure them with two round-head Allen screws (76), flat washers (94) and locking hexagonal nuts (89). Please use 13/14- open end wrench and the accompanying Allen key for this purpose. Caution: Please make sure that the flat washer is under the nut and not under the screw.
-
Place the rail connection (15) between the guide rails (16) and screw it together with four round-head Allen screws (76), four split washers (120) and the flat washers (114). Please use the accompanying Allen key and the Philips head screwdriver.
Assembly instructions
Step 2: Assemble the handle bars
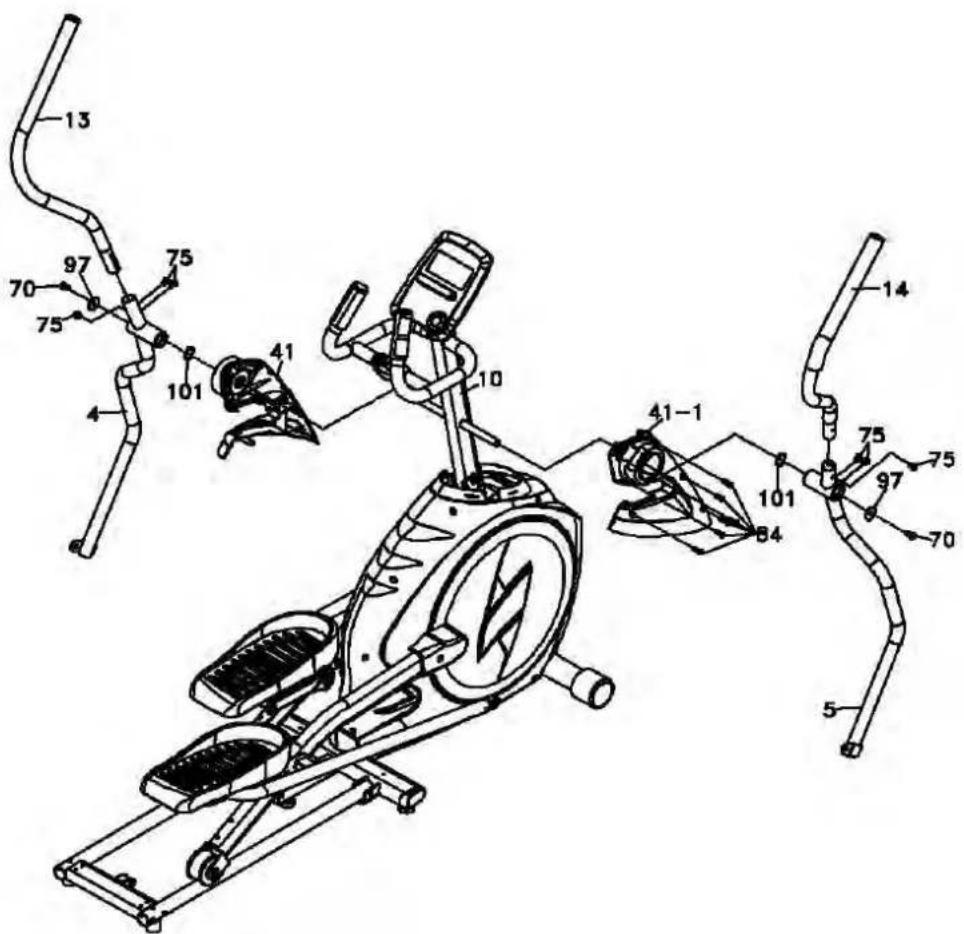
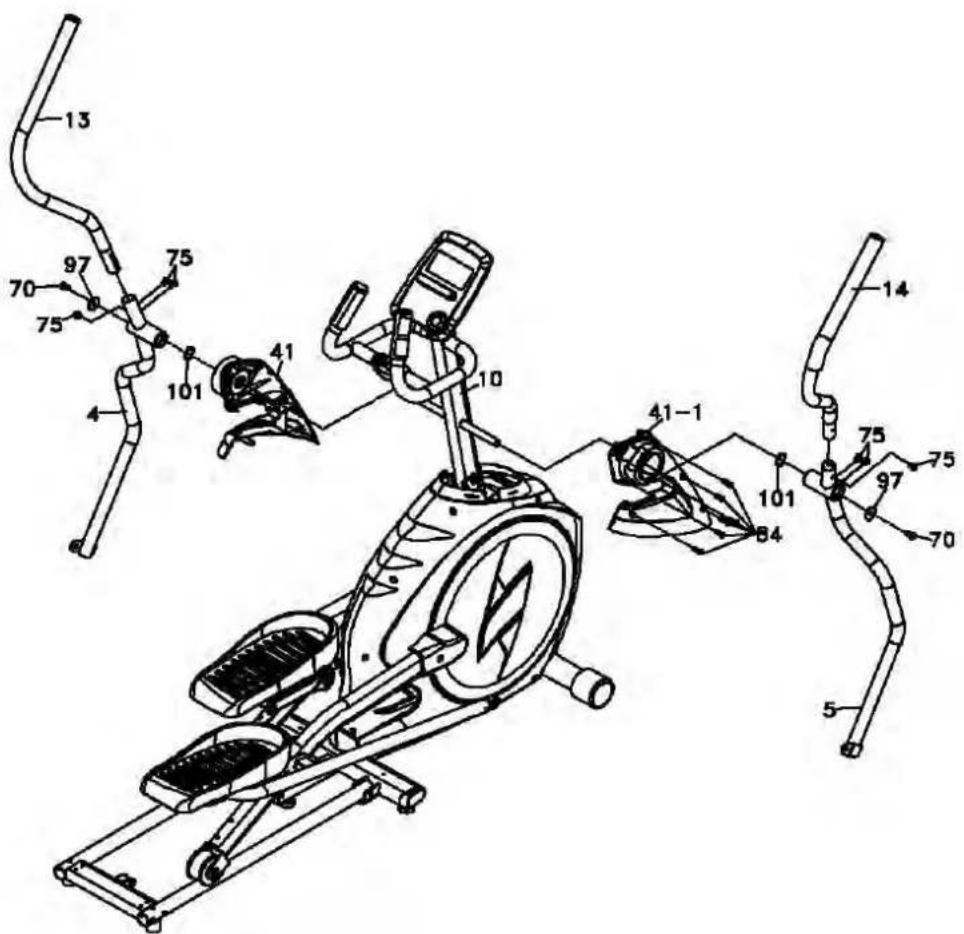
- Mount the left mast cover (L) (41) on the bar on the left side of the mast and the right mast cover (R) (41\~1) on the bar on the right side of the mast. Adjust the mast cover on the side covers on left (42) and right (43) side and secure them with six tapping screws (84). Please use the accompanying Allen key and Philips head screwdriver for this purpose.
- Place the spring washer (101), the lower handle bar (L) as well as the lower handle bar (R) corresponding to the bar of the mast and lock them with the hex head screw (70) and two flat washers (97). Please use the accompanying 12- open end wrench for this purpose.
- Connect the swinging arm (L) (13) with the lower handle bar (L) and lock it with the round head Allen screw (75). Please use the accompanying Allen key and Philips head screwdriver for this purpose. Repeat the same procedure on the right side.
Step 3: Assemble the connecting arms
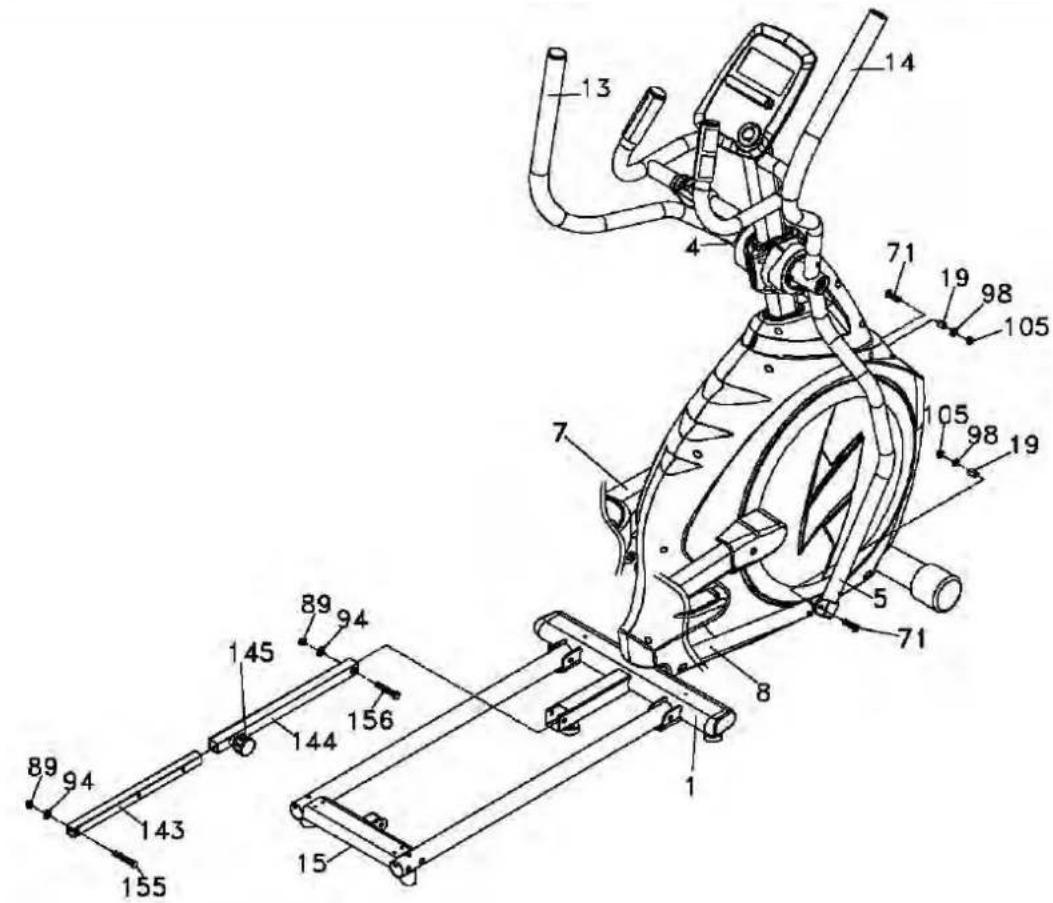
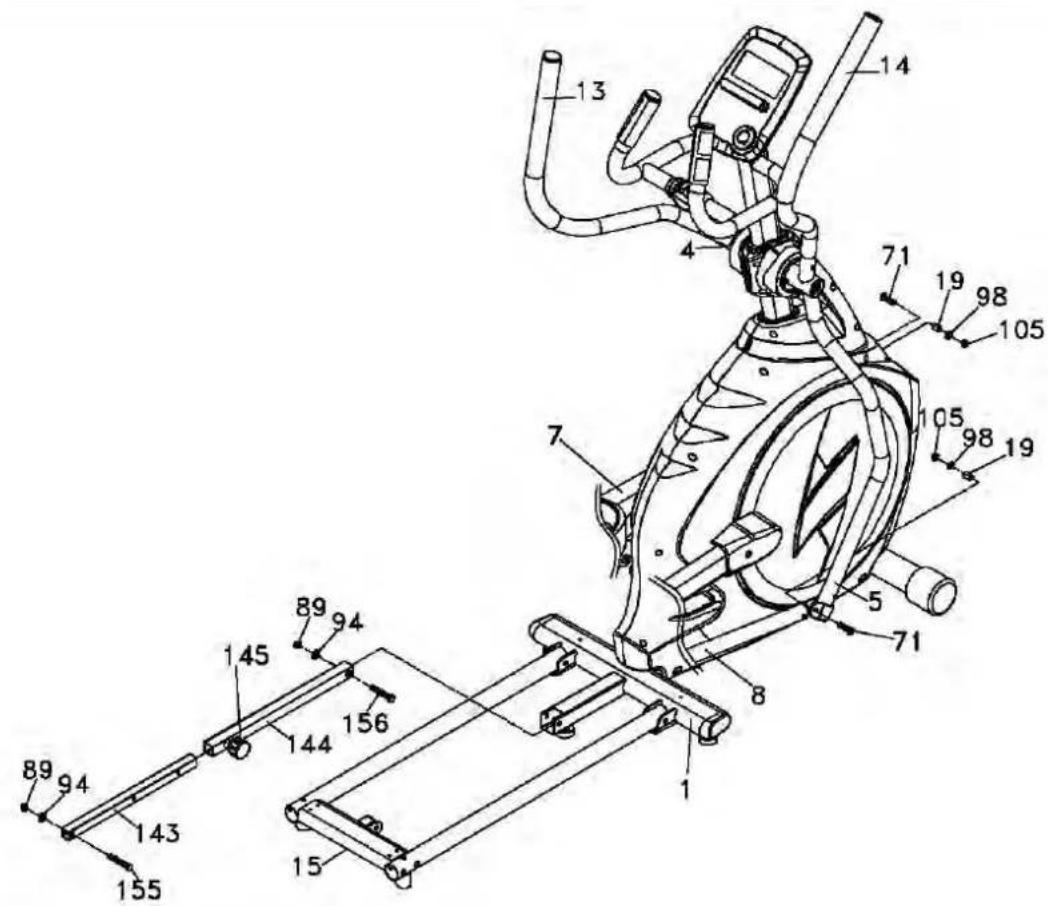
- Use a hex head screw (71) with a flat washer (98) and a locking hex head nut (105) to attach the rod termination (23) at the end of the lower handle bar (L). Please use the 13/14 and 12 open-end wrench. Repeat the procedure on the right side.
- Use a round head Allen key (156), a flat washer (94) and a locking hex-head nut (89) to fix the outer flat rod (144) on the frame. Please use the 13/14 and 12 open end wrench for this purpose. Then use a round head Allen screw (155), a flat washer (94) and a locking hex head nut (89) to fix the inner flat rod (143) to the rail connection (15). Please use the 13/14 and 12 open end wrench for this purpose.
Step 4: Assemble the cover
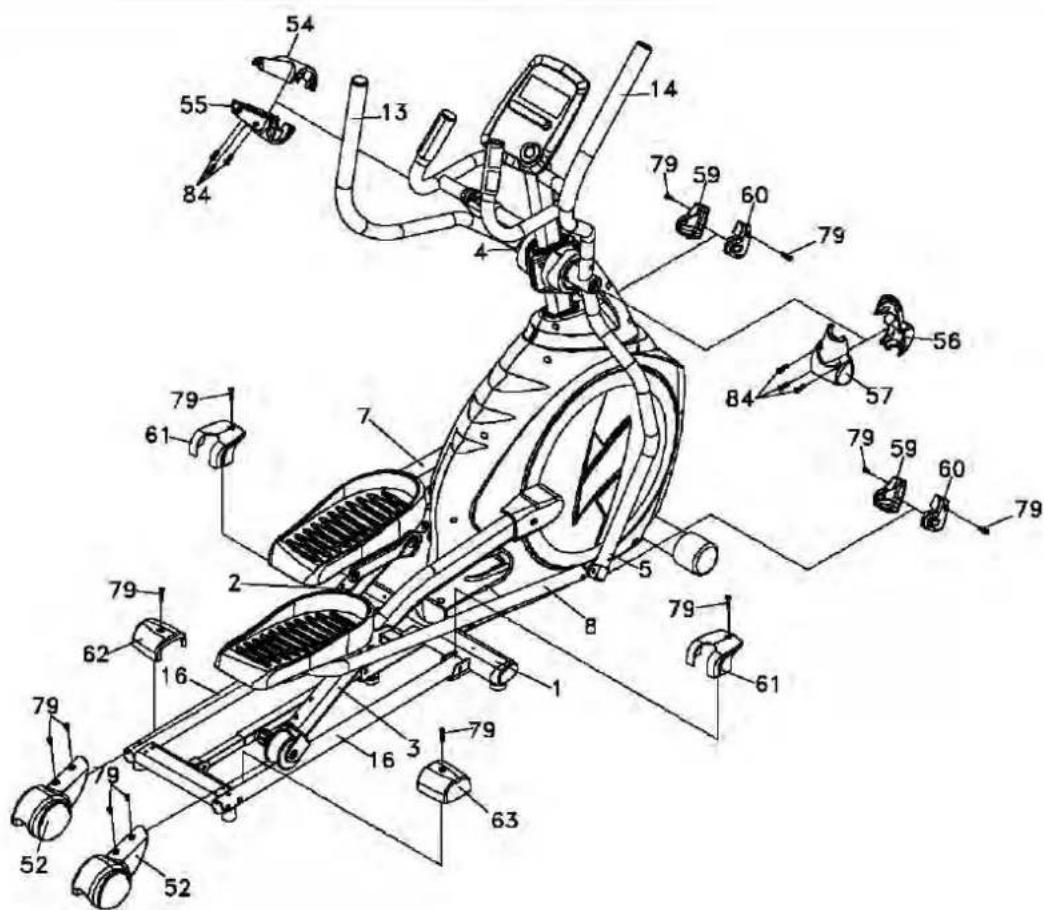
- To mount the connecting cover A(L) (59) and the connecting cover B (R) (60) on both sides of lower handle bars, fix it with four round head Philips screws (79). Please use the Allen key and Philips screwdriver for this purpose.
- To mount the side covers (52) on the right as well as the left pedal arm, use the four round head Philips screw (79). Please use the accompanying Allen key and Philips screwdriver for this purpose.
- Use the round head tapping screws (84) to connect the front handle bar (L) (54) with the rear (L) (55). Please use the accompanying Allen key and Philips screwdriver for this purpose.
- Use the two round head Philips screw (79) to connect the front stabilizing cladding (61) with the rear stabilizers on both sides of the frame. Please use the accompanying Allen key and Philips screwdriver for this purpose.
- Fix the rear stabilizing cladding (L) (62) with a round head Philips screw (79) on the guide rail (16). Please use the accompanying Allen key and Philips screwdriver for this purpose. Repeat the procedure for the rear stabilizing cladding (R) (pos. 63) on the other side.
Maintenance, Lubrication and Transport
Maintenance
Generally, your cross trainer does not require maintenance, however, during the assembly, you should check the used screws from time to time for tightness in order to avoid the risks and to ensure the service life of your gym equipment even under high load.
Lubrication
For "smooth training" in true sense of the word, you can proceed in the following way:
-
Give two drops of lubricating oil at the centre of the guide rail. In case of regular workout, this procedure should be repeated quarterly.
-
When you realize that your workout is not smooth or you experience disturbing noise during the workout, give two drops of lubricating oil on the guide rail.
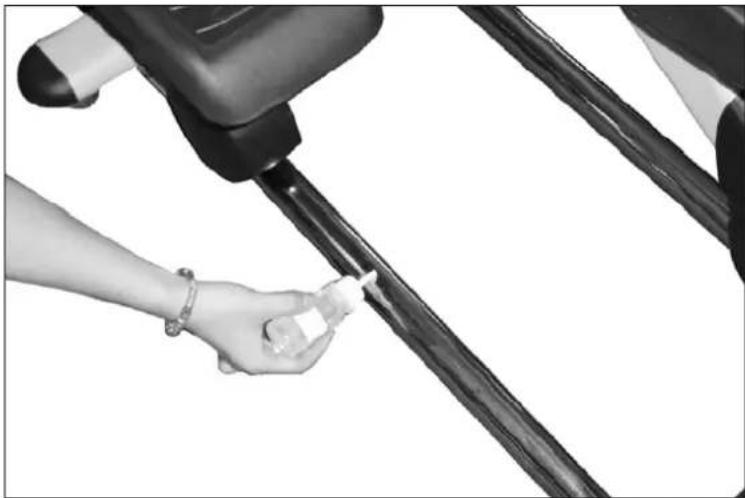
natural_image
Close-up of a hand holding a small white object attached to a black bicycle seatbelt (no text or symbols visible)Transport
Your cross trainer is equipped with rollers which enable the transport of the equipment with elevated rear end.
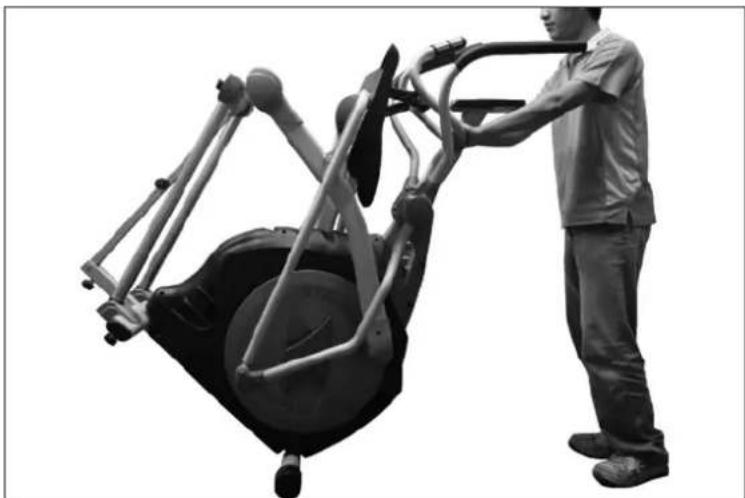
natural_image
Person using a large mechanical exercise machine (no visible text or symbols)Folding mechanism
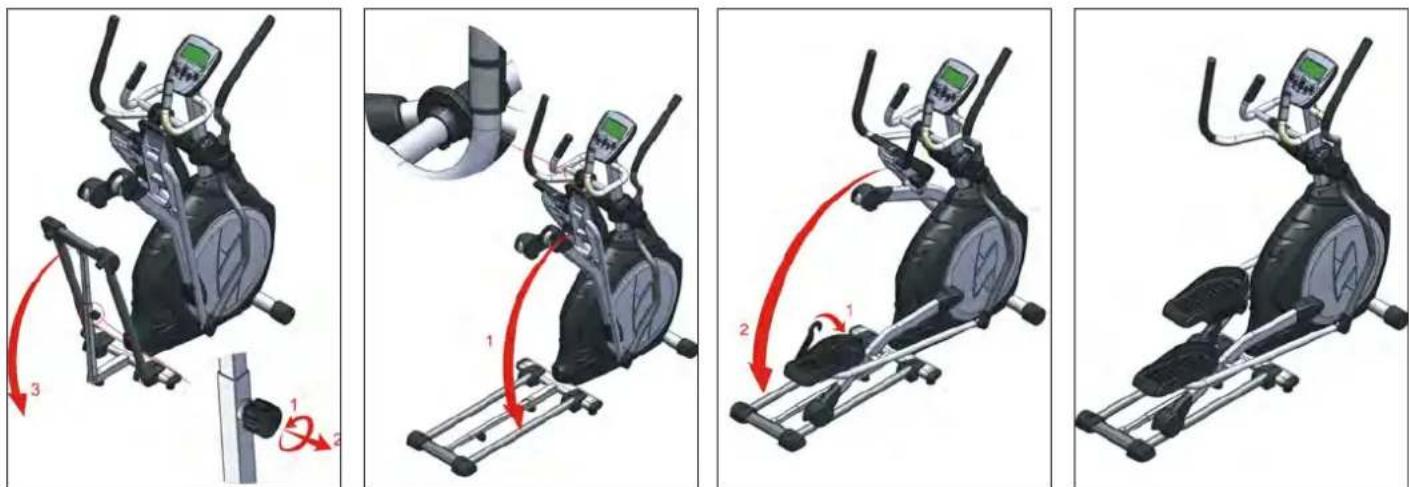
Folding
Step 1:
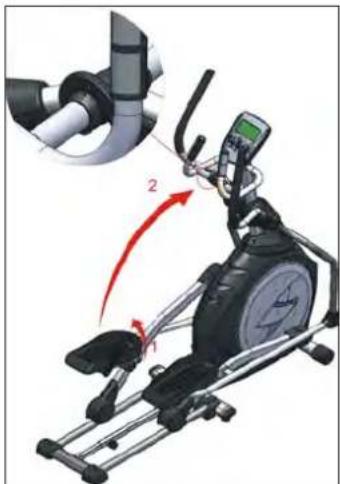
- Start on one side, pull the pedal high and move the pedal arm in the highest position.
- Pull the hook (146) from the mounting frame (L) (148).
- Hold the side cover (52) with one hand (Caution: See to it that your fingers are not trapped between side cover and pedal floor panel to avoid the pinching of fingers), pull the hook (146) high with other hand and position the hook like a circular extension on the corresponding equipment (150) in the available recess.
Step 2:
Here, carry out the same procedure as in step 1.
Step 3:
- Release the knob (145) by turning in the counter clockwise direction.
- Pull out the knob (145) to open the latch.
- Pull the rail link (15) high until the knob (145) is latched (Caution: Pay attention to the "clicking noise" while latching in order to ensure the closing) and turn the knob in clockwise direction to fix it.
Step 4
The folding ends now.
natural_image
Illustration of an exercise machine with a hand operating the gear, showing motion arrows (no text or symbols)
text_image
Diagram of an exercise machine with labeled parts and motion arrows indicating movement from position 1 to position 2.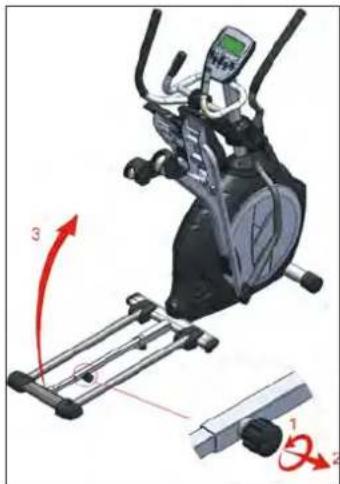
natural_image
Illustration of a stationary exercise machine with rotating arm and motion arrows (no text or symbols)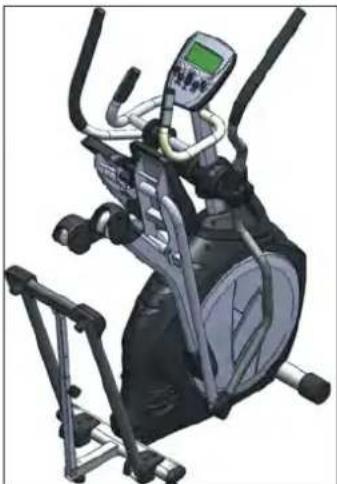
natural_image
Exterior view of a stationary exercise bike with control panel and leg mechanism (no text or symbols visible)Step 1 Step 2 Step 3 Step 4
Folding mechanism
Unfolding
Step 1:
- Release the knob (145) by turning in counter clockwise direction.
- Pull out the knob (145) to open the latch.
- Pull down the rail link (15) until the knob (145) latches and turn it in clockwise direction to fix it.
Step 2:
Mount the hook (146) on the mounting frame (L) (148) as specified in the circular extension, hold the side cover (52) with one hand and lift the hook (146) lightly to remove it from the equipment. Lay the roll on the guide rail.
Caution: This step must take place in the reverse sequence as in case of folding. In case of difficulties, fold the other side first.
Step 3:
- Assemble the hook (146) on the mounting frame (L) (148).
- Repeat the same procedure on the other side.
Step 4
The opening process is completed.
Step 1 Step 2 Step 3 Step 4
Computer operation

text_image
Skandika M W U 00:00 88.0 88:89 88.0 888 888 888 SPEED RPM TIME DISTANCE ONI CALORIES WAIT LEVEL PURE iconsola® RESET START/STOP MODE BODY FAT RECOVERYFunctions and Features
SPEED The computer shows the current speed in the display (0.0 - 99.9).
RPM Displays the rounds per minute (0 - 999).
TIME Computer shows actual exercise time (0:00 - 99:59).
DISTANCE The workout distance is displayed here (0.0 - 99.9).
CALORIES The currently burned calories are displayed here (0 – 999).
WATT Computer shows the actual watt value (0 - 999).
PULSE The computer is showing the user's heart rate in beats per minute. For a correct display please ensure that you fully grasp the hand sensors. It may last up to 2 minutes before the pulse frequency will be measured correctly. A target value for pulse may be set before a workout.
MANUAL Manual mode.
PROGRAM 12 preset programs are available
H.R.C. Automatically steered training depending on your pulse frequency.
WATTS Watt-controlled training mode.
USER In this mode you can exercise according to your own programmed profile.
UP Increase the resistance during exercise / Adjust values
DOWN Decrease the resistance during exercise / Adjust values
MODE Confirm setting or selection.
RESET Press & hold this button for approx. 2 seconds to reset all values to 0. Press this button in a training pause to return to the initial display.
START/STOP Start or stop a workout.
RECOVERY Press this button to start the heart recovery measurement.
BODY FAT Press this button to start the body fat measurement.
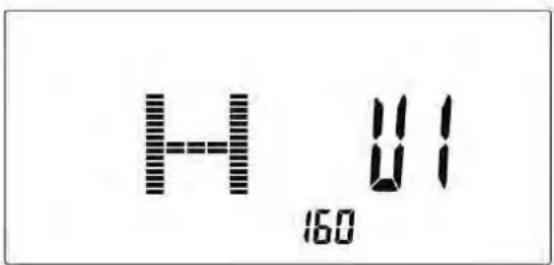
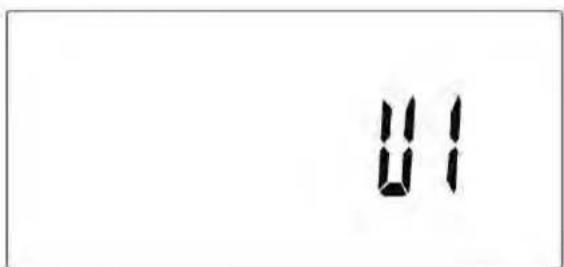
Plug in power supply. Computer will power on and full display will be shown for approx. 2 seconds. In the next step you can enter user data by selection a user from U1 to U4 with the joggle wheel and confirm with "MODE". Set sex, age, height and weight (see figure). After setting all user data, computer will switch to main menu.
text_image
H 160 IIThis computer has an automatic on/off function so that it switches on when the pedals move or when any button is pressed, and turns into stand-by mode automatically if no signal has been received for approx. 4 minutes.
Workout Selection
Select the workout mode with the joggle wheel and press "MODE" to confirm:
M (manual) -> P (program 1-12) -> H.R.C -> W (WATTS) -> U (user).
Manual Mode
In manual mode you can adjust the load manually. After selecting „M“ (confirm with "MODE"-button) you can select the initial tension level (use "UP", "DOWN" and "MODE" to select). Press "START/STOP". You may change the tension level at any time during exercise with "UP" and "DOWN".
You may also input target values for the following function values:
a. TIME
b. DISTANCE (see figure)
c. CALORIE
d. PULSE

text_image
M 0.0 0.0 0.0 SPEED 0:00 0.0 0 0 P TIME DISTANCE K CALORIES WAIT PULSETo input a target value, do not press "Start/Stop" after selecting the initial tension level, but instead use "UP", "DOWN" and "MODE" to input the target values. After your input, press "START/STOP" to start the workout. To pause your workout, press the „START/STOP“-button again. Press "RESET" to return to main menu.
Program Mode
Within this mode you can exercise with a program profile (preset). Mountain- and valley courses: After selecting program mode and "MODE"-button for confirmation, „P1" starts blinking. Choose one of the 12 programs (P1 to P12). Select the initial tension level (use "UP", "DOWN" and "MODE" to select). You may now preset a target value for "TIME" by using "UP", "DOWN" and "MODE". Press "START/STOP" to start workout. You may change the tension level at any time during exercise with "UP" and "DOWN". To pause your workout, press the „START/STOP"-button again. Press "RESET" to return to main menu.
H.R.C mode
After selecting a respective mode (press "MODE" to confirm) you are in the heart frequency controlled mode. You can run an automatically steered training depending on your pulse frequency. Press "UP" or "DOWN" to select one of the following alternatives:
55% Max H.R.C. -- Target H.R. = (220 - AGE) x 55%
75% Max H.R.C. -- Target H.R. = (220 - AGE) x 75%
90% Max H.R.C. -- Target H.R. = (220 - AGE) x 90% (see figure)
TA = Target H.R.C. -- Workout by your target heart rate value.
In "TA" mode, use „UP/DOWN"-buttons for direct input of the target pulse value (between 30 and 230 bpm).
You may now preset a target value for "TIME" by using "UP", "DOWN" and "MODE". Press "START/STOP" to start workout. To pause your workout, press the „START/STOP“-button again. Press "RESET" to return to main menu.
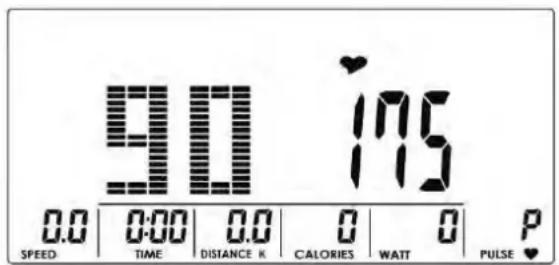
text_image
90.0 175 0.0 0:00 0.0 0 0 P SPEED TIME DISTANCE K CALORIES WAIT PULSE ♥Watt mode
This is a speed-independent exercise mode. With this mode you can exercise according to the preset Watt value. After selecting "W", press "MODE" to enter this mode. The default value for the WATT preset value is 120 (see figure), which you may change with "UP"/"DOWN" and "MODE". You may now preset a target value for "TIME" by using "UP", "DOWN" and "MODE". Press "START/STOP" to start workout. The computer will automatically control the resistance. You may change the watt level at any time during exercise with "UP" and "DOWN". To pause your workout, press the „START/STOP“-button again. Press "RESET" to return to main menu.
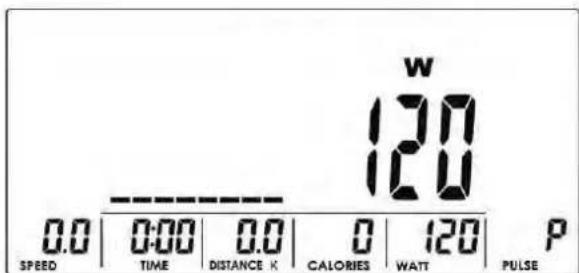
text_image
W 120 120 0.0 0:00 0.0 0 120 P SPEED TIME DISTANCE K CALORIES WAIT PULSEUser program mode
After selecting this mode ("U" and "MODE" for confirmation), use the "UP" and "DOWN" buttons to create your own user profile. You can preset a different resistance level for totally 8 columns. Press "MODE" to continue or hold "MODE" button for at least 2 seconds to quit the setting process. You may now preset a target value for "TIME" by using "UP", "DOWN" and "MODE". Press "START/STOP" to start workout.
You may change the tension level at any time during exercise with "UP" and "DOWN". To pause your workout, press the „START/STOP“-button again. Press "RESET" to return to main menu.
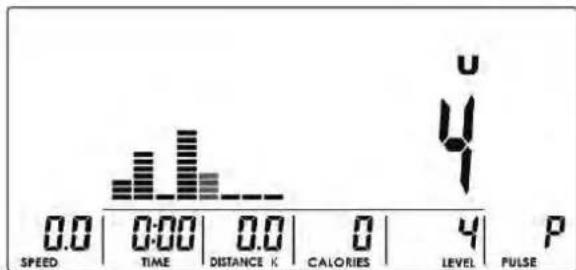
bar
| Time | Value | | :--- | :--- | | 0:00 | 0.0 | | 0:00 | 0.0 | | 0:00 | 0.0 | | 0:00 | 0 | | 0:00 | 4 | | PULSE | P |Recovery
With this special function, you can check your hearts recovery rate after a training session. This is a very important indication for the physical condition of your body. Try to improve your recovery rate with regular training sessions. The aim is, to calm down to a normal pulse frequency (frequency, when you are not in motion) as quickly as possible. To check your recovery rate, you need to keep your hands onto the hand pulse-sensors after your exercise. Now press the button "RECOVERY". The computer will start to countdown 60 seconds. During this period the computer will constantly measure your heart rate through the hand sensors. After this minute, your recovery rate will be displayed on the display. The range is F1 to F6, whereby F1 is very good and F6 is insufficient. Improve your value by intense and regular training! After the recovery function is finished, press "RECOVERY" again to return to normal operation mode.
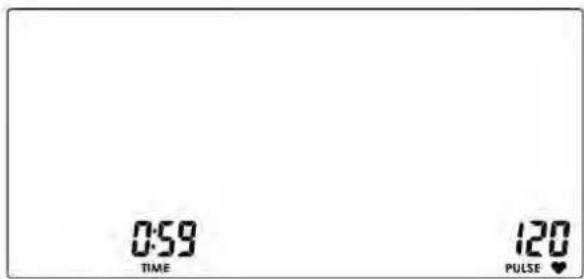
text_image
0:59 TIME 120 PULSE ♥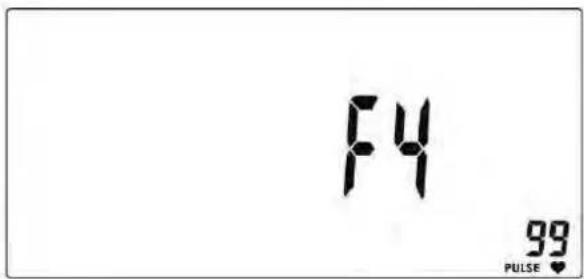
text_image
F4 99 PULSE ♥Body fat
Press this button to start the body fat measurement. Ux will be displayed. Hold both hands on the handsensors during measurement. It will last about 8 seconds until the measurement is finished. After the measurement, the BMI, the fat % and fat advice symbol will be displayed.
text_image
11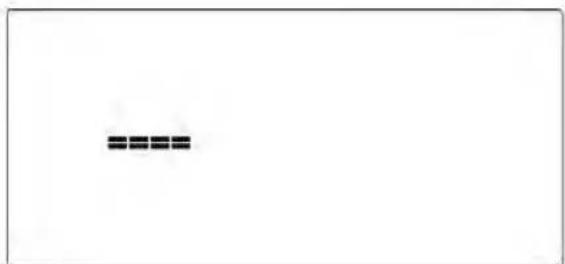
text_image
Image containing a single horizontal line symbol resembling '===' or '=='
text_image
日 19.5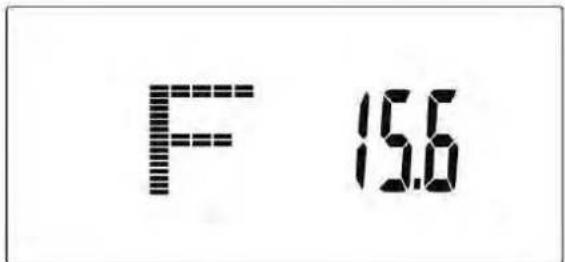
text_image
F 15.6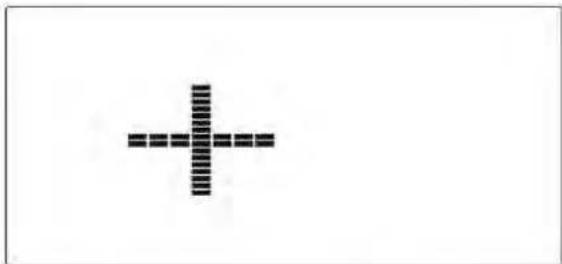
natural_image
Simple black cross symbol on white background, no text or labels presentError messages
"---- " " ----" means, that the contact to the handpulse sensors was not sufficiently for a measurement. The reason for this can be that you have not grasped the two sensors correctly. Start a new measurement with correctly placed hands!
"E-1" means, that no heart rate signal has been detected.
"E-4" appears, if the fat % or BMI values are too low (<5) or too high (> 50).
In case of any abnormal functions, disconnect the device from power source and reconnect after some minutes.
Bluetooth® connection
The computer can be connected via Bluetooth® to communicate with iconsole+ app. Please refer to the app instructions accordingly.
Use of the iConsole+ app
Your item is compatible with the following iOS- resp. Android devices:
iOS-devices:
iPod touch* (4th generation)
iPod touch* (3rd generation)
iPhone* 4S
iPhone* 4
iPhone* 3GS
iPad* 2
iPad*
Android-devices:
Android tablet OS 4.0 or higher
Android tablet 1280X800 pixel
Android phone OS 4.0 or higher
Android phone 800X480 pixel
The iConsole+ app enables you to control your training and show the different function values on your compatible mobile device. Additionally, you may share your training results with your friend through mobile networks, like Facebook or Twitter.
In order to establish a proper connection, Bluetooth needs to be enabled on your device.
Download the app „iConsole+“ and install it onto your iOS- or Android-device. You may use the app search function of your device or the following QR codes to find the app:
Establish a connection with an iOS-device:
Activate Bluetooth and search for the exercise computer of the exercise bike (e.g. "iConsole XXX"). Pair the devices. In case you need to enter a password, use "0000". Establish a connection with an Android device: Activate Bluetooth functionality, start the app and tip the
"Scan" button:

After the exercise computer has been found (e.g. "iConsole XXX") you can pair the devices. In case you need to enter a password, use "0000".
When the pairing has been successfully executed, your exercise computer will automatically switch off.
Before using the app any further, we recommend to enter your personal data and settings under the menu item „Setting“. There you may select the measurement system (metric or imperial) or enter your personal data like name, age, weight etc. under “My Profile”.
Generally, the app will be updated automatically from time to time. Therefore, the here explained symbols, input masks and dialogues may vary. The app is self-explaining in most parts and should be used intuitively.
Exercise with the iConsole+ app
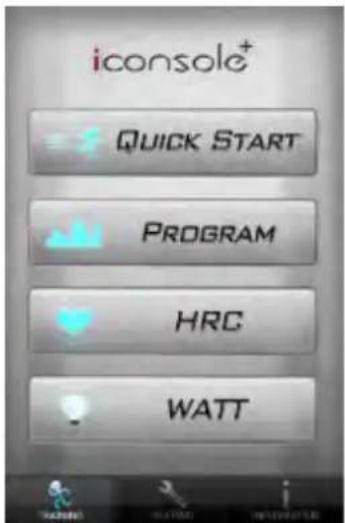
Under the menu item „Training“ the app offers different program profiles and watt- or pulse-controlled (HRC) training modes. Tap “Quick Start” to directly start the exercise.
text_image
iconsole+ QUICK START PROGRAM HRC WATTExample display main menu (shown on iPhone*)
text_image
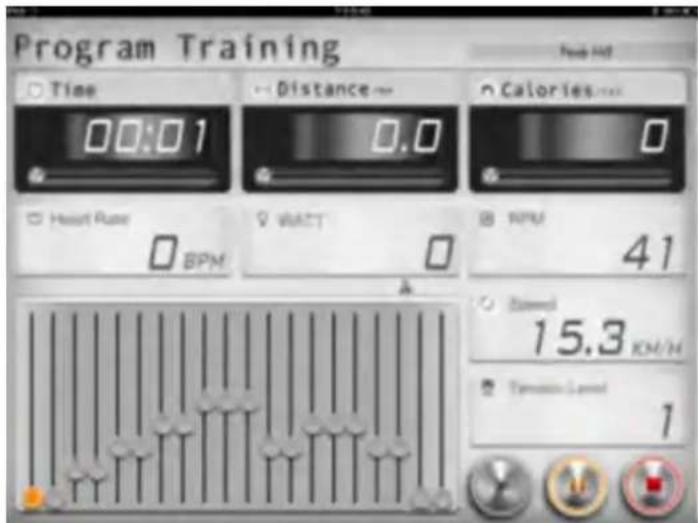
Program Training Time 00:01 Distance 0.0 Calories 0 Heart Rate BPM WACT RPM 41 Speed 15.3 KM/H Transmission Speed 1Example display for exercise data (shown on Android tablet device)
Share your exercise data
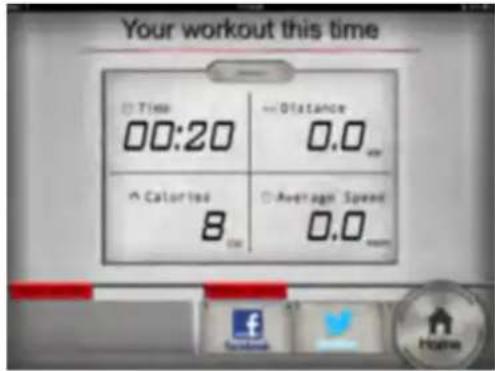
The app will show a training summary after you have finished your exercise, e.g. like this:
text_image
Your workout this time Time 00:20 Distance 0.0 cm Calories 8 gm Average Speed 0.0 mmIf you are a member of the social network Facebook or Twitter, you may easily share your training results with your friends by just tipping the respective button.
*iPad, iPhone, iPod and iPod touch are registered trademarks of Apple Inc., registered in the USA and other countries.
Function buttons inside the app
START of an exercise
To enter target values or other settings
Adjust values
STOPP exercise
PAUSE
Enter a target watt value
Back to mode selection
Using a chest-belt
The computer is equipped with a built-in receiver for the wireless receipt of the pulse frequency with a compatible SKANDIKA chest-belt (frequency: 5.3 kHz, not included in the scope of delivery). Recommended range: 100 - 150 cm.
If you want to transmit your pulse frequency via chest-belt, follow these instructions:
- Make sure, the correct battery is inserted into the chest belt (button cell of type CR-2032, 3 volts). Battery replacement: Open the battery case cover on the back side of your transmitter (you may use a coin for easier handling) and replace the old battery by a fitting new one. The „+” symbol should point upwards. Make sure, the sealing ring ist correctly placed. Close the case cover properly.
- The transmitter needs to be attached to the belt with the 2 buttons. Moisten the electrodes slightly before wearing the belt. This increases the contact sensibility and enables a better wireless signal transmitting.
- Put on the chest belt and make sure the electrodes are touching your breast directly. You may adjust the belt to a comfortable length. However, the electrodes must have contact with your skin in order to measure your heart rate correctly.
- The 5.3 kHz-chest-belt communicates with the computer via the built-in receiver. It may last up to one minute before a correct display can be seen.
Safety hint:
Do not use the chest-belt if you have a pacemaker, unless you double-checked with the producer of the pacemaker and with your doctor!
Battery-Disposal:
Batteries should not be considered as regular garbage. As consumer you are obliged to return finished batteries. The finished batteries can be returned to a collection base at your residential area or at places, where batteries can be bought.
Training instructions / warm-up and cool-down
A successful exercise program consists of a warm-up, aerobic exercise and a cool-down. Exercise for at least two or preferably three times a week, resting for a day between workouts. After several months, you may increase the frequency to four or five times per week.
WARM-UP
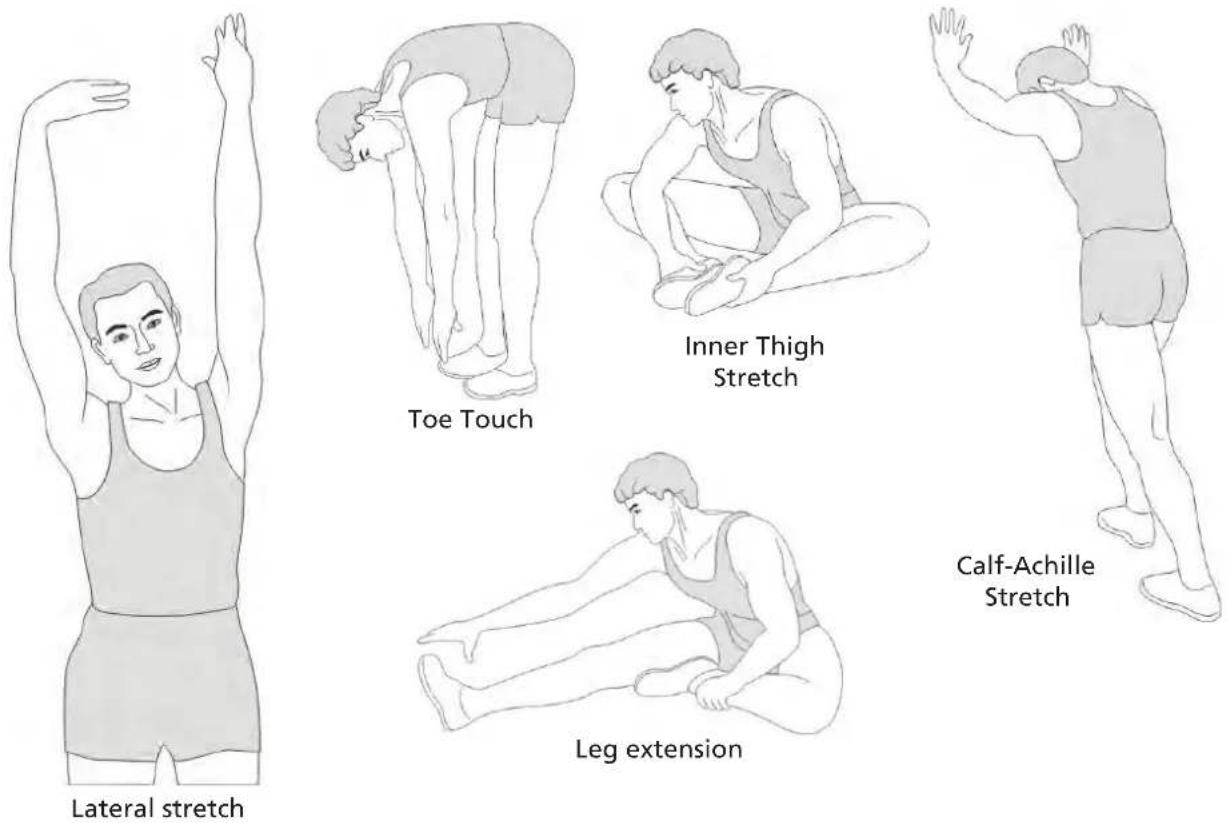
This stage helps to improve the blood circulation and prepares the muscles for your workout. It additionally helps to reduce the risk of injury or cramps. It is recommended to do some stretching exercises as shown here below. Hold each stretching position for approximately 30 seconds. Never force or jerk yourself into a stretching position – if you feel pain, STOP immediately. Warm-up exercises may also include brisk walking, jogging, jumping jacks, jump rope exercises or running in place.
STRETCHING
Muscles can be stretched more easily when these are warm. This reduces the risk of injury. DO NOT BOUNCE.
text_image
Lateral stretch Toe Touch Inner Thigh Stretch Leg extension Calf-Achille StretchRemember always to check with your physician before starting any exercise program.
COOL-DOWN
This stage helps to soothe your muscles and your cardiovascular system after your workout. At the end of your workout, reduce the speed and exercise for approximately 5 minutes at this lower speed level. Afterwards, repeat the warm-up exercises as described above.
Beginner
As a beginner you should always have a goal to acquire: A basic endurance should be considered as fat burning training. Fat burning training means low intensity and longest possible exercise duration.
Exploded drawing
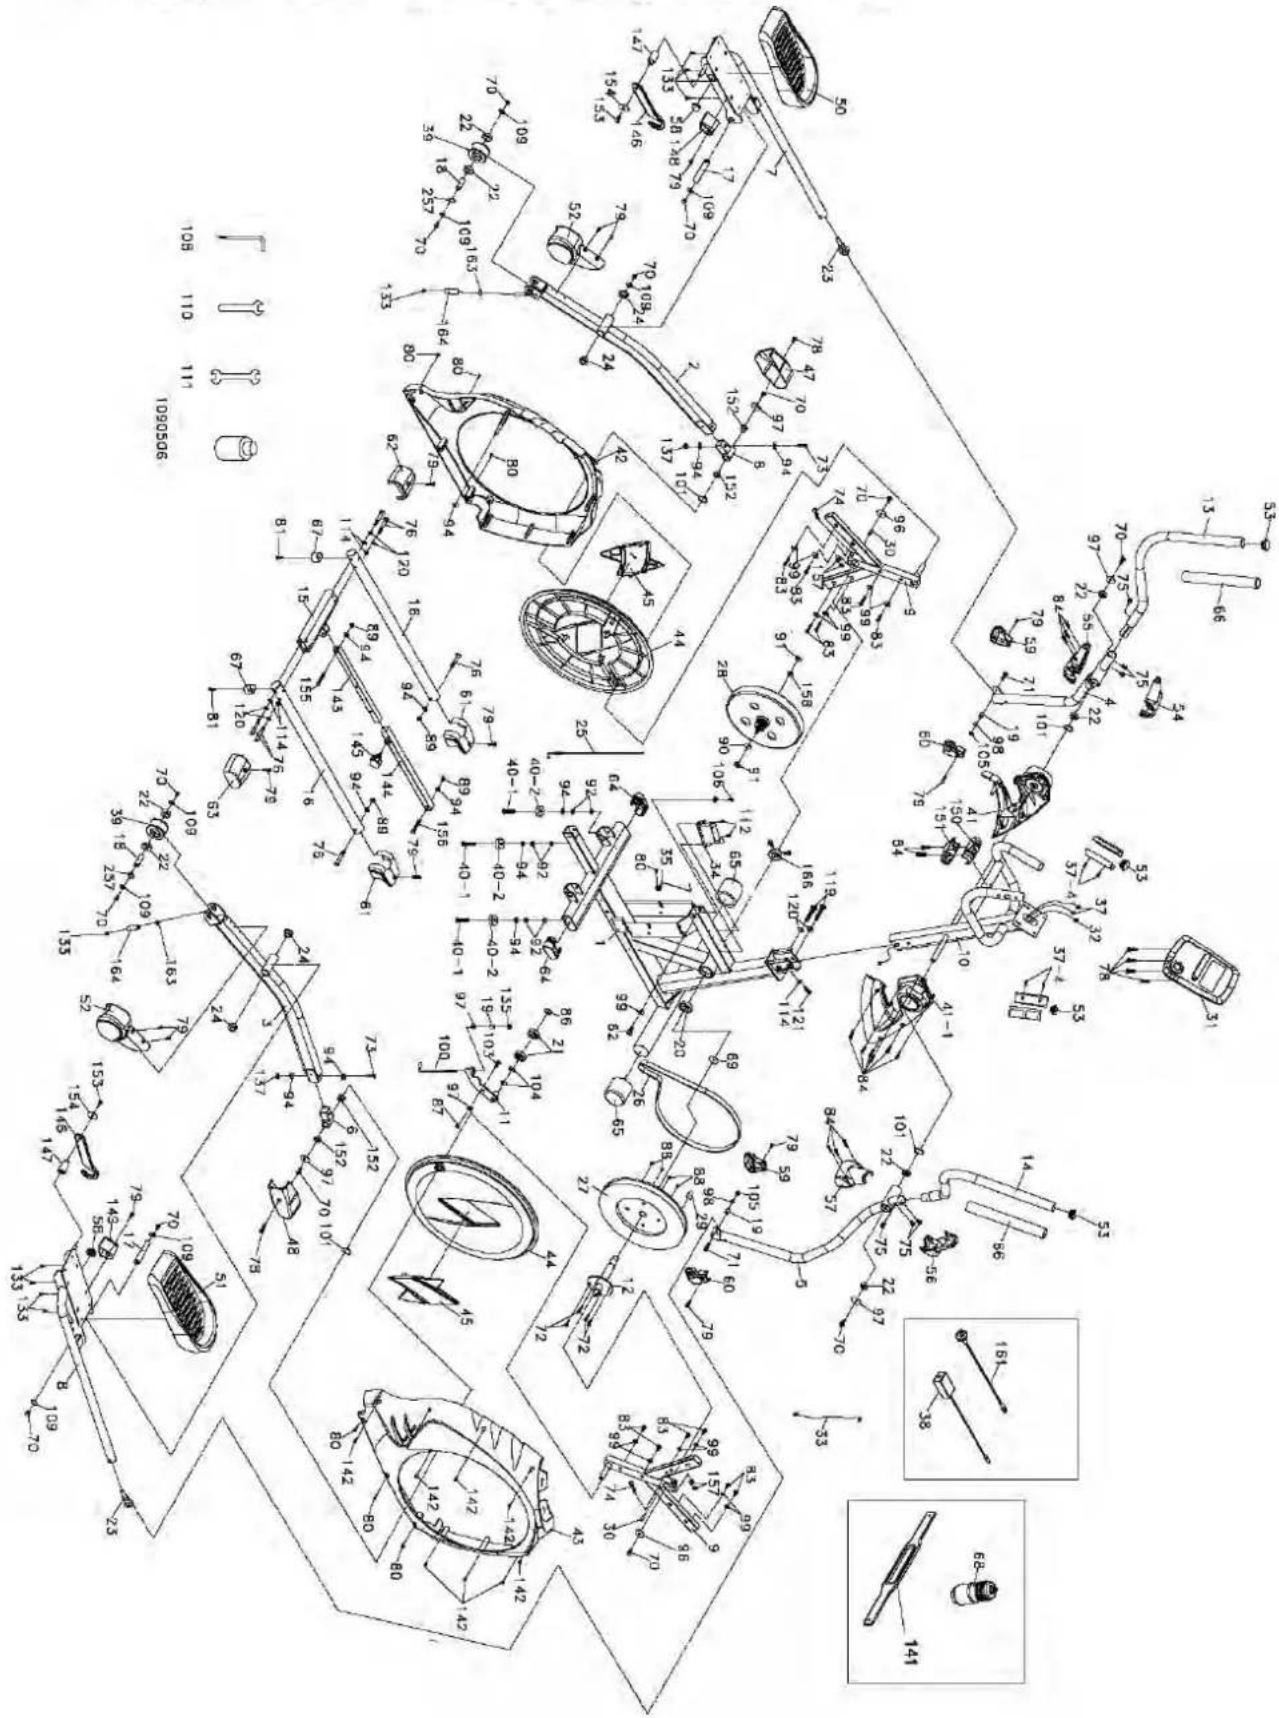
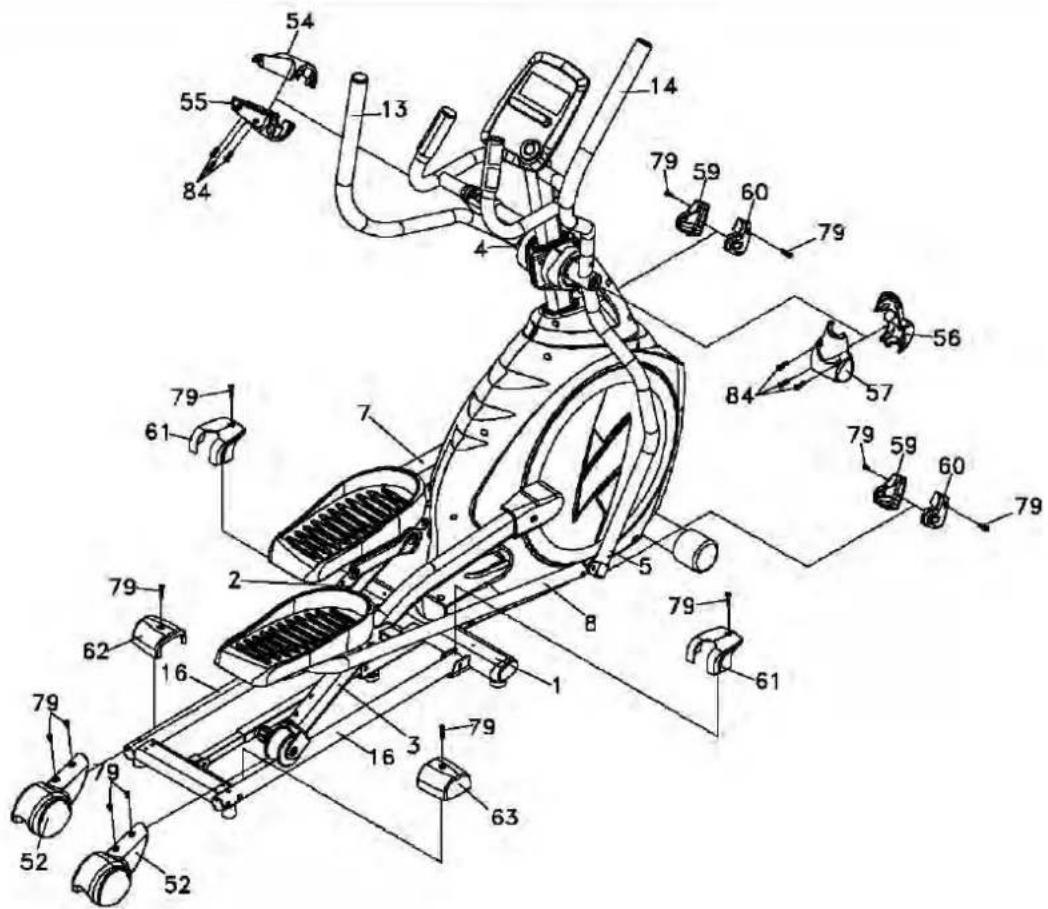
In case of mechanical problems use this explosion drawing. All parts are marked with a specific part number in it. Tell us this number in order to replace the respective part (within warranty time this service may be free of charge). If necessary, you may additionally use the free user manual in pdf-format, available on www.skandika.com. You may enlarge the explosion drawing there with a factor up to 500 %.
text_image
Technical schematic diagram of a mechanical assembly with numbered components and dimension annotationsGuarantee conditions
For our devices we provide a warranty as defined below.
- In accordance with the following conditions (numbers 2-5) we repair defect or damage to the device free of charge, if the cause is a manufacturing defect. Therefore, these defects / damages need to be reported to us without delay after appearance and within the warranty period of 24 months after delivery to the end user. The warranty does not cover parts, which easily break (e.g. glass or plastic). The warranty does not cover slight deviations of the product, which are insignificant for usability and value of the device and damage caused by chemical or electrochemical effects and damages caused by penetration of water or generally force majeure damage.
- The warranty achievement is the replacement or repair of defective parts, depending on our decision. The cost of material and labor will be borne by us. Repairs at customer site cannot be demanded. The proof of purchase along with the date of purchase and / or delivery is required. Replaced parts become our property.
- The warranty is void if repairs or adjustments are made, which are not authorized by us or if our devices are equipped with additional parts or accessories that are not adapted to our devices. Furthermore, the warranty is void if the device is damaged or destroyed by force majeure or due to environmental influences and in case of improper handling / maintenance (e.g. due to non-observance of the instruction manual) or mechanical damages. The customer service may authorize you to replace or repair defective parts after telephone consultation. In this case, the warranty is not void.
- Warranty services do not extend the warranty period nor do they initiate a new warranty period.
- Further demands, especially claims for damages which occurred outside the device, are excluded as long as a liability is not obligatory legal.
- Our warranty terms - which cover the requirements and scope of our warranty conditions - do not affect the contractual warranty obligations of the seller.
- Parts of wear and tear are not included in the warranty.
- The warranty is void if not used properly or if used in gyms, rehabilitation centers and hotels. Even if most of our units are suitable for a professional use, this requires a separate agreement.
Environmental protection
At the end of its life cycle, this product must not be disposed of with household waste but must be taken to a collection unit for the recycling of electric and electronic equipment. The symbol on the product, the instructions for use or the packaging express mention of this. The basic materials can be recycled as specified on the labelling.
When recycling the materials and finding other utilisation for used equipment, you are making a significant contribution towards protecting our environment. Ask at your council about the respective local disposal sites.
For service, accessories and spare parts, please contact: info@skandika.com
Service centre: MAX Trader GmbH, Wilhelm-Beckmann-Straße 19, 45307 Essen, Germany
In accordance with our policy of continual product improvement, we reserve the right to make technical and visual changes without notice.
NOTES
B
Contenu
text_image
QR code image containing encoded data, no visible human-readable texttext_image
Technical diagram of a mechanical device with numbered components and labeled parts, including a 108-pin wrench and 110-pin wrench.Étape 2
text_image
Technical diagram of an exercise machine with numbered components and labeled partsSchéma de montage
Étape 3
text_image
Technical diagram of a stationary exercise machine with numbered components and labeled partsÉtape 4
text_image
Technical diagram of a stationary exercise machine with numbered components and labeled partsnatural_image
Close-up of a hand holding a small object near a black bicycle leg (no visible text or symbols)Transport
natural_image
Person using a stationary exercise machine (no visible text or symbols)Mécanisme de pliage
Pliage
Etape 1:
text_image
Diagram showing a stationary exercise machine with labeled components and motion arrows, including a magnified inset of the device.
text_image
Diagram of an exercise machine with labeled motion arrows indicating movement from position 1 to position 2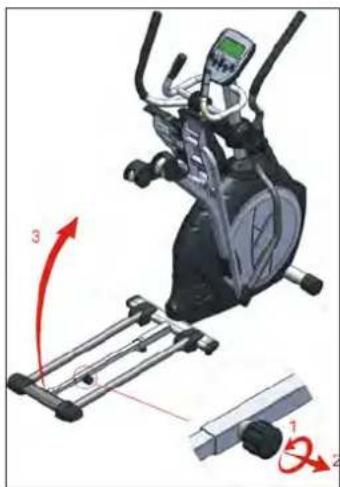
text_image
Diagram of a stationary exercise machine with labeled components and motion arrows indicating rotational motion.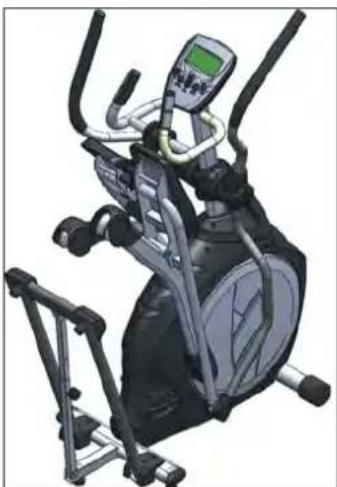
natural_image
Illustration of an exercise bike with a digital controller and leg-mounted arms (no text or symbols visible)Etape 1 Etape 2 Etape 3 Etape 4

Mécanisme de pliage
Déroulement
Etape 1:
natural_image
Illustration of a person exercising on an exercise bike with directional arrows indicating motion (no text or symbols)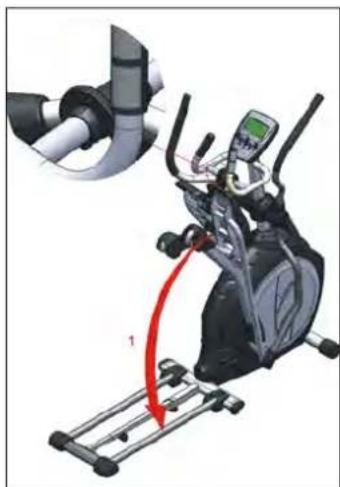
natural_image
Person performing a stationary exercise on an outdoor ramp, with a red curved arrow indicating motion direction (no text or symbols present)
natural_image
Illustration of an exercise machine with two red arrows indicating rotational motion (no text or symbols)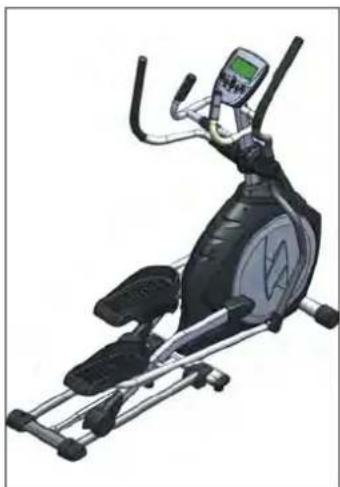
natural_image
Illustration of an exercise bike with a digital display and control panel (no text or symbols visible)Etape 1 Etape 2 Etape 3 Etape 4
text_image
Image containing a single horizontal line symbol resembling '===' or a minus sign.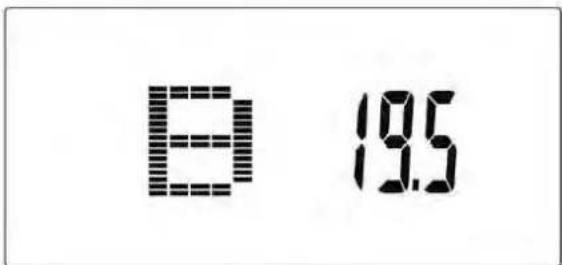
text_image
日 19.5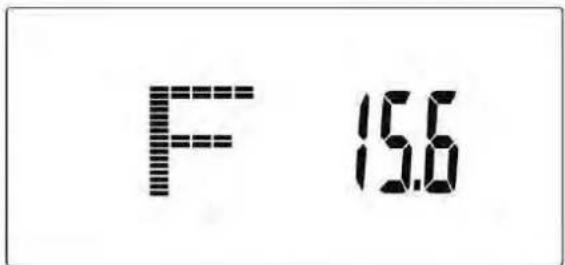
text_image
F 15.6