51461 - Grass trimmer TORO - Free user manual and instructions
Find the device manual for free 51461 TORO in PDF.

| Brand | Toro |
| Model | 51461 |
| Device type | Battery-powered trimmer (brushcutter) |
| Weight | 4.75 kg |
| Cutting diameter | 18 cm |
| Power source | Rechargeable lead-acid battery |
| Initial charge time | 24 hours |
| Cutting line type | Nylon monofilament, diameter 0.065 inch (1.65 mm) |
| Maximum line length | 3 meters |
| Sound pressure | 69 dBA |
| Sound power | 96 dBA |
| Hand-arm vibration | 1.4 m/s² |
| Cutting system | Rotating head with automatic cutting blade |
| Safety | Immediate stop when releasing the trigger |
| Maintenance | Clean with a damp cloth; do not immerse |
| Main materials | Plastic, metal, lead-acid battery |
| Spare parts available | Pre-wound spool model 88185 or 88045, bulk line |
| Recommended accessory | Original Toro charger |
| Starting | Trigger with safety switch |
| Long-term storage | Battery charged, disconnected from charger |
Frequently Asked Questions - 51461 TORO
User questions about 51461 TORO
0 question about this device. Answer the ones you know or ask your own.
Ask a new question about this device
Download the instructions for your Grass trimmer in PDF format for free! Find your manual 51461 - TORO and take your electronic device back in hand. On this page are published all the documents necessary for the use of your device. 51461 by TORO.
USER MANUAL 51461 TORO
18 cm CordlessTrimmer
String Trimmer
Model No. 51461—220000001 & Up
WARNING!—When using the machine, the safety rules must be followed. For your own safety and bystanders, please read these instructions before operating the machine. Please keep the instructions safe for later use.
It is essential that you or any other operator of the appliance read and understand the contents of this manual before operating the appliance. Pay particular attention to the safety alert symbol ⚠️ which means CAUTION, WARNING or DANGER—personal safety instruction. Read and understand the instruction because it has to do with safety. Failure to comply with these instructions may result in personal injury, risk of fire, or electrical shock.
The following safety information has been adapted from European Standard EN 786:1996:
- Wear protective glasses or goggles.
- Never allow children or people unfamiliar with the instructions to use the machine.
- Stop using the machine while people, especially children, or pets are nearby.
- Only use the machine in daylight or good artificial light.
- Before using the machine and after any impact, check for signs of wear or damage and repair as necessary.
- Never operate the machine with damaged guards or without the guards in place.
- Keep hands and feet away from the cutting means at all times and especially when switching on the motor.
• Take care against injury from the line cutting blade on the underside of the trimmer. After installing new line, always return the machine to its normal operating position before switching it on.
- Never use metal cutting elements - Never use replacement parts of accessories not provided or recommended by the Toro Company.
• Always ensure that the ventilation openings are kept clear of debris.
• The machine weighs 10.5 lb. (4.75 kg).
• After use, check the machine for damage.
- When not in use, store the machine away from children.
- If the trimmer requires repair, take it to an Authorized Toro Dealer.
- Use only Toro replacement parts and accessories.
Sound Pressure
The machine has a sound pressure of 69 dBA as directed by 98/37/EC.
Sound Power
The machine has a sound power of 96 dBA as directed by 2000/14/EC.
Vibration, Hand/arm
The machine has a hand/arm vibration of 1.4 m/s ^2 as directed by 98/37/EC.
Safety/Instruction Decals
Important: Safety and instruction decals are located near areas of potential danger. Replace damaged or lost decals.

105-3073
- Warning—read the Operator's Manual.
- Cutting hazard of hand or foot—stay away from moving parts. Keep bystanders away.
- Thrown object hazard—wear eye protection.
- Warning—contains lead; do not discard.
Assembly
- Insert the cables into the black center section.
Note: Ensure that the cables are not twisted.

natural_image
Diagram of a medical or surgical tool with multiple views showing internal components (no text or labels)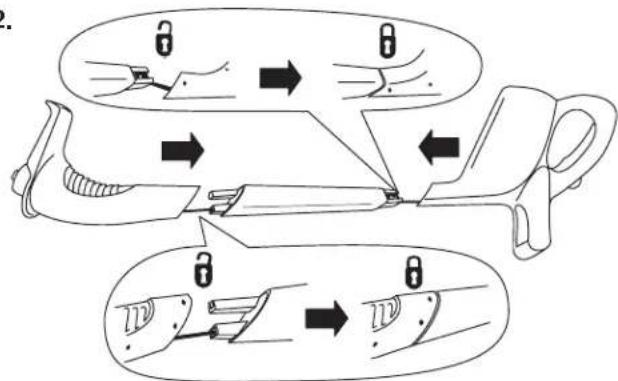
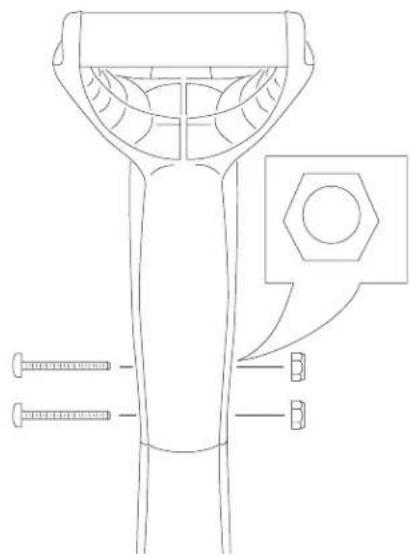
- Install 2 long screws and nuts through the upper handle, as shown, with the nuts in the hexagonal holes.
natural_image
Technical line drawing of a mechanical device with two screws and a hexagonal nut, no text or symbols presentm-5669
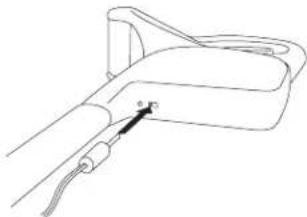
Operation Charging the Battery
Charge the battery for 24 hours before the first use and after each use thereafter.
Important: Always charge the battery after each use. Storing the unit with a discharged battery will reduce the life of your battery. This lead-acid battery has no memory and does not need to be run dead before charging.
- Insert the charger plug into the trimmer receptacle.
natural_image
Line drawing of a handheld device with a probe inserted, no text or symbols presentImportant: Use only the charger supplied with the trimmer or a Genuine Toro charger obtained from your Authorized Toro Dealer.
- Plug the charger into a wall receptacle.
The green charge light lights.
- Charge the battery for 24 hours.
Note: The charge light will always be on when the trimmer is connected to the charger and the power outlet. It does not turn off when charged.
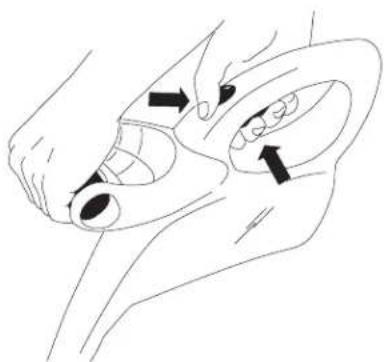
Starting the Trimmer
To start the trimmer, pull the switch on top of the handle rearward and squeeze the trigger.
natural_image
Line drawing of a hand performing a medical or anatomical procedure on an ear (no text or symbols present)Stopping the Trimmer
To stop the trimmer, release the trigger.

natural_image
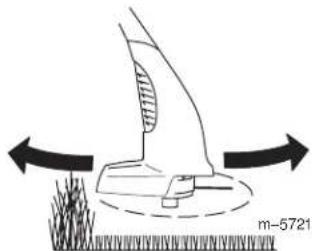
Line drawing of a dog's mouth and teeth (no text or symbols)Operating Tips
To reduce line wear and and improve trimming performance, use the following techniques when trimming:

Warning

When the trimmer is running the cutting head is spinning. If you contact the cutting line or cutting head, you could be injured.
- Keep the cutting head away from your feet and bystanders.
- Ensure that the cutting head has stopped and the trimmer is unplugged before inverting it. Do not start the trimmer when it is inverted.

Warning

During operation, the trimmer may throw objects in the operator's or a bystander's direction, causing injury.
- Wear safety goggles or other suitable eye protection, long pants, and shoes while operating the trimmer.
- Do not use the trimmer as an edger.
-
Keep people and pets away from the trimming area.
-
Inspect the area to be trimmed for any wire, rope or string-like matter which could become entangled in the rotating line. Pick up any objects or debris that could be thrown by the trimmer.
- Trim only when the grass and weeds are dry.
- Slowly move the trimmer in and out of the area being cut.
- Cut grass in excess of eight inches tall or weeds from the top to the bottom in small increments.
- Do not force the trimmer. Allow the very tip of the nylon line to do the cutting (especially along walls).
- Do not drag the trimmer spool on the ground while trimming.
• After each use, feed out some line to prevent line from retracting into cutting head. - Do not store the trimmer with the battery discharged.
• The trimmer cannot be over charged. Keep it on the charger when you are not using it. - Store the trimmer in a cool, dry location away from direct sunlight and heat sources.
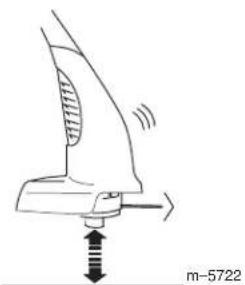
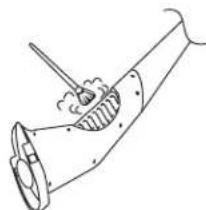
Lengthening the Line
The tip of the cutting line will wear during use and reduce the cutting swath.
To increase the length of the line, tap the spool on the ground while the trimmer is running.
natural_image
Line drawing of a hair iron with a downward arrow indicating compression or dislocation (no text or symbols)Note: The blade under the guard will automatically cut the line to the correct length.
Important: Use the following precautions to ensure optimal line performance.
- Do not hold the spool on the ground.
• To help prevent line tangle, tap only once to lengthen line. If additional line is required, wait a few seconds before tapping the trimmer head. - Do not allow the line to wear too short.
- Keep the line length at full cutting diameter as much as possible.
- If the line is not advanced occasionally, it will wear down to the eyelet. When the trimmer stops, the line tends to relax and may retract into the cutter head. Should this occur, remove spool, refeed the line through eyelet, and assemble spool to trimmer.
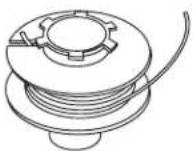
Replacing Line
For replacement line, you can purchase either a new, pre-wound spool of line (model no. 88185 or 88045) or bulk line (0.065 inch dia. x 10ft.) that you can wind onto the old spool. Both are available from your Authorized Toro Dealer.
The spool may wear during normal use and may require occasional replacement.
Note: If the line should tangle or break at the eyelet, stop the trimmer, remove the spool as described below, feed the line through the eyelet, and reassemble the spool to the cutting head.

Caution

If you use line other than Toro .065 inch dia. nylon monofilament, it could cut through clothes and skin causing injury and/or overload the motor, possibly causing a fire or electrical shock. Do not use metal wire, rope, plastic knives, or any cutting line or material other than Toro .065 inch dia. nylon monofilament, 10 foot maximum line length.

Caution

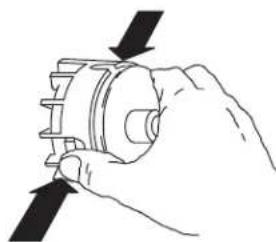
If you do not fully install the spool and cap, the trimmer could throw them during operation, causing injury to the operator or bystanders. Ensure that you fully install the spool and cap, with the two locking tabs on the cap secured in the spool housing.
- Press in the tabs on each side of the cap.
Note: You may need a screwdriver to press the tabs on a new trimmer.
natural_image
Hand holding a mechanical component with arrows indicating direction (no text or symbols)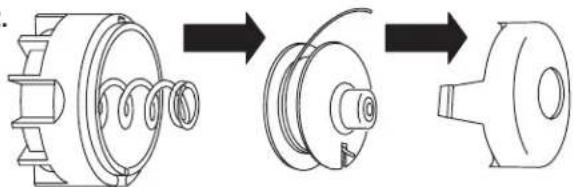
natural_image
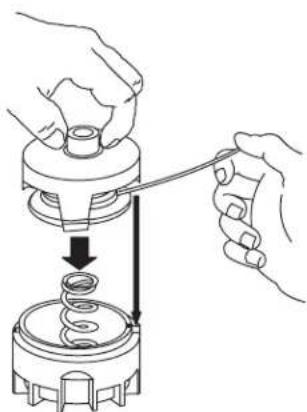
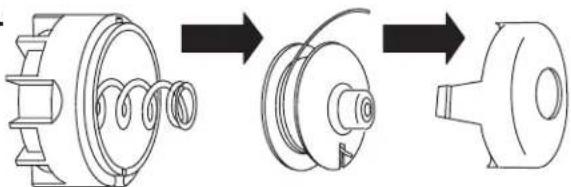
Diagram showing three stages of a mechanical component: winding coil, pulley, and housing (no text or labels)Note: If the spring falls off of the cutter head during this procedure, install the spring before installing the spool and cap.
- If there is any cutting line left (there should be a short piece) remove and discard it.
-
Thoroughly clean the cutter head. Inspect for any damaged or worn parts.
-
If you want to wind new line onto the old spool, complete the following steps:
- Hook one end of line into the slot on the spool, allowing no more than 1/8 inch to protrude, pushing the end of the line all the way to the inner end of the slot.
- Wind the line in the direction of the arrow on the spool, in level rows, between the spool flanges.
Note: The trimmer will not function correctly if the line is wound in the wrong direction, the end of the line protrudes more than 1/8 inch, or the line is wound beyond the outer edges of the spool.
-
Unwind no more than three inches of line from spool (either new or re-wound). Hold line and spool to prevent unraveling.
-
Holding the line and spool to prevent unraveling, place the cap on the spool.
-
Insert line into eyelet, aligning the cap tabs with the slots in the cutter head
-
Press in the tabs and push down the cap and spool to lock the cap in place.
natural_image
Illustration of hands connecting a mechanical component to a spring, showing internal structure and motion direction (no text or symbols)Note: The spool may need to be rotated slightly to allow it to be fully installed.
The fully installed cutting head should appear as illustrated.

natural_image
Line drawing of a mechanical component with a cylindrical top and flanged base (no text or symbols)Maintenance
After each use of the trimmer, complete the following procedures:
- Wipe the trimmer clean with a damp cloth. Do not hose the trimmer down or submerse it in water.
- Wipe or scrape clean the cutter head and spool area any time there is an accumulation of dirt or cuttings.
- Check and tighten all fasteners. If any part is damaged or lost, repair or replace it.
- Scrape debris away from air intake vents.
natural_image
Line drawing of a funnel-shaped object with a handle and internal structure, no text or symbols presentImportant: Keep the air intake vents free of grass and debris to prevent the motor from overheating.
Storage
For idle periods of more than a month, disconnect the charger from the wall outlet and trimmer after the trimmer is fully charged. Do not store the trimmer with the charger plugged in. Storing trimmer in a warm area will decrease life of battery. If the trimmer must be stored in a warm area, charge battery for 24 hours every 2–3 months when not in use.
Service
Toro has designed this product to give you years of trouble free use. Should it need service, take the product to your Authorized Toro Service Dealer. Your Toro Dealer is specially trained to fix Toro products and will ensure that your Toro stays "All" Toro.
Disposing of the Battery
When the battery no longer holds a charge, you can purchase a new battery and have it installed at your Authorized Service Dealer. If you want to discard the trimmer, remove and recycle the battery before discarding the trimmer.
- Remove the 2 bolts and nuts securing the trimmer handle section to the black center section.
- Remove the 6 screws securing the two halves of the handle section together and pull the halves apart.
- Remove the battery and disconnect it from the wire leads.
- Discard the trimmer.
- Recycle the lead-acid battery according to local codes.
Sécurité
105-3073
natural_image
Diagram of a medical or surgical tool with multiple views showing internal components (no text or labels)
m-5669
natural_image
Line drawing of a handheld device with a cable and pointer indicating a measurement (no text or symbols)natural_image
Line drawing of a hand performing a medical or anatomical procedure on a curved object, with arrows indicating motion direction (no text or symbols)natural_image
Line drawing of a human face with open mouth and teeth (no text or symbols)natural_image
Diagram showing a robotic arm interacting with grass and a ruler, labeled m-572 (no text or symbols on the diagram itself)natural_image
Diagram of a steam iron with directional arrows indicating motion (no text or symbols)natural_image
Hand holding a mechanical gear or cam mechanism with a black arrow indicating direction (no text or symbols present)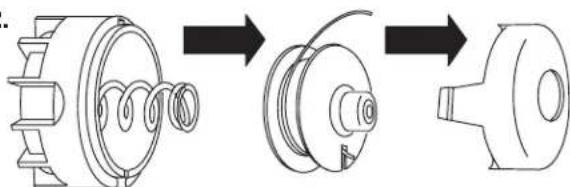
natural_image
Diagram showing three stages of a mechanical component: winding coil, pulley, and housing (no text or labels)natural_image
Illustration of hands using a tool to adjust or install a mechanical component with a spring (no text or symbols present)natural_image
Line drawing of a mechanical component with a cylindrical top and flanged base (no text or symbols)Entretien courant
natural_image
Line drawing of a mechanical component with a tool inserted, no text or symbols present105-3073
natural_image
Diagram of a medical or surgical tool with multiple views showing internal components (no text or labels)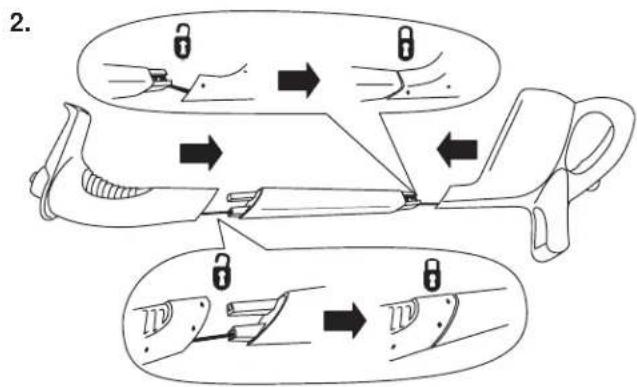
natural_image
Technical line drawing of a mechanical component with threaded fasteners and a hexagonal nut (no text or symbols)m-5669
Betrieb
Aufladen des Akkus
natural_image
Line drawing of a medical device with a probe inserted into a housing (no text or symbols)natural_image
Line drawing of a hand performing a medical or anatomical procedure on a curved object, with arrows indicating motion direction (no text or symbols)Stoppen des Rasentrimmers
natural_image
Line drawing of a hand holding an object with teeth and mouth (no text or symbols)Betriebshinweise
natural_image
Diagram of a steam iron with directional arrows indicating motion (no text or symbols)natural_image
Hand holding a mechanical gear with directional arrows indicating motion (no text or symbols)2.
natural_image
Three-step diagram showing a mechanical component with coiled spring, threaded fastener, and housing (no text or labels)natural_image
Illustration of hands using a tool to adjust or install a mechanical component, with no visible text or symbols.
natural_image
Line drawing of a mechanical component with a cylindrical top and flanged base (no text or symbols)Wartung
natural_image
Line drawing of a pipe with a tool inserted, showing internal flow (no text or symbols)©The Toro Company 8111 Lyndale Ave., Bloomington, MN 55420, USA
105-3073
natural_image
Line drawing of a medical or surgical tool with multiple views of the tool (no text or symbols present)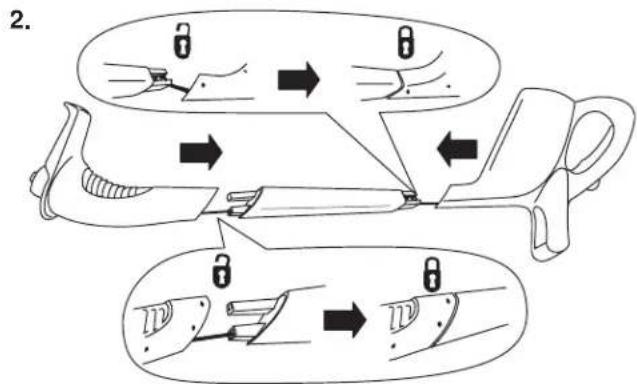
natural_image
Line drawing of a medical or laboratory device with a probe inserted into a container (no text or symbols)natural_image
Line drawing of a hand performing a medical or anatomical procedure on an ear (no text or symbols present)natural_image
Line drawing of a hand holding an animal's head, showing teeth and mouth (no text or symbols)natural_image
Diagram of a steam iron with a downward arrow indicating motion, no text or symbols presentnatural_image
Hand holding a mechanical component with an arrow indicating direction (no text or symbols present)2.

natural_image
Three-step diagram showing a mechanical component with spring, threaded shaft, and housing (no text or labels)natural_image
Illustration of hands performing a mechanical assembly with a spring and base component (no text or symbols)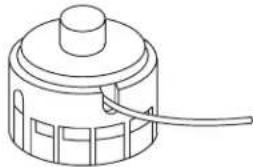
natural_image
Line drawing of a mechanical component with a cylindrical top and flanged base (no text or symbols)Mantenimiento
natural_image
Line drawing of a mechanical component with a tool inserted, no text or symbols present105-3073
natural_image
Line drawing of a medical instrument with three views showing internal components (no text or symbols)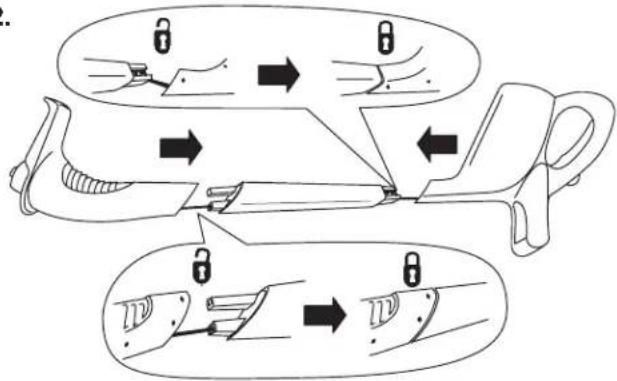
m-5669
natural_image
Line drawing of a medical device with a probe inserted into a housing (no text or symbols)natural_image
Line drawing of a hand performing a medical or anatomical procedure on a jaw (no text or symbols present)De trimmer afzetten
Om de trimmer af te zetten, laat u de trekker los.

natural_image
Line drawing of a hand holding teeth with teeth removed, showing mouth and teeth alignment (no text or symbols)natural_image
Diagram of a robotic arm with directional arrows indicating movement or force (no text or symbols)natural_image
Diagram of a steam iron with a downward arrow indicating motion, no text or symbols presentnatural_image
Hand holding a mechanical component with arrows indicating direction (no text or symbols)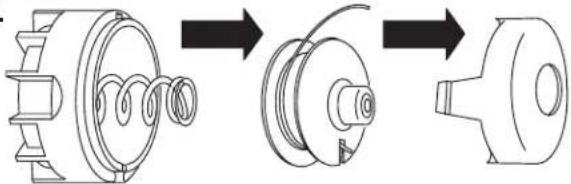
natural_image
Three-step diagram showing a mechanical assembly: spring, helical component, and housing (no text or labels)natural_image
Illustration of hands using a tool to adjust or install a mechanical component, with no visible text or symbols.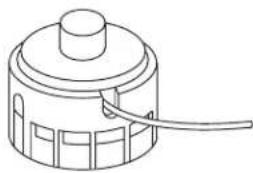
natural_image
Line drawing of a cylindrical mechanical component with a central hub and a handle (no text or symbols)Onderhoud
natural_image
Line drawing of a mechanical component with a tool inserted, no text or symbols present105-3073
natural_image
Diagram of a medical or surgical tool with multiple views showing internal components (no text or labels)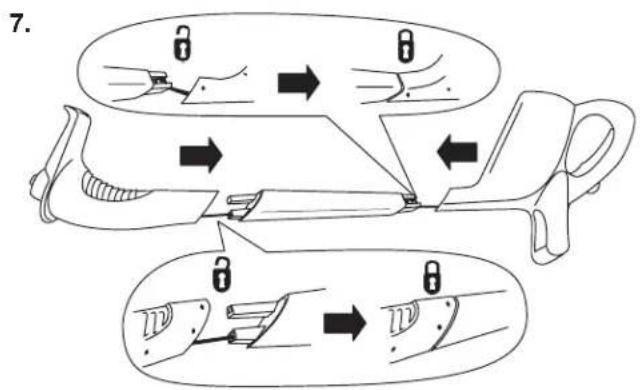
natural_image
Technical line drawing of a mechanical component with threaded pins and a hexagonal nut (no text or symbols)m-5669
natural_image
Line drawing of a medical device with a probe inserted into a housing (no text or symbols)natural_image
Illustration of a hand performing a medical or therapeutic procedure on a curved object, with arrows indicating direction (no text or symbols present)Stänga av trimmern
natural_image
Line drawing of a hand holding an animal's head, showing teeth and mouth (no text or symbols)Arbetstips
natural_image
Diagram of a hairdryer with motion arrows indicating movement (no text or symbols)natural_image
Hand holding a mechanical gear or cam mechanism with directional arrows indicating motion (no text or symbols)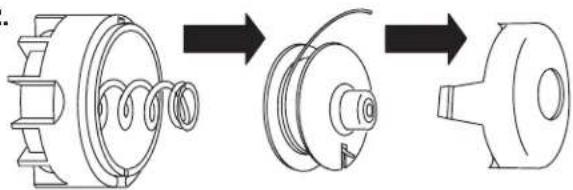
natural_image
Diagram showing a mechanical assembly with three stages: winding coil, pulley, and housing (no text or labels)natural_image
Illustration of hands using a tool to adjust or install a mechanical component with a spring (no text or symbols present)natural_image
Line drawing of a mechanical component with a cylindrical top and flanged base (no text or symbols)Underhåll
natural_image
Line drawing of a funnel with a handle and internal structure (no text or symbols)105-3073
natural_image
Diagram of a medical or surgical tool with multiple views showing internal components (no text or labels)
natural_image
Technical line drawing of a mechanical component with threaded fasteners and a hexagonal nut (no text or symbols)m-5669