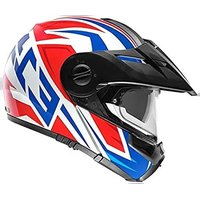
E1 - Motorcycle helmet Schuberth - Free user manual and instructions
Find the device manual for free E1 Schuberth in PDF.


| Product type | Modular motorcycle helmet (adventure) |
| Standard | ECE-R 22.05 |
| Outer shell | Fiberglass-reinforced duroplastic |
| Inner shell | Multi-zone foam in several parts |
| Outer screen | HighClear scratch-resistant coating, EasyChange system |
| Anti-fog visor | Double wall with sealing gasket, tool-free mounting/removal |
| Sun visor | 1.5 mm polycarbonate, grey tinted, scratch-resistant treatment, UV protection |
| Ventilation system | Adjustable head ventilation with 3 levels, chin ventilation, visor ventilation, minimum ventilation |
| Chin guard | Flip-up with double mechanical lock, central slider, automatic anti-opening safety |
| Chin strap | Micro-lock ratchet closure, adjustable, with anti-roll-off system (A.R.O.S.) |
| Lining | Removable and washable, Coolmax, Polygene, Interpower fabrics |
| Safety equipment | Reflective areas, anti-roll-off system |
| Communication preparation | Integrated antennas, compatible with SRC-System™ |
| Weight (approx) | Approx. 1600 g |
| Care | Outer shell and screen: soapy water; visor and sun visor: soft damp cloth; lining: hand wash at 30°C max |
| Recommended lifetime | 5 to 7 years depending on use |
| Spare parts and repairs | Genuine SCHUBERTH parts from authorized dealer; repairs by SCHUBERTH service |
Frequently Asked Questions - E1 Schuberth
User questions about E1 Schuberth
0 question about this device. Answer the ones you know or ask your own.
Ask a new question about this device
Download the instructions for your Motorcycle helmet in PDF format for free! Find your manual E1 - Schuberth and take your electronic device back in hand. On this page are published all the documents necessary for the use of your device. E1 by Schuberth.
USER MANUAL E1 Schuberth
E1

SCHUBERTH
MANUAL
E1
2 - 53
DE
54 - 105
EN
106 - 157
FR
158 - 209
IT
210 - 261
NL
262 - 313
ES
The helmet is not intended for use in the USA and Canada. The helmet has been inspected and approved to the European ECE Standard and therefore does not conform to US and Canadian regulations and requirements. It is only legal to use the helmet in countries in which the European ECE Standard is valid, if you use the helmet in other countries, you will not in the event of injury be entitled to make a claim for compensation before the US or Canadian courts or the courts of other countries not bound by the ECE Standard.

Avertissement:
Achtung:
Achtung:
Warnung:
C. DER HELM
Warnung:
DEMONTAGE
MONTAGE
Achtung:
C. DER HELM

C. DER HELM
Hinweise:
C. DER HELM
Achtung:
Sonnenvisier-Einbau
C. DER HELM
C. DER HELM
AUSBAU KOMFORT-WANGENPOLSTER
C. DER HELM
EINBAU KOMFORT-WANGENPOLSTER
15. BELÜFTUNGSSYSTEME
C. DER HELM

REFLEXBEREICHE
You have made an excellent choice with the SCHUBERTH E1. The E1 combines the functionality of a flip-up helmet with the look and feel of a modern adventure helmet. The E1 is produced with advanced manufacturing methods and was constructed with excellent aerodynamics and a ventilation system perfect for conditions both on and off road.
The first SCHUBERTH adventure helmets combine proven safety and comfort features into one high-quality product, designed to meet the highest demands in both street traffic as well as off-road use.
Be inspired!

Jan-Christian Becker Thomas Schulz
A. HOW TO USE THIS MANUAL CORRECTLY
Please take time to read through this manual carefully so that your helmet protects you properly when riding your motorcycle. In order to ensure that you do not overlook any aspect of the manual that is relevant to your safety, we recommend that you read it in the order in which it appears.
Please play particular attention to:

Caution: safety instructions

Note: advice

Tip: practical tips

: see figure

rnung:
The helmet is not intended for use in the USA and Canada. The helmet has been inspected and approved to the European ECE Standard and therefore does not conform to US and Canadian regulations and requirements. It is only legal to use the helmet in countries in which the European ECF Standard is valid. If you use the helmet in other countries, you will not in the event of injury be entitled to make a claim for compensation before the US or Canadian courts or the courts of other countries not bound by the ECE Standard.

Avertissement:
We reserve the right to make changes that reflect technical advances and to do so without express notice.
B. CONTENTS
A. How to use the manual correctly ____ 55
B. Contents 56
C. The helmet 58
-
Standard 58
-
ECE approval 58
-
Anatomy the helmet 59
-
Outer shell 59
-
Inner shell 59
-
Aerodynamics 60
-
Aeroacoustics 60
-
Wind deflector 62
-
Chin bar 62
-
Chinstrap with micro-lock ratchet fastener 64
-
Shield 66
-
Face shield with integrated anti-fog lens 68
-
Sun visor 75
-
Inner lining 78
-
Ventilation systems 85
-
Additional safety features 88
D. Putting on the helmet and taking it off 89
-
Putting on the helmet 89
-
Taking off the helmet 90
E. Before every journey 91
-
Checking the helmet 91
-
Checking the chinstrap 91
-
Checking the shield, the face shield and sun visor 92
F. For your safety
-
Safety advice concerning the helmet 93
-
Safety advice concerning the face shield / sun visor 95
-
Safety advice concerning modifications / accessories 95
G. Maintenance and care
-
Outer shell and shield 96
-
Chin section 96
-
Face shield and sun visor 96
-
Inner lining 98
-
Ventilation 99
-
Dust filter 100
-
Retention system 100
-
Storing the helmet 100
H. Accessories and spare parts 101
-
Communication systems 101
-
Accessories and spare parts 102
-
Ordering original SCHUBERTH parts 102
I. SCHUBERTH service 103
-
Repair service 103
-
Warranty 103
J. How to contact us 104
C. THE HELMET
1. STANDARD
The E1 conforms to the ECE-R 22.05 standard. This testing norm guarantees conformity to defined safety standards in respect of impact absorption, visor, retention system and field of vision. The certification applies to all the countries of the European Union and all countries that recognise the ECE standard. It also guarantees conformity with all insurance requirements that are important in the event of a claim.
Please note that this E1 with ECE approval is not certified for the USA, Canada or any other EU countries. It is only permitted for use in countries where the ECE standard is valid.
Note:
The only SCHUBERTH helmets that it is legal to use in the USA, Canada or other non-EU countries are those with the appropriate approval and technical specifications.
Further information and details of sales outlets for these helmets can be found on the Internet at:
WWW.SCHUBERTH.COM
2. ECE-APPROVAL

- ANATOMY OF THE HELMET
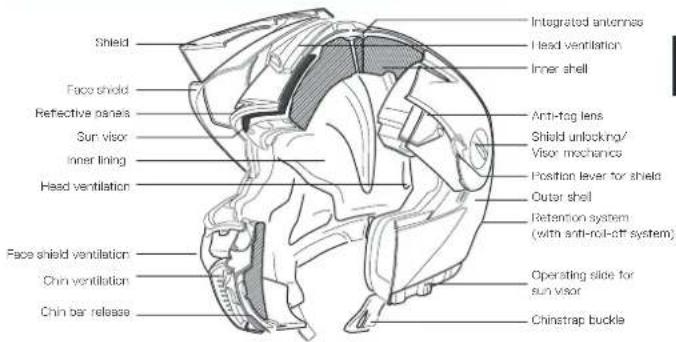
4. OUTER SHELL
The outer shell of the E1 helmet combines an aerodynamically optimal shape with consistent protection. It consists of a special glass-fibre reinforced duroplastic matrix developed by SCHUBERTH, which gives the helmet the high level of strength needed for your protection.
Caution:
The safety helmet is designed to absorb the effects of only one impact. The helmet must be replaced after a fall, accident or any other impact.
5. INNER SHELL
For optimised impact absorption properties, the inner shell of the helmet consists of several components. The complex multi-segment foam padding of the main body provides better absorption and dissipation of impact forces and gives you the highest level of safety. The large side panels ensure the helmet sits optimally and comfortably.
C. THE HELMET
6. AERODYNAMICS
All SCHUBERTH motorcycle and racing sports helmets are developed and improved in SCHUBERTH's own wind tunnel under conditions defined with scientific precision. The E1 is designed especially for the touring riding position and does not move around in the airflow. Even at higher speeds, the E1 generates almost no lift. Additional features of the E1 include improved air resistance and directional stability. Buffeting ™ is significantly reduced on standard motorcycles as well.
* Shaking of the helmet as the air flows around it.

Please note that the strong eddy currents that can occur as a result of the fairing on faired motorcycles may have a significant effect on the aerodynamic characteristics of a helmet.
7. AEROACOUSTICS
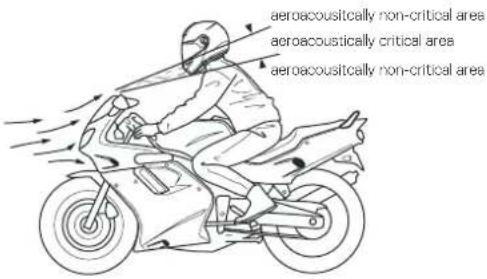
Various features developed in SCHUBERTH's wind tunnel make the helmet notably quiet as far as aeroacoustics are concerned, while providing optimised hearing capability when riding. This enhances concentration, especially at high speeds.

Aeroacoustic values may vary according to the type of motorcycle, fairing design, seat position and physical size of the rider.

As a result of the aeroacoustic optimisation of the helmet (and the lower wind noise inside the helmet that comes with it), your actual speed can easily be underestimated. Please do not rely on your sense of hearing to estimate your road speed - always check it using your speedometer.

With fared motorcycles, strong eddy currents occur at the edges of the wind shadow. These may significantly reduce the aeroacoustic performance of the helmet. The motorcycle fairing should be adjusted so that the turbulence created does not reach the bottom surface of the helmet.
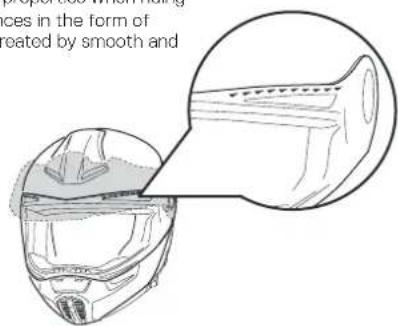
Turbulators
The patented turbulators on the top of the face shield also optimise the aeroacoustic properties when riding and prevent acoustic disturbances in the form of whistling sounds that can be created by smooth and straight edges.
C. THE HELMET
8. WIND DEFLECTOR
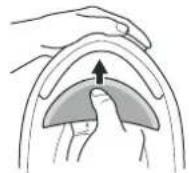
The wind deflector is shortened to a minimum in order to provide enough fresh air, even in off-road use. The additional wind deflector, when mounted, prevents unwanted inrush of wind into the helmet while driving. Additionally, the anti-noise pad can help reduce noise levels in the helmet.
The additional wind deflector is attached to the inside of the acoustic collar with the help of the Velcro strap, and it can be removed if desired to let in additional fresh air in warm weather.
Tip:
The fit of the bottom of the helmet is extremely important in ensuring that the helmet is as quiet as possible. If you have a smaller neck size, we recommend that you also wear a scarf.
9. CHIN BAR
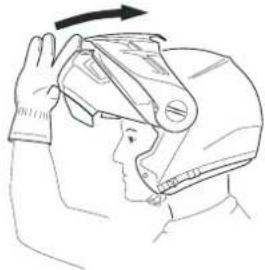
The E1 is equipped with a chin bar that pivots up and can be easily opened and closed by means of the operating element located in the middle of the chin bar. The movement of the section required for this is optimised for convenient, smooth operation.
LOCK SYSTEM
The chin section is equipped with a specially developed lock system on the left and the right side. The construction design of the lock system is similar to the door lock systems used in car design. Despite there being locks on both sides, the chin section opens with only one button. The lock in the opposite side is simultaneously operated by bowden cable. The mechanically optimised system reduces the force need to operate the two locks to a comfortable 16 N, although the safety-relevant overall locking force is many times this amount.
OPERATION
The chin bar can be opened at any time irrespective of the position of the visor or sun visor. The stiff, positive engagement at the end of travel ensures the chin bar remains safely in place when raised.
OPENING THE CHIN BAR
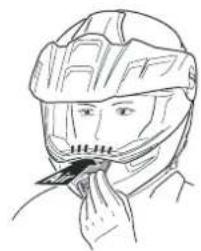
- Open the chin bar by sliding the red button located in the middle of the chin zone forwards in the direction of the arrow as far as it will go, using your thumb.
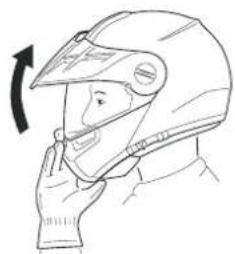
- The Bowden cable mechanism will then release both locks and you can pivot the chin section up to its uppermost locking position.
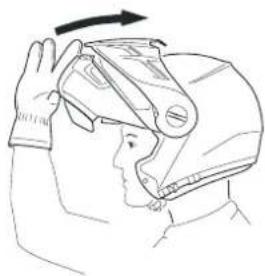
Note:
The E1's chin bar mechanism is equipped with a safety feature which prevents the chin bar from opening of its own accord in the event of a fall, so when opening it you should also grip the chin bar with one hand.
Note:
The positioning of the shield is aligned with the opening for the chin section to guarantee optimal movement of the chin section.
C. THE HELMET
CLOSING THE CHIN BAR
To close the chin bar, pivot it down with one hand until both locks audibly engage.
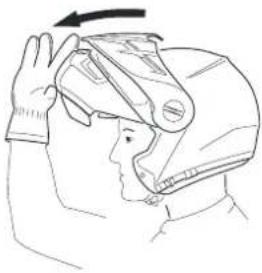
Note:
By closing the chin guard, the shield is returned to its starting position.
Note:
Each time you close the chin bar, check that the locks have engaged properly by pressing the chin bar upwards.
Tip:
When using the additional adjustable wind deflector, locking the chin bar is easier if you grip the chin pad underneath with a finger of your other hand to help you ease the chin bar over your chin.
Caution:
Never ride with the chin bar raised.
10. CHINSTRAP WITH MICRO-LOCK RATCHET FASTENERS
The E1 comes with a ratchet fastener. This locking system is easy to use and enables you to adjust the chinstrap perfectly to your head every time you put the helmet on.

ADJUSTING THE CHINSTRAP
The length of the chinstrap is adjusted by increasing or reducing the length of strap pulled through the metal buckles. Adjust the length of the chinstrap so that it fits firmly but comfortably under your chin and fix the end of the strap using the retaining loop with comfort pad.
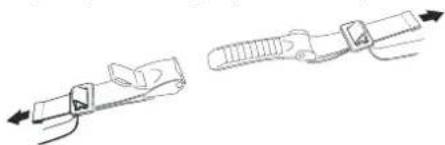
Caution:
When adjusting the strap, make sure that the helmet cannot be pulled off in a forward direction with the chinstrap closed.
Caution:
Check the adjustment of the chinstrap length at regular intervals.
Opening and closing
To close the chinstrap fastener, slide the ratchet tongue step by step into the locking buckle. If you find that the chinstrap fits too loosely around your chin, slide the ratchet tongue one step further into the locking buckle.
When adjusting the chinstrap, make sure that it rests firmly but not uncomfortably around your chin. To open the chinstrap, pull the red ribbon on the ratchet fastener upwards to release the locking buckle. Then pull the ratchet tongue out of the locking buckle.

C. THE HELMET
Aution:
Never ride without making sure that the chinstrap is correctly fastened and adjusted and properly positioned. If the chinstrap is not correctly adjusted or fastened, the helmet could be displaced in the event of an accident.
Caution:
Closing the comfort pad of the chinstrap alone will not provide adequate protection. The chinstrap must always be fully fastened.
Caution:
Never open the chinstrap while riding.
11. SHIELD
The screen designed in SCHUBERTH's own wind tunnel offers protection from the sun's rays and from rocks.
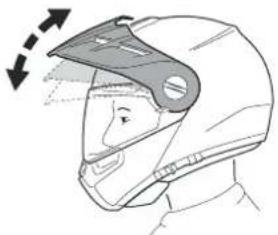
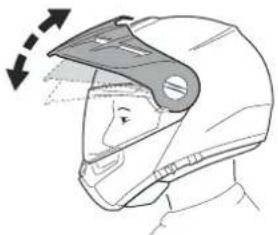
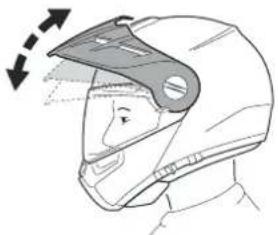
The shield can be fixed into one of three different positions as required.
- Move the positioning lever on both sides toward the bottom.
- Adjust the shield to the desired position.
- Return the positioning lever back to its starting position.
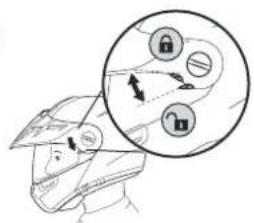
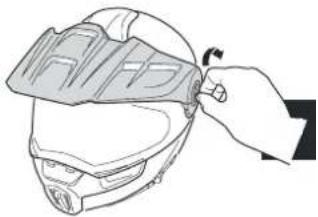
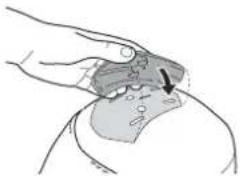
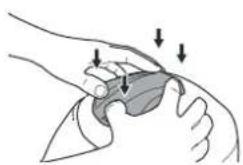
DISASSEMBLY
Turn the bayonet fastenings on both sides to unlock the shield. Then you can remove the shield from the mechanism.
ASSEMBLY
Use both hands to guide the snap-in pins on the shield into the slots provided for them in the visor mechanism, then close the bayonet fastening.
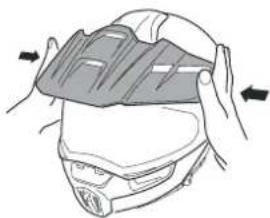
Note:
Check that the shield is firmly seated before you next use it.
Tip:
You can also use the helmet without the shield.
The fastening pins Included in the scope of the delivery can be inserted into the now-visible shield mechanism, after the shield has been removed.
Furthermore, it is possible to use the helmet without the face shield but with the shield. For this combination, SCHUBERTH recommends that you wear safety glasses.
C. THE HELMET
12. FACE SHIELD WITH INTEGRATED ANTI-FOG LENS
The face shield is a fog-free double-lens visor. By fixing the inner anti-fog lens using eccentric pins, the two visor panes are pre-tensioned together and are thereby sealed. An insulating air cushion is thus formed between the visor's main plate – i.e. the outer plate – and the inner plate, which prevents any fogging up of the inner plate.
COATING
The main plate has a HighClear® anti-scratch coating on both sides.
Note:
The helmet should never be used to hold gloves or any other objects as this may damage the scratch-sensitive anti-fog lens.
Note:
The anti-fog lens is supplied with a protective film. Remove this film before using the helmet for the first time.
Note:
The anti-fog lens may only be used in conjunction with the SCHUBERTH main face shield that has been specially designed for this purpose. Other face shields must not be fitted.
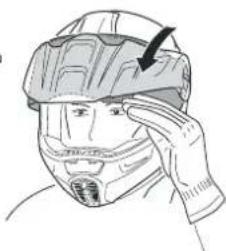
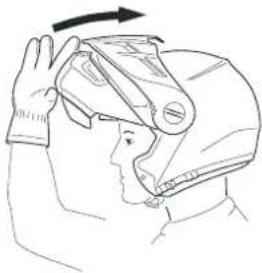
To open the face shield, use your thumb to push the face shield up using one of the finger tabs situated to the left and right of the face shield, and move it to the desired position.
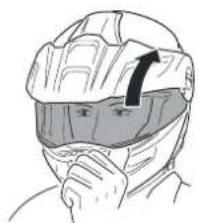
Face shield (including urban position)
The face shield can be locked in any one of seven positions. The second position (urban position) locks in place more firmly, providing greater resistance when the face shield is in this position. This makes it easier to lock the face shield in the urban position, especially while riding.
- When you push the face shield open, it may well travel beyond the urban position
- but it is easy to find this position by moving it downwards again. The face shield mechanism requires no additional lubrication. The face shield can be operated at any time irrespective of the position of the sun visor.
CLOSING THE FACE SHIELD
To close the face shield, grip the finger tabs at top left and right and press the face shield down with one movement until it audibly locks into place.
C. THE HELMET
REPLACING THE VISOR SHIELD
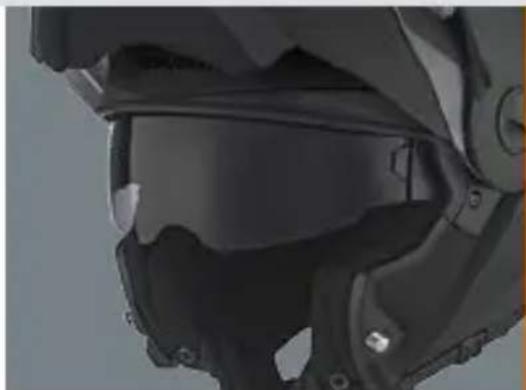
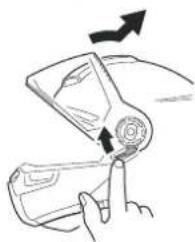
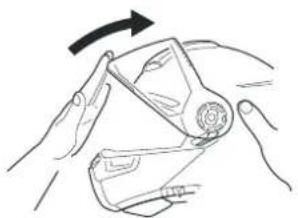
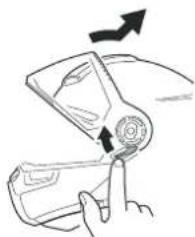
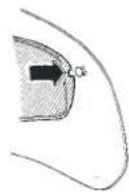
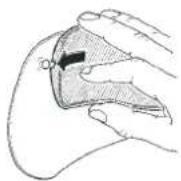
Changing the face shield is easy to do without tools using the convenient EasyChange mechanism. To do so, the shield must be dismantled. To replace the face shield, it is helpful to place the helmet on a flat surface or on your lap while seated.
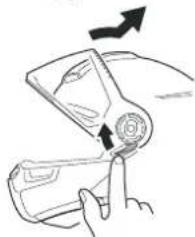
Removing the face shield
- Move the face shield into the uppermost locked position.
- Press the spring underneath the face shield mechanism on one side towards the face shield opening, then do the same with the spring on the other side.
- Move the face shield upwards until it is released from the face shield mechanism.
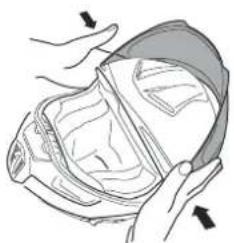
Installing the face shield
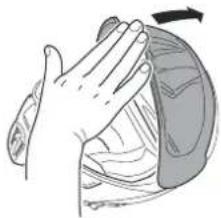
- Using both hands, guide the face shields locking studs into the respective recesses in the face shield mechanism.

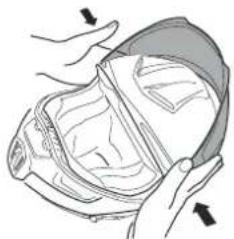
- The face shield will then audibly lock into place when you press it gently towards the helmet with a simultaneous closing movement.
- Make sure that the face shield mechanism is functioning properly by opening the face shield once to its maximum extent.
ANTI-FOG LENS
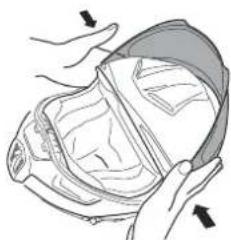
Fitting
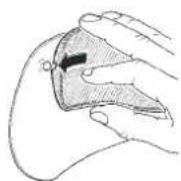
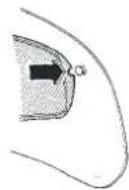
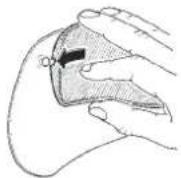
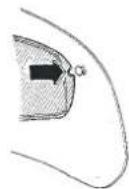
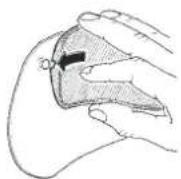
- Lay the anti-fog lens in the face shield in such a way that one side of it is already slotted into the locking pin.
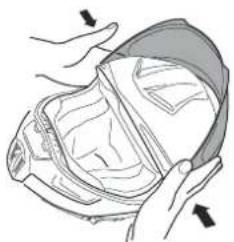
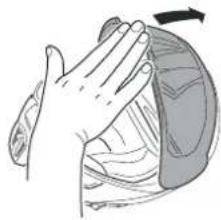
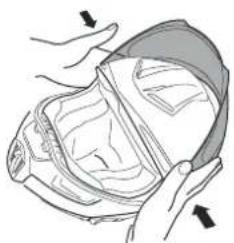
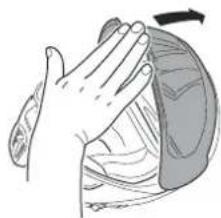
- Now grasp the other side of the anti-fog lens by its upper and lower transverse edges and use your index finger to gently press the end of the visor into a slight "S" shape. Now you can easily guide the slot over the locking pin and release the anti-fog lens into place.
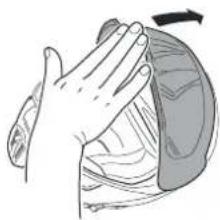
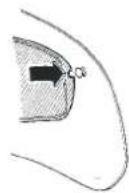
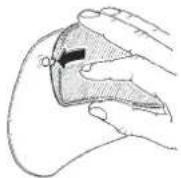
C. THE HELMET
- The anti-fog lens should now be positioned in the face shield with its lower edge parallel to the lower edge of the face shield. If you need to change the positioning of the anti-fog lens, use the balls of your thumbs to gently bend the face shield apart until the inner visor can be adjusted as required.
- Check all around the anti-fog lens to make sure that it fits tightly and evenly against the face shield. Only if this is the case will the anti-misting properties function properly.
- If you have not done so already, remove the protective film from the anti-fog lens.
If the anti-fog lens is not air-tight and the face shield mists up, either the visor is not correctly in place or the pressure on the seal is inadequate. You can regulate the pressure on the seal by adjusting the eccentric locking-pins. To remove the anti-fog shield, use a rubber spanner to turn the retaining pins 180°, and then reinsert. Fit the anti-fog lens and check the seal.
Removal
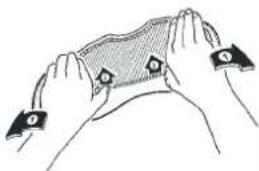
- Before starting to remove the anti-fog lens, first lay the face shield on a soft, clean cloth so that its top edge is facing you.

- To reduce the pretensioning of the anti-fog lens slightly if necessary, use the balls of your thumbs to carefully bend the face shield sufficiently apart while applying pressure with your thumbs to release the anti-fog lens and move it approx. 2–3 mm forward.
- Now grip the back of the anti-fog lens with your index and middle fingers and lift it off the face shield. In this position you can easily remove the anti-fog lens from the locking pin with your thumb.
- You can now remove the anti-fog lens from the face shield.
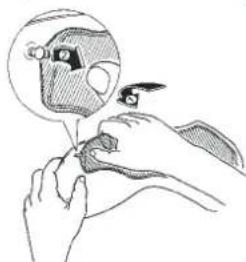

Note:
To avoid scratching the face shield, never remove or fit the anti-fog lens unless the visor unit is clean and dry.
When fitting the anti-fog lens, check that neither dust nor moisture are able to get between the two surfaces.
When removing or fitting the anti-fog lens, it is always best to lay the face shield unit on a clean, dry cloth.
Note:
In view of the strong air pressure acting when travelling with an open face shield, we recommend riding with a closed face shield at all times to prevent any dirt or moisture from getting inside the helmet.

Note:
Never press the locking pins out with your fingers as they may break.
C. THE HELMET
Aution:
As a result of the double lens structure, there is a possibility of greater light reflection in the face shield, especially when riding at night. As a rule, such light reflection is regarded as uncritical due to the absence of fog with this type of visor. However, if this light reflection should cause you difficulties – because of particular sensitivity to it, for example – you should refrain from using the anti-fog lens.
Caution:
If moisture is present in or has penetrated the airtight area between the two plates, you should remove the anti-fog lens immediately in order to prevent any interference with visibility. Do not re-fit it until both plates are completely dry (we recommend air-drying). If you should subsequently detect any further penetration of moisture, the anti-fog lens should not be used on any account and must be replaced.
Caution:
Petrol, solvent and fuel vapours can cause cracking of the face shield. Make sure that the face shield is never exposed to such vapours! Never place the helmet on the tank of your bike.
13. SUN VISOR
SUN VISOR
The sun visor is tinted grey and has a 3D shape. Thanks to the sun visor's 1.5mm thickness, it provides protection against small stone chips or insects when riding with the visor up. It is also scratch-resistant and offers effective UV protection* with its special polycarbonate structure.
* Tested in accordance with the Australian sunglasses standard AS/NZS 1067:2003 lens category 3.
Operation
The sun visor is operated by means of the slide positioned on the left in the chin area, which is easy to use even when wearing gloves.
Moving the slide towards the back lowers the sun visor, moving it forwards retracts the sun visor inside the inner helmet shell and locks it in position.
The sun visor can be operated irrespective of the position of the face shield.
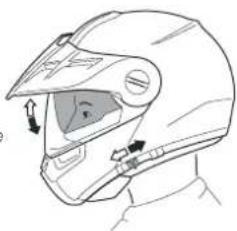
C. THE HELMET

Only use the slide to operate the sun visor.

Never ride in the dark or in conditions of poor visibility with the sun visor down. Always raise the sun visor before entering a tunnel.

Riding without the face shield or with an open face shield can result in injury to the eyes and face from stones, dust, insects and other flying objects. The sun visor, when lowered, will offer a certain amount of protection from light impact from stones or insects but does not provide protection against all hazards.
REPLACING THE SUN VISOR
The sun visor can be replaced without tools.

To avoid fingerprints and scratches, use a soft, clean cloth (we recommend a microfibre cloth) to hold the sun visor when removing or installing it.

Changing the sun visor is easier when the chin section is open and locked in place. It is also helpful if you place the helmet on a flat surface or on your lap while seated.

Try to prevent the sun visor coming into contact with the helmet's inner shell when removing or fitting it.
Removing the sun visor
- Open and lock the chin section in place.
- Pivot the sun visor down.
- Bend the middle snap connection with locating pegs gently outwards until the sun visor is released from the visor holder.
- Repeat this step for the other side.

The sun visor holders should remain in the lower position while you install the visor.
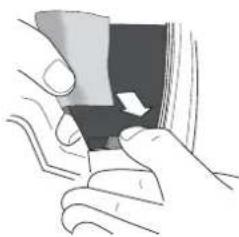
Fitting the sun visor
- Put the sun visor between the snap connections and fit it on to the locating pegs on one side and then on the other.
- Position the sun visor between helmet inner and outer shell and lower it with the operating slide.
- For safety, check that the sun visor mechanism is functioning correctly.
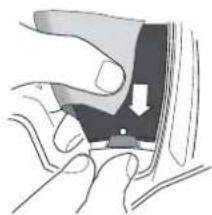
C. THE HELMET
14. INNER LINING
The replaceable inner lining of the E1 is washable and ensures both an excellent fit and improved ventilation of the helmet.
The high-comfort cheek pads ensure that the helmet fits comfortably around the cheeks, and the headband pad provides an optimal fit all around the head. The head pad sits comfortably on the head without covering the ventilation channels.
The internal lining consists of skin-friendly materials throughout, particularly in areas that come in contact with the head. These are a soft, breathable COOLMAX® material that transports heat and moisture very well, a special noise-reducing Polygene® material with antibacterial properties and a sweat-absorbing Interpower® material.
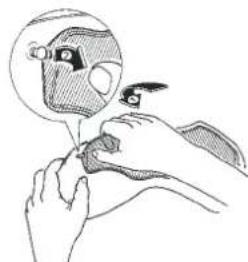
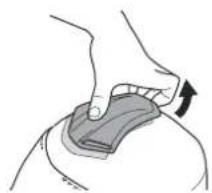
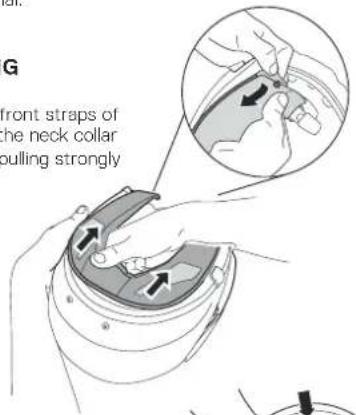
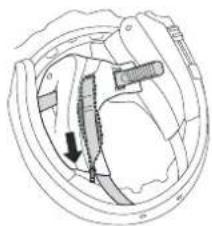
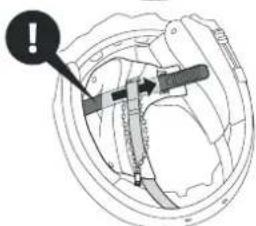
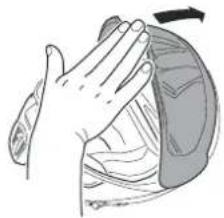
REMOVING THE LINING
- Undo the snaps on the front straps of the neck collar and pull the neck collar out of the mounting by pulling strongly inwards.
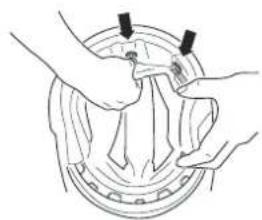
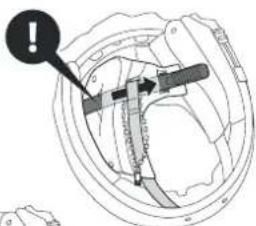
- Undo the two rear snaps of the cheek pads as well as rear crown liner retention flap button.
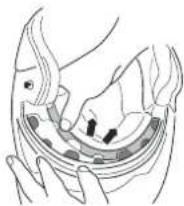
- Pull the plastic bar out of the mounting and remove the crown liner.
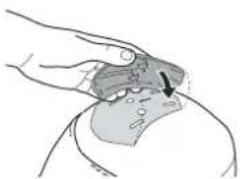
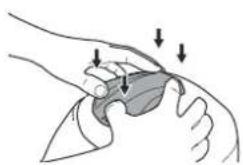
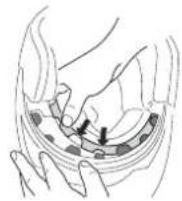
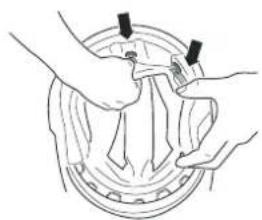
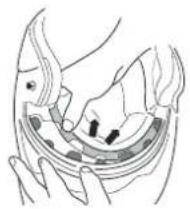
MOUNTING THE CROWN LINER
The sewn-in plastic bar on the forehead section and the retention flaps in the neck area are used as mounting assists.
- Push the plastic bar piece by piece below the notches on the plastic bar affixed to the inner shell.
- Insert the plastic retention flaps with round holes over the pins sewn into the rear section of the cheek pad and affix them using the red snaps.
C. THE HELMET
- Reinsert the neck collar by first inserting the guide pins into the front plugs and sockets on the lower helmet edge on both sides and then mount the neck collar piece by piece into the guide gap.
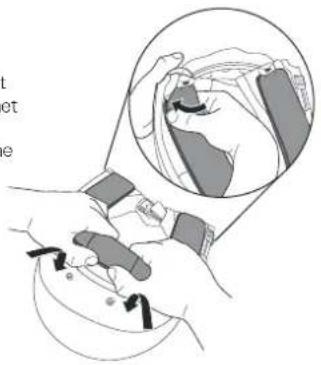
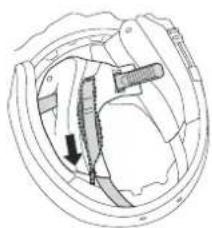
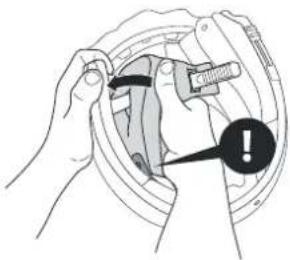
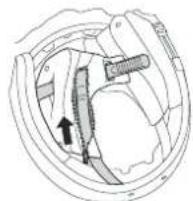
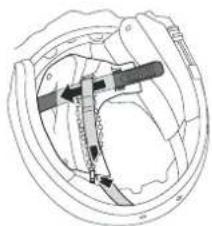
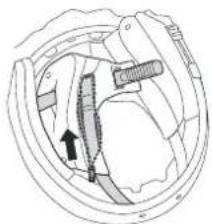
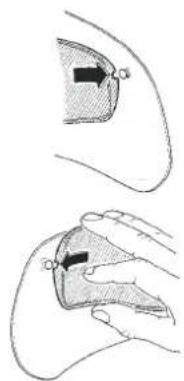
DISMANTLING THE CHEEK PAD
- Undo the snaps on the front straps of the neck collar and pull the neck collar out of the mounting by pulling strongly inwards.
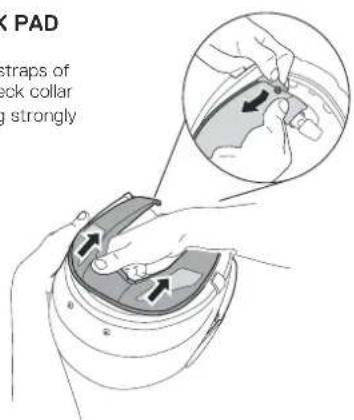
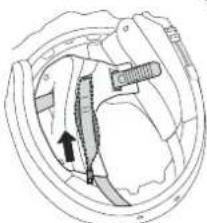
- Remove the cheek pad by pulling the three snaps out of the red plugs and sockets.
- Unzip the zipper.
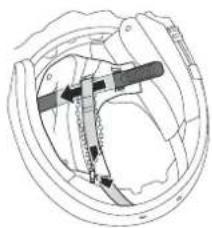
- Thread the chinstrap out of the A.R.O.S. strap and pull this sideways. Pull the neck strap rearwards out of the cheek pad.
- Repeat points 2 to 4 to dismantle the cheek pad on the other side.
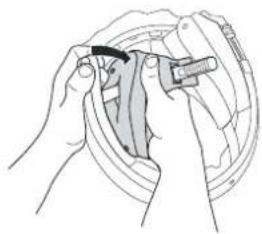
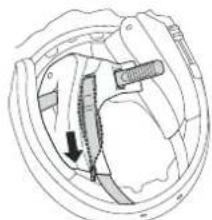
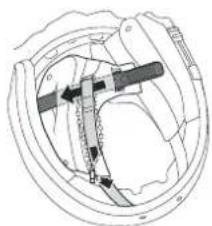
C. THE HELMET
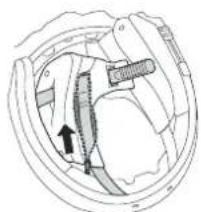
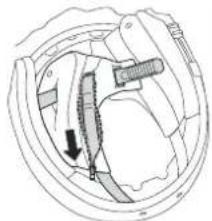
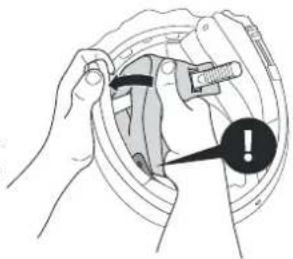
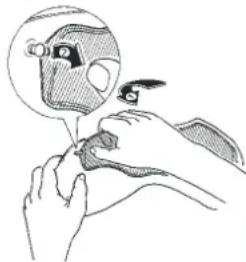
MOUNTING THE CHEEK PAD
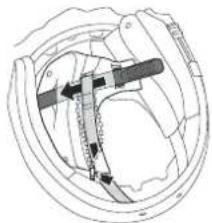
- Push the A.R.O.S. strap through the neck strap channel as far as the chinstrap padding opening.
- From the outside, thread the chinstrap through the cheek cushion and through the A.R.O.S. strap and pull it tight from the back.
- Zip up the zipper.
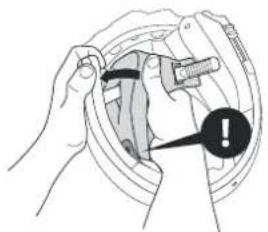
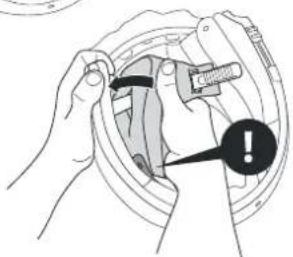
- Mount the cheek pad using the three pins on the red plugs and sockets. ① Ensure that the head strap cushion's plastic strap with the round holes is inserted over the rear cheek cushion pin.
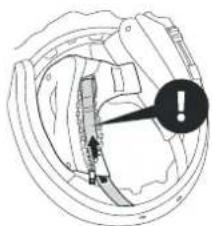
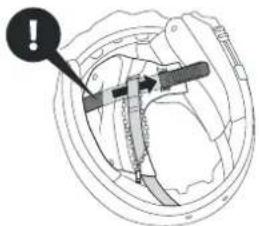
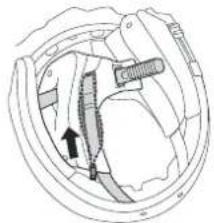
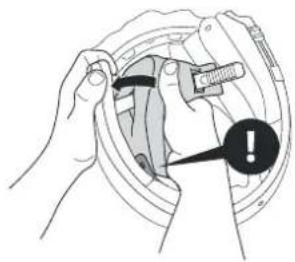
- Repeat points 1 to 4 to mount the cheek pad on the other side.
- Reinsert the neck collar by first inserting the guide pins into the front plugs and sockets on the lower helmet edge on both sides and then mount the neck collar into the guide gap piece by piece.
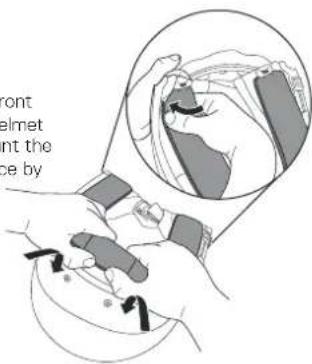

Note:
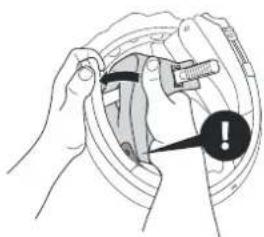
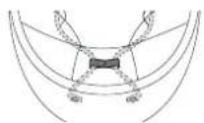
Ensure that the A.R.O.S. straps are not twisted.

Note:
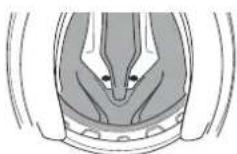
When inserting the crown liner, make sure that the headband ventilation cut-outs are positioned over the ventilation channels at the back of the helmet and that the crown liner runs centrally between the two ventilation channels.

Caution:
Never ride when parts of the inner lining have been removed.

Caution:
Excessive heat (e.g. exhaust heat) can cause damage to the Inner lining!

Note:
To avoid damage to the inner lining and inner shell, do not hang the helmet over the mirrors or handlebar grips.
C. THE HELMET

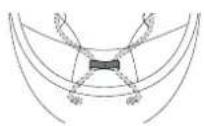
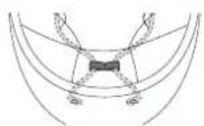
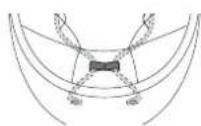
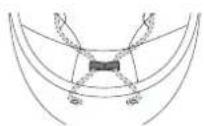
When replacing the cheek pads, the Anti-Roll-Off System must be properly joined to the chinstrap. For this purpose, the loops on the free ends of the A.R.O.S. straps – as shown in the illustration below – must enclose the corresponding ends of the chinstrap and the A.R.O.S. straps must not be twisted or knotted.

For size 54/55 helmets, also ensure that the A.R.O.S. straps are always threaded through the additional loops in the back of the neck area.
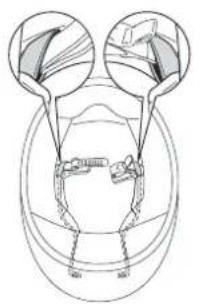
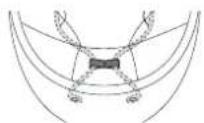
15. VENTILATION SYSTEMS
VENTILATION DEVICE 1 - FACE SHIELD SETTING
The E1 has a face shield that adjusts to several positions. Depending on your road speed and the tendency of the face shield to mist up, open the face shield sufficiently wide to stop it misting up but so that it still protects your eyes from excessive draft.
Urban position
In its second locking position, the face shield is automatically in urban position. Air entering through the bottom gap flows over the inside of the face shield and escapes through the opening at the top.
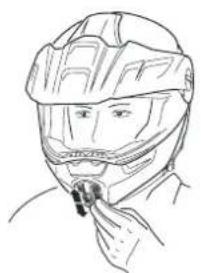
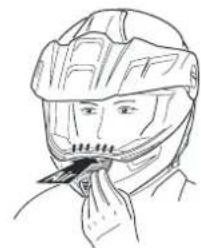
VENTILATION DEVICE 2 - INLET VENT IN CHIN AREA
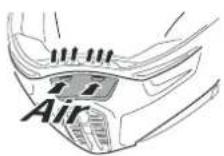
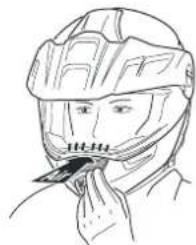
The chin ventilation provides centered air supply. The incoming air is cleaned with a dust filter as well. The chin ventilation can be opened and closed by moving the slider up or down.
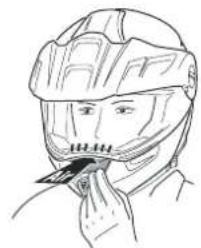
VENTILATION DEVICE 3 - FACE SHIELD VENTILATION
To ventilate the face shield, the E1 is provided with an inlet in the chin area. Irrespective of riding posture, around 80-90% of the central airstream flows directly into this inlet when open. A deflector ensures that the air current ventilates the face shield effectively even at low road speeds. You can open and close the inlet by pushing the vent upwards or downwards.
C. THE HELMET
VENTILATION SYSTEM 4 - HEAD VENTILATION
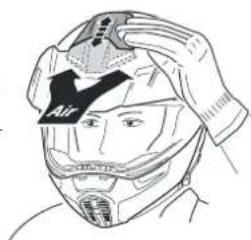
There is a large air inlet cowl with a three-stage adjustable ventilation system on the top of the helmet shell for ventilating the top of your head. Air entering the helmet through this inlet cowl is directed via channels to the top of the head. The head padding system inside the helmet allows for direct contact between the incoming air and the surface of the rider's head, which in turns allows the heat from the helmet's interior to be discharged more quickly. To regulate ventilation, the air inlet cowl is easily operated while wearing gloves. Push the air inlet cowl back to the first latch position for partial ventilation. To open the inlet fully, push the air inlet cowl further back.
Summer and winter adjustment flaps
The ventilation of the E1 can also be adjusted to suit the seasons, weather conditions or your personal preferences. While you will prefer the cooling air current to flow directly on to your head in summer in autumn/winter you can reduce the volume of incoming cold air, or divert it, by covering the ventilation channels with the flaps of the crown liner. To do so, raise the middle section of the crown liner slightly and fold out the fabric flaps located behind the front section.
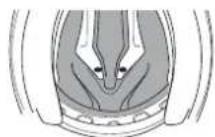
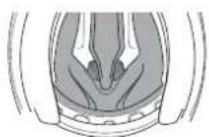
VENTILATION DEVICE 5 - INTERIOR AIR EXTRACTION
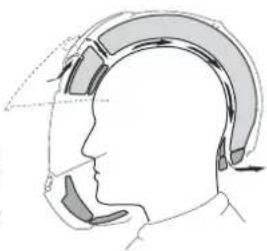
The E1 is equipped with an innovative air extraction system. Fresh air flowing in through the head vent is directed via the air channels in the inner shell to the back of the helmet. The reduced pressure that prevails at the back of the helmet ensures that the air is constantly sucked out through the air vents and special netting material fitted to the neck pad, thus guaranteeing a pleasant climate inside the helmet.
EN
VENTILATION DEVICE 6 - MINIMUM LEVEL OF FRESH AIR
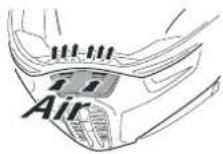
The special shaping of the top of the chin vent provides the helmet with a guaranteed minimum ventilation function that ensures a constant supply of fresh air. The air entering in this way is regulated so that the rider barely notices it, but it provides an effective supply of fresh air from a speed as low as 30 kph (provided the helmet is positioned fully in the air flow when travelling). This function counteracts any build-up of mist on the visor and any excessive concentration of CO₂, even when the helmet is fully closed.
C. THE HELMET D. PUTTING ON THE HELMET AND TAKING IT OFF
16. ADDITIONAL SAFETY FEATURES
ANTI-ROLL-OFF SYSTEM (A.R.O.S.)
The anti-roll-off system specially developed by SCHUBERTH and provided as a safety feature in every SCHUBERTH motorcycle helmet ensures that, if the chinstrap is fastened and correctly adjusted
a) the helmet cannot pivot off the head from behind.
b) the risk of contact between the chin section of the helmet and the chin or neck of the rider is minimised due to the low angle of tilt and
c) the consequences of the helmet hitting the rib cage as the result of an accident are reduced.
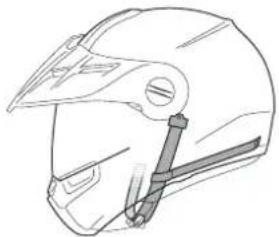
REFLECTIVE PANELS
Together with the silver reflective strips located laterally at the back of the neck collar, the two reflective panels integrated into the left and right areas under the face shield help make the motorcycle rider more noticeable on the road, especially in conditions of poor visibility. If the helmet is plain (no decoration), the SCHUBERTH name also appears on the front and back of the helmet in a reflective film.
Note:
Keep the reflective safety areas clean.
Note:
When riding in France, local law requires that further reflective safety stickers be attached to the front, back and both sides of the helmet.
Note:
Please note the information on the handling of the chin strap.
1. PUTTING ON THE HELMET
- Open and lock the chin bar. Make sure the sun visor is retracted into the helmet shell.
- Open the chinstrap and chinstrap comfort pad.
- Pull apart the lower ends of the chinstrap.
- It will now be easy to put the helmet on.
- Close the chinstrap comfort pad (with the Velcro fastener).
- Fasten the chinstrap.
- Make sure the chinstrap passes under the chin and fits snugly.
- Swing the chin bar down until you hear both locks close.
- Check that the chin section is securely locked by pressing it up from below.
Caution:
Never ride with the chin bar raised!
D. PUTTING ON THE HELMET AND TAKING IT OFF E. BEFORE EVERY JOURNEY
2. TAKING OFF THE HELMET
- Open and lock the chin bar. Make sure the sun visor is retracted into the helmet shell.
- Open the chinstrap.
- Undo the Velcro of the chinstrap comfort pad.
- Grasp the ends of the chinstrap and pull the chinstrap ends apart.
- The helmet can now be removed easily from the head.
- Close the chin bar.

To avoid scratching any objects you might place the helmet on, we recommend closing the chin-strap after you have taken the helmet off.
For your safety, check the following points before every journey:
1. CHECKING THE HELMET
Check the helmet regularly for damage. Small superficial scratches will not impair the protective function of your helmet. In the case of more serious damage (cracks, dents, flaking and cracking paint, etc.), the helmet should no longer be used.

If you have lost a significant amount of weight, you should check that your helmet is still the right size for you.
2. CHECKING THE CHINSTRAP
(WITH HELMET ON AND FASTENED)
- Check that the chinstrap passes under your chin.
- Slip your index finger under the chinstrap and pull.
If the chinstrap is loose under the chin, it is too long and needs to be tightened.
If the chinstrap loosens when you pull it, it is not properly fastened. Undo the chinstrap completely and try fastening it again. Repeat the test. - If you are unable to fasten the chinstrap so that it fits snugly against the chin, check that your helmet is still the right size for you.

Repeat the test after each adjustment.

Never ride with the chinstrap unfastened or incorrectly adjusted. The chinstrap should fit correctly and should not become loose when pulled. The fastener is not correctly closed if the chinstrap becomes loose when pulled.
Before every journey, check that the mechanisms of the face shield and sun visor are working properly and that the face shield and sun visor will provide sufficiently clear visibility. Any dirt should be removed before riding.
Check the shield, face shield and sun visor for mechanical damage and cracks. A badly scratched face shield will considerably impair your vision and should be replaced before setting off on a journey.
Caution:
Make sure that the bayonet fastener is closed properly and the positioning lever for the shield is firmly locked in place.
Caution:
Never use tinted face shield or sun visor in conditions of poor visibility, when riding at night or in a tunnel.
Caution:
A scratched and/or dirty face shield will seriously impair visibility. For your own safety, replace it or clean it immediately.
Caution:
Make sure the face shield and sun visor are always in perfect condition. A damaged face shield is not suitable for riding and needs to be replaced.
Caution:
Stop riding if visibility is poor.
1. SAFETY ADVICE CONCERNING THE HELMET
Motorcycling is associated with particular risks and dangers for the rider and passenger. These risks and dangers can be reduced, but not eliminated completely, by wearing a helmet. It is impossible to state precisely what the protective effect of a helmet will be in the event of an accident. Safe riding techniques, adapted to the particular road and weather conditions, are essential for your safety.
To provide adequate protection, the helmet must fit well and be securely fastened.
Always fasten the chinstrap before setting off and check that the fastening system and strap are correctly in position.
Never ride with the chinstrap unfastened or incorrectly adjusted. The chinstrap must be correctly positioned and must not come loose when pulled. The fastener is not correctly closed if the chinstrap becomes loose when pulled.
The full protective function of a helmet can no longer be guaranteed after an accident or impact. Like the crumple zone of a car, the impact energy of a collision is absorbed by complete or partial destruction of the structure of the outer and/or inner shell of the helmet. Because of the way helmets are designed, this damage is rarely visible from the outside. The safety helmet is designed to absorb only one impact. It is therefore essential to replace the helmet after a fall, accident or other violent impact. For safety reasons, the old helmet should be rendered unusable.
The helmet safety mechanism described above can also cause small cracks in the shell when the helmet is dropped from a small height (less than 1 metre).
F. FOR YOUR SAFETY
Any helmet that has been subjected to a violent impact should be replaced.
No helmet provides absolute protection from all conceivable impacts. This helmet has been specially developed for motorcycle riding and is unsuitable for other purposes.
Examine the helmet for damage at regular intervals. Small scratches will not impair the protective function of your helmet.
The helmet should be replaced after 5 to 7 years, depending on use and care. Although the outer shell is in principle capable of a longer service life, the occurrence of material fatigue and wear to other components, as well as the overall action of the helmet and the unknown conditions in which the helmet has been used, make it advisable for your own safety to replace the helmet after this period of use.
Exposure to Intense heat (e.g. from exhaust) may damage the shield, the finish, the interior of the helmet and the internal elements.
Direct contact with motor fuel, thinners or solvents can destroy the structure of the inner and outer shell. Make sure the helmet does not come into contact with such substances, even for cleaning purposes.
2. SAFETY ADVICE CONCERNING THE FACE SHIELD / SUN VISOR
The protective film used during shipping should be removed before use.
Any scratches and/or dirt arising from the use of the face shield and/or sun visors significantly impair your vision in any driving situation and thus increase the risk of an accident. For your own safety, replace them or clean them immediately.
Never use a tinted face shield or sun visor in conditions of poor visibility, at night or in a tunnel!
A Benzine, solvent and fuel vapour can cause cracks in the face shield. Keep the face shield away from such vapours and do not allow these kinds of substances to come into direct contact with the face shield! Never place the helmet on the tank of your motorcycle.
Make sure the face shield is always in perfect condition. Don't ride when visibility is poor!
3. SAFETY ADVICE CONCERNING MODIFICATIONS / ACCESSORIES
Original components (in particular on the outer shell, inner shell and restraint system) should not be altered or removed. The fitting of additional parts from other manufacturers that have not been recommended can reduce the protective effect and renders the ECE certification and all warranty and insurance claims invalid.
⚠ Use only original parts, replacement parts and accessories that SCHUBERTH has expressly approved for your helmet!
G. MAINTENANCE AND CARE
1. OUTER SHELL
To clean the helmet shell and the shield you can use water, soap or one of the commonly available motorcycle shampoos, cleaners, polishes, plastic cleaners or cleaning fluids. Using water and soap is usually sufficient. Make sure when using the other cleaning materials that these do not come into contact with the face shield, since they can cause damage to the visor and its coating.
Note:
Never use motor fuel, thinners or solvents to clean the helmet. These substances can cause serious damage to the helmet with no external signs. The full safety function of the helmet can then no longer be guaranteed.
2. CHIN SECTION
Please check the functionality of the chin part at regular intervals.
Caution:
Alterations to the strap buckle are not permitted. In particular, you should not oil or grease the metal components of the chin section lock. Repairs may only be carried out by the SCHUBERTH Repair Service.
3. FACE SHIELD AND SUN VISOR
OUTER SURFACE OF THE FACE SHIELD
Use a soft cloth and a mild soap solution (< 20 °C) to remove dirt from the outside of the face shield. To dry the face shield, use a lint-free cloth and apply gentle pressure.
ANTI-FOG LENS
The inside surface of the anti-fog lens must only be cleaned with a soft cloth, which may be slightly dampened if required (we recommend a mocrofibre cloth). Do not use any cleaning agents.
SUN VISOR
The sun visor should only be cleaned with a soft and, if necessary, slightly damp cloth (we recommend a microfibre cloth). Do not use any cleaning agents.
Note:
Only use tepid water (< 20 °C) for cleaning. Never on any account clean the face shield or sun visor with petrol, solvent, a window or glass cleaner or other cleaning agents containing alcohol.
Note:
The face shield should not be soaked in water even if it is very dirty on the outside, as this will severely reduce the surface hardness and thus the durability of the anti-fog/anti-scratch coating.
Note:
The face shield should not be completely closed when not in use (particularly during periods of storage), as the moisture contained on the inside cannot escape if closed and will largely be absorbed by the anti-fog/anti-scratch coating. This can lead to a reduction in the lifespan of the coating. Ideally, position the face shield in the third locking setting above the urban position.
Note:
Never attach labels, adhesive tape or stickers to the face shield or sun visor.
G. MAINTENANCE AND CARE

Stubborn dirt on the outer surface of the face shield (e.g. dried-on insect remains) can be easily removed by covering the closed visor with a moist or wet cloth and allowing the dirt to soften for around 30 minutes to 1 hour.

Always avoid temperatures above 40 °C and high humidity when choosing a place to store the face shield, as these conditions can cause damage to the face shield.
4. INNER LINING
The inner lining of the E1 can be removed completely. The head and cheek pads can be washed by hand using a mild soap solution (e.g. with highly diluted standard mild detergent) at a maximum temperature of 30 °C. Allow the lining to dry at room temperature and with good ventilation.

If required (e.g. during a break in a journey), the headband can be hung out to dry over the mirror.
5. VENTILATION
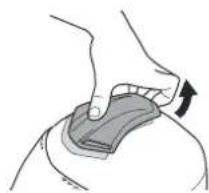
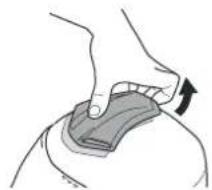
VENTILATION COWL
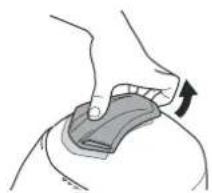
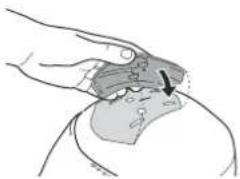
When necessary, the head ventilation system's air inlet cowl can be removed to clean the ventilation mechanism.
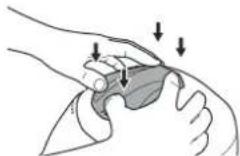
- Before cleaning the ventilation mechanism, you must disassemble the shield.
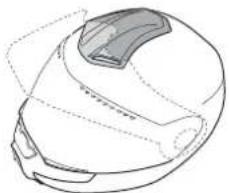
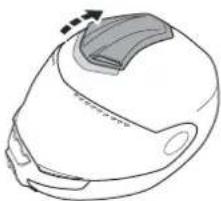
- Move vent caps to the back as far as they will go.
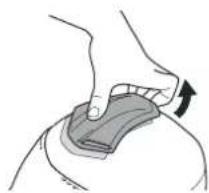
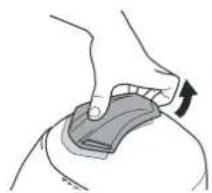
- Grasp under the bottom edge of the vent cap and remove it by moving the lever toward the top.
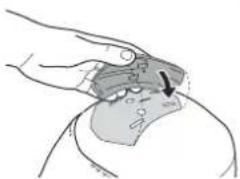
- Clean the vent cap and mechanism.
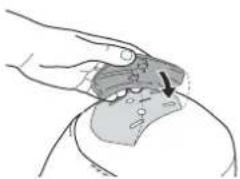
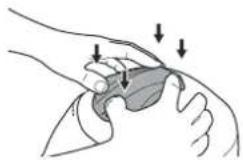
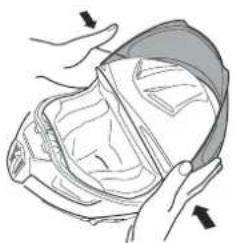
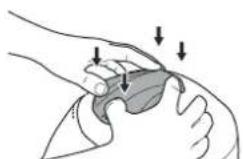
- Set the pin for the vent cap to match the connector system for the ventilation mechanism precisely, and to assemble insert the vent cap into the assembly until an audible "click" is heard. Please ensure that all four mounting points are snapped in.

H. ACCESSORIES AND SPARE PARTSG. MAINTENANCE
6. DUST FILTER
- Take dust filter out from behind the chin ventilation.
- Rinse out the dust filter with cold water and, if necessary, use a mild soapy solution. Let the dust filter dry at room temperature.
- Re-insert after drying.
6. RETENTION SYSTEM
The metal components of the retention system do not require maintenance.
7. STORING THE HELMET
Store the helmet in the helmet bag supplied in a dry, well-ventilated and stable place. Always position the helmet so that it cannot fall to the floor. Damage that occurs in this way is not covered by the warranty.
Note:
Store the helmet out of the reach of children and animals.
1. COMMUNICATION SYSTEMS
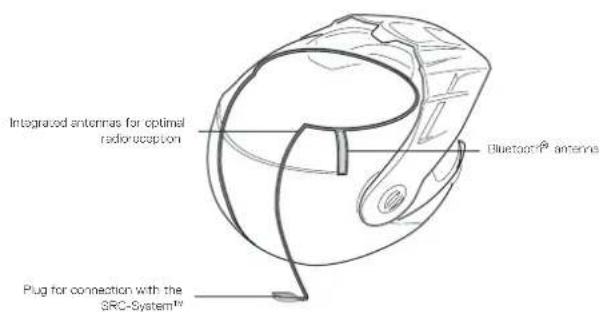
Your E1 is supplied ready for installation of the SCHUBERTH SRC-System™ as standard. The E1 is already fitted with two integrated antennas to amplify reception and a Bluetooth® connection, to provide you with the best possible radio reception.
You can find out more about the SRC-System™ from your specialist dealer and at WWW.SCHUBERTH.COM
Caution:
The installation of a communication system (including basic headsets) constitutes a modification to the helmet. For this reason it is necessary for any communication system and headset intended for installation into a specific model of helmet to be tested and approved in line with the ECE-R 22.05 European helmet standard, otherwise the helmet's approval and compliance with insurance requirements become invalid on installation.
Evidence of approval in line with ECE-R 22.05 in connection with a specific communication system is only valid if certified by an official regulatory office of an EU member state. Any other form of information from these or other institutions (e.g. on the general suitability of communication systems for use in motorcycle helmets) is of no relevance and the helmet will lose its approval.
2. ACCESSORIES AND SPARE PARTS
We recommend that you only use original SCHUBERTH accessories and spare parts for your SCHUBERTH helmet as they are specially adapted to your helmet model.
Caution:
For safety reasons, all other parts of the helmet should only be replaced by your specialist dealer.
3. ORDERING ORIGINAL SCHUBERTH PARTS
Please contact your specialist dealer for original SCHUBERTH accessories and replacements. To find your nearest SCHUBERTH specialist dealer, please go to WWW.SCHUBERTH.COM
I. SCHUBERTH SERVICEH. ACCESSORIES AND SPARE
1. REPAIR SERVICE
The E1 is a SCHUBERTH quality product that has been designed and manufactured using the latest development and production methods. If a repair to your helmet is necessary, please consult your dealer.

Note:
If we receive an order from a customer to carry out a repair without a clear description of the fault, we are entitled to examine the item and/or delay completion of the order until the customer has been consulted. Even where a clear description of the original fault has been provided, if we discover further faults in the course of the repair, we are entitled, but not obliged, to rectify these without a specific order if this is necessary to restore the correct functioning of the helmet and the cost of this is low in relation to the original repair job. Otherwise, we will seek the agreement of the customer.
2. WARRANTY
Your specialist dealers provide a warranty for purchased equipment. In Germany, the warranty period is 2 years. Should you have a problem with your product, please consult your dealers or their service department as appropriate. If the product is returned, please include as precise a description of the fault as possible and a copy of your purchase receipt.
J. HOW TO CONTACT US
HEADQUARTERS
Phone
+49 (0)391 8106-0
Address
SCHUBERTH GmbH
Stegelitzer Straße 12
39126 Magdeburg
Germany
Internet
WWW.SCHUBERTH.COM
E1
BRAVO!
This helmet is not intended for use in the USA and Canada. The helmet has been inspected and approved to the European ECE Standard and therefore does not conform to US and Canadian regulations and requirements. It is only legal to use the helmet in countries in which the European ECE Standard is valid, if you use the helmet in other countries, you will not in the event of injury be entitled to make a claim for compensation before the US or Canadian courts or the courts of other countries not bound by the ECE Standard.

tention :
Attention :
Attention :
Avertissement :
C. LE CASQUE
Attention:
DÉMONTAGE
MONTAGE
Attention :
C. LE CASQUE
REMPLACEMENT DE L'ÉCRAN
C. LE CASQUE
C. LE CASQUE
Avertissement :
Attention :
FR
Conseil :
C. LE CASQUE
14. COIFFE
C. LE CASQUE
DÉMONTAGE DES COUSSINETS DE CONFORT DES JOUES
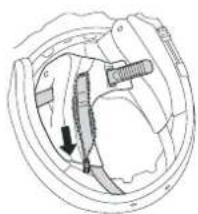
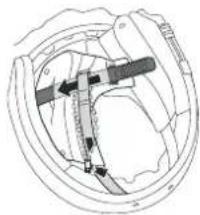
C. LE CASQUE
MONTAGE DES COUSSINETS DE CONFORT DES JOUES
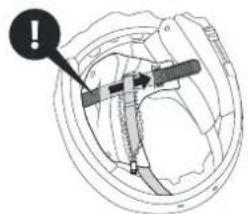
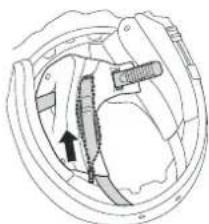
C. LE CASQUE
Attention :
15. SYSTEMES D'AÉRATION
VENTILATION 1 - RÉGLAGE DE LA VISIÈRE
C. LE CASQUE
VENTILATION 4 - AÉRATION DE LA TÊTE
150 151
H. ACCESSOIRES ET PIÈCES DE RECHANGEG. ENTRET
The helmet is not intended for use in the USA and Canada. The helmet has been inspected and approved to the European ECE Standard and therefore does not conform to US and Canadian regulations and requirements. It is only legal to use the helmet in countries in which the European ECE Standard is valid. If you use the helmet in other countries, you will not in the event of injury be entitled to make a claim for compensation before the US or Canadian courts or the courts of other countries not bound by the ECE Standard.

ttenzione:

Avvertenza:
Avvertenza:
Ayvertenza:
C. IL CASCO
Avvertenza:
SMONTAGGIO
MONTAGGIO
Attenzione:
C. IL CASCO
SOSTITUZIONE DELLA VISIERA
VISIERA ANTIAPPANNAMENTO
Montaggio
C. IL CASCO
Attenzione:
C. IL CASCO
Attenzione:
C. IL CASCO
14. IMBOTTITURA
C. IL CASCO
C. IL CASCO
MONTARE L'IMBOTTITURA COMFORT PER LE GUANCE
C. IL CASCO
Avvertenza:
C. IL CASCO
SUPERFICI RIFLETTENTI
VISIERA ANTIAPPANNAMENTO
202 203
H. ACCESSORI E PEZZI DI RICAMBIOG. MANUTENZION
6. FILTRO DELLA POLVERE
This helmet is not intended for use in the USA and Canada. The helmet has been inspected and approved to the European ECE Standard and therefore does not conform to US and Canadian regulations and requirements. It is only legal to use the helmet in countries in which the European ECE Standard is valid. If you use the helmet in other countries, you will not in the event of injury be entitled to make a claim for compensation before the US or Canadian courts or the courts of other countries not bound by the ECE Standard.

Avertissement:
Opgelet:
Opgelet:
Waarschuwing:
C. DE HELM
Aarschuwing:
DEMONTAGE
MONTAGE
C. DE HELM
VIZIER VERVANGEN
C. DE HELM
C. DE HELM
!Vaarschuwing:
C. DE HELM
Opgelet:
Zonnevizier monteren
C. DE HELM
14. INTERNE BEKLEDING
LOSMAKEN BINNENVOERING
VASTMAKEN BINNENVOERING
C. DE HELM
C. DE HELM
Opgelet:
15. VENTILATIESYSTEMEN
VENTILATIE 1 - VIZIERINSTELLING
C. DE HELM
VENTILATIE 4 - HOOFDVENTILATIE
VENTILATIE 5 - HOOFDVENTILATIE
REFLECTERENDE ZONES
H. ACCESSOIRES EN RESERVEONDERDELENG. ONDEI
6. STOFFILTER
Jan-Anna W. Thomas Sch
Jan-Christian Becker Thomas Schulz
The helmet is not intended for use in the USA and Canada. The helmet has been inspected and approved to the European ECE Standard and therefore does not conform to US and Canadian regulations and requirements. It is only legal to use the helmet in countries in which the European ECE Standard is valid. If you use the helmet in other countries, you will not in the event of injury be entitled to make a claim for compensation before the US or Canadian courts or the courts of other countries not bound by the ECE Standard.

Avertissement:
Atención:
Atención:
Advertencia:
C. EL CASCO
Advertencia:
DESMONTAJE
MONTAJE
Atención:
C. EL CASCO
CAMBIO DE VISOR
C. EL CASCO
C. EL CASCO
Atención:
C. EL CASCO
13. EQUIPAMIENTO INTERIOR
MONTAJE DE LA ALMOHADILLA DE LA CINTA DE LA CABEZA
C. EL CASCO
Atención:
C. EL CASCO
MARCAS REFLECTANTES
H. ACCESORIOS Y PIEZAS DE REPUESTO G. CUIDADO
6. FILTRO ANTI POLVO
J. CÓMO CONTACTARNOS
SEDE DE LA EMPRESA
Central telefónica
+49 (0)391 8106-0
Dirección
SCHUBERTH GmbH
Stegelitzer Straße 12
39126 Magdeburg
Alemania
Internet
WWW.SCHUBERTH.COM
CZ DK
BEZPEČNOSTNÍ POKYNY

- MANUAL
- E1
- AVERTISSEMENT
- ACHTUNG
- WARNUNG
- DER HELM
- DEMONTAGE
- MONTAGE
- HINWEISE
- SONNENVISIER-EINBAU
- AUSBAU KOMFORT-WANGENPOLSTER
- EINBAU KOMFORT-WANGENPOLSTER
- BELÜFTUNGSSYSTEME
- REFLEXBEREICHE
- HOW TO USE THIS MANUAL CORRECTLY
- RNUNG
- CONTENTS
- THE HELMET
- STANDARD
- NOTE
- ECE-APPROVAL
- OUTER SHELL
- CAUTION
- INNER SHELL
- AERODYNAMICS
- AEROACOUSTICS
- TURBULATORS
- WIND DEFLECTOR
- TIP
- CHIN BAR
- LOCK SYSTEM
- OPERATION
- OPENING THE CHIN BAR
- CLOSING THE CHIN BAR
- CHINSTRAP WITH MICRO-LOCK RATCHET FASTENERS
- ADJUSTING THE CHINSTRAP
- OPENING AND CLOSING
- AUTION
- SHIELD
- DISASSEMBLY
- ASSEMBLY
- FACE SHIELD WITH INTEGRATED ANTI-FOG LENS
- COATING
- FACE SHIELD (INCLUDING URBAN POSITION)
- CLOSING THE FACE SHIELD
- REPLACING THE VISOR SHIELD
- REMOVING THE FACE SHIELD
- INSTALLING THE FACE SHIELD
- ANTI-FOG LENS
- FITTING
- REMOVAL
- SUN VISOR
- REPLACING THE SUN VISOR
- REMOVING THE SUN VISOR
- FITTING THE SUN VISOR
- INNER LINING
- REMOVING THE LINING
- MOUNTING THE CROWN LINER
- DISMANTLING THE CHEEK PAD
- MOUNTING THE CHEEK PAD
- VENTILATION SYSTEMS
- VENTILATION DEVICE 1 - FACE SHIELD SETTING
- URBAN POSITION
- VENTILATION DEVICE 2 - INLET VENT IN CHIN AREA
- VENTILATION DEVICE 3 - FACE SHIELD VENTILATION
- VENTILATION SYSTEM 4 - HEAD VENTILATION
- SUMMER AND WINTER ADJUSTMENT FLAPS
- VENTILATION DEVICE 5 - INTERIOR AIR EXTRACTION
- VENTILATION DEVICE 6 - MINIMUM LEVEL OF FRESH AIR
- THE HELMET D. PUTTING ON THE HELMET AND TAKING IT OFF
- ADDITIONAL SAFETY FEATURES
- ANTI-ROLL-OFF SYSTEM (A.R.O.S.)
- REFLECTIVE PANELS
- PUTTING ON THE HELMET
- PUTTING ON THE HELMET AND TAKING IT OFF E. BEFORE EVERY JOURNEY
- TAKING OFF THE HELMET
- CHECKING THE HELMET
- CHECKING THE CHINSTRAP
- (WITH HELMET ON AND FASTENED)
- SAFETY ADVICE CONCERNING THE HELMET
- FOR YOUR SAFETY
- SAFETY ADVICE CONCERNING THE FACE SHIELD / SUN VISOR
- SAFETY ADVICE CONCERNING MODIFICATIONS / ACCESSORIES
- MAINTENANCE AND CARE
- CHIN SECTION
- FACE SHIELD AND SUN VISOR
- OUTER SURFACE OF THE FACE SHIELD
- VENTILATION
- VENTILATION COWL
- ACCESSORIES AND SPARE PARTSG. MAINTENANCE
- DUST FILTER
- RETENTION SYSTEM
- STORING THE HELMET
- COMMUNICATION SYSTEMS
- ACCESSORIES AND SPARE PARTS
- ORDERING ORIGINAL SCHUBERTH PARTS
- SCHUBERTH SERVICEH. ACCESSORIES AND SPARE
- REPAIR SERVICE
- WARRANTY
- HOW TO CONTACT US
- HEADQUARTERS
- PHONE
- ADDRESS
- INTERNET
- BRAVO
- TENTION
- ATTENTION
- LE CASQUE
- DÉMONTAGE
- REMPLACEMENT DE L'ÉCRAN
- CONSEIL
- COIFFE
- DÉMONTAGE DES COUSSINETS DE CONFORT DES JOUES
- MONTAGE DES COUSSINETS DE CONFORT DES JOUES
- SYSTEMES D'AÉRATION
- VENTILATION 1 - RÉGLAGE DE LA VISIÈRE
- VENTILATION 4 - AÉRATION DE LA TÊTE
- ACCESSOIRES ET PIÈCES DE RECHANGEG. ENTRET
- TTENZIONE
- AVVERTENZA
- AYVERTENZA
- IL CASCO
- SMONTAGGIO
- MONTAGGIO
- ATTENZIONE
- SOSTITUZIONE DELLA VISIERA
- VISIERA ANTIAPPANNAMENTO
- IMBOTTITURA
- MONTARE L'IMBOTTITURA COMFORT PER LE GUANCE
- SUPERFICI RIFLETTENTI
- ACCESSORI E PEZZI DI RICAMBIOG. MANUTENZION
- FILTRO DELLA POLVERE
- OPGELET
- DE HELM
- AARSCHUWING
- VIZIER VERVANGEN
- VAARSCHUWING
- ZONNEVIZIER MONTEREN
- INTERNE BEKLEDING
- LOSMAKEN BINNENVOERING
- VASTMAKEN BINNENVOERING
- VENTILATIESYSTEMEN
- VENTILATIE 1 - VIZIERINSTELLING
- VENTILATIE 4 - HOOFDVENTILATIE
- VENTILATIE 5 - HOOFDVENTILATIE
- REFLECTERENDE ZONES
- ACCESSOIRES EN RESERVEONDERDELENG. ONDEI
- STOFFILTER
- ATENCIÓN
- ADVERTENCIA
- EL CASCO
- DESMONTAJE
- MONTAJE
- CAMBIO DE VISOR
- EQUIPAMIENTO INTERIOR
- MONTAJE DE LA ALMOHADILLA DE LA CINTA DE LA CABEZA
- MARCAS REFLECTANTES
- ACCESORIOS Y PIEZAS DE REPUESTO G. CUIDADO
- FILTRO ANTI POLVO
- CÓMO CONTACTARNOS
- SEDE DE LA EMPRESA
- CENTRAL TELEFÓNICA
- DIRECCIÓN
- BEZPEČNOSTNÍ POKYNY
Brand : Schuberth
Model : E1
Category : Motorcycle helmet