
ES-CM3B - Shaver PANASONIC - Free user manual and instructions
Find the device manual for free ES-CM3B PANASONIC in PDF.

| Brand | Panasonic |
| Model | ES-CM3B |
| Product type | Rechargeable shaver |
| Power | USB adapter (ES-RU1-02), 100-240 V, output 5 V, USB Type-C cable included |
| Battery | Built-in lithium-ion, not user-replaceable |
| Charging time | Approximately 1 hour |
| Runtime | Approximately 2 weeks (based on 3 minutes of shaving per day) |
| Dimensions (main body) | 6.7 cm × 7.5 cm × 3.1 cm |
| Weight (main body) | 123 g |
| Usage | Dry or wet shaving (with gel/foam), usable in the shower |
| Shaving technology | Beard sensor automatically adjusting power, magnetic linear motor |
| Waterproof | Waterproof, washable under running water |
| Cleaning | Cleaning with soapy water, brush included, lubrication recommended with included oil |
| Replacement parts | Outer foil (WES9087), inner blades (WES9068) |
| Recommended replacement frequency | Foil: approximately 1 year, blades: approximately 2 years |
| Included accessories | USB adapter, USB cable (Type-C), cleaning brush, lubrication oil, protective cover |
| Noise level | 60 dB (A) re 1 pW |
| Safety | Automatic shut-off in case of anomaly, overheat protection, do not immerse the adapter |
| Warranty | Refer to the supplied warranty leaflet |
Frequently Asked Questions - ES-CM3B PANASONIC
User questions about ES-CM3B PANASONIC
0 question about this device. Answer the ones you know or ask your own.
Ask a new question about this device
Download the instructions for your Shaver in PDF format for free! Find your manual ES-CM3B - PANASONIC and take your electronic device back in hand. On this page are published all the documents necessary for the use of your device. ES-CM3B by PANASONIC.
USER MANUAL ES-CM3B PANASONIC
Operating Instructions (Household use) Rechargeable Shaver
Model No.
ES-ACM3B
ES-CM3B

natural_image
Line drawing of a flat-screen flat-screen device with no text or symbolsEnglish....3
Deutsch 24
Français....47
Italiano 69
Español.... 91
Nederlands 113
Português....135
Svenska....157
Dansk....177
Norsk 198
Suomi....219
Polski....240
Česky 262
Slovensky....283
Magyar 305
Română 327
Türkçe....349
Panasonic
Operating Instructions
(Household use) Rechargeable Shaver
ES-ACM3B
Model No.
ES-CM3B
Contents
Safety precautions...... 5
Important information 9
Parts identification 10
Charging.... 11
How to use 12
Cleaning 14
Replacing the system outer foil and the inner blades....16
Troubleshooting 17
Service....20
Removing and disposing of the built-in rechargeable battery .... 21
Specifications 23
Thank you for purchasing this Panasonic product.
Before operating this unit, please read these instructions completely and save them for future use.
WARNING
- Do not immerse the USB power adaptor and USB cable in water or clean them with water. Doing so may cause electric shock or fire due to a short circuit.
- Always unplug the adaptor from a household outlet when cleaning the USB power adaptor and USB cable.
Failure to do so may cause electric shock or injury.
- This appliance can be used by children aged from 8 years and above and persons with reduced physical, sensory or mental capabilities or lack of experience and knowledge if they have been given supervision or instruction concerning use of the appliance in a safe way and understand the hazards involved. Children shall not play with the appliance. Cleaning and user maintenance shall not be made by children without supervision.
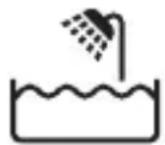
- This WET/DRY shaver can be used for wet shaving using shaving lather or for dry shaving. You can use this watertight shaver in the shower and clean with water.
The following symbol means suitable for use in a bath or shower.
- Do not use anything other than the USB power adaptor for any purpose. Also, do not use any other product with the USB power adaptor. (See page 10)
Doing so may cause burn or fire due to a short circuit.
- Do not charge this product using any USB cable other than the supplied USB cable. Also, do not use any other product with the supplied USB cable.
Failure to do so may cause burns, electric shock or fire.
- The following symbol indicates that a specific detachable power supply unit is required for connecting the electrical appliance to the supply mains. The type reference of power supply unit is marked near the symbol.
Safety precautions
Make sure to follow these instructions.
To prevent accidents, injuries or damage to property, please follow the instructions below.
■ The following chart indicates the degree of damage caused by improper operation.
| ⚠️ DANGER | Indicates potential hazard that will result in serious injury or death. |
| ⚠️ WARNING | Indicates potential hazard that could result in serious injury or death. |
| ⚠️ CAUTION | Indicates potential hazard that could result in minor injury or property damage. |
The illustrations in the manual may differ from the actual item.

WARNING
▶ This product
- This product has a built-in rechargeable battery. Do not throw into flame or heat. Do not charge, use, or leave in high temperature environments.
- Doing so may cause overheating, ignition, or explosion.
- Do not modify or repair.
- Doing so may cause fire, electric shock, or injury. Contact an authorized service center for repair (battery change etc.).
- Never disassemble except when disposing of the product.
- Doing so may cause fire, electric shock, or injury.

WARNING
▶ In case of an abnormality or malfunction
- Immediately stop using this product and disconnect USB power adaptor if there is an abnormality or malfunction.
- Failure to do so may cause fire, electric shock, or injury.
- The main body, USB power adaptor or USB cable is deformed or abnormally hot.
- The main body, USB power adaptor or USB cable smells of burning.
- There is abnormal sound during use or charging of the main body.
→ Immediately request inspection or repair at an authorized service center.
▶ Power supply
- Do not use this product beyond the rated values of the power supply.
- Doing so may cause fire.
- Fully insert the power plug of the USB power adaptor.
- Failure to do so may cause fire or electric shock.
▶ About the USB power adaptor and USB cable
- Do not connect or disconnect the USB power adaptor or USB cable to or from the power supply with a wet hand.
- Doing so may cause electric shock or injury.
- Do not charge this product when the USB power adaptor or USB cable is damaged or when the fitting into the household outlet is loose.
- Do not damage, modify, forcefully bend, pull, twist, or place anything heavy on the USB power adaptor or USB cable.
- Doing so may cause electric shock or fire due to a short circuit.
- Clean regularly to prevent dust from accumulating.
- Failure to do so may cause fire due to insulation failure caused by humidity.
→Disconnect the USB power adaptor and wipe with a dry cloth.
▶ Preventing accidents
- Do not place within reach of children or infants. Do not let them use it.
- Doing so may cause an accident or injury due to accidental ingestion of the inner blade, cleaning brush, etc.

WARNING
- If the oil is consumed accidentally, do not induce vomiting, drink a large amount of water, and consult a physician.
- If the oil comes into contact with eyes, immediately wash thoroughly with running water, and consult a physician.
- Failure to follow these instructions may result in physical problems.

CAUTION
▶ To protect the skin
- Check the system outer foil for any damage or deformation before use.
- Failure to do so may cause injury to skin.
- Do not forcefully press the system outer foil on the skin or lips. When there are small bumps on the face or the skin is injured, avoid direct contact with the system outer foil.
- Do not touch the blade section (metallic section) of the inner blade directly with your hands.
- Doing so may cause injury to skin or hand.
- Do not forcefully press the system outer foil. Do not touch the system outer foil with fingers or nails when in use.
- Do not use this product for any purpose other than shaving. (For example, hair shaving)
- Failure to do so may cause injury to skin or reduce the life of the system outer foil.
▶ Note the following precautions
- Do not allow needles or any other foreign objects to adhere to the power plug of the USB power adaptor or the plugs of the USB cable.
- Doing so may cause electric shock or fire due to a short circuit.
- Do not charge when the socket is wet.
- Failure to do so may cause fire or electric shock.
- Do not share with your family or others.
- Doing so may result in infection or inflammation.
- Disconnect the USB power adaptor from the household outlet when not charging.
- Failure to do so may cause electric shock or fire due to electrical leakage resulting from insulation deterioration.
Handling of the removed battery when disposing

DANGER
- The rechargeable battery is exclusively for use with this product. Do not use the battery with other products.
- Do not charge the battery after it has been removed from this product.
- Do not throw into fire or apply heat.
- Do not hit, disassemble, modify, or puncture with a nail.
- Do not let the positive and negative terminals of the battery get in contact with each other through metallic objects.
- Do not carry or store the battery together with metallic jewellery such as necklaces and hairpins.
- Do not use or leave the battery where it will be exposed to high temperature environments, such as under direct sunlight or near other sources of heat.
- Never peel off the tube.
- Doing so may cause overheating, ignition, or explosion.

WARNING
• After removing the rechargeable battery, do not keep it within reach of children and infants.
- The battery will harm the body if accidentally swallowed. If this happens, consult a physician immediately.
- If the battery fluid leaks out and comes in contact with the eyes, do not rub the eyes, and thoroughly rinse with clean water, such as tap water.
- Failure to do so may cause eye injury. Consult a physician immediately.

CAUTION
- If the battery fluid leaks out and comes in contact with the skin or clothes, rinse off with clean water, such as tap water.
- Failure to do so may cause inflammation.
Important information
▶ To avoid product malfunction, deformation and aging, observe the following precautions:
- Do not drop this product or subject it to shock.
- Do not hit the system outer foil on any hard objects.
• After use, store this product in a dry place. - Do not store this product in a place with direct sunlight inside the carriage.
- Do not heat or dry this product with a hair dryer.
- When carrying or storing this product, always attach the protective cap.
Notes
- Charge this product correctly according to these Operating Instructions. (See page 11 "Charging".)
- This product contains a battery that is only replaceable by skilled persons. Please contact an authorized service center for the details of repair.
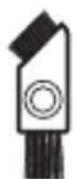
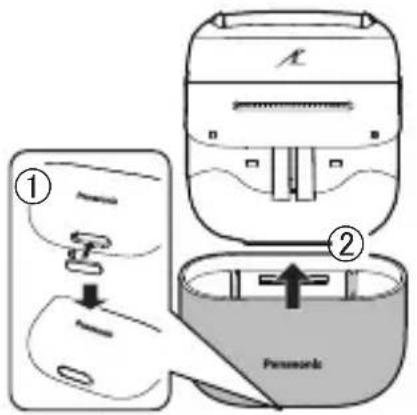
Parts identification
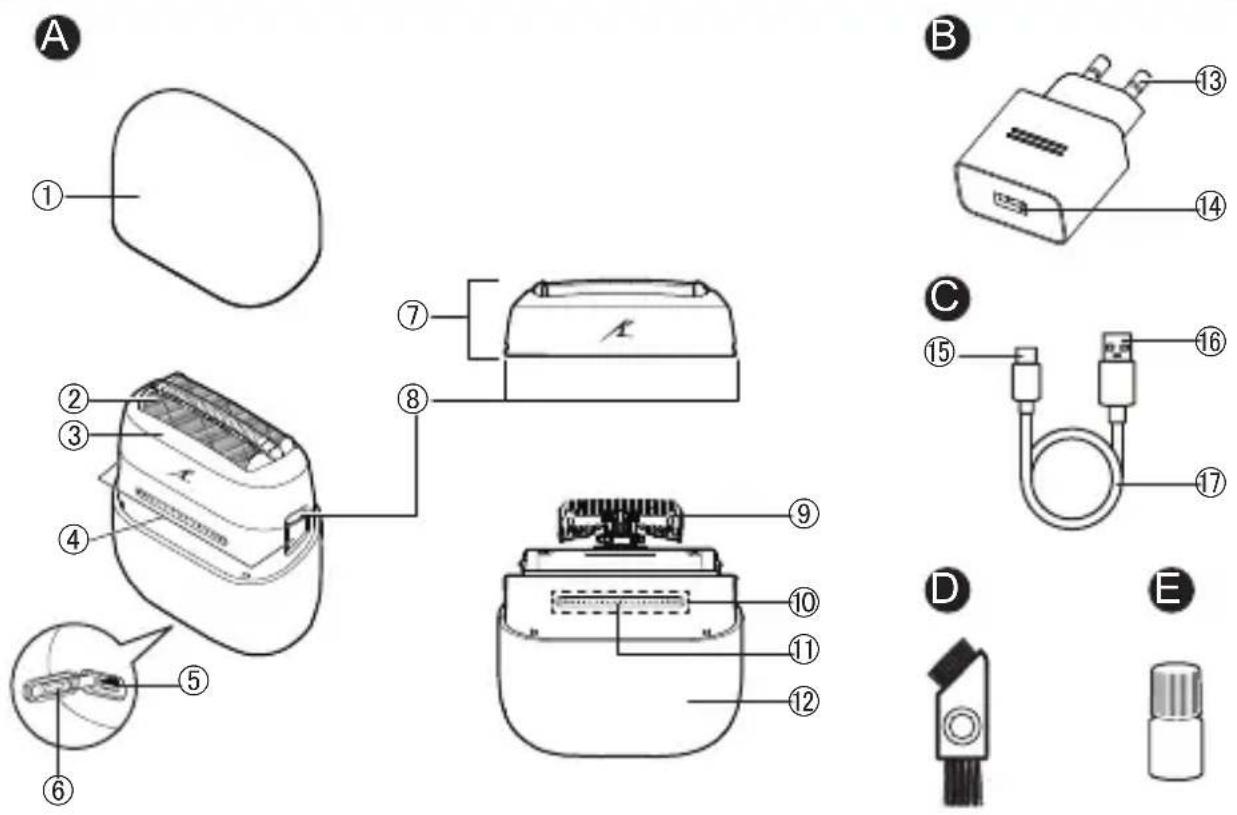
A Main body
① Protective cap
② System outer foil
③ Foil frame
④ Foil frame release buttons
⑤ Socket (Type-C)
⑥ Socket cover
⑦ Outer foil section
⑧ System outer foil release buttons
⑨ Inner blades
⑩ Power Switch
⑪ Charge status indicator (red)
⑫ Shell
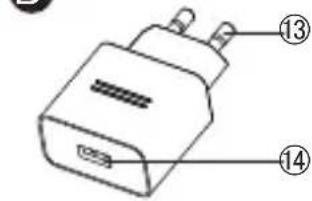
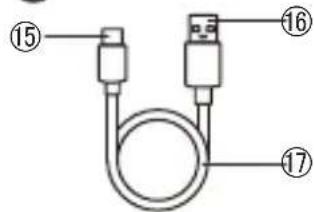
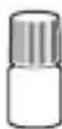
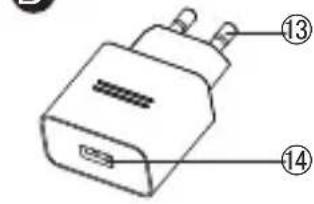
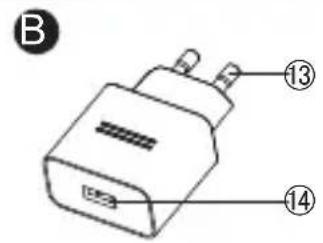
B USB power adaptor (ES-RU1-02)
⑬ Power plug
⑭ USB port (Type-A)
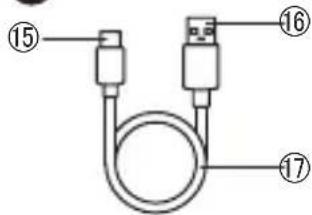
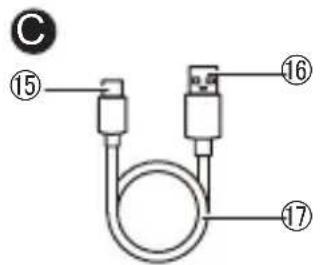
© USB cable
⑮ USB plug (Type-C)
⑯ USB plug (Type-A)
⑰ Cord
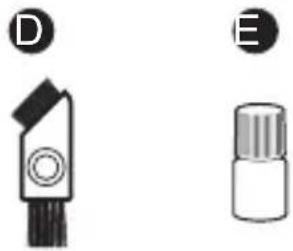
Accessories
D Cleaning brush
E Oil
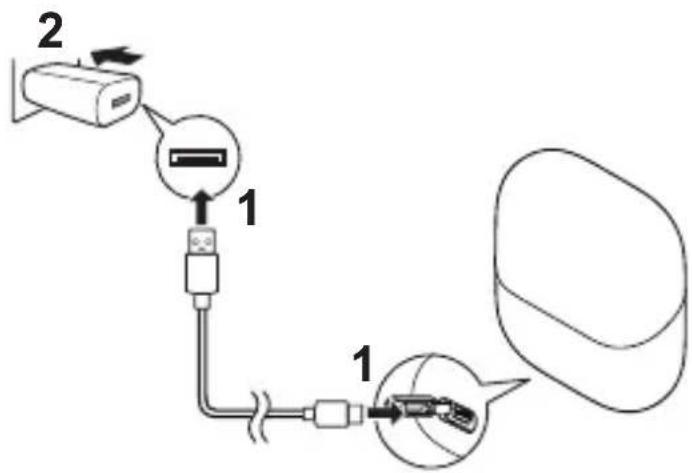
Charging
- Before charging, make sure that this product is powered off.
- Do not charge when the socket is wet. Wipe the socket when it is wet before charging.
- Open the protective cap to check that the charge status indicator lights on, and then install the protective cap to avoid damaging the system outer foil.
flowchart
graph TD
    A["Device 2"] --> B["Port 1"]
    B --> C["Port 1"]
    C --> D["3D Object"]
- Insert the USB cable into the main body and the USB power adaptor.
- Connect the USB power adaptor to a household outlet.
- After charging, remove the USB cable and attach the socket cover.
- Charging is completed after approx. 1 hour. The charging time may be shortened, depending on the remaining battery level.
- Be sure to close the socket cover when using or washing.
▶ Display of the charge status indicator during charging
| Charging in progress Lights on | |
| Charging complete Lights off | |
| Charging abnormal Blink twice every second |
▶ When the battery capacity is low
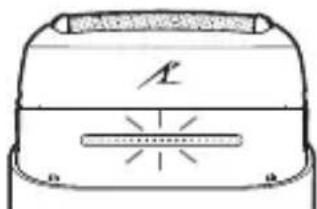
- When this product is in use, the charge status indicator blinks once a second.
- When this product is powered off, the main body generates a prompt tone.
natural_image
Simple line drawing of a device casing with no text or symbols▶ How to confirm that charging is completed
- If the USB plug (Type-C) is removed and inserted back to charge the product again, right after charging is completed, then the charge status indicator will turn on and then off in about 5 seconds.
Notes
- This product may be charged with adaptors other than the specified one, but Panasonic's specified adaptor with splash-resistant design should be used to ensure safety. The Panasonic's specified adaptor is not completely waterproof, so do not immerse the adaptor in water.
- This product uses a Li-ion battery. Therefore, the service life of the battery will not be affected even if it is charged after each use.
- When this product is used for the first time or when it has not been used for more than 6 months, the charging time may differ and the charge status indicator may not light on immediately. However, it will light on as the charging proceeds.
- If this product has not been used for a long time, the battery performance may be degraded. Therefore, if this product has not been used for more than half a year, please fully charge the battery once every half a year.
- If an ineligible power supply is used for charging or such problems as poor contact of the USB cable occur, the charging time may become longer and this product may even be damaged.
- The appliance can be used for approximately 2 weeks after it is fully charged.
(Based on one 3-minute dry-shave usages per day in an ambient temperature range of 20 ^ - 30 ^ .)
The available days depend on the usage conditions: beard thickness, pressure applied to the skin, and use of wet shaving.
- If there is noise from the radio or other sources while this product is used or charged, move this product to a different location or charge it with another household outlet.
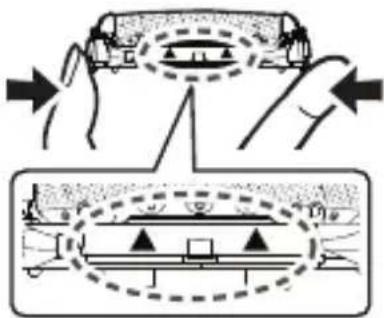
How to use
- You cannot operate this product while charging.
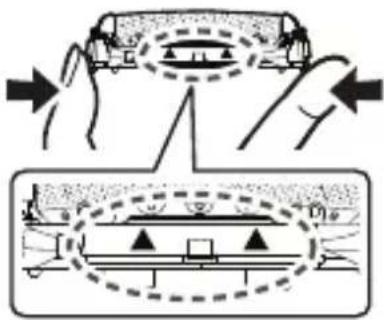
To power on/off:
Touch point A with a finger until the white indicator lights on, slide your finger from point A to point B, and stop at point B for a moment.
You can also slide your finger from point B to point A.
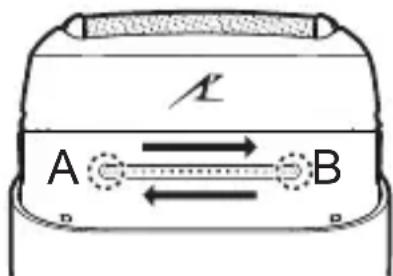
Tips for Use:
- Finish your sliding within 1 second.
- During sliding, do not allow other fingers to touch the area of the power switch.
- Wearing gloves or wet hands may affect the touch sensing effect.
This product comes with a “shaving sensor”, which automatically adjusts the shaving force depending on the beard thickness. This product increases the shaving force in areas with dense beard and reduces the force in areas with sparse beard to reduce the burden on the skin.
■ The following can be used during wet shaving:
| Shaving agent | Shaving foam | √ |
| Shaving gel | √ | |
| Shaving cream | × | |
| Facial cleanser | Cleansing foam (without facial scrub) | √ |
| Cleansing foam (including facial scrub) | × | |
| Cleansing soap | √ | |
| Bathing soap | Liquid | √ |
| Foam | √ |
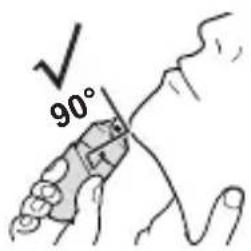
■ How to improve the shaving effect
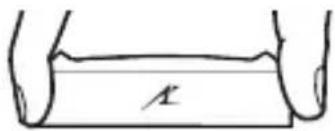
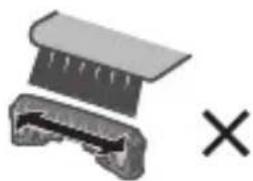
- Apply the whole system outer foil perpendicularly against the skin and shave by slowly sliding this product over the face against the grain of the beard.
- To prevent damaging the system outer foil, do not shave with only a part of the system outer foil.
- The beard under the chin and around the throat can be shaved better by stretching the skin so the beard will stand.
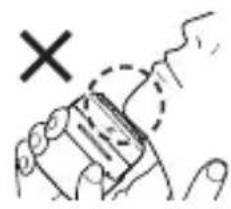
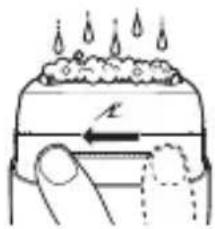
natural_image
Hand holding a rectangular object with a dashed outline and a 'X' mark, no text or symbols present
Notes
- It is recommended to clean this product after each use.
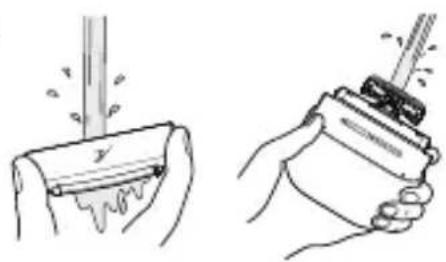
• After wet shaving, clean the main body with water and then apply oil on the system outer foil.
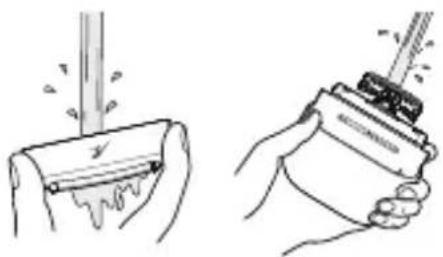
Cleaning
- Power off this product and unplug the USB cable from the main body.
- Check that the socket cover is closed.
1 Apply a small amount of hand soap and water on the system outer foil. Power on this product, leave it running for 10 to 20 seconds, and then power it off.
2 Press the foil frame release buttons to remove the outer foil section. (See pages 16 and 17) Clean this product with running water.
• After rinsing with water, wipe off any excess water with a dry cloth.
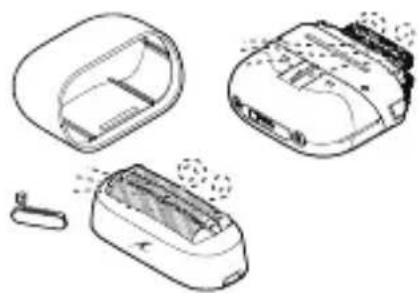
natural_image
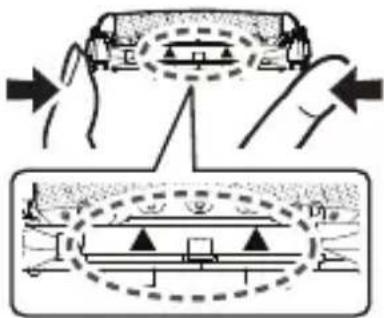
Illustration of two hand-drawn scenarios showing a tool being dispensed into a container, with no text or symbols present.Store this product after drying it.
① Remove the outer foil section and the shell, thoroughly dry the main body. • Leave this product to dry in the shade, out of direct sunlight. ② After this product is dried completely, install the outer foil section and the shell onto the main body.
natural_image
Illustration of three different electronic devices with visible internal components and a small connector (no text or symbols)- Refer to pages 16 and 17 and the following schematic diagram for the method of installation and removal.
- Perform the following operations after installing the outer foil section onto the main body:
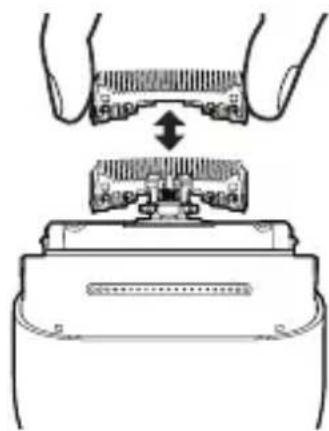
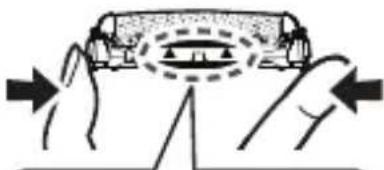
To disassemble the shell:
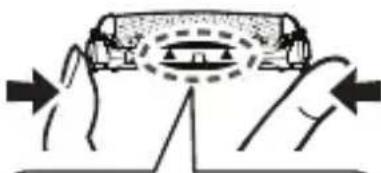
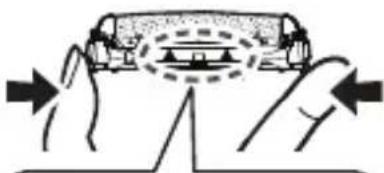
① Hold the enclosure and forcefully squeeze both sides of the enclosure.
② Hold the gray part in the figure with the other hand and gently pull it upwards.
③ Pull the enclosure down.
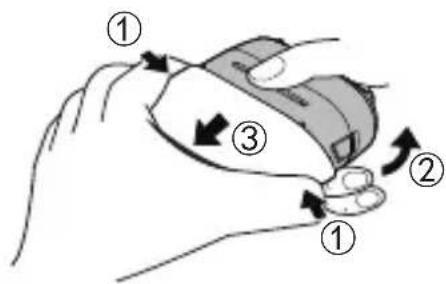
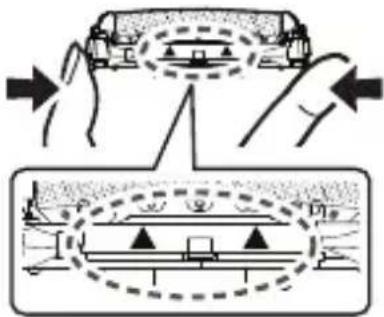
To install the shell:
① Attach the socket cover onto the hole of the shell.
② Attach the shell onto the main body until a “click” sound is heard while keeping the trademark on the shell on the same side as the power switch.
4 Lubricate this product.
- To maintain comfortable shaving on a long-term basis, it is recommended to use the included oil.
① Apply a drop of oil onto the system outer foil.
② Power on this product and leave it running for approximately 5 seconds.
③ Power off this product and wipe off any excess oil from the system outer foil with a soft cloth.

natural_image
Line drawing of a hand holding a handheld electronic device with a pen inserted (no text or symbols)Notes
- Be careful not to hit this product on the sink or any other objects while draining the water. Failure to do so may cause malfunction.
- Do not use any other cleaning agents than hand soap. Doing so may cause malfunction.
- Do not clean this product with thinner, gasoline, alcohol, or other chemicals. Doing so may cause cracking or discoloration of this product. The enclosure can be cleaned with a soft cloth moistened with tap water or soap solution.
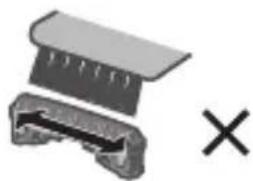
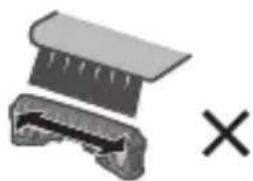
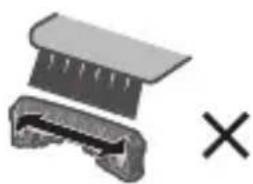
Cleaning with the brush
▶ Clean the system outer foil and the main body using the long brush.

natural_image
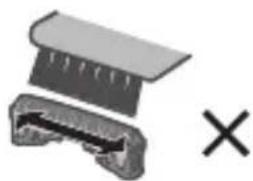
Two-step illustration of a hand holding a small object, showing the process with a tool inserted (no text or symbols present)▶ Clean the inner blades using the short brush by moving it in the direction shown in the right figure (A).
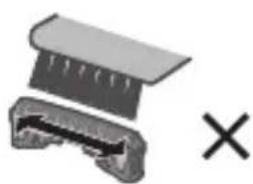
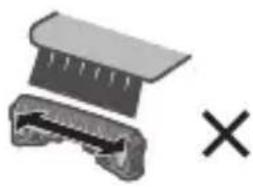
- Do not move the short brush in the (B) direction. Doing so may damage the inner blades and thus affect their sharpness.
- Do not use the short brush to clean the system outer foil.
(A)
natural_image
Pure mechanical component diagram without any text, numbers, or symbols(B)
natural_image
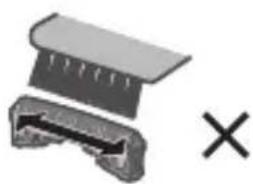
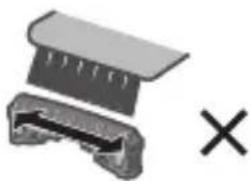
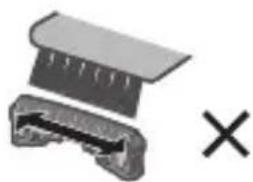
Diagram of a mechanical component with a cross symbol, no text or labels presentReplacing the system outer foil and the inner blades
▶ Outer foil section
How to remove
Press the foil frame release buttons to lift and remove the outer foil section.
How to install
Turn the foil frame mark (✗) to the front, and securely attach the outer foil section onto the main body until a “click” sound is heard.

natural_image
Diagram of a robotic device with arrows indicating motion or force direction (no text or symbols)▶ System outer foil
How to remove
Press the system outer foil release buttons and pull down the system outer foil.
How to install
Align the foil frame mark (✗) with the system outer foil mark (✗ and securely attach them together until a "click" sound is heard.
- Do not press the system outer foil release buttons with excessive force.
Doing so may bend the system outer foil, preventing complete attachment to the foil frame. - The system outer foil cannot be reversely installed.
- When installing the system outer foil into the main body, ensure that the system outer foil is inserted into the foil frame.
▶ Inner blades
How to remove
Remove one inner blade at a time.
- Do not touch the edges (metallic section) of the inner blades in case your hands are injured.
How to install
Insert one inner blade at a time until they are fixed in position.
natural_image
Diagram showing hands assembling a mechanical component with a central bracket and an arrow indicating assembly (no text or symbols present)Note
Do not throw away the foil frame.
Troubleshooting
Problem Action
The shaving sensor does not respond. (The driving sound does not change.)
Depending on the beard thickness or the amount of beard trimmings in the outer foil section, the shaving sensor may not react. This is not a sign of malfunction.
Depending on the amount of foam or the type of shaving agent, the shaving sensor may not react. This is not a sign of malfunction.
When the remaining battery level is too low, charge this product.
▶ Apply oil. (See page 15)
Problem Action
The shaving sensor responds even though this product is not in contact with the skin.
This product cannot be charged.
The power switch cannot be operated.
Operating time is short after charging.
This product does not operate even after charging.
The driving sound changes while shaving.
Clean the beard trimmings from the system outer foil and inner blades. (See pages 14\~16)
Replace the system outer foil or inner blades once they reach their service life.
The recommended ambient temperature for charging is 10 °C to 35 °C.
Check whether the USB cable is securely connected to the power supply. If the above measures are inapplicable, remove the USB cable and insert it again.
If the USB plug (Type-C) heats up, disconnect the power supply, check the socket [A⑤], and remove any water or foreign objects from the socket.
The foam of shaving agent or hand soap may be attached in the area of the power switch. Rinse the foam thoroughly before operating the switch.
▶ Apply oil.
The battery has reached the end of its life. (approx. 3 years)
This can be improved by cleaning this product after each shaving.
The recommended ambient temperature for using the product is not lower than 5 °C.
The battery has reached the end of its life. (approx. 3 years)
When the power supply is connected, this product does not operate.
The shaving sensor is operating. The driving sound changes depending on the beard thickness.
| Problem Action | |
| A loud sound is heard. | Apply oil.When there is no oil on the blades, the blades will not move smoothly and require more power.When the magnetic levitation motor is driven, a high-pitched running sound is heard. This is not a sign of malfunction.Check that the blades are properly attached.Clean the system outer foil with the cleaning brush. |
| An odor is smelt from the blades. | This can be improved by cleaning this product after each shaving. |
| Shavings fly around. | This can be improved by cleaning this product after each shaving.Clean the inner blades with the cleaning brush when shavings are adhering to the inner blades. |
| The system outer foil is overheated. | Apply oil.Replace the system outer foil if it is damaged or deformed. (See pages 16 and 17) |
| The shaving performance deteriorates. | This can be improved by cleaning this product after each shaving.Replace the system outer foil or inner blades once they reach their service life.Apply oil. |
If the problems still cannot be solved, contact the store where you purchased this product or a service center authorized by Panasonic for repair.
Service
Contact
Please visit Panasonic web site https://www.panasonic.com or contact an authorized service center (you find its contact address in the pan european guarantee leaflet.) if you need information or if the shaver or the cord gets damaged.
Replacement parts
System outer foil: Approximately once every year*
Inner blades: Approximately once every two years*
* The replacement timing is a recommendation and is subject to individual usage and preference.
Replacement parts are available at your dealer or Service Center.
| System outer foil and inner blades WES9013 | |
| System outer foil WES9087 | |
| Inner blades WES9068 | |
Battery life
The life of the battery is 3 years. The battery in this shaver is not intended to be replaced by consumers. Have the battery replaced by an authorized service center.
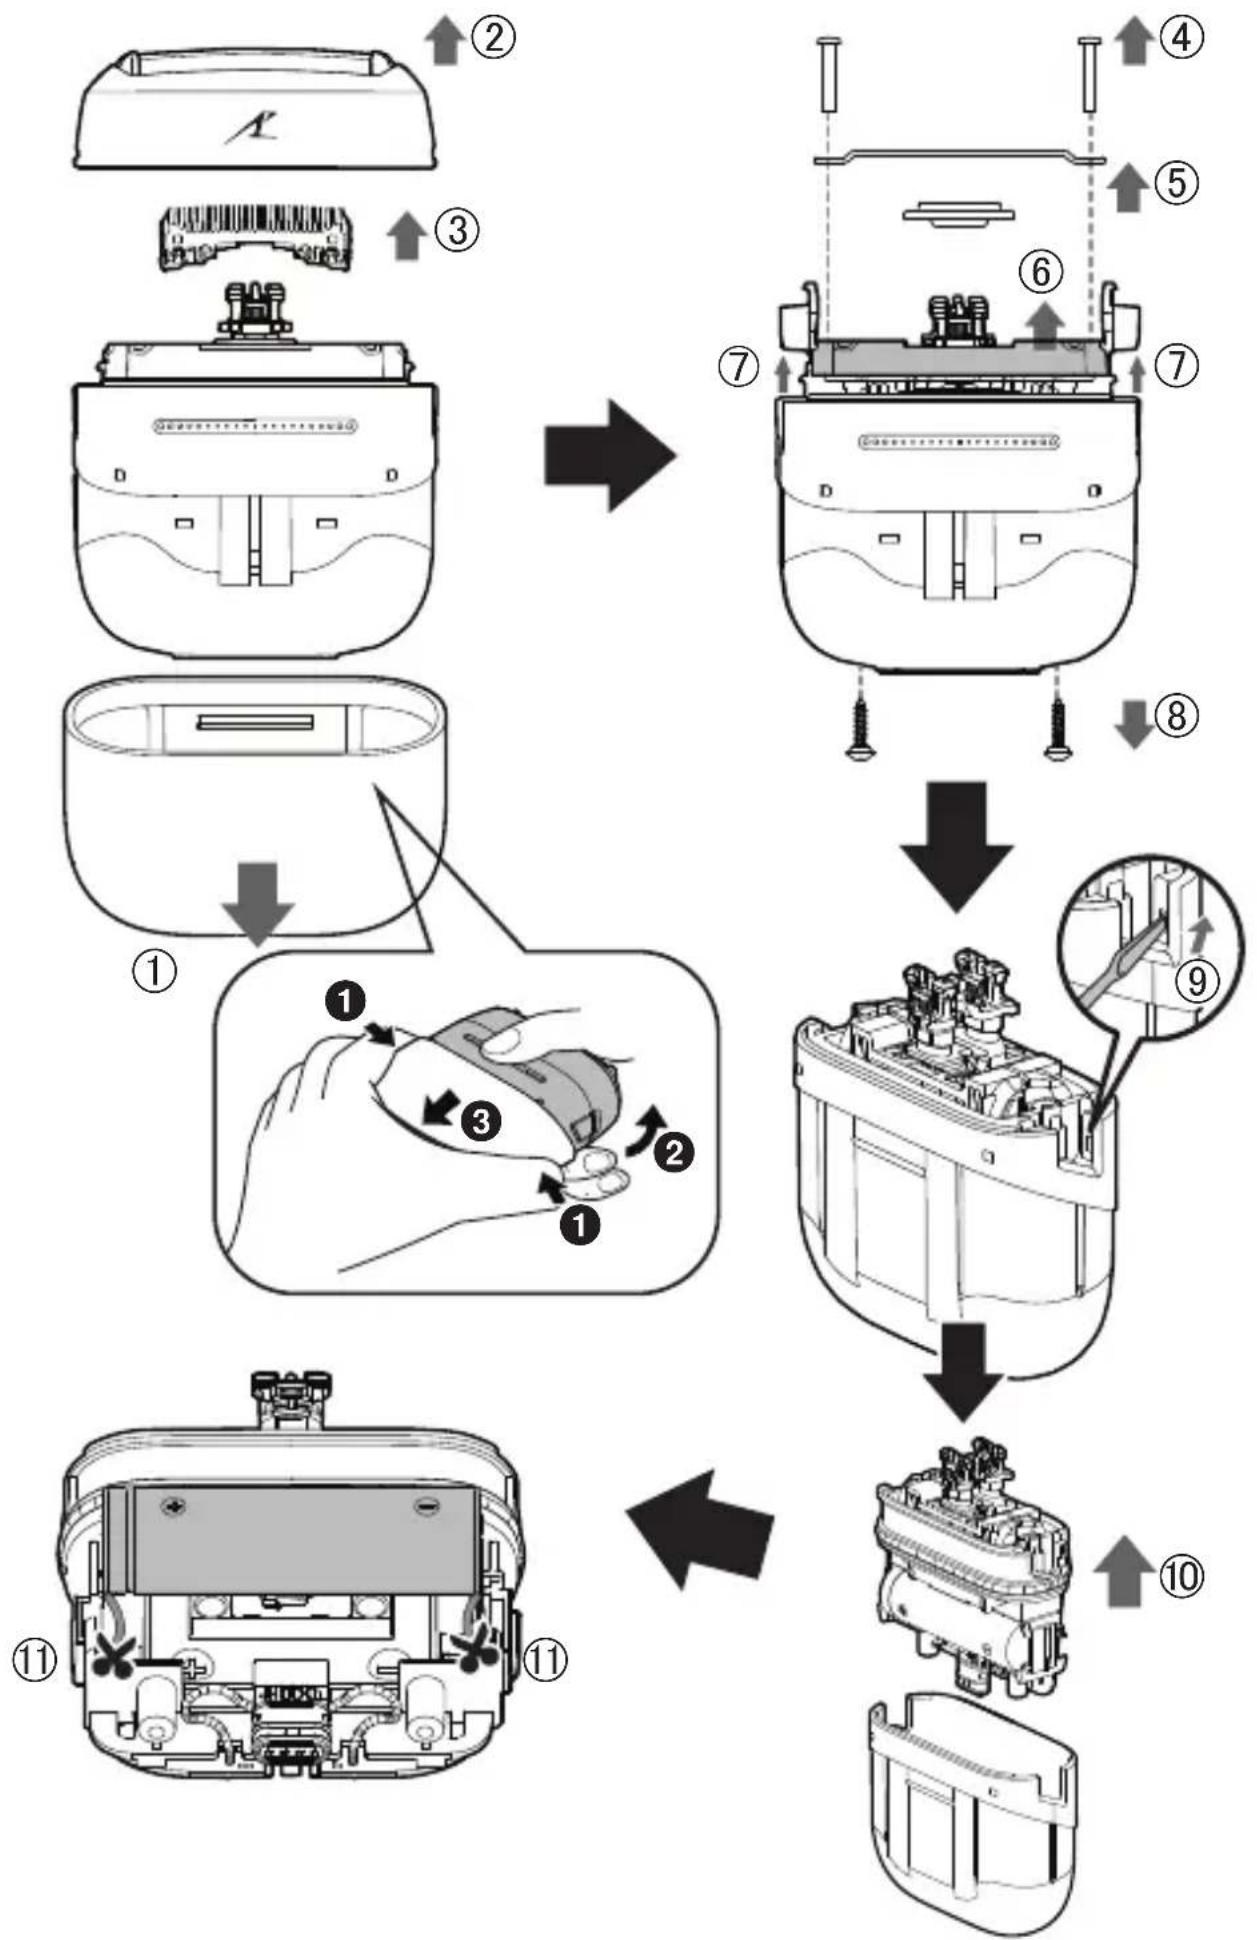
Removing and disposing of the built-in rechargeable battery
This product has a built-in rechargeable battery. Be sure to remove the battery before disposing of this product.
- The battery is to be disposed safely.
- This figure must only be used when disposing of this product and must not be used to repair it.
- If you dismantle this product yourself, it will no longer be waterproof, which may cause it to malfunction.
- We recommend seeking the advice of a dealer or Panasonic's authorized service center before deciding to dispose of this product, so as to extend the service life of this product as much as possible.
- If you decide to dispose of this product but do not want to disassemble this product by yourself to remove the battery, we recommend taking this product to Panasonic's authorized service center which will remove and recycle the battery.
▶ How to remove the built-in rechargeable battery
- Power off this product before removing the battery. Turn on the power and keep the power on until the battery is completely discharged.
- Follow Steps 1 to as illustrated to disassemble this product and remove the battery with a screwdriver.
- During disassembly, take care not to short circuit the positive and negative terminals of the removed battery and insulate the terminals by applying tape to them.
- If you cannot remove the battery, please contact an authorized service center.
For environmental protection and recycling of materials
This product contains a Li-ion battery.
Please make sure that the battery is disposed of at an officially assigned location, if there is one in your country.
flowchart
graph TD
    A["Original Air Inlet"] --> B["Add Air into Air"]
    B --> C{Air Inlet Process}
    C -->|1| D["Check Air to Transport"]
    C -->|2| E["Check Air to Transport"]
    C -->|3| F["Check Air to Transport"]
    C -->|4| G["Check Air to Transport"]
    C -->|5| H["Check Air to Transport"]
    C -->|6| I["Check Air to Transport"]
    C -->|7| J["Check Air to Transport"]
    C -->|8| K["Check Air to Transport"]
    D --> L["Check Air to Transport"]
    E --> M["Check Air to Transport"]
    F --> N["Check Air to Transport"]
    G --> O["Check Air to Transport"]
    H --> P["Check Air to Transport"]
    I --> Q["Check Air to Transport"]
    J --> R["Check Air to Transport"]
    K --> S["Check Air to Transport"]
    L --> T["Final Air Inlet"]
    M --> U["Final Air Inlet"]
    N --> V["Final Air Inlet"]
    O --> W["Final Air Inlet"]
    P --> X["Final Air Inlet"]
    Q --> Y["Final Air Inlet"]
Specifications
| Power supply | See the name plate on the USB power adaptor. (Automatic voltage conversion) |
| Charging time Approx. | 1 hour |
| Airborne Acoustical Noise | 60 (dB (A) re 1 pW) |
This product is intended for household use only.
- For more information about the energy efficiency of the product, please visit our website, www.panasonic.com, and enter the model number in the search box.
Disposal of Old Equipment and Batteries
Only for European Union and countries with recycling systems
natural_image
Symbol of a trash bin crossed out by two diagonal lines, with no text or labels present.These symbols on the products, packaging, and/or accompanying documents mean that used electrical and electronic products and batteries must not be mixed with general household waste.
For proper treatment, recovery and recycling of old products and used batteries, please take them to applicable collection points in accordance with your national legislation.
By disposing of them correctly, you will help to save valuable resources and prevent any potential negative effects on human health and the environment.
For more information about collection and recycling, please contact your local authority.
Penalties may be applicable for incorrect disposal of this waste, in accordance with national legislation.
natural_image
Symbol of a trash bin crossed out by two diagonal lines (no text or numbers present)Note for the battery symbol (bottom symbol)
This symbol might be used in combination with a chemical symbol. In this case it complies with the requirement set by the Directive for the chemical involved.
Authorized Representative in EU:
Panasonic Marketing Europe GmbH
Panasonic Testing Centre
Winsbergring 15, 22525 Hamburg, Germany
Importer:
Panasonic Marketing Europe GmbH
Hagenauer Strasse 43, 65203 Wiesbaden, Germany
Manufactured by:
Panasonic Corporation
1006, Oaza Kadoma, Kadoma City, Osaka, Japan
Panasonic
Betriebsanleitung
natural_image
Hand holding a battery with a hand gesture and a cross mark (no text or symbols)
▶ Hinweise
natural_image
Diagram of a hand pressing down on a container with liquid droplets above (no text or symbols)natural_image
Illustration of two hand-drawn scenarios showing a tool interacting with a surface and a device, both without any text or symbols.natural_image
Line drawings of three different electronic devices with no visible text or symbolsnatural_image
Illustration of a hand holding a handheld electronic device with a pipette inserted (no text or symbols visible)▶ Hinweise
natural_image
Two-step illustration of a hand holding a tool, showing the process from opening to pressing into a device (no text or symbols present)natural_image
Diagram of a mechanical component with an arrow indicating direction and a checkmark (no text or symbols present)(B)
natural_image
Diagram of a mechanical component with a cross symbol indicating cancellation or failure (no text or labels present)natural_image
Diagram of a hand holding a mechanical component with directional arrows indicating movement (no text or symbols)▶ Scherfolie
Entfernen
natural_image
Diagram showing hands assembling a mechanical component with a central component (no text or symbols)▶ Hinweis
flowchart
graph TD
    A["Original Air Inlet"] --> B["Add Air into Air"]
    B --> C{Air Withdraw}
    C -->|Yes| D["Adjust Air to Air"]
    C -->|No| E["Adjust Air to Air"]
    D --> F["Ordering to Air"]
    F --> G["Ordering to Air"]
    G --> H["Ordering to Air"]
    H --> I["Ordering to Air"]
    I --> J["Ordering to Air"]
    J --> K["Ordering to Air"]
    K --> L["Ordering to Air"]
    L --> M["Ordering to Air"]
    M --> N["Ordering to Air"]
Spezifikationen
natural_image
Symbol of a waste bin with crossed lines indicating no waste, and a solid black rectangle below (no text or labels)natural_image
Symbol of a trash bin crossed out by two diagonal lines (no text or numbers present)Panasonic Testing Centre
1006, Oaza Kadoma, Kadoma City, Osaka, Japan
Panasonic
Mode d'emploi
▶ Prévention des accidents
natural_image
Hand holding a rectangular object with a dashed circle and a 'X' mark, no text or symbols present
Notes
natural_image
Diagram of a hand pressing down on a container with liquid droplets above (no text or symbols)natural_image
Illustration of two hands using a tool to lift or lift a cylindrical object, showing motion and spray (no text or symbols)natural_image
Illustration of three different electronic devices with visible internal components and a small connector (no text or symbols)natural_image
Line drawing of a hand holding a handheld electronic device with a pen inserted (no text or symbols)Notes
natural_image
Two-step illustration of a hand holding a small object, showing the process from opening to inserting into a device (no text or symbols present)natural_image
Diagram of a mechanical component with an arrow indicating direction and a checkmark (no text or symbols present)(B)

natural_image
Diagram of a mechanical component with a cross symbol, no text or labels presentnatural_image
Diagram showing hands assembling a mechanical component with a central bracket (no text or symbols)▶ Remarque
natural_image
Symbol of a trash bin crossed with no text or labels, accompanied by a black rectangular block below (no readable text or symbols)Panasonic Testing Centre
B
C
D

E

A Corpo principale
natural_image
Simple line drawing of a container with a handle and internal lines, no text or symbols present.natural_image
Illustration of a hand holding a battery with a cross symbol (no text or labels)
▶ Note
natural_image
Illustration of two hands performing a manual tool manipulation (no text or symbols present)natural_image
Line drawings of three electronic devices with visible internal components and a small battery (no text or symbols)natural_image
Line drawing of a hand holding a handheld device with a pipette inserted (no text or symbols)▶ Note
natural_image
Two-step illustration of a hand holding a plug into a device, showing internal components and wiring (no text or symbols)natural_image
Simple line drawing of a mechanical component with an arrow and checkmark (no text or symbols)(B)
natural_image
Diagram of a mechanical component with a cross symbol, no text or labels present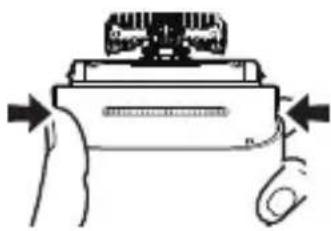
natural_image
Simple line drawing of a mechanical device with arrows indicating motion (no text or symbols)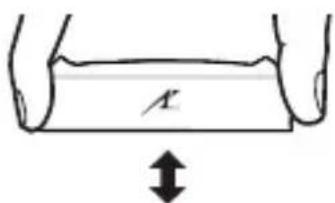
natural_image
Diagram showing hands assembling a mechanical component with a close-up view of the internal structure (no text or symbols)▶ Nota
natural_image
Symbol of a trash bin crossed with no text or numbers, representing waste sorting or disposal (no text present)natural_image
Symbol of a trash bin crossed out by two diagonal lines (no text or numbers present)Panasonic Testing Centre
Winsbergring 15, 22525 Amburgo, Germania
Importatore:
Panasonic Marketing Europe GmbH
Hagenauer Strasse 43, 65203 Wiesbaden, Germania
Fabbricato da:
Panasonic Corporation
B

C
D
E
A Cuerpo principal
natural_image
Line drawing of a device casing with a handle and internal components (no text or symbols)▶ Cómo comprobar si la carga ha finalizado
natural_image
Hand holding a rectangular object with a dashed circle and an 'X' mark, no text or symbols present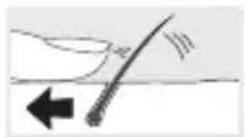
Notas
natural_image
Diagram of a hand pressing down on a container with liquid droplets above (no text or symbols)
natural_image
Illustration of two hand-drawn scenarios showing a tool interacting with a surface and a device, both without any text or symbols.natural_image
Illustration of three different electronic devices with no visible text or symbolsPara instalar la carcasa:
natural_image
Line drawing of a hand holding a handheld device with a pen inserted (no text or symbols)Notas
natural_image
Two-step illustration of a hand holding a plug inserted into a device, showing internal components and wiring (no text or symbols)natural_image
Simple diagram of a mechanical component with an arrow and checkmark indicating approval or confirmation (no text or symbols)(B)
natural_image
Cross-sectional view of a mechanical component with no visible text or symbols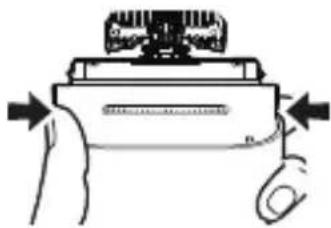
natural_image
Diagram of a robotic arm with a handle and gear, showing motion direction (no text or symbols)▶ Lámina exterior
Cómo desmontarlo
natural_image
Simple line drawing of a rectangular object with a downward arrow, no text or symbols present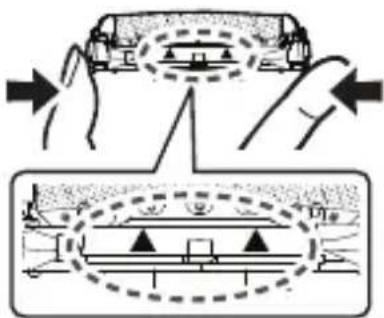
natural_image
Diagram showing hands assembling a mechanical component with a close-up view of the internal structure (no text or symbols)▶ Nota
flowchart
graph TD
    A["Original Air Inlet"] --> B["Add Air into Air"]
    B --> C{Air Withdraw}
    C -->|Yes| D["Adjust Air to Air"]
    C -->|No| E["Adjust Air to Air"]
    D --> F["Recover Air"]
    E --> G["Recover Air with Valve"]
    F --> H["Final Assembly"]
    G --> H
Especificaciones
natural_image
Symbol of a trash bin crossed with no text or labels, accompanied by a solid black rectangle below (no text or symbols present)natural_image
Symbol of a trash bin crossed with a diagonal line, representing no waste or discharge (no text or numbers present)Panasonic Testing Centre
flowchart
graph TD
    A["Wall-mounted device"] --> B["USB port"]
    B --> C["Sensor/Connector"]
    C --> D["Sensor/Connector"]
    D --> E["Sensor/Connector"]
natural_image
Illustration of a hand holding a cylindrical object with a dashed line indicating a gap or stroke (no text or symbols present)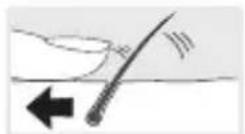
▶ Opmerkingen
natural_image
Illustration of two hands using a tool to lift a cylindrical object, showing motion and assembly (no text or symbols)natural_image
Line drawings of three different electronic devices with no visible text or symbols4 Dit product smeren
natural_image
Line drawing of a hand holding a handheld device with a pipette inserted (no text or symbols)▶ Opmerkingen
natural_image
Two-step illustration of a dental implant procedure: one with a handle and the other with a tool inserted (no text or symbols)natural_image
Pure mechanical component diagram without any text, numbers, or symbols(B)

natural_image
Cross-sectional diagram of a mechanical component with no visible text or symbolsnatural_image
Simple line drawing of a hand pressing a button on a device (no text or symbols)▶ Scheerbladensysteem
Verwijderen
natural_image
Diagram showing hands assembling a mechanical component with a bracket and housing (no text or symbols)▶ Opmerking
natural_image
Symbol of a trash bin with crossed lines indicating no waste or discharge (no text or labels)natural_image
Symbol of a trash bin crossed out by two diagonal lines (no text or numbers present)Panasonic Testing Centre
natural_image
Illustration of a hand holding a battery with a cross mark and dashed line indicating a dissection (no text or symbols)
Notas

natural_image
Illustration of two hands using a tool to lift a cylindrical object, showing motion and assembly (no text or symbols)natural_image
Line drawings of three different electronic devices with no visible text or symbolsnatural_image
Line drawing of a hand holding a handheld electronic device with a pen inserted (no text or symbols)▶ Notas
natural_image
Two-step illustration of a hand holding a plug inserted into a device, showing internal components and wiring (no text or symbols)natural_image
Pure mechanical component diagram without any text, numbers, or symbols(B)
natural_image
Diagram of a mechanical component with a cross symbol, no text or labels present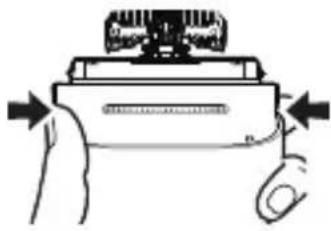
natural_image
Diagram of a mechanical device with arrows indicating force or movement (no text or symbols)
natural_image
Diagram showing hands assembling a component with a close-up view of the internal structure (no text or symbols)flowchart
graph TD
    A["1: Air intake"] --> B["2: Air intake with exhaust"]
    B --> C["3: Air intake with exhaust"]
    C --> D["4: Air intake with exhaust"]
    D --> E["5: Air intake with exhaust"]
    E --> F["6: Air intake with exhaust"]
    F --> G["7: Air intake with exhaust"]
    G --> H["8: Air intake with exhaust"]
    H --> I["9: Air intake with exhaust"]
    I --> J["10: Air intake with exhaust"]
    J --> K["11: Air intake with exhaust"]
Especificações
natural_image
Symbol of a trash bin crossed out by two diagonal lines, with no text or labels present.natural_image
Symbol of a trash bin crossed out by two diagonal lines (no text or numbers present)Panasonic Testing Centre
natural_image
Simple line drawing of a container with a handle and internal lines, no text or symbols present.natural_image
Hand holding a rectangular object with a dashed line indicating a gap, no text or symbols present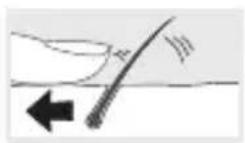
▶ OBS!
natural_image
Illustration of two hand-drawn scenarios showing a tool being dispensed into a container, with no text or symbols present.natural_image
Line drawings of three different electronic devices with no visible text or symbolsAtt installera skalet:
natural_image
Line drawing of a hand holding a device with a pen inserted (no text or symbols)▶ OBS!
natural_image
Two hand-drawn diagrams showing a device being inserted into a component, with no visible text or symbols.natural_image
Simple line drawing of a mechanical component with an arrow and checkmark (no text or symbols)(B)
natural_image
Cross-sectional view of a mechanical component with no visible text or symbols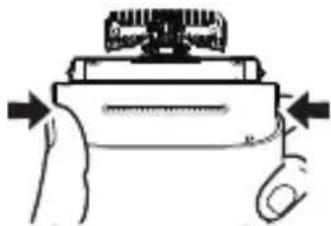
natural_image
Simple line drawing of a hand holding a device with arrows indicating motion (no text or symbols)Ytterbladsenhet
Borttagning
natural_image
Simple line drawing of a rectangular container with a horizontal line inside, no text or symbols present.
natural_image
Diagram showing hands assembling a mechanical component with a central bracket (no text or symbols)▶ Obs
natural_image
Symbol of a trash bin crossed out by two crossed lines, with no text or labels present.natural_image
Symbol of a trash bin crossed out by two diagonal lines (no text or numbers present)Panasonic Testing Centre
Winsbergring 15, 22525 Hamburg, Tyskland
Importör:
Panasonic Marketing Europe GmbH
Hagenauer Strasse 43, 65203 Wiesbaden, Tyskland
Tillverkad av:
Panasonic Corporation
1006, Oaza Kadoma, Kadoma, Osaka, Japan
Panasonic
Brugsanvisning
Genopladelig barbermaskine
natural_image
Line drawing of a device casing with a handle and internal components (no text or symbols)natural_image
Illustration of a hand holding a battery with a cross symbol indicating disassembly (no text or labels present)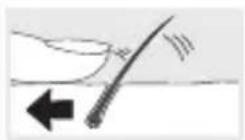
▶ Noter
natural_image
Illustration of two hand-drawn illustrations showing a tool being dispensed into a cylindrical object, with no text or symbols present.natural_image
Line drawings of three electronic devices with no visible text or symbolsnatural_image
Line drawing of a hand holding a handheld electronic device with a pen inserted (no text or symbols)▶ Noter
natural_image
Two-step illustration of a hand holding a battery, showing internal components and a close-up of the final component (no text or symbols)natural_image
Simple line drawing of a mechanical component with an arrow and checkmark (no text or symbols)(B)
natural_image
Diagram showing a mechanical component with a cross symbol, no text or labels presentnatural_image
Diagram showing hands inserting a component into a device (no text or symbols present)Bemærk!
flowchart
graph TD
    A["Original Air Inlet"] --> B["Add Air into Air"]
    B --> C["Add Air into Air Body"]
    C --> D["Add Air into Air Body"]
    D --> E["Add Air into Air Body"]
    E --> F["Add Air into Air Body"]
    F --> G["Add Air into Air Body"]
    G --> H["Add Air into Air Body"]
    H --> I["Add Air into Air Body"]
    I --> J["Add Air into Air Body"]
Specifikationer
natural_image
Symbol of a trash bin crossed with no text or numbers, representing waste sorting or disposal (no text present)Panasonic Testing Centre
Winsbergring 15, 22525 Hamburg, Tyskland
Importør:
Panasonic Marketing Europe GmbH
Hagenauer Strasse 43, 65203 Wiesbaden, Tyskland
Fremstillet af:
Panasonic Corporation
1006, Oaza Kadoma, Kadoma, Osaka, Japan
Panasonic
natural_image
Hand holding a rectangular object with a dashed line indicating a cut or alignment, no text or symbols present.
▶ Notater
natural_image
Diagram of a hand pressing down on a container with water droplets above (no text or symbols)natural_image
Illustration of two hands performing a manual tool: one applying material to a brush, the other holding a container with a tool (no text or symbols present)natural_image
Line drawings of three different electronic devices with no visible text or symbolsSlik installerer du skallet:
① Fest kontaktdekselet på hullet i skallet.
② Fest skallet på hoveddelen til en "klikk"-lyd høres mens du holder varemerket på skallet på samme side som strømbryteren.
natural_image
Line drawing of a hand holding a handheld electronic device with a pen inserted (no text or symbols)▶ Notater
natural_image
Two technical line drawings of a hand holding a plug, showing internal components and a close-up view (no text or symbols)natural_image
Diagram of a mechanical component with an arrow indicating a checkmark (no text or symbols present)(B)
natural_image
Diagram of a mechanical component with a cross symbol, no text or labels presentBytte systemets ytterfolie og de indre bladene
Ytterfolie
Slik fjerner du
natural_image
Diagram of a hand holding a device with arrows indicating motion or force direction (no text or symbols)
natural_image
Simple line drawing of a rectangular object with a horizontal line and a label 'A' (no text or symbols beyond the label)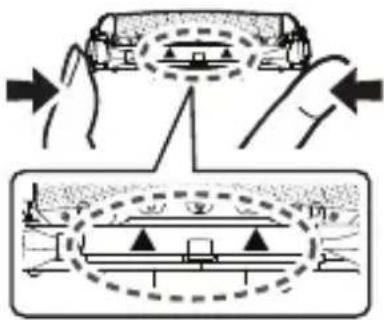
natural_image
Diagram showing hands assembling a mechanical component with a central component (no text or symbols)▶ Merk
Ikke kast folierammen.
Problemløsning
Problem Handling
Lyden endres under barbering.
flowchart
graph TD
    A["Original Air Inlet"] --> B["Add Air into first part"]
    B --> C["Add Air into second part"]
    C --> D["Add Air into third part"]
    D --> E["Add Air into fourth part"]
    E --> F["Add Air into fifth part"]
    F --> G["Add Air into sixth part"]
    G --> H["Add Air into seventh part"]
    H --> I["Add Air into eight parts"]
    I --> J["Final Air Inlet with Inspection"]

Spesifikasjoner
| Strømforsyning | Se navneskiltet på USB-strømadapteren. (Automatisk spenningskonvertering) |
| Ladetid Omtrent 1 time | |
| Luftbåren akustisk støy 60 (dB (A) re 1 pW) | |
Dette produktet er kun ment til husholdningsbruk.
natural_image
Symbol of a trash bin crossed with no visible text or labelsSlike symboler på produkter, emballasje, og/eller på medfølgende dokumenter betyr at brukte elektriske/elektroniske produkter og batterier ikke må blandes med vanlig husholdningsavfall.
Panasonic Testing Centre
Winsbergring 15, 22525 Hamburg, Tyskland
Importør:
Panasonic Marketing Europe GmbH
Hagenauer Strasse 43, 65203 Wiesbaden, Tyskland
Produsert av:
Panasonic Corporation
1006, Oaza Kadoma, Kadoma, Osaka, Japan
Panasonic
B
C

D

E
A Runko-osa
natural_image
Simple line drawing of a device casing with a handle and internal components (no text or symbols)natural_image
Hand holding a cylindrical object with a cross mark and dashed line indicating a motion or force (no text or symbols)
▶ Huomautuksia
natural_image
Illustration of two hand-drawn illustrations showing a tool being dispensed into a cylindrical object, with no text or symbols present.natural_image
Line drawings of three different electronic devices with no visible text or symbolsAsenna komentotulkki:
Voitele tämä tuote.
natural_image
Line drawing of a hand holding a handheld device with a pen inserted (no text or symbols)▶ Huomautuksia
natural_image
Two-step illustration of a hand holding a plug into a device, showing internal components and wiring (no text or symbols)natural_image
Simple line drawing of a mechanical component with an arrow and checkmark (no text or symbols)(B)
natural_image
Diagram of a mechanical component with cross symbol (no text or labels)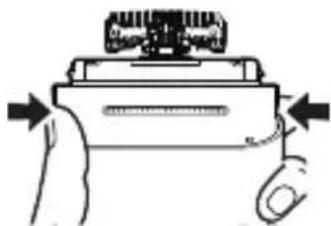
natural_image
Diagram of a hand pressing a button on a device (no text or symbols visible)▶ Teräverkko
Irrotustapa
natural_image
Diagram showing hands pressing a car with motion lines indicating speed (no text or symbols)
natural_image
Simple line drawing of a mechanical or architectural component with no text, numbers, or symbolsnatural_image
Diagram showing hands assembling a mechanical component with a close-up view of the internal structure (no text or symbols)▶ Huom
natural_image
Symbol of a trash bin crossed with no text or numbers, representing waste sorting or disposal (no text present)natural_image
Symbol of a trash bin crossed out by two diagonal lines (no text or numbers present)Huomautus paristosymbolista (symboli alhaalla)
Panasonic Testing Centre
Winsbergring 15, 22525 Hampuri, Saksa
Maahantuoja:
Panasonic Marketing Europe GmbH
Hagenauer Strasse 43, 65203 Wiesbaden, Saksa
Valmistaja:
Panasonic Corporation
1006, Oaza Kadoma, Kadoma-kaupunki, Osaka, Japan
Panasonic
Instrukcja obsługi

A Korpus golarki
natural_image
Illustration of a hand holding a rectangular object with a dashed line indicating a dislocation or transformation (no text or symbols present)
▶ Uwagi
natural_image
Illustration of two hands using a tool to lift a cylindrical object, showing motion and assembly (no text or symbols)2 Produkt schowaj, gdy wyschnie.
natural_image
Line drawings of three different electronic devices with no visible text or symbolsnatural_image
Line drawing of a hand holding a handheld electronic device with a pen inserted (no text or symbols)▶ Uwagi
natural_image
Two hand-drawn diagrams showing a device being inserted into a battery, with no visible text or symbols.natural_image
Diagram of a mechanical component with an arrow indicating a checkmark (no text or symbols present)(B)
natural_image
Diagram of a mechanical component with a cross symbol, no text or labels present
natural_image
Diagram of a mechanical device with arrows indicating motion or force direction (no text or symbols)natural_image
Diagram showing hands pressing a car on a surface with directional arrows indicating motion (no text or symbols)
natural_image
Diagram showing hands assembling a device with a connector (no text or symbols)Uwagi
flowchart
graph TD
    A["Original Air Inlet"] --> B["Add Air into first part"]
    B --> C["Add Air into second part"]
    C --> D["Add Air into third part"]
    D --> E["Add Air into fourth part"]
    E --> F["Add Air into fifth part"]
    F --> G["Add Air into sixth part"]
    G --> H["Add Air into seventh part"]
    H --> I["Add Air into eight parts"]

Polski!
Dane techniczne
natural_image
Symbol of a trash bin crossed with no text or labels, accompanied by a black rectangular block below (no readable text or symbols)natural_image
Symbol of a trash bin crossed out by two diagonal lines (no text or numbers present)Panasonic Testing Centre
natural_image
Two labeled electronic components: a black connector with circular ports and a white cylindrical component (no text or symbols)A Hlavní část
natural_image
Illustration of a hand holding a battery with a cross symbol indicating disassembly or disassembly (no text or labels present)
▶ Poznámky
natural_image
Diagram of a hand pressing down on a container with liquid droplets above (no text or symbols)natural_image
Illustration of two hands holding a tool, one with spray and the other with a brush (no text or symbols)natural_image
Line drawings of three different electronic devices with no visible text or symbolsnatural_image
Line drawing of a hand holding a handheld electronic device with a pipette inserted (no text or symbols)▶ Poznámky
natural_image
Illustration of two hands inserting a plug into a device (no text or symbols present)natural_image
Diagram of a mechanical component with an arrow indicating assembly or inspection (no text or symbols present)
natural_image
Diagram of a mechanical component with cross symbol, no text or labels presentnatural_image
Diagram of a hand operating a device with arrows indicating motion (no text or symbols)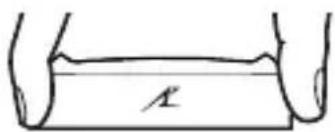
natural_image
Diagram showing hands pressing a valve on a surface with directional arrows indicating force or movement (no text or symbols)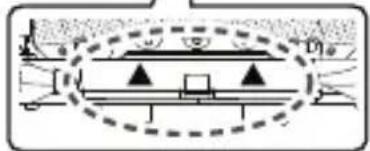
natural_image
Diagram of a mechanical or electrical setup with no visible text, numbers, or symbols▶ Vnitřní břity
Jak odstranit
natural_image
Diagram of a mechanical component with an arrow indicating direction (no text or symbols)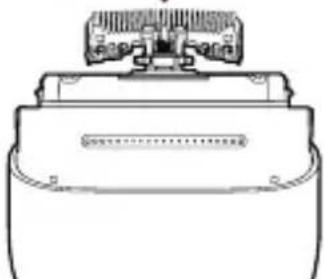
natural_image
Line drawing of a mechanical component with a top view (no text or symbols)▶ Poznámka
flowchart
graph TD
    A["Assembly of motor part"] --> B["Step 1: Screen pressing"]
    B --> C["Step 2: Stamping device"]
    C --> D["Step 3: Stamping device with hand"]
    D --> E["Step 4: Stamping device with screw"]
    E --> F["Step 5: Stamping device with screw"]
    F --> G["Step 6: Stamping device with screw"]
    G --> H["Step 7: Stamping device with screw"]
    H --> I["Step 8: Stamping device with screw"]
    I --> J["Step 9: Stamping device with hand"]
    J --> K["Step 10: Stamping device with hand"]
    K --> L["Final Packaging with Česky component"]
Technické údaje
natural_image
Symbol of a trash bin crossed out by two diagonal lines, with no text or labels present.natural_image
Symbol of a trash bin crossed out by two diagonal lines (no text or numbers present)Poznámka k symbolu baterie (značka pod symbolem)
Panasonic Testing Centre
natural_image
Simple line drawing of a device casing with no text or symbols▶ Ako overit', či je nabíjanie dokončené
- Ak zástrčku USB (Type-C) vyberiete a znova zasuniete, aby ste tento produkt nabili hned' po dokončení nabíjania, indikátor stavu nabitia sa rozsvieti a potom zhasne približne o 5 sekúnd.
▶ Poznámky
natural_image
Hand holding a cylindrical object with a dashed line indicating a measurement or inspection (no text or symbols present)
▶ Poznámky
natural_image
Diagram of a hand pressing down on a cylindrical object with water droplets above, showing an arrow indicating direction (no text or symbols)natural_image
Illustration of two hand-drawn illustrations: one showing a tool on a surface, the other showing a tool above a container (no text or symbols)natural_image
Line drawings of three different electronic devices with no visible text or symbolsDemontáž krytu:
Inštalácia krytu:
4 Výrobok namažte.
natural_image
Line drawing of a hand holding a device with a pen inserted (no text or symbols)▶ Poznámky
natural_image
Two-step illustration of a hand holding a tool, showing the process from opening to inserting or adjusting a component (no text or symbols present)natural_image
Simple line drawing of a mechanical component with an arrow and checkmark (no text or symbols)(B)

natural_image
Crossed mechanical component diagram with no visible text or symbols
natural_image
Diagram of a hand holding a mechanical device with arrows indicating motion (no text or symbols)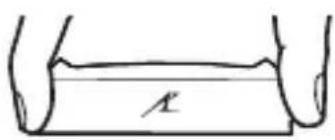

natural_image
Diagram showing hands pressing a car with motion lines indicating speed (no text or symbols)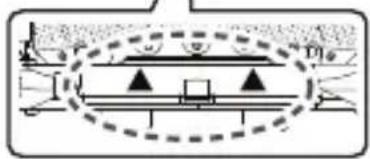
natural_image
Diagram showing hands assembling a mechanical component with a close-up view of the internal structure (no text or symbols)▶ Poznámka
Nevyhadzujte rám fólie.
Riešenie problémov
Problém Činnost'
flowchart
graph TD
    A["Original Air Inlet"] --> B["Add Air into Air"]
    B --> C{Air Release}
    C -->|①| D["Repacker with Hand"]
    C -->|②| E["Recycle with Bag"]
    C -->|③| F["Adjustment to Air"]
    C -->|④| G["Ordering to Air"]
    C -->|⑤| H["Ordering to Air"]
    C -->|⑥| I["Ordering to Air"]
    C -->|⑦| J["Ordering to Air"]
    C -->|⑧| K["Ordering to Air"]
    D --> L["Product Delivery"]
    E --> L
    F --> L
    G --> L
    H --> L
    I --> L
    J --> L
    K --> L
    L --> M["Final Product Delivery"]
natural_image
Symbol of a trash bin crossed with no visible text or labelsnatural_image
Symbol of a trash bin crossed out by two diagonal lines (no text or numbers present)Panasonic Testing Centre
Winsbergring 15, 22525 Hamburg, Nemecko
Dovozca:
Panasonic Marketing Europe GmbH
Hagenauer Strasse 43, 65203 Wiesbaden, Nemecko
Výrobca:
Panasonic Corporation
1006, Oaza Kadoma, Kadoma City, Osaka, Japonsko
Panasonic
Használati utasítás
natural_image
Line drawing of a device casing with a label 'A' and a horizontal bar, no readable text or symbols present.natural_image
Illustration of a hand holding a battery with a cross mark and dashed line indicating a dissection (no text or symbols)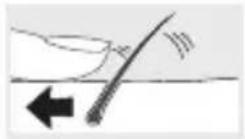
▶ Megjegyzések
natural_image
Diagram of a hand pressing down on a container with liquid droplets above (no text or symbols)natural_image
Illustration of two hands holding a tool, one with spray and the other with a dropper (no text or symbols)natural_image
Line drawings of three electronic devices with no visible text or symbolsA sapka feltétele:
natural_image
Line drawing of a hand holding a handheld electronic device with a pipette inserted (no text or symbols)▶ Megjegyzések
natural_image
Two-step illustration of a hand holding a plug inserted into a device, showing internal components and wiring (no text or symbols)natural_image
Diagram of a mechanical component with an arrow indicating direction and a checkmark (no text or symbols)(B)
natural_image
Diagram of a mechanical component with a cross symbol indicating cancellation or failure (no text or labels present)natural_image
Simple line drawing of a hand holding a device with arrows indicating motion (no text or symbols)

natural_image
Diagram showing hands pressing a button on a device (no text or symbols present)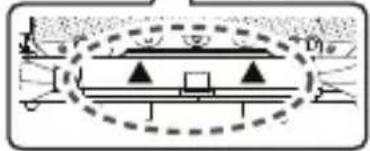
natural_image
Diagram of a mechanical or architectural structure with no visible text, numbers, or symbolsnatural_image
Diagram showing hands inserting a component into a device (no text or symbols present)Hibaelhárítás
flowchart
graph TD
    A["Original Air Inlet"] --> B["Add Air into Air"]
    B --> C{Air Inlet Process}
    C -->|1| D["Check Air to Transport"]
    C -->|2| E["Check Air to Transport"]
    C -->|3| F["Check Air to Transport"]
    C -->|4| G["Check Air to Transport"]
    C -->|5| H["Check Air to Transport"]
    C -->|6| I["Check Air to Transport"]
    C -->|7| J["Check Air to Transport"]
    C -->|8| K["Check Air to Transport"]
    D --> L["Check Air to Transport"]
    E --> M["Check Air to Transport"]
    F --> N["Check Air to Transport"]
    G --> O["Check Air to Transport"]
    H --> P["Check Air to Transport"]
    I --> Q["Check Air to Transport"]
    J --> R["Check Air to Transport"]
    K --> S["Check Air to Transport"]
    L --> T["Final Air Inlet"]
    M --> U["Final Air Inlet"]
    N --> V["Final Air Inlet"]
    O --> W["Final Air Inlet"]
    P --> X["Final Air Inlet"]
    Q --> Y["Final Air Inlet"]
Műszaki adatok
natural_image
Symbol of a trash bin crossed with no text or labels, accompanied by a black rectangular block below (no readable text or symbols)natural_image
Symbol of a trash bin crossed out by two diagonal lines (no text or numbers present)Panasonic Testing Centre
natural_image
Simple line drawing of a device casing with labeled points A and B, no text or symbols presentnatural_image
Hand holding a cylindrical object with a dashed line indicating a measurement or inspection (no text or symbols present)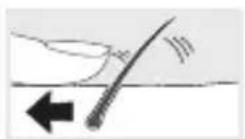
▶ Note
natural_image
Diagram of a container with liquid droplets and an arrow indicating flow or movement (no text or symbols)natural_image
Illustration of two hands holding different types of cleaning or cleaning products, no text or symbols presentnatural_image
Line drawings of three different electronic devices with no visible text or symbolsPentru a instala carcasa:
4 Lubrifiati produsul.
natural_image
Line drawing of a hand holding a device with a pen inserted (no text or symbols)▶ Note
natural_image
Two-step illustration of a hand holding a plug into a device, showing internal components and wiring (no text or symbols)natural_image
Simple line drawing of a mechanical component with an arrow and checkmark (no text or symbols)(B)

natural_image
Cross-sectional view of a mechanical component with no visible text or symbolsnatural_image
Diagram of a mechanical device with arrows indicating motion or force direction (no text or symbols)natural_image
Diagram showing hands assembling a mechanical component with a close-up view of the internal structure (no text or symbols)Notă
natural_image
Symbol of a trash bin crossed with no text or numbers, representing waste sorting or disposal (no text present)natural_image
Symbol of a trash bin crossed out by two diagonal lines (no text or numbers present)Panasonic Testing Centre
Winsbergring 15, 22525 Hamburg, Germania
Importator:
Panasonic Marketing Europe GmbH
Hagenauer Strasse 43, 65203 Wiesbaden, Germania
Fabricat de:
Panasonic Corporation
1006, Oaza Kadoma, Kadoma City, Osaka, Japonia
Panasonic
natural_image
Simple line drawing of a container with a handle and label 'A' (no text or symbols beyond the label)natural_image
Illustration of a hand holding a cylindrical object with a dashed line indicating a dislocation or movement (no text or symbols present)
▶ Notlar
natural_image
Illustration of two hand-drawn scenarios showing a tool being placed on a surface, with no text or symbols present.natural_image
Line drawings of three different electronic devices with no visible text or symbolsnatural_image
Line drawing of a hand holding a handheld device with a pipette inserted (no text or symbols)▶ Notlar
natural_image
Two-step illustration of a hand holding a tool, showing the process from opening to inserting or removing a device (no text or symbols present)natural_image
Simple line drawing of a mechanical component with an arrow and checkmark (no text or symbols)(B)
natural_image
Cross-sectional view of a mechanical component with internal structure (no text or symbols)natural_image
Diagram of a mechanical device with arrows indicating force or movement (no text or symbols)▶ Dis Elek
Sökme
natural_image
Diagram showing hands assembling a mechanical component with a close-up view of the internal structure (no text or symbols)▶ Not
flowchart
graph TD
    A["1: Air intake"] --> B["2: Air intake with exhaust"]
    B --> C["3: Air intake with exhaust"]
    C --> D["4: Air intake with exhaust"]
    D --> E["5: Air intake with exhaust"]
    E --> F["6: Air intake with exhaust"]
    F --> G["7: Air intake with exhaust"]
    G --> H["8: Air intake with exhaust"]
    H --> I["9: Air intake with exhaust"]
    I --> J["10: Air intake with exhaust"]
    J --> K["11: Air intake with exhaust"]
Özellikler
natural_image
Symbol of a trash bin crossed with diagonal lines, no text or numbers presentnatural_image
Simple line drawing of a trash bin with crossed x-bracing (no text or symbols)Panasonic Testing Centre
Winsbergring 15, 22525 Hamburg, Almanya
© Panasonic Corporation 2024
E EN, DE, FR, IT, SP, NL, PT, SV, DA,
NB, FI, PL, CS, SK, HU, RO, TR
Printed in China
ES970WCM3B2503 S0624-10924