Aura - Parasol Glatz - Free user manual and instructions
Find the device manual for free Aura Glatz in PDF.

User questions about Aura Glatz
0 question about this device. Answer the ones you know or ask your own.
Ask a new question about this device
Download the instructions for your Parasol in PDF format for free! Find your manual Aura - Glatz and take your electronic device back in hand. On this page are published all the documents necessary for the use of your device. Aura by Glatz.
USER MANUAL Aura Glatz
natural_image
Line drawing of a simple outdoor umbrella with support structure (no text or symbols)EN Installation and operating instructions 22
text_image
Technical diagram of a twist drill bit with labeled parts including a 5x bolt, nut, and base plate1
Schirm auspacken
Lieferumfang:
text_image
Diagram showing a drill bit being cut with a red arrow indicating the direction, likely illustrating a machining or milling process.2
Schirm ablegen
text_image
Diagram showing a cylindrical container with particles inside, marked by a red downward arrow indicating flow or movement.3
[cm] [kg] [km/h (Bft.)]
350×350 310 45 (6)
400×400310 40 (6)
natural_image
Diagram of a mechanical drill bit with a red arrow indicating rotational motion (no text or symbols)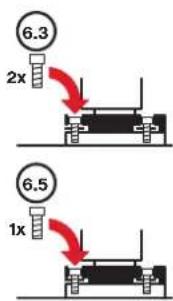
text_image
6.3 2x 6.5 1x6
Schirm fixieren
natural_image
Diagram of a mechanical device with red arrows indicating motion or force direction (no text or symbols)text_image
Diagram illustrating a mechanical or electrical setup with a rotating component and a lever mechanism, labeled with red arrows and symbols.Schirm öffnen
text_image
Diagram showing a hammer mechanism with red 'G' and black circular arrows indicating rotation or motion, alongside a flagpole.5
Schirm schließen
text_image
Technical diagram of a twist drill bit with labeled parts including a 5x bolt, nut, and base plate1
Déballer le parasol
text_image
Diagram showing a rotating mechanical component with a red arrow indicating rotation direction, likely illustrating a motion or force.2
natural_image
Diagram of a cylindrical container with particles inside, showing liquid level and downward arrow (no text or symbols)natural_image
Diagram of a mechanical device with red arrows indicating motion or force direction (no text or symbols)1
text_image
Diagram showing a mechanical setup with a hammer and a graduation cap, labeled with red arrows indicating direction of motion or force.2
Déployer le parasol
text_image
Diagram showing a mechanical device with rotating arrows and a circular symbol, likely illustrating a motion or rotation process.5
Fermer le parasol
Table of Contents Welcome
Welcome 23
Optional accessories 23
Technical data 23
Warranty 23
Safety information 24
Installation and start-up 26
Use 28
Maintenance and care 30
Disassembly 30
Disposal 30
Wood maintenance 31
Intended use
The product serves as a device for the protection of the human body from solar radiation. The product may only be used in private households, in the catering and hotel sector or in a comparable environment. The product may only be used in accordance with these installation and operating instructions. Any use other than the uses described in these installation and operating instructions shall be considered improper use. We reserve the right to make modifications due to technical advances. In these instructions the AURA may also be referred to as 'the product' or 'parasol'.
Warning words used
!DANGEROUS Immediately dangerous situation which can result in death or severe injuries.
!CAUTION Potentially dangerous situation which can result in minor or moderate injuries.
!NOTICE A situation that can lead to property damage.
Congratulations on the purchase of your new AURA. You have purchased a high quality parasol. These instructions form part of this product. It contains important safety, usage and disposal information for users of the product. Please familiarise yourself with all the information listed before using the product. The product may only be used as described herein and for the use scenarios stated. If you continue to use it and care for it properly, your AURA parasol will serve you well for many years to come.
Optional accessories
A high quality range of accessories is included with your parasol: It includes, among other things, the following products, which go perfectly with your parasol:
- Base
- Mounting plate
- Ground Socket
- Protective cover
- OSYRIION Spot
Consult your GLATZ dealer about this.
Technical data
| Size [cm] | Base area [ m^2 ] | Closing height [cm] | Passage height [cm] | Overall height [cm] |
| 350×350 | 12.3 | 45 | 220 | 297 |
| 400×400 | 16.0 | 18 | 220 | 305 |
Details when using the M4 ground socket
Warranty
Please contact your GLATZ partner before returning the product. The warranty on the parasol lasts for 24 months from the date of purchase. The warranty expires in the following cases:
• External application of excessive force
- Inappropriate operation or maintenance of the parasol
• Damage arising from force majeure
The wind guarantee for an open parasol is limited. The maximum permissible wind speeds always require a fixed anchorage in the ground. If there are several parasols, a minimum distance of 20 cm must be maintained between any two of them. Likewise, a minimum distance of 20 cm must be maintained between the parasol and walls.
Safety information
READ ALL THE SAFETY INFORMATION CAREFULLY AND MAKE SURE THAT YOU UNDERSTAND THEM.
- Follow all the instructions to avoid accidents, fire, explosions, electric shock or other hazards that could cause property damage and / or severe or fatal injuries.
- Ensure that each person using the product has read and observes these warnings and instructions.
- Keep these installation and operating instructions for the future. It must be passed on to subsequent users of the product.
- The manufacturer is not liable for material damages or injuries caused by incorrect use or the failure to observe the safety instructions. The warranty becomes invalid in such cases.
- The protective effect against hazardous UV radiation varies depending on the environment. Additional measures to protect your skin are possibly also necessary.
• Children must not play with the product. - !DANGER Always keep children away from packaging material - this constitutes a choking hazard. Children underestimate risks. This product is not a toy.
- Children aged 8 years or over and persons with reduced physical, sensory or mental capabilities, lack of experience or knowledge may only use the appliance if they are supervised by a person who is responsible for their safety or if they have been shown how to use the appliance safely and they have understood the risks inherent in its use. Cleaning and maintenance tasks may not be carried out by children without supervision.
- Do not use the device if you are suffering from a lack of concentration /attention or under the influence of drugs, alcohol or medication.
- The product must be placed in a base or a ground sleeve that is firmly anchored.
- Do not allow the product to fall or knock against anything.
- Check the span of the parasol before opening / closing it.
- Make sure there are no persons / objects in the movement area when opening / closing it. Otherwise, injuries / damage may occur.
- !DANGER Close the parasol when the wind picks up, in stormy weather conditions and / or when snow is falling.
- Observe the specifications concerning the maximum per-
missible wind speed for a fixed ground anchorage (ground sleeve inserted in concrete). The permissible wind speed is reduced if a different anchorage method is used.
- Unattended parasols may not remain opened. Any damage is not covered by the warranty. Always secure closed parasols with a binding belt.
- Only use original accessories / spare parts.
- Product and technical modifications are not permitted.
- The parasol must be monitored during opening and closing.
- Check parasol and accessories regularly to be sure that no undue wear and tear or damage has occurred. If defects are found, have them repaired before further use.
- Do not use any solvents or abrasive cleaning agents.
- Dismantled parasols should only be stored lying down.
- When using a fixed floor anchorage, the installation must be performed by specially trained persons in accordance with the separate installation instructions.
- Do no ignite a naked flame in the proximity of, or under, the parasol.
Installation and start-up
text_image
Technical diagram of a twist drill bit with labeled parts including a 5x bolt and a 10x magnified inset showing the base.1
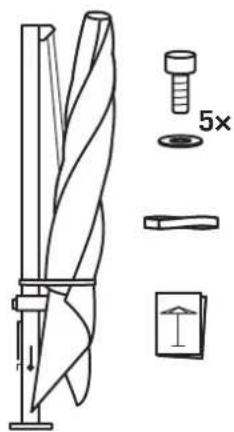
Unpacking the parasol
Supplied with:
- parasol with crank (ready assembled)
- binding
- protective cover
- 5 fastening screws
- 5 support screws
- Allen key
- Operating instructions
! Dispose of packaging material properly and keep away from children. Do not make use of defective material. In the event of any damage, inform the transport service provider immediately.
text_image
Diagram showing a rotating mechanical component with a red arrow indicating rotation direction, likely illustrating a motion or force.2
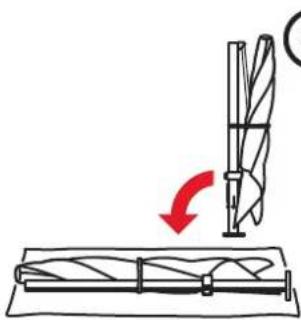
Placing the parasol down
- Spread out on a woollen blanket.
- Place the parasol upon it.
Carefully place the parasol on a clean, horizontal surface. The parasol is very heavy. Work in a threesome and hold the parasol securely.
3
natural_image
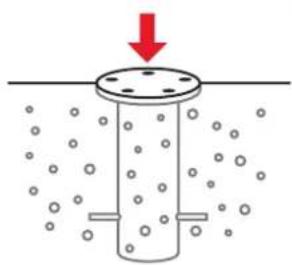
Diagram of a cylindrical container with particles inside, showing liquid level and downward arrow (no text or symbols)Prepare the floor fastening
Place the floor fastening in accordance with the separate instructions.
| Size | minimum weight | maximum wind speed* |
[cm] [kg] [km/h (Bft.)]
350×350 310 45 (6)
400×400310 40 (6)
* maximum wind speed when it is securely anchored in the ground.
text_image
4.24.1 4.4 4.6 4.54
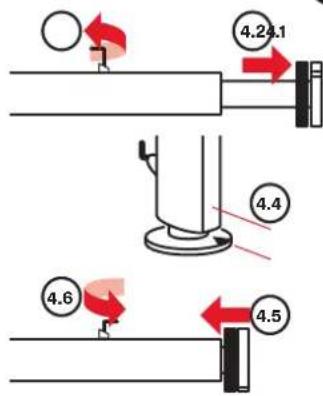
Check the standpipe
- Turn the locking pin upwards
- Pull out the stand pipe from the mast
- Remove any plastic film
- Position the orientation notch towards the parasol part
- Reinsert the stand pipe
- Turn the locking pin downwards
- Lock the standpipe into place.
! The orientation notch must face towards the parasol part. Do not remove the black sliding washer.
text_image
5.1 5.3 5x 5.4 2x5
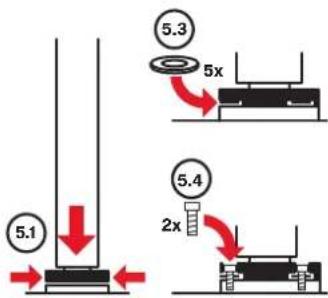
Preassemble the parasol
- Place the parasol with the standpipe on the base
- Align the cutout/position
- Insert the washers completely into the recesses
- Insert 2 opposite screws and screw them tight
! The parasol is very heavy. Work in a threesome and hold the parasol securely.

natural_image
Diagram of a mechanical component with a red curved arrow indicating rotational motion, labeled with number 6.2 (no text or symbols on the diagram itself)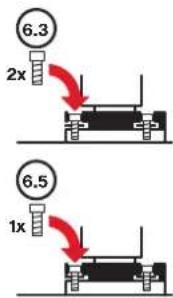
text_image
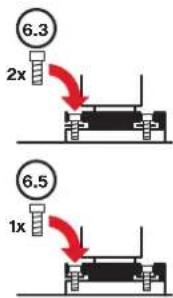
6.3 2x 6.5 1x6
Fixing the parasol in place
- Turn the locking pin upwards
- Carefully turn the parasol
- Insert 2 further screws and screw them tight
- Turn the parasol once more
- Insert the last screw and screw it tight
- Turn the parasol into the original position
- Turn the locking pin downwards
Use
text_image
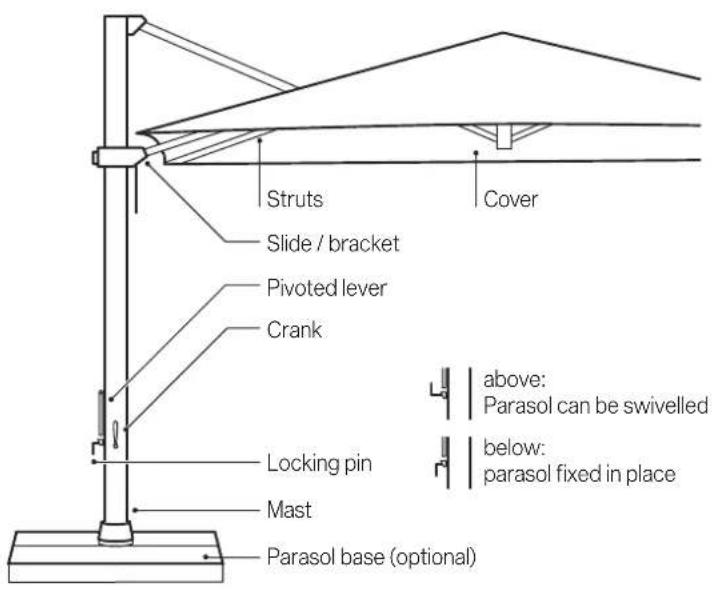
Struts Slide / bracket Pivoted lever Crank Locking pin Mast Parasol base (optional) Cover above: Parasol can be swivelled below: parasol fixed in place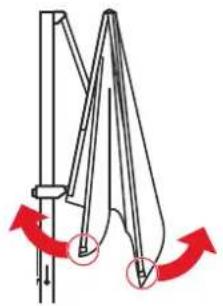
natural_image
Diagram of a mechanical device with red arrows indicating motion or force direction (no text or symbols)1
Prepare to open
- Remove protective cover
- Detach strap
- Detached the slide by means of rotary knob
- Before winding up: lightly loosen / remove the ribs by hand
text_image
Diagram showing a mechanical setup with a hammer and a graduation cap, labeled with red arrows and symbols.2
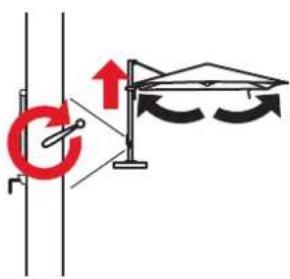
Opening the parasol
- Completely open the parasol through use of the crack and at the same time push the slide upwards
- Secure the slide once more
! Detach the rotary knob on the slide to a sufficient extent that the slide can be moved freely.
text_image
3.2 3.13
Tilting the parasol roof
- Detach the slide by means of rotary knob
- Set an appropriate parasol incline
- Secure the slide once more.
text_image
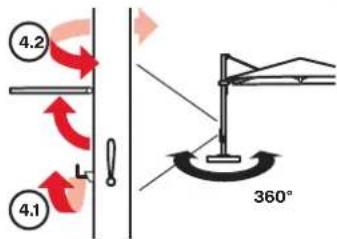
4.2 4.1 360°4
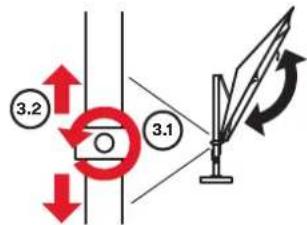
Turning the parasol
The parasol can be tilted in 45° steps
- Turn the locking pin upwards
- Turn the parasol by means of the pivoted lever
- Turn the locking pin downwards
- The parasol locks into place in the next 45° position
text_image
Diagram illustrating a mechanical or electrical switch mechanism with labeled components and directional arrows indicating rotation or movement.5
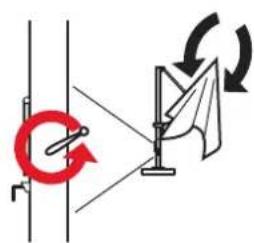
Closing the parasol
- Detached the slide by means of rotary knob
- Crank it anticlockwise, at the same time pull slide downwards
- Pull the bracket on the mast
- Secure the slide once more
Keep the parasol as compact as possible.
text_image
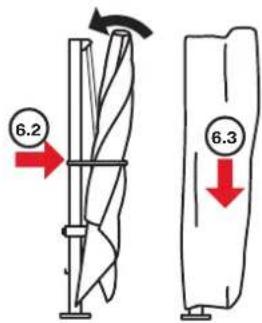
6.2 6.36
Bind/protect the parasol
- Pull out / wrap fabric segments
- Secure the parasol with a binding strap
- Lift the protective cover above the parasol section
- Close the protective cover
! Position the rod on the mast side of the parasol.
Handling and maintenance
- Allow the parasol to dry when open to prevent the formation of mould and discolouration.
- A protective sleeve protects the parasol and will extend its service life.
- Only pull the protective sleeve over the dry parasol when it is dry.
- Do not clean the protective sleeve in the washing machine. Do not use chemicals.
- Clean the parasol cover when needed with lukewarm water, fine detergents and a sponge.
- Do not use any bleach or sharp objects, to avoid damage to the cover.
- Check the tightness of all screws from time to time and tighten them if necessary.
- If the parasol is located in a highly exposed position, increased wear and tear must be expected. In such cases we recommend more intensive care and maintenance.
- In most cases, defective parasols can be repaired by your GLATZ partner. Only use original replacement parts FROM GLATZ.
Disassembly
Dismantle the parasol if it is not going to be used for a long time.
DANGER! DANGER OF TIPPING DANGER OF INJURY IF THE PARASOL TOPPLES OVER
- Close and tie the parasol properly.
- Dismantle the parasol in reverse mounting direction.
- Store the parasol in lying position together with all accessories in a dry place.
Disposal
This symbol on the product, accessories or packaging indicates that the product must not be treated as unsorted domestic waste but must be disposed of separately. Dispose of the product at a designated recycling collection point.
The packaging is made of environmentally friendly materials that can be disposed of at your local recycling facilities. By disposing of the product correctly, you will help to avoid possible environmental and health hazards. The product is made of metal and synthetic parts. End-of-life disposal must be carried out in accordance with regional environmental and waste regulations.
Wood maintenance
Please observe the following:
– Always sand along the grain of the wood.
- The AURA frame is made of eucalyptus wood, which is a hardwood. Please take this into account when selecting an oil.
A) Preventative maintenance of the wooden frame (1–2 times annually, depending on the environment and level of contamination):
- Remove the canopy from the frame to prevent contamination or oil stains on the fabric. If only the mast needs maintenance, the canopy does not need to be removed. However, ensure that the oil/sand paper does not come into contact with the canopy.
- Clean the frame (mast and struts) with a fine, clean, damp cloth and then let dry.
- Lightly sand the frame (mast and struts) with sandpaper for wood in 240 grit.
- Remove any sanding dust from the surface.
- Rub the frame (mast and struts) with a fine, clean, oiled cloth and then let it dry for at least one hour. Oil cut edges and cut surfaces especially well.
-
Wipe the frame (mast and struts) with a fine, clean, dry cloth.
-
If necessary, reattach the canopy to the frame.
B) Treating damage (e.g. scratches, nicks, mouldy spots, etc.):
- Remove the canopy from the frame to prevent contamination or oil stains on the fabric. If only the mast needs treatment, the canopy does not need to be removed. However, ensure that the oil/sand paper does not come into contact with the canopy.
- First sand the damaged/affected area with sandpaper for wood in 80 grit.
- Sand the entire affected part (mast and/or strut) with sandpaper for wood in 120 grit.
- Remove any sanding dust from the surface.
- Rub the entire affected part (mast and/or strut) with a fine, clean, oiled cloth and then let it dry for at least one hour. Oil cut edges and cut surfaces especially well.
- Lightly sand the entire affected part (mast and/or strut) with sandpaper for wood in 240 grit.
- Rub the entire affected part (mast and/or strut) with a fine, clean, oiled cloth. Take care not to use too much oil. Allow it to dry for approx. 15 minutes and then rub the area again with a cloth.
- If necessary, reattach the canopy to the frame.
32
Indice
Benvenuti 33
text_image
Technical diagram of a twist drill bit with labeled parts including a 5x bolt, nut, and base plate1
text_image
Diagram showing a rotating mechanical component with a red arrow indicating rotation direction, likely illustrating a motion or assembly process.2
Deporre l'ombrellone
natural_image
Diagram of a cylindrical container with particles inside, showing liquid level and downward arrow (no text or symbols)3
natural_image
Diagram of a turbine blade with rotating blades and a red curved arrow indicating rotation direction (no text or symbols)6
natural_image
Diagram of a mechanical device with red arrows indicating motion or force direction (no text or symbols)1
text_image
Diagram showing a vertical pole with a red 'G' symbol and an upward arrow, alongside a graduation cap with curved arrows.Aprire l'ombrellone
text_image
Diagram showing a mechanical or electrical setup with a rotating component and a rotating stand, indicating rotational motion.
text_image
6.2 6.36
text_image
Technical diagram of a twist drill bit with labeled parts including screw, nut, and 5x magnified detail1
Desempaquetar la sombrilla
text_image
Diagram showing a rotating mechanical component with a red arrow indicating rotation direction, likely illustrating a motion or assembly process.2
natural_image
Diagram of a cylindrical container with particles inside, showing liquid level and downward arrow (no text or symbols)3
[cm] [kg] [km/h (Bft.)]
350×350 310 45 (6)
400×400310 40(6)
natural_image
Diagram of a wind turbine blade with a red rotation arrow indicating clockwise motion (no text or symbols)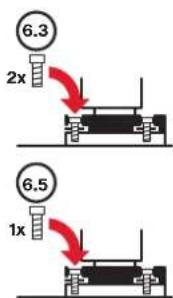
text_image
6.3 2x 6.5 1x6
Fijar la sombrilla
natural_image
Diagram of a mechanical device with red arrows indicating motion or force direction (no text or symbols)1
text_image
Diagram showing a mechanical device with a circular component and a rotating arm mechanism, illustrating rotational motion.
Cerrar la sombrilla
text_image
Diagram illustrating a physics experiment with a pendulum and a graduation cap, showing force direction and motion arrows.2
Abrir la sombrilla
text_image
Technical diagram showing a drill bit with 5x magnified view and component assembly1
Parasol uitpakken
text_image
Diagram showing a drill bit being cut with a red arrow indicating the direction, likely illustrating a machining or milling process.2
Parasol plaatsen
natural_image
Diagram of a cylindrical container with particles inside, showing liquid level and downward arrow (no text or symbols)[cm] [kg] [km/h (Bft.)]
350×350 310 45 (6)
400×400310 40 (6)
natural_image
Diagram of a mechanical component with a red curved arrow indicating rotational motion, labeled with number 6.2 (no text or symbols on the diagram itself)