
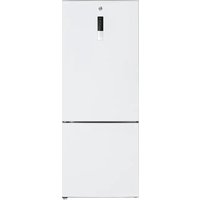
HOCE4T620DWXK - Refrigerator HOOVER - Free user manual and instructions
Find the device manual for free HOCE4T620DWXK HOOVER in PDF.



| Brand | Hoover |
| Model | HOCE4T620DWXK |
| Product Type | Combined refrigerator with freezer |
| Width (mm) | 920 |
| Depth (mm) | 1137 |
| Power Supply | 220-240 V, 50 Hz |
| Control Type | Electronic with control panel |
| Temperature Display | LED |
| Super Cool Function | Yes, up to 30 h |
| Super Freeze Function | Yes, up to 50 h |
| Eco Mode | Yes, via hOn app |
| Holiday Mode | Yes, via hOn app |
| Defrosting | Automatic |
| Water Dispenser | Yes, internal removable tank |
| Wi-Fi Connectivity | Yes, hOn app |
| Door Reversibility | Yes |
| Interior Lighting | LED |
| Shelves | Movable |
| Vegetable Drawer | Yes, with humidity slider |
| Freezer Drawers | Yes |
| Door Balconies | Yes |
| Leveling Feet | Yes |
| Door Alarm | Yes, beep if open > 3 min |
| Error Codes | Yes (e.g., 6° LED flashing for fan error) |
Frequently Asked Questions - HOCE4T620DWXK HOOVER
User questions about HOCE4T620DWXK HOOVER
0 question about this device. Answer the ones you know or ask your own.
Ask a new question about this device
Download the instructions for your Refrigerator in PDF format for free! Find your manual HOCE4T620DWXK - HOOVER and take your electronic device back in hand. On this page are published all the documents necessary for the use of your device. HOCE4T620DWXK by HOOVER.
USER MANUAL HOCE4T620DWXK HOOVER
Discover extra contents and create your inventory list


Summary
PRODUCT DESCRIPTION 2 Space requirements 2 USE 3 Use 3 Customized temperature 3 Fine Tuning 4 Super Cool function 4 Super Freeze function 4 Eco mode 5 Holiday function 5 Defrosting 5 Demo mode 5 Error codes 5 Water Dispenser 6 APP CONNECTION 7 IN APP PAIRING PROCEDURE 7 Step 1 7 Step 2 7 Step 3 7 WiFi Use 8 DOOR REVERSIBILITY 9 TROUBLESHOOTING
PRODUCT DESCRIPTION 6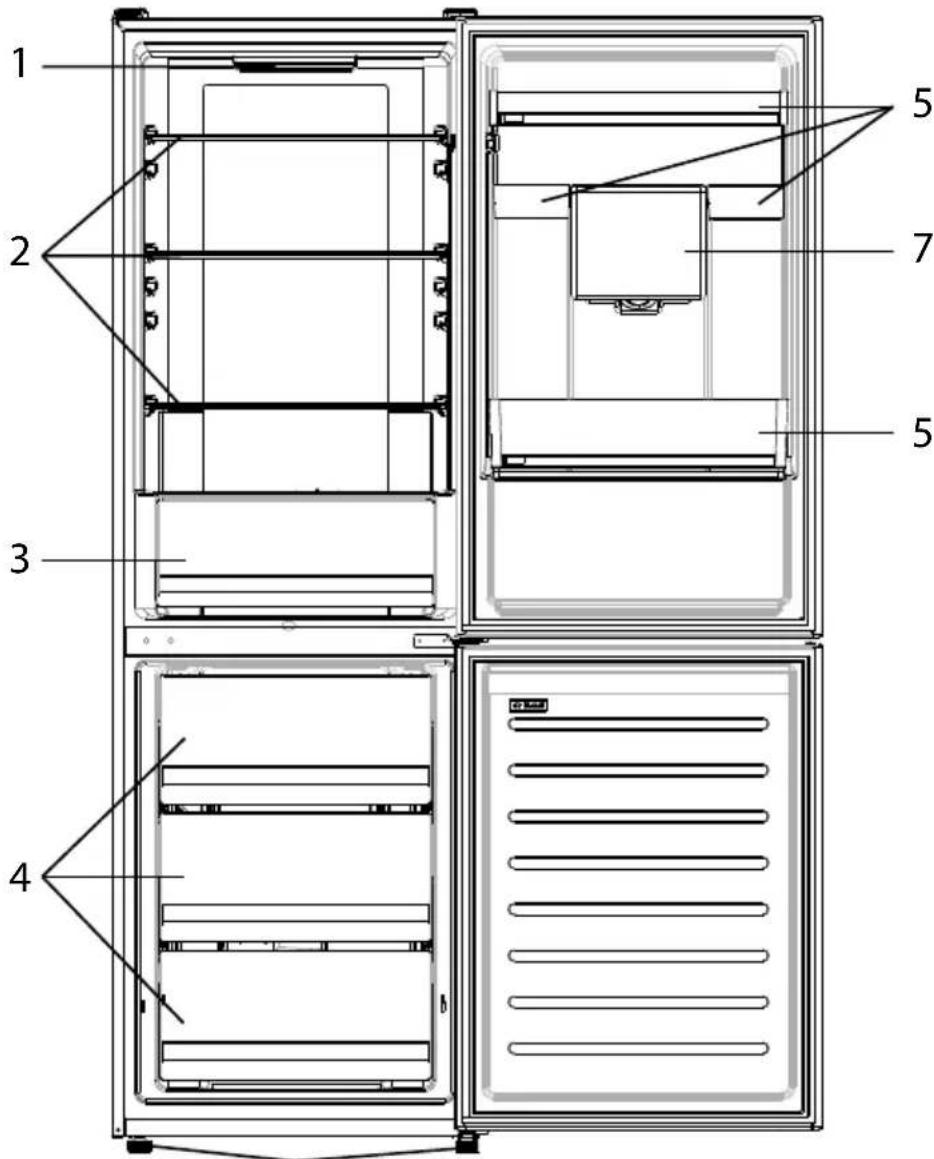
- Control panel and light
- Movable Shelves
- Crisper
- Freezer drawers
- Balconies
- Leveling feet
- Water Dispenser
- The most energy-saving configuration requires drawers, food box and shelves to be positioned in the product, please refer to the above pictures. ** The pictures above are only for reference. The actual configuration will depend on the physical product or statement by the distributor.
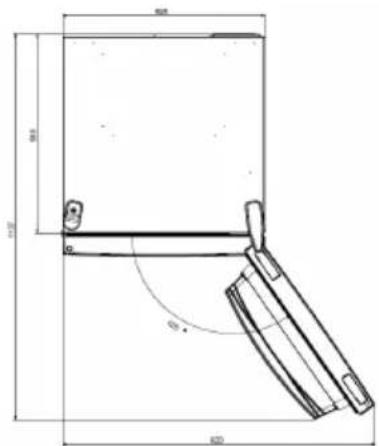
Space requirements
The unit's door must be able to fully open as shown. Spare enough space for convenient opening of the doors and drawers.
Keep a distance of at least 50 mm between the side walls of the product and adjacent parts.
Width: min. 920 mm
Depth: min. 1137 mm
USE
① ON/OFF key, used to switch on/off the appliance. ② SET key, used to select the fridge temperature or the special functions. ③ WiFi Icon, shows if the appliance is connected to the app. ④ Super Cool Icon, shows if the function is activated. ⑤ Temperature levels, show which is the selected temperature.
Use
Plug in the appliance. The appliance will turn on automatically. The temperature will automatically be set at 4°C in the fridge and -18°C in the freezer. - To change the temperature, with the fridge door open, press the SET key. When the setting increases, the corresponding LED light will turn on. An acoustic signal is made every time the SET key is pressed and the temperature is changed. In case of power loss, the last cooling level set will be restored. - To restore the default setting, with the screen lit, keep pressed the TEMP button, and then press ON/OFF button 5 times in 5 seconds. - Under normal operating conditions (in spring and autumn), it is recommended to set the temperature at 4°C. In summer when the ambient temperature is high, it is recommended to set temperature at 6~8°C, so as to guarantee the fridge and freezer temperatures and reduce the refrigerator continuous running time; and in winter when the ambient temperature is low, it is recommended to set temperature at 2~4°C to avoid frequent start/stop of the refrigerator.
Customized temperature
From the app, it is possible to customize the temperature of the fridge compartment. The temperature can be set with 1°C sensitivity and it is possible to select a temperature from 2°C to 8°C in the fridge. An acoustic signal is made every time the temperature is changed. When the temperature is selected by the app, there is no indication on the control panel, all the temperature LED lights are turned off, while only the WiFi icon is turned on.
Fine Tuning
The fine tuning selection mode gives the possibility to set the temperatures by sublevels; each temperature level has three sublevels.
How to use the fine tuning function:
- Press the SET key for 8 seconds to enter fine tuning selection mode. When the appliance enters the mode, an acoustic signal is made and the LED of currently selected cooling level blinks.
- By short pressing the SET key within 5 seconds, the fine tuning setting increases and, at each pressing, an acoustic signal is made.
- During fine tuning, the LED of the selected cooling level is fixed, while the LED of the selected sublevel blinks.
- If no key is pressed for 5 seconds, the system automatically exits from fine tuning selection mode. The fine tuning setting is saved and the LED of the selected fridge temperature is fixed. If the fine tuning is activated again, the setting will start from the previously stored level.
Super Cool function
It is suggested to switch on the Super Cool function if a large quantity of food should be stored (for example after the purchase). The Super-Cool function accelerates the cooling of fresh food and protects the goods already stored from undesirable warming. When the function is activated, the temperature of the fridge is automatically set at 2°C.
How to use the Super Cool function:
- The function can be activated by pressing many times the SET key until the Super Cool LED is turned ON or by selecting it from the app. If the function is activated, the corresponding icon on the control panel will be turned on. To exit the Super Cool function, press the SET key again. The Super Cool function automatically ends after 30 hours running.
- When the Super Cool ends, the corresponding icon of the control panel turns off and the previously set cooling level is restored.
Super Freeze function
The super freezing function accelerates the freezing of fresh food and protects the goods already stored from undesirable warming. If a large amount of food has to be freeze, it is recommended to set the Super Freeze function on 24h before the usage. When the function is activated, the temperature is automatically set at -25 °C.
How to use the Super Freeze function:
- The function can be launched only by selecting it from the app. If the function is activated, it will be shown by the app; there is no indication on the control panel.
- To exit the Super Freeze function, turn it off from the app.
- The Super Freeze function automatically ends when the function has lasted for more than 50 hours.
Eco mode
The Eco mode can be activated to optimize the performance of the appliance, while ensuring the best food storage. When the function is activated, the temperature is automatically set at 5°C in the fridge, and at -18°C in the freezer.
How to use the Eco mode:
The function can be activated only by selecting it from the app. If the function is activated, it will be shown by the app; there is no indication on the control panel. - To exit the Eco mode, turn it off from the app; the previously selected temperature will be restored. The Eco mode automatically ends when another function is chosen from the control panel.
Holiday function
The Holiday function can be used to reduce the energy consumption of the appliance, when it is not used regularly. The function will turn off the LED lights (even if the door is open) and the fridge will work on low power consumption mode, whereas the freezer will keep working normally.
How to use the Holiday function:
The function can be activated only by selecting it from the app. If the function is activated, it will be shown by the app; there is no indication on the control panel. - To exit the Holiday function, turn it off from the app; the previously selected temperature will be restored. The Holiday function automatically ends when another function is chosen from the control panel.
Defrosting
The defrosting of the refrigerator and freezer compartments is done automatically: no manual operation is needed.
Slider
Near the vegetable basket there is a slider that allows you to adjust the humidity inside it: moving it to the right decreases the humidity, moving it to the left increases the humidity.
Demo mode
Keep the refrigerated door open, press and hold the on/off key, and click the set key five times. The refrigerator will enter the Demo mode. To exit the mode, keep pressed the door switch and press again the SET key for 5s.
Error codes
If -6 °C LED light is flashing, it means there has been a fan error. Please, contact the technical assistance to help solve the problem
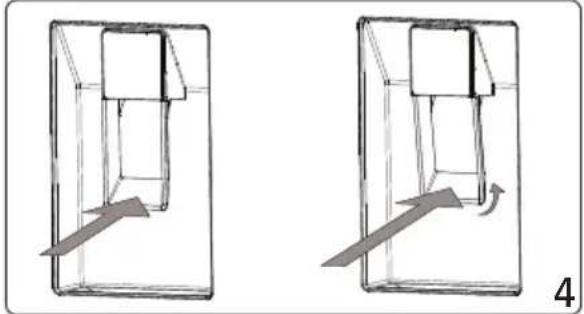
The Water Dispenser Mounting the Water Tank
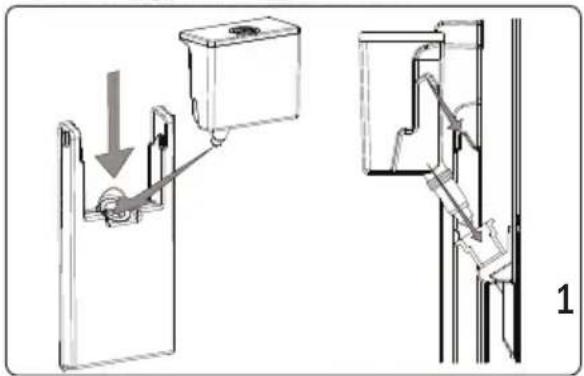
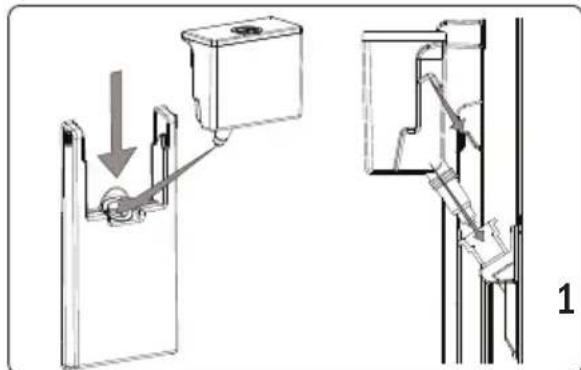
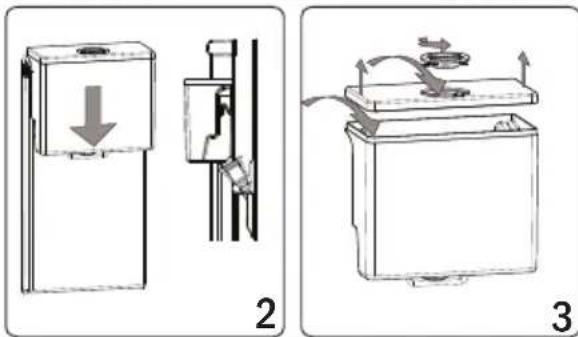
- Place the water tank in the plastic holder on the door, in the direction of the arrow on the diagram.
- After you have mounted the water tank, push it down to firmly secure it in the holder.
- Add your drinks with the help of the water tank top cover. Pull up the water tank cover to remove it.
- Gently press the valve lever to serve your drinks.
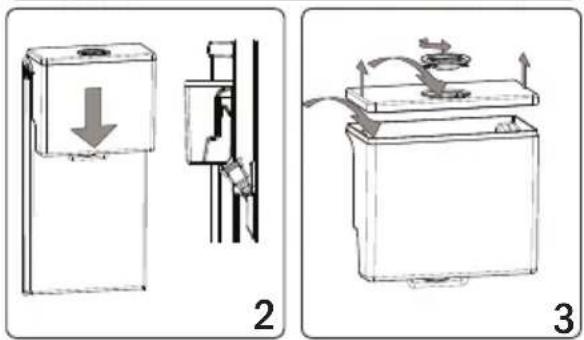
Filling the Water Tank
- Remove the top cover of the water tank.
- Fill the tank up only with drinking water.
- Mount the top cover back on the water tank.

Important: Do not use the water dispenser for anything except water.
Important: If you leave water in the tank for a long time, it will cause an odor. In this case, clean the tank and keep using it.
Important: Clean the water tank before using it for the first time.
Cleaning the Water Tank
- Lift the water tank.
- Remove the tank cover.
- Clean the tank with warm water and reassemble the pieces that you have removed.
Stowing the Water Tank
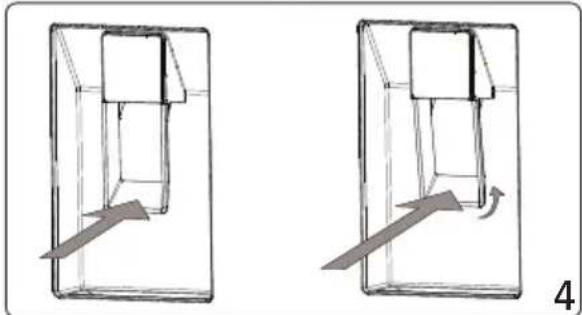
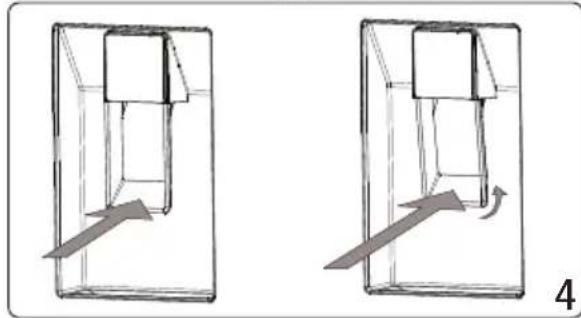
Install the water tank as shown. - Make sure that the tap and the hole match each other while installing. - Water flow may not be as expected if the tank has not been installed properly. Also check that the gaskets have been assembled properly.

Please hold the glass momentarily after distribution to avoid drips.
APP CONNECTION
IN APP PAIRING PROCEDURE
Step 1
Download the hOn app on the stores


GET IT ON
Google Play

Download on the
App Store

EXPLORE IT ON
AppGallery
Step 2
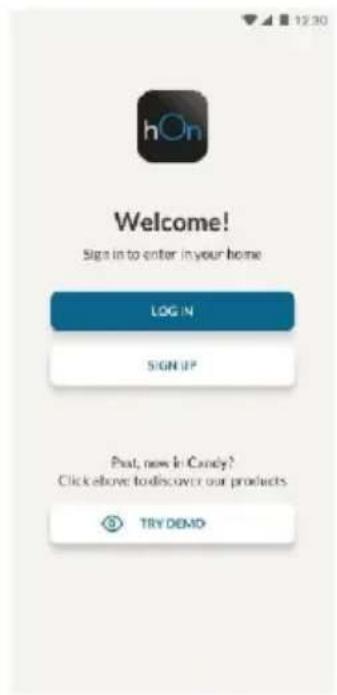
- Create your account on the hOn App or log in if you already have an account
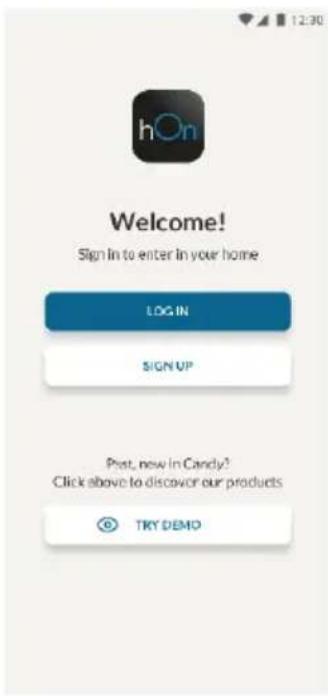
Step 3
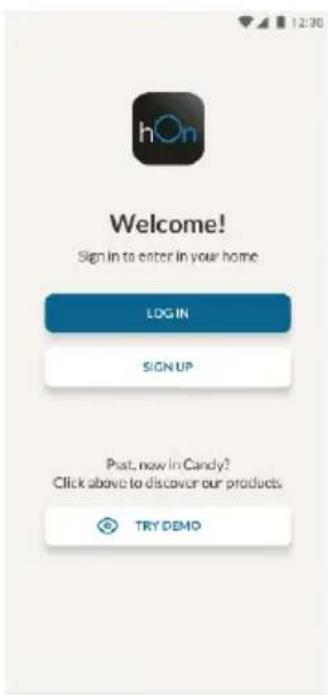
- Follow pairing instructions in the hOn App
WiFi Use
To activate the Wi-Fi, long press the SET key for 2 seconds, the Wi-Fi icon will turn on and an acoustic signal is made.
If the Wi-Fi has not been configured yet, when the refrigerator turns on, it will automatically enter the configuration mode and keep this status for 30 minutes. To use the configuration mode:
- Press the SET key for 2s but less than 8s, the refrigerator enters the Wi-Fi configuration mode and an acoustic signal is made. The Wi-Fi icon starts blinking.
- Follow in app instructions to configure the Wi-Fi (see above).
- Once the Wi-Fi is configured and the connection established, the Wi-Fi icon is on and fixed.
- After 30 minutes without performing any operation, the Wi-Fi will automatically exit the configuration mode.
- If the Wi-Fi has already been configured, it will automatically reconnect according to the configuration information.
Radio-module - Technical data
| Frequency rate (OFR) | 2400 MHz-2843.5 MHz |
| Channel frequencies | 2412...2472 MHz(step size 5 MHz) |
| Maximum power(EIRP) | 100 mW |
Radio equipment type is in compliance with Directive 2014/53/EU.
DOOR REVERSIBILITY
Tools needed: Electric screwdriver
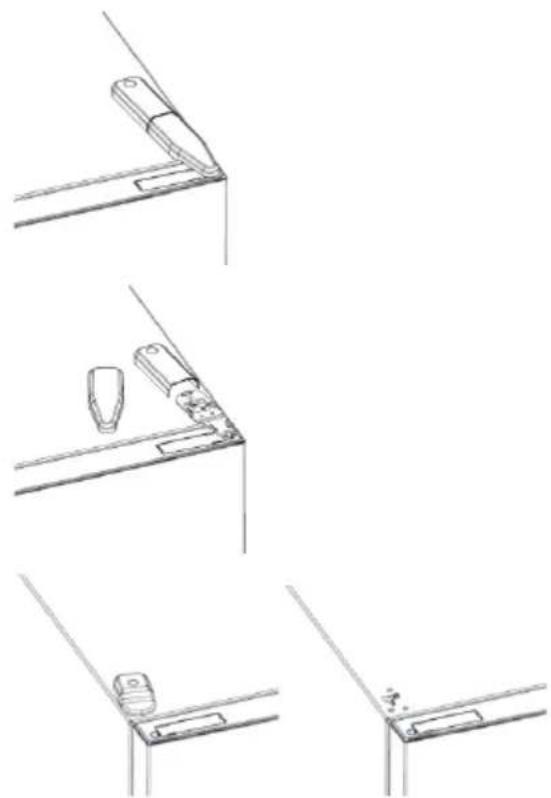
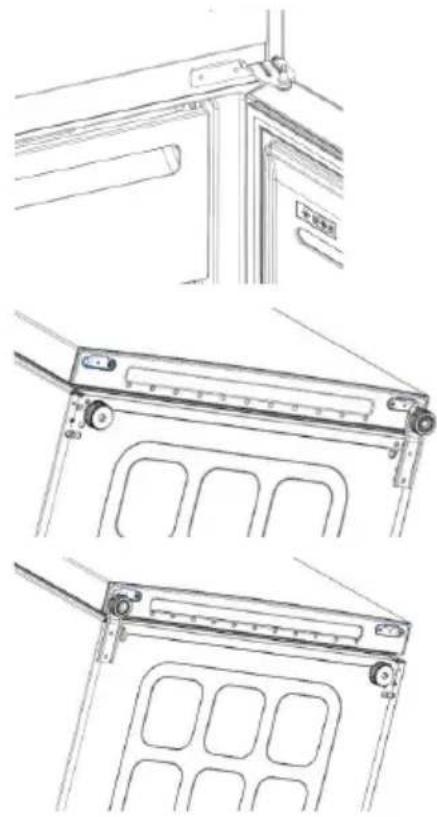
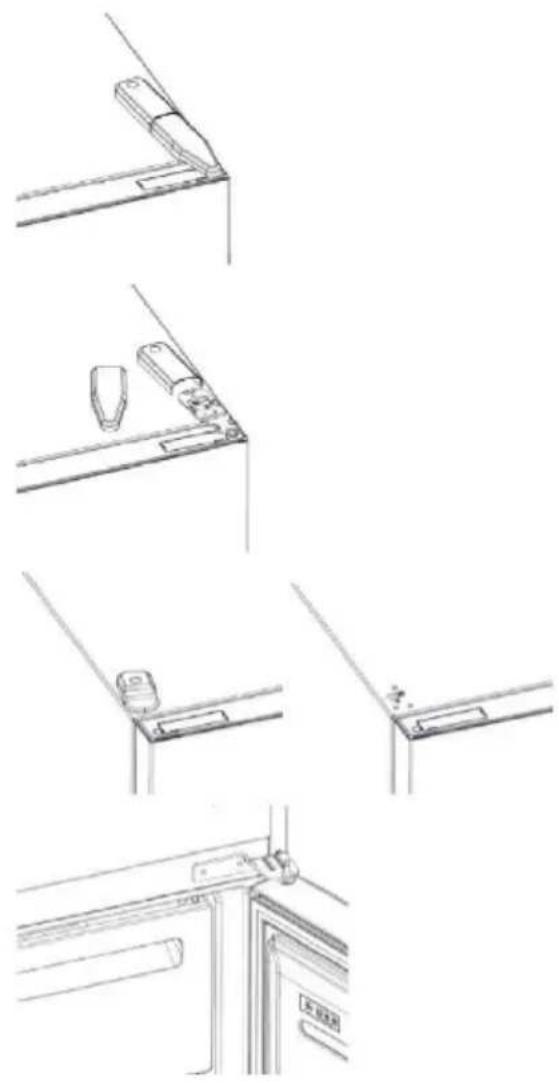
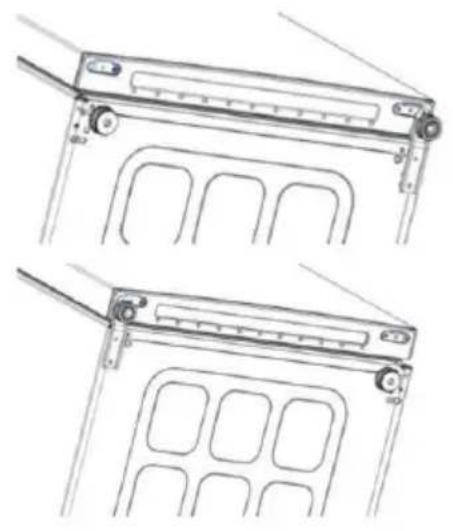
- Remove the top hinge cover
- Unscrew the top hinge
- Remove the top hinge cover (left)
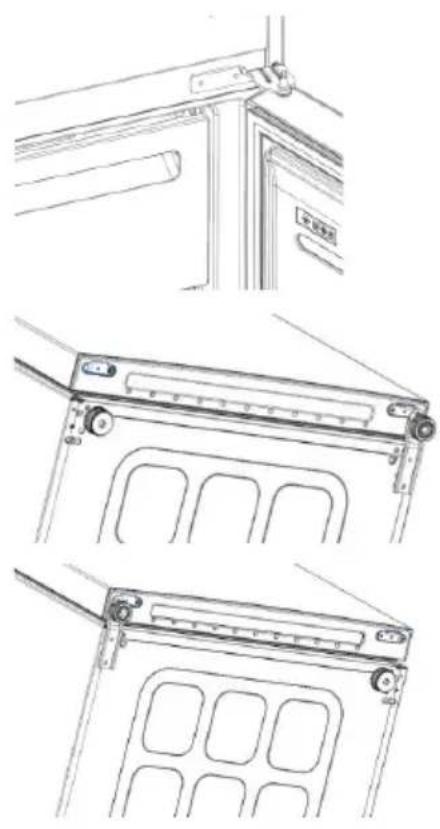
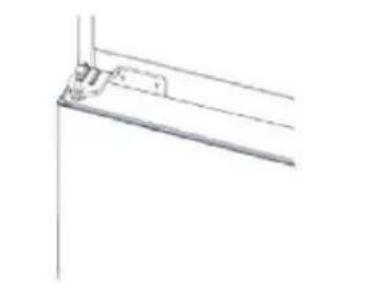
- Remove middle hinge
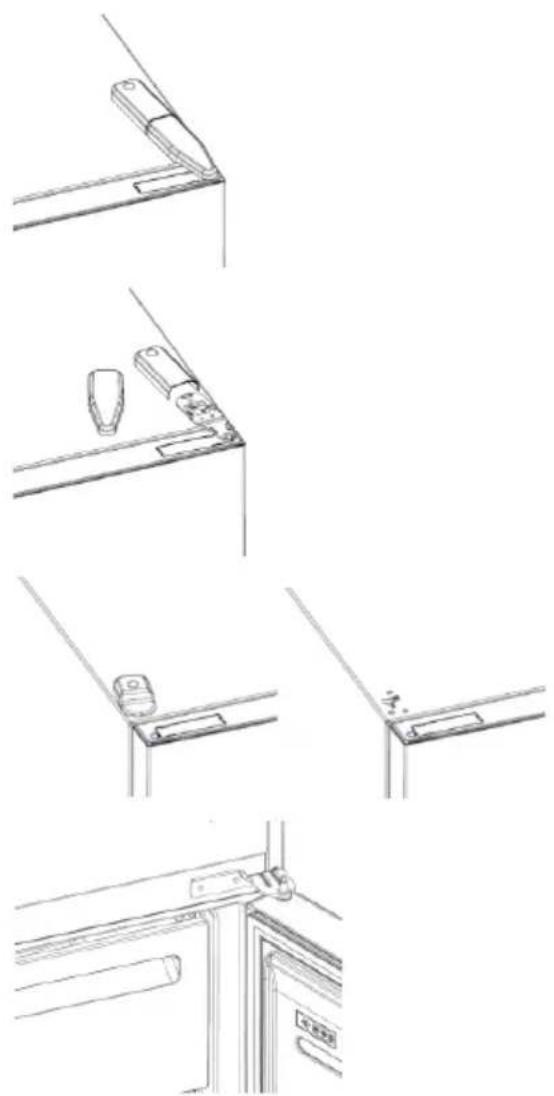
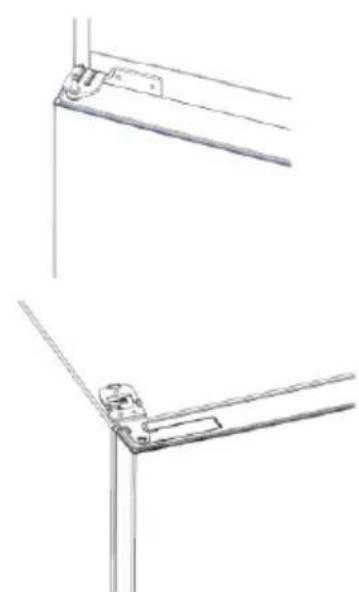
- Remove lower hinge
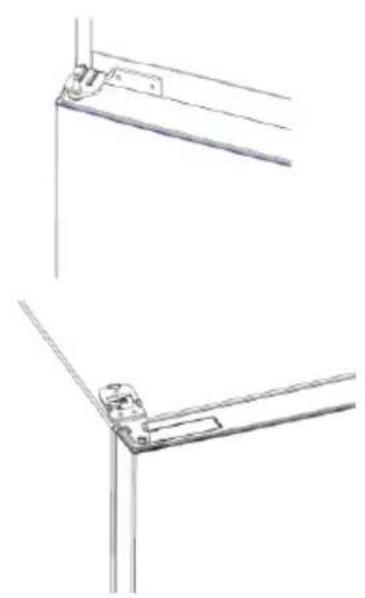
- Mount hinge foot
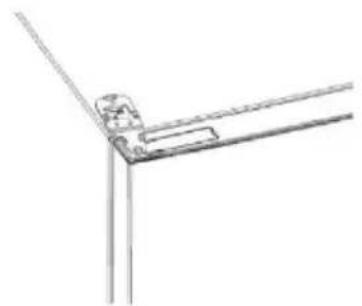
- Mount middle hinge
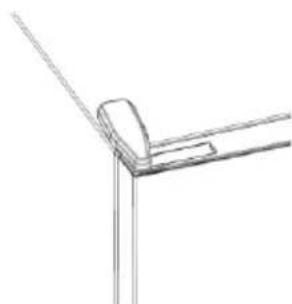
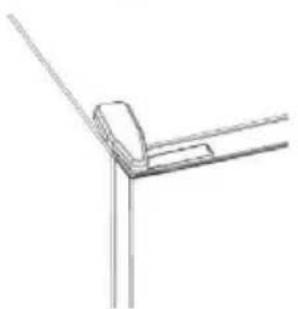
- Mount the upper hinge plate
- Mount the upper hinge cover
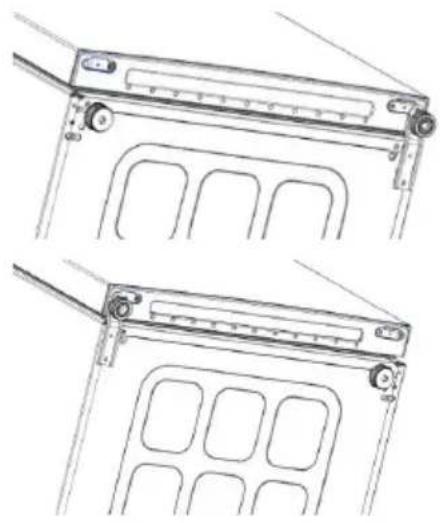
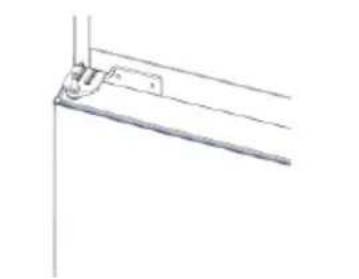
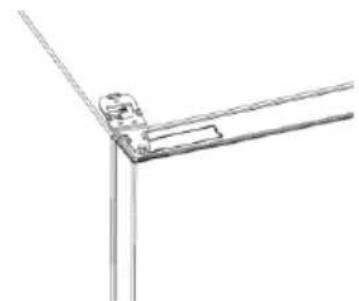
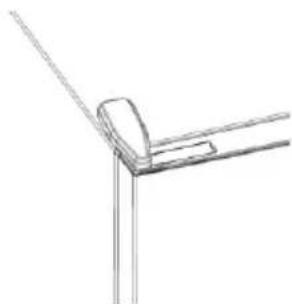
TROUBLESHOOTING
| The inside light bulb does not turn on. | ·No electricity. | ·The power cable is not properly plugged in. ·Check if the appliance is switched off (see Temperature Adjustment). ·Check the power socket is working correctly (e.g. with another electric device). |
| ·Holiday Mode is activated. | ·Deactivate Holiday mode. | |
| The internal temperature of the refrigerator and/or freezer is not cold enough. | ·The doors are not closed. | ·Check that the door and gaskets close properly. |
| ·The doors are frequently opened. | ·Avoid opening the doors unnecessarily for some time. | |
| ·Incorrect temperature setting. | ·Check the temperature setting and, if possible, set a lower temperature (see Temperature Adjustment). | |
| ·The refrigerator and/or freezer are too full. | ·Wait for the temperature of the refrigerator/ freezer to stabilise. ·Avoid filling the refrigerator and freezer excessively. | |
| ·The surrounding temperature is too low. | ·Move the unit to a warmer place or heat the current room. | |
| ·Warm items have been stored. | ·Always allow items to cool before storing them. | |
| The food in the refrigerator freezes. | ·Incorrect temperature setting. | ·Check the temperature setting and, if possible, increase the temperature. |
| ·Food in contact with the back wall. | ·Keep the food away from the refrigerator's back wall. | |
| The bottom of the refrigerator compartment is wet or water droplets are present. | ·The drain hose could be clogged. | ·Clean the drain hose with a stick or similar item to allow the water to drain. |
| Presence of drops of water or frost on the rear wall of the refrigerator. | ·Depending on the function, drops of water or frost form on the rear wall of the refrigerator during operation. | ·It is not a defect. |
| ·Warm items have been stored. | ·Always allow items to cool before storing them. | |
| ·There are open food containers or liquids. | ·Always cover food and liquids. | |
| ·The doors are not closed. | ·Check that the door and gaskets close properly. | |
| ·The doors are frequently opened. | ·Avoid opening the doors unnecessarily for some time. | |
| Presence of water in the vegetable drawer. | ·Lack of air circulation. | ·Verify that your appliance is not too full. |
| ·Vegetables and fruit with too much moisture. | ·Wrap the fruit and vegetables in plastic materials, e.g. cling film, bags or containers. | |
| The motor runs continuously. | ·The doors are not closed. | ·Make sure the doors are closed and check the seals close properly. |
| ·The doors are opened frequently. | ·Avoid opening the doors unnecessarily for some time. | |
| ·Ambient temperature is very high. | ·Verify that the ambient temperature is in the range set out in the specifications on the appliance tag. ·Set the display screen/thermostat to a warmer temperature. | |
| ·The appliance has been off (no power) for some time. | ·It normally takes the appliance 8-12h to cool completely. | |
| The frozen food is thawing. | ·Surrounding temperature is too low. | ·Move the unit to a warmer place or heat the current room. |
| ·The freezer door is not closed. | ·Make sure the door is closed and that the gasket is sealing properly. | |
| Fridge door alarm. | ·Fridge door alarm (acoustic beep) activates whenever the door is left open for more than 3 minutes. | ·Avoid leaving the door open when not needed. The beep ceases when the door is closed. |
| The appliance makes noises such as gurgling, buzzing, clicking, creating. | ·No breakdowns. An engine is running, e.g. refrigeration unit, fan. The refrigerant flows into the pipes. Motor, switches and solenoid valves are switched on or off. | ·No action needed. |
| ·The appliance is not located on level ground. | ·Adjust the feet to level the appliance. | |
| ·The appliance touches an object around it. | ·Remove objects around the appliance. | |
| The appliance does not cool, the temperature and lighting indicators are on. | ·Demo mode is activated. | ·Deactivate DEMO mode. |
| Strong ice and frost in the freezer compartment. | ·The items were not adequately packaged. | ·Always pack the items well. |
| ·A door/drawer of the appliance is not tightly closed. | ·Close the door/drawer. | |
| ·The door/drawer has been opened too frequently or for too long. | ·Do not open the door/drawer too frequently. | |
| ·The door/drawer gasket is dirty, worn, cracked or mismatched. | ·Clean the door/drawer gasket or replace it with a new one. | |
| ·Something on the inside prevents the door/drawer from closing properly. | ·Reposition the shelves, door racks or internal containers to allow the door/drawer to close. | |
| The sides of the appliance are warm. | ·This is normal. |
CONTENTS 12 Placement 12 Use 13 Use 13 Personalized temperature. 13 Fine adjustment 14 "Super Cool" function 14 "Super Freeze" function 14 "Eco" mode 15 "Holiday" function 15 Defrosting 15 Demonstration mode 15 Buttons for errors 15 Water dispenser 16 Connection to the app 17 PROCEDURE FOR SAVING THE APPLIANCE 17 Section 1 17 Section 2 17 Section 3 17 Wi-Fi usage 18 TROUBLESHOOTING 19 TROUBLESHOOTING
Description of the product
6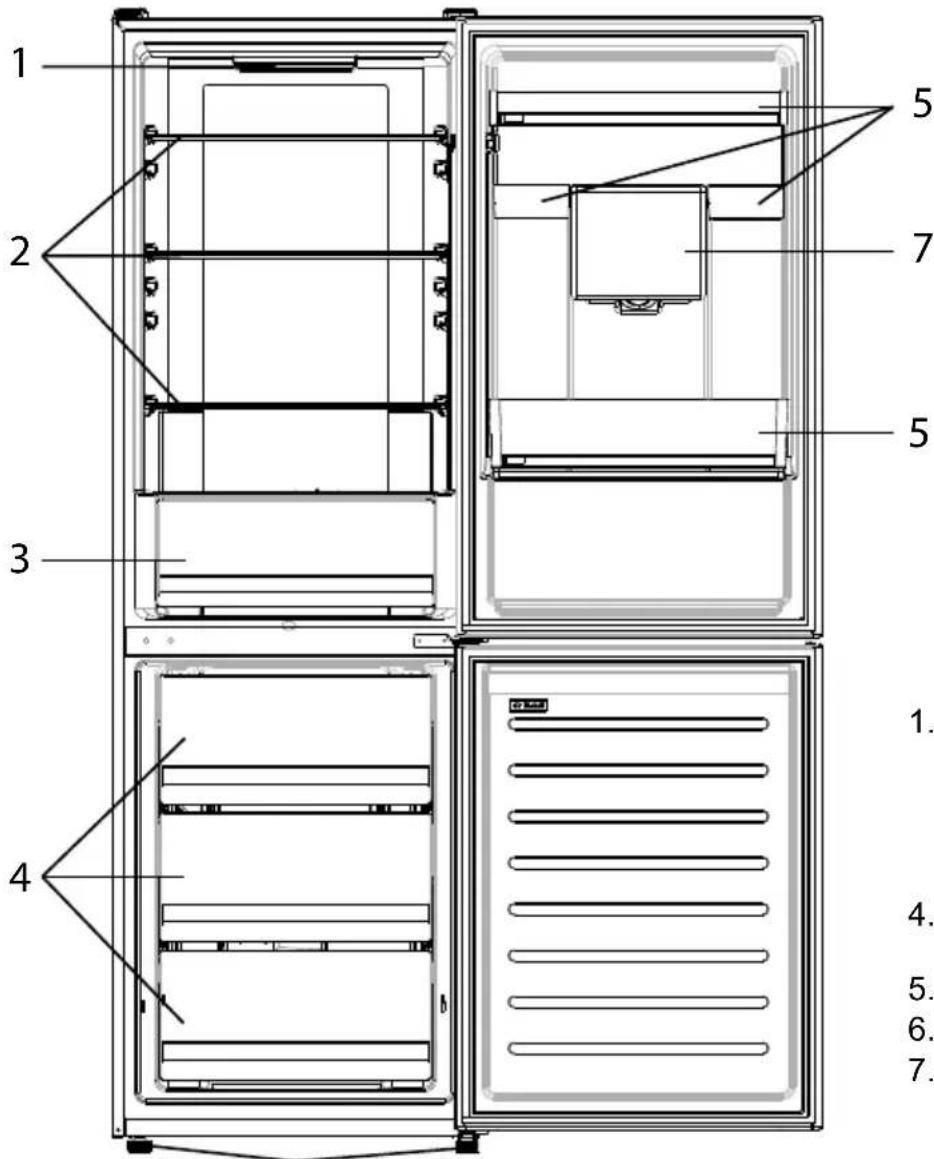
- Control panel and light indicators for the refrigerator compartment
- Freezer compartment
- Shelves
- Crisper drawers 7. Water dispenser
Placement
The appliance door must be able to open fully, as shown. Leave enough space for easy opening of the doors and drawers. Maintain a distance of at least 50 mm between the side walls of the product and adjacent parts.
Width: min. 920 mm
Height: min. 1137 mm

USE

① The "ON/OFF" button is used to turn the appliance on/off. ② The "SET" button is used to select the temperature of the refrigerator and its functions. ③ The Wi-Fi icon shows that the appliance is connected to the app. ④ The "Super Cool" icon shows that the function is activated. ⑤ The temperature level indicator shows the selected temperature.
Use
Plug the appliance into the outlet. The appliance will turn on automatically. The refrigerator temperature will automatically be set to 4°C. To change the temperature, while the door is open, press the "SET" button. When the setting is increased, the corresponding LED light turns on. With each press of the "SET" button, a sound signal is emitted and the temperature changes. In case of power loss, the last setting of the cooling level will be restored. To restore the settings to the default, with the screen lit, press and hold the "TEMP" button and then press the "ON/OFF" button 5 times within 5 seconds. - Under normal operating conditions (in spring and autumn), it is recommended to set the temperature to 4°C. During the summer, when the ambient temperature is high, it is recommended to set the temperature to 6~8°C to guarantee the temperatures of the refrigerator and freezer and to avoid prolonged operation of the refrigerator. During the winter, when the ambient temperature is low, it is recommended to set the temperature to 2~4°C to avoid frequent switching on/off of the refrigerator.
Personalized temperature
It is possible to personalize the temperature of the refrigerator compartment. The temperature can be adjusted with a sensitivity of 1 °C and it is possible to select a temperature from 2 °C to 8 °C in the refrigerator. Every time the temperature is changed, an audible signal is emitted. When the temperature is selected from the appliance, there is an indication on the control panel, all LED temperature lights are off and only the Wi-Fi one is on.
Fine tuning
The fine tuning function allows you to set temperatures through levels; each temperature level has three sub-levels. How to use the fine tuning function:
Press and hold the "SET" button for 8 seconds to enter the fine tuning mode. When you enter the mode, an audible signal will be emitted and the LED light of the currently selected cooling level will flash. With a short press of the "SET" button within 5 seconds, the fine tuning increases and with each press an audible signal is emitted. - During fine tuning, the LED light of the selected cooling level is off, and the LED light of the selected sub-level is on. - If no button is pressed for 3 seconds, the system automatically exits the fine tuning mode. The fine tuning is saved and the LED light of the selected temperature refrigerator is off. - If the fine tuning is activated again, the setting will start from the previously saved level.
Super Cool function
It is recommended to activate the "Super Cool" function if you need to store a large quantity of food (for example after shopping). The "Super Cool" function accelerates the cooling of fresh food and protects already stored products from unwanted warming. When the function is activated, the refrigerator temperature is set automatically to 2°C. How to use the "Super Cool" function:
- The function can be activated by pressing the "SET" button repeatedly until the Super Cool LED turns on, or by selecting it from the app. If the function is activated, the corresponding control panel light will be on. To exit the "Super Cool" function, press the "SET" button again.
- The "Super Cool" function automatically ends after 30 hours. When "Super Cool" ends, the corresponding control panel light turns off and the previously set cooling level is restored.
Download on the App Store

EXPLORE IT ON AppGallery
Step 2
Create your profile in the app or log in if you already have one
Step 3
Follow the instructions for setup in the app
Press the Wi-Fi button
To activate Wi-Fi, press the button "SET" for 2 seconds. The Wi-Fi indicator will turn on and a sound signal will be emitted.
If Wi-Fi is still not configured when the refrigerator is turned on, it will automatically enter configuration mode and will remain in this state for 30 minutes. To use configuration mode:
Press the button "SET" for 2 seconds, but no more than 8 seconds. The refrigerator enters Wi-Fi configuration mode and a sound signal is emitted. The Wi-Fi indicator starts blinking. Follow the instructions in the appendix to configure Wi-Fi (see above). Once Wi-Fi is configured and the connection is established, the Wi-Fi indicator is on and solid. After 30 minutes without any action, Wi-Fi will automatically exit configuration mode. If Wi-Fi is already configured, it will automatically connect using the configuration information.
Radio equipment technical data
| Чебта (OFR) | 2400 MHz-2843.5 MHz |
| Чебты на Каналa | 2412...2472 MHz(разимер на CTыкatinga 5 MHz) |
| Мakсмална мошност(EIRP) | 100 mW |
The radio equipment type complies with Directive 2014/53/EU.
REVERSING THE DOOR
Required tools:
Electric screwdriver
- Remove the caps of the top hinge
- Unscrew the top hinge
- Remove the caps of the top hinge (left)
- Remove the middle hinge
- Remove the bottom hinge
- Mount the hinge on the opposite side
- Mounting the lower part of the belt
- Mounting the upper part of the belt
- Mounting the upper pulley of the belt
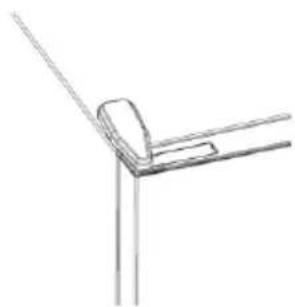
TROUBLESHOOTING
| Бытrewиата сеньгоста Крушиke небетли. | • Hяma TOK. | • 3хараловский Кабел Не в гжлковен лpopавлино. • Пбогорец ддддддддддддддддддддддддддддддддддддддддддддддддддддддддддддддддддддддддддддддддддддддддддддддддддддд徳. • Пбогорец дддддддддддддддддддддддддддддддддддддддддддддддддддддддддддддддддддддддддддддддддддддддддддд徳. (Hар.с дуглесгосту уед). • Дараловский Врахцшонь реким „Holiday". |
| Вытrewиата Tempeparatура на хладиньи Илл phri�зера небета с? хладиньи илл phri�зера небета с? хладиньи илл phri�зера хладиньи илл phri�зера хладиньи илл phri�зера хладиньи илл phri�зера хладиньи илл phri�зера хладиньи илл phri�зера хладиньи илл phri�зера хладиньи илл Phri�зера хладиньи илл Phri�зера хладиньи илл Phri�зера хладиньи илл Phri�зера хладиньи илл Phri�зера хладиньи илл Phri�зера хладиньи илл Phri�зера хладинвь илл Phri�зера хладиньи илл Phri�зера хладиньи илл Phri�зера хладиньи илл Phri�зера хладиньи илл Phri�зера хладиньи илл Phri�зера хладиньи илл Phri�зера xладиньи илл Phri�зера хладиньи илл Phri�зера хладиньи илл Phri�зера хладиньи илл Phri�зера хладиньи илл Phri�зера хладиньи илл Phri�зера хладиньи илл Phrik хладиньи илл Phrik хладиньи илл Phrik хладиньи илл Phrik хладиньи илл Phrik хладиньи илл Phrik хладиньи илл Phrik хладиньи илл Phrik хладиньи илл Phrik хлادиньи илл Phrik хладиньи илл Phrik хладиньи илл Phrik хладиньи илл Phrik хладиньи илл Phrik хладиньи илл Phrik хладиньи илл Phrik хладиньи илл Phrik хладиньи and the other are хладиньи. • Берогорец дддддддддддддддддддддддддддддддддддддддддддддддддддддддддддддддддддддддддддддддддддддддддддддддд • Пбогорец дддддддддддддддддддддддддддддддддддддддддддддддддддддддд • Пбогорец дддддддддддддддддддддддддддд • Пбогорец ддддддддддддддддд • Пбогорец ддддддддд • Пбогорец ддддд • Пбогорец ддд • Пбогорец дд • Пбогорец d • Пбогорец d • Пбогорец d • Пбогорец d • Пбогорец d • Пбогорец d • Пбогорец d • Пбогорец d • Пбогорец d • Пбогорец d • Пбогорец d • Пбогорец d • Пбогорец d • Пьогорец d • Пьогорец d • Пьогорец d • Пьогорец d • Пьогорец d • Пьогорец d • Пьогорец d • Пьогорец d • Пьогорец d • Пьогорец d • Пьогорец d • Пьогорец d • Пьогорец D • Пьогорец d • Пьогорец d • Пьогорец d • Пьогорец d • Пьогорец d • Пьогорец d • Пьогорец d • Пьогорец d • Пьогорец d • Пьогорец d • Пьогорец d • Пьогорец d • Пбогорец d • Пьогорец d • Пьогорец d • Пьогорец d • Пьогорец d • Пьогорец d • Пьогорец d • Пьогорец d • Пьогорец d • Пьогорец d • Пьогорец d • Пьогорец D • Пьогорец D • Пьогорец d • Пьогорец d • Пьогорец d • Пьогорец d • Пьогорец d • Пьогорец d • Пьогорец d • Пьогорец d • Пьогорец d • Пьогорец d • Пьогорец d • Пбогорец d • Пбогорец d • Пьогорец d • Пьогорец d • Пьогорец d • Пьогорец d • Пьогорец d • Пьогорец d • Пьогорец d • Пьогорец d • Пьогорец d • Пьогорец D • Пьогорец d • Пьогорец D • Пьогорец d • Пьогорец d • Пьогорец d • Пьогорец d • Пьогорец d • Пьогорец d • Пьогорец d • Пьогорiec d • Пьогорiec d • Пьогорiec d • Пьогорiec d • Пьогорiec d • Пьогорiec d • Пьогорiec d • Пьогорiec d • Пьогорiec d • Пьогорiec d • Пьогорiec d • Пьогорiec d • Пьогорiec d • Pd • Pd • Pd • Pd • Pd • Pd • Pd • Pd • Pd • Pd • Pd • Pd • Pd • Pd • Pd • Pd • Pd • Pd • Pd • Pd • Pd • Pd • Pd • Pd • Pd • Pp • Pp • Pp • Pp • Pp • Pp • Pp • Pp • Pp • Pp • Pp • Pp • Pp • Pp • Pp • Pp • Pp • Pp • Pp • Pp • Pp • Pp • Pp • Pp • Pp • P • Pp • Pp • Pp • Pp • Pp • Pp • Pp • Pp • Pp • Pp • Pp • Pp • Pp • Pp • Pp • Pp • Pp • Pp • Pp • Pp • Pp • Pp • Pp • Pp • P p • P p • P p • P p • P p • P p • P p • P p • P p • P p • P p • P p • P p • P p • P p • P p • P p • P p • P p • P p • P p • P p • P p • P p • P p • Pp • P p • P p • P p • P p • P p • P p • P p • P p • P p • P p • P p • P p • P p • P p • P p • P p • P p • P p • P p • P p • P p • P p • P p • Pp • Pp • Pp • P p • P p • P p • P p • P p • P p • P p • P p • P p • P p • P p • P p • P p • P p • P p • P p • P p • P p • P p • P p • P p • Pp • P p • P p • Pp • P p • P p • P p • P p • P p • P p • P p • P p • P p • P p • P p • P p • P p • P p • P p • P p • P p • P p • P p • P p • P p • Pp • P p • Pp • P p • P p • P p • P p • P p • P p • P p • P p • P p • P p • P p • P p • P p • P p • P p • P p • P p • P p • P p • P p • P p • P p • Pp • P p • Pp • Pp • P p • P p • P p • P p • P p • P p • P p • P p • P p • P p • P p • P p • P p • P p • P p • P p • P p • P p • P p • P p • P p • P p • Pp • Pp • P p • P p • P p • P p • P p • P p • P p • P p • P p • P p • P p • P p • P p • P p • P p • P p • P p • P p • P p • P p • P p • Pp • Pp • P p • Pp • P p • P p • P p • P p • P p • P p • P p • P p • P p • P p • P p • P p • P p • P p • P p • P p • P p • P p • P p • P p • P p • Pp • Pp • Pp • Pp • Pp • Pp • Pp • Pp • Pp • Pp • Pp • Pp • Pp • Pp • Pp • Pp • Pp • Pp • Pp • Pp • Pp • Pp • Pp • Pp • P pp • P pp • P pp • P pp • P pp • P pp • P pp • P pp • P pp • P pp • P pp • P pp • P pp • P pp • P pp • P pp • P pp • P pp • P pp • P pp • P pp • P pp • P pp • P pp • P pp • P p • P p • P p • P p • P p • P p • P p • P p • P p • P p • P p • P p • P p • P p • P p • P p • P p • P p • P p • P p • P p • P p • P p • P p • P pp • P pp • P pp • P pp • P pp • P pp • P pp • P pp • P pp • P pp • P pp • P pp • P pp • P pp • P pp • P pp • P pp • P pp • P pp • P pp • P pp • P pp • P pp • P pp • P PP • P PP • P PP • P PP • P PP • P PP • P PP • P PP • P PP • P PP • P PP • P PP • P PP • P PP • P PP • P PP • P PP • P PP • P PP • P PP • P PP • P PP • P PP • P PP • P PP • P pp • P PP • P PP • P PP • P PP • P PP • P PP • P PP • P PP • P PP • P PP • P PP • P PP • P PP • P PP • P PP • P PP • P PP • P PP • P PP • P PP • P PP • P PP • P PP • P pp • P pp • P PP • P PP • P PP • P PP • P PP • P PP • P PP • P PP • P PP • P PP • P PP • P PP • P PP • P PP • P PP • P PP • P PP • P PP • P PP • P PP • P PP • P PP • P pp • P PP • P pp • P PP • P PP • P PP • P PP • P PP • P PP • P PP • P PP • P PP • P PP • P PP • P PP • P PP • P PP • P PP • P PP • P PP • P PP • P PP • P PP • P PP • P PP • P pp • P pp • P pp • P PP • P PP • P PP • P PP • P PP • P PP • P PP • P PP • P PP • P PP • P PP • P PP • P PP • P PP • P PP • P PP • P PP • P PP • P PP • P PP • P PP • P pp • P PP • P PP • P pp • P PP • P PP • P PP • P PP • P PP • P PP • P PP • P PP • P PP • P PP • P PP • P PP • P PP • P PP • P PP • P PP • P PP • P PP • P PP • P PP • P PP • P pp • P PP • P pp • P pp • P PP • P PP • P PP • P PP • P PP • P PP • P PP • P PP • P PP • P PP • P PP • P PP • P PP • P PP • P PP • P PP • P PP • P PP • P PP • P PP • P PP • P pp • P pp • P PP • P pp • P PP • P PP • P PP • P PP • P PP • P PP • P PP • P PP • P PP • P PP • P PP • P PP • P PP • P PP • P PP • P PP • P PP • P PP • P PP • P PP • P PP • P pp • P pp • P pp • P pp • P PP • P PP • P PP • P PP • P PP • P PP • P PP • P PP • P PP • P PP • P PP • P PP • P PP • P PP • P PP • P PP • P PP • P PP • P PP • P PP • P pp • P PP • P PP • P PP • P pp • P PP • P PP • P PP • P PP • P PP • P PP • P PP • P PP • P PP • P PP • P PP • P PP • P PP • P PP • P PP • P PP • P PP • P PP • P PP • P PP • P pp • P PP • P PP • P pp • P pp • P PP • P PP • P PP • P PP • P PP • P PP • P PP • P PP • P PP • P PP • P PP • P PP • P PP • P PP • P PP • P PP • P PP • P PP • P PP • P PP • P pp • P PP • P pp • P PP • P pp • P PP • P PP • P PP • P PP • P PP • P PP • P PP • P PP • P PP • P PP • P PP • P PP • P PP • P PP • P PP • P PP • P PP • P PP • P PP • P PP • P pp • P PP • P pp • P pp • P pp • P PP • P PP • P PP • P PP • P PP • P PP • P PP • P PP • P PP • P PP • P PP • P PP • P PP • P PP • P PP • P PP • P PP • P PP • P PP • P PP • P pp • P pp • P PP • P PP • P pp • P PP • P PP • P PP • P PP • P PP - - - - - - - - - - - - - - - - - - - - - - - - - - - - - - - - - - - - - - - - - - - - - - - - - - - - - - - - - - - - - - - - - - - - - - - - - - - - - - - - - - - - - - - - - - - - - - - - - - - - - - - - - - - - - - - - - - - - - - - - - - - - - - - - - - - - - - - - - - - - - - - - - - - - - - - - - - - - - - - - - - - - - - - - - - - - - - - - - - - - - - - - - - - - - - - - - - - - - - - - - - - - - - - - - - - - - - - - - - - - - - - - - - - - - - - - - - - - - - - - - - - - - - - - - - - - - - - - - - - - - - - - - - - - - - - - - - - - - - - - - - - - - - - - - - - - - - - - - - - - - - - - - - - - - - - - - - - - - - - - - - - - - - - - - - - - - - - - - - - - - - - - - - - - - - - - - - - - - - - - - - - - - - - - - - - - - - - - - - - - - - - - - - - - - - - - - - - - - - - - - - - - - - - - - - - - - - - - - - - - - - - - - - - - - - - - - - - - - - - - - - - - - - - - - - - - - - - - - - - - - - - - - - - - - - - - - - - - - - - - - - - - - - - - - - - - - - - - - - - - - - - - - - - - - - - - - - - - - - - - - - - - - - - - - - - - - - - - - - - - - - - - - - - - - - - - - - - - - - - - - - - - - - - - - - - - - - - - - - - - - - - - - - - - - - - - - - - - - - - - - - - - - - - - - - - - - - - - - - - - - - - - - - - - - - - - - - - - - - - - - - - - - - - - - - - - - - - - - - - - - - - - - - - - - - - - - - - - - - - - - - - - - - - - - - - - - - - - - - . - - - - - - - - - - - - - - - - - - - - - - - - - - - - - - - - - - - - - - - - - - - - - - - - - - - - - - - - - - - - - - - - - - - - - - - - - - - - - - - - - - - - - - - - - - - - - - - - - - - - - - - - - - - - - - - - - - - - - - - - - - - - - - - - - - - - - - - - - - - - - - - - - - - - - . - . - - - - - - - - - - - - - - - - - - - - - - - - - - - - - - - - - - - - - - - - - - - - - - - - . - - - - - - - - - - - - - - - - - - - - - - - - - - - - - - - - - - - - - - - - - - - - - - - - - - - - - - - - - - - - - - - - - - - - - - - - - - - - - - - - - - - - - - - - - - - - - - - - - - - - - - - - - - - - - - - - - - - - - - - - - - - - - - - - - - - - - - - - - - - - - - - - - - - - - - - - - - - - - - - - - - - - - - - - - - - - - - - - - - - - - - - . - - - - - - - - - - - - - - - - - - - - - - - - - - - - - - - - - - - - - - - - - - - - - - - - - - - - - - - - - - - - - - - - - - - - - - - - - - - - - - - - - - - - - - - - - - - - - - - - - - - - - - - - - - - - - - - - - - - - - - - - - - - - - - - - - - - - - - - - - - - - - - - - - - - - - - - - - - - - - - - - - - - - - - - - - - - - - - - - - - - - - - - - - - - - - - - - - - - - - - - - - - - - - - - - - - - - - - - - - - - - - - - - - - - - - - - - - - - - - - - - - - - - - - - - - - - - - - - - - - - - - - - - - - - - - - - - - - - - - - - - - - - - - - - - - - - - - - - - - - - - - - - - - - - - - - - - - - - - - - - - - - - - - - - - - - - - - - - - - - - - - - - - - - - - - - - - - - - - - - - - - - - - - - - - - - - - - - - - - - - - - - - - - - - - - - - - - - - - - - - - - - - - - - - - \n. - - - - - - - - - - - - - - - - - - - - - - - - - - - - - - - - - - - - - - - - - - - - - - - - - - - - - - - - - - - - - - - - - \n. - - - - - - - - - - - - - - - - - - - - - - - - - - - - - - - - - - - - - - - - - - - - - - - - - - - - - - - - - - - - - - - - - . . . . . . . . . . . . . . . . . . . . . . . . . . . . . . . . . . . . . . . . . . . . . . . . . . . . . . . . . . . . . . . . . . . . . . . . . . . . . . . . . . . . . . . . . . . . . . . . . . . . P PP P PP P PP P PP P PP P PP P PP P PP P PP P PP P PP P PP P PP P PP P PP P PP P PP P PP P PP P PP P PP P PP P PP P PP P PP P PP P PP P PP P PP P PP P PP P PP P PP P PP C PP B C C C C C C C C C C C C C C C C C C C C C C C C C C C C C C C C C C C C C C C C C C C C C C C C C C C C C C C C C C C C C C C C C C C C C C C C C C C C C C C C C C C C C C C C C C C C C C C C C C C C G. P PP P PP P PP P PP P PP P PP P PP P PP P PP P PP P PP P PP P PP P PP P PP P PP P PP P PP P PP P PP P PP P PP P PP P PP P PP P PP P PP P PP P PP P PP P PP P PP P PP | P PP P PP P PP P PP P PP P PP P PP P PP P PP P PP P PP P PP P PP P PP P PP P PP P PP P PP P PP P PP P PP P PP P PP P PP P PP P PP P PP P PP P PP P PP P PP P PP P PP S. P PP P PP P PP P PP P PP P PP P PP P PP P PP P PP P PP P PP P PP P PP P PP P PP P PP P PP P PP P PP P PP P PP P PP P PP P PP P PP P PP P PP P PP P PP P PP P PP P PP |
Shrnuti
PRODUCT DESCRIPTION 22
FREMGANGSGMÄDEVEDPARRINGIAPP 37
Step 1 37
Step 2 37
Step 3 37
Wi-Fi usage 38
CHANGING THE DOOR HINGE SIDE 39
TROUBLESHOOTING
PRODUCT DESCRIPTION 6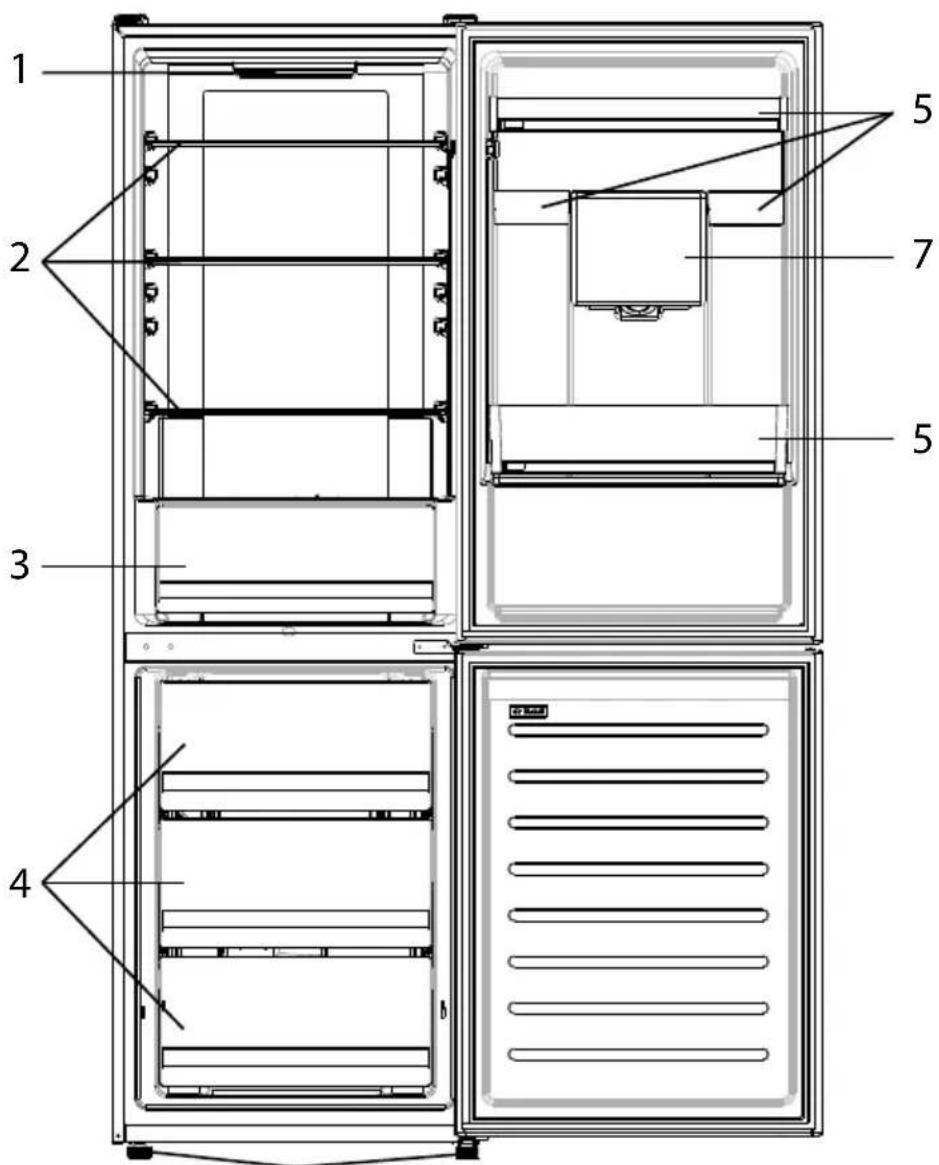
- Control panel and lights
- Adjustable shelves
- Vegetable drawer
- Freezer drawers
- Door shelves
- Leveling feet
- Water dispenser
Space requirements
PRODUCT DESCRIPTION 122
PRODUCT DESCRIPTION 6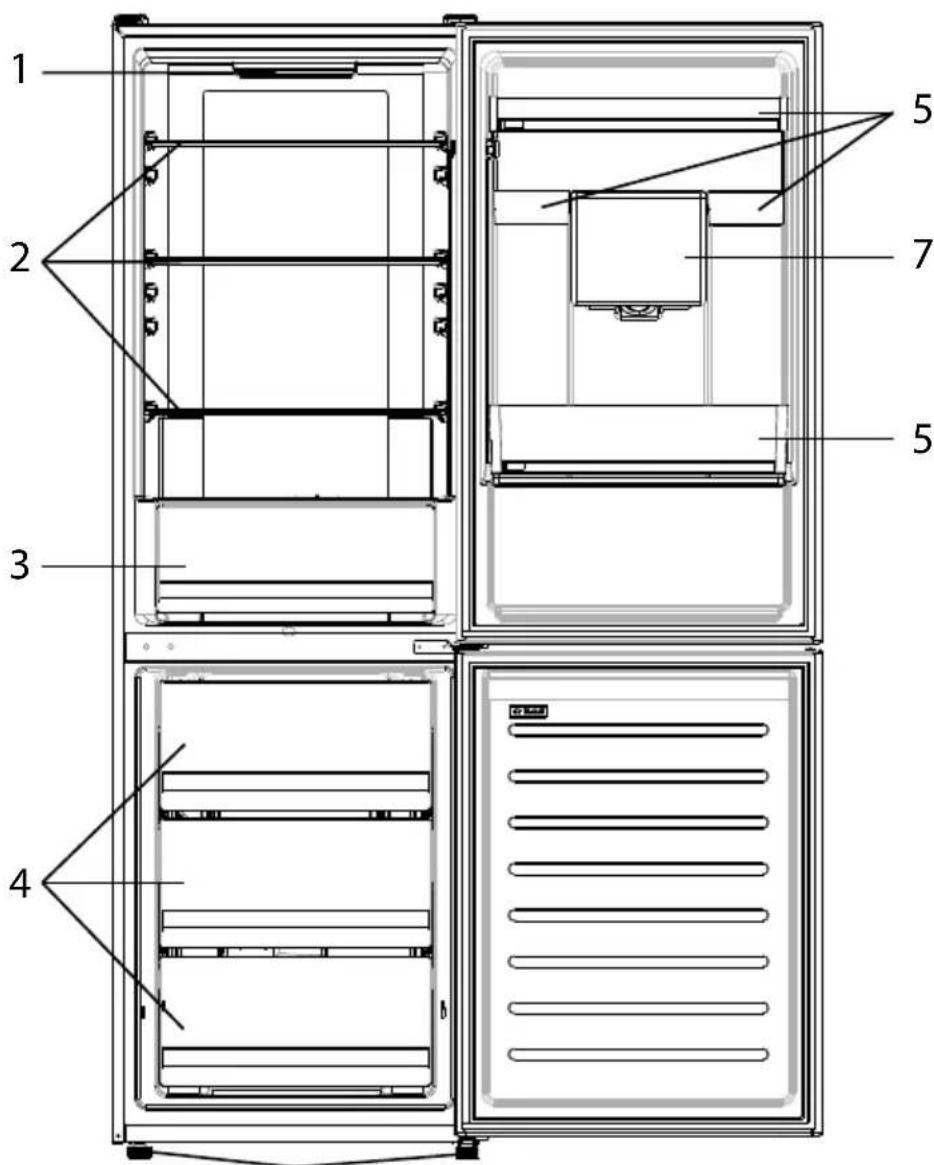
Fine temperature adjustment
The temperature can be set in the app. The temperature can be adjusted in steps of 1 °C, and for the refrigerator compartment, a temperature from 2 °C to 8 °C can be selected. A sound signal is emitted each time the temperature is changed. When the temperature is selected in the app, the control panel will have no indication, all LED temperature indicators will be off, and only the Wi-Fi symbol will be lit.
Fine adjustment
The fine adjustment mode allows you to set the temperature by levels; each level changes the temperature by three levels.
How to use the fine adjustment function:
Press and hold the SET button for 8 seconds to enter the fine adjustment mode. When the device enters this mode, a sound signal is emitted and the LED indicator of the selected cooling level flashes. - With a short press of the SET button within 5 seconds, the fine adjustment value increases, and with each press a sound signal is emitted. During fine adjustment, the LED indicator of the selected cooling level flashes continuously, and the LED indicator of the selected level lights up. If no buttons are pressed within 5 seconds, the system automatically exits the fine adjustment mode. The fine adjustment value is saved, and the LED indicator of the selected temperature of the refrigerator lights up continuously. If the fine adjustment function is activated again, the adjustment is made from the previously saved level.
Super Cool function
It is recommended to activate the Super Cool function if you need to store a large quantity of products (for example, after shopping). The Super Cool function accelerates the cooling of fresh products and protects already stored goods from the heat of the compartment. When this function is activated, the temperature for the refrigerator compartment is automatically set to 2°C.
How to use the Super Cool function:
This function can be activated by pressing the Mode button repeatedly until the Super Cool indicator lights up; or select this function in the app. If the function is activated, the corresponding icon on the control panel turns on. - To turn off the Super Cool function, press the Mode button again. - The Super Cool function turns off automatically after 30 hours of operation. When the Super Cool function turns off, the corresponding icon on the control panel turns off, and the previously set cooling level is restored.
Super Freeze function
The Super Freeze function accelerates the freezing of fresh products and protects already stored products in the freezer compartment from the heat of the compartment. If you need to freeze a large quantity of products, it is recommended to activate the Super Freeze function 24 hours before use. When the function is activated, the temperature is automatically set to -25°C.
How to use the Super Freeze function:
- The function can only be activated by selecting it in the app. If the function is activated, this will be displayed in the app; there will be no indication on the control panel. - To turn off the Super Freeze function, turn it off in the app. - The Super Freeze function turns off automatically after more than 50 hours after its activation.
Eco mode
The Eco mode can be activated to optimize the performance of the appliance while ensuring optimal storage conditions for food products. When this function is enabled, the temperature is automatically set to 5°C in the refrigerator compartment and -18°C in the freezer compartment.
How to use Eco mode:
- The function can only be activated by selecting it in the app. If the function is activated, this will be displayed in the app; there will be no indication on the control panel. - To exit Eco mode, turn it off in the app; the previous temperature setting will be restored. Eco mode turns off automatically when another function is selected on the control panel.
Holiday function
The Holiday function can be used to reduce the energy consumption of the appliance when it is not used regularly. When this function is activated, the indicator lights will be turned off (even if the door is open), and the refrigerator compartment switches to low energy consumption mode, while the freezer compartment will operate normally. How to use the Holiday function:
The function can only be activated by selecting it in the app. If the function is activated, this will be reflected in the app; there will be no indication on the control panel. - To disable the Holiday function, use the app; the previously selected temperature will be restored. - The Holiday function automatically turns off when another function is selected on the control panel.
Defrosting
Defrosting of the refrigerator compartment and freezer compartment is carried out automatically: manual control is not required.
Slider
The drawer with the vegetable compartment has a slider that allows you to adjust the humidity inside it: moving it to the right reduces humidity, moving it to the left increases humidity.
Demonstration mode
With the refrigerator door open, press and hold the On/Off button, press the settings button five times. The refrigerator enters demonstration mode. To exit this mode,
hold the door switch pressed and press the mode button again within 5 seconds.
Error codes
If the LED indicator 6 flashes, it means a fan error has occurred. Contact technical support for assistance in resolving the problem.
Installing the water reservoir
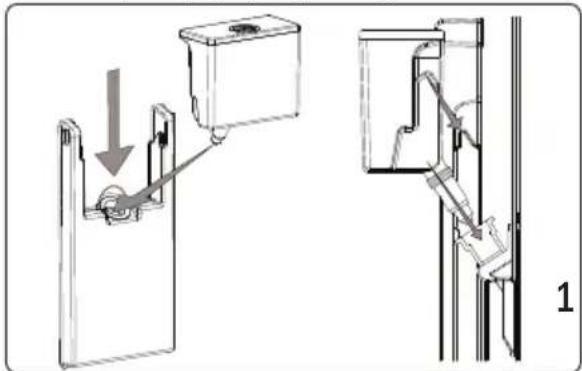
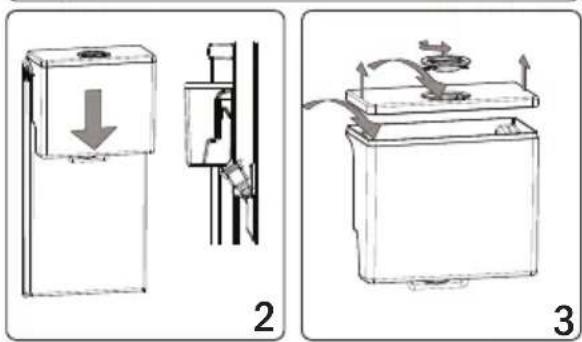
- Insert the water reservoir into the plastic holders on the door in the direction of the arrow in the figure.
- After installing the water reservoir, press on it to securely fix it in the holder.
- Fill the water by removing the top cap of the water reservoir. Press the cap of the water reservoir to remove it. 4. Carefully press the valve lever to supply water.
Filling the water reservoir
- Install the top cover of the water reservoir. Fill the reservoir only with drinking water.
- Install the top cover back on the water reservoir.

Important: Do not use the water dispenser for anything other than water.
Important: If you leave water in the reservoir for a long time, it will cause an unpleasant odor. In this case, clean the reservoir and continue using it.
Important: Clean the reservoir before using it for the first time.
Cleaning the water reservoir
- Rinse the water reservoir.
- Remove the reservoir cover. Clean the reservoir with warm water and install the cleaned parts back.
Installing the water reservoir
- Install the water reservoir as shown in the figure.
- Make sure the tap and the opening align during installation. The water flow may not be as expected if the reservoir is not installed correctly. Also, make sure the gaskets are installed properly. After filling water into the cup, hold it for a while to avoid water spillage.

Individual temperature adjustment 223
Exact temperature adjustment 224
Super Cool function 224
Super Freeze function 224
Pexum Eco 225
Holiday function 225
Dimensioning 225
Demonstration mode 225
Number of sets 225
Water dispenser 206
Charging with adapter 207
Download on the App Store

EXPLORE IT ON AppGallery
Step 2
Create a regular record or select an existing system, where you already have a regular record.
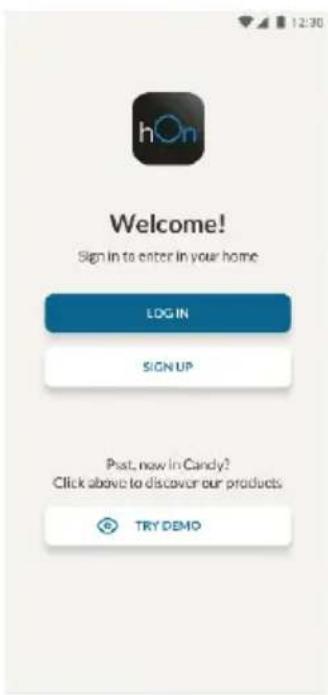
Step 3
Hold down the button for 3 seconds.
Using Wi-Fi
To activate the Wi-Fi function, press and hold the SET button for 2 seconds, after which the Wi-Fi indicator will turn on and a sound signal will be emitted.
Wi-Fi indicator: When the refrigerator is turned on, it automatically enters configuration mode and remains in its state for 30 minutes. To use the configuration mode:
Press and hold the SET button for 2 seconds, then release it within 8 seconds; the refrigerator will enter Wi-Fi setup mode and emit a sound signal. The Wi-Fi indicator will start blinking. - Hold the button until the indicator starts blinking (see above). - Configure Wi-Fi and establish a connection. The Wi-Fi indicator will turn off and light up continuously. - After 30 minutes of inactivity, the Wi-Fi function automatically exits setup mode. - If Wi-Fi is already configured, the connection is automatically restored in configuration mode.
Radio equipment technical data
| Частota (OFR) | 2400 MHz-2843.5 MHz |
| Частоти каналу | 2412...2472 MHz(pondулий 5 MHz) |
| Мakсималha потужнист(b(EIRP) | 100 mW |
Complies with Directive 2014/53/EU.
REVERSING THE DOOR
Required tools: Electric screwdriver
- Remove the top hinge cover
- Unscrew the top hinge
- Remove the top hinge cover (left)
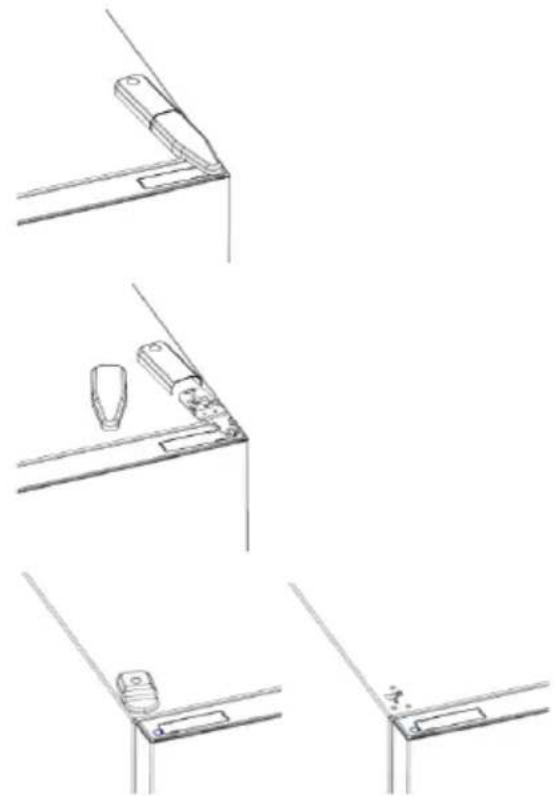
- Remove the middle hinge
- Remove the bottom hinge
- Install the hinge support
- Install the middle hinge
- Install the top hinge cover
- Install the top hinge cover
LLED
all
15
.
1
"Super Cool
Jooi. (e) JIJIIOI JILIIS) pabll no y S k s jz Super Cool
aeg aeg jiajiall nn aai jai jai gilwllggi jiall palebl yjy jiege aell dss
aill aol jlll joll jll l iiee aal baii ie 1. gail lai
Super Cool
Super Cool
Super Cool Lodic
a 1
"Super Freeze
j j j j j j j j j j j j j j j j j j j j j j j j j j j j j j j j j j j j j j j j j j j j j j j j j j j j j j j j j j j j
Super-Freeze 1
-25 1e lalj gll jz bui pi aagbll bui iie .plaiiill Jae cIe 24 1e
Super Freeze
aBwIg Iepe aiebI buei i 1i. gill Jla dnnnne n ne baaagll j
eill
Super Freeze
50 50 Super Freeze
"“ ECO
yie yibgll bia iie pabll jn jai Jiaol ie Juaaall co jiaal aln nn nnnn nnnn nnnn
. 185
:
aBawIg aaepeaae aagbll buee i 1i. gubill nlae e ae baae aegbll by
a a a a a a a a a a a a a a a a a a a a a a a a a a a
a
0
LED (light emitting diode) is a type of lighting that is energy efficient and long-lasting.
Jauu Jaaal jaaal jai
aBaa aee eae aee aee aee aee aee
a a a a a a a a a a a a a a a a a a a a a a a a a
Jl 111111111111111111111111111111
j j j j j j j j j j j j j j j
aiee eae ee eee eee eee eee
5 SET
1
J 3
4
.



WiFi
Therefore, sin α = BC/AC = √(3/5).
Wi-Fi 8 18
(1)
30 Wi-Fi
Wii-Fi 1
.
aaii -
| نور (OFR) | 2400 MHz-2843.5 MHz |
| يرادان الحرفان | 2412...2472 MHz(5ööبال ρ<>MHz) |
| الإستعمال (EIRP) | 100 mW |
2014/534gJgG 5XuU.
1 1s 1 a1la
- 4.
5
6
7
8
9
- SUMMARY
- SPACE REQUIREMENTS
- USE
- CUSTOMIZED TEMPERATURE
- FINE TUNING
- SUPER COOL FUNCTION
- SUPER FREEZE FUNCTION
- ECO MODE
- HOLIDAY FUNCTION
- DEFROSTING
- SLIDER
- DEMO MODE
- ERROR CODES
- THE WATER DISPENSER MOUNTING THE WATER TANK
- FILLING THE WATER TANK
- CLEANING THE WATER TANK
- STOWING THE WATER TANK
- APP CONNECTION
- IN APP PAIRING PROCEDURE
- STEP
- WIFI USE
- DOOR REVERSIBILITY
- DESCRIPTION OF THE PRODUCT
- PLACEMENT
- PERSONALIZED TEMPERATURE
- PRESS THE WI-FI BUTTON
- REVERSING THE DOOR
- REQUIRED TOOLS
- SHRNUTI
- FINE TEMPERATURE ADJUSTMENT
- FINE ADJUSTMENT
- DEMONSTRATION MODE
- INSTALLING THE WATER RESERVOIR
- FILLING THE WATER RESERVOIR
- CLEANING THE WATER RESERVOIR
- USING WI-FI
- SUPER COOL
- SUPER FREEZE
- ECO
Brand : HOOVER
Model : HOCE4T620DWXK
Category : Refrigerator