Water Out Socket - Switch Whale - Free user manual and instructions
Find the device manual for free Water Out Socket Whale in PDF.


User questions about Water Out Socket Whale
0 question about this device. Answer the ones you know or ask your own.
Ask a new question about this device
Download the instructions for your Switch in PDF format for free! Find your manual Water Out Socket - Whale and take your electronic device back in hand. On this page are published all the documents necessary for the use of your device. Water Out Socket by Whale.
USER MANUAL Water Out Socket Whale
natural_image
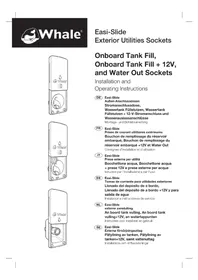
Line drawing of a whale-shaped water dispenser with control buttons and a circular dial (no text or symbols)Onboard Tank Fill,
Onboard Tank Fill + 12V, and Water Out Sockets
Installation and
Operating Instructions
DE Easi-Slide
natural_image
Illustration of a whale brand water heater with control buttons and a circular vent (no text or symbols)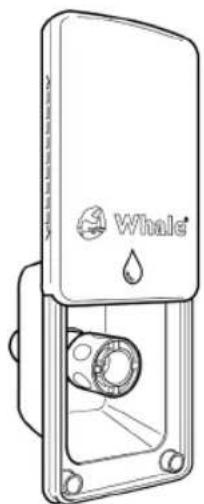
natural_image
Line drawing of a whale water dispenser with a water droplet and mechanical components (no text or symbols)Onboard Tank Fill, Onboard Tank Fill + 12V, and Water Out Sockets
Installation and Operating Instructions

Onboard Tank Fill Socket Pack contains:
1x Whale Onboard Tank Fill Socket
OR
Onboard Tank Fill + 12V Socket Pack contains:
1x Whale Onboard Tank Fill + 12V Socket
In addition you will need the Whale Superfil water pump GP1633 - available separately
OR
Water Out Socket Pack contains:
1x Whale Water Out Socket
In addition you will need the Whale Compact Shower SO4100B (Bulk Packaging),
SO4100C (Retail) - available separately
In addition for all 3 packs you will need: 1x Whale Easi-Slide Lid
Contents
Socket Installation 23
-
Onboard Tank Fill Socket 26
-
Onboard Tank Fill + 12V Socket 30
-
Water Out Socket 34
External Socket Mounting Profile 39
Safety


- This appliance is not intended for use by persons (including children) with reduced physical, sensory or mental capabilities, or lack of experience and knowledge, unless they have been given supervision or instruction concerning use of the appliance by a person responsible for their safety.
- Children must be supervised to ensure that they do not play with the appliance.
- Any alteration to the appliance, misuse or use of non-original Whale parts may invalidate the warranty. Non observation of the installation and operating instructions will lead to cancellation of the warranty and exclusion of liability claims. It also becomes illegal to use the appliance if incorrectly installed, and in some countries may make it illegal to use the vehicle.
- For use in recreational vehicles with a typical water system pressurised up to 3 bar.
Before you begin
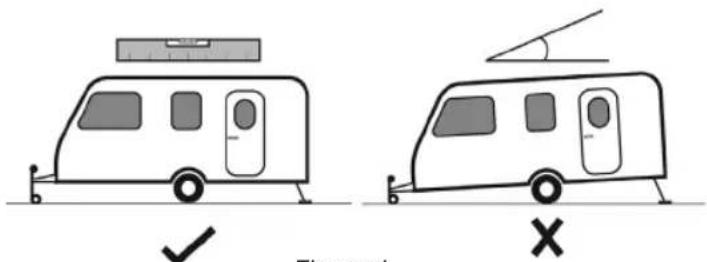
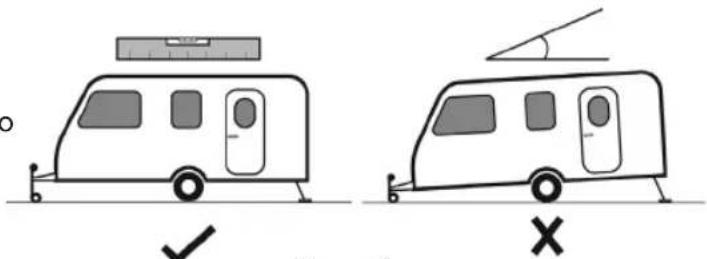
• (Figure 1) Ensure your caravan, motorhome or panel van is on a level surface and secured.
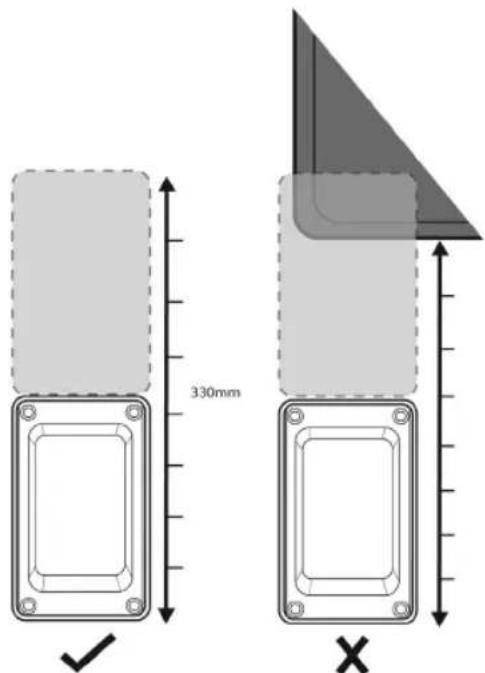
text_image
330mm ✓ ×Figure 2.
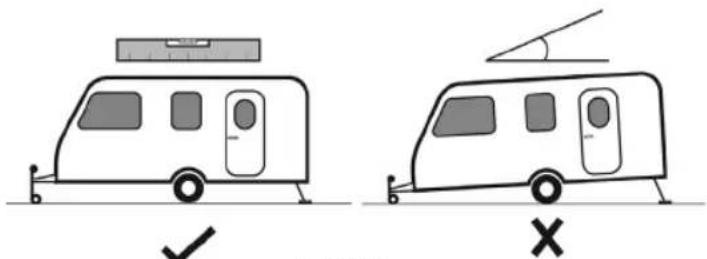
text_image
Diagram showing two scenarios of a vehicle with a roof, one marked with checkmark and the other with cross, indicating correct and incorrect conditions.Figure 1.
• (Figure 2) Ensure you have enough free wall space for the installation including enough clearance for the Whale Easi-Slide Lid when installing and open.
- These products are not designed for any other purpose than for supplying fresh water to a caravan, or other recreational vehicle.
- Always disconnect power sources before installing or making connections.
- With all applications, it is important that a system of safe working practice is applied to installation, use and maintenance.
- Always ensure water system is drained before commencing any work.
Socket Installation (▶1 - 17)
•( ▶1) Ensure you have enough free wall space for the installation including enough clearance for the Whale Easi-Slide Lid when installing and open.
•( ▶2) Use Socket Mounting Profile on page 39 as your cutting template and fix to vehicle wall using masking tape.
•( ▶8) Masking tape should be fitted around the outside of the socket to protect the grooves.
•(▶11) Ensure the rear sealing face of the socket is clean and free from any dirt or debris to ensure a good seal.
•( ▶13) Tighten screws evenly to avoid twisting the socket. Follow order shown.
•( ▶14) In the instance that wall battens do not exist behind the socket cut out, use flat nuts to secure screws in place.
•( ▶15) When removing sealant from around the socket when installed, also clean the grooves to ensure protection and smooth use of socket.
Helpful Hints
- If the cover does not move freely when installed, remove it and ensure guide rails are free from sealant and debris.
- If your socket appears to be twisted when installed, slightly adjust the sealing screws.
Fittings Installation
• Onboard Tank Fill Socket (▶ 18-19)
- Onboard Tank Fill + 12v Socket (▶25-27)
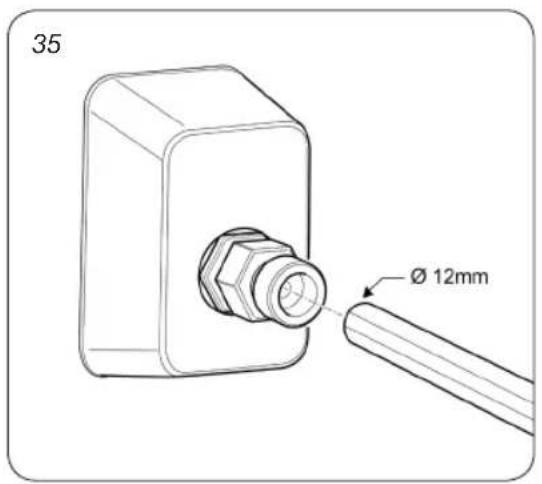
• Water Out Socket (▶35-36)
Lid attachment (▶20-21) or (▶28-29)
- For Onboard Tank Fill and Onboard Tank Fill + 12v Sockets, lids are to be snapped on from the side.
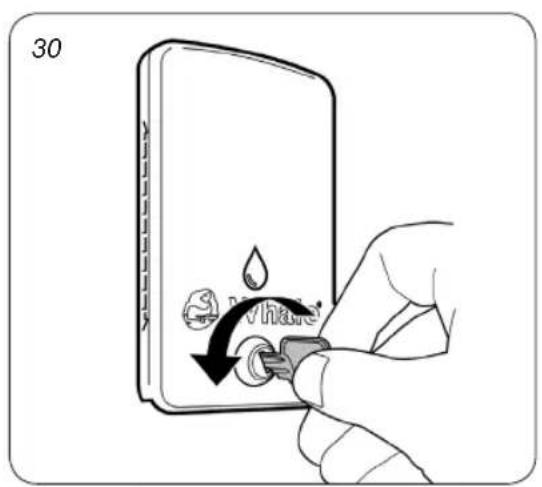
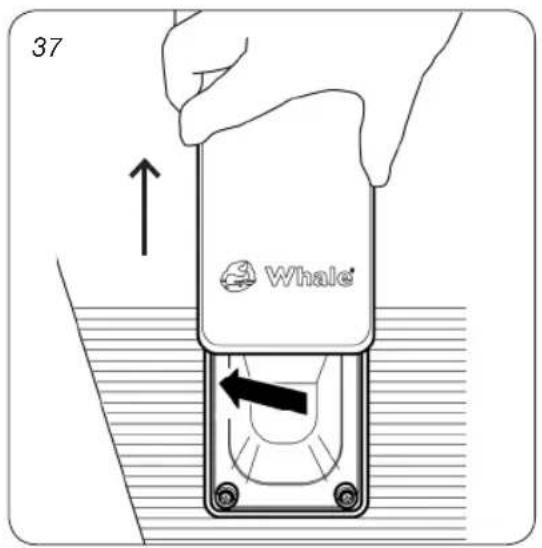
Operation (▶22-24) or (▶30-34) or (▶37-40)
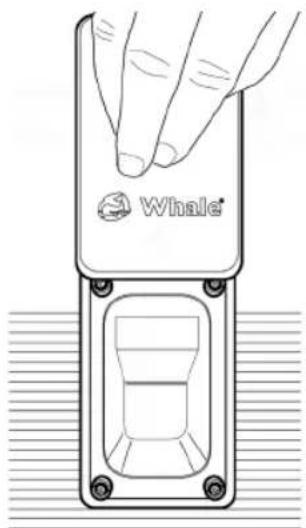
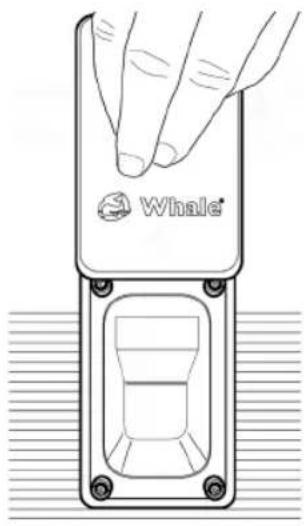
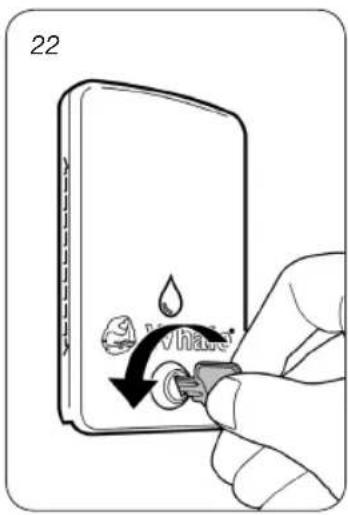
- (Figure 3) Onboard Tank Fill Socket and Onboard Tank Fill + 12v Socket lids incorporate a lock for safety and to restrict access to your fresh water supply. Turn clockwise to lock and anticlockwise to unlock the lid.
- All socket lids must remain closed when not in use.
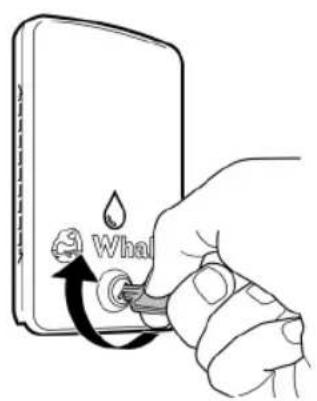
text_image
Whal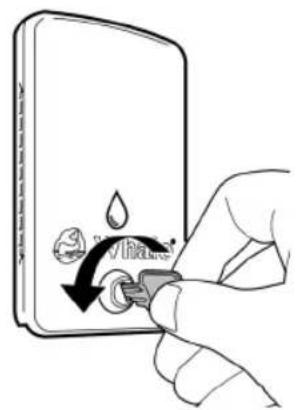
text_image
Diagram showing a hand inserting a device into a device with a water drop and 'VHance' label, indicating fluid or water transfer.Figure 3. Locking and Unlocking Lid
text_image
Whale®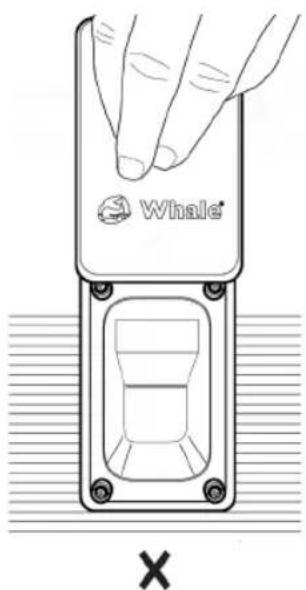
text_image
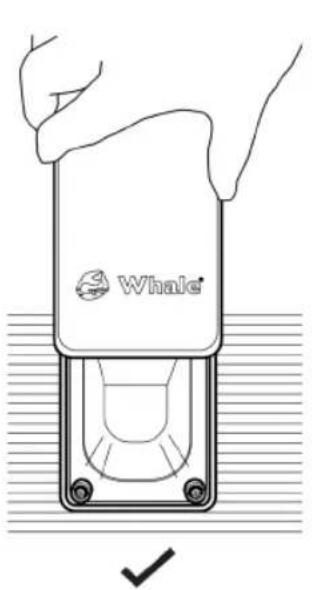
Whale® ×Figure 4. Opening Sliding Lid
text_image
330mm ✓ ×Abbildung 2.
text_image
Diagram showing a hand pressing a valve with a water drop and valve labeled 'Water', illustrating fluid flow or mechanical change.text_image
Whale Whaletext_image
330mm ✓ ×Figure 2.
text_image
Diagram showing two scenarios of a vehicle on different sides, with checkmark and cross symbols indicating correct and incorrect states.Figure 1.
text_image
Diagram showing a hand inserting a device into a device with a water drop and 'VHance' label, indicating fluid or water transfer.text_image
330mm ✓ ×Figuara 2.
text_image
Diagram showing two scenarios of a vehicle on a road, with checkmark and cross symbols indicating correct and incorrect conditions.Figura 1.
text_image
Diagram showing two scenarios of a vehicle with a roof, one marked with checkmark and the other with X, indicating correct and incorrect conditions.Fig. 1.

text_image
330mm ✓ ×Fig. 2.
text_image
Diagram showing a hand inserting a device into a device with a water drop and 'VHance' label, indicating fluid or water transfer.text_image
Diagram showing a hand pressing a valve with water droplets and a valve labeled 'v/h' indicating water displacement.natural_image
Line drawing of a whale brand electronic device with a hand interacting with it (no text or symbols on the device itself)
natural_image
Line drawing of a hand pressing down on a whale-shaped device (no text or symbols)text_image
Diagram showing two scenarios of a vehicle with a roof, one marked with checkmark and the other with cross, indicating correct and incorrect conditions.Bild 1.
natural_image
Line drawing of a whale-shaped electronic device with a hand holding the top part (no text or symbols on the device itself)
natural_image
Line drawing of a whale-shaped device with a handle and mounting feet, no text or symbols presentnatural_image
Illustration of a hand using a ruler to measure a 3D object on a flat surface, with no visible text or symbols.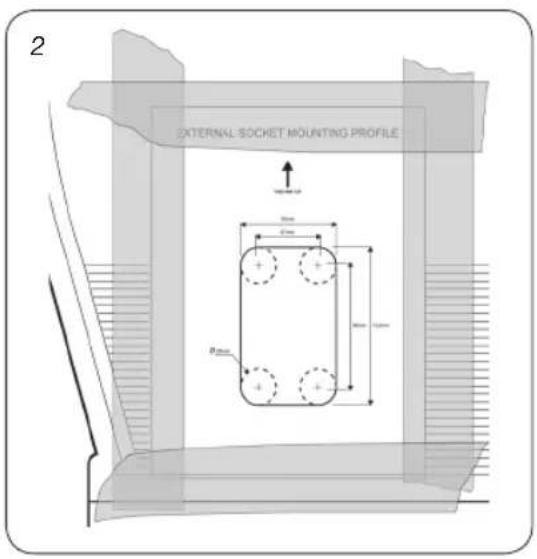
text_image
2 EXTERNAL SOCKET MOUNTING PROFILE 10mm 40mm 10mm Rmax
text_image
3 White BLUE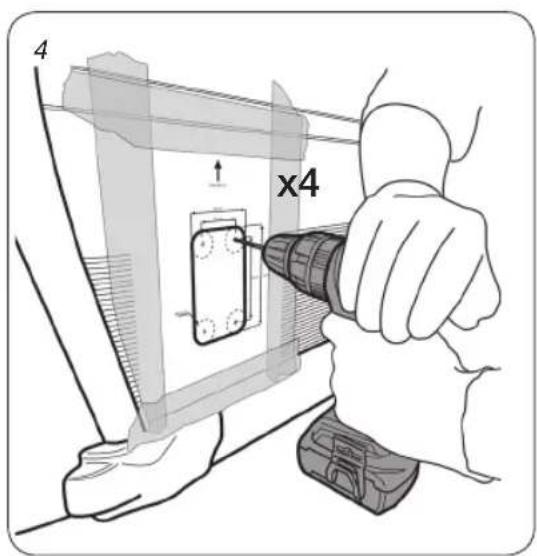
text_image
4 x4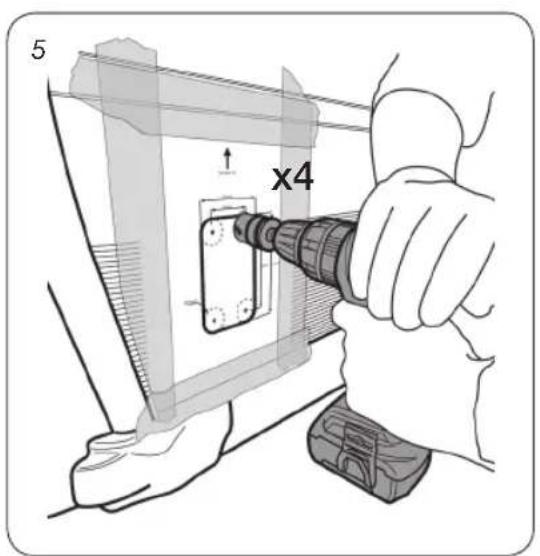
text_image
5 x4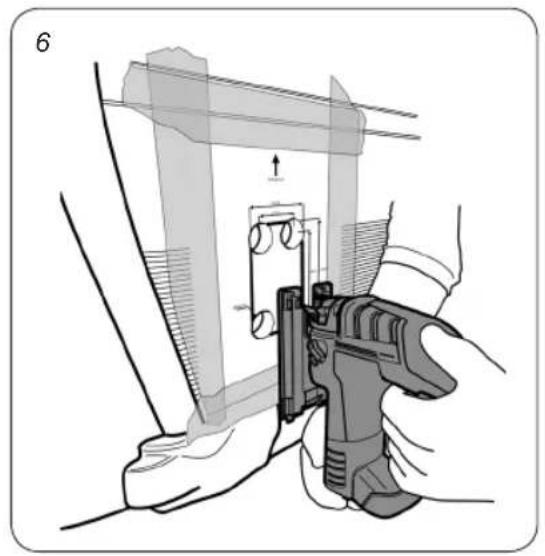
natural_image
Illustration of a hand holding a handgun with a device, no text or symbols present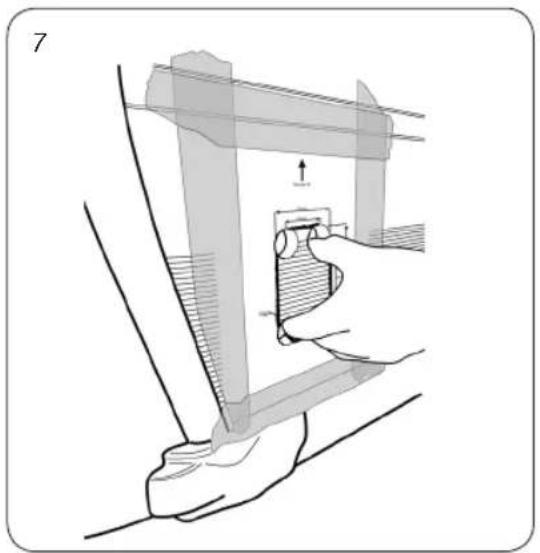
natural_image
Illustration of a hand holding a mechanical component with a tool, no text or symbols present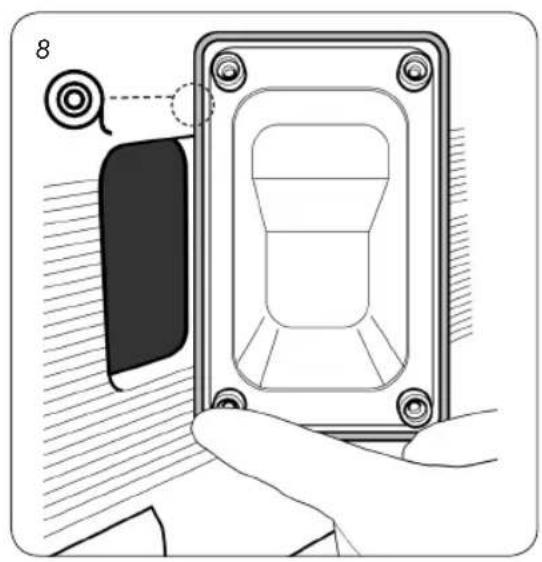
natural_image
Illustration of a hand holding a device panel with a magnified view showing internal structure (no text or symbols)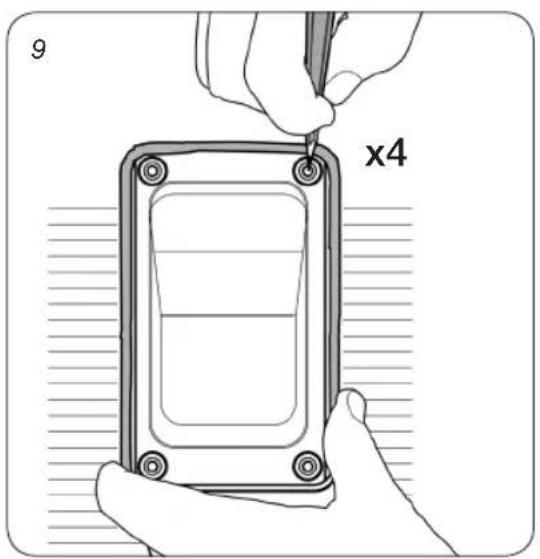
text_image
9 x4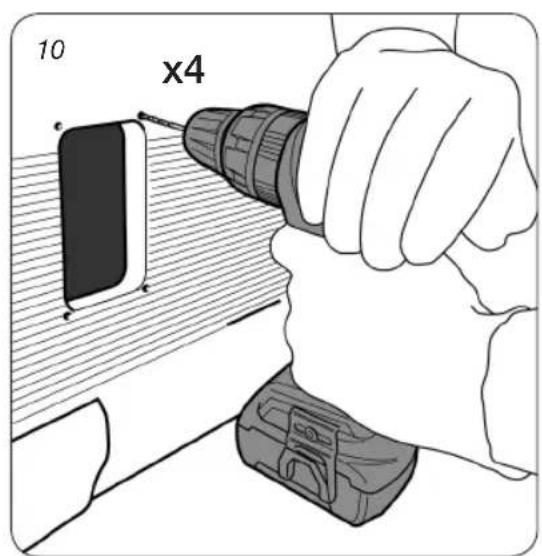
text_image
10 x4
natural_image
Illustration of a hand cleaning a smartphone with a cloth, showing no text or symbols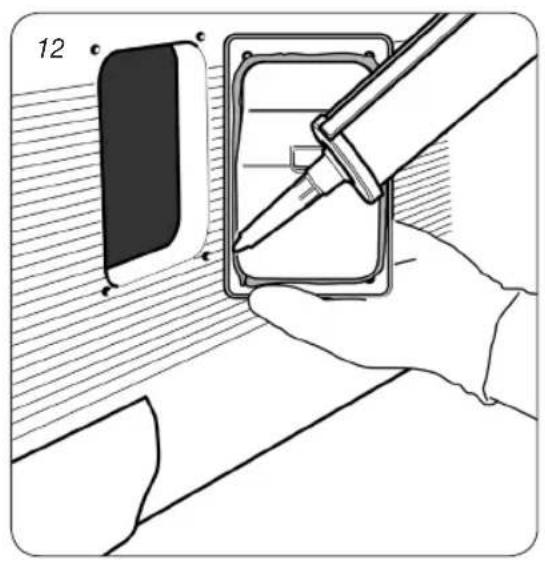
natural_image
Illustration of a hand holding a device with a pen, next to a black rectangular object on a striped surface (no text or symbols)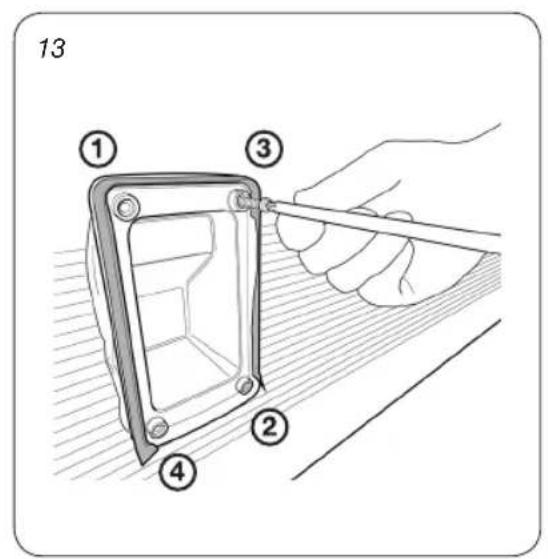
text_image
13 ① ③ ② ④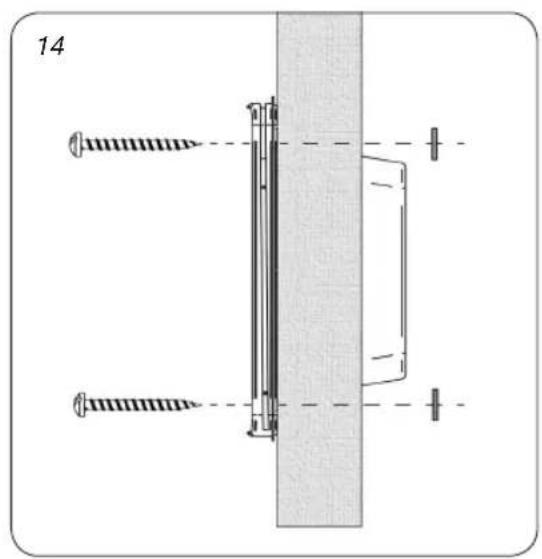
natural_image
Technical diagram showing two screws inserted into a wall-mounted bracket, with no visible text or symbols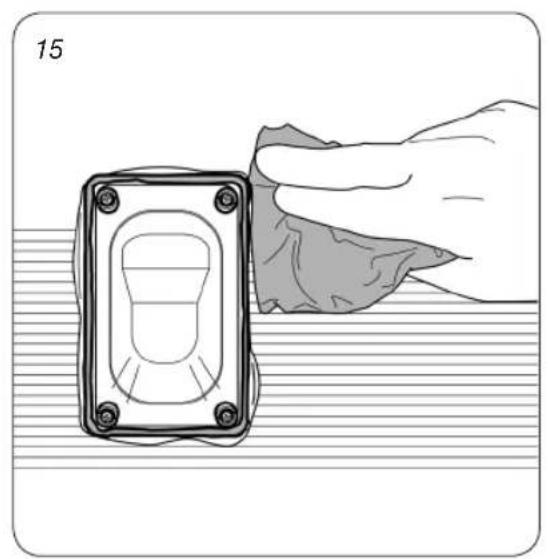
natural_image
Illustration of a hand cleaning a rectangular electronic component with a handle, placed on a striped surface (no text or symbols)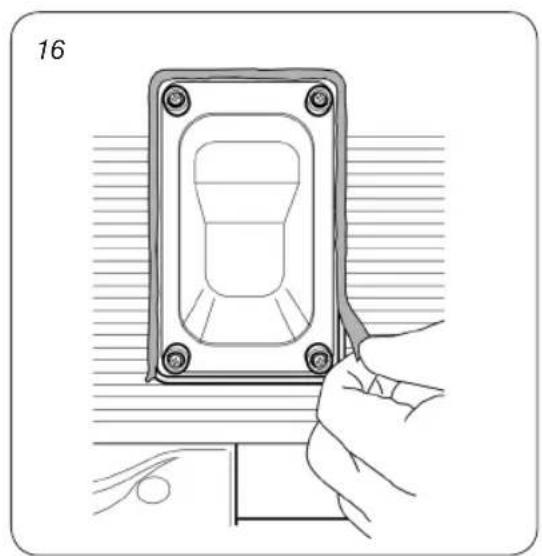
natural_image
Illustration of a hand using a tool to adjust or install a component, no text or symbols present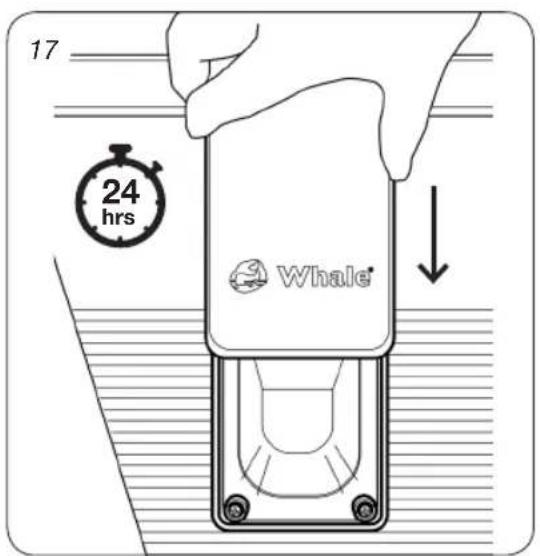
text_image
17 24 hrs Whale®1. Onboard Tank Fill Socket
Directly fill your on-board water tank with the Onboard Tank Fill Socket. The unique secure hose clip keeps the pump in place during filling (▶24). The tank fill design incorporates a lock to protect your water supply and a vent pipe to prevent airlocks. The Onboard Tank Fill Socket is suitable for use with any standard hose and should be used with cold freshwater only.
text_image
Whale 270mm 164mm 103mm Ø 10mm Ø 40mm 66mm 124mm 75mmFigure 5. Onboard Tank Fill Socket Dimensional Drawings
Fittings Installation
DE Armaturen-Installation
FR Installation des raccords
IT Installazione dei raccordi
ES Instalación de elementos
NL Het installeren van de fittingen
SE Anslutningsinstallation
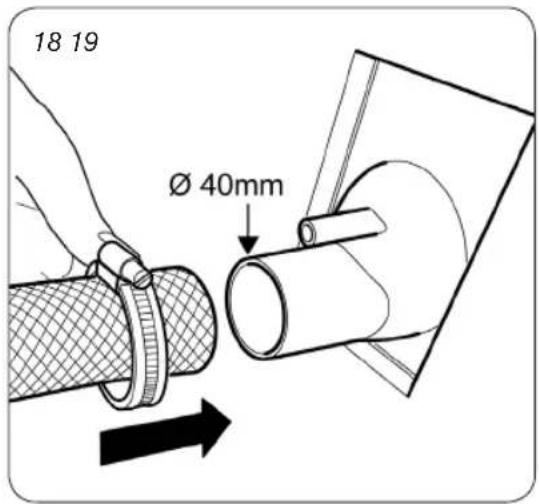
text_image
18 19 Ø 40mm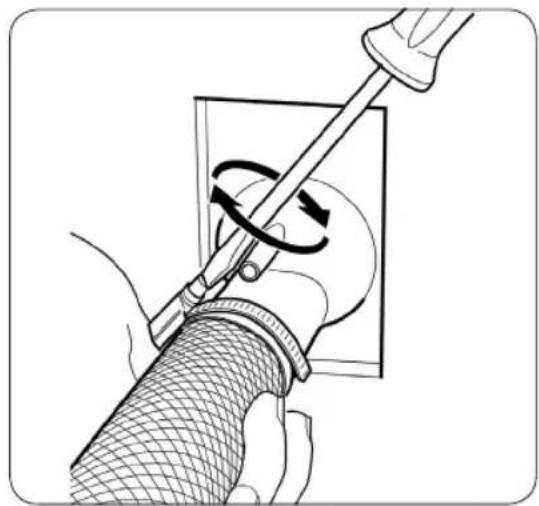
natural_image
Illustration of a hand using a tool to lift a mesh pipe, showing rotational motion (no text or symbols)Lid attachment
DE Befestigung der Abeckkappe
FR Attache du couvercle
IT Attacco coperchio
ES Fijación de la tapa
NL Het aanbrengen van de deksel
SE Lockfastsättning
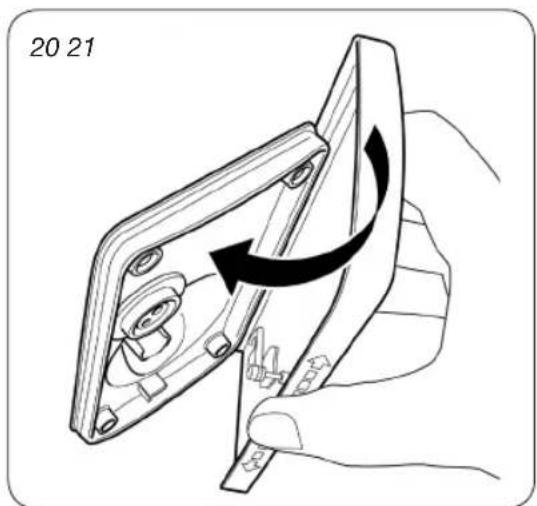
natural_image
Illustration of a hand holding a mechanical component with an arrow indicating rotation (no text or symbols)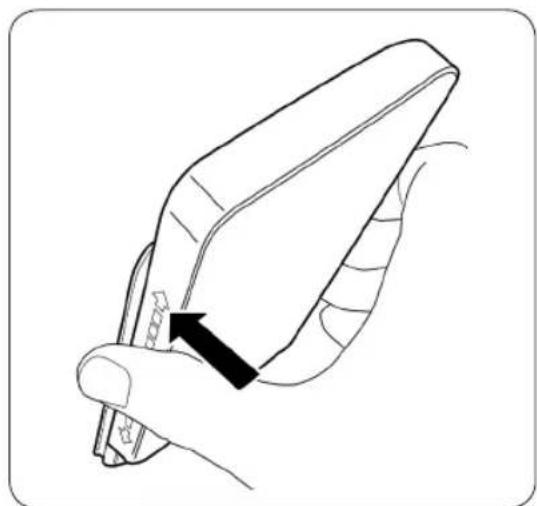
natural_image
Line drawing of a hand holding a tool with an arrow pointing to the grip (no text or symbols)Operation
DE Betrieb
FR Fonctionnement
IT Funzionamento
ES Funcionamiento
NL Gebruik
SE Drift
text_image
22 vVha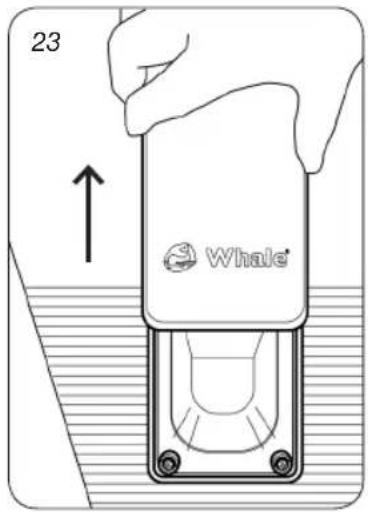
text_image
23 Whale®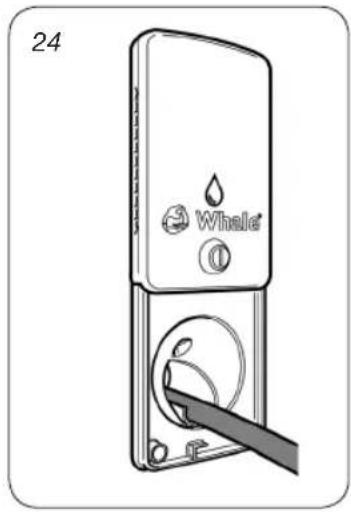
text_image
24 Whale2. Onboard Tank Fill + 12V Socket
Unique 2 in 1 design includes a 12V pump power supply and Onboard Tank Fill all in one socket. The secure hose clip keeps the pump in place during filling (▶34). The Onboard Tank Fill + 12v Power Socket incorporates a lock to protect your water supply and a vent pipe ensuring the tank is vented at all times, preventing airlocks. This socket is suitable for use with any standard hose and is to be used with cold freshwater only.
text_image
12V DC 5A 270mm 164mm Whale® Ø 10mm Ø 40mm 103mm 66mm 75mm 124mmFigure 6. Onboard Tank Fill + 12V Socket Dimensional Drawings
DE Abbildung 6: Maßzeichnungen für Wassertank Füllstutzen + 12-V-Anschlussdose
Figure 6. Schémas de principe de la bouchon de remplissage du réservoir embarqué + 12V
IT Figura 6. Disegni dimensionali bocchettone acqua + presa da 12V
ES Fig. 6. Dibujo dimensional de la llenado del depósito de a bordo + 12 V
NL afb. 6. An boord tank vulling + 12V contactpunt, tekening met afmetingen
SE Bild 6. Påfyllning av tanken + 12V uttag, dimensionsritningar
Fittings Installation
text_image
25 Ø1.5mm² +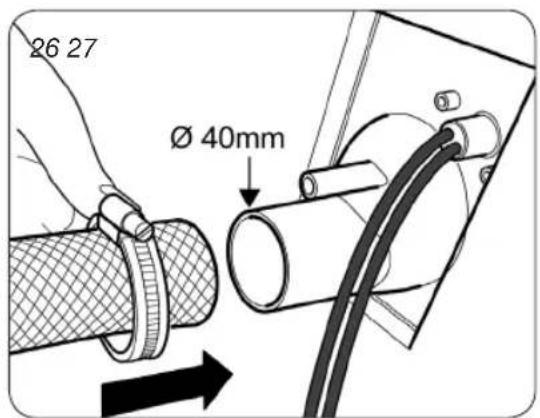
text_image
26 27 Ø 40mm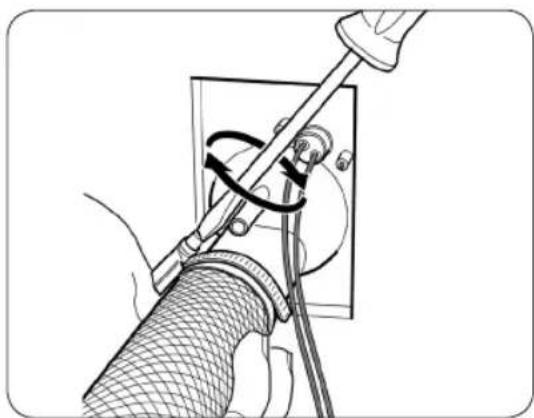
natural_image
Illustration of a person using a tool to connect electrical wires to a wall-mounted device (no text or symbols visible)Lid attachment
natural_image
Diagram of a hand holding a mechanical component with an arrow indicating rotation (no text or symbols)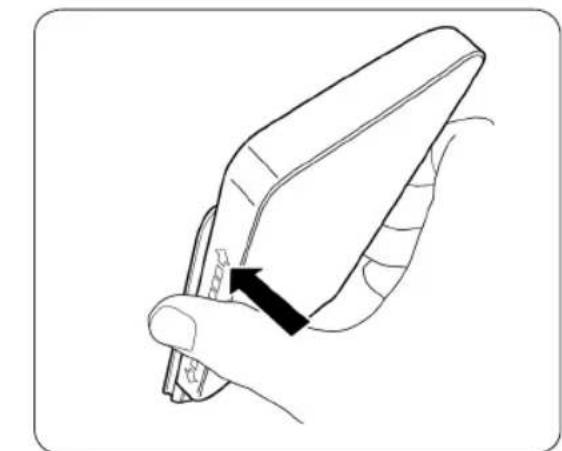
natural_image
Line drawing of a hand holding a pen or stylus, with a black arrow pointing to the pen tip (no text or symbols present)Operation
DE Betrieb
FR Fonctionnement
IT Funzionamento
ES Funcionamiento
NL Gebruik
SE Drift
text_image
30 VHare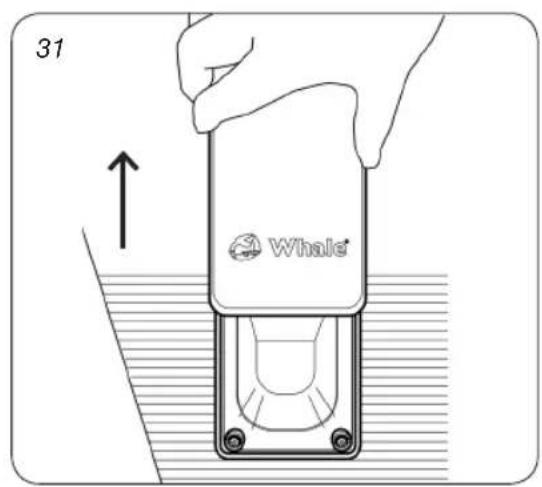
text_image
31 Whale®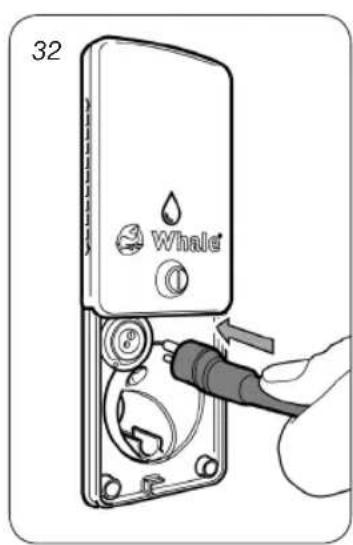
text_image
32 Whale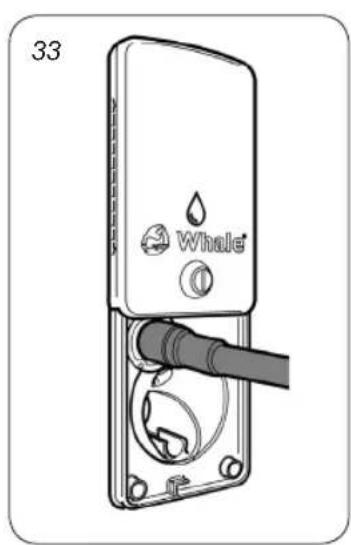
natural_image
Diagram of a whale water heater with labeled ports and a cable (no text or symbols beyond branding)
natural_image
Diagram of a white whale device with attached tubing and control buttons, labeled '34' (no text or symbols on the device itself)3. Water Out Socket
For hassle-free wash down, easily connect Whale's detachable exterior Compact Shower with easy-to-use trigger. Use with cold freshwater only.
text_image
Whale 164mm 270mm 103mm 66mm 126mm 75mm 124mmFigure 7. Water Out Socket Dimensional Drawings
DE Abbildung 7. Maßzeichnungen für den Wasserauslassanschluss
FR Figure 7. Schémas de principe de la prise Water Out
IT Figura 7. Disegni dimensionali presa esterna per acqua
ES Fig. 7. Dibujo dimensional de la toma de corriente para salida de agua
NL afb. 7. Watertappunt, tekening met afmetingen
SE Bild 7. Vattenuttag, dimensionsritningar
Fittings Installation
DE Armaturen-Installation
FR Installation des raccords
IT Installazione dei raccordi
ES Instalación de elementos
NL Het installeren van de fittingen
SE Anslutningsinstallation
text_image
35 Ø 12mm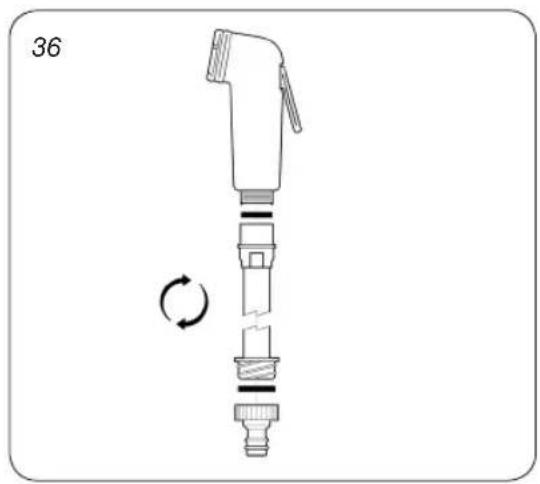
natural_image
Diagram of a mechanical device with a rotating shaft and spring, labeled '36' (no text or symbols on the diagram itself)Operation
DE Betrieb
FR Fonctionnement
IT Funzionamento
ES Funcionamiento
NL Gebruik
SE Drift
text_image
37 Whale®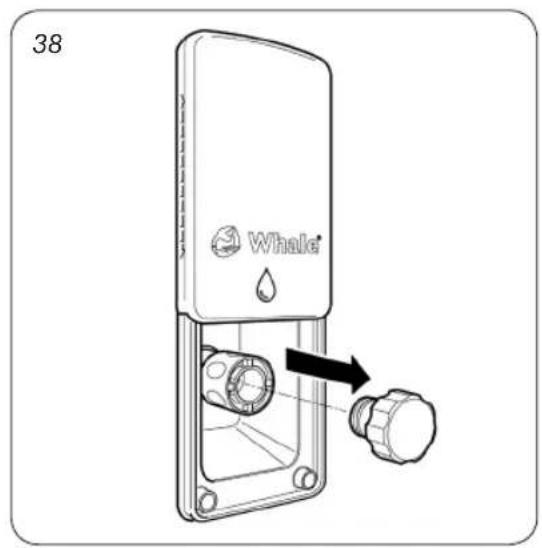
text_image
38 Whale®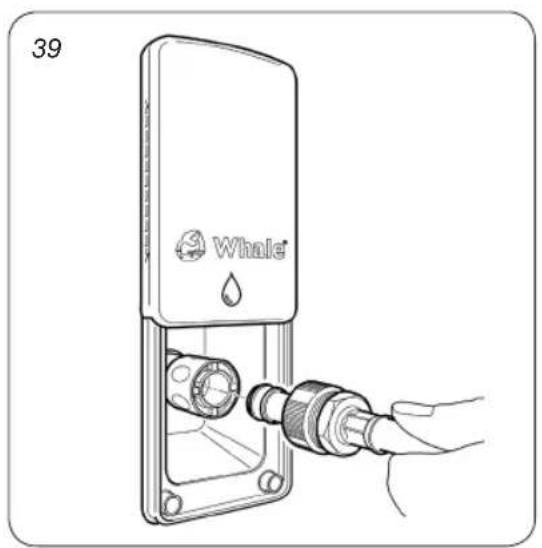
natural_image
Line drawing of a whale water dispenser with a hand inserting a plug into the container (no text or symbols)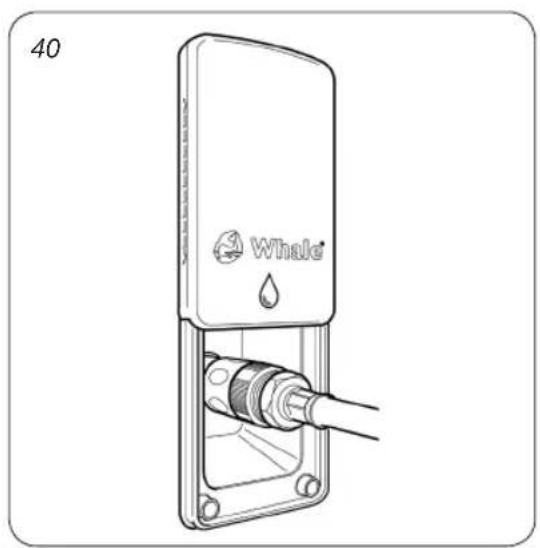
natural_image
Line drawing of a whale water heater with a hose inserted into a housing (no text or symbols)
Rated to IP55 when lid closed
D55-zertifiziert mit geschlossener Kappe
Cetégorie IP55 lorsque le couvercle est fermé
Grado IP55 con coperchio chiuso
Gase de protección IP55 con la tapa cerrada
N55-code als de deksel gesloten is
Klassat som IP55 med stängt lock

This Whale product is covered by a 2 year warranty. Please see the enclosed document for details of our Statement of Limited Warranty.
© Copyright Whale® 2018 – All rights reserved.
Reproduction in whole or in part without permission is prohibited. WHALE® is a registered trademark of Munster Simms Engineering Limited, Bangor, Northern Ireland trading as Whale. Whale's policy is one of continuous improvement and we reserve the right to change specifications without prior notice. Illustrations are for guidance purposes only. Neither the accuracy nor completeness of the information contained in this or any Product literature is guaranteed by the Company and may be subject to change at its sole discretion.
External Socket Mounting Profile
Munster Simms Engineering Ltd.
2 Enterprise Road, Bangor, N Ireland, BT19 7TA
Tel: +44 (0)28 9127 0531
info@whalepumps.com
whalepumps.com


+44 (0)845 217 2933