
SV 60 A2 - Fan SILVERCREST - Free user manual and instructions
Find the device manual for free SV 60 A2 SILVERCREST in PDF.

| Product type | Pedestal fan |
| Brand | SilverCrest |
| Model | SV 60 A2 |
| Power supply | 220-240 V ~ 50 Hz |
| Rated power consumption | 60 W |
| Standby power consumption | 0.3 W |
| Protection class | II (double insulation) |
| Maximum air flow | 57.73 m³/min |
| Service value | 1.03 (m³/min)/W |
| Sound power level | 56.9 dB(A) |
| Fan speeds | 6 adjustable speeds |
| Oscillation | Horizontal, vertical, multidirectional |
| Breeze modes | Natural, sleep, gentle, normal |
| Timer (auto-off) | 1 to 8 hours |
| Remote control | Yes, range 5 m, CR2025 battery included |
| Remote control battery | 1 CR2025 button cell, 3 V |
| Adjustable height | Yes, by adjustment ring |
| Blade material | Plastic |
| Protective grille | Front and rear, removable for cleaning |
| Cleaning | Damp cloth, do not immerse |
| Warranty | 3 years |
| Spare parts | Available during the warranty period |
| Weight | Not specified |
| Dimensions (W × D × H) | Not specified |
Frequently Asked Questions - SV 60 A2 SILVERCREST
User questions about SV 60 A2 SILVERCREST
0 question about this device. Answer the ones you know or ask your own.
Ask a new question about this device
Download the instructions for your Fan in PDF format for free! Find your manual SV 60 A2 - SILVERCREST and take your electronic device back in hand. On this page are published all the documents necessary for the use of your device. SV 60 A2 by SILVERCREST.
USER MANUAL SV 60 A2 SILVERCREST
natural_image
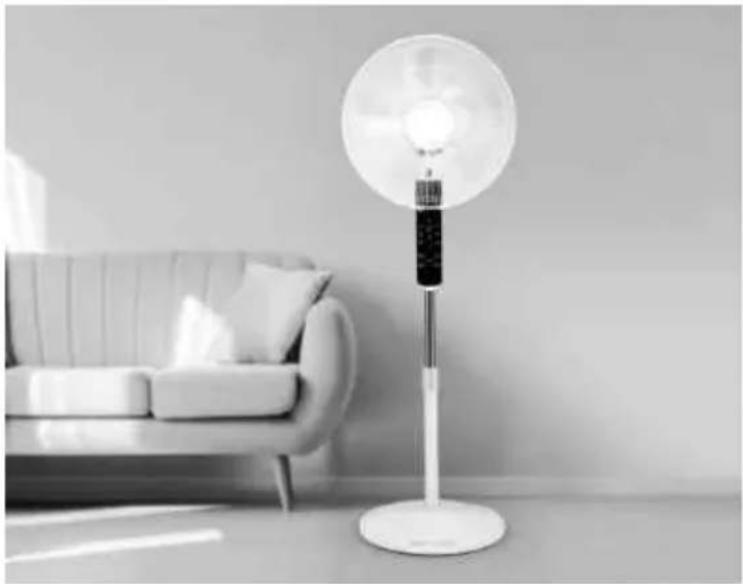
Modern floorstand with a circular light fixture and a white pedestal, placed on a minimalist living room with a sofa in the background (no text or symbols visible)STANDVENTILATOR / PEDESTAL FAN / VENTILATEUR SUR PIED SV 60 A2
DE AT CH
STANDVENTILATOR SV 60 A2
Assembly, operating and safety instructions
FR BE
VENTILATEUR SUR PIED SV 60 A2
GB/IE Assembly, operating and safety instructions Page 17
B
C
D
Ansicht von vorne /
View from front /
Vue frontale /
Frontaanzicht /
Widok od przodu /
Pohled zepředu /
Pohl'ad spredu /
Vista desde el frente /
Set forfra
natural_image
Technical line drawing of a fan or air conditioner with a rotating arm and base mount (no text or symbols)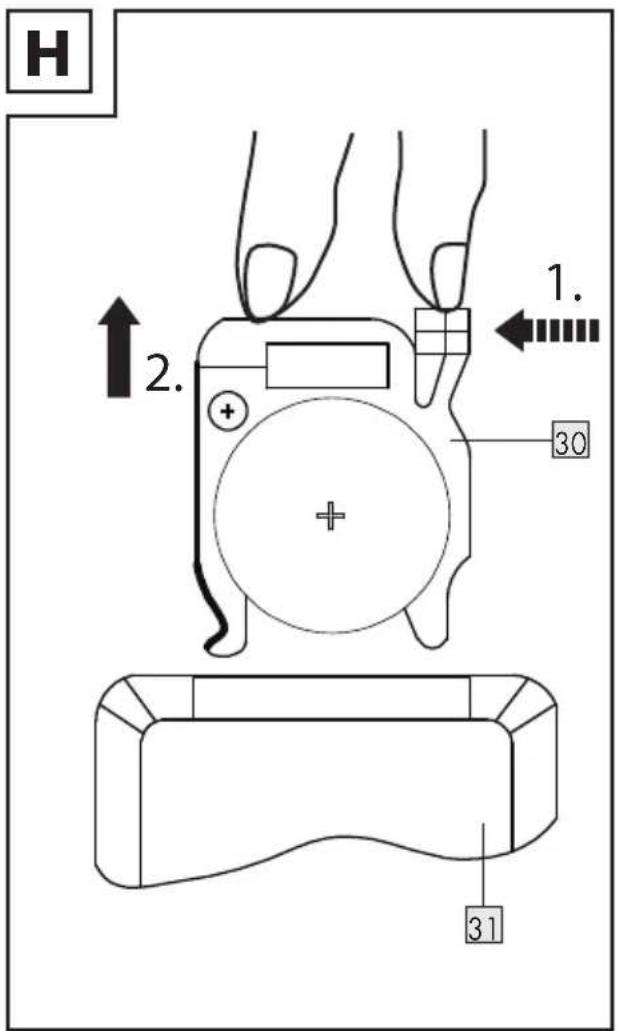
List of pictograms and symbols used Page 18
Introduction Page 18
Intended use. Page 18
Scope of delivery.... Page 19
Description of parts ...... Page 19
Technical data Page 19
Safety instructions.... Page 20
Safety instructions for batteries / rechargeable batteries ...... Page 23
Before use.... Page 24
Unpacking Page 24
Inserting/Replacing the battery Page 24
Assembly Page 24
Height adjustment Page 25
Operation Page 25
Fan speed Page 25
Oscillation Page 25
Airflow modes Page 26
Timer (automatic switch off time) Page 26
Cleaning and care Page 26
Cleaning the blade and the safety guard ...... Page 26
Storage Page 27
Disposal Page 27
Warranty Page 28
| List of pictograms and symbols used | |||
 | DANGER! This symbol with the signal word indicates a hazard with a high level of risk which, if not avoided, will result in serious injury or death. |  | Protection class IIThe product has a double insulation. |
 | WARNING! This symbol with the signal word indicates a hazard with a medium level of risk which, if not avoided, could result in serious injury or death. |  | Alternating current / voltage |
 | CAUTION! This symbol with the signal word indicates a hazard with a low level of risk which, if not avoided, could result in minor or moderate injury. |  | Direct current / voltage |
 | NOTE: This symbol with the signal word provides additional useful information. |  | Hertz (mains frequency) |
 | Danger - Risk of electric shock! Watts |  | |
 | Only use the product in dry indoor rooms. | De  fingers through grille. fingers through grille. | |
PEDESTAL FAN SV 60 A2
Introduction
We congratulate you on the purchase of your new product. You have chosen a high quality product. The instructions for use are part of the product. They contain important information concerning safety, use and disposal. Before using the product, please familiarise yourself with all of the safety information and instructions for use. Only use the product as described and for the specified applications. If you pass the product on to anyone else, please ensure that you also pass on all the documentation with it.
Intended use
This product is intended to produce a cooling airflow. Any other use not mentioned in these instructions may cause a damage to the product or create a serious risk of injury. This product is only intended for private household use, not for commercial purposes.
The manufacturer accepts no liability for damages caused by improper use.
- Scope of delivery
After unpacking the product, check if the delivery is complete and if all parts are in good condition. Remove all packing materials before use.
1 Main unit
1 Round base
1 Stand post with L-shaped bolt and washer
1 Front grille with grille collar
1 Rear grille
1 Grille lock nut
1 Blade lock nut
1 Blade
1 Remote control
1 Battery (pre-installed)
• Description of parts
1 Control panel
2 Rear grille
3 Grille lock nut
4 Blade
5 Blade lock nut
6 Front grille
7 Grille collar
8 Hinged clip
9 Washer
10 L-shaped bolt
11 Round base
12 Stand post
13 Adjustment knob
14 Upper pole
15 Locking knob
16 Main unit
16a Motor
17 ←Horizontal oscillation indicator
18 Vertical oscillation indicator
19 Multi-directional oscillation indicator
20 OSC button (oscillation)
21 SPEED button
22 MODE button
23 ON/OFF button
24 TIMER button
25 Soft mode indicator
26 Speed indicator
27 Sleep indicator
28 Natural indicator
29 Timer indicator
30 Battery compartment
31 Remote control
NOTE: The buttons on the remote control and on the main unit's 16 control panel 1 have the same functions.
- Technical data
Input voltage: 220-240 V\~, 50 Hz
Power consumption: 60 W
Protection class: II / ☐
Remote control -
voltage supply: 1 x 3 V, CR2025
operating range: 5 metres
| Description | Symbol | Value | Unit |
| Maximum fan flow rate | F | 57.73 | m^3/min |
| Fan power input | P | 56.24 | W |
| Service value | SV | 1.03 | (m^3/min)/W |
| Standby power consumption | P_SB | 0.3 W | |
| Fan sound power level | L_WA | 56.9 | dB(A) |
| Maximum air velocity | c | 3.33 | meters/sec |
| Measurement standard for service value | IEC 60879:1986 (corr. 1992) | ||
| Contact details for obtaining more information | OWIM GmbH & Co. KGStiftsbergstraße 174167 NeckarsulmGERMANYwww.owim.com | ||

Safety instructions
BEFORE USING THE PRODUCT, PLEASE FAMILIARISE YOURSELF WITH ALL OF THE SAFETY INFORMATION AND INSTRUCTIONS FOR USE! WHEN PASSING THIS PRODUCT ON TO OTHERS, PLEASE ALSO INCLUDE ALL THE DOCUMENTS!
In the case of damage resulting from non-compliance with these operating instructions the warranty claim becomes invalid! No liability is accepted for consequential damage! In the case of material damage or personal injury caused by incorrect handling or non-compliance with the safety instructions, no liability is accepted!
⚠ WARNING! DANGER OF DEATH AND ACCIDENTS FOR TODDLERS AND CHILDREN!
Never leave children unsupervised with the packaging material. The packaging material represents a danger of suffocation. Children frequently underestimate the dangers. Always keep children away from the packaging material.
⚠️DANGER! Risk of electric shock! Do not attempt to repair the product yourself. In case of malfunction, repairs are to be conducted by qualified personnel only.
⚠ WARNING! Risk of electric shock! Do not immerse the electrical parts of the product in water or other liquids. Never hold the product under running water.
⚠️CAUTION! Risk of electric shock! Never use a damaged product. Disconnect the product from the power supply and contact your retailer if it is damaged.
⚠ WARNING! Risk of injury!
Avoid contacting moving parts. Wait until all components have completely stopped before touching them.
⚠ WARNING! Risk of injury!
Switch the product off and disconnect it from the power supply before cleaning work and when not in use.
⚠ WARNING! Misuse may
lead to injury. Use this product solely in accordance with these instructions. Do not attempt to modify the product in any way.
This product can be used by children aged from 8 years and above and persons with reduced physical, sensory or mental capabilities, or lack of experience and knowledge if they have been given supervision or instruction concerning use of the product in a safe way and understand the hazards involved.
■ Children shall not play with the product.
■ Cleaning and user maintenance shall not be made by children without supervision.
■ Ensure the rated voltage shown on the rating label corresponds with the voltage of the power supply.
- Do not operate any product with a damaged power cord or plug, when the product malfunctions or has been damaged in any manner.
■ Only use the product in dry indoor rooms.
- Do not operate the product with wet hands or while standing on a wet floor. Do not touch the power plug with wet hands.
■ Protect the product against heat. Do not place the product close to open flames or heat sources such as stoves or heating appliances.
- Do not insert fingers or foreign objects in any opening of the product and do not obstruct the air vents.
■ Regularly check the power plug and power cord for damage. If the supply cord is damaged, it must be replaced by the manufacturer, its service agent or similarly qualified persons in order to avoid a hazard.
■ Protect the power cord against damages. Do not let it hang over sharp edges, do not squeeze or bend it. Keep the power cord away from hot surfaces and open flames and ensure that nobody can pull on or trip over it unintentionally.
If the power cord should stop using the product and disconnect the product from the electrical outlet.
- Do not pull the power plug out of the electrical outlet by the power cord. Do not wrap the power cord around the product.
■ Protect the product, its power cord and power plug against dust, direct sunlight, dripping and splashing water.
For safety reasons, it is recommended not to remove the safety grille/guard. However, if you need to remove it, ensure that the product is switched off from the supply mains before removing the grille/guard.
■ Never use the product without the safety grille or with a damaged safety grille.
- Place the product on a firm, level and stable surface to prevent overturning during operation.
- Keep the product at least 50 cm away from any objects (curtains, walls, etc.).
During use, keep hands, hair, clothing and utensils away from the safety grille to avoid injuries and damage of the product.
■ Never try to move the product while it is operating. Always switch the product off before moving it.
■ Always turn the product off beforebatteries / rechargeable batteries disconnecting it from the power and / or open them. Overheating, supply. fire or bursting can be the result.
■ Unplug the product before cleaning, assembly, and when not in use for long time. Wipe with a dry and soft cloth.
- Let the product dry completely before connecting it to the power supply and before storage.
Never recharge non-rechargeable batteries. Do not short-circuit
ebatteries / rechargeable batteries and / or open them. Overheating, fire or bursting can be the result.
■ Never throw batteries / rechargeable batteries into fire or water.
- Do not exert mechanical loads to batteries / rechargeable batteries.
Allow the product to cool down completely before storage.
■ Store the product in a cool, dry place, protected from moisture and out of the reach of children.
● Safety instructions for batteries / rechargeable batteries
■ DANGER TO LIFE! Keep batteries / rechargeable batteries out of reach of children. If accidentally swallowed seek immediate medical attention.
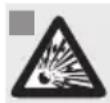
DANGER OF EXPLOSION!
Risk of leakage of batteries / rechargeable batteries
- Avoid extreme environmental conditions and temperatures, which could affect batteries / rechargeable batteries, e.g. radiators / direct sunlight.
If batteries / rechargeable batteries have leaked, avoid contact with skin, eyes and mucous membranes with the chemicals! Flush immediately the affected areas with fresh water and seek medical attention!

WEAR PROTECTIVE GLOVES!
Leaked or damaged batteries / rechargeable batteries can cause burns on contact with the skin. Wear suitable protective gloves at all times if such an event occurs.
In the event of a leakage of batteries / rechargeable batteries, immediately remove them from the product to prevent damage.
■ Remove batteries / rechargeable batteries if the product will not be used for a longer period.
Risk of damage of the product
■ Only use the specified type of battery / rechargeable battery!
- Insert batteries / rechargeable batteries according to polarity marks (+) and (−) on the battery / rechargeable battery and the product.
■ Clean the contacts on the battery / rechargeable battery before inserting!
■ Remove exhausted batteries / rechargeable batteries from the product immediately.
Before use
Unpacking
■Remove the packaging. Check if all parts are complete.
- Inserting/Replacing the battery
For first time use, pull out the insulation strip from the battery compartment 30.
Open the battery compartment 30 by pulling out the battery receptacle (located at the back of the remote control 31 (Fig. H).
■ Remove the used battery if present.
- Insert a button cell (type CR2025) into the battery receptacle. The + polarity marking has to point upwards.
■ Slide the battery receptacle back into the battery compartment 30.
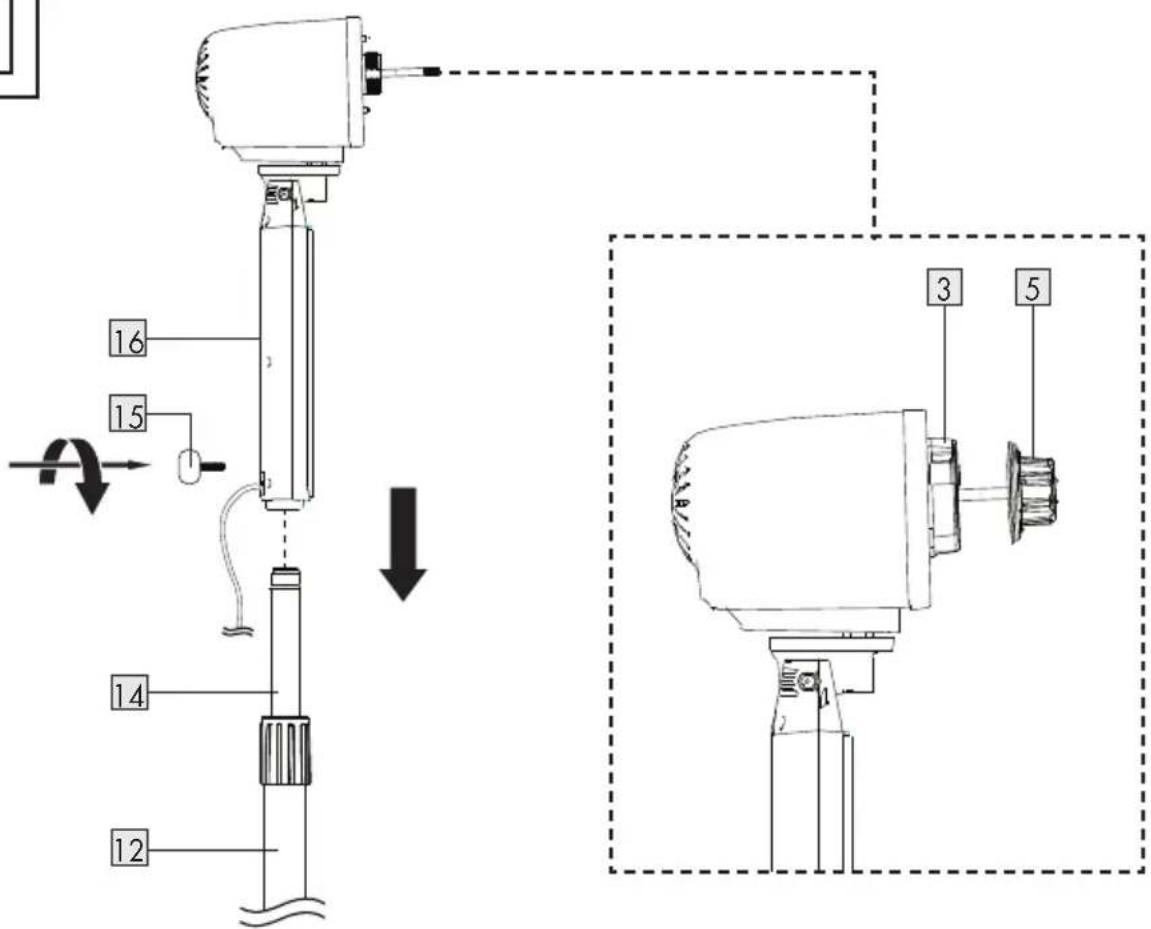
Assembly
Fig. Step
NOTE: The following parts are for transport only. After unpacking, remove and discard these parts.
■ Security tube (located on the shaft of the main unit 16)
■ Security plug (located between rear grille 2 and blade 4)
A
Unscrew the L-shaped bolt 10. Remove the washer 9 from the stand post 12. Place the stand post 12 on the round base 11. Fasten both parts with the washer 9 and the L-shaped bolt 10.
B
Extend the upper pole 14 to its maximum length (refer to "Height adjustment"). Place the main unit 16 on the upper pole 14. Fasten both parts with the locking knob 15.
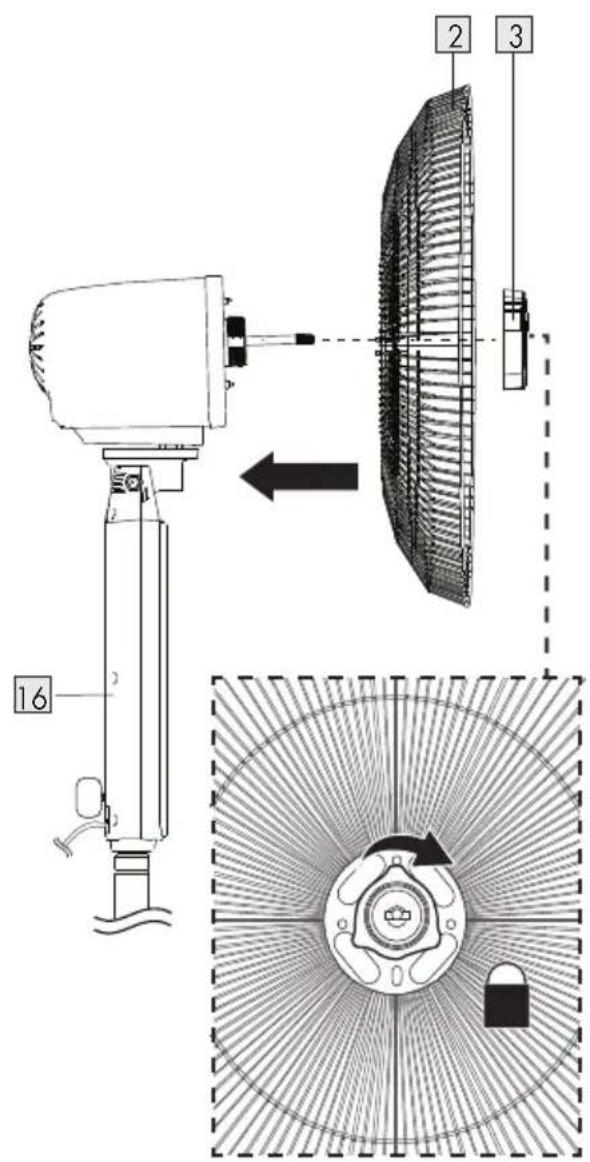
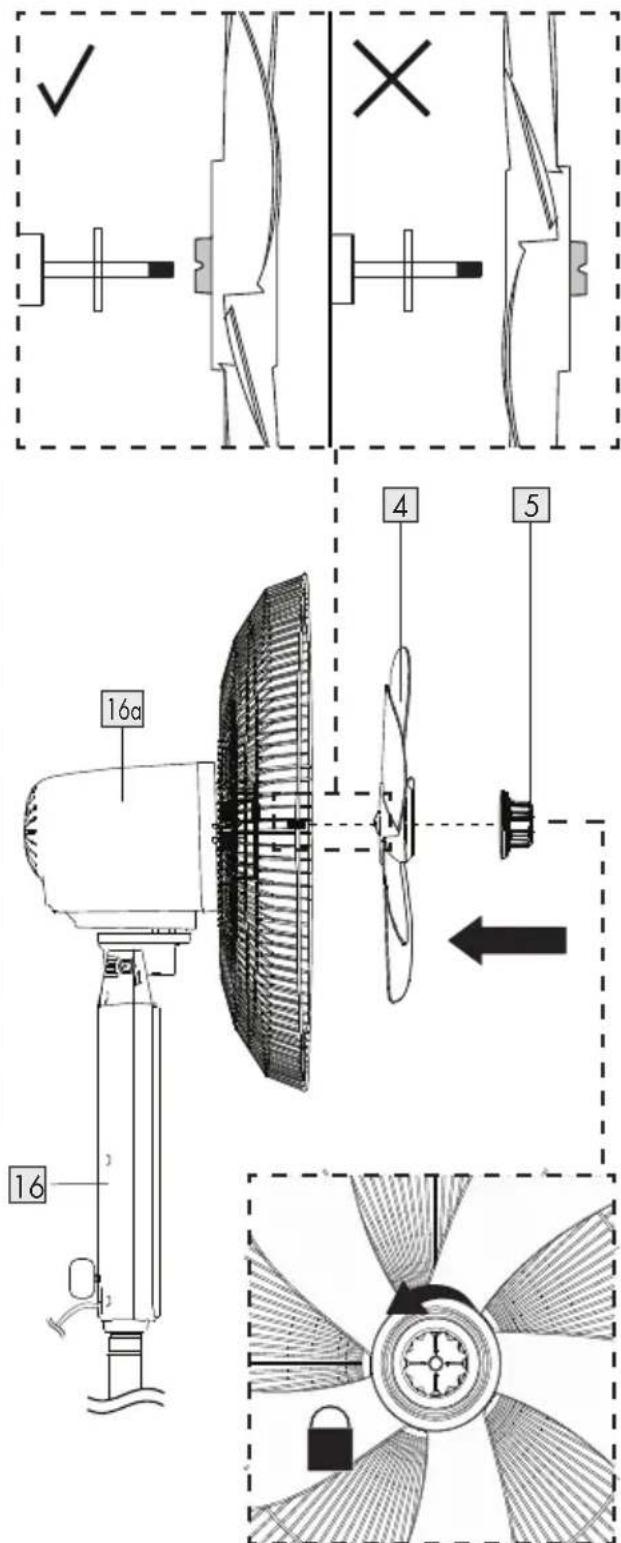
Remove the blade lock nut 5 from the shaft of the main unit 16, grille lock nut 3 from the main unit 16.
Fig. Step
Place the rear grille 2 on the main unit 16. Make sure to align the rear grille's 2 round holes over the 3 mounting lugs on the main unit 16. Secure the grille with the grille lock nut 3. Rotation direction:
Install the blade 4 onto the shaft of motor D 16a until it fits securely with the retaining pin of the motor shaft. Secure it with the blade lock nut 5. Rotation direction:
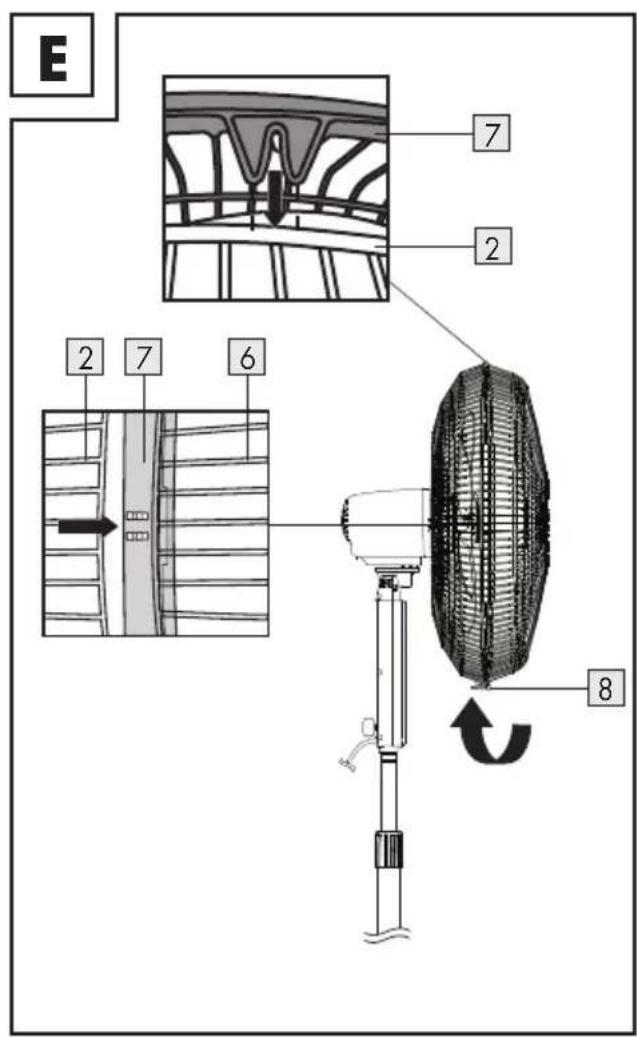
NOTE: Make sure the 10 positions of the grille collar 7 properly click into place at the edge of the front grille 6.
E Use a screwdriver (not included) to unscrew the locking screw from the hinged clip 8. Place the front grille 6 on the rear grille 2. The hook of the grille collar 7 needs to be hooked into the rear grille 2.
Secure both grilles 2 / 6 by closing the hinged clip 8. Use a screwdriver (not included) to secure the locking screw onto the hinged clip 8.
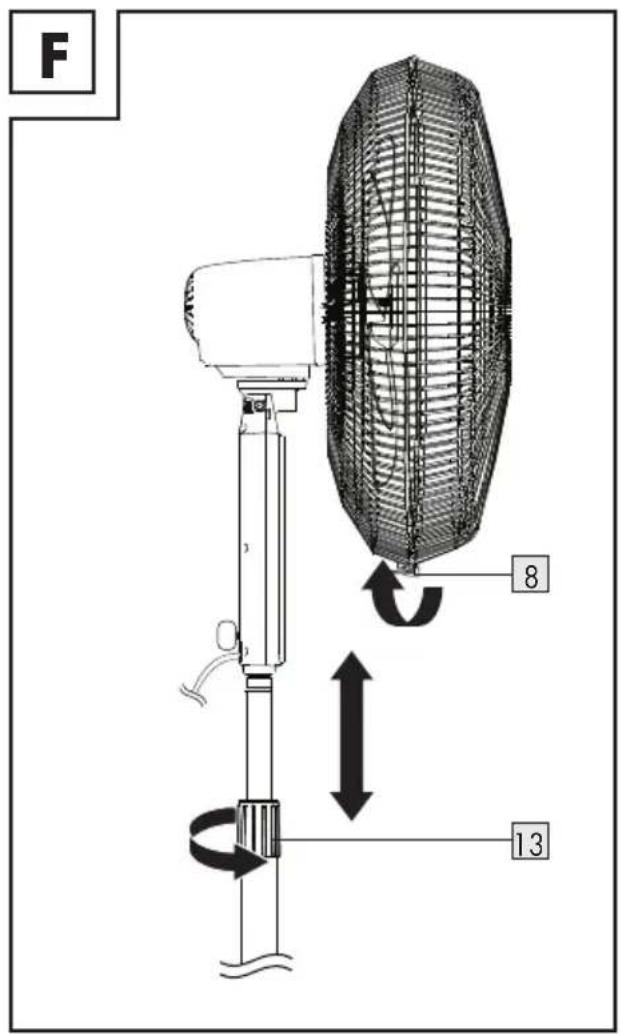
● Height adjustment
■Loosen up the adjustment knob 13 in anticlockwise direction (see Fig. F).
■ Adjust the length of the upper pole.
When the height is set, secure the position by tightening the adjustment knob 13 in clockwise direction (see Fig. F).
Operation
- Place the product on a flat, stable ground. - Connect the power plug to a suitable power socket.
■ Turning the product on/off: Press ⏻ 23.
Fan speed
Press ✦ 21 repeatedly to toggle between the 6 fan speeds:
Display Function
| 1 | Lowest speed |
| 6 | Highest speed |
Oscillation
When the product is on, press 20 to toggle between different oscillation modes:
| Press | Indicator | Function |
| 1x | ↔ | 17 Horizontal oscillation |
| 2x | ↔ | 18 Vertical oscillation |
| 3x | ∞ | 19 Vertical / horizontal oscillation |
4x Oscillation stops
i NOTES:
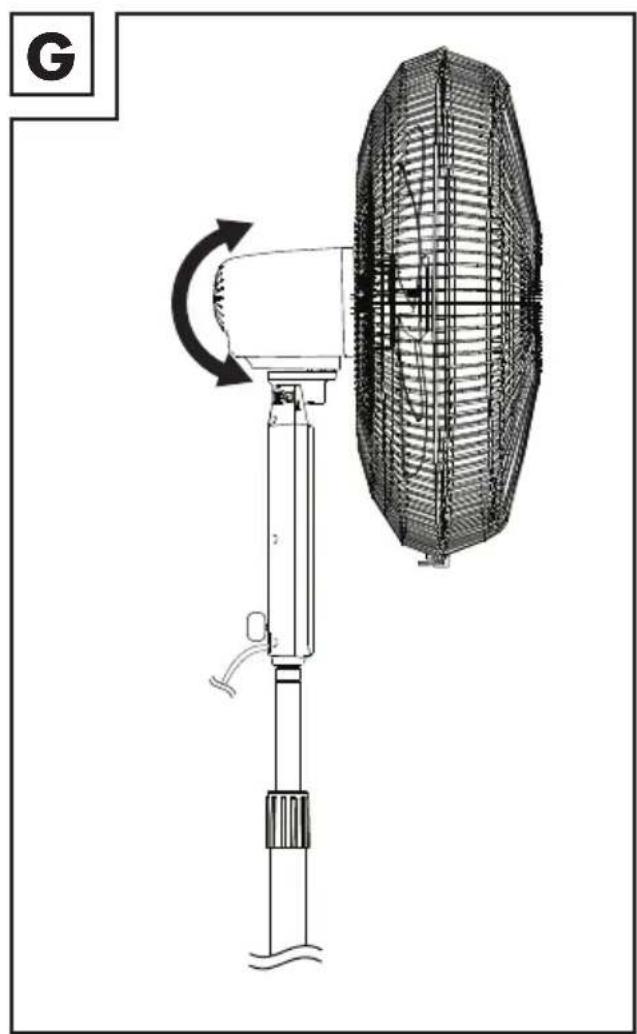
- You can also adjust the angle of the product manually by pulling it lightly up / down (see Fig. G).
- Do not adjust the angle when the product is in operation.
Airflow modes
■ Press 22 repeatedly to select the desired airflow mode:
Press Mode description
1x Natural ☐ - constant cycling through different airflow speeds. Amending airflow speed: In natural mode, press ✿ 21 repeatedly: 1x Mainly low speed 2x Half low half high speed 3x Mainly high speed
2x Sleep - constant cycling through 3 different speed modes (if started from speed mode 3). The product decreases the speed mode every 15 minutes and then stays at the lowest speed mode.
3x Soft - constant soft airflow.
4x Normal - constant airflow at the currently selected airflow speed (from 1 to 6).
NOTE: The normal mode is the default mode once power is on.
- Timer (automatic switch off time)
When the product is on, press 24 repeatedly to set the automatic turn off time. You can choose from 1 to 8 hours.
● Cleaning and care
Before cleaning, press 23 and unplug the product from the power supply to completely switch off the product. Remove the battery from the remote control 31 before cleaning. Use a dry lint-free cloth to clean the contacts on the battery / rechargeable battery before inserting!
⚠ WARNING! Do not immerse the electrical parts of the product in water or other liquids. Never hold the product under running water.
■ Clean the product with a slightly moistened cloth.
- Do not allow any water or other liquids enter the product's interior.
- Do not use abrasives, harsh cleaning solutions or hard brushes for cleaning.
■ Let all parts dry afterwards.
● Cleaning the blade and the safety guard
Dust collections on blade and on the grilles 2 / 6 can be removed with a brush (not supplied). In case of serious soiling, the front grille 6 can be removed for thorough cleaning. To do so, reverse the steps of the "Assembly" chapter.
Wipe the grilles / 6 and blade 4 with a damp cloth. For stubborn soiling use a mild detergent on the cloth. Dry completely before re-assembling them.
NOTE: The grilles 2 / 6 act as safety guards to protect the user from touching the blade 4.
⚠️ DANGER! Ensure that the product is switched off from the supply mains before removing the guard.
Mount the front gride back onto the product when cleaning is complete.
Storage
Wind up the power cord and tighten it with the hook-and-loop fastener.
- When not in use, store the product in its original packaging.
■ Store the product in a dry, secure location away from children.
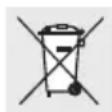
- Disposal
The packaging is made entirely of recyclable materials, which you may dispose of at local recycling facilities.
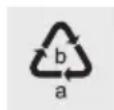
Observe the marking of the packaging materials for waste separation, which are marked with abbreviations (a) and numbers (b) with following meaning: 1-7: plastics / 20-22: paper and fibreboard / 80-98: composite materials.

The product and packaging materials are recyclable, dispose of it separately for better waste treatment. The Triman logo is valid in France only.

Contact your local refuse disposal authority for more details of how to dispose of your worn-out product.
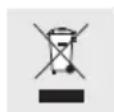
To help protect the environment, please dispose of the product properly when it has reached the end of its useful life and not in the household waste. Information on collection points and their opening hours can be obtained from your local authority.
Faulty or used batteries / rechargeable batteries must be recycled in accordance with Directive 2006/66/EC and its amendments. Please return the batteries / rechargeable batteries and / or the product to the available collection points.
Environmental damage through incorrect disposal of the batteries / rechargeable batteries!
Batteries / rechargeable batteries may not be disposed of with the usual domestic waste. They may contain toxic heavy metals and are subject to hazardous waste treatment rules and regulations. The chemical symbols for heavy metals are as follows: Cd = cadmium, Hg = mercury, Pb = lead. That is why you should dispose of used batteries / rechargeable batteries at a local collection point.
Warranty
The product has been manufactured to strict quality guidelines and meticulously examined before delivery. In the event of product defects you have legal rights against the retailer of this product. Your legal rights are not limited in any way by our warranty detailed below.
The warranty for this product is 3 years from the date of purchase. Should this product show any fault in materials or manufacture within 3 years from the date of purchase, we will repair or replace it – at our choice – free of charge to you.
The warranty period begins on the date of purchase. Please keep the original sales receipt in a safe location. This document is required as your proof of purchase. This warranty becomes void if the product has been damaged, or used or maintained improperly.
The warranty applies to defects in material or manufacture. This warranty does not cover product parts subject to normal wear, thus possibly considered consumables (e.g. batteries) or for damage to fragile parts, e.g. switches, rechargeable batteries or glass parts.
Warranty claim procedure
To ensure quick processing of your case, please observe the following instructions:
Please have the till receipt and the item number (e.g. IAN 123456_7890) available as proof of purchase.
You will find the item number on the rating plate, an engraving, on the front page of the instructions for use (bottom left), or as a sticker on the rear or bottom of the product.
If functional or other defects occur, please contact the service department listed either by telephone or by e-mail.
You can return a defective product to us free of charge to the service address that will be provided to you. Ensure that you enclose the proof of purchase (till receipt) and information about what the defect is and when it occurred.
Service
GB Service Great Britain
Tel.:08000569216
E-Mail:owim@lidl.co.uk
IE Service Ireland
Tel.:1800200736
E-Mail:owim@lidl.ie
CE
UŻYWAĆ RĘKAWIC OCHRONNYCH!
NOSTE OCHRANNÉ RUKAVICE!
POUŽÍVAJTE OCHRANNÉ RUKAVICE!
⚠️ADVARSEL! Fare for
4x Oscillation stoppet
i BEMÄRK:

- STANDVENTILATOR / PEDESTAL FAN / VENTILATEUR SUR PIED SV 60 A2
- STANDVENTILATOR SV 60 A2
- VENTILATEUR SUR PIED SV 60 A2
- List of pictograms and symbols used Page 18
- Introduction Page 18
- Safety instructions.... Page 20
- Before use.... Page 24
- Operation Page 25
- Cleaning and care Page 26
- Storage Page 27
- Disposal Page 27
- Warranty Page 28
- PEDESTAL FAN SV 60 A2
- Introduction
- Intended use
- - Scope of delivery
- • Description of parts
- - Technical data
- Safety instructions
- ⚠ WARNING! DANGER OF DEATH AND ACCIDENTS FOR TODDLERS AND CHILDREN!
- ⚠ WARNING! Risk of injury!
- ⚠ WARNING! Misuse may
- DANGER OF EXPLOSION!
- Risk of leakage of batteries / rechargeable batteries
- WEAR PROTECTIVE GLOVES!
- Risk of damage of the product
- Before use
- Unpacking
- - Inserting/Replacing the battery
- Assembly
- Fig. Step
- ● Height adjustment
- Operation
- Fan speed
- Oscillation
- i NOTES:
- Airflow modes
- Press Mode description
- - Timer (automatic switch off time)
- ● Cleaning and care
- ● Cleaning the blade and the safety guard
- Storage
- - Disposal
- Environmental damage through incorrect disposal of the batteries / rechargeable batteries!
- Warranty
- Warranty claim procedure
- Service
- UŻYWAĆ RĘKAWIC OCHRONNYCH!
- NOSTE OCHRANNÉ RUKAVICE!
- POUŽÍVAJTE OCHRANNÉ RUKAVICE!
- ⚠️ADVARSEL! Fare for
- i BEMÄRK:
Brand : SILVERCREST
Model : SV 60 A2
Category : Fan