58011 - Rice cooker KORONA - Free user manual and instructions
Find the device manual for free 58011 KORONA in PDF.

| Product type | Rice cooker and steamer 2 in 1 |
| Brand | Korona |
| Model | 58011 |
| Power supply | 220-240 V ~ 50-60 Hz |
| Maximum rice capacity | 3 cups (1 cup = 160 ml) |
| Cooking functions | Rice, Claypot Rice, Porridge, Soup, Steaming |
| Keep warm | Up to 12 hours, automatic activation |
| Delayed preset | Up to 24 hours, adjustable in 30-minute increments |
| Inner pot material | Aluminum with non-stick coating |
| Included accessories | Removable inner pot, steaming basket, measuring cup, rice spatula, power cord |
| Care and cleaning | Removable parts washable in warm water and mild detergent; wipe housing with damp cloth; do not immerse |
| Safety | Automatic shut-off in case of dry operation, safety cut-off, hot surfaces |
| Warranty | 2 years against defects in materials and workmanship |
| Approximate weight | 1.8 kg |
| Approximate dimensions (W x D x H) | 25 x 25 x 25 cm |
Frequently Asked Questions - 58011 KORONA
User questions about 58011 KORONA
0 question about this device. Answer the ones you know or ask your own.
Ask a new question about this device
Download the instructions for your Rice cooker in PDF format for free! Find your manual 58011 - KORONA and take your electronic device back in hand. On this page are published all the documents necessary for the use of your device. 58011 by KORONA.
USER MANUAL 58011 KORONA
2 in 1 Rice Cooker and Steamer
Nederlands
Gebruiksaanwijzing
2-in-1 Rijstkoker en stomer
Français
KORONA electric GmbH, Sundern/Germany
www.korona-electric.de


Vor Erstgebrauch
natural_image
Close-up of a black plastic connector with a cable inserted, shown from two angles (no text or symbols visible)natural_image
Three-panel image showing a hand using a wheel to press or adjust a component, with no visible text or symbols.natural_image
Sequence of five black plastic components showing assembly or manufacturing steps, including a dial indicator and mechanical parts (no text or symbols visible)
Before use, please read these instructions carefully and keep them in a safe place for future reference. When passing on the appliance to a third party, make sure to include these instructions for use.
This appliance is only intended for cooking rice and steaming foods. This appliance is only intended for private household use!
Safety:

This symbol identifies hazards which may cause injuries!

This symbol warns of hot surfaces. Risk of burns!

This symbol identifies electric shock hazards!

This symbol warns of evaporating steam!

General Safety Instructions
- Manufacturer takes no responsibility for any damage caused by incorrect use.
- Incorrect or improper use can damage the appliance and cause injuries to the user.
- Before connecting this appliance to the mains, make sure your local voltage matches the technical data of the appliance. Otherwise the appliance may overheat and get damaged.

Caution! Danger of electric shock!
- Never put the appliance, cord or plug into water or any other liquid.
- Do not use the appliance near a sink or wash basin.
- Do not use the appliance with wet hands.
- Do not use the appliance outdoors.
An electric appliance is not a toy!
- Never leave the appliance unattended during use.
- This appliance can be used by children aged from 8 years and above and persons with reduced physical, sensory or mental capabilities or lack of experience and knowledge if they have been given supervision or instruction concerning the use of the appliance in a safe way and understand the hazards involved. Children shall not play with the appliance. Cleaning and user maintenance shall not be made by children unless they are older than 8 and supervised.
- Keep the appliance and its cord out of reach of children less than 8 years.
- Always unplug your appliance when it is not in use, and before cleaning.
- Always pull the plug – not the cord.
- Keep the appliance and the cord well away from any hot surfaces to avoid any damage to the appliance.
- Make sure the cord may not inadvertently be pulled or cause anyone to trip when in use. Do not allow the cord to hang over sharp edges.
- Do not bend the cord or wind it round the appliance.
Do not use the appliance,
- if the cord is damaged.
• in case of malfunction. - if the appliance was dropped or is damaged otherwise. Have it checked and, if necessary, repaired by a qualified person/Customer Service. Never attempt to make any modifications to or repair the appliance yourself.
- Only use accessories evaluated for use with this appliance.
- Never attempt to drive any objects into the appliance.
- Never attempt to open the housing yourself!
- The appliance is not intended to be operated by means of an external timer or separate remote-control system.
Special Safety Instructions

Warning! To avoid the possibility of injury/damage to the appliance, electric shock, and risk of burns.
- Your rice cooker is only intended for cooking rice and for the steaming of foods (e.g. vegetables, fish, meat). Never attempt to heat any other liquids or foods in it.
- Place the appliance on an even and heat-resistant surface. Do not place it on top of a metal surface.
- The temperature of accessible surfaces may be high during operation. Therefore, do not touch the appliance during and/or immediately after operation. Only at its handle if available Danger of serious burns!
• Never open the lid during operation.
• Never use the appliance without water. -
To prevent the appliance from boiling dry, make sure the liquid level is never below minimum filling marking (1 CUP) inside the appliance
-
Never exceed the maximum filling level marking (3 CUPS) inside the appliance to avoid any boiling water from spilling from the appliance. Danger of serious burns!
- The rice bowl should only be used with the appliance.
- Do not move the appliance during operation.
- Let the appliance completely cool down before cleaning.
- The appliance also features a boil-dry cut-out, which will switch to “warm” mode, should it accidentally be operated without liquid. In the event of such a safety cut-out, switch off the appliance immediately, unplug it and let it cool down for at least 15 minutes.
Product Description
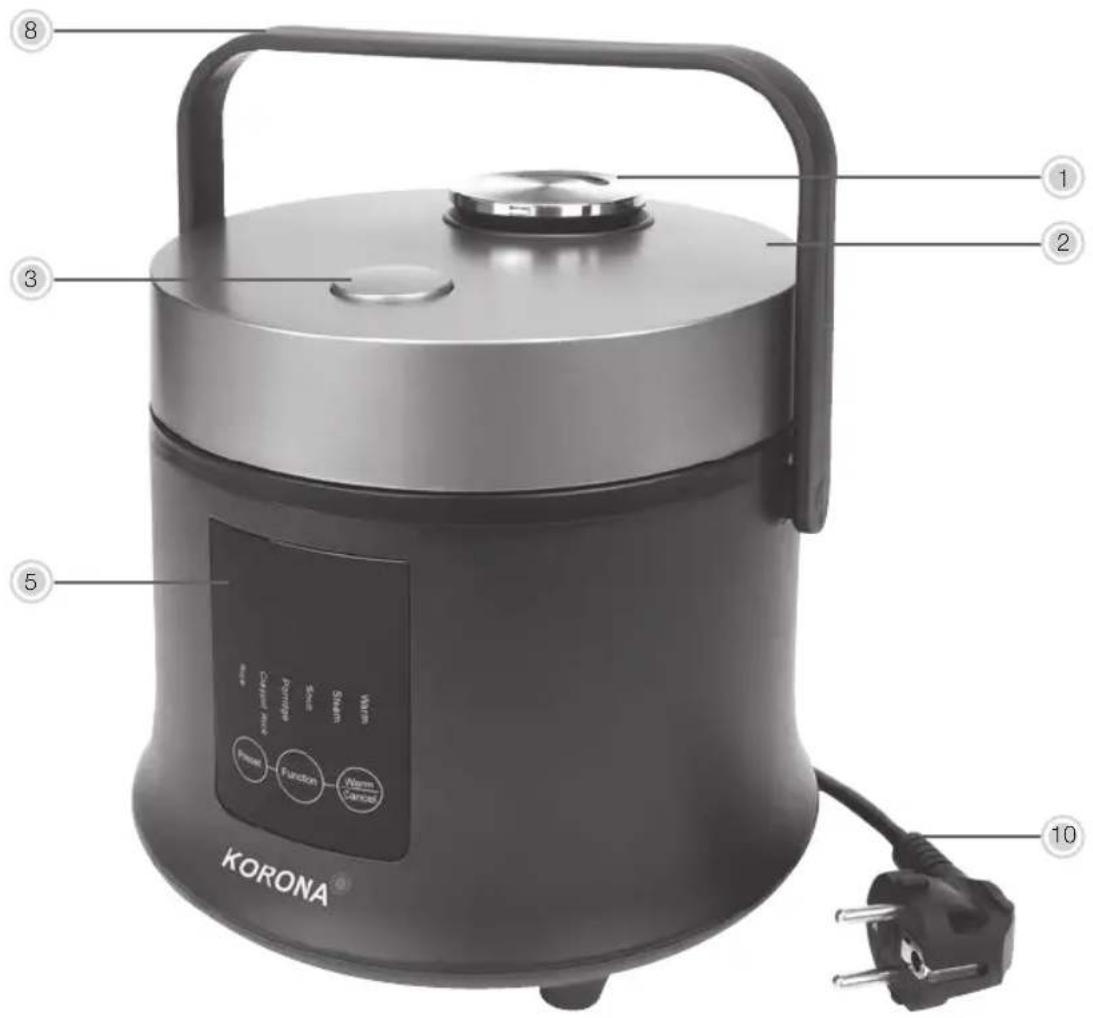
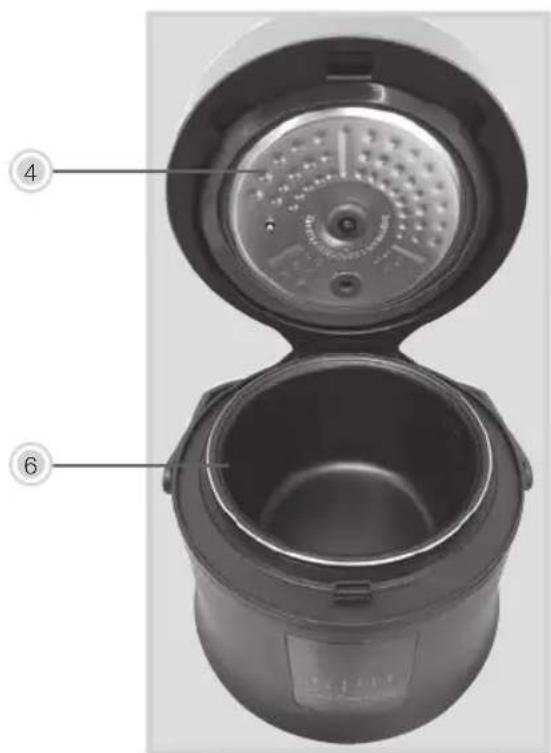
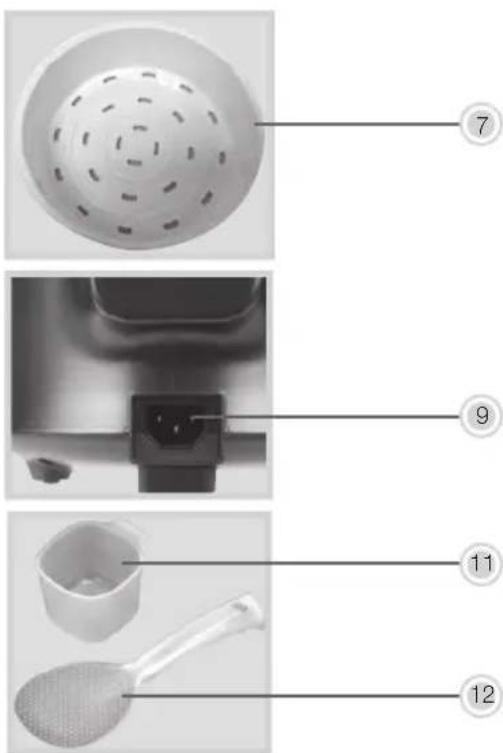
- Steam Vent/Regulator (removable)
- Lid
- Lid opening button
- Inner lid (removable)
- Control Panel
Preset
Function
- Warm
- Steam
- Soup
- Porridge
- Claypot Rice
- Rice
Warm / Cancel

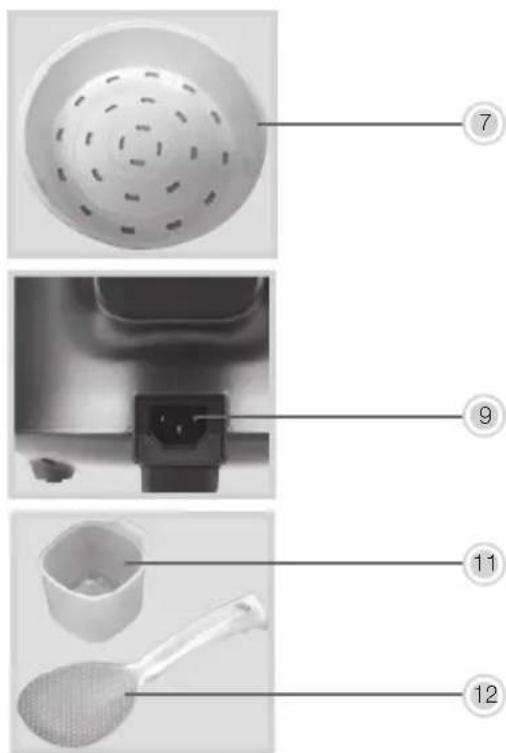
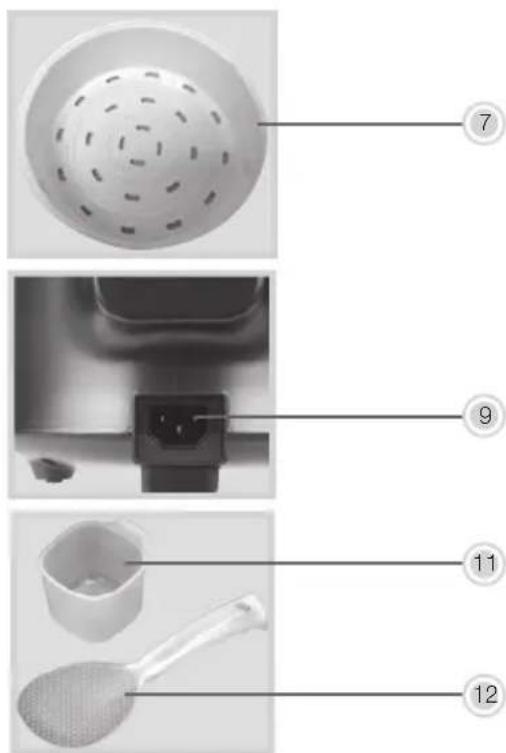
- Removable aluminium rice bowl
- Steaming tray
- Handle
- Cable port
- Power cord and plug
- Measuring Cup
- Rice Spatula
Before First Use
- Remove all packaging material and check whether the appliance is complete and undamaged.
- Do not use the appliance if it shows any signs of damage.
- Clean the appliance according to "Cleaning and Care".
- Fully unwind the power cord and connect the power cord to the cable port of the appliance.

Warning: Plastic bags are a danger to toddlers and babies, therefore keep them away to avoid on.
Steam Vent/Regulator
The appliance is equipped with a steam vent/regulator (1) on top of the lid (2). This steam vent/regulator (1) prevents the appliance from overpressure being generated during the boiling and cooking process.


During use, hot steam might evaporate from the steam vent (1). Danger of burns!
Operation

The temperature of accessible surfaces may be high during operation. Therefore, do not use appliance during and/or immediately after operation.

Never operate the appliance without the rice bowl.

Note:
- Only use loose rice and no boil in bag rice!
- Always rinse the rice several times before adding it into the rice bowl.
- The ratio rice to water should be 1:1 (1 cup rice:water mark 1 cup).
- Maximum amount of raw rice should not exceed 3 cups
- The water volume can be adjusted according to your personal preference and the type of rice used.
- The cooking time for the rice may vary, depending on the ratio of the rice and water, amount and the type of rice.
Preparation
- Place the appliance on an even and heat resistant surface.
- Press the lid opening (3) button to open the lid (2).
- Measure the amount of rice with the measuring cup (11). One cup of rice equals 160 ml on the measuring cup. Always rinse the rice several times before adding it into the rice bowl.
- Add the rice or the ingredients you wish to cook into the rice bowl (6), make sure that it is evenly distributed and add the respective amount of cold water. Pay attention to the minimum (1 CUP) and maximum (3 CUPS) filling quantity.

- Place the rice pot (6) into the appliance, make sure that it is properly inserted.

Before inserting the rice bowl into the appliance, wipe the outside of the rice bowl in order to make sure that no foreign objects stick to the outside of the rice bowl.
- Close the lid (2).
- Insert the power cord (10) into the cable port (9) of the appliance.

natural_image
Close-up of a black plastic plug inserted into a white socket, showing wiring details (no text or symbols visible)- Connect (10) the appliance to a properly installed wall socket.
- Press the respective "Function" key on the control panel (5) to choose the desired cooking option.
Cooking Rice
Approx. Cooking time: 35 minutes
- Follow the steps 1 to 8 under Preparation.
- Press the function key and choose "RICE".
- The indicator light "RICE" will blink for 5 seconds. Once the indicating light stops blinking, there will be a beep sound and the cooking process starts.
- Once the cooking time is completed, 5 beep sounds can be heard the appliance function indicator light will go off and the "WARM" function indicator light lights up. The appliance will enter the "Keep Warm" Mode.

The default keep warm time is 12 hours. Therefore, do not keep the cooked rice on "WARM" mode for more than 12 hours.
- Open the lid (2) and use the spatula (12) to loosen and to take out the rice of the rice pot.

Attention: Use pot holder when removing the rice bowl! Risk of burns.
After use, always switch off the appliance and disconnect if from the mains.
Amount of Rice and Cooking Time
| Cups of rice 1 cup 2 cups 3 cups | ||
| Cooking time Approx. 26mins | Approx. 30 mins Approx. 35 mins |
Only meant as an indication!
Claypot Rice
Cooking Time: 40 minutes
- Follow the steps 1 to 8 under Preparation.
- Press the function key and choose "Claypot Rice".
- The indicator light "Claypot Rice" will blink for 5 seconds. Once the indicating light stops blinking, there will be a beep sound and the cooking process starts.
-
After 20 minutes a beep sound can be heard, press the function key to stop the beep sound. Open the lid and add the additional ingredients for the claypot rice. Close the lid and the cooking process continues for another 20 minutes.
-
Once the cooking time is completed, 5 beep sounds can be heard the appliance automatically switches into the "KEEP WARM" Mode. The "Claypot Rice" function indicator light will go off and the "WARM" function indicator light lights up. The appliance will enter the "Keep Warm" Mode.
Porridge
Approx. Cooking time: 1 hour 30 minutes
- Follow the steps 1 to 8 under Preparation.
- Press the function key and choose "Porridge".
- The indicator light "Porridge" will blink for 5 seconds. Once the indicating light stops blinking, there will be a beep sound and the cooking process starts.
- Once the cooking time is completed, you will hear five beep sounds and the "Porridge" indicator light will go off and the "WARM" function indicator light lights up. The appliance will enter the "Keep Warm" Mode.
Soup
Approx. Cooking time: 2 hours
- Follow the steps 1 to 8 under Preparation.
- Press the function key and choose "Soup".
- The indicator light "Soup" will blink for 5 seconds. Once the indicating light stops blinking, there will be a beep sound and the cooking process starts.
- Once the cooking time is completed, you will hear five beep sounds and the "Soup" indicator light will go off and the "WARM" function indicator light lights the appliance will enter the "Keep Warm" Mode.
Steaming
Approx. Cooking time: 30 minutes
The steam function is for steaming foods only.
- Add some cups of water into the rice bowl.

Note: Minimum amount of water added should at least reach the 1 CUP mark.
- Place the steaming basket (7) into the rice pot (6).
- Place the foods (vegetables, fish, etc.) to be steamed into the steaming basket (7).

Make sure that the foods in the steam basket are not immersed into water.
- Wipe the outside of the rice bowl (6) in order to make sure that no foreign objects stick to the outside of the rice bowl (6).
- Press the function key and choose "Steam". The indicator light "Steam" will blink for 5 seconds. Once the indicating light stops blinking, there will be a beep sound and the steaming process starts.
- Once the steam time is completed, you will hear five beep sounds and the "Steam" indicator light will go off and the "WARM" function indicator light lights up. The appliance will enter the "Keep Warm" Mode.
Keep Warm
The default keep warm time is 12 hours.

All functions can be cancelled by pressing the WARM/CANCEL button!
Pre-set for delayed cooking
You can pre-set the delayed cooking time up to 24 hours for different cooking modes.
- Follow the steps 1 to 8 under Preparation.
- Press the desired function key.
- While the indicator light of the selected function is blinking, press the "Preset" button and adjust the time.
- After adjusting the pre-set time, the delayed cooking process will start after approx. 5 seconds.

Note:
- Default setting: 4 hours
- Max preset time: 24 hours
- By pressing the preset button the time intervals can be increased by 30 minutes each. Once the max. preset time has been reached, it will be reset to the default time.
- Once the cooking process has started the preset function does not work any longer.
Cleaning and Care
Due to hygienic reasons clean your appliance on a regular basis, best after each use. Not doing so could possibly result in a hazardous situation or could lead to health issues (germ formation).

Before cleaning, always switch off the appliance and disconnect it from the mains. Let it
completely cool down.
Never immerse the appliance in water. Danger! Electric Shock!
Clean the steam vent (1), inner lid (4), rice bowl (6), steaming tray (7), measuring cup (11) and spatula (12) in warm water using a mild dishwashing detergent. Rinse under running water and dry all parts thoroughly with a dish towel.
Clean the housing of the appliance with a moistened soft cloth.
Do not use any aggressive cleaning agents and/or other hard objects to clean the appliance.
Make sure that the appliance and all other resp. parts are properly dried.

Never place the appliance and its accessories into the dishwasher – It is not dishwasher manage the appliance and hurt its user!

Cleaning and user maintenance shall not be made by children without supervision.
Food residue can remain in the steam cap and may cause a malfunction of the appliance therefore, keeping it clean is a must.
Disassembly and Re-Assembly of Inner Lid

natural_image
Three-panel image showing a hand turning a tire with a screwdriver, then applying a filter to a circular component (no text or symbols visible)Disassembly and Re-Assembly of Steam Vent/Regulator

natural_image
Sequence of black plastic components showing assembly and disassembly (no text or symbols visible)Storage
Keep the appliance away from children and store it in a clean and dry place.
Disposal Instructions

Waste electrical devices marked with this sign must not be disposed of with your household waste, but are to be collected separately. Therefore, please return this device at the end of its life cycle to special collection points for disposal or your local dealer.

Your 2 in 1 Rice Cooker and Steamer 58011 is packed in a retail box. Such boxes are recyclable waste, i.e. they are reusable or recyclable.
Trouble Shooting
If errors occur please contact the Service Centre.
Technical Data:
Voltage: 220 - 240 V \~ 50 - 60 Hz
Rated Power: 300 W
Protection Class: I
Technical data subject to change!
CE
Guarantee:
This product is guaranteed against defects in materials and workmanship for a period of 2 years.
This guarantee is not valid:
- if the appliance has not been used in accordance to the instructions
• for damages due to wear and tear (batteries, etc.)
• for damages known by customer at time of purchase
• for damages caused by owner
This guarantee does not affect your statutory right, nor any legal right you may have as a customer under applicable national legislation governing the purchase of goods.
In order to assert his/her right in a guarantee case during the guaranteed period, the customer must provide evidence of the date of purchase (receipt).
The guarantee is to be asserted against
KORONA electric GmbH, Sundern/Germany.
Telephone Hotline: +49 2933 90284-80
Mail: service@korona-electric.de
web: www.korona-electric.de
within 2 years after the date of purchase. In case of guarantee the customer is given the right to get the appliance repaired at our own or at an authorized shop. Further rights (due to guarantee case) are not given to the customer.
Beoogd gebruik
natural_image
Close-up of a black plastic plug inserted into a white surface, showing wiring details (no text or symbols visible)natural_image
Three-panel image showing a hand using a tool to press or adjust a circular component, with no visible text or symbols.natural_image
Sequence of five black plastic components showing assembly or manufacturing steps, including a dial indicator and mechanical parts (no text or symbols visible)OPSLAG
-Claypot Rice (Riz Claypot)
-Rice (Riz)
Warm / Cancel (Réchaud / Annuler)


natural_image
Close-up of a black plastic plug inserted into a white plastic container, showing internal wiring (no text or symbols visible)natural_image
Five-panel sequence showing a hand inserting a component into a black circular device, with additional views of the device's internal components (no text or symbols visible)STOCKAGE
-Claypot Rice (Riso in pentola d'argilla)
-Rice (Riso)
Warm / Cancel (Riscalda / Annulla)


natural_image
Close-up of a black plastic plug inserted into a white plastic container, showing two views (no text or symbols visible)natural_image
Three-panel image showing a hand turning a circular mechanical component, with no visible text or symbols.natural_image
Sequence of five black plastic components showing assembly or manufacturing steps, including a dial indicator and circular housing (no text or symbols visible)STOCCAGGIO
-Claypot Rice (Arroz claypot)
-Rice (Arroz)
Warm / Cancel (Calentar/Cancelar)


natural_image
Close-up of a black plastic plug inserted into a white plastic container, showing internal wiring (no text or symbols visible)natural_image
Three-panel image showing a hand using a circular tool to press or press a tire, then to clean a white circular object (no text or symbols visible)natural_image
Five-panel sequence showing a hand inserting a component into a black circular device, with additional views of the device's internal components (no text or symbols visible)ALMACENAMIENTO
- Warm (Sıcak)
- Steam (Buhar)
- Soup (Çorba)
- Porridge (Yulaf Lapasi)
- Claypot Rice (Kil çömlek pilavi)
- Rice (Pilav)
Warm / Cancel (Sıcak / İptal)

natural_image
Close-up of a black plastic connector with plug, shown from two angles (no text or symbols visible)natural_image
Three-panel image showing a hand turning a car wheel, then adjusting the rim and wheel rim (no text or symbols visible)natural_image
Five-panel sequence showing a hand inserting a black plastic component into a circular housing, with additional views of the housing and lid (no text or symbols visible)MUHAFAZA
natural_image
Close-up of a black plastic plug inserted into a white surface, showing wiring details (no text or symbols visible)natural_image
Three-panel image showing a hand using a tool to press or adjust a circular component, with no visible text or symbols.natural_image
Five-panel sequence showing a hand inserting a black plastic component into a fan, with additional close-ups of the same components (no text or symbols visible)PRZECHOWYWANIE
natural_image
Close-up of a black plastic plug inserted into a cable, showing two different states of installation (no text or symbols visible)natural_image
Three-panel image showing a hand turning a circular mechanical component, then applying a filter to a surface (no text or symbols visible)natural_image
Five-panel sequence showing a hand inserting a black plastic component into a fan, then to clean a circular mechanical part with a lid (no text or symbols visible)SKLADOVÁNÍ
natural_image
Abstract geometric shape with curved and angular gray segments, no text or symbols presentRef: 58011/2021.10