
AFD 5010 - Deep fryer AMICA - Free user manual and instructions
Find the device manual for free AFD 5010 AMICA in PDF.

| Brand | AMICA |
| Model | AFD 5010 |
| Product type | Hot air fryer (Air fryer) |
| Power supply | 220-240 V~, 50-60 Hz |
| Rated power | 1800 W |
| Fry basket capacity | 6 L |
| Drawer capacity | 7.2 L |
| Temperature range | 40-200 °C |
| Timer | 1 to 60 minutes (normal programs); up to 9 hours for dried fruits |
| Preset cooking programs | 8 programs: pastries, fries, fish, chicken drumsticks, meat and cold cuts, steaks, chicken wings, dried fruits |
| Display | Digital touch screen with heating and ventilation indicators |
| Safety | Automatic shut-off when drawer is opened; basket lock; overheat protection |
| Basket material | Non-stick coating |
| Power cord length | Approximately 0.90 m |
| Cleaning and maintenance | Basket and drawer washable by hand with hot water and mild detergent; body wiped with a damp cloth |
| Spare parts and repairability | Parts available through authorized service; power cord replaceable only by a professional |
Frequently Asked Questions - AFD 5010 AMICA
User questions about AFD 5010 AMICA
0 question about this device. Answer the ones you know or ask your own.
Ask a new question about this device
Download the instructions for your Deep fryer in PDF format for free! Find your manual AFD 5010 - AMICA and take your electronic device back in hand. On this page are published all the documents necessary for the use of your device. AFD 5010 by AMICA.
USER MANUAL AFD 5010 AMICA
natural_image
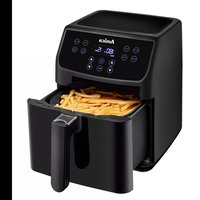
Black Amica air fryer with digital display and handle (no visible text or symbols on device body)PL INSTRUKCJA OBSŁUGI 2
EN USER MANUAL 6
CS NÁVOD K OBSLUZE 10
SK NÁVOD NA OBSLUHU 14

SAFETY INSTRUCTIONS FOR USE Note! To minimise the risk of fire, electric shock or injury:
- Carefully read this instruction before using the appliance.
- This appliance is for household use only.
- This appliance can be used by children aged 8 years and older or by persons with physical, mental or sensory handicaps, or by those who are inexperienced or unfamiliar with the appliance, provided they are supervised or have been instructed how to safely use the appliance and are familiar with risks associated with the use of the appliance. Ensure that children do not play with the appliance. Do not allow children to clean and maintain the appliance unless they are 8 years or older and are supervised by a competent person.
- Children do not realize the dangers that can arise when using electrical appliances; therefore keep the appliance out of reach of children.
- If the power cord is damaged it must be replaced to prevent danger. The power cord must be replaced by a service technician authorised by the manufacturer or by another qualified person.
- Turn off and unplug the appliance from power when not in use and before cleaning, maintenance, or moving.
- When removing the plug from the wall outlet, always pull on
the plug, not the cord, while holding the socket with your other hand.
- Exercise caution as the surfaces of the appliance may become hot during operation.
- Do not submerge any part of the appliance in water or other liquids.
- Do not cover the air inlet and outlet openings while the appliance is in operation.
- Do not fill the frying pan with oil as this may create a fire hazard.
- Never touch the inside of the appliance when it is on.
- Keep the power cord away from hot surfaces.
- During hot air frying, hot steam is released from the air outlet openings. Keep your hands and face away from steam and air outlet openings. When removing the tray from the appliance be careful of hot steam and air.
- Immediately unplug the appliance from power if dark smoke is emitted. Before removing the tray, wait until no more smoke escapes from the appliance.
- Warning: Potential injuries may result from improper use.
- Make sure the frying basket is locked in place at the front of the holder- both tabs of the frying basket handle must be fully inserted into the grooves on the top of the basket holder.
- Ensure the frying basket hold-
er is fully inserted and the handle is securely attached to the frying basket holder while the air fryer is running. WARNING: The air fryer will not operate if the frying basket holder is not completely inserted.
- Do NOT operate this appliance using an external timer or a separate remote control system.
- Do not use the appliance for purposes other than those for which it is intended.
Electrical requirements
Make sure that the voltage indicated on the nameplate corresponds to that of your home electrical mains. Alternating current must be used, typically marked \~.
In accordance with European Directive 2012/19/EU and Polish legislation regarding used electrical and electronic goods, this appliance is marked with the symbol of the crossed-out waste container. This marking indicates that the appliance must not be disposed of together with other household waste after it has been used. The user
is obliged to hand it over to waste collection centre collecting used electrical and electronic goods. The collectors, including local collection points, shops and local authority departments provide recycling schemes. Proper handling of used electrical and electronic goods helps avoid environmental and health hazards resulting from the presence of dangerous components and the inappropriate storage and processing of such goods.
SPECIFICATION:
Model: AFD 5010
Rated voltage: 220-240 V\~, 50-60 Hz
Rated power: 1800W
Capacity:
- Frying basket - 6 L
- Oil pan - 7.2 L
Power cord: \~0,90m
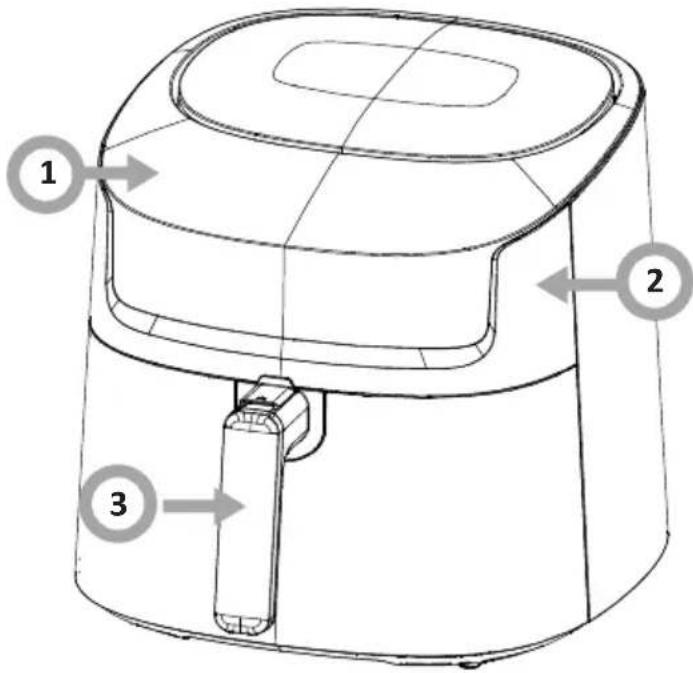
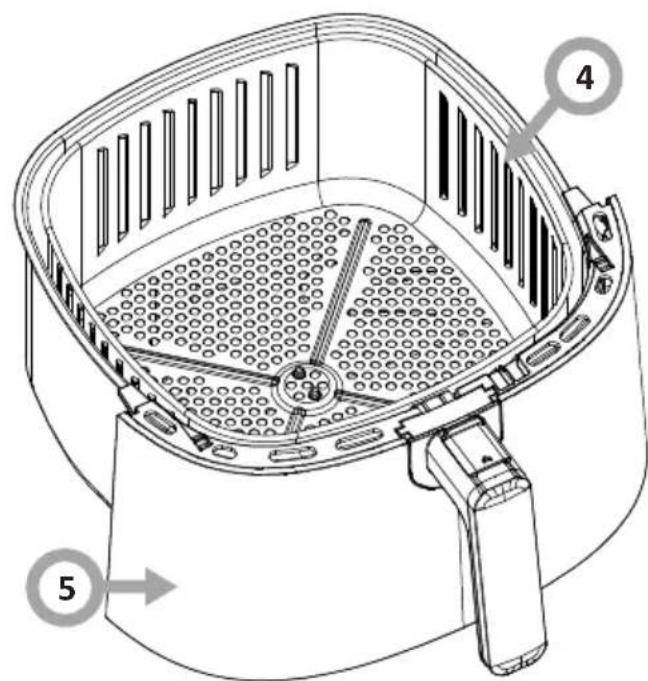
FEATURES AND COMPONENTS
- Touch control panel
- Motor unit
- Handle
- Frying basket
- Frying basket holder

| BUTTON ACTION | |
| On / off button | |
| Adjust duration or temperature | |
| Add duration or increase temperature | |
 | Reduce duration or decrease temperature |
 | Select programmes |
 | Start / stop the appliance |
BEFORE FIRST USE:
- The air fryer comes with a frying basket installed in a holder that is inserted in the appliance body. Firmly grasp the handle to remove the holder with the frying basket from the appliance and place it on a flat, clean surface.
- Remove all packaging materials from the inside and outside of the fryer. Ensure packaging under and around the frying basket and the holder is removed.
- Wash the frying basket and the holder in hot water with an addition of mild detergent.
- DO NOT IMMERSE THE AIR FRYER IN WATER. Wipe the exterior of the air fryer with a damp cloth. Dry all parts thoroughly.
- Install a clean frying basket in the holder and lock it in place.
- There is a ventilation opening at the back of the appliance to vent hot air. Maintain a safety distance of at least 30 - 50 cm between the appliance and walls, furniture, and other objects to ensure proper ventilation.
SWITCH ON THE APPLIANCE:
- Put the basket holder back into place and connect the appliance to power supply. All indicators on the display will illuminate for 1 second the power button light Ⓤ be on to indicate that air fryer is ready.
- No press the 📁 power button once and the appliance will beep. All indicators on the display screen will light up and the default temperature will be “200°C” with a default duration of 0:15, which denotes 15 minutes.
- Touch the ☑ to select the temperature or duration. Use the and ☑ to adjust the frying duration and temperature. You can adjust duration up or down in 1-minute increments. You can adjust the temperature up or down in 5°C increments. You can touch and hold the ☑ button to quickly adjust duration or temperature. You can adjust the temperature in range 40-200°C.
- Touch and the air fryer will start operating and the heating and fan indicators will light up next to the digital display. They will come on and off automatically as the appliance operates. When cooking is completed, the air fryer will beep five times, the duration on the display will be "000", then the air fryer will turn off. Please unplug the appliance after each use.
Note! To ensure even frying, pull out the holder with frying basket halfway through the frying time. Check, turn or shake the food in the frying basket vigorously.
Important! When you pull the holder with frying basket out of the air fryer, the appliance pauses. The appliance resumes operation when you re-insert the holder with frying basket.
OPERATE THE APPLIANCE
- Place the air fryer on a flat, heat-resistant surface in the vicinity of an electrical outlet.
- Firmly grasp the handle to remove the holder with frying basket from the appliance and place it on a flat, clean surface.
- Place food in the frying basket without overfilling it. To ensure proper frying and air circulation, NEVER fill the frying basket more than 12 full.
- Install the frying basket in the holder, make sure it is in place and locked, and make sure the basket holder is completely inserted in the appliance.
- Plug the power cord into an electrical outlet.
- You can adjust the temperature in the range 40-200°C.
- If the air fryer is cold, preheat the appliance for 3-4 minutes to the desired temperature. The heat indicator shows that the air fryer is starting to heat up.
Note!
-You need to press the (start) button to start the appliance. -If you don not insert the holder with frying basket completely, the air fryer will not operate and the display will be off.
-When the target temperature is reached, the heating indicator does not flash on the display.
-During operation, the heating indicator ⓤ turns on and off as the set temperature is maintained.
-
To ensure even frying, pull out the holder with frying basket halfway through the frying time. Check, turn or shake the food in the frying basket vigorously.
-
When you pull out the holder with frying basket, the appliance pauses, the fan stops and the display goes blank. Once you insert the holder with frying basket back in place, the appliance will resume cooking.
-
When the set cooking duration elapses, you will hear a beep. The appliance will turn off, and only the power switch will be on. If you would like to continue frying, adjust the temperature and duration until your food is completely cooked.
- When you have finished using the appliance, pull the holder with frying basket out of the appliance and place it on a flat and heat-resistant surface.
- Transfer the fried food to a suitable container. Continue to cook more food as needed.
- Unplug the appliance when not in use.
Note!
- Be careful when turning hot food. To avoid injury or damage to property, do not turn food by shaking the appliance.
- Be especially careful when removing and inserting the holder with frying basket to avoid being scalded by hot steam.
- Hot oil may accumulate at the bottom of the fryer. To avoid injury or food contamination, remove the basket from the holder and clean the bottom of the fryer of any remaining oil before cleaning.
- After frying, never place the frying basket holder on a heat-sensitive surface. Always place it on a suitable stand or heat-protected surface.
- Before unplugging the appliance, use the power button ⚫ on the fryer to turn it off.
- When cooking another dish, it will take less time for the appliance to heat up.
PROGRAMMES AND FUNCTIONS:
The appliance features 8 cooking programmes. To set the programme, press the function button and then select your preferred programme.
Note!
- The default cooking programme in the table does not guarantee that your food will cook perfectly. The quantity, thickness and shape of the portions and whether the food is thoroughly thawed can affect the total frying time. Frying smaller portions will reduce the cooking time. If the appliance starts cold, increase the frying time by approx. 3 minutes.
- For delicious crispy crust, coat all foods lightly in oil before frying. Spray oils are ideal because the oil is evenly distributed and less oil is needed.
| Dish | Temperature Time | |||
| Default setting | Adjust-ment range | Default setting | Adjust-ment range | |
| Pastries | 160°C | 40-200°C | 30 min-utes | 1-60 minutes |
| Chips | 200°C | 20 min-utes | ||
| Fish | 170°C | 20 min-utes | ||
| Chicken drumsticks | 200°C | 20 min-utes | ||
| Meat and cold cuts | 200°C | 15 min-utes | ||
| Steaks | 180°C | 10 min-utes | ||
| Chicken wings | 200°C | 13 min-utes | ||
| Dried fruits | 40-80°C 40-80°C 4 hours | 2-9 hours | ||
CLEANING AND CARE:
- Unplug the power cord. Remove the frying basket from the holder. Before cleaning, make sure the holder with frying basket has cooled down completely.
- Wash the holder and frying basket in hot water with a mild detergent Do not use metal utensils or abrasive cleaners or harsh cleaning products as this may damage the non-stick coating.
- To clean, wipe the air fryer exterior with a soft, damp cloth.
POKYNY K BEZPEČNÉMU POUŽÍ-VÁNÍ


Brand : AMICA
Model : AFD 5010
Category : Deep fryer