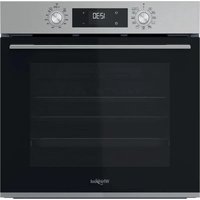
OMK58HU1X - Oven WHIRLPOOL - Free user manual and instructions
Find the device manual for free OMK58HU1X WHIRLPOOL in PDF.


User questions about OMK58HU1X WHIRLPOOL
0 question about this device. Answer the ones you know or ask your own.
Ask a new question about this device
Download the instructions for your Oven in PDF format for free! Find your manual OMK58HU1X - WHIRLPOOL and take your electronic device back in hand. On this page are published all the documents necessary for the use of your device. OMK58HU1X by WHIRLPOOL.
USER MANUAL OMK58HU1X WHIRLPOOL
THANK YOU FOR BUYING A WHIRLPOOL PRODUCT
In order to receive a more complete assistance, please register your product on www.whirlpool.eu/register

Before using the appliance carefully read the Safety Instruction.
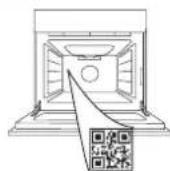
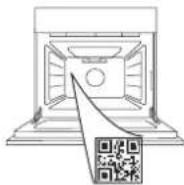
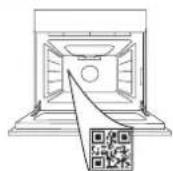
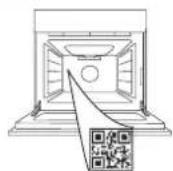
PLEASE SCAN THE QR CODE ON YOUR APPLIANCE IN ORDER TO REACH MORE INFORMATION
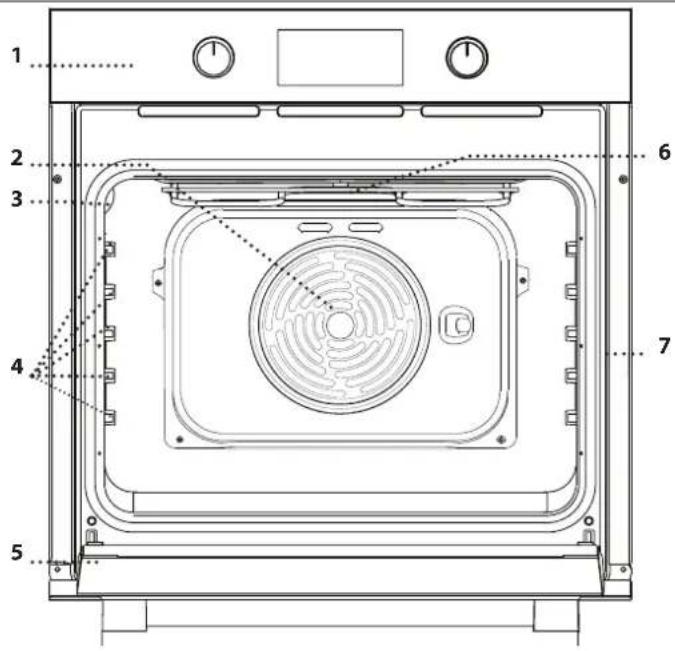
PRODUCT DESCRIPTION
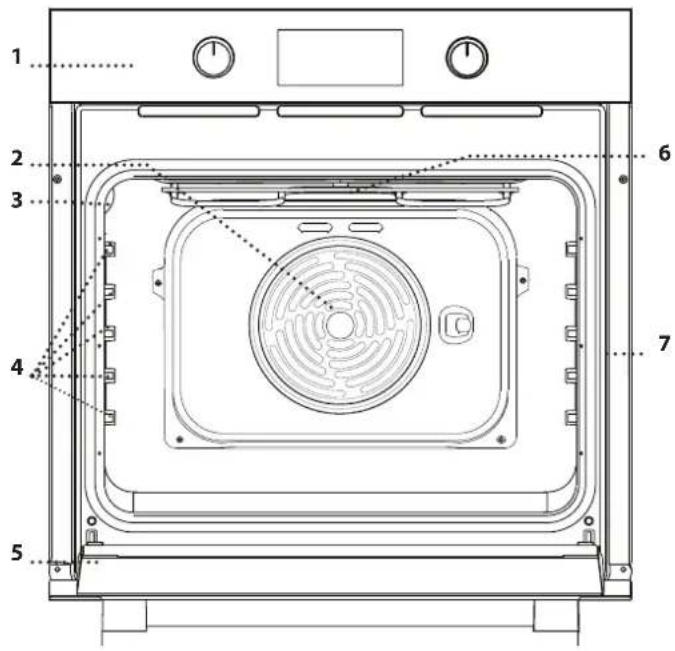
text_image
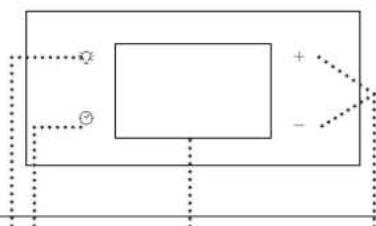
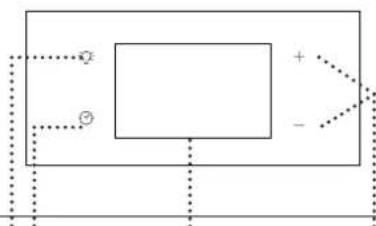
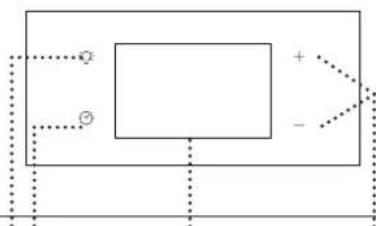
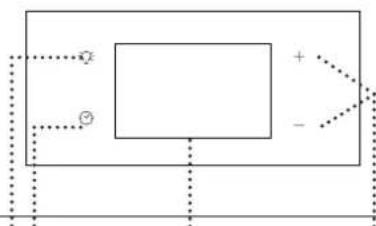
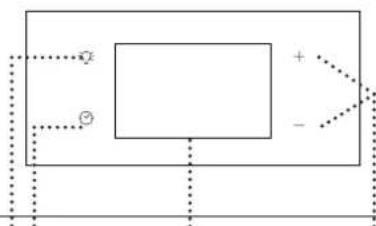
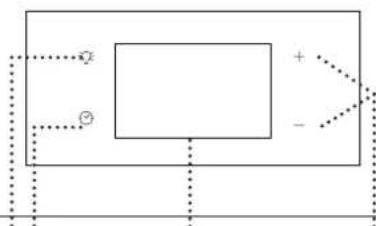
1 2 3 4 5 6 7- Control panel
- Fan and circular heating element (not visible)
- Lamp
- Shelf guides (the level is indicated on the wall of the cooking compartment)
- Door
- Top heating element/grill
- Identification plate (do not remove)
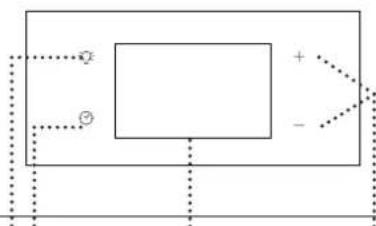
CONTROL PANEL DESCRIPTION
flowchart
graph TD
    A["Camera"] --> B["Monitor"]
    B --> C["Gear"]
    C --> D["Sensor"]
    D --> E["Display"]
    E --> F["Control"]
    F --> G["Feedback to Center"]
    G --> H["End"]
13245
flowchart
graph TD
    A[" "] --> B[" "]
    B --> C["+"]
    B --> D["-"]
radar
| Angle (°) | Value | |-----------|-------| | 0 | 250 | | 45 | 220 | | 90 | 200 | | 135 | 180 | | 180 | 160 | | 225 | 140 | | 270 | 120 | | 315 | 100 | | 360 | 80 | | 405 | 60 | The chart displays a single data point at the center of the circle. The angle values are marked at the top and bottom of the circle.6
1. SELECTION KNOB
For switching the oven on by selecting a function. Turn to the 0 position to switch the oven off.
2. LIGHT
With the oven switched on, press 🙏 to turn the oven compartment lamp on or off.
3. SETTING THE TIME
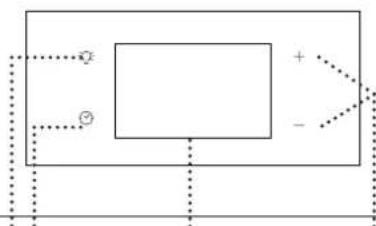
For accessing the cooking time settings, delayed start and timer. For displaying the time when the oven is off.
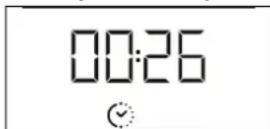
4. DISPLAY
5. ADJUSTMENT BUTTONS
For changing the cooking time settings.
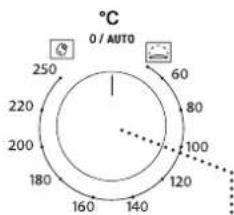
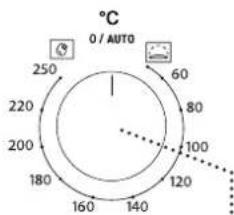
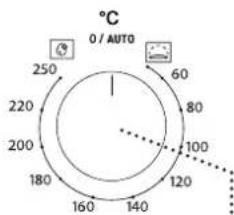
6. THERMOSTAT KNOB
Turn to select the temperature you require when activating manual functions.
Please note: Type of knob may vary from model type. If the knobs are push-activated, push down on the center of the knob to release it from seating.
ACCESSORIES
natural_image
Simple line drawing of a rectangular plate with horizontal slats and a small bracket on top (no text or symbols)Use to cook food or as a support for pans, cake tins and other ovenproof items of cookware.
natural_image
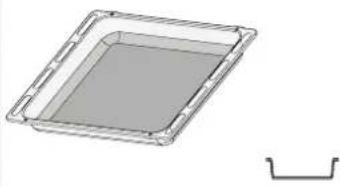
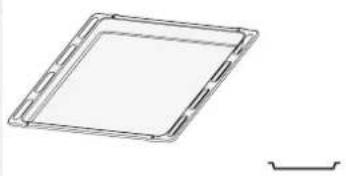
3D rendering of a rectangular tray with a gray interior and a separate U-shaped outline on the right side (no text or symbols)Use as an oven tray for cooking meat, fish, vegetables, focaccia, etc. or position underneath the wire shelf to collect cooking juices.
natural_image
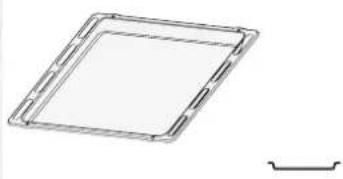
Simple line drawing of a square frame with a small curved line on the right side (no text or symbols)Use for cooking all bread and pastry products, but also for roasts, fish en papillotte, etc.
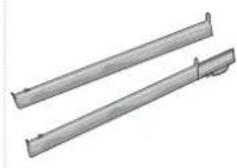
natural_image
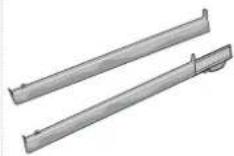
Two metallic cylindrical rods with flanged ends, no text or symbols visibleTo facilitate inserting or removing accessories.
* Available only on certain models
The number and the type of accessories may vary depending on which model is purchased. Other accessories can be purchased separately from the After-sales Service.
INSERTING THE WIRE SHELF AND OTHER ACCESSORIES
- Insert the wire shelf onto the level you require by holding it tilted slightly upwards and resting the raised rear side (pointing upwards) down first.
SLIDING RUNNERS AND SHELF GUIDES
Before using the oven remove the protective tape [a] and then remove the protective foil [b] from the sliding runners.
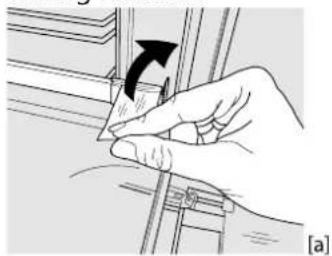
natural_image
Illustration of a hand holding a small object with an arrow indicating direction (no text or symbols present)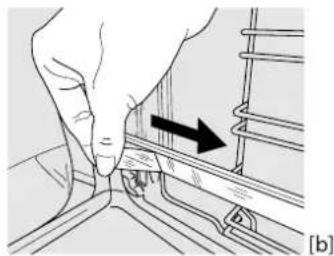
natural_image
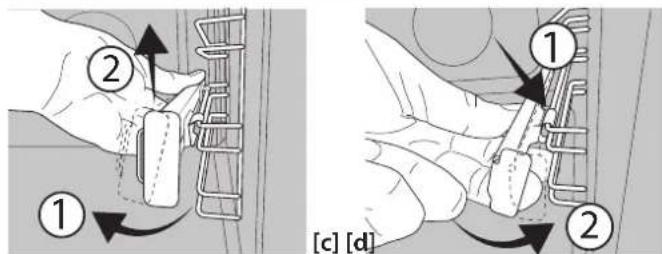
Illustration of a hand pressing down on a mechanical component with an arrow indicating direction (no text or symbols present)REMOVING THE SLIDING RUNNERS [c]
Pull the lower part of the sliding runner to uncouple the lower hooks (1) and pull the the sliding runners upwards, removing them from the upper hooks (2). REFITTING THE SLIDING RUNNERS [d]
Hook the upper hooks on the shelf guides (1) then press the lower part of the sliding runners against the shelf guides, until the lower hooks are clicking (2).
FIRST TIME USE
1. SETTING THE TIME
You will need to set the time when you switch on the appliance for the first time: Press √ until the ☑on and the two digits for the hour start flashing on the display.
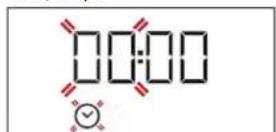
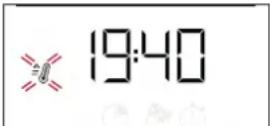
Use + or to set the hour and press to confirm. The two digits for the minutes will start flashing. Use + or to set the minutes and press to confirm. Please note: When the Ⓧ icon is flashing, for example following lengthy power outages, you will need to reset the time.
Then slide it horizontally along the runners as far as possible.
- Other accessories, like the baking tray, are to be inserted horizontally, letting them slide on the runners.
text_image
Diagram showing two mechanical assembly steps labeled ① and ②, with arrows indicating rotation or movement in parts of a device.REMOVING AND REFITTING THE SHELF GUIDES
-
To remove the shelf guides, firmly grip the external part of the guide, and pull it towards you to extract the support and the two internal pins from the lodging.
-
To reposition the shelf guides, position them near the cavity and initially insert the two pins into their lodgings. Next, position the external part near its lodging, insert the support, and firmly press towards the wall of the cavity to make sure the shelf guide is properly secured.
2. HEAT THE OVEN
A new oven may release odours that have been left behind during manufacturing: this is completely normal. Before starting to cook food, we therefore recommend heating the oven with it empty in order to remove any possible odours. Remove any protective cardboard or transparent film from the oven and remove any accessories from inside it. Heat the oven to 250 °C for about one hour. The oven must be empty during this time.
Please note: It is advisable to air the room after using the appliance for the first time.
FUNCTIONS

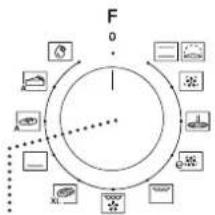
CONVENTIONAL
For cooking any kind of dish on one shelf only.

RISING
For helping sweet or savoury dough to rise ively. Turn the thermostat knob to the icon to te this function.

FORCED AIR
For cooking different foods that require the
same cooking temperature on several shelves (maximum three) at the same time. This function can be used to cook different foods without odours being transferred from one food to another.

PIZZA
For baking different types and sizes of pizza and
bread. It is a good idea to swap the position of the baking trays halfway through cooking.

ECO FORCED AIR
For cooking roasts and stuffed roasting joints single shelf. Food is prevented from drying out sively by gentle, intermittent air circulation.
When this ECO function is in use, the light will remain switched off during cooking but can be switched on again by pressing ⚙️.

GRILL
For grilling steaks, kebabs and sausages,
cooking vegetables au gratin or toasting bread. When grilling meat, we recommend using a dripping pan to collect the cooking juices: position the pan on any of the levels below the wire shelf and add 200 ml of drinking water.

TURBO GRILL
For roasting large joints of meat (legs, roast
beef, chicken). We recommend using a dripping pan
DAILY USE
1. SELECT A FUNCTION
To select a function, turn the selection knob to the symbol for the function you require: the display will light up and an audible signal will sound.

2. ACTIVATE A FUNCTION
MANUAL
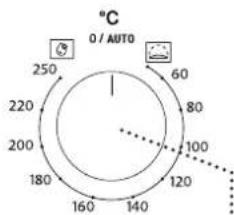
To start the function you have selected, turn the thermostat knob to set the temperature you require.
Please note: During cooking you can change the function by turning the selection knob or adjust the temperature by turning the thermostat knob. The function will not start if the thermostat knob will be on 0/AUTO position. You can set the cooking time, cooking end time (only if you set a cooking time) and a timer.
to collect the cooking juices: position the pan on any of the levels below the wire shelf and add 200 ml of drinking water.

MAXI COOKING
XL For cooking large joints of meat (above 2.5kg). We recommend turning the meat over during cooking to ensure that both sides brown evenly. We also recommend basting the joint every so often to prevent it from drying out excessively.

BOTTOM HEATING
Useful for browning the bottom of dishes. Function also recommended for slow cooking, to finish cooking dishes with a very liquid consistency or concentrate sauces and gravies.

BREAD AUTO
A This function automatically selects the ideal temperature and baking time for bread. For best results, carefully follow the recipe. Activate the function when the oven is cold.

PASTRY AUTO
A This function automatically selects the ideal temperature and baking time for cakes. Activate the function when the oven is cold.

SMARTCLEAN
The action of the steam released during this special low-temperature cleaning cycle allows dirt and food residues to be removed with ease. To activate the "Smart Clean" cleaning function pour 100-120ml of drinking water into the bottom of the oven then turn the selection knob and the thermostat knob to the 📄 icon. It is best to use the function for 35'. The position of the icon does not correspond to the temperature reached during the cleaning cycle.
RISING
To start the "Rising" function, turn the thermostat knob to RisiSng position (40 deg) and put function knob in Conventional position; Insert the food inside to oven after preheat signal. Cover the dough with wet cloth or put a pan of water on the bottom of the cavity to create a humid environment.
SMART CLEAN
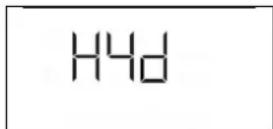
To activate the "Smart Clean" cleaning function, pour 100 - 120 ml of drinking water into the bottom of the oven, then turn the selection knob and the thermostat knob to the 📊icon. The function will activate automatically: the display shows the time remaining to the end; alternating with "HYD".
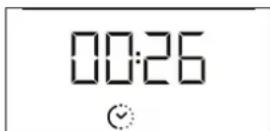
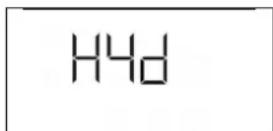
Pleas note: The position of the icon does not correspond to the temperature reached during the cleaning cycle. Please note: It is only possible to programme the end time of this function. The duration is automatically set to 35 minutes.
3. PREHEATING AND RESIDUAL HEAT
Once the function starts, an audible signal and a flashing icon ⚠ on the display indicate that the preheating phase is active.
When the set temperature has been reached, the icon becomes fixed and a new audible signal will sound to indicate that the food can be placed inside and cooking can proceed.
Please note: Placing food in the oven before the preheating phase has finished may have an adverse effect on the final result of cooking.
After cooking and with the function deactivated, the icon ⚪ may continue to remain visible on the display even after the cooling fan has switched off to indicate that there is residual heat in the compartment.
Please note: The time after which the icon switches off varies because it depends on a series of factors such as ambient temperature and function used. In any case, the product should be considered to be off when the pointer on the selection knob is at 0.
4. PROGRAMMING COOKING
You will need to select a function before you can start programming cooking.
DURATION
Keep pressing until the icon and "00:00" start flashing on the display.
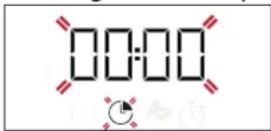
Use or to-set the cooking time you require, then press ⬇ to confirm.
Activate the function by turning the thermostat knob to the temperature you require: an audible signal will sound and the display will indicate that cooking is complete.
Please note: To cancel the cooking time you have set, keep pressing ☺ until the ⏻ on starts flashing on the display, then use – to reset the cooking time to "00:00". This cooking time includes a preheating phase.
PROGRAMMING THE END COOKING TIME/DELAYED START
After a cooking duration has been set, starting the function can be delayed by programming its end time: press ⏻ until the /æon and the current time start flashing on the display.
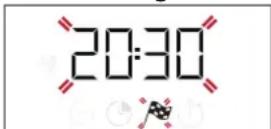
Use or to-set the time you want cooking to end and press ⏻ to confirm.
Activate the function by turning the thermostat knob to the temperature you require: the function will remain paused until it starts automatically in time calculated based on selected cooking end time.
Please note: To cancel the setting, switch the oven off by turning the selection knob O / AUTO.
Delay to start functionality is not available for Grill and Turbo Grill functions.
END OF COOKING
An audible signal will sound and the display will indicate that the function has finished.
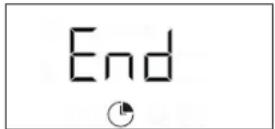
Turn the selection knob to select a different function or to 0 to switch the oven off.
Please note: If the timer is active, the display will show "END" alternately with the remaining time.
5. SETTING THE TIMER
This option does not interrupt or program cooking but allows you to use the display as a timer, either during while a function is active or when the oven is off.
Keep pressing ⏻ until the and "00:00" icon and "00:00" start flashing on the display.
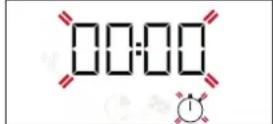
Use or to-set the time you require and press to confirm. An audible signal will sound once the timer has finished counting down the selected time. Please note: To cancel the timer, keep pressing until the icon starts flashing, then use to reset the time to "00:00".
COOKING TABLE
| RECIPE | FUNCTION | PREHEAT | TEMPERATURE (°C) | DURATION (Min) | LEVEL AND ACCESSORIES |
| Leavened cakes | Yes 170 | 30 - 50 | 3 | ||
| Yes 160 | 30 - 50 | 2 | |||
| Yes 160 | 40 - 60 | 4 | |||
| Filled cake(cheese cake, strudel, fruit pie) | Yes 160 | - 200 35 - 90 | 2 | ||
| Yes 160 | - 200 40 - 90 | 4 2 | |||
| Biscuits / tartlets | Yes 160 | 25 - 35 | 3 | ||
| Yes 160 | 25 - 35 | 3 | |||
| Yes 150 | 35 - 45 | 4 2 | |||
| Choux buns | Yes 180 | - 210 30 - 40 | 3 | ||
| Yes 180 | - 200 35 - 45 | 4 2 | |||
| Yes 180 | - 200 35 - 45 | 5 3 1 | |||
| Meringues | Yes | 90 | 150 - 200 | 3 | |
| Yes | 90 | 140 - 200 | 4 2 | ||
| Yes | 90 | 140 - 200 | 5 3 1 | ||
| Pizza / Focaccia | Yes 190 | - 250 15 - 50 | 1/2 | ||
| Yes 190 | - 250 20 - 50 | 4 2 | |||
| Frozen pizza | Yes 250 | 10 - 20 | 3 | ||
| Yes | 230-250 | 10 - 25 | 4 2 | ||
| Salty cakes(vegetable pie,quiche) | Yes 180 | - 200 40 - 55 | 3 | ||
| Yes 180 | - 200 45 - 60 | 4 2 | |||
| Yes 180 | - 200 45 - 60 | 5 3 1 | |||
| Vols-au-vents / puff pastry crackers | Yes 190 | - 200 20 - 30 | 3 | ||
| Yes | 180 - 190 20 - 40 | 4 2 | |||
| Yes | 180 - 190 20 - 40 | 5 3 1 | |||
| Lasagne / baked pasta /canneloni / flans | Yes 190 | - 200 45 - 65 | 2 | ||
| Lamb / veal / beef / pork 1 kg | Yes | 190 - 200 | 80 - 110 | 3 | |
| Roast pork with crackling 2 kg | Yes | 180 - 190 | 110 - 150 | 3 | |
| Chicken / rabbit / duck 1 kg | Yes 200 | - 230 50 - 100 | 2 | ||
| Turkey / goose 3 kg | - | 190 - 200 | 100 - 160 | 2 | |
| Baked fish / en papillote(fillets, whole) | Yes | 170 - 190 | 30 - 45 | 2 | |
| Stuffed vegetables(tomatoes, courgettes, aubergines) | Yes 180 | - 200 50 - 70 | 3 | ||
| Toasted bread | 5' | 250 | 2 - 6 | 5 | |
| Fish fillets / slices | - | 230 - 250 | 15 - 30 * | 4 3 | |
| Sausages / kebabs / spare ribs / hamburgers | -250 15 - 30 * | 5 4 | |||
| Roast chicken 1-1,3 kg | Yes 200 - 220 55 - 70 ** | 2 1 | |||
| Roast beef rare 1 kg | Yes 200 - 210 35 - 50 ** | 3 | |||
| Leg of lamb / knuckle | Yes 200 - 210 60 - 90 ** | 3 | |||
| Roast potatoes | Yes 200 - 210 35 - 55 | 2 | |||
| Vegetable gratin | - 200 - 210 25 - 55 | 3 | |||
| Meat and potatoes | Yes 190 - 200 45 - 100 *** | 4 1 | |||
| Fish and vegetables | Yes 180 | 30 - 50 *** | 4 2 | ||
| Lasagne and meat | Yes 200 | 50 - 100 *** | 4 1 | ||
| Complete meal:fruit tart (level 5) / lasagne(level 3) / meat (level 1) | Yes 180 - 190 40 - 120 *** | 5 3 1 | |||
| Roast meat / stuffed roasting joints | - 170 - 180 | 100 - 150 | 3 | ||
* Turn food halfway through cooking
** Turn food two thirds of the way through cooking (if necessary).
*** Estimated length of time: dishes can be removed from the oven at different times depending on personal preference.
The time indicated does not include the preheating phase: we recommend placing the food in the oven and setting the cooking time only after the required temperature has been reached.
| ACCESSORIES |  Wire shelf Wire shelf |  Baking dish on the wire shelf Baking dish on the wire shelf |  Baking tray/Drip tray or baking dish on the wire shelf Baking tray/Drip tray or baking dish on the wire shelf |  Drip tray / Baking tray Drip tray / Baking tray |  Drip tray / Baking tray with 200 ml of water Drip tray / Baking tray with 200 ml of water | ||
| FUNCTIONS |  Conventional Conventional |  Forced air Forced air |  Pizza Pizza |  Maxi cooking Maxi cooking |  Grill Grill |  Turbo grill Turbo grill |  Eco forced air Eco forced air |
CLEANING AND MAINTENANCE
Make sure that the oven has cooled down before carrying out any maintenance or cleaning.
Do not use steam cleaners.
Do not use wire wool, abrasive scourers or abrasive/corrosive cleaning agents, as these could damage the surfaces of the appliance.
Wear protective gloves.
The oven must be disconnected from the mains before carrying out any kind of maintenance work.
EXTERIOR SURFACES
Clean the surfaces with a damp microfibre cloth. If they are very dirty, add a few drops of pH-neutral detergent. Finish off with a dry cloth.
Do not use corrosive or abrasive detergents. If any of these products inadvertently comes into contact with the surfaces of the appliance, clean immediately with a damp microfibre cloth.
INTERIOR SURFACES
• After every use, leave the oven to cool and then clean it, preferably while it is still warm, to remove any deposits or stains caused by food residues.
To dry any condensation that has formed as a result of cooking foods with a high water content, leave the oven to cool completely and then wipe it with a cloth or sponge.
• The door can be easily removed and refitted to facilitate cleaning of the glass
- Clean the glass in the door with a suitable liquid detergent.
ACCESSORIES
Soak the accessories in a washing-up liquid solution after use, handling them with oven gloves if they are still hot. Food residues can be removed using a washing-up brush or a sponge.
REMOVING AND REFITTING THE DOOR
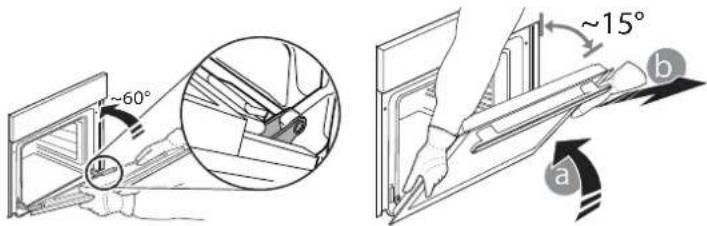
- To remove the door, open it fully and lower the catches until they are in the unlock position.
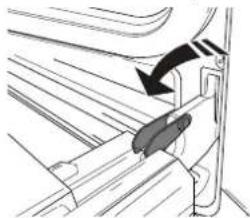
natural_image
Diagram of a mechanical component with an arrow indicating direction (no text or symbols present)- Close the door as much as you can.
Take a firm hold of the door with both hands – do not hold it by the handle.
Simply remove the door by continuing to close it while pulling it upwards (a) at the same time until it is released from its seating (b).
Put the door to one side, resting it on a soft surface.
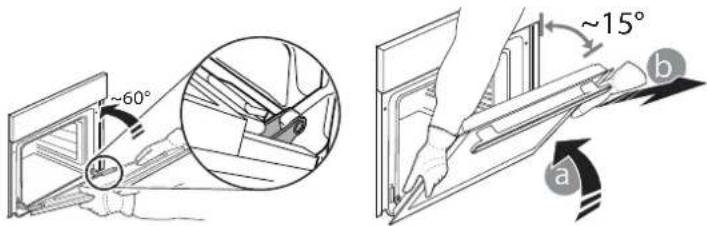
text_image
~60° ~15° a b-
Refit the door by moving it towards the oven, aligning the hooks of the hinges with their seating and securing the upper part onto its seating.
-
Lower the door and then open it fully. Lower the catches into their original position: Make sure that you lower them down completely.
-
Try closing the door and check to make sure that it lines up with the control panel. If it does not, repeat the steps above.
REPLACING THE LAMP
-
Disconnect the oven from the power supply.
-
Unscrew the cover from the light, replace the bulb and screw the cover back on the light.
-
Reconnect the oven to the power supply.
Please note: Use 25 W/230 V type G9, T300 °C halogen lamps.
The bulb used in the product is specifically designed for domestic appliances and is not suitable for general room lighting within the home (EC Regulation 244/2009). Light bulbs are available from our After-sales Service. - Do not handle bulbs with your bare hands as your fingerprints could damage them. Do not use the oven until the light cover has been refitted.
CLEANING OF THE DOOR GLASSES
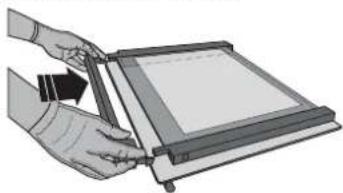
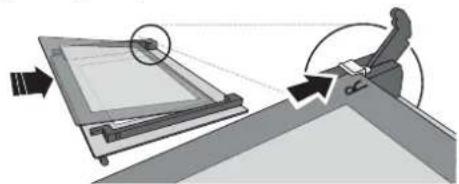
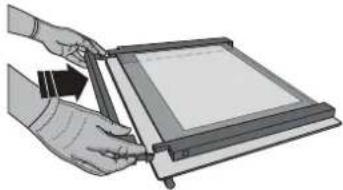
- After removing the door and resting it on a soft surface with the handle downwards, simultaneously press the two retaining clips and remove the upper edge of the door by pulling it towards you.

natural_image
Illustration showing three-step hand manipulation process: holding a tablet, adjusting the screen, and adjusting the device (no text or symbols present)- Lift and firmly hold the inner glass with both hands, remove it and place it on a soft surface before cleaning it.
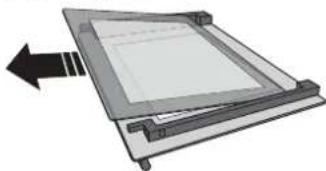
natural_image
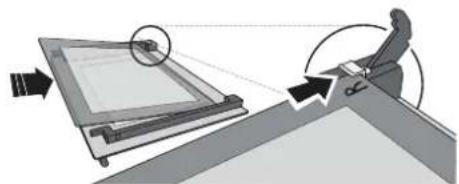
Diagram of a mechanical component with an arrow indicating direction (no text or symbols)- Refit the intermediate pane (marked with "R") before refitting the inside pane: To position the panes of glass correctly, make sure that the "R" mark can be seen in the left-hand corner. First insert the long side of the glass marked "R" into the support seats, then lower it into position. Repeat this procedure for both panes of glass.
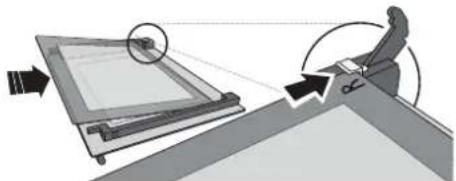
natural_image
Diagram showing a person seated on a chair facing a mechanical device with an arrow indicating motion (no text or symbols present)- Refit the upper edge: A click will indicate correct positioning. Make sure the seal is secure before refitting the door.
natural_image
Illustration of hands using a digital tablet to interact with a screen (no text or symbols visible)TROUBLESHOOTING
| Problem Possible cause Solution | ||
| The oven is not working. | Power cut.Disconnection from the mains. | Check for the presence of mains electrical power and whether the oven is connected to the electricity supply.Turn off the oven and restart it to see if the fault persists. |
| The display shows the letter “F” followed by a number or letter. | Oven failure. | Contact you nearest Client After-sales Service Centre and state the number following the letter “F”. |
| The display is showing the message “Hot” and the selected function will not start. | Temperature too high. | Allow the oven to cool down before activating the function. Select a different function. |
| The display shows unclear text and appears to be broken. | Another language set. Contact your nearest Client After-sales Service Center. | |
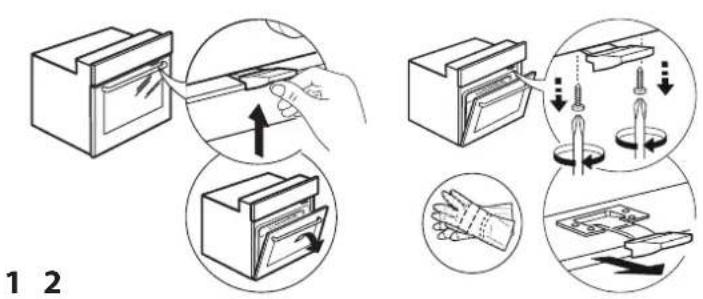
DOOR LOCK DEVICE\*
When keeping door lock installed, door must be manually closed. To open the door with the door lock device (see Fig. 1).
The door safety device can be removed by following the sequence of images (see Fig. 2).

text_image
1 2* Available only on certain models
Policies, standard documentation and additional product information can be found by:
• Using the QR code in your appliance
- Visiting our website docs.whirlpool.eu
• Alternatively, contact our After-sales Service (See phone number in the warranty booklet). When contacting our After-sales Service, please state the codes provided on your product's identification plate.

DANKE, DASS SIE SICH FÜR EIN WHIRLPOOL PRODUKT ENTSCHIEDEN HABEN
flowchart
graph TD
    A["Weather Icon"] --> B["Light Bulb Icon"]
    B --> C["Light Storage Icon"]
    C --> D["Storage Icon"]
    D --> E["Light Storage & Lighting Icon"]
    E --> F["Light Storage & Lighting Icon"]
    F --> G["Light Storage & Lighting Icon"]
    G --> H["Light Storage & Lighting Icon"]
    H --> I["Light Storage & Lighting Icon"]
    I --> J["Light Storage & Lighting Icon"]
    J --> K["Light Storage & Lighting Icon"]
    K --> L["Light Storage & Lighting Icon"]
    L --> M["Light Storage & Lighting Icon"]
    M --> N["Light Storage & Lighting Icon"]
    N --> O["Light Storage & Lighting Icon"]
    O --> P["Light Storage & Lighting Icon"]
    P --> Q["Light Storage & Lighting Icon"]
    Q --> R["Light Storage & Lighting Icon"]
    R --> S["Light Storage & Lighting Icon"]
    S --> T["Light Storage & Lighting Icon"]
    T --> U["Light Storage & Lighting Icon"]
    U --> V["Light Storage & Lighting Icon"]
    V --> W["Light Storage & Lighting Icon"]
    W --> X["Light Storage & Lighting Icon"]
    X --> Y["Light Storage & Lighting Icon"]
13245
natural_image
Pure electrical circuit lines without any symbolsnatural_image
Simple line drawing of a rectangular plate with horizontal slats (no text or symbols)natural_image
3D rendering of a rectangular tray with a shaded interior and a separate curved bracket on the right (no text or symbols)natural_image
Simple line drawing of a square frame with a small curved bracket on the right side (no text or symbols)natural_image
Illustration of a hand holding a small object with an arrow indicating rotation (no text or symbols)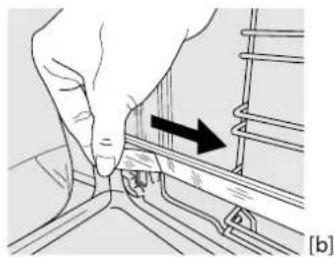
natural_image
Close-up of a hand pressing down on a mechanical component with an arrow indicating direction (no text or symbols)ENTFERNEN DER BACKAUSZÜGE [c]
text_image
Diagram showing hand positioning a component with numbered callouts (1 and 2) indicating movement or positioning steps.![WHIRLPOOL OMK58HU1X - ENTFERNEN DER BACKAUSZÜGE [c] - 1](/content/2026/04/690496/images/e1a335cd0b46505c9e55e95689cd37ee01989f38a6b17aba89822ad0f0e8dec4.jpg)
text_image
[c] [d] ① ②natural_image
Diagram of a mechanical component with an arrow indicating direction (no text or symbols present)natural_image
Illustration of three-step robotic manipulation process: hand holding tablet, hand using a device, and hand holding screen (no text or symbols)natural_image
Diagram of a mechanical component with a rectangular frame and directional arrow (no text or symbols)natural_image
Diagram showing a person seated on a platform with an arrow indicating motion or force direction (no text or symbols present)natural_image
Illustration of hands using a digital tablet to interact with a screen (no text or symbols visible)LÖSEN VON PROBLEMEN
MERCI D'AVOIR ACHETÉ UN PRODUIT WHIRLPOOL
natural_image
Simple line drawing of a rectangular grid or panel with a handle, no text or symbols present.natural_image
3D diagram of a rectangular tray with a gray inner area and a separate U-shaped outline on the right (no text or symbols)natural_image
Pure geometric diagram of a square frame with a small curved line on the right side (no text or symbols)natural_image
Two metallic cylindrical metal rods with flanged ends, shown in 3D rendering (no text or symbols)natural_image
Hand holding a small object with an arrow indicating rotation (no text or symbols)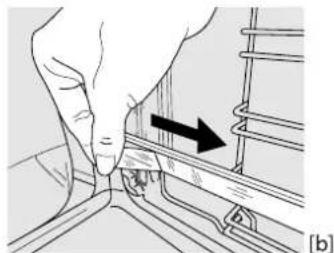
natural_image
Hand pressing a button on a rail track, showing motion direction (no text or symbols)ENLÈVEMENT DES PATINS COULISSANTS [c]
text_image
Diagram showing a hand pressing a component into a rack, labeled with steps 1 and 2 indicating process flow.![WHIRLPOOL OMK58HU1X - ENLÈVEMENT DES PATINS COULISSANTS [c] - 1](/content/2026/04/690496/images/e46196a99d347c4abf596e27e7237554555d48c3cdf65d69a9324f03105e0751.jpg)
text_image
① ② [c] [d]ENLEVER ET REPLACER LES SUPPORTS DE GRILLE
natural_image
Diagram of a mechanical component with an arrow indicating direction (no text or symbols present)natural_image
Illustration of three-step hands performing a manual task: holding a tablet, adjusting a face mask, and adjusting a device (no text or symbols present)natural_image
Diagram of a mechanical component with a rectangular frame and directional arrow (no text or symbols)natural_image
Diagram showing a person interacting with a device on a curved surface, with no visible text or symbols.natural_image
Illustration of hands using a tool to cut or spread a rectangular object (no text or symbols visible)DÉPANNAGE
flowchart
graph TD
    A["Weather Icon"] --> B["Lighting Icon"]
    B --> C["Light Storage Icon"]
    C --> D["Storage Icon"]
    D --> E["Lighting & Lighting Icon"]
    E --> F["Lighting & Storage Icon"]
    F --> G["Lighting & Lighting Icon"]
    G --> H["Lighting & Storage Icon"]
    H --> I["Lighting & Lighting Icon"]
    I --> J["Lighting & Storage Icon"]
    J --> K["Lighting & Lighting Icon"]
    K --> L["Lighting & Storage Icon"]
    L --> M["Lighting & Lighting Icon"]
    M --> N["Lighting & Storage Icon"]
    N --> O["Lighting & Lighting Icon"]
    O --> P["Lighting & Storage Icon"]
    P --> Q["Lighting & Lighting Icon"]
    Q --> R["Lighting & Storage Icon"]
    R --> S["Lighting & Lighting Icon"]
    S --> T["Lighting & Storage Icon"]
    T --> U["Lighting & Lighting Icon"]
    U --> V["Lighting & Storage Icon"]
13245
natural_image
Pure electrical circuit lines without any symbols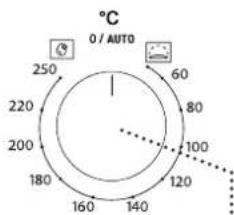
radar
| Angle (°) | Value | |-----------|-------| | 0 | 120 | | 60 | 140 | | 120 | 160 | | 180 | 180 | | 220 | 200 | | 250 | 220 |6
1. SELECTIEKNOP
natural_image
Simple line drawing of a rectangular grid or panel with horizontal lines, no text or symbols present.natural_image
3D diagram of a square frame with a shaded inner region and a separate curved bracket on the right (no text or symbols)natural_image
Pure geometric diagram of a square frame with a small curved line on the right side (no text or symbols)natural_image
Hand holding a small object with an arrow indicating direction, no visible text or symbols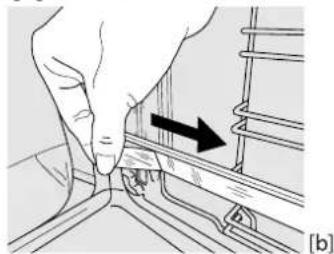
natural_image
Illustration of a hand turning a component with an arrow indicating direction (no text or symbols)DE SCHUIFRAILS VERWIJDEREN [c]
text_image
Diagram showing two mechanical assembly steps labeled ① and ②, with arrows indicating rotation or movement in parts of a device.DE GELEIDERS VAN HET ROOSTER VERWIJDEREN EN TERUGPLAATSEN
SMARTCLEAN (SNELREINIGEN)
natural_image
Diagram of a mechanical component with a black arrow indicating direction (no text or symbols present)natural_image
Illustration of three-step hands using a tool to interact with a device (no text or symbols visible)natural_image
Diagram of a mechanical component with a directional arrow indicating movement (no text or symbols)natural_image
Diagram showing a person using a device to interact with a screen, with no visible text or symbols.natural_image
Illustration of hands using a tablet to interact with a screen (no text or symbols visible)PROBLEEMOPLOSSING
radar
| Angle (°) | Value | |-----------|-------| | 0 | 250 | | 45 | 220 | | 90 | 200 | | 135 | 180 | | 180 | 160 | | 225 | 140 | | 270 | 120 | | 315 | 100 | | 360 | 80 | | 405 | 60 | The chart displays a single data point at the center of the circle. The angle values are marked at the top and bottom of the circle.6
1. SELECTOR
natural_image
Simple line drawing of a rectangular grid-like structure with a handle, no text or symbols present.natural_image
3D diagram of a rectangular tray with a gray inner area and a separate U-shaped outline on the right (no text or symbols)natural_image
Simple line drawing of a square frame with a small curved bracket on the right side (no text or symbols)natural_image
Illustration of a hand holding a small object with an arrow indicating rotation (no text or symbols present)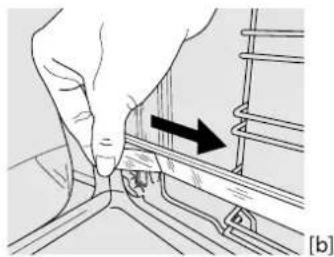
natural_image
Hand holding a tool interacting with a mechanical component, showing a black arrow indicating direction (no text or symbols present)EXTRAER LAS GUÍAS DESLIZANTES [c]
text_image
Diagram showing two mechanical assembly steps labeled ① and ②, with arrows indicating rotation or adjustment.CÓMO EXTRAER Y VOLVER A COLOCAR LAS GUÍAS PARA ESTANTES
natural_image
Diagram of a mechanical component with an arrow indicating direction (no text or symbols present)natural_image
Illustration of three-step hand manipulation process: holding a tablet, adjusting a face mask, and adjusting a device (no text or symbols)natural_image
Diagram of a mechanical component with an arrow indicating direction (no text or symbols)natural_image
Diagram showing a person interacting with a device, possibly a monitor or display unit, with no visible text or symbols.natural_image
Illustration of hands using a tablet to interact with a screen (no text or symbols visible)natural_image
Pure electrical circuit lines without any symbols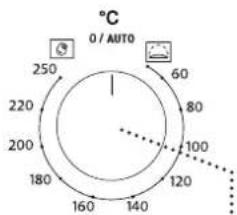
radar
| Angle (°) | Value | |-----------|-------| | 0 | 0 | | 60 | 60 | | 120 | 120 | | 180 | 180 | | 240 | 240 | | 300 | 300 | | 360 | 360 | | 420 | 420 | | 480 | 480 | | 540 | 540 | | 600 | 600 | | 660 | 660 | | 720 | 720 | | 780 | 780 | | 840 | 840 | | 900 | 900 | | 960 | 960 | | 1020 | 1020 | | 1080 | 1080 | | 1140 | 1140 | | 1200 | 1200 | | 1260 | 1260 | | 1320 | 1320 | | 1380 | 1380 | | 1440 | 1440 | | 1500 | 1500 | | 1560 | 1560 | | 1620 | 1620 | | 1680 | 1680 | | 1740 | 1740 | | 1800 | 1800 | | 1860 | 1860 | | 1920 | 1920 | | 1980 | 1980 | | 2040 | 2040 | | 2100 | 2100 | | 2160 | 2160 | | 2220 | 2220 | | 2280 | 2280 | | 2340 | 2340 | | 2400 | 2400 | | 2460 | 2460 | | 2520 | 2520 | | 2580 | 2580 | | Note: The angle values are in degrees Celsius (°C). The chart displays a single data series with 'Value' as the y-axis and 'Angle' as the x-axis. There is only one data series labeled '°C'. The values are estimated based on the 'Auto' label 'O / AUTO'.6
1. ВЪРТЯЩ СЕ БУТОН ЗА ИЗБИРАНЕ
natural_image
Simple line drawing of a rectangular grid or panel with a handle, no text or symbols present.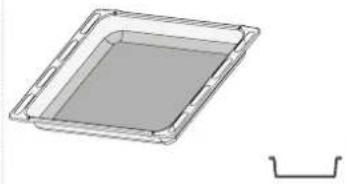
natural_image
3D rendering of a rectangular tray with a gray interior and a small U-shaped bracket on the right side (no text or symbols)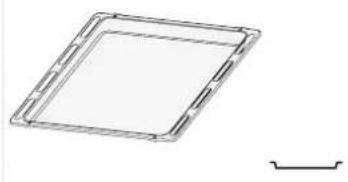
natural_image
Pure geometric diagram of a square frame with rounded corners and a small horizontal line on the right side (no text or symbols)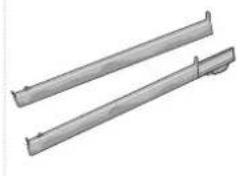
natural_image
Two metallic cylindrical metal rods with flanges, shown from different angles (no text or symbols visible)natural_image
Illustration of a hand holding a tool with an arrow indicating rotation (no text or symbols present)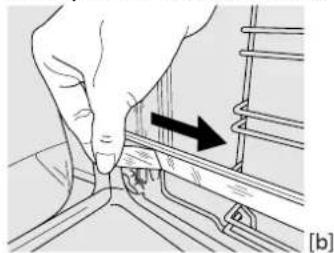
natural_image
Hand pressing a button on a rail track component, showing motion direction (no text or symbols)text_image
Diagram showing a hand holding a device with two numbered steps labeled ① and ②, indicating a process or operation.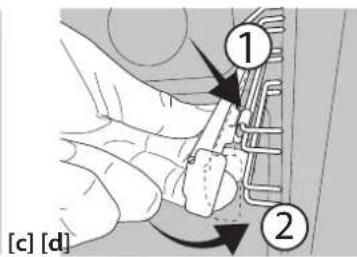
text_image
[c] [d] ① ②ИЗВАЖДАНЕ И ПОСТАВЯНЕ НА ВОДАЧИТЕ
natural_image
Diagram of a mechanical assembly with a black arrow indicating direction (no text or symbols present)natural_image
Illustration of three-step hand manipulation process: holding a tablet, adjusting the mask, and adjusting a device (no text or symbols)natural_image
Diagram of a mechanical component with an arrow indicating direction (no text or symbols present)natural_image
Diagram showing a person sitting on a platform with a device and directional arrows indicating motion (no text or symbols)natural_image
Illustration of hands using a tablet to interact with a screen (no text or symbols visible)ОТКРИВАНЕ И ОТСТРАНЯВАНЕ НА НЕИЗПРАВНОСТИ
text_image
Diagram illustrating a door lock operation with hand placement and tool positioning stepsZAHVALJUJEMO VAM NA KUPOVINI PROIZVODA WHIRLPOOL
Kako bismo vam mogli pružiti potpuniju pomoć, registrirajte svoj uređaj na adresi www.whirlpool.eu/register

Pažljivo pročitajte sigurnosne upute prije upotrebe uređaja.
SKENIRAJTE QR KOD NA SVOM UREĐAJU DA BISTE DOBILI VIŠE INFORMACIJA
OPIS PROIZVODA
text_image
1 2 3 4 5 6 7flowchart
graph TD
    A["Weather Icon"] --> B["Light Bulb Icon"]
    B --> C["Light Storage Icon"]
    C --> D["Storage Icon"]
    D --> E["Light Storage & Lighting Icon"]
    E --> F["Light Storage & Lighting Icon"]
    F --> G["Light Storage & Lighting Icon"]
    G --> H["Light Storage & Lighting Icon"]
    H --> I["Light Storage & Lighting Icon"]
    I --> J["Light Storage & Lighting Icon"]
    J --> K["Light Storage & Lighting Icon"]
    K --> L["Light Storage & Lighting Icon"]
    L --> M["Light Storage & Lighting Icon"]
    M --> N["Light Storage & Lighting Icon"]
    N --> O["Light Storage & Lighting Icon"]
    O --> P["Light Storage & Lighting Icon"]
    P --> Q["Light Storage & Lighting Icon"]
    Q --> R["Light Storage & Lighting Icon"]
    R --> S["Light Storage & Lighting Icon"]
    S --> T["Light Storage & Lighting Icon"]
    T --> U["Light Storage & Lighting Icon"]
    U --> V["Light Storage & Lighting Icon"]
    V --> W["Light Storage & Lighting Icon"]
    W --> X["Light Storage & Lighting Icon"]
    X --> Y["Light Storage & Lighting Icon"]
13245
natural_image
Pure electrical circuit lines without any symbols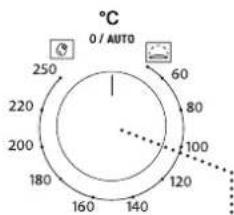
radar
| Angle (°) | Value | |-----------|-------| | 0 | 1 | | 30 | 60 | | 60 | 80 | | 90 | 100 | | 120 | 120 | | 150 | 140 | | 180 | 160 | | 210 | 180 | | 240 | 200 | | 270 | 220 | | 300 | 250 |6
1. GUMB ZA ODABIR
Za uključivanje pećnice odabirom funkcije.
Okrenite u položaj 0 za isključivanje pećnice.
2. SVJETLO
natural_image
Technical illustration of a square frame and two parallel metal beams (no text or symbols)Upotrebljava se za pečenje kruha i peciva, ali i pečenki, ribe u ovitku itd.
natural_image
Illustration showing two hand positions (a and b) of a mechanical component with directional arrows indicating movement, no text or symbols present.UKLANJANJE KLIZNIH VODILICA [c]
Povucite donji dio klizne vodilice da biste odvojili donje kuke (1) i klizne vodilice povucite prema gore skidajući ih s gornjih kuka (2).
PONÓVNO PÓSTÁVLJANJE KLIZNIH VODILICA [d]
Zakvačite gornje kuke na vodilice rešetki (1) pa žatim pritisnite donji dio kliznih vodilica na vodilice rešetki sve dok donje kuke ne kliknu (2).
![WHIRLPOOL OMK58HU1X - PONÓVNO PÓSTÁVLJANJE KLIZNIH VODILICA [d] - 1](/content/2026/04/690496/images/c7e600396a984cdeca3a89a5b606bab40ee8eebdafbf444ade754182655eac71.jpg)
text_image
Diagram illustrating two steps of car door handle positioning, labeled ① and ② with directional arrows and section marker [c] [d]SKIDANJE I PONOVNO POSTAVLJANJE VODILICA RESETKI
- Vodilice rešetki skinite tako da čvrsto uhvatite vanjski dio vodilice i povučete je prema sebi da biste potporu i dva interna zatika izvukli iz ležišta.
- Ponovno ih postavite tako da ih postavite blizu unutrašnjosti i najprije umetnete dva zatika u njihova ležišta. Zatim vanjski dio postavite u blizinu njegovog ležišta, umetnete nosač i čvrsto ga pritisnete prema stijenci unutrašnjosti da biste provjerili je li vodilica rešetke dobro učvršćena.
PRVA UPOTREBA
1. POSTAVLJANJE VREMENA
SMARTCLEAN (PAMETNO ČIŠĆENJE)
Djelovanje pare otpuštene tijekom ovog posebnog ciklusa čišćenja na niskoj temperaturi omogućuje lako otklanjanje prljavštine i ostataka hrane. Ako želite uključiti funkciju pametnog čišćenja „Smart Clean“, ulijte 100 – 120 ml pitke vode na dno pećnice i zatim okrenite gumb za odabir i gumb termostata u položaj ikone. Najbolje bi bilo da funkciju uključite na 35'. Položaj ikone ne odgovara temperaturi koja se doseže tijekom ciklusa čišćenja.
RISING (DIZANJE)
Za pokretanje funkcije „Rising” (Dizanje) okrenite gumb termostata u položaj za RisiSng (Dizanje) (40 stupnjeva) i stavite gumb u položaj Conventional (Konvencionalno); Ubacite hranu u pećnicu nakon signala predgrijanja. Prekrijte tijesto mokrom krpom ili stavite posudu s vodom na dno otvora za stvaranje vlažnog okruženja.
SMART CLEAN (PAMETNO ČIŠĆENJE)
Da biste uključili funkciju čišćenja „Smart Clean“, ulijte 100 – 120 ml pitke vode na dno pećnice, a zatim okrenite gumb za odabir i gumb termostata prema ikoni 📄. Funkcija će se automatski uključiti: na zaslonu će se prikazati vrijeme preostalo do završetka; naizmjenično s porukom „HYD”.
natural_image
Diagram of a mechanical component with an arrow indicating direction (no text or symbols present)- Zatvorite vrata koliko god to možete. Čvrsto uhvatite vrata s obje ruke; ne držite ih za ručku. Vrata jednostavno skinite tako da ih nastavljate zatvarati dok ih istovremeno vučete prema gore (a) dok se ne otpuste iz svog ležišta (b). Stavite vrata sa strane, oslanjajući ih na meku površinu.
text_image
~60° ~15° a b-
Ponovno postavite vrata pomičući ih prema pećnici, poravnavajući kuke šarki s ležištima i učvršćujući gornji dio na njegovo ležište.
-
Spustite vrata pa ih otvorite do kraja. Šarke spustite u njihov početni položaj: provjerite jeste li ih do kraja spustili.
-
Pokušajte zatvoriti vrata i provjerite jesu li poravnata s upravljačkom pločom. Ako nisu, ponovite gore opisane korake.
ZAMJENA ŽARULJE
- Iskopčajte pećnicu iz struje.
- Odvijte pokrov svjetla, zamijenite žarulju i ponovno zavijte pokrov na svjetlo.
- Ponovno ukopčajte pećnicu u struju.
Napomena: Upotrebljavajte samo halogene žarulje od 25 W/230 V, tip G9, T300 °C.
natural_image
Illustration of three-step robotic manipulation process: hand holding tablet, head with magnifying glass, and screen with tool (no text or symbols)natural_image
Diagram of a mechanical component with a directional arrow indicating movement (no text or symbols)- Ponovno postavite srednju staklenu plohu (označeni slovom "R") prije postavljanja unutarnje staklene plohe: Kako biste pravilno postavili staklene plohe provjerite može li se oznaka "R" vidjeti u lijevom kutu. Najprije umetnite dugu stranu stakla označenu slovom "R" u potporna ležišta, pa je zatim spustite u položaj. Ponovite postupak za obje staklene plohe.
natural_image
Diagram showing a person interacting with a device on a platform, with no visible text or symbols.natural_image
Illustration of hands using a tablet to interact with a screen (no text or symbols visible)RJEŠAVANJE PROBLEMA
| Problem Mogući uzrok Rješenje | ||
| Pećnica ne radi. | Nestalo je struje.Došlo je do isključenja iz mreže. | Provjerite ima li struje u mreži i je li pećnica ukopčana u struju.Isključite i ponovno uključite pećnicu kako biste provjerili javlja li se kvar i dalje. |
| Na zaslonu se prikazuje slovo „F“ iza kojeg slijedi broj ili slovo. | Kvar pećnice. | Obratite se najbližem postprodajnom servisu za korisnike i navedite broj iza kojeg slijedi slovo „F“. |
| Na zaslonu se prikazuje poruka “Hot” (Vruće) i odabrana se funkcija ne pokreće. | Previsoka temperatura. | Pustite da se pećnica ohladi prije uključivanja funkcije.Odaberite drugu funkciju. |
| Tekst na zaslonu nije jasan i čini se da je u kvaru. | Postavljen je neki drugi jezik. Obratite se najbližem postprodajnom servisnom centru. | |
MEHANIZAM ZA ZAKLJUČAVANJE VRATA\*
Ako je instalirano zaključavanje vrata, vrata se moraju ručno zatvoriti. Otvaranje vrata s mehanizmom za zaključavanje (pogledajte na sl. 1).
Sigurnosni uređaj za vrata može se ukloniti na način prikazan na slikama (pogledajte sl. 2).
text_image
1 2* Dostupno samo na određenim modelima
Pravila, standardne dokumente i dodatne informacije o proizvodu možete pronaći tako da:
- Koristeći QR kod na Vašem uređaju
- posjetite naše web-mjesto docs.whirlpool.eu
- Možete i kontaktirati naš postprodajni servis (broj telefona potražite u knjižici jamstva). Kada se obraćate našem postprodajnom servisnu navedite kodove navedene na identifikacijskoj pločici proizvoda.

DĚKUJEME, ŽE JSTE SI ZAKOUPILI VÝROBEK ZNAČKY WHIRLPOOL
natural_image
Pure electrical circuit lines without any symbols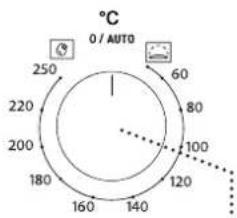
radar
| Angle (°) | Value | |-----------|-------| | 0 | 100 | | 60 | 80 | | 120 | 60 | | 180 | 40 | | 240 | 20 | | 300 | 10 | | 360 | 5 | | 420 | 3 | | 480 | 2 | | 540 | 1 | | 600 | 0.5 | | 660 | 0.3 | | 720 | 0.2 | | 780 | 0.1 | | 840 | 0.05 | | 900 | 0.03 | | 960 | 0.02 | | 1020 | 0.01 | | 1080 | 0.005 | | 1140 | 0.003 | | 1200 | 0.002 | | 1260 | 0.001 | | 1320 | 0.0005| | 1380 | 0.0003| | 1440 | 0.0002| | 1500 | 0.0001| | 1560 | 0.00005| | 1620 | 0.00003| | 1680 | 0.00002| | 1740 | 0.00001| | 1800 | 0.000005| | 1860 | 0.000003| | 1920 | 0.000002| | 1980 | 0.000001| | 2040 | 0.000001| | 2100 | 0.000001| | 2160 | 0.000001| | 2220 | 0.000001| | 2280 | 0.000001| | 2340 | 0.000001| | 2400 | 0.000001| | 2460 | 0.000001| | 2520 | 0.000001| | 2580 | 0.5 | | 2640 | 1 | | 2700 | 1 | | 2760 | 1 | | 2820 | 1 | | 2880 | 1 | | 2940 | 1 | | 3925 | - | | Note: The 'C' label indicates the value 'A' for the 'A' series in the chart.6
1. VOLICÍ KNOFLÍK
natural_image
Simple line drawing of a rectangular plate with vertical slats and a handle, no text or symbols present.natural_image
3D rendering of a rectangular tray with a gray interior and a separate U-shaped outline on the right side (no text or symbols)natural_image
Simple line drawing of a square frame with a small curved line on the right side (no text or symbols)natural_image
Hand holding a tool with an arrow indicating rotation or movement (no text or symbols present)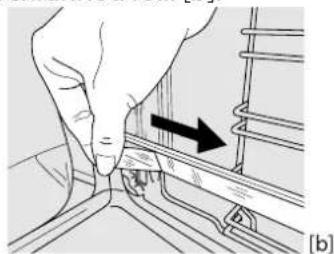
natural_image
Diagram of a hand pressing down on a mechanical component with an arrow indicating direction (no text or symbols present)VYJMUTÍ VÝSUVNÝCH LIŠT [c]
text_image
Diagram illustrating two steps of car door handle positioning, labeled ① and ② with directional arrows and section marker [c] [d]DEMONTÁŽ A INSTALACE VODICÍCH DRÁŽEK
3. PŘEDEHŘEV A ZBYTKOVÉ TEPLO
natural_image
Diagram of a mechanical assembly with a black arrow indicating direction (no text or symbols present)natural_image
Illustration of three-step hand tool application: opening, holding a device, and cutting a flat panel (no text or symbols)natural_image
Diagram of a mechanical component with an arrow indicating direction (no text or symbols)natural_image
Diagram showing a person using a device to interact with a screen, with arrows indicating motion (no text or symbols present)natural_image
Illustration of hands using a tablet to interact with a screen (no text or symbols visible)ODSTRAŇOVÁNÍ ZÁVAD
natural_image
Simple line drawing of a rectangular plate with horizontal slats (no text or symbols)natural_image
3D rendering of a rectangular tray with a gray interior and a separate U-shaped outline on the right side (no text or symbols)natural_image
Simple line drawing of a square frame with a small curved bracket on the right side (no text or symbols)natural_image
Two metallic cylindrical metal rods with flanged ends, shown in 3D rendering (no text or symbols)natural_image
Illustration of a hand holding a small object with an arrow indicating rotation (no text or symbols present)
natural_image
Hand pressing a component on a rail track, showing a black arrow indicating direction (no text or symbols present)LIUGSIINIDE EEMALDAMINE [c]
text_image
Diagram illustrating two-step car door handle assembly with labeled parts and directional arrowsRIIULISIINIDE EEMALDAMINE JA ÜMBERPAIGUTAMINE
natural_image
Technical line drawing of a mechanical component with an arrow indicating direction (no text or symbols)natural_image
Illustration of three-step hand manipulation process: holding a tablet, adjusting the mask, and adjusting a device (no text or symbols)natural_image
Diagram of a mechanical component with an arrow indicating direction (no text or symbols present)natural_image
Diagram showing a person using a device to interact with a mechanical component, no text or symbols presentnatural_image
Illustration of hands using a tablet to interact with a screen (no text or symbols visible)RIKKEOTSING
flowchart
graph TD
    A["Weather Icon"] --> B["Lighting Icon"]
    B --> C["Light Storage Icon"]
    C --> D["Storage Icon"]
    D --> E["Lighting & Lighting Icon"]
    E --> F["Lighting & Storage Icon"]
    F --> G["Lighting & Lighting Icon"]
    G --> H["Lighting & Storage Icon"]
    H --> I["Lighting & Lighting Icon"]
    I --> J["Lighting & Storage Icon"]
    J --> K["Lighting & Lighting Icon"]
    K --> L["Lighting & Storage Icon"]
    L --> M["Lighting & Lighting Icon"]
    M --> N["Lighting & Storage Icon"]
    N --> O["Lighting & Lighting Icon"]
    O --> P["Lighting & Storage Icon"]
    P --> Q["Lighting & Lighting Icon"]
    Q --> R["Lighting & Storage Icon"]
    R --> S["Lighting & Lighting Icon"]
    S --> T["Lighting & Storage Icon"]
    T --> U["Lighting & Lighting Icon"]
    U --> V["Lighting & Storage Icon"]
13245
natural_image
Pure electrical circuit lines without any symbols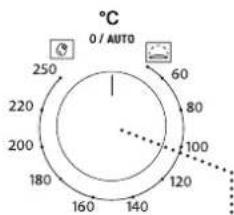
radar
| Angle (°) | Value | |-----------|-------| | 0 | 250 | | 45 | 220 | | 90 | 200 | | 135 | 180 | | 180 | 160 | | 225 | 140 | | 270 | 120 | | 315 | 100 | | 360 | 80 | | 405 | 60 | The value for the gauge is explicitly labeled as '0 / AUTO'. The dashed line indicates this measurement.6
1. VÁLASZTÓGOMB
natural_image
Simple line drawing of a rectangular grid or panel with a handle, no text or symbols present.natural_image
3D rendering of a rectangular tray with a gray inner area and a separate curved bracket on the right (no text or symbols)natural_image
Simple line drawing of a square frame with a small curved bracket on the right side (no text or symbols)natural_image
Illustration of a hand holding a tool with an arrow indicating direction (no text or symbols present)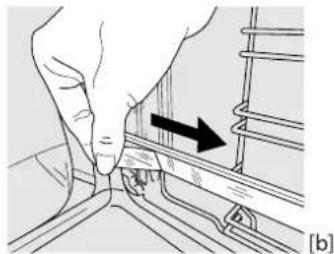
natural_image
Illustration of a hand pressing down on a mechanical component with an arrow indicating direction (no text or symbols present)text_image
Diagram showing two mechanical assembly steps labeled ① and ②, with arrows indicating rotation or movement in parts of a device.natural_image
Technical line drawing of a mechanical component with an arrow indicating direction (no text or symbols)natural_image
Illustration of three-step hand manipulation process: holding a tablet, adjusting a device, and adjusting a slide (no text or symbols)natural_image
Diagram of a mechanical component with an arrow indicating direction (no text or symbols present)natural_image
Diagram showing a person using a device to interact with another person, both with directional arrows indicating motion (no text or symbols present)natural_image
Illustration of hands using a digital tablet to interact with a screen (no text or symbols visible)A PROBLÉMÁK MEGOLDÁSA
text_image
Diagram illustrating a file transfer or storage operation with labeled steps and directional arrows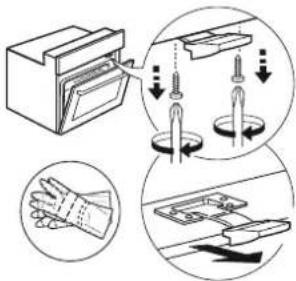
text_image
Diagram illustrating a hand holding a device with labeled parts and directional arrows indicating process steps.natural_image
Simple line drawing of a rectangular grid with horizontal lines, no text or symbols present.natural_image
3D rendering of a rectangular tray with a shaded interior and a separate curved bracket on the right (no text or symbols)natural_image
Simple line drawing of a square frame with a small protrusion at the bottom right corner (no text or symbols)natural_image
Hand holding a small object with an arrow indicating direction, no visible text or symbols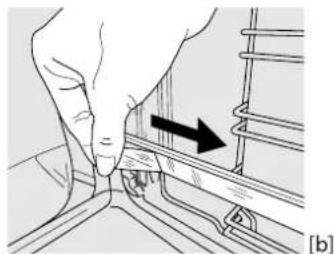
natural_image
Hand pressing a button on a mechanical component, showing a black arrow indicating direction (no text or symbols present)SLÍDOŠO SLIEČU IZNEMŠANA [c]
text_image
Diagram illustrating two-step car door handle assembly with labeled parts and directional arrowsPLAUKTU VADOTNU IZNEMŠANA UN ATKÄRTOTA IEVIETOŠANA
natural_image
Technical line drawing of a mechanical component with a black arrow indicating direction (no text or symbols)natural_image
Illustration of three-step hand tool application: opening, holding a device, and cutting a slide (no text or symbols)natural_image
Diagram of a mechanical component with a directional arrow indicating movement (no text or symbols)natural_image
Diagram showing a mechanical setup with an arrow indicating motion, no text or symbols presentnatural_image
Illustration of hands using a power tool to cut or spread a printed document (no text or symbols visible)PROBLÉMU NOVĚRŠANA
text_image
Diagram illustrating a door lock operation with hand placement and force application stepsnatural_image
Pure electrical circuit lines without any symbols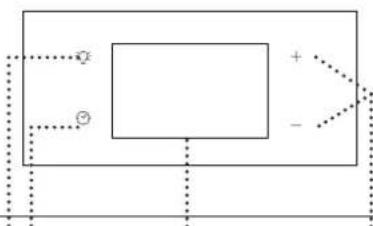
natural_image
Pure electrical circuit lines without any symbols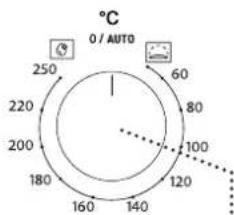
radar
| Angle (°) | Value | |-----------|-------| | 0 | 120 | | 60 | 140 | | 120 | 160 | | 180 | 180 | | 220 | 200 | | 250 | 220 |6
1. PASIRINKIMO RANKENËLË
natural_image
Simple line drawing of a rectangular grid or panel with horizontal lines, no text or symbols present.natural_image
3D diagram of a square frame with a shaded inner region and a separate curved line on the right (no text or symbols)natural_image
Simple line drawing of a square frame with a small protrusion on the right side (no text or symbols)natural_image
Illustration of a hand holding a small object with an arrow indicating rotation (no text or symbols present)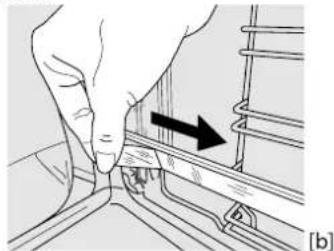
natural_image
Hand pressing a button on a mechanical component with an arrow indicating direction (no text or symbols)SLANKIOJANČIŲ GROTELIŲ IŠĖMIMAS [c]
text_image
Diagram illustrating two mechanical assembly steps labeled ① and ②, with arrows indicating rotation and component positioning.SKERSINIŲ GROTELIŲ IŠĖMIMAS IR JSTATYMAS
natural_image
Diagram of a mechanical component with an arrow indicating direction (no text or symbols present)- Uždarykite dureles.
natural_image
Illustration of three-step robotic manipulation process: hand holding tablet, lens interacting with screen, and close-up of screen with tool (no text or symbols)natural_image
Diagram of a mechanical component with a directional arrow indicating movement (no text or symbols)natural_image
Diagram showing a person seated on a chair facing a mechanical device with an arrow indicating motion (no text or symbols present)natural_image
Illustration of hands using a power tool to cut or spread a printed document (no text or symbols visible)TRIKČIŲ ŠALINIMAS
natural_image
Pure electrical circuit lines without any symbols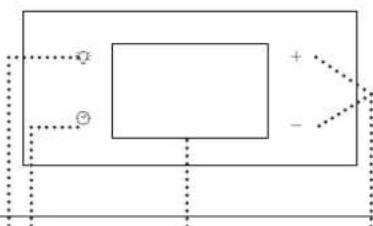
natural_image
Pure electrical circuit lines without any symbols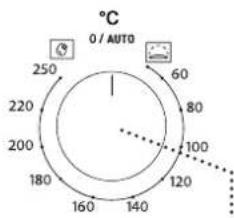
radar
| Angle (°) | Value | |-----------|-------| | 0 | 250 | | 60 | 60 | | 120 | 120 | | 180 | 180 | | 240 | 240 | | 300 | 300 | | 360 | 360 | | 420 | 420 | | 480 | 480 | | 540 | 540 | | 600 | 600 | | 660 | 660 | | 720 | 720 | | 780 | 780 | | 840 | 840 | | 900 | 900 | | 960 | 960 | | 1020 | 1020 | | 1080 | 1080 | | 1140 | 1140 | | 1200 | 1200 | | 1260 | 1260 | | 1320 | 1320 | | 1380 | 1380 | | 1440 | 1440 | | 1500 | 1500 | | 1560 | 1560 | | 1620 | 1620 | | 1680 | 1680 | | 1740 | 1740 | | 1800 | 1800 | | 1860 | 1860 | | 1920 | 1920 | | 1980 | 1980 | | 2040 | 2040 | | 2100 | 2100 | | 2160 | 2160 | | 2220 | 2220 | | 2280 | 2280 | | 2340 | 2340 | | 2400 | 2400 | | 2460 | 2460 | | 2520 | 2520 | | 2580 | 2580 | | 2640 | 2640 | | 2700 | 2700 | | 2760 | 2760 | | 2820 | 2820 | | 2880 | 2880 | | 2940 | 2940 | | 3000 | 3000 | | Note: The 'Value' in the 'Temperature' column is a duplicate of the 'Temperature' value between 'High' and 'Low'. The 'Temperature' values are explicitly labeled on the chart.6
1. POKRETŁO WYBORU
natural_image
Simple line drawing of a rectangular plate with horizontal slats (no text or symbols)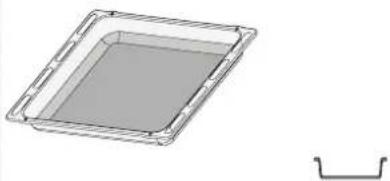
natural_image
Simple line drawing of a rectangular tray with a gray interior and a separate curved bracket on the right (no text or symbols)natural_image
Pure geometric diagram of a square plate with side notches and a small curved line on the right (no text or symbols)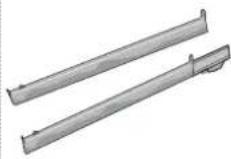
PROWADNICE WYSUWANE I DRABINKI METALOWE
natural_image
Hand holding a small object with an arrow indicating upward motion (no text or symbols)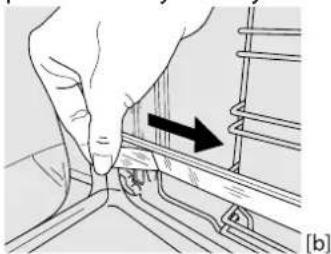
natural_image
Illustration of a hand pressing down on a mechanical component with an arrow indicating direction (no text or symbols present)DEMONTAŻ PROWADNIC WYSUWANYCH [c]
PONOWNY MONTAZ PROWADNIC WYSUWANYCH [d]
text_image
Diagram illustrating two-step car door handle assembly with labeled parts and directional arrowsWYJMOWANIE I PONOWNY MONTAŻ DRABINEK
END OF COOKING (KONIEC PIECZENIA)
natural_image
Diagram of a mechanical assembly with a black arrow indicating direction (no text or symbols present)natural_image
Illustration of three-step hand manipulation process: holding a tablet, adjusting a magnifying glass, and adjusting a slide (no text or symbols)natural_image
Diagram of a mechanical device with a paper sheet and directional arrow (no text or symbols)natural_image
Diagram showing a person interacting with a device on a platform, with no visible text or symbols.natural_image
Illustration of hands using a digital tablet to interact with a screen (no text or symbols visible)ROZWIĄZYWANIE PROBLEMÓW
VĂ MULȚUMIM CĂ AȚI ACHIZIȚIONAT UN PRODUS WHIRLPOOL
natural_image
Pure electrical circuit lines without any symbols3. SETAREA OREI
text_image
°C 0 / AUTO 250 60 80 100 120 140 160 180 200 220 2506
1. BUTONUL DE SELECTARE
natural_image
Simple line drawing of a rectangular plate with horizontal slats (no text or symbols)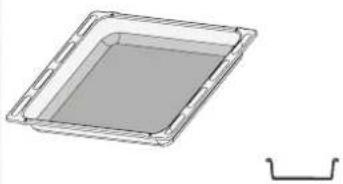
natural_image
3D rendering of a square frame with a gray inner tray and a separate U-shaped bracket (no text or symbols)natural_image
Pure geometric diagram of a square frame with a small curved line below (no text or symbols)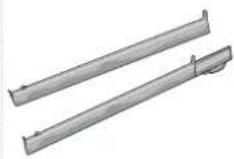
natural_image
Illustration of a hand holding a small object with an arrow indicating rotation (no text or symbols present)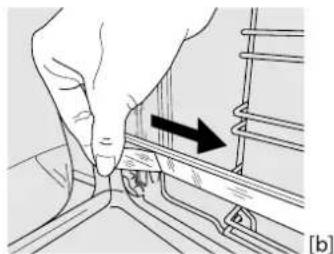
natural_image
Hand pressing a button on a mechanical component with an arrow indicating direction (no text or symbols)DEMONTAREA GHIDAJELOR CULISANTE [c]
text_image
Diagram illustrating two-step car door handle assembly with labeled parts and directional arrowsDEMONTAREA ŞI REMONTAREA GHIDAJELOR PENTRU GRĂTAR
4. PROGRAMAREA PREPARĂRII
natural_image
Diagram of a mechanical assembly with a black arrow indicating direction (no text or symbols present)natural_image
Illustration of three-step hand manipulation process: holding a tablet, adjusting a face mask, and adjusting a device (no text or symbols)natural_image
Diagram of a mechanical component with an arrow indicating direction (no text or symbols)natural_image
Diagram showing a person interacting with a device on a platform, with arrows indicating motion (no text or symbols present)natural_image
Illustration of hands using a digital tablet to interact with a screen (no text or symbols visible)REMEDIEREA DEFECTIUNILOR
HVALA NA KUPOVINI WHIRLPOOL PROIZVODA
Kako biste dobili kompletniju podršku, registrujte svoj proizvod na adresi www.whirlpool.eu/register

natural_image
Simple line drawing of a rectangular grid or panel with a handle, no text or symbols present.natural_image
3D diagram of a rectangular tray with a flat middle section and a separate curved line on the right (no text or symbols)Koristi se kao pleh za pečenje mesa, ribe, povrća, fokače itd. ili je možete postaviti ispod žičane rešetke ako želite da prikupite saft od pečenja.
PLEH ZA PEČENJE* KLIZNE VOĐICE*
natural_image
Pure geometric diagram of a square frame with a small curved line below (no text or symbols)Koristi se za pečenje svih vrsta hleba i peciva, kao i pečenja, ribe u sopstvenom soku itd.
Da bi olakšale postavljanje ili uklanjanje dodatnog pribora.
* Dostupno samo na određenim modelima Količina i vrsta pribora može se razlikovati u zavisnosti od kupljenog modela. Drugi dodatni pribor se može kupiti odvojeno iz postprodajnog servisa.
STAVLJANJE REŠETKI I DRUGIH DODATAKA
- Postavite rešetku na željeni nivo tako što ćete je lagano iskositi nagore i prvo postaviti izdignutu zadnju stranu (usmerenu nagore).
Potom je lagano gurnite da klizi horizontalno po vodicama do kraja, koliko god je moguće.
natural_image
Hand holding a small object with an arrow indicating upward motion (no text or symbols)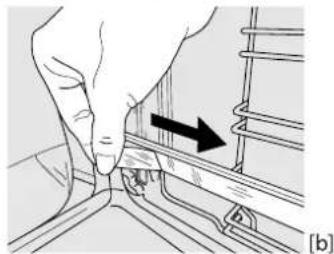
natural_image
Hand pressing a component on a rail track, showing a black arrow indicating direction (no text or symbols present)UKLANJANJE KLIZNIH VOĐICA [c]
Povucite donji deo klizne vođice da biste otkačili donje kuke (1) i povucite klizne vođice nagore, skidajući ih sa gornjih kuka (2).
PONOVNO POSTAVLJANJE KLIZNIH VOĐICA [d]
Zakačite gornje kuke na vodice police (1), a zatim pritisnite donji deo kliznih vodica na vodice police, dok donje kuke ne kliknu (2).
PRVA UPOTREBA
1. PODEŠAVANJE VREMENA
Potrebno je da podesite vreme prilikom prvog uključivanja uređaja: Pritiskajte ☺ sve dok ♦dve cifre koje označavaju sat ne zatrepere na ekranu.
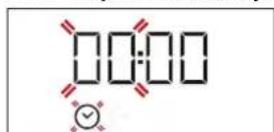
Koristite + ili -da biste podesili sate i pritisnite za potvrdu. Počeće da trepere dve brojke koje označavaju minute.
Koristite + ili da biste podesili minute i pritisnite za potvrdu.
text_image
Diagram showing two-step car door handle assembly with labeled parts and directional arrowsUKLANJANJE I PONOVNO POSTAVLJANJE VODICA
- Da biste uklonili vođice, čvrsto uhvatite spoljašnji deo vođice i povucite je ka sebi da biste izvukli nosač i dva unutrašnja pina iz ležišta.
- Da biste ponovo postavili vođice, postavite ih uz šupljinu i prvo umetnite dva pina u ležište. Zatim, postavite spoljašnji deo blizu ležišta, umetnite nosač i čvrsto pritisnite prema zidu šupljine da bi se vođica pravilno pričvrstila.
2. ZAGREVANJE PEĆNICE
Nova pećnica može ispuštati mirise zaostale nakon procesa proizvodnje: to je sasvim normalno. Pre nego što započnete pripremu hrane, preporučujemo vam da zagrejete praznu pećnicu kako biste eliminisali sve neprijatne mirise. Uklonite zaštitne kartone i folije iz pećnice i uklonite sav dodatan pribor iz unutrašnjosti pećnice.
Zagrejte pećnicu na 250 °C na otprilike sat vremena. Tokom ovog procesa, pećnica mora biti prazna.
Obratite pažnju na sledeće: Preporučuje se provetravanje prostorije nakon prve upotrebe uređaja.
FUNKCIJE

natural_image
Technical line drawing of a mechanical component with an arrow indicating direction (no text or symbols)- Zatvorite vrata koliko god je moguće. Čvrsto držite vrata sa obe ruke – ne držite ih za dršku. Jednostavno skinite vrata tako što ćete nastaviti da ih zatvarate dok ih istovremeno povlačite nagore (a) i oslobađate iz njihovog ležišta (b). Položite vrata da leže na jednoj strani, na mekanoj površini.
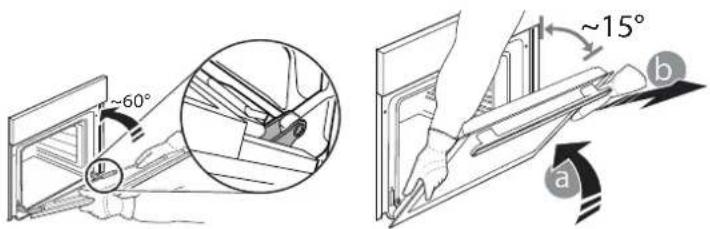
text_image
-60° ~15° a b-
Ponovo postavite vrata tako što ćete ih podići ka pećnici, poravnajte kuke sa šarki sa ležištem i postavite gornji deo vrata u njihovo ležište.
-
Spustite vrata, a potom ih potpuno otvorite. Spustite kvačice na njihovu prvobitnu poziciju: Proverite da li ste ih spustili potpuno.
-
Pokušajte da zatvorite vrata i proverite da li su u istoj ravni sa kontrolnom tablom. Ukoliko nisu, ponovite gore opisane korake.
ZAMENA LAMPICE
- Isključite pećnicu iz struje.
- Odvrnite poklopac lampe, zamenite sijalicu i vratite poklopac.
- Ponovo priključite pećnicu na električnu mrežu. Obratite pažnju na sledeće: Koristite samo halogene sijalice od 25 W/230 V tipa G9, T300 °C.
natural_image
Illustration of three-step hand manipulation process: holding a tablet, adjusting a device, and cutting the screen (no text or symbols)natural_image
Diagram of a mechanical component with a directional arrow indicating movement (no text or symbols)- Ponovo postavite srednje okno (obeleženo slovom „R“) pre postavljanja unutrašnjeg okna: Da biste pravilno postavili staklena okna, vodite računa da oznaka „R“ može da se vidi u levom uglu. Prvo ubacite dužu stranu stakla obeleženu slovom „R“ u ležišta, a potom ga spustite na položaj. Ovu proceduru ponovite za oba staklena okna.
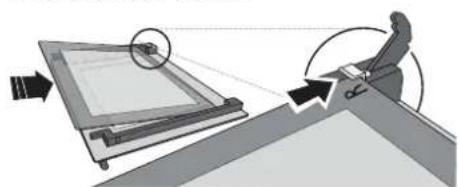
natural_image
Diagram showing a person interacting with a device on a curved surface, with no visible text or symbols.- Vraćanje gornje ivice vrata: Kliknuće ukoliko ste je pravilno postavili. Proverite da li je dobro pričvršćena pre nego što vratite vrata na mesto.
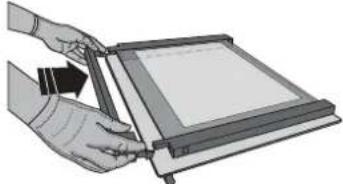
natural_image
Illustration of hands using a pen to interact with a tablet device (no text or symbols visible)OTKLANJANJE PROBLEMA
| Problem Mogući uzrok Rešenje | ||
| Pećnica ne radi. | Nestanak struje.Isključenje iz električne mreže. | Proverite da li postoji dovod električne energije i da li je pećnica priključena na električnu mrežu.Isključite pećnicu i ponovo je uključite kako biste proverili da li je kvar i dalje prisutan. |
| Na ekranu se prikazuje slovo „F“ uz slovo ili broj. | Kvar pećnice. | Kontaktirajte najbliži Postprodajni servis za klijente i recite im broj koji se pojavljuje uz slovo „F“. |
| Na displeju se prikazuje poruka „Hot“ (Vrelo) i izabrana funkcija se neće pokrenuti. | Temperatura previsoka. | Pustite da se pećnica ohladi pre aktiviranja funkcije. Izaberite drugu funkciju. |
| Na displeju se prikazuje nejasan tekst i čini se da je pokvaren. | Podešen je drugi jezik. Kontaktirajte najbliži postprodajni servisni centar za klijente. | |
UREĐAJ ZA ZAKLJUČAVANJE VRATA\*
Kada je instaliran uređaj za zaključavanje vrata, ona moraju ručno da se zatvore. Da biste otvorili vrata kada je postavljen uređaj za zaključavanje vrata, (pogledajte sl. 1.)
text_image
Diagram illustrating a door lock operation with hand placement and tool application steps* Dostupno samo na određenim modelima
Smernice, standardna dokumentacija i dodatne informacije o proizvodu se mogu naći:
• Korišćenje QR koda na uređaju
- putem naše internet stranice docs.whirlpool.eu
- Takođe, možete kontaktirati naš postprodajni servis (broj se nalazi u garantnoj knjižici).
Prilikom kontaktiranja našeg postprodajnog servisa, navedite šifru koja se nalazi na pločici za identifikaciju proizvoda.

ĐAKUJEME, ŽE STE SI KÚPILI VÝROBOK WHIRLPOOL
flowchart
graph TD
    A["Weather Icon"] --> B["Lighting Icon"]
    B --> C["Light Storage Icon"]
    C --> D["Storage Icon"]
    D --> E["Lighting & Lighting Icon"]
    E --> F["Lighting & Storage Icon"]
    F --> G["Lighting & Lighting Icon"]
    G --> H["Lighting & Storage Icon"]
    H --> I["Lighting & Lighting Icon"]
    I --> J["Lighting & Storage Icon"]
    J --> K["Lighting & Lighting Icon"]
    K --> L["Lighting & Storage Icon"]
    L --> M["Lighting & Lighting Icon"]
    M --> N["Lighting & Storage Icon"]
    N --> O["Lighting & Lighting Icon"]
    O --> P["Lighting & Storage Icon"]
    P --> Q["Lighting & Lighting Icon"]
    Q --> R["Lighting & Storage Icon"]
    R --> S["Lighting & Lighting Icon"]
    S --> T["Lighting & Storage Icon"]
    T --> U["Lighting & Lighting Icon"]
    U --> V["Lighting & Storage Icon"]
13245
flowchart
graph TD
    A[" "] --> B[" "]
    B --> C["+"]
    B --> D["-"]
3. NASTAVENIE ČASU
radar
| Temperature (°C) | Value | | :--- | :--- | | 0 | 250 | | 60 | 60 | | 80 | 80 | | 100 | 100 | | 120 | 120 | | 140 | 140 | | 160 | 160 | | 180 | 180 | | 200 | 200 | | 220 | 220 | | 250 | 250 |6
1. VOLIACI GOMBÍK
natural_image
Technical illustration of a square plate and two metal supports (no text or symbols)natural_image
Illustration of a hand holding a tool with an arrow indicating rotation (no text or symbols present)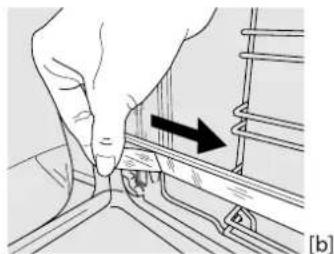
natural_image
Hand pressing a button on a mechanical component with an arrow indicating direction (no text or symbols)VYBRATIE POSUVNÝCH BEŽCOV [c]
text_image
Diagram illustrating two mechanical or electrical component states labeled ① and ②, with arrows indicating rotation or movement.VYBRATIE A VKLADANIE VODIACICH LÍŠT
- Ak chcete vodiace lišty vybrat, pevne uchopte vonkajšiu časť lišty, potiahnite ju k sebe, aby ste vytiahli podperu a dva vnútorné kolíky z otvorov.
- Ak ich chcete zasa nasadit, priložte ich k priestoru rúry a najprv zasuňte oba kolíky do otvorov. Potom umiestnite vonkajšiu časť k otvoru, zasuňte podperu a pevne zatlačte k stene priestoru rúry tak, aby bola vodiaca lišta pevne osadená.
2. ZOHREJTE RÚRU
natural_image
Diagram of a mechanical assembly with a black arrow indicating direction (no text or symbols present)- Zatvorte dvierka, pokial'to ide.
Pevne dvierka chytte oboma rukami – nedržte ich za rukovät.
Dvierka jednoducho vyberiete tak, že ich budete d'alej zatvárat a pritom t'ahat nahor (a), až kým sa neuvolnia zo sedla (b).
natural_image
Illustration of three-step hand manipulation process: holding a tablet, adjusting a mask, and closing the screen (no text or symbols)natural_image
Diagram of a mechanical component with a rectangular frame and an arrow indicating direction (no text or symbols)natural_image
Diagram showing a person using a device to interact with a screen, with an arrow indicating motion (no text or symbols present)natural_image
Illustration of hands using a tablet to interact with a screen (no text or symbols visible)RIEŠENIE PROBLÉMOV
flowchart
graph TD
    A["Weather Icon"] --> B["Light Bulb Icon"]
    B --> C["Light Storage Icon"]
    C --> D["Storage Icon"]
    D --> E["Light Storage & Lighting Icon"]
    E --> F["Light Storage & Storage Icon"]
    F --> G["Light Storage & Storage & Lighting Icon"]
    G --> H["Light Storage & Storage & Lighting Icon"]
    H --> I["Light Storage & Storage & Lighting Icon"]
    I --> J["Light Storage & Storage & Lighting Icon"]
    J --> K["Light Storage & Storage & Lighting Icon"]
    K --> L["Light Storage & Storage & Lighting Icon"]
    L --> M["Light Storage & Storage & Lighting Icon"]
    M --> N["Light Storage & Storage & Lighting Icon"]
    N --> O["Light Storage & Storage & Lighting Icon"]
    O --> P["Light Storage & Storage & Lighting Icon"]
    P --> Q["Light Storage & Storage & Lighting Icon"]
    Q --> R["Light Storage & Storage & Lighting Icon"]
    R --> S["Light Storage & Storage & Lighting Icon"]
    S --> T["Light Storage & Storage & Lighting Icon"]
    T --> U["Light Storage & Storage & Lighting Icon"]
    U --> V["Light Storage & Storage & Lighting Icon"]
    V --> W["Light Storage & Storage & Lighting Icon"]
    W --> X["Light Storage & Storage & Lighting Icon"]
    X --> Y["Light Storage & Storage & Lighting Icon"]
13245
flowchart
graph TD
    A[" "] --> B[" "]
    B --> C["+"]
    B --> D["-"]
NASTAVITEV ČASA
natural_image
Simple line drawing of a rectangular plate with horizontal slats (no text or symbols)natural_image
3D rendering of a rectangular tray with a gray interior and a separate U-shaped outline on the right side (no text or symbols)natural_image
Simple line drawing of a square frame with a small curved bracket on the right side (no text or symbols)natural_image
Two metallic cylindrical metal rods with flanges, shown from different angles (no text or symbols)natural_image
Illustration of a hand holding a tool with an arrow indicating direction (no text or symbols present)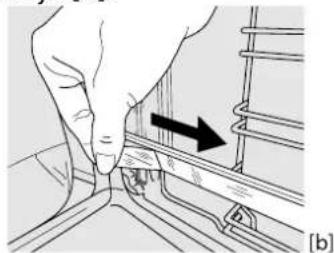
natural_image
Illustration of a hand pressing down on a mechanical component with an arrow indicating direction (no text or symbols)DEMONTAŽA DRSNIH VODIL [c]
text_image
Diagram illustrating two-step car door handle assembly with labeled parts and directional arrowsODSTRANJEVANJE IN PONOVNO VSTAVLJANJE VODIL ZA PEKACE
- Če želite odstraniti vodila za pekače, čvrsto primite zunanji del vodila in ga potegnite proti sebi, tako da iz lukenj izvlečete nosilec in dva notranja zatiča.
- Če želite vodila za pekače ponovno vstaviti, jih postavite blizu vdolbine in najprej v ustrezni luknji vstavite dva zatiča. Nato blizu ustrezne luknje postavite zunanji del, vstavite nosilec in močno pritisnite proti steni vdolbine tako, da se prepričate, da je vodilo pravilno pritrjeno.
natural_image
Technical line drawing of a mechanical component with a black arrow indicating direction (no text or symbols)natural_image
Illustration of three-step hands performing a device manipulation or assembly process (no text or symbols visible)natural_image
Diagram of a mechanical component with a directional arrow indicating movement (no text or symbols)- Ponovno namestite vmesno steklo (označeno z „R“) pred ponovnim nameščanjem notranjega stekla: Za ustrezno ponovno namestitev notranjega stekla se prepričajte, da je v levem vogalu vidna črka „R“. V držali najprej vstavite dolgo stranico stekla, označeno z „R“, in steklo nato spustite v ustrezni položaj. Ta postopek ponovite za obe stekli.
natural_image
Diagram showing a person interacting with a device on a platform, with no visible text or symbols.- Ponovno namestite zgornji rob: će zaslišite klik, to pomeni, da se je rob pravilno zaskočil. Prepričajte se, da je tesnilo na pravem mestu, preden namestite vrata.
natural_image
Illustration of hands using a tablet device to interact with a screen (no text or symbols visible)ODPRAVLJANJE TEŽAV
flowchart
graph TD
    A["Weather Icon"] --> B["Light Bulb Icon"]
    B --> C["Light Storage Icon"]
    C --> D["Storage Icon"]
    D --> E["Light Storage & Lighting Icon"]
    E --> F["Light Storage & Lighting Icon"]
    F --> G["Light Storage & Lighting Icon"]
    G --> H["Light Storage & Lighting Icon"]
    H --> I["Light Storage & Lighting Icon"]
    I --> J["Light Storage & Lighting Icon"]
    J --> K["Light Storage & Lighting Icon"]
    K --> L["Light Storage & Lighting Icon"]
    L --> M["Light Storage & Lighting Icon"]
    M --> N["Light Storage & Lighting Icon"]
    N --> O["Light Storage & Lighting Icon"]
    O --> P["Light Storage & Lighting Icon"]
    P --> Q["Light Storage & Lighting Icon"]
    Q --> R["Light Storage & Lighting Icon"]
    R --> S["Light Storage & Lighting Icon"]
    S --> T["Light Storage & Lighting Icon"]
    T --> U["Light Storage & Lighting Icon"]
    U --> V["Light Storage & Lighting Icon"]
    V --> W["Light Storage & Lighting Icon"]
    W --> X["Light Storage & Lighting Icon"]
    X --> Y["Light Storage & Lighting Icon"]
13245
flowchart
graph TD
    A[" "] --> B[" "]
    B --> C["+"]
    B --> D["-"]
radar
| Angle (°) | Value | |-----------|-------| | 0 | 60 | | 30 | 80 | | 60 | 100 | | 90 | 120 | | 120 | 140 | | 150 | 160 | | 180 | 180 | | 210 | 200 | | 240 | 220 | | 270 | 250 |6
1. РУЧКА ВИБОРУ
natural_image
Simple line drawing of a rectangular grid or panel with a handle, no text or symbols present.natural_image
3D rendering of a rectangular tray with a gray inner area and a separate curved bracket on the right (no text or symbols)natural_image
Simple line drawing of a square frame with a small curved line on the right side (no text or symbols)natural_image
Hand holding a small object with an arrow indicating rotation (no text or symbols)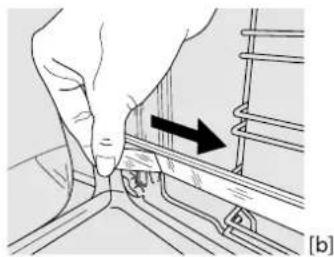
natural_image
Illustration of a hand pressing down on a mechanical component with an arrow indicating direction (no text or symbols present)ЗНЯТТЯ ТЕЛЕСКОПИЧНИХ НАПРЯМНИХ [с]
text_image
Diagram illustrating hand positioning and movement of a device, labeled with numbered steps 1 and 2, and reference to [c] [d].natural_image
Diagram of a mechanical assembly with a black arrow indicating direction (no text or symbols present)natural_image
Illustration of three-step hand tool application: opening, holding a face mask, and cutting a slide (no text or symbols)natural_image
Diagram of a mechanical component with a rectangular frame and an arrow indicating direction (no text or symbols)natural_image
Diagram showing a person seated on a chair facing a large screen, with arrows indicating motion or force direction (no text or symbols present)natural_image
Illustration of hands using a tablet to interact with a screen (no text or symbols visible)natural_image
Simple line drawing of a square frame with a small wavy line below (no text or symbols)Connectivity liesi ve<|ref_end|><|rotate_up|> to perform a plan in the cab and the meeting, and let you want to help the room and the Islamic map. We will find us that we are always difficult.
natural_image
3D diagram of a square container with a side view showing a curved line (no text or symbols)text_image
Diagram showing a hand holding a device with two labeled steps (① and ②) indicating a process or operation.[c][d]
![WHIRLPOOL OMK58HU1X - ЗНЯТТЯ ТЕЛЕСКОПИЧНИХ НАПРЯМНИХ [с] - 1](/content/2026/04/690496/images/68eed6b4599b7514ec9aace8d2ba9f6c2430d6c27ec37aa650474628ccee2e03.jpg)
text_image
Diagram showing a hand holding a tool with labeled parts, including numbered callouts ① and ②.natural_image
Illustration of a hand holding a small object with an arrow indicating rotation (no text or symbols)[a]
![WHIRLPOOL OMK58HU1X - ЗНЯТТЯ ТЕЛЕСКОПИЧНИХ НАПРЯМНИХ [с] - 2](/content/2026/04/690496/images/3ba60f78870cc81c83b1cb299016c1d3cac6832d668d08274c78777fa17512f1.jpg)
natural_image
Hand holding a tool interacting with a rail track (no text or symbols visible)[b]
natural_image
Diagram showing a person using a device to interact with a screen, with no visible text or symbols.natural_image
Illustration of hands using a tablet to interact with a screen (no text or symbols visible)تنظيف زجاج الباب
.1 موجها
natural_image
Illustration of three-step steps in a robotic manipulation process, showing hand positioning and tool movement (no text or symbols)natural_image
Diagram of a mechanical component with an arrow indicating direction (no text or symbols present)دليل تحري الأع泮
حتملمشكلة