
MOD-180 - Vacuum Cleaner MPM - Free user manual and instructions
Find the device manual for free MOD-180 MPM in PDF.

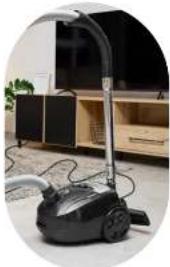
| Product type | Canister vacuum cleaner |
| Brand | MPM |
| Model | MOD-180 |
| Power supply | Mains 220-240 V ~ 50/60 Hz |
| Rated power | 800 W (estimate) |
| Energy consumption | Class A (estimate) |
| Power cord length | 4.5 m |
| Operating radius (cord + hose) | 7 m |
| Dust bag capacity | 2 L (estimate) |
| Bag type | Paper or textile bag (reusable) |
| Filters | EPA filter, motor filter, inlet and outlet sponges |
| Power adjustment | Dial on the switch |
| Bag full indicator | Yes (red indicator) |
| Automatic cord rewinding | Yes |
| Included accessories | Floor/carpet nozzle, crevice tool with brush, telescopic tube, corrugated hose |
| Weight | 4.2 kg (estimate) |
| Dimensions (L x W x H) | 400 x 300 x 250 mm (estimate) |
| Noise level | 76 dB (estimate) |
| Usage | Domestic |
| Maintenance | Regular filter cleaning, bag replacement |
| Safety | Automatic shut-off in case of overheating (estimate) |
| Housing material | ABS plastic |
Frequently Asked Questions - MOD-180 MPM
User questions about MOD-180 MPM
0 question about this device. Answer the ones you know or ask your own.
Ask a new question about this device
Download the instructions for your Vacuum Cleaner in PDF format for free! Find your manual MOD-180 - MPM and take your electronic device back in hand. On this page are published all the documents necessary for the use of your device. MOD-180 by MPM.
USER MANUAL MOD-180 MPM
EL. Supraconoei homophenomene is in 1970, but no monovalent alkene has been isolated from the monohydroxyphenol (C) compound. MBP
EN W/We wish you satisfactor from using the product and invite you to check a wide range of other MPM applications

2.0 her durt bag with microlith
Adjustable section power
Metal tepeope tube
Sarpoa compaement for additional sthymic
Vertical and horizontal parking system for convenient storage
BEZPECNOSTNI POKNY PRIPOUZIVANI
PORANDA JA VAIBA KINNITAMINE
IPEPIPAAH TQN AEEYOAP
IPOZAPTHESH DANEYO KAI XANIOY
Exi oxediota i yia tok aapioo oeyalw v eniee wv eipavew. Eivai eoianoevo e troxouc ia ukoan metakivon o deuopoiTec pioxec kai me ukaunto ouvdoaou to ouvdei me tov ukaunto owlambda avappoohnc, etipertovta c nV odynon tou o diaphopec ywviec. Otav patnoete to koupi oTo enawu npoc tou xaptnatoC (Teo - vtac to oE leitoupvia bouptoa), ia oipa ano kAnpoc trixc th a epaviotei otnv katw PLeupa Tou xapntmuatoc kai taepsei tok aapioo oklnpw daneewv.
EAPTHMA IIA XXIIME ME KINHTH BOYPTZA
Xpnoiopoioietai yia tov kaqapioo duonpooiw v npioxwv, onwc ywwiec domegaiuv,
diIa kai katw ano einnla kai oe nnxec kai pwyue. Eiva enionc idaviko ia tov ka -
thetaapo nknktpooyiw unoloyiotwv, ouptapiwv, kaopipepn kouwhmuatwv napa-
thupwv.
AANAHTHZAKOYAAZKONH
Tia va aalalete tn oakoula okovnc, anoouvdeote tn ouokeu n aoTv npoxn peuap -toc, aiooovdeote tov eukamtno owlhva avappofoonc (18), otn ouvexia avoieto Eanwkaumua (5) xnpoiopoiwvtac to koupi (6), ntaTe tn oakoula okovnc kpa -twvtaoc to koapo me to avoiya elodou npoc ta navw. Opeote mva vea toavta. Eivai eniogduvato va ayopaoete enilaeov xaptivec oakoulecs yia to anoppohtnpa avalo -ya me TIC avaykec oac.
KAOAPI\SMOZ KAI ANTIKATA TA H IATPQN AEPA
H kavovikn λειoupyia tnc nλεκτρικn σκούπaç aπaiτεi tny avtikataσtaon n tov kaθapi - σμο tou φιλtpou που kaλιπει tov kivntnpa σtny πλευρα tcns oakoulaç σκονnc kai tou φιλtpou σtny εξόδo tou aεpa ano kaipó σε kaipó. Γα va to kavete auto, anoouδεσte η μονδα ano tny πηγη ρεμatoc, anoouδεσte tov σωλnhva avappóφnonc.
-
Read the following operating instructions carefully before use.
-
Always remove the plug from the socket when not using the appliance or before cleaning the appliance.
-
Check that the power supply parameters on the unit's rating plate match those of your mains supply.
-
Do not hang the cable on sharp edges or allow it to come into contact with hot surfaces.
-
Never pull the cord to disconnect the device from the power source.
- Never leave a vacuum cleaner on unattended.
-
Take special care when children are around.
-
Do not let the hoover ride on the mains cable, as this can damage the cable's insulation cover.
- Do not attempt to use the hoover if any technical fault is suspected.
-
Do not use the appliance even if the mains cable or plug is damaged - in this case, have the appliance repaired at an authorised service centre.
-
The use of accessories not recommended by the manufacturer may cause damage to the unit, injury or fire.
-
Take special care when operating the hoover on stairs.
-
Do not immerse the appliance, cord or plug in water or other liquids - the mains cord and plug must be kept dry at all times.
- Do not use the hoover to collect flammable and corrosive liquids, solvents, matches, ashes, cigarette butts, oils, sharp objects, etc. This can cause damage to the device or even a fire! Also do not vacuum near flammable liquids and substances!
-
Due to the hoover's plastic housing, keep the appliance away from all heat sources (radiators, cookers, etc.).
-
Do not block the inlet and outlet openings of the hoover!
-
The hoover is intended for domestic use only.
-
This equipment may be used by children of at least 8 years of age and by persons of diminished physical and mental capabilities and persons with inexperience and lack of familiarity with the equipment if supervision or instruction is provided on how to use the equipment safely so that the associated risks are under
stood. Unsupervised children should not carry out cleaning and maintenance of the equipment.
- Children are not allowed to play with the device.
- Keep the device and its cable out of the reach of children under 8 years of age.
-
Do not vacuum people or pets, and be especially careful not to bring the suction tips close to your eyes and ears.
-
Before replacing equipment, turn off the equipment and disconnect it from the power supply.
-
Do not vacuum without a bag, filters or if they are damaged.
-
Check the suction hose, pipes and squeegees - remove debris inside.
- Use the vacuum cleaner only indoors and only for vacuuming dry surfaces. Wet cleaned carpets dry before vacuuming.
- For the safety of children, please do not leave freely accessible parts of the packaging (plastic bags, cardboard boxes, polystyrene, etc.).
-WARNING! Do not allow children to play with the film. Danger of suffocation!
DESCRIPTION OF THE DEVICE
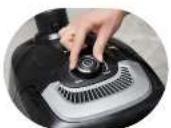
- On/off switch with suction power regulator
- Hoover handle
- Guide
- Dust bag fill indicator
- Top cover
- Button for opening the top cover
- Suction hose connection hole
- Vertical carrying handle
- Power cable
- Exhaust filter cover
-
Outer sponge of the exhaust filter
-
EPA filter
- Inner sponge of the outlet filter
- Dust bag
- Wheels
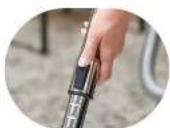
- Telescopic tube
- Suction hose retaining ring
- Suction hose
- Suction hose holder
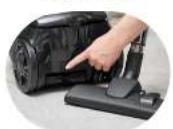
- Floor and carpet attachment
- Crevice tool with movable brush
- Engine filter
- Cable retractor button
ELECTROSTATICS
Vacuuming some surfaces in low humidity conditions may result in the unit becoming slightly electrified. This is a natural phenomenon, does not damage the device and is not a defect.
In order to minimise this, it is recommended:
- discharging the device by frequently touching metal objects in the room with the pipe,
- increasing the humidity in the room,
- use of generally available anti-static agents.
INSTALLATION OF THE DEVICE
- Press the two latches on the suction hose retaining ring (17), then insert the ring into the hole (7) and release the latches. To remove these components, press the latches again and pull the ring (17) out of the hole (7).
- Connect the other side of the suction hose (18) to the holder (19) and on the other side of the holder connect the suction pipe (16). Attach one of the suction attachments (20) or (21) to the end of the tube.
USE OF THE DEVICE
- Before switching on the hoover, unwind the power cord (9) to the appropriate length and insert the plug into the mains socket. The yellow mark on the supply cable indicates the optimum length. Do not extend the cable beyond the red marking! When unwinding the cable, do not press the cable retractor button (23).
- Press the switch (1) to turn on the vacuum cleaner. During vacuuming, the suction power can be adjusted by turning the suction power regulator (1) left/right to the appropriate position.
ATTENTION! We recommend setting the suction power regulator (1) to MIN before switching on the hoover!
ATTENTION! If the suction pipe is clogged or the dust bag is filled to the maximum, the bag fill indicator will turn red. The dust bag should then be replaced or the cause of the blockage in the suction pipe removed.
-
To retract the power cord, press the cord retractor button (23) with one hand and hold the cord with the other hand so that there is no sudden movement that could damage the cord.
-
Use the guide (3) on the back of the hoover to optimally position the unit after use. Place the rail on the back of the floor-carpet attachment with the connected suction hose and telescopic tube on the guide. A second guide for easy upright storage of the hoover is located underneath the unit.
DESCRIPTION OF ACCESSORIES
FLOOR AND CARPET ATTACHMENT
It is designed for cleaning large flat surfaces. It is equipped with wheels for easy movement in hard-to-reach areas and a flexible joint connecting it to the suction hose, allowing it to be guided at different angles. When the button on the top of the attachment is pressed (putting it into brush mode), a row of stiff bristles will appear on the underside of the attachment and allow hard floors to be cleaned.
CREVICE ATTACHMENT WITH MOVABLE BRUSH
It is used for cleaning hard-to-reach areas such as corners of rooms, around and under furniture and in folds and crevices. It is also perfect for cleaning computer keyboards, drawers, radiators or window frames.
CHANGING THE DUST BAG
To change the dust bag, disconnect the appliance from the power supply, unhook the suction hose (18), then open the top cover (5) using the button (6), eject the dust bag by holding the collar with the inlet opening facing upwards. Put on a new bag. It is also possible to purchase additional paper bags for the hoover depending on your needs.
CLEANING AND REPLACING AIR FILTERS
Normal operation of the hoover requires the filter covering the motor on the dust bag side and the filter at the air outlet to be replaced or cleaned from time to time. To do this, disconnect the device from the power source, unplug the suction pipe.
- Release the latch in the cover (10), remove the cover and then remove the filters (11), (12), (13).
- Remove the motor filter (22). You can access the filter by lifting the hoover cover (5) and removing the dust bag (14). Pull out the filter cartridge (22).
- Clean the EPA filter cartridge (12) of accumulated dust. Ensure that the EPA air filter cartridge is dry before insertion. Ensure that the EPA filter cartridge is in the correct position before closing the lid (10). Do not wash the EPA filter.
- Wash the filter cartridges (11), (13) and (22) in running and cool water. After washing, dry the filters thoroughly.
- Clean cartridges monthly or more frequently (depending on frequency of use). If one of the cartridges is too dirty or damaged then replace it with a new one.
- When assembling the cartridges, pay particular attention to the correct position of the cartridge in the filter housing and the filter in the hoover.
NOTES: THE INSTALLED FILTER ELEMENT MUST BE COMPLETELY DRY. FITTING A WET FILTER POSSES A RISK OF ELECTRIC SHOCK.
CLEANING AND MAINTENANCE
-
Clean the housing of the hoover and its other external components from time to time with a damp cloth. This will help keep the device looking good.
-
Sharp objects and all kinds of strong cleaning agents (e.g. solvents) must not be used for this purpose, as this will permanently damage the hoover housing.
- For air filters and dust bag, follow the aforementioned instructions.
IN CASE OF AN EMERGENCY
Type of failure: Possible causes: Directions:
| front cover not closed | dust bag not inserted or inserted incorrectly | install the dust bag properly |
| overheating of the hoover housing | Slight heating of the housing is normal, if it gets very hot, immediately switch off the hoover and contact the service department | |
| heavily contaminated filters clean or replace filters | ||
| dust bag full replace the dust bag or empty the textile bag | ||
| low suction power | clogged hose or extension pipe remove any objects clogging the hose or pipe | |
TECHNICAL DATA
Technical specifications are given on the product nameplate.
Length of mains cable: 4,5m
Hoover range: 7m

ATTENTION! MPM agd S.A. reserves the right to make technical changes.
Proper disposal of the product (waste electrical and electronic equipment)
Marking on the product indicates that after the service-life of the product expires, it should not be disposed with other type of municipal waste. Used equipment may have a negative impact on the environment and health of people due to potentially containing hazardous substances, mixtures and components. Mixing electric waste with other types of waste or disassembling those in an unprofessional manner may cause a release of substances that are hazardous to the environment and health.
Used equipment should be handed-over to a point for collection of electric waste. In order to obtain detailed information regarding the electric waste collection points, the user should contact the municipal point of electric waste collection or used equipment processing department.
BESCHRIJVING VAN HET APPARAAT
INSTALLATIE VAN HET APPARAAT
Hooverassortiment:7m

Y PA3I HECIIPABHOCTI
MapknpoBka Ha npOdykTe yKa3bIbAet Ha To, UTO npOdyKT He CneDyET Bbl6paCbIbTaB BmecTe O
IpyrIMN 6bITOBBIMN OTXODAMN NO OKOHuaHn CpOKa cnyk6bl. N3HOwEHHoe o6OpyObaHne Mo
Ket OKa3bIBaTb BpeHnoe Bo3dEiCTBnE Ha OKpyKaIOUyO CpeDy N 3OpOBBe ueNoBeka I3-3a No
TeHcnaJIbHOrO CoedePkaHnra OaChbIX BeUeCTB, Cmecn I KOMNoHEtOB. CMeIuBaHne OTXODOB
BnE N3HOWeHHoro 3neKtpoHHoro n 3neKtpnueeCKoro ObopyoBaHnC DpyrMMN OTXoAMn INI
nx HnpoeessnohaBna pa36opka moKet npBecTn K BbI6pocy BeueCTB, BpeHbIX Ia 3doPobBa n Okpykaouen Cpebl. N3HOweHHoe yctpoNCTBO Heo6xoJIMo CdaTB Ha nyHK T c6opa OtpaOtaHHoro 3neKtpnueCKoro n 3neKtpoHHoro o6OpDyOBaHNr. Yto6bl NOyUHTb NOpO6HyIO INphiOpMaUNIO O MeCe Cdaun 3neKtpnueCKNX n 3neKtpoHHbIX OTXoOB, NOlb3OBaTeJIb DOJKeH O6paTNTBCR B MeCTbI INyHK T c6opa 6OpDyOBaHNr dnn yTNIN3aCUnn nn Ha 3abOD no nepepa6OTke n3HOweHHoro o6OpDyOBaHNr.
Szanowy Kliencie!
Legible signature of the buyer