UPPSEENDE 204.621.65 - Oven IKEA - Free user manual and instructions
Find the device manual for free UPPSEENDE 204.621.65 IKEA in PDF.

User questions about UPPSEENDE 204.621.65 IKEA
0 question about this device. Answer the ones you know or ask your own.
Ask a new question about this device
Download the instructions for your Oven in PDF format for free! Find your manual UPPSEENDE 204.621.65 - IKEA and take your electronic device back in hand. On this page are published all the documents necessary for the use of your device. UPPSEENDE 204.621.65 by IKEA.
USER MANUAL UPPSEENDE 204.621.65 IKEA
Please record your model and serial numbers below for reference.
Please refer to the last page of this manual for the full list of IKEA appointed After Sales Service Provider and relative national phone numbers.
Please attach sales receipt here for future reference.
IMPORTANT SAFETY INSTRUCTIONS .....4
PART NAMES 8
CONTROL PANEL 9
BEFORE OPERATING....10
SENSOR COOKING....12
CONVECTION COOKING 15
AUTO DEFROST 17
CONVENIENT FEATURES .....20
CLEANING AND CARE ....22
SERVICE CALL CHECK 26
SPECIFICATIONS 26
IKEA LIMITED GUARANTEE....27
IMPORTANT SAFETY INSTRUCTIONS
PRECAUTIONS TO AVOID POSSIBLE EXPOSURE TO EXCESSIVE MICROWAVE ENERGY
(a) Do not attempt to operate this oven with the door open since open-door operation can result in harmful exposure to microwave energy. It is important not to defeat or tamper with the safety interlocks.
(b) Do not place any object between the oven front face and the door or allow soil or cleaner residue to accumulate on sealing surfaces.
(c) Do not operate the oven if it is damaged. It is particularly important that the oven door close properly and that there is no damage to the: (1) door (bent), (2) hinges and latches (broken or loosened), (3) door seals and sealing surfaces.
(d) The oven should not be adjusted or repaired by anyone except properly qualified service personnel.
IMPORTANT SAFETY INSTRUCTIONS
EN
Definitions
This is the safety alert symbol. It is used to alert you to potential personal injury hazards. Obey all safety messages that follow this symbol to avoid possible injury or death.

WARNING
WARNING indicates a potentially hazardous situation which, if not avoided, could result in death or serious injury.

CAUTION
CAUTION indicates a potentially hazardous situation which, if not avoided, may result in minor or moderate injury.
READ ALL INFORMATION BEFORE USING

WARNING
To reduce the risk of fire, burns, electric shock, injury to persons, or exposure to excessive microwave energy when using your appliance, follow basic precautions, including the following sections.
- Read all instructions before using the appliance.
- Read and follow the specific "PRECAUTIONS TO AVOID POSSIBLE EXPOSURE TO EXCESSIVE MICROWAVE ENERGY" on page 3.
- This appliance must be grounded. Connect only to properly grounded outlet. See "GROUNDING INSTRUCTIONS" on page 5-6.
- Install or locate this appliance only in accordance with the provided assembly instructions.
- Some products such as whole eggs and sealed containers —for example, closed glass jars—are able to explode and should not be heated in this microwave oven.
- Use this appliance only for its intended use as described in this manual. Do not use corrosive chemicals or vapors in this appliance. This type of microwave oven is speci cally designed to heat, cook or dry food. It is not designed for industrial or laboratory use.
- As with any appliance, close supervision is necessary when used by children.
- Do not operate this appliance if it has a damaged cord or plug, if it is not working properly or if it has been damaged or dropped.
- This appliance should be serviced only by qualified service personnel. Contact (833) 337-4006 for examination, repair or adjustment.
- Do not cover or block any openings on the appliance.
- Do not store or use this appliance outdoors. Do not use this product near water—for example, near a kitchen sink, in a wet basement or near a swimming pool, or similar locations.
- Do not immerse cord or plug in water.
- Keep cord away from heated surfaces.
- Do not let cord hang over edge of table or counter.
• See door surface cleaning instructions on page 22. - Do not mount over a sink.
- Do not store anything directly on top of the appliance surface when the appliance is in operation.
• To reduce the risk of fire in the microwave oven cavity:
- Do not overcook food. Carefully attend appliance when paper, plastic or other combustible materials are placed inside the microwave oven to facilitate cooking.
- Remove wire twist-ties from paper or plastic bags before placing bag in microwave oven.
- If materials inside the microwave oven ignite, keep microwave oven door closed, turn microwave oven off and disconnect the power cord or shut off power at the fuse or circuit breaker panel.
- Do not use the cavity for storage purposes. Do not leave paper products, cooking utensils or food in the cavity when not in use.
- Liquids, such as water, coffee or tea are able to be overheated beyond the boiling point without appearing to be boiling. Visible bubbling or boiling when the container is removed from the microwave oven is not always present. THIS COULD RESULT IN VERY HOT LIQUIDS SUDDENLY BOILING OVER WHEN A SPOON OR OTHER UTENSIL IS INSERTED INTO THE LIQUID.
To reduce the risk of injury to persons:
- Do not overheat the liquid.
- Stir the liquid both before and halfway through heating it.
- Do not use straight-sided containers with narrow necks. Use a wide-mouthed container.
- After heating, allow the container to stand in the microwave oven at least for 20 seconds before removing the container.
-
Use extreme care when inserting a spoon or other utensil into the container.
-
Clean ventilation openings and grease filters frequently. Grease should not be allowed to accumulate on ventilation openings, louver or grease filters.
- Use care when cleaning the louver and the grease filters. Corrosive cleaning agents, such as lye-based oven cleaners, may damage the louver and the grease filters.
- When flaming food under the hood, turn the fan on.
- This appliance is suitable for use above both gas and electric cooking equipment 30" wide.
- Do not clean with metal scouring pads. Pieces off the pad can touch electrical parts involving risk of electric shock.
WARNING
If you see arcing, press the Cancel button and correct the problem.
1) Oversized food or oversized metal utensils should not be inserted in a microwave/toaster oven as they may create a fire or risk of electric shock.
2) Do not clean with metal scouring pads. Pieces can burn off the pad and touch electrical parts involving a risk of electric shock.
3) Do not use paper products when appliance is operated in the toaster mode.
4) Do not store any materials, other than manufacturer's recommended accessories, in this oven when not in use.
5) Do not cover racks or any other part of the oven with metal foil. This will cause overheating of the oven.
SAVE THESE INSTRUCTIONS.
ARCING
Arcing is the microwave term for sparks in the oven. Arcing is caused by:
• Metal or foil touching the side of the oven.
- Foil not molded to food (upturned edges act like antennas).
- Metal, such as twist-ties, poultry pins, or gold-rimmed dishes, in the microwave.
• Recycled paper towels containing small metal pieces being used in the microwave.
Federal Communications Commission Radio Frequency Interference Statement (U.S.A. Only)
This equipment generates and uses ISM frequency energy and if not installed and used properly, that is in strict accordance with the manufacturer's instructions, may cause interference to radio and television reception. It has been type tested and found to comply with limits for ISM Equipment pursuant to part 18 of FCC Rules, which are designed to provide reasonable protection against such interference in a residential installation.
However, there is no guarantee that interference will not occur in a particular installation. If this equipment does cause interference to radio or television reception, which can be determined by turning the equipment off and on, the user is encouraged to try to correct the interference by one or more of the following:
- Reorient the receiving antenna of the radio or television.
- Relocate the microwave oven with respect to the receiver.
- Move the microwave oven away from the receiver.
- Plug the microwave oven into a different outlet so that the microwave oven and the receiver are on different branch circuits.
The manufacturer is not responsible for any radio or television interference caused by unauthorized modification to this microwave oven. It is the responsibility of the user to correct such interference.
UNPACKING AND EXAMINING YOUR MICROWAVE OVEN
Open the bottom of the carton, bend the carton flaps back and tilt the microwave oven over to rest on plastic foam pad. Lift carton off microwave oven and remove all packing materials, Assembly Instructions, Wall Template, Top Template, Filter, Turntable and Turntable Support. SAVE THE CARTON AS IT MAY MAKE INSTALLATION EASIER.
- Remove the feature sticker from the outside of the door, if there is one.
- DO NOT REMOVE THE WAVEGUIDE COVER, which is located on the ceiling in the microwave oven cavity. Check to see that there are Assembly Instructions,
Wall Template, Top Template and Filter, which is used when recirculating is chosen.
Read enclosures and SAVE the Advice & Instruction. Check the microwave oven for any damage, such as misaligned or bent door, damaged door seals and sealing surfaces, broken or loose door hinges and latches and dents inside the cavity or on the door. If there is any damage, do not operate the microwave oven and contact any IKEA Store.
See Assembly Instructions for more details.
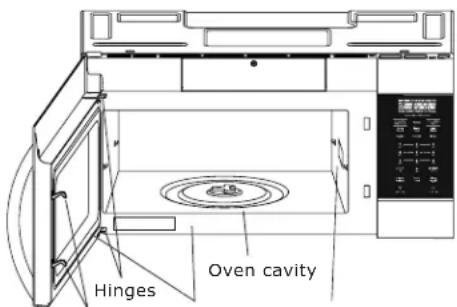
text_image
Hinges Oven cavitySafety door latches Door seals and sealing surfaces Waveguide cover
GROUNDING INSTRUCTIONS
This appliance must be grounded. This microwave oven is equipped with a cord having a grounding wire with a grounding plug. It must be plugged into a wall receptacle that is properly installed and grounded in accordance with the National Electrical Code and local codes and ordinances. In the event of an electrical short circuit, grounding reduces risk of electric shock by providing an escape wire for the electric current.
WARNING
Improper use of the grounding plug can result in a risk of electric shock.
Consult a qualified electrician or serviceman if the grounding instructions are not completely understood, or if doubt exists as to whether the appliance is properly grounded.
Electrical Requirements
Check Assembly Instructions for proper location for the power supply.
The electrical requirements are a 120 volt 60 Hz, AC only, 15 amp. or more protected electrical supply. It is recommended that a separate circuit serving only the microwave oven be provided.
The microwave oven is equipped with a 3-prong grounding plug. It must be plugged into a wall receptacle that is properly installed and grounded. DO NOT UNDER ANY CIRCUMSTANCES CUT OR REMOVE THE GROUNDING PIN FROM THE PLUG. DO NOT USE AN EXTENSION CORD.
A short power supply cord is provided to reduce the risks resulting from becoming entangled in or tripping over a longer cord.
IMPORTANT SAFETY INSTRUCTIONS
EN
If the power supply cord is too short, have a qualified electrician or serviceman install an outlet near the appliance.
The Power Supply Cord and plug must be connected to a separate 120 Volt AC, 60 Hz, 15 Amp, or more branch circuit, single grounded receptacle. The receptacle should be located inside the cabinet directly above the Microwave Oven mounting location as shown in Figure 1.

NOTES
- If you have any questions about the grounding or electrical Instructions, consult a qualified electrician or service person.
- Neither IKEA nor the dealer can accept any liability for damage to the microwave oven or personal injury resulting from failure to observe the correct electrical connection procedures.
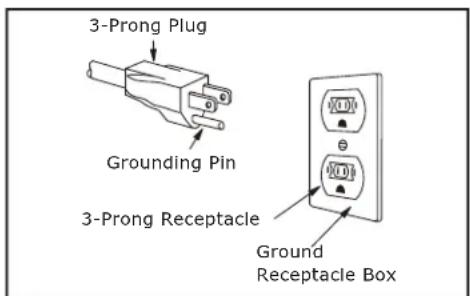
text_image
3-Prong Plug Grounding Pin 3-Prong Receptacle Ground Receptacle Box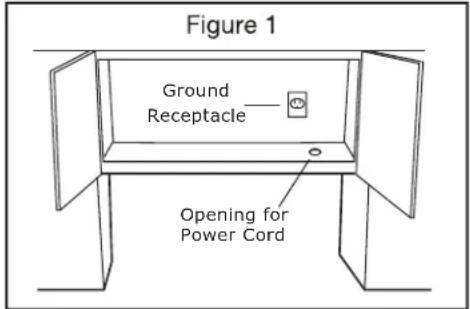
text_image
Figure 1 Ground Receptacle Opening for Power CordThis Advice & Instructions is valuable: read it carefully and always save it for reference.
A good microwave cookbook is a valuable asset. Check it for microwave cooking principles, techniques, hints and recipes.
NEVER use the microwave oven without the turntable and support nor turn the turntable over so that a large dish could be placed in the microwave oven.
ALWAYS have food in the microwave oven when it is on to absorb the microwave energy.
When using the microwave oven at power levels below 100%, you may hear the magnetron cycling on and off. It is normal for the exterior of the microwave oven to be warm to the touch when cooking or reheating.
Condensation is a normal part of microwave cooking. Room humidity and the moisture in food will influence the amount of moisture that condenses in the microwave oven. Generally, covered foods will not cause as much condensation as uncovered ones. Ventilation openings must not be blocked.
The microwave oven is for food preparation only. It should not be used to dry clothes or newspapers.
Your microwave oven is rated 1000 watts by using the IEC Test Procedure. In using recipes or package directions, check food a minute or two before the minimum time and add time accordingly.
ABOUT MICROWAVE COOKING
- Arrange food carefully. Place thickest areas towards outside of dish.
- Watch cooking time. Cook for the shortest amount of time indicated and add more as needed. Food severely overcooked can smoke or ignite.
- Cover foods while cooking. Check recipe or cookbook for suggestions: paper towels, wax paper, microwave plastic wrap or a lid. Covers prevent spattering and help foods to cook evenly.
- Shield with small flat pieces of aluminum foil any thin areas of meat or poultry to prevent overcooking before dense, thick areas are cooked thoroughly.
- Stir foods from outside to center of dish once or twice during cooking, if possible.
- Turn foods over once during microwaving to speed cooking of such foods as chicken and hamburgers. Large items like roasts must be turned over at least once.
- Rearrange foods such as meatballs halfway through cooking both from top to bottom and from the center of the dish to the outside.
- Add standing time. Remove food from microwave oven and stir, if possible. Cover for standing time which allows the food to finish cooking without overcooking.
- Check for doneness. Look for signs indicating that cooking temperatures have been reached.
Doneness signs include:
- Food steams throughout, not just at edge.
- Center bottom of dish is very hot to the touch.
- Poultry thigh joints move easily.
- Meat and poultry show no pinkness.
- Fish is opaque and flakes easily with a fork.
ABOUT FOOD
| FOOD DO | DON'T | |
| Eggs, sausages, nuts, seeds, fruits & vegetables | · Puncture egg yolks before cooking to prevent “explosion”. · Pierce skins of potatoes, apples, squash, hot dogs and sausages so that steam escapes. | · Cook eggs in shells. · Reheat whole eggs. · Dry nuts or seeds in shells. |
| Popcorn · Use | specially bagged popcorn for microwave cooking. · Listen while popping corn for the popping to slow to 1 or 2 seconds or use special popcorn pad. | · Pop popcorn in regular brown bags or glass bowls. · Exceed maximum time on popcorn package. |
| Baby food • Transfer baby food to small dish and heat carefully, stirring often. Check temperature before serving.• Put nipples on bottles after heating and shake thoroughly. “Wrist” test before feeding. | • Heat disposable bottles.• Heat bottles with nipples on.• Heat baby food in original jars. | |
| General • Cut baked goods with fllling after heating to release steam and avoid burns.• Stir liquids briskly before and after heating to avoid “eruption”.• Use deep bowl, when cooking liquids or cereals, to prevent boilovers. | • Heat or cook in closed glass jars or air tight containers.• Can in the microwave as harmful bacteria may not be destroyed.• Deep fat fry.• Dry wood, gourds, herbs or wet papers. | |
ABOUT UTENSILS AND COVERINGS
It is not necessary to buy all new cookware. Many pieces already in your kitchen can be used successfully in your new microwave oven. Make sure the utensil does not touch the interior walls during cooking.
Use these utensils for safe microwave cooking and reheating:
- glass ceramic (Pyroceram®), such as Corningware®.
- heat-resistant glass (Pyrex®)
- microwave-safe plastics
- paper plates
- microwave-safe pottery, stoneware and porcelain
- browning dish (Do not exceed recommended preheating time. Follow manufacturer's directions.)
These items can be used for short time reheating of foods that have little fat or sugar in them:
- wood, straw, wicker
DO NOT USE
• metal pans and bakeware
• dishes with metallic trim
• non-heat-resistant glass
• non-microwave-safe plastics (margarine tubs)
• recycled paper products
- brown paper bags
- food storage bags
- metal twist-ties
Should you wish to check if a dish is safe for microwaving, place the empty dish in the microwave oven and microwave on HIGH for 30 seconds. A dish which becomes very hot should not be used.
The following coverings are ideal:
- Paper towels are good for covering foods for reheating and absorbing fat while cooking bacon.
-
Wax paper can be used for cooking and reheating.
-
Plastic wrap that is specially marked for microwave use can be used for cooking and reheating. DO NOT allow plastic wrap to touch food. Vent so steam can escape.
- Lids that are microwave-safe are a good choice because heat is kept near the food to hasten cooking.
- Microwave oven cooking bags are good for large meats or foods that need tenderizing. DO NOT use metal twist ties. Remember to slit bag so steam can escape.
How to use aluminum foil in your microwave oven:
- Small flat pieces of aluminum foil placed smoothly on the food can be used to shield areas that are either defrosting or cooking too quickly.
- Foil should not come closer than one inch to any surface of the microwave oven.
Should you have questions about utensils or coverings, check a good microwave cookbook or follow recipe suggestions.
ACCESSORIES There are many microwave accessories available for purchase. Evaluate carefully before you purchase so that they meet your needs. A microwave-safe thermometer will assist you in determining correct doneness and assure you that foods have been cooked to safe temperatures. IKEA is not responsible for any damage to the microwave oven when accessories are used.
ABOUT CHILDREN AND THE MICROWAVE
Children below the age of 7 should use the microwave oven with a supervising person very near to them. Between the ages of 7 and 12, the supervising person should be in the same room.
As with any appliance, close supervision by an adult is necessary when used by children.
At no time should anyone be allowed to lean or swing on the microwave oven door.
Children should be taught all safety precautions: use potholders, remove coverings carefully, pay special attention to packages that crisp food because they may be extra hot.
Don't assume that because a child has mastered one cooking skill he/she can cook everything.
Children need to learn that the microwave oven is not a toy. See page 20 for Child Lock feature.
ABOUT SAFETY
- Check foods to see that they are cooked to the United States Department of Agriculture's recommended temperatures.
| TEMP FOOD | |
| 145°F (63°C) | - For beef, lamb or veal cut into steaks, chops or roasts, fi sh |
| 160°F (71°C) | - For fresh pork, ground meat, seafood, egg dishes, frozen prepared food and beef, lamb or veal cut into steaks, chops or roasts |
| 165°F (74°C) | - For leftover, ready-to-reheat refrigerated, deli and carry out "fresh" food, whole chicken or turkey, chicken or turkey breasts and ground poultry used in chicken or turkey burgers |
NOTE
Do not cook whole, stuffed poultry. Cook stuffing separately to 165°F.
To test for doneness, insert a meat thermometer in a thick or dense area away from fat or bone. NEVER leave the thermometer in the food during cooking, unless it is approved for microwave oven use.
- ALWAYS use potholders to prevent burns when handling utensils that are in contact with hot food. Enough heat from the food can transfer through utensils to cause skin burns.
- Avoid steam burns by directing steam away from the face and hands. Slowly lift the farthest edge of a
dish's covering and carefully open popcorn and oven cooking bags away from the face.
- Stay near the microwave oven while it's in use and check cooking progress frequently so that there is no chance of overcooking food.
- NEVER use the cavity for storing cookbooks or other items.
- Select, store and handle food carefully to preserve its high quality and minimize the spread of foodborne bacteria.
- Keep waveguide cover clean. Food residue can cause arcing and/or fires.
- Use care when removing items from the microwave oven so that the utensil, your clothes or accessories do not touch the safety door latches.
- Keep aluminum foil used for shielding at least 1 inch away from walls, ceiling and door.
PART NAMES
FRONT VIEW BOTTOM VIEW
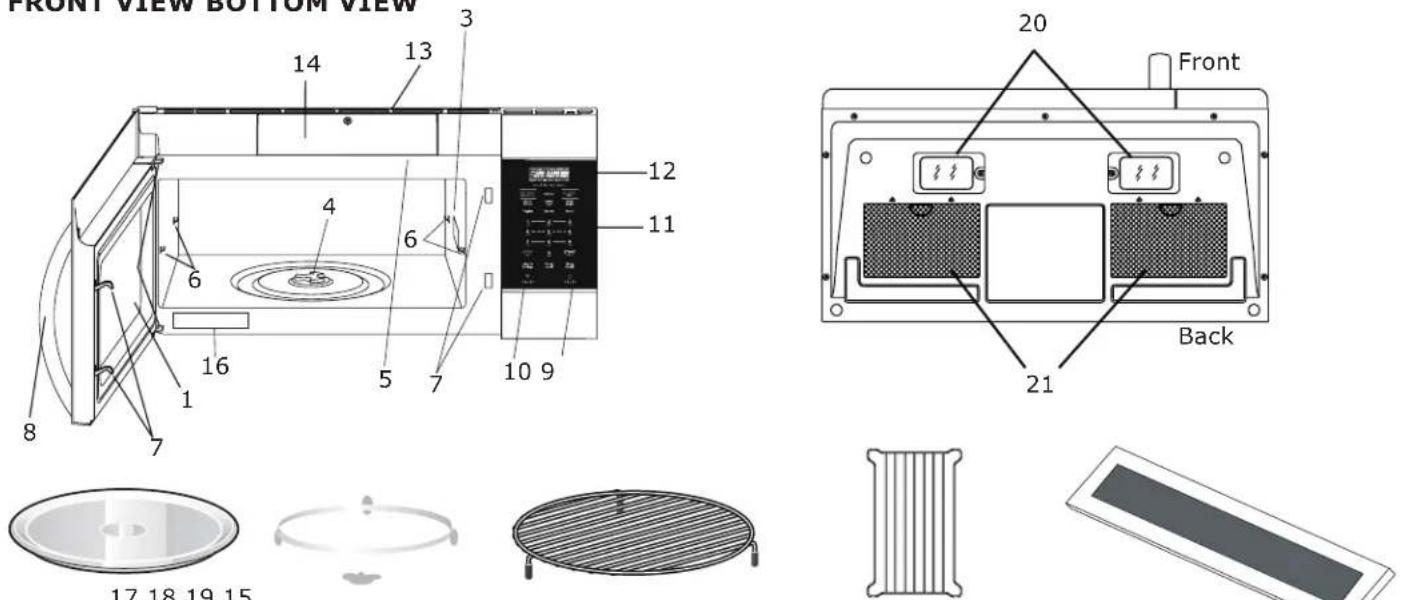
17 18 19 15
natural_image
Simple 3D diagram of a rectangular block with a central dark band, labeled 'wave' at the bottom (no other text or symbols)(Do not leave rack in microwave unless cooking on rack.)
1 Microwave oven door with see-through window
2 Door hinges
3 Waveguide cover: DO NOT REMOVE.
4 Turntable motor shaft
5 Microwave oven light
It will light when microwave oven is operating or door is open.
6 Rack holders
7 Safety door latches
The microwave oven will not operate unless the door is securely closed.
8 Handle
9 Light hi/lo/off pad
Press the light hi/lo/off pad once for high, twice for low and three times to turn off the light.
10 Vent hi/lo/off pad
Press the vent hi/lo/off pad once for high speed, twice for low speed and three times to turn off the fan.
11 Auto-Touch control panel
12 Time display: Digital display, 99 minutes, 99 seconds
13 Ventilation openings
14 Filter Access Door
15 Charcoal Filter
16 Menu label
17 Removable turntable
The turntable will rotate clockwise or counterclockwise. Only remove for cleaning.
18 Removable turntable support
First, carefully place the turntable support on the motor shaft in the center of the microwave oven floor. Place the support ring on the microwave oven floor. Then, place the turntable on the turntable support securely.
19 Rack for 2-level cooking/ reheating
20 Light coverFilter Access Door
21 Grease filters
The 7-digit Interactive Display spells out operating steps and shows cooking hints.

text_image
PRESS AGAIN FOR OPTIONS/ PRESS START TIMER DEFR LOCK FILTER CONVECT SENSOR COOK kg oz lb Convection Microwave 1 2 3 5 6 8 9 10 11 12 13 14 15 16 17 Hi | Low | Off Hi | Low | Off Convection Bake/Roast Defrost Convection +Micro Sensor Reheat Sensor Cook Melt/ Soften Veggies Popcorn Snacks 1 2 3 100° 200° 250° 4 Quick 5 Start 6 300° 325° 350° 7 8 9 375° 400° 425° STOP 0 START Clear 450° +30 Sec Clock & Settings Power Level Timer On-OffNumber next to the control panel key illustration indicates pages on which there are feature descriptions and usage information.
(1) Display:
The display includes a clock and indicators that show the time of day, cooking time settings, cook powers, sensor, quantities, weights and cooking functions selected.
1a. SENSOR:
Icon displayed when using sensor cook.
1b. TIMER:
Icon displayed when timer is being set or running.
1c. COOK:
Icon displayed when starting microwave cooking.
1d. DEFR:
Icon displayed when defrosting food.
1e. LOCK:
Icon displayed in control lock.
1f. PRESS AGAIN FOR OPTIONS:
Icon displayed when additional options are available.
1g. PRESS START:
Icon displayed when a valid function can be started.
1h. kg, oz, lb:
Icon displayed when choosing the weight.
1i. CONVECT:
Icon displayed when choosing convect.
1j. FILTER:
Icon displayed replace Filter.
(2) Convection Bake/Roast (P15)
(3) Defrost (P17)
(4) Convection+Micro (P15)
(5) Sensor Reheat (5 different settings) (P13)
(6) Sensor Cook (P12)
(7) Melt Soften (P14)
(8) Veggies(P13)
(9) Popcorn (P13)
(10) Snacks (P14)
(11) Numeric pads (0 thru 9)
(12) Stop/Clear (P10)
(13) START +30 sec (P10)
(14) Clock & Settings (P20)
(15) Power Level (11 power levels available) (P11)
(16) Timer (On-Off)(P22)
(17) Exhaust (High/Low/Off) \~ Use to turn the exhaust fan off, or to adjust fan speed. (P22)
(18) Surface Light (High/Low/Off)
Press this pad to adjust the brightness of surface lights. (P22)
(19) Quick Start (9 i nstant key settings) (P10)
Note: For detailed information, please go to relative page listed above.
BEFORE OPERATING
EN
- Before operating your new oven make sure you read and understand this Advice & Instructions Guide completely.
- The clock can be disabled when the microwave is first plugged in and the STOP key is selected. To re-enable the clock foll w clock instructions.
To Set the Clock
- Suppose you want to enter the correct time of day 10:59
Touch:
Display
1. Clock & Settings
PRESS AGAIN FOR OPTIONS/

2. ① ① ⑤ ⑨

PRESS START
3. START +30 Sec


NOTE
- If you begin to enter in an incorrect time (e.g. 2:89) the 8 is an invalid digit and cannot be entered. Enter the correct time.
- If you touch while setting the clock, the display will show the last time of day set or a blank display if no time of day has been set.
STOP clear
STOP
Press the to:
- Erase if you make a mistake during programming.
- Cancel timer setting and the signal after cooking.
- Stop the oven temporarily during cooking.
- Return the time of day to the display.
- Cancel a program during cooking, press twice.
MANUAL COOKING
Time Cooking
Your Over the Range Microwave Oven can be programmed for 99 minutes 99 seconds (99:99). Always enter the seconds after the minutes, even if they are both zeros.
- Suppose you want to cook for 5 minutes, 30 seconds at 100% power.
Touch:
Display
1. ⑤ ③ ①

2. START +30 Sec

Time counting down
Interrupting Cooking
You can stop the oven during a cycle by opening the door. The oven stops heating and the fan turns off, but the light stays on. To restart cooking, close the door and Touch.
START
+30 Sec
If you do not want to continue cooking, open the door and touch STOP Shows: Clear
Using One Touch Start
This is a time saving pad that will automatically 2 start cooking 2 seconds after selected. Numeric key 1, 2, 3.....or 9 can be touched for a 1 minute, 2 minutes or 9 minutes automatic start cooking feature.
Touch:
Display


Time counting down

NOTE
"Food" will be displayed if a quick start cooking cycle or +30 sec key is not selected within 5 minutes of placing food in the microwave. You must open then close the door again to clear "Food" from the display.
Using Add 30 Sec.
This is a time-saving pad. It is a simplified feature that lets you quickly set and start microwave cooking at 100% power.
- Suppose you want to cook for one minute.
Touch:
Display
1. START +30 Sec


2. START +30 Sec
Time counting down

NOTE
"Food" will be displayed if a quick start cooking cycle or +30 sec key is not selected within 5 minutes of placing food in the microwave. You must open then close the door again to clear "Food" from the display.
Shows:
Setting Timed Cooking With Power Level
This feature lets you program a specific cook time and power. For best results, there are 1 power level settings in addition to HIGH (100%) power.
- Suppose you want to cook for 5 minutes, 30 seconds at 80% power.
Touch:
Display
- ⑤ ③ ①

- Power Level x 3

- START + 30 Sec
5:30 Time counting down
NOTE
If you do not select a power level, the oven will automatically y coo k a t HIGH (100%) power.
Setting Two-Stage Cooking
For best results, some recipes call for different power levels during a cook cycle. You can program your oven for two power level stages during the cooking cycle.
- Suppose you want to set a 2-stage cook cycle. The first stage is a 3 minute cook time at 80% cook power then a 7 minute cook time at 50% cook power.
Touch:
Display
- ③ ① ①

To set a 3 minute cook time for first stage.

- Power Level x 3

3.⑦①①
To set a 7 minute cook power for the second stage.
- Power Level x 6

NOTE
You can program a "0" power second stage for standing time inside the oven.
- START + 30 Sec

Time counting down
To Set Power Level
There are eleven preset power levels.
Using lower power levels increases the cooking time which is recommended for foods such as cheese, milk and long slow cooking of meats. Consult cookbook or recipes for specific recommendations.
| PRESS POWER LEVEL PAD NUMBER OF TIMES FOR DESIRED POWER | APPROXIMATE PERCENTAGE OF POWER | COMMON WORDS FOR POWER LEVELS |
| POWER LEVEL x 1 100% | High | |
| POWER LEVEL x 2 90% | ||
| POWER LEVEL x 3 80% |
| POWER LEVEL x 4 70% | Medium High | |
| POWER LEVEL x 5 60% | ||
| POWER LEVEL x 6 50% | Medium | |
| POWER LEVEL x 7 40% | ||
| POWER LEVEL x 8 30% | Med Low/Defrost | |
| POWER LEVEL x 9 20% | ||
| POWER LEVEL x 10 10% | Low | |
| POWER LEVEL x 11 0% |
NOTE
DO NOT STORE THE RACK IN THE MICROWAVE NOT IN USE.
Using the Rack
The rack allows several foods to be cooked or reheated at one time. However, for the best cooking and reheating, use Turntable ON function and cook with SENSOR COOKING or AUTO COOKING without the rack. When the rack is used, set time and power level manually. Allow plenty of space around and between the dishes. Pay close attention to the cooking and reheating progress. Reposition the foods and reverse them from the rack to turntable and/or stir them at least once during any cooking or reheating time. After cooking or reheating, stir if possible. Using a lower power level will assist in better cooking and reheating uniformity.
Avoid:
- Storing the rack in the microwave oven when not in use.
- Popping popcorn with the rack in the microwave oven.
• Using any browning dish on the rack. - Using SENSOR COOKING and AUTO COOKING with the rack.
- Cooking directly on the rack—use microwave-safe cookware.
Manual Defrost
If the food that you wish to defrost is not listed on the Defrost chart or is above or below the limits in the Amount column on the Defrost chart (see page 18-19), you need to defrost manually.
You can defrost any frozen food, either raw or previously cooked, by using power level for 30%. For either raw or previously cooked frozen food the rule of thumb is approximately 4 minutes per pound. For example, defrost 4 minutes for 1 pound of frozen spaghetti sauce.
Always stop the oven periodically to remove or separate the portions that are defrosted. If food is not defrosted at the end of the estimated defrosting time, program the oven in 1 minute increments on power level 30% until totally defrosted.
When using plastic containers from the freezer, defrost only long enough to remove from the plastic in order to place in a microwave-safe dish.
Sensor cooking has an electronic controlled sensor that detects the vapor (moisture and humidity) emitted from the food as it heats. The sensor adjusts the cooking times and power level for various foods and quantities automatically.
Using Sensor Settings:
- Be sure the exterior of the cooking container and the interior of the oven are dry. Wipe off any moisture with a dry cloth or paper towel.
- The oven works with foods at normal storage temperature. For example, popcorn would be at room temperature.
- More or less food than the quantity listed in the chart should be cooked following the guidelines in any microwave cookbook.
- During the first part of SENSOR COOKING, food name will appear in the display. Do not open the oven door or press the STOP clear pad during this part of the cycle. The measurement of vapor will be interrupted. When the sensor detects the vapor emitted from the food, remainder of cooking time will appear. Door may be opened when remaining cooking time appears in the display. At this time, you may stir or season food, as desired.
- If the sensor does not detect vapor properly when popping popcorn, the oven will turn off, and the correct time of day will be displayed. If the sensor does not detect vapor properly when cooking other foods, AN ERROR CODE will be displayed, and the oven will turn off.
- Check food for temperature after cooking. If additional time is needed, continue to cook manually.
Covering Foods:
Some foods cook better when covered.
-
Casserole lid.
-
Plastic wrap: Use plastic wrap recommended for microwave cooking. Cover dish loosely; allow approximately 1/2 inch to remain uncovered to allow steam to escape. Plastic wrap should not touch food.
-
Wax paper: Cover dish completely; fold excess wrap under dish to secure. If dish is wider than paper, overlap two pieces at least one inch to cover.
Be careful when removing any covering to allow steam to escape away from you.
NOTES for SENSOR COOKING
- The final cooking result will vary according to the food condition (e.g. initial temperature, shape, quality). Check food for temperature after cooking. If additional time is needed, continue to cook manually.
- Stay near the oven while it's in use and check cooking progress frequently so that there is no chance of overcooking food.
- When SENSOR COOKING is selected Turntable On is automatically set for optimum cooking.
Sensor Cook
You can cook foods by pressing the sensor cook pad multiple times. You don't need to calculate cooking time or power level.
- Suppose you want to cook frozen breakfast.
| Touch: | Display |
| PRESS AGAIN FOR OPTIONS/ PRESS START | |
| 1. Sensor Cook | BACONSENSOR |
| 2. Sensor Cook | PRESS AGAIN FOR OPTIONS/ PRESS STARTFROZEN BINNERSENSOR |
| 3. Sensor Cook | PRESS AGAIN FOR OPTIONS/ PRESS STARTRICESENSOR |
| 4. Sensor Cook | PRESS AGAIN FOR OPTIONS/ PRESS STARTFROZEN BREAKFASTSENSOR |
| 5. Sensor Cook | FROZEN PIZZASensor |
| 6. START + 30 Sec | FROZEN PIZZASensor COOK |
Sensor Cook chart
| FOOD AMOUNT PROCEDURE | ||
| 1. Bacon 1-3 | slices Place bacon | strips on a microwave bacon rack for best results. (Use dinner plate lined with paper towels if rack is not available). |
| 2. Frozen Dinner | 10 oz./ 20 oz. Place | rice and twice as much liquid (water, chicken or vegetable stock) in a 2 quart microwave dish. Cover with plastic wrap and vent. After cooking, allow to stand for 10 minutes. Stir for fluffier rice. |
| 3. Rice 1-2 | cups Use medium or long grain rice. Cook instant rice according to directions on the package. | Place in an appropriately sized microwave container. Cover with plastic wrap. After cooking, stir and allow to stand for 3 minutes. |
| 4. Frozen Breakfast | 8-12 oz. Place in an | appropriately sized microwave container. Cover with plastic wrap. After cooking, stir and allow to stand for 3 minutes. |
| 5. Frozen Pizza | 12 oz. Place in an | appropriately sized microwave container. Cover with plastic wrap . After cooking, stir and allow to stand for 3 minutes. |
EN
Sensor Reheat
- Suppose you want to reheat rolls with sensor reheat.
Touch:
Display
| 1. Sensor Reheat | BEVERAGE |
| SENSOR | |
| PRESS AGAIN FOR OPTIONS/ PRESS START | |
| 2. Sensor Reheat | PIZZA |
| SENSOR | |
| PRESS AGAIN FOR OPTIONS/ PRESS START | |
| 3. Sensor Reheat | SOUP SAUCE |
| SENSOR | |
| PRESS AGAIN FOR OPTIONS/ PRESS START | |
| 4. Sensor Reheat | CASSEROLE |
| SENSOR | |
| 5. START + 30 Sec | CASSEROLE |
| SENSOR |
Sensor Reheat chart
| FOOD AMOUNT PROCEDURE | |
| Beverage 1 - 3 cups To rehe | at beverages.Stir liquid briskly before and after heating to avoid "erup-tion . |
| Pizza 1-4 Pieces Use for pizza | a. Remove from package and unwrap.Follow package directions for use of package and/or silver crisping disk. |
| Soup/ Sauce | 1 Cup Place in shallow microwav-able casserole. Cover with vented plastic wrap. After cooking, stir and let stand 3 minutes. |
| Casserole/ Lasagna | 10.5 Oz Place in a microwavable bowl or casserole. Cover with vented plastic wrap. After cooking, stir and let stand 3 minutes. |
ONE TOUCH COOK
Popcorn
The Popcorn quick touch pad lets you pop 3.3, 3.0, 1.75 ounce bags of commercially packaged microwave popcorn. Pop only one package at a time. If you are using a microwave popcorn popper, follow manufacturer's instructions.
- Suppose you want to pop a 3.3 oz. popcorn.
Touch:
Display
- Popcorn

- START + 30 Sec

Amount
Press popcorn pad
| 3.30 oz. | once |
| 3.00 oz. | 2 times |
| 1.75 oz. | 3 times |

NOTE
- Remove the metal shelf from microwave oven when cooking popcorn. Do not use regular paper bags. Do not re-pop unpopped kernels. Do not pop popcorn in glass cookware.
Veggies
There are 3 options (Potato, Frozen Vegetables, Fresh Vegetables) under the Veggies.
- Suppose you want to cook two cups of frozen veggies.
Touch:
Display
- Veggies

Touch:
Display
| PRESS AGAIN FOR OPTIONS/ PRESS START |
| FRESH |
| VEGGIES |
- Veggies

- Veggies

- START + 30 Sec
Time counting down
Vegetables chart
| FOOD(Initial temperature) | AMOUNT | PROCEDURE |
| Potato 1 - 4 | pieces | Cooking times are based on an average 8 ounce potato. Pierce with fork in several places. Place on paper towel on turntable. Press theveggies pad one time for potato. After cooking, remove from oven and let stand for 5 minutes. |
| Fresh Vegetables (5 °C)Broccoli Brussels sproutsCabbage Cauliflower (fl ower-ets)Cauliflower (whole)Spinach Zucchini | 2 cups | Wash and place in casserole. Add no water if vegetables have just been washed. Cover with lid for tender vegetables. Use plastic wrap for tender-crisp vegetables. Press theveggies pad twice for fresh Vegetables. After cooking, stir, if possible. Let stand, covered, for 2 to 5 minutes. |
| FOOD(Initial temperature) | AMOUNT PROCEDURE |
| Carrots, sliced Corn on cob Green beans Winter squash- diced- halves | 1 Cup Place in casserole. Add 1-4 tbsp. water. Cover with lid for tender vegetables. Use plastic wrap cover for tender-crisp vegetables. Press t he veggies pad twice for fresh vegetables. After cooking stir, if possible. Let stand, covered, for 2 to 5 minutes. |
| Frozen Vegetables (-18 °C) | 2 cups Add no water. Cover with lid or plastic wrap. Press the veggies pad three times for Frozen Vegetables. After cooking, stir and let stand, covered, for 3 minutes. |
Snack Menu
Snack Menu is for cooking/heating foods that take a short amount of time!
- Suppose you want to reheat hot dogs.
Touch:
Display
| 1.Snacks three times. | HOT 2005SENSOR |
| 2.START +30 Sec | 1-6 |
| 3.(2) | PRESS START2 |
- START +30 Sec
HOT BOGS Time counting down
Snack Menu chart
| FOOD(Initial temperature) | AMOUNT | PROCEDURE |
| 1. Chocolate Chip Cookies | 12 cookies | To reheat chocolate chip cookies. Follow package directions for use of package and/or silver crisping disk. Press the Snack pad once for chocolate chip cookies. Then press START to pre-heat the food to 350 F. At this time, put the food into the oven, then press START to start cooking. After cooking, stir, if possible. Let stand, covered, for 2 to 5 minutes. |
| 2. Frozen MW Pizza | 6 - 8 oz (170 - 225 g) | Use for frozen microwave pizza. Remove from package and unwrap. Follow package directions for use of package and/or silver crisping disk. Press the Snack pad twice for frozen Microwave Pizza. |
| FOOD(Initial temperature) | AMOUNT | PROCEDURE |
| 3. Hot Dogs 1 - 6 | pieces | Place hot dog in bun. Wrap each with paper towel or napkin. Press the Snack pad three times for hot dogs. Press SATRT to confirm the menu. Press numerical pads to choose the portions. Press START to start cooking. |
| 4. Frozen Kid's MealShows: | 8.8 oz Press the Snack pad four times for frozen kids meal. Use this pad for frozen, convenience foods. It will give satisfactory results for most brands. You may wish to try several and choose your favorite. Remove package from outer wrapping and follow package directions for covering. After cooking, let stand, covered for 1 to 3 minutes. | |
| 5. Meal in a Cup | 2.39 oz | Press the Snack pad five times for meal in a cup. This setting is ideal for individual portions of canned food packed in a small microwaveable container, usually 6 to 8 ounces. Remove inner metal lid and replace outer microwaveable lid. After cooking, stir food and allow to stand 1 or 2 minutes. |
| 6. Soup 1 - 2 cups | To reheat | Soup. Press the Snack pad six times for soup. Stir liquid briskly before and after heating to avoid "eruption". |
Setting Melt/Soften
The oven uses low power to melt and soften items. See the following table.
- Suppose you want to melt 2 sticks of Butter.
Touch:
Display
| MELT BUTTER |
-
Melt/Soften
-
START +30 Sec
3.②
- START +30 Sec
ENTER 1-2 STK
2 STICK PRESS START
MELT BUTTER
Time counting down

MELT TABLE
| CATEGORY AMOUNT DIRECTION | ||
| BUTTER 1 or 2 | sticks | Unwrap and place in microwavable container. No need to cover butter. Stir at the end of cooking to complete melting. |
| CHOCOLATE 2, | 4 or 8 oz. | Chocolate chips or squares of baking chocolate may be used.Unwrap squares and place in microwavable container. Stir at the end of cycle to complete melting. |
| ICE CREAM Pint, | 1.5 Quart. | Place container in oven. Ice cream will be soft enough to make scooping easier. |
| CREAM CHEESE | 3 or 8 oz. | Unwrap and place in microwavable container. Cream cheese will be at room temperature and ready for use in recipe. |
CONVECTION COOKING
Convection Cooking
There are ten temperatures of convection: 100F,200F, 250F, 300F,325F,350F,375F, 400F,425F,450F.
Convection cooking uses a heating element to raise the temperature of the air inside the oven. Any oven temperature from 100°F to 450°F may be set. A fan gently circulates this heated air throughout the oven, over and around the food, producing golden brown exteriors and rich, moist interiors.
Because the heated air is kept constantly moving, not permitting a layer of cooler air to develop around the food, some foods cook faster than in regular oven cooking.
For Best Results...
Always use the round wire rack when convection cooking. Reduce package/recipe temperature 25°F for baked goods. The round wire rack is required for good air circulation and even browning.
See the Cookware Tips section (P17) for information on suggested cookware.
Using convection with preheating
- Suppose you want to cook food for 5 minutes at 400^ using convection with preheating
Touch:
Display
PRESS AGAIN FOR OPTIONS/ PRESS START
- Convection Bake/Roast
PREHEAT ENTER TEMP
2.⑧
PRESS START 400F
- START + 30 Sec (The oven is preheated, it will signal.)
PREHEAT CONVECT
- When preheated temp. reached. If no action taken in 12 seconds, preheated temp. display.
400F CONVECT
- Open the door in 30 minutes.
ENTER TIME
500
- 325^ 450^ 450^
Place the food in the oven. Press the number keys to set cooking time
5:00 PRESS START
- START + 30 Sec
Time counting down
Using convection without preheating
- Suppose you want to cook food for 5 minutes at 400°F using convection without preheating
Touch:
Display
Shi
- Convection Bake/Roast
PRESS AGAIN FOR OPTION/ PRESS START
PREHEAT ENTER TEMP
PRESS AGAIN FOR OPTIONS/ PRESS START
BAKE ROAST
ENTER TEMP
- Convection Bake/Roast
3.⑧
- START + 30 Sec
500
-
325^ 450^ 450^
-
START + 30 Sec
PRESS START 400F
ENTER TIME
5:00 PRESS START
Time counting down
Microwave+Convection Combination Cooking
- Suppose you want to cook food for 5 minutes using combination cooking.
Touch:
Display
Shi
- Convection+Micro
PRESS AGAIN FOR OPTIONS PRESS START
BAKE 325 F
- START + 30 Sec
ENTER TIME
500
-
325^ 450^ 450^
-
START + 30 Sec
5:00 PRESS START
Time counting down
NOTE
Shows:
Check the Cookware Tips section for correct cookware when Combination Cooking
- Do not use metal cookware when Combination Cooking
- For best roasting and browning results, whole roasts should be cooked in a glass dish placed directly on the oven shelf.
- For foods that are too tall to fit in the oven, you may take out the round wire rack and place the dish directly on the turntable.
Convection Cooking
- Use the round wire rack during convection baking.
- Always pre-heat the oven before convection baking.
- Avoid opening the oven door during cooking - each time the door is opened the oven loses heat and this can cause uneven baking.
Biscuits and bread
| TYPE | TEMPER-ATURE | TIME NOTES | |
| Biscuits 400°F | 20-30 | minutes | Canned refrigerated biscuits take 2 to 4 minutes less time. |
| Muffins 350°F | 15-20 | minutes | Remove from tin straight away and place on cooling rack. |
| Nut bread or fruit bread | 350°F 55-70 minutes | ||
| Bread 350°F | 55-65 minutes | ||
| Plain or sweet rolls | 350°F 40-50 minutes | 50 minutes | Lightly grease baking sheet. |
Cakes
| TYPE | TEMPER-ATURE | TIME NOTES | |
| Cheesecake | 350°F 65-7 | 5 minutes | After baking open oven door slightly and leave cheesecake to stand in oven for 30 minutes |
| Coffee cake | 350°F 30-4 | 0 minutes | |
| Cup cakes 3 | 50°F 20-30 | minutes | |
| Fruit cake 30 | 0°F 85-95 | minutes | |
| Gingerbread | 350°F 40-45 minutes | ||
Combination Cooking
Combination cooking helps to brown and crisp foods.
| TYPE | QUANTITY | TIME NOTES | |
| Beefburgers | 4oz 16-19 | minutes for two | Place on microwave-proof plate, drain fat and turn halfway through cooking. |
| Beef rump roast | 1.0kg Rare: | 15-20 minutes Medium: 21-25 minutes Well done: 26-30 minutes | Place fat side down on low rack, season, shield if necessary After cooking, leave to stand for 15 minutes. |
| TYPE | QUANTITY | TIME NOTES |
| Lamb roast, rolled, boneless | 1.0kg Rare: | Place fat side down on low rack, brush with marinade and season, shield if necessary.After cooking, leave to stand for 15 minutes. |
| Pork 2 chops | Rare: | Place on high rack, brush with marinade and season. Cook until no longer pink or internal temperature reaches 170°F.Turn halfway through cooking. After cooking, cover with foil and leave to stand for 5 minutes. |
| Pork 4 chops | Rare: | Place on high rack, brush with mari-nade and season.Cook until no longer pink or internal temperature reaches 170°F. Turn half-way through cooking. After cooking, cover with foil and leave to stand for 5 minutes. |
| Pork loin roast, rolled, boneless | 1.0kg Rare: | Place fat side down on low rack, sea-son, shield if necessary. After cooking, cover with foil and leave to stand for 15 minutes. |
| Chicken breasts | 1 lb. | Wash and dry meat, remove skin, place thickest portion to outside on high rack. |
| Chicken boneless portions | 1 lb. | Place on high rack, brush with but-ter and season as required. Turn halfway through cooking. Cook until no longer pink and juices run clear. After cooking, coverwith foil and leave to stand for 3-5 minutes. |
EN
| TYPE | QUANTITY | TIME NOTES | |
| Chicken, whole | 1.3kg 25 4 | -0 minutes | Wash and dry bird, place breast down on low rack, brush with butter and season as required. Turn and drain halfway through cooking. Cook until no longer pink and juices run clear. After cooking, cover with foil and leave to stand for 10 minutes. Temperature in thigh should be approx 185°F. |
Cookware Tips Convection Cooking
Metal Pans are recommended for all types of baked products. but especially where browning or crusting is Important.
Dark or dull finish metal pans are best for breads and pies because they absorb heat and produce crisper crust.
Shiny aluminum pans are better for cakes, cookies or muffins because these pans reflect heat and help produce a light tender crust.
Glass or Glass-Ceramic casserole or baking dishes are best suited for egg and cheese recipes due to the cleanability of glass.
Combination Cooking
Glass or Glass-Ceramic baking containers are recommended. Be sure not to use items with metal trim as it may cause arcing (sparking) with oven wall or oven shelf, damaging the cookware, the shelforthe oven.
Heat-Resistant Plasticmicrowave cookware (safe to 450^ F) may be used, but it is not recommended for foods requiring crusting or all-around browning, because the plastic is a poor conductor of heat.
| COOKWARE | MICRO-WAVE | CONVEC-TION | COMBI-NATION |
| Heat-Resistant Glass, Glass-Ceramic (Pyrex®, Fire King®, Corning Ware®, etc.) | Yes Yes | Yes | |
| Metal No Yes No | |||
| Non Heat-Resistant Glass | No No | No | |
| Microwave-Safe Plastics | Yes No | Yes | |
| Plastic Films and Wraps | Yes No | No | |
| Paper Products Yes No | No | ||
| Straw, Wicker and Wood | Yes No | No |
*Use only microwave cookware that is safe to 450 °F.
AUTO DEFROST
Using Auto Defrost
The auto defrost feature provides you with the best defrosting method for frozen foods. The cooking guide will show you which defrost sequence is recommended for the food you are defrosting.
For added convenience, the Auto Defrost includes a built-in beep mechanism that reminds you to check, turn over, separate, or rearrange the food in order to get the best defrost results. Three different defrosting levels are provided:
1. MEAT
2. POULTRY
3. FISH
Available weight is 0.1-6.0 lbs
- Suppose you want to defrost 1.2 lbs of fish.
Touch:
Display
SI
1. Defrost

2. Defrost

3. Defrost

4. START + 30 Sec

5. ① and ②
To enter weight
6. START + 30 Sec


Time counting down
NOTE
The oven will beep during the DEFROST cycle. At this time, open the door and turn, separate, or rearrange the food. Remove any portions that have thawed. Return frozen portions to the oven and touch START +30 Sec to resume the defrost cycle.
Operating Tips
- For best results, remove fish, shell fish, meat and poultry from its original closed paper or plastic package (wrapper). Otherwise, the wrap will hold steam and juice close to the foods, which can cause the outer surface of the foods to cook.
- For best results, roll your ground meat into a ball before freezing. During the DEFROST cycle, the microwave will signal when it is time to turn the meat over. Scrape off any excess frost from the meat and continue defrosting.
- Place foods in a shallow container or on a microwave roasting rack to catch drippings.
This table shows food type selections and the weights you can set for each type. For best results, loosen or remove covering on food.
| KEY PRESS | Category | WEIGHTS YOU CAN SET(tenths of a pound) |
| Defrost x 1 | Mea t 0.1 to 6.0 | |
| Defrost x 2 | Poultry 0.1 to 6.0 | |
| Defrost x 3 | Fish 0.1 to 6.0 |
Weight conversion table
You are probably used to measuring food in pounds and ounces that are fractions of a pound (for example, 4 ounces equals 1/4 pound). However, in order to enter food weight in Auto Defrost, you must specify pounds and tenths of a pound.
If between two decimal weights, choose the lower weight for the best defrosting results.
If the weight on the food package is in fractions of a pound, you can use the following table to convert the weight to decimals.
| Equivalent Weight | |
| OUNCES DECIMAL WEIGHT | |
| 1.6 | .10 |
| 3.2 | .20 |
| 4.0 | .25 One-Quarter Pound |
| 4.8 | .30 |
| 6.4 | .40 |
| 8.0 | .50 One-Half Pound |
| 9.6 | .60 |
| 11.2 | .70 |
| 12.0 | .75 Three-Quarters Pound |
| 12.8 | .80 |
| 14.4 | .90 |
| 16.0 | 1.0 One Pound |
NOTE
If between two decimal weights, choose the lower weight for the best defrosting results.
Auto Defrost Table
NOTE: Meat of irregular shape and large, fatty cuts of meat should have the narrow or fatty areas shielded with foil at the beginning of the defrost sequence.
| FOOD SETTING AT BE EP SPECIAL INSTRUCTIONS | |||
| BEEF | |||
| Ground Beef, Bulk | MEAT | Remove thawed portions with fork. Turn over. Return remainder to oven. | Do not defrost less than 1/4 lb. Freeze in ball shape. |
| Ground Beef, Patties | MEAT Separate and rearrange. | Do not defrost less than 2 oz. patties. Depress center when freezing. | |
| Round Steak | MEAT | Turn over. Cover warm areas with aluminum foil. | Place in a microwave safe dish. |
| Tenderloin Steak | MEAT | Turn over. Cover warm areas with aluminum foil. | Place in a microwave safe dish. |
| Stew Beef | MEAT | Remove thawed portions with fork. Separate remainder. | Place in a microwave safe dish. |
| Pot Roast, Chuck Roast | MEAT Return remainder to oven. Place in a microwave safe dish. | ||
| Rib Roast | MEAT | Turn over. Cover warm areas with aluminum foil. | Place in a microwave safe dish. |
| Rolled Rump Roast | MEAT | Turn over. Cover warm areas with aluminum foil. | Place in a microwave safe dish. |
| LAMB Cubes for Stew | MEAT | Turn over. Cover warm areas with aluminum foil. | Place in a microwave safe dish. |
| Chops (1 inch thick) | MEAT | Remove thawed portions with fork. Return remainder to oven. | Place in a microwave safe dish. |
| PORK Chops (1/2 inch thick) | MEAT Separate and rearrange. Place in a microwave safe dish. | ||
| Hot Dogs | MEAT | Separate and rearrange. | Place in a microwave safe dish. |
| Spareribs Coun-try-style Ribs | MEAT | Turn over. Cover warm areas with aluminum foil. | Place in a microwave safe dish. |
| Sausage, Links | MEAT | Separate and rearrange. | Place in a microwave safe dish. |
| Sausage, Bulk MEAT | Remove thawed portions with fork. Turn over. Return remainder to oven. | Place in a microwave safe dish. | |
| Loin Roast, Bone-less | MEAT | Turn over. Cover warm areas with aluminum foil. | Place in a microwave safe dish. |
Auto Defrost Table (Continued)
Poultry Settings
| FOOD SETTING AT BEEP SPECIAL INSTRUCTIONS | |||
| CHICKEN Whole (up to 6 lbs)Cut-up Separate pieces and rearrange. Place in a microwave safe dish.Turn over. Cover warm areas with aluminum foil. | Turn over breast side down.Cover warm areas with aluminum foil. | Place chicken breast-side up in a microwave safe dish. Finish defrosting by immersing in cold water. Remove giblets when chicken is partially defrosted.Finish defrosting by immersing in cold water. | |
| CORNISH HENS Whole | POULTRY | Turn over. Cover warm areas with aluminum foil. | Place in a microwave safe dish.Finish defrosting by immersing in cold water. |
| TURKEY Breast (up to 6 lbs) | POULTRY | Turn over. Cover warm areas with aluminum foil. | Place in a microwave safe dish.Finish defrosting by immersing in cold water. |
Fish Settings
| FOOD SETTING AT BEEP | SPECIAL INSTRUCTIONS | ||
| FISH Fillets | FISH | Turn over. Separate fillets when partially thawed, if possible. | Place in a microwave safe dish. Carefully separate fillets under cold water. |
| Steaks FISH Separate and rearrange. | Place in a microwave safe dish. Run cold water over to finish defrosting. | ||
| Whole FISH Turn over | Place in a microwave safe dish.Cover head and tail with foil; do not let foil touch sides of microwave. Finish defrosting by immersing in cold water. | ||
| SHELLFISH | |||
| Crab meat FISH Break apart. Turn over. Place in a microwave safe dish. | |||
| Lobster tails | FISH | Turn over and rearrange. | Place in a microwave safe dish. |
| Shrimp | FISH | Separate and rearrange. | Place in a microwave safe dish. |
| Scallops | FISH | Separate and rearrange. | Place in a microwave safe dish. |
Defrosting Tips
- When using Auto Defrost, the weight to be entered is the net weight in pounds and tenths of pounds (the weight of the food minus the container).
- Before starting, make sure to remove any and all metal twist-ties that often come with frozen food bags, and replace them with strings or elastic bands.
- Open containers, such as cartons, before placing in the oven.
• Always slit or pierce plastic pouches or packaging. - If food is foil wrapped, remove foil and place food in a suitable container.
- Slit the skin of skinned food, such as sausage.
-
Bend plastic pouches of food to ensure even defrosting.
-
Always underestimate defrosting time. If defrosted food is still icy in the center, return it to the microwave oven for more defrosting.
- The length of defrosting time varies according to how solidly the food is frozen.
- The shape of the package affects how quickly food will defrost. Shallow packages will defrost more quickly than a deep block.
- As food begins to defrost, separate the pieces. Separated pieces defrost more easily.
- Use small pieces of aluminum foil to shield parts of food such as chicken wings, leg tips, fish tails, or areas that start to get warm. Make sure the foil does not touch the sides, top, or bottom of the oven. The foil can damage the oven lining.
- For better results, let food stand after defrosting.
- Turn over food during defrosting or standing time.
Break apart and remove food as required.
CONVENIENT FEATURES
EN
Clock & Settings
The microwave oven has settings that allow you to customize the operation for your convenience. Below is the table showing the various settings. Touch the Clock& Settings key multiple times to scroll to the desired setting function.
| Key press Option | |
| Clock & Settings x1 Clock | |
| Clock & Settings x2 Control Lock | |
| Clock & Settings x3 Power Save | |
| Clock & Settings x4 Volume | Low/Med/High/Off |
| Clock & Settings x5 Pure Air | Filter Reset/Off |
| Clock & Settings x6 Language | |
| Clock & Settings x7 Weight Ib/kg | |
| Clock & Settings x 8 Demo |
(1). Setting Clock
The clock can be disabled when the microwave is first plugged in and the STOP key is selected.
To re-enable the clock follow clock instructions.
- Suppose you want to set the clock for 10:59.
Touch:
Display
- Clock & Settings

- ① ① ⑤ ⑨

- START + 30 Sec


NOTE
- If you begin to enter in an incorrect time (e.g. 2:89) the 8 is an invalid digit and cannot be entered. Enter the correct time.
- If you touch STOP while setting the clock, the display will show the last time of day set or a blank display if no time of day has been set.
(2). Setting Control Lock On/Off
To turn ON Control Lock.
Touch:
Display
- Clock & Settings
PRESS AGAIN FOR OPTIONS/

- Clock & Settings
PRESS AGAIN FOR OPTIONS/ PRESS START

- START + 30 Sec
Time of day
if time of day was set ock
To turn OFF the Control Lock, touch
Clock &
then touch
START
+30 Sec
Settings
(3). Setting Power Save On/Off
To turn ON Power Save. Turning ON power save turns off the time of day clock display.
Touch:
Display
SI
- Clock & Settings

- Clock & Settings

- Clock & Settings

- START + 30 Sec

Clock &
To turn OFF the Power Save, touch Settings and choose POWER SAVE, select OFF then touch START +30 Sec.
(4). Turning Sound Low/Med/High/Off
Audible signals are available to guide you when setting and using your oven.
- A programming tone will sound each time you touch a pad.
• Three tones signal the end of a Kitchen Timer count down. - Three tones signal the end of a cooking cycle.
- Suppose you want to turn audible signal off.
Touch:
Display
SI
- Clock & Settings

- Clock & Settings

- Clock & Settings


- Clock & Settings

Shows:


- START + 30 Sec


NOTE
When the cooking cycle is completed END will be displayed and the audible signal will sound if the sound is turned on.
(5). SETTING FILTER RESET OR FILTER OFF
- Suppose you want to set the filter reset to off.
Touch:
Display
| 1. Clock & Settings | PRESS AGAIN FOR OPTIONS/12:00 ENTER TIME |
| 2. Clock & Settings | PRESS AGAIN FOR OPTIONS/ PRESS STARTCONTROL LOCK |
| 3. Clock & Settings | PRESS AGAIN FOR OPTIONS/ PRESS STARTPOWER SAVE OFF |
| 4. Clock & Settings | PRESS AGAIN FOR OPTIONS/ PRESS STARTVOLUME OFFON |
| 5. Clock & Settings | PRESS AGAIN FOR OPTIONS/ PRESS STARTFILTER RESET |
| PRESS AGAIN FOR OPTIONS/ PRESS STARTFILTER OFF | |
| 6. START + 30 Sec | OFF |

NOTE
Select FILTER RESET to turn off "FILTER" icon and reset to remind in 6 months; if you want to turn off "FILTER" icon notification and not remind at all, select FILTER OFF and press START +30 Sec.
(6). SETTING LANGUAGE ENGLISH/FRANCAIS
- Suppose you want to set the language.
Touch:
Display
| 1. Clock & Settings | 12:00 ENTER TIME PRESS AGAIN FOR OPTIONS/ PRESS START |
| 2. Clock & Settings | CONTROL LOCK PRESS AGAIN FOR OPTIONS/ PRESS START |
| 3. Clock & Settings | POWER SAVE OFF PRESS AGAIN FOR OPTIONS/ PRESS START |
| 4. Clock & Settings | VOLUME OFF ON PRESS AGAIN FOR OPTIONS/ PRESS START |
| 5. Clock & Settings | FILTER RESET |
| 6. Clock & Settings | LANGUAGE FRANCH PRESS AGAIN FOR OPTIONS/ PRESS START |
| 7. START + 30 Sec | FRANCAIS |

NOTE
START When is pressed and the previous setting shows 30 Sec was English it will be set to French. If you want switch back to English you will have to again press Clock & Settings five times and then press START +30 Sec.
(7). Setting Weight JLb/Kg
- Suppose you want to toggle weight between pounds & kilograms.
Touch:
Display
| 1. Clock & Settings | 12:00 ENTER TIME |
| 2. Clock & Settings | PRESSE AGAIN FOR OPTIONS/PRESS STARTCONTROL LOCK |
| 3. Clock & Settings | PRESSE AGAIN FOR OPTIONS/PRESS STARTPOWER SAVE OFF |
- Clock & Settings

- Clock & Settings

- Clock & Settings

- Clock & Settings

- START: + 30 Sec


NOTE
If the display shows kg, pressing the START button +30 Sec will reset the oven controls to lbs. To return to kg, you will have to again press Clock & six times and then press START Settings +30 Sec.
(8). Setting Demo Mode On/Off
- Suppose you want to enter Demo mode. When Demo mode is ON programming functions will work in a rapid countdown mode with no cooking power.
Touch:
Display
| 1. Clock & Settings | 12:00 ENTER TIME |
| 2. Clock & Settings | PRESS AGAIN FOR OPTIONS/ PRESS STARTCONTROL LOCK |
| 3. Clock & Settings | PRESS AGAIN FOR OPTIONS/ PRESS STARTPOWER SAVE OFF |
- Clock & Settings
PRESS AGAIN FOR OPTIONS/ PRESS START

- Clock & Settings
PRESS AGAIN FOR OPTIONS/ PRESS START
FILTER RESET
- Clock & Settings
PRESS AGAIN FOR OPTIONS/ PRESS START
LANGUAGE FRANCH
- Clock & Settings
PRESS AGAIN FOR OPTIONS/ PRESS START
Lb'kG
- Clock & Settings
PRESS AGAIN FOR OPTIONS/ PRESS START
DEMO OFF
- START + 30 Sec
ON
NOTE
When START is pressed and the previous setting was OFF then it will be set to ON. If you want to turn the demo mode back OFF you will have to again press Clock & Settings seven times and then press START +30 Sec.
2. Setting Kitchen Timer
Your microwave oven can be used as a kitchen timer. You can set up to 99 minutes, 99 seconds The kitchen timer can be used while the microwave oven is running.
- Suppose you want to set for three minutes.
Touch:
Display
| 1. Timer On-Off |
| TIMER | ENTER | TIME |
| 2. | 3 | 0 | 0 |
| TIMER | 3:00 |
- Timer On-Off
| TIMER | 3:00 |
Timer starts counting down
NOTE
Timer count down does not stop even if the door is open. When timer and cooking both are working, press "Timer On-Off" once, the display would show the remaining timer; to cancel the timer, press "Timer On-Off" once again. When only timer working, press "Timer On-Off" once to cancel the timer.
3. Using Vent Fan
The pad controls the 2-speed vent fan. If the vent fan is OFF the first touch of the Vent pad will turn the fan on HIGH, second touch LOW and third touch OFF.
- Suppose you want to set the vent fan speed to LOW from the OFF position.
Touch:
Display
Shows:

- Hi | Low | Off
HIGH

- Hi | Low | Off
LOW
NOTE
If the temperature from the range or cooktop below the oven gets too hot, the vent fan will automatically turn on to protect the oven. It may stay on up to an hour to cool the oven. When this occurs, the Vent pad will not turn the fan off.
4. Using Cooktop Light
The pad controls the cooktop light. If the light is OFF the first touch of the light pad will turn the light ON (high), second touch N ite (low) and third touch OFF.
- Suppose you want to set the light for HIGH from the OFF position.
Touch:
Display
1.

Hi | Low | Off
HIGH
CLEANING AND CARE
Shows:
Disconnect the power cord or leave the door open to deactivate the oven during cleaning. Disconnect the power cord before replacing filters and lights
EXTERIOR
The outside surface is precoated steel and plastic. Clean the outside with mild soap and water; rinse and dry with a soft cloth. Do not use any type of household or abrasive cleaner.
DOOR
Wipe the window on both sides with a soft cloth to remove any spills or spatters. Metal parts will be easier to maintain if wiped frequently with a soft cloth. Avoid the use of spray and other harsh cleaners as they may stain, streak or dull the door surface.
STAINLESS STEEL
BLACK STAINLESS STEEL (SOME MODELS)
Your microwave oven(some models) may have a Stainless Steel finish or coating. Clean the stainless with warm soapy water using a clean sponge or cloth. Rinse with clean water and dry with a soft clean cloth. DO NOT use ANY store bought cleaners like Stainless Steel cleaners or any other types of cleaners containing any abrasive, chlorides, chlorines or ammonia. It is recommended to use mild dish soap and water or a 50/50 solution of water and vinegar.
EN
TOUCH CONTROL PANEL
Care should be taken in cleaning the touch control panel. If the control panel becomes soiled, open the microwave oven door before cleaning. Wipe the panel with a cloth dampened slightly with water only. Dry with a soft cloth. Do not scrub or use any sort of chemical cleaners. Close door and touch STOP/CLEAR.
INTERIOR
Cleaning is easy because little heat is generated to the interior surfaces. To clean the interior surfaces, wipe with a soft cloth and warm water. DO NOT USE ABRASIVE OR HARSH CLEANERS OR SCOURING PADS. For heavier soil, use baking soda or a mild soap; rinse thoroughly with hot water. The round wire rack and shelf can be cleaned with hot soapy water, rinsed and dried.
WAVEGUIDE COVER
The waveguide cover is located on the right side in the microwave oven cavity. It is made from mica so requires special care. Keep the waveguide cover clean to assure good microwave oven performance. Carefully wipe with a damp cloth any food spatters from the surface of the cover immediately after they occur. Built-up splashes may overheat and cause smoke or possibly catch fire. DO NOT REMOVE THE WAVEGUIDE COVER.
ODOR REMOVAL
Occasionally, a cooking odor may remain in the microwave oven. To remove, combine 1 cup water, grated peel and juice of 1 lemon in a 2-cup glass measuring cup.
Boil for several minutes using 100% power. Allow to set in microwave oven until cool. Wipe interior with a soft cloth.
TURNTABLE/TURNTABLE SUPPORT
The turntable and turntable support can be removed for easy cleaning. Wash them in mild, sudsy water; for stubborn stains use a mild cleanser and non-abrasive scouring sponge. They are also dishwasher-proof. Use upper wirerack of dishwasher. The turntable motor shaft is not sealed, so excess water or spills should be wiped up immediately.
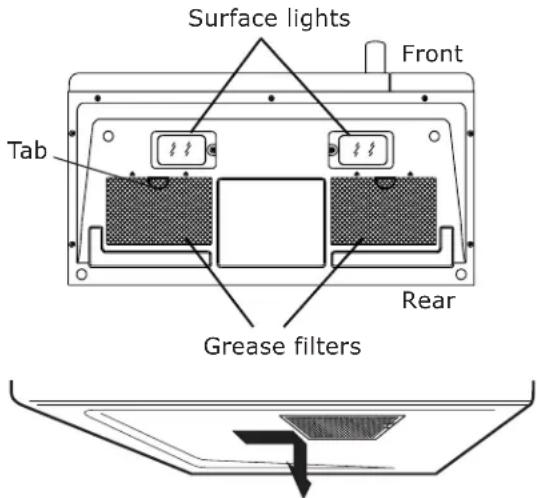
Cleaning the grease filters
The grease filters should be removed and cleaned often; generally at least once every month. Surface light replacement
Grease filter part number 5304478913
To order parts call (833) 337-4006

CAUTION
To avoid risk of personal injury or property damage, do not operate oven hood without filters properly in place.
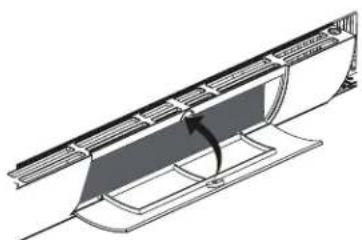
text_image
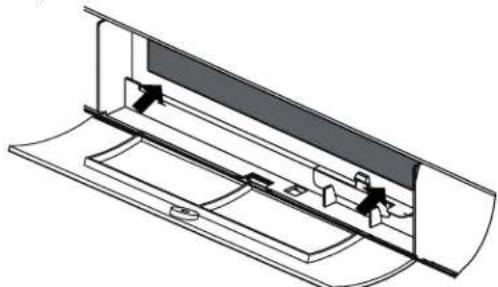
Surface lights Front Tab Rear Grease filters- To remove the grease filters, slide the filter to the rear. Then pull filter downward and push to the other side. The filter will drop out. Repeat for the 2nd filter.
natural_image
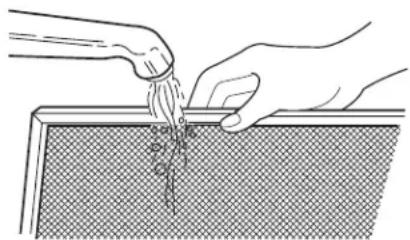
Illustration of hands using a tool to lift a small object into a textured surface (no text or symbols)- Soak the grease filters in hot water using a mild detergent. Rinse well and shake to dry or wash in a dishwasher. Do not use ammonia. The aluminum on the filter will corrode and darken.
natural_image
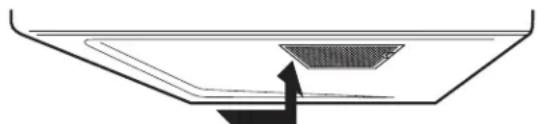
Simple line drawing of a funnel with a mesh inside, no text or symbols present- To reinstall the grease filters, slide it into the side slot, then push up and toward oven to lock. Reinstall the 2nd filter using the same procedure.
Surface light replacement

CAUTION
To avoid risk of personal injury or property damage, wear gloves when replacing the light bulbs.
- Unplug the microwave oven or turn off power at the main circuit breaker.
- Remove the LED light cover mounting screws at both light positions under the microwave.
natural_image
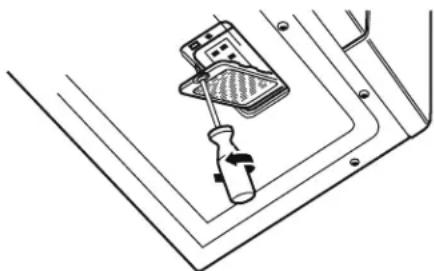
Diagram of a screwdriver inserted into a component, showing internal structure without any text or symbols- Remove the LED light mounting screw.
natural_image
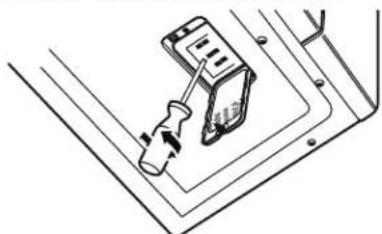
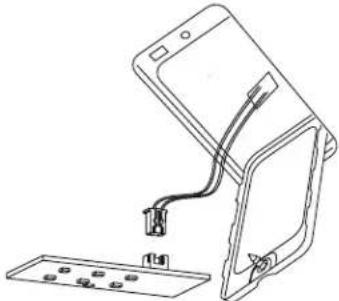
Technical line drawing of a screwdriver inserted into a socket on a base panel (no text or symbols)- Unplug the LED light from the harness, replace with LED light of part #5304499540. To order parts call (833) 337-4006. Then reconnect the harness.
natural_image
Diagram of a smartphone with cable and connector, showing internal components (no text or symbols)-
Re-install LED light and mounting screw. When re-installing mounting screw be careful not to damage the LED light.
-
Re-install LED light cover and mounting screw.
-
Plug the microwave back into the power supply or turn the power back on at the main circuit breaker.
Charcoal filter replacement
Charcoal filter part number 5304464577
To order parts call (833) 337-4006
Charcoal Filter when installed in your microwave oven, is used for nonvented, recirculated Installation. The filter should be changed every 6 to 12 months depending on use.
- Disconnect power to the microwave oven at the circuit breaker panel or by unplugging.
- Remove the vent grill cover mounting screw.
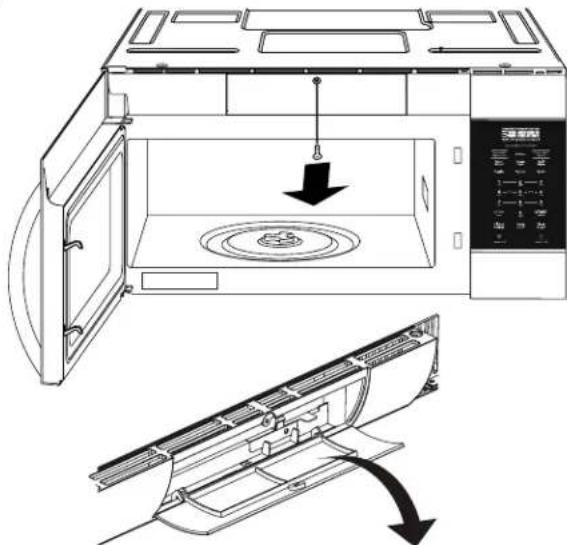
- Open the vent grille door.
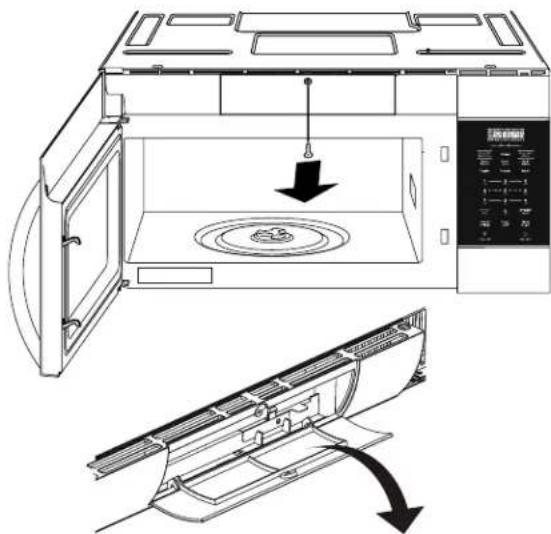
natural_image
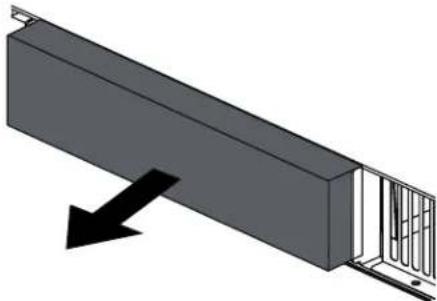
Line drawing of a microwave oven with open door and internal fan, showing airflow direction (no text or symbols)- Remove the charcoal filter by pushing the top of the filter inwards, then pull it forward out from the unit.
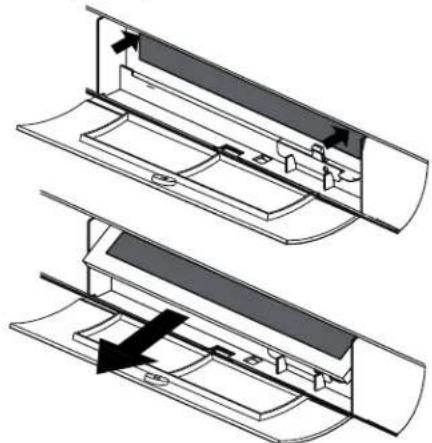
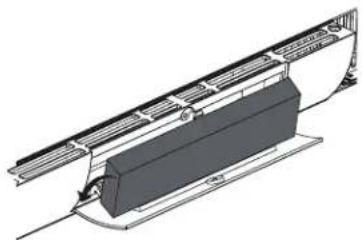
natural_image
Technical illustration of two mechanical components with internal parts and directional arrows (no text or symbols)- Slide the top of the new charcoal filter into? the top area of the filter cavity.
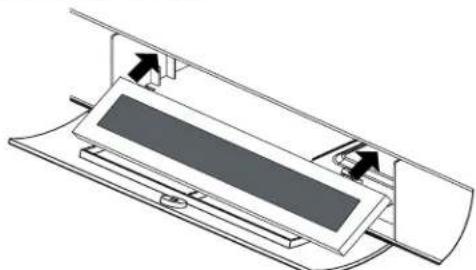
natural_image
Diagram of a mechanical device with internal components and directional arrows indicating movement (no text or symbols)- Press the bottom of charcoal filter to place it into the correct position.
natural_image
Technical line drawing of a mechanical component with internal channels and mounting holes (no text or symbols)- Close the vent grille door and mount the screw.
Carbon Filter replacement
For replacement or call (OPTIONAL) (833) 337-4006 ask for OTRFILTER1.
The Carbon Filter is labeled as optional apart from the Charcoal filter)
Replace filter every 6 months.
The Carbon Filter, when used with the recirculation fan, reduces cooking odors from your cooktop surface by trapping, neutralizing and removing odor-causing molecules. The proprietary activated carbon is 10 times more effective at reducing cooking odors than standard charcoal filters. For best results, replace every 6 months.
- Remove the Carbon Filter from the packaging and shake filter to remove excess carbon.
- Use a Phillips head screwdriver to unscrew the Carbon Filter access door.
EN
- Open the filter access door.
natural_image
Line drawing of a microwave oven with open door and internal fan, showing internal components and airflow direction (no text or symbols)- Remove the existing Carbon Filter (if installed) by pulling forward out from the unit.
natural_image
3D diagram of a mechanical component with a black arrow indicating direction, no text or symbols present- Place the new Cantooth Eiskot behind the door at an angle until it's upright and securely placed in the duct.
natural_image
Technical line drawing of a mechanical assembly with a rectangular component and curved components (no text or symbols)
natural_image
Technical line drawing of a mechanical component with a curved base and internal structure (no text or symbols)- Make sure the Ganbest Filter vertically in the slot. Close access door, tighten screw and the Carbon Filter is ready to use.
Oven light replacement
To access the light cover remove the Carbon Filter per instructions 1-4 above in the Carbon Filter re-placement section.
- Open light cover located behind Carbon Filter by carefully pulling up on the front edge.
natural_image
Technical line drawing of a mechanical assembly with directional arrows indicating movement (no text or symbols)- Remove the LED bracket and light assembly. Remove the LED light from the bracket by removing the mounting screw and replace only with part 5304499540. To order parts call (833) 337-4006.
natural_image
Technical diagram showing a mechanical assembly with a curved arrow indicating motion or force, no text or symbols present.-
Re-install LED light to the bracket with mounting screw. When re-installing mounting screw be careful not to damage the LED light.
-
Reconnect LED light to the harness and place the LED light assembly back into the plastic housing.
natural_image
Technical line drawing of a mechanical component with arrows indicating direction (no text or symbols)5 Replace the microwave oven light cover by carefully pushing into place (make sure the light cover rear tab is inserted into slot at rear).
natural_image
Isometric technical drawing of a mechanical component with an arrow indicating direction (no text or symbols)- Replace the Carbon Filter. Close the vent grille door and tighten the vent grill door mounting screw.
SERVICE CALL CHECK
Please check the following before calling for service: Place one cup of water in a glass measuring cup in the microwave oven and close the door securely.
Operate the microwave oven for one minute at HIGH 100%.
A Does the microwave oven light come on?
B Does the cooling fan work? (Put your hand on the louver above the Control Panel.)
C Does the turntable rotate? (It is normal for the turntable to turn in either direction.)
D Is the water in the microwave oven warm?
YES NO
YES ____ NO ____
YES ____ NO ____
YES ____ NO ____
If "NO" is the answer to any of the above questions, please check electrical outlet, fuse and/or circuit breaker. If they are functioning properly, CONTACT (833) 337-4006.
A microwave oven should never be serviced by a "do-it-yourself" repair person.
NOTE
If time appearing in the display is counting down very rapidly, check Demonstration Mode on page 21.
SPECIFICATIONS
| AC Line Voltage: Single phase 120V, 60Hz, AC only | |
| AC Power Required: | 1500W 13.5A |
| Output Power : 900 W | |
| Output Power*(convection): | 1450W |
| Frequency: 2450 MHz (Class B/Group2) | |
| Outside Dimensions (including handle): | 29.88 "(W) x 16.32 "(H) x 17.52"(D) |
| Cavity Dimensions: | 20.24 "(W) x 9.25 "(H) x 13.67"(D) |
| Microwave oven Ca-pacity : | 1.5 Cu.Ft. |
| Cooking Uniformity: | Turntable |
| Weight: | Approx, (net) 62.17 lbs,(gross)73 lbs |
| Work/Night Light: | 2*1.2W LED, the part number is 5304499540. |
| Oven Light: | 1 *1.2W LED, the part number is 5304499540. |
In compliance with standards set by:
FCC - Federal Communications Commission Authorized.
DHHS - Complies with Department of Health and Human Services (DHHS) rule, CFR, Title 21, Chapter I, Subchapter J.
- This symbol on the nameplate means the product is listed by Underwriters Laboratories, Inc.
- This symbol on the nameplate means the product is listed by Underwriters Laboratories, Inc. for use in USA or Canada.
How long is the IKEA guarantee valid?
This guarantee is valid for five (5) years from the original date of purchase of Your appliance at IKEA, unless the appliance is named LAGAN or TILLREDA in which case two (2) years of guarantee apply. The original sales receipt is required as proof of purchase. If service work is carried out under guarantee, this will not extend the guarantee period for the appliance.
Who will execute the service?
IKEA "Service Provider" will provide the service through its own service operations or authorized service partner network.
What does this guarantee cover?
The guarantee covers faults of the appliance which have been caused by faulty construction or material faults from the date of purchase from IKEA. This guarantee applies to domestic use only. Some exceptions not guaranteed are specified under the headline "What is not covered under this guarantee?" Within the guarantee period, the costs to remedy the fault (e.g., repairs, parts, labour and travel) will be covered, provided that the appliance is accessible for repair without special expenditure. On these conditions the local regulations are applicable. Replaced parts become the property of IKEA.
What will IKEA do to correct the problem?
IKEA appointed Service Provider will examine the product and decide, at its sole discretion, if it is covered under this guarantee. If considered covered, IKEA Service Provider or its authorized service partner through its own service operations, will then, at its sole discretion, either repair the defective product or replace it with the same or a comparable product.
What is not covered under this guarantee?
- Normal wear and tear.
- Deliberate or negligent damage, damage caused by failure to observe operating instructions, incorrect installation or by connection to the wrong voltage, damage caused by chemical or electrochemical reaction, rust, corrosion or water damage including but not limited to damage caused by excessive lime in the water supply, damage caused by abnormal environmental conditions.
- Consumable parts including batteries and lamps.
- Non-functional and decorative parts which do not affect normal use of the appliance, including any scratches and possible colour differences.
- Accidental damage caused by foreign objects or substances and cleaning or unblocking of filters, drainage systems or soap drawers.
- Damage to the following parts: ceramic glass, accessories, crockery and cutlery baskets, feed and drainage pipes, seals, lamps and lamp covers, screens, knobs, casings and parts of casings. Unless such damages can be proved to have been caused by production faults.
- Cases where no fault could be found during a technician's visit.
- Repairs not carried out by our appointed service providers and/or an authorized service contractual partner or where non-original parts have been used.
- Repairs caused by installation which is faulty or not according to specification.
- The use of the appliance in a non-domestic environment i.e. professional use.
- Transportation damages. If a customer transports the product to his home or another address, IKEA is not liable for any damage that may occur during transport. However, if IKEA delivers the product to the customer's delivery address, then damage to the product that occurs during this delivery will be covered by IKEA.
- Cost for carrying out the initial installation of the IKEA appliance. However, if an IKEA appointed Service Provider or its authorized service partner repairs or replaces the appliance under the terms of this guarantee, the appointed Service Provider or its authorized service partner will reinstall the repaired appliance or install the replacement, if necessary.
How country law applies
The IKEA guarantee gives you specific legal rights, and you may also have other rights which vary from state to state or jurisdiction to jurisdiction. However these conditions do not limit in any way consumer rights described in the local legislation.
Area of validity
For appliances which are purchased in United States or Canada, or moved to one of the mentioned countries, the services will be provided in the framework of the guarantee conditions normal in the specified country.
An obligation to carry out services in the framework of the guarantee exists only if the appliance complies and is installed in accordance with:
- the technical specifications of the country in which the guarantee claim is made;
- the Assembly Instructions and User Manual Safety Information.
The dedicated AFTER SALES for IKEA appliances
Please don't hesitate to contact IKEA appointed After Sales Service Provider to:
- make a service request under this guarantee;
- ask for clarifications on installation of the IKEA appliance in the dedicated IKEA kitchen furniture;
- ask for clarification on functions of IKEA appliances.

text_image
IKEAPhone number:
(833) 337-4006
Opening hours:
Monday - Friday
8:30 am - 8:00 pm EST
To ensure that we provide you with the best assistance, please read carefully the Assembly Instructions and/or the User Manual before contacting us.
How to reach us if you need our service
In order to provide you a quicker service, we recommend to use the specific phone
numbers listed on this manual. Always refer to the numbers listed in the booklet of the specific appliance you need an assistance for.
Please also always refer to the IKEA article number (8 digit code) placed on the rating plate of your appliance.
SAVE THE SALES RECEIPT!
It is your proof of purchase and required for the guarantee to apply. The sales receipt also reports the IKEA name and article number (8 digit code) for each of the appliances you have purchased.
Do you need extra help?
For any additional questions not related to After Sales of your appliances please contact your nearest IKEA store call centre. We recommend you read the appliancedocumentation carefully before contacting us.
FR
CONTENU
IMPORTANTES CONSIGNES DE SÉCURITÉ....29
NOMENCLATURE 35
PANNEAU DE COMMANDE .....36
CUISSON MANUELLE 37
CUISSON AU CAPTEUR ....39
CUISSON RAPIDE 40
CUISSON PAR CONVECTION 43
DÉCONGÉLATION AUTO 45
FONCTIONS PRATIQUES ....48
NETTOYAGE ET ENTRETIEN ....51
1f. PRESS AGAIN FOR OPTIONS:
(4) Convection + Micro (P43)
- Convection Bake/Roast
PRESS AGAIN FOR OPTIONS/ PRESS START
PREHEAT ENTER TEMP
PRESS AGAIN FOR OPTIONS/ PRESS START
- Convection Bake/Roast
BAKE ROAST ENTER TEMP
3.⑧
PRESS START 400F
- START + 30 Sec
ENTER TIME
500 5.325°450°450°
5:00 PRESS START
- START + 30 Sec
Compte à rebours
- Convection Bake/Roast
PRESS AGAIN FOR OPTIONS/ PRESS START
PREHEAT ENTER TEMP
2.⑧
PRESS START 400F
Select FILTER RESET to turn off "FILTER" icon and reset to remind in 6 months; if you want to turn off "FILTER" icon notification and not remind at all, select FILTER OFF and press START +30 Sec.
natural_image
Illustration of hands pouring liquid from a pipe into a mesh-lined container (no text or symbols)natural_image
Simple line drawing of a container with a handle and lid, no text or symbols presentnatural_image
Diagram of a mechanical device with a clamp and screwdriver inserted into a bracket (no text or symbols)- Retirez la vis de fixation de la lumière LED.
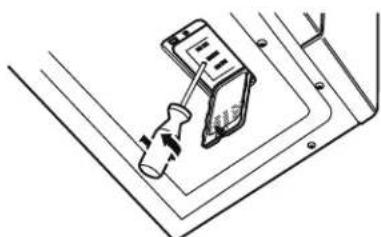
natural_image
Line drawing of a screwdriver inserted into a socket on a metal bracket (no text or symbols)natural_image
Line drawing of a smartphone with cable and connector, showing internal components (no text or symbols)natural_image
Line drawing of a microwave oven with open door and internal air duct (no text or symbols)natural_image
Technical diagram showing two views of a mechanical component with internal parts and directional arrows (no text or symbols)natural_image
Technical diagram of a mechanical device with internal components and directional arrows (no text or symbols)natural_image
Technical line drawing of a mechanical component with internal channels and mounting holes (no text or symbols)natural_image
Line drawing of a microwave oven with open door and internal fan, showing internal components and airflow direction (no text or symbols)natural_image
3D diagram of a mechanical component with a black arrow indicating direction, no text or symbols presentnatural_image
Technical line drawing of a mechanical assembly with no visible text or symbols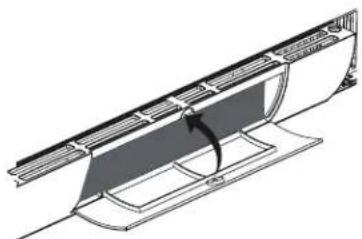
natural_image
Technical line drawing of a mechanical component with a curved internal structure and an arrow indicating rotation (no text or symbols)natural_image
Technical diagram showing mechanical assembly with directional arrows and component placement (no text or symbols)natural_image
Technical diagram showing a mechanical assembly with a curved arrow indicating motion or force, no text or symbols present.natural_image
Technical line drawing of a mechanical component with arrows indicating direction (no text or symbols)FR
natural_image
Isometric line drawing of a mechanical component with an arrow indicating direction (no text or symbols)FCC - Federal Communications Commission.
natural_image
Simple 3D diagram of a rectangular object with a dark horizontal bar inside, no text or symbols present.1f. PRESS AGAIN FOR OPTIONS:
-
Veggies
-
Veggies
-
START + 30 Sec
Tabla de verduras
- Convection Bake/Roast
PREHEAT ENTER TEMP
2.⑧
PRESS START 400F
PRESS AGAIN FOR OPTIONS/ PRESS START VOLUME LOW
PRESS AGAIN FOR OPTIONS/ PRESS START VOLUME MEO
PRESS AGAIN FOR OPTIONS/ PRESS START VOLUME HIGH
- START + 30 Sec
OFF
i NOTA
natural_image
Illustration of hands pouring liquid from a pipe into a container (no text or symbols)natural_image
Simple line drawing of a container with a handle and a mesh inside, no text or symbols present.natural_image
Technical line drawing of a mechanical device with a lever and base component (no text or symbols)ES
natural_image
Diagram of a screwdriver inserted into a socket on a metal bracket (no text or symbols)natural_image
Diagram of a smartphone with cable and connector, showing internal components (no text or symbols)natural_image
Line drawing of a microwave oven with open door and internal fan, showing internal components and airflow direction (no text or symbols)natural_image
Technical diagram showing two views of a mechanical component with internal parts and directional arrows (no text or symbols)natural_image
Technical diagram of a mechanical assembly with arrows indicating direction (no text or symbols)natural_image
Technical line drawing of a mechanical component with internal channels and arrows indicating movement (no text or symbols)natural_image
Line drawing of a microwave oven with open door and internal fan, showing internal components and airflow direction (no text or symbols)natural_image
3D diagram of a mechanical component with a black arrow indicating direction, no text or symbols presentnatural_image
Technical line drawing of a mechanical assembly with a rectangular component and flanged components (no text or symbols)