
VASKARBO 405.876.16 - Oven IKEA - Free user manual and instructions
Find the device manual for free VASKARBO 405.876.16 IKEA in PDF.

| Brand | IKEA |
| Model | VASKARBO 405.876.16 |
| Product Type | Built-in electric oven |
| Dimensions (H x W x D) | 733 mm x 755 mm x 620 mm |
| Power Supply | 120/240 V ~, 60 Hz, 2AC~N |
| Total Power | 3.9 kW (240 V) / 2.9 kW (208 V) |
| Fuse Protection | Min. 20 A |
| Cooking Functions | Baking, Convection Baking, Broil (3 levels), Convection Broil (3 levels), Roast, Convection Roast, Pizza, Sabbath, Keep Warm (3 levels), Proofing Bread, Perfect Turkey |
| Self-Cleaning (Pyrolytic) | 3 levels: 3 h (low), 4 h (medium), 5 h (high) – max temp. 421 °C |
| Meat Probe Included | Yes, internal temperature measurement (40–99 °C) |
| Number of Rack Levels | 5 |
| Included Accessories | 2 metal grids, 1 baking tray, meat thermometer |
| Interior Lighting | Halogen bulb resistant up to 300 °C |
| Removable Door | Yes, for easier cleaning |
| Key Lock | Yes, activated by long press on the 0 key (Key Lock) |
| Child Safety | Integrated key lock |
| Auto Shut-off | Yes, after max 72 h in Sabbath mode, otherwise programmable up to 6 h |
| Display | Digital screen with clock, temperature, timer |
| Warranty | 5 years (except LAGAN/TILLREDA models: 2 years) |
| Country of Manufacture | Turkey (indicated on rating plate) |
Frequently Asked Questions - VASKARBO 405.876.16 IKEA
User questions about VASKARBO 405.876.16 IKEA
0 question about this device. Answer the ones you know or ask your own.
Ask a new question about this device
Download the instructions for your Oven in PDF format for free! Find your manual VASKARBO 405.876.16 - IKEA and take your electronic device back in hand. On this page are published all the documents necessary for the use of your device. VASKARBO 405.876.16 by IKEA.
USER MANUAL VASKARBO 405.876.16 IKEA
Installer should leave these instructions with appliance. Consumer should read these instructions before using the appliance and should retain them for future reference.
IMPORTANT
IMPORTANT SAFETY INSTRUCTIONS READ AND SAVE THESE INSTRUCTIONS
WARNING: Read all safety instructions before using the product. If the information in this manual is not followed exactly, a fire or explosion may result causing property damage, personal injury or death.

IMPORTANT: This appliance is intended for normal household
use only. It is not approved for outdoor or other non-household uses (including sea or air-going vessels). See the Statement of Limited Warranty. If you have any questions, contact the manufacturer.
Do not repair or replace any part of the appliance unless specifically recommended in this manual. Refer all servicing to a factory authorized service center.
Explanation of symbols
Throughout this User Manual the following symbols are used:

Important information or useful hints about usage.

Warning for hazardous situations with regard to life and property.

Warning for electric shock.

Warning for risk of fire.

Warning for hot surfaces.
DANGER indicates a hazardous situation which, if not avoided, will result in death or serious injury.
WARNING indicates a hazardous situation which, if not avoided, could result in death or serious injury.
CAUTION indicates a hazardous situation which, if not avoided, could result in minor or moderate injury.
NOTICE is used to address practices not related to physical injury.
Please read these instructions before installation or using your appliance!
We would like you to obtain best performance with your product that has been manufactured in modern facilities and passed through strict quality control procedures.
Therefore, we advise you to read through this user manual carefully before using your product and keep it for future reference. If you hand over the product to someone else, deliver the user manual as well.
The user manual will help you use the product in a fast and safe way.

IMPORTANT: Save these instructions for the local electrical inspectors use.

IMPORTANT: This product can only be used in the rooms which incorporates a properly adjusted and functioning Carbon Monoxide sensor. Make sure the Carbon Monoxide sensor works properly and its maintenance done frequently. Carbon Monoxide sensor should be installed maximum 6.5 feet away from the product.
The instructions will help you to operate the appliance quickly and safely.
- Upon delivery, please check that the appliance is not damaged. If you note any transport damage, please contact your point of sale immediately and do not connect and operate the appliance!
- Before you connect and start using the appliance, please read this manual and all enclosed documents. Please note in particular the safety instructions.
- Keep all documents so that you can refer to the information again later on.
Please keep your receipt for any repairs which may be required under warranty. - When you pass on the appliance to another person, please provide all documents with it including original date of purchasing. (The warranty does not convey if the unit is sold).
- If you should decide not to use this appliance any longer (or decide to substitute an older model), before disposing of it, it is recommended that it be made inoperative in an appropriate manner in accordance to health and environmental protection regulations, ensuring in particular that all potentially hazardous parts be made harmless, especially in relation to children who could play with old appliances.
TABLE OF CONTENT
Safety Information 6
Basic safety instructions....6
Safety for children.... 10
Safety when working with electricity....11
Intended use....12
Disposal....12
Packaging material....12
Future transportation....12
Product description 13
Product introduction 13
Display 14
Rating Plate Location.... 14
Package contents.... 14
Preparation....17
Tips for saving energy......17
Initial use....17
Setting 12hr – 24 hr....17
Setting the time 17
First cleaning of the appliance......17
How to operate the oven....19
How to use the electric oven....19
Care and cleaning....32
General information....32
Troubleshooting 36
Technical specifications....37
IKEA limited guarantee 38
Safety Information
Basic safety instructions
- The manufacturer reserves its right to make changes in the technical specifications in order to improve the appliance quality without any prior notice. Figures included in this manual are for schematic purpose only and may not match exactly with your appliance. Values stated on the markings of the appliance or in other printed documents supplied with the appliance are obtained under laboratory conditions as per relevant standards. These values may vary according to the usage of the appliance and ambient conditions.
- This appliance is not intended for use by persons (including children) with reduced physical, sensory or mental capabilities, or lack of experience and knowledge, unless they have been given supervision or instruction concerning use of appliance by a person responsible for their safety.
• Children should be supervised to ensure that they do not play with the appliance. - Proper installation - Be sure your appliance is properly installed and grounded by a qualified technician
- If the supply cord damaged, it must be replaced by a special cord or assembly available from the manufacturer or its service agent or similarly qualified persons.
⚠ WARNING: Never use your appliance for warming or heating the room.
- User servicing - Do not repair or replace any part of the appliance unless specifically recommended in the manual. All other servicing should be referred to a qualified technician.
- Wear proper apparel - loose-fitting or hanging garments should never be word while using the appliance.
- Use care when opening door- let hot air or steam escape before removing or replacing food.
⚠️ CAUTION: Placement of oven racks -always place oven racks in desired location while oven is cool. If rack must be moved while oven is hot, do not let potholder contact hot heating element in oven.
- Do not heat unopened food containers- Build-up of pressure may cause container to burst and result in injury.
CAUTION: Use only dry potholders- moist or damp potholders on hot surfaces may result in burns from steam. Do not let potholder touch hot heating elements. Do not use a towel or other bulky clothes.
- Keep oven vent ducts unobstructed.
- Ensure that no flammable materials are adjacent to the appliance as the sides be-come hot during use.
- Do not place baking trays, dishes or aluminum foil directly onto the bottom of the oven. The heat accumulation might damage the bottom of the oven.
CAUTION: Do not use aluminum foil to line drip pans or anywhere in the oven, except as described in this manual. Foil can trap heat or melt, resulting in damage to the product and a shock or fire hazard.
CAUTION: Prevent aluminum foil and meat probes from contacting the heating elements. (including sheathed type surface elements)
WARNING: Keep all ventilation slots clear of obstructions.
- The manufacturer declines all liability for injury to persons or damage to property caused by incorrect or improper use of the appliance.
- Do not use the oven with front door glass removed or broken.
⚠ WARNING: Do not use water on grease fires. If there is a fire in the oven during baking, smother the fire by closing the oven door and turning the oven off or by using
a multi-purpose dry chemical or foam-type fire extinguisher.
⚠ WARNING: Rear surface of the oven gets hot when it is in use. Electric connection should not touch the rear surface, otherwise the mains cable may get damaged. Do not trap the mains cable between the hot oven door and frame. Do not route the mains cable over the hot cooking section. Otherwise, cable insulation may melt and cause fire as a result of short circuit.
- Never wear loose-fitting or hanging garments while using the appliance. Be careful when reaching for items stored in cabinets over the oven. Flammable materiel could be ignited if brought in contact with hor surfaces or heating elements and may cause severe burns.
- Pulling out the rack to the stop-lock is a convenience in lifting heavy foods. It is also a precaution against burns from touching hot surfaces of the door or oven walls.
⚠ WARNING: Do not use the oven to dry newspapers. If overheated, they can catch on fire.
WARNING: Storage in or on Appliance- Flammable materials should not be stored in an oven or near surface units.
WARNING: Do not leave paper products, cooking utensils or food in the oven when not in use.
WARNING: After broiling, always take any broiler pan out of the oven and clean it. Leftover grease in a broiler pan can catch fire next time you use the pan.
- Check that all controls on the appliance are switched off after use.
⚠ WARNING: "Do not touch heating elements or interior surfaces of oven - Heating elements may be hot even though they are dark in color. Interior surfaces of an oven become hot enough to cause burns. During and after use, do not touch, or let clothing or other flammable materials contact heating elements or interior surfaces of oven until they have had sufficient time to cool. Other surfaces of the appliance may become hot enough to cause burns - among these surfaces are oven vent openings and surfaces near these openings, interior surfaces of the oven cavity, oven doors, and window."
⚠ WARNING: Accessible parts may become hot during use. Young children should be kept away.
⚠️ CAUTION: Do not use harsh abrasive cleaners or sharp metal scrapers to clean the oven door glass since they can scratch the surface, which may result in shattering of the glass.
⚠ WARNING: This appliance can be used by children aged from 8 years and above and persons with reduced physical, sensory or mental capabilities or lack of experience and knowledge if they have been given supervision or instruction concerning use of the appliance in a safe way and understand the hazards involved.
• Children shall not play with the appliance. Cleaning and user maintenance shall not be made by children without supervision.
⚠ WARNING: The appliance and its accessible parts become hot during use. Care should be taken to avoid touching heating elements. Children less than 8 years of age shall be kept away unless continuously supervised.
⚠ WARNING: Only use the connection cable specified in the "Technical specifications". If the supply cord damaged, it must be replaced by a special cord or assembly available from the manufacturer or its service agent or similarly qualified persons in order to avoid a hazard.
⚠ WARNING: During self-cleaning, surfaces may become hotter than with standard use. Keep children away.
⚠️ CAUTION: Use care when opening door- let hot air or steam escape before removing or replacing food.
- Do not heat closed food containers and glass jars. Pressure that may build-up in the jar can cause it to burst.
⚠ WARNING: Food Poisoning Hazard: Do not let food sit in oven for more than 1 hour before or after cooking. Doing so can result in food poisoning or sickness.
⚠ WARNING: To avoid permanent damage to the oven bottom finish do not line the oven bottom with any type of foil or liner.
⚠️CAUTION: If a wet sponge or cloth is used to wipe spills on a hot cooking area, be careful to avoid steam burn. Some cleaners can produce noxious fumes if applied to a hot surface. Utensil handles should be turned inward and not extend over adjacent surface units. To reduce the risk of burns, ignition of flammable materials, and spillage due to unintentional contact with the utensil, the handle of a utensil should be positioned so that it is turned
inward, and does not extend over adjacent surface units.
CAUTION: Do not store or use flammable materials in an oven, including paper, plastic, pot holders, linens, wall coverings, curtains, drapes and gasoline or other flammable vapors and liquids.
- Never use when judgment or coordination is impaired by the use of alcohol and/or drugs.
- Do not operate the appliance if it is defective or shows any visible damage.
- Do not carry out any repairs or modifications on the appliance. However, you may remedy some malfunctions; see Troubleshooting.
- Be careful when using alcoholic drinks in your dishes. Alcohol evaporates in high temperatures and may cause fire since it will catch fire when it gets in contact with hot surfaces.
⚠ WARNING: Keep appliance area clear and free from combustible materials, gasoline, and other flammable vapors.
WARNING: Keep the oven free from grease buildup. Grease in the oven may ignite.
- Only authorized replacement parts may be used in performing service on the range. Replacement parts are available from factory authorized parts
distributors. Contact the nearest parts distributor in your area.
⚠ WARNING: Use this appliance for its intended purpose as described in this owner's manual.
⚠️CAUTION: Always use heat-resistant gloves when putting or removing the dishes into/from your oven.
⚠️CAUTION: Always use Only Dry Potholders or heat-resistant gloves when putting or removing the dishes into/from your oven. Do not let potholder touch hot heating elements.
WARNING: Avoid scratching or impacting glass doors, cook tops or control panels. Doing so may lead to glass breakage. Do not cook on a product with broken glass. Shock, fire or cuts may occur.
- Do not use a protective coating to line the oven and do not use commercial oven cleaner unless Certified for use in a self-cleaning oven.
i IMPORTANT: Call the authorized service for installation of the appliance to be used. After this procedure, guarantee period will be started.
• Always place oven racks in desired location while oven is cool. If rack must be moved while oven is hot, do not let
potholder contact hot heating element in oven.
- Do not clean the door gasket. The door gasket is essential for a good seal. Care should be taken not to rub, damage, or move the gasket
- Clean only parts listed in manual.
- Before Self-Cleaning the Oven remove all accessories, broiler pan and other utensils from the oven.
⚠️ CAUTION: Remove broiler pan, pots, and other utensils and excess spillage before self-cleaning.
⚠️ CAUTION: Do not leave food or cooking utensils,etc.,in oven during the pyrolytic self-cleaning mode of operation.
Safety for children
⚠ WARNING: Stepping, leaning or sitting on the door or drawers of this range can result in serious injuries and also cause damage to the range. Do not allow children to climb or play around the range. The weight of a child on an open door may cause the range to tip, resulting in serious burns or other injury.
- Accessible parts may be hot when the broil is in use. Young children should be kept away.
- Surface units may be hot even though they are dark in color. Areas near surface units may
become hot enough to cause burns. During and after use, do not touch or let clothing or other flammable materials contact surface units until they have had sufficient time to cool. Among these areas are (identification of areas) for example, the cook-top and surfaces facing the cook-top.
⚠ WARNING: Do not store items of interest to children in the cabinets above the range or on back guard of a range. Children climbing on the range to reach items could be seriously injured.
- The packaging materials will be dangerous for children. Keep the packaging materials away from children. Please dispose of all parts of the packaging according to environmental standards.
- Do not leave children alone - children should not be left alone or unattended in area where appliance is in use. They should never be allowed to sit or stand on any part of the appliance.
Safety when working with electricity
WARNING: Before
installing, turn power OFF at the service panel. Lock service panel to prevent power from being turned ON accidentally.
⚠ WARNING: Personal injury or death from electrical shock may occur if the range is not installed by a qualified installer or electrician.
- Any additions, changes or conversions required in order for this appliance to satisfactorily meet the application needs must be made by a qualified technician.
- Before performing any service, unplug the range or disconnect the power supply at the household distribution panel by removing the fuse or switching off the circuit breaker.
- Any work on electric equipment and systems may only be carried out by authorized qualified persons.
- In case of any damage, switch off the appliance and disconnect it from the main supply by removing the fuse or switching off the circuit breaker.
- Ensure that the fuse rating is correct.
- Do not operate the appliance barefooted.
- Never touch the appliance with wet hands or feet.
- Do not soak removable heating elements. Heating elements should never be immersed in water.
Intended use
- This product is designed for domestic cooking purposes only. It is not designed for any other uses such as room heating or drying towels and dish cloths. Commercial use will void the guarantee.
- All openings in the wall behind the appliance and in the floor under the appliance shall be sealed.
- This appliance is not intended to use at mobile homes, recreational vehicles.
⚠ WARNING: Do not obstruct the flow of ventilation air.
- The manufacturer shall not be held liable for any damage caused by improper use or handling errors.
- The appliance can be used for defrosting, baking, roasting and broiling food.
Disposal
Packaging material
⚠️ DANGER: Risk of suffocation by the packaging materials!
Packing elements (i.e. plastic bags, polystyrene foam, nails, packing straps, etc.) should not be left around within easy reach of children, as these may cause serious injuries. The packaging material and transport locks are made from materials that are not harmful to the environment. Please dispose of all parts of the packaging according to environmental standards. This is beneficial to the environment.
CAUTION: If product will be given to someone for personal use or given to someone for second hand use, User manual, product labels, other related documents, mounting parts etc. should be given with product.
Future transportation
Do not carry out cleaning or maintenance operations on the appliance without having previously disconnected it from the electric power supply.
i NOTICE: Do not place other items on the top of the appliance. The appliance must be transported upright.
Store the appliance's original box and transport the appliance in its original carton. Follow the guidance marks that are printed on the carton.
i IMPORTANT: Verify the general
appearance of your equipment by identifying possible damage during the transportation. To prevent the wire shelf and tray inside the oven from damaging the oven door, place a strip of cardboard onto the inside of the oven door that lines up with the position of the trays. Tape the oven door to the side walls.
If you do not have the original carton
Pack the appliance in bubble wrap or thick cardboard and tape it securely in order to prevent damage during transportation.
Product description
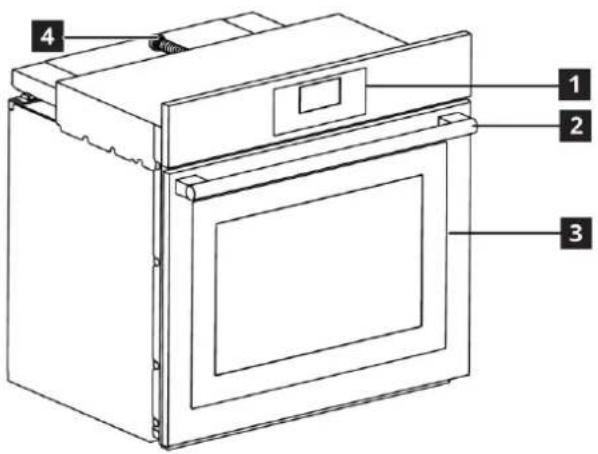
1 Control panel
2 Handle
3 Front door
4 Supply cord
Product introduction
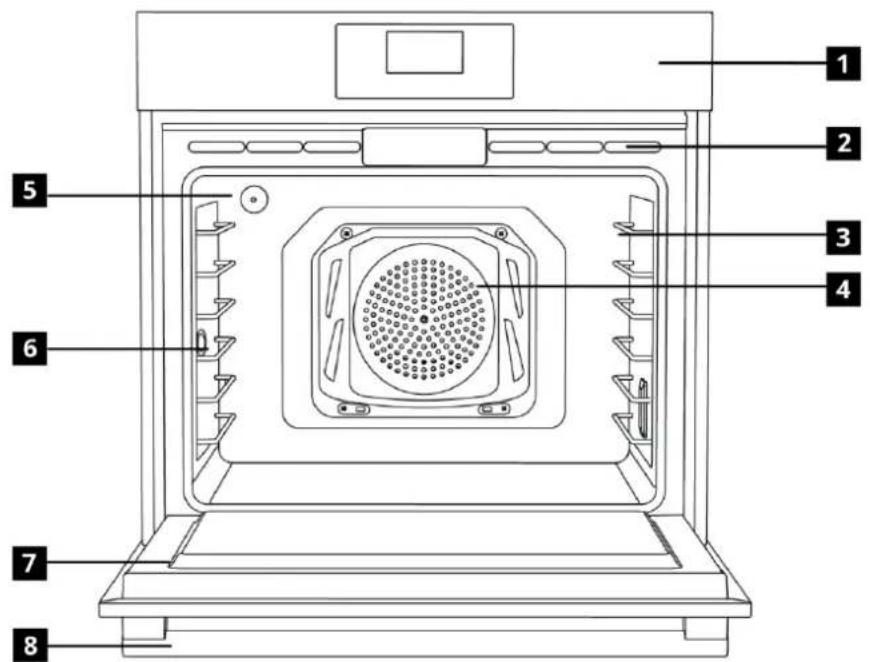
1 Control panel
2 Ventilation holes
3 Wire shelves
4 Fan motor (behind the steel plate)
5 Lamp
6 Meat probe
7 Door
8 Handle
Display
Rating Plate Location
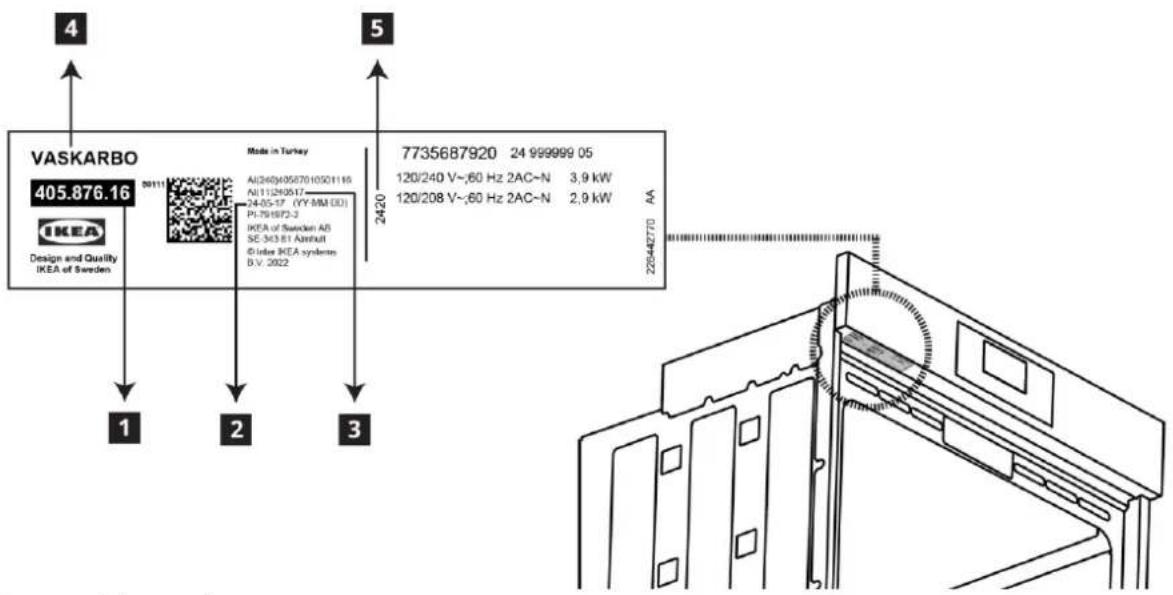
1 Arctic number
2 Production date (Year-Month-Day)
3 Production date (Year-Month-Day)
4 Arcticle name
5 Production date (Year-Week)
Package contents
i Accessories supplied can vary depending on the product model. Not every accessory described in the user manual may exist on your product.
1. Assembly instruction
Product installation instructions guide.

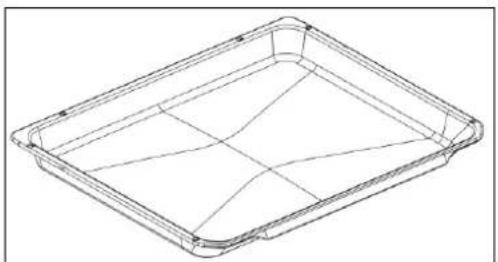
2. Oven tray
Used for pastries, frozen foods and big roasts.
natural_image
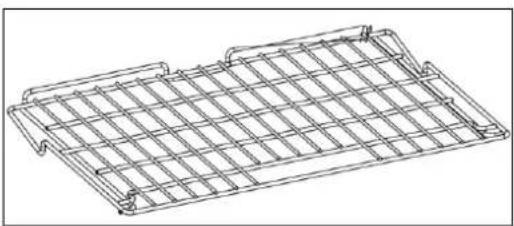
Line drawing of a rectangular tray with internal grid lines (no text or symbols)3. Wire Shelf (2 pieces)
Used for roasting and for placing the food to be baked, roasted or cooked in casserole dishes to the desired rack.
natural_image
Line drawing of a wire mesh grid structure (no text or symbols)The wire shelf spacing where the wire grill should be installed is indicated in the image.
natural_image
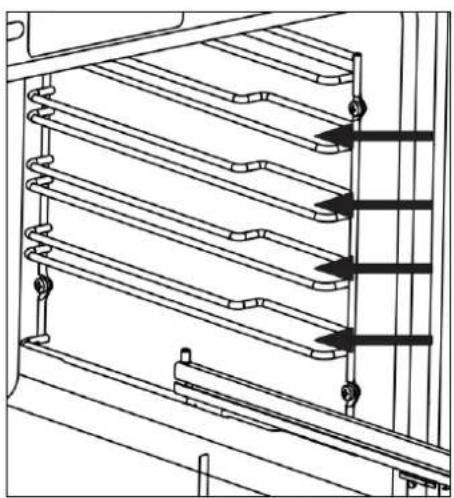
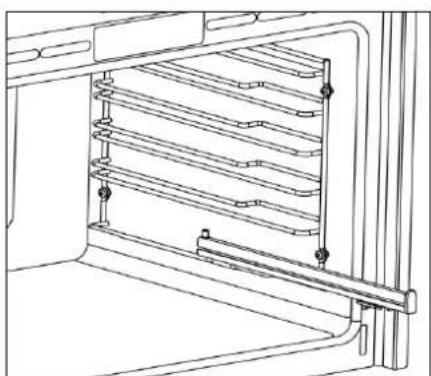
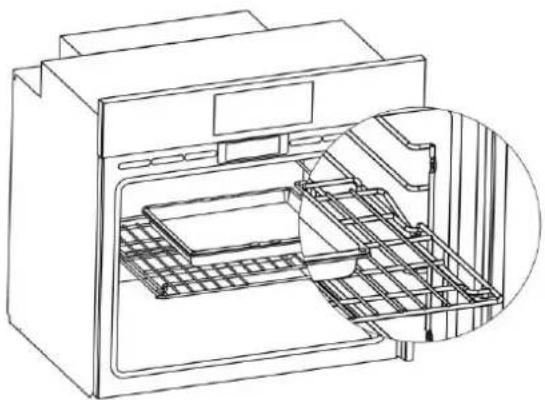
Technical line drawing of a multi-level mechanical or electrical component with no visible text or symbols4. Placing the wire shelf and tray onto the telescopic racks properly
Telescopic racks allow you to install and remove the trays and wire shelf easily. When using the tray and wire shelf with telescopic racks, make sure that the pins at the rear section of the telescopic rack stands against the edges of the wire shelf and tray.
natural_image
Technical line drawing of a refrigerator interior showing horizontal shelves and door frame (no text or symbols)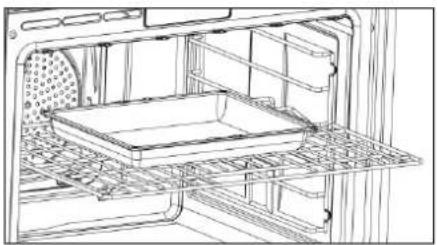
natural_image
Line drawing of an oven interior showing internal structure and tray (no text or symbols)
natural_image
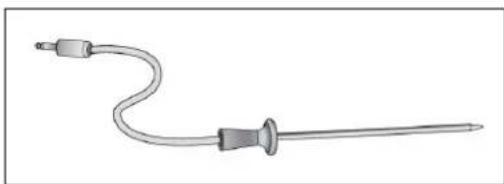
Technical line drawing of a mechanical assembly with two circular components and grid lines (no text or symbols)5. Meat Probe
When cooking meat dishes, the thin long end is stuck on the meat and the other end is used by attaching the other end to its socket on the chassis side wall.
natural_image
Medical catheter with attached tubing and connector (no text or symbols)WARNING: Pull the oven rack to the stop-lock position when loading and unloading food from the oven. This helps prevent burns from touching hot surfaces of the door and oven walls.
CAUTION: When you are using a rack in the lowest position (1), you will need to use caution when pulling the rack out. We recommend that you pull the rack out several inches and then, using two pot holders, pull the rack out by holding the sides of it. The rack is low and you could be burned if you place your hand in the middle of the rack and pull all the way out. Be very careful not to burn your hand on the door when using the rack in the lowest position (1).

CAUTION: You can download the user
manual and installation guide from
www.ikea.com
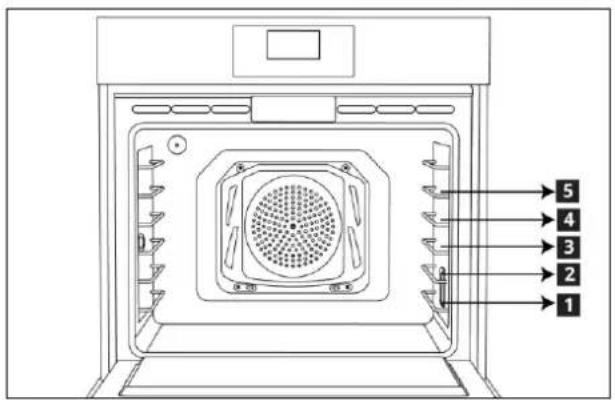
Cooking shelves
There are 5 level shelf positions in the cooking area. The bottom shelf is position 1.
Preparation
Tips for saving energy
The following information will help you to use your appliance in an ecological way, and to save energy:
- Use dark colored or enamel coated cookware in the oven since the heat transmission will be better.
- While cooking your meals, perform a preheating operation if it is advised in the user manual or cooking instructions.
- During cooking, the not open the oven door frequently.
- Try to cook more than one type of meal with in the oven at the same time (You can cook two different meals at the same time by locating cooking bowls on the same shelf). It will be suitable to cook more than one meal after each other. The oven will already be hot.
- Defrost frozen meals before cooking them.
- You can save energy by switching off your oven a few minutes before the end of the cooking time. (The oven door should not be opened).
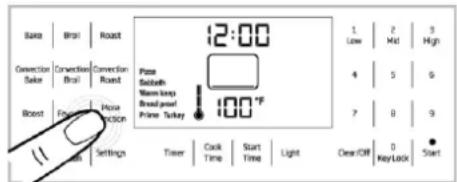
Initial use
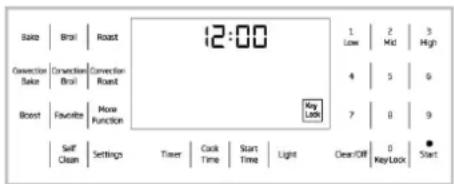
i IMPORTANT: Default setting for clock is 12:00 after initial powering.
IMPORTANT: Active time setting automatically reset when power failure. Please set the clock again.
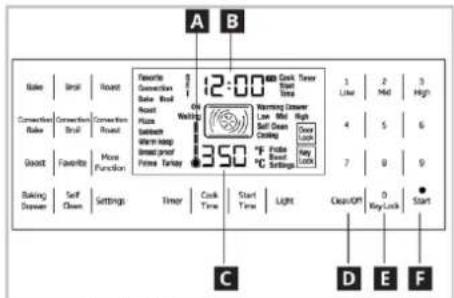
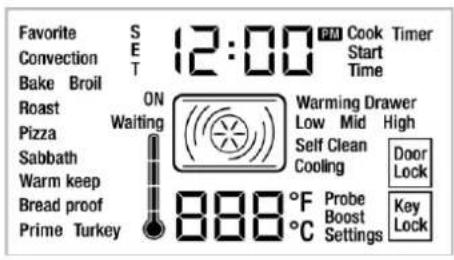
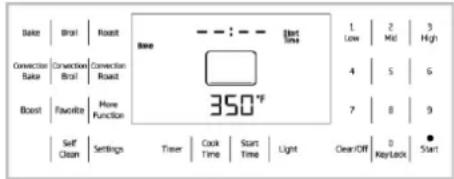
A Symbol of internal temperature
B Display of active clock
C Display of set temperature
D Clear/Off touchpad
E Key Lock touchpad to disable all keys.
F Start/Approve touchpad for cooking
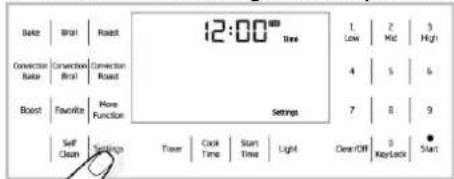
- Touch the "Settings" touchpad three times.
- "Settings" touchpad flashes.
- Adjust 12 hr or 24 hrwithtouching1 and 2 in the numeric keypad.
- Set the 12-hr or 24-hr by pressing "Start" or wait approximately 10 seconds.
Setting the time
- Touch the "Settings" touchpad once.
- Display of timer, "Time" and "Settings" touch pads flash.
- Set the clock with using numeric keypad.
- When desired time entered, set the time by pressing "Start" for wait approximately 10 seconds.
First cleaning of the appliance
i IMPORTANT: Smoke and smell may emit for a couple of hours during the initial operation. This is quite normal. Ensure that the room is well ventilated to remove the smoke and smell. Avoid directly inhaling the smoke and the smell that emits.
i IMPORTANT: When removing appliance for cleaning and/or service; Disconnect AC power supply. Carefully remove the oven by pulling outward. Oven is heavy, use care in handling.
i IMPORTANT: The surface might get damaged by some detergents or cleaning materials. Do not use aggressive detergents, cleaning powders/creams or any sharp objects during cleaning. Be careful to avoid steam burn. Some cleaners can produce noxious fumes if applied to a hot surface.
- Remove all packaging materials.
- Wipe the surfaces of the appliance with a damp cloth or sponge and dry with a cloth.
WARNING: Hot surfaces cause burns!
Product may be hot when it is in use. Never touch the hot burners, inner sections of the oven, heaters and etc. Keep children away. Always use heat resistant oven gloves when putting in or removing dishes into/from the hot oven.
Bake
- Take all baking trays and the wire grill out of the oven.
- Close the oven door.
-
Select the bake function.
-
Set the temperature 350^ F ( 175^ C).
- Press start to operate the oven about 30 minutes.
- Press "clear/off" bottom the turn off your oven.
Broil
- Take all baking trays and the wire grill out of the oven.
- Select the broil function.
- Set the broil level to "HI".
- By touching high bottom.
- Press "clear/off" bottom the turn off your oven.
How to operate the oven
General information on baking, roasting and broiling
WARNING: Hot surfaces cause burns!
Product may be hot when it is in use. Never touch the hot burners, inner sections of the oven, heaters and etc. Keep children away.
Always use heat resistant oven gloves when putting in or removing dishes into/from the hot oven.
⚠️DANGER: Be careful when opening the oven door as steam may escape.
Exiting steam can scald your hands, face and/or eyes.
Tips for baking
- Use non-sticky coated appropriate metal plates or aluminum vessels or heat-resistant silicone moulds.
- Make best use of the space on the rack.
- Place the baking mould in the middle of the shelf.
- Select the correct rack position before turning the oven or Broil on. Do not change the rack position when the oven is hot.
- Always place oven racks in desired location while oven is cool. If rack must be moved while oven is hot, do not let potholder contact hot heating element in oven.
- Keep the oven door closed.
Tips for roasting
- Seasoning with lemon juice and black pepper will improve the cooking performance when cooking a whole chicken, turkey or a large piece of meat.
- Meat with bones takes about 15 to 30 minutes longer before it is cooked than a roast of the same size without bones.
- You should calculate about 4 to 5 minutes cooking time per centimeter height of the meat.
- Let meat rest in the oven for about 10 minutes after the cooking time. The juice is better distributed all over the roast and does not run out when the meat is cut.
- Fish in a fire-resistant dish should be placed on the rack at the medium or lower level.
Tips for broiling
Broiling is ideal for cooking meat, fish and poultry and will achieve a nice brown surface without it drying out to much. Flat pieces, meat skewers and sausages are particularly suited for broiling as are vegetables with a high water content such as tomatoes and onions.
- Distribute the pieces to be broiled on the wire shelf.
- If the broiling is on the wire shelf, locate a dripping pan under it in order to collect the fat.
- Add some water in dripping pan for easy cleaning.
Fire danger due to food which is unsuitable for grilling!
Only use food for grilling which is suitable for intensive grilling heat.
Do not place the food too far in the back of the grill. This is the hottest area and fat food may catch fire.
i IMPORTANT: Fan only runs if necessary for improving performance of cooking and saving the energy of the oven.
Tips for cooking vegetables
- If the vegetable dish runs out of juice and gets to dry,
» Since using a lid during cooking will keep the juice of the dish in the pan, cook your vegetable dishes in a pan with a lid instead of a tray. - If a vegetable dish does not get cooked,
» Boil the vegetables beforehand or prepare them like canned food and put in the oven.
How to use the electric oven
CAUTION: Food Poisoning Hazard
Do not let food sit in oven more than one hour before or after cooking.
Doing so can result in food poisoning or sickness.
i IMPORTANT: Before using the oven, the clock time must be set. If the clock time is not set, the main oven will not work
WARNING: Never cover any slots, holes or passges in the oven bottom or cover an entire rack with materials such as aluminium foil. Doing so blocks airflow through the oven and may cause carbonmonoxide poisoning. Aluminium foil linings may also trap heat, causing a fire hazard.
Fire Hazard!
Never leave the range unattended with the cooktop on medium or high settings. Keep flammable items away from the cooktop. Turn off all controls when done cooking. Failure to follow these instructions can result in fire, serious injury or death.
Shelf positions
For optimum broil coverage, position the wire shelf towards the front of the oven just out of contact with the glass door. Placing the wire shelf fully to the rear of the oven will reduce the broil coverage. It is important to position the wire shelf on side rack correctly. The wire shelf must be placed so that it will fit into the opening of the wire shelf as illustrated in the figure.
natural_image
Line drawing of an open oven with internal rack and ventilation slots (no text or symbols)Settings Temperature Unit
- Touch the "Settings" touchpad four times.
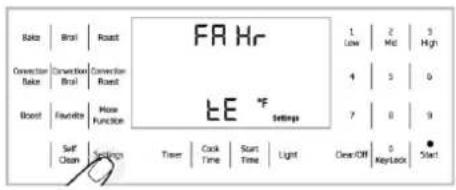
- "Settings", °C or °F icons are flashing.
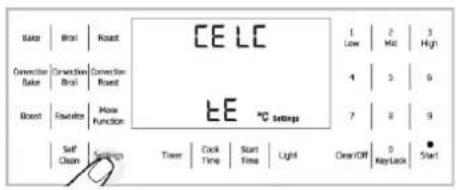
-
Adjust °F or °C with touching 1 and 2 in the numeric keypad.
-
When desired unit entered, set the temperature unit by touching "Start" or wait approximately 10 seconds.
Switch on the electric oven
Stand-by mode is active when oven has power. The display shows only active time. When stand-by mode is active;
Bake
Broil
Roast
Convection Broil
Convection Bake
Convection Roast
More Function
Self Clean
Settings
Light
Key lock
Favorite
Timer touch pads are active.
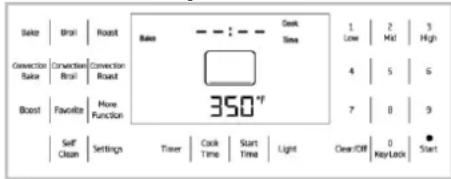
Setting Temperature and Function Mode
1 Functions icon
2 Area of set temperature
3 Area of active clock
4 Function mode name
Recommended temperature is shown in the area of set temperature and working heaters or components are shown in the functions icon.
"Temperature", "Cook Time", "Cook End Time" can be adjustable when functions are selected.
Temperature should be adjustable when functions (except Broil, Convection Broil) are firstly selected. Set temperature adjusts
with numeric keypad. You can change set temperature after starting cook. If you want to change set temperature after starting cook, touch same function and change set temperature.
Broil, Convection Broil, functions temperature can adjustwith-pressing
1-Low,
2-Mid
3-High in the numeric keypad
Function Table
Function table indicates the functions that can be used in the oven and their respective maximum, minimum and initial display temperatures.
| FUNCTION | RECOMENDED TEMPERATURE | LOW | MID | HIGH | MAX | MIN |
| °F / °C | °F / °C | °F / °C | °F / °C | °F / °C | °F / °C | |
| BAKE | 350/175 | 550/290 | 125/50 | |||
| CON BAKE | 350/175 | 550/290 | 125/50 | |||
| BROİL | 350/175 | 350/175 | 450/230 | 550/290 | ||
| CON BROİL | 350/175 | 350/175 | 450/230 | 550/290 | ||
| ROAST | 375/190 | 550/290 | 125/50 | |||
| CON ROAST | 350/175 | 550/290 | 125/50 | |||
| PIZZA | 425/220 | 550/290 | 125/50 | |||
| SABBATH | 350/175 | 450/230 | 125/50 | |||
| WARM KEEP | 150/65 | 150/65 | 170/75 | 200/95 | ||
| BREAD PROOF | 100/40 | 125/50 | 100/40 | |||
| PRIME TURKEY | 325/165 | 550/290 | 125/50 | |||
| SELF CLEAN | 3 HOURS | 4 HOURS | 5 HOURS |
Using the meat probe
natural_image
Line drawing of a person lying on a tray inside an oven, with no text or symbols present.The probe is used to measure the central temperature of meats and poultry such as chicken or turkey by sticking the thin and long part into the meat and attaching the other end to its slot on the side wall of the chassis.
Measured inner temperature of the food indicates the doneness level of the meat. "Probe" appears on the display of the oven when the probe is attached to its slot on the side wall of the chassis. It can be used with the Probe; Bake, Convection Bake, Roast, Convection Roast, Prime Turkey functions.
Using the probe:
-
Select one of the oven functions which allows using the probe.
-
To adjust the food central temperature, enter the food central temperature with the numbers on the right hand side
while °F or °C is blinking and press "Start".
- To adjust the oven inner temperature, enter the oven inner temperature with the numbers on the right hand side while °F or °C is blinking. And then press "Start" to start cooking.
- The temperature that appears on the display during cooking is the food central temperature measured by the probe.
- Cooking is terminated automatically once the adjusted food central temperature is attained.
CAUTION: Use of probes other than the one provided with this product may result in damage to the probe or oven control.
CAUTION: Use the handles of the probe and plug when inserting and removing them from the food and outlet.
CAUTION: To avoid damaging your probe, do not use tongs to pull on the cable when removing it.
CAUTION: Insert the probe completely into the meat. It should not touch bone, fat or gristle.
CAUTION: For roasts with no bone, insert the probe into the meatiest part of the roast. For bone-in ham or lamb, insert the probe into the center of the lowest large muscle.
CAUTION: Insert the probe into the center of dishes such as meat loaf or casseroles.
CAUTION: Insert the probe into the
meatiest part of the inner thigh from below
and parallel to the leg of a whole turkey.
In functions where the meat probe is used, "Probe" symbol appears on the display and flashes with an interval of about 1 sec as illustrated in the image.
The "Probe" symbol also appears for the functions where the meat probe is not used. The "Probe" symbol flashes rapidly on the display.
⚠ WARNING: Never store the probe inside the oven when it is not in use.
⚠ WARNING: Take the meat probe out of the oven when the Self-Clean mode is activated.
WARNING: Do not remove the probe from its slot on the side wall when the cooking is over; wait for it to cool down. Heat may cause burns..
CAUTION: There is the risk of fracture for the thin and long part of the probe when the probe is stuck into the frozen food. Wait for the frozen food to thaw and use the probe with thawed food.
WARNING: Use heat-resistant gloves to remove the probe when the cooking is over.
CAUTION: Stick the probe to the center of the food. If the tip of the probe is close to the bone or surface of the meat, cooking will be terminated before the de-sired doneness level is attained.
CAUTION: Failure to fully insert the probe into the meat may result in poor cooking performance because the probe will sense the oven air vs. the food temperature.
CAUTION: Food central temperature can be set between 100-210°F (40-99 °C).
i IMPORTANT: Cooking time is not indicated when the meat probe is attached..
i IMPORTANT: It is not suggested to set the cooking time for the best cooking results with meat probe.
i IMPORTANT: In case of cooking without meat probe, the oven temperature and the oven set temperature are displayed alternately until the oven temperature
reaches the set temperature. After that, oven set temperature displayed.
i IMPORTANT: In case of cooking with meat probe, the oven temperature and the oven set temperature are displayed alternately until the oven temperature reaches the set temperature. After that, meat probe's real temperature displayed.
i IMPORTANT: Cooking cannot be started in functions where the meat probe cannot be used.
i IMPORTANT: If cooking without a meat probe, keep the meat probe cover closed.
Operating modes
Bake
Only bottom heat is on. The bake mode can be used for a variety of food items, from cakes to casseroles.
Bake food on a single rack with the pans are positioned in the middle of the oven. Bake foods with 1" (25mm) to 1.5" (38mm) space between pans and oven walls.
When using the Bake mode, preheat the oven for best results.
Baking time will vary with the size, shape and material of the pan used.
Convection Bake
Only ring heater is on. The heat comes from back of steel plate and is circulated throughout the oven by the convection fan. The convection bake mode can be used for a variety of food items, from cakes to breads.
It is also ideal for sponge cakes, pasties and biscuits on multiple racks (3 and 5) at the same time and large quantities of baked foods.
The cakes are positioned with the top rack cakes towards the back of the oven and the lower rack cakes towards the front of the oven. Bake foods with 1" (25mm) to 1.5" (38mm) space between pans and oven walls.
When using the Convection Bake mode, preheat the oven for best results.
Baking time will vary with the size, shape and material of the pan used.
Broil
Top heat is on. The broil mode can be used for cuts of meat, poultry and fish. It can also be used to brown breads. The food must be put on a grid in a pan (broiler tray).
Broil food on a single rack with the broiler tray are centrally located with respect to the heating element.
The broil mode has three settings: low 350°F (175°C), mid 450°F (230°C), high 550°F (290°C).
When using the Broil mode, preheat the oven 5-6 minutes for best results.
Turn foods once during the recommended cook time.
The size, weight, thickness, starting temperature and personal preference of doneness will affect broiling times.
Convection Broil
Top heat is on. The heat comes from top and is circulated throughout the oven by the convection fan. The convection broil mode can be used for cuts of meat, poultry and fish. The food must be put on a grid in a pan (broiler tray).
Broil food on a single rack with the broiler tray are centrally located with respect to the heating element.
The convection broil mode has three settings: low (350°F (175°C)), mid (450°F (230°C)), high (550°F (290°C)).
When using the Convection Broil mode, preheat the oven 5-6 minutes for best results.
Turn foods once during the recommended cook time.
The size, weight, thickness, starting temperature and personal preference of doneness will affect broiling times.
Roast
Top and bottom heat are on. The roast mode can be used for meat and poultry.
Roast food on a single rack with the pan is positioned in the middle of the oven.
When using the Roast mode, preheat the oven for best results.
For best performance, use a pan and grid (roasting tray or broiler tray) under the meat or poultry. The pan catches grease spills.
WARNING: You can use a lid or roasting bags in this mode. Follow manufacturer's directions for the roasting bag.
Convection Roast
Top and bottom heat are on. The heat comes from top and bottom and is circulated throughout the oven by the convection fan. The convection roast mode can be used for meat, poultry and large quantities of roasted foods.
Roast food on a single rack with the pan is positioned in the middle of the oven.
When using the Convection Roast mode, preheat the oven for best results.
For best performance, use a pan and grid (roasting tray or broiler tray) under the
meat or poultry. The pan catches grease spills.
WARNING: Do not cover meat or use roasting bags in this mode.
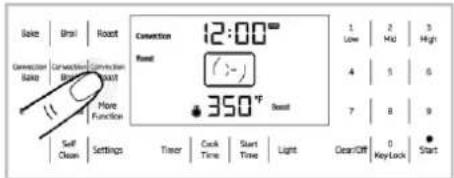
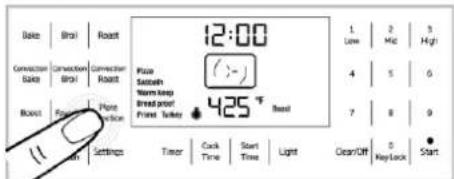
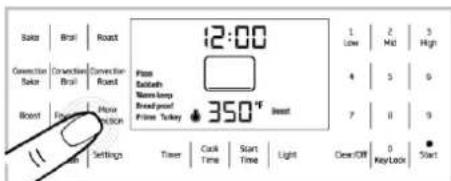
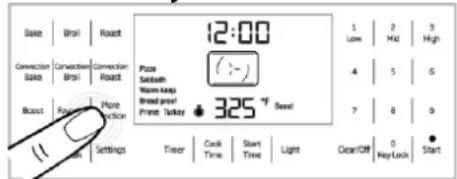
More Functions
The functions (Pizza, Sabbath, Warm keep, Bread proof, Prime Turkey) are available by pressing "More Functions" on touchpad until the function illuminates on the display.
Pizza
Bottom heat is on. The heat comes frombottom and is circulated throughout theoven by the convection fan. The pizza modecan be used for fresh and frozen pizza.
Follow manufacturer's directions for frozen pizza.
For best performance, use a pizza pan or baking tray.
You can also use pizza stone but follow manufacturer's directions for the pizza stone.
Bake pizza on a single rack with the pizza pan or baking tray is positioned in the middle of the oven.
When using the Pizza mode, preheat the oven for best results.
Sabbath
Only bottom heat is on.
Cook food on a single rack with the pans are positioned in the middle of the oven. Cook foods with 1" (25mm) to 1" 12 "(38mm) space between pans and oven walls.
The Sabbath mode can be started by choosing the Sabbath mode in the more function menu and then press the start button.
The temperature must be with range of 125°F (50°C) to 450°F (230°C). with in the Sabbath mode.
i All control button except CLEAR/OFF button is deactivated when Sabbath mode is active.
i CLEAR/OFF button closes the all heaters when Sabbath mode is active but the appearance of display is not changed.
If Sabbath mode is wanted to close, both CLEAR/OFF and LIGHT buttons are touched simultaneously for approximately 2 seconds.
The maximum time for Sabbath mode is 72 hours if you set the cook time.
i IMPORTANT:Light is off when the Sabbath function in use. No change in light if you press the button without Sabbath mode.
i IMPORTANT: You cannot change the oven temperature after Sabbath starts.
i IMPORTANT: All acoustic signals is deactivated when Sabbath mode is active.
i IMPORTANT: If you set the Cook Time in Sabbath mode, all heaters are closed but the appearance of display is not changed after the Cook Time finished.
The maximum time for Sabbath mode is 72 hours if you do not use Cook Time.
WARNING: Food Poisoning Hazard: Do not let food sit in oven for more than 1 hour before or after cooking. Doing so can result in food poisoning or sickness.
WARNING: To avoid permanent damage to the oven bottom finish do not line the oven bottom with any type of foil or liner.
WARNING: Sabbath mode should be used only on the Jewish Sabbath and Holidays.
WARNING:The health of some birds and pets is extremely sensitive to the fumes given off during the Sabbath mode. Always move birds and pets to another closed and well ventilated room. Keep the kitchen well-
ventilated during the Sabbath mode also for your health.
All food should be placed in the oven before the Sabbath begins, since none may be placed in the oven during the Sabbath.
On the Sabbath the oven door may only be opened once, all the food removed and then closed. On the Holidays, the oven door may be opened/closed at any time as often as desired.
i After recovery from a power failure, the oven will return to the start up screen.
The start time can be adjusted max.12 hours at Sabbath mode. Make sure the oven clock shows the correct time of day.
Warm Keep
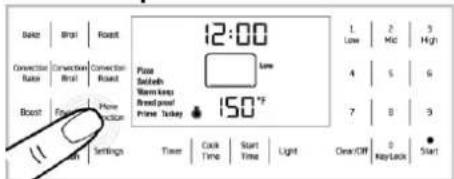
Only bottom heat is on. The warm keep mode will keep hot, cooked foods at serving temperature. Always start with hot food. Cold or room temperature foods cannot be heated or warmed in this mode (except crisping crackers, chips, dry cereal).
Bacteria will grow very rapidly in food that in between 40°F (4,5°C) and 140°F (60°C).
Always preheat the oven before warming food.
For best results, do not warm food longer than one hour.
The warm keep mode has three settings: low (150°F(65°C.), mid (170°F(75°C.), high (200°F(95°C.).
Recommendations
| Temperature | Food type |
| Low | Soft rolls, chips, empty dinner plates |
| Medium | Casseroles, pizza, vegetables, eggs, pastries, biscuits, hard rolls, gravies |
| High | Roasts, poultry, hamburgers, bacon, potatoes (baked) |
CAUTION: Put the cooked food in heat-safe serving dish on the rack in the oven. Remove serving spoons etc. before placing dishes in the oven.
WARNING: Do not leave paper products, plastics, canned food or combustible materials in the drawer. They may ignite.
WARNING: Do not leave paper products, plastics, canned food or combustible materials in the drawer. They may ignite.
WARNING: Fire risk!
Do not store flammable material in the oven and/or in the warming drawer.
Bread Proof
Only bottom heat is on. The bread proof mode can be used leavening of the bread and pizza dough or other yeast dough. Use a bowl or a pan with lid or cover. Proof dough on a single rack with bowl or a pan is positioned in the middle of the oven. No preheat is necessary.
Prime Turkey
Top and bottom heat are on. The heat comes from top and bottom and is circulated throughout the oven by the convection fan. The Prime Turkey mode can be used for whole or parts of turkey. Roast turkey on a single rack with the pans are positioned in the middle of the oven. When using the Prime Turkey mode, preheat the oven for best results. Always use a pan and grid (roasting tray or broiler tray) under whole or parts of Turkey. The pan catches grease spills.
WARNING: Do not cover meat or use roasting bags in this mode.
i IMPORTANT: Maximum adjustable cooking time in modes is limited with 6 hours due to safety reasons. It is limited with 5 hours for Self Clean.
i IMPORTANT: While adjusting any function, related symbols will flash on the display.
i IMPORTANT: Program will be canceled in case of power failure. You must reprogram the appliance.
Self-cleaning function
WARNING: If the oven is hot, self cleaning mode cannot be operated until the oven is cold. If the self cleaning mod malfunctions (power cut), turn the oven off and disconnect the power supply, and call the service.
⚠️DANGER: Hot surfaces cause burns! Do not touch the product during self cleaning step and keep children away from it. Keep at least 30 minutes before removing the remnants.
WARNING: The oven is equipped with self-cleaning function. The oven is heated to approx. 790°F (421°C) and existing dirt is burned to ashes. A strong smoke development may arise. Provide for good ventilation.
The self-cleaning should be used after approx. every 10th oven usage.
The self-cleaning has three levels. It can be selected according to level of dirtiness.
Low level (Low): it takes 3 hours.
Medium Level (Mid): it takes 4 hours.
High Level (High): it takes 5 hours.
WARNING: Remove all accessories, broiler pan and other utensils from the oven.

natural_image
Line drawing of an open oven with a black X mark indicating the quantity inside (no text or symbols)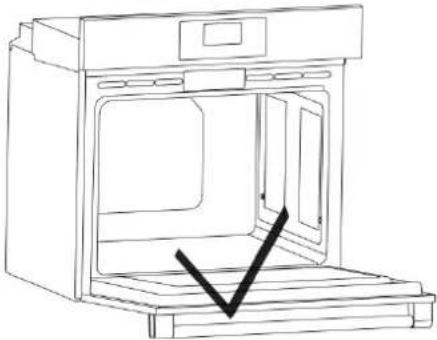
natural_image
Line drawing of an open oven with a black checkmark indicating a drop or inspection (no text or symbols present)WARNING: If the self-cleaning mode malfunctions, turn the oven off and disconnect the power supply. Have it serviced by a qualified technician.
WARNING: Before operating the self-clean cycle, Wipe grease and food soils from the oven. Excessive amount of grease may ignite, leading to smoke damage to your home.
WARNING: Do not clean the door gasket. The door gasket is essential for a good seal. Care should be taken not to rub, damage, or move the gasket Fiberglass gasket is highly sensitive and can get damaged easily. In case of a damage on the oven door gasket, replace with the new one from the authorized service.
WARNING: Before operating the self-clean cycle, remove dirt from exterior surfaces and oven interior with a damp cloth, wipe grease and food soils from the oven. Excessive amount of grease may ignite, leading to smoke damage to your home. Remove all accessories from the oven.
-
Before the self-cleaning cycle, remove dirt from exterior surfaces and oven interior with a damp cloth.
-
Keep the function knob pressed and turn it clockwise to desired level of "Clean". (Low, Mid or High).
This duration cannot be changed.
WARNING: The health of some birds and pets is extremely sensitive to the fumes given off during the Self-Cleaning cycle. Always move birds and pets to another closed and well ventilated room. Keep the kitchen well-ventilated during the Self-Cleaning cycle also for your health.
- If there is a fire in the oven during self-clean, turn the oven off and wait for the fire to go out. Do not force the door open. Introduction of fresh air at self-clean temperatures may led to a burst of flame from the oven. Failure to follow this instruction may result in severe burns.
CAUTION: After a clean cycle, remove soil deposits with vinegar water.
i IMPORTANT: During the Self-Cleaning cycle, the lamp cannot be operated.
WARNING: If there is a fire in the oven during self-clean, turn the oven off and wait for the fire to go out. Do not force the door open. Introduction of fresh air at self-clean temperatures may led to a burst of flame from the oven. Failure to follow this instruction may result in severe burns.
How to operate the oven control unit
Activating semi-automatic operation mode In this operation mode, you may adjust the time period during which the oven will operate (cooking time).
-
Put your meal into the oven and close the oven door.
-
Select the desired oven function.
-
If you want to change the temperature adjust the temperature using numbers on the right side while °F or °C is flashing.
-
For cooking time, touch the 'Cook Time' key once.
» Enter the cooking time using numbers on the right keypad while Cook and Time are flashing.
5. Once the cooking time is set, Cook and Time symbols will appear on the display continuously.
- If cooking function, temperature and time values are suitable, touch Start to start cooking. Cooking starts and "ON" appears on the display.
» The oven will be heated up to the preset temperature and will maintain this temperature until the end of the cooking time you selected.
i IMPORTANT: All segments of the inner oven temperature symbol (1) will turn on when the oven reaches the set temperature.
- After the cooking is completed, the oven will give an audible warning.
- To stop the alarm signal, just touch any key.
Switch on fully automatic operation
In this operation mode you can adjust cooking time and end of cooking time.
- Put your meal into the oven and close the oven door.
- Select the desired oven function.
- If you want to change the temperature adjust the temperature using numbers on the right side while °F or °C is flashing.
- For cooking time, touch the 'Cook Time' key once.
» Enter the cooking time using numbers on the right keypad while Cook and Time are flashing.

-
Touch "Start Time" key once for end of cooking time. Enter end of cooking time using numbers on the right while Start and Time are flashing.
-
When end of cooking time is set, end of cooking time and the Start and Time symbols will appear on the display continuously.
- If cooking function, temperature, time and end of cooking time values are suitable, touch "Start" key to start cooking. "Cooking" appears on the display.
» Oven timer automatically calculates the startup time for cooking by deducting the cooking time from the end of cooking time you have set.
8. Selected operation mode is activated when the startup time of cooking has come. "ON" appears on display and oven heats up to the adjusted temperature. It maintains this temperature until the end of the cooking time.
i IMPORTANT: All segments of the inner oven temperature symbol (1) will turn on when the oven reaches the set temperature.
- After the cooking is completed, the oven will give an audible warning.
- To stop the alarm signal, just touch any key.
i IMPORTANT: If you want to cancel the program after performing semi-automatic or automatic programming, you need to reset the cooking time. You can also switch off the oven by touching the "Clear/Off" key.
i IMPORTANT: If you want to cancel the program after performing semi-automatic or automatic programming, you need to reset the cooking time. You can also switch off the oven by touching the "Clear/Off" key.
i IMPORTANT: In case of malfunction of the "Clear/Off" key, you can touch any other program selector keys to switch off the oven.
Setting the booster(for only electric ovens) (Quick heating)
Use Booster (rapid pre-heating) function to make the oven reach the desired temperature faster.
i IMPORTANT: Booster cannot be selected in Warm Keep, Self Clean and Bread Proof cooking positions. Booster will
be set by default in other positions. If you do not want to use Booster function, disable it by pressing 'Booster' key.
- If cooking function, temperature and time values are suitable, touch Start to start cooking. Cooking starts and 'ON' appears on the display.
» 'Booster' disappears from the display as soon as the oven reaches the desired temperature and oven resumes operating in the function it was in before the Booster function. - Touch the 'Booster' key again in order to enable or disable booster function. If 'Booster' appears on the display, it means it is enabled. If not, it means it is disabled.
Using the key lock
You can prevent oven from being intervened with by activating the key lock function.
i IMPORTANT: Key lock can be enabled only when the oven is in Standby position and operating mode.
Activating the key lock
Key lock is activated by pressing 0-Key Lock key amongst the numbers on the right of display for approximately 3 seconds.
Deactivating the key lock
Key Lock is deactivated by pressing 0-Key Lock key amongst the numbers on the right of display for approximately 3 seconds.
i IMPORTANT: Oven keys are not functional when the key lock function is activated. Key lock will be canceled in case of power failure.
Using the timer as an alarm clock
You can use the timer of the product for any warning or reminder apart from the cooking program. The alarm clock has no influence on the functions of the oven. It is only used as a warning. For example, this is useful when you want to turn food in the oven at a certain point of time. Alarm clock will give a signal once the time you set is over.
i IMPORTANT: Maximum alarm period can be 6 hours.
To set the alarm:
Press 'Timer' key on display and set the desired alarm period by entering the alarm period using the numbers on the right of the display. It will be activated after about 10 seconds when no key is pressed.
After the alarm time has elapsed, 'END' will start flashing and an alarm signal will sound. Touch any button to stop the alarm signal and make "END" disappear.
To cancel the alarm:
Touch 'Timer' key when alarm is set. When you set the time to 00:00, the alarm will be canceled about 10 seconds later and 'Timer' symbol on display will disappear.
Turning the light on and off
Every time you touch 'Light' key on display, it will be turned on if it is off or vice versa.
i IMPORTANT: If Self Clean is active, light will be off at all times. Pressing 'Light' key does not change this.
i IMPORTANT: If internal temperature of the oven exceeds 572°F (300°C), light will be off at all times. Pressing 'Light' key does not change this.
i IMPORTANT: While oven functions are on, all heaters will be switched off when Clear/Off key is pressed.
i IMPORTANT: If oven door is opened when turbo fan is on, turbo fan will be stopped.
i IMPORTANT: If oven door is opened when an oven function is active, all heaters will be deactivated after about 30 seconds. There are lights on keys. Descriptions of these lights are given in the table below
Using the Favorite Mode
Saving the Favorite Function
When a cooking function is on display, current values will be saved as your favorite meal when you touch "Favorite" key for about 3 seconds.
IMPORTANT: 1 menu will be saved as
Favorite meal. Therefore, when you save a new meal, previously saved meal will be deleted and the latest will be stored.
i IMPORTANT: Bake and Set values are preset as "Favorite" meal in the initial setup.
Selecting the favorite menu
Favorite menu will appear on display when you touch "Favorite" key for 1 second when the oven is on.
Touch the 'Start' key to activate cooking.
Cooking times table
IMPORTANT: The values indicated in the table below are data indicative. They may vary according to the type of food as well as your preferences of cooking.
i IMPORTANT: Level1 is the bottom level in the oven.
(**) For preheating, set the required temperature, the thermostat lamp will go out when the required temperature is reached
Baking and roasting
| Food | Cooking Mode | Oven Temperature (°F) / (°C) | Number of Racks | Rack Position | Time (min.) | Pan Size&Type | Explanation |
| Sponge Cake | Bake | 350/175 | Single | 3 | 20-30 | 8" or 9"(200-230 mm) round | The cakes are positioned in the middle of the oven.Bake foods with 1" (25mm) to 1.5" (38mm) space between pans and oven walls. |
| Sponge Cake | Convection Bake | 325/160 | Multiple | 3&5 | 20-30 | 8" or 9"(200-230 mm) round | The cakes are positioned with the top rack cakes towards the back of the oven and the lower rack cakes towards the front of the oven.Bake foods with 1" (25mm) to 1.5" (38mm) space between pans and oven walls. |
| Loaf (leavened*) | Bake | 400/205 | Single | 3 | 30-40 | Baking tray | - |
| Loaf (leavened*) | Convection Bake | 400/205 | Single | 3 | 25-35 | Baking tray | - |
| Puff pastry | Convection Bake | 375/190 | Multiple | 3&5 | 15-20 | Baking tray | The sheets are positioned with the top rack sheet towards the back of the oven and the lower rack sheet towards the front of the oven.Bake foods with 1" (25mm) to 1.5" (38mm) space oven walls. |
| Fresh pizza, thin | Pizza | 425/220 | Single | 2 | 8-15 | Baking tray | - |
| Fresh pizza, thick | Pizza | 425/220 | Single | 2 | 12-20 | Baking tray | - |
| Frozen pizza, thick | Pizza | 425/220 | Single | 2 | 10-15 | Baking tray | |
| Chicken, whole (4-4.5 lbs.) | Convection Roast | 375/190 | Single | 2 | 120-140 | Baking tray | Minimum internal temperature is 180°F (82 °C) in thigh |
| Turkey, whole, unstuffed (18-20 lbs.) | Prime Turkey | 325/160 | Single | 1 | 150-180 | Baking tray | Minimum internal temperature is 180°F (82 °C) in thigh.Foil the top surface of turkey to prevent over-browning in last 30 minutes of the cooking, if necessary. |
| Sirloin, boneless (4-4.5 lbs.) | Convection Roast | 325/160 | Single | 3 | 90-120 | Baking tray | Internal temperature is 145°F (62 °C) (medium rare), 160°F (71 °C) (medium) |
| Toast bread | Broil | High | Single | 5 | 2-2:30 | Wire shelf | Place broiler tray centrally located with respect to the heating element. |
| Chicken thigh (2-2.5 lbs) | Broil | High | Single | 4 | Side 1: 16-20Side 2: 8-12 | Baking tray | Place broiler tray centrally located with respect to the heating element.Minimum internal temperature is 180^ ( 82^ ) in thigh. |
| Chicken thigh (2-2.5 lbs) | Broil | Mid | Single | 4 | Side 1: 20-24Side 2: 14-16 | Baking tray | Place broiler tray centrally located with respect to the heating element.Minimum internal temperature is 180^ ( 82^ ) in thigh. |
| Ground beef (0.3"-0.5" thick, 6 patties) | Broil | High | Single | 4 | Side 1: 5-7Side 2: 3-5 | Baking tray | Place broiler tray centrally located with respect to the heating element. |
| Hamburger, frozen (0.3"-0.5" thick, 6 patties) | Broil | High | Single | 4 | Side 1: 7-10Side 2: 2-4 | Baking tray | Place broiler tray centrally located with respect to the heating element. |
| *Leavening | Bread Proof | 100/40 | Single | 3 | 30-40 | Bowl or pan with cover | |
| **It is suggested to perform preheating for all foods cooking.It is suggested to perform 5-6 minutes preheating for all foods broiling. | |||||||
Care and cleaning
General information
Service life of the product will extend and the possibility of problems will decrease if the product is cleaned at regular intervals.
i IMPORTANT: Clean only parts listed in manual.
DANGER: Risk of electric shock!
Switch off the electricity before cleaning appliance to avoid an electric shock.
DANGER: Hot surfaces may cause burns!
Allow the appliance to cool down before you clean it.
i IMPORTANT: The surface might get damaged by some detergents or cleaning materials.
Do not use aggressive detergents, cleaning powder/cream or any sharp objects. Do not use aggressive detergents, cleaning powder/cream or any sharp objects.
Clean the appliance thoroughly after each use; in this way it will be possible to remove cooking residues more easily, thus avoiding these from burning the next time the appliance is used.
i IMPORTANT: No special cleaning agents are required for cleaning the appliance. It is recommended to use warm water with washing liquid, a soft cloth or sponge and use a dry cloth for drying.
Do not use any abrasive cleaning materials!
i The surface might get damaged by some detergents or cleaning materials.
Do not use aggressive detergents, cleaning powders/creams or any sharp objects during cleaning.
Do not use harsh abrasive cleaners or sharp metal scrapers to clean the oven door glass since they can scratch the surface, which may result in shattering of the glass.
⚠ WARNING: Do not use steam cleaners to clean the appliance as this may cause an electric shock.
Cleaning the control panel
Clean the control panel and knobs with a damp cloth and wipe them dry.
i IMPORTANT: Damage of the control panel!
Do not remove the control knobs for control panel cleaning.
Cleaning the oven
No oven cleaner or any other special cleaning agent is required for cleaning the oven. It is recommended to wipe the oven with a damp cloth while it is still warm.
WARNING: Do not use oven cleaners. No commercial oven cleaner or oven liner protective coating of any kind should be used in or around any part of the oven.
Self-cleaning function
WARNING: If the oven is hot, self cleaning mode cannot be operated until the oven is cold. If the self cleaning mod malfunctions (power cut), turn the oven off and disconnect the power supply, and call the service.
⚠️ DANGER: Hot surfaces cause burns! Do not touch the product during self cleaning step and keep children away from it. Keep at least 30 minutes before removing the remnants.
WARNING: The oven is equipped with self-cleaning function. The oven is heated to approx. 790 °F (421 °C) and existing dirt is burned to ashes. A strong smoke development may arise. Provide for good ventilation.
The self-cleaning should be used after approx. every 10th oven usage.
The self-cleaning has three levels. It can be selected according to level of dirtiness.
Low level (Low): it takes 3 hours.
Medium Level (Mid): it takes 4 hours.
High Level (High): it takes 5 hours.

WARNING: Remove all accessories from the oven.

WARNING: If the self-cleaning mode malfunctions, turn the oven off and disconnect the power supply. Have it serviced by a qualified technician.

WARNING: Before operating the self-clean cycle, Wipe grease and food soils from the oven. Excessive amount of grease may ignite, leading to smoke damage to your home.

WARNING: Do not clean the door gasket. The door gasket is essential for a good seal. Care should be taken not to rub, damage, or move the gasket. Fiberglass gasket is highly sensitive and can get damaged easily. In case of a damage on the oven door gasket, replace with the new one from the authorized service.

WARNING: Before operating the self-clean cycle, remove dirt from exterior surfaces and oven interior with a damp cloth, wipe grease and food soils from the oven. Excessive amount of grease may ignite, leading to smoke damage to your home. Remove all accessories from the oven.
- Press "Self Clean" on the touchpad.
- Set the desired level by pressing the keypad.
- Confirm the by pressing "Start" on the touchpad and it begins.
- If there is a fire in the oven during self-clean, turn the oven off and wait for the fire to go out. Do not force the door open. Introduction of fresh air at self-clean temperatures may led to a burst of flame from the oven. Failure to follow this instruction may result in severe burns.

WARNING: The health of some birds and pets is extremely sensitive to the volumes given off during the Self-Cleaning cycle. Always move birds and pets to another closed and well ventilated room. Keep the kitchen well-ventilated during the Self-Cleaning cycle also for your health.

CAUTION: After a clean cycle, remove oil deposits with vinegar water.

IMPORTANT: During the Self-Cleaning cycle, the lamp cannot be operated.

WARNING: If there is a fire in the oven during self-clean, turn the oven off and wait for the fire to go out. Do not force the door open. Introduction of fresh air at self-clean temperatures may led to a burst of flame from the oven. Failure to follow this instruction may result in severe burns.
Clean oven door
To clean the oven door, use warm water with washing liquid, a soft cloth or sponge to clean the product and wipe it with a dry cloth.

IMPORTANT: Don't use any harsh asive cleaners or sharp metal scrapers cleaning the oven door. They could tch the surface and destroy the glass.
Removing the oven door
When removing the oven door, make sure oven is cool and power to the oven has been turned off before removing the door.

natural_image
Line drawing of a hand opening a kitchen appliance with a checkmark indicating cancellation (no text or symbols present)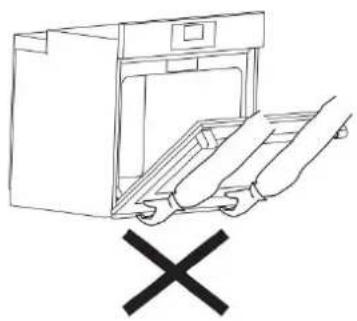
natural_image
Line drawing of a kitchen appliance with a hand holding a tray and a 'X' symbol below (no text or labels)
CAUTION: When removing the product over, do not hold it under the cover.
Failure to do so could result in electrical shock or burns. The oven door is heavy and parts of it are fragile. Use both hands to remove the oven door. The door front is glass. Handle carefully to avoid breakage. Grasp only the sides of the oven door. Do not grasp the handle as it may swing in your hand and cause damage or injury. Failure to grasp the oven door firmly and properly could result in personal injury or product damage. To avoid injury from hinge bracket snapping closed, be sure that both levers are securely in place before removing the door. Also, do not force door open or closed—the hinge could be damaged and injury could result. Do not lay removed door on sharp or pointed objects as this could break the glass. Lay on a flat, smooth surface, positioned so that the door cannot fall over. Oven door can be removed in order to clean the inside of oven easily. 1. Open the oven door completely. 2. Press the hinge clamps located at both sides of the door backwards.
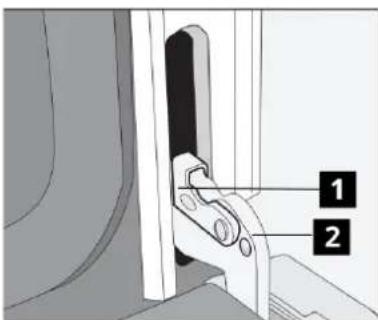
1 Hinge clamp
2 Hinge
-
Move the oven door to a slightly inclined position.
-
Raise the oven door forwards with your two hands.
-
Once you complete cleaning, perform the same procedure in reverse order to reinstall the oven door.

IMPORTANT :Once you complete leaning, perform the same procedure in reverse order to reinstall the oven door.
Replacing the oven lamp
DANGER: Before replacing the oven lamp, make sure that the product is disconnected from mains and cooled down in order to avoid the risk of an electrical shock. Hot surfaces may cause burns!
i IMPORTANT: The oven lamp is a special electric light bulb that can resist up to 300°C (573 °F). See Technical specifications. for details. Oven lamps can be obtained from Authorised Service Agents or technician with license.
i IMPORTANT: Position of lamp might vary from the figure.
Removing the round lamp;
natural_image
Line drawing of a washing machine with a close-up inset showing the door and seat (no text or symbols)-
Disconnect the product from mains.
-
Turn the glass cover counter clockwise to remove it.
natural_image
Diagram of a mechanical component with circular motion arrows indicating rotational direction (no text or symbols)- Pull out the oven lamp from its socket and replace it with the new one.
- Install the glass cover.
Removing square lamp:

natural_image
Pure architectural line drawing of a window with vertical supports and a central rectangular opening (no text or symbols)The oven lights can be illuminated with light key. The lights are switched on when the door is opened or when the oven is in a cooking cycle.
The oven lights are not illuminated during self clean. Each light assembly consists of a removable lens, a light bulb as well as a light socket housing that is fixed in place. Light bulb replacement is considered to be a routine maintenance item.
- Turn off power at the main power supply (your fuse or breaker box).
- Remove the wire racks as described. you can refer to the "removing Wire Shelves." next to the picture on the right.
natural_image
Diagram showing a door panel being inserted into a device with a screwdriver, alongside a close-up of the component (no text or symbols visible)- Remove the protective glass cover with a screwdriver.
- Pull out oven lamp and replace it with new one.
- Install the glass cover and then the wire racks.
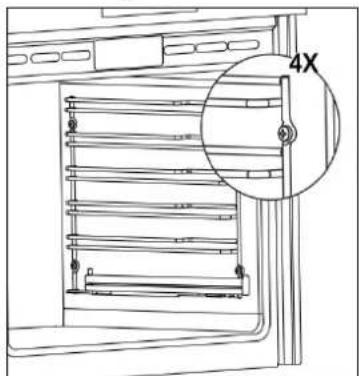
Removing Wire Shelves:
natural_image
Technical line drawing of a rack-mounted appliance with a magnified inset showing a 4X ratio (no text or symbols present)Remove the 4 screws on the side walls of the product and take the wire shelf.
Troubleshooting
| Problem | Possible Cause | Solution |
| Oven emits steam when it is in use. | It is normal that steam escapes during operation. | This is not a fault. |
| Product emits metal noises while heating and cooling. | The mains fuse is defective or has tripped. | Check fuses in the fuse box. If necessary, replace or reset them. |
| Product is not plugged into the (grounded) socket | Check the plug connection. | |
| Buttons/knobs/keys on the control panel do not function. | Keylock may be enabled. Please disable it. (See. Using the keylock, page ) | |
| Oven light does not work. | Oven lamp is defective. | Replace oven lamp. |
| Power is cut. | Check if there is power. Check the fuses in the fuse box. If necessary, replace or reset the fuses. | |
| Oven does not heat | Function and/or Temperature are not set. | Set the function and the temperature with the Function and/or Temperature knob/key. |
| In models equipped with a timer, the timer is not adjusted. | Adjust the time.(In products with microwave oven, timer controls only microwave oven.) | |
| Power is cut. | Check if there is power. Check the fuses in the fuse box. If necessary, replace or reset the fuses. | |
| (In models with timer) Clock display is blinking or clock symbol is on. | A previous power outage has occurred. | Adjust the time / Switch of the product and switch it on again. |
Error Codes
| Error Code | Description |
| E01 | ADC short circuit error |
| E02 | SR-IO short circuit error |
| E03 | PT500 error |
| E04 | Electronic board temp error |
| E05 | Touch board communication error |
| E06 | Door Lock error |
| E07 | Oven is too hot |
| E08 | Constant Oven Temperature |
Technical specifications
| GENERAL | |
| Outer dimensions (height/width/depth) | 733 mm(28" 7/8) /755 mm(29" 3/4) /620 mm (24" 7/16) |
| Voltage / frequency / Total electric power | 120/240 V~; 60Hz 2AC~N 3,9 kW120/208 V~; 60Hz 2AC~N 2,9 kW |
| Fuse protection | Min. 20 A |
| Cable type / cross section | BC-SIL 4X13 AWG |
| Cable length | max. 1780 mm |
| Inside illumination | |
| Bake | 2400 W |
| Broil | 3500 W |
| Convection Roast | 3900 W |
| * Powers are for 240 V 2AC ~ N | |
Your oven heat setting recommendations are provided based on the 240 volt power source as the product is designed with. If your product is powered with 208 volt source, duration of cooking may take longer as the same heat settings apply.
IKEA limited guarantee
How long is the IKEA guarantee valid?
This guarantee is valid for five (5) years from the original date of purchase of Your appliance at IKEA, unless the appliance is named LAGAN or TILLREDA in which case two (2) years of guarantee apply. The original sales receipt is required as proof of purchase. If service work is carried out under guarantee, this will not extend the guarantee period for the appliance.
Who will execute the service?
IKEA "Service Provider" will provide the service through its own service operations or authorized service partner network.
What does this guarantee cover?
The guarantee covers faults of the appliance which have been caused by faulty construction or material faults from the date of purchase from IKEA. This guarantee applies to domestic use only. Some exceptions not guaranteed are specified under the headline "What is not covered under this guarantee?" Within the guarantee period, the costs to remedy the fault (e.g., repairs, parts, labour and travel) will be covered, provided that the appliance is accessible for repair without special expenditure. On these conditions the local regulations are applicable. Replaced parts become the property of IKEA.
What will IKEA do to correct the problem?
IKEA appointed Service Provider will examine the product and decide, at its sole discretion, if it is covered under this guarantee. If considered covered, IKEA Service Provider or its authorized service partner through its own service operations, will then, at its sole discretion, either repair the defective product or replace it with the same or a comparable product.
What is not covered under this guarantee?
•Normal wear and tear.
- Deliberate or negligent damage, damage caused by failure to observe operating instructions, incorrect installation or by connection to the wrong voltage, damage caused by chemical or electro-chemical reaction, rust, corrosion or water damage including but not limited to damage caused by excessive lime in the water supply, damage caused by abnormal environmental conditions.
- Consumable parts including batteries and lamps.
• Non-functional and decorative parts which do not affect normal use of the appliance, including any scratches and possible colour differences.
- Accidental damage caused by foreign objects or substances and cleaning or unblocking of filters, drainage systems or soap drawers.
- Damage to the following parts: ceramic glass, accessories, crockery and cutlery baskets, feed and drainage pipes, seals, lamps and lamp covers, screens, knobs, casings and parts of casings. Unless such damages can be proved to have been caused by production faults.
- Cases where no fault could be found during a technician's visit.
• Repairs not carried out by our appointed service providers and/or an authorized service contractual partner or where non-original parts have been used.
- Repairs caused by installation which is faulty or not according to specification.
- The use of the appliance in a non-domestic environment i.e. professional use.
- Transportation damages. If a customer transports the product to his home or another address, IKEA is not liable for any damage that may occur during transport. However, if IKEA delivers the product to the customer's delivery address, then damage to the product that occurs during this delivery will be covered by IKEA.
- Cost for carrying out the initial installation of the IKEA appliance. However, if an IKEA appointed Service Provider or its authorized service partner repairs or replaces the appliance under the terms of this guarantee, the appointed Service Provider or its authorized service partner will reinstall the repaired appliance or install the replacement, if necessary.
How country law applies
The IKEA guarantee gives you specific legal rights, and you may also have other rights which vary from state to state or jurisdiction to jurisdiction. However these conditions do not limit in any way consumer rights described in the local legislation.
Area of validity
For appliances which are purchased in United States or Canada, or moved to one of the mentioned countries, the services will be provided in the framework of the guarantee conditions normal in the specified country. An obligation to carry out services in the framework of the guarantee exists only if the appliance complies and is installed in accordance with:
- the technical specifications of the country in which the guarantee claim is made; - the Assembly Instructions and User Manual Safety Information.
The dedicated AFTER SALES for IKEA appliances
Please don't hesitate to contact IKEA appointed After Sales Service Provider to:
• make a service request under this guarantee;
- ask for clarifications on installation of the IKEA appliance in the dedicated IKEA kitchen furniture;
- ask for clarification on functions of IKEA appliances.
You can find phone numbers of the IKEA appointed After Sales Service Providers at the end of this manual.
To ensure that we provide you with the best assistance, please read carefully the Assembly Instructions and/or the User Manual before contacting us.
How to reach us if you need our service In order to provide you a quicker service, we recommend to use the specific phone numbers listed on this manual. Always refer to the numbers listed in the booklet of the specific appliance you need an assistance for.
Please also always refer to the IKEA article number (8 digit code) placed on the rating plate of your appliance.
SAVE THE SALES RECEIPT!
It is your proof of purchase and required for the guarantee to apply. The sales receipt also reports the IKEA name and article number (8 digit code) for each of the appliances you have purchased.
Do you need extra help?
For any additional questions not related to After Sales of your appliances, please contact our nearest IKEA store call centre. We recommend you read the appliance documentation carefully before contacting us.

Website IKEA.us/appliancesupport
Sitio web :
CANADA- CANADA- CANADÁ
Phone number
Website IKEA.ca/appliancesupport
Website fr.IKEA.ca/soutienelectromenagers
Sitio web :
PUERTO RICO - PUERTO RICO - PUERTO RICO
natural_image
Line drawing of a rectangular tray with internal grid lines (no text or symbols)natural_image
Line drawing of a wire mesh tray or rack structure (no text or symbols)natural_image
Technical line drawing of a multi-tiered electrical cabinet or rack system with no visible text or symbolsnatural_image
Technical line drawing of a door frame with horizontal shelves and metal railings (no text or symbols)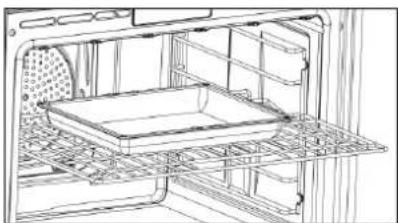
natural_image
Line drawing of an oven interior showing tray, shelves, and grilles (no text or symbols)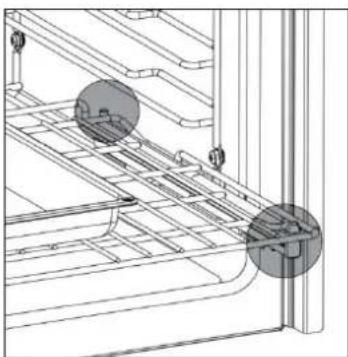
natural_image
Technical line drawing of a mechanical assembly with no visible text or symbolsnatural_image
Medical catheter with attached tubing and connector (no text or symbols visible)natural_image
Line drawing of an open oven with internal rack and ventilation slots (no text or symbols)natural_image
Line drawing of a person lying inside an oven with a coiled tube attached (no text or symbols)natural_image
Line drawing of an open oven with a black X mark indicating the quantity inside (no text or symbols)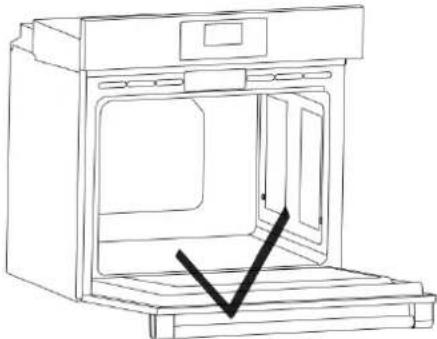
natural_image
Line drawing of an open oven with a black checkmark indicating a location (no text or symbols present)
natural_image
Line drawing of a washing machine with a close-up inset showing the door and seat (no text or symbols)natural_image
Diagram of a rotary knob with three curved arrows indicating clockwise rotation (no text or symbols)natural_image
Pure architectural line drawing of a window with vertical supports and a central rectangular opening (no text or symbols)natural_image
Diagram showing a computer monitor with an open panel and a close-up of the screen being inserted (no text or symbols visible)natural_image
Technical line drawing of a refrigerator with a 4X zoom detail (no text or symbols)Website IKEA.us/appliancesupport
Sitio web :
CANADA- CANADA- CANADÁ
Phone number
Website IKEA.ca/appliancesupport
Website fr.IKEA.ca/soutienelectromenagers
Sitio web :