ET500 - Measuring equipment Klein Tools - Free user manual and instructions
Find the device manual for free ET500 Klein Tools in PDF.


User questions about ET500 Klein Tools
0 question about this device. Answer the ones you know or ask your own.
Ask a new question about this device
Download the instructions for your Measuring equipment in PDF format for free! Find your manual ET500 - Klein Tools and take your electronic device back in hand. On this page are published all the documents necessary for the use of your device. ET500 by Klein Tools.
USER MANUAL ET500 Klein Tools
natural_image
Close-up of a black cylindrical object with textured ends and a dotted line, no visible text or symbols.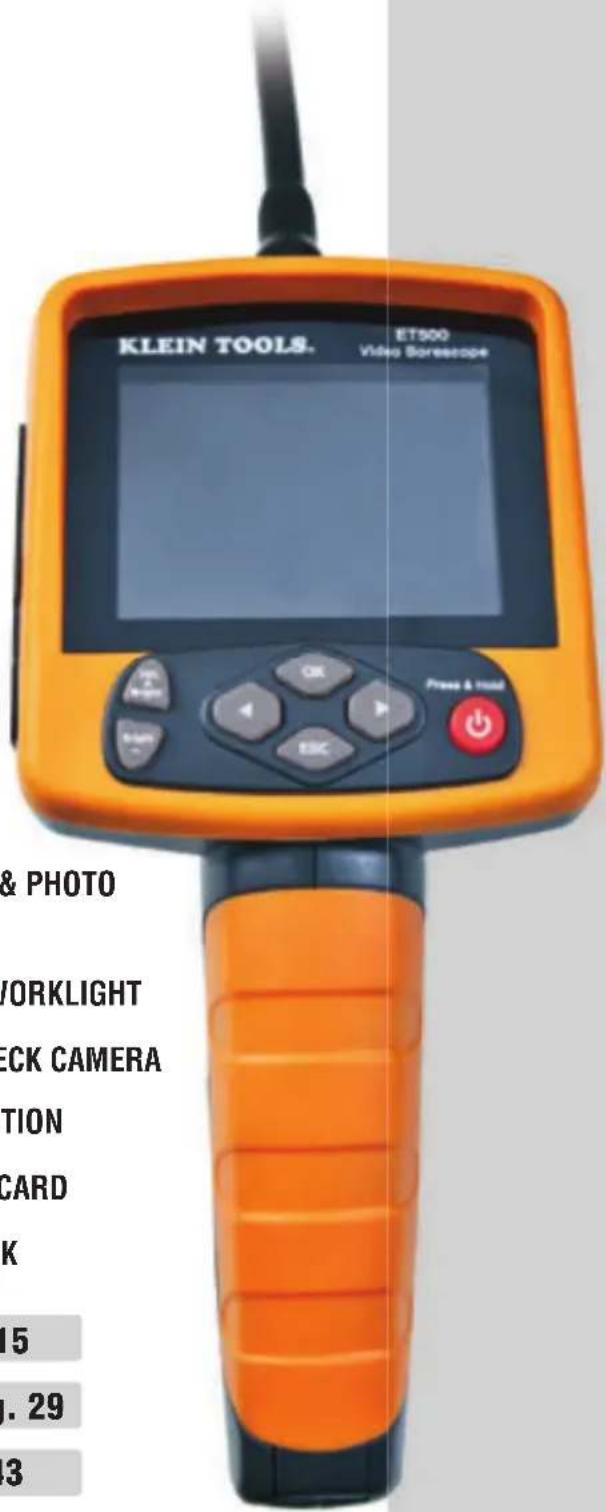
text_image
KLEIN TOOLS. ET500 Video Scorscope & PHOTO WORKLIGHT ECK CAMERA TION CARD K 15 . 29 3For Professionals... Since 1857® USA
www.kleintools.com
Instruction Manual
ENGLISH

natural_image
Close-up of a black cylindrical object with textured ends and a metallic shaft (no visible text or symbols)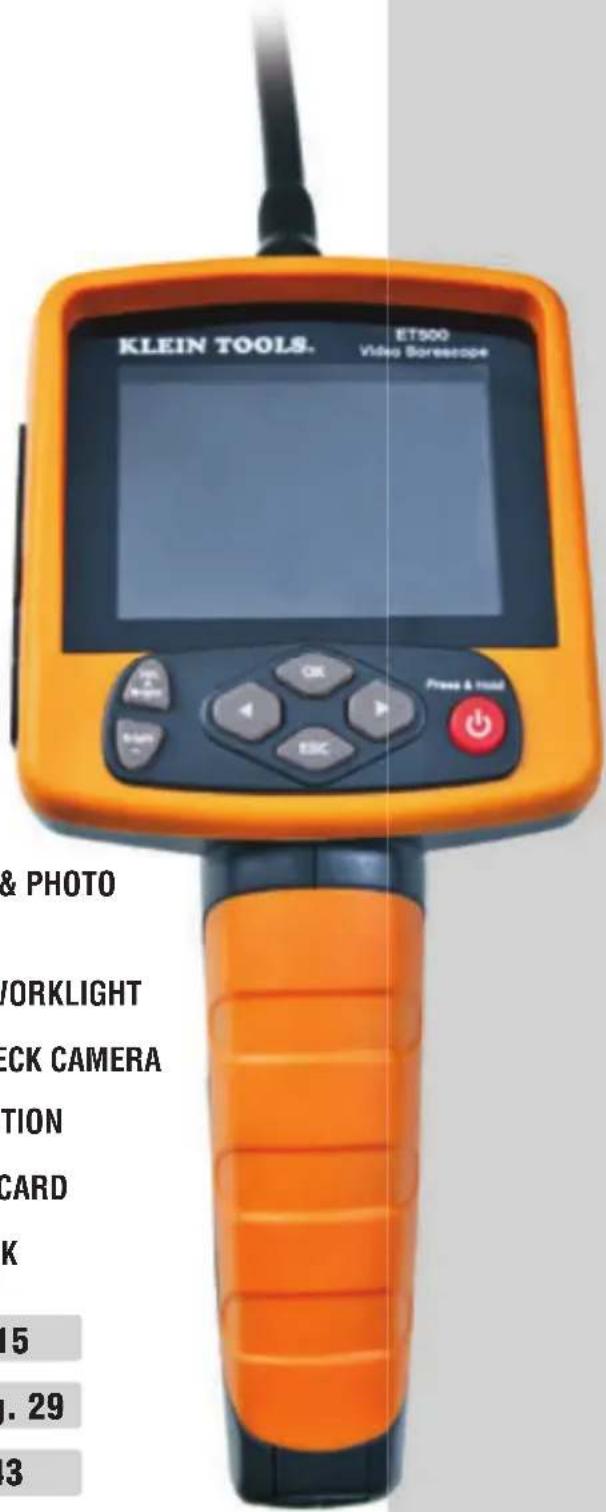
text_image
KLEIN TOOLS. ET500 Video Scorscope & PHOTO WORKLIGHT ECK CAMERA TION CARD K 15 . 29 3For Professionals... Since 1857® USA
www.kleintools.com
Video Borescope Instruction Manual
GENERAL SPECIFICATIONS
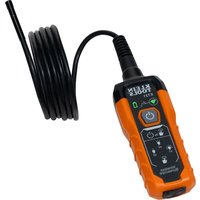
The Klein Tools ET500 Video Borescope is an extendable video camera used to view inaccessible areas. It features video, audio, and photo recording, file playback, a durable camera snake with an adjustable intensity LED worklight, and video output capabilities.
• Dimensions: 9.5" x 4" x 6.3" (24.0 x 10.0 x 16.0 cm)
• Weight: 22.5 oz. (638 grams) with battery and camera snake
- Operating Temperature: 0°C to 55°C / 32°F to 131°F
• Charging Temperature: 0°C to 50°C / 32°F to 122°F
• Storage Temperature: -20^ to 60^ / -4^ to 140^
• Storage Humidity: 15% to 85%
• Sensor Resolution: 640 x 480px
• Screen Resolution: 320 x 240px
• Video Capture Format: 3GP
• Video Playback Formats: MPEG4, 3GP, AVI, ASF
• Video Frames Per Second (FPS): 30 FPS max
• Color Depth: 24 bits
• TV Out Format: NTSC or PAL
• Photo Capture Format: JPG (640 x 480px)
• Photo Playback Format: JPG
• Fixed Focus Distance: 1.97"\~5.90" (5\~15cm)
- Internal Memory: \~65MB
• SD Card Memory: 32GB max SD or SDHC
• Camera Diameter: 0.67" (17mm)
- Gooseneck Length: 3.28' (1m)
• Battery Specification: "18650" Lithium Ion 3.7V 2000mAh
- Battery Life (Typical): 8 hours without worklight.
WARNINGS
To ensure safe operation and service of the Video Borescope, follow these instructions. Failure to observe these warnings can result in severe injury or death.
- The Borescope and gooseneck camera are NOT insulated. Avoid probing areas where energized conductive elements may be present. Shut off power to the nearby work areas before starting work.
- Avoid probing areas where chemicals may be present.
- Do not probe moving machinery that could catch the Borescope and cause harm to the operator and the Borescope.
• The Borescope is not intended for use on people or animals. - Do not use the Borescope body in wet conditions.
- Do not use the Borescope near sources of heat.
- Keep steady footing at all times, following ladder safety procedures when necessary.
- Do not use if the Borescope casing is cracked or broken in any way.
 | WARNING SYMBOLS: |
 | Always wear approved eye protection. |
| [XZW6] | Do NOT use on energized circuits. |
 | Do NOT probe moving machinery. |
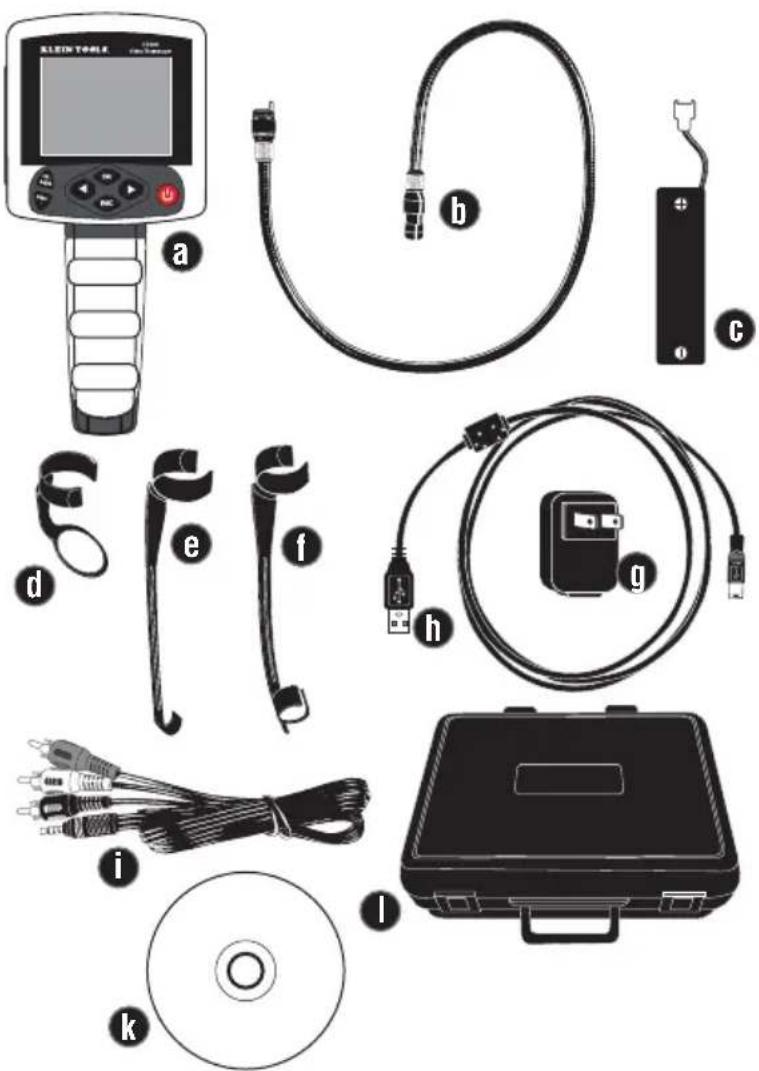
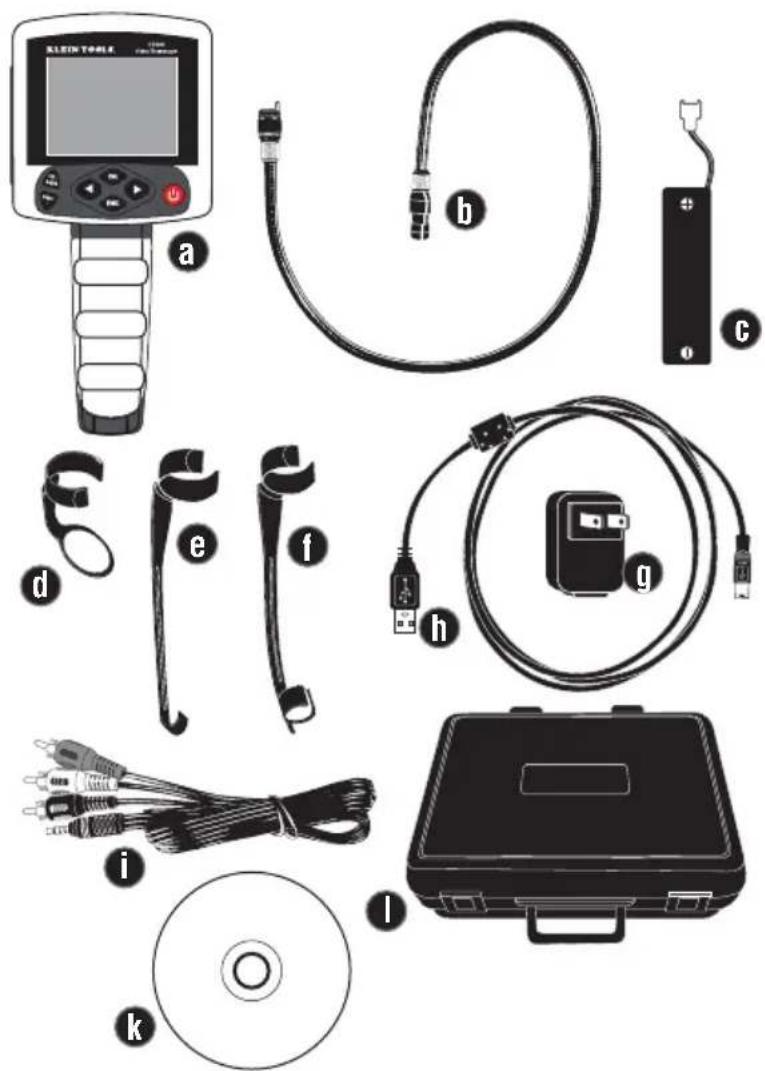
PACKAGE CONTENTS
a. Main Unit
b. Gooseneck Camera 17mm
c. 18650 Series 3.7V 2000mAh Rechargeable Li-Ion Battery
d. Mirror Camera Attachment
e. Hook Camera Attachment
f. Magnet Camera Attachment
g. USB Power Adapter/Charger
h. USB Data/Charger Cable
i. RCA Composite A/V to 3.5mm Mini A/V Cable
j. Quick Start Guide
k. Software/Instruction Manual CD-ROM
I. Carrying Case
text_image
KLEIN TOOL a b c d e f g h i k lFEATURE LAYOUT
text_image
KLEIN TOOLS. ET500 Video Borescope 1 2 3 4 5 OK OK Bright Bright ESC 6 7 8 9 10 11 12 13 14 15 16 18 19FEATURE LAYOUT
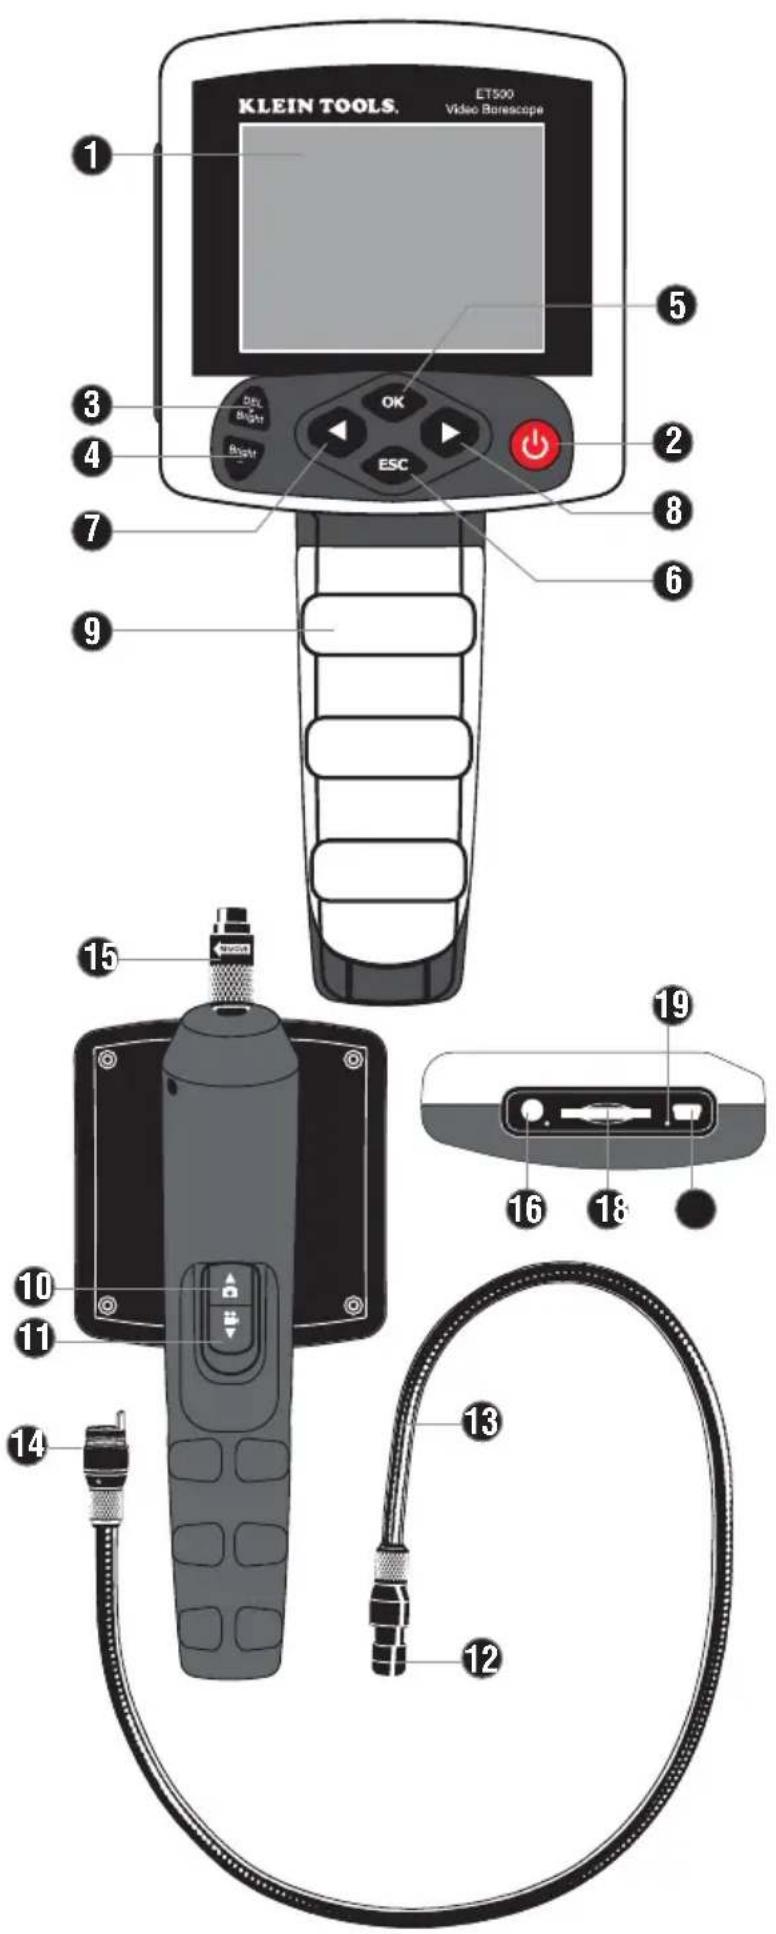
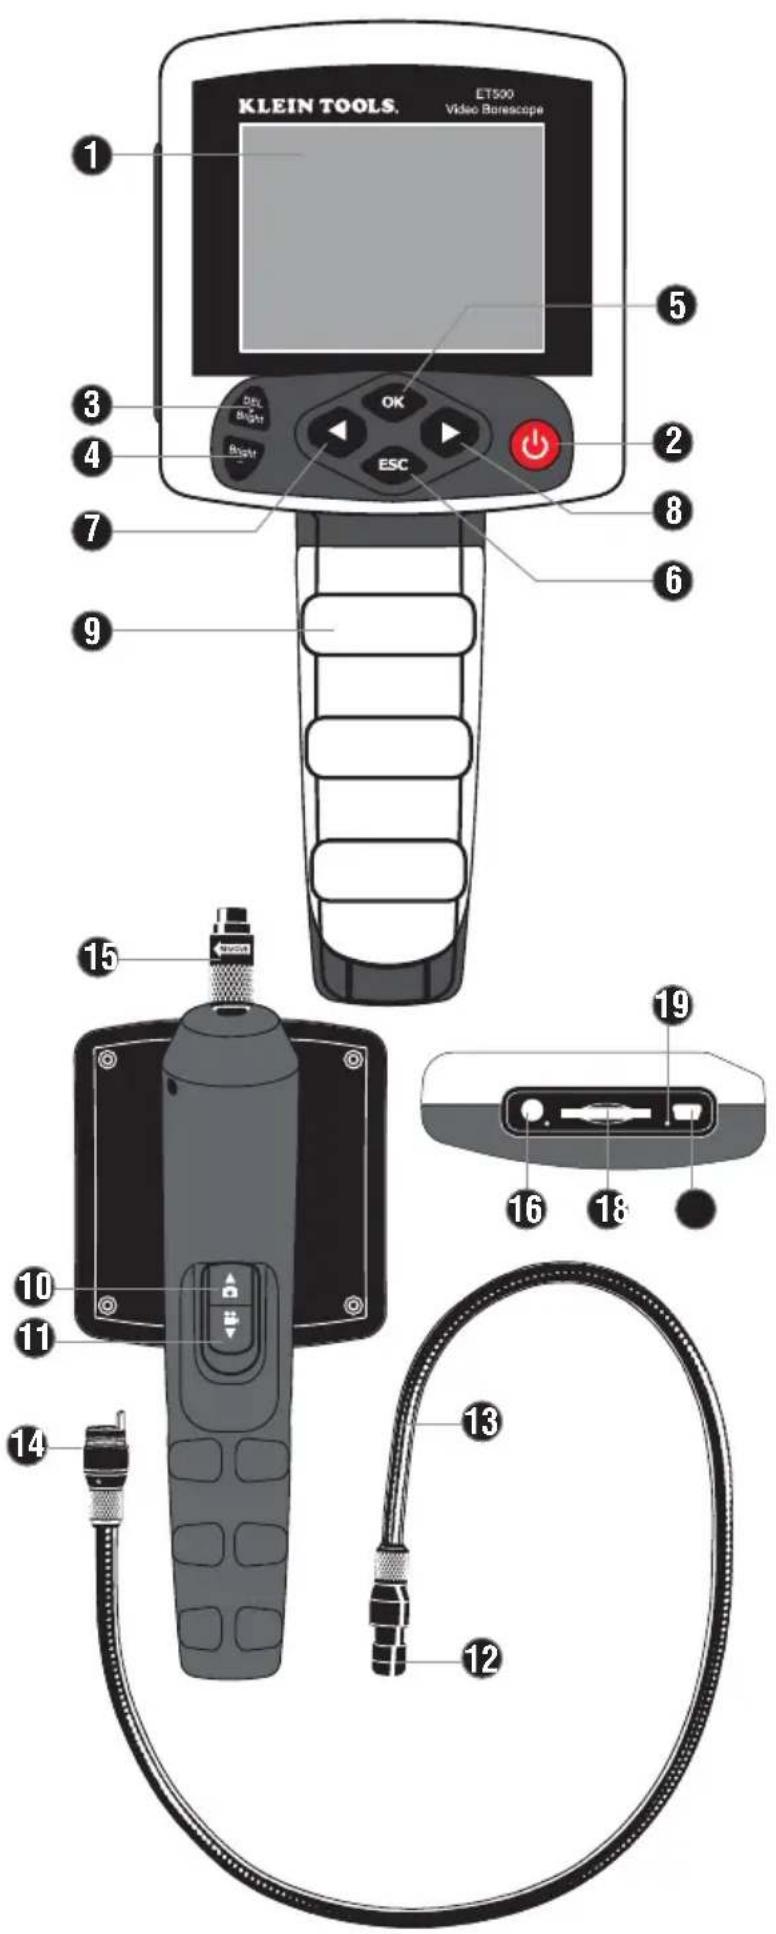
- LCD Screen: 3.2" TFT LCD screen.
- Power Button: Press and hold for 3 seconds to turn the instrument on and off.
- Bright Plus Button: Increases the brightness of the camera-mounted LEDs up to 10. Deletes photos or videos in the file explorer mode.
- Bright Minus Button: Decreases the brightness of the camera-mounted LEDs down to 0 (off).
- OK Button: Accepts the current selection on screen. Enters menus. Play and pause in video playback mode.
- ESC Button: Returns to live video mode from top level menu. Returns to submenu from file explorer mode.
- Left Button: Flips screen 180 degrees in live video mode. Moves left or up one selection. Moves to the previous video or photo in the list while viewing a file.
- Right Button: Flips screen 180 degrees in live video mode. Moves right or down one selection. Moves to the next video or photo in the list while viewing a file.
- Battery Cover: Pulls back to reveal the battery container.
- Photo Capture Trigger: Press momentarily to capture a photo in live preview mode. Increases value in video settings mode and time mode. Toggles between internal flash memory and SD card in memory mode.
- Video Capture Trigger: Press and hold for 1 second to begin or end video capturing in live preview mode. Decreases value in video settings mode and time mode. Toggles between internal flash memory and SD card in memory mode.
- Camera Head: Contains the CMOS sensor and LEDs. The arrow on top indicates the camera is right-side up.
- Gooseneck: Rated to IP67 to withstand all ingress of dust and submersion in water up to 1 meter. Caution: bending the gooseneck to 90 degrees or greater can permanently damage it.
- Camera Output: Attaches to borescope body when the notch is oriented correctly.
- Camera Input Socket: Screw into place once the camera output plug is inserted.
- TV & Headphone Out: Insert a standard 1/8" headphone jack or the included component video adapter.
- SD Card Slot: Insert an SD or SDHC card with 32GB capacity or less to store more video or photos.
- USB & Charging Port: Attach the borescope to a computer via USB to charge and transfer files. Attach to included 5V adapter to charge via a standard outlet.
- Reset Button: Perform a hard reset of the borescope.
SETUP
CHARGING
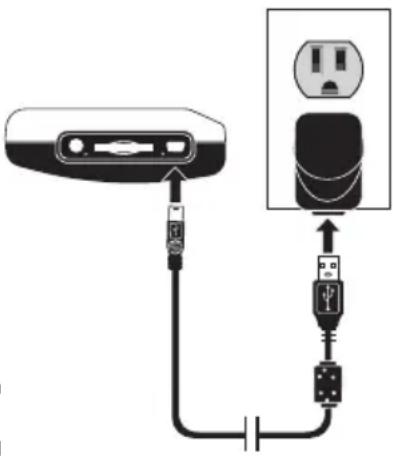
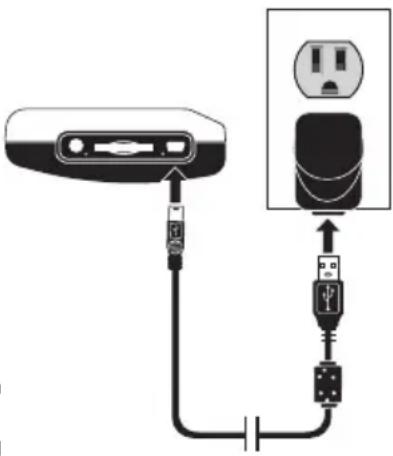
The rechargeable lithium-ion battery should be charged before operating the borescope for the first time. The battery can be charged via a standard 120V wall outlet or through a computer USB port. An exhausted battery will take up to 5 hours to charge. It can be left charging overnight without needing to be removed from power. The expected lifetime of the included battery is 500 charging cycles.
WALL OUTLET: Locate the power wall adapter (g) and the USB cable (h). Remove the soft input cover and plug the cable into the borescope's USB port (18). Plug the other end of the cable into the power adapter, and plug the wall adapter into a standard 120V outlet.
COMPUTER: Locate the USB cable (h). Remove the soft input cover and plug the cable into the borescope's USB port (18). Plug the rectangular end into your computer's USB port. The LCD will briefly show a USB illustration then go dark.
natural_image
Diagram showing connection between a device and a socket with connected pins (no text or symbols)ATTACHING THE GOOSENECK CAMERA
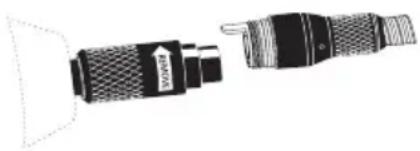
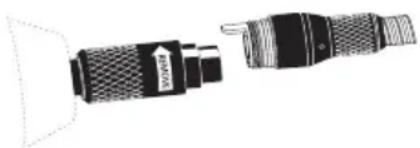
Locate the gooseneck camera (13). Plug it into the camera input socket of the borescope. Rotate the adjustment piece clockwise to lock it into place. The white arrow on the camera head should be pointing up.
natural_image
Illustration of a handheld device with a label pointing to its left side (no text or symbols on the device itself)POWERING ON/OFF
To power the unit on and off, press and hold the Power Button until the splash screen appears then release it. This usually takes about 3 seconds.
INSTALLING AN SD CARD
The borescope contains a small amount of internal memory to store videos and photos. To add additional storage, remove the soft input cover and insert a standard SD/SDHC card face up into the slot until you hear a click. To remove the SD card, use your fingernail to push it into the slot. You will hear another click and the card will pop out. See Memory menu section for more information.
LIVE VIDEO MODE
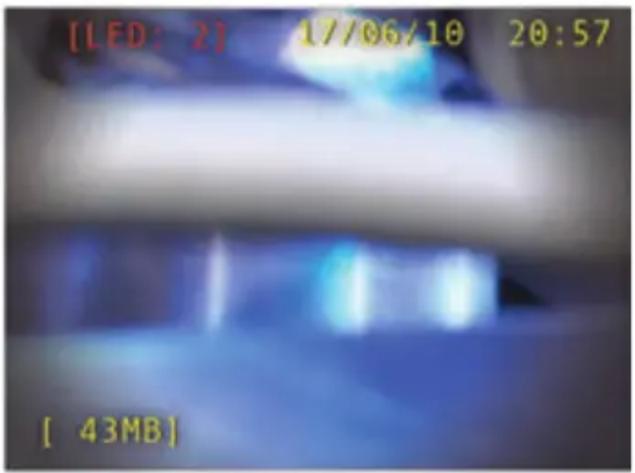
On startup, the borescope will enter the live output mode. The screen will show the live output of the gooseneck camera along with the LED brightness, date and time, and amount of video/photo storage remaining.
text_image
[LED: 2] 17/06/10 20:57 [ 43MB ]LED BRIGHTNESS
The borescope gooseneck camera head has several LEDs used to light your work area. You can control the brightness using the "Bright+" and "Bright-" buttons. The LED brightness ranges from off (LED:0) to full (LED:10). This setting will be saved between uses.
DATE AND TIME
The date and time are shown in the upper right hand corner of the screen in the format "Day/Month/Year Hour:Minute". The time is in 24 hour format. See the TimeSet menu section.
STORAGE
The amount of storage in megabytes available in your current workspace is shown on the bottom left. See Memory menu section.
TAKING A PHOTO
To take a photo, press and release the top trigger. The screen will momentarily freeze to indicate a photo was taken. The date and time will be recorded onto the image if the option is selected in the TimeSet menu.
RECORDING A VIDEO
To record a video, press and hold the bottom trigger for one second. The video camera icon will begin to flash on the top left side of the screen to indicate a video is being recorded. Press and hold the bottom trigger for one second again to stop recording. All buttons will be disabled while recording except for the power button which will still power off the unit and stop the recording. DO NOT remove the SD card during recording.
ROTATING THE CAMERA OUTPUT
Press the left or right button to rotate the camera output 180°.
MENU MODE (SYSTEM SETUP)
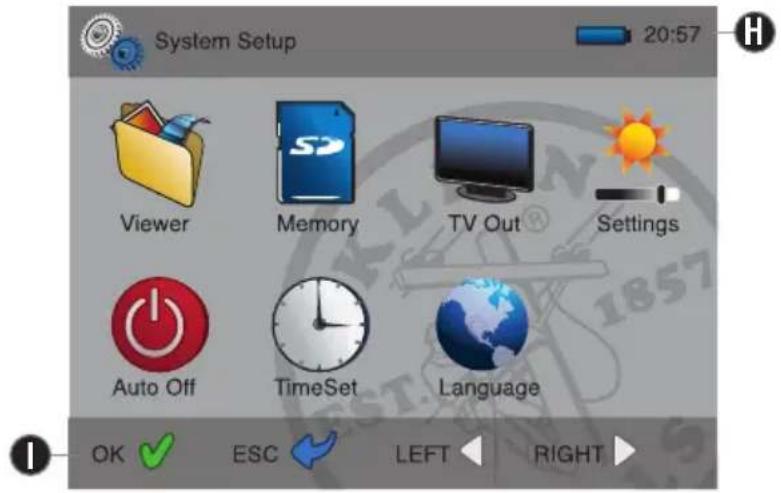
In Menu Mode you can configure system settings, browse media, or work with storage.
ENTERING/EXITING MENU MODE
From Live Video Mode, press and release the OK button to enter Menu Mode. To exit the Menu Mode, press the ESC button at the top level menu.
TOP LEVEL MENU
text_image
System Setup 20:57 Viewer Memory TV Out Settings Auto Off TimeSet Language OK ✓ ESC ← LEFT ← RIGHT ►A. Viewer: Browse photos or playback videos.
B. Memory: View storage usage, switch workspaces, format an SD card.
C. TV Out: Select the output device.
D. Settings: Adjust brightness, contrast, and other video settings.
E. Auto Off: Set the auto power off duration.
F. TimeSet: Set the system date/time and enable photo labeling.
G. Language: Set the language to English, Spanish, or French.
H. Status Icons: SD card status, battery life status, and current time.
I. Button Action Hints: Brief description of current button operation.
A. VIEWER
| Viewer Top Menu | |
| Left/Right Highlight Video Player or Picture View. | |
| OK Select an option. | |
| ESC Go back to top level menu. | |
| Video Player Menu | |
| Left/Right Highlight/preview a video. | |
| OK Start playing the highlighted video. | |
| ESC Go back to Viewer Top Menu. | |
| DEL Delete the highlighted video. | |
| Video Player Full Screen | |
| Left/Right Start the previous or next video in the menu. | |
| OK Toggle between play and pause. | |
| ESC Go back to Video Player Menu. | |
| Picture View Menu | |
| Left/Right Highlight/preview a photo. | |
| OK View the highlighted photo full screen. | |
| ESC Go back to Viewer Top Menu. | |
| DEL Delete the highlighted photo. | |
| Picture View Full Screen | |
| Left/Right Show the previous or next photo in the menu. | |
| ESC Go back to Video Player Menu. | |
B. MEMORY
The memory menu shows the formatted capacity of the storage as well as the unused and used portions in megabytes (MB).
| Memory Menu | |
| Left/Right Highlight Work space or Format action. | |
| Trigger Toggle between internal and SD memory. | |
| OK Select an action. | |
| ESC Go back to top level menu. | |
Workspace: The workspace can be either the internal memory ("flash") or the removable SD storage card ("SD"). Photos and videos will be recorded onto the selected storage space. The viewer will only show videos and photos from the selected work space.
Format: The format action clears the selected memory and sets it up to be written to. New SD cards should be formatted before use. Important: Formatting will erase all data on the SD card or internal flash memory!
C. TV OUT
The borescope shows both the live camera output and viewer playback on the LCD screen by default. It can also output to a television via the composite output port and included adapter cable. Select NTSC for a North American style television or PAL for a European style television.
The included adapter cable has a yellow RCA connector for video, white for left channel audio, and red for right channel audio.
If a TV Out mode is selected by accident, cycle the power button for 3 seconds to restart the unit using the LCD screen.
| TV Out Menu | |
| Left/Right Highlight output device. | |
| OK Select an output device. | |
| ESC Go back to top level menu. | |
D. SETTINGS
Control the look of the videos and photos by adjusting these settings.
| Video Settings Menu | |
 | Left/Right Highlight video setting. |
 | Top Trigger Increase a setting's value. |
 | Bottom Trigger Decrease a setting's value. |
| Save? | OK Save all video settings, return to menu. |
| Drawout | ESC Go back to top level menu without saving. |
Default: Reset the video settings to their default values.
E. AUTO OFF
The borescope can turn itself off after a period of non-use. Select 3, 15, or 60 minutes. Select "Never" to disable auto power off.
| Auto Power Off Time Menu | |
| Left/Right Highlight an auto power off time. | |
| OK Select and save the highlighted auto power off time. | |
| ESC Go back to top level menu. | |
F. TIMESET
Set the time used by the system in this menu. The system time can be used to permanently label photos.
| Time Set Menu | |
 | Left/Right Highlight a date or time setting. |
 | Trigger Change the selected date or time setting. |
| [2A8S] | OK Save the time setting, return to menu. |
 | ESC Discard changes, go back to top level menu. |
Date: In the format of day, month, year.
Time: In 24-hour format of hour, minute.
Date Label: When this is set to "On", the date and time will be permanently stamped into photos.
G. LANGUAGE
Set the language used in the system menu and on-screen labels.
| Time Set Menu | |
| Left/Right Highlight a language setting. | |
| OK Select the highlighted language setting. | |
| ESC Go back to top level menu. | |
COMPUTER SETUP
The borescope can be used in conjunction with a personal computer to extend its functionality.
Copying Media
There are two ways to copy photos and videos from the borescope to a computer. If you are using an SD card and your computer has an SD card adapter, you can remove the SD card from the borescope and insert it into the computer.
If your computer does not have an SD card adapter or you are using the internal flash memory of the borescope, you will have to connect the borescope directly to the computer using the included USB cable.
The borescope will briefly show an illustration of a USB cable on the screen while it is connecting to the computer. Once it is connected, the screen will go blank, the battery will begin to charge, and the computer will begin initializing the connection.
Windows 2000, XP, Vista, 7
A balloon will pop up in the taskbar at the bottom right stating that drivers are installing. After a short period of time, the balloon will state that the device is ready to use.
- Open Windows Explorer
- Click on the "My Computer" icon on your desktop or...
- Click Start and select "My Computer"
-
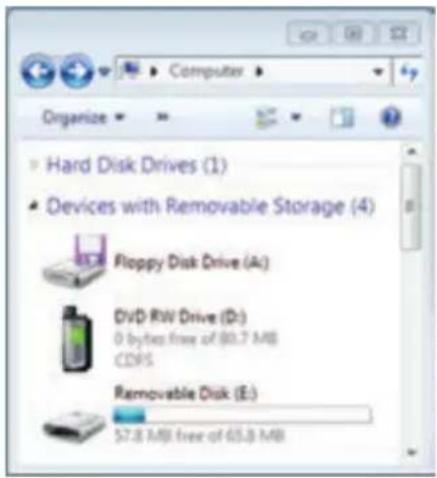
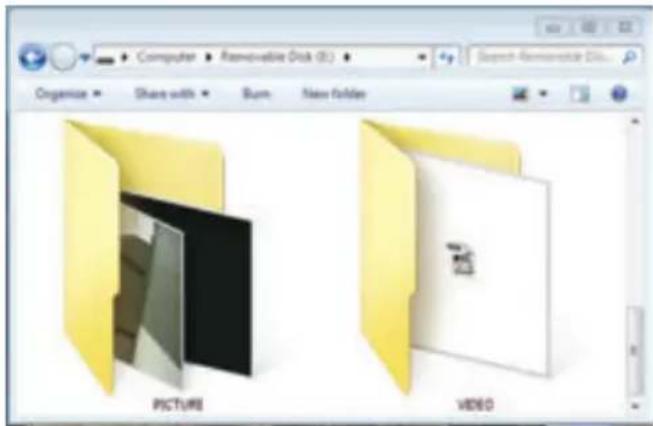
The window will show a new "Removable Disk" entry for the internal flash memory and the SD card if it is installed.
-
Double-click the icon of the disk you would like to view.
text_image
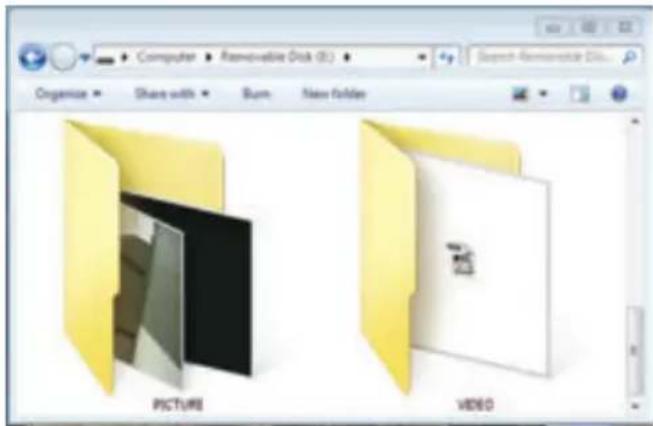
Computer Organize Hard Disk Drives (1) Devices with Removable Storage (4) Floppy Disk Drive (A) DVD RW Drive (D) 0 bytes free of 80.7 MB CDPS Removable Disk (E) 57.8 MB free of 65.8 MB- The borescope creates a "PICTURE" and a "VIDEO" folder to store media. From here, you can access the photos or videos directly from the removable disk, or you can copy them to your hard drive by right clicking a folder or file and selecting "Copy". Browse to the destination folder, right click on it and select "Paste".
text_image
Computer Removable Disk (R) Organize Share with Burn New folders PICTURE VIDEO- When you are fi nished copying or viewing your media, right click on the removable disk icon and select "Eject".
Mac OSX 10.4+
- Open a new Finder window by selecting the Finder icon in the dock.

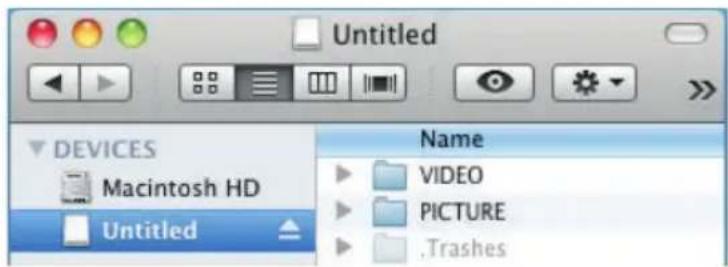
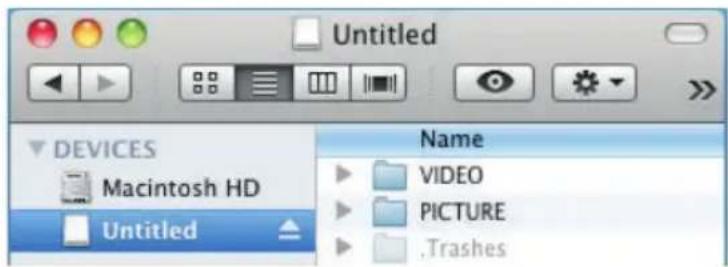
- On the left side under "DEVICES" you will see a white disk icon with "Untitled" or the name of your SD card next it. Select the disk you would like to view.
text_image
Untitled DEVICES Macintosh HD Untitled Name VIDEO PICTURE .Trashes-
Inside the disk, you will see a "PICTURE" and a "VIDEO" folder. Open these to reveal your photos and videos. You can view your media directly from the removable disk, or copy them to your hard drive by control-clicking the folder or file and selecting "Copy". Navigate to the destination folder, right click on it and select "Paste".
-
When you are fi nished copying or viewing your media, click on the eject icon next to the disk name in the "DEVICES" list.
BATTERY REPLACEMENT
- Pull back orange handle cover from the indented sides near the top.
- Disconnect battery cable and recycle exhausted battery.
- Acquire a "18650" Lithium Ion 3.7V 2000mAh battery.
- Connect battery cable to new battery observing polarity and place into battery compartment.
- Push forward battery door.
WARRANTY
Turn instrument off and disconnect the gooseneck camera and any cables. Clean the instrument by using a damp cloth. Do not use abrasive cleaners or solvents.
STORAGE
Remove the battery when instrument is not in use for a prolonged period of time. Do not expose to high temperatures or humidity. After a period of storage in extreme conditions exceeding the limits mentioned in the Specifications section, allow the instrument to return to normal operating conditions before using it.
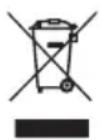
DISPOSAL / RECYCLE
Do not place equipment and its accessories in the trash. Items must be properly disposed of in accordance with local regulations.
CUSTOMER SERVICE
KLEIN TOOLS, INC. 450 Bond Street Lincolnshire, IL 60069
1-800-553-4676 • www.kleintools.com
natural_image
Close-up of a black handheld device with threaded tip and textured body (no visible text or symbols)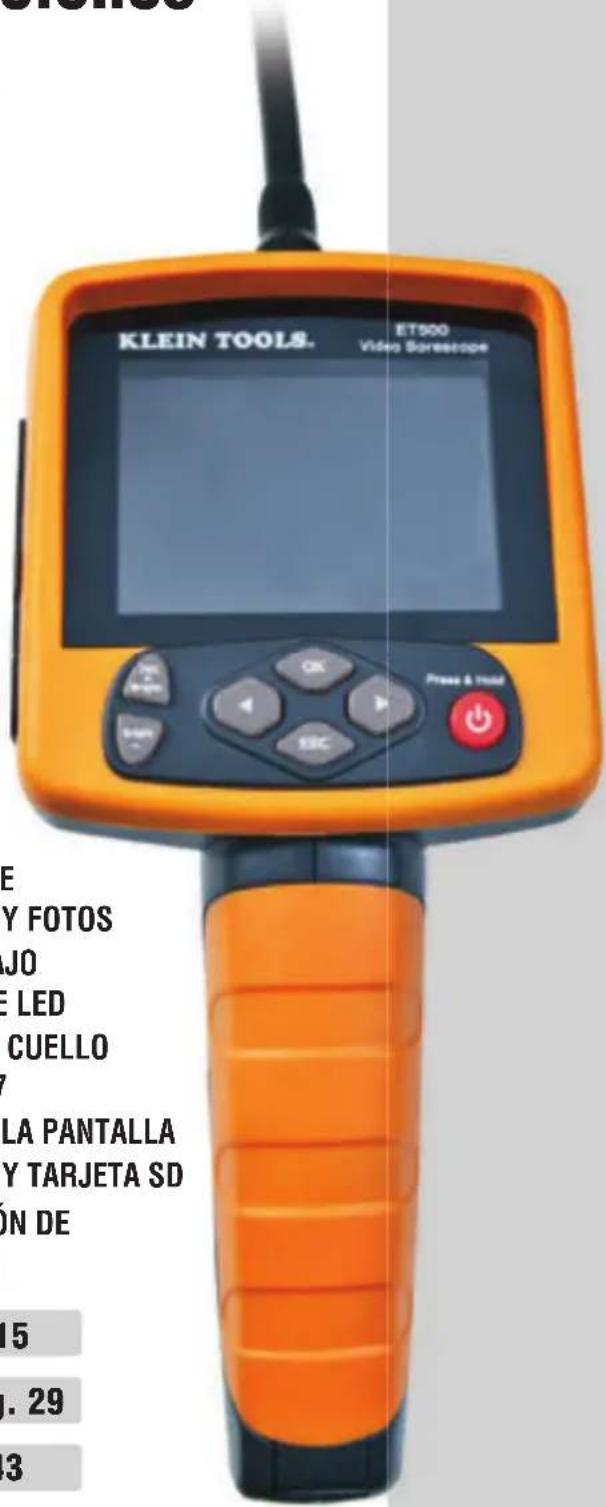
text_image
KLEIN TOOLS. ET500 Video Scroscope Press & Hold E Y FOTOS JO E LED CUELLO / LA PANTALLA Y TARJETA SD ON DE 15 . 29 3For Professionals... Since 1857® USA
www.kleintools.com
text_image
Diagram showing connection between a device and a socket with labeled pins and plug connectionsnatural_image
Diagram of two types of optical lenses with a label indicating 'HANOS' (no text or symbols on the lenses themselves)ENCENDIDO/APAGADO
text_image
[LED: 2] 17/06/10 20:57 [ 43MB ]BRILLO DEL LED
text_image
Computer Organize Hard Disk Drives (1) Devices with Removable Storage (4) Floppy Disk Drive (A) DVD RW Drive (D): 0 bytes free of 80.7 MB CDFS Removable Disk (E): 57.8 MB free of 65.8 MBtext_image
Computer > Removable Disk (E) Organize Share with Burn New Folder PICTURE VIDEOnatural_image
Close-up of a black cylindrical object with textured ends and a visible internal structure (no text or symbols)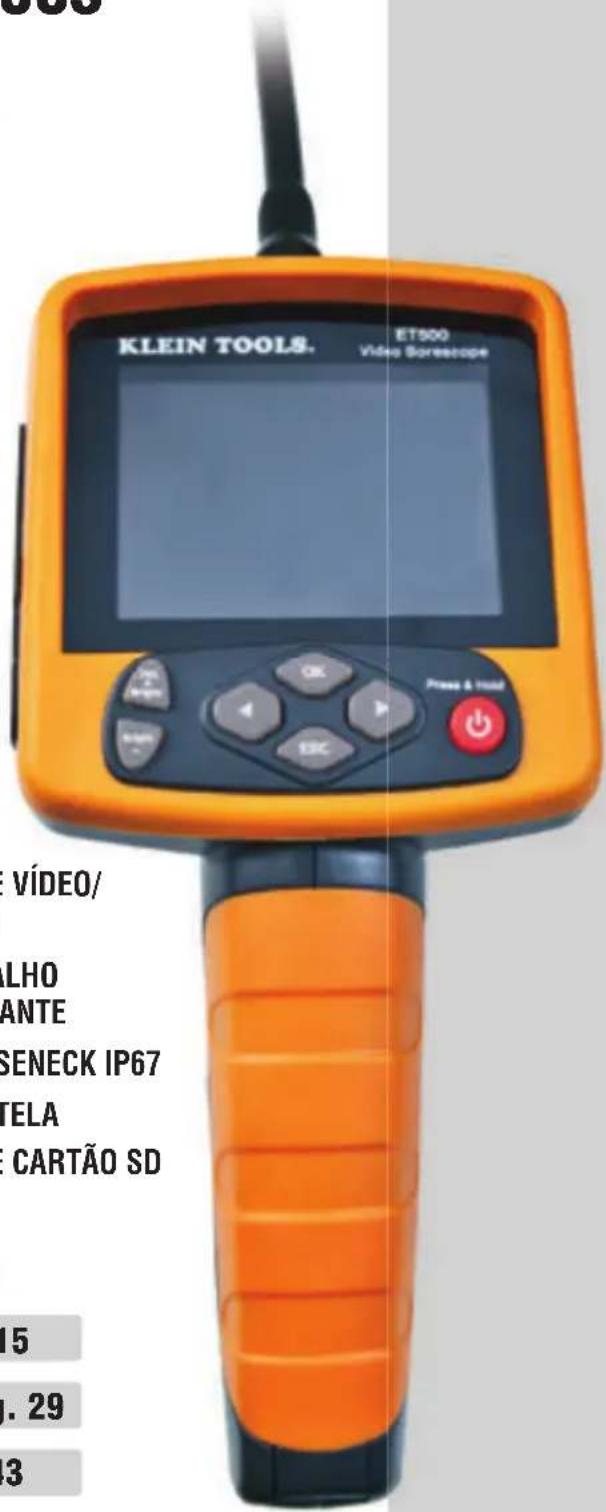
text_image
KLEIN TOOLS. ET500 VIDEO SORoscope VÍDEO/ LHO ANTE SENECK IP67 TELA CARTÃO SD 15 . 29 3For Professionals... Since 1857® USA
www.kleintools.com
natural_image
Diagram showing connections between a device and a socket, with no visible text or symbolsCONEXÃO DA CÂMERA GOOSENECK
natural_image
Diagram of a flashlight with a labeled component (no text or symbols present)COMO LIGAR/DESLIGAR
text_image
[LED: 2] 17/06/10 20:57 [ 43MB ]BRILHO DO LED
text_image
Computer Organize Hard Disk Drives (1) Devices with Removable Storage (4) Floppy Disk Drive (A) DVD RW Drive (D): 0 bytes free of 60.7 MB CDPS Removable Disk (E): 57.8 MB free of 65.8 MBtext_image
Computer - Removable Disk (E) Organize Share with Burn New Folder PICTURE VIDEOnatural_image
Close-up of a black cylindrical connector with threaded tip and textured body (no visible text or symbols)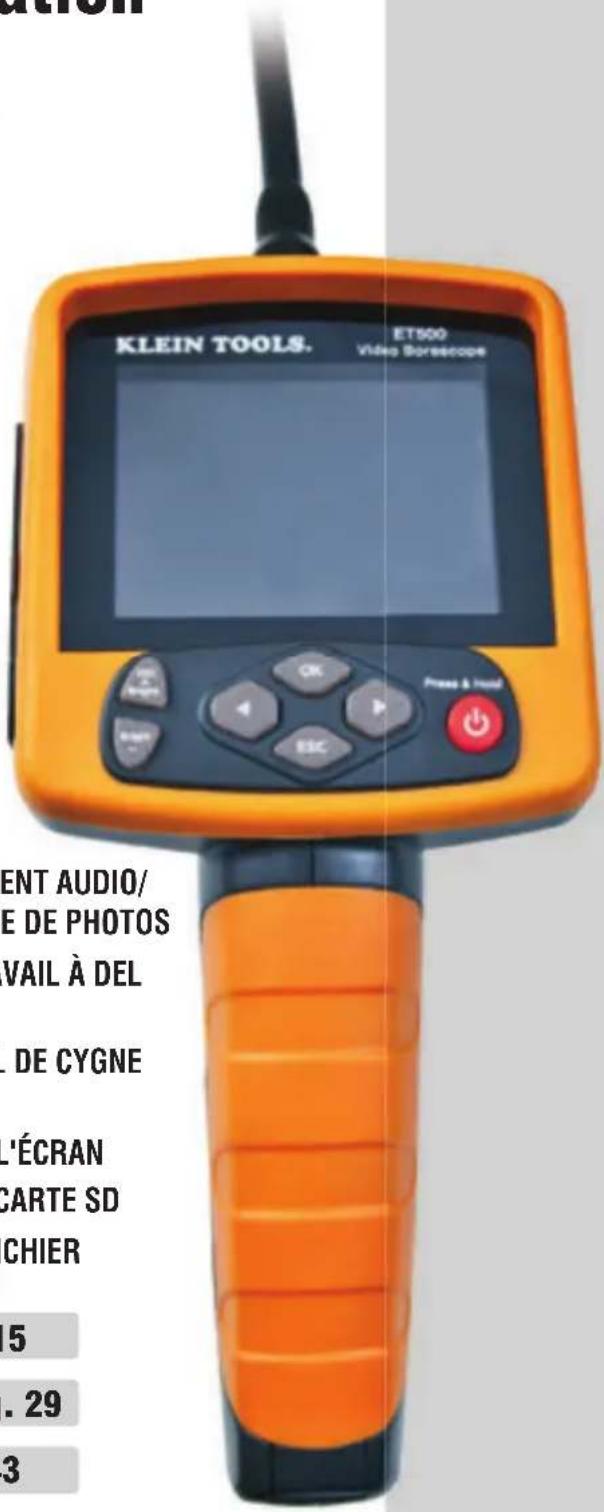
text_image
KLEIN TOOLS. ET500 Video Scorscope ENT AUDIO/ E DE PHOTOS VAIL À DEL . DE CYGNE L'ÉCRAN CARTE SD CHIER 5 . 29 3• ENREGISTREMENT AUDIO/VIDÉO ET PRISE DE PHOTOS
• LAMPE DE TRAVAIL À DEL LUMINEUSE
• CAMÉRA À COL DE CYGNE IP67
- ROTATION DE L'ÉCRAN
- SORTIE TV ET CARTE SD
• LECTURE DE FICHIER
Español pg. 15
Português pg. 29
Français p. 43
KLEIN TOOLS®

For Professionals... Since 1857® USA
www.kleintools.com
natural_image
Diagram showing connection between a device and a socket with connected pins (no text or symbols)BRANCHEMENT DE LA CAMÉRA À COL DE CYGNE
natural_image
Diagram of a flashlight with a labeled component (no text or symbols present)METTRE SOUS/HORS TENSION
text_image
[LED: 2] 17/06/10 20:57 [ 43MB ]LUMINOSITÉ DE DEL
text_image
Computer Organize Hard Disk Drives (1) Devices with Removable Storage (4) Floppy Disk Drive (AL) DVD RW Drive (D:) 0 bytes free of 80.7 MB CDFS Removable Disk (E:) $7.8 MB free of 65.8 MBtext_image
Computers Removable Disk (E) Organize Share with Burn New Folder PICTURE VIDEOVideo Borescope Instruction Manual
GENERAL SPECIFICATIONS
The Klein Tools ET500 Video Borescope is an extendable video camera used to view inaccessible areas. It features video, audio, and photo recording, file playback, a durable camera snake with an adjustable intensity LED worklight, and video output capabilities.
• Dimensions: 9.5" x 4" x 6.3" (24.0 x 10.0 x 16.0 cm)
• Weight: 22.5 oz. (638 grams) with battery and camera snake
- Operating Temperature: 0°C to 55°C / 32°F to 131°F
• Charging Temperature: 0°C to 50°C / 32°F to 122°F
• Storage Temperature: -20^ to 60^ / -4^ to 140^
• Storage Humidity: 15% to 85%
• Sensor Resolution: 640 x 480px
• Screen Resolution: 320 x 240px
• Video Capture Format: 3GP
• Video Playback Formats: MPEG4, 3GP, AVI, ASF
• Video Frames Per Second (FPS): 30 FPS max
• Color Depth: 24 bits
• TV Out Format: NTSC or PAL
• Photo Capture Format: JPG (640 x 480px)
• Photo Playback Format: JPG
• Fixed Focus Distance: 1.97"\~5.90" (5\~15cm)
- Internal Memory: \~65MB
• SD Card Memory: 32GB max SD or SDHC
• Camera Diameter: 0.67" (17mm)
- Gooseneck Length: 3.28' (1m)
• Battery Specification: "18650" Lithium Ion 3.7V 2000mAh
- Battery Life (Typical): 8 hours without worklight.
WARNINGS
To ensure safe operation and service of the Video Borescope, follow these instructions. Failure to observe these warnings can result in severe injury or death.
- The Borescope and gooseneck camera are NOT insulated. Avoid probing areas where energized conductive elements may be present. Shut off power to the nearby work areas before starting work.
- Avoid probing areas where chemicals may be present.
- Do not probe moving machinery that could catch the Borescope and cause harm to the operator and the Borescope.
• The Borescope is not intended for use on people or animals. - Do not use the Borescope body in wet conditions.
- Do not use the Borescope near sources of heat.
- Keep steady footing at all times, following ladder safety procedures when necessary.
- Do not use if the Borescope casing is cracked or broken in any way.
| WARNING SYMBOLS: | |
| Always wear approved eye protection. | |
| Do NOT use on energized circuits. | |
| Do NOT probe moving machinery. | |
PACKAGE CONTENTS
a. Main Unit
b. Gooseneck Camera 17mm
c. 18650 Series 3.7V 2000mAh Rechargeable Li-Ion Battery
d. Mirror Camera Attachment
e. Hook Camera Attachment
f. Magnet Camera Attachment
g. USB Power Adapter/Charger
h. USB Data/Charger Cable
i. RCA Composite A/V to 3.5mm Mini A/V Cable
j. Quick Start Guide
k. Software/Instruction Manual CD-ROM
I. Carrying Case
text_image
LEIM TOOL a b c d e f g h i k lFEATURE LAYOUT
text_image
KLEIN TOOLS. ET500 Video Borescope 1 2 3 4 5 OK OK Bright Bright ESC 6 7 8 9 10 11 12 13 14 15 16 18 19FEATURE LAYOUT
- LCD Screen: 3.2" TFT LCD screen.
- Power Button: Press and hold for 3 seconds to turn the instrument on and off.
- Bright Plus Button: Increases the brightness of the camera-mounted LEDs up to 10. Deletes photos or videos in the file explorer mode.
- Bright Minus Button: Decreases the brightness of the camera-mounted LEDs down to 0 (off).
- OK Button: Accepts the current selection on screen. Enters menus. Play and pause in video playback mode.
- ESC Button: Returns to live video mode from top level menu. Returns to submenu from file explorer mode.
- Left Button: Flips screen 180 degrees in live video mode. Moves left or up one selection. Moves to the previous video or photo in the list while viewing a file.
- Right Button: Flips screen 180 degrees in live video mode. Moves right or down one selection. Moves to the next video or photo in the list while viewing a file.
- Battery Cover: Pulls back to reveal the battery container.
- Photo Capture Trigger: Press momentarily to capture a photo in live preview mode. Increases value in video settings mode and time mode. Toggles between internal flash memory and SD card in memory mode.
- Video Capture Trigger: Press and hold for 1 second to begin or end video capturing in live preview mode. Decreases value in video settings mode and time mode. Toggles between internal flash memory and SD card in memory mode.
- Camera Head: Contains the CMOS sensor and LEDs. The arrow on top indicates the camera is right-side up.
- Gooseneck: Rated to IP67 to withstand all ingress of dust and submersion in water up to 1 meter. Caution: bending the gooseneck to 90 degrees or greater can permanently damage it.
- Camera Output: Attaches to borescope body when the notch is oriented correctly.
- Camera Input Socket: Screw into place once the camera output plug is inserted.
- TV & Headphone Out: Insert a standard 1/8" headphone jack or the included component video adapter.
- SD Card Slot: Insert an SD or SDHC card with 32GB capacity or less to store more video or photos.
- USB & Charging Port: Attach the borescope to a computer via USB to charge and transfer files. Attach to included 5V adapter to charge via a standard outlet.
- Reset Button: Perform a hard reset of the borescope.
SETUP
CHARGING
The rechargeable lithium-ion battery should be charged before operating the borescope for the first time. The battery can be charged via a standard 120V wall outlet or through a computer USB port. An exhausted battery will take up to 5 hours to charge. It can be left charging overnight without needing to be removed from power. The expected lifetime of the included battery is 500 charging cycles.
WALL OUTLET: Locate the power wall adapter (g) and the USB cable (h). Remove the soft input cover and plug the cable into the borescope's USB port (18). Plug the other end of the cable into the power adapter, and plug the wall adapter into a standard 120V outlet.
COMPUTER: Locate the USB cable (h). Remove the soft input cover and plug the cable into the borescope's USB port (18). Plug the rectangular end into your computer's USB port. The LCD will briefly show a USB illustration then go dark.
text_image
Diagram showing connection between a device and a socket with labeled pins and plug connectionsATTACHING THE GOOSENECK CAMERA
Locate the gooseneck camera (13). Plug it into the camera input socket of the borescope. Rotate the adjustment piece clockwise to lock it into place. The white arrow on the camera head should be pointing up.
natural_image
Diagram of a flashlight showing internal structure and tip (no text or symbols)POWERING ON/OFF
To power the unit on and off, press and hold the Power Button until the splash screen appears then release it. This usually takes about 3 seconds.
INSTALLING AN SD CARD
The borescope contains a small amount of internal memory to store videos and photos. To add additional storage, remove the soft input cover and insert a standard SD/SDHC card face up into the slot until you hear a click. To remove the SD card, use your fingernail to push it into the slot. You will hear another click and the card will pop out. See Memory menu section for more information.
LIVE VIDEO MODE
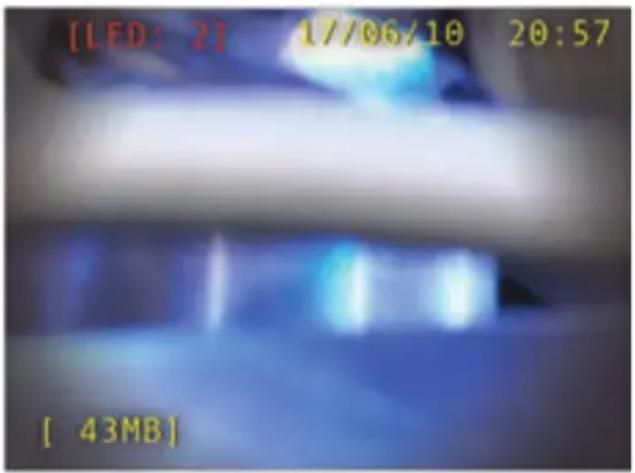
On startup, the borescope will enter the live output mode. The screen will show the live output of the gooseneck camera along with the LED brightness, date and time, and amount of video/photo storage remaining.
text_image
[LED: 2] 17/06/10 20:57 [ 43MB ]LED BRIGHTNESS
The borescope gooseneck camera head has several LEDs used to light your work area. You can control the brightness using the "Bright+" and "Bright-" buttons. The LED brightness ranges from off (LED:0) to full (LED:10). This setting will be saved between uses.
DATE AND TIME
The date and time are shown in the upper right hand corner of the screen in the format "Day/Month/Year Hour:Minute". The time is in 24 hour format. See the TimeSet menu section.
STORAGE
The amount of storage in megabytes available in your current workspace is shown on the bottom left. See Memory menu section.
TAKING A PHOTO
To take a photo, press and release the top trigger. The screen will momentarily freeze to indicate a photo was taken. The date and time will be recorded onto the image if the option is selected in the TimeSet menu.
RECORDING A VIDEO
To record a video, press and hold the bottom trigger for one second. The video camera icon will begin to flash on the top left side of the screen to indicate a video is being recorded. Press and hold the bottom trigger for one second again to stop recording. All buttons will be disabled while recording except for the power button which will still power off the unit and stop the recording. DO NOT remove the SD card during recording.
ROTATING THE CAMERA OUTPUT
Press the left or right button to rotate the camera output 180°.
MENU MODE (SYSTEM SETUP)
In Menu Mode you can configure system settings, browse media, or work with storage.
ENTERING/EXITING MENU MODE
From Live Video Mode, press and release the OK button to enter Menu Mode. To exit the Menu Mode, press the ESC button at the top level menu.
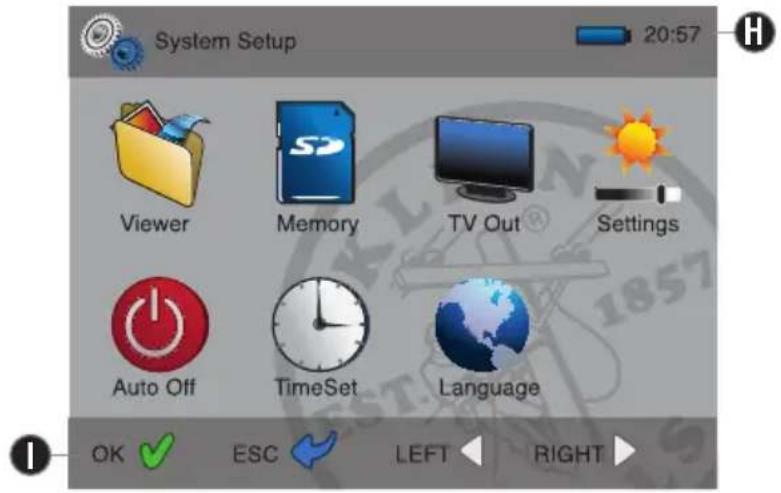
TOP LEVEL MENU
text_image
System Setup 20:57 Viewer Memory TV Out Settings Auto Off TimeSet Language OK ✓ ESC ← LEFT ← RIGHT ►A. Viewer: Browse photos or playback videos.
B. Memory: View storage usage, switch workspaces, format an SD card.
C. TV Out: Select the output device.
D. Settings: Adjust brightness, contrast, and other video settings.
E. Auto Off: Set the auto power off duration.
F. TimeSet: Set the system date/time and enable photo labeling.
G. Language: Set the language to English, Spanish, or French.
H. Status Icons: SD card status, battery life status, and current time.
I. Button Action Hints: Brief description of current button operation.
A. VIEWER
| Viewer Top Menu | |
| Left/Right Highlight Video Player or Picture View. | |
| OK Select an option. | |
| ESC Go back to top level menu. | |
| Video Player Menu | |
| Left/Right Highlight/preview a video. | |
| OK Start playing the highlighted video. | |
| ESC Go back to Viewer Top Menu. | |
| DEL Delete the highlighted video. | |
| Video Player Full Screen | |
| Left/Right Start the previous or next video in the menu. | |
| OK Toggle between play and pause. | |
| ESC Go back to Video Player Menu. | |
| Picture View Menu | |
| Left/Right Highlight/preview a photo. | |
| OK View the highlighted photo full screen. | |
| ESC Go back to Viewer Top Menu. | |
| DEL Delete the highlighted photo. | |
| Picture View Full Screen | |
| Left/Right Show the previous or next photo in the menu. | |
| ESC Go back to Video Player Menu. | |
B. MEMORY
The memory menu shows the formatted capacity of the storage as well as the unused and used portions in megabytes (MB).
| Memory Menu | |
| Left/Right Highlight Work space or Format action. | |
| Trigger Toggle between internal and SD memory. | |
| OK Select an action. | |
| ESC Go back to top level menu. | |
Workspace: The workspace can be either the internal memory ("flash") or the removable SD storage card ("SD"). Photos and videos will be recorded onto the selected storage space. The viewer will only show videos and photos from the selected work space.
Format: The format action clears the selected memory and sets it up to be written to. New SD cards should be formatted before use. Important: Formatting will erase all data on the SD card or internal flash memory!
C. TV OUT
The borescope shows both the live camera output and viewer playback on the LCD screen by default. It can also output to a television via the composite output port and included adapter cable. Select NTSC for a North American style television or PAL for a European style television.
The included adapter cable has a yellow RCA connector for video, white for left channel audio, and red for right channel audio.
If a TV Out mode is selected by accident, cycle the power button for 3 seconds to restart the unit using the LCD screen.
| TV Out Menu | |
| Left/Right Highlight output device. | |
| OK Select an output device. | |
| ESC Go back to top level menu. | |
D. SETTINGS
Control the look of the videos and photos by adjusting these settings.
| Video Settings Menu | |
| Left/Right Highlight video setting. |
| Top Trigger Increase a setting's value. |
| Bottom Trigger Decrease a setting's value. |
| [2673] | OK Save all video settings, return to menu. |
| [6771] | ESC Go back to top level menu without saving. |
Default: Reset the video settings to their default values.
E. AUTO OFF
The borescope can turn itself off after a period of non-use. Select 3, 15, or 60 minutes. Select "Never" to disable auto power off.
| Auto Power Off Time Menu | |
| Left/Right Highlight an auto power off time. | |
| OK Select and save the highlighted auto power off time. | |
| ESC Go back to top level menu. | |
F. TIMESET
Set the time used by the system in this menu. The system time can be used to permanently label photos.
| Time Set Menu | |
| Left/Right Highlight a date or time setting. |
| Trigger Change the selected date or time setting. |
| [8H10] | OK Save the time setting, return to menu. |
| [404C] | ESC Discard changes, go back to top level menu. |
Date: In the format of day, month, year.
Time: In 24-hour format of hour, minute.
Date Label: When this is set to "On", the date and time will be permanently stamped into photos.
G. LANGUAGE
Set the language used in the system menu and on-screen labels.
| Time Set Menu | |
| Left/Right Highlight a language setting. | |
| OK Select the highlighted language setting. | |
| ESC Go back to top level menu. | |
COMPUTER SETUP
The borescope can be used in conjunction with a personal computer to extend its functionality.
Copying Media
There are two ways to copy photos and videos from the borescope to a computer. If you are using an SD card and your computer has an SD card adapter, you can remove the SD card from the borescope and insert it into the computer.
If your computer does not have an SD card adapter or you are using the internal flash memory of the borescope, you will have to connect the borescope directly to the computer using the included USB cable.
The borescope will briefly show an illustration of a USB cable on the screen while it is connecting to the computer. Once it is connected, the screen will go blank, the battery will begin to charge, and the computer will begin initializing the connection.
Windows 2000, XP, Vista, 7
A balloon will pop up in the taskbar at the bottom right stating that drivers are installing. After a short period of time, the balloon will state that the device is ready to use.
- Open Windows Explorer
- Click on the "My Computer" icon on your desktop or...
- Click Start and select "My Computer"
-
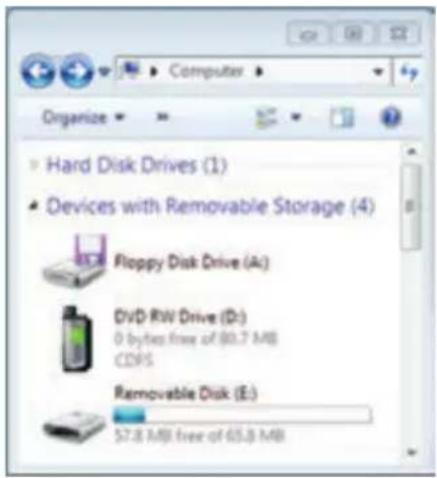
The window will show a new "Removable Disk" entry for the internal flash memory and the SD card if it is installed.
-
Double-click the icon of the disk you would like to view.
text_image
Computer Organize Hard Disk Drives (1) Devices with Removable Storage (4) Floppy Disk Drive (A) DVD RW Drive (D) 0 bytes free of 80.7 MB CDPS Removable Disk (E) 57.8 MB free of 65.8 MB- The borescope creates a "PICTURE" and a "VIDEO" folder to store media. From here, you can access the photos or videos directly from the removable disk, or you can copy them to your hard drive by right clicking a folder or file and selecting "Copy". Browse to the destination folder, right click on it and select "Paste".
text_image
Computer Removable Disk (R) Organize Share with Burn New folders PICTURE VIDEO- When you are fi nished copying or viewing your media, right click on the removable disk icon and select "Eject".
Mac OSX 10.4+
- Open a new Finder window by selecting the Finder icon in the dock.

- On the left side under "DEVICES" you will see a white disk icon with "Untitled" or the name of your SD card next it. Select the disk you would like to view.
text_image
Untitled DEVICES Macintosh HD Untitled Name VIDEO PICTURE .Trashes-
Inside the disk, you will see a "PICTURE" and a "VIDEO" folder. Open these to reveal your photos and videos. You can view your media directly from the removable disk, or copy them to your hard drive by control-clicking the folder or file and selecting "Copy". Navigate to the destination folder, right click on it and select "Paste".
-
When you are fi nished copying or viewing your media, click on the eject icon next to the disk name in the "DEVICES" list.
BATTERY REPLACEMENT
- Pull back orange handle cover from the indented sides near the top.
- Disconnect battery cable and recycle exhausted battery.
- Acquire a "18650" Lithium Ion 3.7V 2000mAh battery.
- Connect battery cable to new battery observing polarity and place into battery compartment.
- P ush forward battery door.
WARRANTY
Turn instrument off and disconnect the gooseneck camera and any cables. Clean the instrument by using a damp cloth. Do not use abrasive cleaners or solvents.
STORAGE
Remove the battery when instrument is not in use for a prolonged period of time. Do not expose to high temperatures or humidity. After a period of storage in extreme conditions exceeding the limits mentioned in the Specifications section, allow the instrument to return to normal operating conditions before using it.
DISPOSAL/RECYCLE
Do not place equipment and its accessories in the trash. Items must be properly disposed of in accordance with local regulations.
CUSTOMER SERVICE
KLEIN TOOLS, INC. 450 Bond Street Lincolnshire, IL 60069
1-800-553-4676 • www.kleintools.com
natural_image
Close-up of a black handheld device with threaded tip and textured body (no visible text or symbols)
text_image
KLEIN TOOLS. ET500 Video Scroscope Press & Hold E Y FOTOS JO E LED CUELLO / LA PANTALLA Y TARJETA SD ON DE 15 . 29 3For Professionals... Since 1857® USA
www.kleintools.com
natural_image
Diagram showing connection between a device and a plug, with no visible text or symbolsnatural_image
Diagram of a mechanical component with a labeled arrow pointing to a section (no text or symbols present)ENCENDIDO/APAGADO
text_image
[LED: 2] 17/06/10 20:57 [ 43MB ]BRILLO DEL LED
text_image
Computer Organize Hard Disk Drives (1) Devices with Removable Storage (4) Floppy Disk Drive (A) DVD RW Drive (D): 0 bytes free of 80.7 MB CDFS Removable Disk (E): 57.8 MB free of 65.8 MBtext_image
Computer > Removable Disk (E) Organize Share with Burn New Folder PICTURE VIDEOnatural_image
Close-up of a black cylindrical object with textured surface and no visible text or symbols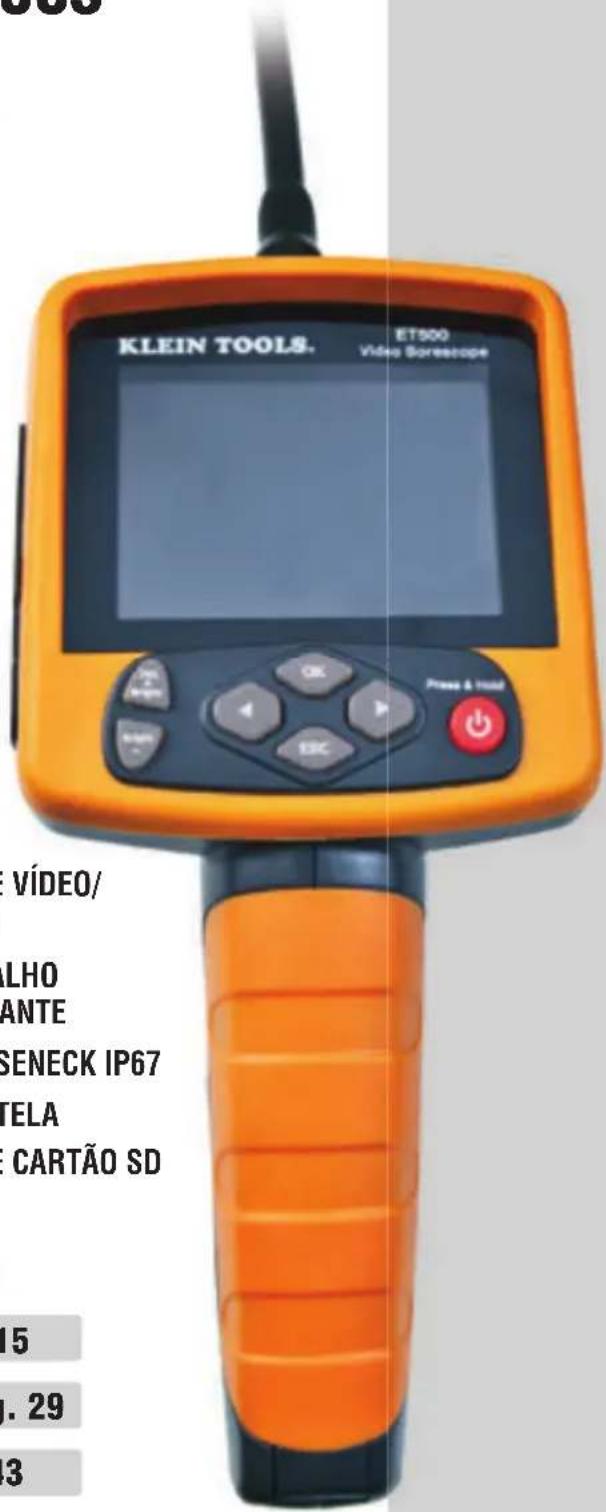
text_image
KLEIN TOOLS. ET500 VIDEO SORoscope Press & Hold VÍDEO/ LHO ANTE SENECK IP67 TELA CARTÃO SD 15 . 29 3For Professionals... Since 1857® USA
www.kleintools.com
natural_image
Diagram showing connection between a device and a plug, with no visible text or symbolsCONEXÃO DA CÂMERA GOOSENECK
natural_image
Diagram of a flashlight with a labeled component (no text or symbols present)COMO LIGAR/DESLIGAR
text_image
[LED: 2] 17/06/10 20:57 [ 43MB ]BRILHO DO LED
text_image
Computer Organize Hard Disk Drives (1) Devices with Removable Storage (4) Floppy Disk Drive (A) DVD RW Drive (D): 0 bytes free of 60.7 MB CDPS Removable Disk (E): 57.8 MB free of 65.8 MBtext_image
Computer - Removable Disk (E) Organize Share with Burn New Folder PICTURE VIDEOnatural_image
Close-up of a black cylindrical connector with threaded tip and textured body (no visible text or symbols)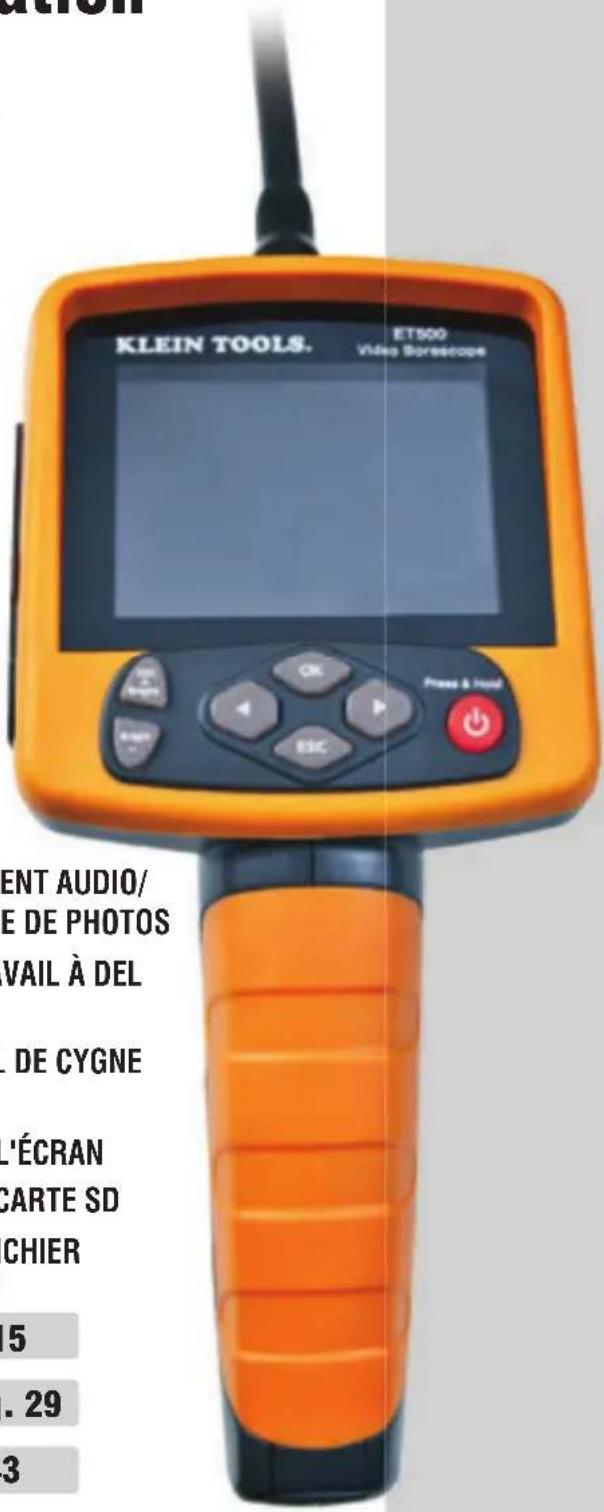
text_image
KLEIN TOOLS. ET500 Video Scorscope ENT AUDIO/ E DE PHOTOS VAIL À DEL . DE CYGNE L'ÉCRAN CARTE SD CHIER 5 . 29 3• ENREGISTREMENT AUDIO/VIDÉO ET PRISE DE PHOTOS
• LAMPE DE TRAVAIL À DEL LUMINEUSE
• CAMÉRA À COL DE CYGNE IP67
- ROTATION DE L'ÉCRAN
- SORTIE TV ET CARTE SD
• LECTURE DE FICHIER
Español pg. 15
Português pg. 29
Français p. 43
KLEIN TOOLS®

For Professionals... Since 1857® USA
www.kleintools.com