Pure Hot+Cool Link - Air purifier DYSON - Free user manual and instructions
Find the device manual for free Pure Hot+Cool Link DYSON in PDF.

| Product type | Air purifier with heating and cooling |
| Brand | Dyson |
| Model | Pure Hot+Cool Link |
| Power supply | Mains (plug directly into wall socket) |
| Standby power consumption | 2.3 W with maintained Wi-Fi connection |
| Remote control battery | CR2032 (lithium button cell) |
| Connectivity | Wi-Fi 2.4 GHz (IEEE802.11b/g/n) |
| Control | Magnetic remote control and Dyson Link app |
| Functions | Heating, cooling, air purification, oscillation, automatic, night, targeted, ambient, timer modes |
| Sensors | Air quality (VOCs, particles), temperature |
| Filter | Non-washable filter unit, replacement recommended every 12 months (12 h/day) |
| Filter replacement indicator | Display on unit and notification via app |
| Safety cut-off | Automatic circuit break in case of tip-over or overheating |
| Automatic shut-off in heating mode | After 9 hours of continuous operation |
| Cleaning | Dry or damp cloth, do not use detergents |
| Warranty | 2 years parts and labor (excluding filters) |
| Serial number | On the rating plate under the unit |
Frequently Asked Questions - Pure Hot+Cool Link DYSON
User questions about Pure Hot+Cool Link DYSON
0 question about this device. Answer the ones you know or ask your own.
Ask a new question about this device
Download the instructions for your Air purifier in PDF format for free! Find your manual Pure Hot+Cool Link - DYSON and take your electronic device back in hand. On this page are published all the documents necessary for the use of your device. Pure Hot+Cool Link by DYSON.
USER MANUAL Pure Hot+Cool Link DYSON
See "Setting up Dyson Link app"
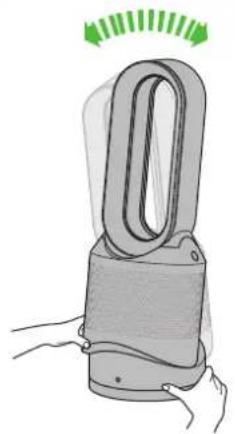
natural_image
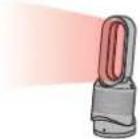
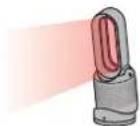
Illustration of a gray electric fan with a green arrow indicating airflow or motion, no text or symbols present.This product is only suitable for well insulated spaces or occasional use.
THANK YOU FOR CHOOSING TO BUY A DYSON APPLIANCE
After registering your free 2 year guarantee, your Dyson appliance will be covered for parts and labour (excluding filters) for 2 years from the date of purchase, subject to the terms of the guarantee. If you have any questions about your Dyson appliance, call the Dyson Helpline with your serial number and details of where/when you bought the appliance. Most questions can be solved over the phone by one of our trained Dyson Helpline staff.
Your serial number can be found on your rating plate which is on the base of the appliance.
SERVICE CONSOMMATEURS DYSON
MERCI D'AVOIR CHOISI UN APPAREIL DYSON
This illustration is for example purposes only.
Note your serial number for future reference.
IMPORTANT SAFETY INSTRUCTIONS
BEFORE USING THIS APPLIANCE READ ALL INSTRUCTIONS AND CAUTIONARY MARKINGS IN THIS MANUAL AND ON THE APPLIANCE
When using an electrical appliance, basic precautions should always be followed, including the following:
WARNING
THE APPLIANCE AND THE REMOTE CONTROL BOTH CONTAIN MAGNETS.
- Pacemakers and defibrillators may be affected by strong magnetic fields. If you or someone in your household has a pacemaker or defibrillator, avoid placing the remote control in a pocket or near to the appliance.
- Credit cards and electronic storage media may also be affected by magnets and should be kept away from the remote control and the top of the appliance.
WARNING
These warnings apply to the appliance, and also where applicable, to all tools, accessories, chargers or mains adaptors.
TO REDUCE THE RISK OF FIRE, ELECTRIC SHOCK, OR INJURY:
- When used in heating mode the appliance is hot when in use and for a short period after use. To avoid burns, do not let bare skin touch hot surfaces. When moving the appliance hold it by the base, not the air loop amplifier.
- Keep combustible materials, such as furniture, pillows, bedding, papers, clothes and curtains, at least 0.9m (3 feet) from the front of the appliance and keep them away from the sides and rear when the appliance is plugged in.
- Use only as described in this Dyson Operating Manual. Do not carry out any maintenance other than that shown in this manual, or advised by the Dyson Helpline. Any other use not recommended by the manufacturer may cause fire, electric shock, or injury to persons.
- Ensure appliance is fully assembled in line with the instructions before use. Do not dismantle the appliance or use without the loop amplifier fitted.
- Do not allow to be used as a toy. Close attention is necessary when used by or near children. Children of less than 3 years should be kept away unless continuously supervised. Children should be supervised to ensure that they do not play with the appliance and remote control.
- Children aged from 3 years and less than 8 years shall only switch on/off the appliance provided that it has been placed or installed in its intended normal operating position and they have been given supervision or instruction concerning use of the appliance in a safe way and understand the hazards involved. Children aged from 3 years and less than 8 years shall not plug in, regulate and clean the appliance or perform user maintenance. CAUTION – Some parts of this product can become very hot and cause burns. Particular attention has to be given where children and vulnerable people are present.
- This Dyson appliance can be used by children aged from 8 years and above and persons with reduced physical, sensory or reasoning capabilities, or lack of experience and knowledge, only if they have been given supervision or instruction by a responsible person concerning use of the appliance in a safe way and understand the hazards involved. Cleaning and user maintenance should not be performed by children without supervision.
-
Suitable for dry locations ONLY. Do not use outdoors or on wet surfaces. Do not use in bathrooms, laundry areas or similar indoor locations. Never locate the appliance where it may fall into a bath or other water container. Do not use or store where it may get wet or in the immediate surroundings of a bath, a shower, or a swimming pool.
-
This appliance has hot parts inside. Do not use it in areas where petrol, paint, or flammable liquids are used or stored or where their vapours are present. Do not use in conjunction with or directly next to an air freshener or similar products.
-
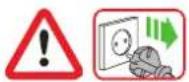
Do not locate directly below a mains electricity supply socket.
-
Always plug directly into a wall socket. Never use with an extension cable as overloading may result in the cable overheating and catching fire.
-
Do not handle any part of the plug or appliance with wet hands.
-
Do not use with a damaged cable or plug. If the supply cable is damaged it must be replaced by Dyson, its service agent or similarly qualified person in order to avoid a hazard.
-
Do not unplug by pulling on the cable. To unplug, grasp the plug, not the cable.
-
Do not stretch the cable or place the cable under strain. Keep cable away from heated surfaces.
-
Do not route the cable under furniture or appliances. Do not cover cable with throw rugs, runners or similar coverings. Arrange cable away from traffic area and where it will not be tripped over.
-
To prevent a possible fire, do not use with any opening or exhaust blocked, and keep free of dust, lint, hair, and anything that may reduce airflow. Do not put any object into the inlet grill or the exhaust opening as this may cause an electric shock or fire, or damage the appliance.
-
Do not use on soft surfaces, such as a bed, where openings may become blocked.
-
In order to avoid overheating and fire hazard, do not cover the appliance.

-
Turn off all controls before unplugging.
-
Do not use any cleaning agents or lubricants on this appliance. Unplug before cleaning or carrying out any maintenance.
-
If there is a loose fit between the plug and the socket or the plug becomes very hot, the socket may need to be replaced. Check with a qualified electrician to replace the socket.
-
WARNING: Chemical Burn and Choking Hazard. Keep batteries away from children. This product contains a lithium button/coin cell battery. If a new or used lithium button/coin cell battery is swallowed or enters the body, it can cause severe internal burns and can lead to death in as little as 2 hours. Always completely secure the battery compartment. If the battery compartment does not close securely, stop using the product, remove the batteries, and keep it away from children. If you think batteries might have been swallowed or placed inside any part of the body, seek immediate medical attention.
-
If the appliance is not working as it should, has received a sharp blow, has been dropped, damaged, left outdoors, or dropped into water, do not use and contact the Dyson Helpline.
-
Contact the Dyson Helpline when service or repair is required. Do not disassemble the appliance as incorrect reassembly may result in an electric shock or fire.
-
Do not put any object into openings or the inlet grille. Do not use with any opening blocked; keep free of dust, lint, hair, and anything that may reduce airflow.
-
Always carry the appliance by the base, do not carry it by the loop amplifier.
-
To avoid a tripping hazard wind the cable when not in use.
-
Do not use near furnaces, fireplaces, stoves or other high temperature heat sources.
-
Do not use in conjunction with or directly next to an air freshener or similar products. Do not spray or apply perfumes directly on or near the filter. Keep essential oils and chemicals away from the appliance.
-
The appliance should not be forcefully turned or oscillated, under any circumstances. This will cause damage to the oscillation mechanism.
-
When removing or replacing the filter, take care to keep your fingers clear.
IMPORTANT SAFETY FEATURES
For your safety this appliance is fitted with automatic cut-out switches that operate if it tips over or overheats. If the switches operate, unplug the appliance and allow it to cool. Before restarting, check and clear any blockages and ensure the appliance is on a solid level surface.
READ AND SAVE THESE INSTRUCTIONS
THIS DYSON APPLIANCE IS INTENDED FOR HOUSEHOLD USE ONLY
Do not pull on the cable.

In order to avoid overheating and fire hazard, do not cover the appliance.
Do not store near heat sources.

Do not carry by the air loop amplifier. The air loop amplifier is not a handle.
Do not use near naked flames.
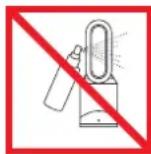
Do not spray scented products such as air freshener or perfume near the filter or the appliance.
FR/BE/CH
CONSIGNES DE SÉCURITÉ IMPORTANTES
AVANT D'UTILISER CET APPAREIL, LISEZ ATTENTIVEMENT LES INSTRUCTIONS ET LES MISES EN GARDE FIGURANT DANS CE MANUEL ET SUR L'APPAREIL
Setting up Dyson Link app
Additional features can be enabled when connected to the Dyson Link app on your smart device. This requires an app enabled device and a Wi-Fi connection.

Download the Dyson Link app, available on iOS and Android.
Select 'Add a Product' from within the app and follow the on screen instructions.

In order to connect the appliance, you will need the information on the front of this manual.
Internal and external air quality data is displayed via the Dyson Link app. Please refer to the on-screen instructions. You can make a personal choice for indoor air quality sensitivity during initial Dyson Link app set up. You can also select a location for external air quality data.
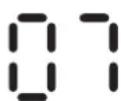
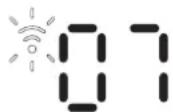
Display icons
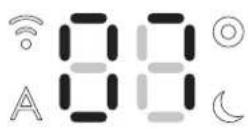

Flashing green = Wi-Fi is ready to connect to your Dyson Link app

Flashing white = Wi-Fi connecting

Solid white = Wi-Fi connected
Off = Wi-Fi disabled

Solid white = purifying/ air quality target has not been met

Solid green = air quality target has been met
Off = appliance is not in auto cleaning mode

Solid red = appliance is heating

Solid white = appliance has reached target temperature

Solid white = appliance is in night mode
Off = appliance is not in night mode
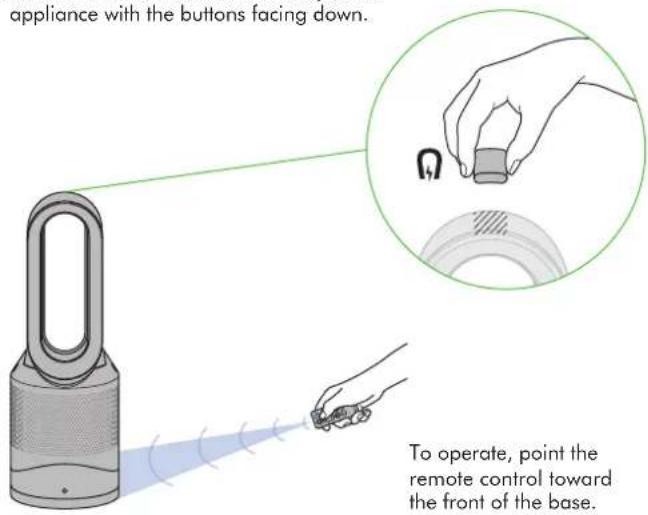
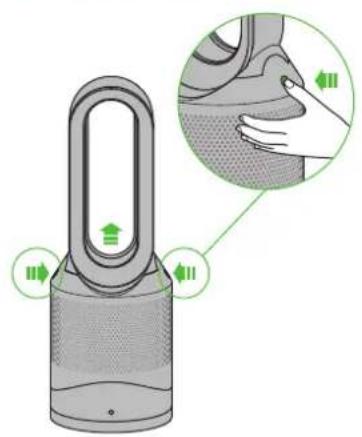
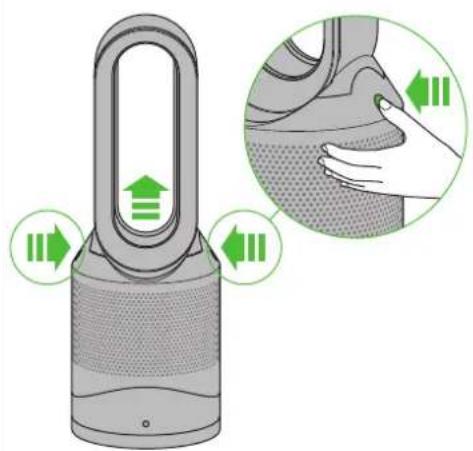
Remote control
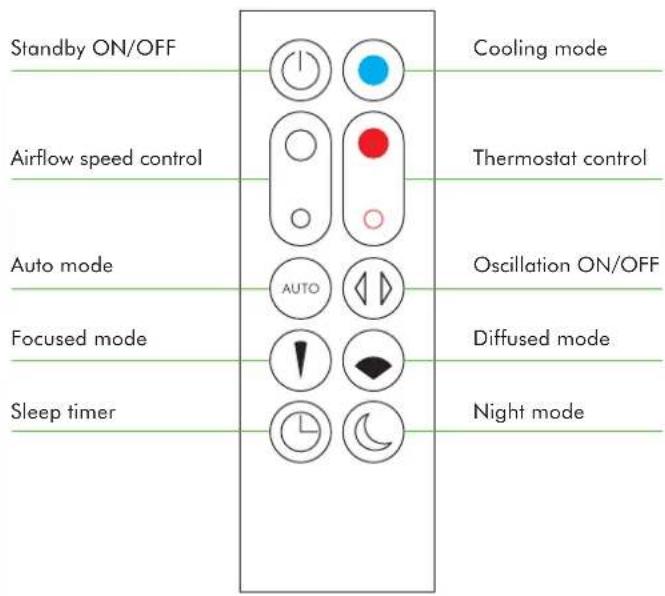
The Dyson Link app can also be used to control your appliance. Please note the appliance and the Dyson Link app requires a Wi-Fi signal to function.
Remote control docks magnetically.
Attach the remote control to the top of the appliance with the buttons facing down.
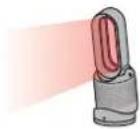
Heating and cooling modes
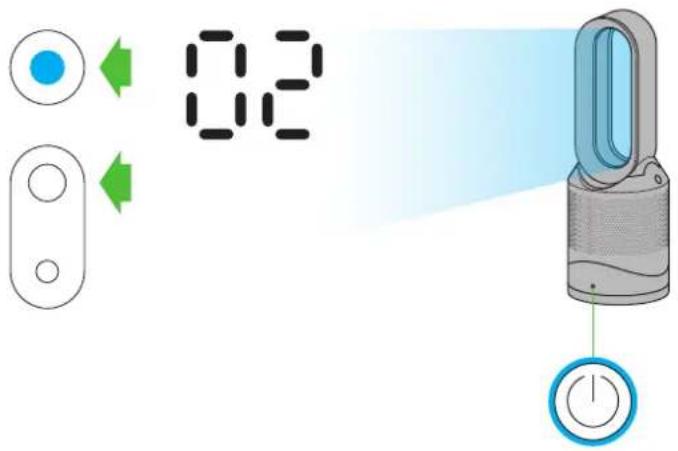
Appliance is in cooling mode
Press the blue cooling mode button to enter cooling mode. The power button light will change from red to blue to indicate that you have entered cooling mode. To adjust the airflow speed use the airflow control button or use auto mode for automatic control.
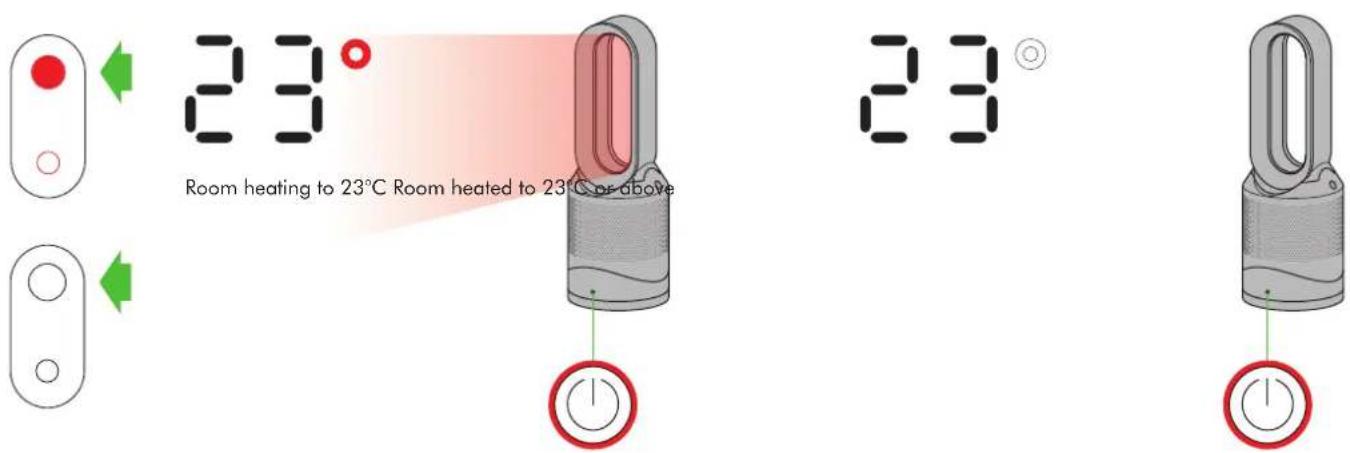
Appliance is in heating mode
Press the red thermostat control button until the digital display shows the target room temperature. The power button light will change from blue to red to indicate that you have entered heating mode. The heating symbol will be red while heating and will change to white when the target room temperature has been reached. Once the target room temperature has been reached, the appliance will stop heating the air. If the room temperature falls below the target temperature, the appliance will start to heat again. The red circle surrounding the power button remains on when the product is in heater mode. To adjust the airflow speed use the airflow control button or use auto mode for automatic control.
On first use, the appliance will default to a temperature 3^ C higher than the detected room temperature. Thereafter, the appliance will remember the last target temperature set.
Each time the heating mode is selected, it conducts a short calibration cycle. Airflow will be automatically controlled during this cycle. Once the calibration cycle is complete, it will revert to the selected airflow speed.
Auto mode


Selecting Auto mode adjusts the airflow according to the air quality in the room.
When auto mode is enabled (indicated by an A symbol in the bottom left corner of the display), the on-board sensors will intelligently adjust the speed of the appliance according to the air quality.
Auto mode behaviour differs slightly between cooling and heating modes.
Auto purification in cooling mode

If the air is clean the A symbol will turn green and the numerical display will switch off. If the air quality worsens the A symbol will turn white and the appliance will automatically restart purifying the room. While purifying the numerical display will show the airflow speed.
Auto purification in heating mode

When auto mode is used while in heating mode, the appliance is both purifying and heating the air. The appliance will display the target room temperature, not the fan airflow. Once the target room temperature has been reached, the appliance will stop heating the air. If the air quality target has not been met, the fan will continue to run in order to keep purifying the air. If the room temperature falls below the target temperature, the appliance will start to heat again.

For additional control the Dyson Link app can be used to further adjust the sensitivity of the appliance remotely.
A period of 6 days is required after the machine is first used for the sensor to calibrate. During this period the machine may be more sensitive to VOCs (such as odours) than normal.
Night mode


The night mode will dim the display and run quietly, making it ideal for use while sleeping.
When night mode is enabled (indicated by an illuminated half moon symbol in the bottom right corner of the display), the display will dim and after 5 seconds will fade to off. The half moon symbol remains illuminated.


If the appliance is not in auto mode, the airflow speed will reduce to level 4. When night mode is activated, if it is already below level 4, it will remain the same. This can be manually changed if desired. The display will illuminate briefly, then fade as before. If in auto mode the airflow speed will be reduced automatically.
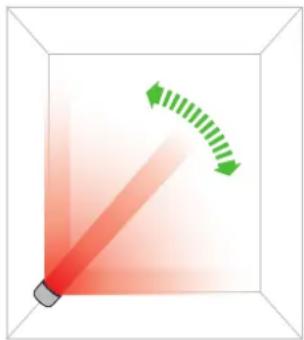
Oscillation


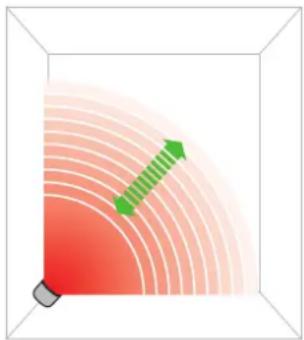
Airflow speed control
natural_image
Diagram showing a red laser beam interacting with green curved arrows inside a transparent cube (no text or symbols)Oscillation control
To start the appliance oscillating, press the oscillation control button. To stop the appliance oscillating, press it again. The appliance will not oscillate when the control buttons are pressed.
natural_image
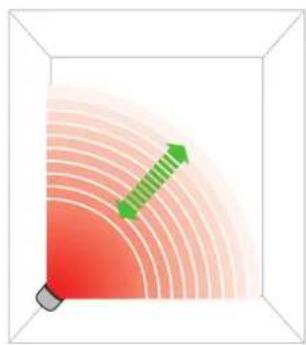
Diagram showing concentric arcs with a green arrow indicating direction, no text or symbols presentAirflow speed control
To change the airflow speed press the airflow control button. The digital display will show the new fan speed. If in heater mode after 2.5 seconds it will change back to displaying the target temperature.
Diffused and focused modes


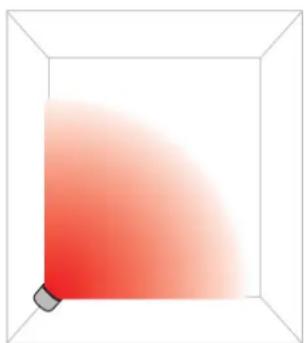
natural_image
Simple 3D cube with a red gradient arc inside, no text or symbols presentDiffused mode
Press the wide angle button to change from a personal directed airflow to wider projection of air flow.
Heating and cooling modes work in this mode.
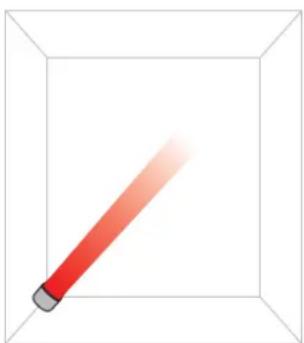
natural_image
Simple illustration of a red pencil inside a transparent cube (no text or symbols)Focused mode
Press the narrow angle button to change from a wider projection of airflow to a personal directed airflow.
Heating and cooling modes work in this mode.
Sleep Timer
The sleep timer will turn your appliance off once the time set has passed.
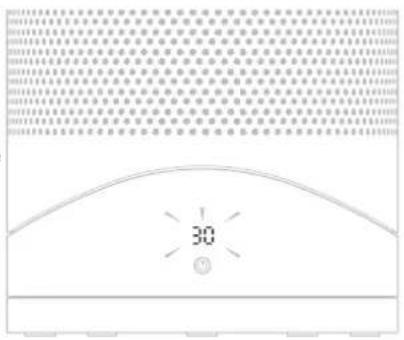
To set the sleep timer, select the desired time. When time reaches zero, the appliance will go into standby mode. To cancel, increase the time until two dashes appear.
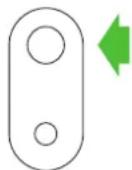
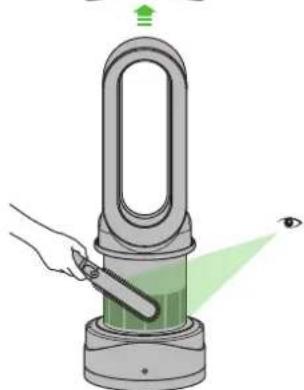
Tilt function
natural_image
Illustration of a hand holding a small fan-shaped device with green directional arrows indicating rotation (no text or symbols)

Carefully hold the base and the main body. Tilt the amplifier forward or backward for the required airflow angle.
Clearing blockages

natural_image
Illustration of a power drop tower with green directional arrows indicating movement or force (no text or symbols)
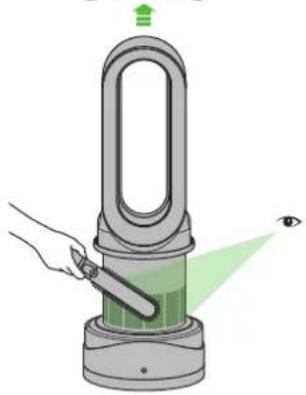
natural_image
Illustration of a hand using a power shaver to observe green light from a digital eye (no text or symbols present)
natural_image
Illustration of a hand using a pen to interact with a green-lit padlock, projecting light into an eye (no text or symbols present)Ensure the appliance is unplugged. If the appliance has been in use, leave for 1 to 2 hours in order to allow the appliance to cool down completely. Look for blockages in the air inlet holes and in the small aperture inside the air loop amplifier. Use a soft brush to remove debris.
Cleaning

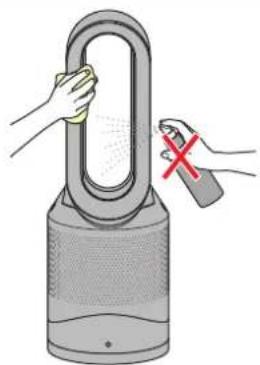
natural_image
Illustration of a hand holding a U-shaped device with a red X mark, next to a gray electric fan (no text or symbols)Unplug from the mains electricity supply. If the appliance has been in use, leave for 1 to 2 hours before cleaning to allow the appliance to cool completely. Dust may accumulate on the surface of the machine. Wipe dust from the loop, filter unit and other parts with a dry or damp cloth when dust accumulates. Do not use detergents or polishes.
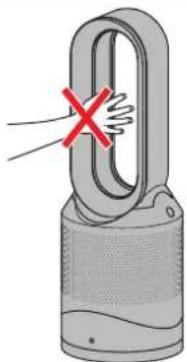
Caution: Hot when in use


natural_image
Illustration of a hand holding a U-shaped device with a red X mark, no text or symbols presentThis appliance is hot when in use and for a short period after use. Do not let bare skin touch hot surfaces. If children are present, consider positioning the appliance out of their reach.
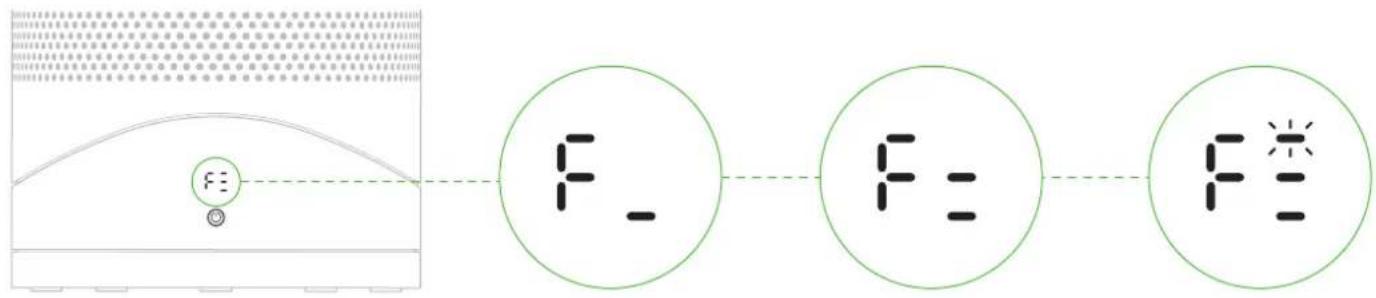
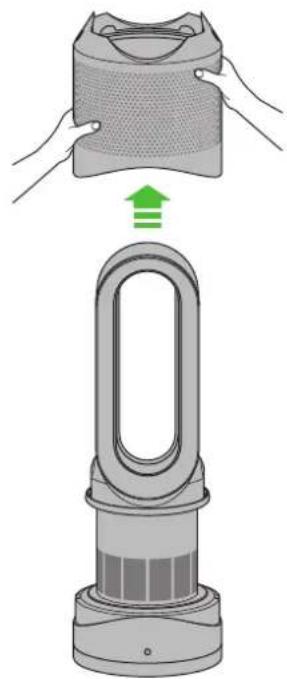
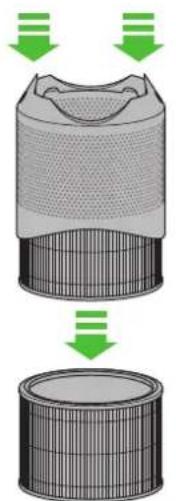
Replacing the filter unit
When your non-washable filter unit needs replacing the appliance will display the pattern shown. To replace the non-washable filter unit, follow these steps. Ensure your appliance is unplugged. Your Dyson appliance is programmed to remind you to replace the filter unit after 12 months based on 12 hours usage a day. Please note your indicator will activate sooner with more use. The indicator is only a guide. Use in heavily polluted environments may require the filter unit to be replaced more regularly. Outside air quality can be checked through the Dyson Link app.
1
2
natural_image
Illustration of a hair dryer with a green upward arrow indicating the process (no text or symbols present)345

natural_image
Illustration of hands performing a step-up on a textured surface, with a magnified inset showing the step and direction of change (no text or symbols present)When disposing of the exhausted filter unit please do so in accordance with local regulations.
natural_image
Diagram showing airflow or particle movement from a cylindrical container to a flat surface, with green arrows indicating direction of motion (no text or symbols)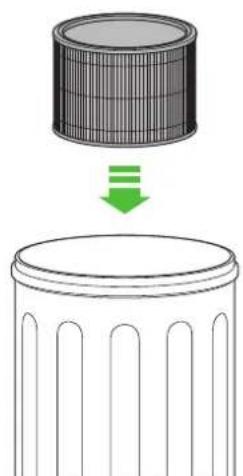
natural_image
Diagram showing a cylindrical object with a downward arrow and a blank cylindrical base, no text or symbols present.Replacing the filter unit
678

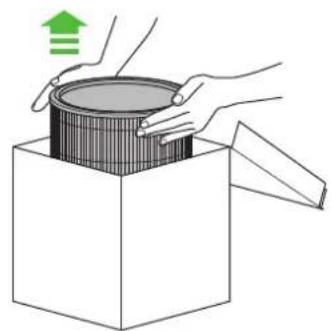
natural_image
Illustration of hands opening a box with a green upward arrow (no text or symbols)
natural_image
Diagram showing a cylindrical object being dropped into a meshed container with a green arrow indicating the process (no text or symbols present)
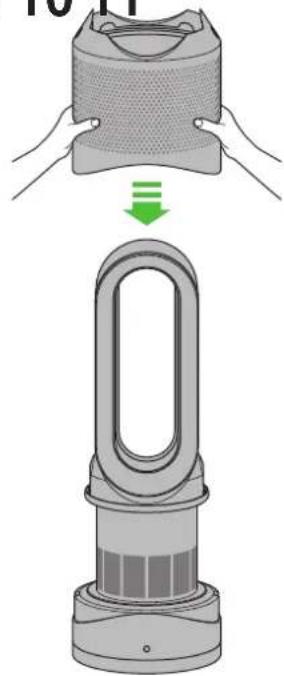
9 10 11

natural_image
Illustration of a pair of hands assembling a filter component, showing the top view with a green arrow indicating process (no text or symbols present)Clean the hatch every time the filter is replaced. Open the small hatch on the side of the appliance. Use a cotton bud to clean inside and remove any debris. This maintains sensor accuracy and ensures the continuing high performance of the appliance.

natural_image
Diagram of a smart lock device with a close-up inset showing internal components (no text or symbols)12

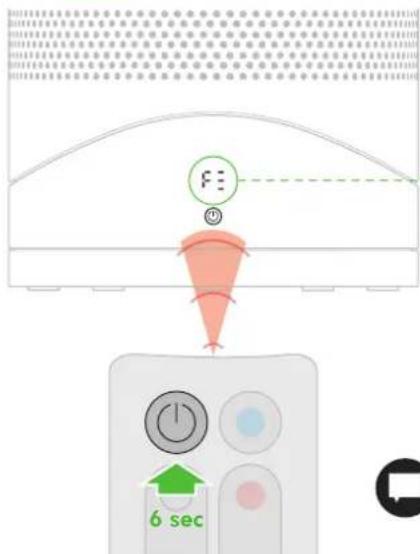
When you have re-assembled your appliance, press and hold the 'Standby ON/OFF' button for 6 seconds on the remote control to reset the filter indicator.


natural_image
Green circular icon with a zigzag arrow and plus/minus symbols inside, enclosed in a circle (no text or numbers)
A clockwise-rotating loading pattern will be shown on the LED display.
Once the loading pattern is complete, the appliance will return to its normal usage.

The Dyson Link app will notify you when your non-washable filter needs to be replaced. The filter indicator can also be reset from within the Dyson Link app. Please note your filter may require replacing more frequently with more use.
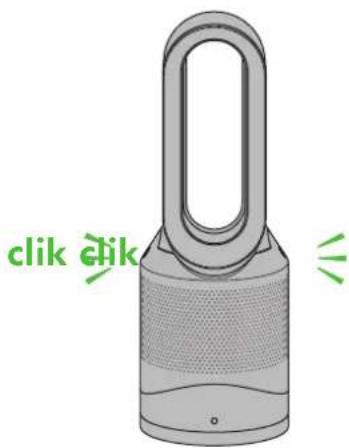
Enabling or Disabling Wi-Fi


10-20 secs
Wi-Fi can be enabled or disabled by pressing and holding the ON/OFF button on the appliance for between 10 and 20 seconds.
Wi-Fi disabled Wi-Fi enabled


Solid white = Wi-Fi connected

Flashing white = Wi-Fi connecting

Flashing green = Wi-Fi is ready to connect to your Dyson Link app
Off = Wi-Fi disabled

If Wi-Fi is disabled, the appliance will not connect to the Dyson Link app.
Clearing your Wi-Fi settings


21 secs It is possible to remove your network details from the appliance.


Press and hold the ON/OFF button on the appliance for longer than 20 seconds.
The Wi-Fi symbol will flash alternately between white and green to indicate that your network details have been removed.

If you clear your network settings the appliance will not connect to the Dyson Link app.
Troubleshooting


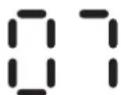
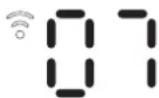
If you see a flashing 'E' when trying to use the appliance, it is unable to do what has been requested.
If you see a solid 'E' when trying to use the appliance, it shows the appliance has stopped functioning correctly.
Make sure you have checked the following:
The room temperature is above 5°C.
There are no blockages in the inlet grille or loop amplifier outlet.
The filter has been correctly assembled and doesn't need to be replaced.
The appliance is correctly plugged in directly to the wall outlet.
If the message still displays, unplug and leave for 10 seconds before turning on again.
If the problem persists, please call the Dyson helpline.
Configuration de l'appli Dyson Link
natural_image
Illustration of a hand holding a small object with a U-shaped magnet above it, enclosed in a green circle (no text or symbols)natural_image
Diagram showing a red laser beam interacting with green arrows indicating direction (no text or symbols)natural_image
Diagram showing concentric arcs with a green arrow indicating direction, no text or symbols presentnatural_image
Simple 3D cube with a red gradient arc inside, no text or symbols presentMode ambiant
natural_image
Simple illustration of a red pencil inside a transparent cube (no text or symbols)Mode ciblé
natural_image
Illustration of a hand holding a small electric fan with a green directional arrow indicating rotation (no text or symbols)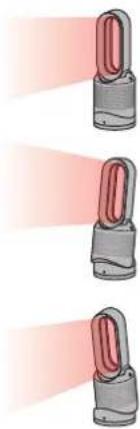
natural_image
Three identical illustrations of a stylized object with a handle, shown in sequence from left to right (no text or symbols)natural_image
Illustration of a power drop tower with green directional arrows indicating movement or force (no text or symbols)
natural_image
Illustration of a hand using a power shaver to interact with an eye, showing green light emission from the device (no text or symbols present)
natural_image
Illustration of a hand using a pen to interact with a green-lit padlock, projecting light into an eye (no text or symbols present)natural_image
Illustration of a hand holding a paper filter next to a power plant, with a red X mark indicating no text or symbols.

natural_image
Illustration of a hand holding a U-shaped device with a red X mark, no text or symbols present1


2

natural_image
Illustration of a hair dryer with a green upward arrow indicating the process (no text or symbols present)345

natural_image
Illustration of hands performing a step-up on a textured surface, with a magnified inset showing the step and direction of change (no text or symbols present)natural_image
Diagram showing a cylindrical container with internal structure and downward arrows indicating flow or movement (no text or symbols)
natural_image
Diagram showing a cylindrical object with internal structure being lowered into a base, no text or symbols presentnatural_image
Illustration of hands opening a box with a green upward arrow (no text or symbols)
natural_image
Diagram showing a cylindrical object being dropped into a meshed container with a green arrow indicating the process (no text or symbols present)
9 10 11

natural_image
Illustration of a hand holding a mesh device with a green downward arrow indicating a process or transformation (no text or symbols present)
natural_image
Diagram of a smart lock device with a close-up inset showing internal components (no text or symbols)12

natural_image
Green circular icon with a zigzag arrow and plus/minus symbols inside, enclosed in a circle (no text or numbers)
natural_image
Illustration of a hand holding a small object with a circular frame below (no text or symbols)natural_image
Illustration of a gray handheld device with a red circular button labeled 'Power' pointing to its side (no text or symbols on the device itself)natural_image
Diagram showing a red laser beam interacting with green curved arrows inside a transparent cube (no text or symbols)Drehbewegung
natural_image
Diagram showing concentric arcs with a green arrow indicating direction, no text or symbols presentLuftstromsteuerung
natural_image
Simple 3D cube with a red gradient arc inside, no text or symbols presentVerteilungsfunktion
natural_image
Simple illustration of a red pencil inside a transparent cube (no text or symbols)Focus-Funktion
2

natural_image
Illustration of a hair dryer with a green upward arrow indicating the process (no text or symbols present)natural_image
Illustration of hands performing a step-up on a textured surface, with a magnified inset showing the step and direction of change (no text or symbols)
natural_image
Diagram showing airflow or particle movement between a cylindrical container and a perforated airfoil (no text or symbols)
natural_image
Diagram showing a cylindrical object with a downward arrow and a blank cylindrical base, no text or symbols present.Filterwechsel
678
natural_image
Illustration of hands opening a box with a green upward arrow (no text or symbols)
natural_image
Diagram showing a cylindrical object being dropped into a meshed container with a green arrow indicating the process (no text or symbols present)
9 10 11
natural_image
Illustration of a hand holding a mesh device with a green downward arrow indicating a process or transformation (no text or symbols present)natural_image
Diagram of a smart lock device with a close-up inset showing internal components (no text or symbols)natural_image
Green circular icon with a zigzag arrow and plus/minus symbols inside, enclosed in a circle (no text or numbers)Ononderbroken groen =
Ononderbroken rood =
natural_image
Illustration of a hand holding a small object with a U-shaped magnet above it, enclosed in a green circle (no text or symbols)natural_image
Diagram showing a red laser beam interacting with green arrows indicating direction (no text or symbols)Draaibeweging
natural_image
Diagram showing concentric arcs with a green arrow indicating direction, no text or symbols presentnatural_image
Simple 3D cube with a red gradient arc inside, no text or symbols presentnatural_image
Simple illustration of a red pencil inside a transparent cube (no text or symbols)natural_image
Illustration of a hand holding a small fan-shaped device with green directional arrows indicating rotation (no text or symbols)


natural_image
Illustration of a power drop tower with green directional arrows indicating movement or force (no text or symbols)
natural_image
Illustration of a hand using a power shaver to interact with an eye, showing green laser path and component (no text or symbols)
natural_image
Illustration of a hand using a pen to interact with a green-lit padlock, projecting light into an eye (no text or symbols present)natural_image
Illustration of a hand holding a U-shaped device with a red X mark, next to a gray electric fan (no text or symbols)
natural_image
Illustration of a hand holding a U-shaped device with a red X mark, no text or symbols present1


2

natural_image
Illustration of a hair dryer with a green upward arrow indicating the process (no text or symbols present)345

natural_image
Illustration of hands performing a step-up on a textured surface, with a magnified inset showing the step and direction of change (no text or symbols present)natural_image
Diagram showing a cylindrical container with internal structure and downward green arrows indicating flow or process (no text or symbols)
natural_image
Diagram showing a cylindrical object with internal structure being lowered into a base, no text or symbols present.natural_image
Illustration of hands opening a box with a green upward arrow (no text or symbols)
natural_image
Diagram showing a cylindrical object being dropped into a meshed container with a green arrow indicating the process (no text or symbols present)
9 10 11

natural_image
Illustration of a pair of hands assembling a filter component, showing the top view with a green arrow indicating downward motion (no text or symbols present)
natural_image
Diagram of a smart lock device with a close-up inset showing internal components (no text or symbols)12

natural_image
Green circular icon with a zigzag arrow and plus/minus symbols inside, no text or numbers present.natural_image
Illustration of a hand holding a small object with a U-shaped symbol, enclosed in a green circle (no text or symbols)
natural_image
Illustration of a hand holding a small object near a power tower emitting light rays (no text or symbols)natural_image
Diagram showing a red laser beam interacting with green arrows indicating direction (no text or symbols)natural_image
Diagram showing concentric arcs with a green arrow indicating direction, no text or symbols presentnatural_image
Simple 3D cube with a red gradient arc inside, no text or symbols presentModo difusor
natural_image
Simple illustration of a red pencil inside a transparent cube (no text or symbols)Modo concentrado
natural_image
Illustration of a hand holding a small electric fan with a green directional arrow indicating rotation (no text or symbols)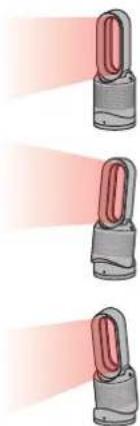
natural_image
Three identical illustrations of a stylized lamp with red and gray blades, emitting light rays (no text or symbols)natural_image
Illustration of a power drop tower with green directional arrows indicating movement or force (no text or symbols)
natural_image
Illustration of a hand using a power shaver to interact with an eye, showing green light emission from the device (no text or symbols present)
natural_image
Illustration of a hand using a pen to interact with a green-lit padlock, projecting light into an eye (no text or symbols present)natural_image
Illustration of a hand holding a U-shaped device with a red X mark, next to a gray electric fan (no text or symbols)

natural_image
Illustration of a hand holding a U-shaped device with a red X mark, no text or symbols present1


2

natural_image
Illustration of a hair dryer with a green upward arrow indicating the process (no text or symbols present)345

natural_image
Illustration of hands performing a step-up on a textured surface, with a magnified inset showing the step and direction of change (no text or symbols)natural_image
Diagram showing a cylindrical container with internal structure and downward green arrows indicating flow or process (no text or symbols)
natural_image
Diagram showing a cylindrical object with internal structure being lowered into a base, no text or symbols presentnatural_image
Illustration of hands opening a box with a green upward arrow (no text or symbols)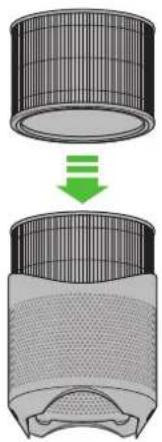
natural_image
Diagram showing a cylindrical object being dropped into a meshed container with a green arrow indicating the process (no text or symbols present)
9 10 11

natural_image
Illustration of a hand holding a mesh device with a green downward arrow indicating a process or transformation (no text or symbols present)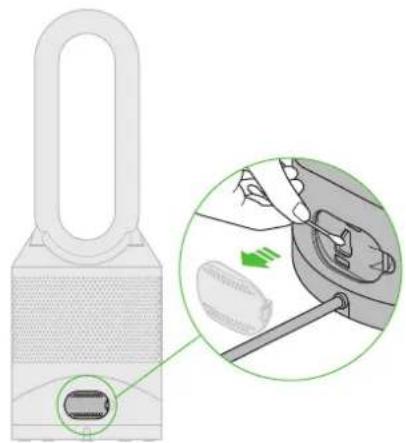
natural_image
Diagram of a smart lock device with a close-up inset showing internal components (no text or symbols)12

natural_image
Green circular icon with a zigzag arrow and plus/minus symbols inside, enclosed in a circle (no text or numbers)
natural_image
Illustration of a padlock with a curved handle and mesh base (no text or symbols)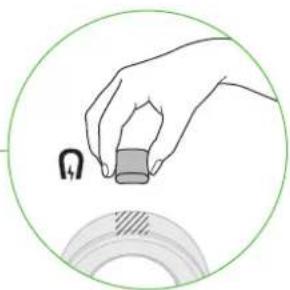
natural_image
Illustration of a hand holding a small object with a U-shaped magnet above it, enclosed in a green circle (no text or symbols)natural_image
Diagram showing a red laser beam interacting with green curved arrows inside a transparent cube (no text or symbols)natural_image
Diagram showing concentric arcs with a green arrow indicating direction, no text or symbols presentnatural_image
Simple 3D cube with a red gradient arc inside, no text or symbols presentModalità diffusa
natural_image
Simple illustration of a red pencil inside a transparent cube (no text or symbols)natural_image
Illustration of a hand holding a small fan or air conditioner with green directional arrows indicating rotation (no text or symbols)

natural_image
Illustration of a power drop tower with green directional arrows indicating movement or force (no text or symbols)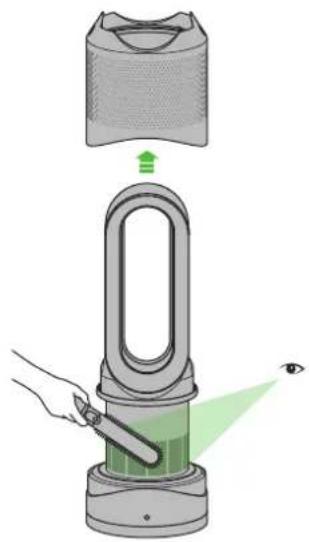
natural_image
Illustration of a hand using a power shaver to interact with an eye, showing green light emission from the device (no text or symbols present)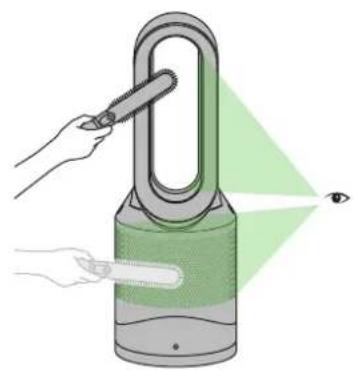
natural_image
Illustration of a hand using a pen to interact with a green-lit padlock, projecting light into an eye (no text or symbols present)natural_image
Illustration of a hand holding a U-shaped device with a red X mark, next to a gray electric fan (no text or symbols)

natural_image
Illustration of a hand holding a U-shaped device with a red X mark, no text or symbols present2

natural_image
Illustration of a hair dryer with a green upward arrow indicating the process (no text or symbols present)345

natural_image
Illustration of hands performing a step-up on a textured surface, with a magnified inset showing the step and direction of change (no text or symbols)
natural_image
Diagram showing airflow or particle movement from a cylindrical container to a perforated structure, with green arrows indicating direction (no text or symbols)natural_image
Diagram showing a cylindrical object with internal structure being lowered into a base, no text or symbols present.natural_image
Illustration of hands opening a box with a green upward arrow (no text or symbols)
natural_image
Diagram showing a cylindrical object being dropped into a meshed container with a green arrow indicating the process (no text or symbols present)
9 10 11

natural_image
Illustration of a hand holding a mesh device with a green downward arrow indicating a process or transformation (no text or symbols present)
natural_image
Diagram of a smart lock device with a close-up inset showing internal components (no text or symbols)12

natural_image
Green circular icon with a zigzag arrow and plus/minus symbols inside, no text or numbers present.
natural_image
Illustration of a hand holding a small object with a circular frame below (no text or symbols)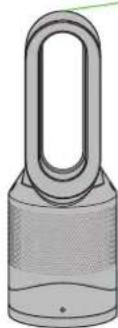
Для управления
natural_image
Illustration of a gray handheld device with a red circular button labeled 'Power' pointing to its side (no text or symbols on the device itself)natural_image
Diagram showing a red laser beam interacting with green curved arrows inside a transparent cube (no text or symbols)natural_image
Diagram showing concentric arcs with a green arrow indicating direction, no text or symbols presentnatural_image
Simple 3D cube with a red gradient arc inside, no text or symbols presentnatural_image
Simple illustration of a red pencil inside a transparent cube (no text or symbols)natural_image
Illustration of a hand holding a small fan or air conditioner with green directional arrows indicating rotation (no text or symbols)

natural_image
Illustration of a power drop tower with green directional arrows indicating movement or force (no text or symbols)
natural_image
Illustration of a hand using a power shaver to interact with an eye, showing green laser path and component (no text or symbols)
natural_image
Illustration of a hand using a pen to interact with a green-lit padlock, projecting light into an eye (no text or symbols present)natural_image
Illustration of hands holding a large industrial fan with a red X mark indicating a stop or release (no text or symbols present)

natural_image
Illustration of a hand holding a U-shaped device with a red X mark, no text or symbols present2

natural_image
Illustration of a hair dryer with a green upward arrow indicating the process (no text or symbols present)345

natural_image
Illustration of hands performing a step-up on a textured surface, with a magnified inset showing the step and direction of change (no text or symbols)
natural_image
Diagram showing airflow or particle movement from a cylindrical container to a perforated structure, with green arrows indicating direction (no text or symbols)natural_image
Simple line drawing of a cylindrical object with vertical supports (no text or symbols)Замена фильтра
678

natural_image
Illustration of hands opening a box with a green upward arrow (no text or symbols)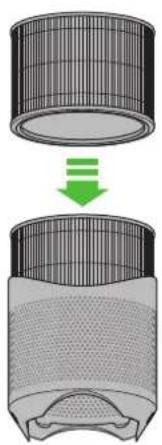
natural_image
Diagram showing a cylindrical object being dropped into a meshed container with a green arrow indicating the process (no text or symbols present)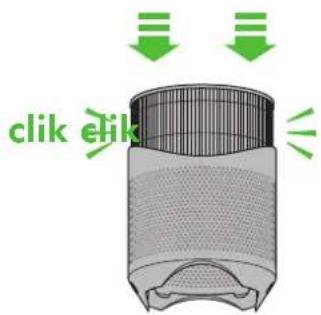
9 10 11

natural_image
Illustration of a pair of hands assembling a filter component, showing the top view with a green arrow indicating process (no text or symbols present)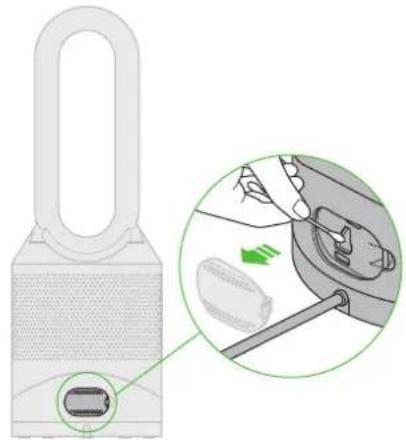
natural_image
Diagram of a smart lock device with a close-up inset showing internal components (no text or symbols)12

natural_image
Green circular icon with a zigzag arrow and plus/minus symbols inside, no text or numbers present.
natural_image
Illustration of a gray handheld device with a red circular button labeled 'Power' pointing to its side (no text or symbols on the device itself)Pri prvi uporabi bo privzeta temperatura naprave 3 °C visja od zaznane sobne temperature. Potem si bo naprava zapomnila zadnjo nastavljeno ciljno temperaturo.
natural_image
Diagram showing a red laser beam with green directional arrows indicating motion or force (no text or symbols)Nadzor oscilacije
Za začetek oscilacije pritisnite gumb za nadzor oscilacije. Za ustavitev oscilacije ponovno pritisnite gumb. Naprava ne bo oscilirala, ko držite pritisnjene nadzorne gumbe.
natural_image
Diagram showing concentric arcs with a green arrow indicating direction, no text or symbols presentnatural_image
Simple 3D cube with a red gradient arc inside, no text or symbols presentDifuzni način
natural_image
Simple illustration of a red pen inside a transparent cube (no text or symbols)Usmerjen način
natural_image
Illustration of a hand holding a small fan-shaped device with a green arrow indicating rotation (no text or symbols)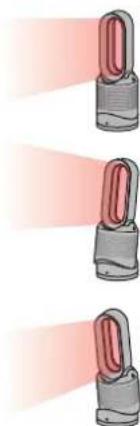
natural_image
Three identical illustrations of a lock switch with red light beams, shown from different angles (no text or symbols)natural_image
Illustration of a power shaver with a hand touching its surface, showing internal components and green directional arrows (no text or symbols)
natural_image
Illustration of a hand using a power tool to observe green laser emission from a digital tower, with an eye nearby (no text or symbols)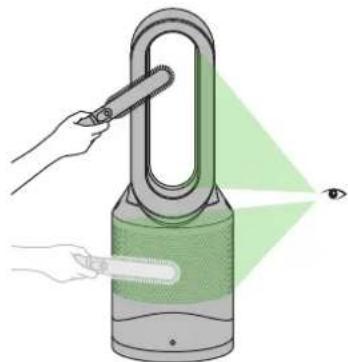
natural_image
Illustration of a hand using a handheld device to observe a green laser beam from a power shaver, with an eye symbol nearby (no text or labels)natural_image
Illustration of a hand cleaning a power tower with a red X mark indicating the handle (no text or symbols present)natural_image
Illustration of a hand holding a U-shaped device with a red X mark indicating the left-hand rule (no text or symbols present)2

natural_image
Illustration of a hair dryer with a green upward arrow indicating the process (no text or symbols present)natural_image
Illustration of hands performing a step-up on a textured surface, with a magnified inset showing the step and direction of change (no text or symbols present)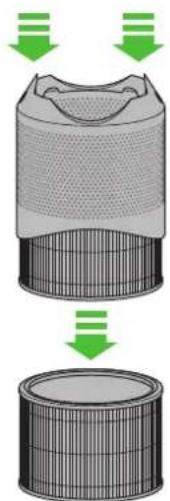
natural_image
Diagram showing airflow or particle movement between a cylindrical container and a perforated airfoil (no text or symbols)
natural_image
Diagram showing a cylindrical object with a downward arrow and a blank cylindrical base, no text or symbols present.natural_image
Illustration of hands opening a box with a green upward arrow (no text or symbols)
natural_image
Diagram showing a cylindrical object being dropped into a meshed container with a green arrow indicating the process (no text or symbols present)
9 10 11

natural_image
Illustration of a hand holding a mesh device with a green downward arrow indicating a process or transformation (no text or symbols present)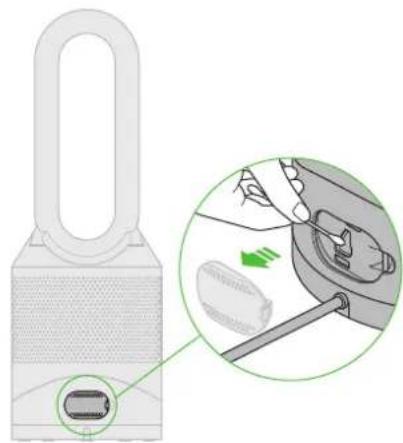
natural_image
Diagram of a smart lock with a close-up inset showing internal components (no text or symbols)12

Ko znova sestavite vašo napravo pritisnite tipko 'Standby ON/OFF' na daljinskem upravljalniku in jo držite 6 sekund, da bi tako ponastavili indikator za filter.

natural_image
Green circular icon with a zigzag arrow and plus/minus symbols inside, enclosed in a circle (no text or numbers)
USING YOUR DYSON APPLIANCE
PLEASE READ THE 'IMPORTANT SAFETY INSTRUCTIONS' IN THIS DYSON OPERATING MANUAL BEFORE PROCEEDING.
LOOKING AFTER YOUR DYSON APPLIANCE
• Do not carry out any maintenance or repair work other than that shown in this Dyson Operating Manual, or advised by the Dyson Helpline.
• Always disconnect the plug from the mains before inspecting for problems. If the appliance will not operate, first check the mains socket has electricity supply and that the plug is properly inserted into the socket.
OPERATION
- Ensure appliance is fully assembled in line with the instructions before use. Do not dismantle the appliance or use without the loop amplifier fitted.
• The appliance will not operate in heating mode unless the target temperature is above the room temperature.
• Each time the heating mode is selected, it conducts a short calibration cycle. Airflow will be automatically controlled during this cycle. Once the calibration cycle is complete, it will revert to the selected airflow speed.
• The appliance will not oscillate when the control buttons are pressed.
• Do not lubricate any part of this appliance.
AUTO MODE
• A period of 6 days is required after the machine is first used for the sensor to calibrate. During this period the machine may be more sensitive to VOCs (such as odours) than normal.
CONTROL WITHOUT THE REMOTE
• The appliance can be controlled through your Dyson Link app.
DYSON LINK APP CONNECTIVITY
• You must have a live internet connection and app enabled device in order for the Dyson Link app to work.
• The appliance only connects to 2.4GHz networks, which includes most modern routers. Check your router documentation for compatibility.
• Wi-Fi 2.4-2.5 GHz, 0.08 W max
- Supported Wi-Fi protocols:
IEEE802.11b (Not recommended)
IEEE802.11g
IEEE802.11n (Support only for 2.4GHz)
• Networked standby: 2.3 W
TILT FUNCTION
- Carefully hold the base and the main body. Tilt the amplifier forward or backward for the required airflow angle.
AUTOMATIC CUT-OUT
- For your safety this appliance is fitted with automatic cut-out switches that operate if the appliance tips over or overheats. If the switches operate, unplug the appliance and allow it to cool. Before restarting the appliance check and clear any blockages and ensure the appliance is on a solid level surface.
- In heating mode the appliance will automatically switch 'OFF' after 9 hours of continuous use and will return to standby mode. To restart the machine, press the power button on either the remote control or the base, or restart via the Dyson Link app.
REPLACEABLE PARTS
BATTERY REPLACEMENT
!
CAUTION
• Unscrew the battery compartment on the remote control. Loosen the base and pull to remove the battery.
• Do not install backwards or short circuit the batteries.
• Do not attempt to dismantle or charge the batteries. Keep away from fire.
• Always replace the screws in the remote control.
• Follow battery manufacturers' instructions when installing new batteries (battery type CR 2032).
NON-WASHABLE FILTER UNIT
- Your filter unit is non-washable and non-recyclable.
• To replace your filter unit follow the steps as shown. - When disposing of the exhausted filter unit please do so in accordance with local regulations.
• A new filter unit can be purchased at www.dyson.com/filter.
DISPOSAL INFORMATION
- Dispose of or recycle the battery in accordance with local ordinances or regulations.
This marking indicates that this product should not be disposed with other household wastes throughout the EU. To prevent possible harm to the environment or human health from uncontrolled waste disposal, recycle it responsibly to promote the sustainable reuse of material resources. To return your used device, please use the return and collection systems or contact the retailer where the product was purchased. They can take this product for environmental safe recycling.
[NO TEXT]
- Keep the used batteries away from children as these can still harm children if swallowed.
- Dyson products are made from high grade recyclable materials. Recycle where possible.
- Your filter unit is non-washable and non-recyclable.
• The battery should be removed from the product before disposal.
GUARANTEE TERMS AND CONDITIONS
DYSON CUSTOMER CARE
THANK YOU FOR CHOOSING TO BUY A DYSON APPLIANCE
After registering your free 2 year guarantee, your Dyson appliance will be covered for parts and labour for 2 years from the date of purchase, subject to the terms of the guarantee. If you have any questions about your Dyson appliance, call the Dyson Helpline with your serial number and details of where/when you bought the appliance.
Most questions can be solved over the phone by one of our trained Dyson Helpline staff.
Alternatively, visit www.dyson.com for online help, general tips and useful information about Dyson.
Your serial number can be found on your rating plate which is on the base of the appliance.
If your Dyson appliance needs a service, call the Dyson Helpline so we can discuss the available options. If your Dyson appliance is under guarantee, and the repair is covered, it will be repaired at no cost.
PLEASE REGISTER AS A DYSON APPLIANCE OWNER
To help us ensure you receive prompt and efficient service, please register as a Dyson appliance owner. There are three ways to do this:
• Online at www.dyson.co.uk/register
• Telephone the Dyson Helpline on 0800 298 0298 (UK) or 01 475 7109 (ROI).
• Smartphone. Download the Dyson Link app and you will be taken through registration as part of the set up.
This will confirm ownership of your Dyson appliance in the event of an insurance loss, and enable us to contact you if necessary.
LIMITED 2 YEAR GUARANTEE
TERMS AND CONDITIONS OF THE DYSON 2 YEAR LIMITED GUARANTEE
WHAT IS COVERED
- The repair or replacement of your Dyson appliance (at Dyson's discretion) if it is found to be defective due to faulty materials, workmanship or function within 2 years of purchase or delivery (if any part is no longer available or out of manufacture Dyson will replace it with a functional replacement part).
• Where this machine is sold outside of the EU, this guarantee will only be valid if the appliance is used in the country in which it was sold. - Where this machine is sold within the EU, this guarantee will only be valid (i) if the appliance is used in the country in which it was sold or (ii) if the appliance is used in Austria, Belgium, France, Germany, Ireland, Italy, Netherlands, Spain or the United Kingdom and the same model as this appliance is sold at the same voltage rating in the relevant country.
WHAT IS NOT COVERED
- Replacement filters. The appliance's filter is not covered by the guarantee. Dyson does not guarantee the repair or replacement of a product where a defect is the result of:
• Damage caused by not carrying out the recommended appliance maintenance. - Accidental damage, faults caused by negligent use or care, misuse, neglect, carelessness or operation or handling of the appliance which is not in accordance with the Dyson Operating Manual.
- Use of the appliance for anything other than normal domestic household purposes.
• Use of parts not assembled or installed in accordance with the instructions of Dyson.
• Use of parts and accessories which are not genuine Dyson components. - Faulty installation (except where installed by Dyson).
• Repairs or alterations carried out by parties other than Dyson or its authorised agents. - Blockages – please refer to the Dyson Operating Manual for details of how to look for and clear blockages.
• Normal wear and tear (e.g. fuse etc.). - Reduction in battery discharge time due to battery age or use (where applicable). If you are in any doubt as to what is covered by your guarantee, please contact the Dyson Helpline.
SUMMARY OF COVER
• The guarantee becomes effective at the date of purchase (or the date of delivery if this is later).
- You must provide proof of (both the original and any subsequent) delivery/purchase before any work can be carried out on your Dyson appliance. Without this proof, any work carried out will be chargeable. Keep your receipt or delivery note.
• All work will be carried out by Dyson or its authorised agents.
• Any parts which are replaced by Dyson will become the property of Dyson.
• The repair or replacement of your Dyson appliance under guarantee will not extend the period of guarantee.
• The guarantee provides benefits which are additional to and do not affect your statutory rights as a consumer.
PRIVACY AND PERSONAL DATA PROTECTION
You will need to provide us with basic contact information when you register your Dyson Product or the Dyson Link App;
WHEN REGISTERING YOUR DYSON PRODUCT
• You will need to provide us with basic contact information to register your product and enable us to support your guarantee.
WHEN REGISTERING VIA THE DYSON LINK APP
You will need to provide us with basic contact information to register the Dyson Link App; this enables us to securely link your product to your instance of the App.
- When you register, you will have the opportunity to choose whether you would like to receive communications from us. If you opt-in to communications from Dyson, we will send you details of special offers and news of our latest innovations. We never sell your information to third parties and only use information that you share with us as defined by our privacy policies which are available on our website. www.dyson.com/support/privacypolicy
FR/BE/CH
UTILISATION DE VOTRE APPAREIL DYSON
VEUILLEZ LIRE ATTENTIVEMENT LES CONSIGNES DE SÉCURITÉ IMPORTANTES DE CE MANUEL DYSON AVANT DE CONTINUER.
ENTRETIEN DE VOTRE APPAREIL DYSON
INFORMATIONS DE MISE AU REBUT
SERVICE CONSOMMATEURS DYSON
MERCI D'AVOIR CHOISI UN APPAREIL DYSON
UW DYSON APPARAAT ONDERHOUDEN
MANUTENZIONE DELL'APPARECCHIO DYSON
CONNETTIVITÀ APP DYSON LINK
JAK PŘÍSTROJ DYSON POUŽÍVAT
NEŽ BUDETE POKRAČOVAT, PŘEČTĚTE SI „DŮLEŽITÉ BEZPEČNOSTNÍ POKYNY“ V TOMTO NÁVODU NA POUŽITÍ DYSON.
ÚDRŽBA PŘÍSTROJE DYSON
DYSON-ASIAKASPALVELU
KIITOS, ETTÄ VALITSIT DYSON-LAITTEEN.
SLIK VEDLIKEHOLDER DU DYSON-PRODUKTET
DYSON LINK-APPTILKOBLING
GWARANCJA NIE OBEJMUJE:
W PRZYPADKU REJESTROWANIA PRODUKTU FIRMY DYSON
ANSLUTNING MED DYSON LINK-APP
SAMMANFATTNING AV GARANTIN
UPORABA VAŠE NAPRAVE DYSON
PROSIMO VAS, DA PRED NADALJEVANJEM PREBERETE "POMEMBNA VARNOSTNA NAVODILA" V TEM DYSONOVEM PRIROČNIKU ZA UPORABO.
NEGA VAŠE NAPRAVE DYSON
| Model Identifier: HP02 | ||||||
| Item | Symbol | Value | Unit | Item | Unit | |
| Heat output Type of heat input, for electric storage | local space heaters | only | ||||
| Nominal heat output P | nom | 2.0 | kW | manual heat charge control, with integrated thermostat | No | |
| Minimum heat output (indicative) | P_min | 2.0 kW | manual heat charge control with room and/or outdoor temperature feedback | No | ||
| Maximum continuous heat output | P_max,c | 2.0 kW | electronic heat charge control with room and/or outdoor temperature feedback | No | ||
| Auxiliary electricity consumption | fan assisted heat output | Yes | ||||
| At nominal heat output el | max | 2.0 kW | Type of heat output/room temperature control | |||
| At minimum heat output el | min | 2.0 | kW | single stage heat output and no room temperature control | No | |
| In standby mode | el_ss | <0.5 | W | Two or more manual stages, no room temperature control | No | |
| with mechanic thermostat room temperature control | No | |||||
| with electronic room temperature control | No | |||||
| electronic room temperature control plus day timer | No | |||||
| electronic room temperature control plus week timer | Yes | |||||
| Other control options (multiple selections possible) | ||||||
| room temperature control, with presence detection | No | |||||
| room temperature control, with open window detection | No | |||||
| with distance control option | Yes | |||||
| with adaptive start control | No | |||||
| with working time limitation | Yes | |||||
| with black bulb sensor | No | |||||
| Contact details | Dyson Technology LimitedTetbury Hill, Malmesbury, SN16 0RP, United KingdomTel +44 1666 827200 | |||||
UK
Dyson Customer Care
askdyson@dyson.co.uk
0800 298 0298
Dyson Technology Limited, Tetbury Hill, Malmesbury,
Wiltshire, SN16 ORP
ROI
Dyson Customer Care
askdyson@dyson.co.uk
01 475 7109
Dyson Ireland Limited, Office 2, Central Park,
Leopardstown, Dublin 18, Ireland
AT
Dyson Kundendienst
help@dyson.at
0800 88 66 73 42
switzerland@dyson.com
0800 740 183
Dyson SA, Hardturmstrasse 253, CH-8005 Zürich
CY
Burotek sarl (Member of Antaki Group)
info@antaki.com.lb
01-252 474
Moutran Bldg., Sin El Fil Boulevard, P.O.Box: 90-720, Beirut
LT
Dyson servisas
remontas@bcsc.lt
8 700 555 95
Baltic Continent, UAB Lukšio g. 23, Vilnius, Lietuva
MA
IDEAPLUS SARL
info@idea-group.ma
0801 001 424
18 Rue Sidi Bennour, Quartier Ain Borja, Casablanca,
Maroc
NL
Dyson Helpdesk
help@dyson.nl
0800 020 6203
Dyson BV, Keizersgracht 209, 1016DT Amsterdam
NO
help@dyson.no
80069196
CPM International Telebusiness SL, Edificio Ono, Carrer de
Lepant 350, Planta 1a, 08025 Barcelona, Spain
PL
service.dyson@aged.com.pl
022 738 31 03
Aged Sp. z o.o., ul. 3 Maja 8, 05-800 Pruszków, Polska
PT
Chysty Svet Lodgistic Ltd
0 800 50 41 80
21 Moscowskiy Av, Kiev - 04655 Ukraine
ZA
Dyson Customer Care
DysonService@tudortech.co.za
087 807 9353
Tudortech, 4th floor Park On Long, 66 Long Street, Cape
Town, 8001, South Africa