TRA 69 HF - Remote control THEBEN - Free user manual and instructions
Find the device manual for free TRA 69 HF THEBEN in PDF.
| Product type | HF remote control |
| Brand | THEBEN |
| Model | TRA 69 HF |
| Power supply | 12 V DC battery (type A23) |
| Transmission range | Approx. 50 m (outdoors) |
| Transmission frequency | 433.92 MHz |
| Modulation | ASK |
| Channel setting | 64 combinations (16 HF codes × 4 selectors) |
| Operating temperature | 0 °C to +45 °C |
| Transmission indicator | LED |
| Protection type | IP 40 |
| Package contents | Transmitter, user manual |
| Main functions | On/off, light dimmer (with compatible receiver), memory of light level, control up to 64 receivers |
| Design | Mini pocket switch, can be used as keychain |
| Compatibility | Compatible with Theben HF receivers (REC 100 HF, REC 154 HF, etc.) |
| Battery replacement | Yes, 12 V A23 battery |
| Maintenance | Clean with a soft, dry cloth. Do not use chemicals. |
| Safety | Compliant with EU directives (LVD, EMC, R&TTE). Use only with compatible receivers. |
Frequently Asked Questions - TRA 69 HF THEBEN
User questions about TRA 69 HF THEBEN
0 question about this device. Answer the ones you know or ask your own.
Ask a new question about this device
Download the instructions for your Remote control in PDF format for free! Find your manual TRA 69 HF - THEBEN and take your electronic device back in hand. On this page are published all the documents necessary for the use of your device. TRA 69 HF by THEBEN.
USER MANUAL TRA 69 HF THEBEN
Suggestion de solution
- Rated Voltage: DC 12V (A23) battery.
Transmission Range: 50M (in open air).
Transmission Frequency: 433.92MHz.
Modulation: ASK
Channel:
Operation Temperature:
Transmission Status:
Environmental Protection:
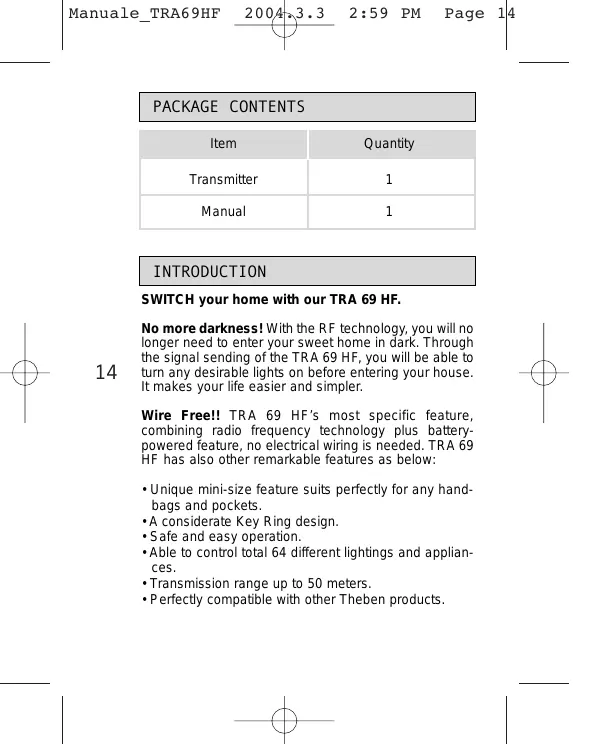
PACKAGE CONTENTS
| Item | Quantity |
| Transmitter | 1 |
| Manual | 1 |
INTRODUCTION
SWITCH your home with our TRA 69 HF.
No more darkness! With the RF technology, you will no longer need to enter your sweet home in dark. Through the signal sending of the TRA 69 HF, you will be able to turn any desirable lights on before entering your house. It makes your life easier and simpler.
Wire Free!! TRA 69 HF's most specific feature, combining radio frequency technology plus battery-powered feature, no electrical wiring is needed. TRA 69 HF has also other remarkable features as below:
- Unique mini-size feature suits perfectly for any handbags and pockets.
- A considerate Key Ring design.
- Safe and easy operation.
- Able to control total 64 different lightings and appliances.
Transmission range up to 50 meters. - Perfectly compatible with other Theben products.
SET-UP CHANNEL

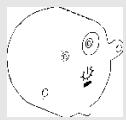
Transmitter and Receiver communicate each other by having the same channel. Transmitter TRA 69 HF has been preset its System Channel at I before it is ex-factory (See Fig.2), AND unit channel is fixed at "11" (See Fig.3). The user can respectively change the system channel and fix the unit channel at "5,7,9,11" according to his preference. Please make sure the channel settings on transmitter and receiver are identical.
However, if the user finds the transmitter TRA 69 HF and Receiver have the same channel setting with other wireless device around them, a new channel combination is DEFINITELY required.
Please follow steps below to change the channel settings of Transmitter TRA 69 HF.
15
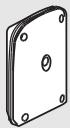
- Loosen the screws of cover with a crosshead screwdriver and take it off from the button case (See Fig.1).
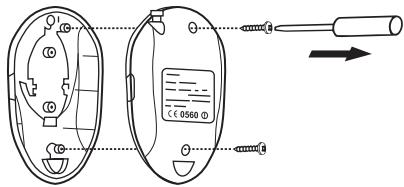
Fig. 1
- Adjust system channel to the desired position, if it is necessary (See Fig. 2).
- Cover the bottom case and tighten the screws.
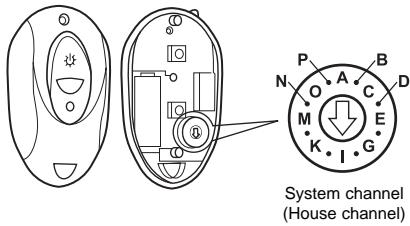
Fig. 2
16
Note: The 16-codes System channel and the 4-section Unit channel provide flexible combination capability of a total 64 different combinations.
- Make sure the arrowheads are adjusted to the proper position.
- Make sure the transmitter and receiver are set with the same channel i.e. Adjusting two unit's system channel (house channel) to position "I".
OPERATION
A. Helpful Tips for a Better Transmission
-
In order to obtain better signal transmission performance, please have TRA 69 HF held at least 1 meter high from floor, while the signal is emitting.
-
Keep Transmitter TRA 69 HF being located from any conductive devices, such as aluminum reinforced UPVC window and door, metallic plate, and electric cables, at least one meter away.
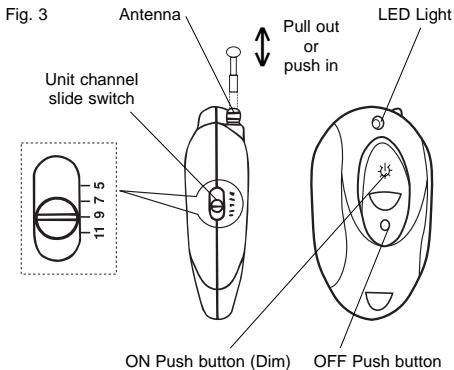
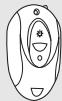
- During operation, please pull out the antenna inside Transmitter TRA 69 HF for better transmission performance (See Fig. 3).
- Keep electric cable from nearing to antenna that would cause radio waves interference and affect the reception of signal from Transmitter TRA 69 HF.
During operation, make sure the combining receiver at least 2 meters away from other receivers to avoid shortening the remote control distance.
B. Operation of Transmitter TRA 69 HF
1. Operation and function
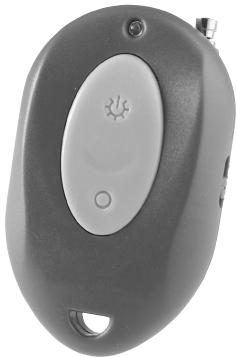
On the front panel of Transmitter TRA 69 HF, The top mark " 出 " stands for ON (Dim) switch and the bottom mark "O" stands for OFF switch. On the flank of Transmitter TRA 69 HF has one unit channel slide switch (See Fig.3). The switch can be respectively fixed at 5,7,9 or 11 and control four different combining Receivers in different locations.
When press ON button of Transmitter TRA 69 HF, Transmitter sends out an "ON" signal to the combining receiver which receives the signal and its controlled unit turns on. When press OFF button of Transmitter TRA 69 HF, Transmitter sends out an "OFF" signal to the combining receiver which receives the signal and its controlled unit turns off.

17
18
2. LED function
LED on Transmitter TRA 69 HF is mainly used as an indicator. When press ON button, LED turns on and a signal transmits to the combining Receiver, the controlled unit of receiver also turns on. When press OFF button, LED turns on and the controlled unit of receiver receives OFF signal and turns off.
3. Dimmer function
When the combining receiver has dimmer feature, by keeping pressing ON pushbutton of TRA 69 HF can cyclically adjust the illumination level of the connected light device of receiver from the rate about 5% - 100% .
The illumination value of TRA 69 HF can be stored as memory that means when user turns light on again, the
illumination level will remain at previous rating which is the value before the lighting device was turned off.

When combining chime or alert receiver has no dimmer function, TRA 69 HF can only activate the receiver, but can not DIM control the receiver.
BATTERY REPLACEMENT
temperature. The more of activating frequency and the lower of environmental temperature is, the sooner the power consumes. We like to remind you to take off the battery when the power is insufficient or you will be long period not to use the Transmitter TRA 69 HF. In addition, please note that reverse polarity may be subject Transmitter TRA 69 HF to damage (See Fig.
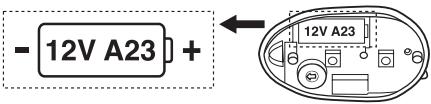
Fig. 4
19
Transmitter TRA 69 HF requires a 12V A23 battery. When the battery is in low battery status, LED gets faint or it becomes difficult to operate the receiver, please replace the battery.
Please follow the steps below for changing the battery.
- Loosen the screws of cover with a crosshead screwdriver and take it off from the bottom case (See Fig.1).
- Take out the used battery and put in a new battery.
- Cover the bottom case and tighten the screws with a crosshead screwdriver.
TROUBLE SHOOTING
When Transmitter TRA 69 HF fails to work normally, check presumptive problems and suggested solutions in following table that will hopefully solve your problem.
| Problem | Possible cause |
| Press ON button of TRA 69 HF, the LED indicator does not turn on. | 1. Low battery or battery is inserted incorrectly. 2. No battery. |
| Receiver can not receive signal. | 1. Transmitter and Receiver may have different codes. 2. Exceeding working range. 3. Interference. 4. Signal is faint. |
20
Suggested solutions
- Replace the battery or make sure the battery is inserted correctly.
-
Insert a new battery.
-
Make sure their codes are identical.
- Make sure it is within effective range.
- Make sure no other products with the same codes and frequency affect the reception and transmission of combining receiver and transmitter.
- Make sure antenna is pull out completely.
21
EXTENTION OF TRA 69 HF
TRA 69 HF is fully compatible with other Theben product that allows the user to integrate any desired quantities with TRA 69 HF to build up a specific user network of transmitters and receivers at home, office and small-scaled store.
Please refer to the following chart which is used to illustrate the typical compatible machines.
Transmitter
TRA 69 HF
Mini switch
Receiver
REC 100 HF
Outdoor/Indoor
10A Receiver
REC 154 HF
Build-in Dim
Type Module
C∈APPROVAL

C∈0560①
| N | DK | SF | IS | S |
| E | D | F | P | I |
| B | NL | L | GR | GB |
| IRL | CH | A |
Remarks:
- Theben HF products are allowed to sell to all EU and EFTA countries.
- The receiver complies with essential safety and radio frequency requirements in accordance with CE (LVD & EMC) and R & TTE directives.
23

TRA 69 HF TRASMETTITORE HF MINI INTERRUPTORE TASCABILE
24
SPECIFICHE TECNICHE
circa 50m
(in Campo aperto).
433.92 MHz.
ASK
64 combinazioni
da 0^ Ca + 45° C.
LED
IP 40.
CONTENUTO DELL'IMBALLAGGIO