HVC5101W - Vacuum Cleaner HISENSE - Free user manual and instructions
Find the device manual for free HVC5101W HISENSE in PDF.

User questions about HVC5101W HISENSE
0 question about this device. Answer the ones you know or ask your own.
Ask a new question about this device
Download the instructions for your Vacuum Cleaner in PDF format for free! Find your manual HVC5101W - HISENSE and take your electronic device back in hand. On this page are published all the documents necessary for the use of your device. HVC5101W by HISENSE.
USER MANUAL HVC5101W HISENSE
natural_image
Line drawing of a Hisense vacuum cleaner with attached case dux device (no text or symbols on the device itself)Cross Duo
1
natural_image
Line drawing of a vacuum cleaner with attached device (no text or symbols)2
natural_image
Simple line drawing of a bent tool or bracket (no text or symbols)3
4
natural_image
Two rectangular blocks with textured fill patterns, no text or symbols visible5
6

SI Navodila za uporabo....3
EN Instruction manual....23
natural_image
Line drawing of a vacuum cleaner with adjustable arm and base (no text or symbols)natural_image
Line drawing of a mechanical device with a handle and lever (no text or symbols)natural_image
Simple line drawing of a bent tool or bracket with two arrows pointing to the tip (no text or symbols)natural_image
Line drawing of a device with an arrow pointing to a component, no text or symbols presentnatural_image
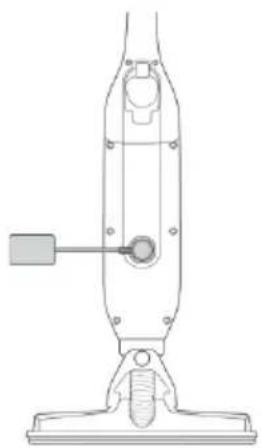
Line drawing of a vacuum cleaner with attached screw base (no text or symbols)Pretvornik s kablom za polnjenje pritrdite na zadnji strani sesalnika. Pretvornik ima magnetni nastavek za lažji priklop za polnjenje.
natural_image
Diagram of a hand using a tool to lift a small object on a flat surface, with arrows indicating motion (no text or symbols present)natural_image
Technical line drawing of a mechanical component with directional arrows indicating rotation (no text or symbols)natural_image
Line drawing of a vehicle chassis with an arrow pointing to a rectangular component (no text or symbols)natural_image
Line drawing of a vacuum cleaner with adjustable arm and hook (no text or symbols)Sastavite ručku uređaja i motornu jedinicu. Uređaj je pravilno sastavljen ako je čvrsto pričvršćen do kraja na utore.
natural_image
Diagram of a mechanical or architectural component with no visible text or symbolsnatural_image
Simple line drawing of a curved object with two arrows pointing to its top edge (no text or symbols)natural_image
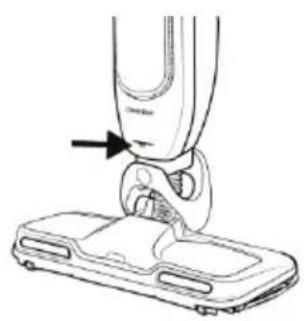
Line drawing of a mechanical device with an arrow pointing to a component (no text or symbols present)Za prskanje vode po podu, pritisnite gumb na stražnjoj strani ručke. Uređaj prska vodu kroz mlaznicu na prednjoj strani, iznad četke.
natural_image
Line drawing of a vacuum cleaner with attached screw base (no text or symbols)Pričvrstite adapter za punjenje s kabelom napajanja na stražnju stranu usisavača. Adapter/punjač ima magnetski umetak za lakše povezivanje i punjenje.
natural_image
Diagram of a hand using a tool to lift a car body panel, showing motion arrows (no text or symbols)natural_image
Technical line drawing of a mechanical component with directional arrows indicating rotation (no text or symbols)Kad izvadite spremnik za prašinu iz četke, pritisnite gumb kako biste otvorili spremnik za prašinu i ispraznili ga.
Spremnik se može oprati, ali se mora temeljito osušiti prije zamjene.
natural_image
Line drawing of a 3D object with an arrow pointing to a small block (no text or symbols)Uklonite filtar za prašinu kako je prikazano na slici i lagano ga protresite. Možete ga i nježno oprati, ali bez agresivnog rukovanja jer se lako može oštetiti. Ako je filtar oštećen, zamijenite ga jer nepravilna uporaba može dovesti do oštećenja motorne jedinice. Za optimalnu uporabu preporučujemo zamjenu filtra svakih 6 mjeseci
natural_image
Line drawing of a vacuum cleaner with a vertical handle and mounting base (no text or symbols)Sastavite ručku uređaja i jedinicu sa motorom. Uređaj je pravilno sastavljen kada su svi delovi pričvršćeni u utore.
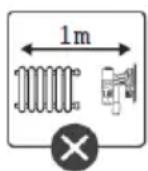
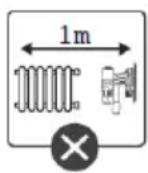
Kada je uređaj uskladišten ili za vreme punjenja, treba ga držati na udaljenosti od najmanje 1 m od najbližeg izvora toplote. Zbog svog dizajna, uređaj nije samostojeći.
natural_image
Line drawing of a mechanical device with a handle and lever (no text or symbols)Da biste otvorili posudu za čistu vodu, postupite kao što je prikazano na slici. Napunite posudu za vodu vodom iz slavine (sobne temperature) do oznake maks. koja označava maksimalnu dozvoljenu količinu. Nemojte da prekoračite maks. oznaku da biste sprečili izlivanje. Zatvorite poklopac.
natural_image
Simple line drawing of a bent tool or tool with two arrows pointing to the tip (no text or symbols)Dugme za uključivanje/isključivanje se nalazi na prednjem delu ručke. Pomoću dugmeta na zadnjoj strani ručke kontrolišite količinu vode koja se pršće po podu. Pod se može navlažiti po želji ili potrebi. Uređaj ne dozvoljava mokro usisavanje; stoga, pazite da ne navlažite pod preterano.
natural_image
Line drawing of a device with a handle and base, no text or symbols presentDa biste poprskali pod vodom, pritisnite dugme na zadnjoj strani ručke. Uređaj raspršuje vodu kroz mlaznicu sa prednje strane, iznad četke.
natural_image
Line drawing of a vacuum cleaner with attached screw base (no text or symbols)Priključite adapter za punjenje sa kablom za napajanje na zadnju stranu usisivača. Adapter/punjač ima magnetni umetak za lakše povezivanje i punjenje.
Uređaj se ne može uključiti tokom punjenja.
Čišćenje uređaja
natural_image
Diagram of a hairdryer tool interacting with a mechanical component (no text or symbols visible)Posuda za prašinu se nalazi na gornjem delu četke.
Da biste uklonili posudu za prašinu, uhvatite povišeni srednji deo i jednostavno ga podignite.
natural_image
Technical line drawing of a mechanical component with directional arrows indicating rotation (no text or symbols)Kada izvadite posudu za prašinu iz četke, pritisnite dugme da biste otvorili posudu za prašinu i ispraznili je.
natural_image
Diagram of a car body with an arrow pointing to a small block (no text or symbols present)Uklonite filter za prašinu kao što je prikazano na slici i lagano ga protresite. Možete ga i nežno oprati, ali bez agresivnog rukovanja, jer se lako može oštetiti. Ako je filter oštećen, zamenite ga jer nepravilna upotreba može dovesti do oštećenja jedinice sa motorom. Za optimalnu upotrebu preporučujemo zamenu filtera svakih 6 meseci.
natural_image
Line drawing of a vacuum cleaner with adjustable arm and base (no text or symbols)natural_image
Line drawing of a mechanical component or bracket with no visible text or symbolsnatural_image
Simple line drawing of a curved object with two arrows pointing to its top edge (no text or symbols)natural_image
Line drawing of a mechanical device with a handle and base, no text or symbols presentnatural_image
Line drawing of a vacuum cleaner with a handle and mounting base (no text or symbols)natural_image
Diagram of a hand using a tool to press or install a mechanical component, with arrows indicating movement (no text or symbols present)natural_image
Technical line drawing of a mechanical component with directional arrows indicating rotation (no text or symbols)natural_image
Simple line drawing of a vehicle chassis with an arrow pointing to a box (no text or symbols)When using the vacuum cleaner always observe the following basic safety precautions: Carefully read this instruction manual and only use the appliance in accordance with the instructions herein. Before using the appliance for the first time, remove all protective film or plastics. // Never leave the appliance unattended during use. // Before using the appliance, carefully assemble all of its parts. // Only use the appliance indoors and in dry areas. // Only use the appliance with the parts recommended by the manufacturer. // Do not use the appliance if it has been dropped, if it is damaged, if it has been kept outdoors, or if it has been dropped or immersed in a liquid. // Regular cleaning can extend the appliance's useful life. // Make sure your hair, loose parts of your garments, fingers or other parts of the body do not come into contact with the vents or moving parts of the appliance. // The appliance complies with all required standards regarding electricity, and radio interference regulations. // The appliance is not intended to be used by children and persons with impaired physical or mental abilities. This appliance may be used by children aged 8 years and more, and by persons with reduced physical, sensory or mental capabilities or lack of experience and knowledge, if they are supervised during the use of the appliance or if they have been provided relevant instructions regarding the use of the appliance in a safe way, and they understand the hazards involved. Keep children under supervision while they are using the appliance and make sure they do not play with it. // Children should not perform any cleaning or maintenance tasks on the appliance, unless they are older than 8 years, and they do so under supervision. // Switch off the appliance after use.
Danger
Do not immerse the main unit/appliance housing or the charging base in water or any other liquid and do not rinse them under running water.
Special warnings
Before connecting the appliance or the charging base with the power cord to the power mains, make sure the indicated voltage matches the voltage of the power mains in your home. // Do not used a damaged vacuum cleaner or a damaged charging base (or adapter – depending on your vacuum cleaner model). // If the charging base (or adapter) is damaged, replace it only with an original spare part in order to avoid danger. // A transformer is integrated into the adapter. Removal and replacement of adapter with another one are not allowed as this may lead to a dangerous situation. // Only charge the vacuum cleaner with the supplied adapter and charging base. The adapter may heat up during charging. This is a normal occurrence. (Depending on your model, if it has an adapter.) // Switch off the appliance during charging. // Never use the vacuum cleaner without filters or filtering unit in place. // The exhaust vents may not be blocked during vacuum cleaning. // Only use the appliance for household purposes and indoors. // Keep the suction vents clean and free in order to ensure optimum and unimpeded suction power of the appliance. It is highly recommended to regularly clean the open parts of the suction hose, and to remove dust, hair, or anything else that may block the airflow. // Before cleaning the support or the charging base, unplug it from the power socket. // Never use the vacuum cleaner to clean up embers or filings, cigarette butts,
matches, liquids (e.g. water, carpet cleaning foam), or sharp or pointed objects (broken glass etc.). // Keep the suction tube or the open part of the appliance away from your face and body. // Never use the appliance to vacuum construction material (such as fine sand, lime, cement powder, toner dust etc.). This can cause damage to the appliance.
Problems and solution
| Problem | Possible reason | Solution |
| Not working. | The battery is dead.The handy VC is not assembled correctly. | Charge.Assemble the handy VC correctly. |
| Suction power has decreased. | The dust cup is full.Block in filter.Block in the air inlet tunnel or on the roller of electrical brush. | Pour out the dust.Clean or change filter.Clean the electrical brush. |
| The VC is not charging. | The charger is not connected on socket.The connector of charger is not connected to the hole of base body.The handy VC is not assembled to the body. | Connect the charger on socket.Connect the charger with base body of VC.Assemble the handy VC on body. |
| Use very short time after charging. | Not enough charging time.The battery is aging. | Charge according to instruction.Change the battery. |
Environment
Do not throw away the appliance with the normal household waste at the end of its life. Hand it in at an official collection point for recycling. By doing this, you help to preserve the environment.
This appliance is marked according to the European directive 2012/19/EU on Waste Electrical and Electronic Equipment (WEEE). This guideline is the frame of a European-wide validity of return and recycling on Waste Electrical and Electronic Equipment.
Guarantee & service
If you need information or if you have a problem, please contact the Hisense Customer Care Centre in your country (the phone number is in the worldwide guarantee leaflet). If there is no Customer Care Centre in your country, go to your local Hisense dealer or contact the Service department of Hisense domestic appliances.
Note: The warranty on the battery of vacuum cleaner is 12 months.
For personal use only!
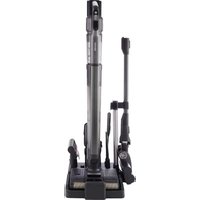
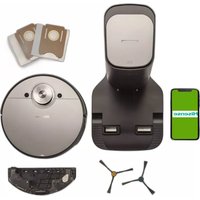
For easier transport, some appliance parts are packed separately and safely placed in the main packaging unit.
Before first use, read and observe the instructions for assembly and safe use.
Due to its design, the appliance is not free-standing. Therefore, we recommend safe placement on the charging station. The appliance is intended for household use, for dry vacuum cleaning with an option for wet mopping of the floor.
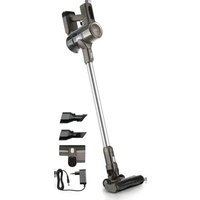
Appliance parts
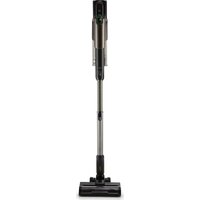
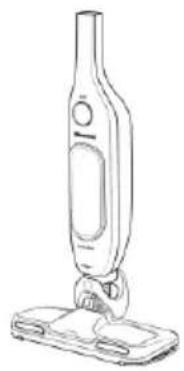
1 Housing with motor unit, battery, and dust bin
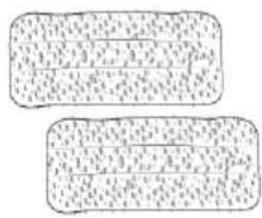
4 2 × Wet floor cleaning mop
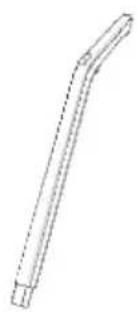
2 Handle
5 Dispenser tray
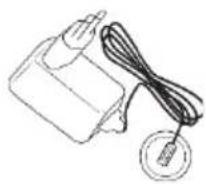
3 Adapter with power cord
6 Extra filter
Appliance assembly
natural_image
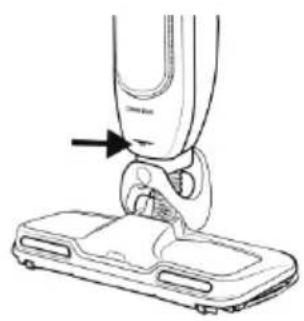
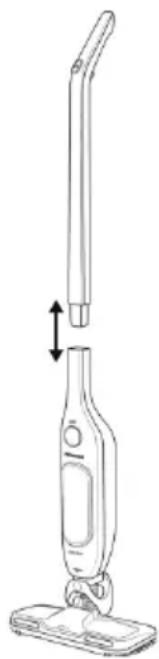
Line drawing of a vacuum cleaner with a vertical handle and attached base (no text or symbols)Assemble the appliance handle and the motor unit. The appliance is correctly assembled with the appliance is firmly attached all the way to the grooves.
When the appliance is stored or during charging, it should be kept at least 1 m away from the closest heat source. Due to its design, the appliance is not free-standing.
Using and operating the appliance
The appliance can be used as an upright vacuum cleaner that also allows wet mopping of the floor. The two functions can also be used separately. When you are only vacuum cleaning and not using the mopping function, we recommend removing the mopping pad from the bottom of the brush,
natural_image
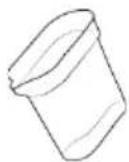
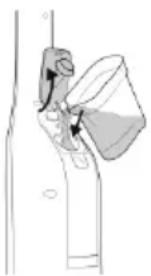
Line drawing of a mechanical component or bracket with no visible text or symbolsTo open the clean water tank, proceed as displayed in the figure. Fill the water tank with tap water (room temperature) up to the max. marking indicating the maximum allowed amount. Do not exceed the max. marking to prevent spilling. Close the lid.
natural_image
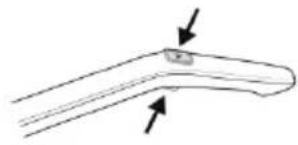
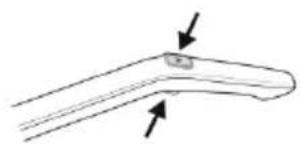
Simple line drawing of a curved object with two arrows pointing to its top edge (no text or symbols)The on/off button is located on the front part of the handle. Use the button on the back side of the handle to control the amount of water sprayed on the floor. You may wet the floor as desired or necessary. The appliance does not allow wet vacuum cleaning; therefore, be careful not the wet the floor excessively.
natural_image
Line drawing of a mechanical device with an arrow pointing to a component (no text or symbols)To spray water onto the floor, press the button on the back side of the handle. The appliance sprays water through a nozzle on the front side, above the brush,

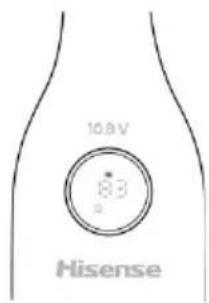
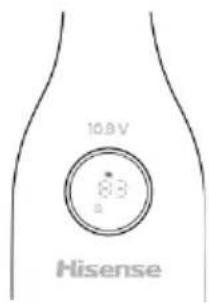
The display unit on the front side indicates the following: The appliance has a digital battery charge indicator. It indicates the current battery charge during use or during the charging process. Vacuum cleaning indicator Mopping indicator
Charging the appliance
natural_image
Line drawing of a vacuum cleaner with a handle and base mount (no text or symbols)Attach the charging adapter with the power cord to the back side of the vacuum cleaner. The adapter/charger has a magnetic insert for easier connection and charging.
The appliance cannot be powered on during charging.
Cleaning the appliance
Before each use, make sure the appliance is clean and that the dust bin and filter are always clean; only this way can you ensure a long useful life.
natural_image
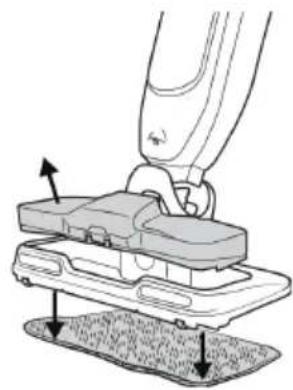
Diagram of a mechanical device with arrows indicating movement or force, no visible text or symbolsThe dust bin is located on the top part of the brush.
To remove the dust bin, grab the elevated middle part and simply lift it.
Also, remove the mopping pad attached to the bottom of the brush by means of a hook-and-loop fastener. The pad can be reused and is machine washable at up to 40 °C. We advise against machine drying, as excessive temperature may result in deformation.
natural_image
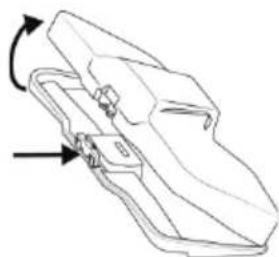
Technical line drawing of a mechanical component with directional arrows indicating rotation (no text or symbols)When you remove the dust bin from the brush, press the button to open the dust bin and empty it.
The bin may be washed, but it must be thoroughly dried before it is replaced.
natural_image
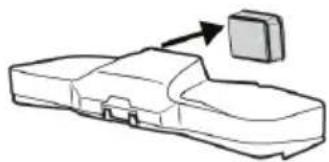
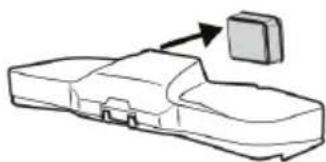
Diagram of a vehicle chassis with an arrow pointing to a specific component (no text or symbols present)Remove the dust filter as shown in the figure, and shake it gently. You may also gently wash it, but without any aggressive handling, as it can be easily damaged. If the filter is damaged, replace it since incorrect use could result in damage to the motor unit. For optimum use, we recommend replacing the filter every 6 months.
When all parts are clean, reassemble the appliance.
ENVIRONMENT
Do not disassemble or open the appliance yourself unnecessarily. Before discarding the appliance, make sure the battery is completely empty. After the expiry of the appliance's useful life, do not discard it with common household waste. Rather, take it to an authorized recycling centre. This will help preserve the environment.
| Product name: | Vacuum cleaner with floor mopping option |
| Appliance nominal voltage: | DC 10.8 V / 2000 mAh / lithium-ion batteries |
| Appliance nominal power: | 85W |
| Adapter voltage: | 18 VDC: 500 mA |
| Clean water tank capacity: | 400 ml |
| Dust bin capacity: | 300 ml |
Allgemeine hinweise
natural_image
Line drawing of a vacuum cleaner with a vertical handle and attached base (no text or symbols)natural_image
Simple line drawing of a mechanical component or device with no visible text, numbers, or symbols.natural_image
Simple line drawing of a curved object with two arrows pointing to its top edge (no text or symbols)natural_image
Line drawing of a mechanical device with a handle and base plate, no text or symbols presentnatural_image
Line drawing of a vacuum cleaner with attached screw base (no text or symbols)natural_image
Diagram of a mechanical device with arrows indicating movement or force, no visible text or symbolsnatural_image
Technical line drawing of a mechanical component with directional arrows indicating rotation (no text or symbols)natural_image
Line drawing of a vehicle chassis with an arrow pointing to a box (no text or symbols)natural_image
Line drawing of a vacuum cleaner with a vertical handle and attached base (no text or symbols)natural_image
Line drawing of a mechanical device with a handle and lever mechanism (no text or symbols)natural_image
Simple line drawing of a curved object with two arrows pointing to its top edge (no text or symbols)natural_image
Line drawing of a mechanical device with an arrow pointing to a component (no text or symbols present)natural_image
Line drawing of a vacuum cleaner with a handle and base mount (no text or symbols)natural_image
Diagram of a hairdryer tool interacting with a mechanical component (no text or symbols visible)natural_image
Technical line drawing of a mechanical component with directional arrows indicating rotation (no text or symbols)natural_image
Diagram of a car body with an arrow pointing to a rectangular component (no text or symbols)natural_image
Line drawing of a vacuum cleaner with a vertical handle and attached base (no text or symbols)natural_image
Line drawing of a mechanical device with a handle and lever (no text or symbols)natural_image
Simple line drawing of a curved object with two arrows pointing to its top edge (no text or symbols)natural_image
Line drawing of a mechanical device with an arrow pointing to a component (no text or symbols present)natural_image
Line drawing of a vacuum cleaner with a handle and mounting base (no text or symbols)Nabíjací adaptér s napájacím káblom pripojte k zadnej strane vysávača. Adaptér/nabíjačka má magnetickú vložku na jednoduchšie pripojenie a nabíjanie.