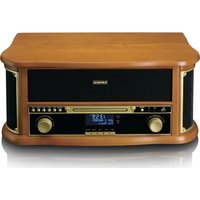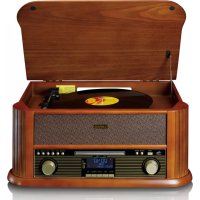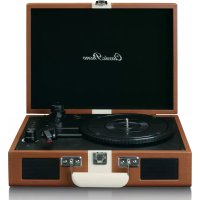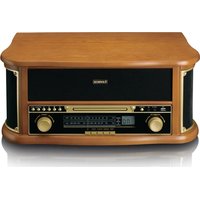
TCD-2551 - Turntable Classic Phono - Free user manual and instructions
Find the device manual for free TCD-2551 Classic Phono in PDF.


User questions about TCD-2551 Classic Phono
0 question about this device. Answer the ones you know or ask your own.
Ask a new question about this device
Download the instructions for your Turntable in PDF format for free! Find your manual TCD-2551 - Classic Phono and take your electronic device back in hand. On this page are published all the documents necessary for the use of your device. TCD-2551 by Classic Phono.
USER MANUAL TCD-2551 Classic Phono
Classic Phono by Lenco
Model: TCD-2551
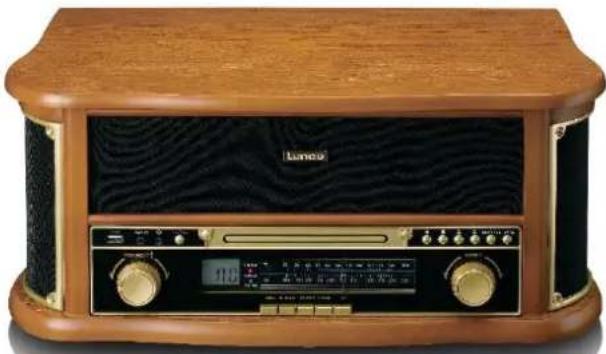
natural_image
Vintage portable radio with wooden frame and black textured back panel, no visible text or symbols on device bodyUser manual - Wooden Turntable with Bluetooth, USB encoding, AM/FM radio, CD and Cassette Player
Usage of controls or adjustments or performance of procedures other than those specified herein may result in hazardous radiation exposure.
KEEP THESE INSTRUCTIONS IN MIND:
- Do not cover or block any ventilation openings. When placing the device on a shelf, leave 5 cm (2") free space around the whole device.
- Install in accordance with the supplied user manual.
- Keep the device away from heat sources such as radiators, heaters, stoves, candles and other heat-generating products or naked flame. The device can only be used in moderate climates. Extremely cold or warm environments should be avoided. Working temperature between 0^ and 35^ C.
- Avoid using the device near strong magnetic fields.
- Electrostatic discharge can disturb normal usage of this device. If so, simply reset and restart the device following the instruction manual. During file transmission, please handle with care and operate in a static-free environment.
- Warning! Never insert an object into the product through the vents or openings. High voltage flows through the product and inserting an object can cause electric shock and/or short circuit internal parts. For the same reason, do not spill water or liquid on the product.
- Do not use in wet or moist areas such as bathrooms, steamy kitchens or near swimming pools.
- The device shall not be exposed to dripping or splashing and make sure that no objects filled with liquids, such as vases, are placed on or near the apparatus.
- Do not use this device when condensation may occur. When the unit is used in a warm wet room with damp, water droplets or condensation may occur inside the unit and the unit may not function properly; let the unit stand in power OFF for 1 or 2 hours before turning on the power: the unit should be dry before getting any power.
- Although this device is manufactured with the utmost care and checked several times before leaving the factory, it is still possible that problems may occur, as with all electrical appliances. If you notice smoke, an excessive build-up of heat or any other unexpected phenomena, you should disconnect the plug from the main power socket immediately.
- This device must operate on a power source as specified on the specification label. If you are not sure of the type of power supply used in your home, consult your dealer or local power company.
- Keep away from animals. Some animals enjoy biting on power cords.
- To clean the device, use a soft dry cloth. Do not use solvents or petrol based fluids. To remove severe stains, you may use a damp cloth with dilute detergent.
- The supplier is not responsible for damage or lost data caused by malfunction, misuse, modification of the device or battery replacement.
- Do not interrupt the connection when the device is formatting or transferring files. Otherwise, data may be corrupted or lost.
- If the unit has USB playback function, the USB memory stick should be plugged into the unit directly. Don't use an USB extension cable because it can cause interference resulting in failing of data.
- The rating label has been marked on the bottom or back panel of the device.
- This device is not intended for use by people (including children) with physical, sensory or mental disabilities, or a lack of experience and knowledge, unless they're under supervision or have received instructions about the correct use of the device by the person who is responsible for their safety.
- This product is intended for non professional use only and not for commercial or industrial use.
- Make sure the unit is adjusted to a stable position. Damage caused by using this product in an unstable position vibrations or shocks or by failure to follow any other warning or precaution contained within this user manual will not be covered by warranty.
- Never remove the casing of this device.
- Never place this device on other electrical equipment.
- Do not allow children access to plastic bags.
-
Only use attachments/accessories specified by the manufacturer.
-
Refer all servicing to qualified service personnel. Servicing is required when the device has been damaged in any way, such as the power supply cord or the plug, when liquid has been spilled or objects have fallen into the device, when the device has been exposed to rain or moisture, does not operate normally, or has been dropped.
-
Long exposure to loud sounds from personal music players may lead to temporary or permanent hearing loss.
-
If the product is delivered with power cable or AC power adaptor:
-
If any trouble occur, disconnect the AC power cord and refer servicing to qualified personnel.
- Don't step on or pinch the power adaptor. Be very careful, particularly near the plugs and the cable's exit point. Do not place heavy items on the power adaptor, which may damage it. Keep the entire device out of children's reach! When playing with the power cable, they can seriously injure themselves.
● Unplug this device during lightning storms or when unused for a long period.
● The socket outlet must be installed near the equipment and must be easily accessible.
● Do not overload ac outlets or extension cords. Overloading can cause fire or electric shock.
● Devices with class 1 construction should be connected to a main socket outlet with a protective earthed connection.
● Devices with class 2 construction do not require a earthed connection.
● Always hold the plug when pulling it out of the main supply socket. Do not pull the power cord. This can cause a short circuit. -
Do not use a damaged power cord or plug or a loose outlet. Doing so may result in fire or electric shock.
-
If the product contains or is delivered with a remote control containing coin/cell batteries:
Warning:
● “Do not ingest battery, Chemical Burn Hazard” or equivalent working.
● [The remote control supplied with] This product contains a coin/button cell battery. If the battery is swallowed, it can cause severe internal burns in just 2 hours and can lead to death.
- Keep new and used batteries away from children.
- If the battery compartment does not close securely, stop using the product and keep it away from children.
- If you think batteries might have been swallowed or placed inside any part of the body, seek immediate medical attention.
- Caution about the use of Batteries:
● Danger of explosion if battery is incorrectly replaced. Replace only with the same or equivalent type.
● Battery cannot be subjected to high or low extreme temperatures, low air pressure at high altitude during use, storage or transportation.
● Replacement of a battery with an incorrect type that can result in an explosion or the leakage of flammable liquid or gas.
- Disposal of a battery into fire or a hot oven, or mechanically crushing or cutting of a battery, that can result in an explosion.
● Leaving a battery in an extremely high temperature surrounding environment that can result in an explosion or that leakage of flammable liquid or gas.
● A battery subjected to extremely low air pressure that may result in an explosion or the leakage of flammable liquid or gas.
● Attention should be drawn to the environmental aspects of battery disposal.
INSTALLATION
- Unpack all parts and remove protective material.
- Do not connect the unit to the mains before checking the mains voltage and before all other connections have been made.
WARNING
Class 1 Laser Product
CLASS 1 LASER PRODUCT APPAREIL À LASER DE CLASSE 1 PRODUCTO LASER DE CLASE 1
This product contains a low power laser device.
CAUTION INVISIBLE LASER RADIATION WHEN OPEN AND INTERLOCKS DEFEATED. AVOID EXPOSURE TO BEAM

Warning: Do not touch the lens.
CLEANING THE CABINET
If the wooden cabinet becomes dusty please wipe it with a soft, non-abrasive dust cloth. Also don't use water or spray cleaners as this can damage the cabinet and the plastic/metal parts of the unit.
TECHNICAL SPECIFICATION
• Turntable speed: 33/45/78 RPM (Disc size 17.5/25/30cm)
• CD can play CD/CD-R/CD-RW/MP3
- USB can play MP3
• Cassette: C60 & C90 (C120 cassette is not recommended)
PREPARATION FOR USE
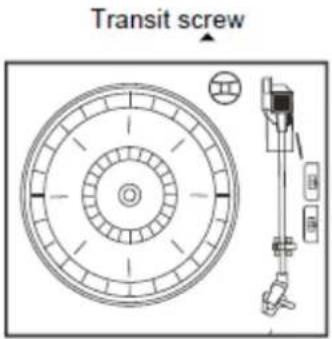
text_image
Transit screw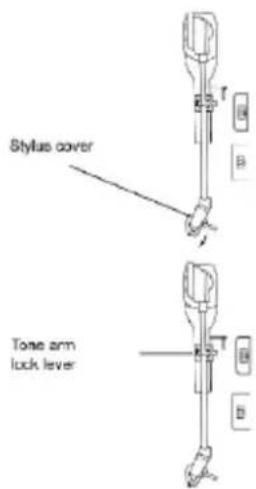
text_image
Stylus cover Tone arm lock lever- Carefully remove the unit from the carton and remove all packing material from the unit.
- Unwind the AC power cord and extend it to its full length.
- Unwind the FM Antenna wire and extend to it to its full length.
Raise the lid to expose the turntable.
- Remove the opaque white plastic stylus cover from the phonograph stylus by sliding it in the direction of the arrow.
- Please pay attention to the stylus during operation because stylus damage is not covered by the warranty.
- Remove the twist-tie that was used to secure the tone arm during shipment.
- Release the tone arm lock lever.
- Connect the power plug to your AC 220V, 50HZ outlet.
IMPORTANT: RAISING AN LOWERING THE TURNTABLE LID
To open the lid. Raise it as far as it can, then pull the support bracket gently to the front of the device and slowly lower the lid.
To close the lid. Pull up the lid to unlock the support bracket and gently lower the lid.
TO AVOID DAMAGING THE CABINET OR THE LID, NEVER FORCE THE LID CLOSED. ALWAYS RAISE THE LID TO RELEASE THE LID SUPPORT BRACKET.
LOCATIONS OF CONTROLS AND INDICATORS
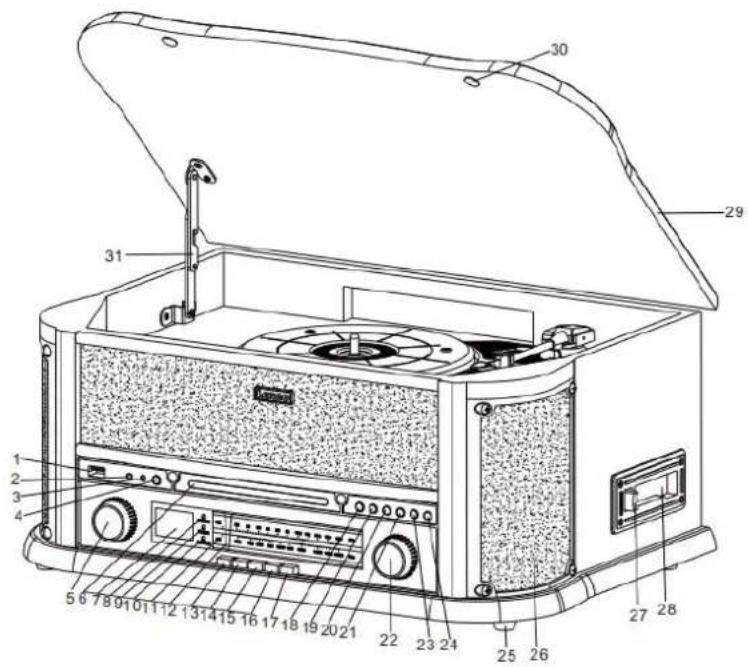
text_image
Technical diagram of a portable radio with numbered parts for identification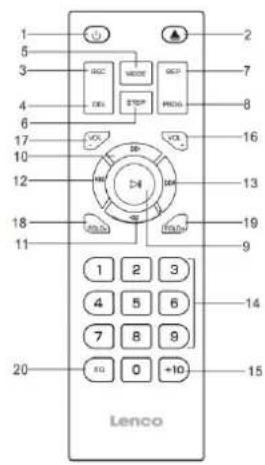
text_image
1 2 3 4 5 6 7 8 9 10 11 12 13 14 15 16 17 18 19 20 LencoLocations of Controls:
| 1. USB SOCKET | 17. EQ BUTTON |
| 2. 3.5MM AUX-IN JACK | 18. PLAY/PAUSE BUTTON |
| 3. 3.5MM HEADPHONE JACK | 19. STOP BUTTON |
| 4. RECORD/DELETE BUTTON | 20. DN/F-R BUTTON |
| 5. VOLUME KNOB/ POWER STANBY | 21. UP/F-F BUTTON |
| 6. CD DOOR | 22. TUNING CONTROL |
| 7. LCD DISPLAY | 23. ERP/PROG |
| 8. REMOTE CONTROL SENSOR | 24. CD DOOR OPEN / CLOSE BUTTON |
| 9. POWER INDICATOR | 25. PLASTIC FOOT PAD |
| 10. FM ST./REC INDICATOR | 26. SPEAKERS |
| 11. AM/FM DIAL SCALE | 27. CASSETTE EJ/F.F BUTTON |
| 12. TUNING POINTER | 28. CASSETTE PLAYER SLOT |
| 13. TUNER(AM/FM) BUTTON | 29. DUST COVER |
| 14. CD/USB/BT BUTTON | 30. DUST COVER PAD |
| 15. TAPE/AUX IN BUTTON | 31. HINGE |
| 16. PHONO BUTTON |
REMOTE CONTROL
- POWER ON/OFF
- OPEN/CLOSE CD DOOR
- REC: in CD/AM/FM/AUX IN/BT/PHONO/CASSETTE mode, press to active recording function.
- DELETE BUTTON
- MODE BUTTON to select source CD/USB/BT/AM/FM/TAPE/PHONO/AUX IN.
- STOP BUTTON
- REPEAT BUTTON to select repeat playback(CD/USB).
- PROGRAM: in CD/USB mode, press to active programming function.
- PLAY/PAUSE: in CD/USB mode, press once to start playback, press again to enter pause mode.
- FAST FORWARD BUTTON
- REWIND BUTTON
- SKIP-BUTTON
- SKIP+ BUTTON
- NUMBER BLOCK 0-9
- 10+ Track Button to select 2-digit numbers.
- VOLUME + BUTTON
- VOLUME - BUTTON
- FOLDER-
- FOLDER+
- EQ BUTTON: to choose from different sound effect among FLAT/ POP/ CLASSIC/ ROCK/ JAZZ.
Batteries for Remote Control
The infrared remote control requires 2xAAA batteries (excluded)
A) Remove the battery compartment cover
B) Insert 2xAAA batteries according to the markings inside the compartment.
C) Close the compartment.
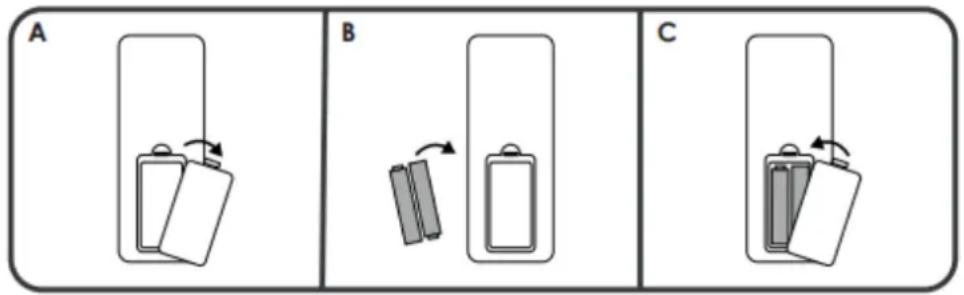
text_image
A B CNote 1: All buttons on the remote control have the same function as the buttons on the unit. The remote control is just used for CD/MP3 and USB mode.
Note 2: Long pressing PLAY/PAUSE on remote control for 2 seconds will change between CD and USB.
Note 3: Long pressing DELETE on remote control for 2 times will delete file in USB mode.
text_image
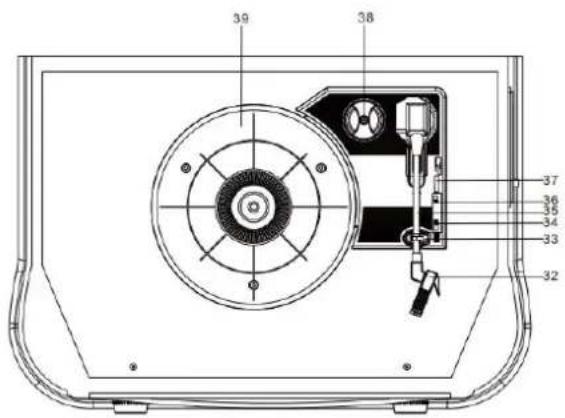
39 38 37 36 35 34 33 32
text_image
40 PULLET 41 42 43 44 LINE OUT U NC LUTTER SWITCH- CARTRIDGE
- PICK-UP HOLDER
- 33/45/78 RPM SPEED SELECTOR
- TONE ARM
- Auto-stop ON/OFF
- TONEARM LIFT
- ADAPTOR
- TURNTABLE
- FM / DAB ANTENNA
- ON/OFF SWITCH
- AC POWER CORD
43/44. LINE OUT SOCKETS(R+L)
INFORMATION
The AM antenna is inside the cabinet. IF AM reception is unsatisfactory try re-positioning the cabinet slightly until the internal antenna is picking up the strongest signal.
The FM wire is located back of the cabinet. If necessary adjust the position and direction of this antenna until you find the position that provides the best reception.
POWER ON/OFF
- Flip the ON/OFF SWITCH to the ON position. Press POWER to turn on the system, the display will light up.
- Press the function selector buttons (AM/FM/CD/USB/TAPE/PHONO/AUX IN) to select the desired function.
- Start to adjust the volume by using the volume control button.
- When finished listening press POWER again to turn off the system. The display turns off.
Remark: The unit is comply with ERP2, the unit will turn to Standby mode if there is no operation on the unit after 15 mins, please press POWER button once if you want to re-start the unit.
RADIO OPERATION
- Press POWER to turn the system on.
- Press TUNER to go to radio mode, press the TUNER button again to switch between AM and FM.
- Rotate the TUNING control to tune the desired radio station, the FM ST/REC indicator will light when stereo FM is found.
CD OPERATION
- Press the POWER button to turn on the system.
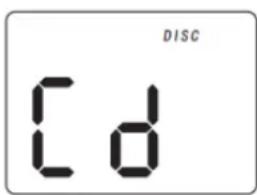
- Press the CD/USB/BT button to enter CD mode, 'Cd' and the 'DISC' icon will be shown on the screen. The unit can play CD, CD-R and CD-RW.
text_image
DISC c_d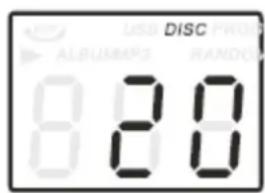
text_image
USB DISC ALBUMPR3 RANDOM 820- Press the OP/CL button top open the CD drawer.
- Place your disc in the CD drawer with the label side facing up.
- Press the OP/CL button again to close the CD drawer. Playback will automatically start from the first track.
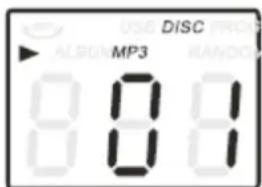
- MP3 icon will be shown if MP3 file is detected in the disc.
text_image
DISC ▶ ALBUM MP3 RANDOM 001 001PLAYING CASSETTE
Note: Before inserting the tape in the player be sure that there is no excess slack in the cassette that could jam the mechanism.
- Press POWER to turn the system on.
- Press TAPE/AUX button to enter TAPE mode.
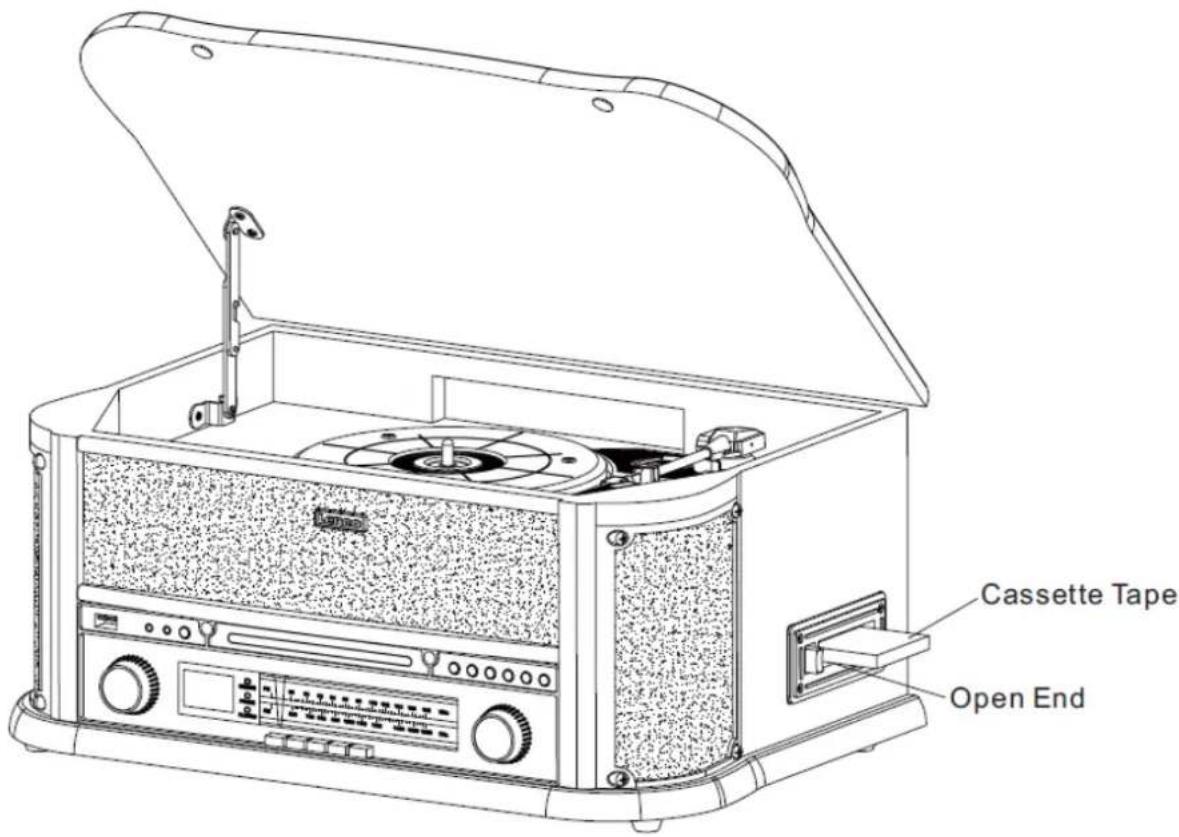
- Insert your cassette into the slot located on the right side of the cabinet, as shown in the illustration, with the side you wish to play facing up and the open end on the right side.
text_image
Cassette Tape Open End- Cassette playback begins as soon as the tape is inserted. Adjust the VOLUME control to the desired level.
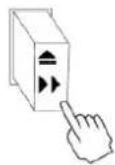
- To advance the tape rapidly, press the button approximately half way. The tape will move forward rapidly as long as the button is pressed half way. Normal playback will resume when the button is released.
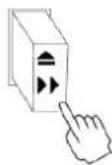
- When the tape ends, the player stops automatically. Press the button completely to remove the tape from the player. You may press the button to stop playing the tape at any time.
- Press POWER again to turn the system off.
text_image
Technical line drawing of a portable radio with open lid, showing internal components and a hand operating the top panel.How to Open/Close the Turntable Cover
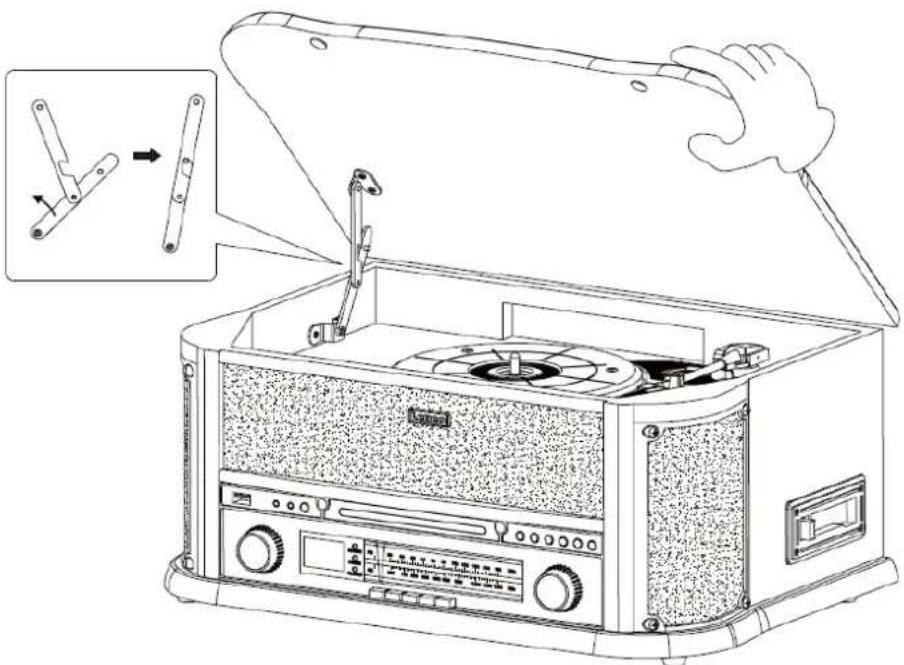
To Open:
- Lift the Turntable cover all the way up until it stops.
• Pull the support bracket gently to the front of the device, then lower the lid.
• The cover will now stay open.
To Close:
- Lift the cover all the way up until it stops.
- The latch should disengage. Slowly lower the cover. If the latch does not disengage, push out the lower bar by hand.
• Make sure you hold the cover carefully to avoid pinching your fingers as it closes.
PLAYING VINYLS RECORDS
The system includes a full-size, 3 speed, belt-drive turntable. You can play 33, 45 and 78rpm records.
- Press POWER to turn the system on.
- Press the PHONO button to enter the PHONO mode.
● Make sure you have removed the stylus cover from the stylus and have released the tone arm lock that secured the tone arm to the tone arm rest. - Set the turntable speed selector to appropriate speed 33, 45 or 78rpm. If you are playing 45 rpm singles, place the 45rpm adapter on the centre spindle.
- Place your record on the remove centre spindle.
- Raise the TONEARM LIFT to lift the tone arm of its rest. Move the tone arm to the edge of the record. The turntable starts automatically. Use the TONEARM LIFT to gently lower the tone arm onto the record.
- Adjust the volume control to the desired level.
- When the tone arm reaches the end of the record it automatically stops the record.
- Press POWER again to turn the system off.
Installing the Stylus
- Hold the tip of the stylus and insert the stylus by pressing as shown in direction "B".
- Push the stylus upward as in direction "C" until the stylus locks into the tip position.
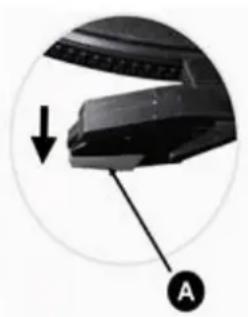
natural_image
Close-up of a mechanical component with a downward arrow and labeled point A (no text or symbols beyond labels)
natural_image
Diagram of a mechanical device with labeled parts (B and C) and directional arrows indicating motion, no readable text or symbols present.Guide Pins (inside)
NOTES
We advise you to clean your records with an anti-static cloth to gain maximum enjoyment from them.
We would also point out that for the same reason your stylus should be replaced periodically (approximately every 250 playback hours)
BLUETOOTH PLAY
Press the CD/USB/BT multiple times until the display shows 'BT'.
Search for 'Lenco TCD-2551' on your transmitting device and select it to pair. When the connection is successful a beep will play and the display stops blinking.
AUX IN OPERATION
Connect the audio system into the AUX IN jack on the front panel, Press the TAPE/AUX button twice. Start playing from the connected device.
USB OPERATION

- Press the CD/USB/BT button twice to enter USB mode. The ‘---’ and USB icon will be shown.
- Insert a USB flash device into the USB socket.
● PLAY/PAUSE, DN/UP and stop functions are the same as CD functions.
PLAYING IN MP3 MODE (CD/USB)
- Press PLAY/PAUSE button to start or pause playback selected track.
● While playing the song, the song number and folder number of the selected track will be shown in the display.
● You can stop the playback at any time by pressing the STOP button.
TRACK SKIP AND HIGH SPEED TRACK SEARCH IN CD/USB MODE
During CD/USB playback press UP/F.F ( ) or DN/F.R ( ) button on the unit front panel or on the remote control repeatedly to change track. To rapidly search forward or backwards within a track press and hold UP/F.F ( ) or DN/F.R ( ) button. To skip 10 tracks press TRACK+10 on the remote control.
USB RECORDING
- CD recording
Insert USB flash drive into the USB socket. Then press CD/USB/BT button. Place CD into the CD drawer and play the track which will be recorded. Press RECORD button twice to start recording. If all CD is played, Then all tracks will be recorded.
NOTE: Recording will stop when the STOP button is pressed.
● MP3 DISC recording
Insert USB flash drive into the USB socket. Then press CD/USB/BT button. Place CD with MP3 files into the CD drawer and play the MP3 track which will be recorded. Press RECORD button twice to start recording. If all MP3 files is played, Then all tracks will be recorded.
NOTE: Recording will stop when the STOP button is pressed.
- Cassette recording
Insert USB flash drive into the USB socket. Then press TAPE/AUX button. Place the cassette into the socket. Play cassette. Press RECORD button to start recording. Recording will stop when the STOP button is pressed.
- Vinyl recording
Insert USB flash drive into the USB socket. Then press PHONO button. Play the vinyl and press RECORD button to start recording. Recording will stop when the STOP button is pressed.
- AUX IN recording
Insert USB flash drive into the USB socket. Connect the external audio device into the AUX jack on the rear panel. Then press TAPE/AUX button and play audio and press RECORD button to start recording.
● AM/FM radio recording
Insert USB flash drive into the USB socket. Then press the TUNER button to switch to AM/FM mode. Press the RECORD button to start recording. Press STOP to stop the recording.
DELETE TRACKS FROM USB DISC
Press CD/USB/BT button on the front panel. Select the track and press delete for 2 seconds and the track is deleted.
Guarantee
Commaxx B.V. offers service and warranty in accordance to European law, which means that in case of repairs (both during and after the warranty period) you should contact your local dealer.
Important note: It is not possible to send products that need repairs to Commaxx B.V. directly.
Important note: If this unit is opened or accessed by a non-official service center in any way, the warranty expires.
This device is not suitable for professional use. In case of professional use, all warranty obligations of the manufacturer will be voided.
Disclaimer
Updates to Firmware and/or hardware components are made regularly. Therefore some of the instruction, specifications and pictures in this documentation may differ slightly from your particular situation. All items described in this guide for illustration purposes only and may not apply to particular situation. No legal right or entitlements may be obtained from the description made in this manual.
Disposal of the Old Device
natural_image
Symbol of a trash bin crossed with diagonal lines, no text or labels presentThis symbol indicates that the relevant electrical product or battery should not be disposed of as general household waste in Europe. To ensure the correct waste treatment of the product and battery, please dispose them in accordance to any applicable local laws of requirement for disposal of electrical equipment or batteries. In so doing, you will help to conserve natural resources and improve standards of environmental protection in treatment and disposal of electrical waste (Waste Electrical and Electronic Equipment Directive).
DECLARATION OF CONFORMITY
Hereby, Commaxx declares that the radio equipment type [Lenco TCD-2551] is in compliance with directive 2014/53/EU. The full text of the EU declaration of conformity is available at the following internet address: https://commaxx-certificates.com/doc/tcd-2551_doc.pdf
| Type RF | Frequency range (MHz) | Power (dBm) |
| Bluetooth | 2402-2480 | <6 |
| DAB | 174-240 | - |
| FM | 87.5-108 | - |
Service
For more information and helpdesk support, please visit
www.lenco.com
Commaxx B.V. Wiebachstraat 37, 6466 NG Kerkrade, The Netherlands.
NEDERLANDS
VOORZICHTIG:
This product contains a low power laser device.
| EN | NL |
| CLASS 1 LASER PRODUCT | KLASSE 1 LASERPRODUCT |
| CAUTION | VOORZICHTIG |
| INVISIBLE LASER RADIATION WHEN OPEN AND INTERLOCKS DEFEATED. | ONZICHTBARE LASERSTRALING INDIEN OPEN EN VERGRENDELINGEN UITGESCHAKELD. |
| AVOID EXPOSURE TO BEAM | VERMIJD BLOOTSTELLING AAN DE STRAAL |
| This product contains a low power laser device. | Dit product bevat een laserapparaat met laag vermogen. |
text_image
Transit screw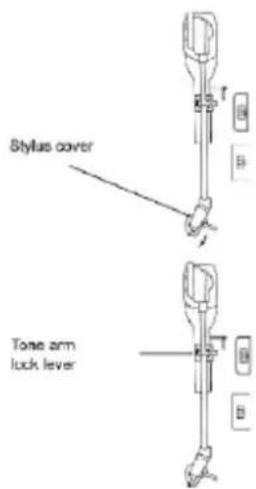
text_image
Stylus cover Tone arm lock lever| EN | NL |
| Transit screw | Transportschroef |
| Style cover | Naaldafdekking |
| Tone arm lock lever | Toonarmklem |
BELANGRIJK: HET DEKSEL VAN DE PLATENSPELER OPTILLEN EN LATEN ZAKKEN
text_image
Technical diagram of a portable radio with numbered parts for identification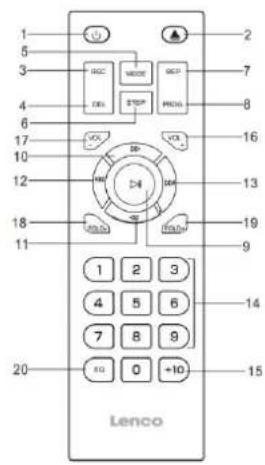
text_image
1 2 3 4 5 6 7 8 9 10 11 12 13 14 15 16 17 18 19 20 Lencotext_image
Technical line drawing of a vintage portable radio with open lid and control panel, showing internal components and a hand holding the lid.natural_image
Close-up of a mechanical component with a downward arrow and labeled point A (no text or symbols beyond labels)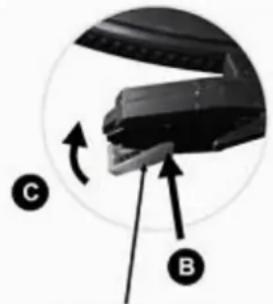
natural_image
Close-up of a mechanical device with labeled parts (B and C) and directional arrows indicating motion, no readable text or symbols beyond labels.natural_image
Symbol of a trash bin crossed with no text or labels, accompanied by a black rectangular block below (no readable text or symbols)This product contains a low power laser device.
| EN | DE |
| CLASS 1 LASER PRODUCT | LASERPRODUKT DER KLASSE 1 |
| CAUTION | ACHTUNG |
| INVISIBLE LASER RADIATION WHEN OPEN AND INTERLOCKS DEFEATED. | UNSICHTBARE STRAHLUNG, WENN GEÖFFNET UND BEI UMGANGENER VERRIEGELUNG. |
| AVOID EXPOSURE TO BEAM | SCHAUEN SIE NIE DIREKT IN DEN LASERSTRAHL |
| This product contains a low power laser device. | Dieses Produkt enthält eine Lasereinheit geringer Leistung. |
text_image
Transit screw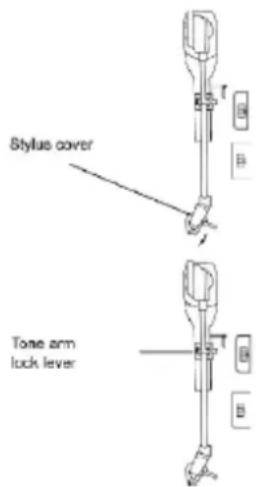
text_image
Stylus cover Tone arm lock levertext_image
Technical diagram of a portable radio with numbered parts for identification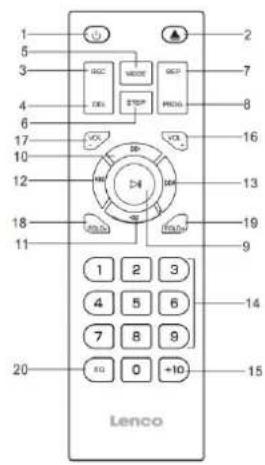
text_image
1 2 3 4 5 6 7 8 9 10 11 12 13 14 15 16 17 18 19 20 LencoBedienelemente:
natural_image
Simple line drawing of two batteries with one moving right (no text or symbols)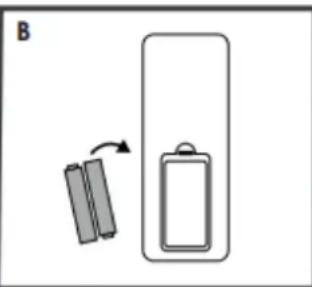
natural_image
Diagram showing two battery cells with one moving right and the other inside a rectangular frame (no text or symbols)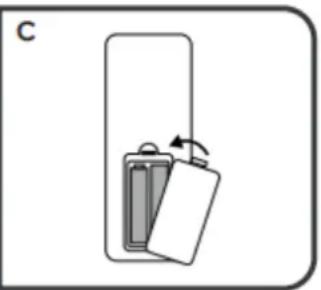
natural_image
Diagram of a battery stack with an arrow indicating rotation (no text or symbols)text_image
Technical line drawing of a vintage portable radio with open lid and control panel, showing internal components and a hand holding the lid.natural_image
Close-up of a mechanical component with a downward arrow and labeled point A (no text or symbols beyond labels)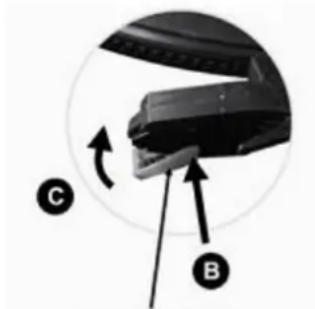
natural_image
Close-up of a mechanical device with labeled parts (B and C) and directional arrows, no readable text or symbols beyond labels.natural_image
Symbol of a trash bin crossed out by two crossed lines, with a solid black rectangle below (no text or labels)This product contains a low power laser device.
| EN | FR |
| CLASS 1 LASER PRODUCT | PRODUIT LASER DE CLASSE 1 |
| CAUTION | ATTENTION |
| INVISIBLE LASER RADIATION WHEN OPEN AND INTERLOCKS DEFEATED. | RAYONNEMENT LASER INVISIBLE EN CAS D'OUVERTURE ET DE DÉVERROUILLAGE. |
| AVOID EXPOSURE TO BEAM | ÉVITER D'ÊTRE EXPOSÉ AU FAISCEAU |
| This product contains a low power laser device. | Ce produit contient un dispositif laser à faible puissance. |
text_image
Transit screw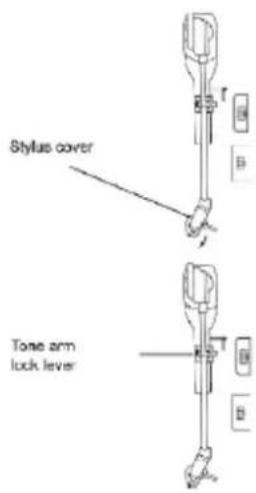
text_image
Stylus cover Tone arm lock levertext_image
Technical diagram of a portable radio with numbered parts for identification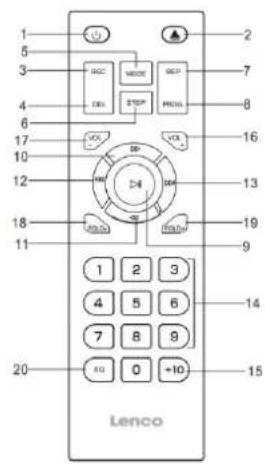
text_image
1 2 3 4 5 6 7 8 9 10 11 12 13 14 15 16 17 18 19 20 Lenconatural_image
Simple line drawing of two batteries with one moving right (no text or symbols)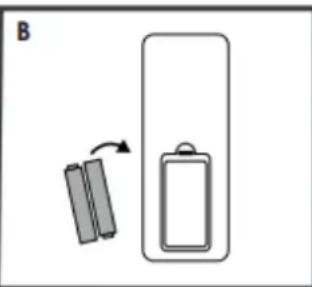
natural_image
Diagram showing two battery cells with one moving right and the other inside a larger cell (no text or symbols)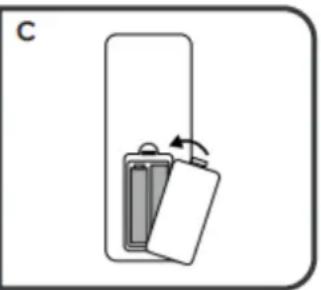
natural_image
Diagram of a battery stack with an arrow indicating rotation (no text or symbols)text_image
Technical line drawing of a vintage portable radio with open lid and control panel, showing internal components and a hand operating the device.natural_image
Close-up of a mechanical component with a downward arrow and labeled point A (no text or symbols beyond labels)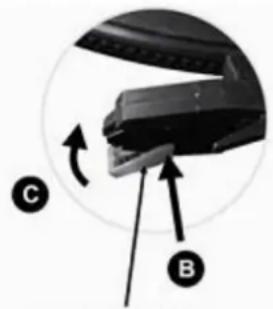
natural_image
Close-up of a mechanical device with labeled parts (C and B) and directional arrows indicating motion or assembly (no text or symbols beyond labels)natural_image
Symbol of a trash bin crossed out by two crossed lines, with a solid black rectangle below (no text or labels)DÉCLARATION DE CONFORMITÉ
This product contains a low power laser device.
text_image
Transit screw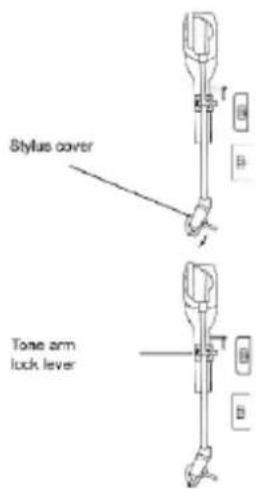
text_image
Stylus cover Tone arm lock levertext_image
Technical diagram of a portable radio with numbered parts for identification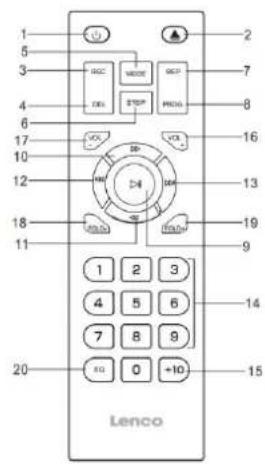
text_image
1 2 3 4 5 6 7 8 9 10 11 12 13 14 15 16 17 18 19 20 Lencotext_image
Technical line drawing of a vintage portable radio with open lid and control panel, showing internal components and a hand operating the top panel.natural_image
Close-up of a mechanical component with a downward arrow and labeled point A (no text or symbols beyond labels)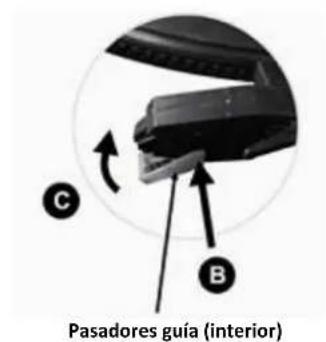
text_image
Pasadores guía (interior) C BNOTAS
natural_image
Simple line drawing of a trash bin with crossed lines and a blank rectangular base (no text or symbols)This product contains a low power laser device.
| EN | DK/NO |
| CLASS 1 LASER PRODUCT | LASERPRODUKT I KLASSE 1 |
| CAUTION | FORSIGTIG |
| INVISIBLE LASER RADIATION WHEN OPEN AND INTERLOCKS DEFEATED. | USYNLIG LASERSTRÅLING HVIS ENHEDEN ÅBNES, OG SIKKERHEDSLÅSE BRYDES OP. |
| AVOID EXPOSURE TO BEAM | UNDGÅ EKSPONERING FOR STRÅLE |
| This product contains a low power laser device. | Produktet indeholder en laserenhed med lav effekt. |
RENG∅RING AF KABINETTET
text_image
Transit screw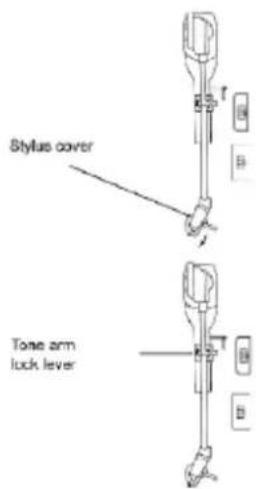
text_image
Stylus cover Tone arm lock levertext_image
Technical diagram of a portable radio with numbered parts for identification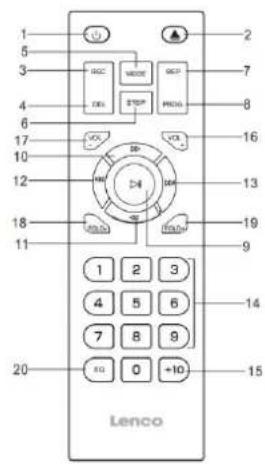
text_image
1 2 3 4 5 6 7 8 9 10 11 12 13 14 15 16 17 18 19 20 Lencotext_image
Technical line drawing of a vintage portable radio with open lid and control panel, showing internal components and a hand holding the top part.natural_image
Close-up of a mechanical component with a downward arrow and labeled point A (no text or symbols beyond labels)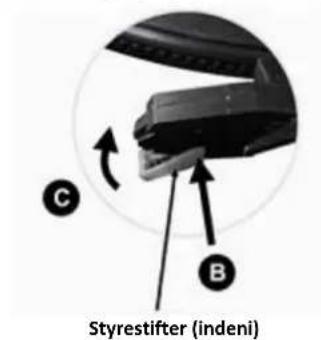
text_image
C B Styrestifter (indeni)NOTER
natural_image
Symbol of a trash bin crossed out by two crossed lines, with a solid black rectangle below (no text or labels)This product contains a low power laser device.
| EN | SE |
| CLASS 1 LASER PRODUCT | KLASS 1 LASERPRODUKT |
| CAUTION | VAR FÖRSIKTIG |
| INVISIBLE LASER RADIATION WHEN OPEN AND INTERLOCKS DEFEATED. | OSYNLIG LASERSTRÅLNING I ÖPPET LÄGE OCH MED ÅSIDOSATTA FÖRREGLINGAR. |
| AVOID EXPOSURE TO BEAM | UNDVIK EXPONERING FÖR STRÅLE |
| This product contains a low power laser device. | Den här produkten innehåller en laserenhet med låg effekt. |
text_image
Transit screw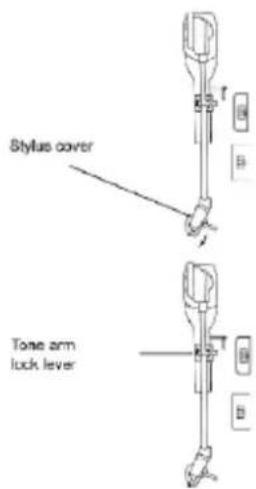
text_image
Stylus cover Tone arm lock levertext_image
Technical diagram of a portable radio with numbered parts for identification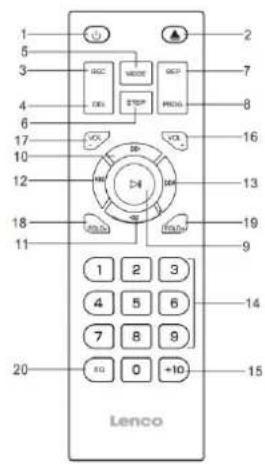
text_image
1 2 3 4 5 6 7 8 9 10 11 12 13 14 15 16 17 18 19 20 LencoKontrollernas placering:
| 1. USB-UTTAG | 17. EQ-knapp |
| 2. 3,5 MM AUX-INGÅNG | 18. KNAPPEN UPPSPELNING/PAUS |
| 3. 3,5 MM HÖRLURSUTTAG | 19. STOPPKNAPP |
| 4. KNAPP FÖR ATT SPELA IN/RADERA | 20. KNAPP FÖR NED/SPOLNING BAKÅT |
| 5. VOLYMRATT/STANDBY-LÄGE | 21. KNAPP FÖR UPP/SPOLNING FRAMÅT |
| 6. CD-LUCKA | 22. INSTÄLLNINGSRATT |
| 7. LCD-DISPLAY | 23. ERP/PROG |
| 8. FJÄRRKONTROLLSENSOR | 24. KNAPP FÖR CD-LUCKA ÖPPEN/STÄNGD |
| 9. STRÖMINDIKATOR | 25. PLASTFÖTTER |
| 10. INDIKATOR FÖR FM ST./INSPL | 26. HÖGTALARE |
| 11. INDIKATORSKALA FÖR AM/FM | 27. KNAPP FÖR MATA UT KASSETT/S.F |
| 12. INSTÄLLNINGSMARKÖR | 28. PLATS FÖR KASSETTBANDSPELARE |
| 13. KNAPP FÖR ATT JUSTERA (AM/FM) | 29. DAMMSKYDD |
| 14. KNAPP FÖR CD/USB/BT | 30. FÄSTE FÖR DAMMSKYDD |
| 15. KNAPP FÖR KASSETT/AUX IN | 31. GÅNGJÄRN |
| 16. KNAPP FÖR PHONO |
FJÄRRKONTROLL
natural_image
Simple line drawing of two batteries with one moving upward and the other holding a battery (no text or symbols)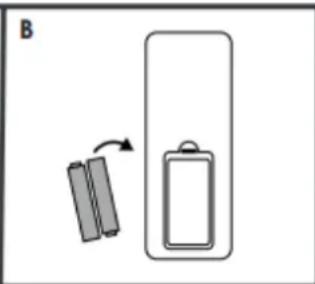
natural_image
Diagram showing two battery cells with one moving right and the other fixed, labeled 'B' (no text or symbols on the cells themselves)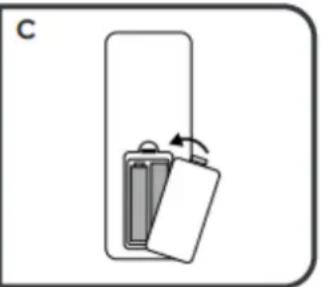
natural_image
Diagram of a battery stack with an arrow indicating rotation, no text or symbols presenttext_image
40 PWR LTR 41 42 43 44 LIFE OUT W T ACC 200V-50 V/FE- PICKUP
- PICKUP-HÅLLARE
- VRED FÖR VAL AV VARVTAL 33 45/78 RPM
- TONARM
- Automatisk avstängning PÅ/AV
- TONARMSHISS
- ADAPTER
- SKIVSPELARE
- FM/DAB-ANTENN
- STRÖMBRYTARE (PÅ/AV)
- AC-NÄTKABEL
43/44. LINJEUTGÅNGAR (H+ V)
INFORMATION
text_image
Technical line drawing of a portable radio with open lid, showing internal components and a hand adjusting the lid.natural_image
Close-up of a mechanical component with a downward arrow and labeled point A (no text or symbols beyond labels)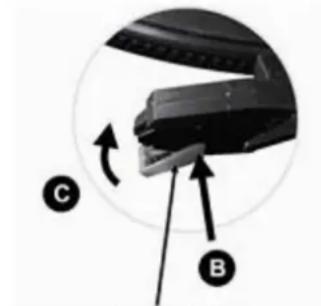
natural_image
Mechanical component diagram showing a clamping mechanism with labeled parts C and B (no text or symbols beyond labels)Styrstift (inuti)