TCD2570 - Turntable Classic Phono - Free user manual and instructions
Find the device manual for free TCD2570 Classic Phono in PDF.

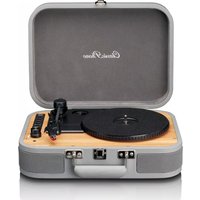
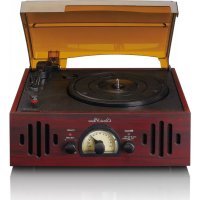
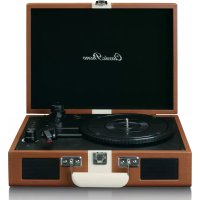
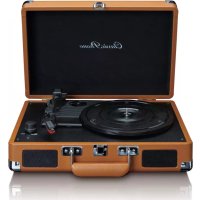
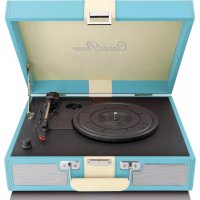
| Product type | Turntable with CD, USB, Bluetooth, cassette player and FM/DAB radio |
| Brand | Classic Phono |
| Model | TCD2570 |
| Power supply | 230-240 V ~ 50 Hz (mains) |
| Power consumption | 40 W max |
| Audio output power | 2 x 4.5 W RMS |
| Turntable speeds | 33, 45 and 78 RPM |
| Turntable cartridge | Ceramic N10 |
| CD player | CD, CD-R, CD-RW, MP3 compatible |
| USB port | MP3 playback and recording (128 kbps) |
| Bluetooth | Class II, 2.4 GHz, compatible with smartphones/tablets |
| Radio | FM (87.5-108 MHz) and DAB/DAB+ (Band III 174-240 MHz) |
| Cassette player | Playback and recording to USB |
| USB recording | From CD, cassette, vinyl turntable or Bluetooth |
| Remote control | Infrared, CR2025 lithium battery included |
| Included antenna | FM/DAB wire antenna |
| Included accessories | Remote control, 45 RPM adapter, transport screw |
| Maintenance and cleaning | Soft dry cloth; no solvents or petroleum-based liquids |
| Safety | Do not open the device; unplug if malfunctioning; keep out of reach of children |
| Reparability | Have serviced by qualified personnel; warranty through retailer |
| Intended use | Non-professional, domestic |
Frequently Asked Questions - TCD2570 Classic Phono
User questions about TCD2570 Classic Phono
0 question about this device. Answer the ones you know or ask your own.
Ask a new question about this device
Download the instructions for your Turntable in PDF format for free! Find your manual TCD2570 - Classic Phono and take your electronic device back in hand. On this page are published all the documents necessary for the use of your device. TCD2570 by Classic Phono.
USER MANUAL TCD2570 Classic Phono
ClassicPhono by Lenco
Model: TCD-2570
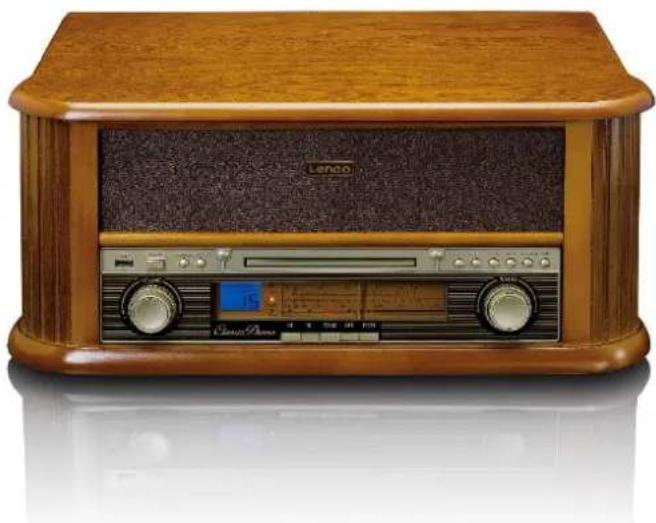
USER MANUAL- Wooden Turntable with FM/DAB+ radio, USB-encoding, CD and cassette player
GEBRUISHANDLEIDING-Houten Platenspeler met FM-/DAB+-radio, USB-codering, cd- en cassettespeler
BEDIENUNGSCANLEITUNG-Holzplattenspieler mit FM/DAB+-Radio, USB-Kodierung, CD-Player und Kassettenspieler MODE D'EMPLOI-Platine en bois avec radio FM/DAB+, encodage USB, lecteur de CD et de cassette
MANUAL DE USUARIO-Tocadiscos de madera con radio FM/DAB+, codificacion USB, CD y reproductor de casete
Index
ENGLISH 3
NEDERLANDS 16
DEUTSCH 34
FRANÇAIS 49
ESPANOL 66
Version: 3.0
ENGLISH
CAUTION:
Usage of controls or adjustments or performance of procedures other than those specified herein may result in hazardous radiation exposure.
KEEP THESE INSTRUCTIONS IN MIND:
- Do not cover or block any ventilation openings. When placing the device on a shelf, leave 5cm (2") free space around the whole device.
- Install in accordance with the supplied user manual.
- Keep the device away from heat sources such as radiators, heaters, stoves, candles and other heat-generating products or naked flame. The device can only be used in moderate climates. Extremely cold or warm environments should be avoided. Working temperature between 0^ and 35^ .
- Avoid using the device near strong magnetic fields.
- Electrostatic discharge can disturb normal usage of this device. If so, simply reset and restart the device following the instruction manual. During file transmission, please handle with care and operate in a static-free environment.
- Warning! Never insert an object into the product through the vents or openings. High voltage flows through the product and inserting an object can cause electric shock and/or short circuit internal parts. For the same reason, do not spill water or liquid on the product.
- Do not use in wet or moist areas such as bathrooms, steamy kitchens or near swimming pools.
- The device shall not be exposed to dripping or splashing and make sure that no objects filled with liquids, such as vases, are placed on or near the apparatus.
- Do not use this device when condensation may occur. When the unit is used in a warm wet room with damp, water droplets or condensation may occur inside the unit and the unit may not function properly; let the unit stand in power OFF for 1 or 2 hours before turning on the power: the unit should be dry before getting any power.
- Although this device is manufactured with the utmost care and checked several times before leaving the factory, it is still possible that problems may occur, as with all electrical appliances. If you notice smoke, an excessive build-up of heat or any other unexpected phenomena, you should disconnect the plug from the main power socket immediately.
- This device must operate on a power source as specified on the specification label. If you are not sure of the type of power supply used in your home, consult your dealer or local power company.
- Keep away from animals. Some animals enjoy biting on power cords.
- To clean the device, use a soft dry cloth. Do not use solvents or petrol based fluids. To remove severe stains, you may use a damp cloth with dilute detergent.
- The supplier is not responsible for damage or lost data caused by malfunction, misuse, modification of the device or battery replacement.
- Do not interrupt the connection when the device is formatting or transferring files. Otherwise, data may be corrupted or lost.
- If the unit has USB playback function, the USB memory stick should be plugged into the unit directly. Don't use an USB extension cable because it can cause interference resulting in failing of data.
- The rating label has been marked on the bottom or back panel of the device.
- This device is not intended for use by people (including children) with physical, sensory or mental disabilities, or a lack of experience and knowledge, unless they're under supervision or have received instructions about the correct use of the device by the person who is responsible for their safety.
- This product is intended for non professional use only and not for commercial or industrial use.
- Make sure the unit is adjusted to a stable position. Damage caused by using this product in an unstable position vibrations or shocks or by failure to follow any other warning or precaution contained within this user manual will not be covered by warranty.
- Never remove the casing of this device.
- Never place this device on other electrical equipment.
- Do not allow children access to plastic bags.
-
Only use attachments/accessories specified by the manufacturer.
-
Refer all servicing to qualified service personnel. Servicing is required when the device has been damaged in any way, such as the power supply cord or the plug, when liquid has been spilled or objects have fallen into the device, when the device has been exposed to rain or moisture, does not operate normally, or has been dropped.
-
Long exposure to loud sounds from personal music players may lead to temporary or permanent hearing loss.
-
If the product is delivered with power cable or AC power adaptor:
-
If any trouble occur, disconnect the AC power cord and refer servicing to qualified personnel.
- Don't step on or pinch the power adaptor. Be very careful, particularly near the plugs and the cable's exit point. Do not place heavy items on the power adaptor, which may damage it. Keep the entire device out of children's reach! When playing with the power cable, they can seriously injure themselves.
- Unplug this device during lightning storms or when unused for a long period.
The socket outlet must be installed near the equipment and must be easily accessible. - Do not overload ac outlets or extension cords. Overloading can cause fire or electric shock.
- Devices with class 1 construction should be connected to a main socket outlet with a protective earthed connection.
Devices with class 2 construction do not require a earthed connection.
Always hold the plug when pulling it out of the main supply socket. Do not pull the power cord. This can cause a short circuit. -
Do not use a damaged power cord or plug or a loose outlet. Doing so may result in fire or electric shock.
-
If the product contains or is delivered with a remote control containing coin/cell batteries:
Warning:
- "Do not ingest battery, Chemical Burn Hazard" or equivalent working.
- [The remote control supplied with] This product contains a coin/button cell battery. If the battery is swallowed, it can cause severe internal burns in just 2 hours and can lead to death.
- Keep new and used batteries away from children.
-
If the battery compartment does not close securely, stop using the product and keep it away from children.
If you think batteries might have been swallowed or placed inside any part of the body, seek immediate medical attention. -
Caution about the use of Batteries:
-
Danger of explosion if battery is incorrectly replaced. Replace only with the same or equivalent type.
- Battery cannot be subjected to high or low extreme temperatures, low air pressure at high altitude during use, storage or transportation.
- Replacement of a battery with an incorrect type that can result in an explosion or the leakage of flammable liquid or gas.
- Disposal of a battery into fire or a hot oven, or mechanically crushing or cutting of a battery, that can result in an explosion.
- Leaving a battery in an extremely high temperature surrounding environment that can result in an explosion or that leakage of flammable liquid or gas.
- A battery subjected to extremely low air pressure that may result in an explosion or the leakage of flammable liquid or gas.
- Attention should be drawn to the environmental aspects of battery disposal.
INSTALLATION
- Unpack all parts and remove protective material.
- Do not connect the unit to the mains before checking the mains voltage and before all other connections have been made.
WARNING
Class 1 Laser Product
CLASS 1 LASER PRODUCT APPAREL A LASER DE CLASSE 1 PRODUCTO LASER DE CLASE 1
This product contains a low power laser device.
CAUTION INVISIBLE LASER RADIATION WHEN OPEN AND INTERLOCKS DEFEATED. AVOID EXPOSURE TO BEAM

Warning: Do not touch the lens.
REMOTE CONTROL
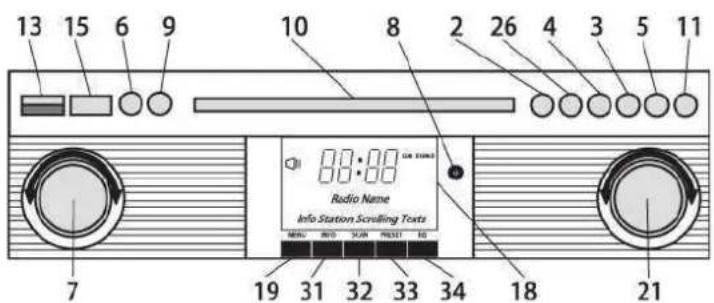
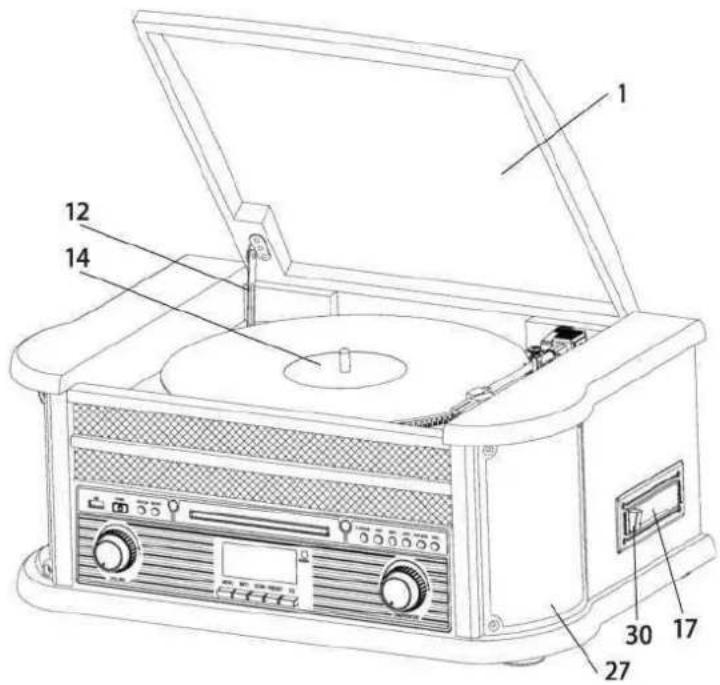
FRONT PANEL
TURNTABLE
- DUST COVER
- CD PLAY/PAUSE BUTTON
- CD SKIP UP BUTTON
- CD SKIP DOWN BUTTON
- PLAY MODE BUTTON
- FUNCTION BUTTON (FM/BLUETOOTH/CD/USB/PHONO/TAPE)
- VOLUME KNOB
- REMOTE SENSOR
- RECORD BUTTON
- CD DOOR
- CD DOOR OPEN/CLOSE BUTTON
- COVER MECHANISM
- USB SOCKET
- TURNTABLE
- POWER ON/OFF
- CUE LEVER
- CASSETTE MECHANISM
- LCD DISPLAY
- MENU BUTTON
- Line out/Headphone jack
- TUNING/ENTER KNOB
- ARM LOCK
- SPINDLE ADAPTOR
- 33/45/78 RPM SPEED SELECTOR
- PICK-UP HOLDER
- STOP BUTTON
- SPEAKERS
- FM/DAB ANTENNA JACK
- AC CORD
- TAPE STOP/EJECT BUTTON
- INFO BUTTON
- SCAN BUTTON
- PRESET BUTTON
- EQUALIZER BUTTON
The FM/DAB wire antenna is packed in a plastic bag together with the user manual
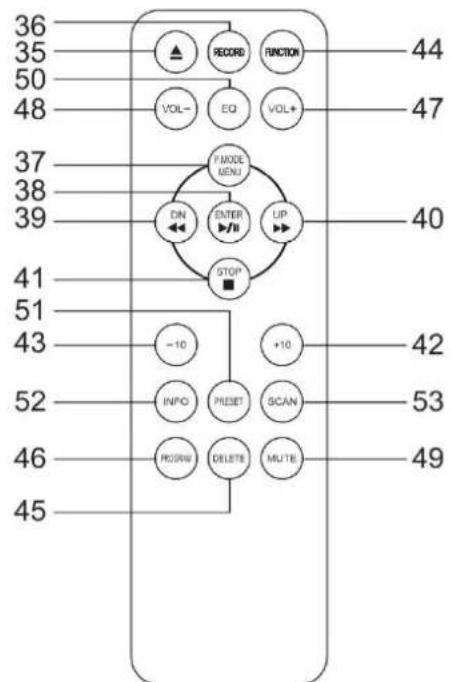
REMOTE CONTROL
- OPEN/CLOSE CD DOOR
- REC: in CD/RADIO/PHONO/CASSETTE mode, press to active recording function.
- PLAYBACK MODE BUTTON
- PLAY/PAUSE: in CD/USB mode, press once to start playback. Press again to enter pause mode.
- SKIP/SEARCHBACKWARD: press once to skip to previous track. press & hold for search backward.
- SKIP/SEARCHFORWARD: press once to skip to next track, press & hold for search forward.
- STOP BUTTON
- 10+ Track Button
- 10-Track Button
- FUNCTION BUTTON to select CD/USB/DAB/FM/TAPE/PHONO.
- DELETE BUTTON
- PROGRAM: in CD/USB mode, press to active programming function.
- VOLUME + BUTTON
- VOLUME - BUTTON
- MUTE BUTTON
- EQUALISER BUTTON
- PRESET BUTTON
- INFO BUTTON
- SCAN

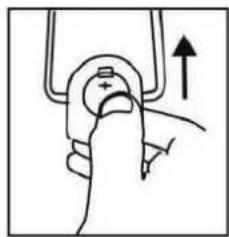
REMOTE BATTERY INSTALLATION
The infrared remote control requires 1 pc CR-2025 (3V) Lithium Battery size battery for operation.
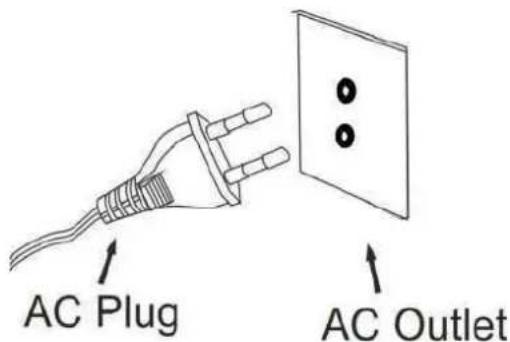
CONNECTING TO POWER
Press the POWER button (15) 1 second to turn ON the unit. Press and hold the POWER button during 3 seconds to turn OFF the unit. When no sound is produced, the unit will switch OFF automatically after 15 minutes.
This unit is designed to operate on AC 230-240V 50Hz. Connect the plug to a mains power outlet. Other power sources may damage the unit. To prevent electric shock disconnect from the mains before opening cabinet No user serviceable parts inside. Refer servicing to qualified service personal.
Operation
- Switch ON the POWER ON/OFF BUTTON (15). The Display (18) will light up.
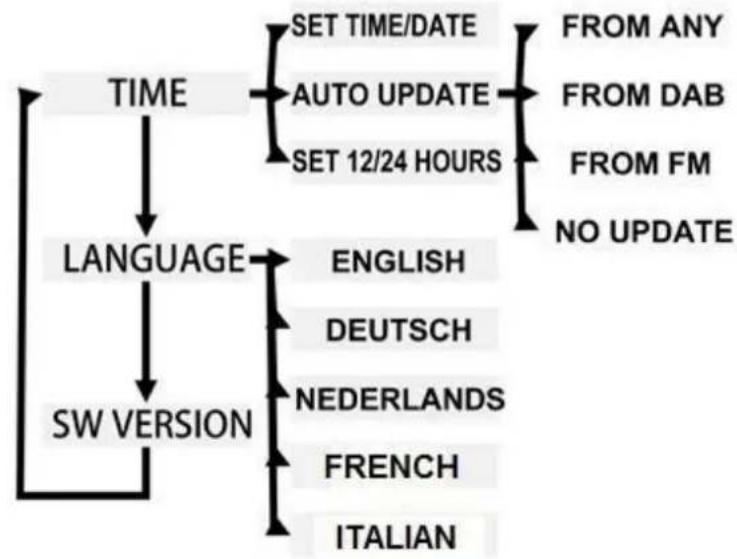
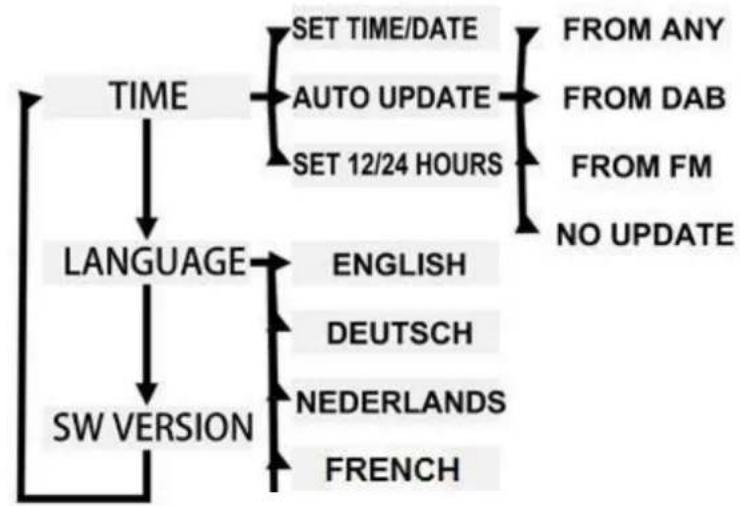
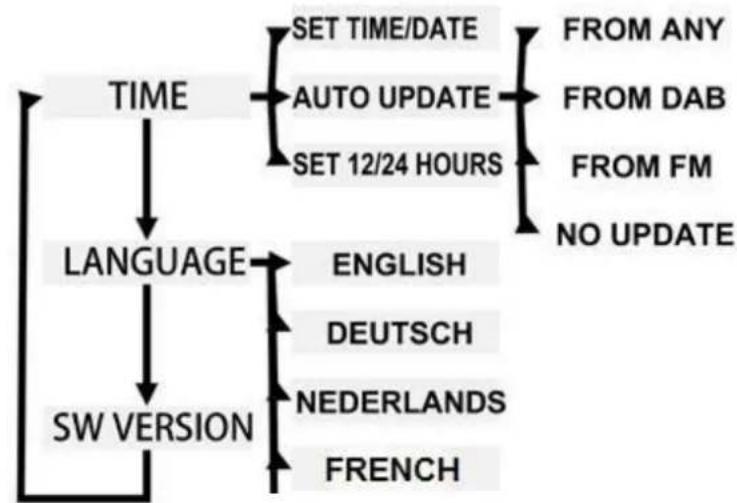
- Press the MENU BUTTON (19) to select FM or DAB. Turn the TUNING/ENTER KNOB (21) to select "SYSTEM", then press confirm.
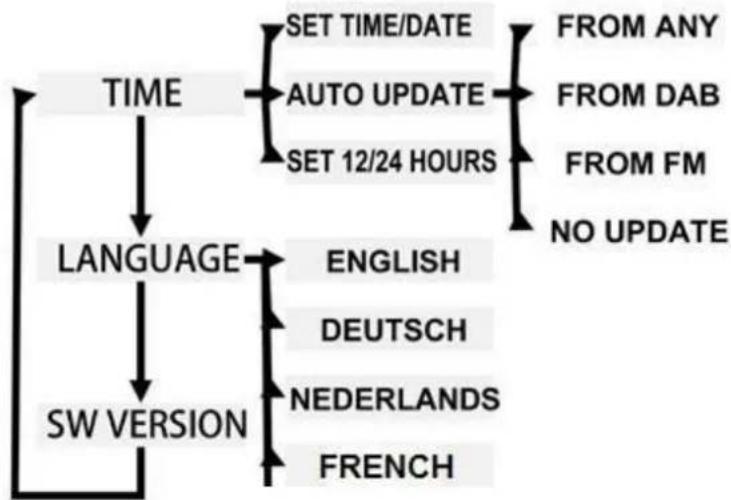
- Turn the TUNING/ENTER KNOB (21) to select LANGUAGE, then press the TUNING/ENTER KNOB (21) to confirm
- Turn the TUNING/ENTER KNOB (21) to select the desired languages, then press the same TUNING/ENTER KNOB (21) to confirm.
SETTING THE DISPLAY TIME AND DATE
Operation
- Switch ON the POWER ON/OFF BUTTON (15). The Display (18) will light up.
- Press the MENU BUTTON (19) and turn the TUNING/ENTER KNOB (21) to select SYSTEM".
- Turn the TUNING/ENTER KNOB (21) to select TIME, then press the TUNING/ENTER KNOB (21) to confirm.
- Turn the TUNING/ENTER KNOB (21) and select SET 12/24 HOURS. Press the TUNING/ENTER KNOB (21) to confirm.
- Repeat the above operation 2-4 and select one of the following options: SET TIME/DATE or AUTO UPDATE.
- If selected SET TIME/DATE, use the TUNING/ENTER KNOB (21) to set Hour & Minutes, then press the TUNING/ENTER KNOB (21) to confirm the operation.
- To set the Auto-Updating, follow the above procedure 2-6 and select AUTO UPDATE. From this menu, turn the TUNING/ENTER KNOB (21) to select one of the following options: FROM ANY/FROM DAB/FROM FM/NO UPDATE.
The operation is complete and the display show the DATE and TIME.

TUNER/ENTER
TUNER/ENTER
Turn left & right to move inside of Display menu, then push the same knob to confirm each function.

ANTENNA
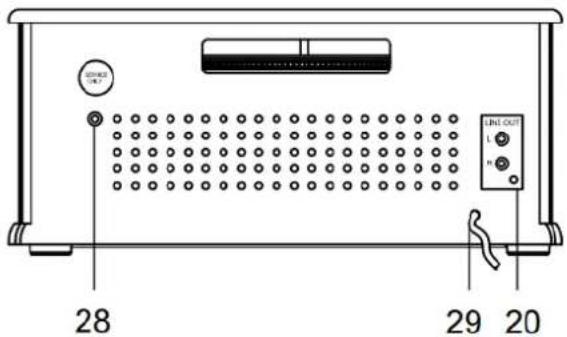
For FM and DAB reception, there is a wired antenna jack (28) on the back of the unit. The FM/DAB wire antenna is packed in a plastic bag together with the user manual. Plug the antenna wire into the jack. Extend the antenna cable and move around to get the best signal reception
Operation
- Switch ON the POWER ON/OFF BUTTON (15). The Display (18) will light up.
- Press sequentially the FUNCTION BUTTON (6) to select the FM radio manual tuning and look for the desired radio station by turning the TUNING/ENTER KNOB (21).
AUTOMATIC TUNING
- During FM working mode, press the MENU BUTTON (19), then turn the TUNING/ENTER KNOB (21) to select the "SCAN SETTING".
- Turn again TUNING/ENTER KNOB (21) and select the option between ALL STATIONS and STRONG STATIONS ONLY. Press the TUNING/ENTER KNOB (21) to confirm.
- Press the SCAN BUTTON (32) and the unit will scan all of the FM stations.
RADIO DATA SYSTEM INFORMATIONS
During FM working mode, press the INFO BUTTON (31) to display the following informations: PROGRAM TYPE/PROGRAM NO/AUDIO BITRATE/TIME/DATE.
FM & FM-Stereo Reception
- Stereo reception is possible when the tuned FM station is broadcasting in stereo.
- Press the MENU BUTTON (19) until select "AUDIO SETTING", then press the TUNING/ENTER KNOB (21) and turn again the TUNING/ENTER KNOB (21) to select between FORCED MONO or STEREO ALLOWED.
DAB OPERATION
- Press sequentially the FUNCTION BUTTON (6) to select DAB mode.
- Extend the DAB antenna at the back of the unit.
AUTOMATIC TUNING
- Press the MENU BUTTON (19), then move the TUNING/ENTER KNOB (21) to select FULL SCAN.
- Press the TUNING/ENTER KNOB (21) to start searching the DAB/DAB+station.
MANUAL TUNING
- Press the MENU BUTTON (19), then move the TUNING/ENTER KNOB (21) to select MANUAL TUNE.
- Turn the TUNING/ENTER KNOB (21) to tune manually the desired station.
- When tuned a DAB stereo station, the "stereo" will show on the LCD.
- During DAB reception, press the INFO BUTTON (31) to see the information of the playing DAB station on the display, i.e Program Type/Program No./Frenquency Range/Signal Strength/Time/Date.
PRESET MEMORY DAB/DAB+
- When selected the desired station, press and hold the PRESET BUTTON (33) for 2 seconds.
- The display show, "Preset Store 1: (Empty)". Turn the TUNING/ENTER KNOB (21) to select the desired preset number, then press the TUNING/ENTER KNOB (21) to store the station.
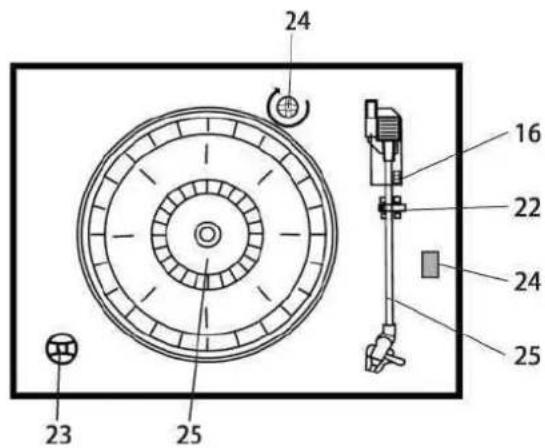
TURNTABLE OPERATION
Lock Lever Stylus Cover
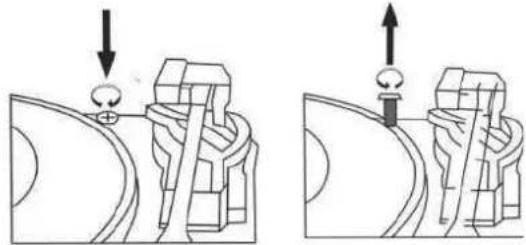
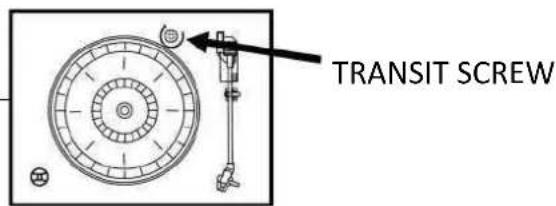
VERY IMPORTANT!
To prevent damages during transportation, a transit screw is located at the upper right side of the turntable platform.
Before start playing, use a screwdriver and turn the transit screw in clockwise direction (screw going down) completely. In case of transportation, remember to turn again this screw in counter-clockwise direction to prevent damages.
Preparation
- Open the Record Player Cover.
- Release the Tonearm Clamp, and remove the stylus protector.
Listening to Records
- Press the FUNCTION BUTTON (6) to select the TURNTABLE function.
- Place a record on the turntable, over the central spindle. Place the EP adapter over the central spindle when playing 17cm EP 45 RPM smaller records.
- Set the Speed Selector (24) to 33/45 or 78 rpm according to the record.
- Release the tonearm clamp, and remove the protective cap from the stylus.
- Lift the Tonearm with the Tonearm Lift Lever.
- Move the tonearm to the beginning of the record, or to the start of a particular track.
- Gently lower the tone arm onto the record with the Tonearm Lift lever to start playing.
- When the record is finished the tonearm will automatically stop and return automatically to the rest. To stop manually, lift the tonearm from the record and return it to the rest.
Notes: Do not stop or turn the platter manually. Moving or jarring the turntable without securing the Tonearm clamp could result in damage to the Tonearm. Put the protective cap on the stylus when not in use.
To start
- Press FUNCTION BUTTON (6) to select "CD" model.
- Press "open/close" button (11) to open the CD door (10).
- Place a CD with the printed side facing up inside the tray & then close the CD door.
- Focus search is performing, the first track will start playback.
- To interrupt, press the STOP BUTTON (26) once, the total number of tracks appears on the led display (18). Press again PLAY/PAUSE BUTTON (2) to resume normal playback.
Skip/search mode (skip/search up/skip/search down)
- During play or pause mode, if SKIP UP BUTTON (3) is pressed, it will go to next track and display the track no. and then keep the play or pause mode.
- During play or pause mode, if SKIP DOWN BUTTON (4) is pressed, it will go back to the beginning of the track, original track number is displayed and keep the play or pause mode.
- After step 2, press SKIP DOWN BUTTON (4) again will go to the previous track and keep the play or pause mode.
- If press and hold the SKIP UP BUTTON (3)/SKIP DOWN BUTTON (4) during cd/mp3 playback the playing track will go fast forward or backward until the button is released.
To skip 10 tracks UP or DOWN press the TRACK +10 or TRACK -10 button on RemoteControl
REPEAT/RANDOM MODE
Press the PLAY MODE BUTTON (5) to activate this function. All the tracks can be played in difference mode as follow:
- Repeat play: you can listen the desired tracks or folder repeatedly by this function.
- Random play: you can listen all the tracks or folder in a random order by this function
CD DISC PROGRAMMING
Up to 99 tacks can be programmed for mp3 (20 in CD) and play in any order, before use, be sure the system is at stop mode before programming:
- In cd mode and stop the cd playback.
- Press the PROGRAM BUTTON (46), "P" will appear on led display (18). Moreover, it will indicate program no. and digits for track no. to be programmed.
- Select a desired track by pressing SKIP UP/DOWN BUTTONS (3)/(4).
- Press the PROGRAM BUTTON (46) to store the track into memory.
- Repeat steps 3 and 4 to enter additional tracks into the memory if necessary.
- When all the desired tracks have been programmed, press PLAY/PAUSE BUTTON (2) to play the disc in assigned order.
- To cancel the programmed file, press STOP BUTTON (26).
PLAYBACK OF MP3/WMA SONG VIA USB STORAGE MEDIA
The system is able to decode and playback all mp3/wma file which stored in the memory media with USB connecting port.
- Press FUNCTION BUTTON (6) to select "USB" mode.
- Plug-in the USB plug with the face up & make sure the plug is completely going into the USB port.
- The system will start reading the storage media automatically after connecting, and the LED display (18) will show the total number of mp3/wma files
- Repeat the same playback procedure as playing cd/mp3 disc as above
REMARKS:
- The system can detect and read the file under mp3 and wma format only through the USB port.
- If connect the system to mp3 player via the USB socket, due to variances in mp3 encoding format some mp3 player may not be able to play via the USB socket, this is not a malfunction of the system.
- Connecting the USB upside down or backwards could damage the audio system or the storage media. Check to be sure the direction is correct before connection.
- Set the FUNCTION BUTTON (6) to "TAPE" mode. The system will start playback automatically after inserting the cassette tape.
- Press CASSETTE STOP/EJ BUTTON (30) half inwards during playback mode. The tape will wind forward.
- Slightly press the CASSETTE STOP/EJ BUTTON (30) again to resume playback.
- Press the CASSETTE STOP/EJ BUTTON (30) completely inwards and the cassette tape will be ejected through the CASSETTE DOOR (17).
BLUETOOTH OPERATION
- Press the MENU button, the BT indicator will light up.
- Select from your portable device (Smartphone, Tablet...) the ID Bluetooth tagged as "TCD-2570" then confirm connection.
- Now you can stream the music to the TCD-2570 and all operations can only be operated from your mobile device.
ENCODING FROM CD
Plug USB Disk into USB socket. During CD playing mode, press the RECORD BUTTON (9) one time, "REC-T" will show on the display: press the RECORD BUTTON (9) secondly to record the playing track; or press the SKIP UP BUTTON (3) one time to choose to record whole file in the CD and "REC-A" will show on the display.
ENCODING FROM CD-MP3
Plug USB Disk into USB socket. During MP3 playing mode press the RECORD BUTTON (9) one time, "REC-T" will show on the display; then press the RECORD BUTTON (9) secondly to confirm "REC" will flash and start to record after 5 seconds; or press the SKIP UP BUTTON (3) one time to choose to record all the file in the playing folder and "REC-F" will show on the display; or press the SKIP UP BUTTON (3) twice to record the file in the whole playing MP3 disc and "REC-A" will show on the display.
ENCODING FROM CASSETTE
Plug USB Disk into USB socket. During TAPE playing mode, press the RECORD BUTTON (9) one time, "USB" will show on the display, then press the RECORD BUTTON (9) secondly to confirm, "USB" will flash and start to record after 5 seconds; press PLAY/PAUSE BUTTON (2) one time to stop the recording and "USB" will not flash; press PLAY/PAUSE BUTTON (2) button again to resume to record and "USB" will flash again.
ENCODING FROM PHONO
Plug USB Disk into USB socket. During PHONO playing mode, press RECORD BUTTON (9) one time, "USB" will show on the display, then press the RECORD BUTTON (9) twice to confirm "USB" will flash and start to record after 5 seconds; press PLAY/PAUSE BUTTON (2) one time to stop the recording and "USB" will not flash; press PLAY/PAUSE BUTTON (2) again to resume to record and "USB" will flash again.
ENCODING FROM A BLUETOOTH SOURCE
Plug an USB Disk into the USB socket. While BLUETOOTH playmode is active, press the RECORD BUTTON (9) one time, "USB" symbol will show on the display, then press the RECORD BUTTON (9) again to start recording the Bluetooth sound source. The "USB" symbol will flash and record will start after 5 seconds. Press the PLAY/PAUSE BUTTON (2) one time to pause the recording (the "USB" symbol will stop flashing). Press the PLAY/PAUSE BUTTON (2) again to resume recording (the "USB" symbol will flash again).
Press the STOP button to stop recording when you want to finish recording.
NOTE: Be sure to turn the volume of your Bluetooth device to maximum. (If the Bluetooth device's volume level is 0, nothing will be recorded).
DELETE USB
- During USB mode, press DELETE BUTTON (45) one time/"DEL-1" will show on the display. You can delete the playing track.
- Press SKIP UP BUTTON (3). The playing file and "DEL-F" will show on the display. You can delete the current playing folder.
- Press SKIP UP BUTTON (3). "DEL-A" will show on the display. You can delete all of the tracks into the playing USB.
- Finally press DELETE BUTTON (45) again once confirmed to choose "DEL-1", "DEL-F" or "DEL-A".
MUTE/EQ OPERATION
During playing mode, press the MUTE BUTTON (49) one time, the sound will not be heard from the speakers and "MUTE ON" will show on the display; press the MUTE BUTTON (49) or rotate the VOLUME KNOB (7) to cancel mute function and the sound can be heard again from the speakers. During playing mode, press the EQ BUTTON (34) to choose from different sound effect among FLAT/POP/CLASSIC/ROCK/JAZZ.
SPECIFICATIONS
Radio: FM: 87.5 - 108 MHz
DAB: Band III 174 - 240 MHz
Bluetooth: Class II 2400 - 2483.5 MHz
Turntable: N10 ceramic cartridge
speeds 33/45/78 RPM
CD Player: Compatibility CD/CD-R/RD-RW/MP3
USB socket: play/record on USB stick (MP3) (not for charging)
USB recording bitrate: mp3 format 128KBPS
Power consumption: 40W (max)
Music output power: 2 X 4.5W (RMS)
Design and specifications are subject to change without notice.
Guarantee
Lenco offers service and warranty in accordance to European law, which means that in case of repairs (both during and after the warranty period) you should contact your local dealer.
Important note: It is not possible to send products that need repairs to Lenco directly.
Important note: If this unit is opened or accessed by a non-official service center in any way, the warranty expires.
This device is not suitable for professional use. In case of professional use, all warranty obligations of the manufacturer will be voided.
Disclaimer
Updates to Firmware and/or hardware components are made regularly. Therefore some of the instruction, specifications and pictures in this documentation may differ slightly from your particular situation. All items described in this guide for illustration purposes only and may not apply to particular situation. No legal right or entitlements may be obtained from the description made in this manual.

Disposal of the Old Device
This symbol indicates that the relevant electrical product or battery should not be disposed of as general household waste in Europe. To ensure the correct waste treatment of the product and battery, please dispose them in accordance to any applicable local laws of requirement for disposal of electrical equipment or batteries. In so doing, you will help to conserve natural resources and improve standards of environmental protection in treatment and disposal of electrical waste (Waste Electrical and Electronic Equipment Directive).
CE Marking
Hereby, Lenco Benelux B.V., Thermiekstraat 1a, 6361 HB Nuth, The Netherlands, declares that this product is in compliance with the essential EU directive requirements.
The declaration of conformity may be consulted via techdoc@commaxxgroup.com

Service
For more information and helpdesk support, please visit www.lenco.com
Lenco Benelux BV, Thermiekstraat 1a, 6361 HB, The Netherlands.
NEDERLANDS
LET OP:
This product contains a low power laser device.
CAUTION INVISIBLE LASER RADIATION WHEN OPEN AND INTERLOCKS DEFEATED. AVOID EXPOSURE TO BEAM

| EN | NL |
| CAUTION | LET OP |
| INVISIBLE LASER RADIATION WHEN OPEN AND INTERLOCKS DEFEATED. | ONZICHTBARE STRALING WANNEER OPEN EN BEVEILIGING NIET INTACT. |
| AVOID EXPOSURE TO BEAM | VERMIJD BLOOTSTELLING AAN DE BUNDEL |
| This product contains a low power laser device. | Dit product bevat een laser met laag vermogen. |
The operation is complete and the display show the DATE and TIME.

TUNER/ENTER
TUNER/ENTER
Turn left & right to move inside of Display menu, then push the same knob to confirm each function.
| EN | NL |
| The operation is complete and the display show the DATE and TIME. | De installingen zijn nu voltooid en de display zal de DATUM en TIJD weergeven. |
| TUNER/ENTER | AFSTEMMEN/ENTER |
| Turn left & right to move inside of Display menu, then push the same knob to confirm each function. | Draai maar links & rechts om door het Schermmenu te bewegen en druk opdezelfde knop om elke functie te bevestigen. |
| TIME | TIJD |
| SET TIME/DATE | TIJD/DATUM INSTellen |
| AUTO UPDATE | AUTOMATISCH BIJWERKEN |
| SET 12/24 HOURS | STEL 12/24 UUR IN |
| FROM ANY | VIA ALLE |
| FROM DAB | VIA DAB |
| FROM FM | VIA FM |
| NO UPDATE | GEEN UPDATE |
| LANGUAGE | TAAL |
| ENGLISH | NEDERLANDS |
| DEUTSCH | DUITS |
| NEDERLANDS | NEDERLANDS |
| FRENCH | FRANS |
| SW VERSION | SW -VERSIE |
ANTENNE
This product contains a low power laser device.
CAUTION INVISIBLE LASER RADIATION WHEN OPEN AND INTERLOCKS DEFEATED. AVOID EXPOSURE TO BEAM

| EN | DE |
| CAUTION | ACHTUNG |
| INVISIBLE LASER RADIATION WHEN OPEN AND INTERLOCKS DEFEATED. | UNSICHTBARE STRAHLUNG, WENN GEÖFFNET UND BEI UMGANGENER VERRIEGELUNG. |
| AVOID EXPOSURE TO BEAM | SCHAUEN SIE NIE DIREKT IN DEN LASERSTRAHL. |
| This product contains a low power laser device. | Dieses Produkt enthalt eine Lasereinheit geringer Leistung. |
The operation is complete and the display show the DATE and TIME.

TUNER/ENTER
TUNER/ENTER
Turn left & right to move inside of Display menu, then push the same knob to confirm each function.
This product contains a low power laser device.
CAUTION INVISIBLE LASER RADIATION WHEN OPEN AND INTERLOCKS DEFEATED. AVOID EXPOSURE TO BEAM

| EN | FR |
| CAUTION | ATTENTION |
| INVISIBLE LASER RADIATION WHEN OPEN AND INTERLOCKS DEFEATED. | RAYONNEMENT LASER INVISIBLE EN CAS D'OUVERTURE ET DE DÉVERROUILLAGE. |
| AVOID EXPOSURE TO BEAM | ÉVITER D'ÊTRÉ EXPOSE AU FAISCEAU |
| This product contains a low power laser device. | Ce produit contient un dispositif laser à faible puissance. |
The operation is complete and the display show the DATE and TIME.

TUNER/ENTER
TUNER/ENTER
Turn left & right to move inside of Display menu, then push the same knob to confirm each function.
This product contains a low power laser device.
CAUTION INVISIBLE LASER RADIATION WHEN OPEN AND INTERLOCKS DEFEATED. AVOID EXPOSURE TO BEAM

| EN | ES |
| CAUTION | PRECAUCION |
| INvisible LASER RADIATION WHEN OPEN AND INTERLOCKS DEFEATED. | RADIACION DE LÁSER INVISIBLE AL ABRIRLO Y DESACTIVAR LOS BLOQUEOS. |
| AVOID EXPOSURE TO BEAM | EVITE LA EXPOSICión A Este HAZ |
| This product contains a low power laser device. | Este producto contiene un dispositivo láser de baja potencia. |
The operation is complete and the display show the DATE and TIME.

TUNER/ENTER
TUNER/ENTER
Turn left & right to move inside of Display menu, then push the same knob to confirm each function.
| EN | ES |
| The operation is complete and the display show the DATE and TIME. | La operación se ha completado y la pantalla muestra la FECHA y la HORA. |
| TUNER/ENTER | RADIO / ENTRAR |
| Turn left & right to move inside of Display menu, then push the same knob to confirm each function. | Gire a la derecha y a la izquierda para moverse por el interior del menú de Pantalla; posteriormente, pulse el mesmo dial para confirmar cada funciona. |
| TIME | HORA |
| SET TIME/DATE | CONFIGURAR FECHA / HORA |
| AUTO UPDATE | ACTUALIZACION AUTOMÁTICA |
| SET 12/24 HOURS | Ajustar 12/24 h |
| FROM ANY | DESDE CUALQUIERA |
| FROM DAB | DESDE DAB |
| FROM FM | DESDE FM |
| NO UPDATE | SIN ACTUALIZACION |
| LANGUAGE | IDIOMA |
| ENGLISH | ESPÁÑOL |
| DEUTSCH | ALEMÁN |
| NEDERLANDS | HOLANDÉS |
| FRENCH | FRANCÉS |
| SW VERSION | Vers. SW |