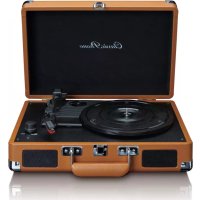
TT33 - Turntable Classic Phono - Free user manual and instructions
Find the device manual for free TT33 Classic Phono in PDF.

User questions about TT33 Classic Phono
0 question about this device. Answer the ones you know or ask your own.
Ask a new question about this device
Download the instructions for your Turntable in PDF format for free! Find your manual TT33 - Classic Phono and take your electronic device back in hand. On this page are published all the documents necessary for the use of your device. TT33 by Classic Phono.
USER MANUAL TT33 Classic Phono
natural_image
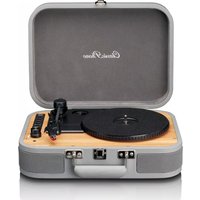
Black vintage portable cassette with red cover and black body, no visible text or symbols on the device itself.User manual Retro Suit Case Turntable Gebruiksaanwijzing Platenspeler in Retro Behuizing Benutzerhandbuch Koffer-Plattenspieler im Retro-Stil
Mode d'emploi Tourne-Disque Valise Rétro Manual del usuario Maleta Retro Para Tocadisco
Index
English....3
Nederlands....12
Deutsch....21
Français....31
Español 41
English
1. Safety instructions
- When using electrical equipment basic safety precautions should always be followed.
- This equipment is not intended to be used by persons (including children) with reduced physical, sensory or mental capabilities or lack of experience or knowledge. They should be given appropriate supervision and instructions to use the equipment by a person responsible for their safety.
• Ensure the equipment is not too close to heat emitting appliances or placed in direct sunlight. - Check that the voltage indicated on the data plate corresponds with that of the local network before connecting the equipment to the mains power supply.
- Do not leave the equipment unattended while connected to the power supply.
- Do not immerse the equipment in water or any other liquids. It is imperative to unplug the power cord after the equipment has been used, before it is cleaned and while being repaired.
- Close supervision is required when using this equipment near children.
• Never leave the equipment within the reach of children. - Repairs to electrical appliances should only be performed by qualified personnel. Improper repairs may place the user and/or equipment at serious risk.
- This equipment's intended for household use only and should not be used for industrial or commercial purposes.
- Do not operate this appliance with a damaged plug or cord, after a mal-function or after being dropped or damaged in any way.
- Do not use this equipment for anything other than its intended use. This equipment must be placed on a stable, heat resistant surface.
- Do not push objects into any openings as damage to the equipment and/or electric shock may occur.
- Do not use this product in wet or bad weather conditions. This product is not a toy.
- Do not play music at excessive levels especially near children.
- The normal function of the product may be disturbed by Strong Electro Magnetic Interference. If so, simply reset the product to resume normal operation by following the instruction manual.
- Refer all service to qualified service personnel. Servicing is required when the apparatus has been damaged in any way, such as power supply cord or plug is damaged, liquid has been spilled or objects have fallen into the apparatus, or when the apparatus has been exposed to rain or moisture.
- Please keep the unit in a well-ventilated environment.
- These servicing instructions are for use by qualified service personnel only. To reduce the risk of electric shock, do not perform any servicing other than that contained in the operating instructions unless you are qualified to do so.
• The main plug is used as disconnect device, the disconnect device shall remain readily operable. - This equipment is a class II or double insulated electrical appliance. It is designed in such a way that it does not require a safety connection to electrical earth.
- The lighting with the triangle symbols shows that the unit contains non-insulated dangerous voltage.
• The batteries in remote shall not be exposed to excessive heat such as sunshine and fire.
- The apparatus shall not be exposed to liquid, and objects filled with liquids, such as vases, shall not be placed on the apparatus.
We strongly recommend retaining the packaging for future transport of the product.
WARNING:  | Never remove the casing of this apparatus. Never place this apparatus on other electrical equipment. |
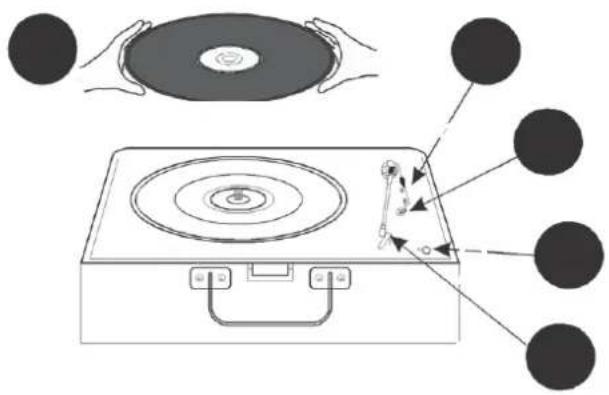
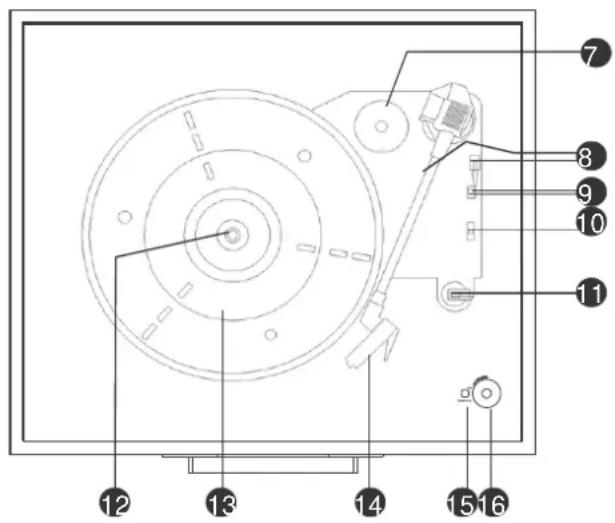
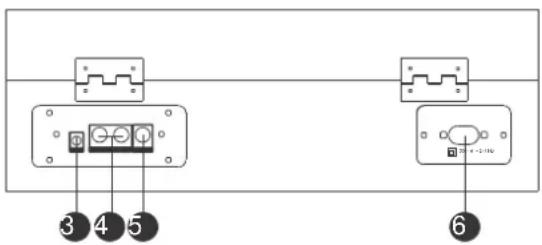
2. Outlook and controls
Front

text_image
Technical diagram showing two labeled components (① and ②) with connection points and a central rectangular block.-
SPEAKER
-
LOCK
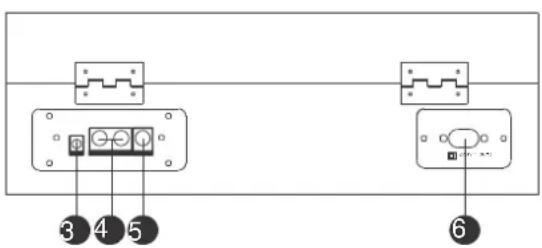
Back
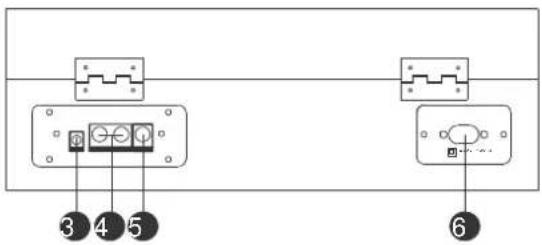
text_image
③ ④ ⑤ ⑥-
AUX INPUT 3.5MM JACK
-
LEFT/RIGHT LINE OUT JACK
-
SUBWOOFER LINE OUTPUT JACK
-
POWER SUPPLY
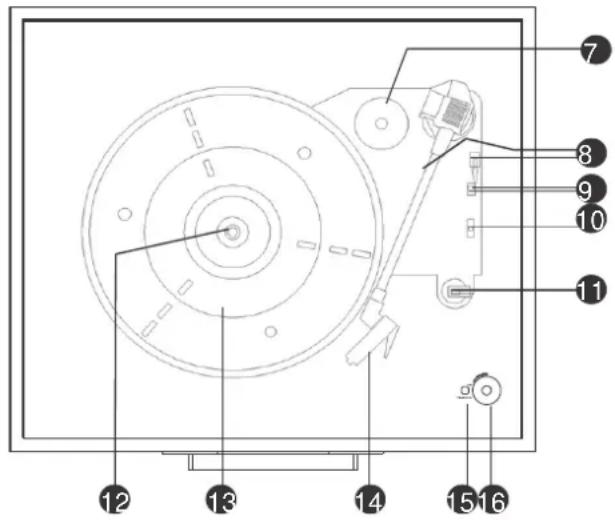
Inside
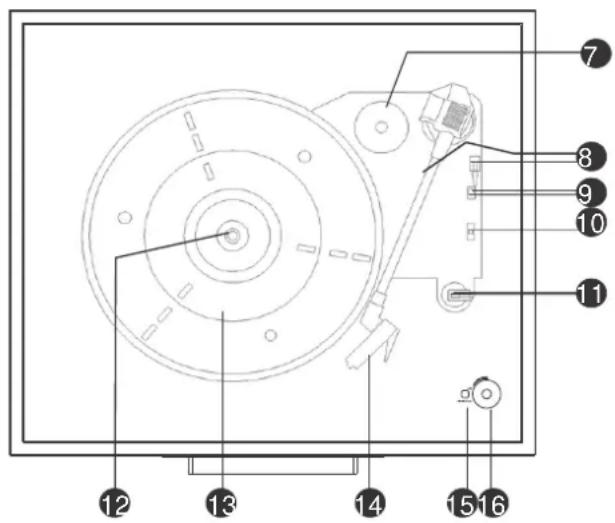
text_image
Technical diagram of a mechanical device with numbered components for identification- ADAPTOR FOR 45 RPM RECORDS
- TONE ARM, ARM LIFT
- AUTO STOP ON/OFF SWITCH
- R.P.M 33½, 45, 78 SELECTION
- ARM LOCK/REST
- SPINDLE
- TURNTABLE
- CARTRIDGE
- POWER INDICATOR
- POWER/VOLUME
Metal support
- Tap up the cover until the Metal spike touches the end of the metal arm.
- Move the metal spike to the gap of the other metal arm.
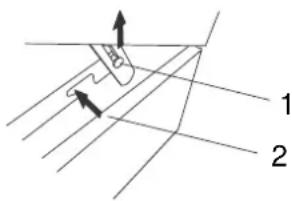
text_image
Technical diagram showing a mechanical or structural component with labeled parts 1 and 2, including directional arrows indicating movement.ACCESSORY
Adaptor for 45 rpm record
To play the 45 rpm record, place the ADAPTOR on the SPINDLE.

- Place the 45 rpm adaptor over the spindle.
- Gently place your 45 rpm record onto the turntable.
- Follow the step of OPERATION to play your record.
3. Cartridge installation
UNPACKING
- Remove all packing materials from the unit. (Save all packing materials.)
- Carefully remove the unit from its Styrofoam and take it out of the plastic bag.
- Although records can be played with the lid closed as well as opened, it is recommended that the lid is opened.
- Remove the white protective needle cover by gently pulling towards the front of the unit.
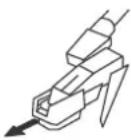
REMOVING THE NEEDLE
- Gently pull down the tip of the cartridge.
- Pull the cartridge forward.
- Pull out and remove.

flowchart
graph LR
1["Step 1: Hand grip"] --> 2["Step 2: Robot holding part"]
3["Step 3: Hand press"] --> 3["Step 3: Robot holding part"]
INSTALLING THE CARTRIDGE
Position the red cartridge with the sapphire stylus facing down.
- Line up the tab on the back of the needle with the tone arm.
- Insert the cartridge with its front end at a downward angle.
- Lift the front end of the needle upward until it snaps into place.

flowchart
graph LR
    A["1: Robot with handle"] --> B["2: Robot with lever"]
    B --> C["3: Robot with handle"]
ADDITIONAL INFORMATION
- The red cartridge has a very small sapphire stylus that is barely visible.
Notice that the replacement needle you are receiving should be the same as the one already on the tone arm. - This Needle is safe for 33 13 , 45 & 78 speed records.
- Replacing the needle depends on how often you use the turn table.
System connection
Follow the operation steps on the next page to start using the unit.
text_image
Diagram illustrating the working principle of a CD or DVD disc, showing hand positioning and internal components with labeled parts.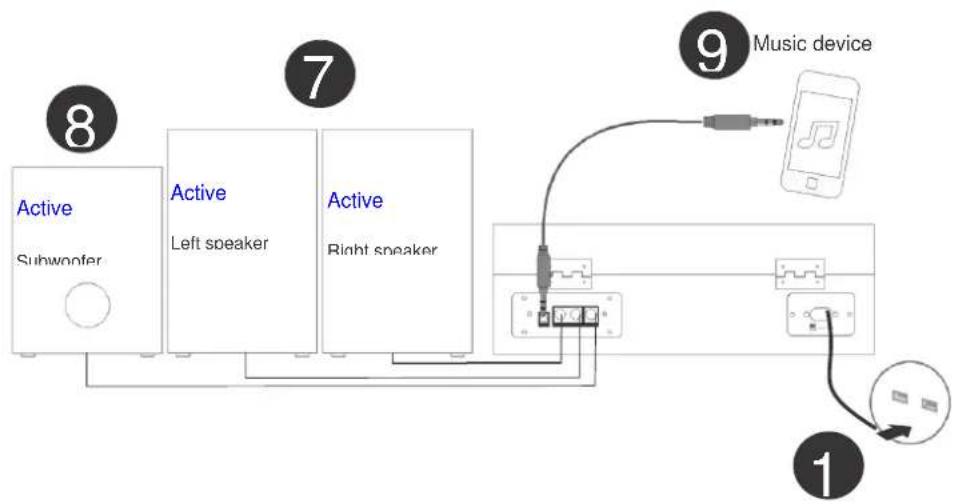
flowchart
graph TD
    A["Active Subwoofer"] --> B["Active Left speaker"]
    B --> C["Active Right speaker"]
    C --> D["Music device"]
    D --> E["Switch"]
    E --> F["Ground"]
    style A fill:#f9f,stroke:#333
    style B fill:#bbf,stroke:#333
    style C fill:#bbf,stroke:#333
    style D fill:#dfd,stroke:#333
    style E fill:#dfd,stroke:#333
    style F fill:#dfd,stroke:#333
4. Operation
Use the POWER CABLE to connect the unit with the power outlet.
POWER ON
Turn the unit on by rotating the POWER/VOL located on the front panel to power on the unit.
VOLUME CONTROL
Rotate the POWER/VOL on the front panel of the unit to adjust the volume to a comfortable level.
Release the TONE ARM from the ARM LOCK/REST.
SELECT SPEED: Set the R.P.M 33½, 45, 78 SELECTION to the desired speed of the records.
AUTO STOP
Choose whether the records stop automatically when finished playing by the AUTO STOP ON/OFF SWITCH. If the AUTO STOP ON/OFF SWITCH turns on, the record will stop turning when it comes to its end.
Gently place the record on the TURNTABLE.
Gently lift the TONE ARM and move it to the desired starting point on the records.
LINE OUT CONNECTION
- Connect the Auxiliary cable (not supplied) to the LINE OUT JACK on the rear of the record player and the other end of the cable to the auxiliary inputs of the external component, e.g. another Hi-Fi unit, Amplifier, etc.
- Check the volume level of your external component and adjust it if necessary.
- Refer to the instruction manual of the external component for its correct operation.
SUBWOOFER OUTPUT JACK
The subwoofer output jack enables you to attach an active subwoofer (not supplied) which will enhance bass response. Please contact your retailer for suitable subwoofer models.
AUX IN CONNECTION & OPERATION
Any component with an Audio Output, such as for instance a DAB Radio module, CD/Cassette Player, MP3 Player can be connected by using a cable with a 3.5mm dia. jack plug (a 3.5mm AUX IN cord is supplied).
- Turn the unit on and adjust the volume.
- Plug the supplied AUX IN cord into the AUX IN JACK on the rear of the unit.
- Insert the plug at the other end of the Auxiliary cable into the output jack or 3.5mm dia. headphone jack of the external audio player.
- Switch the other Audio Player on, play the music and adjust its volume if required.
Note: Inserting the Aux plug will disable the record play function.
5. Trouble shooting
THERE IS NO POWER
* The POWER CORD is not connected to either a power outlet or the unit.
- Check the plugs and whether they are not damaged.
* The unit is not turned on.
- Rotate the POWER/VOL switch from the OFF position.
THE UNIT KEEPS SHUTTING ITSELF DOWN
* This unit has a POWER SAVING FUNCTION, to comply with ERP Stage II regulations. If the unit is not operated or there is no signal output for 15 minutes, it will automatically turn itself off.
* Turn the POWER/VOL switch off for approximately 5 seconds and then switch it ON again to reactivate the unit.
THE TURNTABLE IS NOT ROTATING
* The turn table drive belt may have come off the turn table mechanism and needs to be refitted. Please contact professionals for advice on how to re-fit it.
* The AUX IN cable is plugged in. Disconnect it.
* Ensure you have placed the 45rpm spindle adaptor on the turn table before installing the record.
MY RECORD DOES NOT PLAY AT THE CORRECT SPEED
* Switch the speed control switch to the correct one for 33½, 45 or 78 rpm records.
MY 33½ RECORD WOBLES WHEN PLACED ON THE TURN TABLE PLATTER
* Make sure you have folded down the ARM LOCK before placing the record on it, or that the 45rpm SPINDLE ADAPTOR has not been left on the turntable platter.
THE TONE ARM SLIDES ACROSS THE RECORD AND DOES NOT PLAY IT
* The white protective cover is still covering the needle cartridge. Remove it.
* The stylus tip may be damaged. Replace the stylus. (See specifications for details)
* Adjust the VOLUME CONTROL knob to turn the sound up.
* Check if the Aux connection is removed.
6. Specifications
| Power source | AC 230V/50Hz |
| Speakers | 4Ohm X 2 |
| 3-Speed Turn table | 33 13 , 45, 78 rpm |
| Line-Out | RCA connection |
| Aux In | 3.5mm dia. |
| Subwoofer Output Jack | RCA jack for Active Subwoofer |
| Stylus | Universal type fitted (for 33 13 , 45 & 78 rpm records*) |
| Accessories supplied | 45rpm Spindle Adaptor3.5mm Aux in connection |
* DESIGN AND SPECIFICATIONS ARE SUBJECT TO CHANGE WITHOUT NOTICE.
7. Guarantee
Lenco offers service and warranty in accordance with the European law, which means that in case of repairs (both during and after the warranty period) you should contact your local dealer.
Important note: It is not possible to send products that need repairs to Lenco directly.
Important note: If this unit is opened or accessed by a non-official service center in any way, the warranty expires.
This device is not suitable for professional use. In case of professional use, all warranty obligations of the manufacturer will be voided.
8. Disclaimer
Updates to Firmware and/or hardware components are made regularly. Therefore some of the instruction, specifications and pictures in this documentation may differ slightly from your particular situation. All items described in this guide for illustration purposes only and may not apply to particular situation. No legal right or entitlements may be obtained from the description made in this manual.
9. Disposal of the Old Device

natural_image
Simple line drawing of a trash bin with crossed lines indicating no waste or discharge (no text or symbols)This symbol indicates that the relevant electrical product or battery should not be disposed of as general household waste in Europe. To ensure the correct waste treatment of the product and battery, please dispose them in accordance to any applicable local laws of requirement for disposal of electrical equipment or batteries. In so doing, you will help to conserve natural resources and improve standards of environmental protection in treatment and disposal of electrical waste (Waste Electrical and Electronic Equipment Directive).
10. CE Marking

Products with the CE marking comply with the EMC Directive (2004/108/EC) and the Low Voltage Directive (2006/95/EC) issued by the Commission of the European Community.
Hereby, Lenco Benelux BV, Thermiekstraat 1a, 6361 HB Nuth, The Netherlands, declares that this product is in compliance with the essential requirements and other relevant provisions of Directive 1999/5/EC.
The declaration of conformity may be consulted at techdoc@lenco.com
11. Service
For more information and helpdesk support, please visit www.lenco.com Lenco Benelux BV, Thermiekstraat 1a, 6361 HB, The Netherlands.
Nederlands
text_image
Technical diagram showing two labeled components (1 and 2) with connection points and a central rectangular component.- LUIDSPREKER
- VERGRENDELING
Achterkant

text_image
③ ④ ⑤ ⑥-
AUX-INGANG 3,5MM
-
LLINKS/RECHTS LIJNUITGANG
-
SUBWOOFER LIJN UITGANG
-
STROOMVOORZIENING
Binnenzijde
text_image
Technical diagram of a mechanical device with numbered components for identification- ADAPTER VOOR 45 TPM PLATEN
- TOONARM, TOONARMLIFT
- AUTO-STOP AAN/UITSCHAKELAAR
- T.P.M 33½, 45, 78 SELECTIE
- ARMVERGRENDELING/STEUN
- AS
- DRAAITAFEL
- PATROON
- INDICATIELAMPJE AAN/UIT
- AAN/UIT/VOLUME
Metalen steun
text_image
Diagram showing a mechanical or structural component with labeled parts 1 and 2, including directional arrows and grid lines.ACCESSOIRE
flowchart
graph LR
1["Hand with grip"] --> 2["Close-up of tool"]
3["Hand holding grip"] --> 3["Close-up of tool"]
HET PATROON INSTALLEREN
flowchart
graph LR
    A["1: Robot with handle"] --> B["2: Robot with handle"]
    B --> C["3: Robot with handle"]
AANVULLENDE INFORMATIE
text_image
Diagram showing a CD player with a disc and its electrical circuit, illustrating the working principle of the device.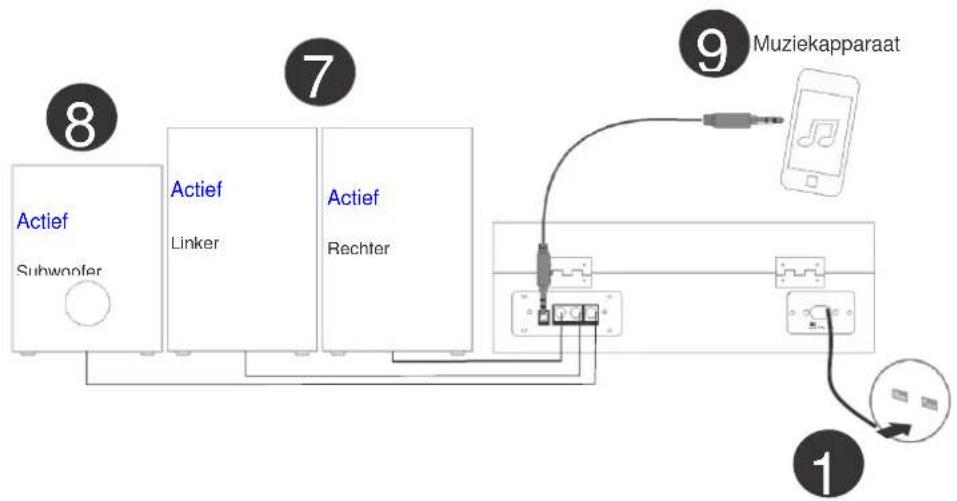
flowchart
graph TD
    A["Actief Subwoofer"] --> B["Linker"]
    B --> C["Rechter"]
    D["Muziekapparaat"] --> E["USB Port"]
    E --> F["Switch"]
    G["1"] --> H["Switch"]
    H --> I["Switch"]
    J["7"] --> K["Switch"]
    K --> L["Switch"]
    M["8"] --> N["Switch"]
    N --> O["Switch"]
    P["9"] --> Q["Switch"]
4. Operatie
natural_image
Simple line drawing of a trash bin with two crossed lines indicating no waste or discharge (no text or symbols)
text_image
Technical diagram showing two labeled components (1 and 2) with connection points and a central component.text_image
Technical diagram of a mechanical device with numbered components for identificationtext_image
Technical diagram showing a mechanical component with labeled parts 1 and 2, including directional arrows indicating motion or force.ZUBEHÖR
flowchart
graph LR
    A["1: Hand with tool"] --> B["2: Targeted hand with tool"]
    B --> C["3: Targeted hand with tool"]
ZUSÄTZLICHE INFORMATIONEN
text_image
Diagram illustrating the working principle of a CD/DVD power supply, showing hand positioning and component assembly.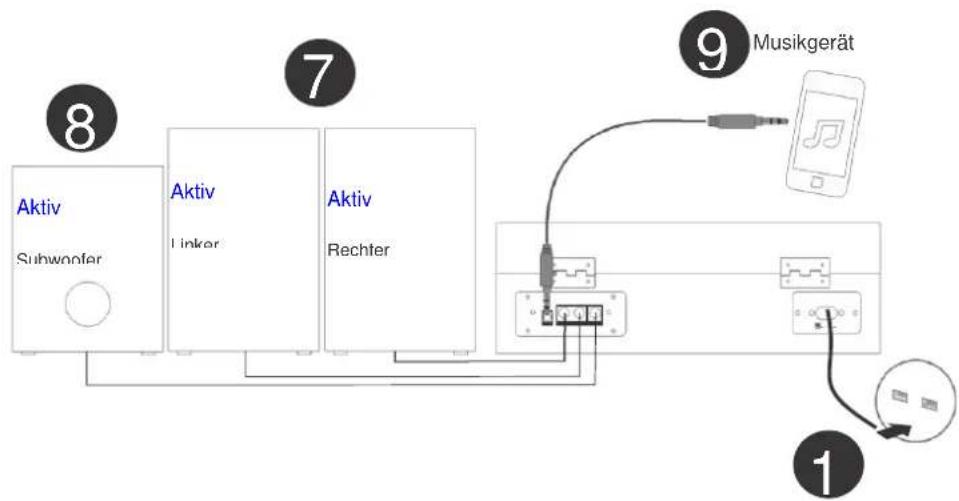
flowchart
graph TD
    A["Aktiv Subwoofer"] --> B["Aktiv Linker"]
    B --> C["Aktiv Rechter"]
    D["1"] --> E["2"]
    E --> F["3"]
    F --> G["4"]
    G --> H["5"]
    H --> I["6"]
    I --> J["7"]
    J --> K["8"]
    style A fill:#f9f,stroke:#333
    style B fill:#f9f,stroke:#333
    style C fill:#f9f,stroke:#333
    style D fill:#f9f,stroke:#333
    style E fill:#f9f,stroke:#333
    style F fill:#f9f,stroke:#333
    style G fill:#f9f,stroke:#333
    style H fill:#f9f,stroke:#333
    style I fill:#f9f,stroke:#333
    style J fill:#f9f,stroke:#333
    style K fill:#f9f,stroke:#333
4. Betrieb
SUBWOOFER AUSGANGSBUCHSE
natural_image
Symbol of a trash bin crossed out by two crossed lines, with a solid black rectangle below (no text or labels)Electrical and Electronic Equipment Directive).
10. CE-Kennzeichen

text_image
Technical diagram showing two labeled components (1 and 2) with connection points and a central connector.- HAUT-PARLEUR
- VERROUILLAGE
Arrière
text_image
3 4 5 6- PRISE DE 3,5 MM D'ENTRÉE AUX
- PRISE DE SORTIE DE LIGNE GAUCHE/DROITE
- PRISE DE SORTIE DE LIGNE DU CAISSON DE BASSES
- ALIMENTATION ÉLECTRIQUE
Intérieur
text_image
Technical diagram of a mechanical device with numbered components for identification- ADAPTATEUR POUR 45 TOURS
- BRAS DE LECTURE, LEVAGE DU BRAS
- ARRÊT AUTOMATIQUE INTERRUPTEUR MARCHE/ARRÊT
- SÉLECTION DE 33 ^1/3 , 45, 78 TOURS
- BLOCAGE/SUPPORT DU BRAS
- BROCHE
- TOURNE-DISQUE
- CARTOUCHE
- TÉMOIN D'ALIMENTATION
- POWER/VOLUME
Support métallique
text_image
Technical diagram showing a mechanical component with labeled parts 1 and 2, including directional arrows indicating motion or force.ACCESSOIRES
text_image
Diagram showing hands holding a CD and a rotary switch on a power station, with labeled components and arrows indicating measurement or operation.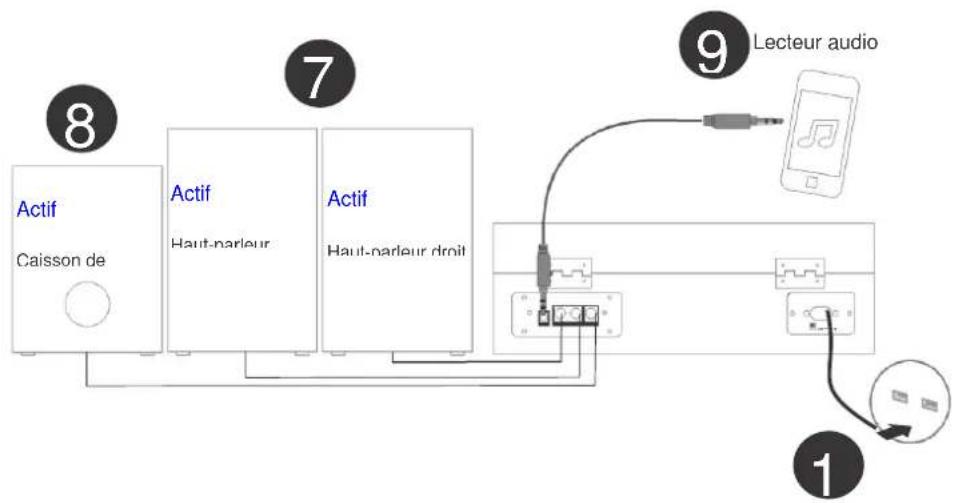
flowchart
graph TD
    A["Actif Caisson de"] --> B["Actif Haut-parleur"]
    B --> C["Actif Haut-parleur droit"]
    C --> D["Lecteur audio"]
    D --> E["Switch"]
    E --> F["Switch"]
    style A fill:#f9f,stroke:#333
    style B fill:#bbf,stroke:#333
    style C fill:#bfb,stroke:#333
    style D fill:#dfd,stroke:#333
    style E fill:#fff,stroke:#333
    style F fill:#fff,stroke:#333
4. Utilisation
natural_image
Simple line drawing of a trash bin with crossed lines indicating no waste or restriction (no text or symbols)
text_image
Technical diagram showing a mechanical or electrical component with labeled parts 1 and 2- ALTAVOZ
- BLOQUEO
Traseras
text_image
③ ④ ⑤ ⑥text_image
Technical diagram showing a mechanical or structural component with labeled parts 1 and 2, including directional arrows and measurement indicators.ACCESORIO
flowchart
graph LR
    A["Step 1: Hand holding device"] --> B["Step 2: Hand holding device"]
    B --> C["Step 3: Hand holding device"]
flowchart
graph LR
    A["1: Robot with handle"] --> B["2: Robot with handle"]
    B --> C["3: Robot with handle"]
text_image
Diagram illustrating the components of a CD or DVD drive, showing top-down view and internal structure with labeled parts.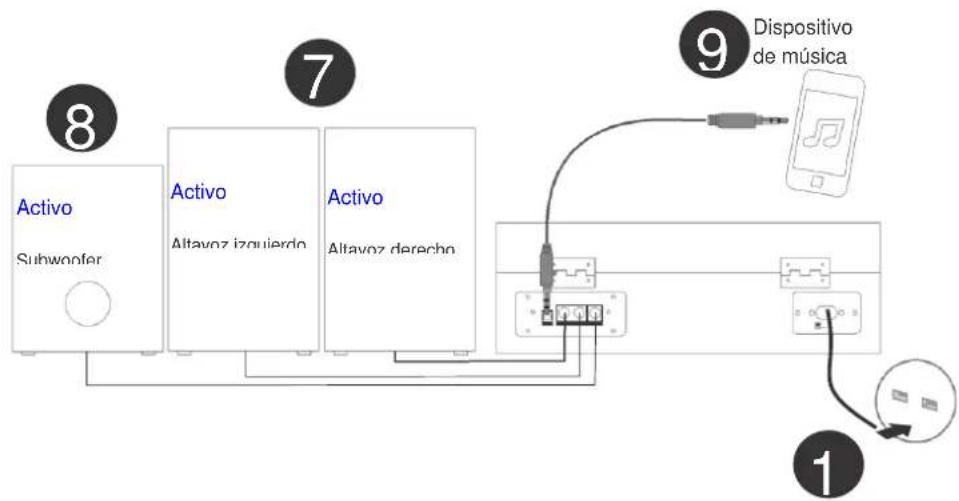
flowchart
graph TD
    A["8 Activo Subwoofer"] --> B["7 Activo Altavoz izquierdo"]
    B --> C["9 Dispositivo de música"]
    C --> D["1"]
    style A fill:#f9f,stroke:#333
    style B fill:#bbf,stroke:#333
    style C fill:#dfd,stroke:#333
    style D fill:#fff,stroke:#333