306617 - Irrigation timer Brandson - Free user manual and instructions
Find the device manual for free 306617 Brandson in PDF.


User questions about 306617 Brandson
0 question about this device. Answer the ones you know or ask your own.
Ask a new question about this device
Download the instructions for your Irrigation timer in PDF format for free! Find your manual 306617 - Brandson and take your electronic device back in hand. On this page are published all the documents necessary for the use of your device. 306617 by Brandson.
USER MANUAL 306617 Brandson
text_image
QR code image containing encoded data, no visible human-readable textENG: Current drivers, user manuals and other relevant documents for this product can be found on our homepage.
text_image
NO OFF SET STARTnatural_image
Technical line drawing of a mechanical device with no visible text or symbolstext_image
Technical diagram of a water control device with labeled ports and control buttonstext_image
SET CLOCK 12:30 AM OFF NO SET STARTtext_image
ZONE [1] 2 MANUAL ZONE 1 [2] MANUAL ZONE [1][2] MANUALThank you for purchasing a Brandon product. Please read the following brief instructions carefully so that you can enjoy your new appliance. Before using the delivered goods, check that they are complete, fault-less and undamaged.
1. Scope of delivery
- Irrigation control
- PTFE sealing tape
- Operating instructions
2. Technical data
| Operating voltage 2.3V - 3.3V DC | |
| Battery type 2x 1.5V AAA battery | |
| Connections | • Water connection 3/4" (inlet/without adapter) |
| Dimensions (H x W x D) Water outlet 3/4" (outlet/without adapter) | |
| Water pressure 70mm x 130mm x 140mm | |
| Max. flow rate 0.5 - 8 bar (7 psi - 116 psi) | |
| IP protection class 35L/min (10Gal/min) | |
| Working temperature IP54 | |
| Features • 3°C - 50°C (37.4°F - 122°F)• Manual operation• Adjustable watering programme | |
3. Product details
text_image
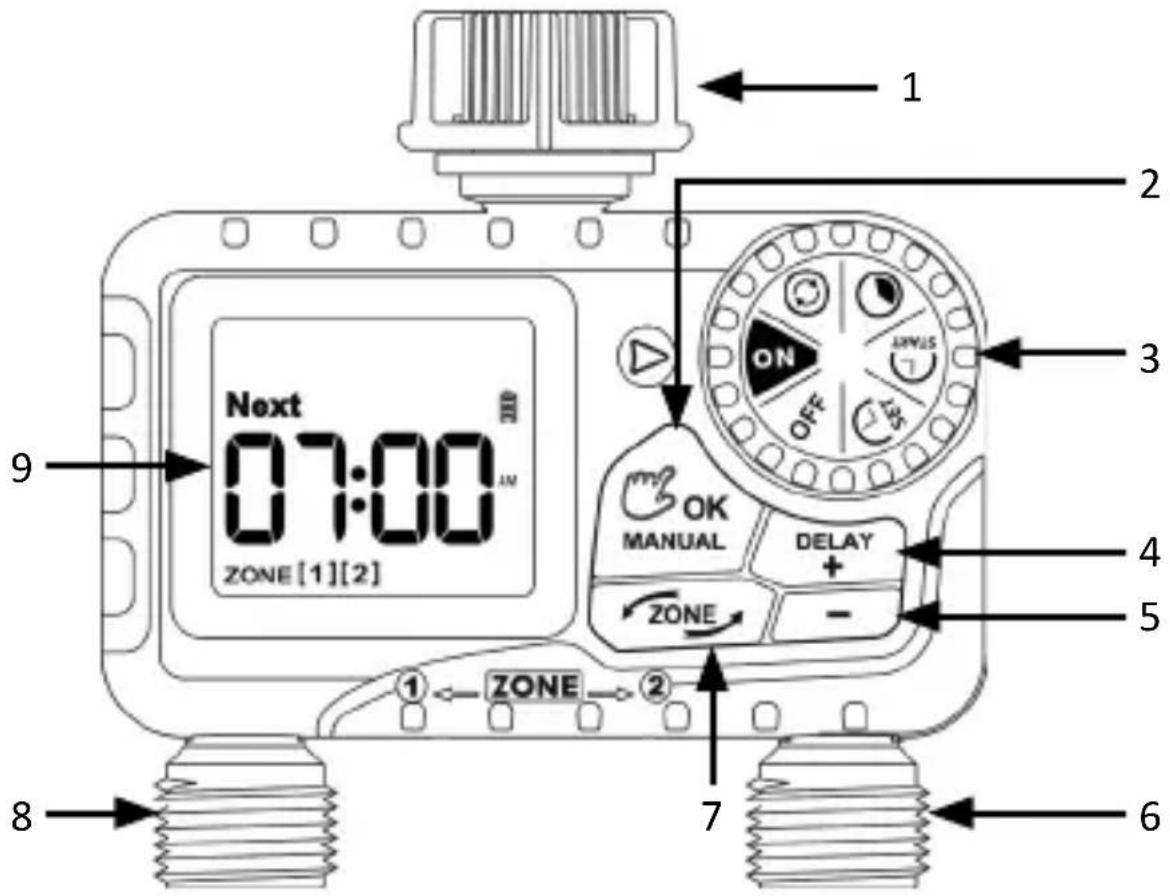
Next 07:00 ZONE [1][2] ZONE 1 2 3 ON OFF OK MANUAL DELAY + - ZONE ZONE ZONE 1 ZONE 2 7 8 6| 1 Water tap connection |
| 2 "OK/Manual" button |
| 3 Selector wheel |
| 4 "Delay/+" button |
| 5 "-" button |
| 6 Water outlet zone 2 (hose connection) |
| 7 "Zone" button (zone change) |
| 8 Water outlet zone 1 (hose connection) |
| 9 Display |
text_image
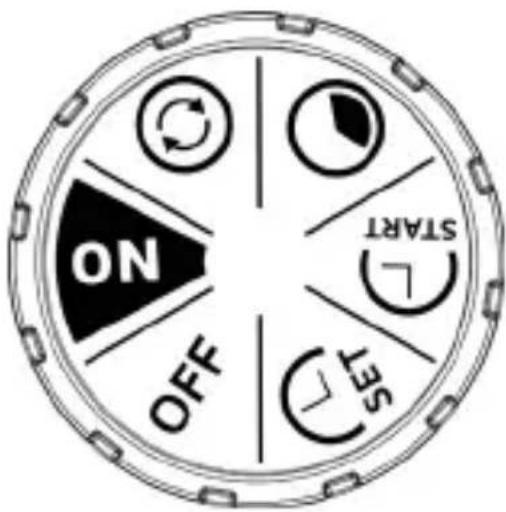
NO OFF SET START| ON | Timer irrigates according to your individual schedule for both zones |
| OFF Switch off watering | |
Set Clock  | Switch 12H/24H and set the current time |
Start Time  | Set the first watering start time for each zone |
How Long  | Determine the watering duration for each zone |
How Often  | Choose how often you water for each zone |
Key functions
| Button Function | |
| Selector wheel | Timer irrigates according to your individual schedule for both zones |
| "OK/Manual" | Confirmation button to go to the next/previous step or manual watering mode. |
| "Delay/+" | Adjust time and system settings or delay watering programme. |
| "- " Adjust time and system settings | |
| "Zone" Switch between ZONE 1 and ZONE 2 | |
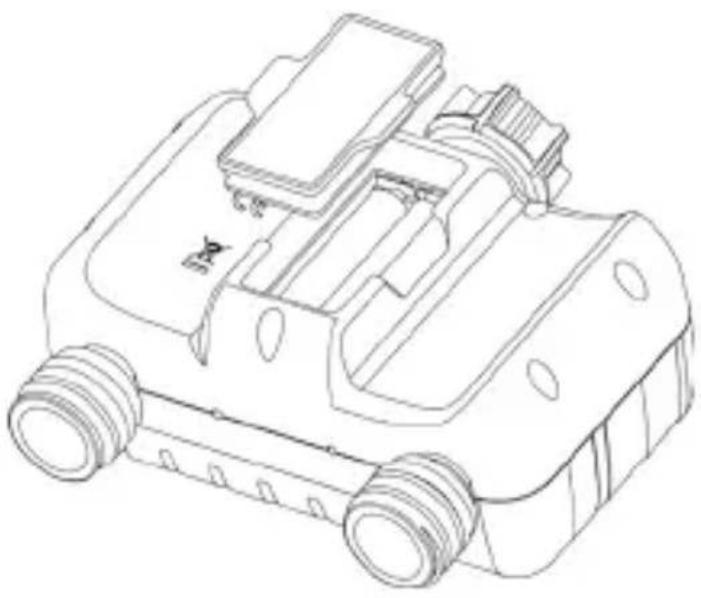
4. Changing batteries / Inserting batteries
natural_image
Technical line drawing of a mechanical device with no visible text or symbolsThe display indicates as soon as the inserted batteries are empty. The battery indicator flashes on the display.
Remove the battery compartment cover on the back of the device.
Insert 2 new AAA (1.5 V) batteries into the battery compartment. Always ensure that the polarity of the contacts is correct.
Replace the battery compartment cover and press firmly to ensure that it is completely sealed.
Note:
Do not use rechargeable batteries.
If the device is not used for a longer period of time, please remove the batteries and dispose of them properly.
Do not dispose of the batteries in a fire. The batteries may explode or leak. To ensure a longer service life, please use 2 new AAA alkaline batteries (not included). Do not mix new and old alkaline, standard (carbon-zinc) or rechargeable batteries.
5. Initial start-up
text_image
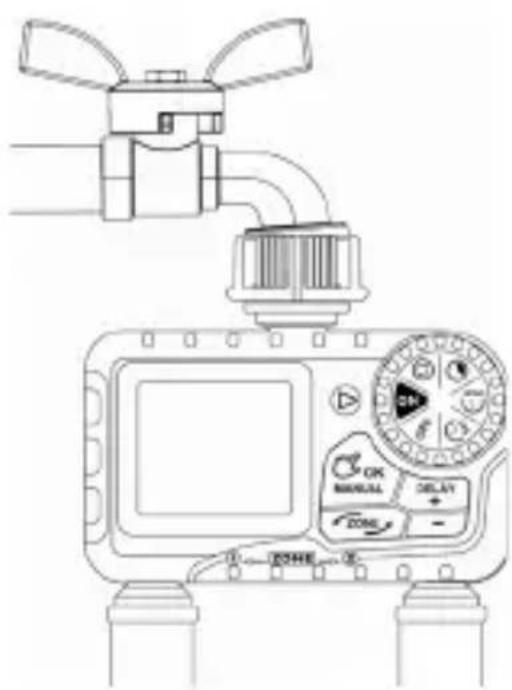
Technical diagram of a water control device with labeled ports and control panelMake sure that the filter in the tap connection is pointing upwards.
- Wrap PTFE tape around the thread of the tap.
- Screw the irrigation controller to the garden tap and ensure that the indicator is as vertical as possible to prevent rainwater from collecting and entering the interior.
- Wrap PTFE tape around the threads of the water outlets.
- Screw the garden hoses to the outlets of the irrigation controller.
- Turn on the tap after programming the timer.
Note:
- Please do not use any tools for installation, only install the appliance by hand.
- If temperatures below freezing are expected, the appliance should be removed from the tap and stored indoors to avoid possible frost damage.
5.1 Activate the device before use
Please activate the device before using it for the first time or after a period of inactivity.
- Leave the tap turned off.
- Turn the watering control to „ON“.
- Press and hold the „MANUAL“ button for 3-5 seconds to activate manual watering mode.
- Press the „ZONE“ button twice to select both Zone 1 and Zone 2. When the screen flashes, immediately press the „OK“ button to start manual watering.
- After hearing 2 „click“ sounds or after waiting approximately 5 seconds, the valves in the timer will open, then turn the dial to „OFF“ to close the valves.
- Repeat steps 2-5 approx. 3-4 times.
Turn the tap on a little to test and then repeat steps 2-5 to check whether the water flows out as expected or is switched off.
6. Start-up
This device is a dual-zone irrigation controller that allows you to irrigate two different areas from the same tap. Each zone can be programmed with an independent start time, duration and frequency.
Attention! If two zones are operated simultaneously, the water pressure is lower than with a single zone, as the water pressure is divided between the two zones.
Configure the watering programme separately for each zone. Pay attention to which zone you have selected in the settings.
Set the time
text_image
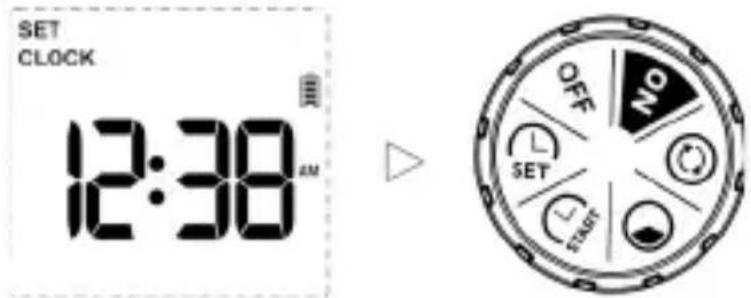
SET CLOCK 12:30 AM OFF NO SET START- Turn the selection dial to „SET CLOCK“. Use the „+“ or „-“ buttons to select the 24-hour or 12-hour format and confirm the entry with the „OK/Manual“ button.
- Set the exact time using the „+“ or „-“ button. If you select the 12-hour format, please note AM and PM.
- Confirm with the „OK“ button and switch between hours and minutes.
- Then turn the selection dial to the desired position to save the changes in this step.
Note: When you have finished setting the time, turn the selection dial to save the changes instead of pressing the „OK“ button. If you press the „OK“ button, the appliance returns to the previous setting instead of saving it.
Determine start time (,,") START
After connecting the Water Computer to the tap and the hose of the irrigation system, set the start time of the irrigation.
- Turn the selection dial to „“.

-
Use the „+“ and „-“ buttons to set your start time.
-
Press the „OK/Manual“ button to change the time (hours or minutes).
-
Turn the selection dial clockwise to save the changes in this step and go to the next step.
Note: When the setting of this step is complete, please turn the selection dial to save the changes instead of pressing the „OK/Manual“ button. If you press the „OK/Manual“ button, the device will return to the previous setting instead of saving it.
Determine watering duration


- Turn the selection dial to ,".
- Use the „+“ and „-“ buttons to set the watering duration.
- Use the „OK/Manual“ button to switch between hours and minutes.
- Turn the wheel clockwise to save the changes in this step and go to the next step.
Note: When the setting of this step is complete, turn the selection dial to save the changes instead of pressing the „OK/Manual“ button. If you press the „OK/Manual“ button after the setting, the device returns to the previous setting instead of saving it.
The running time can be set to a maximum of 3 hours and 59 minutes.
Determine watering cycle

- Turn the selection dial to ,,".

-
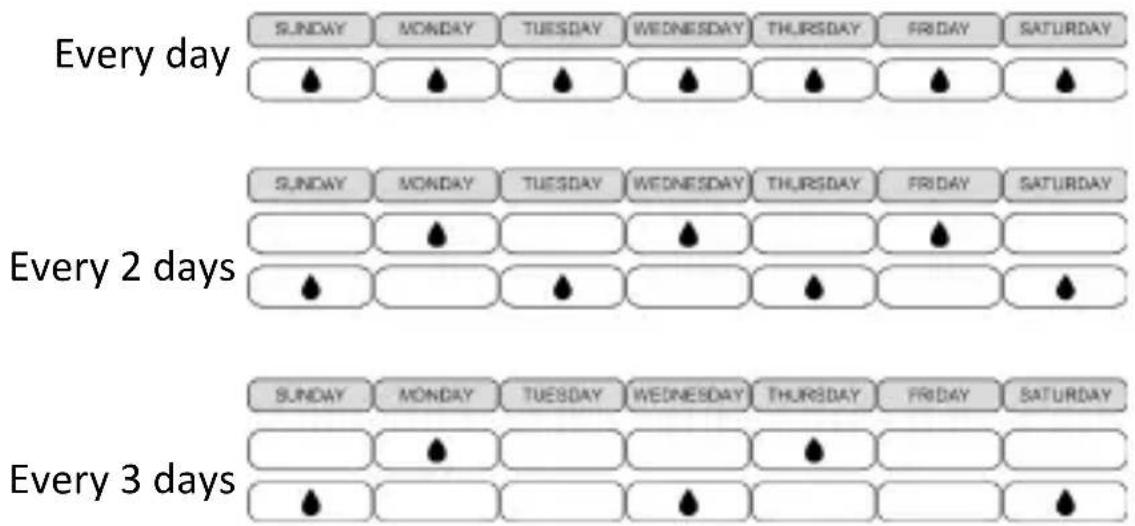
Use the „+“ and „-“ buttons to set the watering frequency. You can choose whether you want to water every 1 to 12 hours or every 1 to 7 days. (NOTE: 01D is every day, 02D is every other day, etc.)
-
Turn the selection dial clockwise to save the changes in this STEP and go to the next STEP.
Note: When the setting of this step is complete, please turn the rotary knob to save the changes instead of pressing the „OK/Manual“ button. If you press the „OK/Manual“ button after making the setting, the device will return to the previous setting instead of saving it.
Examples of watering frequency: Every day, every 2 days and every 3 days:
Once you have set the watering cycle, set the selection dial to „ON“.
The LCD screen displays the current time and the next watering start time in zone 1 and then the current time and the next watering start time in zone 2.
Note: The automatic watering programme only runs when the rotary switch is in the ON position.
After successful programming, turn the water tap to which the device is connected fully open.
If the selection dial is not in the „ON“ position, all watering schedules are stopped and do not start automatically. The automatic watering schedules are only executed when the selection dial is in the „ON“ position.
Then turn the selection dial back to „ON“.
If the current time has exceeded the set start time of the programme, all watering schedules for this day will be skipped and the automatic watering programme will start watering at the frequency you have set from the start time of the next day.
If the start time of the automatic watering schedule for the day has not yet been reached, the watering schedule will be executed normally from the start time of the day according to the frequency you have set.
Rain Delay-Funktion
With the rain delay, you can postpone watering in both zones for a certain period of time without interrupting the set watering schedule. To activate the rain delay, follow the steps below.
- When the selection dial is set to „ON“, press and hold the „DE-LAY“ button for 3-5s to activate delay mode.
- In delay mode, the „24H“ option flashes on the screen. Press „+“ and „-“ to select the delay time of 24H, 48H and 72H.
- Press the „OK“ button to start the delay function, then a count-down of the remaining delay will be displayed on the screen.
- To cancel the rain delay, press and hold the „DELAY“ button again for 3-5 seconds to resume your programmed watering schedule.
Note: Remember to press the „OK“ button after selecting the rain delay time to start the rain delay programme. Otherwise, the rain delay setting will be cancelled automatically after the screen flashes for 3-5s.
7. Manual watering mode
This function allows you to water manually without interrupting your set watering schedule.
- Turn the selection dial to „ON“.
- Press and hold the „OK/Manual“ button for 3-5s to call up the manual watering mode.
- Press the „ZONE“ button to select the desired zone.

text_image
ZONE [1] 2 MANUAL ZONE 1 [2] MANUAL ZONE [1][2] MANUAL-
Use the „+“ or „-“ button to set the manual watering time from 1 minute to 8 hours. (Press and hold the „+“ or „-“ button to quickly increase or decrease the time).
-
Immediately press the „OK“ button when the screen flashes to confirm and start manual watering. The screen will display the zones and the remaining time for manual watering.
-
To end manual watering and restore the original watering programme, press and hold the „MANUAL“ button for 3-5s.
Note: Remember to press the „OK“ button after setting the manual watering time to start manual watering. Otherwise, the manual watering setting will be cancelled automatically after the screen flashes for about 3-5s.
8 Use of only one zone
If you only want to use ZONE 1 and close ZONE 2, please proceed as follows.
- Turn the selection dial to “” and press the „ZONE“ button to select ZONE 2.
- Press the „+“ or „-“ button to set the hour until „00:00“ is displayed on the screen.
- Turn the selection dial to „ON“ to save the changes. This means that ZONE 2 is switched off and you can select ZONE 1 to programme the schedule as required and the timer will then only run for ZONE 1.
9 „OFF“ mode
- If you want to interrupt the watering schedule for a longer period of time, turn the rotary switch to „OFF“. (Your settings will be saved)
- The device does not water automatically when it is in OFF mode. (The word OFF is displayed in large letters on the screen)
- To restart automatic watering, turn the rotary switch back to „ON“ to continue your programmed watering schedule.
10. Troubleshooting
| Error Possible cause Solution | |
| The Water inlet is leaking | No filter or not placed horizontally.The tap is not the correct standard 3/4”. |
| The water is not flowing | Long-term storage and transport render the valve inactive.Blocking of the valve. |
| Low battery life | Mixed use of old and new batteries.Use carbon batteries or rechargeable batteries. |
| Error Possible | cause Solution | |
| Low water pressure | The filter is clogged.The inlet pressure is not sufficient to support irrigation. | Check whether the filter is clogged; if so, clean or replace the filter.Ensure that the timer is installed correctlyInstall a booster pump or other auxiliary device to increase the pressure. |
| The device does not irrigate | The rotary switch is set to OFF.The tap is not switched on.The battery is flat, it switches off automatically.The rain delay is switched on. | Turn the rotary switch to the ON position.Once you have made all the settings, turn on the tap.Replace the batteries with new alkaline batteries.Wait for the schedule to resume. |
| LCD display shows nothing | The LCD screen is temporarily not displayed during long exposures.The battery is empty, the camera switches off automatically. | Avoid exposing the device to sunlight for long periods of time.Replace them with new alkaline batteries. |
11. Additional safety instructions
- The appliance is water-resistant, NOT waterproof. The appliance must be installed above ground and perpendicular to the water tap. Do not immerse the appliance in water!
- DO NOT pull on the hose while it is connected to the irrigation controller to prevent damage to the timer
- This device is only intended for outdoor use to control irrigation systems.
- The device must not be used for industrial purposes
- The operating water pressure is between 0.5 bar and 8 bar (7 psi to 116 psi).
Only use with clean water and fresh water, the water temperature must be above 1^ C and below 60^ C.
- Protect the appliance during the winter season or in the event of frost. Remove the appliance from the tap and drain all the water from it. Remove the batteries and store the appliance and batteries indoors.
- Do not use the appliance if it has been dropped or knocked.
- Make sure that you clean the filter regularly if it is dirty.
12. Cleaning
After a certain period of use, impurities or dirt can accumulate in the appliance. The appliance should therefore be cleaned regularly to ensure proper operation. Please follow the steps below to clean the timer.
- Turn off the garden tap and dismantle the appliance. Check whether impurities have accumulated in the filter on the water inlet.
- If the filter is dirty, remove it and rinse it under running water.
- Switch on manual watering mode to open the valve and check whether the water pipe is blocked. If it is clogged, please clean it carefully with a small cleaning brush.
13. Safety instructions and disclaimer
Never attempt to open the appliance to carry out repairs or modifications. Avoid contact with the mains voltage. Do not short-circuit the product. Keep the device away from high temperatures. Do not expose the device to sudden temperature changes or strong vibrations, as this could damage the electronic components. Check the device for damage before use.
The appliance should not be used if it has been knocked or damaged in any other way. Please observe the national regulations and restrictions. Do not use the device for purposes other than those described in the instructions. This product is not a toy. Keep it out of the reach of children or mentally impaired persons. Any repair or modification to the device that is not carried out by the original supplier will invalidate the warranty or guarantee. The product may only be used by persons who have read and understood these instructions. The device specifications may change without prior notice.
14. Disposal instructions
According to the European WEEE Directive, electrical and electronic devices may not be disposed of with household waste. Their components must be recycled or disposed of separately, as toxic and hazardous components can cause lasting damage to the environment if disposed of incorrectly. As a consumer, you are obliged under the Electrical and Electronic Equipment Act (ElektroG) to return electrical and electronic equipment free of charge at the end of its life to the manufacturer, the point of sale or to public collection centres set up for this purpose. Details are regulated by the respective state law. The symbol on the product, the operating instructions and/or the packaging indicates these regulations. By separating, recycling and disposing of old appliances in this way, you are making an important contribution to protecting our environment.
15. Notes on battery disposal
In connection with the sale of batteries or the delivery of devices containing batteries, the supplier is obliged to inform the customer of the following: The customer is legally obliged to return used batteries as the end user. The customer can return used batteries that the supplier carries or has carried as new batteries free of charge to the supplier's dispatch warehouse (dispatch address). The symbols shown on the batteries have the following meaning: Pb = battery contains more than 0.004 per cent lead by mass, Cd = battery contains more than 0.002 per cent cadmium by mass, Hg = battery contains more than 0.0005 per cent mercury by mass.
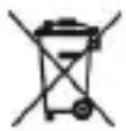
The crossed-out dustbin symbol means that the battery must not be disposed of with household waste.


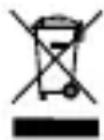
WEEE Directive: 2012/19/EU
WEEE Register No.: DE 67896761
Hereby, WD Plus GmbH declares that the device 306617 is in compliance with the essential requirements and other relevant provisions. You can obtain a complete declaration of conformity from WD Plus GmbH, Wohlenbergstraße 16, 30179 Hanover, Germany
text_image
NO OFF SET STARTnatural_image
Technical line drawing of a mechanical device with no visible text or symbolstext_image
Technical diagram of a water control device with labeled ports and control paneltext_image
SET CLOCK 12:30 AM OFF NO SET STARTActiver le programme
ZONE [1] 2 MANUAL ZONE 1 [2] MANUAL ZONE [1][2] MANUAL
natural_image
Symbol of a trash bin with crossed lines indicating no waste or discharge, and a solid black rectangle below (no text or labels)text_image
NO OFF SET STARTnatural_image
Technical line drawing of a mechanical device with no visible text or symbolstext_image
Technical diagram of a water control device with labeled ports and control paneltext_image
SET CLOCK 12:30 AM OFF NO SET STARTtext_image
Ogni giorno SUNDAY MONDAY TUESDAY WEDNESDAY THURSDAY FRIDAY SATURDAY ● ● ● ● ● ● ● Ogni 2 giorni SUNDAY MONDAY TUESDAY WEDNESDAY THURSDAY FRIDAY SATURDAY ● ● ● ● ● ● Ogni 3 giorni SUNDAY MONDAY TUESDAY WEDNESDAY THURSDAY FRIDAY SATURDAY ● ● ● ● ● ●text_image
ZONE [1] 2 MANUAL ZONE 1 [2] MANUAL ZONE [1][2] MANUALtext_image
NO OFF SET STARTnatural_image
Technical line drawing of a mechanical device with no visible text or symbolstext_image
Technical diagram of a water control device with labeled ports and control buttonstext_image
SET CLOCK 12:30 AM OFF NO SET STARTtext_image
ZONE [1] 2 MANUAL ZONE 1 [2] MANUAL ZONE [1][2] MANUALMO-FR 9:30am - 18pm CET

text_image
QR code image containing encoded data, no visible human-readable textbrandson-equipment.de