JF41 Pro - Air Conditioning JIMMY - Free user manual and instructions
Find the device manual for free JF41 Pro JIMMY in PDF.


| Product Type | Tower Fan |
| Brand | JIMMY |
| Model | JF41 Pro |
| Power Supply | Adapter 24V 1000mA (input 100-240V~ 50/60Hz) |
| Rated Power | 20 W |
| Left-Right Oscillation Angles | 30°, 60°, 360° |
| Manual Vertical Tilt | -5° to 90° |
| Ventilation Modes | Constant Wind (3 speeds), Natural Wind (strong/weak forest wind, sleep wind) |
| Timer | From 1 to 7 hours |
| Remote Control | Yes, with button cell |
| Connectivity | WiFi 2.4 GHz via Jimmy Smart Life app |
| Parts that can be cleaned with water | Rear cover, fan blades, front cover |
| Parts to dry clean | Blade buttons, rear seat components, support rod and base |
| Warranty | 2 years for the host, 1 year for accessories |
| Country of Origin | China (manufacturer Kingclean Electric Co., Ltd) |
Frequently Asked Questions - JF41 Pro JIMMY
User questions about JF41 Pro JIMMY
0 question about this device. Answer the ones you know or ask your own.
Ask a new question about this device
Download the instructions for your Air Conditioning in PDF format for free! Find your manual JF41 Pro - JIMMY and take your electronic device back in hand. On this page are published all the documents necessary for the use of your device. JF41 Pro by JIMMY.
USER MANUAL JF41 Pro JIMMY
natural_image
Line drawing of a standard electric fan with radial blades and a flat base (no text or symbols)JF41 Pro
| User Manual Smart Fan | |
| Instrukcja obsługi Inteligentny wentylator | |
| Gebrauchsanweisung | IntelligenterKlimaanlagenlüfter |
| Mode d'emploi | Ventilateur de climatisation intelligent |
| Manuale d'uso Ventola intelligente | |
| Instrucciones de uso | Ventilador de aireacondicionado inteligente |
| Инструкция по эксплуатации | Умный вентилятор длякондиционированиявоздуха |
Contents
English 2
Polski 13
Deutsch 24
Français 35
Italiano 46
Español 57
русский язык 68
Product Installation
Unpacking
Open the package, take out the foam pad, all accessories and machine from the package and take off the plastic bags. Keep the carton and plastic bags in good condition for the purpose of maintenance and repair in the future.
Part Name
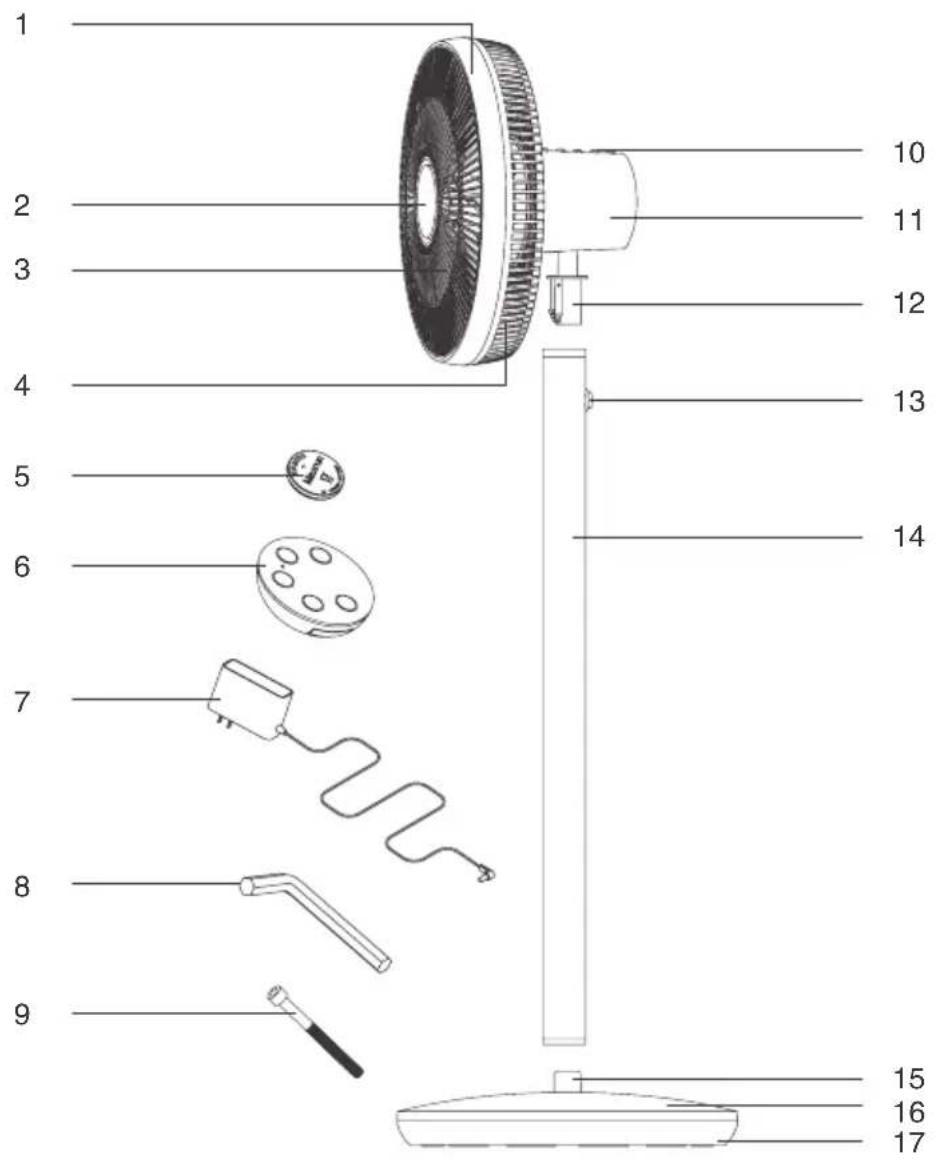
- Decorative Ring
4.Rear Cover
7.Power Adapter
-
Buttons
-
Release Button
16.Base Cover
- Decorative Part of Front Cover
5.Coin Battery
8.Wrench
-
Back housing
-
Supporting Pole
17.Base
3.Front Cover
6.Remote Controller
9.M8 Screw
- Upper Connector
15.Bottom Connector
Packing List
| Part Name Fan | Support Pole Base | Power Adapter | ||
| Quantity 1 1 1 | 1 | |||
| Remote Controller | Coin Battery M8 Screw Wrench User Manual | |||
| 1 1 1 1 1 | ||||
Main-body Assembly
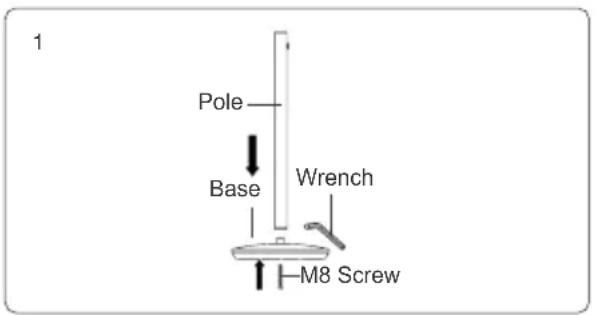
- Open the package, take out the support pole and base, insert the pole into the base and make sure the release button of pole be on the top side. Then screw up the base and pole with the M8 screw.(Picture 1)
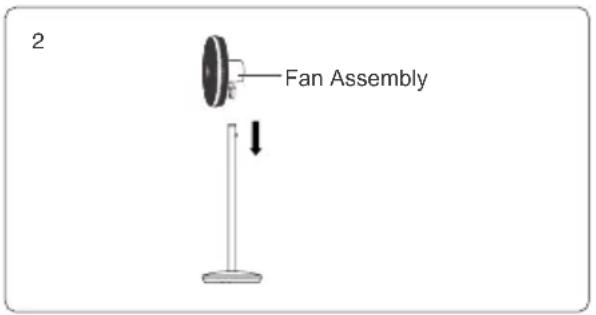
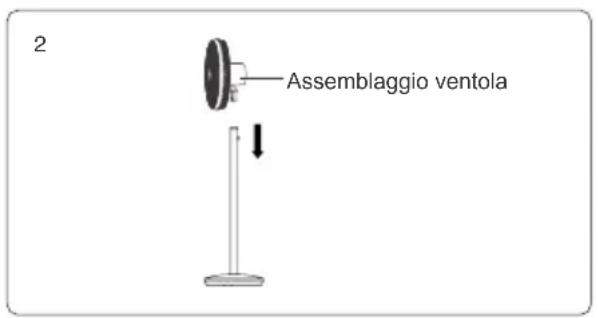
- Take the fan assembly out and install it to the support pole, when a "click" sound is heard, the installation is finished. (Picture 2)
Note :
- Please hold the motor & control part tightly when you assemble or disassemble the fan to prevent the pinch of fingers.
- When you don't use the product and want to put it away, just disassemble the it in the reverse order of the assembly.
Connection of the Power Adapter
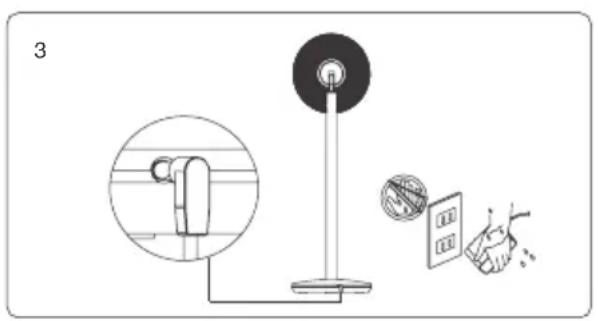
Take out the power adapter, insert the plug into the socket, and connect the other side to the bottom interface of the base, then it's done. (Picture 3)
Note :
Please make sure the input voltage is 220V-240V, keep the plug and your hands dry before you touch the plug and insert it into the socket.

Production Operation
Operation Buttons and Indicator Instruction
" 🔊 Button
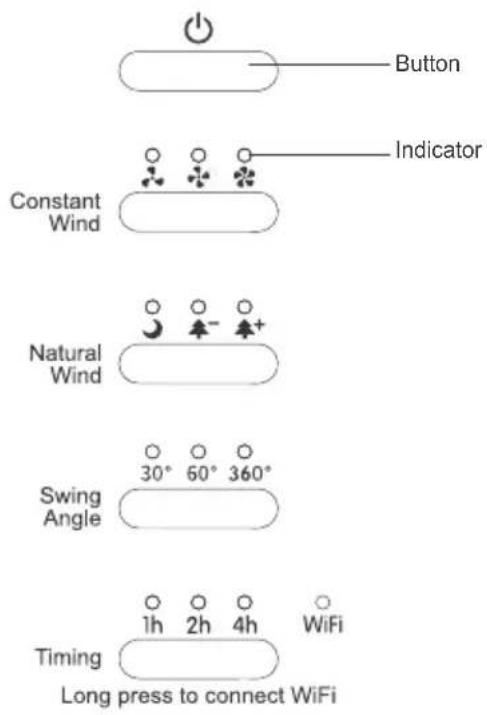
After being connected to the power, the whole machine will issue a bell and all the indicator lights will flash once. The machine is in the state of power on and standby. Press the “” button, the buzzer will sound a bell. The machine will enter the mode of constant and moderate wind mode set by default when the machine is started for the first time. When the machine is started again, it will directly enter the mode set when the machine was shut down last time (the power cord plug is not pulled out). If you need to turn it off, just press the “” button again.
"Constant Wind" button
The machine provides the mode of constant wind, which can be selected by pressing the button of "Constant Wind". In the mode of constant wind, low, medium and high wind speeds are provided for users to choose manually. When the wind speed is selected, the corresponding indicator light will be on. This button is cyclic.
"Natural Wind" button
The machine provides a natural wind mode, which can be selected by pressing the "Natural Wind" button. In the natural wind mode, the user can manually select the three wind speeds of sleeping wind, forest wind low and forest wind high, and the corresponding indicator light will be on when the wind speed is selected. This button is cyclic.
The application of various modes is as follows:
Forest wind (high): the wind blows gently on the surface of the human body, which is comfortable and not harsh. It is suitable for young people.
Forest wind (low) and sleeping wind: the wind blows gently on the surface of human body, which is comfortable and not harsh. It is suitable for infants, pregnant women and the elderly.
"Swing Angle" button
The machine provides three swing angles of 30^ left and right, 60^ right and left, and 360^ infinite cycle. The swing of the machine is the left and right motion centered on the current position. Press the "swing angle" button to swing the fan head from side to side for 30^ , press two times to swing the fan head from side to side for 60^ , press three times to rotate the fan head for 360^ indefinitely, and then press the "swing angle" button to stop. This button is a cyclic key, which will be accompanied by the prompt sound from the buzzer. In the selected state of a certain angle, the corresponding indicator lights up.
"Timing" button
In order to meet the needs of consumers, the product provides 1-7 hours of timing time. Press the "timing" button, the timing is 1h, two times 2h, three times 3h, and so on. This button is a cyclic key, and it will be accompanied by the prompt sound issued by the buzzer. When the time is up, the machine stops running.
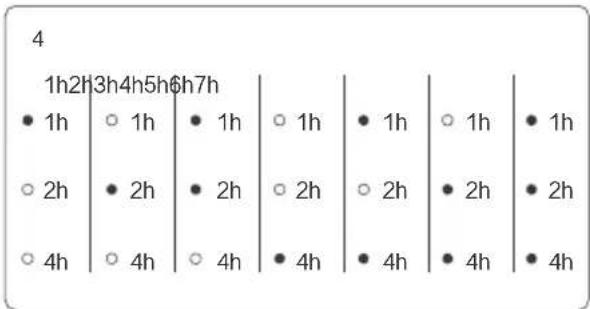
In the timing state, the indicator light is on. Timing for 1h, "1h" light on; When is 2n, "2h" light is on; Timing for 3h, "1h+2h" light; Timing for 4h, "4h" light on; Timing for 5h, "1h+4h" light; Timing for 6h, "2h+4h" light; Timing for 7h, "1h+2h+4h" light. (Picture 4)
Manual angle adjustment
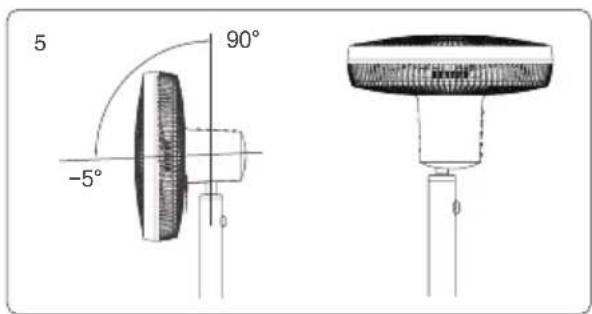
In addition to the right and left automatic swing function, the product also can be manually adjusted at any angle from the bottom to the top - 5° to 90°. (Picture 5)
Use of Remote Controller
Matching of remote controller and fan
The remote controller and the fan have already been matched and are normal in use. If there is no response to operation, please match the remote controller and fan by means as below: Keep pressing the "button tightly, and then plug in the adapter. After a tinkle sound, the constant wind high-speed indicator light is on. Release the" "button and keep pressing the "natural wind" button on the remote controller until the fan rotates, then finish the match.
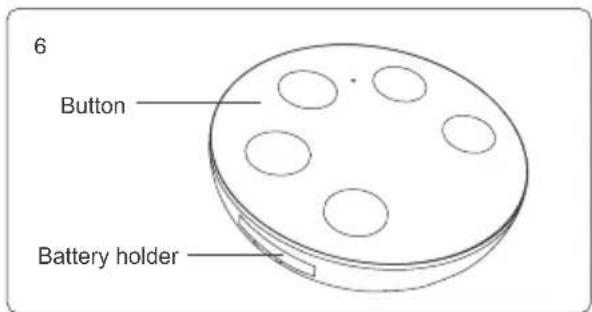
Keys and function description .(Picture 6) "On/off" button: The same function as the " 🔊" button on the fan.
"Constant Wind" button: The same as the "Constant Wind" button on the fan.
"Natural Wind" button: The same way as the "Natural Wind" button on the fan.
"Swing Angle" button: The same as the "Swing Angle" button on the fan.
"Timing" button: The same as the "Timing" button on the fan.
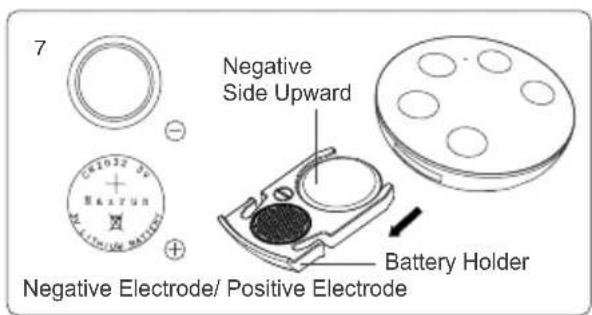
The battery replacement Remove the battery holder from the remote controller. Please distinguish the positive and negative electrodes of the battery when replacing it. (Picture 7)
natural_image
Technical diagram of a fan or turbine with internal blades and a close-up inset showing a lock and switch symbol (no text or labels)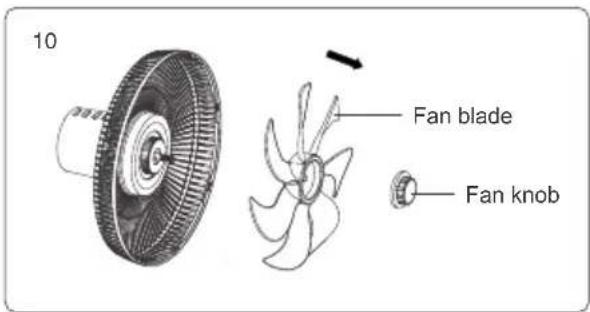
Note:
- Do not place the remote controller (battery) where children can touch it.
Seek medical advice if batteries are swallowed. - When the remote controller is idle for a long time, please remove the battery from the remote controller in order to prevent battery leakage.
- If the battery leakage liquid accidentally enters your eyes, please rinse with plenty of water and seek medical advice immediately.
- When the battery leakage liquid sticks to the skin or clothes, please rinse immediately with plenty of water.
- When discarding the battery, please properly dispose of the battery according to the garbage classification method stipulated in the local area.
WiFi App connection Introduction
- Power on the machine, ensure that the mobile phone is connected to 2.4GHz WiFi network and the bluetooth of the phone is turned on.
- Ensure that the device, mobile phone and wireless router close to each other.
- Download and open the App:
Users can search for "JIMMY smart life" in the App Store to download.
For the first use, please click "Sign Up" to register. If users have an existing account, please click "Log In" to enter account login.
Device networking settings
Long press the "timing" button for 5 seconds until the "WiFi" indicator starts to flash.
Open the "Home" page of JIMMY Smart Life App and click "+" button on the upper right corner of the page. Select the "Auto Scan" mode, and the JIMMY Smart Fan will appear on the screen, click "Next", then fill in Wifi name and password, click "Next". Until the mobile App pops up the "add device successfully" interface, click "Done", the added device will be displayed in the device list. Click the device to enter the main control interface.
Remove device from App
If the user needs to remove the device, click the main page of App, long press the device name, and click "Remove device". The mobile App will pop up "Delete device or dismiss group?", click "Confirm". Remove the device successfully, click "Done" to return to the interface.
Notes:
- If the "WiFi" indicator is always on, it means the device is connected to the network.
- If the "WiFi" indicator flashes, it means that the device is not connected to the network. Please reconnect and check whether the home network and mobile phone are connected properly.
For more information about the features and content of the App, please download and use it to understand, and user can also check the "FAQ&Feedback" in the APP.
Cleaning and Maintenance
Note:
- In order to effectively use the machine, please carry out maintenance every two weeks according to the following method during continuous use.
- Be sure to pull the adapter out of the socket before disassembly and cleaning.
- Hold the fan tightly to prevent hand clamping when disassembling.
Disassembly and assembly of machinery
Disassembly
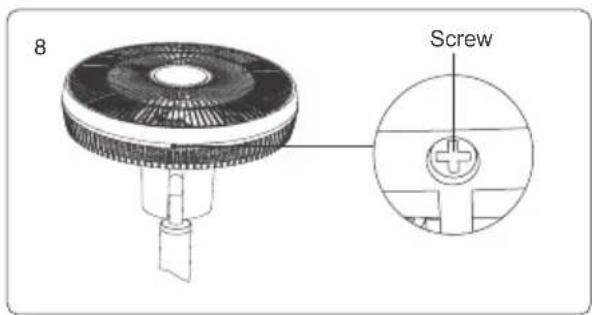
- Close the machine, press and hold the release button on the support pole, pull out the fan components (or not), and screw down the bottom screw of the decorative ring with a cross screwdriver. (Picture 8)
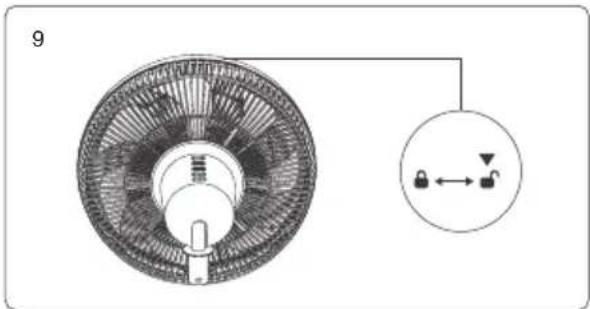
- Rotate the front cover clockwise, and remove the front cover after the arrow "▼ on the front cover points to "from" (Picture 9)
- Hold the fan blade in one hand, turn the fan knob clockwise with the other hand, and remove the fan blade. (Picture 10)
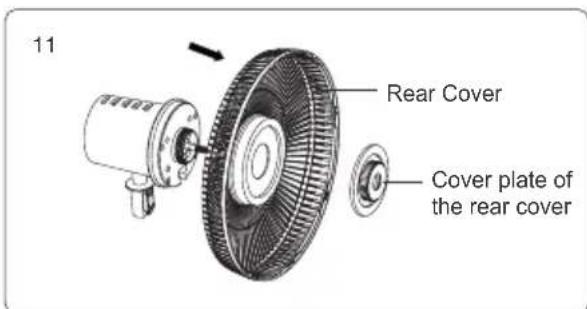
- After removing the fan blade, rotate the cover plate of the rear cover counterclockwise and remove the cover after unscrewing. (Picture 11)
The installation
After the cleaning of all parts of the fan components, they can be assembled in reverse according to the disassembly sequence. Please note the following points:
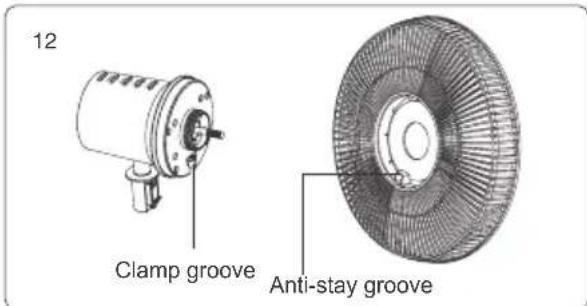
- When the rear cover is assembled with the motor & control part, the anti-stay groove of the rear cover shall be aligned with the clamp groove of the motor & control part, and the cover plate of the rear cover shall be tightened. (Picture 12)
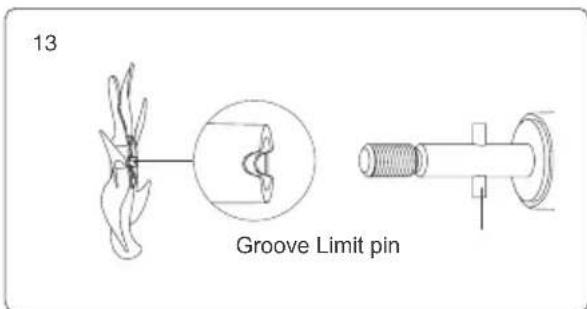
- When installing, please note that the groove behind the fan blade shall be stuck on the limit pin of the motor shaft. (Picture 13)
- When installing the front cover, the arrows "▼" and " 🔍" should be aligned. Rotate the front cover clockwise until "▼" and " 🔍" are aligned. Tighten the screw and finish the installation.
Cleaning and maintenance of all parts
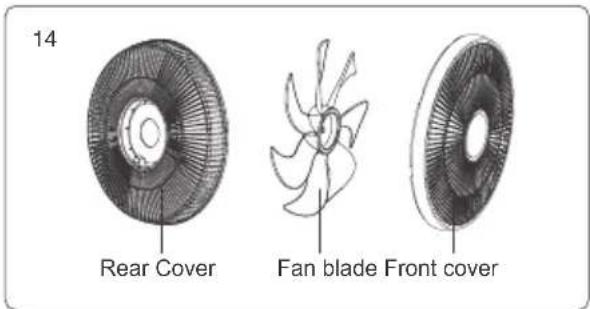
Parts that can be cleaned with water: Rear cover, fan blade, front cover .(Picture 14)
Use neuter kitchen cleaner to dip wet soft cloth or sponge and then clean the parts. After cleaning, please put them in cool and dry place, avoiding direct sunlight.
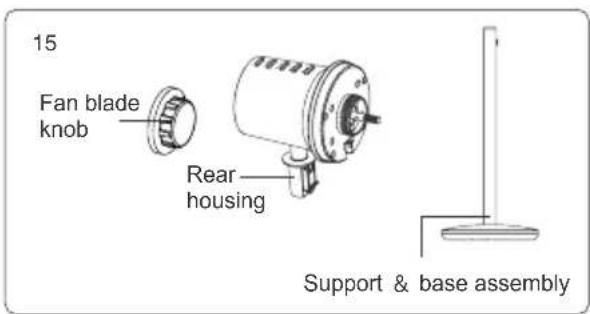
Parts not to be cleaned with water: fan blade knob, motor & control assembly, support pole and base assembly.(Picture 15) Please use a soft dry cloth to gently wipe them, do not use banana oil, volatile oil, detergent, alkaline cleaning fluid.
Note: Do not put them into the water to clean, so as not to burn the internal electrical parts and damage the machine.
Storage
If the machine is to be long idled, unplug the power cord and store it in a dry place.
Safety Notes
Before using the machine, please read this instruction carefully and keep it for future reference. In order to avoid failure and danger, please do not electrify the machine before it is assembled. Don't let children play with or operate the machine to avoid accidents.
Before use, check whether the voltage is consistent with the marked voltage of the machine.
Please use the attached special adapter as the power source, otherwise it may cause fire or damage to the machine.
Do not use if the power cord or plug is damaged or becomes loose when plugged into a power outlet.
Do not damage, process, forcibly bend, stretch or twist the power cord. Do not put heavy objects on the power cord or pinch the power cord. Otherwise, it may cause fire and electric shock.
Do not pull the power cord out of the power supply. Be sure to pull it out by grasping the power plug at the front end.
Do not pull the power plug with wet hands to avoid electric shock hazard.
Do not place the product in the following places:
-
obstacles that have influence on wind flow (such as curtains), which are involved in the machine, may cause accidents or injuries.
-
Direct sunlight will discolor the shell of the machine.
-
Close to heat source (such as heater), which mayl discolor or deform the machine shell.
-
Fire or explosion may occur near or in the presence of combustible gas.
-
Obvious damp places may cause electric shock or fire.
-
On uneven or sloping ground, machine toppling may result in personal injury.
Do not run the product without installing the front cover.
Do not spray perfume on this product.
Do not put your fingers or other sharp objects into the front cover.
In case of abnormal sound, high temperature or irregular operation of the machine, please stop using immediately.
Do not put foreign matter in the machine or spray water on i, or it may cause fire or electric shock.
In addition to maintenance, please do not decompose or modify the product, which may cause fire, electric shock or injury.
Do not let this product fall from the height or hit the product hard, otherwise it may lead to failure or damage.
Do not expose in front the fan when it works for a long time, too cold may affect the health.
Before assembling and disassembling the machine, be sure to pull out the power plug.
If you do not use the machine for a long time, please turn off the power switch, unplug the power plug, and place it in a dry place for proper storage.
When not in use, turn off the power and unplug the power plug to avoid circuit failure.
Trouble shooting
Please check the following points before entrusting the maintenance department.
| Symptoms Possible | Causes Solutions | |
| Press the "button and the fan won't work | Adapter not properly plugged into socket | Plug the adapter into the socket correctly |
| Adapter power cord plug not securely plugged into host interface | The adapter will make a sound when it is properly connected to the host | |
| Fan running noise is too high | The fan blade knob is loose Tighten the fan knob | |
| Fan head and front cover are not installed correctly | Firmly install fan head and front cover | |
| The fan runs but the wind is weaker | Check the fan mode settings | It is normal for the wind force of this product to change under the mode other than constant wind mode |
| The fan blades and the front & rear cover are coated with dust | Dust will reduce the efficiency of the wind supply, regular maintenance is recommended | |
| The fan stops automatically | The timer was set and time is up | Please reset the timer |
| Unable to operate remote controller | Aging of remote controller battery | Replace the battery |
| The battery positive and negative poles of the remote controller are wrongly placed | Confirm battery positive and negative electrode | |
| distance exceeds maximum remote controller distance | Must be in the range of remote controller | |
| The remote controller is wrongly matched | Refer to "use of remote controller" for matching | |
Product Specification
Technical Parameter
| Model No. JF41 Pro | |
| Rated Voltage 24V | == |
| Rated Power 20W | |
| Adapter Rated Input Voltage 1 | 100-240V~50/60Hz 0.8A |
| Adapter Rated Output Voltage | 24V 1000mA |
Circuit Diagram
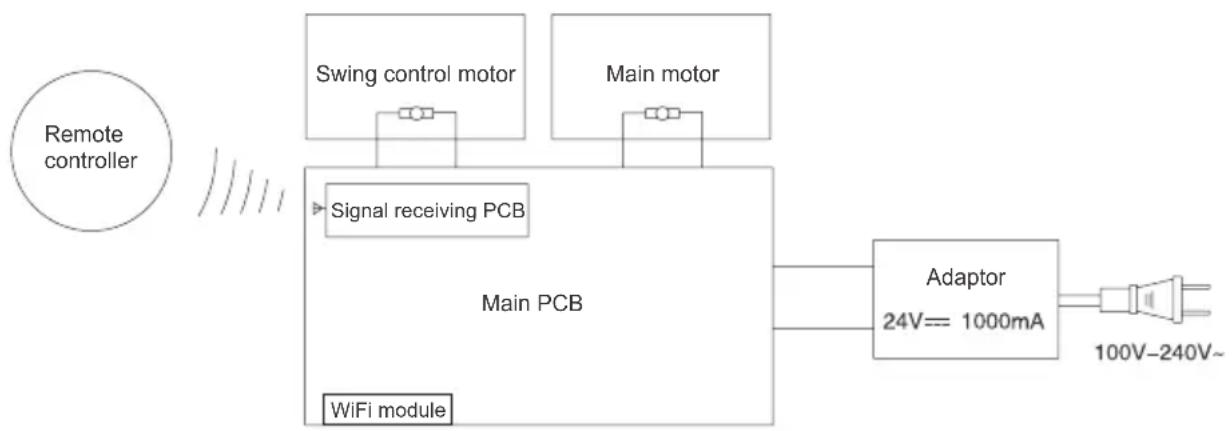
flowchart
graph LR
    A["Remote controller"] --> B["Signal receiving PCB"]
    B --> C["Main PCB"]
    C --> D["Adaptor 24V== 1000mA"]
    D --> E["100V-240V~"]
    F["Swing control motor"] --> B
    G["Main motor"] --> B
    H["WiFi module"] --> C
Manufacturer Information
| Manufacturer Kingclean Electric Co., Ltd | |
| Address | No.1 Xiangyang Road, Suzhou New District, Jiangsu Province 215009, China |
CE EAC
Disposal
The machine, accessories and packaging should be sorted for environmental-friendly recycling.
Do not dispose of the machine into household waste!
Only for EC countries:
According to the European Guideline 2012/19/EU, machine that are no longer usable, and according to the European Guideline 2006/66/EC, defective or used battery packs/batteries, must be collected separately and disposed of in an environmentally correct manner.
Subject to change without notice.
Warranty Information
This product enjoys two years warranty for the main machine and one year warranty for the accessories from the date of purchase.
Excluded from the guarantee is normal wear, commercial use, alterations to the appliance as purchased, cleaning activities, consequences of improper use or damage by the purchaser or a third person, damage that can be attributed to external circumstances.
Instalacja produktu
Rozpakowanie
Przycisk "Constant wind"
Przycisk "Natural wind"
natural_image
Technical diagram of a fan or turbine with internal blades and a circular component showing directional arrows (no text or symbols)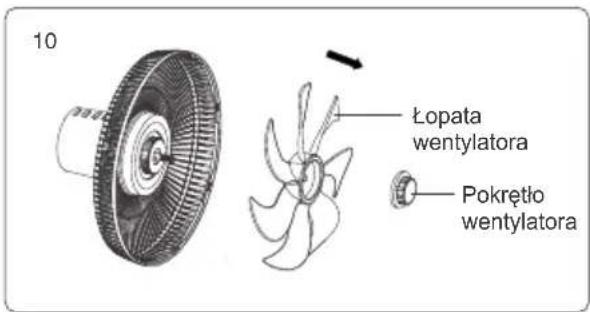
| Producent Kingclean Electric Co., Ltd | |
| Adres | No.1 Xiangyang road, Suzhou New District,Jiangsu province, 215009, China |
CE EAC
Utylizacja
8.Schraubenschlüssel
natural_image
Technical diagram of a fan or turbine with internal blades and a circular component showing directional arrows (no text or symbols)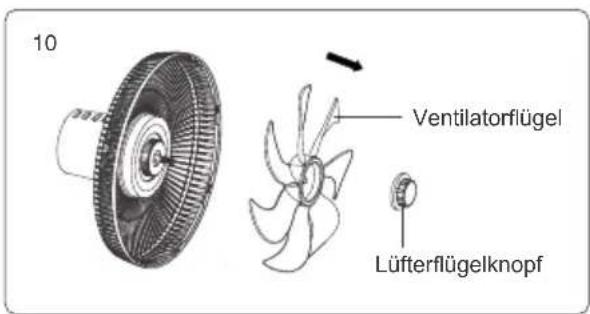
natural_image
Technical diagram of a fan or turbine with internal blades and a circular component showing directional arrows (no text or symbols)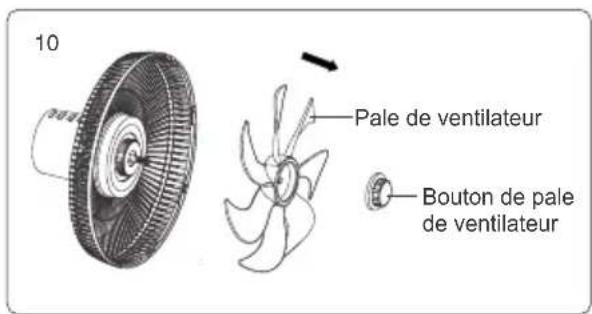
natural_image
Technical diagram of a fan or turbine with internal blades and a circular component showing directional arrows (no text or symbols)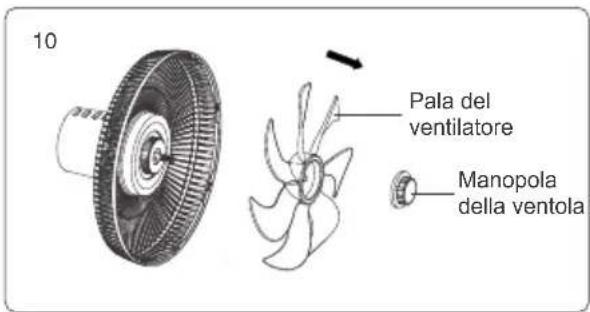
natural_image
Technical diagram of a fan or turbine with internal blades and a circular component showing directional arrows (no text or symbols)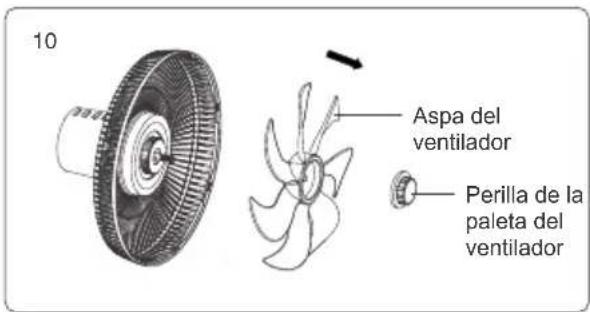
natural_image
Technical diagram of a fan or turbine with internal blades and a circular component showing directional arrows (no text or symbols)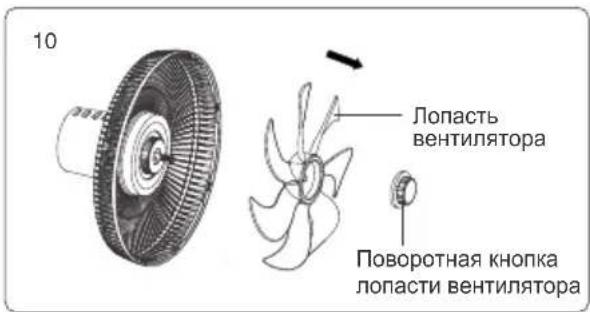
natural_image
Technical line drawing of a mechanical assembly with two views: top shows a pin-like component, bottom shows a threaded bolt (no text or symbols)natural_image
Technical line drawing of a mechanical device with no visible text or symbols
- Contents
- Product Installation
- Unpacking
- Main-body Assembly
- Note :
- Connection of the Power Adapter
- Production Operation
- " 🔊 Button
- "Constant Wind" button
- "Natural Wind" button
- The application of various modes is as follows:
- Use of Remote Controller
- Note:
- WiFi App connection Introduction
- Device networking settings
- Remove device from App
- Notes:
- Cleaning and Maintenance
- Disassembly and assembly of machinery
- Disassembly
- The installation
- Cleaning and maintenance of all parts
- Storage
- Safety Notes
- Trouble shooting
- Product Specification
- CE EAC
- Disposal
- Only for EC countries:
- Warranty Information
- Instalacja produktu
- Rozpakowanie
- Przycisk "Constant wind"
- Przycisk "Natural wind"
- Utylizacja
Brand : JIMMY
Model : JF41 Pro
Category : Air Conditioning