USER MANUAL AIR STAND WOOD Create
natural_image
Line drawing of a standard office fan with a circular top and radial blades, mounted on a stand (no text or symbols)
RETRO STAND FAN VENTILADOR DE PIE RETRO
CREATE CREATE CREATE
ATE CREATE CREATE CRE
CREATE CREATE CREATE
ATE CREATE CREATE CRE
CREATE CREATE CREATE
ATE CREATE CREATE CRE
CREATE CREATE CREATE
ATE CREATE CREATE CRE
CREATE CREATE CREATE
ATE CREATE CREATE CRE
CREATE CREATE CREATE
ATE CREATE CREATE CRE
CREATE CREATE CREATE
ATE CREATE CREATE CRE
CREATE CREATE CREATE
ATE CREATE CREATE CRE
CREATE CREATE CREATE
ATE CREATE CREATE CRE
CREATE CREATE CREATE
ATE CREATE CREATE CRE
CREATE CREATE CREATE
ATE CREATE CREATE CRE
CREATE CREATE CRE
CREATE CREATE CRE
CREATE CREATE CRE
CREATE CREATE CREATE
ATE CREATE CREATE CRE
CREATE CREATE CREATE
ATE CREATE CREATE CRE
CREATE CREATE CREATE
ATE CREATE CREATE CRE
CREATE CREATE CREATE
ATE CREATE CREATE CRE
CREATE CREATE CREATE
ATE CREATE CREATE CRE
CREATE CREATE CREATE
ATE CREATE CREATE CRE
CREATE CREATE CREATE
ATE CREATE CREATE CRE
CREATE CREATE CREATE
ATE CREATE CREATE CRE
CREATE CREATE CREATE
ATE CREATE CREATE CRE
CREATE CREATE CREATE
ATE CREATE CREATE CRE
CREATE CREATE CREATE
ATE CREATE CREATE CRE
CREATE CREATE CRE
CREATE CREATE CRE
ATE CREATE CREATE CRE
CREATE CREATE CRE
CREATE CREATE CRE
INDEX
ENGLISH
Safety precautions 6
Parts list 8
Assembly 8
Base assembly 8
Fan head assembly 8
Operation 9
CLeaning and maintenance 9
Storage and disposal 10
PORTUGUÊS
Thank you for choosing our fan. Before using the appliance, and to ensure the best use, carefully read these instructions.
The safety precautions enclosed herein reduce the risk of death, injury and electrical shock when correctly adhered to. Keep the manual in a safe place for future reference, along with the completed warranty card, purchase receipt and package. If applicable, pass these instructions on to the next owner of the appliance. Always follow basic safety precautions and accident-prevention measures when using an electrical appliance. We assume no liability for customer failing to comply with these requirements.
SAFETY PRECAUTIONS
When using any electrical appliance, basic safety precautions should always be observed.
- Use this fan only as described in this manual. Other use not recommended may cause fire, electric shock or injury to persons. This will also void your warranty.
- Always operate the product from a power source of the same voltage, frequency and rating as indicated on the rating label.
- This product is intended for indoor, household use only. Do not use outdoors or for commercial or industrial purposes.
- To protect against electric shock: do not immerse unit, plug or cord in water or spray with liquids; do not place fan on windowsills or other places where it may be exposed to dripping or splashing of water; do not place vases or similar objects filled with liquids near the fan.
- Do not use this product in the immediate vicinity of water, such as bath-tubs, washbowls, swimming pools etc. where the likelihood of immersion or splashing could occur.
- To reduce the risk of fire or electric shock, do not use this fan with any solid-state speed control device.
- This appliance is not intended for use by persons (including children) with reduced physical, sensory or mental capabilities, or lack of experience and knowledge, unless they have been given supervision or instruction concerning use of the appliance by a person responsible for their safety.
- This product is not a toy. Children should be supervised to ensure that they do not play with the appliance.
- Turn the fan off and unplug the fan from the outlet when not in use, when moving the fan from one location to another and before cleaning. Fully assemble the fan before switching on again.
- To disconnect the fan, first turn the unit off, grip the plug and pull it from the wall outlet. Never pull the plug by the cord.
- Do not operate the fan in the presence of explosive and/or flammable fumes.
- Do not place the fan or any parts near an open flame, cooking or other heating appliance.
- Do not operate fan with a damaged cord or plug, or if the product malfunctions, or is dropped or damaged in any manner.
- Avoid contact with moving fan parts. Do not insert any body parts (e.g. finger) or objects through the grill when the fan is operating.
- The use of attachments not recommended by the manufacturer may be hazardous.
- Place the fan on a dry level surface to avoid overturning.
- Do not operate if the fan housing is damaged.
- Do not cover the grill, or operate in close proximity to curtains, etc. Ensure adequate ventilation around the unit.
- A loose fit between the AC outlet (receptacle) and plug may cause overheating and a distortion of the plug. Contact a qualified technician to replace loose or worn outlet.
- If the supply cord is damaged, it must be replaced by the manufacturer, its service agent or similarly qualified persons in order to avoid hazard.
- If the fan is not working properly, contact a qualified technician for examination and repair. Never attempt to dismantle the fan yourself.
- Never install or store the unit where it could be subject to heat sources such as radiators, heat registers, stoves or other products that produce heat, direct sunlight, mechanical vibration or shock, excessive dust, lack of ventilation, such as a cabinet or bookcase ou uneven surfaces.
- Do not leave the fan running unattended.
- Do not hang or mount fan on a wall or ceiling.
- The fan must be fully and properly assembled before use.
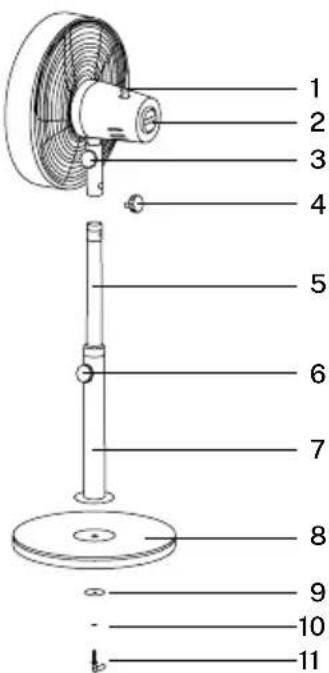
PARTS LIST
- Oscillation Knob
- On/Off/Speed dial (0/I/II/III)
- Tilt adjustment screw
- Locking screw
- Inner pipe
- Height adjustment screw
- Outer pipe
- Base
- Big washer
- Small washer
- Base locking screw
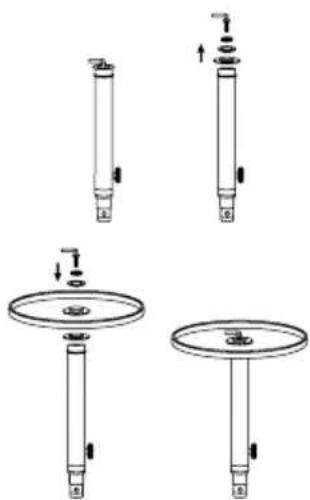
ASSEMBLY
Remove all small parts from the box.
BASE ASSEMBLY
- Loosen and remove the base locking screw and washers from the bottom of the pipe.
- Fit the pipe into the recess in the top side of the base; and while holding it, turn it over to access underneath.
- Align the big washer, small washer and the base locking screw against the hole. Rotate the base locking screw to finish attaching the base to the fan body.
- Now turn it right way up and place on a flat stable surface.
natural_image
Technical line drawings of mechanical components including cylindrical and circular parts with mounting holes (no text or symbols)
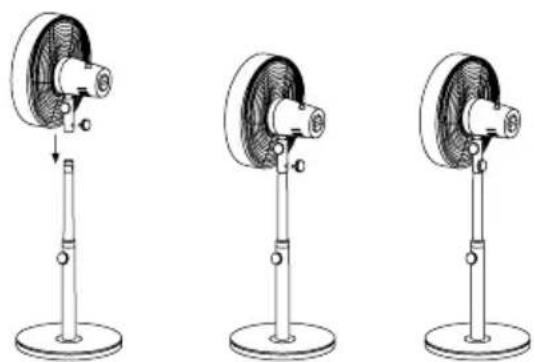
FAN HEAD ASSEMBLY
Loosen the locking screw on the bottom of the fan head and align the fan head to the top of the inner pole. Tighten the locking screw to attach the fan head to the fan body.
natural_image
Three identical line drawings of a standard office fan with a stand, showing different mounting positions (no text or symbols)
OPERATION
Warning: Make sure that the fan is fully assembled (and that the grills are in place and locked) before switching it on.
- Place your fan on a level and dry surface, keeping in mind the safety precautions outlined.
- Plug the fan into a suitable mains socket (see technical specifications for details).
• Speed Adjustment: Turn the On/Off/Speed dial to the desired setting. There are 4 settings
• 0 (Off).
• I (Low speed),
• II (Medium speed)
- III (High speed).
- Oscillation function: Push the oscillation knob down to start oscillation. Pull it up to stop oscillation.
- Tilt adjustment: To adjust the air flow, the tilt angle can be adjusted. To do this, loosen the tilt adjustment screw and adjust the fan head to the desired angle. Tighten the tilt adjustment screw to fix the position.
Caution: The fan should be switched off when making this adjustment.
- Height adjustment: To adjust the height of the fan, loosen the height adjustment screw on the outer pipe and push the inner pipe up/down to the desired height. Tighten the height adjustment screw to fix the fan in place.
Caution: The fan should be switched off when making this adjustment.
Note: Fan height can be adjusted from 90 cm to 120 cm.
CLEANING AND MAINTENANCE
Caution: Always switch off and unplug the fan before performing any cleaning.
- Do not use harsh detergents, chemical cleaners or solvents as they may damage the surface finish of the components.
- Use a vacuum cleaner with a brush attachment to clean the grills.
- Use a soft duster or a cloth rag to dust off all the surfaces.
- To clean the blade, first remove the front grill and cover by unscrewing the small screws around the edge of the rear grill.
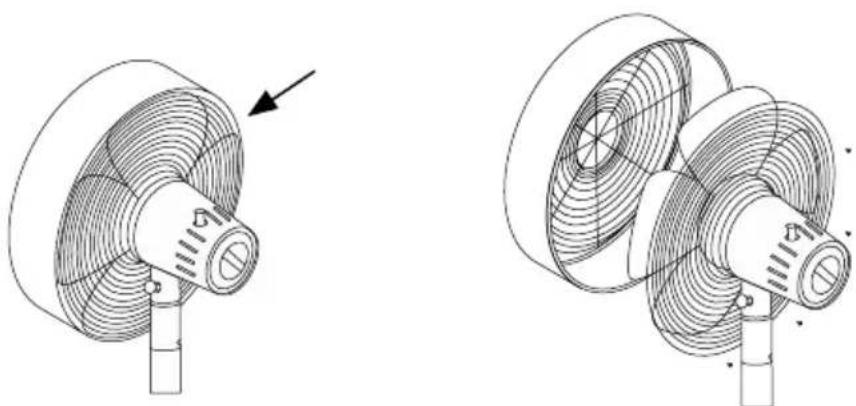
natural_image
Technical line drawing of a mechanical fan assembly with two views (no text or symbols)
- Wipe all the parts with a soft damp (not wet) cloth dipped in mild soapy water.
Caution: Ensure that water doesn't get into the motor unit.
Use a dry cloth to thoroughly dry the blades and the grills before reassembling.
Make sure that the fan is completely assembled before switching on again.
STORAGE AND DISPOSAL
- If you do not plan to use the fan for extended periods of time, it is recommended that it is cleaned and stored (preferably in its original packaging) in a cool, dry place.
- Please check with your local council for alternative disposal methods before disposing of electrical products with household waste. If electrical appliances are disposed of in landfills or dumps, it is possible that hazardous substances may leak into the groundwater and get into the food chain, damaging your health and well-being.
In compliance with Directives: 2012/19/EU and 2015/863/EU on the restriction of the use of dangerous substances in electric and electronic equipment as well as their waste disposal. The symbol with the crossed dustbin shown on the package indicates that the product at the end of its service life shall be collected as separate waste. Therefore, any products that have reached the end of their useful life must be given to waste disposal centres specialising in separate collection of waste electrical and electronic equipment, or given back to the retailer at the time of purchasing new similar equipment, on a one for one basis. The adequate separate collection for the subsequent start-up of the equipment sent to be recycled, treated and disposed of in an environmentally compatible way contributes to preventing possible negative effects on the environment and health and optimises the recycling and reuse of components making up the apparatus. Abusive disposal of the product by the user involves application of the administrative sanctions according to the laws.
MONTAJE
natural_image
Technical line drawings of mechanical components including cylinders, gauges, and a circular base (no text or symbols)
MONTAJE DEL CABEZAL DEL VENTILADOR
natural_image
Three identical line drawings of a standard office fan with a stand, showing different mounting positions (no text or symbols)
FUNCIONAMIENTO
natural_image
Two technical diagrams of a mechanical component with internal curved structures and a directional arrow (no text or symbols)
ASSEMBLÉIA
natural_image
Technical line drawings of four different mechanical components or assemblies (no text or symbols present)
MONTAGEM DA CABEÇA DO VENTILADOR
natural_image
Three identical line drawings of a standard office fan with a stand, showing different mounting positions (no text or symbols)
OPERAÇÃO
natural_image
Technical line drawings of two mechanical components with curved internal patterns and a directional arrow (no text or symbols)
ASSEMBLAGE
natural_image
Technical line drawings of mechanical components with no visible text or symbols
ENSEMBLE TÊTE DE VENTILATEUR
natural_image
Three identical line drawings of a standard front-mounted fan with a handle, shown from different angles (no text or symbols)
FONCTIONNEMENT
natural_image
Technical line drawings of two mechanical components with curved internal patterns and a directional arrow (no text or symbols)
MONTAGGIO
natural_image
Technical line drawings of four different mechanical components or assemblies (no text or symbols present)
ASSEMBLAGGIO DELLA TESTA
natural_image
Three identical line drawings of a desktop fan with a stand, showing different mounting positions (no text or symbols)
OPERAZIONE
natural_image
Technical line drawings of a mechanical fan or impeller assembly, showing two views with no text or symbols.
VERSAMMLUNG
natural_image
Technical line drawings of a mechanical assembly with multiple components (no text or symbols)
LÜFTERKOPFEINHEIT
natural_image
Three identical line drawings of a desktop fan with a stand, showing different mounting positions and internal blades (no text or symbols)
BEDIENUNG
natural_image
Technical line drawings of a mechanical fan or turbine component, showing two views with no text or symbols.
MONTAGE
natural_image
Technical line drawings of mechanical components including cylindrical and circular parts with mounting holes (no text or symbols)
MONTAGE VAN DE VENTILATORKOP
natural_image
Three identical line drawings of a desktop fan with a stand, showing different mechanical configurations (no text or symbols)
FUNCTIONEREN
natural_image
Technical line drawings of two mechanical components with curved internal surfaces and a directional arrow (no text or symbols)
MONTOWANIE
natural_image
Technical line drawings of mechanical components including cylinders, gauges, and a circular base (no text or symbols)
MONTAŻ GŁOWICY WENTYLATORA
natural_image
Three identical line drawings of a standard front-mounted fan on a stand, showing top-down and side-view views (no text or symbols)
natural_image
Technical line drawings of two mechanical components with curved internal patterns and a directional arrow (no text or symbols)