IRON 2600 - Iron Create - Free user manual and instructions
Find the device manual for free IRON 2600 Create in PDF.

| Product type | Steam iron |
| Brand | Create |
| Model | IRON 2600 |
| Power | 2600 W |
| Voltage | 220-240 V~ |
| Frequency | 50 Hz |
| Soleplate | Ceramic coating |
| Water tank capacity | Approx. 300 ml (up to MAX mark) |
| Main functions | Dry ironing, steam, extra steam, spray, steam shot, auto shut-off |
| Anti-calc system | Yes, built into the tank |
| Anti-drip function | Yes, automatic steam selection |
| Self-cleaning function | Yes |
| Automatic safety shut-off | Yes: 8 min in vertical position, 30 s in horizontal position |
| Power cord | Swivel 360° |
| Weight | Approx. 1.2 kg |
| Dimensions (L x W x H) | Approx. 30 x 15 x 15 cm |
| Maintenance | Wipe exterior with damp cloth; monthly self-cleaning; empty tank after each use |
| Safety tips | Do not use outdoors, do not direct steam at body, unplug before filling, keep out of reach of children |
| Usage | Household use only |
Frequently Asked Questions - IRON 2600 Create
User questions about IRON 2600 Create
0 question about this device. Answer the ones you know or ask your own.
Ask a new question about this device
Download the instructions for your Iron in PDF format for free! Find your manual IRON 2600 - Create and take your electronic device back in hand. On this page are published all the documents necessary for the use of your device. IRON 2600 by Create.
USER MANUAL IRON 2600 Create
natural_image
Line drawing of a steam iron with attached screw and handle (no text or symbols)STEAM IRON
PLANCHA DE VAPOR
USER MANUAL
CREATE CREATE CREATE ATE CREATE CREATE CRE CREATE CREATE CREATE ATE CREATE CREATE CRE CREATE CREATE CREATE ATE CREATE CREATE CRE CREATE CREATE CREATE CREATE CREATE CREATE CREATE CREATE CREATE CREATE CREATE CREATE CREATE CREATE CREATE CREATE CREATE CREATE CREATE CREATE CREATE CREATE CREATE CREATE CREATE CREATE CREATE CREATE CREATE CREATE CREATE CREATE CREATE CREATE CREATE CREATE CREATE CREATE CREATE CREATE CREATE CREATE CREATE CREATE CREATE CREATE CREATE CREATE CREATE CREATE CREATE CREATE CREATE CREATE CREATE CREATE CREATE CREATE CREATE CREATE CREATE CREATE CRE
CREATE CREATE CREATE ATE CREATE CREATE CRE CREATE CREATE CREATE ATE CREATE CREATE CRE CREATE CREATE CREATE ATE CREATE CREATE CRE CREATE CREATE CREATE ATE CREATE CREATE CRE CREATE CREATE CREATE ATE CREATE CREATE CRE CREATE CREATE CREATE ATE CREATE CREATE CRE CREATE CREATE CREATE ATE CREATE CREATE CRE CREATE CREATE CREATE ATE CREATE CREATE CRE CREATE CREATE CREATE ATE CREATE CREATE CRE CREATE CREATE CREATE ATE CREATE CREATE CRE CREATE CREATE CREATE ATE CREATE CREATE CRE CREATE CREATE CRE CREATE CREATE CRE ATE CREATE CREATE CRE CREATE CREATE CRE CREATE CREATE CRE CREATE CREATE CRE
INDEX
ENGLISH
Security instructions 6
Main features 7
Characteristics 7
Diagram 7
Filling the water tank 7
Operating instructions 7
After each use 9
Cleaning 9
Self-cleaning 9
Technical specifications 9
PORTUGUÊS
Medidas importantes de segurança 14
Thank you for choosing our steam iron. Before using the appliance, and to ensure the best use, carefully read these instructions.
The safety precautions enclosed herein reduce the risk of death, injury and electrical shock when correctly adhered to. Keep the manual in a safe place for future reference, along with the completed warranty card, purchase receipt and package. If applicable, pass these instructions on to the next owner of the appliance. Always follow basic safety precautions and accident-prevention measures when using an electrical appliance. We assume no liability for customer failing to comply with these requirements.
SECURITY INSTRUCTIONS
When using any electrical appliance, basic safety precautions should always be observed.
- Do not use outdoors or for commercial purposes. This appliance is intended for household use only. Using the steam iron for commercial purposes will void the warranty.
- This iron has been created to iron fabrics on an ironing board. Incorrectly operating the appliance can cause problems with the appliance and injury to the user.
- To protect against burns or other injuries, do not iron or steam fabrics while being worn.
- Switch off the appliance before plugging or unplugging it from the mains. Never leave the iron unattended while it's still plugged in.
- Never lift up, carry or unplug the appliance by pulling from the power cord.
- Do not let the cord come in contact with hot surfaces, avoid proximity to open fires and all types of heat and sources of ignition. Allow the iron to cool down completely before storing.
- Switch off the appliance and disconnect it from the power supply before filling or emptying the water tank and when not in use.
- Do not pick up or operate the appliance if the power supply cord or the plug are damaged, or if the iron is malfunctioning or has been dropped or damaged in any way. In case of damage, contact the aftersales service. A damaged cord or plug must be exclusively replaced by the manufacturer or a qualified person in order to avoid injuries.
- Children should be supervised to ensure that they do not play with the appliance.
- This appliance can be used by children and persons with reduced physical, sensory or mental capabilities or lack of experience and knowledge if they have been given supervision or instruction concerning use of the appliance in a safe way and understand the hazards involved.
- Burns can occur from touching hot metal parts, hot water or steam. Hot water may leak from the iron. Handle with caution when filling or turning the steam iron upside down.
- To protect against burns or other injuries, do not direct steam towards the body when ironing.
- The iron must be used and rested on a stable surface. When placing the iron on its stand, ensure that the surface on which the stand is placed is stable.
MAIN FEATURES
• Temperature regulation
- Spraying
- Dry ironing
- Steam
- Strong steam
- Self-cleaning function
• Auto-Stop safety feature
CHARACTERISTICS
- Elegant shape
• High-heat efficiency - Easy use
• Effort & time saving
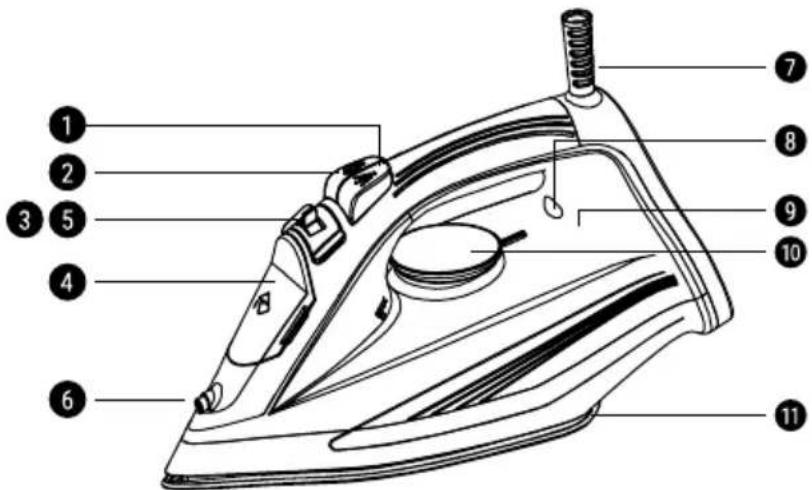
DIAGRAM
- Spray button
- Burst of Steam button
- Steam control knob
- Water tank cover
- Self-clean button
- Spray nozzle
- 360° swivel cord
- Indicator light
- Water tank
- Temperature control knob
- Ceramic coated Soleplate
FILLING THE WATER TANK
Always make sure the iron is switched off and unplugged before filling the water tank.
- Set the steam control knob to the "0" position.
- Open the water tank lid and fill it up to the "MAX" line.
- The water level can be observed through the tank when the iron is placed vertically. If the iron is running out of water, please refill the tank.
- Pour out the remaining water after each use
Note: Your appliance has been designed to function with untreated tap water. Do not use water additives or substitutes such as linen sprays or scented water in the steam iron; they can stain the fabrics and even damage the iron. Do not fill the tank more than to the 'MAX' position.
OPERATING INSTRUCTIONS
Dry ironing
- Position the iron vertically.
- Plug in the iron.
- Set the Steam control Knob to the "MIN" position.
- Preheat the iron until the indicator light goes out.
You may start dry ironing.
Steam ironing
- Fill the water tank following the instructions.
- Plug in the iron.
- Position the iron vertically and turn the temperature control knob to the steam position. When steam ironing, the appliance must be set to the maximum temperature, otherwise, the water will leak and drip from the soleplate.
- Preheat the iron until the indicator light goes out. The light will turn off when the iron reaches the indicated temperature.
- Turn the temperature control knob to the required setting for each type of fabric.
You may start steam ironing.
Spray Function
Before using the spray feature, check the fabric label for ironing instructions; some fabrics may become stained with moisture.
The spray feature is particularly helpful for removing stubborn wrinkles and where extra dampening is needed. You can use the spray with both steam and dry ironing. Simply press the Spray button whenever you need it.
Burst of steam function
This feature provides additional steam for removing stubborn wrinkles. You can use the burst of steam with both steam and dry ironing.
Press the Burst of Steam button to release a blast of steam. You might need to press the button several times to activate the system. Wait a few seconds to allow the steam to penetrate the fabric before pressing the button again.
Note: For optimum steam quality, do not apply more than three successive bursts.
Anti-Scale Function
You're iron is equipped with an integral anti-scale system located inside the water tank to eliminate impurities from the water and to reduce the problems connected with lime scale build-up.
To prolong the working life of this system, please, follow these steps occasionally:
- Unplug the iron and allow it to cool down.
- Fill the cup provided with your iron to the 3/4 mark. Add 1 tsp. of salt and pour this solution into the water tank.
- Let the solution sit in the water tank for 15 minutes, gently shaking the iron occasionally. Then empty it and repeat this step a second time.
- Fill the tank with clean water to rinse it and empty it.
Anti-drip function
The principle of automatic selection of the steam according to the fabric selected reduces the steam flow at lower temperatures and avoids water dripping from your iron onto the fabric.
Auto-Stop safety feature
The electronic system cuts off the electric power and the Auto-Stop warning light flashes if the iron is left vertically on its heel for more than 8 minutes, or in a horizontal position for more than 30 seconds, for your security.
To indicate that the iron has been switched off, the auto-stop indicator light will start blinking. To restart the iron, just move it gently until the blue auto-stop pilot stops flashing. The blue temperature pilot will light up.
AFTER EACH USE
- Unplug the iron and wait for the soleplate to cool down.
- Empty the water tank after each use. Do not store the iron with water in it.
- Wind the cord not too tightly around the heel at the back of the iron.
- Store the iron vertically on its heel to protect the soleplate from scratches, corrosion and stains.
When placing the iron on its stand, ensure that the surface on which the stand is placed is stable.
CLEANING
Before cleaning the appliance, unplug it and wait for the soleplate to cool down.
To clean the outer body of the iron, simply wipe it with a damp cloth and if necessary, use a mild detergent.
Never use alcohol or abrasive cleaners.
You can easily wipe starch and other residues from the soleplate with a damp cloth.
To avoid scratching the ceramic finish, never use a scourer and do not place it on a rough surface.
Do not iron synthetic fabrics at too high of a temperature to avoid ruining the fabric and covering the soleplate with melted remains of the fabric.
The best way to remove synthetic residue from the soleplate is to heat the iron and to iron over an old cotton rag.
SELF-CLEANING
In order to extend the life of your iron, use the Self-Cleaning function once a month.
- Allow your iron to heat up with the tank half-full and standing on its heel (on MAX temperature).
- When the thermostat light goes out, unplug the iron and hold it in a horizontal position, over a sink.
- Set the steam control tab to the maximum position. Boiling water and steam will now start coming out from the holes in the soleplate.
- Shake the iron gently, over the sink, until the water in the water tank (with the impurities) has flowed out through the soleplate.
- Turn the steam control tab to the "0" position.
- Turn the iron back on and set the temperature control knob to the "MAX" position. Let the iron heat up again, the remainder of the water inside the steam chamber will now vaporize and leave the iron through the soleplate.
- Unplug the iron, and when the soleplate is just warm, wipe it with a soft cloth.
We advise you do the dry-steaming over and old piece of cloth.
TECHNICAL SPECIFICATIONS
| EN Characteristics | |
| Power 2600W | |
| Voltage 220-240V AC | |
| Frequency 50Hz |
In compliance with Directives: 2012/19/EU and 2015/863/EU on the restriction of the use of dangerous substances in electric and electronic equipment as well as their waste disposal. The symbol with the crossed dustbin shown on the package indicates that the product at the end of its service life shall be collected as separate waste. Therefore, any products that have reached the end of their useful life must be given to waste disposal centres specialising in separate collection of waste electrical and electronic equipment, or given back to the retailer at the time of purchasing new similar equipment, on a one for one basis. The adequate separate collection for the subsequent start-up of the equipment sent to be recycled, treated and disposed of in an environmentally compatible way contributes to preventing possible negative effects on the environment and health and optimises the recycling and reuse of components making up the apparatus. Abusive disposal of the product by the user involves application of the administrative sanctions according to the laws.
COMO ENCHER O DEPÓSITO DE ÁGUA
COMMENT REMPLIR RÉSERVOIR D'EAU
Auto-Stop safety feature
The electronic system cuts off the electric power and the Auto-Stop warning light flashes if the iron is left vertically on its heel for more than 8 minutes, or in a horizontal position for more than 30 seconds, for your security.
To indicate that the iron has been switched off, the auto-stop indicator light will start blinking. To restart the iron, just move it gently until the blue auto-stop pilot stops flashing. The blue temperature pilot will light up.