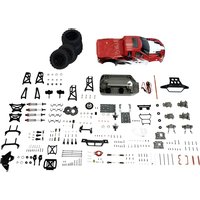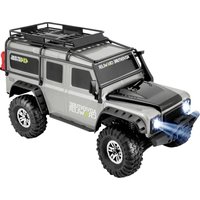
Desert Climber - Remote control toy Reely - Free user manual and instructions
Find the device manual for free Desert Climber Reely in PDF.


User questions about Desert Climber Reely
0 question about this device. Answer the ones you know or ask your own.
Ask a new question about this device
Download the instructions for your Remote control toy in PDF format for free! Find your manual Desert Climber - Reely and take your electronic device back in hand. On this page are published all the documents necessary for the use of your device. Desert Climber by Reely.
USER MANUAL Desert Climber Reely
1:10XS Electrical Buggy "Desert Climber" 4WD RtR
Item No. 1527213 Page 31 - 57
F Notice d'emploi
www.conrad.com/downloads
- Introduction 33
- Explanation of Symbols 33
- Intended Use 34
- Scope of Delivery 34
- Required Accessories 35
- Safety Notes 36
a) General 36
b) Mains Adapter/Mains Voltage/Charger 37
c) Commissioning/Operation 38
d) Driving the Vehicle 39
- Battery and Rechargeable Battery Notes 41
a) General 41
b) Transmitter 42
c) Vehicle 42
- Charging Drive Battery 43
- Operating Elements of the Transmitter 44
- Commissioning 45
a) Inserting Batteries/Rechargeable Batteries in the Transmitter 45
b) Taking the Transmitter into Operation. 45
c) Inserting the Drive Battery in the Vehicle. 45
d) Connecting the Drive Battery to the Speed Controller. 46
e) Switching on the Speed Controller 46
f) Controlling the Vehicle. 46
g) Stopping the Vehicle 48
- Set the Shock Absorbers 49
- Cleaning and Maintenance 51
a) General 51
b) Before or after Every Drive 51
c) Wheel Change 52
- Disposal 53
a) Product 53
b) Batteries/Rechargeable Batteries 53
Page
14.Declaration of Conformity (DOC) 53
15. Troubleshooting 54
16. Technical Data 56
a) Vehicle 56
b) Transmitter. 56
c) Drive Battery. 56
d)Charger. 57
e) Mains Adapter 57
1. Introduction
Dear Customer,
thank you for purchasing this product.
This product complies with the statutory national and European requirements.
To maintain this status and to ensure safe operation, you as the user must observe these operating instructions!

These operating instructions are part of this product. They contain important notes on commissioning and handling. Also consider this if you pass on the product to any third party. Therefore, retain these operating instructions for reference!
All company names and product names are trademarks of their respective owners. All rights reserved.
If there are any technical questions, please contact:
International: www.conrad.com/contact
United Kingdom: www.conrad-electronic.co.uk/contact
2. Explanation of Symbols

The symbol with a lightning bolt in a triangle is used where there is a health hazard, e.g. from electric shock.

The exclamation mark in a triangle indicates important notes in these operating instructions that must be observed strictly.

The arrow symbol indicates that special advice and notes on operation are provided.
3. Intended Use
The product is an all-wheel model car which can be radio-controlled via the enclosed wireless remote control. The control functions are forward/back/left/right (each smoothly).
The installed motor is controlled via an electronic speed controller, the steering via a servo.
The vehicle (chassis and car body) is set up ready to run.
However, operation of the vehicle requires various accessories that are not enclosed. On this, observe chapter 5.
This product is not a toy and not suitable for children under 14 years of age.

Observe the safety information in these operating instructions. They contain important information on handling of the product. Read the entire operating instructions attentively before commissioning and operation of the vehicle.
Non-observation leads to various dangers; e.g. danger of injury.
4. Scope of Delivery
Ready-to-run vehicle
Transmitter (remote control)
Drive battery
- Charger
- Mains adapter
- Socket wrench
- Screwdriver
- Operating instructions
Current operating instructions
Download the current operating instructions via the link www.conrad.com/downloads or scan the QR code displayed. Observe the instructions on the website.

5. Required Accessories
Operation of the vehicle requires various accessories that are not part of the delivery (can be ordered separately).
Components that are absolutely necessary:
- 4 batteries of type AA/Mignon for the transmitter
We also recommended the following components for best use of the vehicle:
- One or several additional drive batteries (in order to continue driving after a brief break to let the motor and the speed controller cool off)
- Spare batteries (4x AA/Mignon) for the transmitter (if the batteries in the transmitter run out while driving)
- Spare tyres (to be able to quickly change run-down/damaged tyres)
Assembly stand (for test runs and easier maintenance) - Various tools (e.g. screwdriver, long-nose pliers, hexagon wrench)
- Compressed air spray (for cleaning purposes)
- Threadlocker varnish (to fasten loosened screw connections again)
- Transport bag
The spare part list can be found on our website www.conrad.com in the download section for the respective product.
6. Safety Notes

In case of damage caused by non-compliance with these operating instructions, the warranty/ guarantee will expire. We do not assume any liability for consequential damage!
We do not assume any liability for property damage or personal injury caused by improper use or non-compliance with the safety instructions! In such cases the warranty/guarantee is voided.
Normal wear and tear during operation (e.g. worn tyres, worn gears) and damage from accidents (e.g. broken transverse links or damaged chassis, etc.) are excluded from the guarantee and warranty.
Dear customer, these safety instructions are not only for the protection of the product but also for your own safety and that of other people. Therefore, read this chapter very carefully before taking the product into operation!
a) General
Caution, important note!
Operating the model may cause damage to property and/or individuals. Therefore, make sure that you are sufficiently insured when using the model, e.g. by taking out private liability insurance. If you already have private liability insurance, verify whether or not operation of the model is covered by your insurance before commissioning your model.
- The unauthorized conversion and/or modification of the product is inadmissible because of safety and approval reasons.
- This product is not a toy and not suitable for children under 14 years of age.
- Do not leave packaging material unattended. It may become a dangerous toy for children.
- Should questions arise that are not answered by these operating instructions, contact us (for contact information, see chapter 1) or another expert.
The operation and handling of remote controlled model cars must be learned! If you have never driven such a vehicle before, drive particularly carefully and get used to the reactions of the car to the remote control commands first. Do be patient!
Do not take any risks when operating the product! Your own safety and that of your environment depends completely on your responsible use of the model.
- The intended operation of the vehicle requires maintenance work or repairs from time to time. The tyres, for example, will wear during operation, and there may be "accident damage" due to driving errors.
Only use genuine spare parts for the maintenance and repair work you then have to perform!
b) Mains Adapter/Mains Voltage/Charger
- The mains adapter is constructed pursuant to protection class II. Use only a proper mains socket of the public supply mains for voltage/current supply of the mains adapter.
- The mains socket to which the mains adapter is connected must be easily accessible.
- Do not pull the mains adapter from the mains socket by pulling the cable. Take it at the side of the housing and pull it from the socket then.
- If the mains adapter is damaged, do not touch it. Danger to life from electric shock!
First switch off the mains voltage for the mains socket to which the mains adapter is connected (switch off the circuit breaker or turn out the fuse, then switch off the FI protection switch so that the mains socket is separated from the mains voltage on all poles).
Then unplug the mains adapter from the mains socket. Dispose of the damaged mains adapter in an environmentally compatible way. Do not use it anymore. Replace it by a mains adapter of the same specifications.
- Only connect the enclosed mains adapter to the charger. Never use the mains adapter for any other purposes. The charger and the mains adapter must only be operated together.
- The charger is intended for dry indoor use only. It must not become damp or wet. Avoid direct sun irradiation, strong heat or cold. Keep the charger away from dust and dirt. Also do not place any containers filled with liquid, vases or plants, on or next to the mains adapter/charger.
- When these liquids get into the mains adapter/charger, the mains adapter/charger will be destroyed and there is a considerable fire hazard. There also is a risk of potentially fatal electric shock.
- For more information on acceptable environmental conditions, see the chapter "Technical Data".
- The charger is only suitable for charging the enclosed drive battery (or a spare drive battery of the same build). Never charge any other rechargeable battery types or non-rechargeable batteries. There is great danger of fire or explosion!
- Never place the charger on a flammable surface (e.g. carpet, tablecloth). Always use a suitable, non-flammable, heatproof surface. Never cover the charger and the mains adapter. Keep the charger away from flammable or easily inflammable materials (e.g. curtains).
- Do not place the charger on any valuable furniture surfaces without using a suitable protection. Otherwise, scratches, pressure points or discolourations are possible.
- Do not use the mains adapter/charger inside a vehicle.
- Keep children away from the mains adapter/charger. Children may short-circuit the rechargeable battery, which may lead to fire or explosion. Danger to life!
- Avoid operation in direct proximity of strong magnetic or electromagnetic fields, transmitter aerials or HF generators. This can affect the control electronics of the charger.
- Never charge the drive battery unsupervised in the charger.
Always charge only a single drive battery with the charger. - Before you connect the drive battery to the charger and start charging, the drive battery must be disconnected from the vehicle/speed controller. Otherwise, the charger or speed controller may be damaged. Loss of warranty/guarantee!
-
Take the drive battery out of the vehicle for charging.
-
Do not wear any metal or conductive materials, such as jewellery (necklaces, bracelets, rings, etc.) while you are working with the charger or batteries. Short-circuit poses a danger of burns and explosion.
- Never operate the mains adapter/charger immediately after it has been taken from a cold room to a warm room. The resulting condensation may lead to malfunctions or damage!
Allow the mains adapter/charger to reach room temperature before connecting and operating it. This may take several hours!
- If you have reason to assume that safe operation is no longer possible, disconnect the mains adapter/ charger immediately and secure it against inadvertent operation.
First deactivate all sides of the mains socket to which the mains adapter is connected (e.g. switch off the respective fuse or turn out the fuse. Then deactivate the FI protection switch). Then unplug the mains adapter from the mains socket. Then disconnect any connected rechargeable battery from the charger.
Do not use the mains adapter/charger after this anymore, but take it to a specialised workshop or dispose of it in an environmentally compatible manner.
- It can be assumed that operation without danger is no longer possible if the mains adapter/charger has any visible damage, the mains adapter/charger no longer works, after extended storage under unsuitable conditions or after difficult transport conditions.
c) Commissioning/Operation
- If you do not yet have sufficient knowledge on how to deal with remote-controlled models, please contact an experienced model sportsman or a model construction club.
- When you operate the model, always make sure that no parts of your body, other people or objects come within the dangerous range of the motors or any other rotating drive parts.
- Use only the enclosed drive battery (or a spare battery of the same build) for your vehicle. Never operate the speed controller with a mains adapter, not even for test purposes.
- This vehicle is exclusively suitable for use with a Lilon drive battery with 2 cells (rated voltage 7.4 V). When using a drive battery with more cells, there is a danger of fire from overheating of the speed controller. Apart from this, the vehicle's drive will be overloaded and damaged by this (e.g. differential). Loss of guarantee/warranty!
- When putting the device into operation, always turn on the transmitter first. Only then must the vehicle's drive battery be connected with the speed controller and the speed controller switched on. Otherwise, the vehicle may show unpredictable responses!
Proceed as follows for commissioning:
- Place the vehicle on an appropriate support before connecting the drive battery so that the wheels can turn freely.
- Switch off the speed controller.
- Switch on the transmitter if you haven't done it already. Check its function (e.g. operation display of the transmitter). Replace weak or flat batteries in time.
-
Turn the trim controller "T/H DR" all the way to the right.
-
Connect a fully charged drive battery to the speed controller in the correct polarity (red cable = plus/+, black cable = minus/-).
- Now switch on the speed controller. Wait for a few seconds until the speed controller has completed its self-test.
- Set the trim controller "ST TRIM" at the transmitter so that the front wheels are roughly centred. An exact setting of the straight driving alignment is carried out later when driving the vehicle.
- Check that the vehicle reacts to remote control commands as expected (steering and drive) before taking it from the support and placing it on the ground with its wheels. Do not reach into the drive, and do not hold the vehicle by its wheels.
d) Driving the Vehicle
- Improper operation can cause serious damage to people and property! Only drive with the model directly in view.
- Only drive when your ability to react is unimpaired. Tiredness or the influence of alcohol or medication can cause incorrect responses, just as with real vehicles.
- Please note that this model car must not be driven on public roads, places or streets. Also do not operate it on private grounds without the owner's permission.
Operate your model in an area where you do nor endanger any persons, animals or objects. Don't drive towards animals or people!
Before you operate the model on a place specifically designated for that purpose (e.g. model car racing/ rally route, etc.), ask the operator of that location for permission.
- Avoid driving at very low outdoor temperatures. Plastic parts lose elasticity, which may lead to damage even in a light accident.
- Do not drive in the case of a thunderstorm, under high-voltage power lines or in the proximity of radio masts.
- Protect the vehicle, drive battery and transmitter from dampness and severe dirt. Do not expose the remote control to direct sunlight or excessive heat for a long period of time.
- As long as the vehicle is in operation you must always leave the transmitter switched on.
- In case of a fault stop operating your model straight away and remove the cause of malfunction before you continue to use the model.
- When parking the vehicle, always switch off the vehicle's speed controller first and disconnect the drive battery from the speed controller completely then. Now you may turn off the transmitter.
- If the batteries (or rechargeable batteries) in the transmitter grow weak, the range reduces and the vehicle may no longer react to the control commands at the transmitter. In that case, end driving with the vehicle and switch off the speed controller. Then exchange the batteries or rechargeable batteries in the transmitter for new ones.
- When the car's drive battery is weak, the car gets slower or no longer responds correctly to the transmitter.
The drive battery in the vehicle is not only used for supplying the engine though the speed controller. The speed controller also generates the voltage/current required for operating the receiver and the steering servo.
For this, the speed controller has an integrated BEC ("Battery Eliminator Circuit"; electronic circuit for direct voltage supply of the receiver without additional receiver battery).
If the voltage in the drive battery is too low, the voltage at the receiver may also drop, causing the vehicle to no longer respond to the control commands at the transmitter.
In this case, stop driving at once (switch off speed controller, disconnect drive battery from vehicle completely, switch off transmitter). Then replace the vehicle drive battery or recharge the drive battery.
Before recharging the rechargeable battery, let it cool off entirely.
-
The motor and drive as well as speed controller and drive battery of the vehicle get hot during operation. Wait at least 5 to 10 minutes before exchanging the rechargeable battery.
-
Do not touch the motor, the speed controller or the rechargeable battery until they have cooled down. Danger of burns!
7. Battery and Rechargeable Battery Notes

Although use of batteries and rechargeable batteries in everyday life is a matter of course today, there are many dangers and problems. In particular in lithium batteries with high energy content (as compared to conventional NiMH batteries), various provisions must be complied with to avoid danger of explosion and fire.
Therefore, always observe the following information and safety notes in handling of batteries and rechargeable batteries.
a) General
- Keep batteries/rechargeable batteries out of the reach of children.
- Do not leave any batteries/rechargeable batteries lying around openly. There is a risk of batteries being swallowed by children or pets. If swallowed, consult a doctor immediately!
- Batteries/rechargeable batteries must never be short-circuited, disassembled or thrown into fire. There is a danger of explosion!
- Leaking or damaged batteries/rechargeable batteries can cause chemical burns to skin on contact; therefore, use suitable protective gloves.
- Liquids leaking from batteries/rechargeable batteries are chemically highly aggressive. Objects or surfaces that come into contact with them may take severe damage. Therefore, keep batteries/rechargeable batteries in a suitable location.
- Never recharge normal (non-rechargeable) batteries. There is a risk of fire and explosion! Charge only rechargeable batteries intended for this; use suitable chargers.
- Always observe correct polarity of batteries/rechargeable batteries and the connection of a rechargeable drive battery (note plus/+ and minus/-) when inserting the batteries.
- Never mix batteries and rechargeable batteries! Use batteries or rechargeable batteries, e.g. for the transmitter.
- Always replace the entire set of batteries or rechargeable batteries in the transmitter. Never mix fully charged batteries/rechargeable batteries with partially discharged ones. Always use batteries or rechargeable batteries of the same type and manufacturer.
- A battery charger corresponding to battery technology (NiMH, LiPo, Lilon....) is required. Never leave, e.g., LiPo batteries unattended in an NiMH charger! There is a risk of fire and explosion!
Therefore, charge the enclosed drive battery (and additionally purchased spare drive batteries of the same build) only with the enclosed charger; only use the enclosed mains adapter for voltage/current supply of the charger.
- Only charge multiple-cell lithium rechargeable batteries with a suitable balancer (integrated in the enclosed charger). A balancer (frequently also referred to as an equalizer) prevents overcharging of a single lithium battery cell by inspection of the individual cell voltages.
When overcharging a lithium battery cell, the rechargeable battery may bloat or even catch fire or explode!
- Only charge intact and undamaged batteries. If the outer isolation of the rechargeable battery or battery housing is damaged or the battery is deformed or bloated, it must not be charged. In this case, there is immediate danger of fire and explosion!

- Never charge the battery right after use. Always leave the rechargeable batteries to cool off first (at least 5 - 10 minutes).
- Remove the drive battery from the model for recharging. Disconnect the drive battery from the speed controller/vehicle completely.
- Never place the charger and drive battery on a heat-resistant, inflammable surface.
- The charger and drive battery heat up when charging. Leave enough distance between the charger and the drive battery, never place the drive battery on the charger. Never cover the charger and the drive battery. Do not expose the charger and drive battery to any high/low temperatures or to direct solar radiation or dampness/wetness.
- Never leave batteries unattended while charging them.
- Regularly recharge the rechargeable batteries (about every 2 - 3 months). Otherwise, self-discharge of the batteries may cause deep discharge. This renders the rechargeable batteries useless!
NiMH batteries (except for specific builds with low self-discharge) lose their energy even within a few weeks.
Lithium rechargeable batteries usually retain their energy for several months; however, they are damaged permanently by deep discharge and cannot be used anymore.
- Lithium rechargeable batteries should not be stored fully charged for an extended period, but only to about 50 - 70% of the available capacity (if necessary, observe additional information from the rechargeable battery manufacturer, if present).
- Never use a too-high charging current. Observe the manufacturer information on ideal or maximum charging currents. The enclosed charger is optimally coordinated with the lithium drive battery.
- Disconnect the drive battery from the charger when it is fully charged.
b) Transmitter
- Use batteries or rechargeable batteries for the transmitter. Never mix batteries and rechargeable batteries.
Always replace the entire set of batteries or rechargeable batteries in the transmitter. - When using rechargeable batteries in the transmitter, the operating duration will reduce due to the low voltage (rated voltage of the battery = 1.5V , rechargeable battery = 1.2V ). If you want to use rechargeable batteries anyway, we recommend use of NiMH rechargeable batteries with low self-discharge. For reasons of operational safety, however, use batteries instead of rechargeable batteries.
- If you do not use it for any extended period of time (e.g. during storage), remove the batteries/rechargeable batteries inserted in the transmitter to prevent damage from leaking batteries/rechargeable batteries.
c) Vehicle
- Only use the enclosed li-ion-drive battery in the vehicle (nominal voltage 7.4 V), or use a spare drive battery of the same build. Never use any other rechargeable batteries or even batteries in the vehicle.
- If you do not use the vehicle for any extended period of time (e.g. during storage), remove the drive battery to prevent damage from leaking rechargeable batteries. Disconnect the connection between the drive battery and the speed controller/vehicle entirely.
- Only charge the enclosed drive battery via the enclosed charger. Never use any other charger; this may cause fire or explosion of the drive battery.
8. Charging Drive Battery
Observe chapters 6 and 7.
be the enclosed li-ion-drive battery or a spare battery of the same build in the vehicle. Never use any other rechargeable batteries or batteries in the vehicle.
The drive battery is delivered uncharged and must be charged. Several complete discharge and charge cycles are necessary before the drive battery delivers its maximum power.
Only charge the enclosed Li-1on drive battery via the enclosed charger. Never use any other charger; this may cause fire or explosion of the drive battery.
Only use the enclosed mains adapter to supply the charger with voltage/power.
Disconnect the drive battery from the speed controller/vehicle completely before charging and take it out of the vehicle.
Charging of a partially discharged Li-lon drive battery is not a problem. Previous discharge is not necessary.
The drive battery heats up during charging/discharging (driving the vehicle). Wait until the drive battery has reached room temperature before charging it. The same applies after the charging procedure. Do not use the rechargeable battery in the vehicle until it has cooled down sufficiently after the charging process.
- First connect the round plug of the mains adapter to the corresponding round socket of the charger.
- Plug the mains adapter into a proper mains socket of the public mains (wall outlet). The power-LED of the charger now needs to light up.
- Connect the 3-pin plug of the drive battery to the corresponding socket of the charger. Ensure proper alignment of the plug and socket; only one position is correct.
- Charging commences; the charge LED lights up.
- When the charge LED goes out, the drive battery is fully charged. Charging may take several hours depending on the charge condition.
- Disconnect the drive battery from the charger when the drive battery is fully charged.
- When the vehicle is not in operation (e.g. during winter storage), disconnect the drive battery from the speed controller/vehicle. Keep the drive battery at a suitable site that is not accessible to children. Protect the rechargeable battery contacts from short circuit since there is a danger of fire and explosion. The same applies at mechanical damage to the rechargeable batteries or at high temperatures (e.g. near a heating or in direct sunlight).
- Pull the mains adapter from the mains socket when you no longer need the charger.
9. Operating Elements of the Transmitter
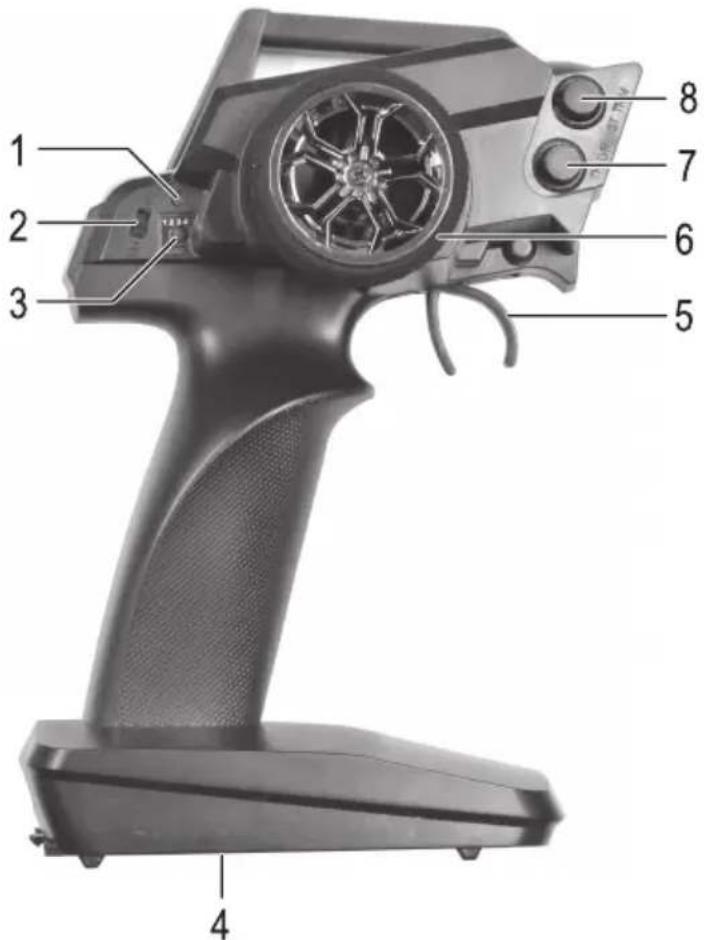
1 LED
2 On/off switch
3 Button "MODE" (no function in this vehicle)
4 Battery compartment
5 Throttle/brake lever
6 Steering wheel for steering
7 Dial switch "TH D/R" (dual rate setting for driving function)
8 Dial switch "ST TRIM" (trimming for straight run)
10. Commissioning
a) Inserting Batteries/Rechargeable Batteries in the Transmitter
Open the transmitter's battery compartment and insert either new batteries or fully charged rechargeable batteries. Observe correct polarity (plus/+ and minus/-), see label on the battery compartment. Close the battery compartment again.
b) Taking the Transmitter into Operation
Switch on the transmitter. The LED (1) flashes. Put the dial switch "ST TRIM" (8) to the middle position (trim for straight operation), turn the dial switch "TH D/R" (7) clockwise to the right until the stop.

The "MODE" (3) button has no function in this vehicle (the same transmitter is also used for other vehicles).
c) Inserting the Drive Battery in the Vehicle

Attention!
The battery must not be connected to the speed controller yet. First switch on the transmitter, see chapter 10. a) and 10. b).
Important!
This vehicle is exclusively suitable for use with a Lilon drive battery with 2 cells (rated voltage 7.4V ).
When using a drive battery with more cells, there is a danger of fire from overheating of the speed controller. Apart from this, the vehicle's drive will be overloaded and damaged by this (e.g. differential). Loss of guarantee/warranty!
Pull out the clip (A) and fold the battery bracket (B) up.
Insert the rechargeable battery into the battery compartment of the vehicle.
Fasten the rechargeable battery with the battery bracket (B) and insert the clip (A) again.
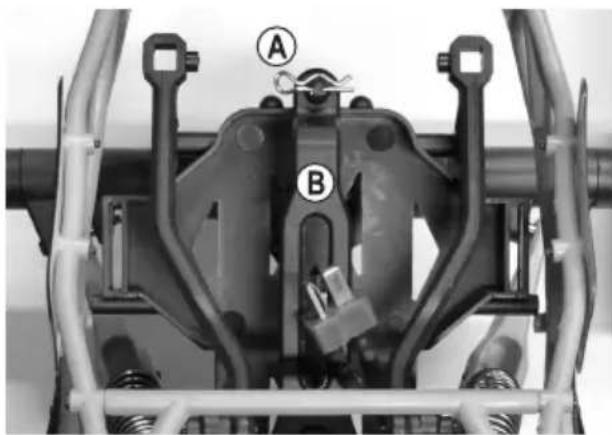
d) Connecting the Drive Battery to the Speed Controller
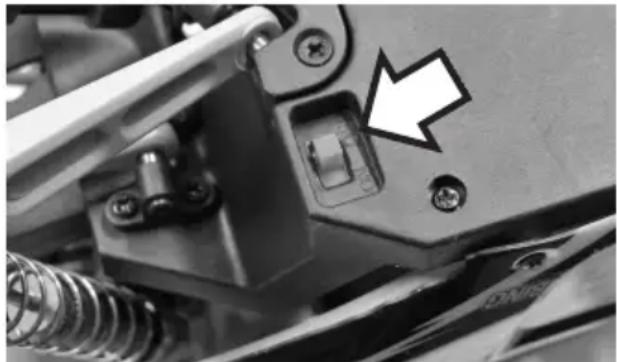
First switch off the speed controller (switch position "OFF", see labels next to the slider). The on/off switch (see arrow in the figure on the right) is located at the bottom of the vehicle.

To prevent sudden start-up of the wheels and therefore uncontrolled starting of the model, place the model vehicle on a suitable support (or starting box), so that the wheels can turn freely in case of an error.
Do not reach into the drive. Do not hold the wheels.
Now connect the drive battery to the speed controller. Ensure correct polarity (red cable = plus/+, black cable = minus/-). The tee plug connection between the drive battery and the speed controller is protected against polarity.
e) Switching on the Speed Controller
Release the throttle/brake lever (5) at the transmitter so that it sits in the neutral position.
Switch on the speed controller by moving the slider at the bottom of the vehicle (see figure in chapter 10. d) into the "ON" position. The white LED lamps on the vehicle are activated.
Then wait for a few seconds (leave the throttle/brake lever on the transmitter in the neutral position; do not move it) until the speed controller has completed its self-test.
Now check the drive and steering functions of the vehicle, e.g. by moving the steering wheel (6) to the left and right or by carefully pushing the throttle/brake stick.
The LED (1) on the transmitter stops flashing when the transmitter has found the vehicle receiver). The transmitter and the vehicle are then ready.
f) Controlling the Vehicle

Operate the throttle/braking lever for the drive function at the transmitter very cautiously and do not drive too quickly at the beginning until you get used to the car's reactions. Do not make any quick and jerky movements with the operating elements of the remote control.
If the vehicle tends to pull towards the left or the right, set the steering trim on the transmitter accordingly via the dial switch "ST TRIM" (8).
If the vehicle moves only very slowly, turn the dial switch "TH D/R" (7) to the right to the stop.
The dial switch "TH D/R" makes the dual rate settings for the driving function. Putting it simply, you can use the dial switch to set the maximum speed of the vehicle (at full deflection of the throttle/brake lever at the transmitter).
Turn to the right clockwise = faster
Turn to the left counter clockwise = slower
Since slower or faster speeds each use the full path of the throttle/brake stick, the vehicle can be controlled more precisely at slower speeds.
For example, this can be done to use the vehicle for agility exercises in slow mode.
When switching between forward and reverse driving, the throttle/brake lever must be put in the neutral position (neutral position = let go of lever, do not move it) briefly (approx. 1 - 2 seconds). If the throttle/brake lever is moved from forward to reverse directly, the brake function of the drive is activated (vehicle will not reverse).

The following figures are only to illustrate the functions and do not necessarily correspond to the design of the transmitter provided!
- Release throttle/braking lever, vehicle rolls to a halt (or does not move, if required, correct trimming), lever is in neutral position
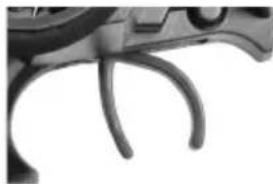
- Drive forwards, slowly pull the throttle/brake lever towards the handle
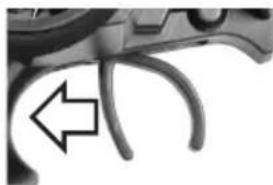
- Drive forwards and then brake (vehicle slows down; it does not roll to a halt slowly); push throttle/brake lever away from the handle without stopping
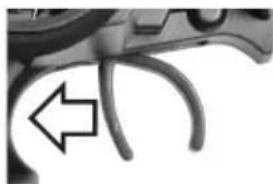
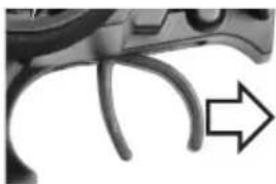
- Driving forward, braking and then reversing: Push the throttle/brake stick away from the handle without break (braking); when the vehicle has stopped, briefly (approx. 1 second) put the throttle/brake stick in the neutral position; then push the throttle/brake stick away from the handle (the vehicle now drives backwards)
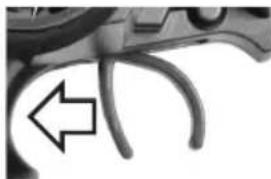
Driving forwards
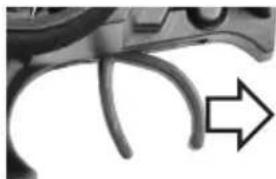
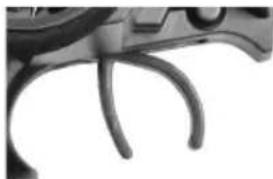
Braking Wait briefly when the vehicle has stopped (1 second)
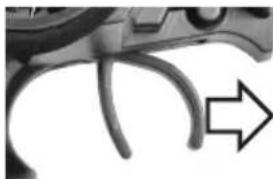
Driving backwards
If the vehicle tends to pull towards the left or the right, set the steering trim on the transmitter accordingly via the dial switch "ST TRIM" (8).
If the throttle/brake lever is moved from forward to reverse directly, the brake function of the drive is activated (vehicle will not reverse).
If you want to switch from forward to reverse operation, the throttle/brake stick first needs to be pushed away from the handle and then to the neutral position (when the vehicle moves forward during this phase, braking is also performed by this). When the throttle/brake stick is pushed away from the handle again now, the vehicle will reverse.

The vehicle will only reverse when the throttle/brake stick is pushed away from the handle the second time. This is necessary because of the brake function; it also protects the drive from overload due to immediate change from forward to reverse operation.
If the rechargeable battery voltage drops below 6.5V , the speed controller will switch off the motor to protect the rechargeable battery from harmful deep discharge.
When the drive battery is flat, wait for at least 5 - 10 minutes until motor and speed controller have cooled down sufficiently before the next run. Only then start a new drive with a full drive battery.
Only recharge a flat drive battery when it has cooled off.

Stop driving immediately if the vehicle shows any unusual responses to the remote commands or if the vehicle does not respond at all. This behaviour could be caused by low drive batteries, low batteries/ rechargeable batteries in the remote control or by too great a distance between vehicle and remote control.
A coiled/damaged telescopic aerial, interference on the radio channel used (e.g. radio transmissions from other devices, Bluetooth, WLAN) or adverse transmission/reception conditions may also cause unusual responses of the vehicle.
Since the receiver is supplied with power via the speed controller/drive battery, low or empty drive batteries will cause unintentional movement of the vehicle (e.g. twitching of the steering servo, etc.).
For example, the voltage of the drive battery decreases for a short time under full throttle, so that the receiver will no longer receive the required operating voltage. The vehicle will speed up, but the steering servo does not react properly. Stop operating the vehicle at once and use a new, fully charged drive battery.
g) Stopping the Vehicle
To stop driving, proceed as follows:
- Let go of the throttle/brake lever on the transmitter so that it goes into neutral position, and let the vehicle run out.
After the vehicle stands still, switch off the speed controller via the slider on the bottom, see figure in chapter 10. d).

Never touch the wheels or the drive mechanism, and make sure you do not move the throttle/brake lever at the transmitter!
- Disconnect the drive battery from the speed controller. Disconnect the plug-in connection completely.
Now you may turn off the transmitter.

Attention!
Toptor, the speed controller and the drive battery get hot during operation! Do not touch these parts immediately after operation. Danger of burns!
11. Set the Shock Absorbers

The manufacturer has already chosen the best settings for the vehicle's shock absorbers; the shock absorbers usually do not need to be set.
If the shock absorber settings are changed, you must take off the car body.
Proceed as follows:
First switch off the vehicle's speed controller and completely disconnect the drive battery from the speed controller.
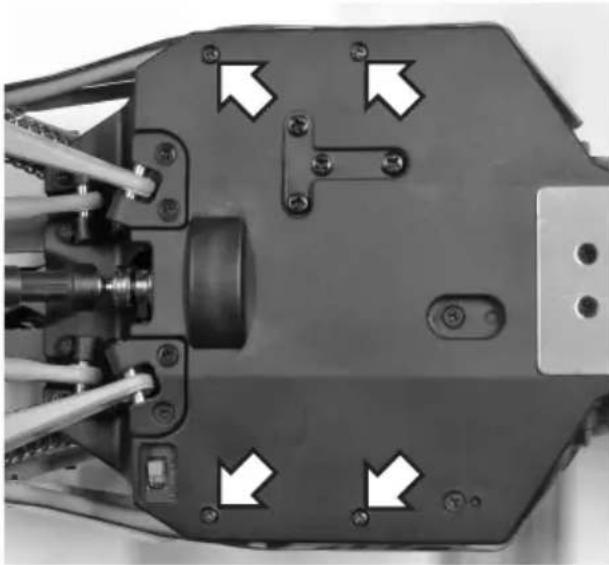
Turn the vehicle around so that the bottom points up.
Remove the 4 screws marked with an arrow in the figure on the right.
Remember the positions for these and the following screws (if the screws differ).
Then turn the vehicle back around so that it is standing on its wheels.
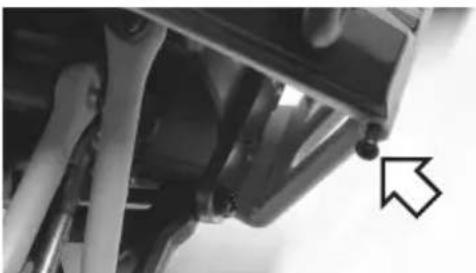
Now remove the screws at the left and right of the vehicle's front; see figure on the right.
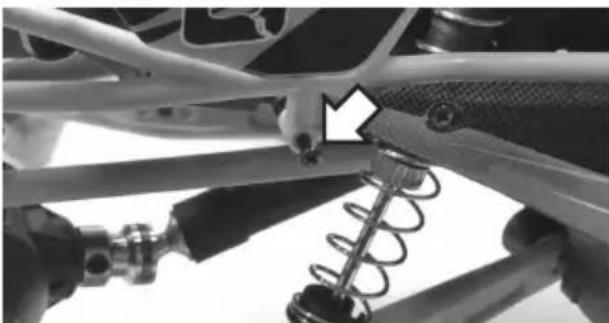
Now remove the screws at the left and right sides of the vehicle; see figure on the right.
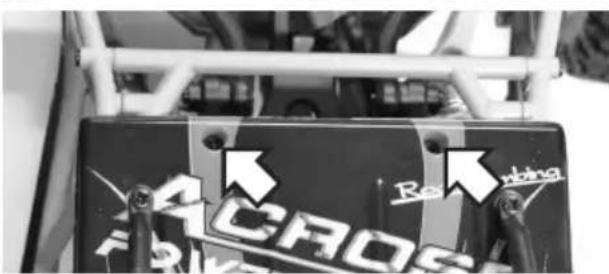
Last, remove the screws at the top of the vehicle; see figure on the right.
The car body can now be carefully lifted off upwards.

There is a connection cable to the LEDs between the chassis and the car body. Ensure that this is not damaged or even torn off when taking off the car body!
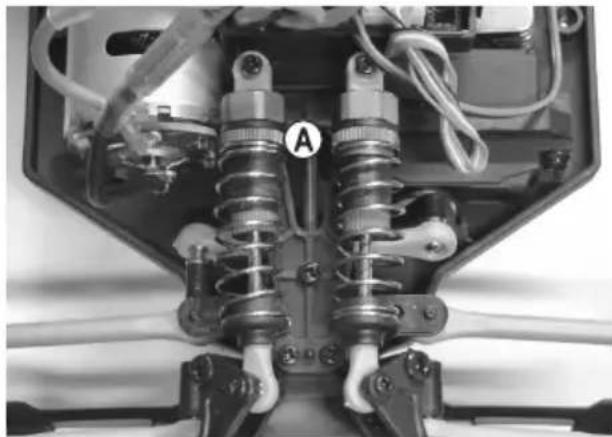
The spring pre-tension of the front axle can be adjusted by turning a knurled wheel (A).
Always set the shock absorbers evenly (at the left and right wheels of the front axle). Otherwise, driving behaviour will be influenced negatively.
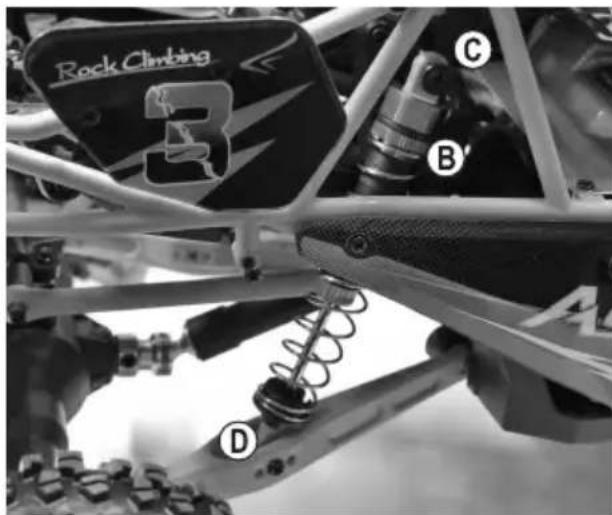
The spring pre-tension of the rear axle can be adjusted by turning a knurled wheel (B). With a little skill, the car body does not need to be removed for this (see figure on the right).
The shock absorber can also be installed in different locations at the upper end (C) or the lower end (D). The different geometries lead to different deflection behaviours.
Always set the shock absorbers evenly (at the left and right wheels of the rear axle). Otherwise, driving behaviour will be influenced negatively.

After setting the shock absorbers, install the car body in the reverse order.
12. Cleaning and Maintenance
a) General
Before cleaning or servicing, turn the speed controller off and completely disconnect the drive battery from the speed controller. Then switch off the transmitter. If you have driven the vehicle before, let all parts (e.g. motor, speed controller, etc.) cool down completely first.
Clean the whole vehicle of dust and dirt after driving, e.g. with a long-haired clean brush and a vacuum cleaner.
Compressed air aerosols can also be helpful.
Do not use cleaning aerosols or conventional household cleaners. This may damage the electronics and lead to discolouration of the plastic parts or the body.
Never wash the vehicle with a garden hose or a high-pressure cleaner.
A soft cloth, slightly dampened, can be used to wipe the car body. Do not rub too firmly in order to avoid scratch marks.
b) Before or after Every Drive
Motor vibrations and shocks during driving can loosen parts and screw fittings.
Therefore, check the following items before and after every drive:
- The tight fit of wheel nuts and of all vehicle screw fittings
- Fastening of car body, speed controller/receiver, on/off switch
- Fastening of tyres and runs or tyre condition
-
Attachment of all cables (they must not get into movable parts of the vehicle)
-
Also check the vehicle for damage before or after every use. If you find any damage, the car may not be used anymore and has to be taken out of operation.
Only original spare parts must be used to replace worn vehicle parts (e.g. tyres) or defective vehicle parts (e.g. a broken transverse link).
c) Wheel Change
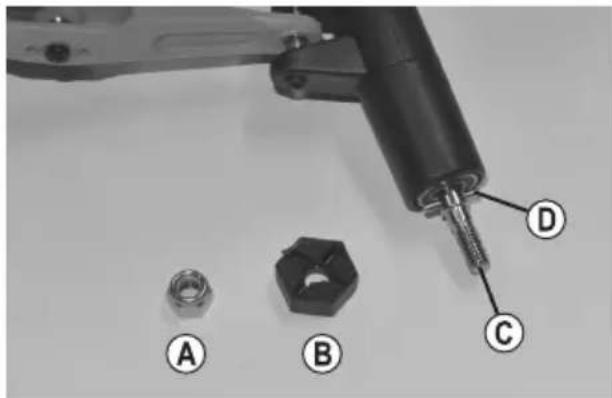
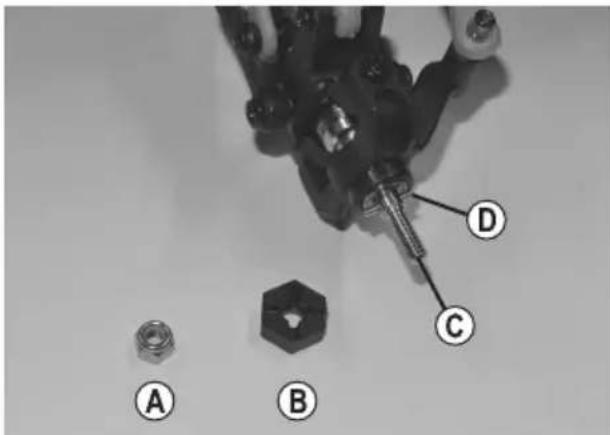
After loosening of the wheel nut (A), the wheel may be removed from the wheel axle (C).
The wheel tappet nut (B) may remain in the rim when removing the wheel or detach from the wheel axle (C) when the wheel is taken off. In this case ensure that the tappet pin (D) does not fall out and get lost.
When the wheel is later replaced, ensure that the tappet pin (D) is exactly in the centre of the wheel axle (C) and inserted into the respective groove of the wheel tappet nut (B).
If the tappet pin (D) is missing, no torque can be transferred from the motor to the wheel and the wheel will spin freely.
Then the new wheel is plugged on so that the hexagon socket on the wheel rim's inside is precisely pushed onto the wheel tappet nut (B).
Screw on the wheel with the wheel nut (A).
Observe proper placement of the wheel nut (A) when tightening here. The wheel nut is a stop nut; there is a plastic insert on one side of the stop nut. It must point outward when tightening.
Do not apply any force for screwing on. This will require greater force to turn the wheel, which may damage the drive.
13. Disposal
a) Product

Electronic devices are recyclable and should not be disposed of in household waste. Dispos of the product according to the applicable statutory provisions at the end of its service life.
ove any inserted batteries/rechargeable batteries and dispose of them separately from the product.
b) Batteries/Rechargeable Batteries
You as the end user are required by law (Battery Ordinance) to return all used batteries/rechargeable batteries. Disposing of them in the household waste is prohibited.

Batteries/rechargeable batteries that contain hazardous substances are labelled with the adjacent icon to indicate that disposal in domestic waste is forbidden. The descriptions for the respective heavy metals are: Cd=cadmium, Hg=mercury, Pb=lead (the names are indicated on the battery/rechargeable battery e.g. below the rubbish bin symbol shown on the left).
You may return used batteries/rechargeable batteries free of charge at the official collection points in your community, in our stores, or wherever batteries/rechargeable batteries are sold.
You thus fulfil your statutory obligations and contribute to the protection of the environment.
14. Declaration of Conformity (DOC)
Conrad Electronic SE, Klaus-Conrad-Straße 1, D-92240 Hirschau, hereby declares that this product complies with directive 2014/53/EU.

The complete text of the EU declaration of conformity is available under the following web address: www.conrad.com/downloads
Choose a language by clicking a flag symbol and enter the item number of the product into the search field; then you may download the EU declaration of conformity in the PDF format.
15. Troubleshooting
Even though the model and the remote control system were built with the latest available technology, there can still be malfunctions or errors. For this reason, we would like to give you some information on how to deal with possible problems. Also observe the enclosed operating instructions for the remote control system.
The model doesn't respond or does not respond properly
- Are the vehicle drive battery or the batteries/rechargeable batteries in the transmitter discharged? Exchange the drive battery or batteries/rechargeable batteries in the transmitter for new ones.
- Did you switch on the transmitter first and then the speed controller? The speed controller will not work for reasons of safety in case of reverse order.
- Is the drive battery connected to the speed controller correctly? Check the plug connections for whether it is contaminated or oxidised.
Is the drive battery fully charged? - If the vehicle stops when driving, the undervoltage recognition may have been activated, since the voltage of the connected rechargeable battery is too low (the speed controller switches off the motor when the rechargeable battery's voltage drops below approx. 6.5 V). Connect a new, fully charged rechargeable battery to the vehicle (first take a break of at least 5 - 10 minutes so that the speed controller and the motor can cool off).
- Is the vehicle too far away? With a fully charged drive batteries and fully charged batteries/rechargeable batteries in the transmitter, the range should be 50m and more. The range can be decreased by outside influences, such as interference on the transmitter frequency, or proximity to other transmitters (not only remote controller transmitters but also WLAN/Bluetooth devices that also use a transmission frequency of 2.4 GHz), metal parts, buildings, etc.
- If the transmission signal is missing, the speed controller switches off the motor for reasons of safety.
The vehicle slows down or the steering servo shows only slight or no reaction; the range between transmitter and vehicle is very short
- The drive battery is weak or discharged.
- The receiver power supply and thus also the power supply of the steering servo is achieved through the speed controller BEC. Therefore, a weak or discharged drive battery will cause the receiver to no longer work properly.
- Replace the drive battery by a fully charged one (before inserting a new drive battery, wait at least 5 - 10 minutes until motor and speed controller have cooled down sufficiently).
- Check the batteries/rechargeable batteries in the transmitter.
The vehicle doesn't drive in a straight line correctly
- Set straight driving at the transmitter via the dial switch "ST TRIM".
- Did your car have an accident? If so, check the vehicle for any defective or broken parts and replace them.
Driving works opposite to the movement of the throttle/brake lever at the transmitter
- If the motor was disconnected from the speed controller (e.g. for maintenance purposes) and re-connected again later, the motor cables may have been swapped. Swap the two motor cables.
The vehicle only moves very slowly
- Turn the dial switch "TH D/R" at the transmitter clockwise to the right.
The dial switch "TH D/R" makes the dual rate settings for the driving function. Putting it simply, this dial switch sets the maximum speed of the vehicle.
Turn to the right clockwise = faster
Turn to the left counter clockwise = slower
The steering is not functioning or is functioning incorrectly, steering deflection at the vehicle insufficient
- Check the steering mechanism for loose parts or damage.
- Check if there may be leaves or small stones blocking the steering mechanism function.
The driving time is very short
- Charge the drive battery or use a different, fully charged drive battery
The drive battery heats up when charging and driving the vehicle
This is normal.
16. Technical Data
a) Vehicle
Scale. 1:10XS
Suitable drive battery. 2-cell Li-1on drive battery (rated voltage 7.4 V)
Drive .Electro motor type 540
Four wheel drive
Ball-bearing drive
Differential in front and rear axles
Chassis....Individual wheel suspension in front, stiff axle in the rear
Shock absorber with spiral springs, adjustable
Dimensions (L x W x H) 389 x 227 x 165 mm
Tyredimensions (W× 0) . 32× 92mm
Wheelbase. 250 mm
Ground clearance. 35 mm
Weight approx. 1.4 kg (without drive battery)
b) Transmitter
Frequency range 2.413.2.463 GHz
Transmission output. <20 dBm
Channel number 2
Operating voltage 6 V/DC via 4 type AA/mignon batteries
Dimensions (W x H x D) .87 x 200 x 145 mm
Weight approx. 182 g (without batteries)
c) Drive Battery
Build.Li-Ion
Number of cells. 2 (rated voltage 7.4 V)
Capacity. 1500 mAh
Balancer plug-in system .XH
Connection .T-socket
d) Charger
Operating voltage 10 V/DC
Suitable rechargeable batteries.Li-Ion, LiPo, 2 cells, XH connection
Charging current. 500 mA
Deactivation voltage. 8.4 V/DC (4.2 V/DC per cell)
e) Mains Adapter
Operating voltage 100 - 240 V/AC, 50/60 Hz
Output. 10 V/DC, 0.6 A
Page
Cher client, chere clientele,
France (email): technique@conrad-france.fr
Suisse:
www.conrad.ch
www.biz-conrad.ch
2. Explication des symboles
Tension de service. 10 V/CC
Batteries compatibles.. Li-Ion, LiPo, 2 cellules, pris XH
Courant de charge. 500 mA
www.conrad.com/downloads