SHX51HEAT2022 - Heating SHX - Free user manual and instructions
Find the device manual for free SHX51HEAT2022 SHX in PDF.

| Product Type | Infrared radiant heater |
| Brand | SHX |
| Model | SHX51HEAT2022 |
| Input voltage | 220-240 V, 50-60 Hz |
| Rated power | 2000 W |
| Dimensions (L x W x H) | 820 x 130 x 58 mm |
| Weight | 4.6 kg |
| Protection rating | IP65 (protected against water jets) |
| Adjustable temperature range | 5 °C to 45 °C (41 °F to 113 °F) |
| Heating type | Carbon fiber infrared rod |
| Installation | Wall or ceiling, horizontal or vertical mounting |
| Minimum safety distance | 1.8 m from floor, 0.5 m from walls, 1 m from flammable objects |
| Functions | Thermostat, timer, smart heating, child lock, open window detection, WiFi |
| Control | Remote control, Smart Life app (iOS/Android) |
| Display | LED screen with temperature, time, icons |
| Delivery contents | Heater, user manual, remote control, mounting accessories |
| Cleaning | Soft damp cloth, alcohol-based cleaner for fingerprints |
| Warranty | 2 years (valid in Austria and Germany) |
| Certifications | CE, compliant with European directives |
| Intended use | Covered outdoor spaces (terraces), occasional use |
Frequently Asked Questions - SHX51HEAT2022 SHX
User questions about SHX51HEAT2022 SHX
0 question about this device. Answer the ones you know or ask your own.
Ask a new question about this device
Download the instructions for your Heating in PDF format for free! Find your manual SHX51HEAT2022 - SHX and take your electronic device back in hand. On this page are published all the documents necessary for the use of your device. SHX51HEAT2022 by SHX.
USER MANUAL SHX51HEAT2022 SHX
natural_image
Close-up of a black industrial electrical heater with visible internal structure and control panel (no text or symbols)HERZLICHEN GLÜCKWUNSCH!
VIELEN DANK, DASS SIE SICH FÜR DIESES PRODUKT VON SHX ENTSCHIEDEN HABEN.

other
| Category | Value | |---|---| | DE | 25 | | IT | 49 | | FR | 73 | | GB | 96 | | CZ | 119 | | SK | 143 | | PL | 167 | | SL | 190 | | HU | 190 |
other
| Category | Value | |---|---| | RUS | 214 | | NL | 239 | | GR | 263 | | SE | 287 | | FI | 310 | | KAZ | 333 | | BAHR | 357 | | RO | 380 |INHALTSVERZEICHNIS
| L(mm) | L1(mm) |
| 820 | 535 |
natural_image
Simple line drawing of a cylindrical object with two protruding pins, labeled 'B' at the bottom (no text or symbols on the object itself)natural_image
Technical line drawing of a cylindrical mechanical component with mounting brackets (no text or symbols)App Verwendung:
natural_image
Close-up of a black cylindrical heating element with visible internal structure and control panel (no text or symbols)CONGRATULAZIONI!
GRAZIE PER AVER DECISO DI ACQUISTARE QUESTO PRODOTTO DI SHX.

INDICE
IT
| L(mm) | L1(mm) |
| 820 | 535 |
natural_image
Simple line drawing of a cylindrical object with two protruding pins, labeled 'B' at the bottom (no text or symbols on the object itself)natural_image
Technical illustration of a cylindrical device with internal components and mounting brackets (no text or symbols)Uso dell'app:
natural_image
Close-up of a black cylindrical heating element with visible internal structure and control panel (no text or symbols)FÉLICITATIONS !
MERCI D'AVOIR OPTÉ EN FAVEUR DE CE PRODUIT DE SHX.

SOMMAIRE
flowchart
graph LR
    A["Rectangular Device"] --> B["Arrow to next block"]
    B --> C["Cable with circular connector"]
    C --> D["Rectangular Device with two blocks and a separate component"]
    D --> E["Final Product"]
| L(mm) | L1(mm) |
| 820 | 535 |

natural_image
Simple line drawing of a cylindrical object with two protruding pins, labeled 'B' at the bottom (no text or symbols on the object itself)natural_image
Technical illustration of a cylindrical device with internal components and mounting brackets (no text or symbols)DÉCLARATION DE CONFORMITÉ
Schuss Home Electronic GmbH Scheringgasse 3 - 1140 Wien -Autriche
Directive CEM 2014/30/UE, Directive LVD 2014/35/UE, Directive RED2014/53/UE,
Directive ErP -2009/125/CE Règlemenmt (CE) n°. / Regulation (EV) No. UE 206/2012
Directive RoHs 2011/65/UE & (UE) 2015/863
Directive RED 2014/53/UE
Sécurité :
EN 60335-2-30:2009+A11:2012+A1:2020+A12:2020
EN 60335-1:2012+A11:2014+A13:2017+A1:2019+A2:2019+A14:2019
EN 60335-2-30:2009+A11:2012+A1:2020
EN 60335-1:2012+A11:2014+A13:2017+A1:2019+A2:2019+A14:2019
Santé :
EN 62233:2008
EN 62233:2008
EN 62311:2008, EN 50665:2017
CEM :
EN 301 489-1 V2.2.3(2019-11)
EN 301 489-17 V3.2.4(2020-09)
EN 55014-1:2017+A11:2020, EN 55014-2:2015
EN IEC 61000-3-2:2019, EN 61000-3-3:2013+A1:2019
Radio :
EN 300 328 V2.2.2 (2019-07)
Authorized representative of manufacture
natural_image
Close-up of a black cylindrical heating element with mesh insulation and a small indicator light (no visible text or symbols)CONGRATULATIONS!
THANK YOU FOR PURCHASING THIS SHX PRODUCT.
TABLE OF CONTENTS
EN
| Important information on safety, place of use and electrical connections |
| Recycling, disposal and Declaration of Conformity |
| Scope of delivery |
| Description of the appliance |
| Place of use and connection to power supply |
| Starting up and functions |
| Cleaning and maintenance |
| Technical information |
| Warranty |
PLEASE READ THE OPERATING MANUAL CAREFULLY BEFORE BEGINNING ASSEMBLY,, INSTALLATION, OPERATION OR MAINTENANCE. PROTECT YOURSELF AND OTHERS BY FOLLOWING THE SAFETY INSTRUCTIONS. FAILURE TO COMPLY WITH THESE INSTRUCTIONS MAY RESULT IN PERSONAL INJURY AND/OR PROPERTY DAMAGE AND/OR LOSS OF CLAIMS UNDER WARRANTY.
Intended Use
This appliance is splash-water protected (IP65). This appliance is intended for heating in covered outdoor areas (e.g. terraces). The appliance is suited for occasional use and not for continuous operation. The appliance is intended for private use and not for commercial use. The appliance may only be operated when connected to 220 – 240 V AC/50-60 Hz (10/16A) earthed contact sockets.
Any other use than described above will cause damage to the appliance. In addition, there is a risk of short circuit, fire or electric shock. The appliance may neither be modified, opened nor altered.
IMPORTANT INFORMATION ON SAFETY, STANDARDS AND ELECTRICAL CONNECTIONS
Safety notes
WARNING: This appliance is not equipped with a thermostat for controlling the room temperature.
WARNING: Do not use the heater in small rooms when they are occupied by persons who are not capable of leaving the room on their own, unless constant supervision is provided. WARNING: This appliance is intended exclusively for the heating of sheltered outdoor areas and may not be used for any other purpose.
WARNING: Do not spray the appliance!
-
The appliance is not suitable for continuous or high-precision operation
-
Remove the appliance from the packaging and check that it is in good working order.
-
Keep the packaging materials away from children. If swallowed, these pose a risk of suffocation!
-
Check whether the power supply in your household corresponds with the information provided on the radiant heater.
-
Check the power cable and plug before use to make sure they are not damaged.
-
Always make sure that the appliance is switched off before unplugging the power cable. Only switch on the appliance with dry hands. Otherwise: There is a risk of electric shock!
-
Do not put any flammable objects close to the radiant heater, and do not direct the radiant heater towards such objects. Make sure that the front of radiant heater is set up or installed at least 1 metre away from bedding, paper, clothing and curtains. It is best to set the radiant heater up beside or with its back facing such items.
WARNING: Do not set up close to water (bathtubs, pools, etc.).
- To protect against electric shock, do not immerse the power cable or plug in water or any other liquids.

-
Do not insert any foreign objects in the air outlets. Attention: Risk of electric shock, fire or damage!
-
Unplug from the power socket when not in use. Do not let the cables hang over the table in order to protect your children.
-
Do not insert your fingers or foreign objects through the grille while the appliance is in operation.
-
Do not leave the appliance unsupervised.
-
Do not use the radiant heater in the bathroom, laundry room or any similar locations. Do not set the appliance up near a bathtub or any other vessels containing water.
-
No liability is accepted for damage which arises from non-adherence to this operating manual or improper use.
-
The heater must not be installed directly below a wall power socket.
-
This appliance cannot be used by persons (including children) with reduced physical or mental capabilities, unless they are supervised or an adult has given them instruction concerning use of the appliance in a safe way.
-
Children and other persons needing assistance shall not play with the appliance.
-
Keep children under the age of 3 away from the appliance unless they are under constant supervision.
-
Children between the ages of 3 and 8 may only switch the appliance on or off under supervision or if they have been
instructed in its safe use and understand the resultant dangers, on the condition that the appliance is positioned or installed in its normal place of use.
- Connection as well as control, cleaning and user maintenance may not be carried out by children between the ages of 3 and 8. Children shall not play with the appliance.
CAUTION: The appliance is not designed to be operated with an external timer or a separate remote control system.
-
The appliance must always be disconnected from the power supply when left unattended and before cleaning it.
-
Always let the appliance cool down completely before cleaning it or putting it in storage. Parts of the radiant heater such as the heating tube, reflector and surrounding metal parts may reach temperatures above 200^ C. Risk of injury due to severe burns! Do not touch hot surfaces!
-
Do not make any modifications to the appliance. Do not replace the connection cable yourself.
-
To prevent overloading a circuit, do not operate the radiant heater on a circuit with other equipment.
-
Avoid using extension cables as they are more prone to overheating and therefore constitute a fire hazard.
-
The connection cable cannot be replaced. The appliance must be disposed if the cable is damaged.

- Do not run the connection cable under carpeting, and do not cover the cable. Make sure that nobody can trip over the cable.
Do not wrap the connection cable around the appliance.
-
Do not use the appliance in direct sunlight or near other sources of heat. The appliance should not be exposed to outdoor weather for an extended period.
-
The minimum distance between the radiant heater and the floor should be 180 cm and a distance of 40 cm should be kept on the sides in order to ensure sufficient distance is kept between the appliance and people/animals and to prevent burns. The heating element should not be directed toward the ceiling, instead it should always be directed toward the area to be heated.
-
Never cover the radiant heater under any circumstances in order to prevent overheating.
-
Never install the radiant heater in a position where it can fall into a bathtub or another vessel containing water.
-
The radiant heater should not be placed next to or on items or objects which are flammable or can melt, for example, wood, straw, curtains, furniture, bedding, clothing, paper, plastics, etc.
-
Do not use the appliance in areas where petrol, paint or other flammable liquids are stored.

- The radiant heater becomes hot during use. To prevent burns, do not let bare skin touch the appliance.
Warning: The heater is not equipped with a controller to regulate the room temperature.
-
Always grab the radiant heater by the stand if you want to move it, and let it cool down beforehand.
-
If the heating element is touched, remove any fingerprints with a soft cloth and an alcohol-based cleaning agent. Burnt-on dirt can cause malfunctions.
-
Do not operate the radiant heater with wet or damp hands.
-
People with reduced sensitivity to heat are not recommended to use the appliance.
-
Extreme caution is necessary when the heater is used by or near children or impaired persons, or when the heater is left operating and unsupervised.
-
Do not leave the radiant heater unsupervised when it is switched on. Unplug the radiant heater when it is not in use.
-
If the appliance has visible signs of damage, it may no longer be used.
ATTENTION | RISK OF INJURYThis appliance becomes hot during use.Never touch the appliance while it is in use → this may result in severe BURNS. |
ATTENTION | RISK OF FIREDo not cover the appliance while it is in use. |
ATTENTION | SAFE DISTANCEMaintain a safe distance of at least one metre from flammable items such as furniture, curtains, paper and similar.PLACE OF USEPosition the appliance in such a way that air can flow in and out without hindrance.RISK OF BURNSThis appliance becomes very hot during use and can cause burns. Take particular care if children or vulnerable persons are present.RISK OF OVERHEATING |
Symbol markings on the appliance Symbol:
Meaning:
Attention! Do not cover The symbol on the device indicates that it is not permitted to suspend any item (e.g. towels, clothing etc.) above the appliance or directly in front of it. To prevent overheating and the risk of fire, the heater must not be covered.
Recycling, disposal and Declaration of Conformity
 | RECYCLINGThe packaging materials can be recycled. It is recommended that you dispose of them in separated waste. |
 | DISPOSALThe pictogram with the crossed out dustbin indicates that electrical and electronic appliances must be disposed of separately from household waste (WEEE). Electrical and electronic appliances can contain harmful and environmentally hazardous materials. Do not dispose of them in unsorted residual waste, but at a registered collection centre for waste electrical and electronic equipment. By doing so, you will help to conserve resources and protect the environment. For further information please consult your dealer or your local authorities. Directive 2012/19/EU |
 | DECLARATION OF CONFORMITYWe hereby confirm that this article complies with the essential requirements, regulations and guidelines of the EU. The detailed declaration of conformity can be viewed at any time via following link:https://www.schuss-home.at/downloads |
Errata and technical changes reserved.
Scope of delivery
- Radiant heater
- Operating manual
■ Installation accessories
Description of the appliance
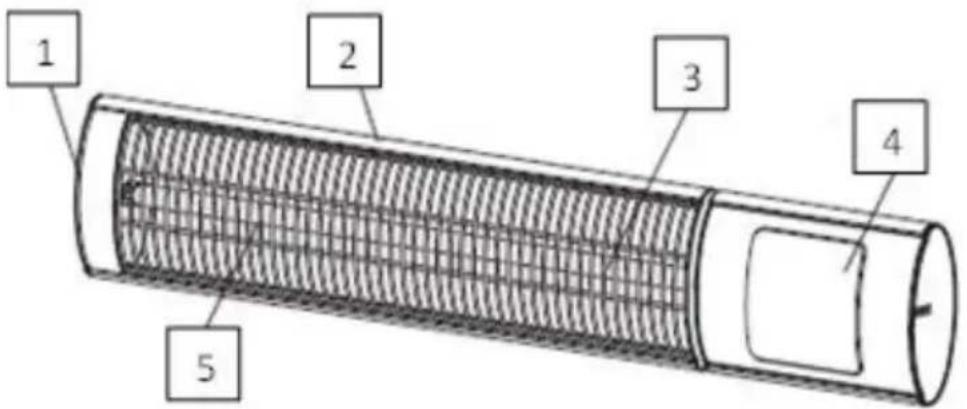
1) Protective cap, left
2) Back
3) Protective grille
4) Display
5) Carbon fibre rod
Description of remote control
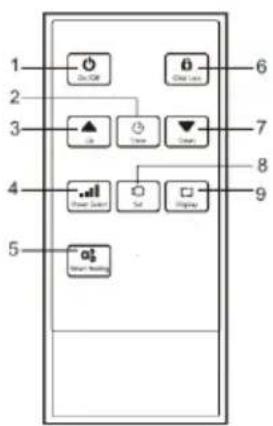
1) On-Off
2) Timer
3) "Up" button
4) Switch
5) Smart Heating
6) Child safety lock
7) "Down" button
8) Set button
9) Display button
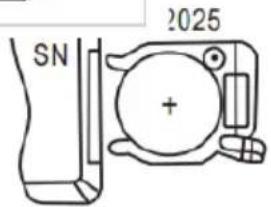
Preparing the remote control
Please follow the steps below to make it operate correctly:
- To operate the appliance via remote control, please remove the plastic protection from the battery compartment.
- To change the battery, carry out the following steps:
Pull out the battery holder on the back of the remote control, remove the old battery and then insert a new one:

flowchart
graph LR
    A["Front Panel"] --> B["Arrow"]
    B --> C["Box 1"]
    C --> D["Cable"]
    D --> E["Box 2"]
    E --> F["Display Unit"]
    style A fill:#f9f,stroke:#333
    style F fill:#bbf,stroke:#333
- Please always pay attention to the polarity markings (+/-) on the battery and the battery holder:
- Then insert the battery holder back into the remote control.
The display:

1) Temperature and time display
2) Power supply symbol
3) Smart Heating symbol
4) Heating level indicator
5) Child safety lock activated
6) OPEN WINDOW activated
7) Heating function symbol
8) OPEN WINDOW detected
9) Timer active
10) Timer ON
11) Display of units
12) WI-FI symbol
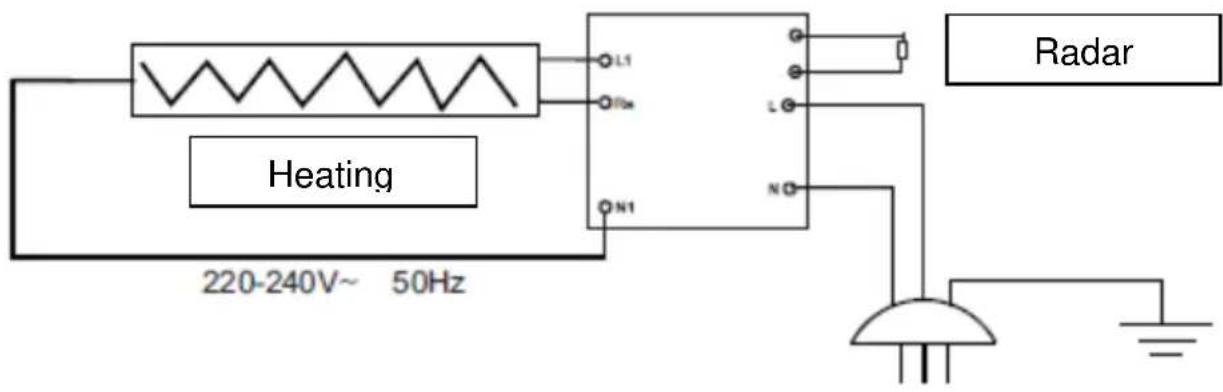
Place of use and connection to power supply
Circuit diagram
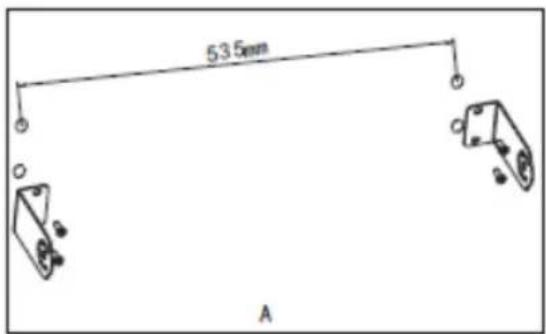
Installation
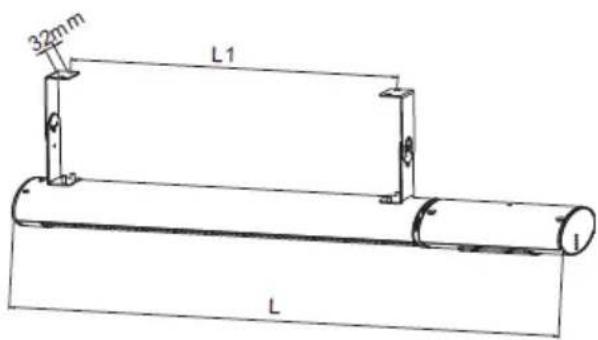
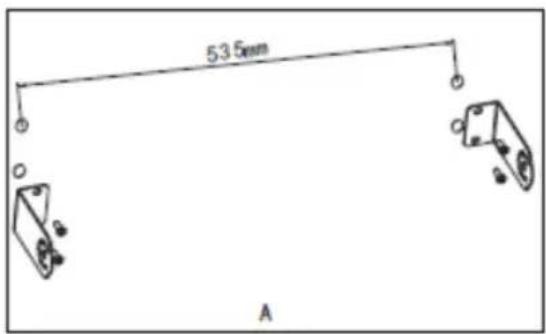
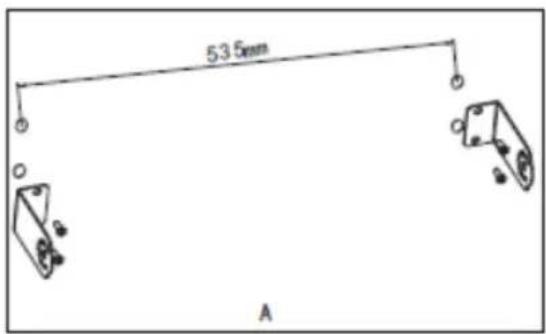
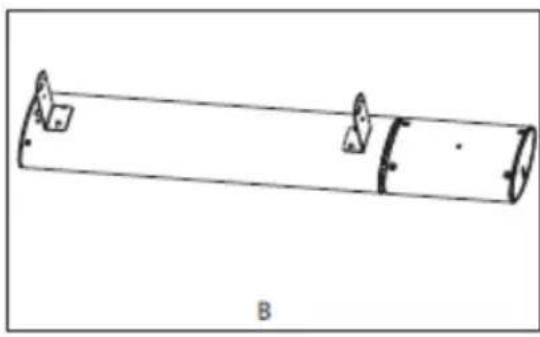
| L(mm) | L1(mm) |
| 820 | 535 |

Remove the rubber plugs and screws from the supplied bag. Drill four holes to a depth of 60mm and at a distance of 535mm.
Insert the rubber plugs into the holes and screw in the wall bracket with 5*60 screws (figure A).

natural_image
Simple line drawing of a cylindrical object with two protruding pins, labeled 'B' at the bottom (no text or symbols on the object itself)Take 4 ST4*8 screws from the supplied bag and tighten them with a Phillips screwdriver to connect the appliance bracket to the appliance (Figure B).
natural_image
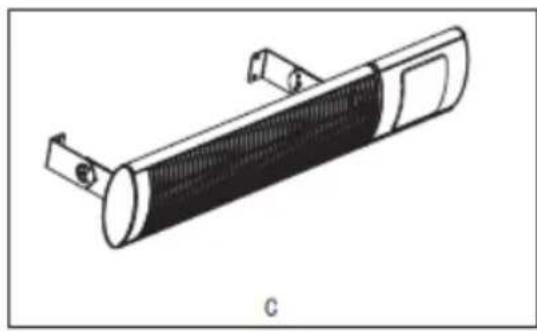
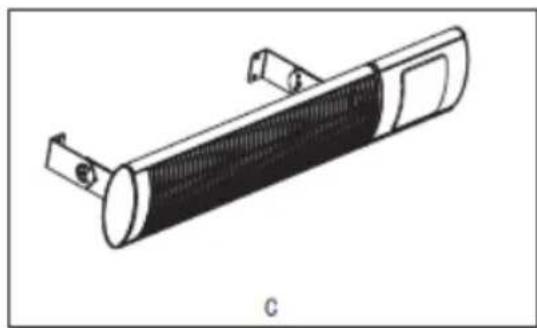
Technical illustration of a cylindrical device with internal structure and mounting brackets (no text or symbols)Take 2 M6*16 screws from the supplied bag. Set a suitable angle by aligning the wall bracket and the appliance bracket. Then tighten the screws with the supplied nuts (Figure C).
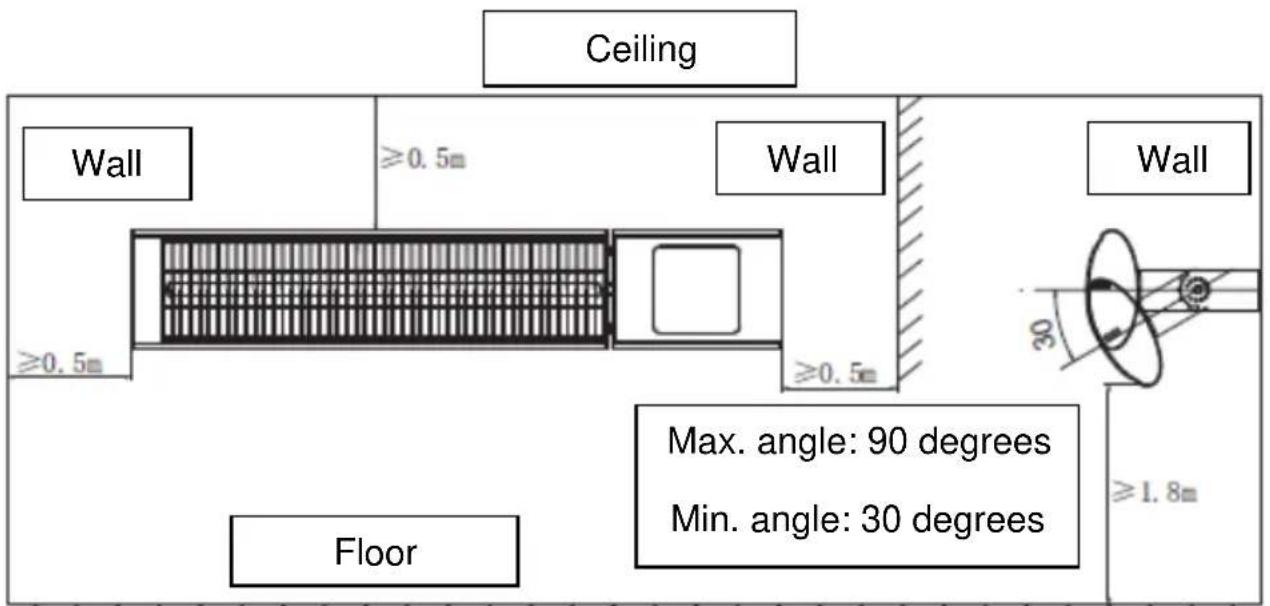
This appliance must be installed by qualified personnel. Make sure the appliance is unplugged and cool before and after installation. The appliance can be installed horizontally or vertically.
ATTENTION
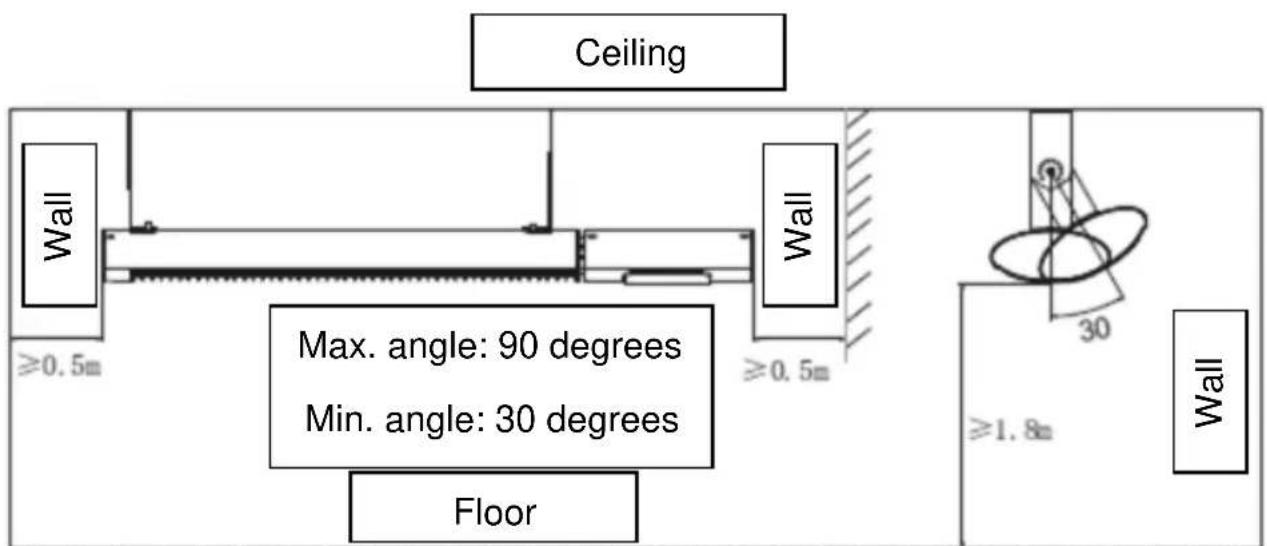
There must be a distance of at least 1.8m to the nearest surface under the appliance.
When installing on the ceiling, make sure to choose an angle between 45 and 90 degrees.
With vertical installation, make sure that the power cable is always positioned below the appliance.
Vertical installation diagram
Horizontal installation diagram
ATTENTION
Certain parts of this appliance may become very hot and cause burns.
Starting up and functions
Remove the appliance carefully from the packaging. Keep the boxes and foam parts for storage and transport after use. Install the product as described in the operating manual. It is recommended not to use the same connection for several appliances at the same time in order not to overload the circuit. Insert the plug into an earthed socket and switch on the appliance.
After switching on, the appliance goes into standby mode. The standby icon 8 lights up on the display.
To switch to operating mode, press the On-Off switch again. The appliance can be switched off any time by pressing the On/Off button "1". The appliance will then be in standby mode again.
If the appliance is not going to be used for a long period of time, the plug should be removed from the socket and suitably protected against damage
- Timer:
To access the timer, press the "2" button on the remote control. The timer symbol "10" will light up on the display and a switch off time can be set.
The temperature and time display "1" 888 flashes and the "H" is shown on the appliance display.
The switch-off time can be selected using the remote control buttons "3" and "7".
○ After selecting, the display flashes for 5 seconds and then saves the time automatically.
- Then return to the display and set the temperature using the remote control buttons "3" and "7".
As soon as the timer has elapsed, the timer symbol "10" goes out.
- Setting the temperature:
○ Select the desired temperature using buttons "3" and "7" on the remote control.
○ The temperature range is 5 - 45 °C (41 -113°F). The pre-set temperature is 25°C (77°F).
- The temperature setting can be rotated and includes a memory function. (Returns to the pre-set temperature after a power cut)
• Smart Heating options:
o Press button "5" on the remote control.
The Smart Heating symbol "3" lights up on the display and Smart Heating mode is activated. The pre-set temperature is 25 °C (the temperature can be manually changed).
- Temperature-dependent changes in Smart Heating mode occur as follows: If the room temperature is equal to or higher than the set temperature, the heating process is stopped.
If the room temperature is 2 degrees lower than the set temperature, the appliance selects the first heating level.
If the room temperature is 3 degrees lower than the set temperature, the appliance selects the second heating level.
If the room temperature is at least 4 degrees lower than the set temperature, the appliance selects the third heating level.
- Child safety lock:
- First press the Set button "8" and then button "6" on the remote control to activate child safety lock.
- The child safety lock symbol lights up. The child safety lock is on and all buttons are locked.
To release the child safety lock, repeat the process. Press button "8" again and then button "6". The child safety lock will be switched off and the child safety lock symbol on the display will go out.
- Units between ^ and F:
First press the Set button "8" and then button "3" on the remote control to switch between Fahrenheit and Celsius. It has a temperature range of 41 - 113 Fahrenheit, or 5 - 45 degrees.
• OPEN WINDOW DETECTION:
- Press the Set button "8" and then button "4" on the remote control to switch open window detection mode on and off. - The symbol "6" will light up on the display.
• Voltage display:
- Press the Set button "8" and then button "9" on the remote control. - The display will show the current voltage for 5 seconds and then return to the start display.
- Display On/Off:
- Press button "9" on the remote control once. The display will show the room temperature for 3 seconds. - Press button "9" twice in quick succession. The heating function symbol "8" will be displayed. - Press button "9" again to exit the display mode.
- Reset Wi-Fi:
On the remote control, press button "8" and then within 5 seconds button "7" to reset the Wi-Fi.
App/Wi-Fi
App download:
Scan the QR code in the manual with your smartphone or enter "Smart Life" into your browser and download the app.

App usage:
- Call up the user interface in the app.
o Press the + icon in the top right corner or press "Add Device"
- Open the "Small Home Appliances" and select "Heater".
○ Select a Wi-Fi network and login.
○ If you have any problems, reset the Wi-Fi (see Starting up and functions 1) and repeat the steps in App Usage.
○ Complete your appliance information and return to the user interface. You can now control the appliance from the control user interface.
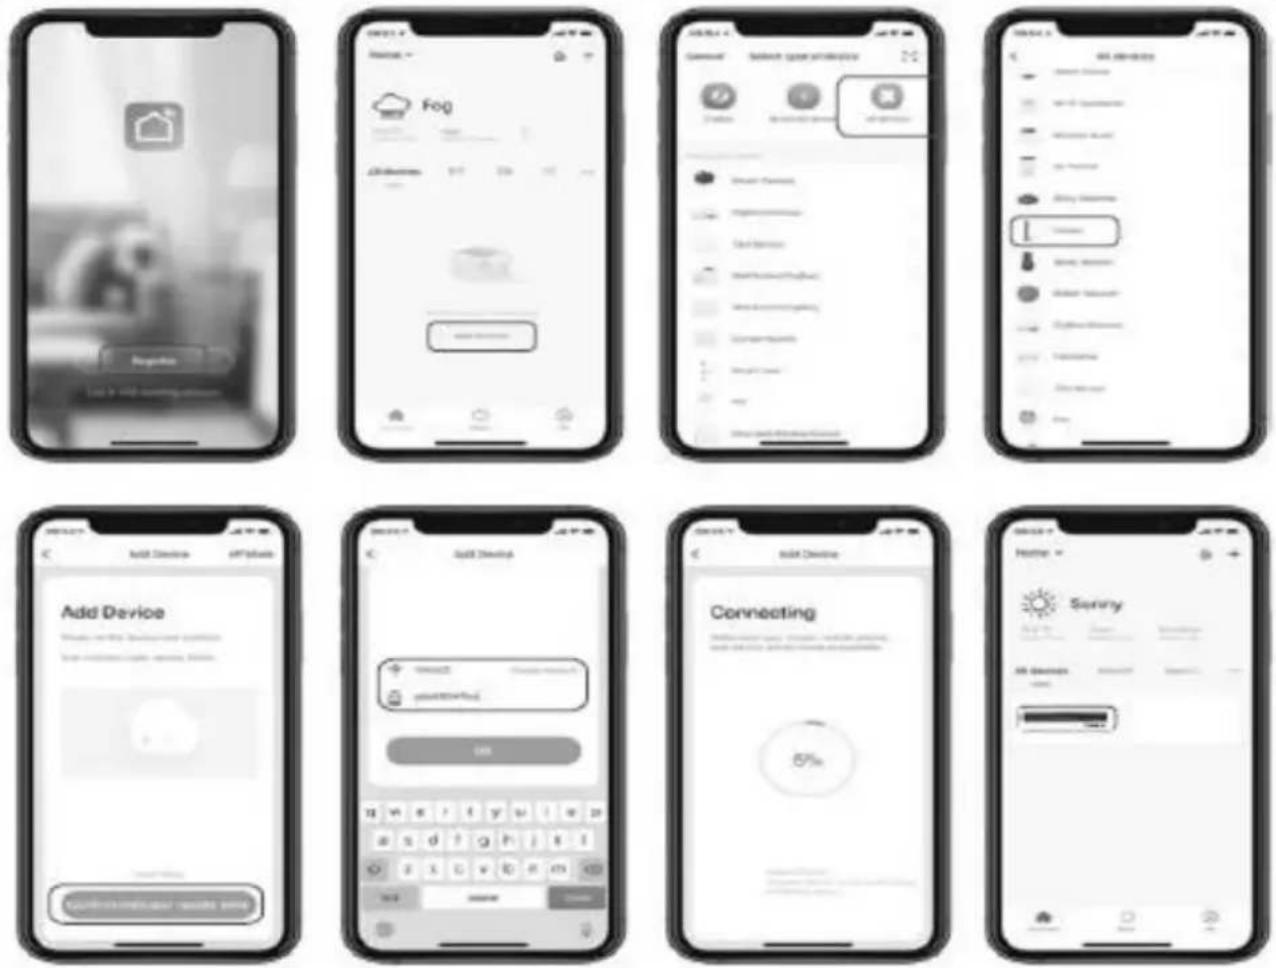
These images are just for reference and may differ from the current, updated version.
ATTENTION
Do not place any objects on the radiant heater such as clothing or towels.
Do not use this appliance in close proximity to bathtubs, showers or other vessels containing water.
When in operation, the housing of the appliance is hot.
Avoid any bodily contact with the appliance while it is on as this may cause severe injuries. Always allow the appliance to cool down before moving it.
Cleaning and maintenance
The exterior of the appliance requires periodic cleaning. Before cleaning, unplug the appliance from the power supply and wait until it has cooled down completely.
- Clean dust from the grilles.
- Clean the appliance with a moderately damp cloth.
- Never use strong or abrasive detergents, scouring pads or steel wool as these will damage the appliance.
When the appliance reaches the end of its useful life, do not dispose of it in the household waste. Instead, it must be taken to a collection point for the recycling of domestic electrical and electronic appliances.
TECHNICAL INFORMATION
| Article number: | SHX51HEAT2022 |
| Input voltage: | 220-240 V |
| Frequency: | 50-60 Hz |
| Rated power consumption: | 2000 W |
| Controllable parameters: | Thermostat 5-45°C |
| Protection class: | IP65 |
| Weight: | 4.6 kg |
| Dimensions: | 820 × 130 × 58 mm |
| Contact address for further information: | Schuss Home Electronic GmbHScheringgasse 3, A-1140 Vienna, AustriaService line: +43 (1) 97 0 21www.schuss-home.at / www.shx.atFB no.: 236974 t / FB court: Vienna |
WARRANTY
By purchasing this SHX quality product, it means you have decided to place trust in durability, reliability and innovation.
For this SHX appliance, we grant a warranty period of 2 years from the date of purchase valid in Austria and Germany!
If, contrary to expectations, service work on your appliance is still necessary during this period, we hereby guarantee either free repairs (spare parts and working time) or (at the discretion of Schuss) that we will replace the product. If it is not possible to either repair or exchange the product for economic reasons, we reserve the right to create a time value credit.
In any case, please contact the customer hotline as a first step (see the operating manual – ‘contact addresses for further information and service line’).
We would like to point out that repair work that has not been performed by authorised contract workshops will immediately terminate the validity of this warranty.
This warranty does not cover:
- Damage due to non-adherence to the operating manual
• Repair or replacement of parts due to normal wear and tear - Appliances that are used commercially, even in part
- Appliances mechanically damaged due to external influence (any fall(s), impact(s), breakage(s), improper use, etc.) as well as signs of wear and tear of an aesthetic nature
• Appliances that have been improperly treated
- Appliances that have not been opened by our authorised service workshop
• Unfulfilled consumer expectations
- Damage caused by force majeure, water, lightning and overvoltage
- Appliances that have had their type designation and/or serial number on the appliance changed, deleted, made illegible or removed
• Defects due to extreme contamination
• Services outside our contract workshops, the transport costs to either an authorised workshop or to us and back, and the associated risks
We would like to expressly point out that a fixed amount of €60 (indexed basis CPI 2015, June 2020) will be charged within the warranty period in the event of operating errors or if no error has been detected.
The provision of a warranty service (repairs or replacement of the appliance) does not extend the absolute warranty period of 2 years from the date of purchase.
The 2-year warranty is only valid upon presentation of the proof of purchase (name and address of the dealer as well as the complete appliance designation must be included) and the corresponding warranty certificate, on which the appliance type and the serial number (on the box and on both the back and underside of the appliance) are to be noted! Without presenting the warranty certificate, only the legal warranty applies!
We would like to expressly point out that the statutory warranty rights are unaffected by this warranty and continue unabated.
A liability for damage on the part of Schuss Home Electronic GmbH and its vicarious agents only exists in the event of gross negligence or intent. In any event, liability for lost profits, expected but not occurred savings, consequential damage and damage arising from claims of third parties is excluded.
The contact address of the relevant service workshop is available on our homepage www.schuss-home.at.
Congratulations on making your choice. We wish you a lot of pleasure with the SHX appliance!
ADDRESS
SHX Vertrieb
Schuss Home Electronic GmbH
A-1140 Vienna (Austria), Scheringgasse 3
Type designation:....
Serial number:
Tel.: +43 (0)1/ 970 21
DECLARATION OF CONFORMITY
Schuss Home Electronic GmbH Scheringgasse 3 – 1140 Vienna – Austria
Declares that the product
Description: Infrared Radiant Heater Model No.: SHX51HEAT2022
complies with following directives, standards and/or regulations:
EMC Directive 2014/30/EU, LVD Directive 2014/35/EU, RED Directive 2014/53/EU, ErP Directive 2009/125/EC Regulation (EC) No. / Regulation (EC) No. EU 206/2012 RoHs Directive 2011/65/EU and (EU) 2015/863
RED Directive 2014/53/EU
Safety:
EN 60335-2-30:2009+A11:2012+A1:2020+A12:2020
EN 60335-1:2012+A11:2014+A13:2017+A1:2019+A2:2019+A14:2019
EN 60335-2-30:2009+A11:2012+A1:2020
EN 60335-1:2012+A11:2014+A13:2017+A1:2019+A2:2019+A14:2019
Health:
EN 62233:2008
EN 62233:2008
EN 62311:2008, EN 50665:2017
EMC:
EN 301 489-1 V2.2.3 (2019-11)
EN 301 489-17 V3.2.4 (2020-09)
EN 55014-1:2017+A11:2020, EN 55014-2:2015
EN IEC 61000-3-2:2019, EN 61000-3-3:2013+A1:2019
Radio:
EN 300 328 V2.2.2 (2019-07)
CE marking on the product:

Declaration reference:
Schuss Home Electronic GmbH
Scheringgasse 3 – 1140 Vienna – Austria
Authorised representative of the manufacturer
Place and date of issue: Vienna, 2022-05-09
NÁVOD K OBSLUZE
natural_image
Close-up of a black cylindrical heating element with visible internal structure and control panel (no text or symbols)SRDEČNĚ BLAHOPŘEJEME!
DĚKUJEME, ŽE JSTE SE ROZHODLI PRO TENTO PRODUKT SPOLEČNOSTI SHX.

OBSAH
CZ
| L(mm) | L1(mm) |
| 820 | 535 |

natural_image
Simple line drawing of a cylindrical object with two protruding pins, labeled 'B' at the bottom (no text or symbols on the object itself)natural_image
Technical line drawing of a cylindrical device with internal components and mounting brackets (no text or symbols)Používání aplikace:
natural_image
Close-up of a black cylindrical heating element with visible internal structure and control panel (no text or symbols)SRDEČNE BLAHOŽELÁME!
ĎAKUJEME, ŽE STE SA ROZHODLI PRE TENTO VÝROBOK OD SHX.

OBSAH
SK
1) Zap-Vyp
2) Časovač
3) Tlačidlo „nahor“
4) Prepínač
5) Smart Heating
6) Detská poistka
7) Tlačidlo „nadol“
8) Tlačidlo nastavenia
9) Tlačidlo displeja
| L(mm) | L1(mm) |
| 820 | 535 |

natural_image
Simple line drawing of a cylindrical object with two protruding pins, labeled 'B' at the bottom (no text or symbols on the object itself)natural_image
Technical line drawing of a cylindrical device with internal structure and mounting brackets (no text or symbols)POZOR
Authorized representative of manufacture
natural_image
Close-up of a black cylindrical heating element with visible internal structure and heat sink (no text or symbols)GRATULACJE!
DZIĘKUJEMY BARDZO ZA WYBRANIE PRODUKTU MARKI SHX.

SPIS TREŚCI
| L(mm) | L1(mm) |
| 820 | 535 |

natural_image
Simple line drawing of a cylindrical object with two protruding pins, labeled 'B' at the bottom (no text or symbols on the object itself)natural_image
Technical illustration of a cylindrical device with internal components and mounting brackets (no text or symbols)Używanie aplikacji:
natural_image
Close-up of a black cylindrical heating element with visible internal structure and control panel (no text or symbols)ISKRENE ČESTITKE!
NAJLEPŠA HVALA, DA STE SE ODLOČILI ZA TA IZDELEK PODJETJA SHX.
KAZALO
SL
| L(mm) | L1(mm) |
| 820 | 535 |

Vzemite gumijaste kapice in vijake iz priložene vrečke. Izvrtajte štiri luknje z globino 60 mm in razmikom 535 mm. Gumijaste kapice vtaknite v luknje in privijte stenski nosilec z vijaki 5*60 (slika A).

natural_image
Simple line drawing of a cylindrical object with two protruding pins, labeled 'B' at the bottom (no text or symbols on the object itself)Iz priložene vrečke vzemite vijake 4 ST4*8 in jih zategnite s križnim izvijačem, da povežete držalo naprave z napravo (slika B).
natural_image
Technical line drawing of a cylindrical device with internal components and mounting brackets (no text or symbols)Iz priložene vrečke vzemite vijake 2 M6*16. Nastavite primeren kot, tako da naravnate stenski nosilec in držalo naprave. Nato privijte vijake skupaj s priloženimi maticami (slika C).
To napravo mora namestiti usposobljen strokovnjak. Prepričajte se, da naprava pred in po namestitvi ni priključena ter da je hladna. Napravo lahko namestite vodoravno ali navpično.
POZOR
Naprava mora biti od površine pod njo oddaljena najmanj 1,8 m.
Uporaba aplikacije:
natural_image
Close-up of a black cylindrical heating element with visible internal structure and control panel (no text or symbols)GRATULÁLUNK!
KÖSZÖNJÜK, HOGY AZ SHX TERMÉKÉT VÁLASZTOTTA.

TARTALOMJEGYZÉK
HU
natural_image
Simple line drawing of a device with a labeled 'SN' and a circular button, no text or symbols present.| L(mm) | L1(mm) |
| 820 | 535 |

natural_image
Simple line drawing of a cylindrical object with two protruding pins, labeled 'B' at the bottom (no text or symbols on the object itself)natural_image
Technical line drawing of a cylindrical device with internal components and mounting brackets (no text or symbols)natural_image
Close-up of a black rectangular heating element with visible internal structure and a small indicator light (no text or symbols)| L(mm) | L1(mm) |
| 820 | 535 |
natural_image
Simple line drawing of a cylindrical object with two protruding pins, labeled 'B' at the bottom (no text or symbols on the object itself)natural_image
Technical line drawing of a cylindrical mechanical component with mounting brackets (no text or symbols)natural_image
Close-up of a black cylindrical heating element with visible internal structure and control panel (no text or symbols)HARTELIJK GEFELICITEERD!
HARTELIJK BEDANKT DAT U VOOR DIT PRODUCT VAN SHX HEBT GEKOZEN.

INHOUDSOPGAVE
| L(mm) | L1(mm) |
| 820 | 535 |

natural_image
Simple line drawing of a cylindrical object with two protruding pins, labeled 'B' at the bottom (no text or symbols on the object itself)natural_image
Technical line drawing of a cylindrical mechanical component with mounting brackets (no text or symbols)App gebruiken:
natural_image
Close-up of a black rectangular electronic device with metallic grating and a circular indicator light (no visible text or symbols)ΣΥΓΧΑΡΗΤΗΡΙΑ!
| L(mm) | L1(mm) |
| 820 | 535 |

natural_image
Simple line drawing of a cylindrical object with two protruding pins, labeled 'B' at the bottom (no text or symbols on the object itself)natural_image
Technical line drawing of a cylindrical mechanical component with mounting brackets (no text or symbols)Χρήση εφαρμογής:
Regulation (EV) No. EE 206/2012
natural_image
Close-up of a black cylindrical heating element with mesh insulation and a small indicator light (no visible text or symbols)GRATTIS!
TACK FÖR ATT DU HAR BESTÄMT DIG FÖR DEN HÄR PRODUKTEN FRÅN SHX.
INNEHÅLLSFÖRTECKNING
SE
| L(mm) | L1(mm) |
| 820 | 535 |

natural_image
Simple line drawing of a cylindrical object with two protruding pins, labeled 'B' at the bottom (no text or symbols on the object itself)natural_image
Technical line drawing of a cylindrical mechanical component with mounting brackets (no text or symbols)• Smart-heating-tillval:
App användning:
natural_image
Close-up of a black cylindrical heating element with mesh insulation and heat sink (no visible text or symbols)ONNEKSI OLKOON!
KIITOS, ETTÄ VALITSIT TÄMÄN SHX:N TUOTTEEN.
SISÄLLYSLUETTELO
FI
1) Virtakytkin
2) Ajastin
3) Ylöspainike
4) Kytkin
5) Smart-Heating
6) Lapsilukko
7) Alaspainike
8) Asetuspainike
9) Näyttöpainike
| L(mm) | L1(mm) |
| 820 | 535 |

natural_image
Simple line drawing of a cylindrical object with two protruding pins, labeled 'B' at the bottom (no text or symbols on the object itself)natural_image
Technical line drawing of a cylindrical device with internal components and mounting brackets (no text or symbols)Sovelluksen käyttö:
Authorized representative of manufacture
natural_image
Close-up of a black cylindrical device with internal grid structure and a labeled button (no readable text or symbols)ҚҮТТЫҚТАЙМЫН!
natural_image
Line drawing of a device with a circular component and a plus sign, no text or symbols present| L(mm) | L1(mm) |
| 820 | 535 |

natural_image
Simple line drawing of a cylindrical object with two protruding pins, labeled 'B' at the bottom (no text or symbols on the object itself)natural_image
Technical line drawing of a cylindrical mechanical component with mounting brackets (no text or symbols)natural_image
Close-up of a black cylindrical heating element with mesh insulation and a small indicator light (no visible text or symbols)ČESTITAMO!
HVALA ŠTO STE SE ODLUČILI ZA OVAJ PROIZVOD MARKE SHX.

SADRŽAJ
BAHR
1) Uključivanje/isključivanje
2) Timer
3) Tipka sa strelicom prema gore
4) Sklopka
5) Pametno grijanje
6) Zaštita za djecu
7) Tipka sa strelicom prema dolje
8) Tipka za postavljanje
9) Tipka za zaslon
| L(mm) | L1(mm) |
| 820 | 535 |

Izvadite gumeni čepić i vijke iz priložene vrećice. Izbušite četiri otvora dubine od 60 mm i s razmakom od 535 mm.
Umetnite gumeni čepić u otvore i vijčano pričvrstite zidni držač s pomoću 5*60 vijaka (Slika A).
natural_image
Simple line drawing of a cylindrical object with two protruding pins, labeled 'B' at the bottom (no text or symbols on the object itself)natural_image
Technical line drawing of a cylindrical device with internal components and mounting brackets (no text or symbols)Izvadite 2 M6*16 vijka iz priložene vrećice. Namjestite odgovarajući kut tako što ćete usmjeriti zidni držač i držač uređaja. Zatim zategnite vijke priloženim maticama (Slika C).
Oznaka CE na proizvodu / CE marking on the product:
Uputa na deklaraciju:
Schuss Home Electronic GmbH
Scheringgasse 3 – 1140 Beč – Austrija
natural_image
Close-up of a black cylindrical heating element with visible internal structure and heat sink (no text or symbols)FELICITĂRI!
VĂ MULȚUMIM CĂ AȚI DECIS SĂ ACHIZIȚIONAȚI ACEST PRODUSUL DE LA SHX.

CUPRINS
flowchart
graph LR
    A["Rectangular Device"] --> B["Arrow to next panel"]
    B --> C["Circular component with internal components"]
    C --> D["Rectangular Device with two parts and one end"]
    D --> E["+ -"]
| L(mm) | L1(mm) |
| 820 | 535 |

natural_image
Simple line drawing of a cylindrical object with two protruding pins, labeled 'B' at the bottom (no text or symbols on the object itself)natural_image
Technical illustration of a cylindrical device with internal structure and mounting brackets (no text or symbols)Utilizarea aplicatiei:
Regulation (EV) No. UE 206/2012
Directiva-RoHs 2011/65/UE & (UE) 2015/863
Directiva privind echipamentele radio 2012/53/UE
Securitate:
EN 60335-2-30:2009+A11:2012+A1:2020+A12:2020
EN 60335-1:2012+A11:2014+A13:2017+A1:2019+A2:2019+A14:2019
EN 60335-2-30:2009+A11:2012+A1:2020
EN 60335-1:2012+A11:2014+A13:2017+A1:2019+A2:2019+A14:2019
Sănătate:
EN 62233:2008
EN 62233:2008
EN 62311:2008, EN 50665:2017
CEM:
EN 301 489-1 V2.2.3(2019-11)
EN 301 489-17 V3.2.4(2020-09)
EN 55014-1:2017+A11:2020, EN 55014-2:2015
EN IEC 61000-3-2:2019, EN 61000-3-3:2013+A1:2019
Radio:
EN 300 328 V2.2.2 (2019-07)
Marcaj CE pe produs / CE marking on the product:

Authorized representative of manufacture