Century - Turntable Prixton - Free user manual and instructions
Find the device manual for free Century Prixton in PDF.

User questions about Century Prixton
0 question about this device. Answer the ones you know or ask your own.
Ask a new question about this device
Download the instructions for your Turntable in PDF format for free! Find your manual Century - Prixton and take your electronic device back in hand. On this page are published all the documents necessary for the use of your device. Century by Prixton.
USER MANUAL Century Prixton
natural_image
Illustration of a vintage television set with a speedometer and two cars, no text or symbols present.text_image
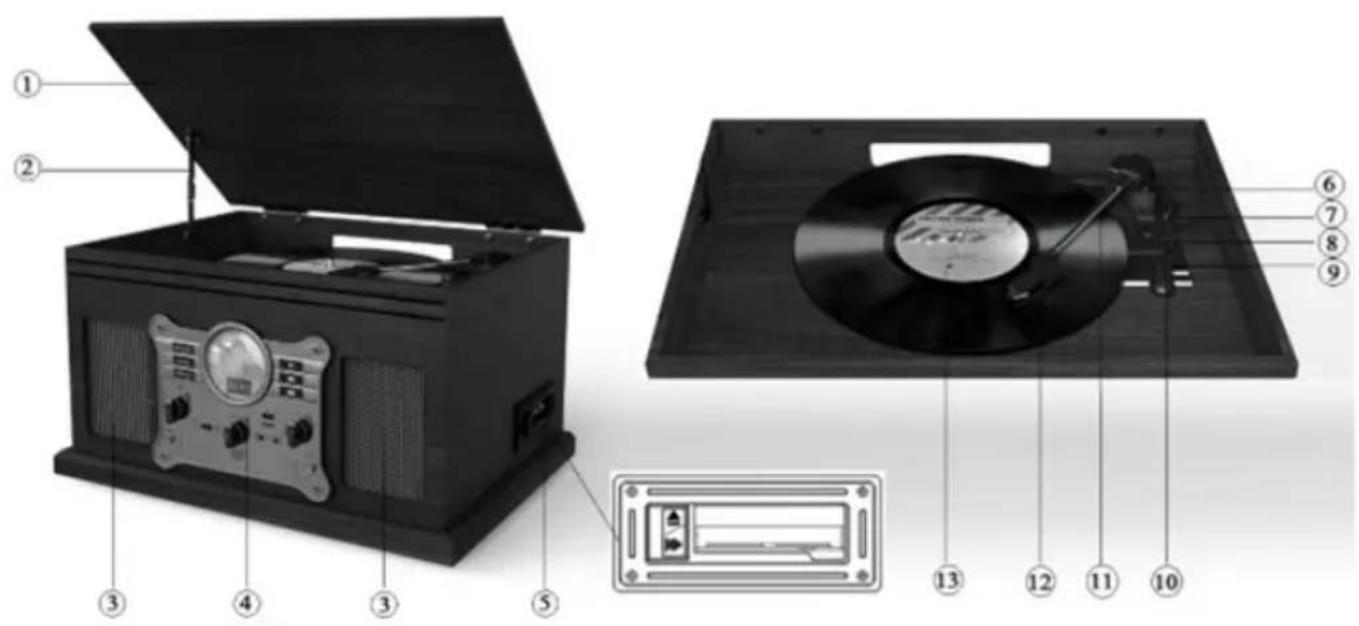
Diagram of a vintage portable radio with labeled parts including open box, CD, and display case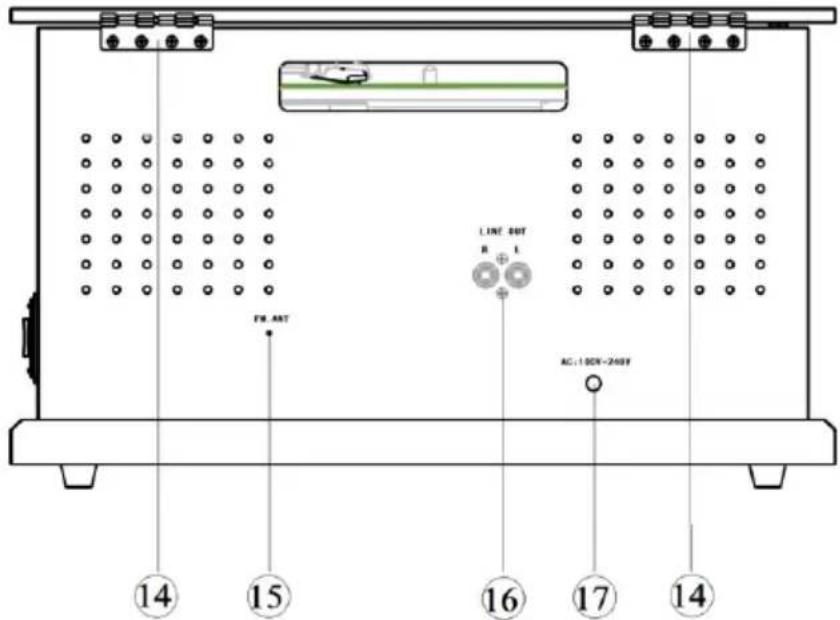
text_image
14 15 16 17 14 FW ART LINE OUT B L AC: 100K~240Ktext_image
Labeled diagram of an electronic device control panel with numbered components and function buttonsInsert your USB disk or TF card until "USB" or "TF" appear on the screen, USB or TF music will begin automatically.
USB disk or TF card on device but under the other modes, long press mode switch key [■/USB/TF/BT] 2 seconds to select USB or TF mode.
Long press and hold 2 seconds DEL key and short press again to delete the current USB/TF music.
Grabación en USB/TF
GENERAL SAFETY INSTRUCTIONS
Read this manual thoroughly before first use and keep it in a safe place for future reference, along with the completed warranty card, purchase receipt and carton. The safety precautions enclosed herein reduce the risk of fire, electric shock and injury when correctly adhered to.
Electrical safety and cord handling
- To prevent contact with high voltage components inside, do not attempt to open the equipment.
- Before installing this equipment, make sure your outlet voltage corresponds to the voltage stated on the appliance rating label.
- When connecting the equipment, align the plug properly and insert it fully to prevent electric shock.
- Only use this equipment with the cord and plug supplied, and do not overload the power outlet.
- If the power cord is damaged, do not use the equipment. The cord must be replaced by the manufacturer or similarly qualified personnel to avoid a hazard. Contact the after-sales support line for advice.
Usage conditions and restrictions
To reduce the risk of fire or electric shock, do not expose this equipment, the cord or plug to rain or moisture; do not use it anywhere near water or where water splashes or drips; do not touch the plug with wet hands. In the event of water or other liquids entering the device, unplug it immediately and clean and dry it as best as possible. Then have it checked for damage by a qualified technician, or contact the after-sales support line.
- Do not repair the unit yourself. Only have it serviced by qualified personnel. Contact the after-sales support line for advice.
- Unplug the unit from the power outlet after use to avoid possible damage during electrical storms, or when the equipment will be unattended or unused for an extended period.
- Do not let the cord hang over the edge of a table or counter, or touch any hot surface. Do not allow anything to rest on or roll over the power cord, and run any cords so that no one steps on or trips over them.
- Do not run the cord near heat-producing appliances such as radiators, stoves or irons. Excessive heat could melt insulation and expose live wires.
- Always grasp the plug, not the cord, when disconnecting the unit. Pulling the cord can damage the internal wires and may cause a fire.
- Avoid placing the unit in direct sunlight or close to any sources of heat. Also avoid locations subject to vibrations and excessive dust, heat, cold or moisture.
- Do not install the unit in an inclined position. It is designed to be operated in a horizontal position only.
- Openings on the cabinet are provided for ventilation and to protect the unit from overheating. To ensure proper operation, do not cover them with things such as newspapers, tablecloths, curtains etc.
- Do not place heavy objects on top of the equipment or step on it.
- Do not place objects filled with water (such as vases) or any naked flame sources (such as lit candles, incense sticks or cigarettes) on top of the unit.
• The equipment is not intended for use by persons (including children) with reduced physical, sensory or mental capabilities, or lack of experience and knowledge, unless they have been given supervision or instruction concerning use of the equipment by a person responsible for their safety.
- Young children should be supervised to ensure they do not play with the equipment. Close supervision is always necessary when an appliance is used by or near children.
- Unplug the unit from the power outlet before cleaning. Clean the unit only with a dry, clean cloth. Do not use liquid or aerosol cleaners.
- During playback, the disc rotates at high speeds. Do not move or lift the unit during playback as this may damage the unit and the disc.
- When moving the unit to a different location or packing the unit away, be sure to remove the record or disc. Moving the unit with a disc or record inside may cause damage to the unit.
• We assume no liability for any damage caused by noncompliance with these instructions or any other improper use or mishandling of the Equipment.
PRODUCT INSTRUCTION
text_image
Diagram of a vintage portable radio with labeled parts including an open box, CD, and control panel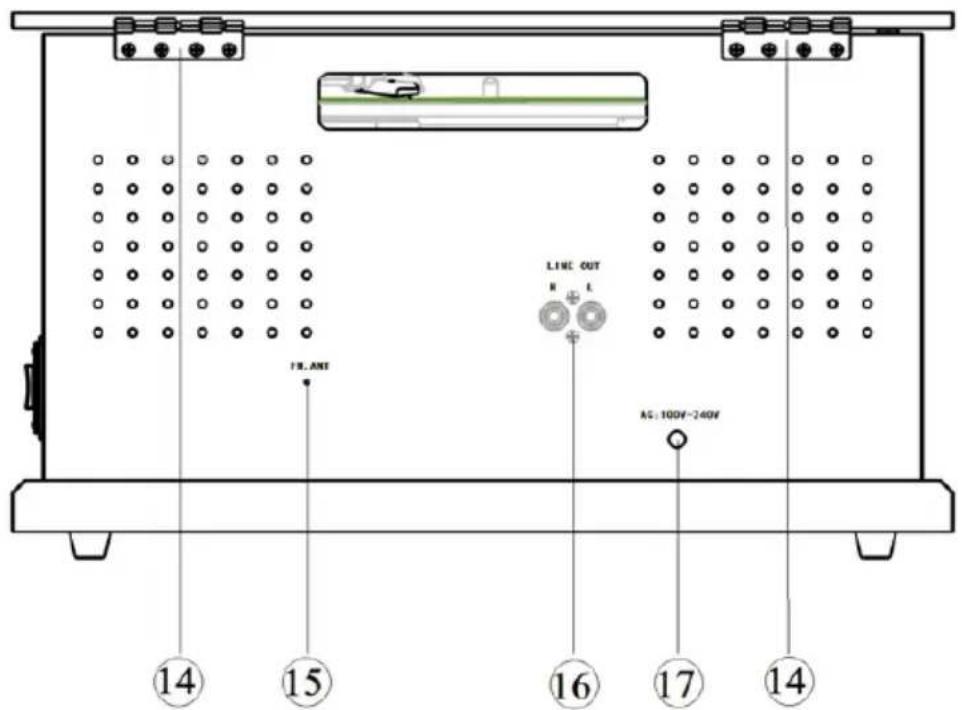
text_image
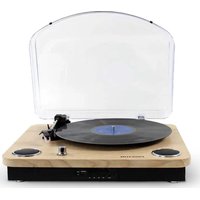
LINE OUT H L 14 15 16 17 14 AG: 100V~240V(1). Dust Cover
(2). Support frame
(3).Speakers
(4). Control panel
(5). Cassette tray and operation button: Eject/Fast Forward cassette.
(6). 45 RMP adaptor
(7). Arm lifter
(8). 33/45/78 Speed switch
(9). Auto stop ON/OFF switch
(10). Tone arm lock
(11). Tone arm
(12). Cartridge
(13). Turntable platter
(14). Hinges
(15). FM Antenna
(16). RCA output
(17). AC Power Cable
text_image
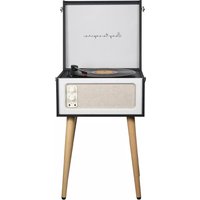
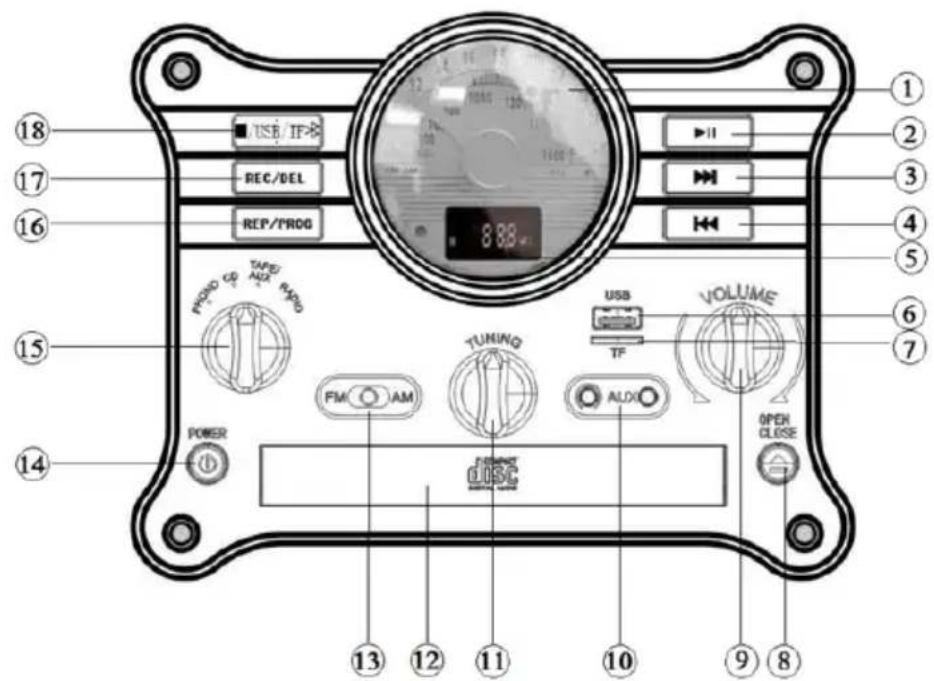
18 17 16 15 14 POWER 13 12 11 10 9 8 USB/IF- REC/DEL REP/PROG TAPID/NOX RADI FM AM TUNING ALOX USB TF VOLUME OPEN CLOSE1-Display Panel
2-Pause and Play switch key (Short press Pause/Play music under the CD/USB/TF/BT mode; Long press and hold 6 seconds to pair the Bluetooth device)
3-Next music or Fast forward (Short press to select next song under the CD/BT/USB/TF mode; Long press for fast forward song under the CD mode)
4-Previous song or Fast reverse (Short press to select previous song under the CD/BT/USB/TF mode; Long press for fast reverse song under the CD mode)
5-Digital LED display
6-USB slot
7-TF card slot
8-OPEN/CLOSE CD Tray under the CD mode
9-Volume knob
10-3.5mm AUX-IN and earphone jacks
11-Tuning knob: Tuning the radio station under the Radio mode
12-Compact Disc Tray
13-FM/AM band selection key under the RADIO mode.
14-Power ON/OFF key
15-Function switch knob (Rotate the knob to select Phono/CD/TAPE/AUX/RADIO mode)
16-Repeat/Program key (Short press to switch the single repeat/folder repeat/entire CD repeat under the CD/USB/TF mode)
17-Record/Delete (Short press start recording from CD/Phono/Radio/BT/TAPE/AUX; Long press and hold 2 second to delete the current USB/TF music)
18-Stop/USB/TF/BT mode selection key (Short press to stop playback under the CD/USB/TF mode; Short press to stop the record when record the music, Long press to select USB/TF/BT/CD mode)
Operation
- SET-UP: Place your record player in a secure location where it will be protected from the elements or possible falls.
- POWER CONNECTION: Plug in the record player and make sure your outlet voltage corresponds to the voltage stated on the appliance rating label. (Remark: Please unplug the AC power supply plug If it is not used for a long time.)
- TURN ON: Turn on the Power ON/OFF key and adjust the volume to an appropriate level by Volume knob.
- PHONO MODE: Turn the Function switch knob to the PHONO position.
- INSERT THE VINYL RECORD (Not include): Carefully remove the vinyl record from its case and place the record on the turntable plate.
- SPEED SELECTION: Select the speed between 33, 45 and 78 rpm through speed switch according to the speed of vinyl record. When playing a 45 RPM vinyl record, use the included 45 RMP adaptor.
- MOVE THE NEEDLE: Take off the protector of needle, release the tone arm lock and lift up the tone arm by arm lifter, slowly and gently move the needle over the record, put it on the outermost part or the desired position of the vinyl record.
- DROP THE NEEDLE: Use the lifter lever put down Tone Arm slowly on the outermost part or desired position on the vinyl record.
- ENJOY YOUR MUSIC: Once above steps are completed, then the vinyl record will play music. (the turntable will stop automatically if the auto-stop switch is in the ON position when the needle has reached the end of the vinyl record. If the switch is in the OFF position then it will keep revolving until the tone arm is moved.)
● FINISHING UP: Lift up the tone arm and put it back and lock it once finished, put on the protector of needle, turn off the Power Switch.
Connecting to an external sound system
Connect an RCA audio cable (not supplied) to the AUDIO LINE OUT sockets on the rear of the turntable.
Connect the other end of the cable to an AUDIO INPUT on the amplifier.
● Red plug into R channel output.
● White plug into L channel output.
CD/MP3 Playback
Turn the Function switch knob to the CD position until "CD" appears on the screen.
- Short press OPEN/CLOSE button to open the tray, then “OP” will appears on the screen. Place a disc on the tray correctly. (Remark: Do not place more than one disc in the tray at a time and do not force the tray by hand when it is opening and closing. The disc must be placed in the centre of the disc tray. If the disc is not properly inserted, it may not be possible to get the disc out once it has closed.)
- Short press OPEN/CLOSE button to close the tray, the "CL" will appears on the screen. After that the system will read TOC and start playback in sequence automatically. The screen will display current playing progress.(Remark: No disc load, then "NO" will appear on the screen; Unrecognized disks will appear "ERR" on the screen).
- Press the PLAY/PAUSE button [▶Ⅱ] during playback, the playback will stop at the current position. To resume playback, press the PLAY/PAUSE button [▶Ⅱ] again.
-
Press the Stop button [■] during playback, the device will stop to playback. Press the PLAY/PAUSE button [▶II] again, it will restart playing from the first track.
-
While CD playback, short press NEXT key [▶] to select and play next song; Press and hold down NEXT key [▶] for fast forward the current song.
- Press the PLAY/PAUSE button [▶II] during playback, the playback will stop at the current position. To resume playback, press the PLAY/PAUSE button [▶II] again.
- Press the Stop button [■] during playback, the device will stop to playback. Press the PLAY/PAUSE button [▶II] again, it will restart playing from the first track.
- While CD playback, short press NEXT key [▶] to select and play next song; Press and hold down NEXT key [▶] for fast forward the current song.
- While MP3 playback, press and hold NEXT key [▶] 2 seconds for select and play next folder.
- While CD playback, short press PREVIOUS key[◀] to select and play previous song; Press and hold down PREVIOUS key [◀] for fast reverse the current song.
- While MP3 playback, press and hold PREVIOUS key [◀] 2 seconds for select and play previous folder.
- While CD playback, Press REP key twice to repeat playback current song, the screen will alternate display 2 seconds "ONE" and will display the time of current track. Short press REP key again to repeat playback all songs, the screen will alternate display 2 seconds "ALL" and will display for the time of current track.
- While MP3 playback, short press REP key to repeat playback folder, the screen will alternate display 2 seconds“FOLD” and will display for the time of current track.
Program Playback
Under the CD mode in stop, setting the program playback based on below steps if never setting before.
- Short press the PROG key until P 01 flashing on the screen.
- Press NEXT key [▶] or PREVIOUS key[◀] to select your favorite track number as the first programs song and press PROG to confirm.
- Use the same step to set second and more programs songs until P X2/3/4... appear on screen. (Remark: The maximum number of programs playback setting is 20 songs)
- Press the PLAY/PAUSE button [▶II] to start playback program songs in sequence automatically after finished setting.
- Press the PLAY/PAUSE button [▶II] to play or pause the current song.
- Press NEXT key [▶] or PREVIOUS key[◀] to switch the songs during playback.
Exit Program Playback
Press the Stop button [■] during playback, the device will stop to playback.
Press the Stop button [■] again, the device exit the program playback.
Clear Program Playback Settings
Short press OPEN/CLOSE button to open the CD tray.
Short press Power ON/OFF key to turn off the device.
USB/TF function
Turn the Function switch knob to the CD position, long press mode switch key [■ /USB/T-F/BT] to select USB/TF mode.
Insert your USB disk or TF card until "USB" or "TF" appear on the screen, USB or TF music will begin automatically.
USB disk or TF card on device but under the other modes, long press mode switch key [■/USB/TF/BT] 2 seconds to select USB or TF mode.
Long press and hold 2 seconds DEL key and short press again to delete the current USB/TF music.
USB/TF recording
The device can directly record from Vinyl record/Cassette/CD/BT/AUX and convert songs to digital format by USB or TF card.
Insert the USB disk or TF card.
Enter into PHONO/Cassette/CD/BT/AUX mode and play the music you want to record. (Remark: Please make sure the AUX cable not connect when you want to record the music from Cassette)
Press the REC key until "REC" appear on the screen. The record start while the "REC" is flashing after several seconds.
Press the stop button [ ■ ] to stop the record, END will appear on the screen. The music will save on USB disk or TF card.
Press the stop button [■] until "ONE" appear on the screen and press this button again to stop the record under the CD mode.
Bluetooth function
Turn the Function switch knob to the CD position.
Long press mode switch key [■ /USB/TF/BT] to select BT mode until “▶” icon light up and “BT” is flashing on the screen.
Make sure the available Bluetooth device into "pairing mode". Choose and click the correct Bluetooth name to connect.
You will be heard the Connected once connect successful. Then the music can be playback via Bluetooth.
Connect back to the available Bluetooth device
The connected Bluetooth device will connect back automatically when you back to the workable area under the BT mode.
Long press the PLAY/PAUSE button [▶II] 6 seconds the current connected Bluetooth device will disconnect. Long press the PLAY/PAUSE button [▶II] 6 seconds again, it will connect back if no pairing update.
FM/AM function
Turn the Function knob to the RADIO position.
Toggle [FM/AM] wave changing switch to select FM or AM radio.
Left/ Right rotate the TUNING knob to tune the radio station.
Extend and move the FM antenna to obtain the best reception.
Turn the Function knob to AUX/TAPE position
Insert the cassette into the cassette slot correctly
Push the cassette slightly, it will slide into place and begin playback automatically.
Push the [Cassette eject/ Fast forward] button will fast forward the cassette. To resume normal playback, push the button again.
Push the [Cassette eject/ Fast forward] button to the bottom, playback will stop and the cassette will eject.
Insert one end of the 3.5mm AUX-IN cable (not supplied) into the 3.5mm AUX-IN Jack on the front panel of the device and the other end to insert your audio available device's (Such as: CD player, Tablet, MP3 player etc.)
Remark: Cassette playback will stop when AUX-IN cable insert the device.
Headphone function
Plug in your 3.5mm headphone jack to the headphone socket.
MAINTENANCE
REPLACING THE STYLUS NEEDLE
Push back the arm lock to release the tone arm.
Unclip and remove the stylus needle from the cartridge then replace with a new one.
INSTALLING A NEW STYLUS CARTRIDGE
Note: Please exercise extreme care whilst performing this operation so as to avoid the tone arm and audio line wires from any damage.
Gently unclip the cartridge from the tone arm.
Gently pull out the audio wires attached to the cartridge.
Replace with a new cartridge, please ensure audio wires are fitted securely then clip back on to the tone arm.
NOTES
We advise you to clean your records with an anti-static cloth to gain maximum enjoyment from them and to make them last.
We would also point out that for the same reason your stylus should be replaced periodically (approximately every 250 hours) Dust the stylus from time to time using a very soft brush dipped in alcohol. (Brushing from back to front of the cartridge)
WHEN TRANSPORTING YOUR RECORD PLAYER DO NOT FORGET TO
Replace the protective cap on the stylus.
Put the rest clip into the pick-up arm.
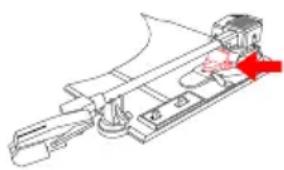
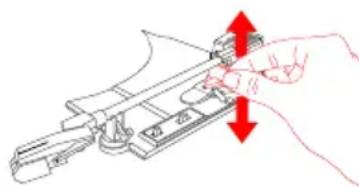
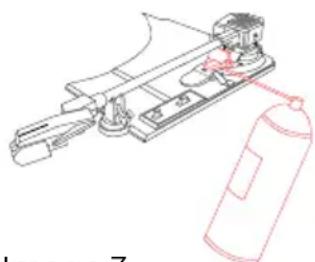
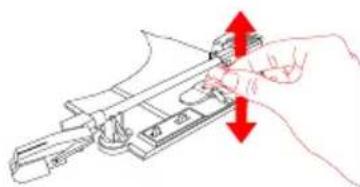
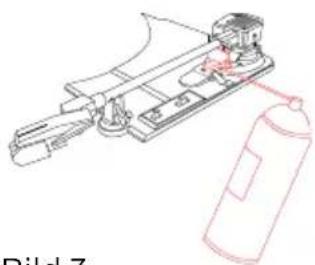
As shown in image 1, the indicated part must be properly lubricated internally to allow the arm to make a slow descent from the moment the lever is actuated. If this descent is too slow, it could cause that in the first moments of contact of the needle with the disc, the music reading does not sound as it should and could cause the needle to jump until the arm has completed the descent completely. To solve this problem, with the lever lowered, manually raise and lower (image 2) the indicated part several times. This will allow the internal lubricant to be distributed and the lowering speed of the arm to be corrected. If after this operation this problem persists, you can apply very gently a very small amount of multipurpose lubricant spray in the indicated area (image 3).
natural_image
Technical line drawing of a mechanical assembly with no visible text or symbolsImage 1
natural_image
Line drawing of a hand operating a mechanical device with red arrows indicating direction (no text or symbols)Image 2
natural_image
Technical line drawing of a mechanical device with a gas cylinder and housing (no text or symbols)Image 3
Warranty policy
This product complies with the warranty law in force in the country of purchase. When you have a problem that you can not solve, you must access the web www.prixton.com and click on the contact option to send us your assistance form.
These technical and electrical specifications are those of typical units and may be changed without prior notice in order to provide improved equipment.
Simplified EU Declaration Of Conformity
We, La Trastienda Digital located in Avenida Cervantes 49, módulo 25, Basauri 48970, Bizkaia hereby declare that the following goods, imported and selling at European market:
| BRAND | MODEL NAME DESCRIPTION | CATEGORY |
| Prixton CENTURY | Record Player | Audio |
Are in compliance with the EC Council Directive of 2014/53/EU (EM DIRECTIVE) and harmonized standards and with the board of the 16th of April 2014.
The complete text of the UE Declaration of conformity is available anytime at this website address:
www.prixton.com LA TRASTIENDA DIGITAL
INSTRUCTIONS D'UTILISATION

text_image
Diagram of a portable vinyl record with labeled parts including open case, CD, and display panel
text_image
LINE OUT R L FM ART AC, 100V-240V ⑭ ⑮ ⑯ ⑰ ⑱ ⑲ ⑳ ⑴ ⑵ ⑶ ⑷ ⑩text_image
USB/TF REQ/DEL REP/PROG 8.88 mm Tuning FM ○ AM AUDIO VOLUME USB TF POWER dsc OPEN CLOSE 13 12 11 10 9 8text_image
Diagram of a portable electronic device with labeled parts including an open top, CD, and front panel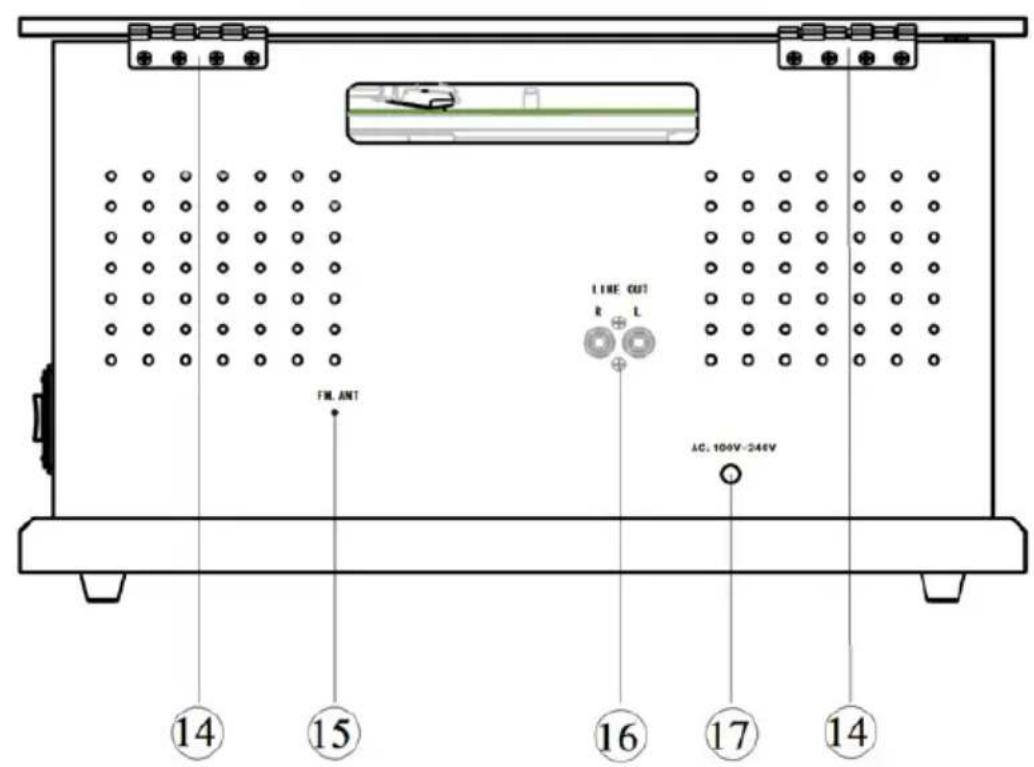
text_image
FML ANT LINE OUT R L AC 100V-244V ⑭ ⑮ ⑯ ⑰ ⑱ ⑲ ⑳ ⑴text_image
Labeled diagram of an electronic device control panel with numbered components and function buttonstext_image
Image 1 Image 2 Image 3text_image
Diagram of a vintage portable radio with labeled parts including an open top, CD, and control panel
text_image
TML ANT LINE OUT E L AG: 100V~244V ⑭ ⑮ ⑯ ⑰ ⑱ ⑲ ⑭ ⑮ ⑯ ① ⑰ ⑱text_image
Diagram of a vintage portable radio with labeled parts including open box, CD, and display case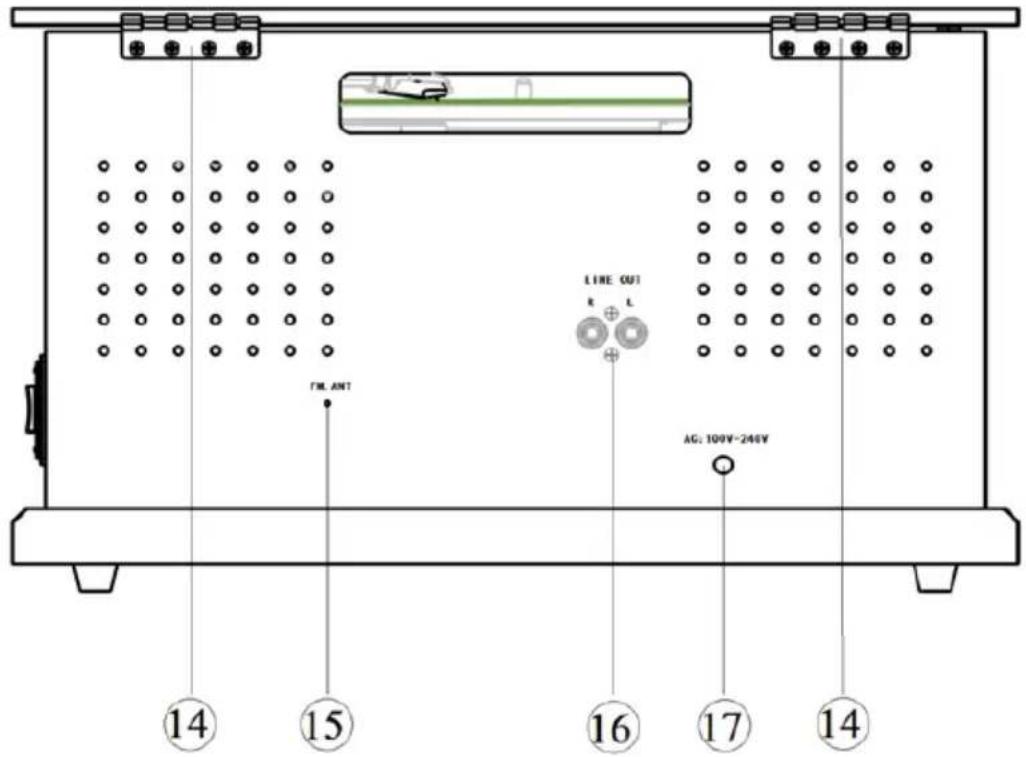
text_image
TML ANT LINE OUT R L AG: 100V-246V 14 15 16 17 14text_image
Diagram of a vintage portable radio with labeled parts including an open box, CD, and display case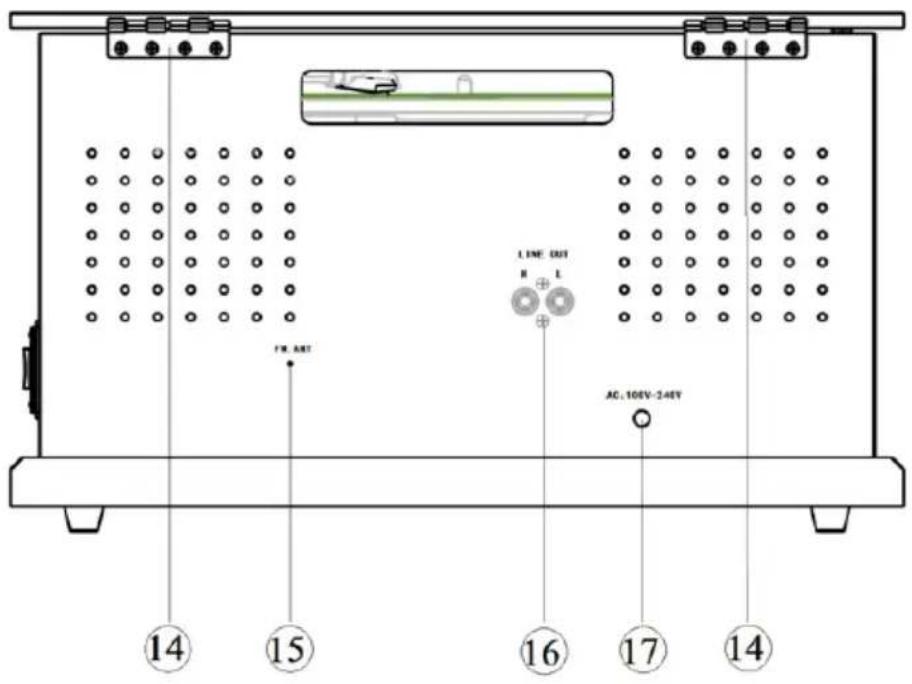
text_image
14 15 16 17 14 LINE OUT R L AC: 10EV-24EVnatural_image
Technical line drawing of a mechanical assembly with no visible text or symbolsBild 1
natural_image
Line drawing of a hand using a tool to adjust or install a mechanical component (no text or symbols present)Bild 2
natural_image
Technical line drawing of a mechanical assembly with a spray can (no text or symbols)Bild 3