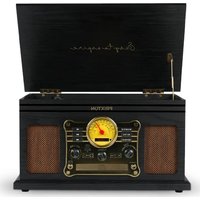
Marconi - Turntable Prixton - Free user manual and instructions
Find the device manual for free Marconi Prixton in PDF.

User questions about Marconi Prixton
0 question about this device. Answer the ones you know or ask your own.
Ask a new question about this device
Download the instructions for your Turntable in PDF format for free! Find your manual Marconi - Prixton and take your electronic device back in hand. On this page are published all the documents necessary for the use of your device. Marconi by Prixton.
USER MANUAL Marconi Prixton
natural_image
Line drawing of a vintage CD or DVD stand with open lid and base (no text or symbols)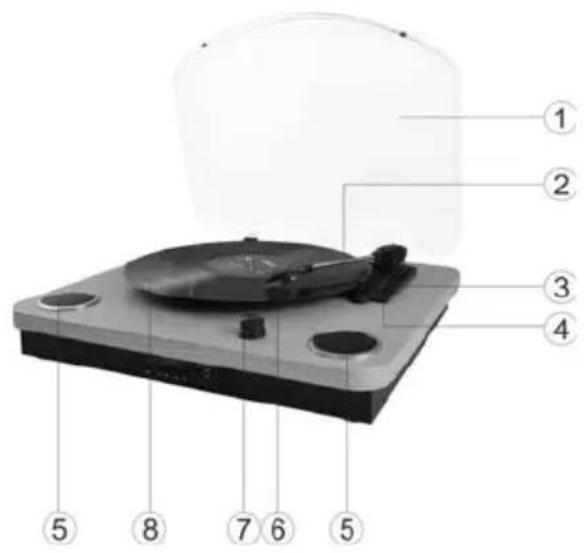
text_image
Labeled diagram of a CD or DVD disc with numbered parts for identificationtext_image
Diagram showing a device with labeled ports and directional arrows, likely illustrating a process or assembly step.text_image
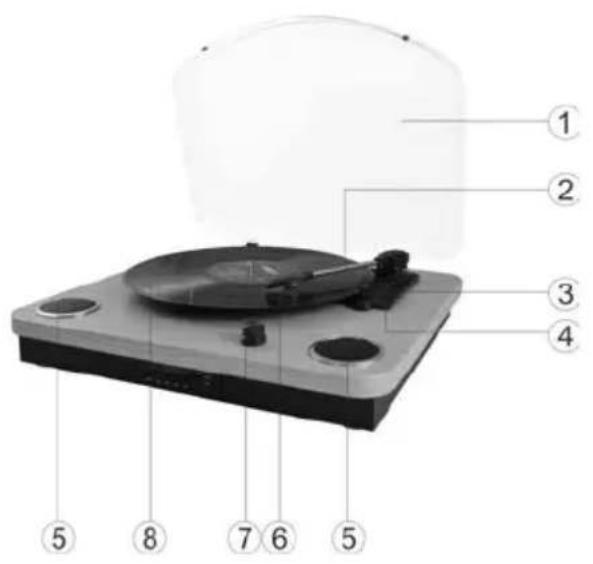
Labeled diagram of a CD or DVD disc with numbered parts for identification- Dust Cover
- Tone arm
- Speed switch
- Auto stop ON/OFF switch
- Speakers
- Cartridge
- Power switch/Volume control
- Turntable plate
text_image
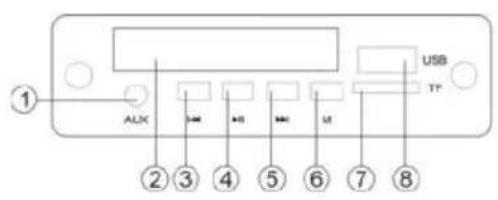
① ALIX USB TP ② ③ ④ ⑤ ⑥ ⑦ ⑧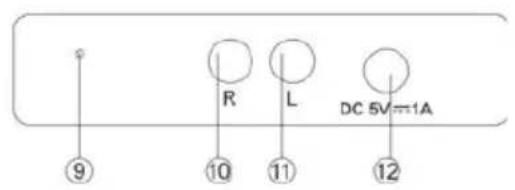
text_image
⑨ R L DC 5V=π1A ⑩ ⑪ ⑫ ⑫- Aux line in jack
- Digital LED display
- Previous music or FM program switch
- Pause and Play switch/DEL button
- Next music or FM program switch
- Play modes select key/ Record button
- TF card slot
- USB slot
- FM antenna
- Output Right channel jack
- Output Left channel jack
- DC power jack
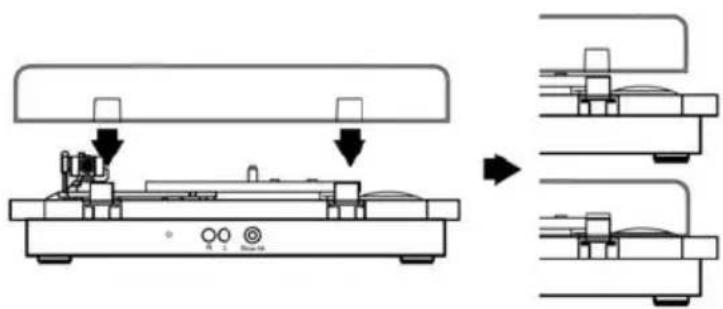
Fitting the dust cover
Refer to the diagram below to attached the plastic dust cover.
Take care when fitting, and do not press down to hard . Remove the dust cover in thesame manner, but pull the cover upwards.
text_image
Diagram showing a device with labeled ports and directional arrows, likely illustrating a process or assembly step.Set-up : Place your turntable in a secure location where it will be protected from the elements or possible falls.
Power connection: Connect the power by 5V DC adaptar.
Lift the dust cover: Lift the dust cover and keep it open when in use.
Turn on: Turn on the Power Switch, note that this also controls volume.
Speed selection: Select the speed between 33, 45 and 78 rpm through speed switch.
Insert the record: Carefully remove the record from its case and place the record on the turntable plate.
Move the needle: Release the tone arm lock, slowly and gently move the needle over the record, placing it on the outermost part of the record.
Drop the needle: Once the needle is over the record, use the small lever on the base of the needle and press down to lower it onto the record.
Enjoy your music: Once above steps are completed, press the "Play mode" select key the turntable will start turning automatically.
Finishing up: Lift up the tone arm and put it on the rest when finished, turn off the Power Switch. (the turntable will stop automatically if the auto-stop switch is in the ON position. If the switch is in the OFF position then it will keep revolving until the tone arm is moved.)
Connecting to an external sound system: Connect an RCA audio cable (not supplied) to the AUDIO LINE OUT sockets on the rear of the turntable. Connect the other end of the cable to an AUDIO INPUT on the amplifier. Red plug into R channel output. White plug into L channel output.
USB/TF function: (lift up the tone arm and put it on the rest) Insert your USB disk or TF card. Wait for few second, USB or TF music will begin. Under this function, other functions will stop automatically.
USB/TF recording: Insert the TF card or USB stick and hold down the "M" key until "REC" appears on the screen, then press the "PLAY/PAUSE" key to start recording. To stop recording press the "M" button.
Bluetooth transmitter function: Press the "M" button twice to enter into Bluetooth transmitter function. Make other Bluetooth speaker in BT mode. Devise and other BT speaker will pair automatically. There four audio sources can be transmitted, USB/TF/AUX IN/PHONO.
Note:
When you want to play your vinyl through an external bluetooth speaker, please note that it does not allow for device selection. Therefore, make sure that all surrounding Bluetooth devices are turned off and only the one you want to connect to is turned on. After the first connection, the turntable will automatically connect to the previously connected speaker the next few times.
FM function: (Lift up the tone arm and put it on the rest) Press "M" key to select FM mode.
Clear recorder music: When you want to clear the recorder music, press and hold the "PLAY/PAUSE" button till display"DEL" and click the "PLAY/PAUSE" button once again to confirm, the currently playing music will be removed.
Aux in function: (Lift up the tone arm and put it on the rest) Insert Aux in cable (Please note other functions will not work while cable is inserted).
Replacing the stylus needle: Push back the arm lock to release the tone arm. Unclip and remove the stylus needle from the cartridge then replace with a new one.
Installing a new stylus cartridge: Note: Please exercise extreme care whilst performing this operation so as to avoid the tone arm and audio line wires from any damage.
Gently unclip the cartridge from the tone arm. Gently pull out the audio wires attached to the cartridge. Replace with a new cartridge, please ensure audio wires are fitted securely then clip back on to the tone arm.
We advise you to clean your records with an anti-static cloth to gain maximum enjoyment from them and to make them last.
We would also point out that for the same reason your stylus should be replaced periodically (approximately every 250 hours) Dust the stylus from time to time using a very soft brush dipped in alcohol. (Brushing from back to front of the cartridge)
When transporting your record player do not forget to
Replace the protective cap on the stylus. Put the rest clip into the pick-up arm.
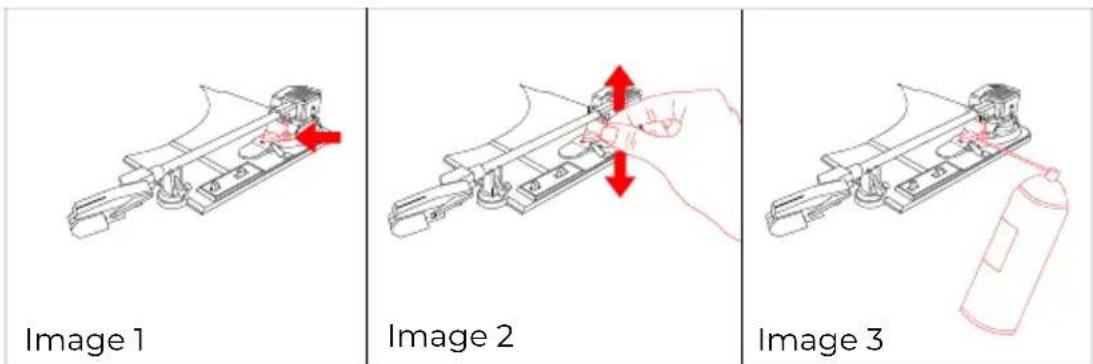
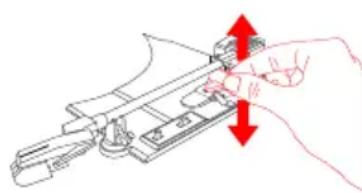
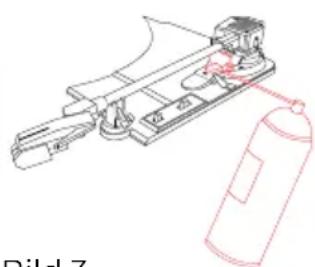
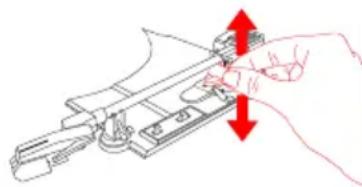
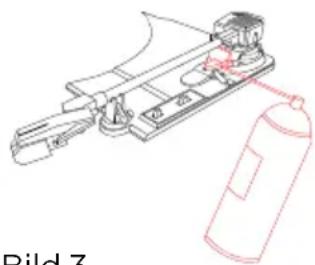
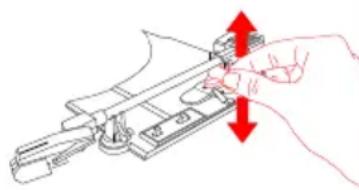
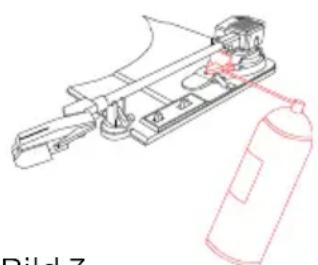
As shown in image 1, the indicated part must be properly lubricated internally to allow the arm to make a slow descent from the moment the lever is actuated. If this descent is too slow, it could cause that in the first moments of contact of the needle with the disc, the music reading does not sound as it should and could cause the needle to jump until the arm has completed the descent completely. To solve this problem, with the lever lowered, manually raise and lower (image 2) the indicated part several times. This will allow the internal lubricant to be distributed and the lowering speed of the arm to be corrected. If after this operation this problem persists, you can apply very gently a very small amount of multipurpose lubricant spray in the indicated area (image 3).
Warranty policy
This product is guaranteed for 2 years from the date of purchase. When you have a problem that you can not solve, you must access the web www.prixton.com and click on the contact option to send us your assistance form. These technical and electrical specifications are those of typical units and may be changed without prior notice in order to provide improved equipment.
Simplified eu declaration of conformity
We, La Trastienda Digital located in Avenida Cervantes 49, módulo 25, Basauri 48970, Bizkaia hereby declare that the following goods, imported and selling at European market:
| BRAND | MODEL NAME DESCRIPTION | CATEGORY | |
| PRIXTON | MARCONI | RECORD PLAYER | AUDIO |
Are in compliance with the EC Council Directive of 2014/53/EU (EM DIRECTIVE) and harmonized standards and with the board of the 16th of April 2014.
The complete text of the UE Declaration of conformity is available anytime at this website address:
www.prixton.com LA TRASTIENDA DIGITAL
text_image
Labeled diagram of a CD or DVD disc with numbered parts for identificationtext_image
R L DC 5V=1A ⑨ ⑩ ⑪ ⑫ ⑫text_image
Technical diagram showing a device with labeled components and directional arrows indicating assembly or transformation steps.text_image
Labeled diagram of a CD or DVD disc with numbered parts for identificationtext_image
R L DC 5V=1A ⑨ ⑩ ⑪ ⑫text_image
Diagram showing a device with labeled components and directional arrows indicating assembly or process steps.text_image
Image 1 Image 2 Image 3text_image
Labeled diagram of a CD or DVD disc with numbered parts for identificationtext_image
R L DC 5V=1A ⑨ ⑩ ⑪ ⑫ ⑫text_image
Diagram showing a device with labeled ports and directional arrows, likely illustrating a process or assembly step.natural_image
Technical line drawing of a mechanical assembly with no visible text or symbolsBild 1
natural_image
Line drawing of a hand holding a knife with red arrows indicating force direction (no text or symbols)Bild 2
natural_image
Technical line drawing of a mechanical device with a fire extinguisher (no text or symbols)Bild 3
Garantiepolitik
text_image
Labeled diagram of a CD or DVD disc with numbered parts for identificationtext_image
R L DC 5V=1A ⑨ ⑩ ⑪ ⑫ ⑫text_image
Diagram showing a device with labeled ports and directional arrows, likely illustrating a process or assembly step.natural_image
Technical line drawing of a mechanical assembly with no visible text or symbolsBild 1
natural_image
Line drawing of a hand holding a knife with red directional arrows indicating movement (no text or symbols)Bild 2
natural_image
Technical line drawing of a mechanical assembly with a fire extinguisher (no text or symbols)Bild 3
Política de garantia
text_image
Labeled diagram of a CD or DVD disc with numbered parts for identificationtext_image
R L DC 5V=1Atext_image
Diagram showing a device with labeled ports and directional arrows, likely illustrating a process or assembly step.natural_image
Technical line drawing of a mechanical assembly with a red arrow indicating direction (no text or symbols)Bild 1
natural_image
Line drawing of a hand using a tool to adjust or install a mechanical component (no text or symbols present)Bild 2
natural_image
Technical line drawing of a mechanical assembly with a fire extinguisher (no text or symbols)Bild 3