
Beer Master - Beer dispenser CASO - Free user manual and instructions
Find the device manual for free Beer Master CASO in PDF.

| Product type | Beer dispenser |
| Brand | CASO |
| Model | Beer Master |
| Usage | Domestic, enclosed spaces |
| Capacity of compatible kegs | 5 liters (universal or Heineken) |
| Adjustable temperature | 4°C to 12°C (in increments of 1°C) |
| CO₂ cartridge type | 16 g, specific dimensions (Ø21.7-22 mm, H88-89 mm) |
| Power supply | 220-240 V, 50 Hz (16 A circuit breaker recommended) |
| Water consumption | 800 ml of water in the cooling chamber |
| Drawing capacity per CO₂ cartridge | More than 5 liters of beer |
| Cooling system | Cooling chamber filled with water, ideal cooling time 19-21 h (ambient temperature 22-24°C) |
| Cleaning | Manual cleaning of the dispensing system with provided pump; do not immerse the motor block |
| Safety | Automatic gas shut-off in case of pause or replacement; danger warnings (DANGER, ATTENTION, CAUTION) |
| Spare parts provided | Connection seals (beer-riser tube), CO₂ cartridge seals, punch, 3 Heineken adapters, 2 keg seals |
| Included accessories | Cleaning pump, 3 CO₂ cartridges, beer hose, drip tray with grid |
| Warranty | 24 months (Germany, Austria, Netherlands; for other countries contact service) |
Frequently Asked Questions - Beer Master CASO
User questions about Beer Master CASO
0 question about this device. Answer the ones you know or ask your own.
Ask a new question about this device
Download the instructions for your Beer dispenser in PDF format for free! Find your manual Beer Master - CASO and take your electronic device back in hand. On this page are published all the documents necessary for the use of your device. Beer Master by CASO.
USER MANUAL Beer Master CASO
The following warning notices are used in the Operating Manual concerned here.

DANGER
A warning notice of this level of danger indicates a potentially dangerous situation. If the dangerous situation is not avoided, this can lead to death or serious injuries.
Observe the instructions in this warning notice in order to avoid the danger of death or serious personal injuries.

WARNING
A warning notice of this level of danger indicates a possible dangerous situation. If the dangerous situation is not avoided, this can lead to serious injuries.
Observe the instructions in this warning notice in order to avoid the personal injuries.

ATTENTION
A warning notice of this level of danger indicates a possible dangerous situation. If the dangerous situation is not avoided, this can lead to slight or moderate injuries.
Observe the instructions in this warning notice in order to avoid the personal injuries.
PLEASE NOTE
A notice of this kind indicates additional information, which will simplify the handling of the machine.
Intended use
This appliance is only intended for domestic use in closed rooms for cooling and serving beer from 5 litre kegs.
This appliance is intended to be used in household and similar applications, such as:
- in kitchens, for employees in shops, offi ces and other commercial areas,
in farms, - by customers in hotels, motels and other similar residential environments,
- in bed and breakfast establishments.
Uses for a different purpose or for a purpose which exceeds this description are considered incompatible with the intended or designated use.

WARNING
Danger due to unintended use! Dangers can emanate from the device if it is used for an unintended use and/or a different kind of use.
Use the device exclusively for its intended use.
Observe the procedural methods described in this Operating Manual.
Claims of all kinds due to damages resulting from unintended uses are excluded. The User bears the sole risk.
General Safety information
PLEASE NOTE
Please observe the following general safety notices with regard to the safe handling of the device.
- Examine the device for any visible external damages prior to using it. Never put a damaged device into operation.
The device may be used by individuals with reduced physical, sensory or mental capabilities or a lack of experience and / or knowledge of their use if they are supervised or have been instructed at to the safe use of the device and have understood the resulting hazards. - Cleaning and user maintenance shall not be made by children.
Children are not allowed to play with the device.
Children must not use this appliance. Keep the appliance and its power supply unit away from children. - Only customer service departments authorized by the manufacturer may carry out repairs on the device, as otherwise the guarantee entitlements will be null and void in the event of any subsequent damages. Improperly performed repairs can cause considerable dangers for the user.
PLEASE NOTE
Defective components must always be replaced with original replacement parts. Only such parts will guarantee that the safety requirements are fulfilled.
- Use the appliance only as described in the user's guide to avoid possible injury from misuse.
Do not use the appliance:
- if the appliance itself or parts are damaged,
- if the power cord or plug is damaged,
- if the appliance has been dropped.
Always unwind the power cord completely before use. When doing so, ensure the power cord is not damaged by sharp edges or hot objects.
- Do not make any modifi cations to the appliance or the power cord. Only have repairs carried out by a specialist workshop, as appliances that have not been repaired properly endanger the user. Please also observe the enclosed warranty conditions.
Only use the appliance with original accessories.
The dispenser should not be used to cool other liquids and beverages.
Do not expose this device to rain or other environmental conditions.
Do not remove the keg from the dispenser until it is completely empty.
Do not remove the CO_2 pressure cartridge until it is empty.
To avoid unintended start-up of the dispenser, make sure that the on/off switch is turned to "Off" before you connect to it to a power source.
Leaving the door open for a longer period of time may result in a signifi cant temperature increase in the dispenser chamber.
Before you insert a keg, make sure that it is not damaged and that its use-by date has not expired.
Pre-cool the beer keg before you use it. Do not put the keg in a freezer to do this.
Do not shake the keg before you use it.
- Do not expose the keg to direct sunlight. The keg must be stored as per the instructions on its label.

WARNING
Warning: Risk of fire / flammable materials used.
- Do not store explosive substances such as aerosol cans with a flammable propellant in this device.
- Do not cover any ventilation openings of the devixe and do not block them.
Do not use electrical devices inside the device.
Do not damage the cooling circuit of the device. - Do not use CO2 pressure cartridges if the room temperature exceeds 49^ C . Failure to follow this warning may result in explosion and death.
If the dispenser catches fire, only use a powder or carbon dioxide (CO2) fire extinguisher to put it out.
Regularly check the status of the safety information labels. Replace the labels if they are illegible.
Dangers due to electrical power

DANGER
Mortal danger due to electrical power!
Mortal danger exists when coming into contact with live wires or subassemblies! Observe the following safety notices to avoid dangers due to electrical power:
If the power cord of this appliance is damaged, it must be replaced by the manufacturer or its customer service or a similarly qualified person in order to avoid hazards.
- Do not open the housing on the device under any circumstances. There is a danger of an electrical shock if live connections are touched and the electrical or mechanical structure is altered. In addition, functional faults on the device can also occur.
Do not touch the appliance or the mains plug with wet hands.
- Do not immerse the appliance in water or other liquids, and do not put it in the dishwasher.
WARNING: When setting up the dispenser, make sure that the power cord is not caught or damaged.
WARNING: Do not put movable multiple power sockets or cables behind the dispenser.
Transport inspection

WARNING
Do not allow children to play with packaging materials due to risk of suffocation.
PLEASE NOTE
Examine the shipment to ensure the unit and manual are included and inspect the unit for any visible damage.
Immediately notify the carrier and/or the supplier about an incomplete shipment or any damage as a result of inadequate packaging or mishandling.
Setup location requirements
In order to ensure the safe and trouble-free operation of the device, the setup location must fulfil I the following prerequisites:
- The device must be set up on a firm, flat, horizontal surface with sufficient load-bearing capacity.
- Do not leave the ice maker to direct sunlight.
- Ensure that there is sufficient distance to strong heat sources such as hobs, heating pipes, etc.
- Choose the setup location in such a way that children cannot reach any hot surfaces on the device.
- The device is not intended to be installed in a wall or a built-in cupboard.
- Do not set up the device in a hot, wet or extremely damp environment or near flammable material.
- WARNING! Do not close the ventilation openings in the device housing.
- The device requires an adequate flow of air in order to operate correctly. Make sure that the back of the device is at least 12cm away from the wall. Keep 10cm free space at the other sides of the device.
- Ensure that the power cable does not hang down over a table or counter edge.
- The electrical socket must be easily accessible so that the power lead can be disconnected easily, in the case of an emergency.
- The installation and assembly of this device in non-stationary setup locations (e.g. on ships) must be carried out by specialist companies / electricians, provided they guarantee the prerequisites for the safe use of this device.
Electrical connection
In order to ensure the safe and trouble-free operation of the device, the following instructions must be observed for the electrical connection:
- Before connecting the device, compare the connection data (voltage and frequency) on the rating plate with those of your electrical network. This data must agree in order that no damages occur in the device. If in doubt, ask your qualified electrician.
- The electrical outlet must be protected by a 16A safety cut-out switch, separately from other electricity consumers,
-
The connection between the device and the electrical network may employ a 3 meter long (max.) extension cable with a cross-section of 1.5mm^2 . The use of multiple plugs or gangs is prohibited because of the danger of fire that is involved with this.
-
Make sure that the power cable is undamaged and has not been installed under the oven or over hot or sharp surfaces.
- The electrical safety of the device is only guaranteed if the device is connected to a properly installed protective conductor system. Operations using an electrical outlet without a protective conductor are prohibited. If in doubt, have the house installation checked over by a qualified electrician. The manufacturer cannot be made responsible for damages that are caused by a missing or damaged protective conductor.
ES Seguridad
Advertencias
Table of contents - Operation
1 General 53
1.1 Information on this manual 54
1.2 Limitation of liability 54
1.3 Copyright protection 54
1.4 Delivery scope 54
1.5 Unpacking 55
2 Design and Function 55
2.1 Overview 55
2.3 How to select a keg 56
2.3.1 Beer keg seals 56
2.4Assembling 57
2.5 Rating plate 57
3 Operation and Handing. 57
3.1 Universal 5 L keg . 58
3.1.1 How to install the CO2 pressure cartridge 59
3.2 5 L Heineken keg 59
3.3 Operation of the dispenser 60
3.4 Replacing the beer keg 61
3.5 Replacing the CO2 pressure cartridge 61
3.6 Replacing the water in the cooling chamber.. 62
4 Cleaning and Maintenance 62
4.1 Safety information 62
4.2 Cleaning 63
4.3 Cleaning the beer tap mechanism 63
4.4 Replacing the CO_2 pressure cartridge piercing spike and sealing ring 63
4.5 Replacing the pin seal on the beer riser pipe 64
5 Troubleshooting 64
5.1 Safety notices 64
5.2 Troubleshooting table 64
6 Disposal of the Old Device 65
6.1 Disposal of the packaging 66
7 Guarantee 66
1 General
Please read the information contained herein so that you can become familiar with your device quickly and take advantage of the full scope of its functions.
Your device will serve you for many years if you handle it and care for it properly. We wish you a lot of pleasure in using it!
1.1 Information on this manual
These operating instructions are a component of the beer dispenser CASO Beer Master (referred to hereafter as the Device) and provide you with important information for the initial commissioning, safety, intended use and care of the device.
The Operating Instructions must be available at all times at the device. This Operating Manual must be read and applied by every person who is instructed to work with the device:
Commissioning, Operation
- Troubleshooting and/or - Cleaning
Keep the Operating Manual in a safe place and pass it on to the subsequent owner along with the device.
1.2 Limitation of liability
All the technical information, data and notices with regard to the installation, operation and care are completely up-to-date at the time of printing and are compiled to the best of our knowledge and belief, taking our past experience and findings into consideration. No claims can be derived from the information provided, the illustrations or descriptions in this manual. The manufacturer does not assume any liability for damages arising as a result of the following:
Non-observation of the manual
Uses for non-intended purposes
- Improper repairs
- Technical alterations, modifi cations of the device
- Use of unauthorized spare parts
Modifications of the device are not recommended and are not covered by the guarantee. All translations are carried out to the best of our knowledge. We do not assume any liability for translation errors, not even if the translation was carried out by us or on our instructions. The original German text remains solely binding.
1.3Copyrightprotection
This document is copyright protected. CASO GmbH reserves all the rights, including those for photomechanical reproduction, duplication and distribution using special processes (e.g. data processing, data carriers, data networks), even partially. Subject to content and technical changes.
1.4Deliveryscope
The device includes the following components:
- CASO Beer Master - Cleaning pump
- 3 x Heineken adapter - 2 x keg seals
- Beer hose - 3 × CO_2 pressure cartridges
- operating manual
Spare parts:
- 2 connection seals (beer riser pipe)
- 3 sealing rings for CO_2 pressure cartridge
- Piercing spike for CO_2 pressure cartridge
1.5 Unpacking
Unpack your ice maker as follows:
- Take out the ice maker from the box and remove the interior and exterior packaging.
PLEASE NOTE
If possible, keep the original packaging for the duration of the guarantee period in the event a return is necessary.
2 Design and Function
This chapter provides you with important safety notices on the design and function of the device.
2.1Overview
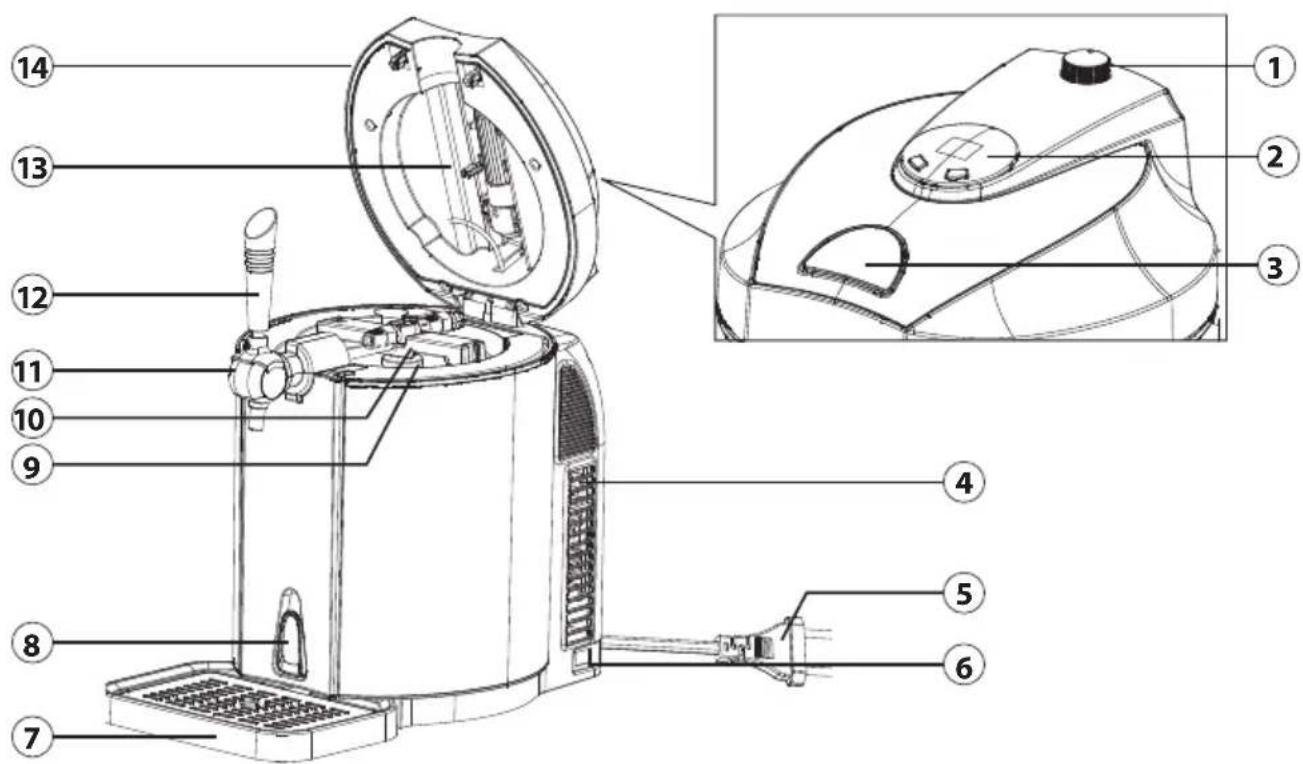
① CO_2 pressure regulator knob
② Operating panel
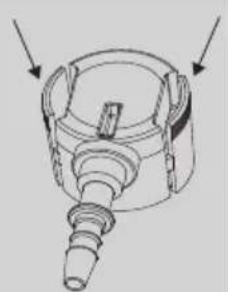
3 Cover release
4 Ventilation slots
5 Power cord with plug
6 On/Off switch
Drip tray with drip grid
8 Drain lever
Cooling chamber
10 Spike with riser pipe
11 Tap
12 Tap handle
13 CO_2 cartridge sheath
14 Cover
2.2 Controlelements
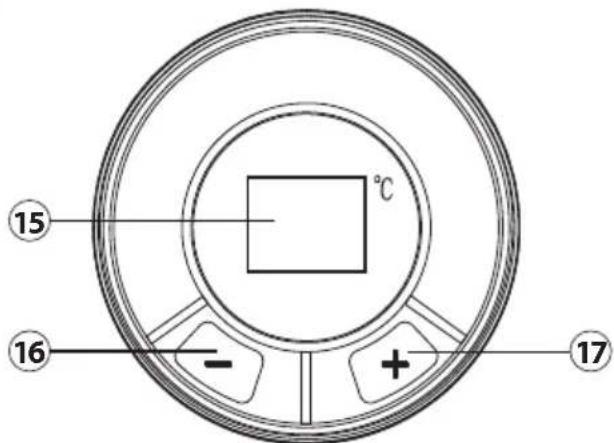
⑤ LED temperature display (4°C-12°C)
16 Reduce temperature
17 Increase temperature
2.3 How to select a keg
- Only use universal 5 litre kegs or 5 litre Heineken kegs.
- Pay attention to the safety and storage information on the keg.
- Before buying a keg, check its use-before date and that it is not damaged.
- Protect the top surface of the keg from damage. Failure to do so may make it difficult to access the keg seal.
- Never shake the keg before you use it!
- Do not expose the keg to direct sunlight.
- Store the keg in a refrigerator or other cool place.
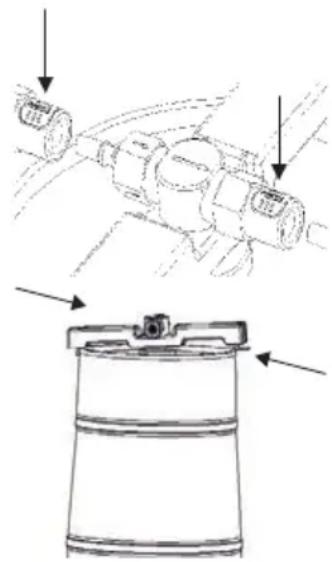
2.3.1 Beer keg seals
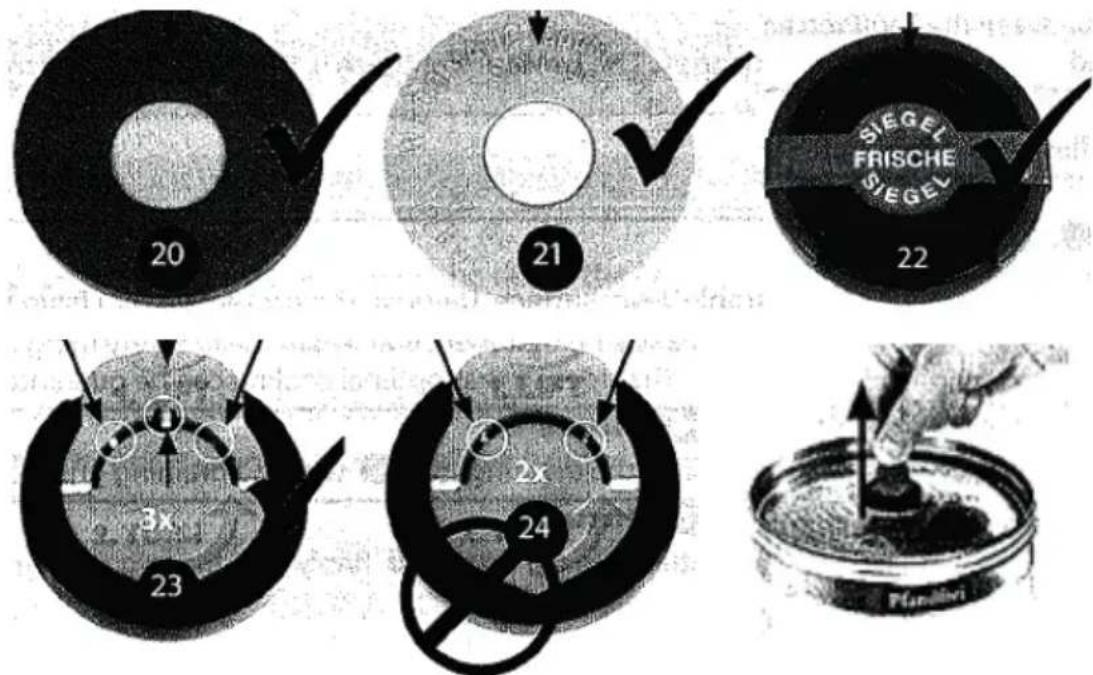
You can use any 5 litre keg which has one of the sealing caps shown below. Pay attention to the following information. Seals with Codes No. 20 and 21 can be pierced using the spike. In the case of sealing caps with Code No. 22, you must first remove the marking ring and then use the beer dispenser's riser pipe to make a hole in the seal. No. 23 and No. 24 have a different number of safety clasps. Carefully pull up the safety clasp and then turn it to
remove it from the keg. Replace the clasp with one of the connection seals supplied with the dispenser (identical to No. 20).
WARNING! To prevent too much gas being released from the keg, you must follow the manufacturer's operating instructions before you remove, change or pierce one of the seals. Before piercing the seal make sure that the keg has not been shaken and that it has rested long enough to avoid excess foam coming out. If you are using a Heineken keg, there is no need to release the gas or use the sealing cap because the keg has its own internal CO_2 pressure system, so gas from an external system is not required.
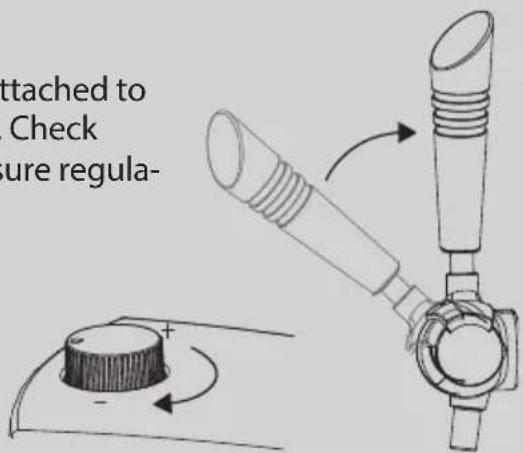
2.4Assembling
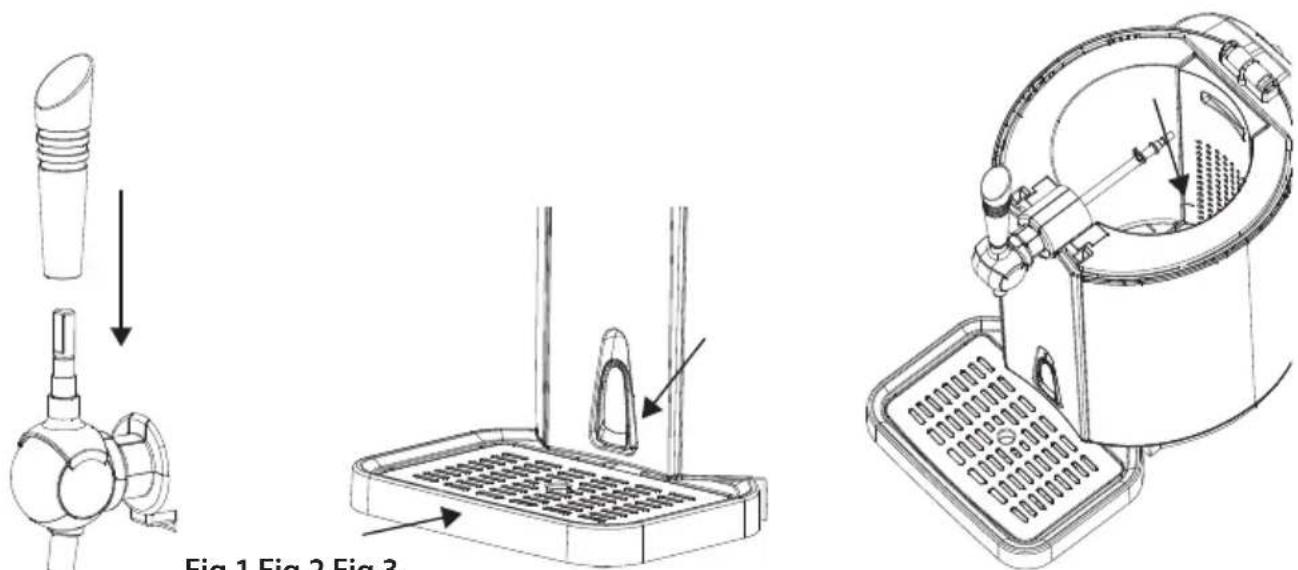
Fig.1 Fig.2 Fig.3
- Place the dispenser on a stable, fl at surface. Make sure to leave approx. 12cm of space around the dispenser for ventilation.
- Attach the tap handle to the tap. Make sure that the handle is firmly attached (Fig. 1).
- Push the drip tray and drip grid into the corresponding opening on the dispenser. Make sure that the drain lever is closed (Fig. 2) and that the tap is shut.
- Open the cover and press the white buttons to loosen the hose connections.
- Remove the spike with riser pipe from the dispenser. Pour 800ml cold water into the cooling chamber. Pay attention to the "MAX" mark in the cooling chamber and make sure that there are no other objects inside it (Fig. 3).
2.5Ratingplate
The rating plate with the connection and performance data is located on the back of the appliance.
3 Operation and Handing
This chapter provides you with important notices with regard to operating the device. Observe the following notices to avoid dangers and damages:
3.1 Universal 5 L keg
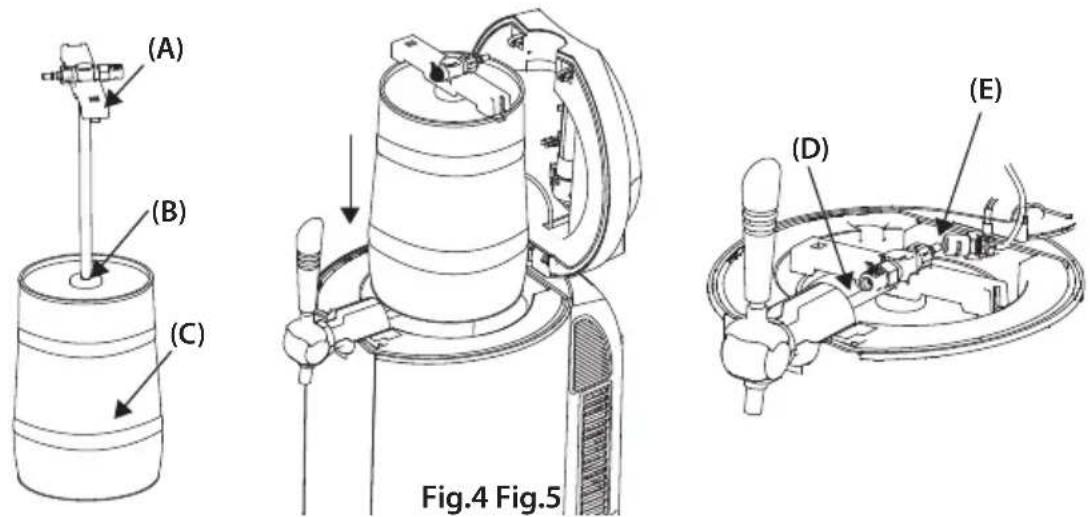
- Follow the instructions given on the beer keg. Make sure that the keg has rested for long enough to avoid foam coming out of the tap. Use a pre-cooled keg.
- Place the pointed end of the spike (A) on the sealing ring (B) located in the centre of the keg's top. You may need to remove the closure or replace the seal (see the "Beer keg seals" section).
- Hold the spike vertically and quickly push it into the keg (C). You will hear a noise which signals that the spike has clicked into place on the keg's top.
- Release the locking mechanism on the cover to open the beer dispensing unit and place the correctly assembled keg in the cooling chamber (Fig. 4).
- Attach the beer hose connector (D) and the CO_2 connection hose (E) (Fig. 5).
PLEASE NOTE
Make sure that all the connectors are correctly attached to the beer riser tap and that they are not damaged. Check that the tap is in the "Off" position. The CO_2 pressure regulator knob must be set to "Off" or "-".
3.1.1 How to install the CO_2 pressure cartridge
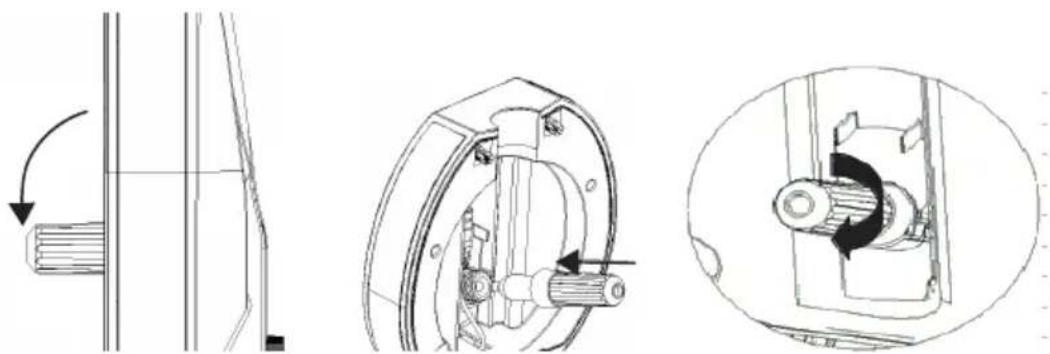
Fig.6 Fig.7 Fig.8
- Tilt the CO_2 cartridge sheath in the cover downwards to a maximum angle of 90^ and unscrew the housing (Fig. 6.
- Insert an unused 16 gramme CO_2 pressure cartridge (Fig. 7).
- Screw the CO_2 cartridge sheath back onto the dispenser cover.
- You should hear a clicking sound. This signals that the cartridge seal was pierced when the sheath was screwed back onto the cover, enabling the gas to flow into the keg (Fig. 8).
- Tilt the CO_2 cartridge sheath back up into the dispenser cover.
- Close the beer dispenser cover.
3.2 5 L Heineken keg
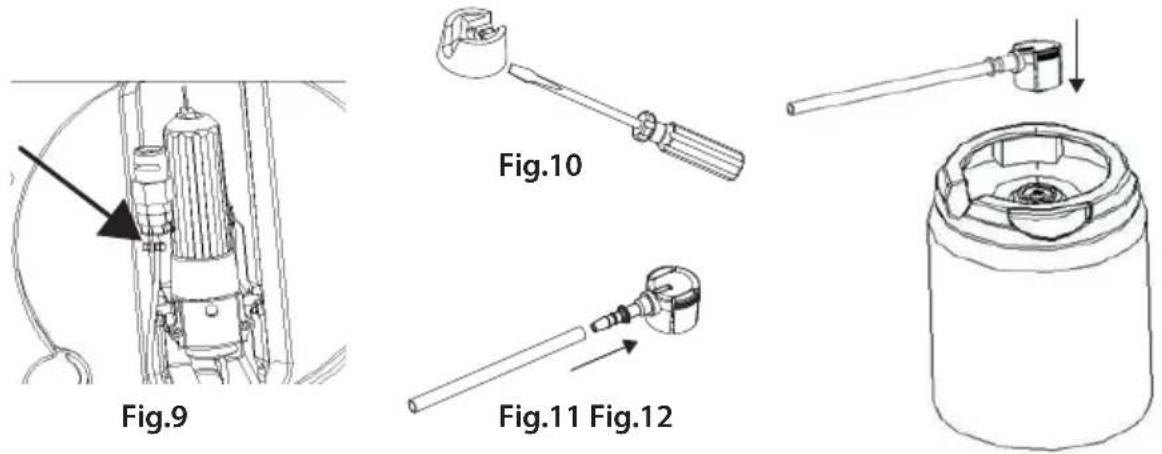
PLEASE NOTE
Heineken kegs are pre-filled with CO2 , so no pressure regulator or CO2 pressure cartridge are required. Correspondingly, the regulator knob on the cover is also not required.
- Place the CO2 connection hose next to the CO2 cartridge sheath. Neither of these components is required for Heineken legs (Fig. 9).
- You will need a screwdriver to remove the green cover from your Heineken keg (Fig. 10).
- Connect the beer hose supplied with the dispenser to one of the Heineken adapters also supplied with it (Fig. 11).
- Attach the adapter and beer hose to the Heineken keg (Fig. 12).
- Place the keg in the dispenser cooling chamber.
- Attach the other end of the beer hose to the connector on the dispensing unit.
- Close the dispenser cover.
PLEASE NOTE
When removing the Heineken adapter you must squeeze its sides together. Failure to do so will quickly result in damage to the adapter.
3.3 Operation of the dispenser
PLEASE NOTE
Rinse out the beer glasses before use and store them in a cool place.
At a room temperature of 22 - 24^ it will take 19-21 hours for the dispenser to cool the beer to the ideal temperature.
We recommend that you cool the keg in a refrigerator for at least 12 hours before you connect it to the dispenser.
- Prepare the dispenser as described above.
- Plug the power socket into mains power.
- Use the "On/Off" power switch to turn the dispenser on.
- The actual temperature in the cooling chamber will be shown on the display.
- Press the "−" or "+" key to set the cooling temperature for the keg to between 4^ and 12^ in 1^ increments.
- The selected temperature will automatically be confirmed and the display will then show the actual temperature in the cooling chamber again.
- Set the CO_2 pressure regulator to the "+" position. By turning the pressure regulator you can set the pressure, thus controlling the flow rate of the beer and the amount of bubbles.
ATTENTION
- When the pressure regulator is set to the "+" position, the gas flow to the keg will be fully open; when set to the "-" position it will be shut.
Shut the gas flow when:
Cooling the beer keg,
- If there are longer intervals between pulling beer,
- When replacing the CO_2 pressure cartridge,
- When the beer keg is empty.
If beer does not come out of the tap even though there is enough beer in the keg or if there is not enough head on the beer, turn the pressure regulator to the maximum opening position for approx. 5 seconds. Do not open the tap during this time.
- Hold a beer glass under the tap. Lean the side of the glass against the tap spout.
- Pull the tap handle downwards.
- As the beer flows into the glass, gradually straighten it into a vertical position.
- When you have finished pulling the beer, push the tap handle back to its starting position.
PLEASE NOTE
Do not dip the pouring spout into the beer in the glass. This can result in a too much head.
It is normal for there to be more foam than usual when pulling the first serving of beer.
The last serving may squirt out of the keg at a higher than normal pressure.
3.4 Replacing the beer keg
- Push the tap handle into the vertical, shut position.
- Turn the dispenser off.
- Set the CO_2 pressure regulator to the "Off" / "-" position.
- Open the beer dispenser cover.
- Push the white buttons on the beer riser pipe down to release the connections.
- Remove the keg and riser pipe from the dispenser.
- Loosen the right-hand side of the riser pipe first, then the left-hand side.
- Hold the beer riser pipe in a vertical position when you pull it out of the dispenser.
- After this, follow the instructions in the "Universal 5 litre beer keg" or "5 litre Heineken beer keg" section.
PLEASE NOTE
Clean the beer riser pipe and the dispenser as described in the "Cleaning and care" section before you insert a new beer keg.
3.5 Replacing the CO_2 pressure cartridge
The CO2 pressure cartridge should only be changed if no beer comes out of the tap although the CO2 pressure regulator is turned on and there is enough beer in the keg.
Turn the dispenser off. Set the CO2 pressure regulator to "--". Open the beer dispenser cover. Proceed as described in the "How to install the CO2 pressure cartridge" section.
PLEASE NOTE
When removing the empty CO2 pressure cartridge, make sure that you do not also remove or damage the sealing ring or spike.
CO2 pressure cartridges are not required for 5 litre Heineken kegs.
A 16 gramme CO_2 pressure cartridge may dispense more than 5 litres of beer.
Only use CO_2 pressure cartridges which meet the following parameters:
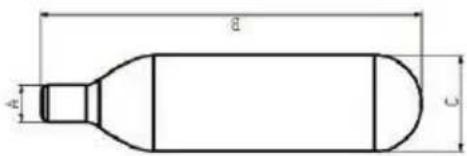
| Net weight 15.5-16.5 | g B 88-89 mm | ||
| Volume 20 ml C 21.7 | 22 mm | ||
| Gross weight 57-58.6 | g D 19-11 mm | ||
| Cartridge weight 42- | 42.6 g Pressure 60 kgf/cm2 | ||
| A 8.6-8.9 mm Detonation pressure 45 bar | |||
3.6 Replacing the water in the cooling chamber
We recommend replacing the water in the cooling chamber each time you use the dispenser and if it will not be used for a longer period of time.
- Turn the dispenser off.
- Remove the drip tray from the dispenser.
- Position the dispenser so that the front section is over a sink or sufficiently large container.
- Open the drain lever.
- Wait until all the water has drained out of the dispenser, then shut the drain lever again.
- Pour 800ml of fresh water into the dispenser cooling chamber.
4 Cleaning and Maintenance
This chapter provides you with important notices with regard to cleaning and maintaining the device. Please observe the notices to prevent damages due to cleaning the device incorrectly and to ensure trouble-free operation.
4.1 Safety information

ATTENTION
Please observe the safety instructions, before cleaning your device:
Turn the device off prior to cleaning and whenever you replace accessories. Also remove the plug from the power socket.
Never immerse the motor unit, cord or plug in water or other liquids and do not place in the dishwasher.
If moisture penetrates the appliance, electronic components may be damaged.
Do not use iron brush, aberrant kitchen cleaner, or sharp cleaning tool for cleaning.
Do not use any aggressive or abrasive cleaning agents or solvents.
4.2 Cleaning
Wipe the inside and outside of the dispenser with a damp cloth. Remove the drip tray from the dispenser, pour away any beer and use warm soapy water to clean the drip tray and drip grid.
4.3 Cleaning the beer tap mechanism
The beer tap mechanism must be cleaned before first use; once a week and if it will not be used for a longer period of time. Remove any beer keg from the dispenser before you clean it.
- Place an empty container under the tap.
- Fill the cleaning pump supplied with the dispenser with warm, clean water.
- Attach the cleaning pump to the bottom end of the beer riser pipe.
- Open the tap.
- Slowly squeeze the pump so that water flows up the pipe and through the tap (Fig. 13).
- If required, repeat the process again.
- If you are using a Heineken adapter, then you must attach the cleaning pipe to the beer hose (Fig. 14).
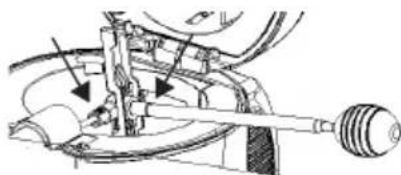
Fig.13
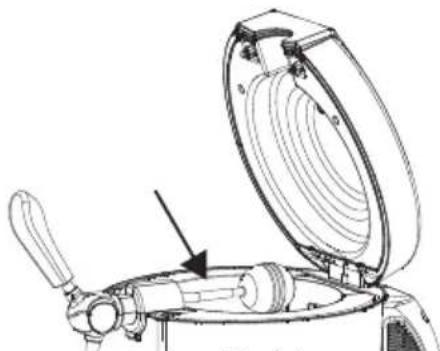
Fig.14
PLEASE NOTE
If required, unscrew the spike to make it easier to clean the individual parts.
After cleaning, always allow all the parts to dry thoroughly before you replace them in the dispenser.
4.4 Replacing the CO_2 pressure cartridge piercing spike and sealing ring
When the dispenser is used on a regular basis, the piercing spike and/or the CO_2 sealing ring may be damaged or unintentionally removed. Should this occur, then they must be replaced.
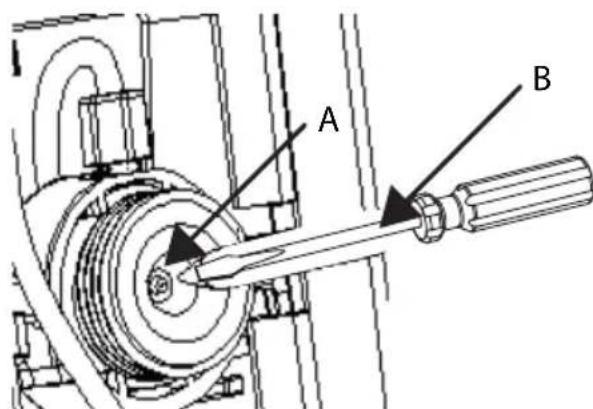
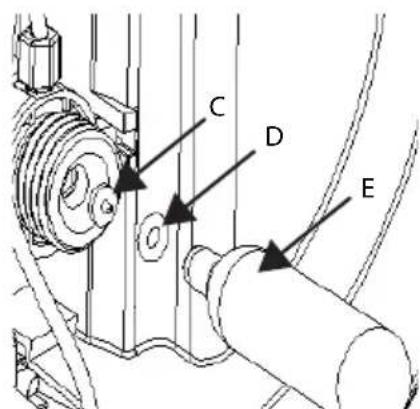
A. Reduction valve B. Thin metal rod
C. Spike D. Sealing ring
E. Empty CO_2 pressure cartridge
- Remove the empty CO_2 pressure cartridge.
- Use a slim fl at-tip screwdriver (B) to remove the worn out sealing ring (D).
-
If the spike needs to be replaced, then also use a slim flat-tip screwdriver to remove it.
-
Insert a new spike in the CO_2 regulator assembly (the spike must be visible and facing towards you).
- Place the CO2 sealing ring in the CO2 regulator assembly.
- Use an empty CO_2 pressure cartridge or a screwdriver to carefully push both elements into the assembly.

DANGER
WARNING! Using a full CO_2 pressure cartridge may result in an explosion!
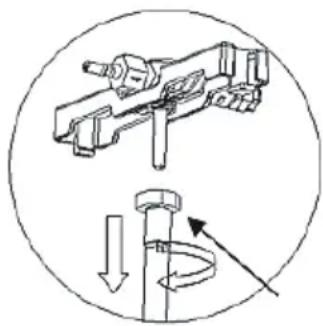
4.5 Replacing the pin seal on the beer riser pipe
If you notice that beer is leaking out of the riser pipe, then you must replace the seal. Remove the beer riser pipe and tap from the dispenser. Unscrew the pipe from the tap (anti-clockwise); remove the old seal and insert a new one. Following this, screw the pipe back onto the tap (clockwise).
5 Troubleshooting
This chapter provides you with important notices with regard to operating the device. Observe the following notices to avoid dangers and damages:
5.1 Safetynotices

ATTENTION
Repairs of electrical appliances must be carried out by qualified person who are trained by the manufacturer.
Repairs performed by untrained persons may result in considerable hazards for the user and damage the machine.
5.2Troubleshootingtable
| Error Possible cause Solution | ||
| The tap does not work / No beer is coming out of the dispenser. | The beer pouring hose is attched incorrectly | Attach the hose correctly. |
| No beer keg is connected or there is no beer in the keg. | Connect a new beer keg. | |
| No gas in the CO2 pressure cartridge | Replace the cartridge. | |
| The beer is too frothy. | The beer was dispensed incorrectly. | Hold a beer glass at an angle under the tap. As the beer flows into the glass, gradually straighten it into a vertical position. |
| The beer is too warm. Let the beer cool some more. | ||
| The beer keg was shaken before use. | Let the keg rest before you connect it. | |
| The beer keg is almost empty. | Connect a new beer keg. | |
| The beer is not frothy enough. | The carbon dioxide pressure in the keg is too low. | Slowly turn the pressure regulator to the "+" position for 5 seconds. |
| The beer is too cold. | Let the keg rest for a while. The dispenser will then correct the temperature. | |
| The beer glass is not clean. There are washing-up liquid residues in the glass. | Rinse out the glass thoroughly and then rinse it again with cold water. | |
| The beer flow rate is too slow. | The beer riser pipe or the connection between the CO2 pressure cartridge and the beer keg is leaking. | Check the hose connections and the condition of the hoses. If required, replace the seal. |
| The CO2 pressure cartridge is nearly empty. | Replace the cartridge. | |
DE
EN
ES
SV
FR
IT
NL
PLEASE NOTE
If you cannot solve the problem by carrying out the steps described above, our Customer Service will help you free of charge.
Clean the device before you send it to customer service.
6 Disposal of the Old Device
Old electric and electronic devices frequently still contain valuable materials. However, they also contain damaging substances, which were necessary for their functionality and safety. If these were put in the non-recyclable waste or were handled incorrectly, they could be detrimental to human health and the environment. Therefore, do not put your old device into the non-recyclable waste under any circumstances.
PLEASE NOTE
Utilise the collection point, established in your town, to return and recycle old electric and electronic devices. If necessary, contact your town hall, local refuse collection service or your dealer for information.
Ensure that your old device is stored safely away from children until it is taken away.
6.1 Disposal of the packaging
The packaging protects the device against damages during transit. The packaging materials are selected in accordance with environmentally compatible and recycling-related points of view and can therefore be recycled. Returning the packaging back to the material loop saves raw materials and reduces the quantities of accumulated waste.

Take any packaging materials that are no longer required to "Green Dot" recycling collection points for disposal.
7 Guarantee
We provide a 24-month guarantee for defects caused by production or material faults, beginning on the date of purchase. Our guarantee is valid for Germany, Austria and the Netherlands. For all other countries, please contact us.
Your legal guarantee claims as per Art. 437 ff. German Civil Code (BGB) will remain unaffected by this. You may exercise your statutory guarantee rights free of charge. The guarantee does not cover damage caused by improper handling or use of the product or defects which have only a minor impact on the product's functionality or value. In addition to this, the guarantee also excludes parts which are subject to wear and tear; transport damages insofar as we are not responsible for them and damages caused by repairs which were not carried out by us.
This product has been constructed for non-commercial use (domestic use) and its performance is designed to meet the corresponding needs. The guarantee only covers commercial use insofar as it is comparable to domestic use. The product is not intended for any other type of commercial use.
In the case of legitimate complaints we may either repair the defective product or replace it with a defect-free product at our discretion. Obvious defects must be notified to us within 14 days of the product's delivery. Any further claims are excluded.
When making a guarantee claim please contact us before you return the product (always with the purchase receipt!). Our contact details ("Guarantor") are provided at the beginning of this instruction manual.