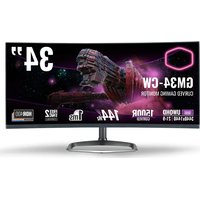
GM34-CW - Monitor CM Storm - Free user manual and instructions
Find the device manual for free GM34-CW CM Storm in PDF.


| Product Type | Curved Gaming Monitor |
| Brand | CM Storm |
| Model | GM34-CW |
| Screen Size | 34 inches |
| Maximum Resolution | 3440 x 1440 pixels |
| Refresh Rate | 144 Hz (DP), 100 Hz (HDMI) |
| Panel Type | VA |
| Brightness | 400 nits (max) |
| Contrast Ratio | 3000:1 |
| Response Time | 1 ms (MPRT), 4 ms (gray to gray) |
| Viewing Angles | 178° horizontal / 178° vertical |
| Built-in Speakers | 2 x 3 W |
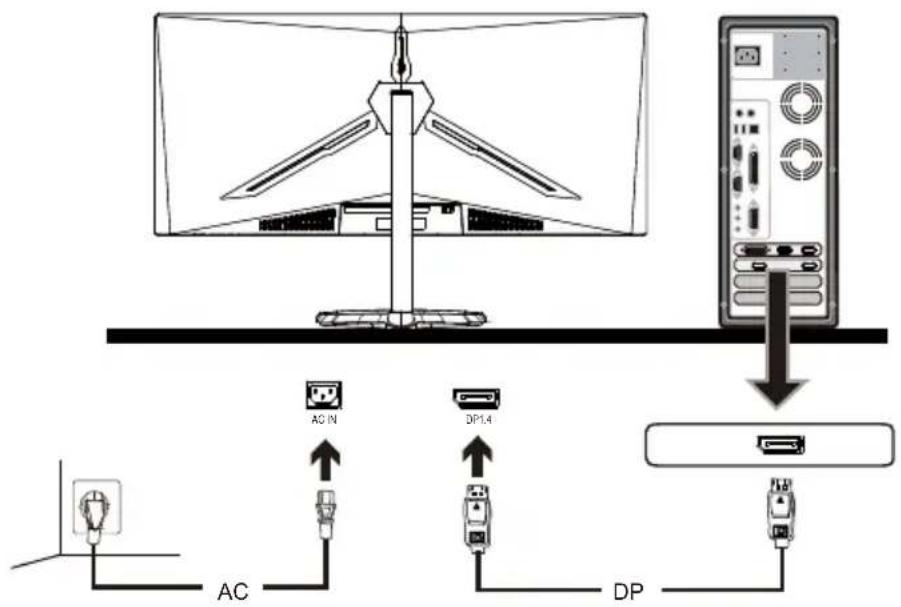
| Input Connectors | 2 x HDMI 2.0, 2 x DP 1.4, audio jack |
| Dimensions (with stand) | 808.65 x 520.82 x 263.9 mm |
| Net Weight | 6.2 kg |
| Power Supply | 100-240 V AC, 50/60 Hz, 2 A |
| Typical Power Consumption | 54 W (max 80 W) |
| Standby Power Consumption | ≤ 0.5 W |
| Adjustments | Tilt (-5° to +15°), Swivel (±45°), Height (0-100 mm), Detachable Stand |
| Main Features | FreeSync, HDR, Image Modes (Standard, Graphic, Movie, Game), PIP/PBP, Gaming Crosshairs, Low Blue Light |
| Maintenance and Cleaning | Unplug before cleaning; use a soft non-abrasive cloth without solvent; do not expose to rain or sunlight |
| Safety | Do not open the housing; unplug in case of damage, liquid spillage, or cable wear; entrust repairs to a certified technician |
| Spare Parts and Repairability | Contact a certified technician; no user-serviceable parts; warranty on Cooler Master website |
| General Information | Manual available for free download; multilingual instructions; technical support via www.coolermaster.com/warranty |
Frequently Asked Questions - GM34-CW CM Storm
User questions about GM34-CW CM Storm
0 question about this device. Answer the ones you know or ask your own.
Ask a new question about this device
Download the instructions for your Monitor in PDF format for free! Find your manual GM34-CW - CM Storm and take your electronic device back in hand. On this page are published all the documents necessary for the use of your device. GM34-CW by CM Storm.
USER MANUAL GM34-CW CM Storm
Cooler Master 34" Curved Gaming Monitor
User Manual
natural_image
Line drawing of a modern flat-screen monitor with a curved screen and stand (no text or symbols)【English】
Table of Contents
Important Safety Instructions .... 3
Connecting the Monitor to the Base 4
Wall Mount Installation Instructions 6
External Control Buttons 7
OSD Function Introductions 9
Main Menu 11
Color Setting 12
Picture Quality Setting ....13
Display....13
OSD....15
Other....16
Specifications....17
Declaration of Restricted Substances ....18
Important Safety Instructions
Please read the following instructions carefully.
-
To clean the LCD monitor screen:
Turn off the LCD monitor and unplug the power cord.
Spray a non-solvent cleaning solution onto a rag and clean the screen gently. -
Do not place the LCD monitor near a window. Exposing the monitor to rain, moisture or sunlight can severely damage it.
-
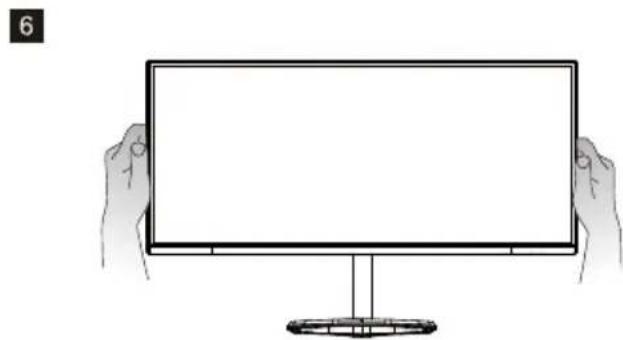
Do not apply pressure to the LCD screen. Excessive pressure may cause permanent damage to the display.
-
Do not remove the cover or attempt to service this unit yourself.
An authorized technician should perform servicing of any nature
-
Store the LCD monitor in a room with a temperature of -20° to 60° C ( -4° to 140° F). Storing the LCD monitor outside this range may result in permanent damage.
-
Immediately unplug your monitor and call an authorized technician if any of the following circumstances occur:
-
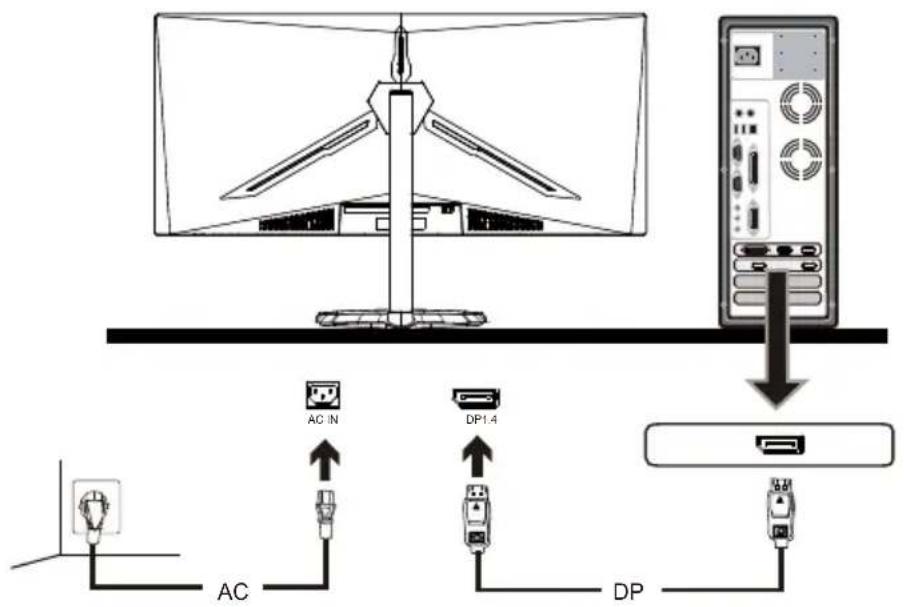
Monitor -to -PC signal cable is frayed or damaged.
- Liquid spills onto the LCD monitor or the monitor is exposed to rain.
- The LCD monitor or case is damaged.
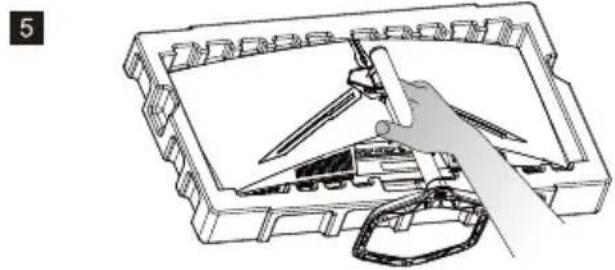
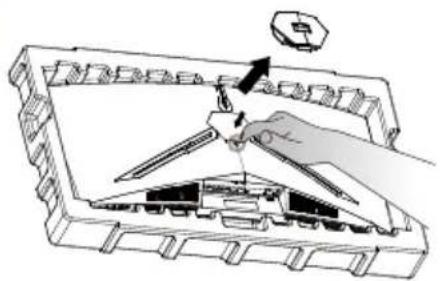
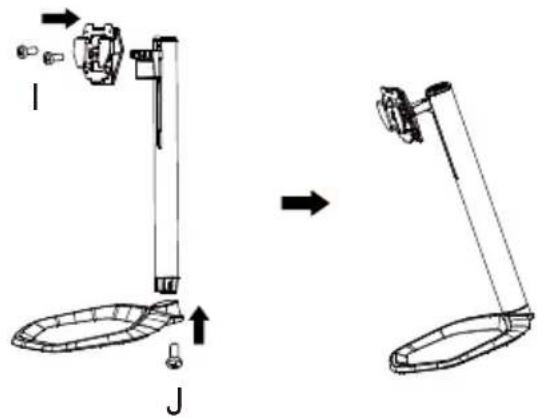
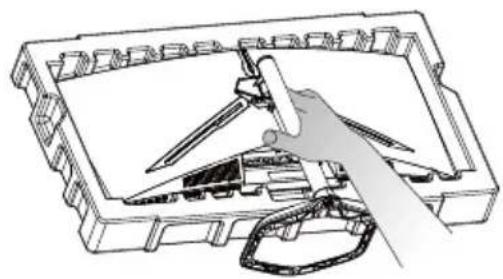
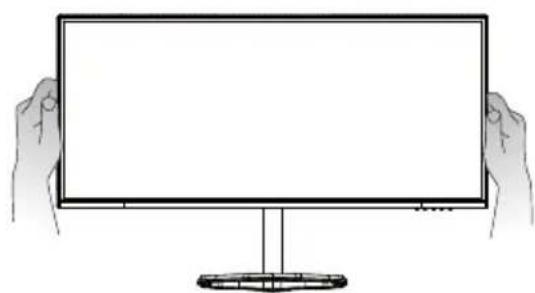
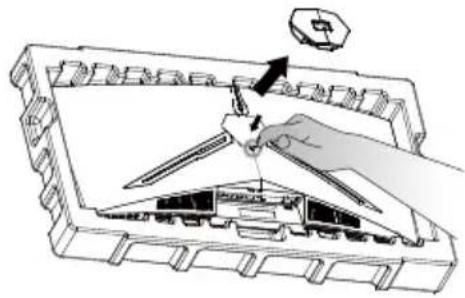
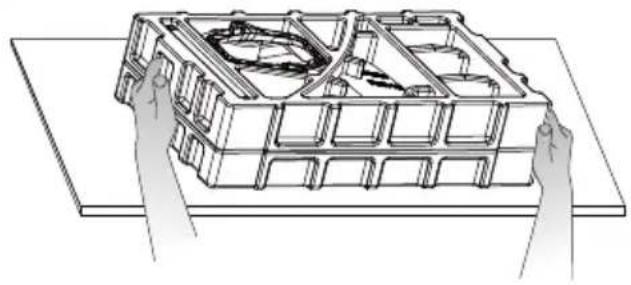
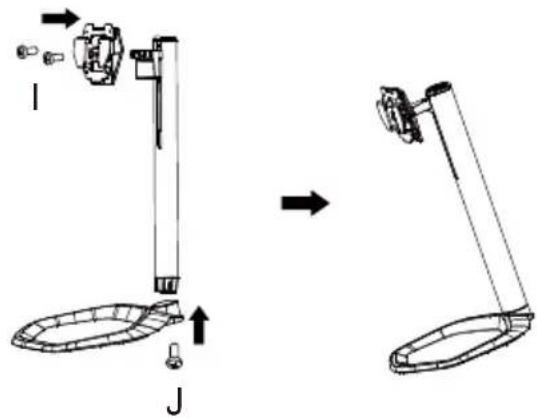
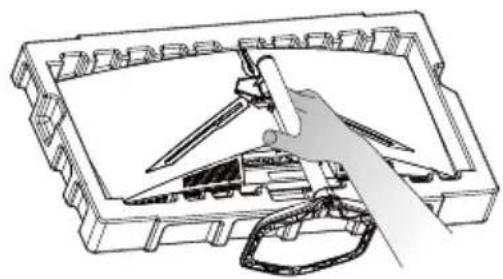
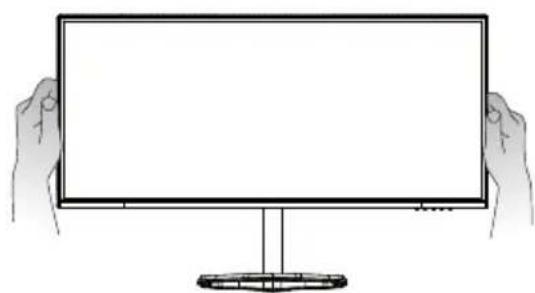
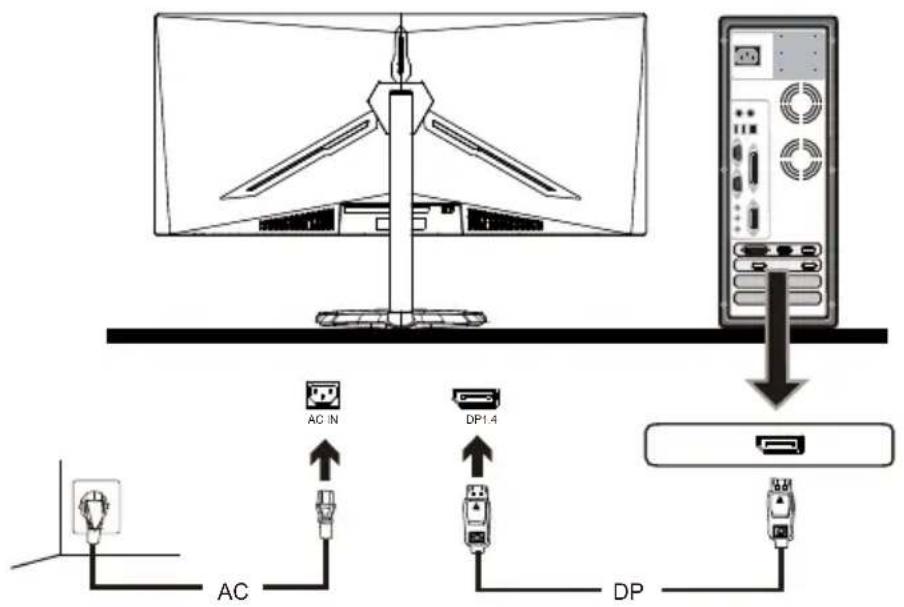
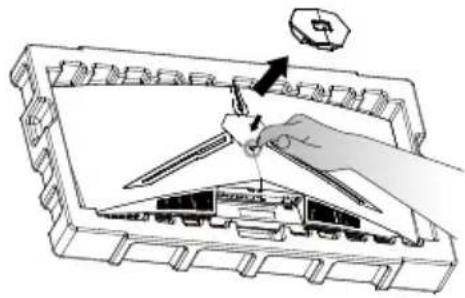
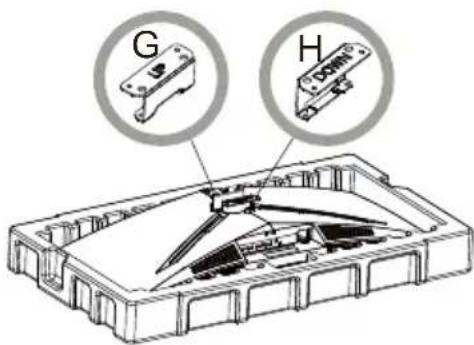
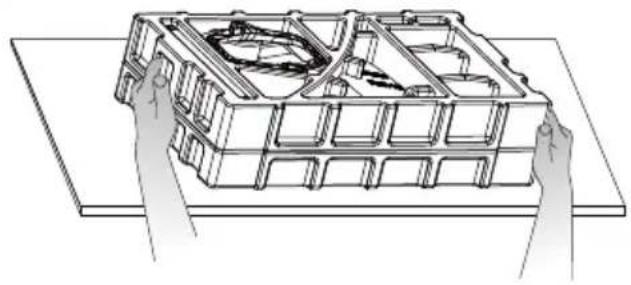
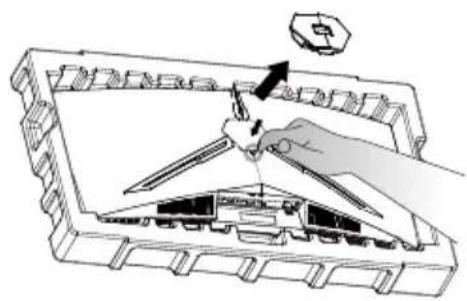
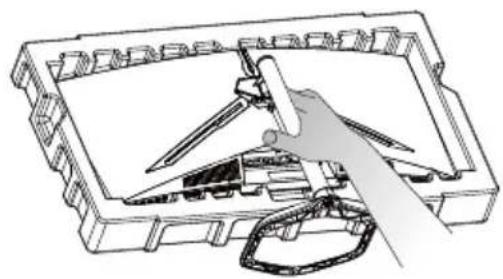
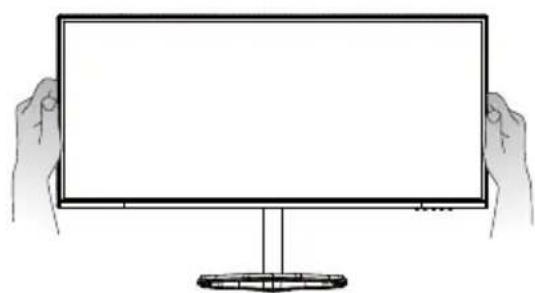
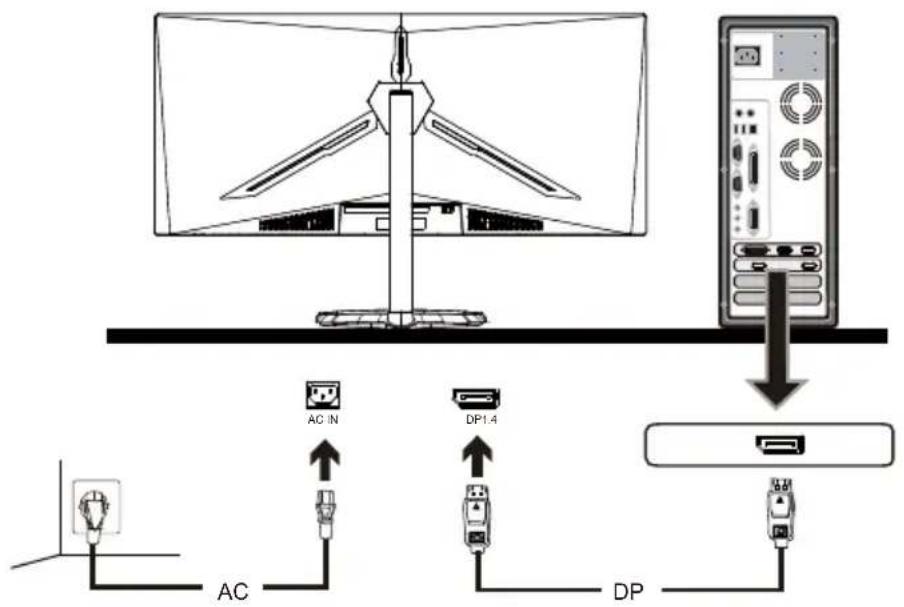
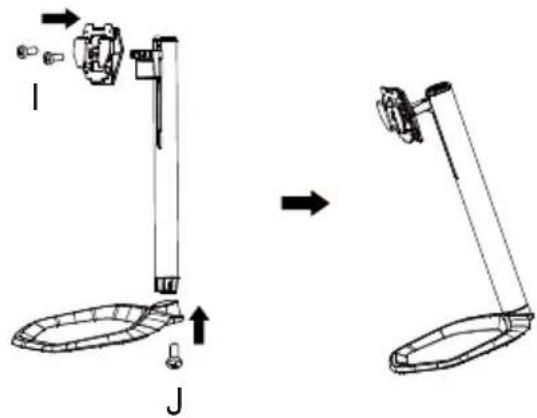
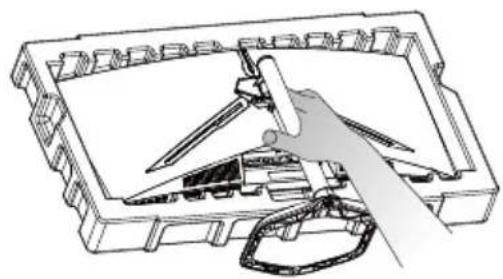
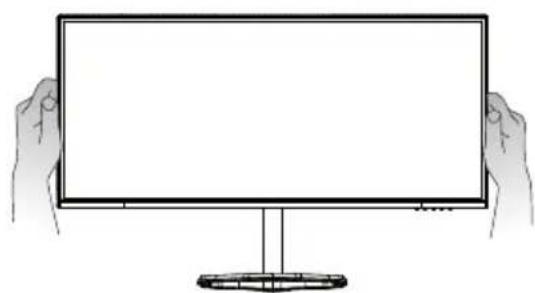
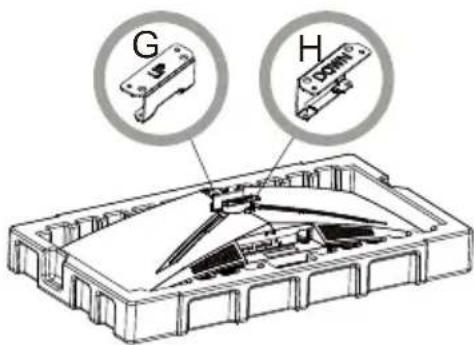
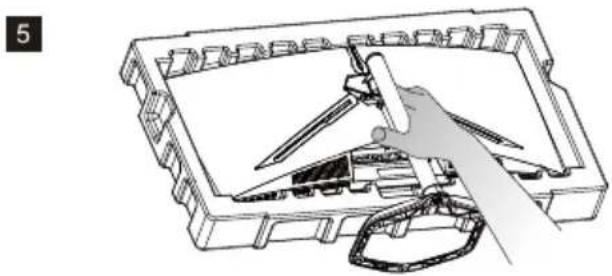
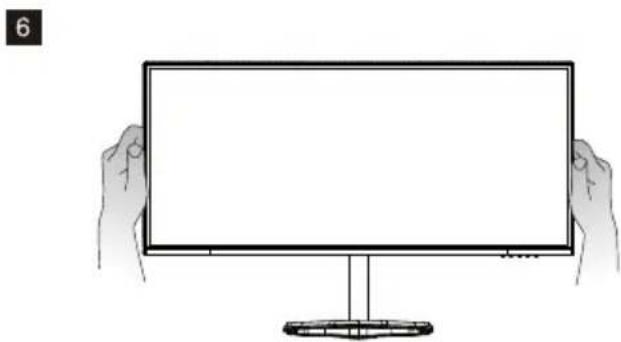
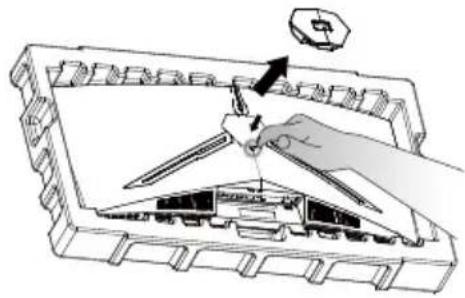
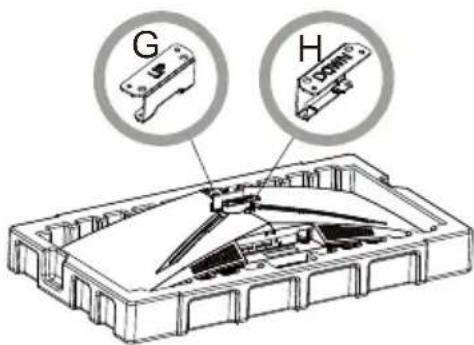
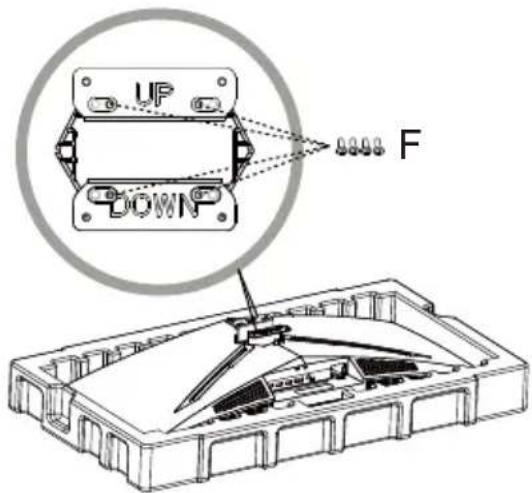
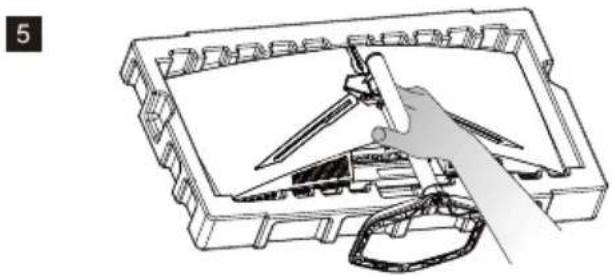
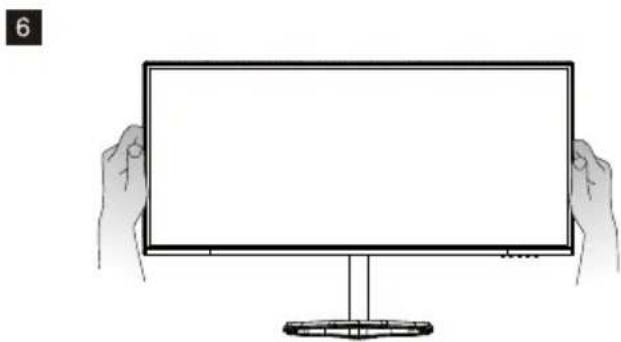
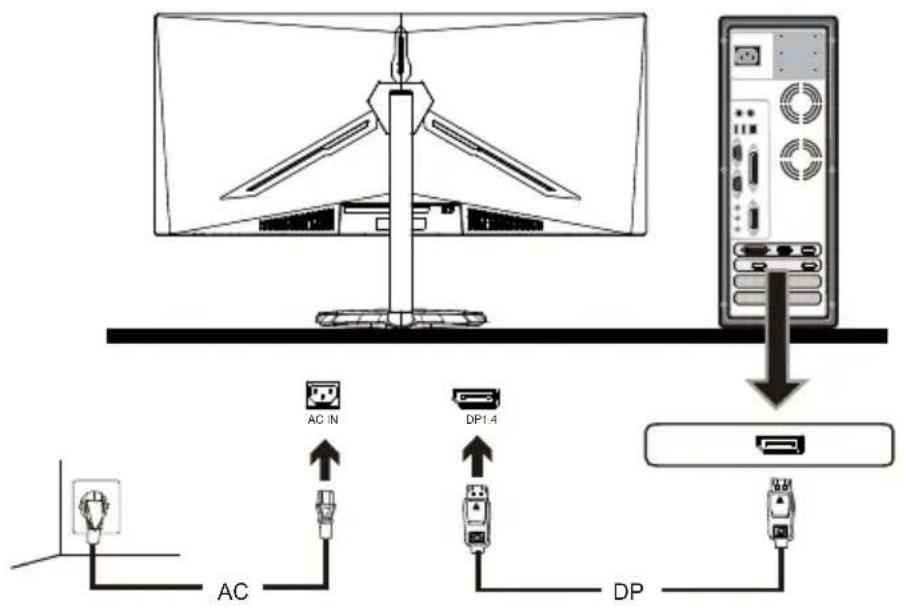
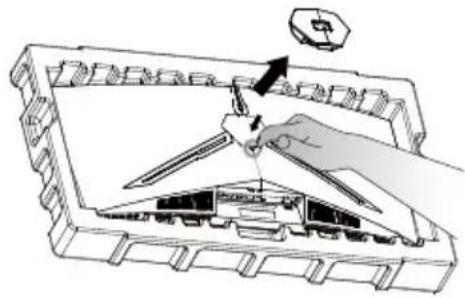
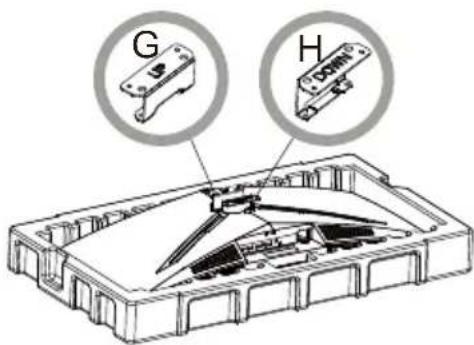
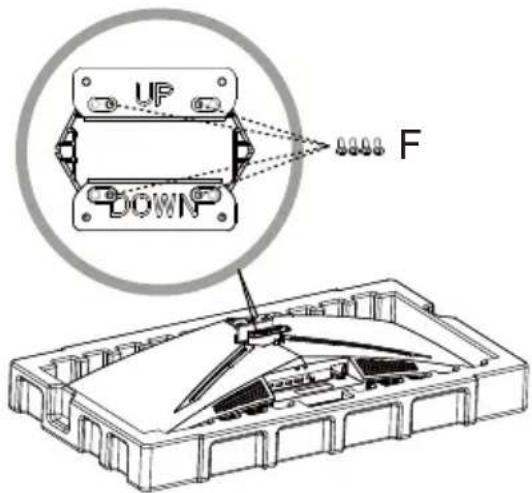
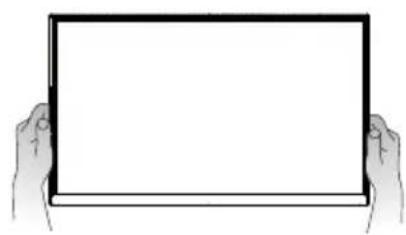
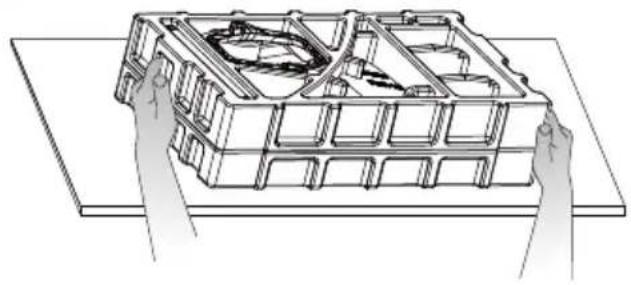
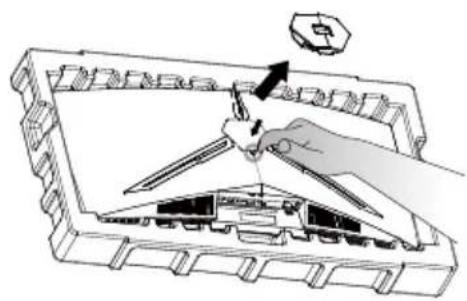
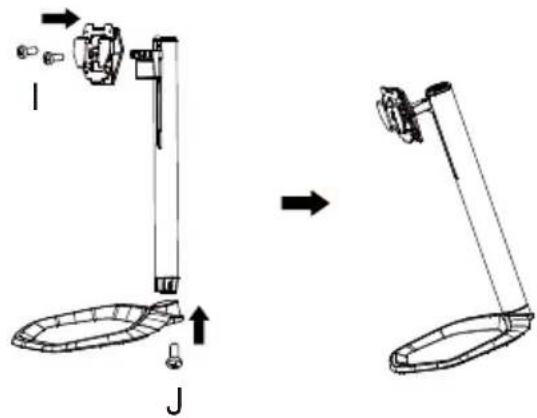
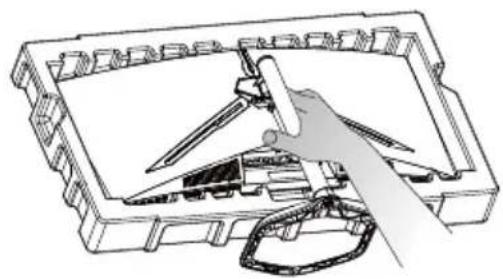
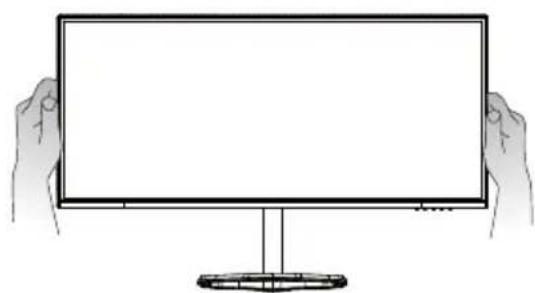
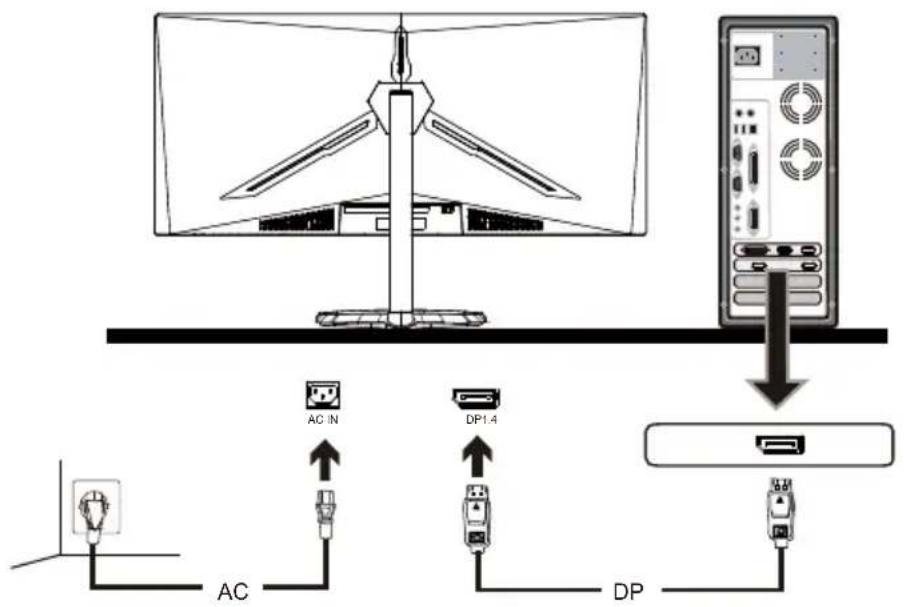
Connect the monitor to the base

natural_image
Diagram of a mechanical or electrical component with internal compartments and directional arrows (no text or symbols)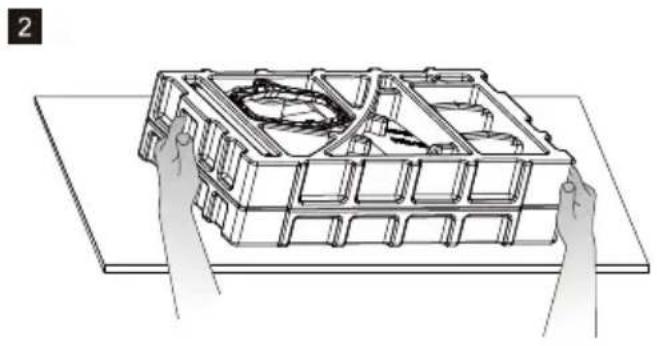
natural_image
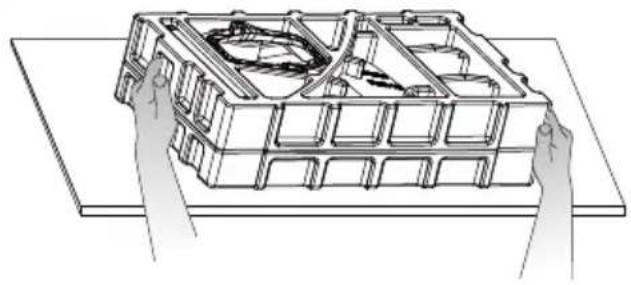
Illustration of hands assembling a multi-layer plastic container on a flat surface (no text or symbols)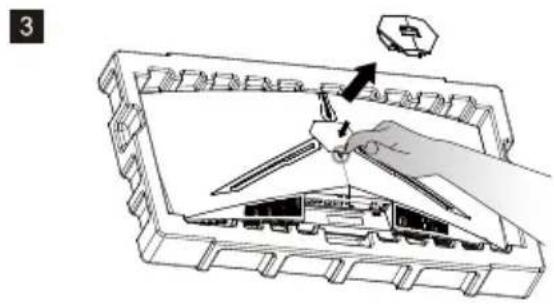
natural_image
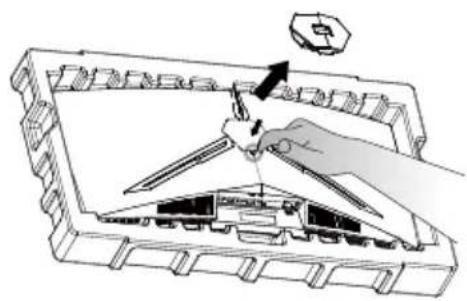
Illustration of a hand using a tool to adjust or install a device inside a container (no text or symbols visible)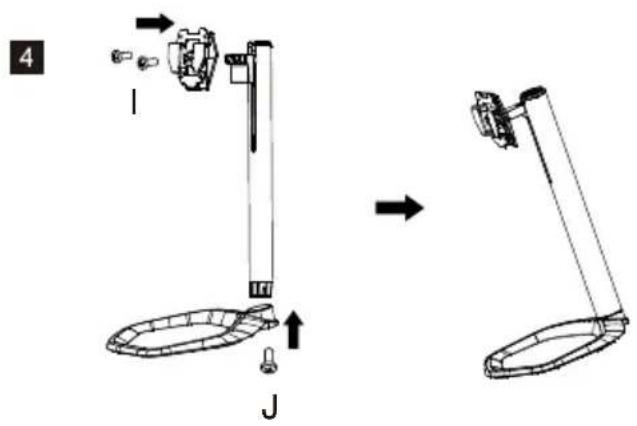
natural_image
Illustration of a hand using a tool to adjust or install a mechanical component (no text or symbols visible)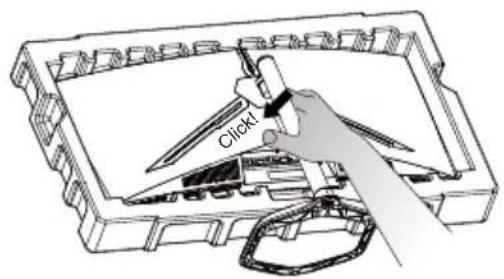
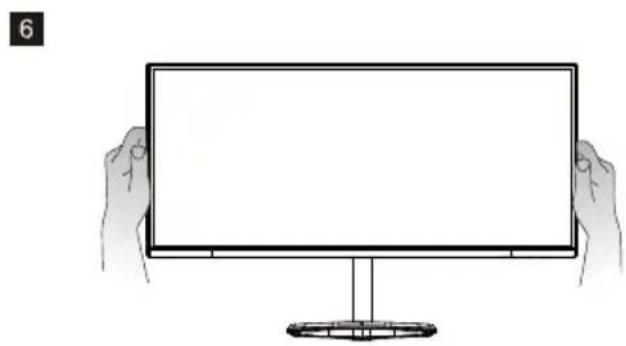
natural_image
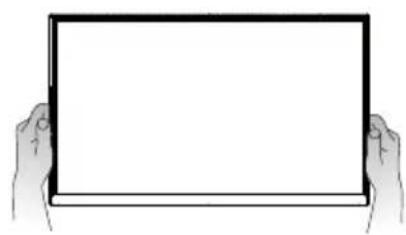
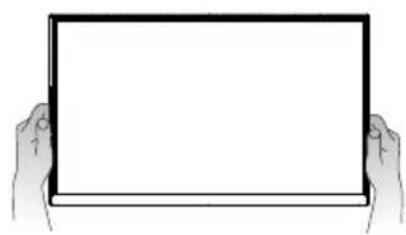
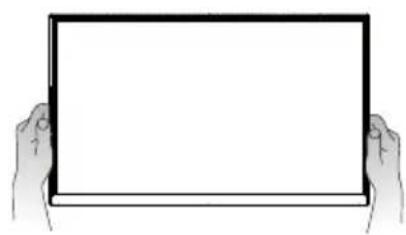
Illustration of two hands holding a blank rectangular monitor with a circular base (no text or symbols)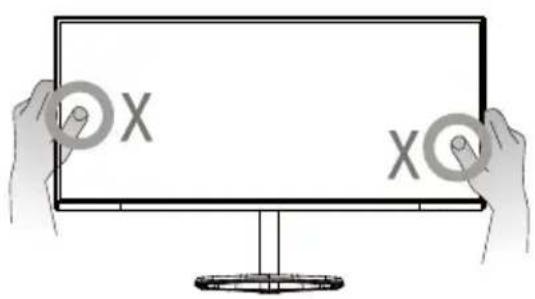
7
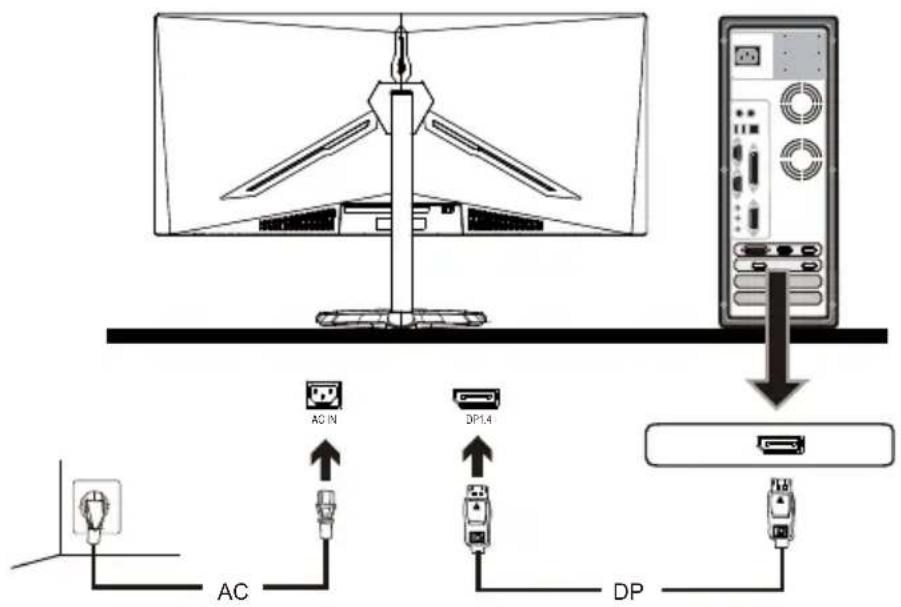
8
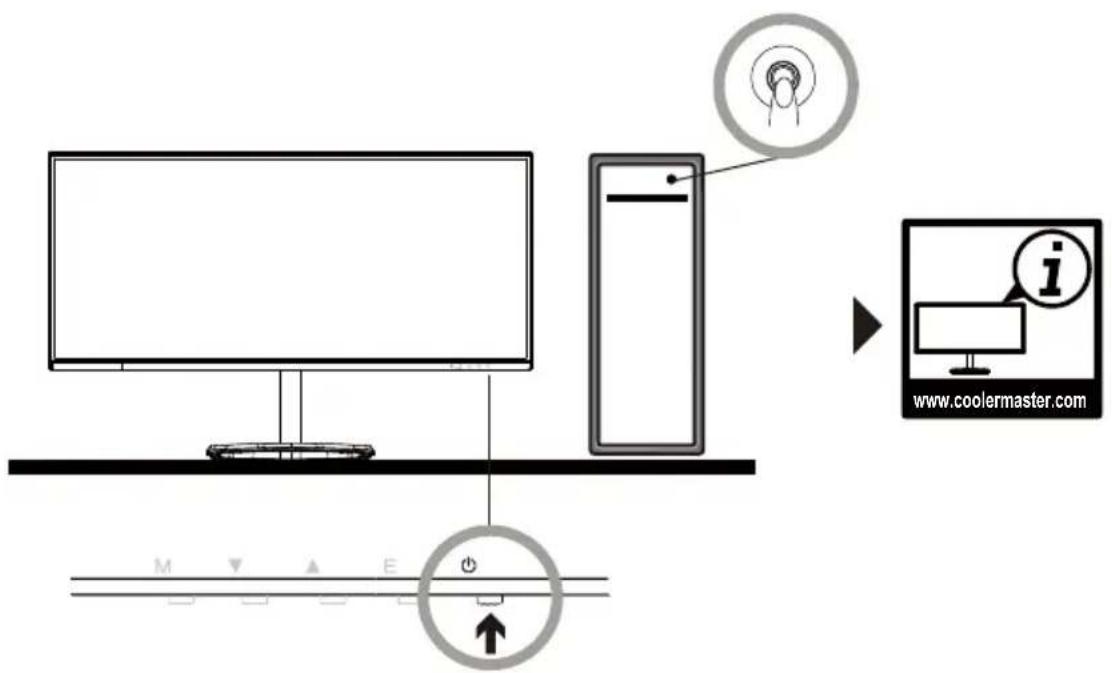
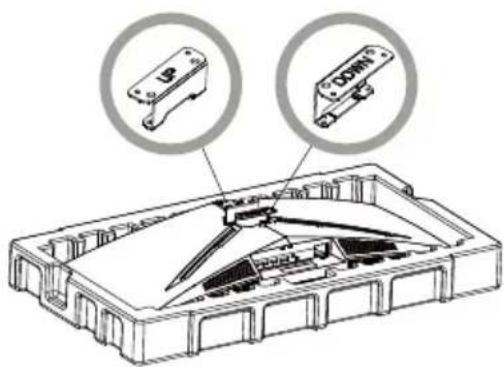
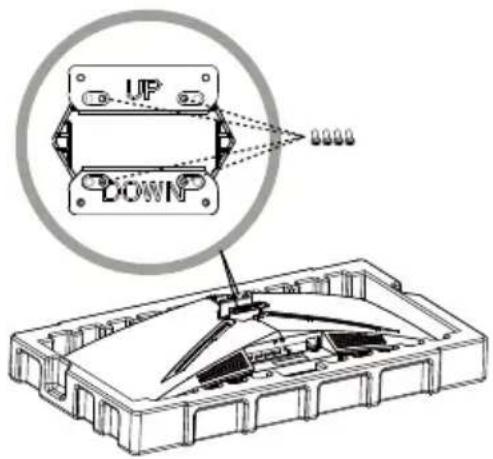
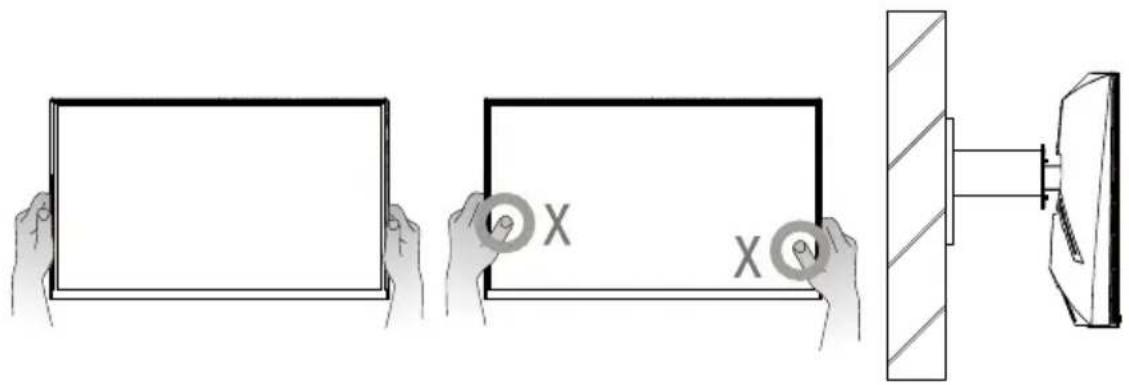
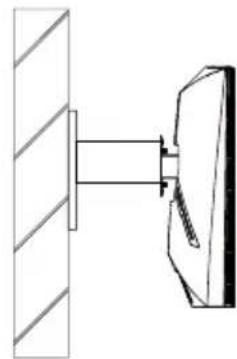
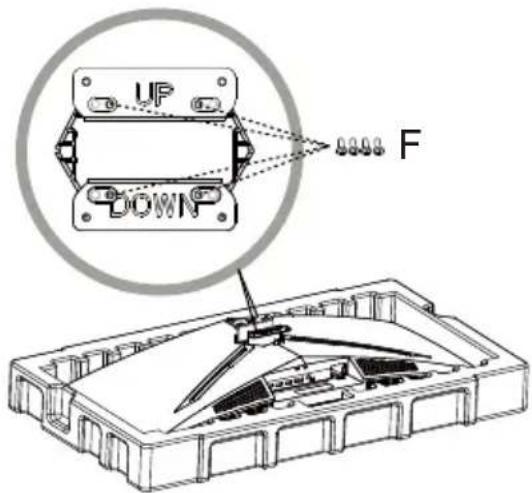
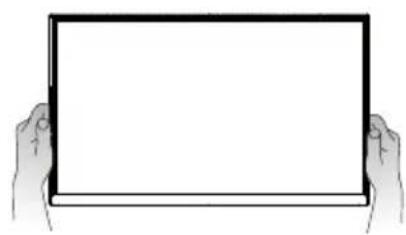
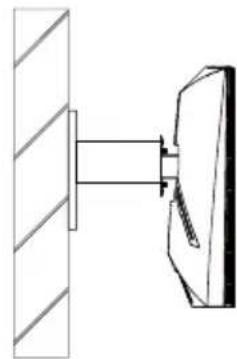
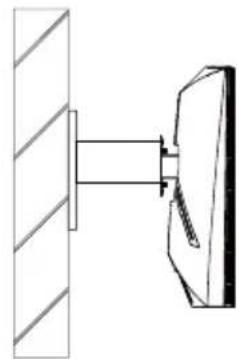
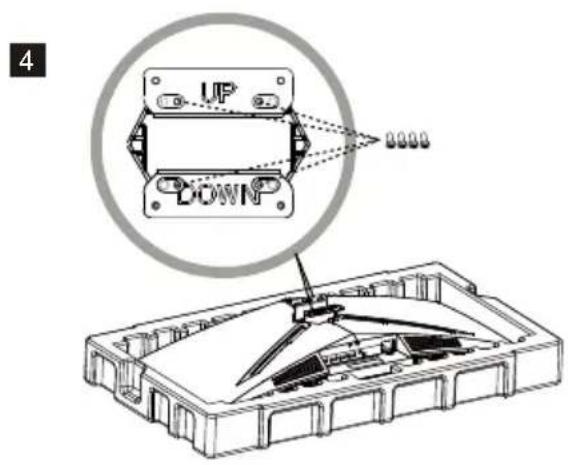
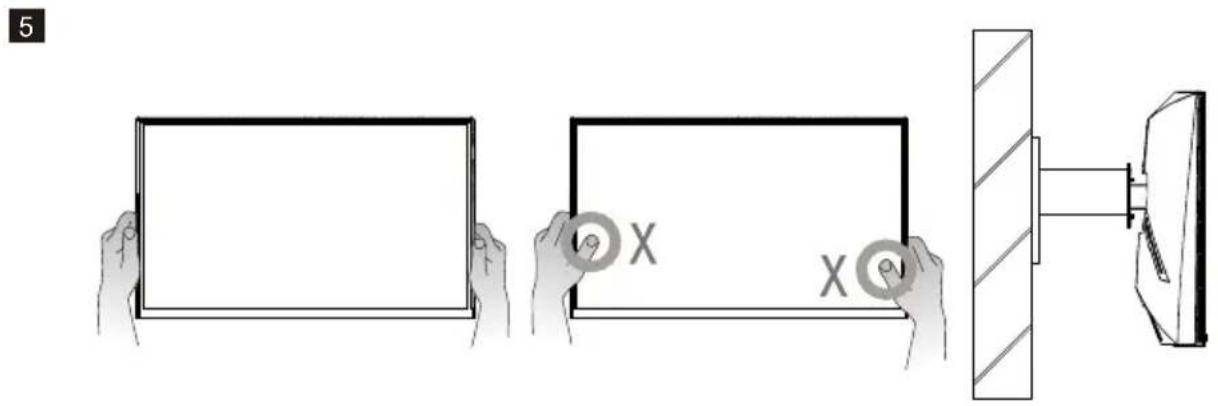
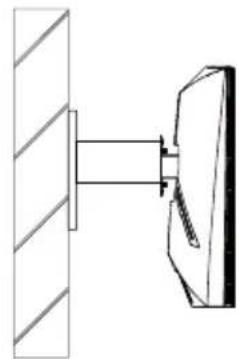
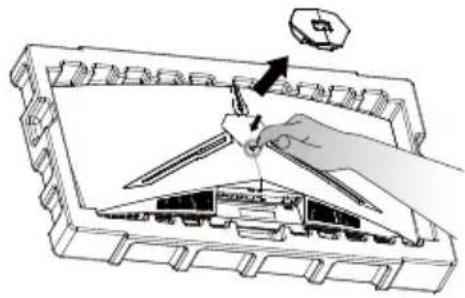
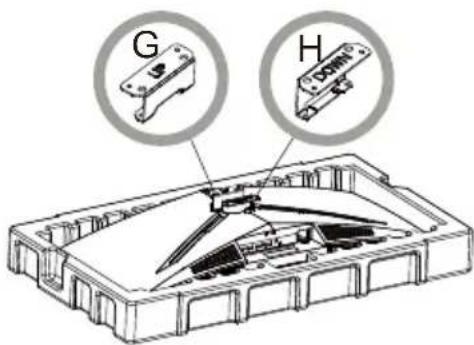
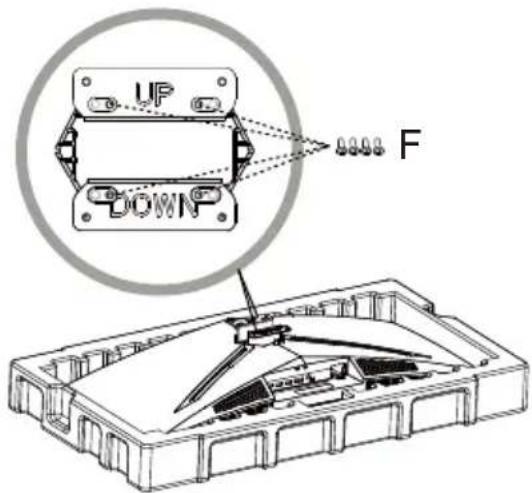
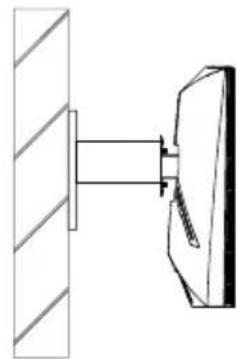
Wall Mount Installation Instructions
1
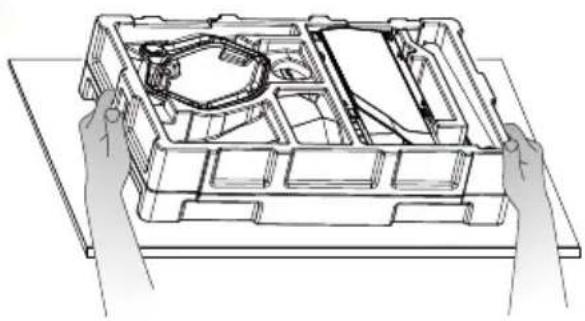
natural_image
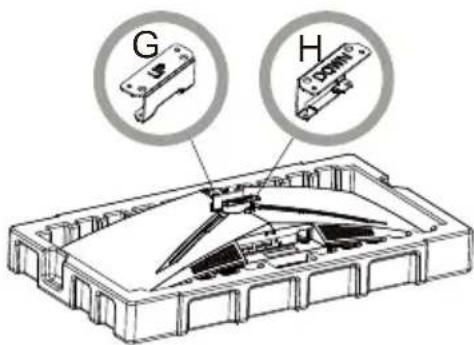
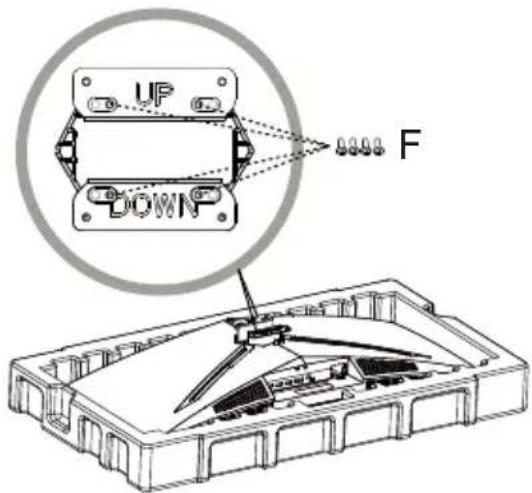
Line drawing of a mechanical device with hands holding a tray (no text or symbols)2
natural_image
Illustration of a hand using a tool to adjust or install electronic components inside a device casing (no text or symbols visible)3
4
5
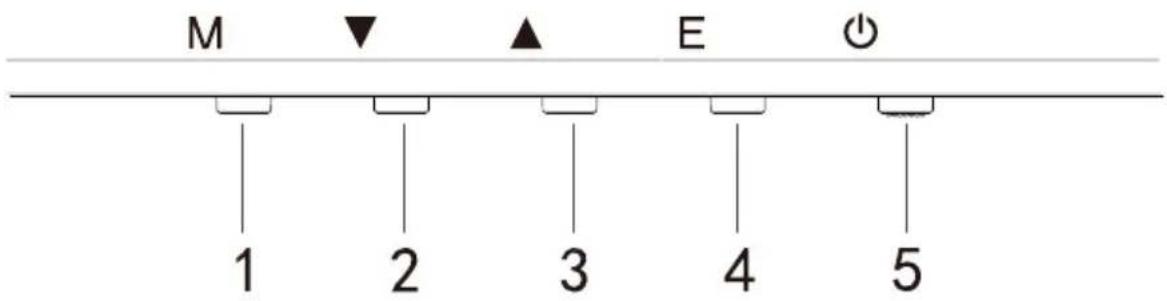
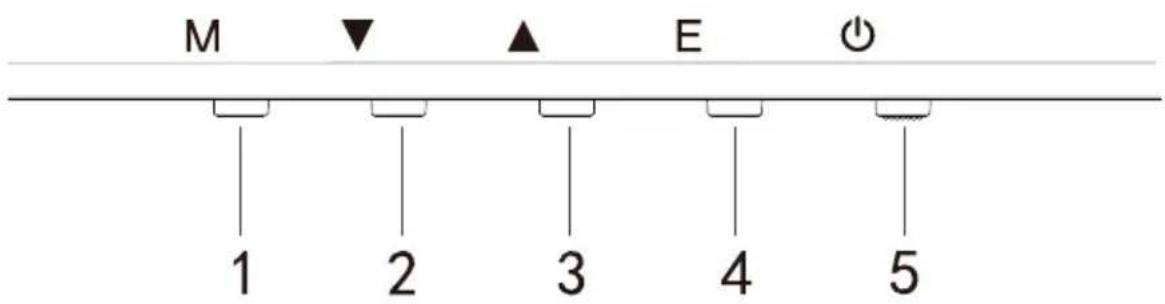
External Control Buttons
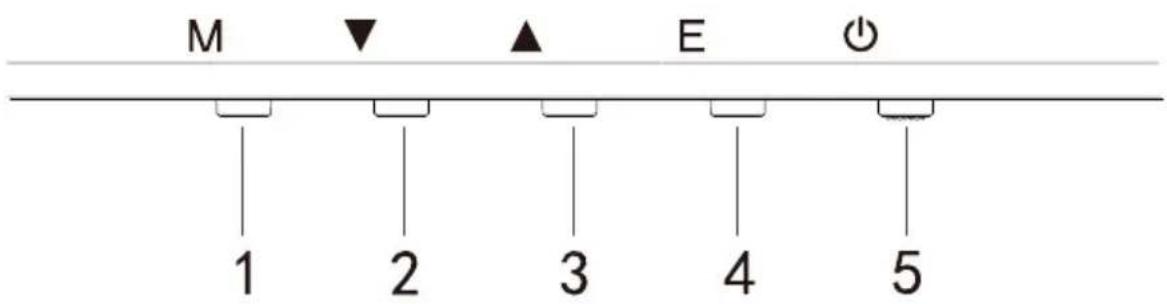
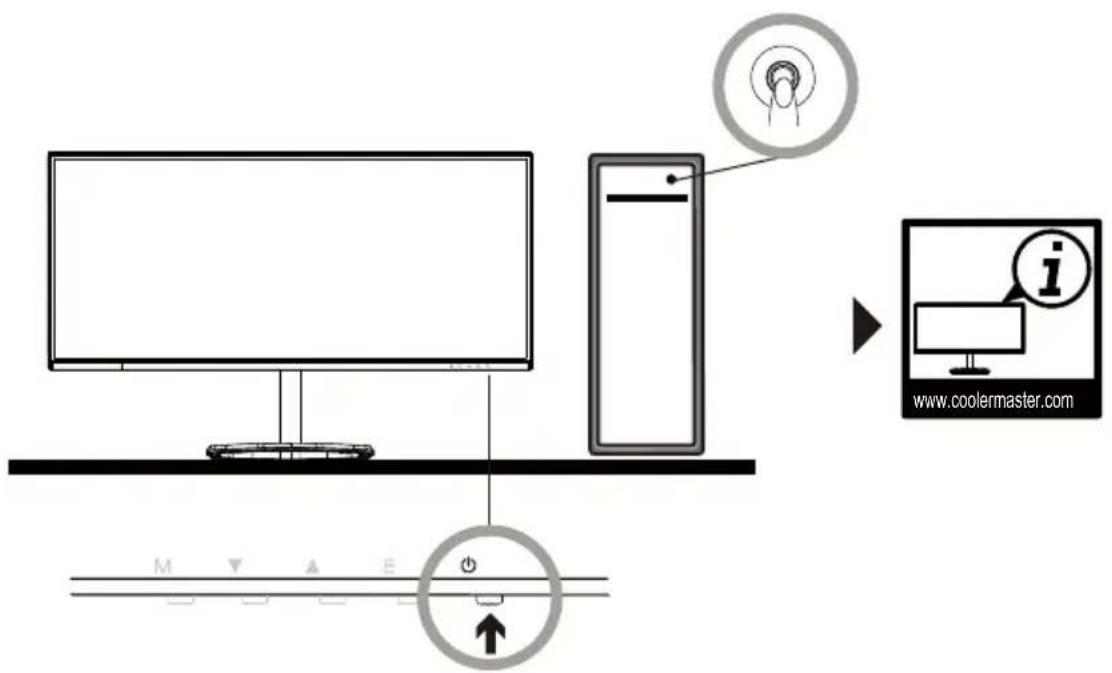
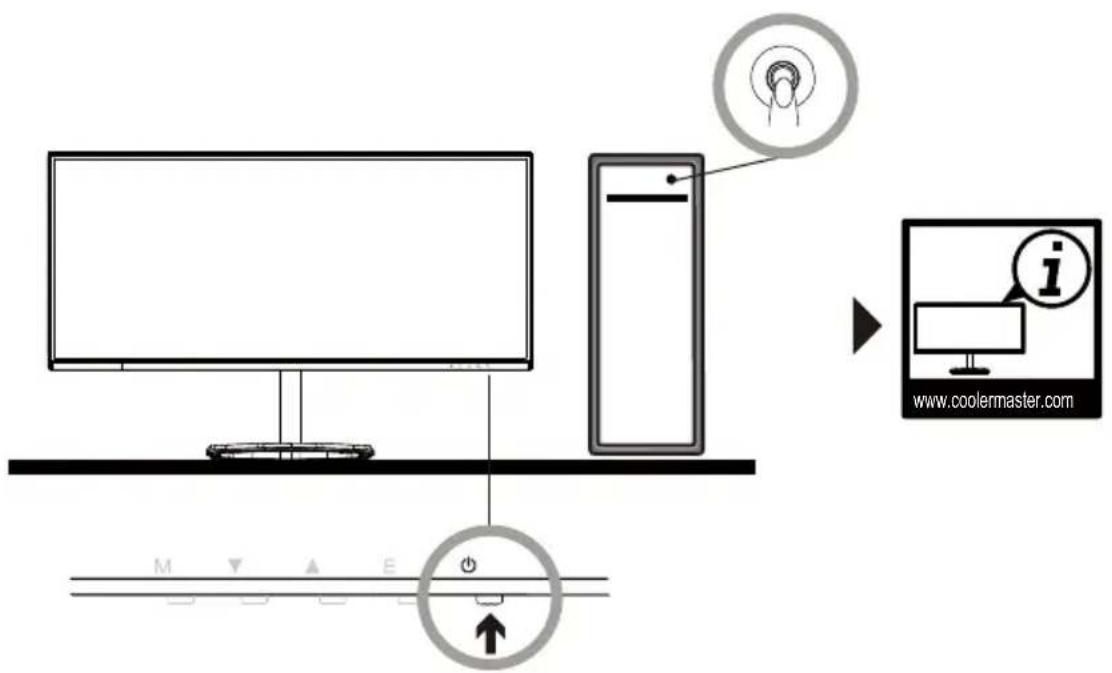
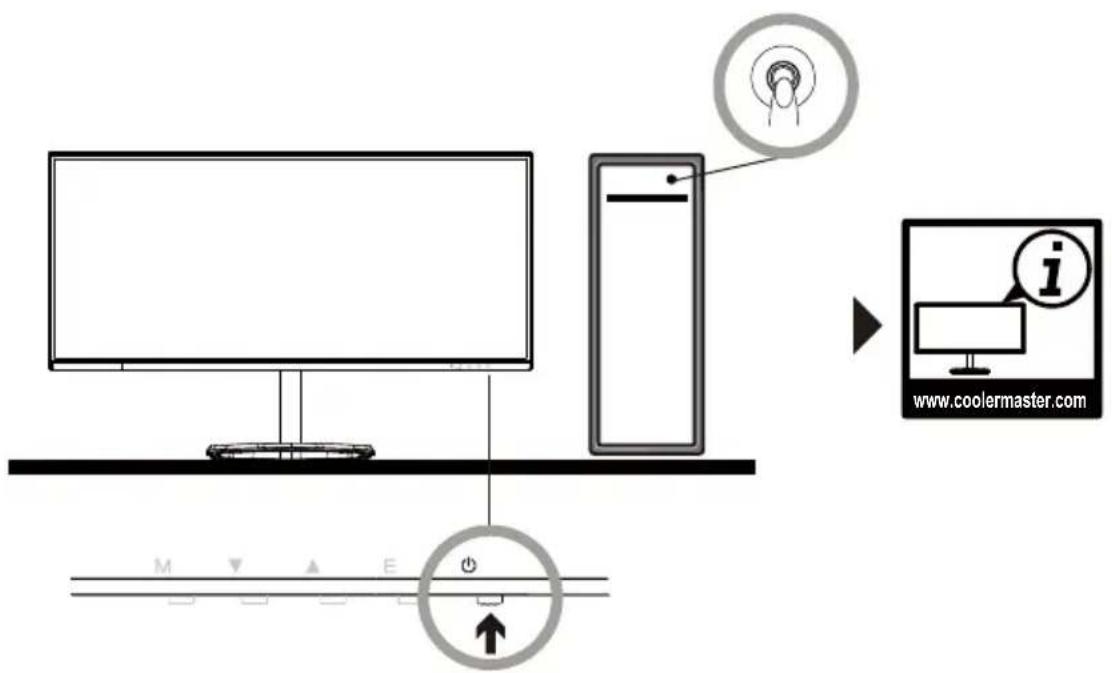
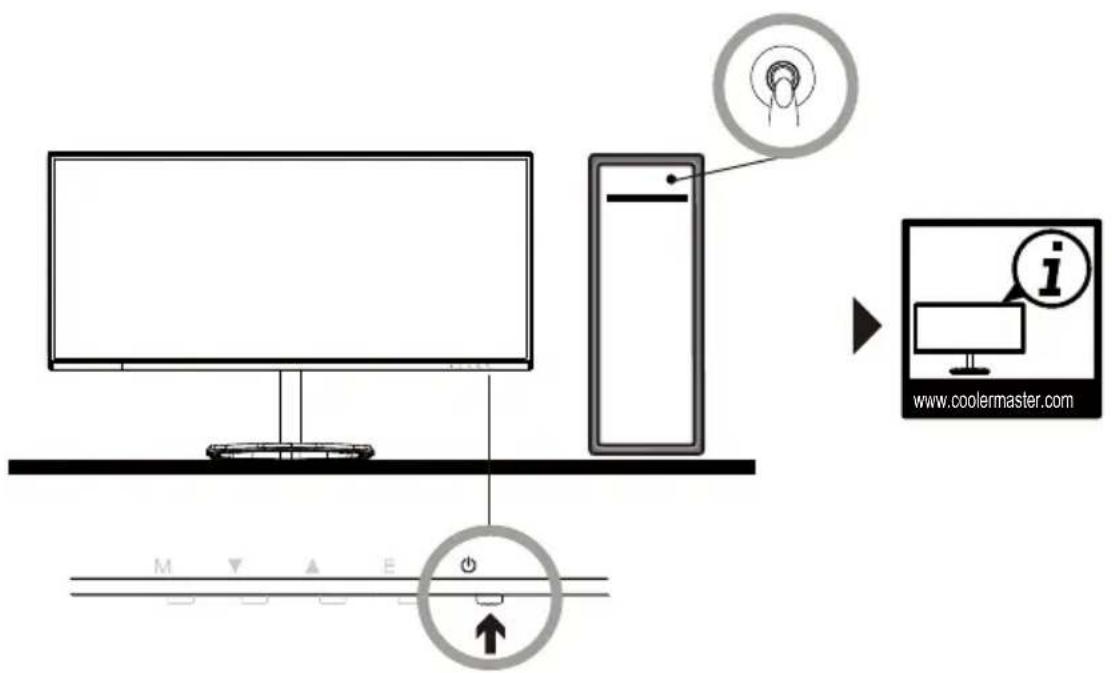
Press any of the buttons to enter the quick navigation menu, i.e., to activate the Quick Mode
| 1 |  | OSD menu | a. Press the button to enter the OSD menu to activate the Quick Modeb. After entering the OSD menu, press the button to enter submenu |
| 2 |  | Quick button for in-game crosshairs | a. Press the button under the Quick Mode to turn on in-game crosshairsb. When the OSD menu is activated, press the button for Down |
| 3 |  | Quick button for Scene Mode | a. Press the button to quickly switch between the Game, Graphic and Standard Scene Modeb. When the OSD menu is activated, press the button for Up |
| 4 |  | Quick button for HDR | a. Press the button under the Quick Mode to switch to HDR to turn on/off the Signal Modeb. When the OSD menu is activated, press the button to return to the last menu/exit the OSD menu |
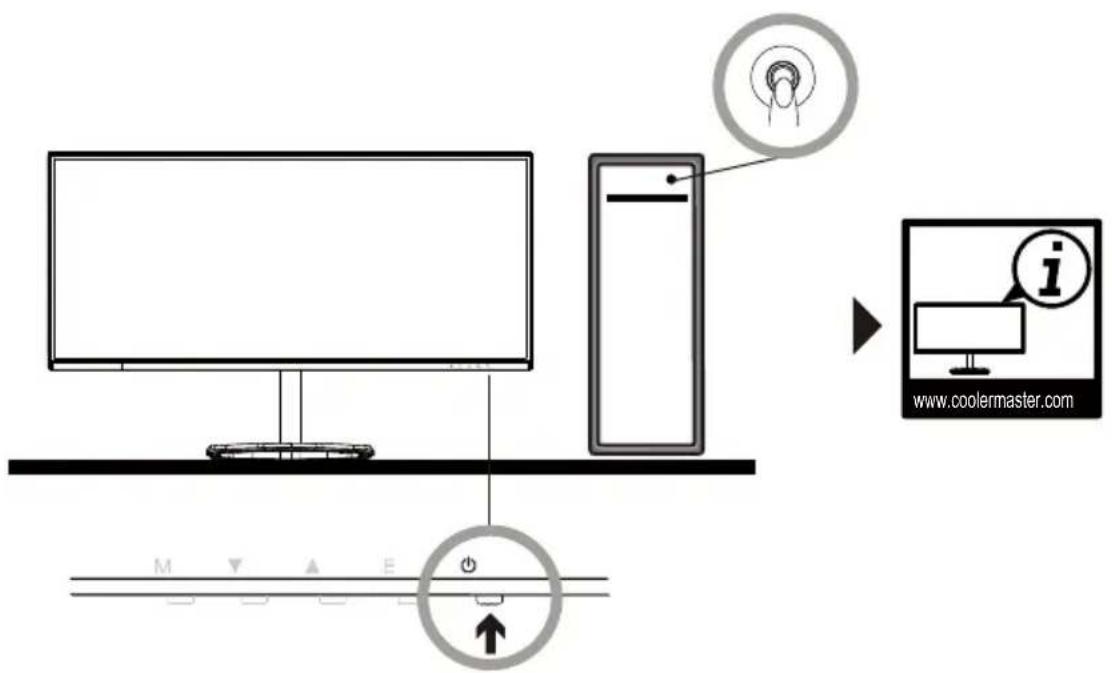
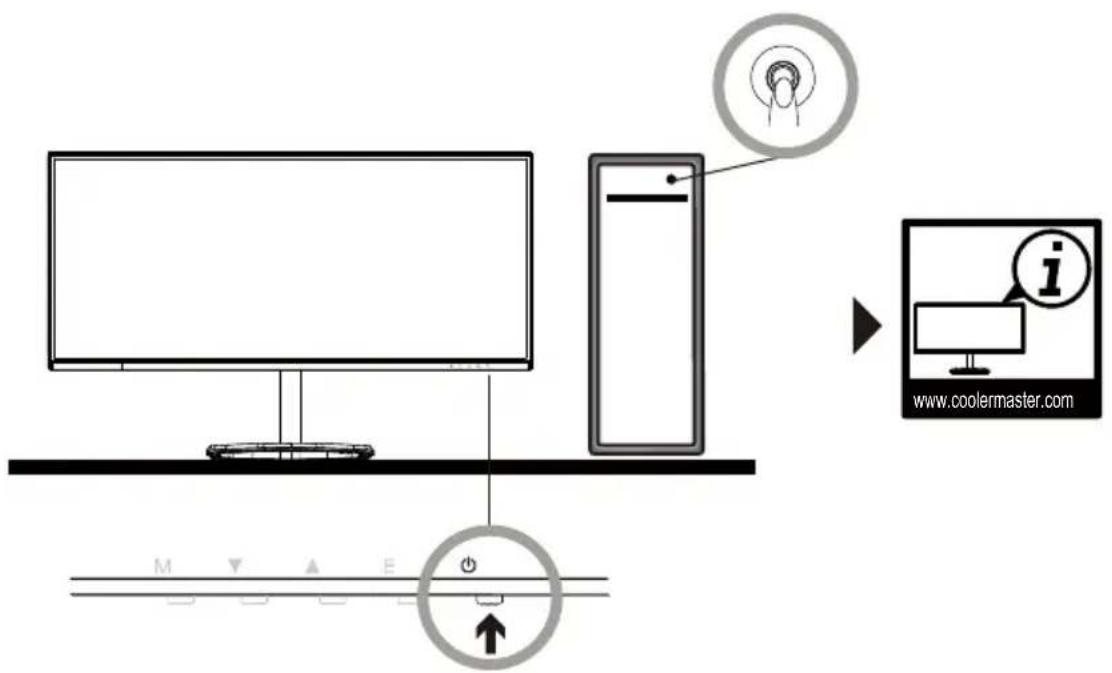
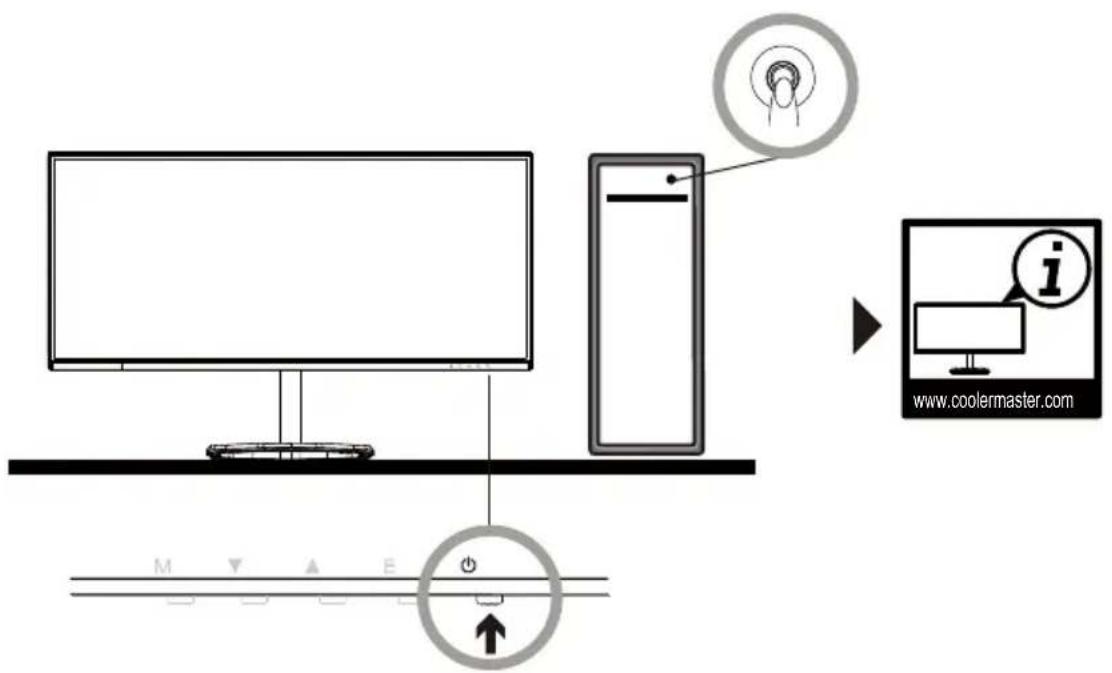
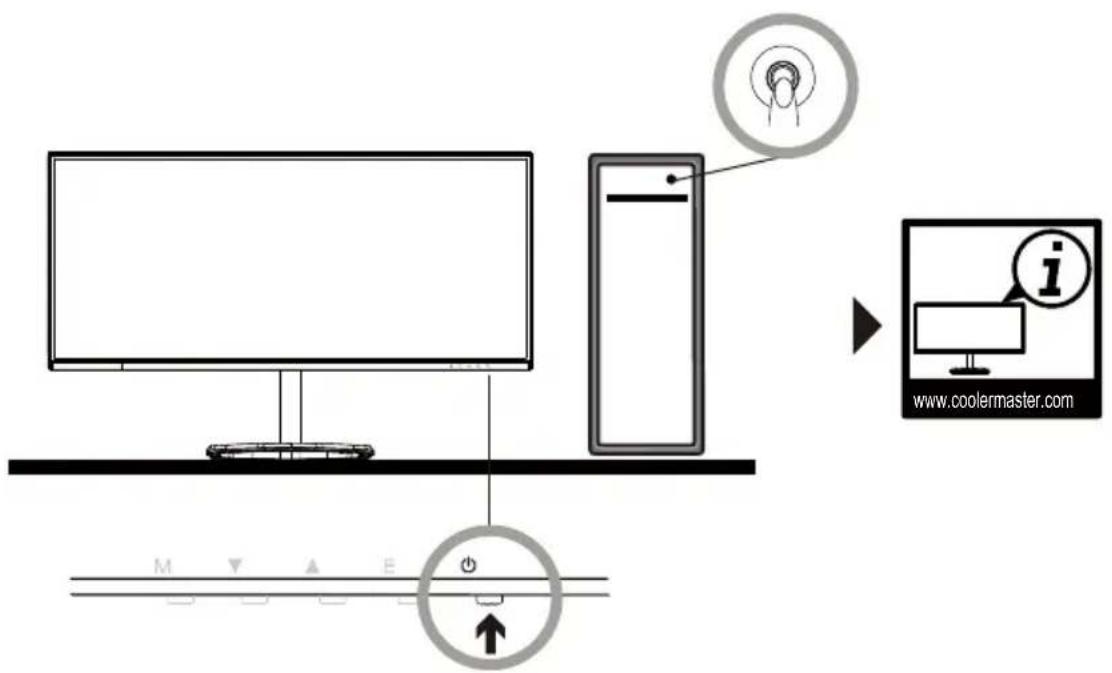
| 5 |  | Power button | Turn on/off the monitor. Blue indicates the power is on.Flashing blue light indicates the monitor is under Standby Mode |
FreeSync
Switch to the Game Mode to activate FreeSync+HDR
This function enables the graphic source supporting FreeSync to adjust the screen refresh rate of the monitor in a dynamic manner based on the energy-saving typical content frame rates. It is almost able to totally prevent screen tearing and stuttering display.

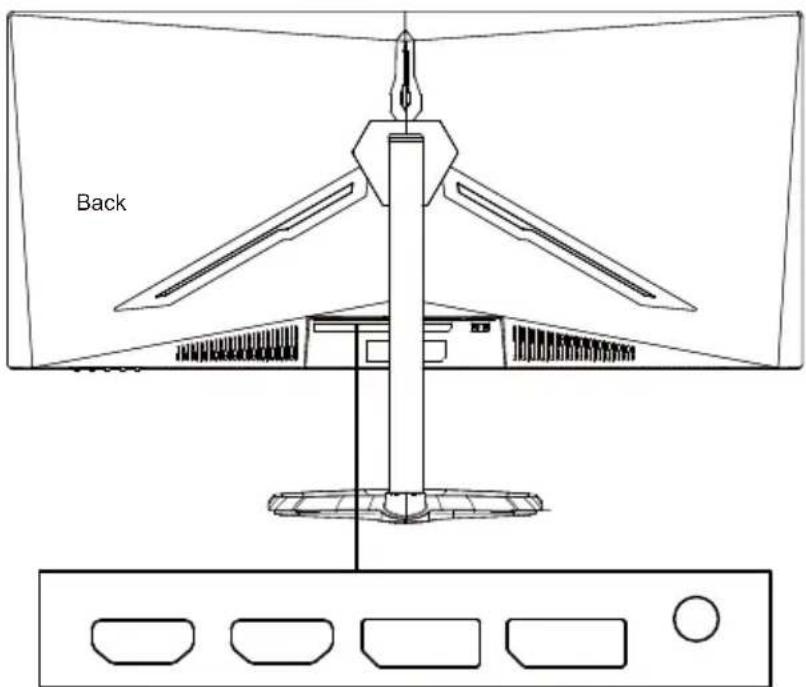
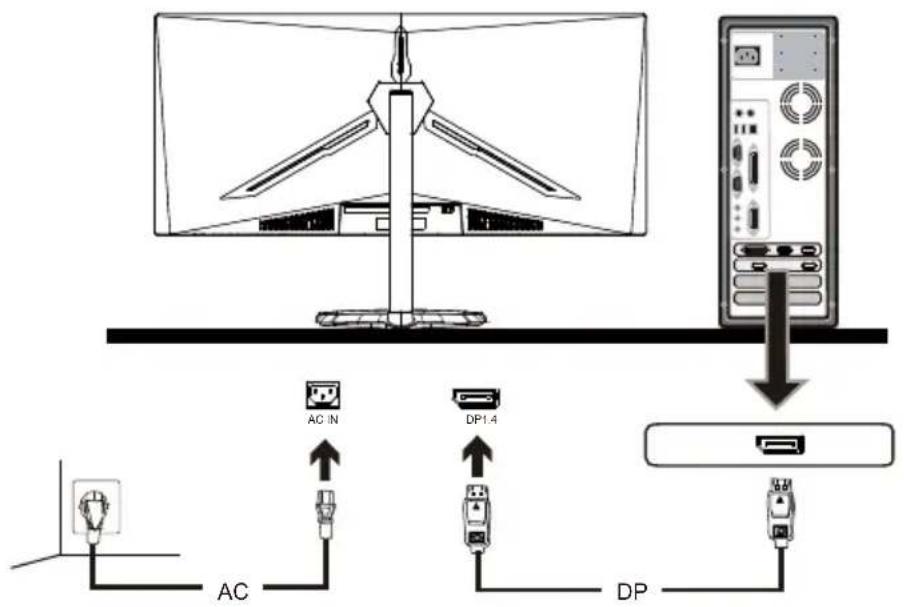
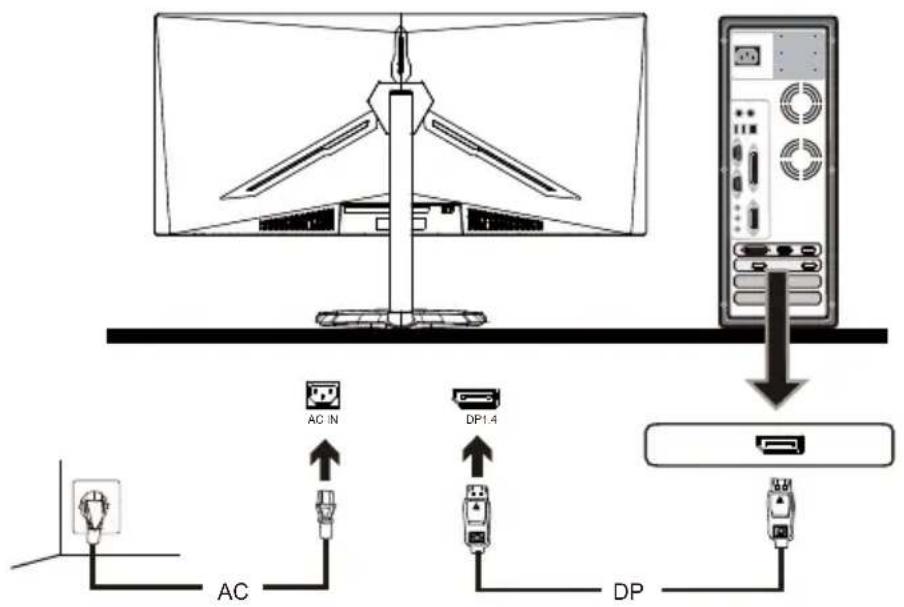
HDMI2(1.4) HDMI2(2.0) DP(1.4) DP(1.4) AUDIO
Notes:
• DP: 144Hz, Adaptive Sync supported under 3440X1440
• HDMI: 100Hz, Adaptive Sync supported under 3440X1440
OSD Function Introductions
| Level1 Level2 Level3 | Default Value | ||
| Input Source | DP1 | ||
| DP2 | |||
| HDMI1 | |||
| HDMI2 | |||
| Brightness/Contrast | Brightness 0~100 90 | ||
| BlackLevel 0~100 | 50 | ||
| DCR | On | Off | |
| Off | |||
| Contrast 0~100 50 | |||
| Color Setting | Gamma | 1.8 | 2.2 |
| 2.0 | |||
| 2.2 | |||
| 2.4 | |||
| 2.6 | |||
| Picture Mode | Standard | Standard | |
| Graphic | |||
| Movie | |||
| Game | |||
| Color Temperature | Warm | Warm | |
| Cool | |||
| USER | |||
| Low Blue Light 0~100 0 | |||
| Hue 0~100 50 | |||
| Saturation | 0~100 | 50 | |
| RGB Range | Limited | Full | |
| Full | |||
| Picture Quality Setting | Sharpness 0~100 50 | ||
| Response Time Override | Off | Normal | |
| Fastest | |||
| Fast | |||
| Normal | |||
| Super Resolution | Off | Off | |
| High | |||
| Middle | |||
| Low | |||
| Dynamic Luminous Control | On | Off | |
| Off | |||
| MPRT | Off | Off | |
| Fastest | |||
| Fast | |||
| Normal | |||
| Display | Aspect Ratio | Wide Screen | Wide Screen |
| 4:3 | |||
| 1:1 | |||
| Auto | |||
| LED Mode (Rear) | Normal | Normal | |
| Off | |||
| Flicker | |||
| Crosshair Transparency | 0-100 0 | ||
OSD Function Introductions
| Level1 Level2 Level3 | Default Value | ||
| Audio | Mute | On | Off |
| Off | |||
| Volume 0~100 50 | |||
| Audio Source | HDMI1 | ||
| HDMI2 | |||
| DP1 | |||
| DP2 | |||
| Multi-Window | Muti-Window | Off | Off |
| PIP Mode | |||
| PBP 2Win | |||
| Sub Win2 Input | DP1 | ||
| DP2 | |||
| HDMI1 | |||
| HDMI2 | |||
| PIP Size | Small | Medium | |
| Medium | |||
| Large | |||
| PIP Position | TopRight | TopRight | |
| TopLeft | |||
| BottomRight | |||
| BottomLeft | |||
| Swap | |||
| OSD | 中文 | EnglishLanguage | |
| English | |||
| 한국의 | |||
| РУССКИЙ | |||
| Español | |||
| 日本語 | |||
| Francais | |||
| 繁體中文 | |||
| OSDH-Position 0~100 50 | |||
| OSDV-Position 0~100 50 | |||
| OSD Transparency 0~100 50 | |||
| OSD Time Out 5~100 20 | |||
| OSD Rotation | Normal | Normal | |
| 90 | |||
| 180 | |||
| 270 | |||
| Other | FreeSync | On | Off |
| Off | |||
| HDR | On | Off | |
| Off | |||
| Reset | |||
Main Menu 【Input】
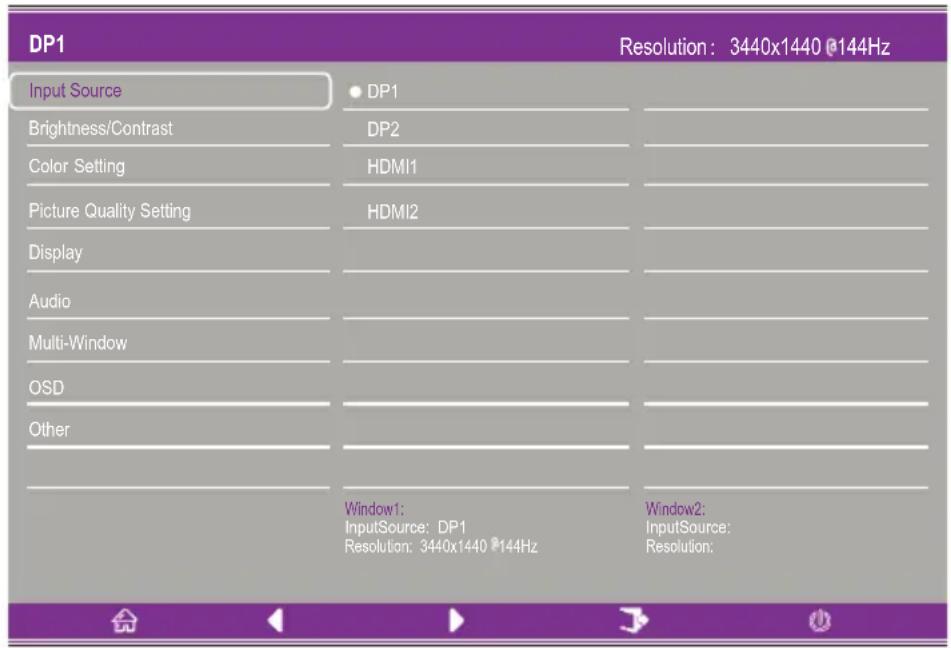
Enter the input menu to switch the input signal.
- DP: 144Hz, Adaptive Sync supported under 3440X1440
• HDMI: 100Hz, Adaptive Sync supported under 3440X1440
| DP1 | Resolution: 3440x1440 @144Hz | |
| Input Source | Brightness | 90 |
| Brightness/Contrast | Blacklevel | 50 |
| Color Setting | Contrast | 50 |
| Picture Quality Setting | DCR | Off |
| Display | ||
| Audio | ||
| Multi-Window | ||
| OSD | ||
| Other | ||
| Window1: InputSource: DP1 Resolution: 3440x1440 @144Hz | Window2: InputSource: Resolution: | |
Enter the Brightness/Contrast menu to adjust the brightness, contrast and dynamic contrast functions.
- Brightness: Adjust the brightness between 0 and 100.
- Contrast: Adjust the contrast between 0 and 100.
- Dynamic Contrast: Enable or Disable the dynamic contrast function.
【Color】
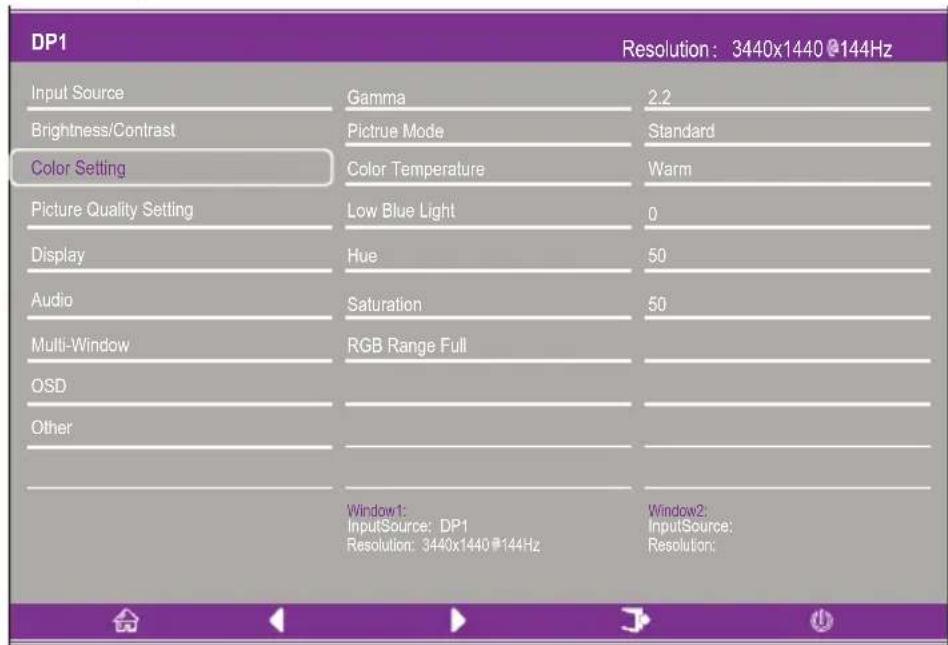
Enter the Color menu to adjust the Gamma, Picture Mode, Color Temperature, Low Blue Light, Hue and Saturation functions etc.
- Gamma: Adjust the gamma between 1.8 and 2.6.
2.Picture Mode: Adjust between different usage scenarios including Standard, Graphic, Movie, Game etc.
3.Color Temperature: Adjust between Cool, Warm and USER settings.
4.Low Blue Light: Adjust the low blue light setting value between 0 and 100.
5.Hue: Adjust the hue for the three colors red, green and blue. - Saturation: Adjust the saturation for the three colors red, green and blue.
【Picture Quality Setting】
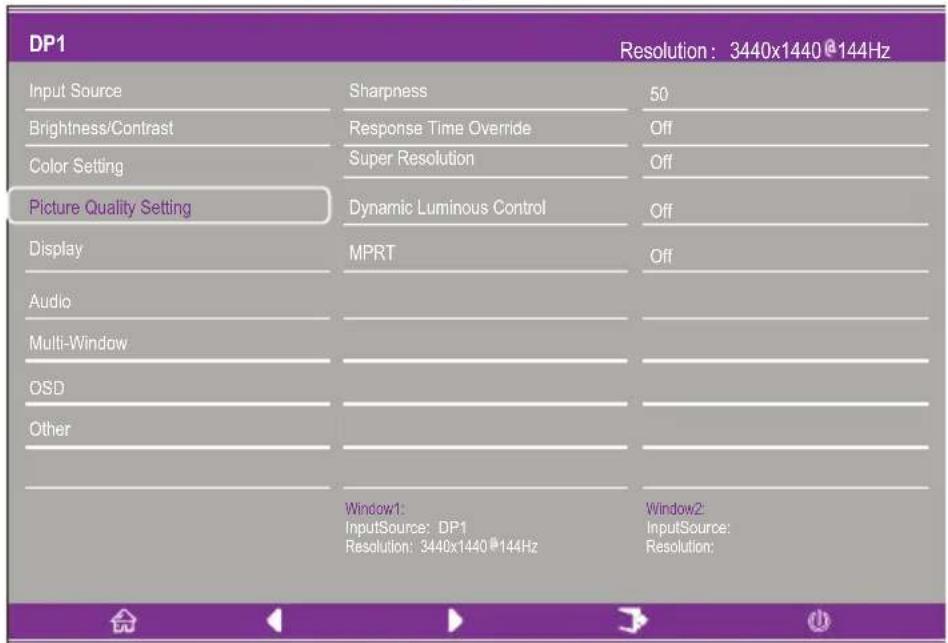
Enter the Picture Quality Setting menu to adjust functions including Sharpness, Response Time Override, Noise Reduction, Super Resolution, and Dynamic Luminous Control etc.
- Sharpness: Adjust the sharpness between 0 and 100.
- Response Time Override: Enable this to increase the response time of the monitor; it can be adjusted between Fastest, Fast, Normal and Off.
- Super Resolution: Enable this to reduce the level of blurriness of edges of images and texts; it can be adjusted between High, Middle, Low and Off.
- Dynamic Luminous Control: Turns the dynamic luminous function On or Off.
Crosshair Transparency
【Display】
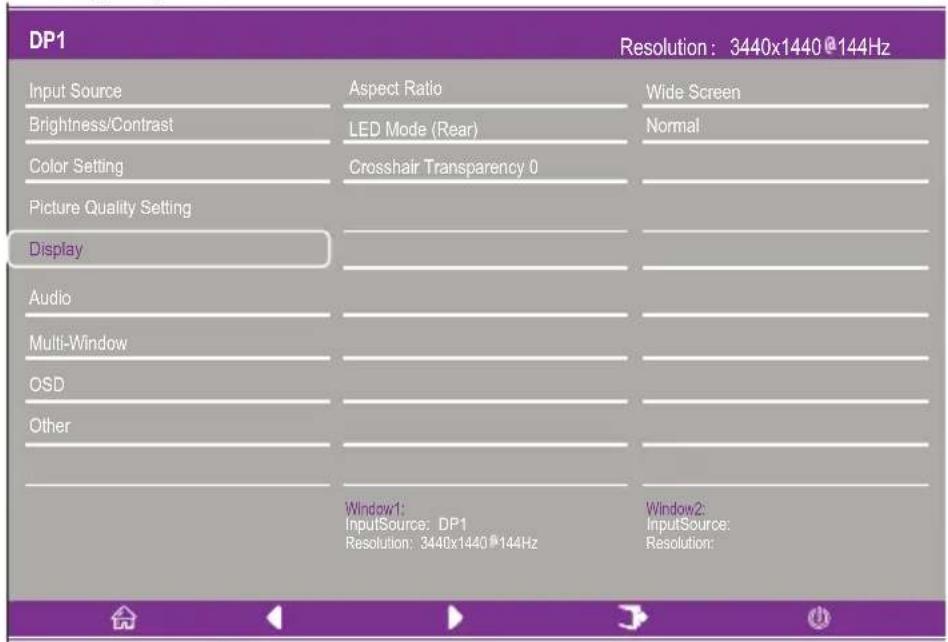
Enter the Display menu to adjust functions including Aspect Ratio and LED Mode (Rear) etc.
- Aspect Ratio: This can be set to Wide Screen, 4:3, 1:1 and Auto.
2.LED Mode (Rear): This can be set as Normal, Off or Flicker.
【Audio】
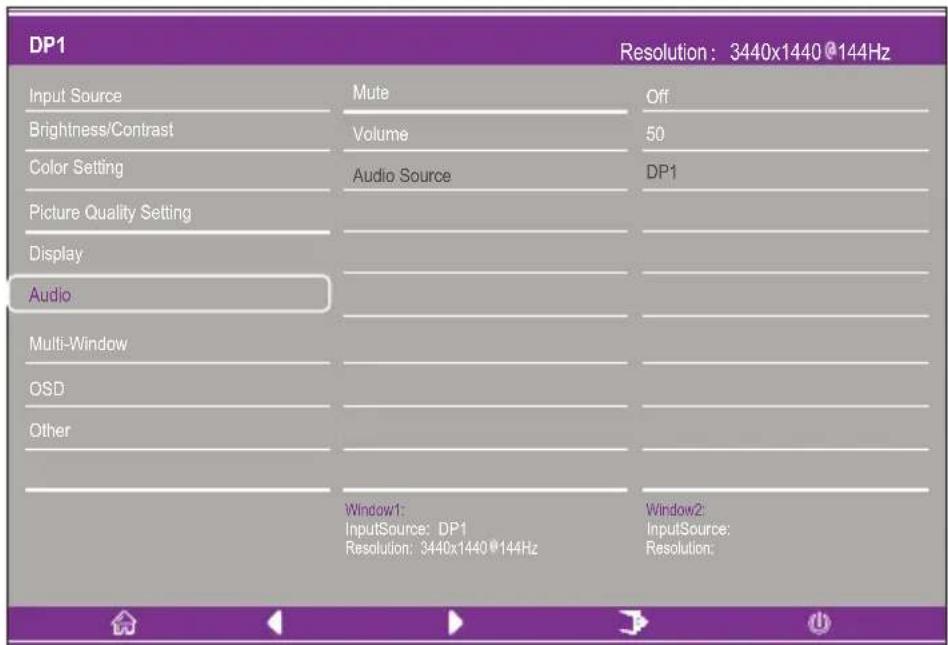
Enter the Audio menu to adjust functions including Mute function, Volume, and Audio Source etc.
-
Mute: Enables or disables the mute function.
-
Volume: Adjust the volume value between 0 and 100.
Audio Source: Select the audio source input port.
【PIP/PBP】
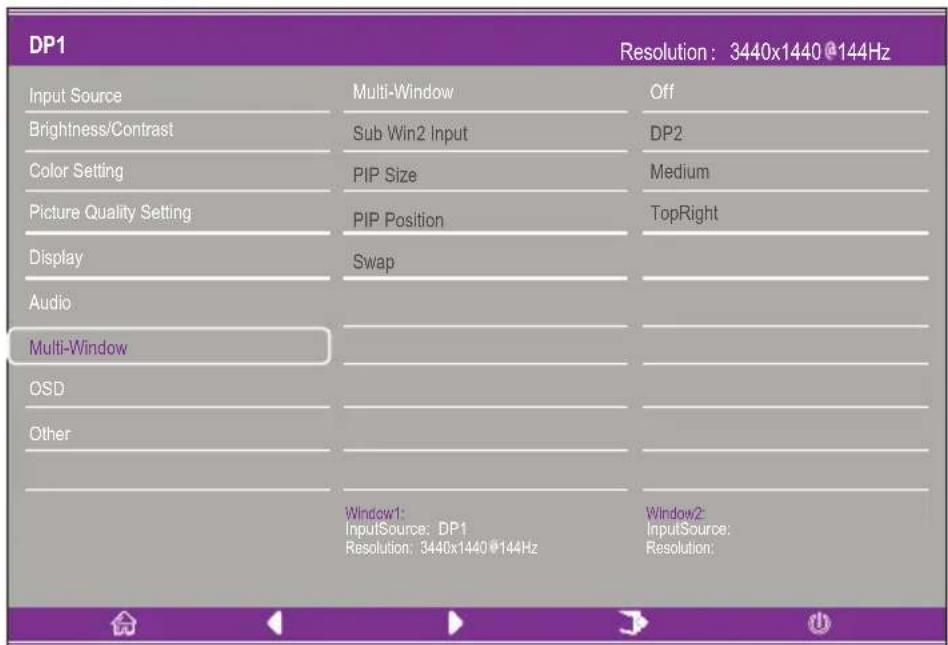
Enter the PIP/PBP menu to adjust functions including PIP/PBP mode, Sub Win2 Input, PIP Size, PIP Position and Swap etc.
- PIP/PBP Mode: Adjust between PIP, PBP and Off.
2.Sub Win2 Input: Allows selecting of the screen 2 input signal source port.
3.PIP Size: Allows adjusting of PIP display size as Small, Medium or Large. - PIP Position: Allows adjusting of PIP display position as TopRight, TopLeft, BottomRight or BottomLeft.
5.Swap: Turns the screen swap function On or Off.
【OSD】

Enter the OSD to adjust functions including Language, OSDH-Position, OSDV-Position, OSD Transparency, OSD Time Out and OSD Rotation etc.
- Language: This can be adjusted to English, Simplified Chinese, Korean, Russian, Spanish, Japanese, French or Traditional Chinese.
- OSDH-Position: Adjust the horizontal position of the OSD between 0 and 100.
- OSDV-Position: Adjust the vertical position of the OSD between 0 and 100.
- OSD Transparency: Adjust the transparency value of the OSD between 0 and 100.
5.OSD Time Out: Set the display time of the OSD between 0 and 100.
6.OSD Rotation: Enables the rotate OSD function; it can be adjusted to Normal, 90 degrees, 180 degrees and 270 degrees etc.
【Other】
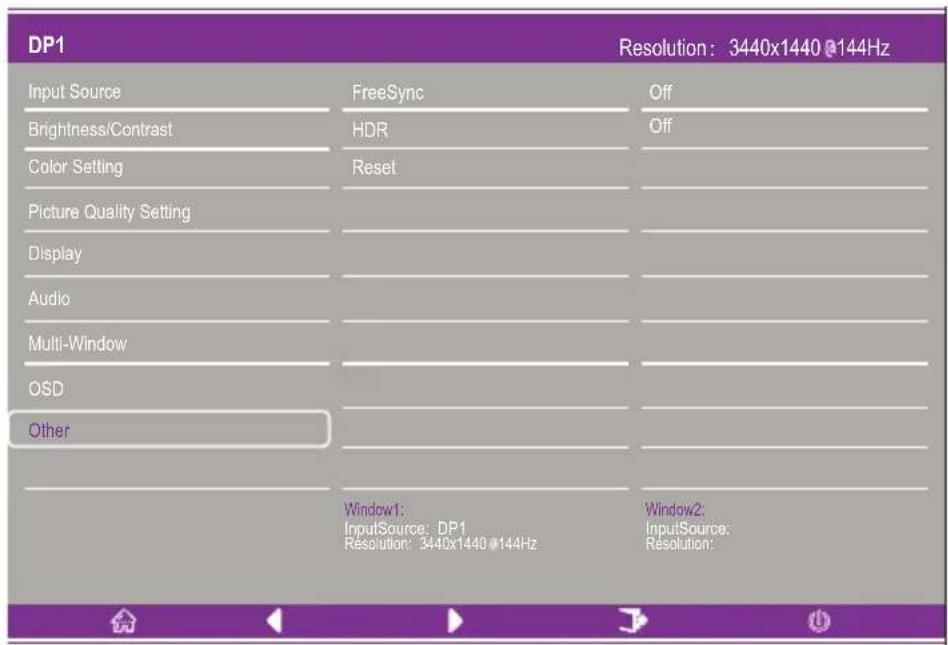
Enter Other to adjust functions including DP Version, FreeSync (Adaptive Sync) and reset all settings etc.
1.FreeSync (Adaptive Sync): Turns the FreeSync (Adaptive Sync) function On or Off.
Please note that the following situations might occur when playing games while FreeSync (Adaptive Sync) is turned On:
- The screen may flicker according to the video card type, game settings and the video you are currently playing. Please try to set the current FreeSync (Adaptive Sync) mode to "Off" or visit the official AND website to update the video card driver.
- The screen may flicker due to different output frequency of the video card when using FreeSync (Adaptive Sync).
- When FreeSync (Adaptive Sync) is set as "ON", changing the resolution may result in tearing of the screen; it is recommended to set FreeSync (Adaptive Sync) as "Off" before changing resolution.
- If FreeSync (Adaptive Sync) is turned On under the 144Hz refresh frequency, it may result in flickering issues or other opposite effects under certain scenario modes.
- Reset: Selecting this allows restoring all setting values back to the default factory status.
Specifications
| LCD Panel | Drive System | TFT Color LCD | |
| Size | 34" | ||
| Pixel Pitch | 0.23175(H) - 0.23175(V) | ||
| Brightness | 400nits(Max.) | ||
| Contrast | 3000:1 | ||
| Visible Angle | 178°(HorizontalVertical) | ||
| Response Time | 1ms (MPRT), OD 4ms (G to G) | ||
| Panel Type | VA | ||
| Horizontal Frequency | 71.52-214.56 KHz | ||
| Vertical Frequency | 48-144 Hz | ||
| Display Color | 16.7 million colors | ||
| Maximum Resolution | DP 1.4:3440 x 1440 144HzHDMI 2.0:3440 x 1440 100Hz | ||
| Power consumption | AC Input Power | 54W Typical, 80W Max | |
| Standby Power (Maximum) | Standby≤0.5W | ||
| Input Connector | (DP) (DP models only)HDMI (HDMI models only) | ||
| Input Video Signal | DP Signal (DP input models only)HDMI Signal (HDMI input models only) | ||
| Speakers | 3W x 2 | ||
| Audio effect | Audio Output (Audio output models only) | ||
| Adapter | 100-240V AC, 50/60Hz 2A | ||
| Environmental Conditions | Operating Temperature: 0°C~40°CStorage Temperature: -20°C~60°COperating Humidity: 10~85%RH | ||
| Machine Dimensions | 808.65*520.82*263.9mm | ||
| Weight (Net Weight) | 6.2 KG / Unit (Net Weight) | ||
| Machine Specifications | Tilt: -5° to +15°Rotation: Can be rotated to either the left or right by 45 degreesHeight Adjustment: Lifting base; stroke 0-100mmRemovable Stand: Yes | ||
| Regulatory ComplianceR38755HDMI HIGH-DEFINITION MULTIMEDIA INTERFACEHDMI, HDMI high definition multimedia interface and the HDMI logo are trademarks or registered trademarks of HDMI Licensing Administrator, Inc. in the U.S. and other countries. | |||
If you have any usage problems, please visit: https://www.coolermaster.com/warranty
Declaration of Restricted Substances
| Equipment name : LCD Monitor : GM34-CW Type designation (Type) | ||||||
| Unit | Restricted substances and its chemical symbols | |||||
| Lead(Pb) | Mercury(Hg) | Cadmium(Cd) | Hexavalent chromium( Cr+6 ) | Polybrominated biphenyls(PBB) | Polybrominated diphenyl ethers(PBDE) | |
| Internal and external cases(External case, case, support...) | ○ | ○ | ○ | ○ | ○ | ○ |
| Main Board | - | ○ | ○ | ○ | ○ | ○ |
| Other Circuit Boards | - | ○ | ○ | ○ | ○ | ○ |
| LCD Display Panel | ○ | ○ | ○ | ○ | ○ | ○ |
| Speakers | ○ | ○ | ○ | ○ | ○ | ○ |
| Base | ○ | ○ | ○ | ○ | ○ | ○ |
| Power Supply(Switching adapter) | - | ○ | ○ | ○ | ○ | ○ |
| Accessories(Power cable, HDMI signal cable...) | ○ | ○ | ○ | ○ | ○ | ○ |
| Other fixed components(Screws, clamps, latches) | ○ | ○ | ○ | ○ | ○ | ○ |
| Note 1: “Exceeding 0.1 wt %” and “exceeding 0.01 wt %” indicate that the percentage content of the restricted substance exceeds the reference percentage value of presence condition.Note 2: “○” indicates that the percentage content of the restricted substance does not exceed the percentage of reference value of presence.Note 3: The “-” indicates that the restricted substance corresponds to the exemption. | ||||||
GM34-CW
Cooler Master 34" gebogen gaming monitor
natural_image
Line drawing of a modern flat-screen monitor with a curved screen and stand (no text or symbols)Inhoudsopgave
natural_image
Diagram of a mechanical or architectural component with directional arrows indicating movement or force (no text or symbols present)2
natural_image
Line drawing of a mechanical housing with hands holding it, showing internal components and mounting plate (no text or symbols)3
natural_image
Illustration of a hand using a tool to adjust or install electronic components on a device chassis (no text or symbols visible)4
5
natural_image
Line drawing of a hand using a tool to adjust or install a component inside a rectangular device (no text or symbols visible)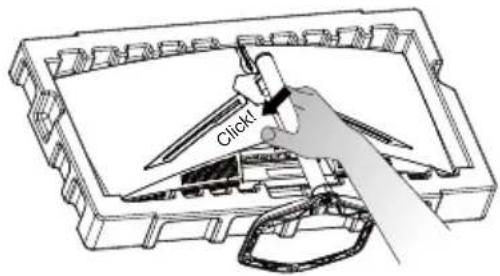
6
natural_image
Illustration of two hands holding a blank rectangular monitor (no text or symbols visible)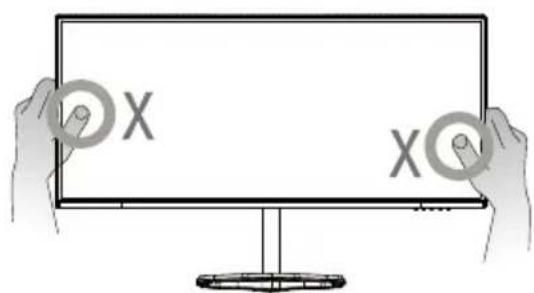
7
8
natural_image
Line drawing of hands assembling a mechanical component (no text or symbols)2
natural_image
Illustration of a hand using a tool to adjust or install a component inside a device casing (no text or symbols visible)3
4
5
natural_image
Illustration of two hands holding a blank tablet (no text or symbols)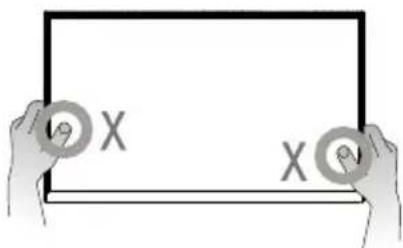
natural_image
Diagram showing a wall-mounted device connected to a mounted component (no text or symbols present)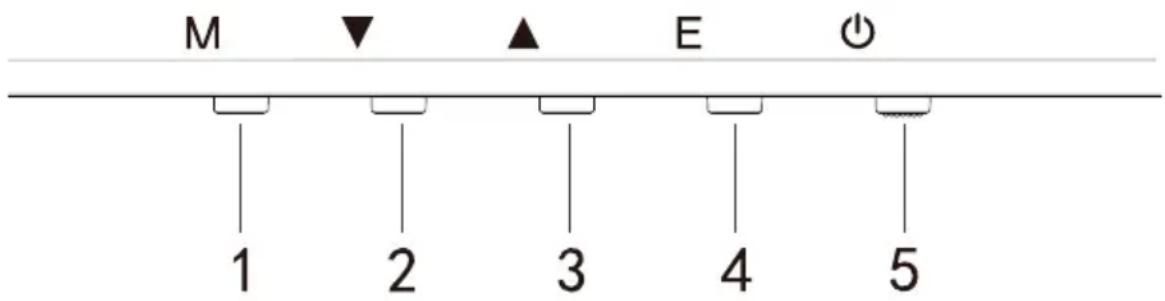
natural_image
Line drawing of a modern flat-screen monitor with a curved screen and stand (no text or symbols)【French】
Table des matières
natural_image
Diagram of a storage or rack system with directional arrows indicating flow or movement (no text or symbols)2
natural_image
Line drawing of a mechanical housing with hands holding it, no text or symbols present3

natural_image
Illustration of a hand using a tool to adjust or install electronic components on a device chassis (no text or symbols visible)4
5
natural_image
Line drawing of a hand using a tool to adjust or install a component inside a rectangular device (no text or symbols visible)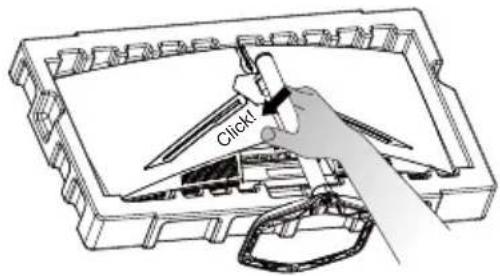
6
natural_image
Illustration of two hands holding a blank rectangular monitor (no text or symbols visible)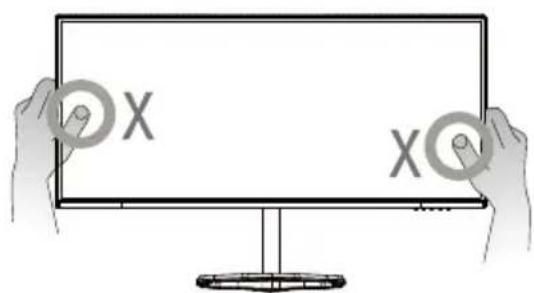
7
8
natural_image
Line drawing of hands assembling a mechanical component (no text or symbols)2
natural_image
Diagram of a hand using a tool to adjust or install a component inside a device casing (no text or symbols visible)3
4
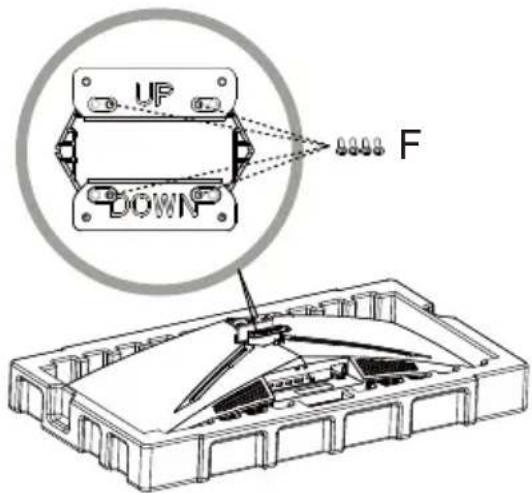
5
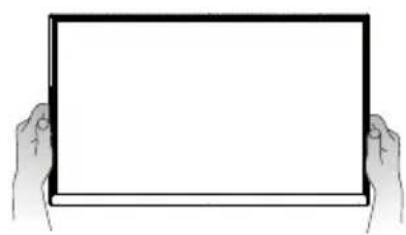
natural_image
Illustration of two hands holding a blank tablet device (no text or symbols visible)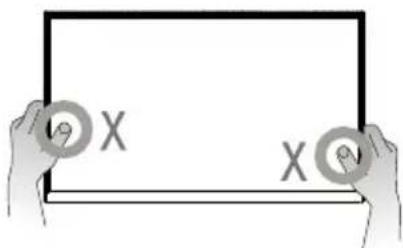
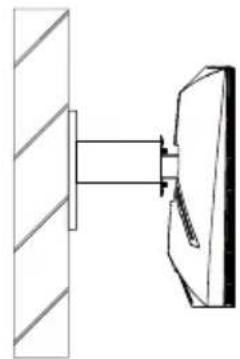
natural_image
Diagram showing a wall-mounted device connected to a vertical panel, with no visible text or symbols.natural_image
Line drawing of a modern flat-screen monitor with a curved screen and stand (no text or symbols)Inhalt
natural_image
Diagram of a 3D container with internal compartments and directional arrows indicating flow or movement (no text or symbols)2
natural_image
Line drawing of a mechanical housing component being handled by two hands (no text or symbols)3
natural_image
Illustration of a hand using a tool to adjust or install electronic components on a device chassis (no text or symbols visible)4

5
natural_image
Line drawing of a hand using a tool to adjust or install a mechanical component (no text or symbols visible)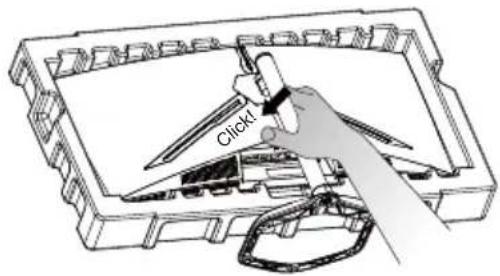
6
natural_image
Illustration of two hands holding a blank rectangular monitor (no text or symbols visible)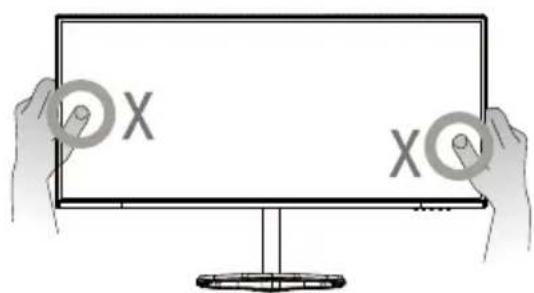
7
8
natural_image
Line drawing of hands holding a mechanical component with internal components (no text or symbols)2
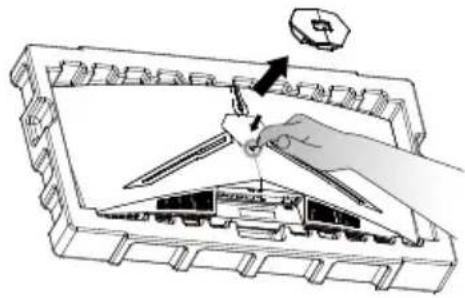
natural_image
Illustration of a hand using a tool to adjust or install a device inside a tray (no text or symbols visible)3
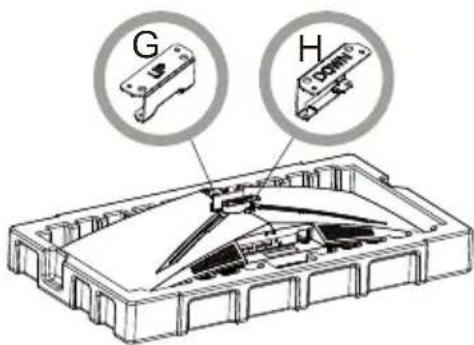
4
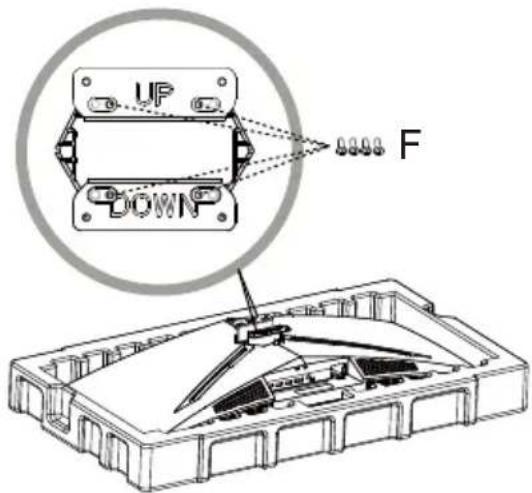
5
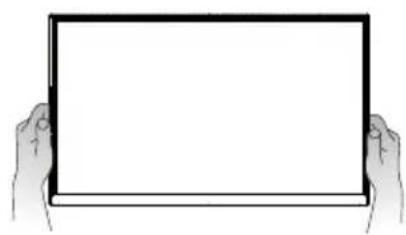
natural_image
Illustration of two hands holding a blank tablet (no text or symbols)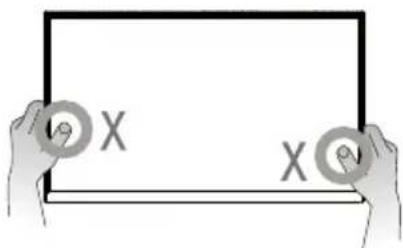
natural_image
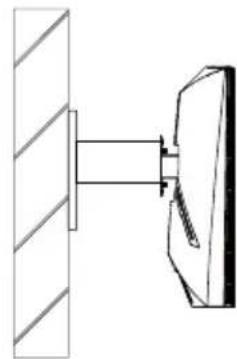
Pure mechanical diagram showing a vertical wall connected to a mounted component (no text or symbols)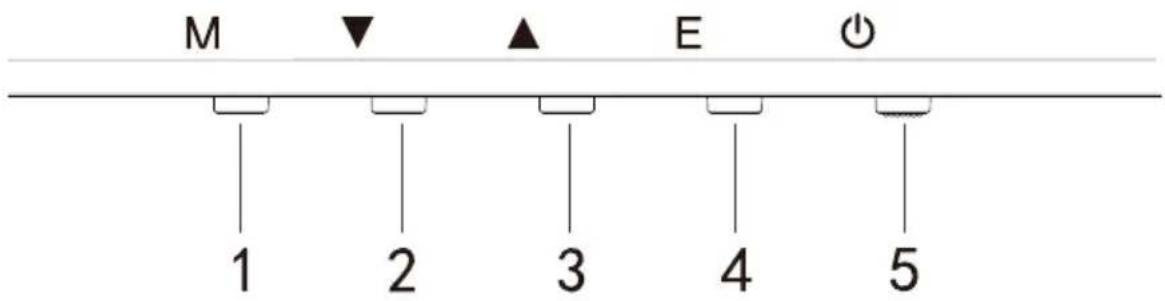
https://www.coolermaster.com/warranty
natural_image
Line drawing of a modern flat-screen monitor with a curved screen and stand (no text or symbols)Indice
natural_image
Diagram of a mechanical or architectural component with internal compartments and directional arrows indicating movement (no text or symbols)2

natural_image
Line drawing of a mechanical housing with hands holding it, showing internal components and structural details (no text or symbols)3
natural_image
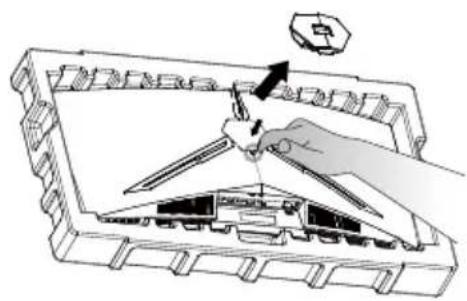
Illustration of a hand using a tool to adjust or install electronic components on a device chassis (no text or symbols visible)4
5
natural_image
Line drawing of a hand using a tool to adjust or install a component inside a rectangular device (no text or symbols visible)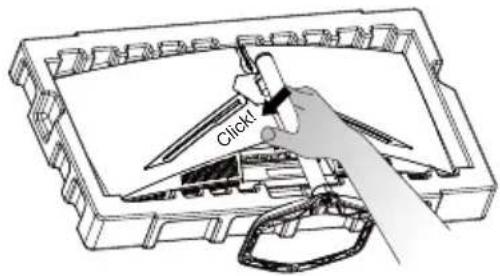
6
natural_image
Illustration of two hands holding a blank rectangular monitor (no text or symbols visible)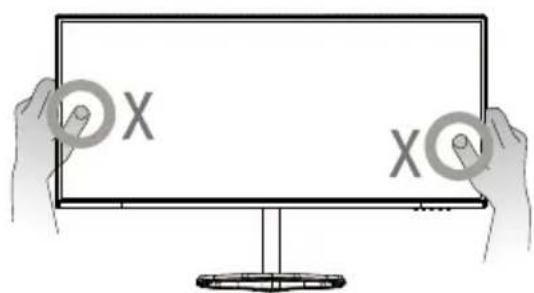
7
8
natural_image
Line drawing of hands holding a 3D mechanical component with internal cavities (no text or symbols)2

natural_image
Illustration of a hand using a tool to adjust or install a component inside a device casing (no text or symbols visible)3
4
5
natural_image
Illustration of two hands holding a blank tablet device (no text or symbols visible)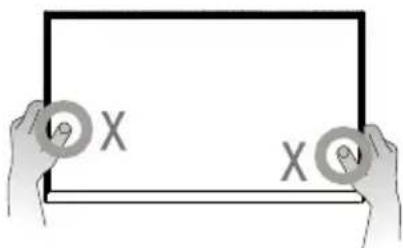
natural_image
Diagram showing a wall-mounted device connected to a vertical panel, with no visible text or symbols.https://www.coolermaster.com/warranty
natural_image
Line drawing of a modern flat-screen monitor with a curved screen and stand (no text or symbols)Spis treści
natural_image
Diagram of a mechanical or architectural component with directional arrows indicating movement, no text or symbols present.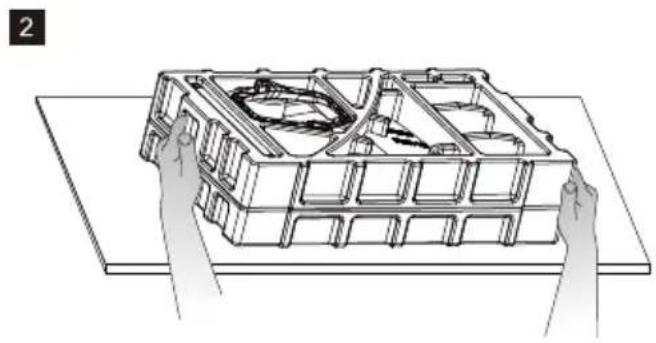
natural_image
Line drawing of hands assembling a multi-chamber plastic housing (no text or symbols)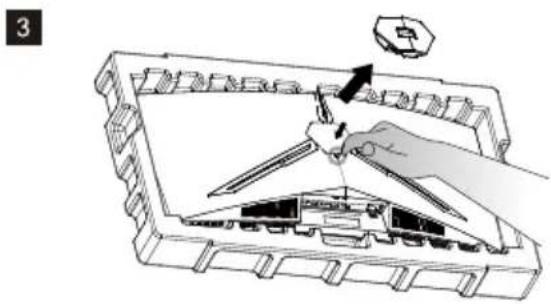
natural_image
Illustration of a hand using a screwdriver to adjust or install a mechanical component (no text or symbols visible)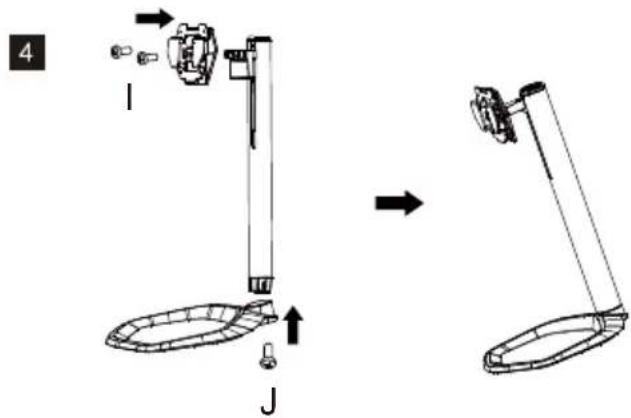
natural_image
Illustration of a hand using scissors to cut or install a mechanical component inside a tray (no text or symbols visible)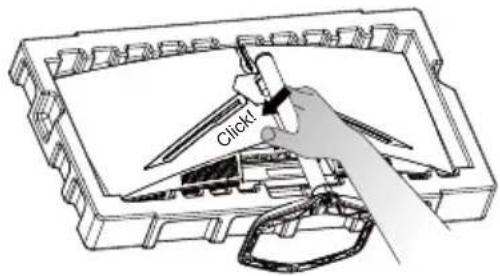
natural_image
Illustration of two hands holding a blank rectangular monitor (no text or symbols visible)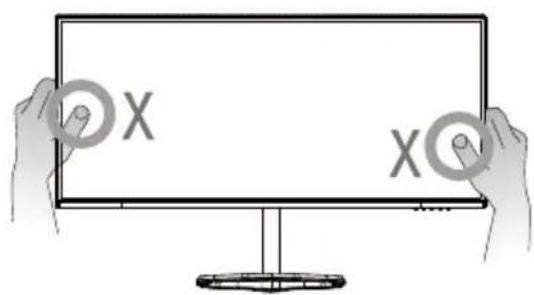
7
8
natural_image
Line drawing of hands assembling a mechanical component (no text or symbols)2
natural_image
Illustration of a hand using a tool to adjust or install a device into a tray (no text or symbols visible)3
4
5
natural_image
Illustration of two hands holding a blank tablet device (no text or symbols visible)
natural_image
Diagram showing a wall-mounted device connected to a vertical panel, with no visible text or symbols.natural_image
Line drawing of a modern flat-screen monitor with a curved screen and stand (no text or symbols)Содержание
natural_image
Diagram of a mechanical or electrical component with directional arrows indicating movement, no text or symbols present.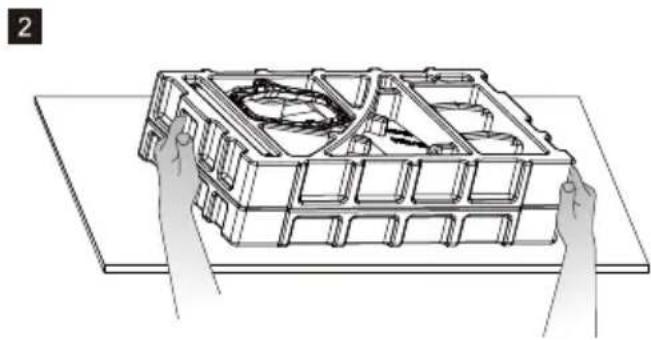
natural_image
Line drawing of a mechanical housing with hands holding it, showing internal components and structural details (no text or symbols)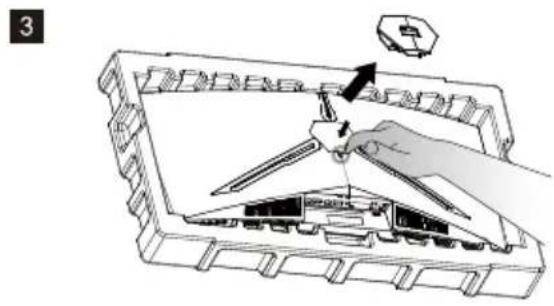
natural_image
Illustration of a hand using a tool to adjust or install a device inside a container (no text or symbols visible)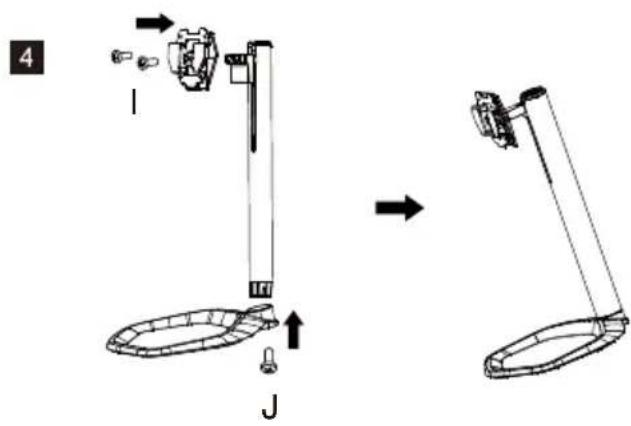
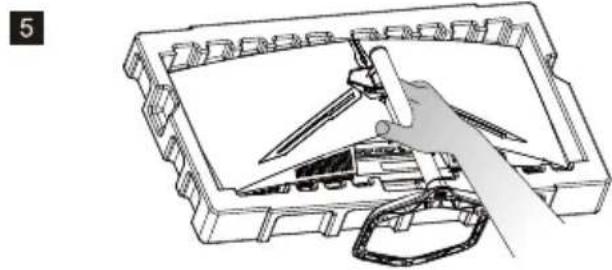
natural_image
Illustration of a hand using scissors to adjust or install a mechanical component inside a toolbox (no text or symbols visible)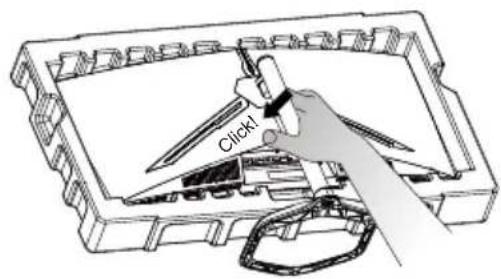
natural_image
Illustration of two hands holding a blank rectangular monitor (no text or symbols visible)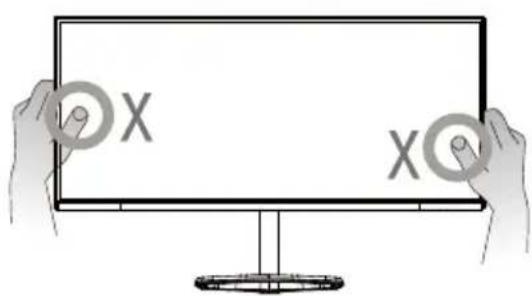
7
8
natural_image
Illustration of hands assembling a multi-compartment electronic device into a tray (no text or symbols visible)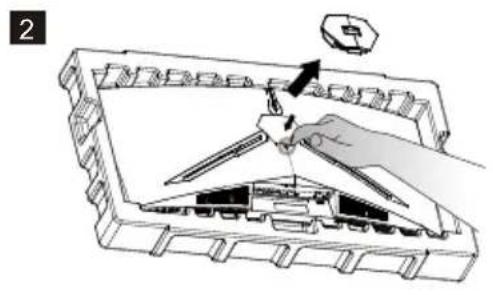
natural_image
Diagram of a hand using a tool to adjust or install a component inside a 3D mechanical housing (no text or symbols visible)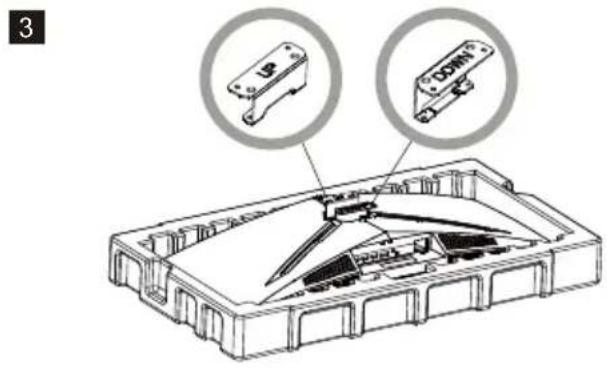
Declaration of Restricted Substances
natural_image
Line drawing of a modern flat-screen monitor with a curved screen and stand (no text or symbols)Índice
natural_image
Diagram of a 3D box-like structure with internal compartments and directional arrows indicating movement (no text or symbols)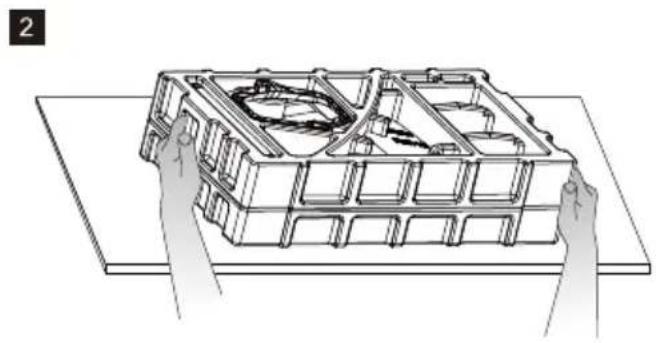
natural_image
Illustration of hands assembling a multi-layered plastic housing (no text or symbols visible)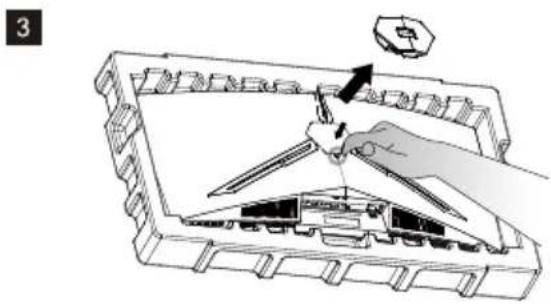
natural_image
Illustration of a hand using a screwdriver to adjust or install a mechanical component (no text or symbols visible)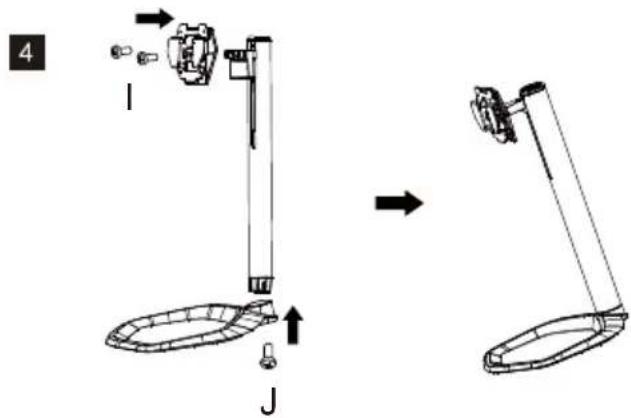
natural_image
Illustration of a hand using a tool to adjust or install a mechanical component inside a tray (no text or symbols visible)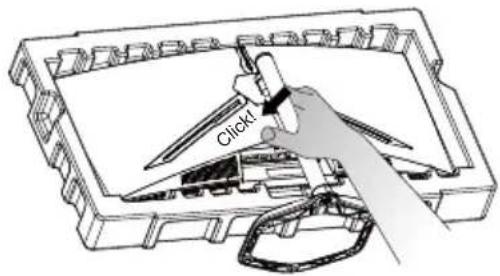
natural_image
Illustration of two hands holding a blank rectangular monitor (no text or symbols visible)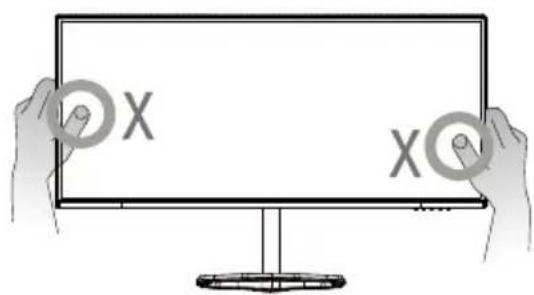
7
8
natural_image
Line drawing of hands assembling a mechanical component into a tray (no text or symbols)2
natural_image
Illustration of a hand using a tool to adjust or install a device inside a tray (no text or symbols visible)3
4
5
natural_image
Illustration of two hands holding a blank tablet (no text or symbols)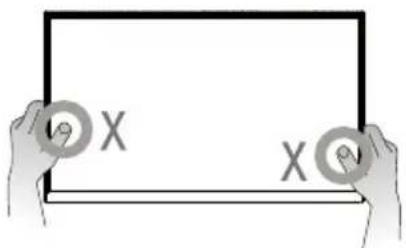
natural_image
Diagram showing a wall-mounted device connected to a vertical panel, with no visible text or symbols.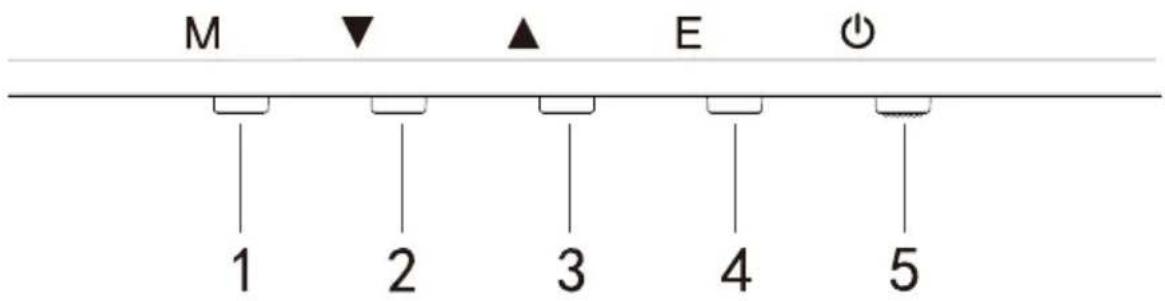
natural_image
Line drawing of a modern flat-screen monitor with a curved screen and stand (no text or symbols)natural_image
Diagram of a 3D box-like structure with internal compartments and directional arrows indicating movement (no text or symbols)2
natural_image
Line drawing of a mechanical housing with hands holding it, no text or symbols present3
natural_image
Illustration of a hand using a tool to adjust or install electronic components on a device chassis (no text or symbols visible)4
5
natural_image
Technical line drawing of a mechanical assembly with a tool inserted into a housing (no text or symbols)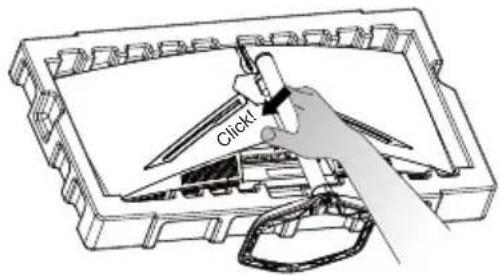
6
natural_image
Illustration of two hands holding a blank rectangular monitor (no text or symbols visible)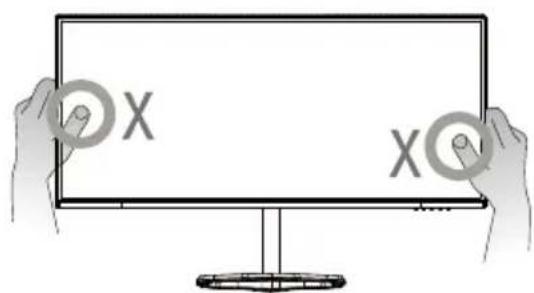
7
8
natural_image
Line drawing of hands assembling a mechanical component (no text or symbols)2
natural_image
Illustration of a hand using a tool to adjust or install a component inside a device casing (no text or symbols visible)3
4
5
natural_image
Illustration of two hands holding a blank tablet device (no text or symbols visible)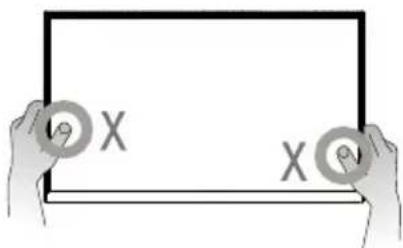
natural_image
Simple line drawing of a wall-mounted device connected to a vertical panel (no text or symbols)Externa kontrollknappar
https://www.coolermaster.com/warranty
- Cooler Master 34" Curved Gaming Monitor
- User Manual
- Table of Contents
- Important Safety Instructions
- Connect the monitor to the base
- Wall Mount Installation Instructions
- External Control Buttons
- Press any of the buttons to enter the quick navigation menu, i.e., to activate the Quick Mode
- FreeSync
- Switch to the Game Mode to activate FreeSync+HDR
- Notes:
- Main Menu 【Input】
- 【Color】
- 【Picture Quality Setting】
- Crosshair Transparency
- 【Display】
- 【Audio】
- 【PIP/PBP】
- 【OSD】
- 【Other】
- Please note that the following situations might occur when playing games while FreeSync (Adaptive Sync) is turned On:
- Declaration of Restricted Substances
- Inhoudsopgave
- Table des matières
- Inhalt
- Indice
- Spis treści
- Содержание
- Índice
- Externa kontrollknappar
Brand : CM Storm
Model : GM34-CW
Category : Monitor