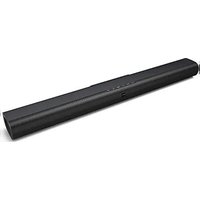
SB-1900P - Remote control VISION - Free user manual and instructions
Find the device manual for free SB-1900P VISION in PDF.


| Brand | VISION |
| Model | SB-1900P (remote control included) |
| Category | Infrared remote control |
| Power | 2 AAA batteries (not included) |
| Range | Approximately 8 meters |
| Buttons | ON, OFF, VOL+, VOL-, MUTE, PLAY, PAIR, EQ, SOURCE (HDMI 1, HDMI 2, HDMI ARC, AUX, BT) |
| Main functions | Power on/off, input selection, volume control, mute, Bluetooth play/pause, Bluetooth pairing, EQ modes |
| EQ modes | Flat, Movie, Music, News (according to manual) |
| Bluetooth | Pairing via PAIR button, compatible with A2DP/AVRCP |
| Compatibility | VISION SB-1900P soundbar |
| Cleaning | Wipe with a soft, dry cloth |
| Safety | Do not expose to humidity, do not open, replace batteries out of reach of children |
| Used batteries | Recycle according to local regulations |
| Repairability | No user-serviceable parts |
| General information | Manual available online, manufacturer's warranty |
Frequently Asked Questions - SB-1900P VISION
User questions about SB-1900P VISION
0 question about this device. Answer the ones you know or ask your own.
Ask a new question about this device
Download the instructions for your Remote control in PDF format for free! Find your manual SB-1900P - VISION and take your electronic device back in hand. On this page are published all the documents necessary for the use of your device. SB-1900P by VISION.
USER MANUAL SB-1900P VISION
www.visionaudiovisual.com/techaudio/sb-1900p/
DECLARATION OF CONFORMITY
Where applicable Vision products are certified and comply with all known local regulations to a 'CB Certification' standard. Vision commits to ensure all products are fully compliant with all applicable certification standards for sale in the EU and other participating countries.
The product described in this owner manual is in compliance with RoHS (EU directive 2002/95/EC), and WEEE (EU directive 2002/96/EC) standards. This product should be returned to the place of purchase at the end of its useful life for recycling.
WARNINGS



CAUTION: TO REDUCE THE RISK OF ELECTRIC SHOCK DO NOT REMOVE COVER (OR BACK). NO USER-SERVICEABLE PARTS INSIDE. REFER SERVICING TO QUALIFIED SERVICE PERSONNEL.

The lightning flash with arrowhead symbol, within an equilateral triangle, is intended to alert the user to the presence of uninsulated "dangerous voltage" within the product's enclosure that may be of sufficient magnitude to constitute a risk of electric shock to persons.

The exclamation point within an equilateral triangle, is intended to alert the user to the presence of important operating and maintenance (servicing) instructions in the literature accompanying the appliance.
WARNING: TO REDUCE THE RISK OF FIRE OR ELECTRIC SHOCK, DO NOT EXPOSE THIS APPLIANCE TO RAIN OR MOISTURE.
All products are designed and imported into the EU by 'Vision' who is wholly owned by 'Azlan Logistics Ltd.', Registered in England Nr. 04625566 at Lion House, 4 Pioneer Business Park, Clifton Moor, York, YO30 4GH. WEEE Registration: GD0046SY



DECLARATION OF ORIGIN
All Vision products are made in the People's Republic of China (PRC).
USE ONLY DOMESTIC AC OUTLETS
Connecting the unit to an outlet supplying a higher voltage may create a fire hazard.
HANDLE THE POWER CORD WITH CARE
Do not disconnect the plug from the AC outlet by pulling the cord; always pull the plug itself. Pulling the cord may damage it. If you do not intend to use your unit for any considerable length of time, unplug the unit. Do not place furniture or other heavy objects on the cord, and try to avoid dropping heavy objects on it. Do not tie a knot in the power cord. Not only could the cord be damaged, but a short circuit could also be caused with a consequent fire hazard.
PLACE OF INSTALLATION
Avoid installing this product under the following conditions:
- Moist or humid places
- Places exposed to direct sunlight or close to heating equipment
• Extremely cold locations - Places subject to excessive vibration or dust
- Poorly ventilated places
Do not expose this product to dripping or splashing. DO NOT PLACE OBJECTS FILLED WITH LIQUIDS ON OR NEAR THIS PRODUCT!
MOVING THE UNIT
Before moving the unit, be sure to pull out the power cord from the AC outlet and disconnect the interconnection cords with other units.
WARNING SIGNS
If you detect an abnormal smell or smoke, turn this product off immediately and unplug the power cord. Contact your reseller or Vision.
PACKAGING
Save all packing material. It is essential for shipping in the event the unit ever needs repair.
IF ORIGINAL PACKAGING IS NOT USED TO RETURN THE UNIT TO THE SERVICE CENTRE, DAMAGE IN TRANSIT WILL NOT BE COVERED BY WARRANTY.
WATTS
The most consistent standards for measuring watts are "Program Power" and "RMS" because these measure average sustained levels.
Where loudspeakers have integrated amplifiers, then load (resistance, measured in ohms) is known so the wattage rating is fixed.
SPECIAL WARNINGS
Never use this product near an aircraft or medical facility. It can cause interference.
Use of product in the following locations may result in abnormal video and audio output:
• Product installed in the walls made of concrete
• Product situated near refrigerator. Microwave oven, or other metal items
• A cluttered room where the wireless signals may be blocked
This product has been tested and manufactured to comply with each country's safety rules, however there is no guarantee that interference will not occur in some scenarios.
FEDERAL COMMUNICATIONS COMMISSION INTERFERENCE STATEMENT
This equipment has been tested and found to comply with the limits for a Class B digital device, pursuant to Part 15 of the FCC Rules. This equipment generates, uses and can radiate radio frequency energy and may in extreme cases cause harmful interference to radio communications. If this happens the user should try:
- Relocating the receiving antenna
• Increasing the separation between the equipment and receiver - Connect the equipment to a different power circuit.
RADIATION EXPOSURE STATEMENT:
This equipment complies with IC radiation exposure limits set forth for an uncontrolled environment. This equipment should be installed and operated with minimum distance 20cm between the radiator and your body.
CHASSIS
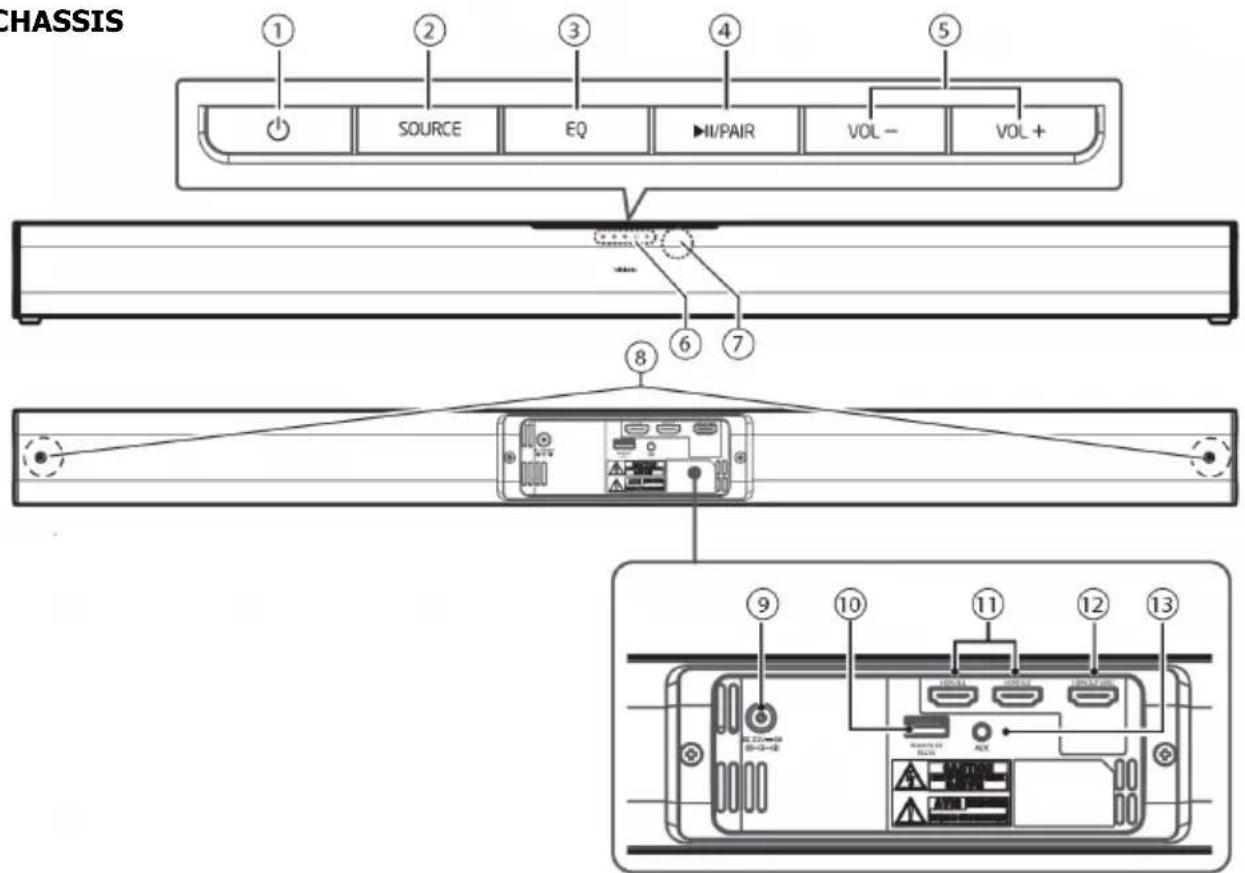
- Standby button
- SOURCE button
- EQ Equaliser button
-
PLAY/PAIR button
-
Pause or play content on Bluetooth source device.
-
Press and hold to activate pairing function and disconnect existing paired device.
-
VOL+/VOL- buttons. If BT selected this does not affect the volume level of the device.
-
LED Indicators on front
• Red STANDBY
- Green AUX
- Blue Bluetooth
- White HDMI 1
• Flashing White HDMI 2
• Orange HDMI ARC
- IR remote receiver
- Wall bracket screws
- DC power socket
- USB-A Socket for changing BT name and pin, and RS-232 control
- HDMI 1 and 2 inputs
- HDMI OUT ARC
- AUX 3.5mm Minijack input Socket
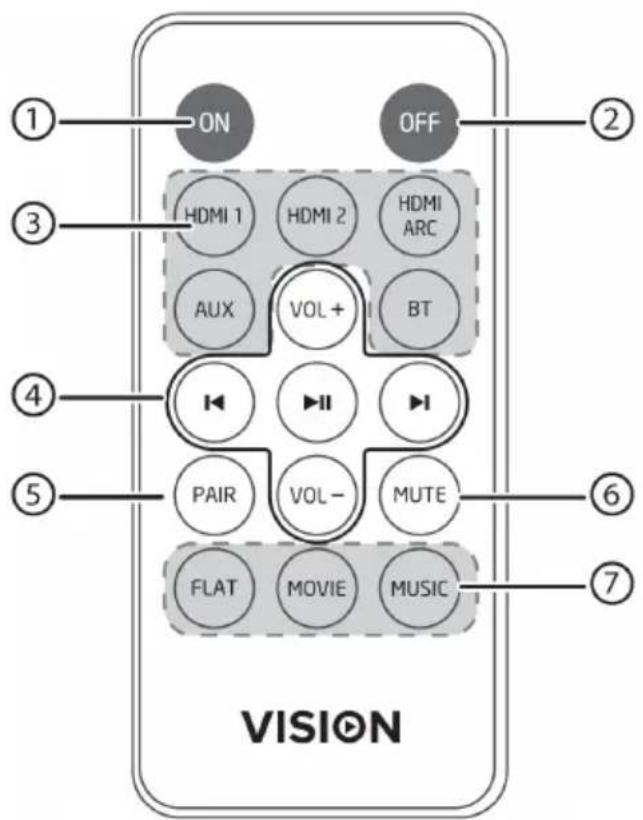
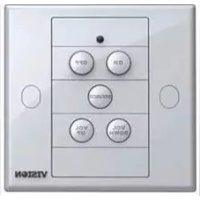
REMOTE CONTROL
- On
- Off
- Input selection
- VOL volume up and down PLAY if in BT mode, controls the source device
- PAIR activates pairing function and disconnect existing paired device.
- Mute
- EQ Equaliser buttons
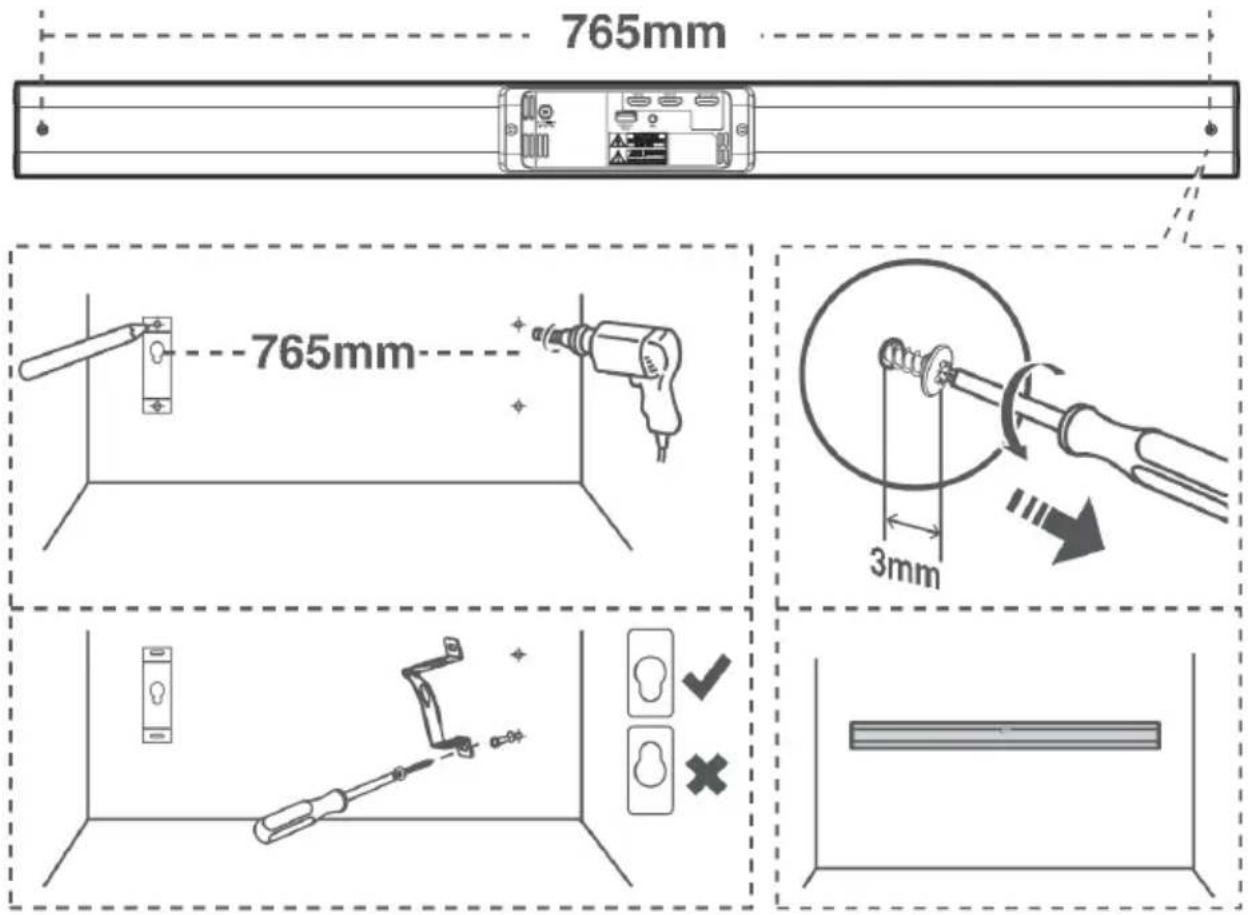
INSTALLATION
AUTO STANDBY
This product has auto-standby and complies with ErPII (2009/125/EC reduction of energy use directive).
• It will turn off after 15 minutes.
• It will automatically turn on when signal is sensed.
• It relies on input sensitivity to do this. Make sure volume on source device is turned up.
DISABLE
Put into STANDBY then hold V+ button until blue light flashes. The blue LED will flash slowly once. To enable do the same again. The blue LED will flash quickly three times.
POWER CYCLING
If mains power is turned off and on, this product will automatically turn back on and resume previous settings.
EQ
Pressing this button cycles through:
- Music
- Movie
- Speech
MINIJACK (HEADPHONE JACK) INPUT
Connect source device as shown (cables not included)
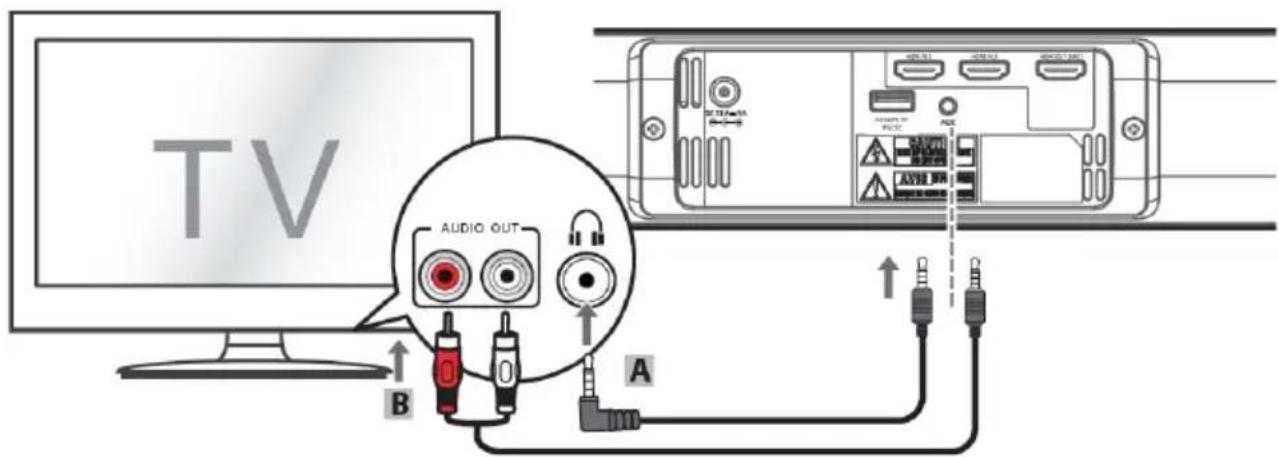
Used as shown the TV remote can be used to adjust volume. Note: not all TVs have a headphone jack.
HDMI INPUTS
Connect source device as shown (cables not included)
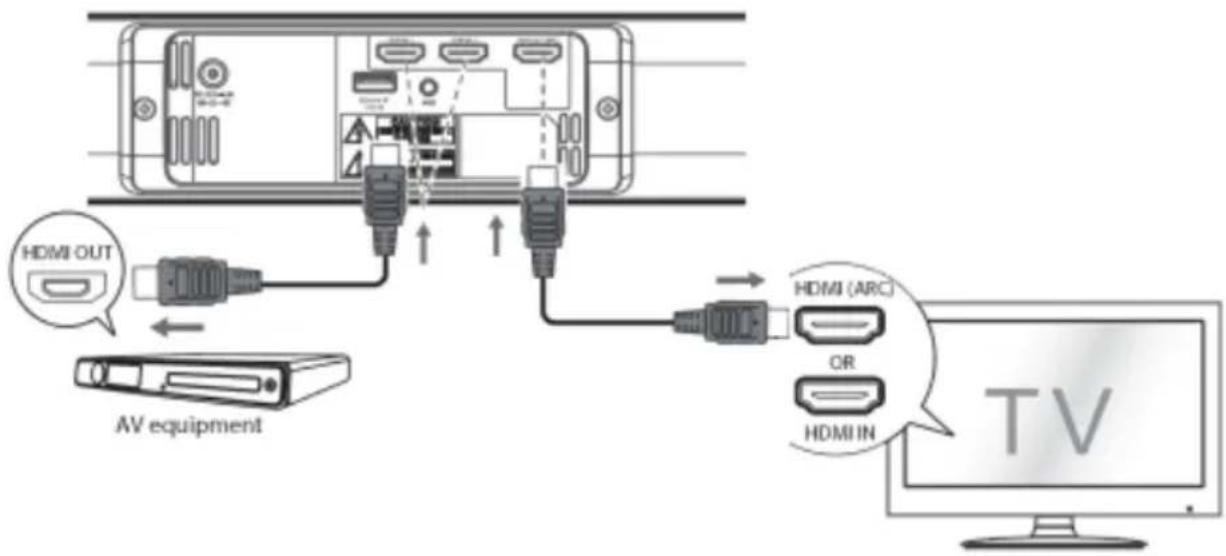
HDMI ARC (Audio Return Channel) INPUT
Connect the ARC INPUT on the SB-1900P to the ARC OUTPUT on the display.
The speakers in the display will no longer work.
The display remote control will now control the soundbar output.
Note: not all displays have an ARC output, and you may need to activate it in the menu.
STANDARD HDMI INPUTS
Connect source/s to Input 1 and 2.
Connect HDMI output on SB-1900P to normal HDMI Input on display
Note: If no sound and the Status lights flashes quickly, you may need to activate PCM Signal output on your source device.
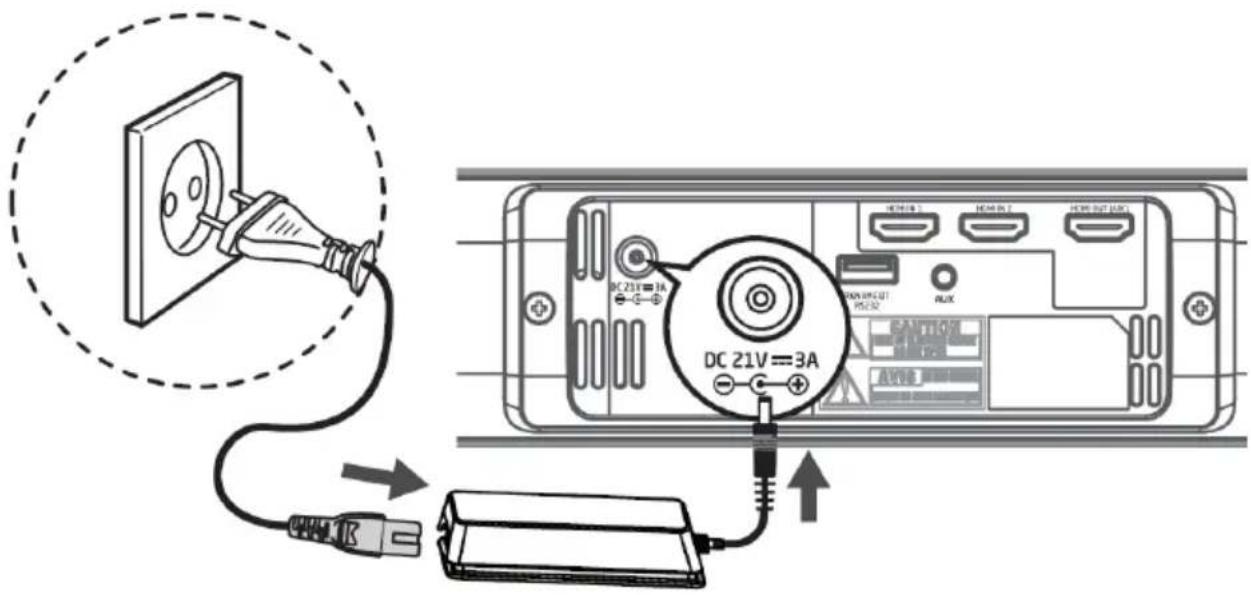
CONNECT POWER
Before connecting power ensure you complete all other connections.
Unwind DC cable to its full length. Connect the other end of the mains cable to the socket at the rear of the soundbar then connect the mains plug to the mains socket.
BLUETOOTH INPUT
The first time you connect you will need to pair your device. For this example we will pair a phone.
- PRESS SOURCE TO ACTIVATE BT INPUT Blue Indicator will start flashing
- ON PHONE GO INTO SETTINGS/BLUEOOTH You will see the SB-1900P listed. If not it may already be paired to another device (Blue indicator will have stopped flashing). Press PAIR button on the remote control, or Press and hold PAIR button on the speaker, until blue indicator starts flashing.
- ENTER PASSWORD 0000 (zero four times). When it pairs the blue indicator will light up solidly.
Notes:
• The operational range is approximately 8 metres (26 feet)
• If signal strength is weak and connection is lost, the soundbar will revert to pairing mode.
• This product uses Bluetooth version 4.2. It is not guaranteed to work with all source devices.
• This product can only pair with one source at a time.
• If no source device is paired within 2 minutes will revert to the previous source.
- This device supports A2DP (Advanced Audio Distribution Profile) and AVRCP (Audio Video Remote Control Profile)
RENAME BLUETOOTH
- Create a plain text file on PC named ubt_cfg.txt and put it in the root directory of a USB thumb drive

ubt_cfg.txt
- Open the file and copy this content:
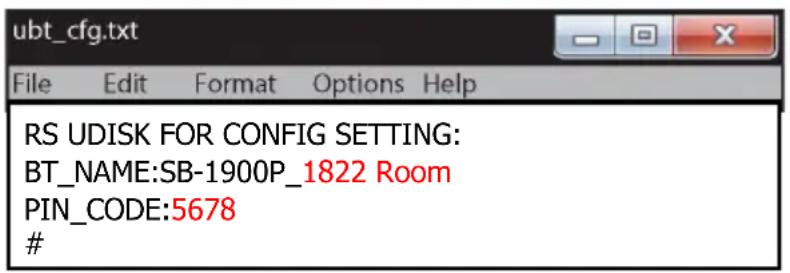
Note: Only the red text is editable. The maximum length is 32 characters.
If the pin is left blank, or if an alphabetical character is used it will be regarded as no pin.
- Unplug power from the soundbar
- Press and hold EQ button
- Plug power in. All source LEDs will flash 2 times to indicate BT rename mode
- Insert USB thumb drive. It will automatically update the name;
To confirm name update the BT input LED will flash slowly 1 time
To confirm name and pin update the BT input LED will flash 3 times
RS-232 is via the USB port.
Use the USB to RS-232 adaptor included. Other USB to RS-232 adaptors may not work.
The pin out is:
| Pin | 2 | 3 | 5 |
| Signal | TXD | RXD | GND |
This pin configuration allows a PC running a serial terminal program (such as Hyper Terminal) to communicate with the soundbar using a straight-through DB9 9-pin RS-232 serial cable.
Do NOT use a "Null-Modem" type cable for PC connection.
Communication Settings:
| Baud Rate | Data Bits | Parity | Stop Bit | Flow Control |
| 19200 | 8 | None | 1 | None |
Command Structure:
Each command starts with a # sign (ASCII 0x23) followed by a 3-character command code.
If there are any parameters for the command, the parameters are given in text format, separated by a space (ASCII 0x20) from the command code.
The # character must never appear in the parameters.
A carriage return (ASCII 0x0d) indicates the end of the command.
A linefeed (ASCII 0x0a) can optionally follow the carriage return and will be ignored.
Each command generally may not exceed 20 bytes including the start of command and end of command bytes.
The illustration of the command structure is as follows:
<Command> = <Start of Command><Command Code>[<sp><Parameters>] <End of Command>
<Start of Command> = #, ASCII 0x23
<Parameters> = command-specific
<End of Command> = CR, ASCII 0x0d LF, ASCII 0x0a
Response Structure:
Upon receiving a command the soundbar will execute the command and send back a response.
- The response starts with an "@" sign (ASCII 0x23), followed by the original command code and a space (ASCII 0x20), and a result code, either "OK" or "ER".
- If there are any parameters or additional messages, the parameters or messages are given in text format, separated by a space (ASCII 0x20) from the result code.
- The "@" character (ASCII 0x40) must never appear in the parameters or message.
- A carriage return (ASCII 0x0d) indicates the end of response. Each response generally may not exceed 25 bytes including the start of response and the end of response bytes.
• The illustration of the response structure is as follows.
<Start of Response> = @, ASCII 0x40
<Command Code> = <byte><byte><byte>
<Result Code> = OK|ER
<sp> = space, ASCII 0x20
<Parameters> = command-specific
<End of Response> = CR, ASCII 0x0d
Status Update Messages Structure:
If the verbose mode is set to 2 or 3, the soundbar will send status update messages automatically. These messages are not a response to any particular command. Any status change caused by commands from RS232 control, front panel buttons, IR remote control, or playback progress may trigger status update messages.
The status update messages have the following structure:
<Update> = <Start of Update><Status Code>[<sp><Parameters>]<End of Update>
<Start of Update> = @, ASCII 0x40
<Status Code> = <byte><byte><byte>
<sp> = space, ASCII 0x20
<Parameters> = status-specific
<End of Response> = CR, ASCII 0x0d
Command Sequence:
Commands are executed in the order they are received. The control client should wait for a response from the soundbar before sending the next command.
If the soundbar receives a new command before executing the previous command, the soundbar may execute the commands in sequence or discard the previous command, depending on the internal processing of the soundbar. The control client should avoid sending multiple commands in sequence without waiting for a response.
If the host does not receive a response from the soundbar 10 seconds after the command is issued, the host may consider the command or response lost during transmission, and can retransmit the command.
A. Remote Control Commands
Commands that are mapped to a remote control buttons
No parameters are needed for these commands. The soundbar handles the commands as if it receives the same IR remote commands.
| Command Code | Remote Key | Function Response | Example |
| #POW23 50 4F 57 0D | POWER | Toggle STANDBY and ON | "@ OK ON/OFF"ON BootOFF Turn OFF |
| #PON23 50 4F 4E 0D | ON Discrete on | "@ OK ON"ON Boot | |
| #POF23 50 4F 46 0D | OFF Discrete off | "@ OK OFF"OFF Turn OFF | |
| #VUP23 56 55 50 0D | VOL + Increase volume | "@ OK xx"STE VOL xx | |
| #VDN23 56 44 4E 0D | VOL - Decrease volume | "@ OK xx"STE VOL xx | |
| #MUT23 4D 55 54 0D | MUTE Mute audio | "@ OK MUT"STE MUTE | |
| #SRC23 53 52 43 0D | SOURCE | Switch Function | "@ OKAUX/ABT/CAO/OPT/ARC/HD1/HD2/STANDBY"STE SOURCE xxx |
| #NEQ23 4E 45 51 0D | EQ Switch preset EQ | "@ OK MUSI"@ OK MOVI"@ OK NEWS"@ OK FLAT"STE EQ xxx | |
| #PLA23 50 4C 41 0D | PLAY Start playback | "@ OK"MUSIC PLAY | |
| #PRE23 50 52 45 0D | PREV | Skip to previous | "@ OK" |
| #NXT23 4E 58 54 0D | NEXT | Skip to next | "@ OK" |
| #PAR23 50 41 52 0D | PAIR | BT Pair | "@ OK" |
Input Commands
September 2019 note: a firmware upgrade may be required to make these codes work
| #SSR AUX 23 53 53 52 20 41 55 58 0D AUX | |
| #SSR BT | 23 53 53 52 20 42 54 0D BT |
| #SSR ARC | 23 53 53 52 20 41 52 43 0D ARC |
| #SSR HD1 | 23 53 53 52 20 48 44 31 0D HDMI1 |
| #SSR HD2 | 23 53 53 52 20 48 44 32 0D HDMI2 |
| #SEQ MOV | 23 53 45 51 20 4D 4F 56 0D MOVIE |
| #SEQ MUS | 23 53 45 51 20 4D 55 53 0D MUSIC |
| #SEQ NEW | 23 53 45 51 20 4E 45 57 0D NEWS |
B. Query Commands
This group of commands issues queries to the soundbar. The soundbar will respond according to its current status.
| Command Code | Function Response Example | |
| #QVM23 51 56 4D 0D | Query verbose mode | "@ OK 0"verbose mode 0"@ OK 1"verbose mode 1"@ OK 2"verbose mode 2"@ OK 3"verbose mode 3 |
| #QPW23 51 50 57 0D | Query power status | "@ OK ON" sound on"@ OK OFF" sound off |
| #QVR23 51 56 52 0D | Query firmware version | "@ OK 0 xx" sound version 0 xx |
| #QVL23 51 56 4C 0D | Query volume | "@ OK 0-32 " sound work vol xx"@ OK MUTE" sound mute |
| #QPL23 51 50 4C 0D | Query playback status | "@ OK PLAY"Now Playing |
| #QRP23 51 52 50 0D | Query Repeat Mode | "@ OK REPF" |
| #QSR23 51 53 52 0D | Query Input Source | "@ OKAUX/ABT/CAO/OPT/ARC/HD1/HD2/STANDBY "Work Source xx |
| #QEQ23 51 45 51 0D | Query preset EQ | "@ OK MUSI"@ OK MOVI"@ OK NEWS"@ OK FLAT"Work EQ xx |
Advanced Commands
This group of commands instructs the soundbar to perform an advanced operation in a single step.
| Command Code | Parameters Function | Response Example | |
| #SVM23 53 56 4D X 0D | 30 Close verbose mode31 No Function32 Updated when relevant parameters change33 Update on time | Set verbose mode | "@ OK " |
| #SVL | 0 - 32MUTE | Set volume controle.g. #SVL 9 = VOL 923 53 56 4C 20 39 0De.g. #SVL MUT = MUTE23 53 56 4C 20 4D 55 54 0D | OK 32OK MUTE |
| #SRP | ALLCHOFFRND | Repeat allRepeatchapterRepeat offRandom | OK RPTAOK RPT1OK RPTFOK RPTR |
| #SSR23 53 53 52 X 0D | 41 55 58 Set Source AUX42 54 Set Source BT41 52 43 Set Source ARC48 44 31 Set Source HDMI 148 44 32 Set Source HDMI 2 | Set Input Source "@ OK " | SET Source OK |
| #SEQ23 53 45 51 X 0D | 4D 4F 56 Set EQ MOVIE4D 55 53 Set EQ MUSIC4E 45 57 Set EQ NEWS | Set EQ | "@ OK "SET EQ OK |
| #RST | Reset Command – Clean all command buffers, do not wait for any pending/ executing commands.Start over again. | ||
| #QVL23 53 56 76 X 0D | See the table below for detailed volume Settings | Set volume | "@ OK "SET VOL OK |
Volume Commands
| VOL (X) | hex |
| 0-9 | 30-39 |
| 10 | 31 30 |
| 11 | 31 31 |
| 12 | 31 32 |
| 13 | 31 33 |
| 14 | 31 34 |
| 15 | 31 35 |
| 16 | 31 36 |
| 17 | 31 37 |
| 18 | 31 38 |
| 19 | 31 39 |
| 20 | 32 30 |
| 21 | 32 31 |
| 22 | 32 32 |
| 23 | 32 33 |
| 24 | 32 34 |
| 25 | 32 35 |
| 26 | 32 36 |
| 27 | 32 37 |
| 28 | 32 38 |
| 29 | 32 39 |
| 30 | 32 30 |
| 31 | 32 31 |
| 32 | 33 32 |
| MUT | 4D 55 54 |
Status Update Messages:
The following status update messages are sent by the soundbar automatically when the verbose mode is set to 2 or 3.
UPW - Power Status Update:
Sent when there is a change of power on/off status. Possible parameters: 2 chars
ON – Unit is turned on
OFF – Unit is going off
Example: UPW ON
USR - Functional status update:
Send when the function is active. Possible parameters:3 chars
AUX –Auxiliary input
OPT – Optical input
COA – Coaxial input
ABT – Bluetooth input
ARC-HDMI ARC input
Example: USR ABT
UPL - Play status update
Send when there is a changes of play status. Possible parameters: 4 chars
PLAY – Playback is starting
PAUS-Playback is paused
STOP – Playback is stopped
Example: UPL PLAY
URP – Repeat playback status update
Send when there is a changes of repeat playback status. Possible parameters: 4 chars
RPTA – Repeat all
RPT1 - Repeat chapter
RPTF – Repeat off
RPTR – Random
Example: UPR RPTA
UVL - Volume Level Update:
Sent when there is a change in volume level or mute status. Possible Parameters: 3 chars
MUT – Mute is engaged
000 .. 100 – Current volume level. (Also sent when mute is cancelled.)
Example: UVL 068
UEQ – Preset EQ status update
Sent when there is a changes of default EQ state Possible Parameters: 4 chars
MUSI – MUSIC EQ take effect
MOVI – MOVIE EQ take effect FLAT –
FLAT EQ take effect
NEWS – NEWS EQ take effect
GAME – GAME EQ take effect
Example: UEQ MUSI.
Added 26/05/22 - Update MCU V0.09 software
Adds RS-232 code which sets a max volume limit.
Operation:
Connect PC to SB-1900P via RS232 interface, and with serial port tool send #MVL 20 to set the max volume to 20.
Max volume can only be less than or equal to 32. If greater than @MVL ER INVALID is returned.
Max volume is remembered after power off, but factory reset will return to 32.
Firmware upgrade process:
- Copy unzipped file "jl_690x.bfu" to USB memory stick
- Press and hold source button on SB-1900P, then connect to power. SB-1900P will power on.
- Plug in the USB stick
- Software upgrade will start. All lights are on.
Once the red lights comes on the upgrade has finished.
How to check the version:
Press and hold the VOL+ button on unit to power on.
The green light flashes 9 times, indicating that the current version is V0.09
www.visionaudiovisual.com/de/techaudio/sb-1900p/


URSPRUNGSERKLÄRUNG
BLUETOOTH-EINGANG
www.visionaudiovisual.com/da/techaudio/sb-1900p/
KONFORMITETSERKLÆRING


FORSIGTIG: RISIKO FOR ELEKTRISK ST∅D MÅ IKKE ÅBNES
ADVARSEL: FOR AT REDUCERE RISIKOEN FOR ELEKTRISK ST∅D MÅ DÆKSLET IKKE FJERNES (ELLER BAGBEKLÆDNINGEN). DER ER INGEN DELE INDENI DER KAN VEDLIGEHOLDES AF BRUGEREN. VEDLIGEHOLDELSE SKAL UDF∅RES AF KVALIFICERET SERVICEPERSONALE.

OPRINDELSESERKLÆRING
HDMI ARC-INDGANG (Audio Return Channel)
BLUETOOTH-INDGANG


ENTRADA DE BLUETOOTH
COA – Entrada Coaxial
ABT – Entrada de Bluetooth
DÉCLARATION DE CONFORMITÉ


ATTENTION: RISQUE DE CHOC ÉLECTRIQUE NE PAS OUVRIR
ATTENTION : AFIN DE LIMITER LES RISQUES DE CHOC ÉLECTRIQUE, NE RETIREZ JAMAIS NI CAPOT NI CACHE ARRIÈRE. AUCUNE PIÈCE INTERNE N'EST RÉPARABLE PAR L'UTILISATEUR. POUR LA MAINTENANCE, ADRESSEZ-VOUS À UN PERSONNEL QUALIFIÉ.

ENTRÉE BLUETOOTH
www.visionaudiovisual.com/it/techaudio/sb-1900p/


ATTENZIONE: PERICOLO DI SCOSSE ELETTRICHE NON APRIRE
ATTENZIONE: PER RIDURRE IL PERICOLO DI SCOSSE ELETTRICHE, NON RIMUOVERE IL COPERCHIO (O IL PANNELLO POSTERIORE). ALL'INTERNO NON SONO PRESENTI PARTI RIPARABILI DALL'UTENTE. PER LA MANUTENZIONE RIVOLGERSI A PERSONALE TECNICO QUALIFICATO.

DICHIARAZIONE DI ORIGINE
INGRESSO HDMI ARC (Audio Return Channel)
INGRESSO BLUETOOTH
www.visionaudiovisual.com/nl/techaudio/sb-1900p/
CONFORMITEITSVERKLARING


WAARSCHUWING: RISICO OP ELEKTRISCHE SCHOK NIET OPENEN
WAARSCHUWING: OM HET RISICO OP EEN ELEKTRISCHE SCHOK TE VERMINDEREN, MAG DE BEHUIZING (OF ACHTERPLAAT) NIET VERWIJDERD WORDEN ER ZIJN GEEN ONDERDELEN DIE DE GEBRUIKER ZELF KAN ONDERHOUDEN. LAAT ONDERHOUD AAN GEKWALIFICEERD PERSONEEL OVER.

VERKLARING INZAKE OORSPRONG
PLAATS VAN INSTALLATIE
HET APPARAAT VERPLAATSEN
WAARSCHUWINGSSIGNALEN
HDMI ARC- (Audio Return Channel-) INGANG
BLUETOOTH-INGANG
www.visionaudiovisual.com/techaudio/sb-1900p/
DEKLARACJA ZGODNOŚCI


DEKLARACJA POCHODZENIA
WEJŚCIE BLUETOOTH
www.visionaudiovisual.com/pt-pt/techaudio/sb-1900p/


CUIDADO: RISCO DE CHOQUE ELÉCTRICO NÃO ABRIR
CUIDADO: PARA REDUZIR O RISCO DE CHOQUE ELÉTRICO, NÃO RETIRE A TAMPA (OU COBERTURA POSTERIOR). NÃO CONTÉM PEÇAS NO INTERIOR QUE NECESSITEM DE MANUTENÇÃO POR PARTE DO UTILIZADOR. SOLICITE ASSISTÊNCIA A PESSOAL QUALIFICADO.

ENTRADA HDMI ARC (Audio Return Channel)
Ligar a ENTRADA ARC na SB-1900P à SAÍDA ARC no ecrã.
ENTRADA BLUETOOTH
COA – Entrada coaxial
ABT – Entrada Bluetooth



- DECLARATION OF CONFORMITY
- WARNINGS
- DECLARATION OF ORIGIN
- USE ONLY DOMESTIC AC OUTLETS
- HANDLE THE POWER CORD WITH CARE
- PLACE OF INSTALLATION
- MOVING THE UNIT
- WARNING SIGNS
- PACKAGING
- WATTS
- SPECIAL WARNINGS
- FEDERAL COMMUNICATIONS COMMISSION INTERFERENCE STATEMENT
- RADIATION EXPOSURE STATEMENT
- REMOTE CONTROL
- INSTALLATION
- AUTO STANDBY
- DISABLE
- POWER CYCLING
- EQ
- MINIJACK (HEADPHONE JACK) INPUT
- HDMI INPUTS
- HDMI ARC (AUDIO RETURN CHANNEL) INPUT
- STANDARD HDMI INPUTS
- CONNECT POWER
- BLUETOOTH INPUT
- NOTES
- RENAME BLUETOOTH
- COMMAND STRUCTURE
- RESPONSE STRUCTURE
- STATUS UPDATE MESSAGES STRUCTURE
- COMMAND SEQUENCE
- REMOTE CONTROL COMMANDS
- INPUT COMMANDS
- QUERY COMMANDS
- ADVANCED COMMANDS
- STATUS UPDATE MESSAGES
- UPW - POWER STATUS UPDATE
- USR - FUNCTIONAL STATUS UPDATE
- UPL - PLAY STATUS UPDATE
- URP – REPEAT PLAYBACK STATUS UPDATE
- UVL - VOLUME LEVEL UPDATE
- ADDED 26/05/22 - UPDATE MCU V0.09 SOFTWARE
- OPERATION
- FIRMWARE UPGRADE PROCESS
- HOW TO CHECK THE VERSION
- URSPRUNGSERKLÄRUNG
- BLUETOOTH-EINGANG
- KONFORMITETSERKLÆRING
- FORSIGTIG: RISIKO FOR ELEKTRISK ST∅D MÅ IKKE ÅBNES
- OPRINDELSESERKLÆRING
- BLUETOOTH-INDGANG
- ENTRADA DE BLUETOOTH
- DÉCLARATION DE CONFORMITÉ
- ATTENTION: RISQUE DE CHOC ÉLECTRIQUE NE PAS OUVRIR
- ENTRÉE BLUETOOTH
- ATTENZIONE: PERICOLO DI SCOSSE ELETTRICHE NON APRIRE
- DICHIARAZIONE DI ORIGINE
- INGRESSO HDMI ARC (AUDIO RETURN CHANNEL)
- INGRESSO BLUETOOTH
- CONFORMITEITSVERKLARING
- WAARSCHUWING: RISICO OP ELEKTRISCHE SCHOK NIET OPENEN
- VERKLARING INZAKE OORSPRONG
- PLAATS VAN INSTALLATIE
- HET APPARAAT VERPLAATSEN
- WAARSCHUWINGSSIGNALEN
- BLUETOOTH-INGANG
- DEKLARACJA ZGODNOŚCI
- DEKLARACJA POCHODZENIA
- WEJŚCIE BLUETOOTH
- CUIDADO: RISCO DE CHOQUE ELÉCTRICO NÃO ABRIR
- ENTRADA BLUETOOTH
Brand : VISION
Model : SB-1900P
Category : Remote control