
TKG BBA 2001 - Bread maker KALORIK - Free user manual and instructions
Find the device manual for free TKG BBA 2001 KALORIK in PDF.

| Product Type | Bread Machine |
| Brand | Kalorik |
| Model | TKG BBA 2001 |
| Bread Capacity | 500 g or 750 g |
| Number of Programs | 19 automatic programs (Basic, French, Sweet, Super Rapid, Rapid, Cake, Dessert, Rice Bread, Corn Bread, Gluten Free, Oatmeal, Glutinous Rice, Dough, Kneading, Rice Wine, Yogurt, Jam, Bake) |
| Display | LCD Screen |
| Crust Options | Light, Medium, Dark (depending on program) |
| Delay Timer | Up to 15 hours |
| Keep Warm | 1 hour after baking |
| Memory Function | Automatic restart in case of power outage (up to 10 minutes) |
| Included Accessories | Bread pan, kneading paddle, hook, measuring cup, measuring spoon |
| Pan Material | Non-stick coating |
| Cleaning | Pan and paddle washable with warm water and mild detergent; exterior wipe with a damp cloth; do not immerse the appliance |
| Safety Instructions | Use by children from 8 years and above with supervision; do not touch hot surfaces; unplug after use; do not use outdoors |
| Operating Temperature | 15°C to 34°C |
| Repairability | Qualified after-sales service for repairs; do not open yourself |
Frequently Asked Questions - TKG BBA 2001 KALORIK
User questions about TKG BBA 2001 KALORIK
0 question about this device. Answer the ones you know or ask your own.
Ask a new question about this device
Download the instructions for your Bread maker in PDF format for free! Find your manual TKG BBA 2001 - KALORIK and take your electronic device back in hand. On this page are published all the documents necessary for the use of your device. TKG BBA 2001 by KALORIK.
USER MANUAL TKG BBA 2001 KALORIK
- Lid
- Kneader
- Bread pan
- LCD Display
- Control panel
- Main body
- Hook
- Measuring cup
- Measuring spoon
- Handle
FR
Please read this manual carefully before using the appliance, and always follow the safety and operating instructions.
Important : This appliance can be used by children over 8 years old and people with reduced physical, sensory or mental capacities or with a lack of experience or knowledge if they have been given supervision or instructions concerning the safe use of the appliance and the risks involved. Children shall not play with the appliance. Cleaning and user maintenance shall not be made by children unless they are older than 8 years and supervised.
Never leave the appliance and its cord unsupervised and within reach of children less than 8 years old or irresponsible persons when it is plugged into the wall or when it is cooling down.
☐ Check that your mains voltage corresponds to that stated on the rating plate of the appliance before using the unit.
☐ To protect against electrical shock do not immerse cord, plug, or the unit in water or other liquid.
☐ To disconnect the unit remove the plug from the wall outlet.
☐ Unplug from outlet when not in use and before cleaning. Allow the unit to cool down before taking off parts or cleaning.
☐ Do not operate any unit with a damaged cord or plug or after the unit malfunctions or has been dropped or damaged in any manner. Return unit to the nearest authorized service facility (*) for examination, repair, or adjustment.
☐ The use of accessory attachments not recommended by the unit manufacturer may cause hazards or injuries.
□ Do not use outdoors.
☐ Do not let cord hang over edge of table or counter or touch hot surfaces.
☐ Do not place on or near a hot gas or electric burner, or in a heated oven.
☐ This unit is not intended to be operated by the way of an external timer or separate remote-control system.
☐ Never place anything on the top of the unit when in use.
□ Always use the unit on a clean, flat, hard, dry surface. There should be no flammable material such as a tablecloth, plastic, curtain, napkin, draperies, walls... between the unit and the surface, or touching, or close by when in operation.
☐ It is absolutely necessary to keep this unit clean at all times as it comes into direct contact with food.
☐ Do not touch any moving or spinning parts of the machine when baking.
☐ Do not touch hot surfaces. Use handles or knobs.
□ Never switch on the appliance without properly placed bread pan filled ingredients.
☐ Never beat the bread pan on the top or edge to remove the pan, this may damage the bread pan.
☐ Metal foils or other materials must not be inserted into the bread maker as this can increase the risk of fire and short circuit.
☐ This unit is designed for household use only. It may not be suitable to be safely used in environments such as staff kitchens, farms, motels, and other non-residential environments.
☐ Do not use the unit for other than intended use. The guarantee is invalid if the unit is used for (semi-) professional purposes and/or not according to these instructions.
The manufacturer will not assume any responsibility in case of non-respect of these instructions.
Keep this user manual carefully.
(*) Competent qualified electrician: after-sales department of the producer or importer or any person who is qualified, approved and competent to perform this kind of repairs in order to avoid all danger. In case of need you should return the appliance to this electrician.
BEFORE FIRST USE
- Remove all packaging materials and stickers or labels.
- Clean the bread pan and kneader with hot water, with some washing up liquid and a non-abrasive sponge.
- Wipe the inside and outside of the appliance with a damp cloth.
- Set the bread maker on bake mode and bake empty for 10 minutes. Let it cool down completely and clean all the removable parts again. Make sure they are completely dry before reassembling.
Note: the appliance may emit a little smoke and/or odour when you operate it for the first time. This is normal and will disappear after the first or second use.
• This bread maker can operate in a range of temperatures between 15°C and 34°C.
FUNCTIONS
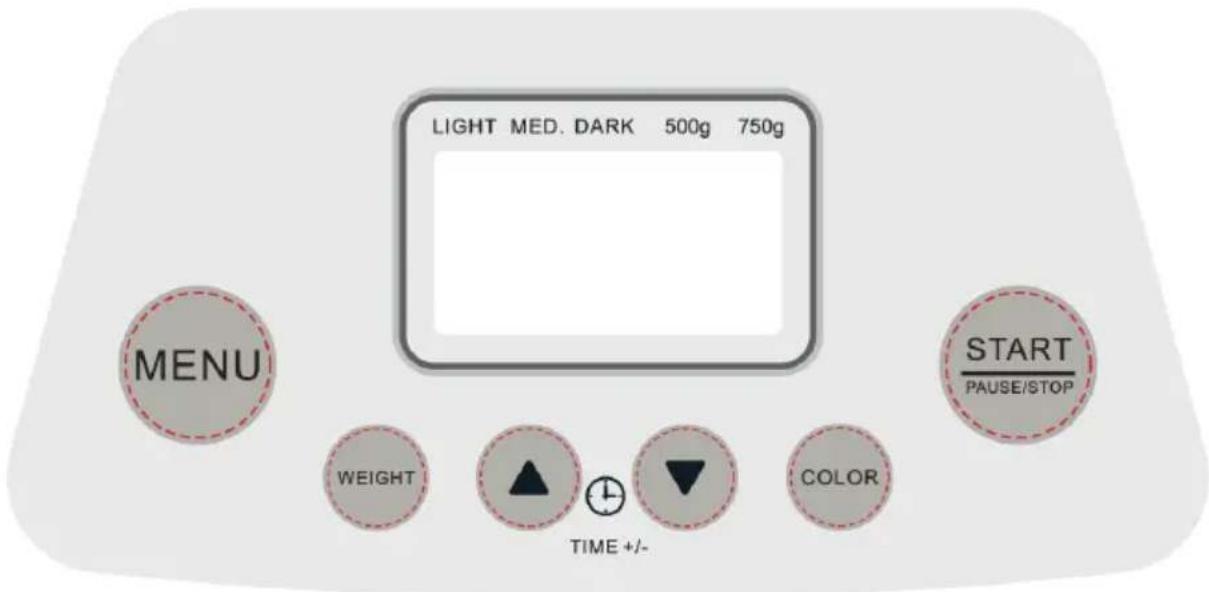
Menu
This button allows you to set the baking program. Press the button continuously to navigate in the 19 available programs. After each press a beep will be heard and the number of the program is displayed on the LCD screen.
| 1. Basic | Kneading, rise and baking normal bread. |
| 2. French | Kneading, rise and baking with a longer rising time. The bread will have a crisper crust and a lighter texture. |
| 3. Sweet | Kneading, rise and baking sweetened bread.The bread will have a crispy crust and a sweet taste. |
| 4. Ultra-fast | Kneading, rise and baking a loaf in the shortest time.The bread will be smaller and rougher than with Quick program. |
| 5. Quick | Kneading, rise and baking a loaf with baking soda or baking powder.The bread will be smaller with a dense texture. |
| 6. Cake | Kneading, rise and baking of cakes with soda or baking powder. |
| 7. Dessert | Kneading and baking preparations that contain more fat and protein. |
| 8. Rice bread | Kneading, rising and baking of bread that contains cooked rice. |
| 9. Corn bread | Kneading, rising and baking of bread that contains corn. |
| 10. Gluten free bread | Kneading, rise and baking gluten free bread.The pre-heating time is longer to allow the grain to soak up the water and expand. |
| 11. Gruel | Kneading and stewing to make coarse cereals gruel. |
| 12. Sticky rice | Stirring and heating of rice to make rice balls. |
| 13. Mix | Thorough stirring of the flour and liquids. |
| 14. Dough | Kneading and rise only.Remove the dough and shape it to make bread rolls, pizza, steamed bread, etc. |
| 15. Knead | Kneading only. |
| 16. Rice wine | Rising and baking glutinous rice. |
| 17. Yogurt | Rising and preparation of yogurt. |
| 18. Jam | Preparation of jams or marmalades from fresh fruits. |
| 19. Bake | Baking only, use this function to increase the baking time if necessary. |
Weight
Press this button to select the Loaf size of the bread (500 g or 750 g): the operation time may vary depending on the loaf size.
Time + or Time - (▲ or ▼)
Add a delay before the start of the program by entering in how much time the bread should be ready to eat (the delay time includes the kneading, rising and baking of the bread). Set the delay by pressing or , the time increases or decreases at 10 minutes increments. The maximum delay is 15 hours.
Example: it is 8:30 p.m and you would like your bread to be ready the next morning at 7 o'clock, i.e. in 10 hours and 30 minutes.
Select your program, crust colour, loaf size and then press the ▲ or ▼ to add the time until 10:30 appears on the screen. Then press the Start/Stop button to activate the delayed program. You can see the dot flashing and the countdown of the remaining time. The bread will be ready 7:00 in the morning with a keeping warm time of 1 hour.
Caution : It is not recommended either to delay the baking of a bread containing easily perishable ingredients such as eggs, milk, butter...etc.
Color :
Select a LIGHT, MEDIUM or DARK browning for the crust. This button is adjustable in programs 1-3,5-6, 8-10, 19.
Start/Stop :
To start a program, press the Start/Stop button once. A short beep will be heard, the two dots in the time display begin to flash and the program starts. Any other button is inactivated except the Start/Stop button after a program has started.
To pause the program, press the Start/Stop button. If no operation is done within 3 minutes, the program will resume and operate until completed.
To stop the program, press and hold the Start/Stop button for 3 seconds until a beep confirms that the program has been switched off.
FIRST USE
- When the appliance is plugged in, it automatically turns on: a beep will be heard and "3:00" appears on the screen. The dots between the "3" and "00" twinkle.
• The arrow points to 750 g and MEDIUM as it is the default setting. - For the best results, we suggest the use of the appliance in a room where the temperature should be between 15°C and 34°C.
AUTOMATIC FUNCTIONS
- Keep Warm: Bread is automatically kept warm for 60 minutes after baking. When you want to take the bread out, press the Start/Stop button and hold for 3 seconds.
- Memory : If the power supply has been shut off during the program, the program will be continued automatically within 10 minutes. If the break time exceeds 10 minutes, the program must be restarted manually : press Start/Stop to restart the program from the beginning.
Note: if the dough has started rising, it is recommended to discard the ingredients and start over.
HOW TO MAKE BREAD
-
Place the pan in position, then turn it clockwise until they click in the correct position. Fix the kneading blade onto the drive shafts. Turn the kneaders clockwise until they click into place. It is recommended to fill holes with heat-resisting margarine prior to placing the kneaders, this avoids the dough to stick below the kneaders and the kneaders can be removed from bread easily.
-
Place ingredients into the bread pan.
Usually the water or liquid substance should be put first, then add sugar, salt and flour, always add yeast or baking powder as the last ingredient. In case of heavy dough with high rye or wholemeal portion, we advise to reverse the order of ingredients. i.e. to fill in first the dry yeast and flour, and finally the liquid to get a better kneading result.
- With your finger, make a small hole on the top of the flour to add yeast into.
Make sure it does not come into contact with the liquid ingredients or salt. The maximum quantities of flour and yeast which may be used refer to the recipe.
-
Close the lid gently and plug the power cord into a wall outlet.
-
Press the Menu button until your desired program is selected.
-
Press the Color button to select the desired crust color.
-
Press the Weight button to select the desired size (500 g or 750 g).
-
Set the delay time by pressing Time ▲ or ▼ button. This step may be skipped if you want the bread maker to start operating immediately.
-
Press the Start/Stop button to start the operation.
-
For programs requiring add-ins (fruits, nuts, raisins,...), ten beeps will be heard during operation. This is to prompt you to add ingredients. Open the lid and put in the needed ingredients. It is possible that steam will escape through the vent slits in the lid during baking. This is normal.
-
Once the process has been completed 10 beeps will be heard. You can press the Start/Stop button for approx. 3 seconds to stop the process and take out the bread or you can wait: the bread will be kept warm automatically for 1 hour.
-
Open the lid and while using oven mitts, firmly grasp the bread pan handle. Turn the pan anti-clockwise and gently pull the pan straight up and out of the machine.
-
Use a non-stick spatula to gently loosen the sides of the bread from the pan.
Turn the bread pan upside down onto a clean cooking surface and gently shake until the bread falls out onto a rack. Remove the bread carefully from the pan and cool for about 20 minutes before slicing.
Note: Before slicing the loaf, use the hook to remove out the kneading blade hidden on the bottom of loaf.
- Unplug the power cord.
KNOW YOUR INGREDIENTS
Flour
- Bread flour is recommended in most yeast-based recipes. It has a high gluten content and prevents the bread from collapsing after rising.
- All-purpose flour contains no baking powder, it is suitable for “quick” breads or bread made with the Quick settings.
- Whole-wheat flour is richer in fiber and more nutritious. It is heavier and, as a result, loaves may be smaller in size and have a heavier texture. To achieve the best result, it is recommended to combine whole-wheat flour with bread flour.
- Black Wheat Flour also named as "Rye Flour", is a kind of high fiber flour, similar to whole-wheat flour. To obtain the large size after rising, it must be used in combination with high proportion of bread flour.
- Self-rising flour contains baking powder, use especially for making cakes. Do not use self-rising flour in combination with yeast.
- Corn flour and oatmeal flour are ground from corn and oatmeal separately. They are the additive ingredients of making rough bread, which are used for enhancing the flavor and texture.
Sugar
Sugar is used to “nourish” the yeast and also increases the sweet taste and color of bread. It is a very important element of making the bread rise. White sugar is normally used; however, brown sugar and powdered sugar may also be used in some recipes.
Yeast
Yeast produces carbon dioxide, making bread expand and inner fibre soft.
Yeast must be stored in refrigerator as it will be killed at high temperature, before using check the date and storage life of your yeast. Store it back to the refrigerator as soon as possible after each use.
When pouring the ingredients together in the bread pan, be careful for yeast to be placed only in dry flour. It can't touch the salt or liquids.
Be careful to add the proper amount of yeast according to the recipe :
- 1 tsp. active dry yeast =3/4 tsp. instant yeast
• 1.5 tsp. active dry yeast = 1 tsp. instant yeast - 2tsp. active dry yeast =1.5 tsp. instant yeast
Failure of bread rising is usually caused by the unproper use or amount of yeast.
Water
Water is an essential ingredient for making bread. Water temperature should be between 20^ C and 25^ C.
The water may be replaced by fresh milk or water mixed with 2% milk powder, which may enhance bread flavor and improve crust color. Some recipes may call for juice for the purpose of enhancing bread flavor, eg: apple juice, orange juice, lemon juice and so on.
Salt
Salt is necessary to improve bread flavor and crust color. It is also used to restrain yeast activity. Never use too much salt in a recipe.
Eggs
Eggs can improve bread texture, make the bread more nourishing and larger in size. They must be whisked in with the other liquid ingredients.
Grease, Butter and Vegetable Oil
Grease can soften bread and increase storage life. Butter should be melted or cut into small pieces before adding to liquids.
Baking Powder and Baking Soda
Baking powder is used for rising the Ultra-Fast bread and cake. It does not need rise time.
Baking Soda is similar to baking powder. It can also be used in combination with baking powder.
Ingredients weight
One of the key steps to making good bread is using proper amounts of ingredients.
It is strongly suggest to use a measuring cup and measuring spoon to obtain accurate amount, otherwise the result will be largely influenced.
Water, fresh milk or milk powder solution should be measured with measuring cups.
When you measure cooking oil or other ingredients, clean the measuring cup thoroughly between each measurement.
RECIPES
Tips
- Add ingredients in the order listed on the recipe.
• Always put the sugar and salt on the corner.
- Always put yeast on the dry flour and do not allow it to come into contact with liquid ingredients.
- For Ultra-fast and Quick bread programs, the water should be at a 40-50°C temperature.
| Program | Ingredients | Loaf size | |
| 750 g | 500 g | ||
| 1/ Basic bread | water | 200 ml | 150 ml |
| salt | 0.7 tsp | 0.5 tsp | |
| sugar | 3 tbsp | 2 tbsp | |
| oil | 2 tbsp | 1.5 tbsp | |
| high gluten flour | 300g | 210g | |
| instant yeast | 1 tsp | 0.8 tsp | |
| 2/ French Bread | water | 200ml | 150ml |
| salt | 0.7 tsp | 0.5 tbsp | |
| sugar | 3 tbsp | 2 tbsp | |
| oil | 2 tbsp | 1.5 tbsp | |
| high gluten flour | 300g | 210g | |
| instant yeast | 1.0 tsp | 0.8 tsp | |
| 3/ Sweet Bread | water | 200ml | 150ml |
| salt | 0.7 tsp | 0.5 tsp | |
| sugar | 3 tbsp | 2 tbsp | |
| milk powder | 1.5 tbsp | 1 tbsp | |
| oil | 2 tbsp | 1.5 tbsp | |
| high gluten flour | 300g | 210g | |
| instant yeast | 1.0 tsp | 0.8 tsp | |
| 4/ Ultra- fast Bread | water | 200ml | |
| salt | 0.7 tsp | ||
| sugar | 3 tbsp | ||
| oil | 2 tbsp | ||
| high gluten flour | 300g | ||
| instant yeast | 3.5 tsp | ||
| 5/ Quick Bread | water | 200ml | 150ml |
| salt | 0.7 tsp | 0.5 tsp | |
| sugar | 3 tbsp | 2 tbsp | |
| oil | 2 tbsp | 1.5 tbsp | |
| high gluten flour | 300g | 210g | |
| instant yeast | 3.5 tsp | 3.5 tsp | |
| 6/ Cake | water | 30ml | |
| egg | 3 pcs | ||
| sugar | 100 g | ||
| oil | 2 tbsp | ||
| self-rising flour | 280g | ||
| instant yeast | 1.5 tsp | ||
| 7/ Dessert | egg | 2 pcs | |
| milk | 240 ml | ||
| cooked rice | 210 g | ||
| sugar | 100 g | ||
| raisins | 60 g | ||
| 8 / Rice Bread | water | 140ml | 110ml |
| oil | 2 tsp | 1.5 tsp | |
| sugar | 4 tbsp | 3 tbsp | |
| salt | ^3/_4 tsp | ^1/_2 tsp | |
| cooked rice | 70g | 50g | |
| high gluten flour | 240g | 180g | |
| instant yeast | 1.5 tsp | 1 tsp | |
| 9/ Corn Bread | water | 140ml | 110ml |
| oil | 2 tsp | 1.5 tsp | |
| sugar | 4 tbsp | 3 tbsp | |
| salt | ^3/_4 tsp | ^1/_2 tsp | |
| corn (soaked in water for 2-3 hours) | 70g | 50g | |
| high gluten flour | 240g | 180g | |
| instant yeast | 1.5 tsp | 1 tsp | |
| 10/ Gluten free bread | water | 180ml | 120ml |
| oil | 2.5 tsp | 2 tsp | |
| sugar | 3 tbsp | 2.5 tbsp | |
| salt | 1 tsp | ^1/_2 tsp | |
| corn flour | 210g | 175g | |
| high gluten flour | 210g | 175g | |
| instant yeast | 1.5 tsp | 1.5 tsp | |
| 11/ Gruel | dry ingredients | 120g | |
| water | 600ml | ||
| 17/ Yogurt | milk | 600ml | |
| lactic acid bacteria | 60ml | ||
| 18/ Jam | fruit pulp | 600 g | |
| corn flour | 65 g | ||
| sugar | 200 g | ||
| Water (if needed) | Appropriate amount | ||
| Problem | Cause | Solution | |
| 1 | Smoke comes out during baking | Some ingredients are stuck on the heating element. | Unplug the bread maker and clean the heating element. |
| 2 | The ingredients are not stirred properly and the baking is uneven | 1. Improper selected program | Select the proper program |
| 2. The lid has been opened several time after the start of the program | Don't open the lid during the rise and baking time | ||
| 3. Stir resistance is too high and that kneader can't rotate adequately | Take the bread pan out and operate without: if it rotate proper the bread mix is too dense; If it doesn't rotate or abnormally, contact with the after-sales service. | ||
| 3 | Display “H:HH” after pressing start/stop button | The temperature in the bread maker is too high | Press the start/stop and unplug the bread maker, then take the bread pan out and open the lid until the device has cooled down |
| 4 | Hear the motor noises but dough isn't stirred | Bread pan is fixed improperly or dough is too dense to be stirred | Check whether the bread pan is fixed properly and dough is made according to the recipe |
| 5 | Bread is so risen it pushes the lid | Too much yeast in the bread mix or too high temperature in the room | Use the amount of yeast recommended in the recipe and to use the appliance in a proper temperature range environment |
| 6 | Bread size is too small or bread hasn't raised | Not enough yeast in the bread mix or too low temperature in the room. | |
| 7 | Dough flows over the bread pan | Too much water or other liquid in the bread mix | Reduce the amount of liquids to improve the dough rigidity |
| 8 | Bread collapses in the middle during the baking | 1. improper flour | Use only bread flour |
| 2. Yeast temperature too high | Yeast must be at room temperature | ||
| 3. Too much water | Use the amount of water recommended in the recipe | ||
| 9 | Bread is too dense and thick | 1. Too much flour or shortage of water | Reduce flour or increase water |
| 2. Too much added ingredients (seeds, nuts, dried fruits...) or too much whole wheat flour | Reduce the amount of added ingredients and add some yeast | ||
| 3. Too much high glutinosity added ingredients : butter, banana... | |||
| 10 | The middle part of the bread is hollow | 1. Too much water or yeast or no salt | Reduce properly water or yeast and check salt |
| 2. Temperature of the water used was too high | Use water only at room temperature | ||
| 11 | Crust is too thick and baking color is too dark when making cakes or sweet bread | Too much sugar in the bread/cake mix | Press start/stop to interrupt the program 10min before the end and keep the bread or cake in the bread pan, covered with a towel for about 20 minutes |
| 12 | The crust color is too light. | The lid has been opened during baking. | Do not open the lid during baking.Select a darker crust option. |
| 13 | The bread is under baked or the dough is sticky. | Too much liquid or incorrect program chosen. | Decrease the liquid amount and measure the ingredients accurately.Choose the right program. |
CLEANING AND STORAGE
Always remove the plug and wait for the appliance to cool down completely before cleaning.
- Clean the appliance after every use.
- Clean the bread pan and kneader with hot water and some detergent.
- Do not clean the appliance or its accessories with metallic or abrasive sponges, as this may damage the non-stick coating.
- Wipe the outside of the appliance with a moist cloth.
- Do NOT immerse in water or any other liquid.
- Store the appliance when clean and dry in its original box to avoid dust and humidity.
PROTECTION OF THE ENVIRONMENT – DIRECTIVE 2012/19/EU
In order to preserve our environment and protect human health, the waste electrical and electronic equipment should be disposed of in accordance with specific rules with the
implication of both suppliers and users. For this reason, as indicated by the symbol on the rating label or on the packaging, your appliance should not be disposed of as unsorted municipal waste. The user has the right to bring it to a municipal collection point performing waste recovery by means of reuse, recycling or use for other applications in accordance with the directive.
ERP DECLARATION - REGULATION 1275/2008/EC
We, TKG SRL/Bvba, hereby confirm that our product meets the requirements of regulation 1275/2008/EC. Admittedly, our product does not dispose of a function to minimize the power consumption, which should according to regulation 1275/2008/EC put the product in off or standby mode after finishing the main function, but this is practically impossible, as it would compromise the main function of the product so strongly, that using the product would no longer be possible!
For this reason we always tell the customer in our instruction manual to unplug the appliance immediately after use.
The user manual is by simple request also available in electronic format from the after-sales service.

DEUTSCH
PROBLEEMOPLOSSINGSGIDS

