PRGE5500 - Generator RIBIMEX - Free user manual and instructions
Find the device manual for free PRGE5500 RIBIMEX in PDF.


User questions about PRGE5500 RIBIMEX
0 question about this device. Answer the ones you know or ask your own.
Ask a new question about this device
Download the instructions for your Generator in PDF format for free! Find your manual PRGE5500 - RIBIMEX and take your electronic device back in hand. On this page are published all the documents necessary for the use of your device. PRGE5500 by RIBIMEX.
USER MANUAL PRGE5500 RIBIMEX
Original instructions
IT
GENERATORE DI ENERGIA A BENZINA
Carefully read this instruction manual before operating this product.
Incorrect operation may cause injury and/or damages.
Please keep this manual for future reference.

AVVERTENZA:
EN - Original instructions
I. Parts List
III. Safety instructions
V. Operation
II. Characteristics
IV. Getting Started
VI. Maintenance, Storage and Troubleshooting
I. PARTS LIST
See figures
II. CHARACTERISTICS
| Description | Gasoline Generator | Gasoline Generator | |
| Reference | PRGE2800 / 605126 | PRGE5500 / 605136 | |
| Model / Type | ART2800T | BLD5500 | |
| Engine | Type | 4-stroke gasoline OHV | 4-stroke gasoline OHV |
| Cooling system | Air-cooled | Air-cooled | |
| Cylinder arrangement | Inclined, single cylinder | Inclined, single cylinder | |
| Displacement | 207.7 cm³ | 389cm³ | |
| Engine speed | 3000 min^-1 | 3000 min^-1 | |
| Operation hours | Rated load 7.5hrs, 2/3 load 11hrs | Rated load 10hrs, 2/3 load 11.2hrs | |
| Fuel | Normal unleaded gasoline | Normal unleaded gasoline | |
| Fuel tank capacity | 15L | 25L | |
| Engine oil capacity | 0.6 L | 1.1 L | |
| Ignition system | TCI | TCI | |
| Spark plug | LGF7RTC | F7RTC | |
| Sound power level | 96 dB(A) | 96 dB(A) | |
| AC Output | Rated voltage | 230V | 2x230V~ 400V 3~ |
| Rated frequency | 50Hz | 50Hz | |
| Rated current | 11.3A | 5.2A 13A | |
| Rated output | 2600kW | 3kW 3.6kW | |
| Maximum output | 2800kW | 3.3kW 4.8kW | |
| Net weight | In Kg | 42 | 83.5 |
| Dimensions | (L×W×H) (mm) | 610 x 460 x 460 | 710 x 575 x 585 |
III. SAFETY INSTRUCTIONS
Before using this product, carefully read this manual and familiarise yourself with its content and understand all safety instructions. Do not operate or service the product unless you clearly understand this manual. Always follow the safety instructions to minimize risk of damage to property, and to minimize any risk of damages and injuries to yourself and other persons and/or animals. Keep the manual with the product or in a safe place, so that you can read it whenever you have a question about its use or servicing.
Safety notes and attention statements should always be observed.
3.1- Symbols
| Do not expose to weather conditions (ex.: storm, rain, snow ...) or moisture. Do not use during weather conditions. | |
| Caution! Risk of injury and/or damage and/or deterioration of product in case of non-compliance to safety requirements. | |
| Beware of electrical voltage | |
| Read the instructions manual. Make sure all users read the instructions. Keep this manual for future reference | |
| Wear protective equipment (face shield or goggles, ear protection) Your hearing is at risk of irreparable damage. Anyone operating this machine under conditions of conscious daily use may be exposed to a noise level equal to or exceeding 85 dB (A). The operator must wear Personal Protective Equipment (PPE). In order to protect the operator's hearing. | |
| Wear protective gloves and protective boots. | |
| Never operate this tool or any other power equipment if you are tired, ill, or under the influence of alcohol, drugs, or any substance that could affect your ability or judgement. | |
| Danger: Fire hazard! Fuel is inflammable. Do not spill! | |
| Keep away from naked flames and any other heat source. Do not smoke. Do not spill fuel. Never attempt to refill while the motor is running or hot! | |
| Warning! Hot surfaces! Do NOT touch, burn hazard. During operation and for a certain time after the machine has been switched off, cylinder, motor casing etc. will be hot. Do not touch them until they have cooled down. You risk getting burnt. | |
| Warning: Read the information on the manual. Use 2-stroke automotive lubricating oil. | |
| Never run the engine indoors. Make sure there is always good ventilation when operating the product. Fumes from engine exhaust contain carbon monoxide, which can cause serious injury or death. | |
| Sound power level. | |
| Do not dispose of this product with household rubbish. Dispose of this product in the nearest recycle centre. Please contact your local authority or local recycle centre for further information for its safe disposal. |
3.2-GENERAL SAFETY INFORMATION
- Keep work area clean
Cluttered areas invite accidents and injuries.
- Consider work area environment
Do not expose product to rain or to humidity.
Do not use product in damp or wet locations, during weather conditions.
Keep work area well lit (natural light or sufficient artificial lighting).
Do not use product indoors.
- Guard against electric shock
Avoid contact with electrical parts.
- Keep children away
Do not let bystanders touch the product.
All bystanders (esp. children) should be kept away from product and work area.
Keep the product away from children or from their environment. Never allow children to operate the appliance. Children should be supervised to ensure that they do not play with the product.
- Store idle product
When not in use, product should be stored in a dry, high or locked up place, out of reach of children.
- Do not force the product
It will do the job better and safer at the rate speed for which it is intended.
Do not use the product for purposes other than those for which it is intended. The product will do a better and safer job if it is used only for the purposes it was designed for.
- Use the right product
Do not force small products or attachments to do the job of heavy-duty tools.
- Dress properly
Do not wear loose clothing or jewellery; they can be caught in moving parts.
Wear protecting hair covering to contain long hair.
- Use protective equipment
Wear protective equipment appropriate to working conditions and work environment
Wear protective helmet, safety goggles, ear mufflers, face or dust mask or breathing mask with proper filter, rubber gloves and non-skid footwear to reduce the risk of personal injury during products use or manipulation.
- Do not overreach
Keep proper footing and balance at all times.
Do not work on unsecured scaffolding, ladders...
- Maintain product with care
Keep product clean for better and safer performance.
Follow instructions for lubrication and changing accessories.
Keep handles dry, clean and free from oil and grease.
Ensure that ventilation slots are kept clean and free from dust at all times (to avoid product from overheating)
-
Switch off product when not in use, before servicing and when changing accessories.
-
Always be sure to include this manual when selling, lending or otherwise transferring the ownership of the product
-
Always keep the warning labels clean and nice at any time without any scratches or damages.
If warning seals peel off or become soiled and impossible to read, you should contact the dealer from which you purchased the product to order new seals and affix the new seals.
Please tear down the original soiled warning label before affixing a new one. Let the surface dry thoroughly and then affix the new label on the original position.
- Stay alert
Watch what you are doing. Use common sense.
Never operate this machine or other power equipment if you are tired, ill, or under the influence of alcohol, drugs, or any other substance that could affect your ability of judgment.
- Check damaged parts
Before further use or reuse of the product, it should be carefully checked to determine that it will operate properly and perform its intended function.
- Defective switches or other part that is damaged should be properly repaired or replaced by an authorized service centre.
Do not use the product if the switch does not turn it on and off.
- Warning
The use of any accessory or attachment, other than those recommended in this instruction manual, may present a risk of injury to persons or animals and may cause damages.
The user and/or operator are responsible for any damages or injury caused to properties and/or persons.
- Have your product repaired by qualified personnel
Unless otherwise indicated in this instruction manual, repairs or replacement of any damaged part in an authorised service centre is recommended.
This product is in accordance with the relevant safety requirements. Repairs should only be carried out by qualified persons using original spare parts; otherwise this may result in considerable danger to the user.
- Remarks:
The safety precautions and instructions given in this manual are unable to cover in detail all the conditions and situations that may arise.
The operator and/or user must use common sense and caution when operating the product especially for any matters that are not referred in the above
-
Note: For specific maintenance and safety information about this product, consult the user's manual provided with it. If it has been lost or misplaced, contact your local retailer for a replacement.
-
Important: The information contained in this instruction's manual describes components available at the time of publication. We reserve the right to make changes without prior notice and without obligation to make alterations to components previously manufactured.
3.3-WARNING! SPECIFIC SAFETY PRECAUTIONS
- Never permit a person without training or instruction to operate this machine.
- Make sure there is always good ventilation when operating the product. Fumes from engine exhaust can cause serious injury or death.
- Never run the engine indoors!
- Please avoid running the engine in areas without good ventilation such as indoors, plastic green houses, tunnels, underground caves etc.
- Make sure there are no missing or loose fasteners, and that the stop switch is working properly.
- Stop the motor immediately if the product suddenly begins to vibrate or shake. Inspect for
broken, missing or improperly installed parts or attachments.
- Never smoke or light fires near the hedge trimmer. Keep the trimmer away from excessive heat. Engine fuel is very flammable and fire could lead to serious personal injury or property damage.
- Make sure of no fuel leaking from Fuel tank, Fuel cap, Fuel pipe and Carburetor and other parts which fuel may leak. Repair the machine if fuel leaking, make sure no leaking again.
- Don't get product close to inflammable materials such as ropes, dead leaves, waste paper and oilcloth etc.
- After refueling, screw the fuel cap back tightly onto the fuel tank and then carry the product to a spot 3m or more away from where it was refueled before turning on the engine.
11. Refueling
Never store cans of fuel or refill the fuel tank in any place where is a boiler stove, wood fire, electrical sparks, welding sparks or any other source of heat or fire which might ignite the fuel.
Don't smoke when handling the fuel.
When refilling the tank, always turn off the engine first and take a careful look around to make sure that there are no sparks or open flames anywhere nearby before refueling.
- If any fuel spillage occurs during refuelling, use a dry rag to wipe up spills before turning the engine back on again.
- Do not transport this unit on an uneven surface of the road for a long time when the fuel tank is full. This may cause fuel spillage after the tank cap is loosened as a result of bumping and impacting.
- Before starting engine, keep children and animals out of the working area.
- Never touch the muffler, spark plug and plug wire while the engine is in operation or immediately after stopping the engine. Doing so could result in electric shock and/or serious burns because of high temperature.
- For safe operation, use caution and keep the children away from the spot where the engine is in operation.
- The working temperature should be within 5^ and 40^ .
3.4-Fuel
3.4.1- Check fuel level

ATTENTION: always check the fuel level before each use and startup.
Check the fuel level with engine switched off and with generator on flat ground.
3.4.2-Fuel recommendations
- Use unleaded gasoline only.
- You can use unleaded gasoline with 10% ethanol.
- Unleaded gasoline pollutes the engine and sparkplug less and preserves the life of the exhaust system.
- Never use stale or contaminated gasoline or an oil/gasoline mixture.
- Avoid getting dirt or water in the fuel tank.
ADANGER:
Fuel catches fire easily. So be careful with your operation to avoid fire.
Smoking is extremely dangerous: always be sure to keep lit cigarettes away when mixing fuel
or refilling fuel tank.
When refilling the tank in operation, always turn off the engine first. Don't refill the tank until the engine is cooled.
Never put any inflammables material near the air exhaust, engine openings when it is running.
After refueling and before starting engine, clean any fuel drops or spills with a dry cloth. If any fuel spillage occurs during refueling, use a dry rag to wipe up spills before turning the engine back on again.

ATTENTION: Gasoline is a flammable and explosive product.
You can get burn or be seriously injured during handling.
- Stay away from any spark or flame
- Handle only in outdoors
- Clean if overflows
3.5-Oil
3.5.1-Oil level check

ATTENTION: always check the oil level before each use and startup
Running the engine with a low oil level can cause engine damage
Check the engine oil level with engine switched off and with pump on flat ground.
- Loosen and remove the oil dipstick (Fig. 1) and wipe it.
- Check the oil level by reinserting the dipstick in the neck.
- If the line on the dipstick is between both marks, the oil level is correct. If the line does not reach the lower mark, the oil level is too low, fill to the upper limit with the recommended oil (Fig. 2).
- Screw in the oil dipstick.
- Make sure there is no oil leakage on the generator.
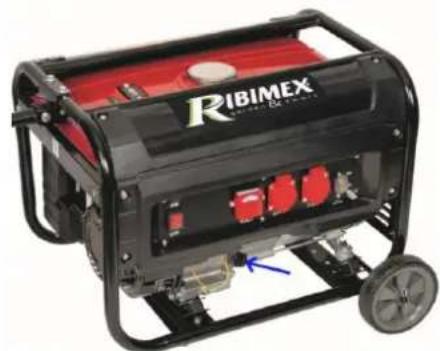
PRGE2800
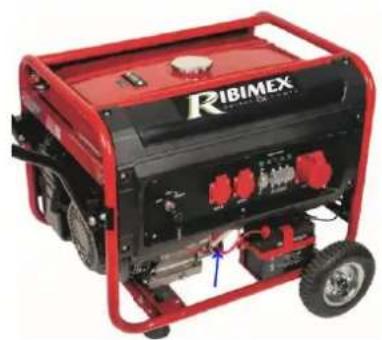
PRGE5500
Fig. 1
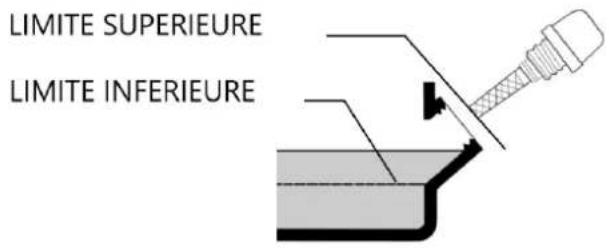
Fig. 2
3.5.2- Engine oil recommendations
Oil is a major factor affecting performance and service life. Use 4-stroke automotive lubricating oil. 4T SAE 15W/40.
IV. GETTING STARTED
4.1- Unpacking
- Remove product from its packaging.
- Check that tool and accessories are not damaged.
4.2-Assembly
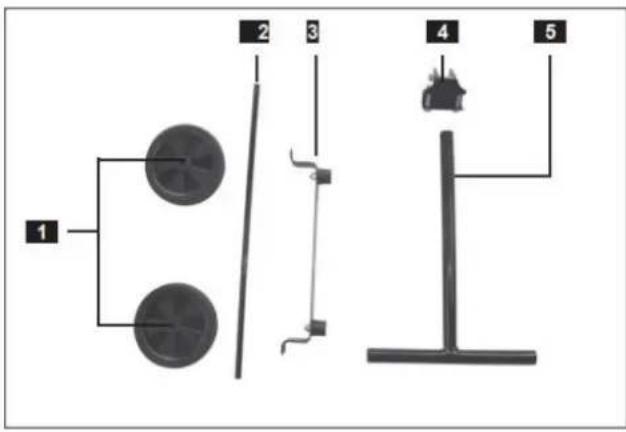
PRGE2800 - Spare parts' list
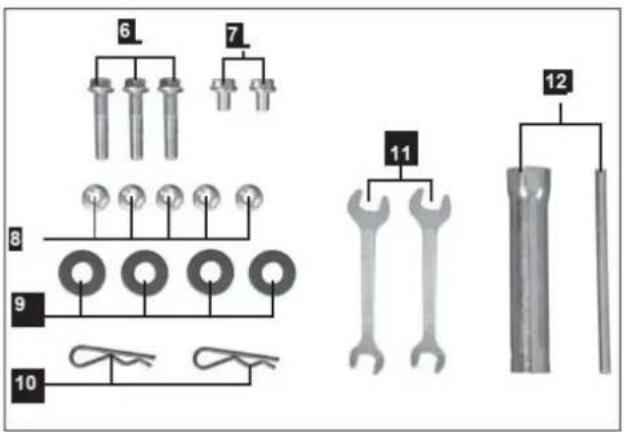
PRGE2800 - Assembly
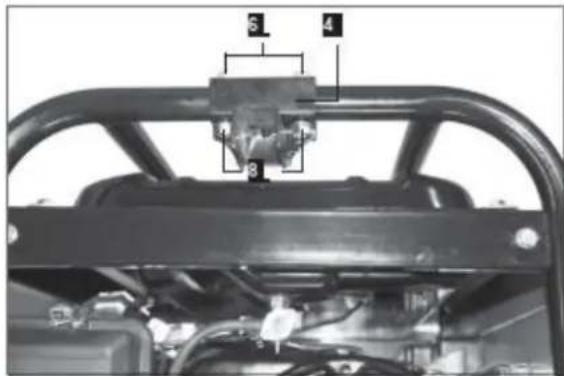
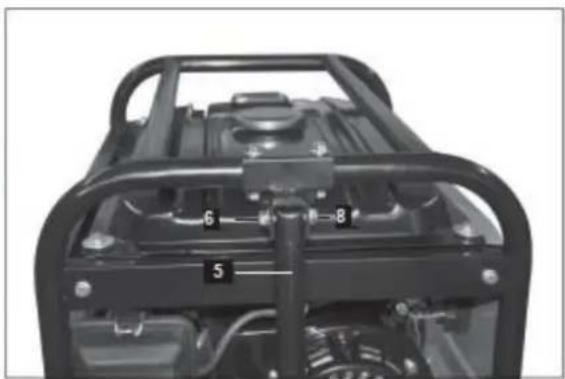
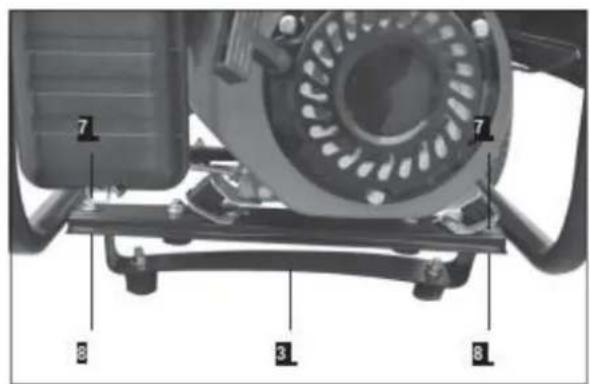
- Assemble the feet (3) under the frame using bolts (7) and nuts (8).
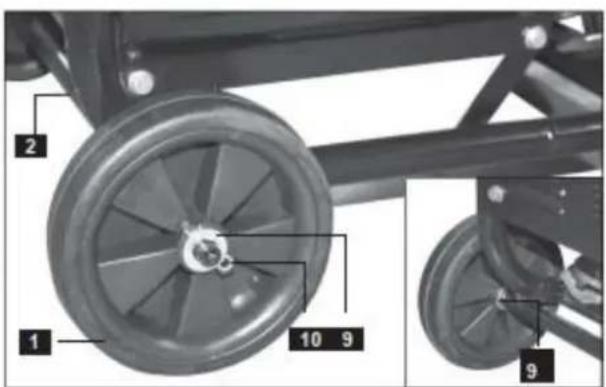
- Assemble the axle and wheels by placing the axle (2) in the hole of the frame, in the washer (9) and the wheels (1) and secure it with the cotter pin (10).
- Assemble the handle bracket (4) to the frame with a bolt (6) and a nut (8).
- Assemble the handle (5) by securing it to the bracket with a bolt (6) and a nut (8).
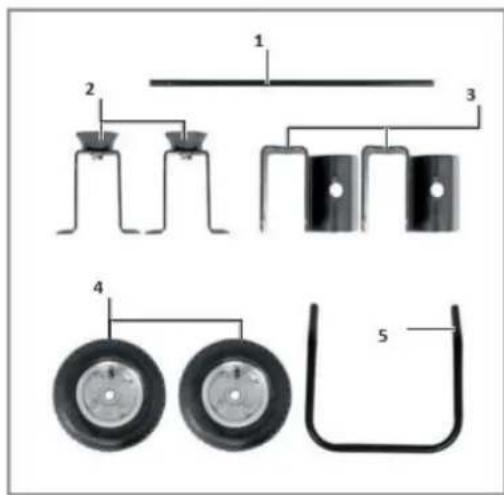
PRGE5500 - Spare parts' list
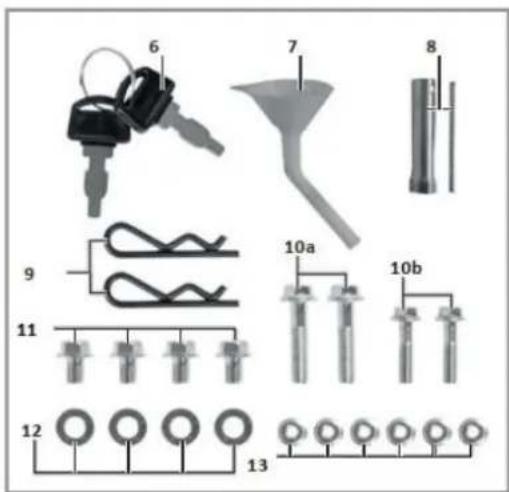

PRGE5500 - Assembly
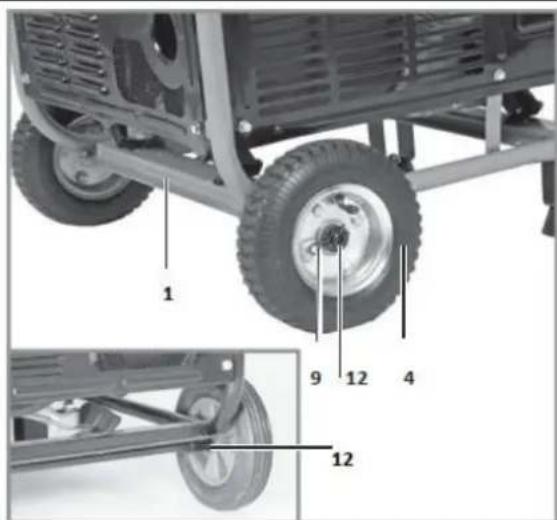
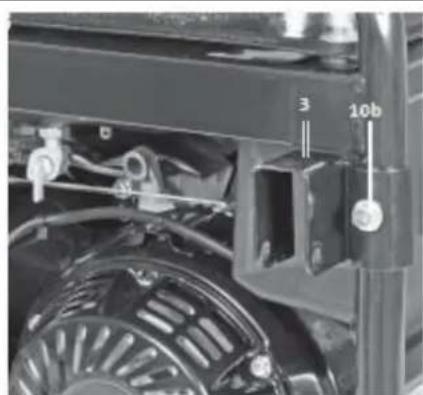
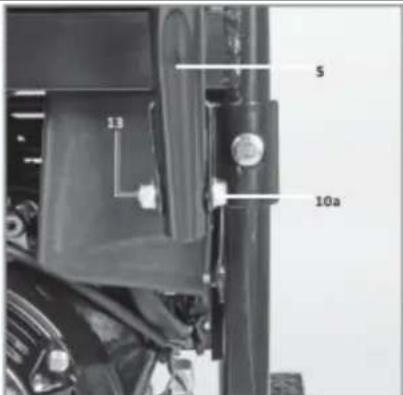
- Mount the feet (2) under the frame, use the bolt (11) and the nut (13).
- Assemble the axle and the wheels: place the axle (1) in the hole in the frame, then in the washer (12) and the wheels (4), then fix it with the cotter pin (9).
- Assemble the handle bracket to the frame with a bolt (10b).
- Assemble the handle (5) by securing it to the bracket with a bolt (10a) and a nut (13).
4.3- Starting the generator

WARNING! Before starting the engine, the generator must be grounded to discharge static electricity. Connect one end of a cable to the generator ground connection (Fig. 5) and the other end to an external ground (Fig. 6).
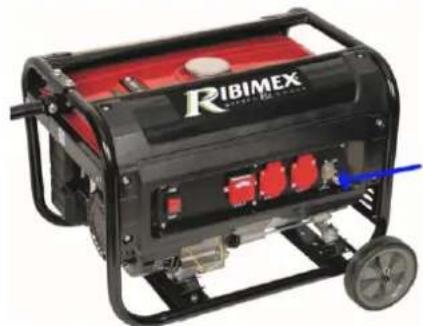
PRGE2800
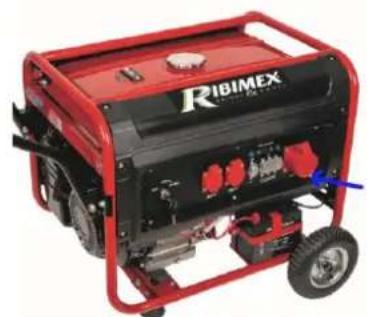
PRGE5500
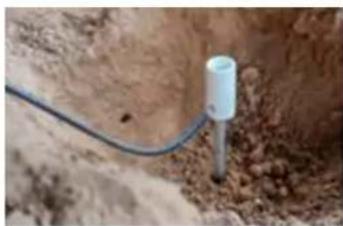
Fig. 5
Fig. 6
Battery (only applicable for PRGE5500)
Attention! If you wish to service the battery and/or dispose it, you must read or follow the manufacturer's safety instructions.
Attention! The person replacing the battery should remove all metal armbands, wristwatches, rings, etc., before handling the battery. If any of these components come into contact with the battery poles or current-conducting cables, there is a risk of burns.
Inserting and removing the battery (Fig. 7).
Attention! Use the generator only with a maintenance-free 12V battery.
Open the battery cover with a screwdriver (Fig. 7). Place the battery (Fig. 7) on the base. First connect the red (+) cable then the black (-) cable (Fig. 8). To remove the battery, perform the procedure in reverse.
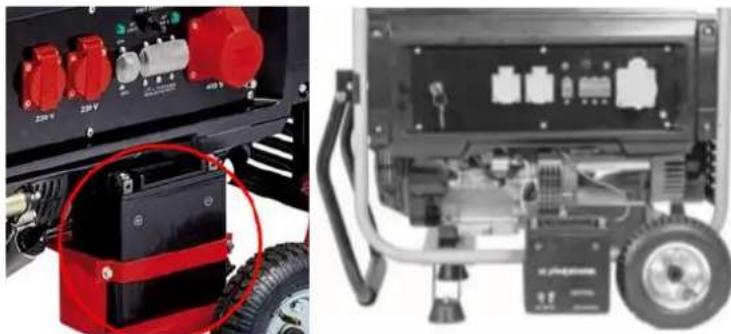
Fig. 7
Fig. 8
Attention! Do not disconnect the battery while in use as this may destroy the electronics. The battery is charged by the generator during its operation.
Maintenance and care of the battery
- Make sure your battery is always working and safe.
- A perfect connection to the electrical system cable network must be ensured at all times.
- Keep the battery clean and dry.
Fill up with oil and fuel before starting the generator (see 3.4- and 3.5-)
Starting the engine with the reversing starter.
- Open the fuel tap (Fig. 9) while turning it
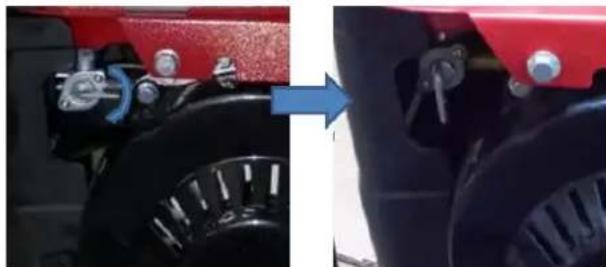
Fig. 9
- Place the ON/OFF switch to the ON position (Fig. 10).
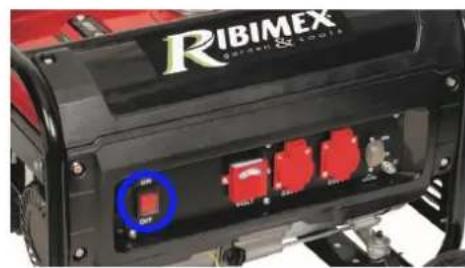
PRGE2800
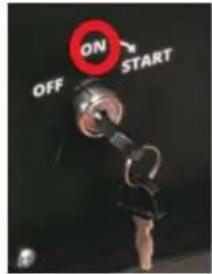
PRGE5500
Fig. 10
- Place the choke lever (pos. 11 for PRGE2800 and pos. 14 for PRGE5500) in position
- Gently pull the reversible starter until you feel a resistance then pull it firmly. If the engine does not start, pull again (Fig. 11).
- Place the choke lever back to its original position once the engine has started.
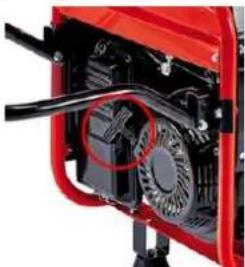
Fig. 11
Starting using the electric starter (only for PRGE5500):
- Open the fuel tap (Fig. 9).
- Turn the ON / OFF switch to the ON position (Fig. 10 PRGE5500).
- Place the choke level (pos. 14) in position
- Start the engine by turning the ignition key to the START position (Fig. 12). Once the engine has started, immediately return the ignition key to its original position. Do not operate the ignition key while the engine is running, this will damage the starter system.
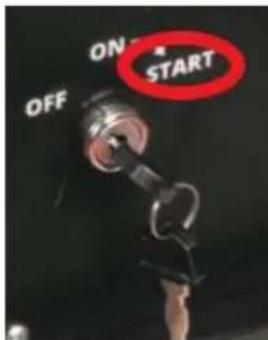
Fig. 12
- Place the choke lever back to its original position once the engine has started. Connect electrical appliances you wish to use to the generator: 230V and/or 400V 3~ sockets (for PRGE5500).
For PRGE2800:
Outlets can be charged continuously (S1) with 3000W and temporarily (S2) for a maximum of 5 minutes with 3300W.
For PRGE5500:
Outlets can be charged continuously (S1) with 2600W and temporarily (S2) for a maximum of 5 minutes with 2800 W or for a maximum of 2 minutes (with a cold engine) with 3100W.
Set the selector (Fig. 13) to the right to activate the 400V3 socket.
This outlet can be continuously charged (S1) at 3600W and temporarily for a maximum of 2 minutes at 5500W (when stopped, the generator being cooled) or for at most 5 minutes at 4800W (at operating temperature).
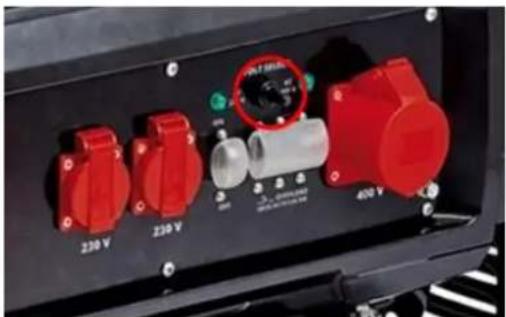
Fig. 13
The generator is suitable for 220 - 240V AC devices.
Do not connect the generator to your home mains as this could damage it to other electrical appliances in your home.
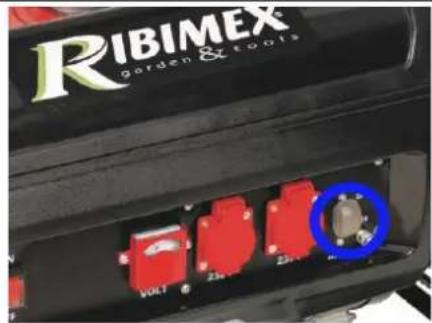
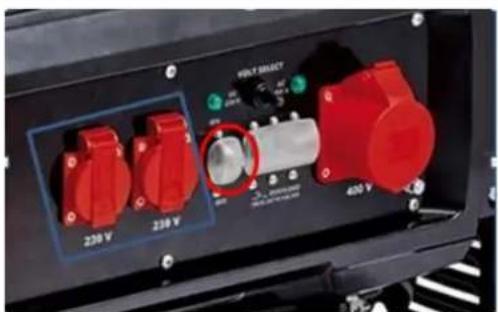
Important! The generator comes with an overload cut-off.
This disconnects the power outlets in case of overload. If applicable: Reduce the electrical power you draw from the generator or remove the connected defective devices and then restart sockets by pressing the safety switch (Fig. 14).
PRGE2800
PRGE5500
Fig. 14
4.4- Switching off the generator
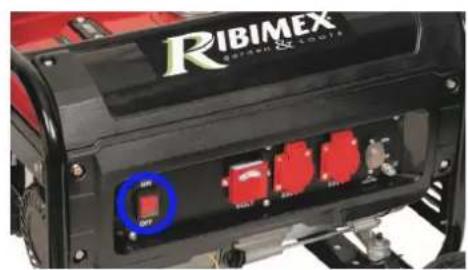
Before turning off the generator, let it run briefly without any consumers to allow it to cool. 1. Place the ON / OFF switch in position OFF (Fig. 15).
PRGE2800
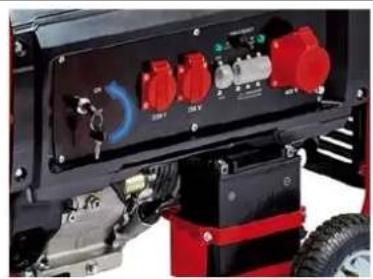
PRGE5500
Fig. 15
- Close the petrol cock (Fig. 16).
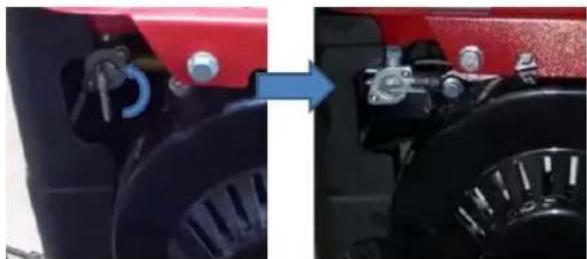
Fig. 16
V. OPERATION
This device is a generator for outdoor use only. Never use this generator indoors even if windows or doors are open. The device is suitable for all uses intended for operation with a voltage of 230V / 400V3 . Please observe the limits indicated in the safety instructions. The purpose of this generator is to power appliances and lighting sources. Check the suitability of the appliances as indicated by the supplier. If in doubt, contact a specialized dealer. The machine must only be used in accordance with its assignment. Each use beyond this assignment is considered non-compliant and dangerous. For resulting damage / injury, we accept no liability and the operator is solely responsible. Our devices have been designed to be used in a personal environment. We decline all responsibility if the device is used in a professional or industrial setting and any other equivalent activity.
VI. MAINTENANCE, STORAGE AND TROUBLESHOOTING

Before any intervention on product, ensure that the generator is turned off (OFF position) and disconnected any devices.
Reminder: Make sure to maintain the machine in good working condition, carry out regular maintenance of the machine after each use and before storage. Any breach or default of adequate maintenance reduces the life of the machine and increases the risk of breakdowns and accidents. To preserve the security system throughout the life of the machine, it is important to perform maintenance and proper cleaning. DO NOT use non-compliant replacement parts and do NOT dismantle yourself the machine or change the security features.
6.1- General product maintenance
Clean plastic parts with a soft clean cloth.
Do not use aggressive cleansers (solvents or abrasive cleansers), abrasive sponge or sharp objects.
Do not put or immerse product in water or any other liquid.
- Keep all safety devices, vents and engine housing free of dirt and dust as much as possible. Wipe the equipment with a clean cloth or blow it with low-pressure compressed air.
- We recommend that you clean the unit immediately and after each use.
- Clean the equipment regularly with a damp cloth and mild soap. Do not use cleaning agents or solvents; these could attack the plastic parts of the equipment. Make sure no water can seep into the unit.
6.1.1-Air filter
- Clean the air filter at regular intervals and replace if necessary.
- Open both clips at the back of the generator (Fig. 17) and remove the air filter cover.
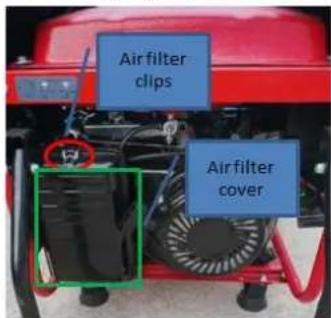
Fig. 17
- Remove the foam filter.
- Do not use abrasive cleaners or gasoline to clean items.
- Clean items by tapping them on a flat surface. Then clean with soapy water then rinse thoroughly with clear water and allow to dry.
- Reassemble the air filter by following the above steps in the opposite order.
6.1.2- Spark plug
Check the spark plug for the first time after 20 hours of operation. Clean it with a copper brush if necessary. Then carry out maintenance of the spark plug every 50 hours of operation.
- Remove the spark plug lug.
- Remove the spark plug using the supplied spark plug wrench (Fig.18).
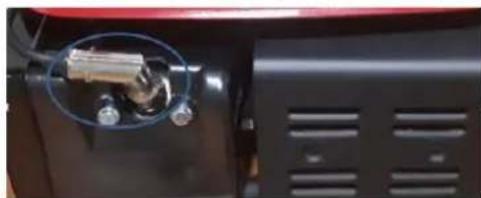
Fig. 18
- Replace the spark plug by following the above steps in the opposite order.
6.1.3-Draining and checking the oil level (before each use)
The draining of engine oil must be done when the engine is at operating temperature.
- Place the generator on a suitable support slightly at an angle with the oil draining screw.
- Open the oil draining screw.
- Open the oil draining plug and drain the oil into a receiving container.
- After draining the generator, close the oil drain plug and return the generator to the ground.
- Fill with recommended oil up to the upper mark on the oil level gauge. Do not screw the dipstick for the oil level check, only insert it to the thread.
The generator is equipped with an automatic shutdown system in case of low oil level.
6.1.4- Replacement of defective fuses (for PRGE5500 Fig. 17)
Open the fuse compartment and replace the defective fuse with a new model. Only use fuses of the same type as the one installed (check the maximum current on the fuse). If in doubt, contact our customer service or an electrician.
6.2-Storage
Note! Failure to follow these recommendations may result in deposits on the inside wall of the accelerator, which in turn results in a difficult start or lasting damage to the machine.
- Perform all maintenance work.
- Run the fuel from the tank (using a fuel pump for example).
- Once the fuel is empty, start the machine.
- Allow the machine to run empty until it stops. This cleans the carburetor of any remaining fuel.
- Cool the machine (about 5 minutes).
- Remove the spark plug.
- Clean the outer casing of the machine.
- Store the machine in a cool, dry place out of reach of ignition sources and flammable substances.
- Ideally, cover the machine to protect it from dust.
6.3- Disposal
When discarding the generator, drain it from the fuel and oil and be sure to follow local regulations. Do not throw in or with garbage.
6.4-Transportation
- Use the handle for transporting the generator.
- Transport the equipment only by carrying it by the handle.
- Protect the equipment against unexpected knocks and vibrations.
6.5- Troubleshooting
| Fault | Possible cause | Remedy |
| Engine does not function | Automatic oil cut-out has not responded | Check oil level, top up engine oil |
| Spark plug fouled | Clean or replace spark plug (electrode spacing 0.6 mm) | |
| No fuel | Refuel / have the petrol | |
| cock checked | ||
| Generator has too little or no voltage | Controller or capacitor defective | Contact your dealer |
| Overcurrent circuit-breaker has triggered Air filter dirty | Actuate the circuit-breaker and reduce the consumers | |
| Clean or replace the filter | ||
| The battery does not charge up | Poor contact to the battery | Clean the contacts |
| Battery defective | Have the battery checked by an expert and replace it if necessary | |
| Defective fuse (Fig. 17) | Check the function of the equipment using a different battery; replace the fuse | |
| Fig. 17 | ||
| Starter does not turn | Battery discharged | Charge the battery |
| Battery not connected | Connect the battery |
6.6- Information about the guarantee
The product is guaranteed in accordance with the legislation of the country of sale.
The guarantee starts from the date of purchase (subject to proof of purchase, ie. Sales receipt with purchase date)
The guarantee only covers defects in materials or workmanship.
Repairs (under the guarantee) can only be performed by an authorized service center.
When making a claim under the guarantee, the original sales receipt (with purchase date) must be submitted.
The guarantee does not apply in the following:
-
Normal wears and tears (on the product itself or wear parts).
-
Incorrect use, eg overloading of the device, use of non-approved accessories
-
Abuse or damage to the product, and damage caused by external factors.
-
Damage caused by non-compliance with the instructions and guidelines of the manual, e.g. connection to the wrong power source or non-compliance with instructions for assembly or installation.
-
Partially or totally disassembled device.
- Partially or fully modified device with parts not recommended by the manufacturer
Special provisions:
A 6 months guarantee is given for rechargeable batteries.
In case of dispute or litigation concerning the product or guarantee, the Melun Commercial Court has exclusive jurisdiction.
Our warranty conditions are available from our STAV department [^*] and on our website.
Should you have any repair requests under the warranty, please contact your retailer or our STAV [^*] who will inform you on the procedure.
Should you have any parts and/or accessories request, you can contact our STAV [^*] to ask for the product exploded view by indicating our reference and the serial number or batch number appearing on the nameplate.
[^*]STAV = Technical and After-Sales Service department
STAV contact details: Ribimex, 56 Route de Paris, F-77340 Pontault-Combault.
Tel: 08 92 35 05 77 (0,34€/min; only in France); email: sav@ribimex.fr
Internet Website: www.ribimex.com