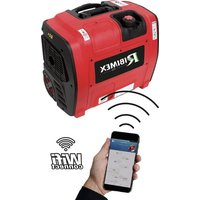
PRGES2000I - Generator RIBIMEX - Free user manual and instructions
Find the device manual for free PRGES2000I RIBIMEX in PDF.


| Product type | Inverter gasoline generator |
| Model / Reference | PRGES2000I / 605066 |
| Engine type | OHV 4-stroke, inclined single cylinder |
| Displacement | 79 cm³ |
| Engine speed | 3,000 to 5,000 rpm (ECO ON) |
| Cooling system | Forced air |
| Fuel | Unleaded gasoline (max 10% ethanol) |
| Fuel tank capacity | 4.2 L |
| Oil tank capacity | 0.35 L |
| Runtime at rated load | 3.5 hours |
| Rated AC voltage | 230 V |
| Rated AC frequency | 50 Hz |
| Rated AC current | 7.8 A |
| Rated AC output | 1.8 kW |
| Maximum AC output | 2.1 kW |
| DC voltage | 12 V |
| DC current | 8.0 A |
| USB output | 5 V, 2 A / 1 A |
| Sound pressure level | 92 dB(A) |
| Measured sound power level | 70.46 dB(A) |
| Net weight (empty) | 24 kg |
| Dimensions (L × W × H) | 530 × 320 × 430 mm |
| Safety devices | Electronic overload protection, DC protection, LOW OIL indicator, automatic low oil shutdown |
| Connected functions | Wi-Fi, Gen‑mate app (remote control and monitoring) |
| Ignition type | CDI |
| Recommended spark plug | A5RTC (TORCH) |
Frequently Asked Questions - PRGES2000I RIBIMEX
User questions about PRGES2000I RIBIMEX
0 question about this device. Answer the ones you know or ask your own.
Ask a new question about this device
Download the instructions for your Generator in PDF format for free! Find your manual PRGES2000I - RIBIMEX and take your electronic device back in hand. On this page are published all the documents necessary for the use of your device. PRGES2000I by RIBIMEX.
USER MANUAL PRGES2000I RIBIMEX
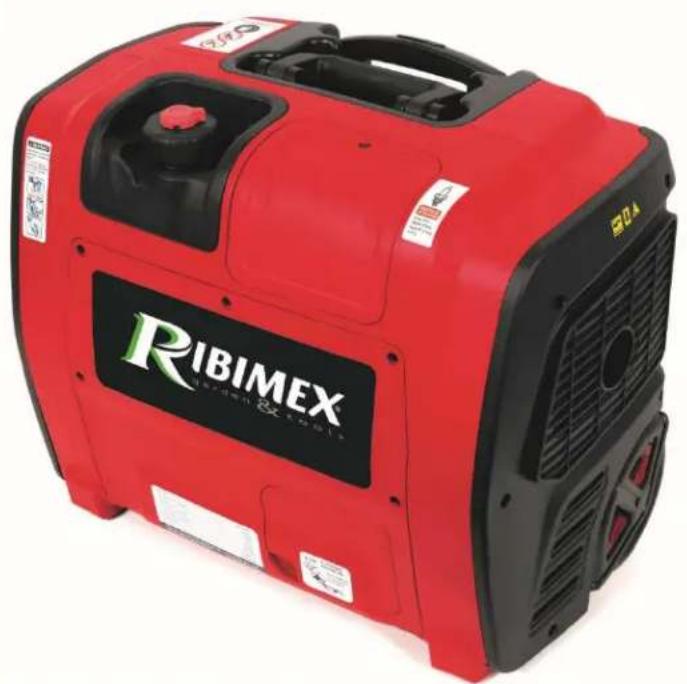
FR G ENERATEUR INVERSEUR AVEC DEMARREUR A RAPPEL Traduction des instructions d'origine
EN G ASOLINE INVERTER GENERATOR WITH RECOIL START Original instructions
Carefully read this instruction manual before operating this product.
Incorrect operation may cause injury and/or damages.
Please keep this manual for future reference.

AVVERTENZA:
Fig. 3
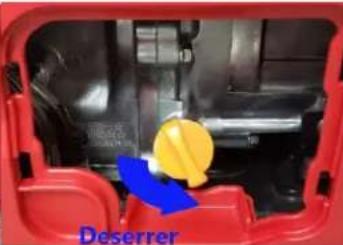
Fig. 4
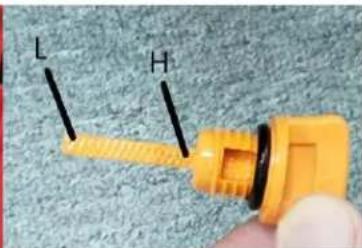
Fig. 5
LIMITE SUPERIEURE LIMITE INFERIEURE
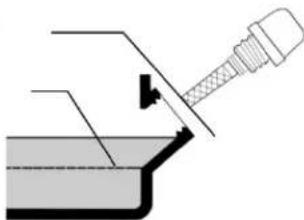
Fig. 6
3.4.2- Type d'huile
Fig. 7
- Placer le robinet de carburant en position ON (Fig. 8).
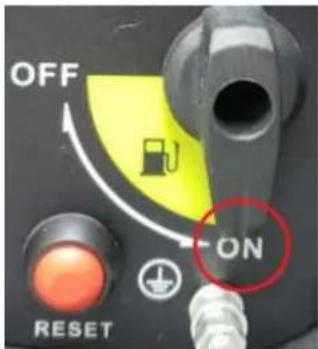
Fig. 8
Fig. 12
Fig. 18
Fig. 19

ATTENTION :
Fig. 20
Remarques :
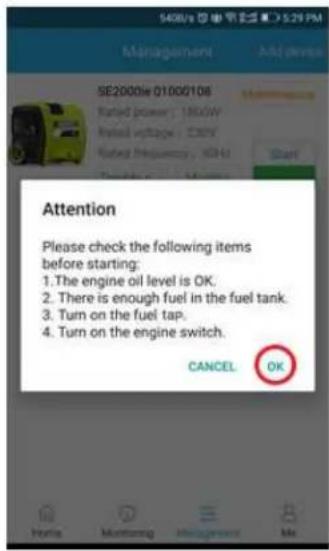
"Attention, please check the following items before starting":
"The engine oil level is OK" = Le niveau d'huile est suffisant
"There is enough fuel in the fuel tank" = il y a suffisament de carburant dans le réservoir
"Turn on the fuel tap" = Ouvrir le robinet de carburant
4.6.6- Maintenance
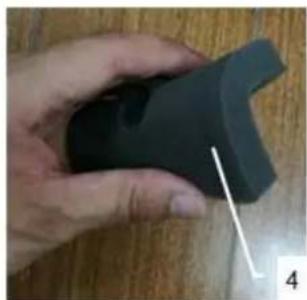
Fig. 22
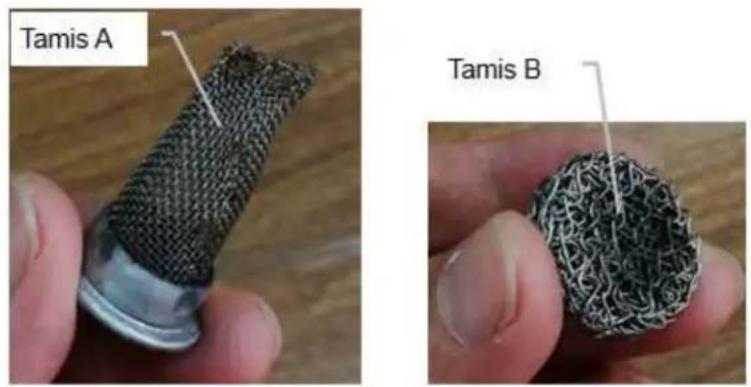
Fig. 24
Fig. 27
EN – Original instructions
I. Parts List
III. Safety instructions
V. Operation
II. Characteristics
IV. Getting Started
VI. Maintenance, Storage and Troubleshooting
I. PARTS LIST
See figures
II. CHARACTERISTICS
| Description Gasoline Inverter Generator | with Recoil Starter | |
| Reference PRGES2000I / 605066 | ||
| Model / Type SE2000i | ||
| Engine | Type | 4-stroke gasoline OHV |
| Cooling system | Forced air | |
| Cylinder arrangement | Inclined, single cylinder | |
| Displacement | 79cc | |
| Engine speed | 3,000 à 5,000/min (ECO ON) | |
| Operation hours | 3,5h at rated load | |
| Fuel | Unleaded gasoline | |
| Fuel tank capacity | 4,2L | |
| Engine oil capacity | 0,35 L | |
| Ignition system | CDI | |
| Spark plug | A5RTC (TORCH) | |
| Sound power level | 92 dB(A) | |
| Sound power level Measured 70.46dB(A) | Guaranted 91.46 dB(A) | |
| AC Output | Rated voltage | 230V |
| Rated frequency | 50Hz | |
| Rated current | 7.8A | |
| Rated output | 1.8kW | |
| Maximum output | 2.1kW | |
| Safety device type | Electronic | |
| DC Output | Rated voltage | 12V |
| Rated current | 8.0A | |
| USB | 5V, 2A/1A | |
| Safety device type | DC Protector | |
| Net weight | In Kg | 24 |
| Dimensions | (L×W×H) (mm) | 530 x 320 x 430 |
III. SAFETY INSTRUCTIONS
Before using this product, carefully read this manual and familiarise yourself with its content and understand all safety instructions. Do not operate or service the product unless you clearly understand this manual. Always follow the safety instructions to minimize risk of damage to property, and to minimize any risk of damages and injuries to yourself and other persons and/or animals. Keep the manual with the product or in a safe place, so that you can read it whenever you have a question about its use or servicing.
Safety notes and attention statements should always be observed.
3.1- Symbols
 | Do not expose to weather conditions (ex.: storm, rain, snow ...) or moisture.Do not use during weather conditions. |
 | Caution! Risk of injury and/or damage and/or deterioration of product in case of non-compliance to safety requirements. |
 | Read the instructions manual.Make sure all users read the instructions.Keep this manual for future reference |
 | Wear protective equipment (face shield or goggles, ear protection)Your hearing is at risk of irreparable damage. Anyone operating this machine under conditions of conscious daily use may be exposed to a noise level equal to or exceeding 85 dB (A). The operator must wear Personal Protective Equipment (PPE). In order to protect the operator's hearing. |
 | Wear protective gloves and protective boots. |
 | Never operate this tool or any other power equipment if you are tired, ill, or under the influence of alcohol, drugs, or any substance that could affect your ability or judgement. |
 | Hazard!Fuel is inflammable. Do not spill! |
 | Keep away from naked flames and any other heat source.Do not smoke. Do not spill fuel.Never attempt to refill while the motor is running or hot! |
4  | Warning! Hot surfaces! Do NOT touch, burn hazard.During operation and for a certain time after the machine has been switched off, cylinder, motor casing etc. will be hot.Do not touch them until they have cooled down. You risk getting burnt. |
 [YCYS] [YCYS] | Warning: Read the information on the manual.Use 4-stroke automotive lubricating oil.SAE 10W-30 is recommended for general, all-temperature use. |
  | Never run the engine indoors.Make sure there is always good ventilation when operating the product.Fumes from engine exhaust contain carbon monoxide, which can cause serious injury or death. |
 | Sound power level |
 | Do not dispose of this product with household rubbish. Dispose of this product in the nearest recycle centre. Please contact your local authority or local recycle centre for further information for its safe disposal. |
3.2- GENERAL SAFETY INFORMATION
- Keep work area clean
Cluttered areas invite accidents and injuries.
- Consider work area environment
Do not expose product to rain or to humidity.
Do not use product in damp or wet locations, during weather conditions.
Keep work area well lit (natural light or sufficient artificial lighting).
Do not use product indoors.
- Guard against electric shock
Avoid contact with electrical parts.
- Keep children away
Do not let bystanders touch the product.
All bystanders (esp. children) should be kept away from product and work area.
Keep the product away from children or from their environment. Never allow children to operate the appliance. Children should be supervised to ensure that they do not play with the product.
- Store idle product
When not in use, product should be stored in a dry, high or locked up place, out of reach of children.
- Do not force the product
It will do the job better and safer at the rate speed for which it is intended.
Do not use the product for purposes other than those for which it is intended. The product will do a better and safer job if it is used only for the purposes it was designed for.
- Use the right product
Do not force small products or attachments to do the job of heavy-duty tools.
- Dress properly
Do not wear loose clothing or jewellery; they can be caught in moving parts.
Wear protecting hair covering to contain long hair.
- Use protective equipment
Wear protective equipment appropriate to working conditions and work environment
Wear protective helmet, safety goggles, ear mufflers, face or dust mask or breathing mask with proper filter, rubber gloves and non-skid footwear to reduce the risk of personal injury during products use or manipulation.
- Do not overreach
Keep proper footing and balance at all times.
Do not work on unsecured scaffolding, ladders...
- Maintain product with care
Keep product clean for better and safer performance.
Follow instructions for lubrication and changing accessories.
Keep handles dry, clean and free from oil and grease.
Ensure that ventilation slots are kept clean and free from dust at all times (to avoid product from overheating)
-
Switch off product when not in use, before servicing and when changing accessories.
-
Always be sure to include this manual when selling, lending or otherwise transferring the ownership of the product
-
Always keep the warning labels clean and nice at any time without any scratches or damages.
If warning seals peel off or become soiled and impossible to read, you should contact the dealer from which you purchased the product to order new seals and affix the new seals.
Please tear down the original soiled warning label before affixing a new one. Let the surface dry thoroughly and then affix the new label on the original position.
- Stay alert
Watch what you are doing. Use common sense.
Never operate this machine or other power equipment if you are tired, ill, or under the influence of alcohol, drugs, or any other substance that could affect your ability of judgment.
- Check damaged parts
Before further use or reuse of the product, it should be carefully checked to determine that it will operate properly and perform its intended function.
- Defective switches or other part that is damaged should be properly repaired or replaced by an authorized service centre.
Do not use the product if the switch does not turn it on and off.
- Warning
The use of any accessory or attachment, other than those recommended in this instruction manual, may present a risk of injury to persons or animals and may cause damages.
The user and/or operator are responsible for any damages or injury caused to properties and/or persons.
- Have your product repaired by qualified personnel
Unless otherwise indicated in this instruction manual, repairs or replacement of any damaged part in an authorised service centre is recommended.
This product is in accordance with the relevant safety requirements. Repairs should only be carried out by qualified persons using original spare parts; otherwise this may result in considerable danger to the user.
- Remarks:
The safety precautions and instructions given in this manual are unable to cover in detail all the conditions and situations that may arise.
The operator and/or user must use common sense and caution when operating the product especially for any matters that are not referred in the above
-
Note: For specific maintenance and safety information about this product, consult the user's manual provided with it. If it has been lost or misplaced, contact your local retailer for a replacement.
-
Important: The information contained in this instruction's manual describes components available at the time of publication. We reserve the right to make changes without prior notice and without obligation to make alterations to components previously manufactured.
3.3- WARNING! SPECIFIC SAFETY PRECAUTIONS
-
Never permit a person without training or instruction to operate this machine.
-
Make sure there is always good ventilation when operating the product. Fumes from engine exhaust can cause serious injury or death.
-
Never run the engine indoors!
-
Please avoid running the engine in areas without good ventilation such as indoors, plastic green houses, tunnels, underground caves etc.
-
Make sure there are no missing or loose fasteners, and that the stop switch is working properly.
-
Stop the motor immediately if the product suddenly begins to vibrate or shake. Inspect for
broken, missing or improperly installed parts or attachments.
- Never smoke or light fires near the hedge trimmer. Keep the trimmer away from excessive heat. Engine fuel is very flammable and fire could lead to serious personal injury or property damage.
- Make sure of no fuel leaking from Fuel tank, Fuel cap, Fuel pipe and Carburetor and other parts which fuel may leak. Repair the machine if fuel leaking, make sure no leaking again.
- Don't get product close to inflammable materials such as ropes, dead leaves, waste paper and oilcloth etc.
- After refueling, screw the fuel cap back tightly onto the fuel tank and then carry the product to a spot 3m or more away from where it was refueled before turning on the engine.
- Refueling
Never store cans of fuel or refill the fuel tank in any place where is a boiler stove, wood fire, electrical sparks, welding sparks or any other source of heat or fire which might ignite the fuel.
-
Don't smoke when handling the fuel.
When refilling the tank, always turn off the engine first and take a careful look around to make sure that there are no sparks or open flames anywhere nearby before refueling. -
If any fuel spillage occurs during refuelling, use a dry rag to wipe up spills before turning the engine back on again.
-
Do not transport this unit on an uneven surface of the road for a long time when the fuel tank is full. This may cause fuel spillage after the tank cap is loosened as a result of bumping and impacting.
- Before starting engine, keep children and animals out of the working area.
- Never touch the muffler, spark plug and plug wire while the engine is in operation or immediately after stopping the engine. Doing so could result in electric shock and/or serious burns because of high temperature.
- For safe operation, use caution and keep the children away from the spot where the engine is in operation.
- The working temperature should be within 5°C and 40°C.
3.4- Fuel
3.4.1- Check fuel level

ATTENTION: always check the fuel level before each use and startup.
Check the fuel level with engine switched off and with generator on flat ground.
- Remove the fuel tank cap and check fuel level (Fig. 1).
- Refill fuel by making sure not to exceed the upper limit (red level Fig. 2). The fuel level can also be checked on the dipstick (Fig. 2).
- Close the cap securely and make sure there is no gasoline leakage on the generator.
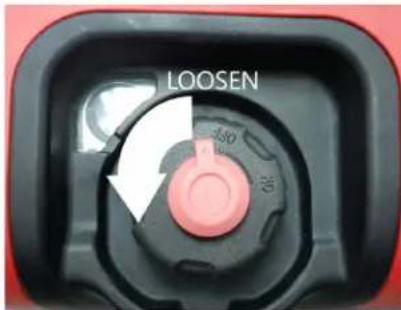
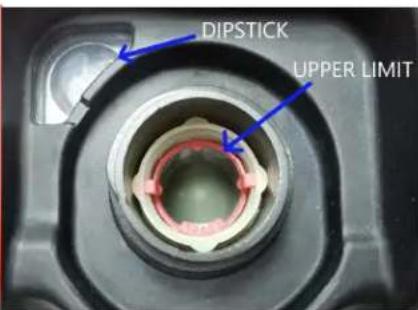
Fig. 1
Fig. 2
3.4.2- Fuel recommendations
- Use unleaded gasoline only.
- You can use unleaded gasoline with 10% ethanol.
- Unleaded gasoline pollutes the engine and sparkplug less and preserves the life of the exhaust system.
- Never use stale or contaminated gasoline or an oil/gasoline mixture.
- Avoid getting dirt or water in the fuel tank.
DANGER:
➢ Fuel catches fire easily. So be careful with your operation to avoid fire.
Smoking is extremely dangerous: always be sure to keep lit cigarettes away when mixing fuel or refilling fuel tank.
When refilling the tank in operation, always turn off the engine first. Don't refill the tank until the engine is cooled.
➢ Never put any inflammables material near the air exhaust, engine openings when it is running.
After refueling and before starting engine, clean any fuel drops or spills with a dry cloth. If any fuel spillage occurs during refueling, use a dry rag to wipe up spills before turning the engine back on again.

ATTENTION: Gasoline is a flammable and explosive product.
You can get burn or be seriously injured during handling.
- Stay away from any spark or flame
- Handle only in outdoors
- Clean if overflows
3.5-Oil
3.5.1- Oil level check

ATTENTION: always check the oil level before each use and startup
Running the engine with a low oil level can cause engine damage
Check the engine oil level with engine switched off and with pump on flat ground.
- Open the oil maintenance compartment (Fig. 3)
- Loosen and remove the oil dipstick (Fig. 4) and wipe it.
- Check the oil level by reinserting the dipstick in the neck (without screwing it in).
- If the line on the dipstick is between L and H (Fig. 5), the oil level is correct. If the line does not
reach the L mark, the oil level is too low, fill to the upper limit with the recommended oil (Fig. 6).
- Screw in the oil dipstick and replace the oil maintenance compartment.
- Make sure there is no oil leakage on the generator.
3.5.2- Engine oil recommendations
Oil is a major factor affecting performance and service life. Use 4-stroke automotive lubricating oil. SAE 10W40 API SE/SF/SG/SH/SJ or more.
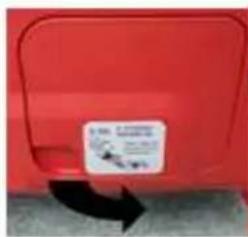
Fig. 3
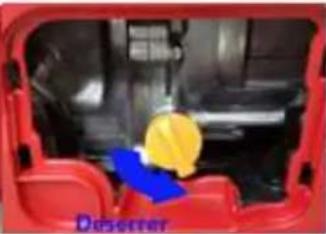
Fig. 4
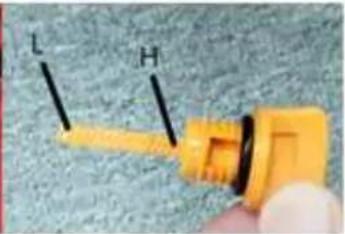
Fig. 5
UPPER LIMIT LOWER LIMIT
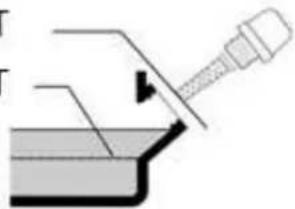
Fig. 6
IV. GETTING STARTED
4.1- Unpacking
- Remove product from its packaging.
- Check that tool and accessories are not damage
4.2- Assemble
The generator is delivered assembled.
4.3- Starting the engine
- Place the fuel breather in the ON position (Fig. 7).
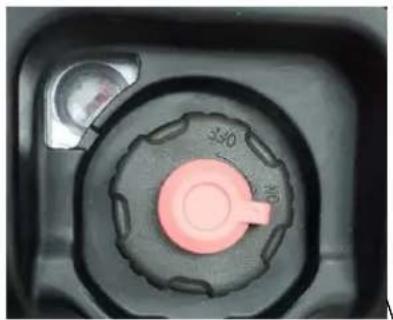
Fig. 7
- Place the fuel valve in the ON position (Fig. 8).
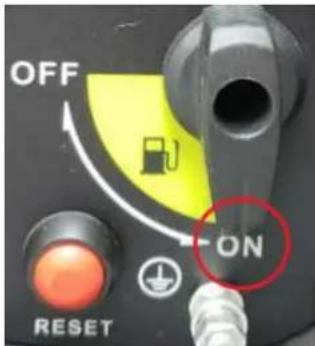
Fig. 8
- Set the motor switch (red) to the ON position (Fig. 9).
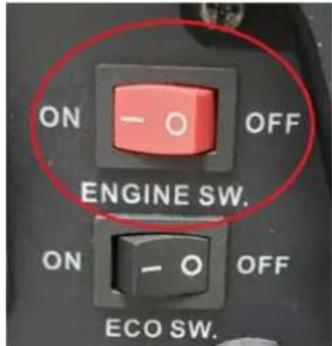
Fig. 9
- Set the ECO switch (black) to the OFF position (Fig. 10).
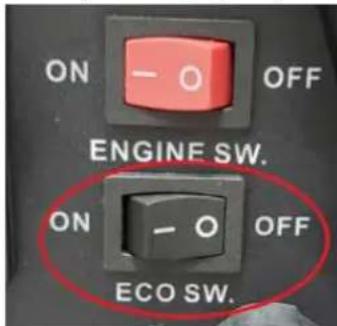
Fig. 10
- Pull the choke towards you in the START position (Fig. 11). Note: The choke is only required to start a cold engine. Set the choke to the START position for 2 tries only. If the engine still can't start, set the choke to RUN for 3 retries.
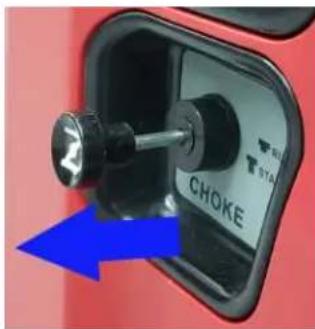
Fig. 11
- Gently pull the handle until you feel resistance and pull firmly (Fig. 12).
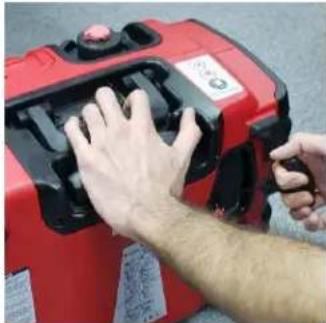
Fig. 12
- Let the engine run for 2-3 minutes then place the choke in the RUN position (Fig. 13).
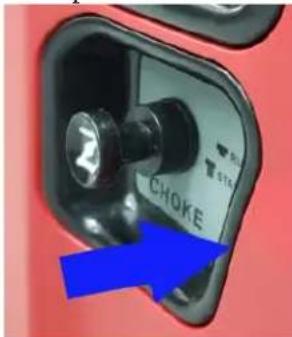
Fig. 13
- Make sure the green READY LED is lit (Fig. 14).
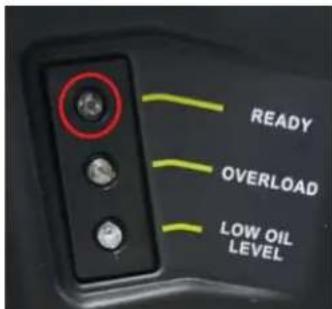
Fig. 14
- Set the ECO switch (black) to the ON position (Fig. 15).
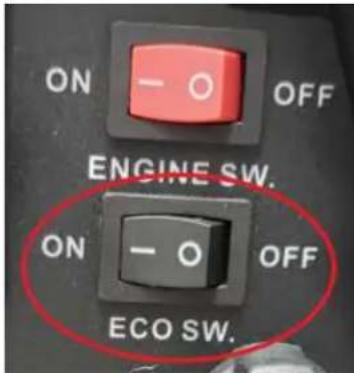
Fig. 15
- Connect the plug to the AC socket for electrical devices (Fig. 16).
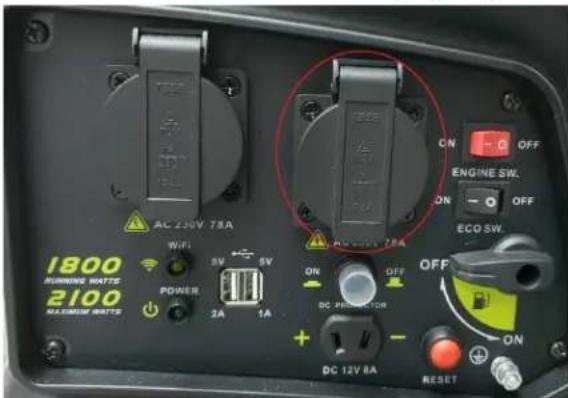
Fig. 16
- Turn on your electrical appliance.

Make sure electrical appliances are turned off before connecting them to the generator.
Notes :
- The ECO Switch 1 must be turned to OFF position when using electric devices that require a large starting current, such as a heavy compressor or some high electrical loads.
- Be sure all electrical devices including the lines and plug connections are in good condition before connecting them to the generator.
- Be sure the total load is within generator rated output.
- Be sure the receptacle load current is within receptacle rated current.
- If the generator is overloaded (in excess of rated power), or if there is a short circuit in a connected appliance, the OVERLOAD LED (red) will light on, and the current to the connected appliance(s) will shut off, and the READY LED (green) will light off.
- The Reset Button 3 can be used to recover output of the generator under the condition of overload protection, and unnecessary to restart engine overall. But at first check and correct the problem, if there is a short circuit in a connected appliance or wire.
- When an electric motor is started, the OVERLOAD LED (red) may light on. This is normal if the OVERLOAD LED (red) will light off after a few seconds.
4.4- Stopping the engine
Turn off the generator when it is no longer needed/used.
- Turn off all appliances plugged to the generator then disconnect them.
- Set the fuel valve to the OFF position (Fig. 17).
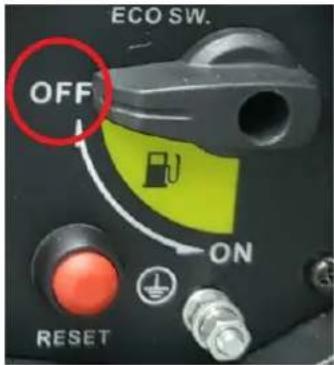
Fig. 17
- Set the motor switch (red) to the OFF position (Fig. 18)
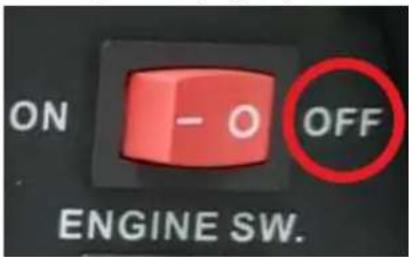
Fig. 18
- Let the engine cool down and put the breather in the OFF position (Fig. 19).
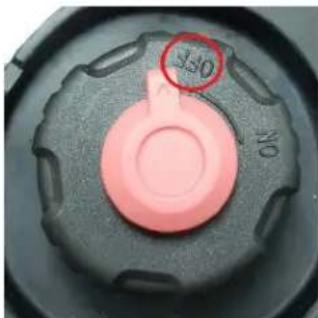
Fig. 19

WARNING :
Always let the generator cool down before moving it. Wait until the generator is cool to place the breather in the OFF position.
4.5- Charging battery (Fig. 20)
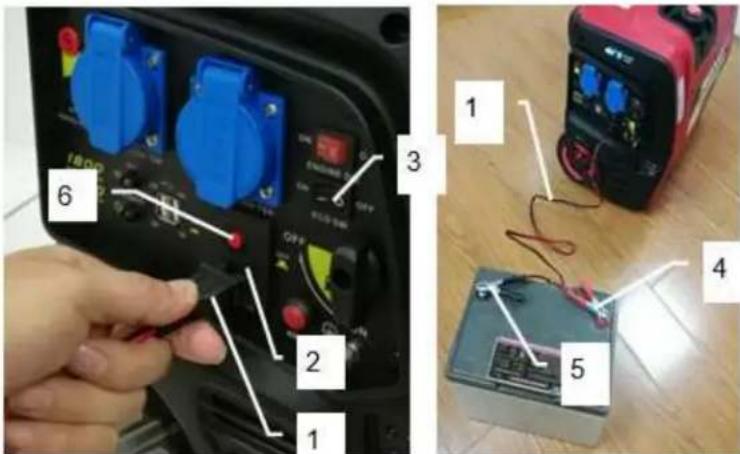
Fig. 20
- Disconnect the ground wire from the vehicle battery from the negative (-) terminal.
- Connect the battery charging cable (1) to the 12VDC socket (2) of the generator.
- Connect the red clamp of the charger (4) to the positive terminal of the battery (+) and the black clamp (5) to the negative (-) terminal.
- Set the ECO switch (3) to the OFF position.
- Start the generator motor.
- Battery charging time varies by model, DC breaker (6) does not prevent overcharging of the battery.

WARNING :
The 12VDC socket should only be used for 12V batteries.
Always set the ECO switch to the OFF position.
Never reverse polarity.
Never start a vehicle while charging the battery.
Overcurrent of the DC circuit or a wiring problem will trip the DC circuit breaker (spring push button). If necessary, wait a few minutes before resetting.
Disconnecting the battery charging cable:
- Place the engine switch in the OFF position to stop the engine.
- Disconnect the black clamp from the charger from the negative terminal of the battery.
- Disconnect the red clamp from the charger from the positive terminal of the battery.
- Remove the battery charging cable from the 12VDC socket of the generator.
- Connect the vehicle ground wire to the negative terminal of the battery.
4.6- Using the "Gen-mate" application
4.6.1- Downloading and Connection
- For both IOS and Android systems, download the "Gen-mate" application and install it according to the instructions.
- Click on "Free Register" and then enter the required data to complete the installation:
Field 1 "Please input your account name": choose an account name.
Field 2 "Please input your email box": Enter your email address.
Field 3 "Please input your verification code": Type the verification code received by email.
Field 4 "Please set the login password": Select a password.
Field 5 "Please confirm login password": Confirm the selected password.
- Click on "Quick Register".
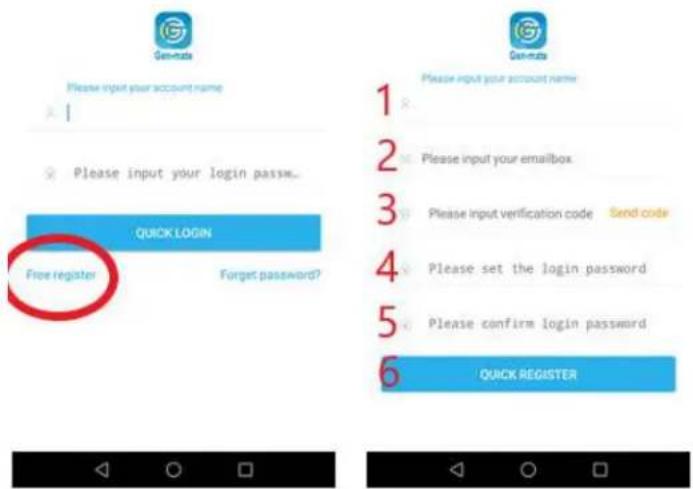
Note: During installation, click on "Trust this app" if the invitation appears.
- Log in with the generated username and password.
4.6.2- Adding the generator to the application
-
Open your WIFI settings on your smartphone and select the generator's network (PRGES2000I) and connect to it.
-
Open the application and click on "Management".
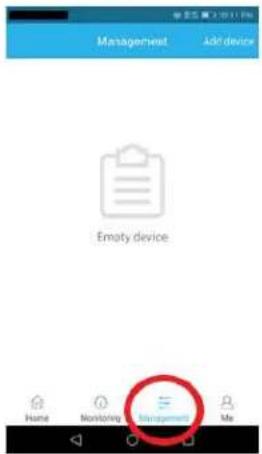
- Click on "Add device", select the WIFI signal PRGES2000I in the "Devices detected" page then click on "Quick Add".
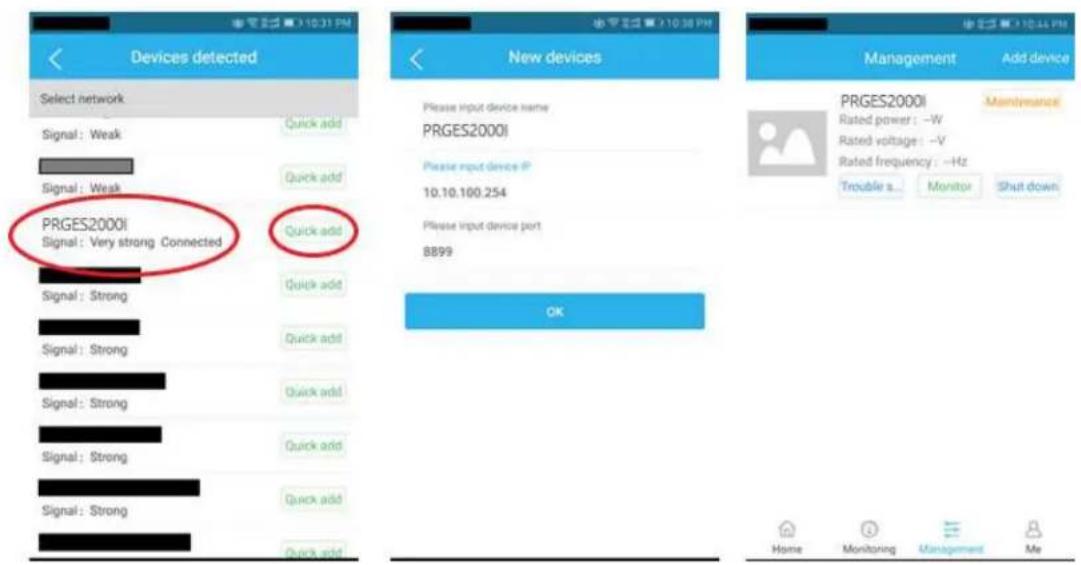
- Before clicking "OK" on the "New devices" page, disconnect your WIFI by keeping the "New devices" page opened. Reconnect your WIFI to make sure your smartphone can connect to the network and click OK on the "New devices" page. An "Add success" message will appear to confirm that the generator has been successfully added to the application.
Note: Once the builder is added to the "Management" tab, it will be automatically saved unless you remove it manually.
4.6.3- Generator connection and monitoring
- Connect to the PRGES2000I network again.
- Click on "Monitor" in the "Management" page.
Note: you can control: power, current, voltage, frequency, remaining fuel, remaining time, total running time, total fuel consumption rate and total power output.
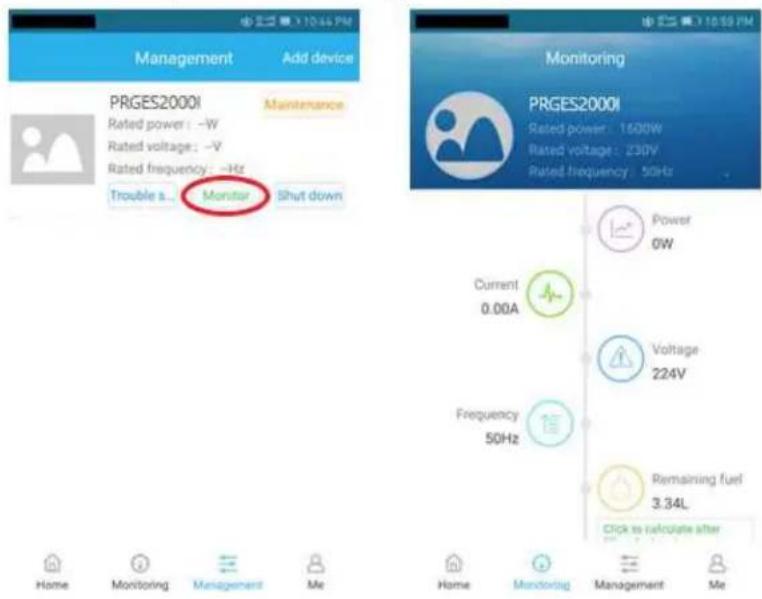
Notes:
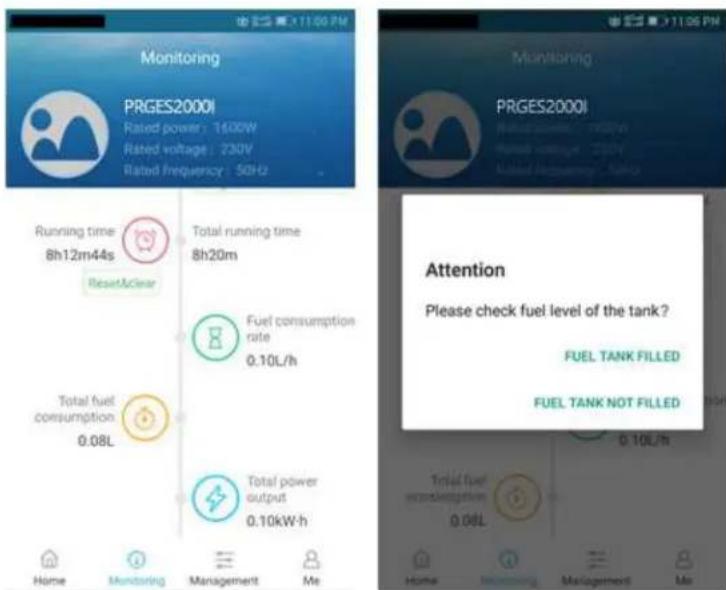
(1) If you wish to carry out the exact monitoring of the remaining fuel, you must click on "Click to calculate after filling fuel tank" provided that you completely fill the fuel tank. Otherwise, he can not control the correct data.
(2) When the remaining fuel quantity is too low, the "remaining fuel" icon appears to remind you to refuel.
(3) The environment may affect the maximum control distance between the generator and the smartphone. If placed in the open area, the maximum surveillance distance may exceed 100 meters.
4.6.4- Starting the generator
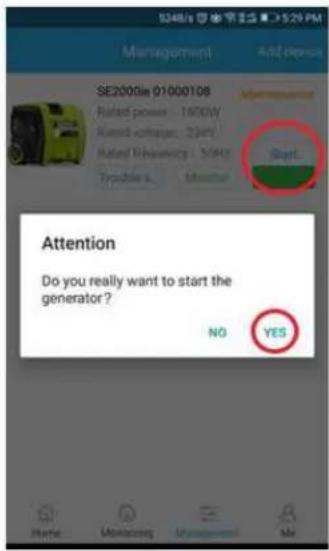
It is possible to start the generator directly from your smartphone / app to make sure your smartphone is connected. To do so, follow the instructions below:
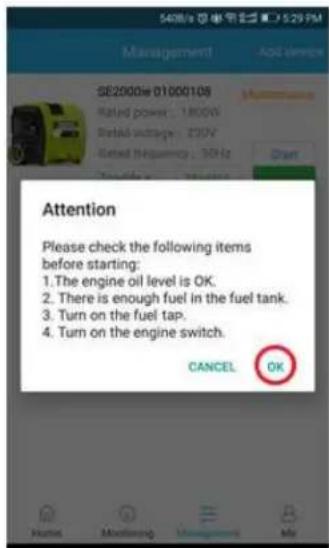
- Click on "Start" in the "Management" tab.
- A message "Do you really want to start the generator? Appears, click on YES."
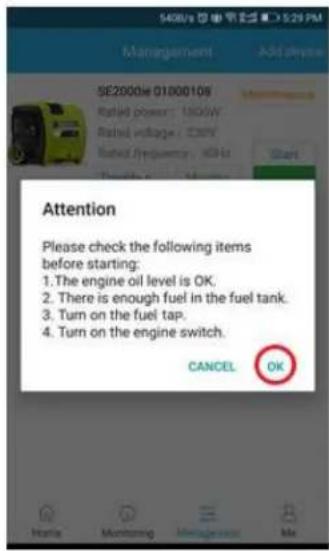
- Another message appears to make sure the generator is ready to start:
"Be careful, please check the following items before starting":
"The engine oil level is OK" = The oil level is sufficient
"There is enough fuel in the fuel tank" = there is enough fuel in the tank
"Turn on the fuel tap" = Open the fuel tap
"Turn on the engine switch" = set the engine switch to ON - Once the 4 checks above have been confirmed, click on OK.
Notes:
Open the fuel cock and set the engine switch to ON before starting. Use the choke (START position) for any cold engine.
4.6.5- Turning off the generator
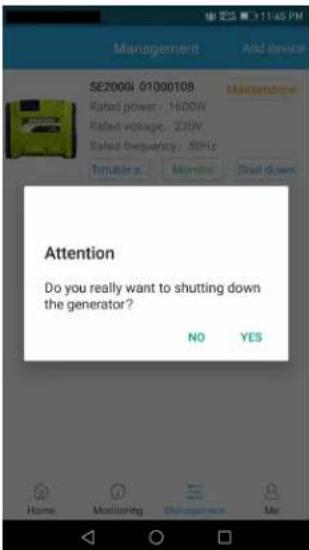
It is possible to turn off the generator directly from your smartphone / app. To do so, follow the instructions below:
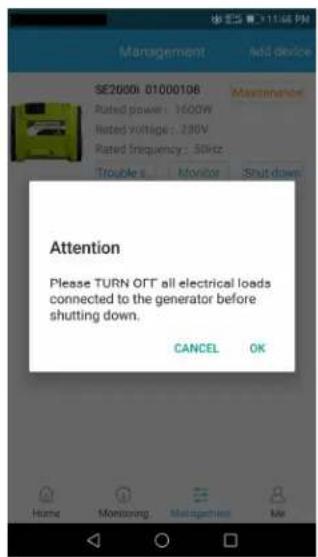
- Click on "Shut down" in the "Management" tab.
- A message "Do you really want to shut down the generator?" appears, click on YES.
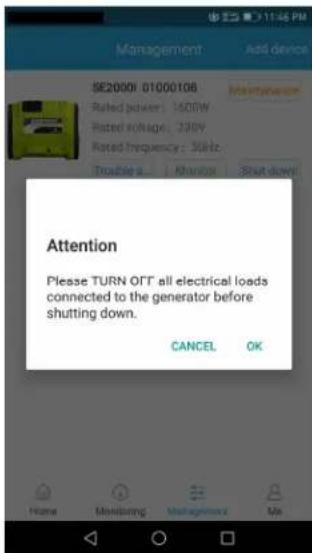
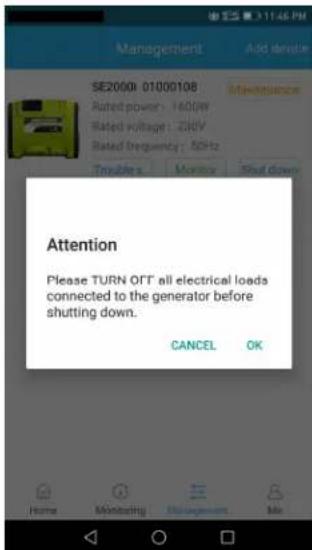
- Another message appears to make sure the generator is ready to be turned off:
“Caution, please turn off any electrical equipment connected to the generator before shutting it down”.
- Then click OK.
4.6.6- Maintenance
The "Maintenance" icon will flash to remind the user to revise the generator according to the maintenance schedule (see VI MAINTENANCE, STORAGE AND TROUBLESHOOTING).
4.6.7- Troubleshooting
If you have problems with the generator, you can click on "Troubleshooting" and troubleshoot with the step-by-step guide (see MAINTENANCE, STORAGE AND TROUBLESHOOTING for more details).
V. OPERATION
This device is a generator intended to be used outdoors. Never use this generator indoors even if windows or doors are open.
VI. MAINTENANCE, STORAGE AND TROUBLESHOOTING

Stop and let the engine cool down before any intervention. Make sure the generator is far from any source of heat. If you are unfamiliar with the maintenance work, have it done by an authorized dealer.
6.1- General Product Maintenance
Clean plastic parts with a soft clean cloth.
Do not use aggressive cleansers (solvents or abrasive cleansers), abrasive sponge or sharp objects.
Do not put or immerse product in water or any other liquid.
| Item\Regular Service Period (4) | Each use | Every 6 months or 50 hrs. | Every 1 year or 100 hrs. | Every 2 years or 300 hrs. | |
| Engine oil | Check level ⊙ | ||||
| Change ⊙(1) | |||||
| Air cleaner Clean ⊙(2) | |||||
| Spark plug | Check-adjust ⊙ | ||||
| Replace | ⊖ | ||||
| Spark arrester | Clean ⊙ | ||||
| Valve Clearance | Check-adjust | ⊖(3) | |||
| Combustion Chamber | Clean ⊙(3) | ||||
| Fuel tank & filter | Clean ⊙ | ||||
| Fuel line | Check | ⊖ | |||
(1) Change engine oil after the first 10 hours of operation.
(2) More frequently if generator used in dusty areas.
(3) These components should be checked by your reseller unless you have the proper tools and are mechanically proficient.
(4) For commercial use, long hours of operation to determine proper maintenance intervals. Failure
to follow this maintenance schedule could result in non-warrantable failures.
6.2- Specific Maintenance
6.2.1- Engine oil (Fig. 21)
Drain the oil when the engine is still hot, the hot oil will flow quickly and easily.
(1) Close the fuel valve, close the cap securely and place the breather valve in the OFF position to reduce the risk of leakage.
(2) Open the oil maintenance compartment (1).
(3) Place a suitable container (3) near the engine to collect used oil.
(4) Unscrew and remove the dipstick (2), use an A4 sheet and make it a roll with a diameter of about 30mm.
(5) Put the paper roll (4) outside of the filler neck (5) and drain the used oil into the container (3) by tilting the motor towards the filler neck (5).
(6) With the engine level, fill with recommended oil to the upper limit through the filler neck (5).
(7) Screw in the dipstick (2) and make sure that it is correctly and firmly tightened.
(8) Replace the oil maintenance cap (1).
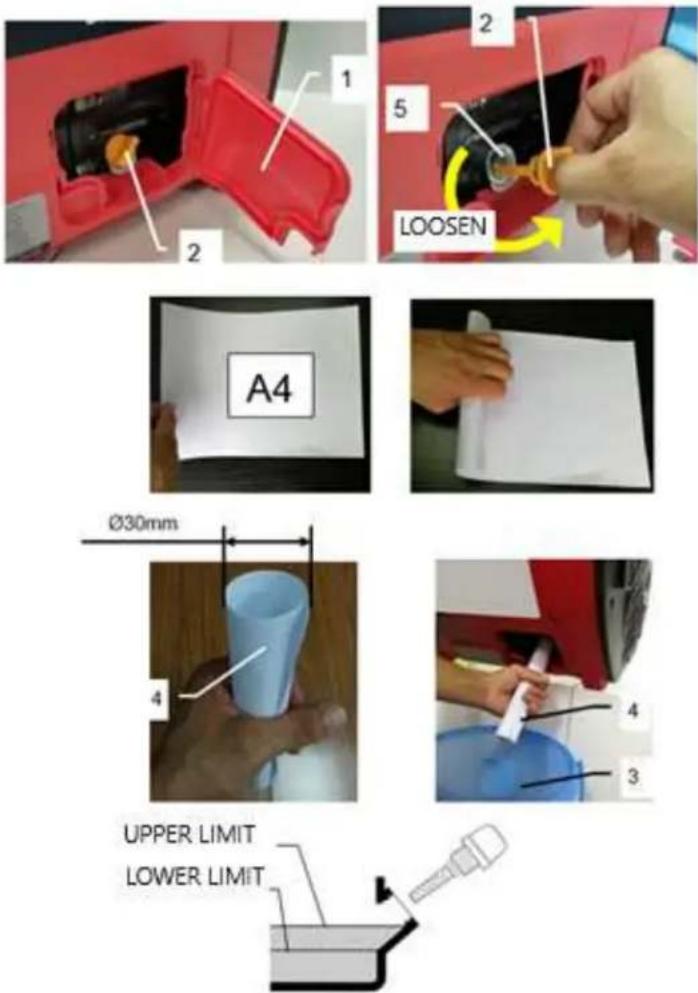
Fig. 21
6.2.2- Air filter maintenance (Fig. 22)
A dirty air filter limits the air flow to the carburetor. To prevent malfunction of the carburetor, regularly clean the air filter. Check and clean more often when the generator is used in dusty areas.

Using a flammable solvent or gasoline to clean the air filter can result in a fire or explosion. Only use soapy water or a non-flammable solvent.
Note: Running the engine without an air filter or a damaged filter will allow dirt to enter the engine and cause rapid engine wear. This type of damage is not covered by the warranty.
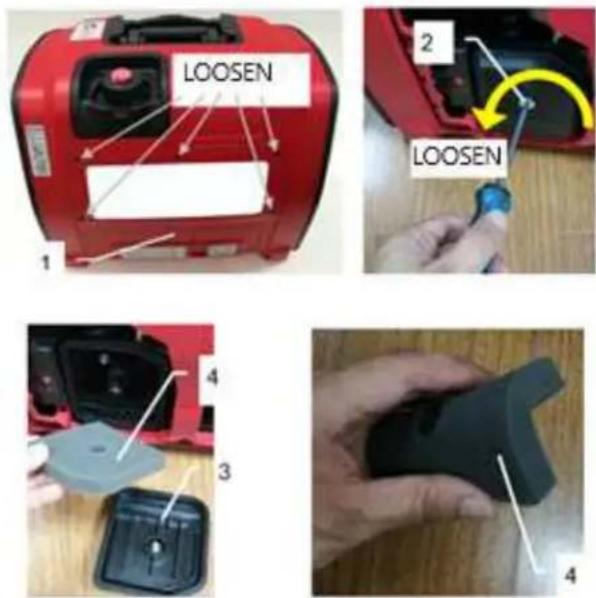
Fig. 22
(1) Unscrew the 5 screws and remove the engine maintenance compartment (1).
(2) Unscrew the screw (2) and remove the air filter cover (3).
(3) Wash the foam (4) in a solution of household detergent and warm water, then rinse thoroughly. Or wash in a non-flammable solvent. Allow to dry well.
(4) Replace the foam (4) and the air filter cover (3) and tighten the cover screw (2).
(5) Replace the engine maintenance cover (1) and tighten the 5 screws securely.
6.2.3- Spark plug maintenance (Fig. 23)

Recommended spark plug: A5RTC (TORCH). For proper motor operation, the spark plug electrodes must be removed properly and without deposit. Using an unsuitable spark plug can cause engine damage. Allow the engine to cool before servicing.
(1) Unscrew the screw (5) then remove the maintenance compartment from the spark plug.
(2) Remove the spark plug cap (2).
(3) Use a spark plug wrench (4) to remove the spark plug (3).
(4) Inspect the spark plug. Replace it if the electrodes are worn out or if the insulator is cracked, crumbled or soiled.
(5) Measure the electrode gap with a feeler gauge. The spacing should be 0.6 to 0.7mm.
(6) Check the spark plug sealing washer and check that it is in good condition.
(7) Once the spark plug is installed, tighten with the spark plug wrench to compress the washer. Tighten 1/8 to 1/2 turn to compress the washer.
(8) Reposition the cap (2) on the spark plug (3).
(9) Refit the spark plug maintenance cover (1).
Note: A loose spark plug overheats and can damage the engine. A spark plug that is too tight can damage the thread of the orifice.
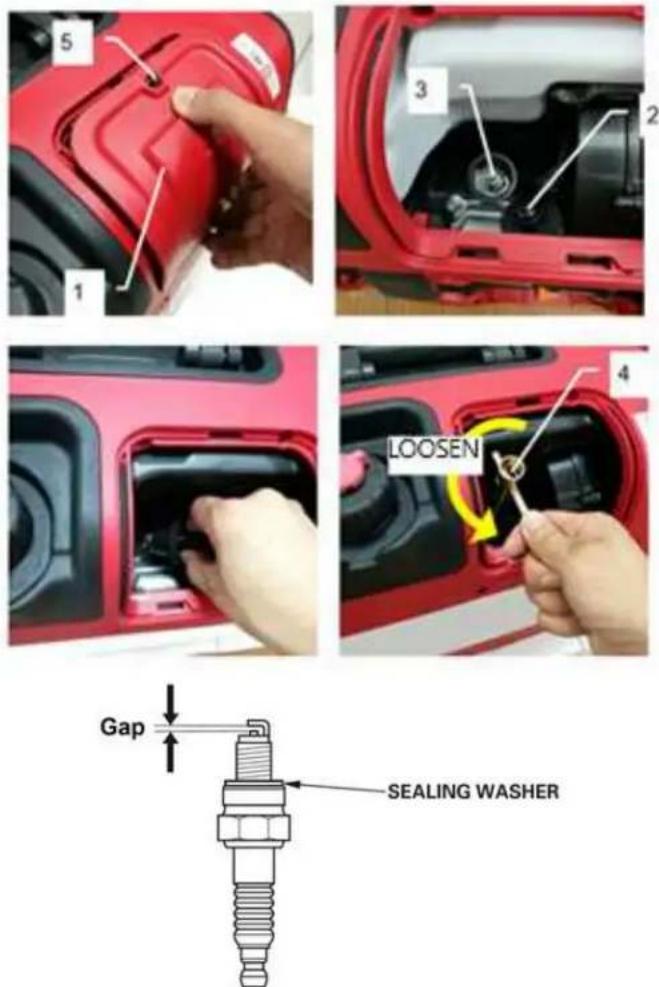
Fig. 23
6.2.4- Spark arrestor maintenance (Fig. 24)
Allow the engine to cool before servicing the suppressor.
(1) Unscrew the cover screws (2).
(2) Withdraw the spark arrestor (1).
(3) Use a brush to remove carbon deposits from sieves A and B.
(4) Inspect the sieve A for breaks or tears and replace if necessary.
(5) Reposition the spark arrestor (1) and the cover (2).
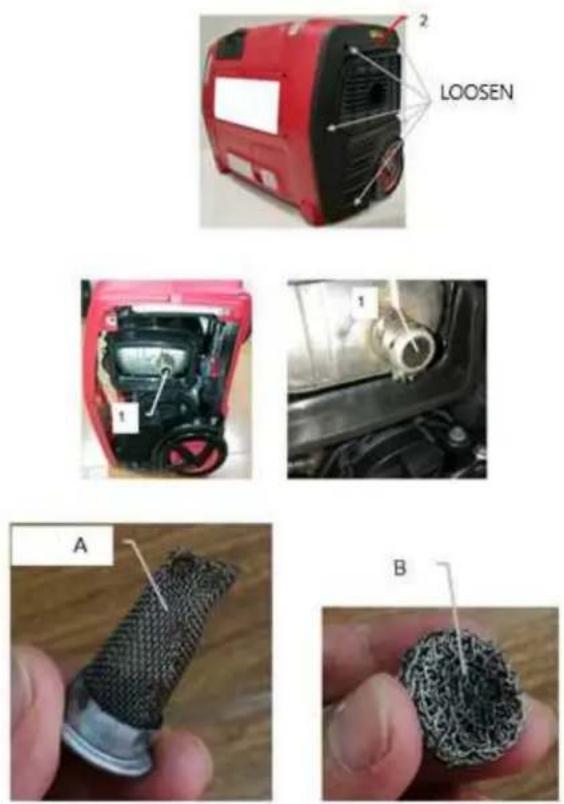
Fig. 24
6.2.5- Fuel filter maintenance (Fig. 25)
(1) Remove the fuel cap (1) and the filter (2).
(2) Clean the filter (2) with gasoline, if it is damaged replace it.
(3) Wipe the filter (2) and replace it.
(4) Close the tank cap (1) firmly.
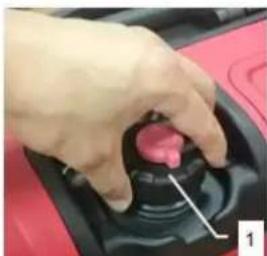
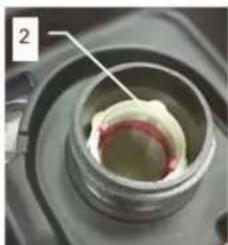

Fig. 25
6.3- Transport and storage
Before transporting or storing the generator, proceed as follows:
(1) Close the fuel tap.
(2) Allow generator to cool.
(3) Close the fuel cap securely.
(4) Close the fuel tank breather. Do not close the breather before the engine is completely cool.
For storage longer than six months, the generator must be prepared as follows:
6.3.1- Drain the fuel from the carburettor (Fig. 26)
(1) Turn the fuel valve (5) to the OFF position.
(2) Unscrew the 5 screws of the maintenance cover (4) and remove it.
(3) Remove the drain hose (1) from the hole at the bottom of the housing and place a suitable container.
(4) Unscrew the drain screw counter clockwise.
(5) Drain the gasoline from the carburettor (2) into the container with the drain hose (1).
(6) Securely tighten the drain screw (3) clockwise.
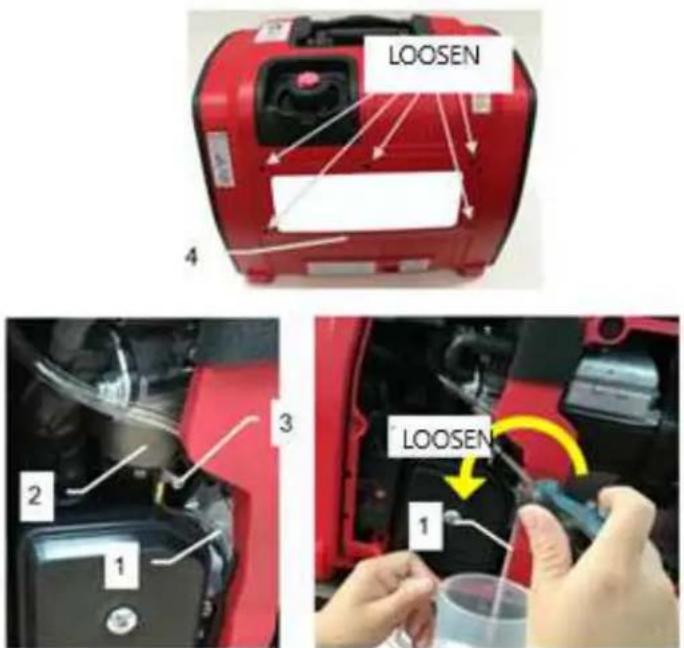
Fig. 26
6.3.2- Drain the fuel from the tank (Fig. 27)
(1) Unscrew the cap and remove the filter from the tank.
(2) Empty the fuel tank through the tank neck (1) into a suitable container by gently tilting the generator.
(3) Replace the filter and the tank cap.
(4) Tighten the cap firmly clockwise.
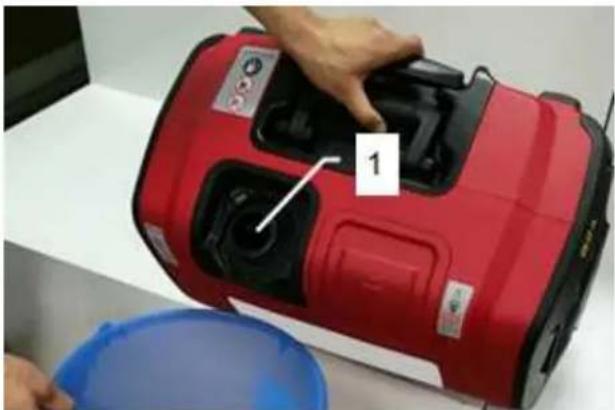
Fig. 27
6.3.3- Drain the carburettor fuel again (Fig. 28)
(1) Place the fuel breather in the ON position.
(2) Set the fuel valve to the ON position.
(3) Put the drain hose (1) in a suitable container.
(4) Loosen the drain screw counter clockwise.
(5) Drain the fuel from the carburettor (2) into the container.
(6) Tighten the drain screw clockwise.
(7) Replace the drain hose (1) in the hole.
(8) Replace the maintenance cover.
(9) Place the fuel valve in the OFF position.
(10) Place the fuel breather in the OFF position.
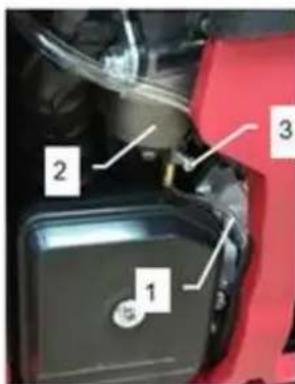
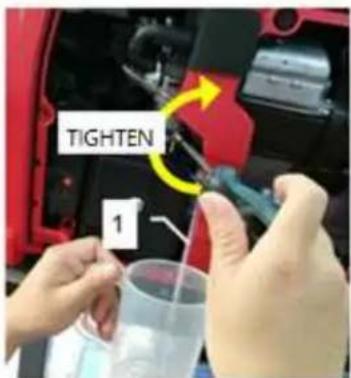
Fig. 28
6.3.4-Engine
(1) When the engine is still hot, drain the crankcase oil. Fill with recommended oil.
(2) Remove the spark plug and pour 15ml of engine oil into the cylinder through the spark plug hole on the piston head and cover the spark plug with a cloth. Pull the starter cord several times to cover the cylinder walls with the engine oil.
(3) Replace the spark plug.
(4) Pull the starter cord until you feel resistance and then stop pulling (this prevents the cylinder and the valves from rusting).
(5) Clean the external surfaces of the generator. Check that the ventilation openings are not
obstructed.
(6) Store the generator indoors in a clean, dry place and cover it to protect it from dust.
6.4- Disposal
When discarding the product, drain the fuel and oil from the tool, and be sure to follow local regulations. Do not throw in or with garbage.
6.5- Troubleshooting
The engine cannot be started:
![graph TD A["Is there fuel in the tank?"] -->|YES| B["Are the engine switch and fuel tap ON?"] A -->|NO| C["Refill the fuel tank"] B -->|YES| D["Is the fuel cap vent lever ON?"] B -->|NO| E["Turn the two switches on"] D -->|YES| F["Does the choke knob pull out?"] D -->|NO| G["Turn the fuel cap vent l…](/content/2026/04/673918/images/4877cf6e2087f7fe671fb42bc3118c7e0458ddee1ed21e9c2b32df25dcd013e4.jpg)
Engine starts, then shuts down:
![graph TD A["Is the fuel level low? Add fuel to tank"] -->|NO| B["Is fuel cap vent lever closed? Open fuel cap vent lever"] B -->|YES| C["Is engine oil level low?"] B -->|NO| D["Check engine oil level, add or drain as needed"] C -->|NO| E["Is the fuel in the fuel tank contaminated?"] C -->|YES| F["Re…](/content/2026/04/673918/images/36ffde29a69008bff32b8a85871bd70e8edb91f911da0e429676da874a631777.jpg)
Engine starts, then runs rough:
![graph TD A["Is the choke stuck or left on?"] -->|NO| B["Is the air cleaner dirty or clogged?"] A -->|YES| C["Turn choke to run position"] B -->|NO| D["Is the spark plug defective or dirty?"] B -->|YES| E["Clean or replace the air filter element"] D -->|NO| F["Contact with an authorized dealer"] D --…](/content/2026/04/673918/images/838d2c07e00a0030222f0a582e3900fcff199c8c7137c5c954628f2815790a3a.jpg)
No AC output:
![graph TD A["Is the generator overloaded?"] -->|NO| B["Is AC voltage low?"] A -->|YES| C["Reduce loads and push reset button to reset module"] B -->|NO| D["Is the electrical device short circuit?"] B -->|YES| E["Verify the choke is on run position, and check fuel in the fuel tank and carburetor, and…](/content/2026/04/673918/images/bb01db1f7533c11d2ee7b19fec24a5ad9be6def10acc41b3b82207a478f55e47.jpg)
No DC output:
![graph TD A["Is the DC voltage low? Verify ECO Switch"] -->|NO| B["Is the DC circuit protector OFF?"] A -->|YES| C["is on the "0" OFF position"] B -->|YES| D["Push the DC circuit protector ON."] B -->|NO| E["Check the electrical appliance for any fault"] E -->|NO| F["Contact with an authori…](/content/2026/04/673918/images/425fb39080426a445f00edb89aeebe8502e285783d4861fe95759c5d602a49fc.jpg)
Fuel leaks from drain hoses:
![graph TD A["Is the pressure in fuel tank too high?"] -->|NO| B["Is the carburetor drain in bowl not closed?"] A -->|YES| C["Open fuel tank vent to balance pressure"] B -->|NO| D["Is the fuel tap not closed while tilting the generator?"] B -->|YES| E["Turn drain screw clockwise to close"] D -->|NO| F…](/content/2026/04/673918/images/fe39194114348f07d1392c0ca82d60cc2b48046a52f146f536891cb0964dfd46.jpg)
Fig. 7
Fig. 12
Fig. 18
Fig. 19

AVVERTIMENTO:
Fig. 20
Appunti:
4.6.6- Manutenzione
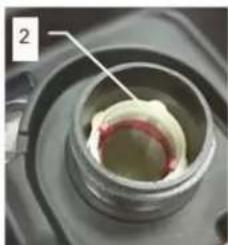
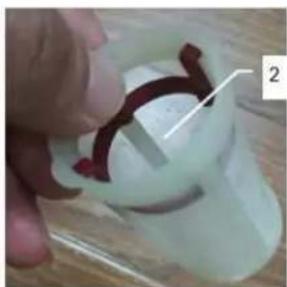
Fig. 25
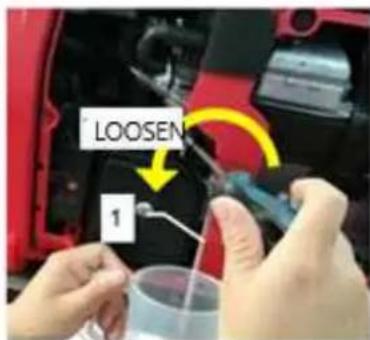
Fig. 26
Fig. 27
| Pos2 | FR EN IT | ||
| 1 Timon Shaft Albero | |||
| 2 Poignée Handle Maniglia | |||
| 3 Capot de maintenance bougie Spark plug compartment Vano candela | |||
| 4 Capot de maintenance d’huile Oil compartment Scomparto dell’olio | |||
| 5 Reniflard Breather | Pausa | ||
| 6 | Bouchon d’essence | Fuel tank lid | Coperchio del serbatoio del carburante |
| 7 Capot de maintenance moteur Engine compartment Vano motore | |||
| 8 | Carburateur | Carburetor | Carburatore |
| 9 | Boitier Gen mate | Gen Mate box | Scatola gen mate |
| 10 | Bouchon du réservoir d’huile | Oil tank lid | Coperchio del serbatoio dell’olio |
| 11 | Démarreur à rappel | Starter rope | Corda di avviamento |
| 12 | Starter | Choke | Soffocare |
| 13 | Roue | Wheel | Ruota |
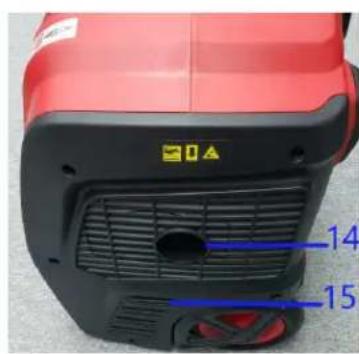
| 14 | Pot d’échappement | Exhaust pipe | Tubo di scarico |
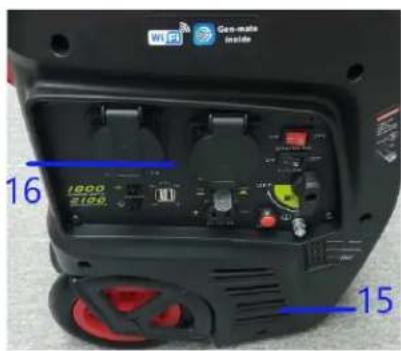
| 15 | Grille d’aération | Aeration grid | Griglia di earazione |
| 16 | Panneau de commande et prises de courant | Control panel and power outlets | Pannelo do controllo e prese di corrente |
- AVVERTENZA
- 3.4.2- TYPE D'HUILE
- ATTENTION
- REMARQUES
- 4.6.6- MAINTENANCE
- EN – ORIGINAL INSTRUCTIONS
- PARTS LIST
- SAFETY INSTRUCTIONS
- 3.1- SYMBOLS
- 3.2- GENERAL SAFETY INFORMATION
- 3.3- WARNING! SPECIFIC SAFETY PRECAUTIONS
- 3.4- FUEL
- 3.4.1- CHECK FUEL LEVEL
- 3.4.2- FUEL RECOMMENDATIONS
- DANGER
- 3.5-OIL
- 3.5.1- OIL LEVEL CHECK
- 3.5.2- ENGINE OIL RECOMMENDATIONS
- GETTING STARTED
- 4.1- UNPACKING
- 4.2- ASSEMBLE
- 4.3- STARTING THE ENGINE
- NOTES
- 4.4- STOPPING THE ENGINE
- WARNING
- 4.5- CHARGING BATTERY (FIG. 20)
- DISCONNECTING THE BATTERY CHARGING CABLE
- 4.6- USING THE "GEN-MATE" APPLICATION
- 4.6.1- DOWNLOADING AND CONNECTION
- 4.6.2- ADDING THE GENERATOR TO THE APPLICATION
- 4.6.3- GENERATOR CONNECTION AND MONITORING
- 4.6.4- STARTING THE GENERATOR
- 4.6.5- TURNING OFF THE GENERATOR
- 4.6.7- TROUBLESHOOTING
- OPERATION
- MAINTENANCE, STORAGE AND TROUBLESHOOTING
- 6.1- GENERAL PRODUCT MAINTENANCE
- 6.2- SPECIFIC MAINTENANCE
- 6.2.1- ENGINE OIL (FIG. 21)
- 6.2.2- AIR FILTER MAINTENANCE (FIG. 22)
- 6.2.3- SPARK PLUG MAINTENANCE (FIG. 23)
- 6.2.4- SPARK ARRESTOR MAINTENANCE (FIG. 24)
- 6.2.5- FUEL FILTER MAINTENANCE (FIG. 25)
- 6.3- TRANSPORT AND STORAGE
- 6.3.1- DRAIN THE FUEL FROM THE CARBURETTOR (FIG. 26)
- 6.3.2- DRAIN THE FUEL FROM THE TANK (FIG. 27)
- 6.3.3- DRAIN THE CARBURETTOR FUEL AGAIN (FIG. 28)
- 6.3.4-ENGINE
- 6.4- DISPOSAL
- 6.5- TROUBLESHOOTING
- AVVERTIMENTO
- APPUNTI
- 4.6.6- MANUTENZIONE
Brand : RIBIMEX
Model : PRGES2000I
Category : Generator