Padshop 1 - Software license & extension STEINBERG - Free user manual and instructions
Find the device manual for free Padshop 1 STEINBERG in PDF.


| Product Type | Software License and Extension |
| Model Name | Padshop 1 |
| Brand | Steinberg |
| Category | Virtual Granular Synthesizer |
| Supported Formats | VST3, AU, AAX |
| Compatibility | Windows, macOS |
| Synthesis Type | Granular |
| Number of Layers | 2 (A and B) with independent complete structure |
| Oscillators per Layer | 1 granular oscillator using built-in samples |
| Filter Types | 12 types (LP24, LP18, LP12, LP6, BP24, BP12, HP24, HP18, HP12, HP6, BR24, BR12) |
| Built-in Distortion | Tube, Clip, Bit, Rate (with Key Follow) |
| Modulation Effects | Chorus / Flanger with parameters Rate, Depth, Phase, Feedback, Mix |
| Delay Effects | Stereo, Cross, Ping-Pong with time, feedback, High Damp, Mix |
| Modulation Matrix | 10 slots with sources (LFO, envelopes, step modulator, etc.) and destinations (pitch, cutoff, grain, etc.) |
| LFO | 2 monophonic LFOs with shapes Sine, Triangle, Saw, Square, S&H1, S&H2 |
| Step Modulator | Polyphonic step modulator up to 32 steps with slopes |
| Maximum Polyphony | Up to 16 voices (adjustable) |
| Sample Library | Includes samples in categories Synths, Waveforms, Instruments, Nature Fx, Musical Fx |
| Preset Saving | Yes, via local menu |
| User Manual | 165 pages in PDF (French included) |
Frequently Asked Questions - Padshop 1 STEINBERG
User questions about Padshop 1 STEINBERG
0 question about this device. Answer the ones you know or ask your own.
Ask a new question about this device
Download the instructions for your Software license & extension in PDF format for free! Find your manual Padshop 1 - STEINBERG and take your electronic device back in hand. On this page are published all the documents necessary for the use of your device. Padshop 1 by STEINBERG.
USER MANUAL Padshop 1 STEINBERG
VST Granular Synthesizer

natural_image
Abstract geometric pattern with red squares and white outlines (no text or symbols)English
Matthias Klag, Michael Ruf
Revision and quality control: Cristina Bachmann, Heiko Bischoff, Marion Bröer, Insa Mingers, Sabine Pfeifer, Benjamin Schütte
This PDF provides improved access for vision-impaired users. Please note that due to the complexity and number of images in this document, it is not possible to include text descriptions of images.
The information in this document is subject to change without notice and does not represent a commitment on the part of Steinberg Media Technologies GmbH. The software described by this document is subject to a License Agreement and may not be copied to other media except as specifically allowed in the License Agreement. No part of this publication may be copied, reproduced, or otherwise transmitted or recorded, for any purpose, without prior written permission by Steinberg Media Technologies GmbH. Registered licensees of the product described herein may print one copy of this document for their personal use.
All product and company names are ^TM or ^ trademarks of their respective holders. For more information, please visit www.steinberg.net/trademarks.
Release Date: June 28, 2012
© Steinberg Media Technologies GmbH, 2012.
All rights reserved.
Introduction
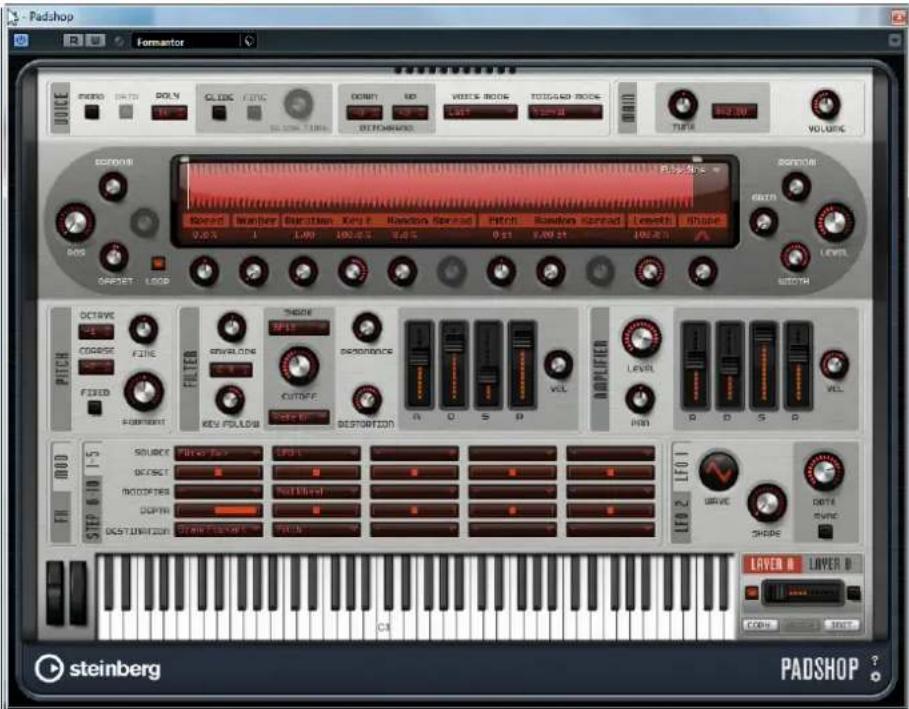
This manual describes the functions in Padshop and Padshop Pro. Most of the screenshots show Padshop. If functions are available only in the Pro version, this is stated clearly in the text.
Padshop
Padshop is a sophisticated granular synthesizer. This VST Instrument allows you to create complex sounds that can drastically evolve over time. It features two completely independent layers that each use a set of preconfigured samples as grain oscillator sources. This way, you can combine slowly moving pads with rhythmic parts, for example, to create interesting pad sounds. The Filter section provides 12 different filter types, including low-pass, high-pass, band-pass, and band-reject filters. The integrated filter distortion can produce analog tube distortions or hard clipping effects, or reduce the bit depth or sample frequency. Two envelopes, two LFOs, and the step modulator in Padshop can be used to modulate a large number of modulation destinations, which are accessible in the modulation matrix. The matrix features 10 freely assignable modulation rows. This allows you to create Note Expression modulation assignments that can be directly addressed from within Cubase, for example. To give the sounds the final polish, Padshop provides a two-stage effect section including chorus, flanger, and different delay effects.
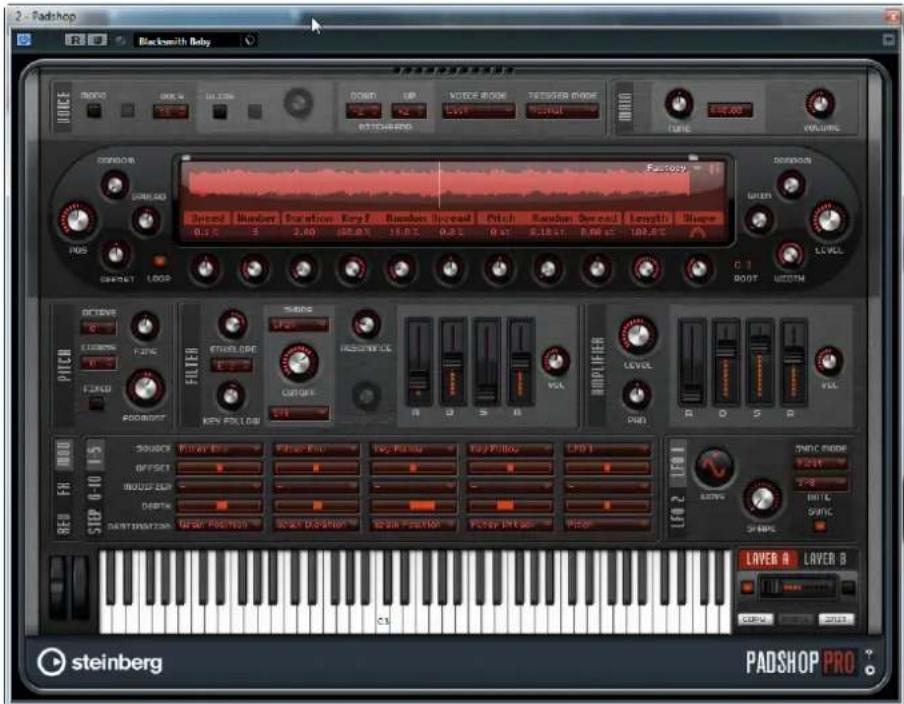
Padshop Pro
On top of the functions available in Padshop, Padshop Pro allows you to use your own samples as sources for the grain oscillator. It includes a 3-band equalizer for each layer that can be used to fine-tune the layers for perfect combinations. And, last, but not least, it includes a global algorithmic reverb effect that can be fed individually by both layers, to create even larger spaces and soundscapes.
About Granular Synthesis
Granular synthesis is based on a simple idea: Instead of playing back an entire sample, only short portions of the sample, the so-called grains, are played. These grains can be played back in any order. Each time a grain ends, a new one starts. To avoid discontinuities in the playback and to minimize artefacts, envelopes are applied to the grains. Granular synthesis can be used to extract interesting spectra from all kinds of samples, to create sound effects by completely scrambling a sample, or for low-fidelity time stretching, for example.
Very short grains produce sounds with an individual pitch. For that reason, you can also use samples without a distinct pitch, such as drum loops, and sound effects, to extract pitched spectra from them. Sounds with longer grains usually play back with the pitch of the original sample.
If you play back the same portion of a sample over and over again, the sound may become too static. You can use the Random, Spread, and Offset parameters to compensate for this and bring more liveliness into the sound. By adding more grain streams, the grain and sound density can be increased to produce a richer sound.
Tutorials
The following examples help you to get familiar with the functions and possibilities in Padshop. Experiment with the different presets, and try out the available samples.
Tutorial 1 – Creating Sounds Using Long Grains
-
In the Oscillator section, select the "Crystal Pad" sample from the "Padshop/01 Synth" folder.
-
Set the Duration parameter to 200.0.
-
Play a note and listen: a single grain is repeated continuously.
-
Set the "Number of Grains" parameter to 3. This way, you get three grain streams.
-
Again, play a note and listen: the grain density has increased, but the sound is still rather repetitive.
-
Set the Position parameter to 50%.
-
Play a note and increase the "Position Random" value until the repetitiveness of the sound is gone.
Now, each grain plays a random portion of the sample, and the sound is much richer.
-
Experiment with the other parameters and see what they do, for example, try out "Pitch Interval", Speed, Duration, and "Duration Key Follow".
-
Select another sample from the "Padshop/01 Synth" folder, and see how it sounds with your settings.
-
Adjust the filter, envelope, and effect settings to your liking, and save your sound as a preset.
⇒ The “Swarm Intelligence” preset from the factory library is a good example for a pad sound created using long grains.
Tutorial 2 – Creating Sounds Using Short Grains
-
Select the "Pure Sine" sample from the "Padshop/02 Waveforms" folder. As the name suggests, the sample is a perfect sine wave.
-
Play a note and listen. You hear a single stream of grains.
-
Set the Duration parameter to 1. The grain duration, determines the pitch of the sound. With a Duration setting of 1 and "Duration Key Follow" at +100 %, the sound plays back at the pitch that you play on the keyboard. If you set the duration to 2, the pitch drops by one octave, because the grain duration is twice as long. The longer the duration, the more the pitch of the sound is determined by the pitch of the original sample.
-
Adjust the Shape parameter while you play, to hear the amplitude modulation. The shape of the grains determines the amplitude of the portion of the sample that is played back within the grain. This is similar to amplitude modulation, where one signal (the modulator) determines the amplitude of another signal (the carrier). In this case, the sample is the carrier and the grain is the modulator. Amplitude modulation adds sidebands to each sinusoidal component of the carrier signal. Therefore, the more complex the sample is, the more sidebands you hear.
Until now, we produced only static spectra from a single sine wave. Let's change the spectrum some more, and add liveliness to the sound:
5.Play a note and increase the Formant parameter.
You hear that a formant in the spectrum moves up. A formant is a group of frequencies in the spectrum that is emphasized. The pitch of the sound does not change, because the grain duration is not modified. If you take a look at the waveform display, you see that the higher the Formant setting, the longer the portion of the sample that is played back within the grain.
6.Play a note, and decrease the Length parameter.
The Length parameter has an effect similar to the Formant parameter. By decreasing the length, the grain is shortened, but the period at which the grains repeat stays the same. Therefore, only the spectrum of the sound changes, but not its pitch.
- Open the modulation matrix, select "Grain Formant" or "Grain Length" as modulation destinations, and select a modulation source, for example "Filter Envelope" or "LFO 1/2".
This adds more liveliness to the sound.
-
Adjust the modulation depth, and listen to the result.
-
Try out your settings with a more complex sample.
-
Click the waveform to change the position of the grain playback. The spectrum changes accordingly.
-
Adjust the filter, envelope, and effect settings to your liking, and save your sound as a preset.
⇒ The Formantor preset from the factory library is a good example for a pad sound created using short grains.
Tutorial 3 – Low-Fidelity Time Stretching
-
Select the Cosmic sample from the "Padshop/05 Musical Fx" folder.
-
Set Speed to +100% and Number to 2.
These settings assure that the sample plays back at its original speed, using two grain streams that overlap completely.
-
Play C3 to listen to the sample as it was recorded.
-
Play a note, and decrease the Speed setting to +1%.
The pitch of the sound is one octave above C3. This is because the two grain streams that play the same sample are 180^ out of phase, thereby cancelling out the root of the sound.
- Adjust the "Position Offset" parameter.
The two grain streams play at different sample positions and the root is not canceled out any longer. The pitch returns to C3.
-
Select a different sample and see how it sounds with your settings.
-
Adjust the filter, envelope, and effect settings to your liking, and save the sound as a preset.
⇒ The “Cosmic Bend Down” preset from the factory library is a good example for a sound that was produced this way.
The Voice Section

The Voice section contains the following settings:
Mono
Activates monophonic playback.
Retrigger
When Retrigger is activated, a note that was stolen is retriggered if you still hold the stolen note when releasing the new one. For example, this lets you play trills by holding one note and quickly and repeatedly pressing and releasing another note.
→ The Retrigger option is only available in Mono mode.
Poly
When Mono mode is not active, this parameter determines how many notes can be played simultaneously.
Glide
Bends the pitch between notes that follow each other. You achieve the best results in Mono mode. When you activate the Glide option, the following parameters become available:
Option Description
Fingered Activate this parameter to glide the pitch only between notes that are played legato.
Glide Time Specifies the time it takes to bend the pitch from one note to the other.
Pitchbend Down/Up
Sets the range of the pitch modulation that is applied when you move the pitchbend wheel.
Voice Mode
Determines which notes are stolen during playback and whether new notes are triggered when the Polyphony setting is exceeded. The following settings are available:
Option Description
Last New notes have playback priority over the notes played first. If you exceed the maximum number of notes, the notes played first are stolen in chronological order (First in/First Out), and the new notes are triggered.
First Older notes have playback priority over newer notes. If you exceed the maximum number of notes while older notes are still being held, no notes are stolen. New notes are only triggered if a free voice is available.
Option Description
Low Low notes have playback priority over higher notes.
If you exceed the maximum number of notes by playing a note that is lower than the ones being held, the highest note is stolen, and the new note is triggered.
If you exceed the maximum number of notes by playing a note that is higher than the ones being held, no note is stolen, and no new note is triggered.
High High notes have playback priority over lower notes.
If you exceed the maximum number of notes by playing a note that is higher than the ones being held, the lowest note is stolen, and the new note is triggered.
If you exceed the maximum number of notes by playing a note that is lower than the ones being held, no note is stolen, and no new note is triggered.
Trigger Mode
Defines the trigger behavior for new notes. The following settings are available:
Option Description
Normal Triggers a new note when the previous note is stolen.
Resume The envelope is retriggered, but resumes at the level of the stolen note. The pitch is set to the new note.
Legato The envelopes keep playing. The pitch is set to the new note.
The Main Section
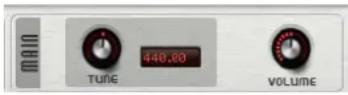
Tune
Adjusts the main tuning of the plug-in.
Volume
Adjusts the main volume of the plug-in.
The Oscillator Section

Padshop comes with a large variety of samples that can be used as sources for the grain oscillator. Loading a new sample in the Oscillator section does not change any of the parameter settings for the plug-in.
Browsing for Samples
The available samples are accessed via the sample browser, which is opened by clicking the triangle in the upper right corner of the sample display.
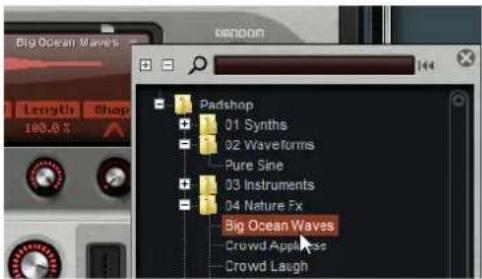
- To load a sample, select it in the tree structure.
This way, you can browse the sample content until you find a sample that you want to use.
If you double-click a sample, it is loaded and the browser closes.
Searching for Samples
- To search for a specific sample, enter its name in the text field at the top of the browser.
- To remove the search filter and show all samples again, click the reset button to the right of the text field.
Importing Samples (Padshop Pro only)
The maximum length for samples to be imported is ten minutes. If you try to import a longer sample, Padshop Pro imports only the first ten minutes.
You can import samples using one of the following methods:
- Drag a sample from the MediaBay of Steinberg's Cubase or Nuendo to the waveform display.
- Drag one or more selected audio events from a Cubase or Nuendo project to the waveform display.
- Drag a slice from the Sample Editor of Cubase or Nuendo to the waveform display.
- Drag a sample from the Windows Explorer/Mac OS Finder to the waveform display.
- Click the menu button in the top right corner of the display and select "Import Sample" on the context menu.
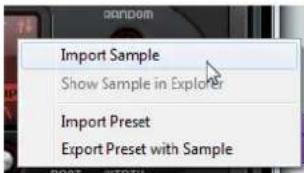
On import, samples are saved in a predefined directory
(C:\Users\user\documents\Steinberg\Padshop\Samples\User Samples). This directory is scanned regularly by Padshop Pro. You can add subfolders to the "User Samples" folder, to structure your sample content. These subfolders are shown in Padshop Pro the next time you open the program.
If you try to import a sample that has the same name as another sample already used in Padshop Pro, a number is added to the file name on import.
→ You can only import samples from VST Sound containers shown in the MediaBay of the Steinberg sequencers Cubase and Nuendo. Samples from the VST Sound nodes in HALion or HALion Sonic cannot be imported.
The Sample Root Key
When a sample is loaded, Padshop reads root key information from the sample file to set the correct pitch for the oscillator. If no root key information is found, the root key is set to C3. You can adjust this value manually.
Exporting Presets with Samples (Padshop Pro only)
You can export Padshop presets that contain samples. This allows you to transfer your samples to another computer system, for example.
Proceed as follows:
- Click the menu button to open the context menu.
- Select "Export Preset with Sample".
3.In the dialog, specify where you want to save the preset.
In this location, a Samples folder is created in which the samples used in the preset are saved.
⇒ If you export multiple presets to the same location, they share one Samples folder.
If you try to export a sample that has the same name as another sample already saved in the Samples folder, a number is added to the file name on export. In this case, the sample references are updated accordingly.
Importing Presets with samples (Padshop Pro only)
You can import presets containing user samples using one of the following methods:
- Drag a preset from the Explorer/Finder to the waveform display.
- Click the menu button in the top right corner of the display and select "Import Preset" from the context menu.
→ You can import multiple presets at the same time.
Defining Sample Start and End
- To specify the sample range that is used to create grains, drag the handles above the sample waveform.
- To move the entire sample range, click in the area between the handles, and drag.
Position Settings
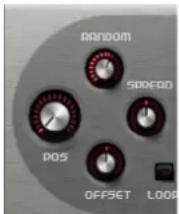
Position
You can set the playback position of the grains manually. The playback position is updated with every new grain.
Random
Determines the range from which a random playback position is chosen. At a setting of 100 %, the playback position jumps to a random position between the start and the end of the sample. The random playback position is calculated separately for each channel of the sample, at the start of a new grain. This can be used to widen the panorama of the sound.
Offset
Offsets the playback position for each channel of the sample. With positive values, the playback position of the right channel is modified and with negative values, the playback position of the left channel. In either case, the other channel is not affected. This can be used to widen the panorama of the sound.
Spread
This parameter is available when “Number of Grains” is set to a value higher than 1. It spreads the playback positions of the grains, making each grain play back a different portion of the sample.
Playback Settings
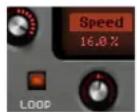
Loop
When you activate the Loop button, the sample is played back continuously. When the Loop button is deactivated, playback stops at the end of the sample.
This function also applies to grain playback. If a grain ends up outside the sample boundaries, due to the Random, Spread, or Offset settings, it is played back, and then, playback resumes at the start of the sample.
Speed
Determines how fast and in which direction the grain position progresses through the sample.
Some examples:
- A t 0 %, the grain position always stays the same.
- At 100%, the grain position progresses through the sample at the original speed and direction.
- At 200%, the grain position progresses through the sample at twice the original speed.
- At -100%, the grain position progresses through the sample at the original speed, but in reverse direction.
- At -200%, the grain position progresses through the sample at twice the original speed, and in reverse direction.
Grain Settings
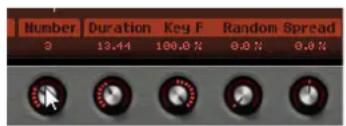
Number of Grains
You can specify the number of grains for each channel of the sample. At a setting of 2, the two grains are offset by 180^ . Due to this phase offset, the root of the spectrum is canceled out, and the pitch increases by one octave. To compensate for this, adjust the "Position Spread", "Position Offset", or "Duration Spread" parameters.
Duration
Increases the grain period by a factor ranging from 1 to 1000.
For very short grains, the sound gets the pitch of the frequency at which the grains repeat. For example, the grain duration at the center key C3 is 3.82 ms. If you set the grain duration to 2, the grain period is 7.64 ms, and the pitch of the sound is one octave lower.
When grains with a Duration setting above 10 are used, the sound gets the pitch of the sample.
Key Follow
Determines how the grain duration changes with the notes you play. At a setting of +100 % and a duration of 1.0, the grain duration corresponds to the pitch of the note that you play.
With a duration of 1 and a Key Follow setting of 100%, for example, the difference in pitch between two keys is one semitone, which corresponds to the standard keyboard tuning. Longer durations lead to an audible volume modulation that is different for the different keys. To apply the same volume modulation with each key on your keyboard, set "Key Follow" to 0%.
The center key for this function is C3, therefore, C3 is always played at the set duration, regardless of the "Key Follow" setting.
Duration Random
The random grain duration is calculated separately for each channel, at the start of a new grain. This can be used to widen the panorama of the sound. At a setting of 100 %, the grain duration varies between half and twice the grain period.
Duration Spread
This parameter is available when "Number of Grains" is set to a value higher than 1. It modifies the grain durations by the factor you set. This way, each grain is played with a different duration. A setting of +100% corresponds to twice the original duration, and a setting of -100 to half the original duration.
For short grains with a duration of 1, lower Spread values result in slightly different pitches for the different grains. Higher Spread values are perceived as the sound being detuned.
Pitch Settings
In granular synthesis, you have two different approaches to define the pitch of a sound: It can either be the pitch of the original sample or be defined by the grain oscillator.
- To use the pitch of the original sample, raise the Duration value until you can clearly hear the sample's own pitch.
- To define the pitch using the grain oscillator, set Duration to very low values, preferably 1 or 2.
Pitch Interval
Here, you can specify an interval between -12 and +12 semitones. The grains are played randomly at their original pitch, or are transposed according to the pitch interval. This interval is calculated separately for each channel of the sample, at the start of a new grain.
Pitch Random
Sets the random pitch range in semitones and cents. At a setting of +12, the random pitch values lie between -12 and +12 semitones. The random pitch is calculated separately for each channel of the sample, at the start of a new grain. This can be used to widen the panorama of the sound.
Pitch Spread
This parameter is available when “Number of Grains” is set to a value higher than 1. It detunes the pitch of the grains in semitones and cents. The first grain keeps its pitch, and the other grains are detuned evenly to values within the specified range. The last grain is detuned to the maximum value.
For shorter grains, this is perceived as a change in the spectrum and for longer grains as a detuning of the sample.
Length and Shape Settings
Grain Length
Shortens the length of the grain without changing the grain duration. At a setting of 100%, the length of the grain corresponds to the grain duration. By decreasing the length of the grain, a shorter portion of the sample is played back, which results in a change in the spectrum. The pitch of the sound does not change, because the grain duration stays the same.
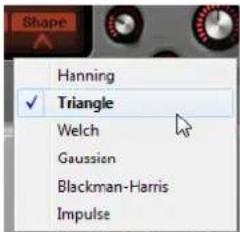
Grain Shape
Determines the shape of the grain. The shape strongly influences the spectrum of the sound.
- Step through the available shapes using the knob, or click on the display, and select a shape from the pop-up menu.
Level Settings
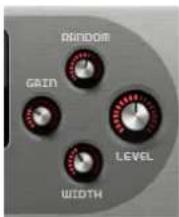
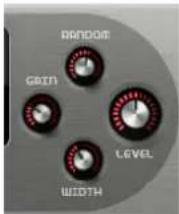
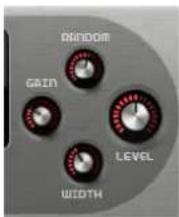
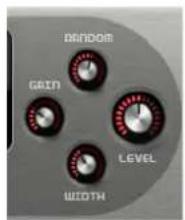
Grain Level
Adjusts the overall level of the grain oscillator. When you increase the number of grains, it might become necessary to lower the oscillator level. If you play back a portion of a sample that is very quiet, you can use this control to raise the level.
Level Random
Sets a random level for each new grain. At a setting of 100%, the level varies between a factor of 0 and 2 of the original level. The random level is calculated separately for each channel of the sample, at the start of a new grain. This can be used to widen the panorama of the sound.
Stereo Width
Narrows the stereo width of the grain oscillator. It is applied after the grain oscillator and does not affect the stereo width of the actual sample. At a setting of 0 %, the output of the grain oscillator is monophonic.
Gain
Allows you to automatically adjust the level of grains using quieter sample parts. Note that by raising the gain, you can lose the dynamics of the sample.
The Pitch Section
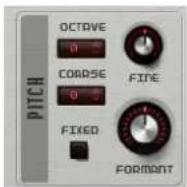
Octave
Adjusts the pitch in octave steps.
Coarse
Adjusts the pitch in semitone steps.
Fine
Fine-tunes the pitch in cent steps.
Fixed
Activate this option to set the same pitch for all keys.
When working with longer grain durations, activating the Fixed option sets a constant pitch for all keys. When working with shorter durations, each key plays a different spectrum.
Formant
Changes the pitch of the original sample. The following applies:
- For short grain durations, where the perceived pitch depends on the grain size, changing the pitch of the underlying sample creates an effect similar to formant shifting.
- For longer grain durations, where the perceived pitch is the pitch of the original sample, the effect changes to a pitch offset.
The Filter Section
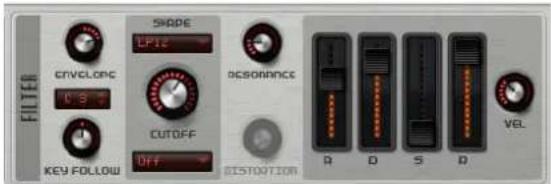
The Filter section allows you to adjust the tone color of the sound.
Envelope
Adjusts the cutoff modulation of the filter envelope. Negative values invert the modulation direction.
Key Follow
Adjusts the cutoff modulation using the note number. Set this parameter to positive values to raise the cutoff with notes above the center key. Use negative values to lower the cutoff with notes above the center key. At +100 %, the cutoff follows the played pitch.
Key Follow Center Key
Determines the MIDI note that is used as the central position for the "Key Follow" function.
Shape
Determines which frequencies are affected. The following filter shapes are available:
Option Description
| LP24 | Low-pass filter with 24dB/oct. Frequencies above the cutoff are attenuated. |
| LP18 | Low-pass filter with 18dB/oct. Frequencies above the cutoff are attenuated. |
| LP12 | Low-pass filter with 12dB/oct. Frequencies above the cutoff are attenuated. |
| LP6 | Low-pass filter with 6dB/oct. Frequencies above the cutoff are attenuated. |
| BP24 | Band-pass filter with 24dB/oct. Frequencies below and above the cutoff are attenuated. |
| BP12 | Band-pass filter with 12dB/oct. Frequencies below and above the cutoff are attenuated. |
| HP24 | High-pass filter with 24dB/oct. Frequencies below the cutoff are attenuated. |
| HP18 | High-pass filter with 18dB/oct. Frequencies below the cutoff are attenuated. |
| HP12 | High-pass filter with 12dB/oct. Frequencies below the cutoff are attenuated. |
| HP6 | High-pass filter with 6dB/oct. Frequencies below the cutoff are attenuated. |
| BR24 | Band-reject filter with 24dB/oct. Frequencies around the cutoff are attenuated. |
| BR12 | Band-reject filter with 12dB/oct. Frequencies around the cutoff are attenuated. |
Cutoff
Adjusts the cutoff frequency of the filter.
Type
Determines the distortion type. The following options are available:
Option Description
| Off No filter distortion is applied. | |
| Tube Adds warm, tube-like distortion. | |
| Clip Adds bright, transistor-like distortion. | |
| Bit | Adds digital distortion by means of quantization noise. You can adjust the bit reduction with the Distortion parameter. |
| Rate | Adds digital distortion by means of aliasing. You can adjust the rate reduction with the Distortion parameter. |
| Rate KF | As above, but with “Key Follow”. The rate reduction follows the keyboard, which means that the higher you play, the higher the sample rate. |
Resonance
Emphasizes the frequencies around the cutoff. For an electronic sound, increase the resonance. At higher resonance settings, the filter self-oscillates, which results in a ringing tone.
Distortion
Adds distortion to the signal. The effect depends on the selected type. At higher settings, it creates a very intense distortion effect.
Envelope Faders and Velocity Control
With the envelope faders, you can specify the attack, decay, sustain, and release times of the filter envelope.
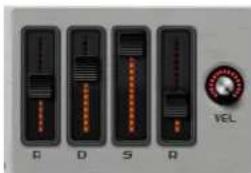
The Velocity control determines how much the envelope intensity depends on velocity. When the control is set to 0, the envelope is fully applied. Higher values reduce the intensity for lower velocities.
The Amplifier Section
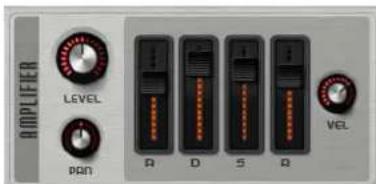
Level
Adjusts the level of the sound.
Normally, the internal headroom of 12dB in Padshop allows for polyphonic playback without the need for level adjustments. However, when working with higher filter distortion levels, it can become necessary to reduce the level.
Pan
Sets the position of the sound in the stereo panorama.
Envelope Faders and Velocity Control
With the envelope faders, you can specify the attack, decay, sustain, and release times of the amplifier envelope.
The Velocity control determines how much the output level depends on velocity. When the control is set to 0, the sound is always played back at its full amplitude. Higher values reduce the level for lower velocities.
The Effects Section
Padshop features two insert effects in series: a modulation effect, and a delay. In Padshop Pro, the effects section also contains an EQ and a global reverb effect.
Routing Section (Padshop Pro only)
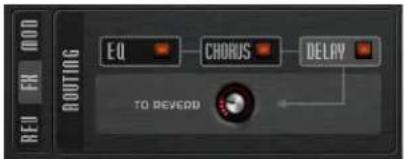
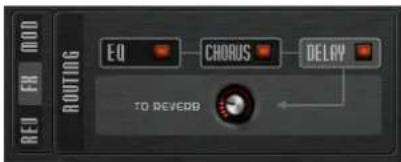
The Routing section shows the signal flow. The signal passes the EQ first, then the modulation effect, and then the delay effect. With the "To Reverb" control, you can specify how much of the processed signal is sent to the global reverb effect.
Click the labels to display the corresponding settings to the right of the Routing section. If the LED on a label is lit, the eq module or effect is activated.
EQ (Padshop Pro only)
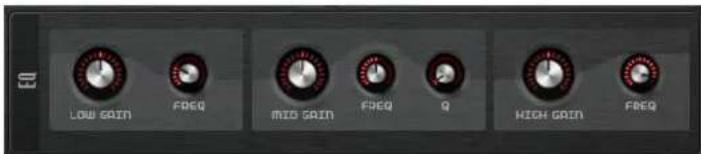
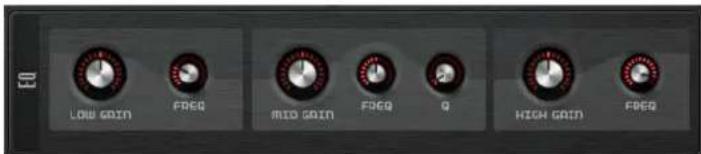
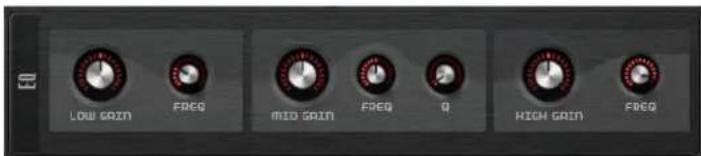
A high-quality 3-band equalizer is available for each layer. The mid-range band acts as peak filter and the low and high bands act as shelving filters. The mid-range band is fully parametric with adjustable gain, frequency, and Q factor.
Low/Mid/High Gain
Sets the amount of cut or boost for the corresponding band.
Freq
Sets the frequency that is cut or boosted with the corresponding Gain parameter.
Q (Quality)
Adjusts the bandwidth of the mid-range peak filter from wide to narrow.
Modulation Effects
The first effect in the effect chain is the modulation effect. It can be used as a chorus or as a flanger.
- To activate/deactivate the effect, click the On/Off button.
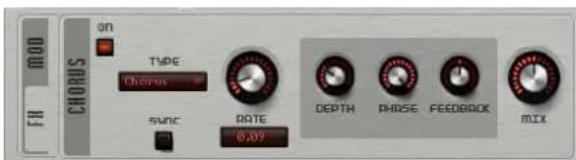
The following parameters are available:
Option Description
Type Determines which modulation effect is used.
Rate Specifies the frequency of the pitch modulation.
Option Description
Sync Activate this button to set the Rate value in fractions of beats.
Depth Sets the intensity of the pitch modulation.
Phase Widens the sound image of the effect from mono to stereo.
Feedback Adds resonances to the effect.
Mix Controls the mix between the dry and the wet signal.
Delay Effects
The second effect in the chain is a delay effect.
- To activate/deactivate the effect, click the On/Off button.
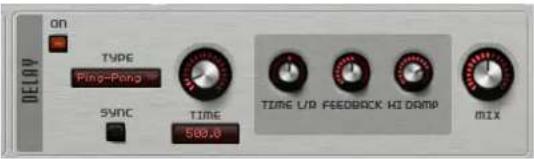
You can select the delay effect that you want to use on the Type pop-up menu:
Option Description
Stereo This effect has two independent delay lines, one for the left and one for the right audio channel, each with its own feedback path.
Cross This effect has two delay lines with cross feedback, where the delay of the left channel is fed back into the delay of the right channel, and vice versa.
Ping-Pong This mode mixes the left and right input channels and sends the mixed signal to hard-panned left and right delays. This way, the echoes bounce like a ping-pong ball between left and right in the stereo panorama.
For the effects, the following parameters are available:
Option Description
Delay Time Specifies the delay time in milliseconds.
Sync Activate this button to set the Rate value in fractions of beats.
Time L/R Offsets the time of the left or right delay from the overall delay time. The offset value is a factor. At a factor of 0.5, the right or left delay time is half as long as the overall delay time. To offset the left delay time, turn the control to the left. To offset the right delay time, turn the control to the right.
Feedback Sets the overall amount of feedback for the left and right delay.
Feedback means that the output of the delay is fed back to its input. Depending on the setting, the echoes repeat more or less often. At a setting of 0%, you hear one echo. At a setting of 100%, the echoes repeat indefinitely.
High Damp Attenuates the high frequencies of the delays.
Mix Controls the mix between the dry and the wet signal.
Reverb Section (Padshop Pro only)
The integrated reverb effect works as a global AUX effect. It can be fed by the two layers individually. This allows you to add reverb only to one of the layers while keeping the other layer dry, for example.

Layer A/Layer B
Here, you can specify how much of the signal is received by each of the layers. This is the same as using the "To Reverb" control in the Routing section for a layer.
Reverb Display
You can click and drag in the display to modify the parameters, or you can enter new values manually in the fields below the display. The following parameters are available:
Option Description
| PreDelay | Determines the amount of time between the dry signal and the onset of the reverb. With higher predelay values, you can simulate larger rooms. |
| Low Time Controls | the reverb time for the low frequencies of the reverb. When you set positive values, the decay time of the low frequencies is longer, when you set negative values, it is shorter. |
| Low Freq Sets | the cross-over frequency between the low and the mid band of the reverb. |
| Main Time | Controls the overall reverb time. The higher this value, the longer the decay. At a setting of 100 %, the reverb time is infinitely long. |
| High Freq Sets | the cross-over frequency between the mid and the high band of the reverb. |
| High Time Controls | the reverb time for the high frequencies of the reverb. When you set positive values, the decay time of the high frequencies is longer, when you set negative values, it is shorter. |
| High Cut Attenuates | the high frequencies of the reverb. |
Size
This parameter controls the dimensions of the simulated room. At a setting of 100% the dimensions correspond to a cathedral or a large concert hall. At a setting of 50% the dimensions correspond to a medium sized room or studio. Settings below 50% simulate the dimensions of small rooms or a booth.
Width
This adjusts the output of the reverb signal between mono and stereo. At a setting of 0%, the output is mono, at 100%, it is stereo.
Level
The return level of the reverb.
The LFO Section
Padshop features two monophonic LFOs. In this context, monophonic means that the LFOs are calculated once and feed multiple voices at the same time.
![150 2 [150 1] WAVE SMADE RATE SYNC](/content/2026/04/671658/images/44ea3bf254b49bda821a16fe2c9cbc5523675c4f26f2144b71bb362e4d911b33.jpg)
Wave and Shape
The following waveforms are available on the Wave pop-up menu:
Option Description
| Sine | Produces smooth modulation, suitable for vibrato or tremolo. The Shape parameter adds additional harmonics to the waveform. |
| Triangle | This waveform is similar in character to Sine. The waveform periodically ramps up and down. The Shape parameter continuously changes the triangle waveform to a trapezoid. |
| Saw Produces a ramp cycle. The Shape parameter continuously changes the waveform from ramp down to triangle to ramp up. | |
| Square | Produces stepped modulation, where the modulation switches abruptly between two values. The Shape parameter continuously changes the ratio between the high and low state of the waveform. With Shape set to 50 %, a square wave is produced. |
| S&H 1 | Produces randomly stepped modulation. The Shape parameter puts ramps between the steps and changes the S&H into a smooth random signal when turned fully right. |
| S&H 2 | This waveform is similar to S&H 1. The steps are alternating between random high and low values. |
Rate
Controls the frequency of the modulation, that is, the "speed" of the LFO.
Sync
When Sync is active, the frequency is set in fractions of beats.
Sync Mode
Specifies how the LFO is retriggered. The following options are available:
Option Description
| Beat | Synchronizes the LFO restart to the transport of the host application and aligns it to the beats of the project. |
| First Note | The LFO restarts when a note is triggered and no other note is held. |
| Each Note | The LFO restarts each time a note is triggered. |
The Step Modulator
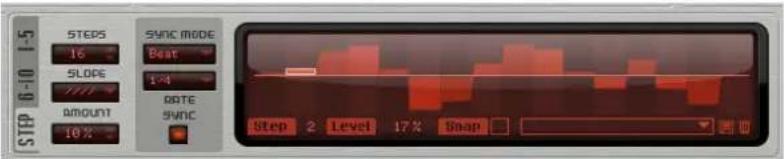
Padshop features a polyphonic step modulator that allows you to create rhythmic control sequences. A sequence can have up to 32 steps.
You can load and save presets for the step modulator via the pop-up menu.
Editing Steps
To adjust the steps using the mouse, proceed as follows:
- To set the level of a step, click in the graphical editor.
- To change the value of a single step, drag it up/down.
- To adjust all steps at once, [Shift]-drag a step.
- To reset a step to a level of 0%, [Ctrl]/[Command]-click the step.
- To reset all steps, [Shift]-[Ctrl]/[Command]-click in the graphical editor.
- To draw a ramp with steps, [Alt]/[Option]-click and draw a line.
- To draw symmetric ramps, [Shift]-[Alt]/[Option]-click and draw a line.
- You can also enter a value directly in the value field for the step.
- To increment or decrement the selected step, use the up and down arrow keys. By default, the increment or decrement is in steps of 1%. Hold [Shift] to increment or decrement the selected step in increments of 0.1%.
Steps
Determines the number of steps that the sequence plays.
Slope
Depending on the settings you made here, the step modulator jumps from step to step, or creates ramps between the steps. The following options are available:
Option Description
None Produces hard steps.
Rising Creates ramps only for rising edges.
Falling Creates ramps only for falling edges.
All Creates ramps for all edges.
Amount
When Slope is set to Rising, Falling or All, the Amount parameter determines the time of the ramp between two steps. The higher the setting, the smoother the transitions between steps.
Sync Mode
You can synchronize the steps to the tempo of the host application by setting a note value. Alternatively, you can specify a frequency at which the sequence repeats.
Whether you can set a note value or a frequency depends on the option you select here:
Option Description
Beat Synchronizes the step modulator restart to the transport of the host application and aligns it to the beats of the project.
First The step modulator restarts when a note is triggered and no other note is held.
Each The step modulator restarts each time a note is triggered.
Rate
When "Sync Mode" is deactivated, this parameter controls the speed at which the sequence is repeated.
When Sync mode is activated, this control adjusts the length of the steps in fractions of beats. You can also set triplet note values.
The Modulation Matrix
The concept of controlling one parameter by another is called modulation. In addition to the built-in modulations, such as “filter envelope to cutoff” or “velocity to envelope level”, the modulation matrix section gives you access to additional modulations.
Assigning modulations means interconnecting modulation sources like LFOs and envelopes with modulation destinations like pitch, cutoff, amplitude, etc. The modulation matrix offers you up to 10 freely assignable modulations, each with a source, an offset parameter, a modifier, and a destination with adjustable depth. All modulation sources and destinations can be assigned several times.
For example, by assigning the step modulator in the modulation matrix and routing it to the grain position, you can use a different spectrum for each step.

- To switch between display of modulations 1 to 5 and 6 to 10, click the corresponding tab.
Modulation Sources
The modulation sources are available from the Source and Modifier pop-up menus.
The following modulation sources are available:
Option Description
LFO 1/2 The LFOs produce cyclic modulation signals. They are bipolar.
Amp Envelope The amplifier envelope (unipolar). The shape of the envelope corresponds to the modulation signal.
Filter Envelope The filter envelope. The shape of the envelope corresponds to the modulation signal. The Filter Envelope parameter is unipolar.
Key Follow Produces modulation in relation to the MIDI note number. The values range from -1 (C-2) to +1 (G8).
Option Description
| Velocity | Uses note-on velocity as a modulation signal. Velocity is unipolar. |
| Pitchbend Uses the position of the pitchbend wheel as a modulation signal. Pitchbend is bipolar. | |
| Mod Wheel | Uses the position of the modulation wheel as a modulation signal. Mod Wheel is unipolar. |
| Aftertouch | Uses Aftertouch as a modulation signal. Aftertouch is unipolar. |
| Note Expression | Uses the eight note expression parameters as modulation signals. You can select the note expression parameter from the corresponding submenu. |
| Noise | Produces a random modulation signal. Noise is bipolar. |
| Bus 1–16 | Modulations that have been sent to one of the sixteen busses can be reused as sources. This way, you can combine several modulations to produce more complex signals. Select the corresponding modulation bus to assign it as source. |
Offset
Sets an additional offset for the output of the modulation source.
Modifier
All modulation sources can also be used as modifiers. A modifier scales the output of the modulation source. A typical example would be an LFO as a source and the modulation wheel as the modifier. This allows you to control the intensity of the LFO modulation using the wheel.
Depth
Adjusts the intensity of the modulation.
Modulation Destinations
The following modulation destinations are available:
Option Description
| Pitch Modulates the pitch. For example, assign one of the LFOs to create a vibrato effect. When Pitch is selected, the modulation depth adjusts in semitones. | |
| Cutoff Modulates the filter cutoff. | |
| Resonance Modulates the filter resonance. Resonance changes the character of the filter. For example, assign velocity to resonance to accent the filter the harder you hit a key. | |
| Distortion Modulates the filter distortion. | |
| Level This modulation adds to the level setting. | |
| Volume1 | Modulates the gain. The volume modulation multiplies with the level. It is ideal for effects such as tremolo. |
| Volume2 | As Volume 1. Volume 1 is multiplied with volume 2. This way, you can build more complex modulations. |
| Pan | Modulates the position of the sound in the panorama. |
| Grain Position | Modulates the playback position. The modulation is not continuous, but it is updated at the start of each grain. |
| Grain Speed | Modulates the Speed parameter. |
Option Description
| Grain Duration Modulates the grain duration, that is, the frequency at which the grains repeat. | |
| Grain Length Modulates the Length parameter. | |
| Grain Pitch | Modulates the pitch of a grain. The modulation is not continuous, but is updated at the start of a new grain. For continuous pitch modulation, use Pitch instead of “Grain Pitch” as destination. |
| Grain Formant | Modulates the pitch of the source sample independently from the grain duration. This results in formant shifting for short durations. |
| Grain Level | Modulates the grain level. The modulation is not continuous, but is updated at the start of each new grain. For continuous level modulation, use the destinations Volume 1, Volume 2, or Level. |
| Step Modulator Frequency | Modulates the Frequency parameter of the step modulator. |
| Step Modulator Slope | Modulates the Slope parameter of the step modulator. |
| Amplitude Envelope Attack, Decay, Sustain, and Release | Modulates the time of the amplitude envelope attack, decay, sustain, and release, respectively. These parameters cannot be modulated continuously. The time is updated only when the segment starts. |
| Filter Envelope Attack, Decay, Sustain, and Release | Modulates the time of the filter envelope attack, decay, sustain, and release, respectively. These parameters cannot be modulated continuously. The time is updated only when the segment starts. |
| Bus 1-16 | You can send any modulation to one of the sixteen busses, for example, to produce more complex modulation signals. Select the bus you want to send the signals to as a destination. To use the modulation that was sent to a bus, assign the corresponding bus as a modulation source. |
Quick Controls
Padshop provides a predefined set of eight quick controls that can be controlled directly from within Cubase or Nuendo.
By default, these quick controls are assigned to the following parameters:
Quick control Parameter
| 1 Layer A Filter Cutoff |
| 2 Layer A Filter Resonance |
| 3 Layer A DCA Attack |
| 4 Layer A DCA Release |
| 5 Layer B Filter Cutoff |
| 6 Layer B Filter Resonance |
| 7 Layer B DCA Attack |
| 8 Layer B DCA Release |
⇒ You can also change the default quick controls assignments. For more information, see the Operation Manual of your Steinberg sequencer application.
MIDI Controller Assignments
Almost all parameters in Padshop can be adjusted via MIDI controllers. The MIDI controller assignments are saved globally for the plug-in, with one exception: The Mod Wheel assignment is saved with each preset. This allows you to control effect parameters using the Mod Wheel which would otherwise not be controllable, as they are not available as modulation destinations in the modulation matrix.
→ Volume and Pan are assigned to controllers 7 and 10 by default, and are therefore always available.
When you use Padshop in a host application like Cubase, the MIDI controller assignments are saved within the project.
Assigning MIDI Controllers
To assign MIDI controllers, proceed as follows:
- Right-click the control that you want to remote-control.
- Select "Learn CC" from the context menu.
- On your MIDI device, move a knob, fader, or button.
You can assign the same MIDI controller several times to different parameters. However, you cannot assign different MIDI controllers to the same parameter.
The Mod Wheel cannot be assigned using the Learn function, see “Assigning the Mod Wheel” on page 27.
- To remove a MIDI controller assignment, right-click the corresponding control, and select "Forget CC".
Setting the Parameter Range
You can define the minimum and maximum values separately for each parameter assignment.
- To define the minimum value, set the parameter to the value, right-click the control, and select "Set Minimum".
- To define the maximum value, set the parameter to the value, right-click the control, and select "Set Maximum".
Assigning the Mod Wheel
- Right-click the control for which you want to assign the Mod Wheel.
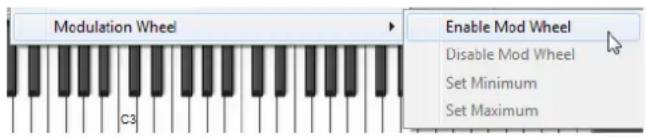
- On the "Modulation Wheel" submenu, select "Enable Mod Wheel".
- Set the minimum and maximum values for the Mod Wheel using the corresponding commands.
The Layer Section
You can combine two separate sounds using the Layer section. Layer A and layer B each provide a complete synthesis structure, including effects. The use of two layers allows you to combine two completely different sounds, for example, which offers a lot of flexibility when creating your sounds.
Click here to switch between the settings for layer A and layer B.
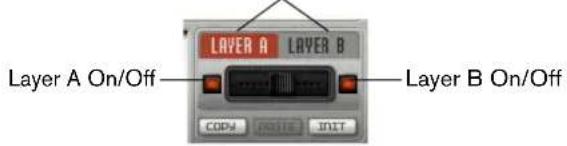
In the Layer section, you can make the following settings:
- Adjust the relative levels of the layers in the final mix using the fader between the On/Off buttons.
- Copy layers with the Copy and Paste buttons. You can copy one layer to the other or even copy layers between presets or different instances of the plug-in. All settings are copied from the source to the destination layer.
- To reset the current layer to its default settings, click the Init button.
- To use only one of the layers, deactivate the other layer using the On/Off button.
Additional Settings
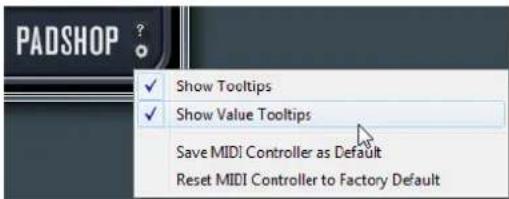
Click the button in the lower right of the panel to open the Options pop-up menu.
This pop-up menu contains the following options:
Option Description
Show Tooltips Activates and deactivates the tooltips.
| Value Tooltips | Activates additional value tooltips for controls that do not have a value field. The value tooltips are shown when you use the control. |
| Save MIDI Controller as Default | Saves the current MIDI controller assignments as default. If you add a new instance of the plug-in, the new default settings are used. |
| Reset MIDI Controller to Factory Default | Restores the factory MIDI controller assignments. |
Deutsch
Matthias Klag, Michael Ruf
Granularsynthese
Number of Grains
Pegeleinstellungen
Grain Level
Key Follow Center Key
Key Follow Center Key
natural_image
Four black switches labeled A, D, S, D with orange leads and a red circular logo labeled 'HEL' on the right (no readable text or symbols beyond labels)Section Routing (Padshop Pro uniquement)
Section Reverb (Padshop Pro uniquement)
Ajustes de nivel
Grain Level
Key Follow Center Key
EQ (solo Padshop Pro)
Layer A/Layer B
2.En el submenú "Modulation Wheel", seleccione "Enable Mod Wheel".
Number of Grains
Key Follow Center Key
natural_image
Four black switches labeled D, D, S, D with orange leads and a red circular logo labeled 'NEL' on the right (no text or symbols on switches)EQ (solo Padshop Pro)
All rights reserved.
概要
グラニュラーシンセシスについて
Number of Grains
レベルの設定
LEVEL
Key Follow Center Key


- VST Granular Synthesizer
- Introduction
- Padshop
- Padshop Pro
- About Granular Synthesis
- Tutorials
- Tutorial 1 – Creating Sounds Using Long Grains
- Tutorial 2 – Creating Sounds Using Short Grains
- Tutorial 3 – Low-Fidelity Time Stretching
- The Voice Section
- Mono
- Retrigger
- Poly
- Glide
- Option Description
- Pitchbend Down/Up
- Voice Mode
- Trigger Mode
- The Main Section
- Tune
- Volume
- The Oscillator Section
- Browsing for Samples
- Searching for Samples
- Importing Samples (Padshop Pro only)
- The Sample Root Key
- Exporting Presets with Samples (Padshop Pro only)
- Importing Presets with samples (Padshop Pro only)
- Defining Sample Start and End
- Position Settings
- Position
- Random
- Offset
- Spread
- Playback Settings
- Loop
- Speed
- Grain Settings
- Number of Grains
- Duration
- Key Follow
- Duration Random
- Duration Spread
- Pitch Settings
- Pitch Interval
- Pitch Random
- Pitch Spread
- Length and Shape Settings
- Grain Length
- Grain Shape
- Level Settings
- Grain Level
- Level Random
- Stereo Width
- Gain
- The Pitch Section
- Octave
- Coarse
- Fine
- Fixed
- Formant
- The Filter Section
- Envelope
- Key Follow Center Key
- Shape
- Cutoff
- Type
- Resonance
- Distortion
- Envelope Faders and Velocity Control
- The Amplifier Section
- Level
- Pan
- The Effects Section
- Routing Section (Padshop Pro only)
- EQ (Padshop Pro only)
- Low/Mid/High Gain
- Freq
- Q (Quality)
- Modulation Effects
- Delay Effects
- Reverb Section (Padshop Pro only)
- Layer A/Layer B
- Reverb Display
- Size
- Width
- The LFO Section
- Wave and Shape
- Rate
- Sync
- Sync Mode
- The Step Modulator
- Editing Steps
- Steps
- Slope
- Amount
- The Modulation Matrix
- Modulation Sources
- Modifier
- Depth
- Modulation Destinations
- Quick Controls
- MIDI Controller Assignments
- Assigning MIDI Controllers
- Setting the Parameter Range
- Assigning the Mod Wheel
- The Layer Section
- Additional Settings
- Deutsch
- Granularsynthese
- Pegeleinstellungen
- Section Routing (Padshop Pro uniquement)
- Section Reverb (Padshop Pro uniquement)
- Ajustes de nivel
- EQ (solo Padshop Pro)
- 概要
- グラニュラーシンセシスについて
- レベルの設定
Brand : STEINBERG
Model : Padshop 1
Category : Software license & extension