USER MANUAL Pact Pro Joie
i-Snug™ 2 enhanced child restraint
GB Instruction Manual
PT Manual de instruções
ES Manual de instrucciones
FR Mode d'emploi
Manuale di istruzioni
DE Bedienungsanleitung
NL Handleiding
TR Kullanma kalvuzu
SL Navodila za uporabo
SE Bruksanvisning
DA Brugervejledning
RU Руководство по эксплуатации
AR دليل التعليمات
PL Instrukcja obsługi
CZ Návod k obsluze
SK Návod na použitie
HU Használati utasítás
RO Manual de instructiuni
Ελ Εγχειρίδιο οδηγιών χρήσης
HR Upute za uporabu
Fl Käyttöohje
LV Lietošanas instrukcija
LT Naudojimo instrukcija
ET Kasutusjuhend
NO Instruksjonsbok
natural_image
Icon depicting a person relaxing and sitting next to an icon of a person holding a child (no text or symbols)
ECE R129/03
natural_image
Line drawings of a baby car seat and backrest, showing different seat designs (no text or symbols)

natural_image
Line drawing of a baby car seat with hand placement and a downward arrow indicating motion (no text or symbols)
natural_image
Illustration of a hand pressing down on a curved object, with no visible text or symbols
natural_image
Illustration of a child lying in bed with a red seatbelt, no text or symbols present

natural_image
Illustration of hands holding a paper with an arrow indicating downward motion (no text or symbols)
natural_image
Illustration of a person using a medical device to adjust or install a seatbelt (no text or symbols visible)


natural_image
Illustration of a baby wearing a seatbelt in a car seatbelt (no text or symbols)
natural_image
Illustration of a hand adjusting a saddle with a yellow arrow indicating motion (no text or symbols)
natural_image
Interior view of a car seatbelt with no visible text or symbols
natural_image
Interior view of a car seatbelt with a black strap and orange checkmark indicating selection (no text or symbols on the belt)
natural_image
Illustration of a sewing machine needle and handle (no text or symbols)
natural_image
Illustration of hands performing a medical procedure on a patient's abdomen, with no visible text or symbols
natural_image
Illustration of a car seatbelt with a red bookmark and orange belt, no text or symbols present
natural_image
Illustration of a bicycle's seat and wheel assembly, showing front view and side view (no text or symbols)
natural_image
Line drawing of a baby seatbelt device with red arrows indicating movement or force (no text or symbols)
natural_image
Illustration of a person wearing a helmet and holding a device, with no visible text or symbols.
natural_image
Illustration of a car seatbelt with a highlighted seatbelt and orange arrow indicating upward motion (no text or symbols)
natural_image
Line drawing of a baby stroller with an orange arrow indicating motion (no text or symbols)
natural_image
Illustration of a person climbing a ladder with an arrow indicating upward motion (no text or symbols)
GB
Welcome to Joie™
Congratulations on becoming part of the Joie family! We are so excited to be part of your journey with your little one. While traveling with the Joie i-Snug™ 2 enhanced child restraint you are using a high quality, fully certified safety i-Size Enhanced Child Restraint. Please carefully read this manual and follow each step to ensure a comfortable ride and best protection for your child.
To use this Jole enhanced child restraint with the i-Size base according to the UN Regulation No.129, your child must meet the following requirements.
Child height 40cm-75cm/ Child weight 13kg; (Child age< 12 months).
To use this infant carrier module with vehicle belt, your child must meet the following requirements.
Child height 40cm-75cm/ Child weight 13kg; (Child age< 12 months).
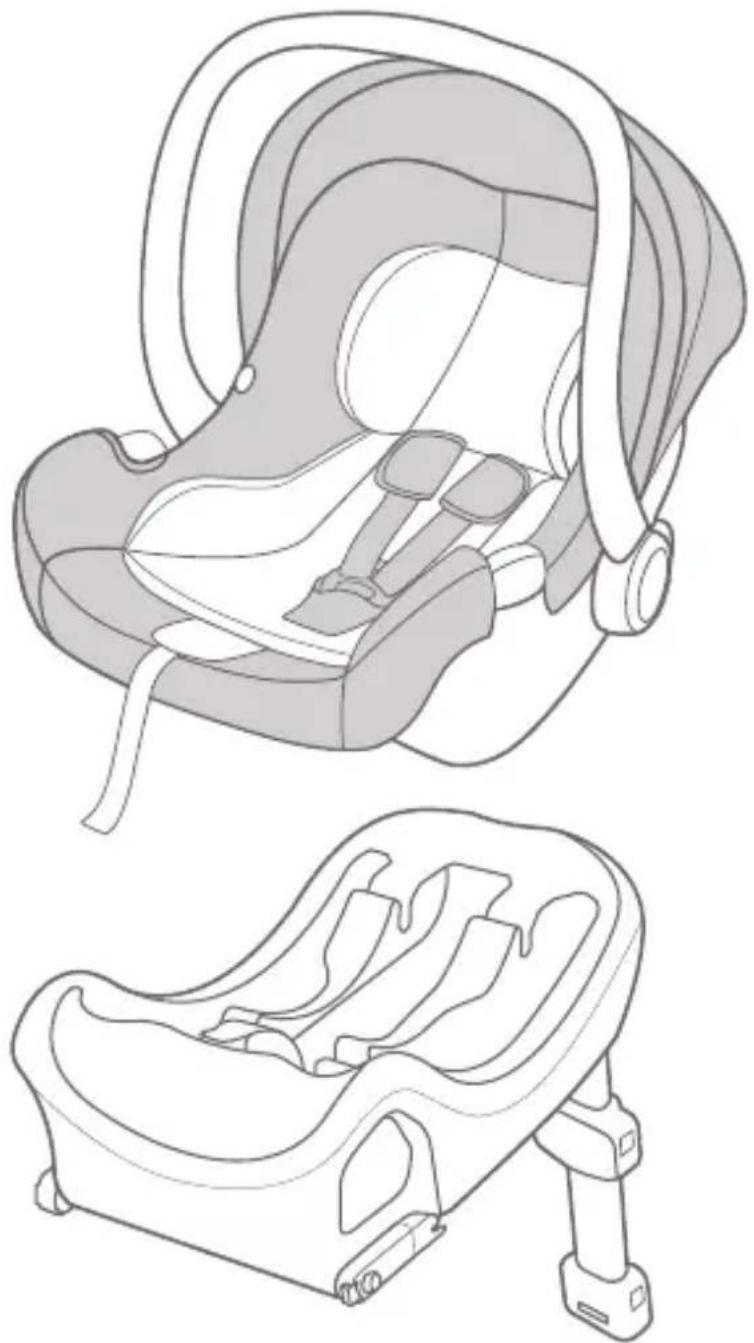
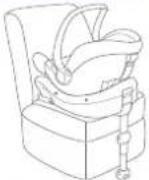
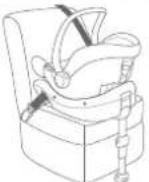
Base
These instructions show the use of the infant carrier module and the base. This base can also be used with other certain Joie infant carrier module. Please read all the instructions in this manual before installing and using the product.
! IMPORTANT: KEEP FOR FUTURE REFERENCE, PLEASE READ CAREFULLY.
Please keep the instruction manual in the storage compartment at the bottom of the base as right figure.
Please keep the instruction manual at the bottom of the soft goods.
For warranty information, please visit our website at joiebaby.com
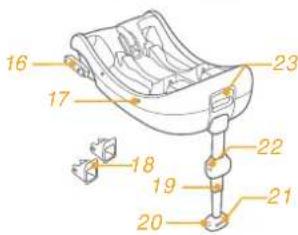
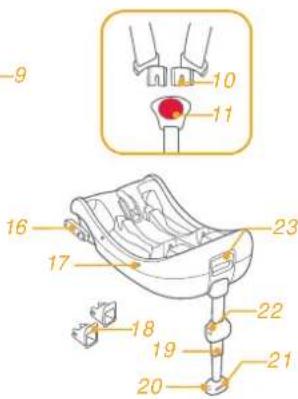
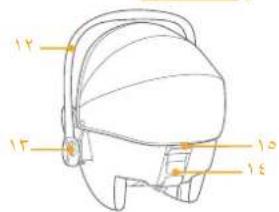
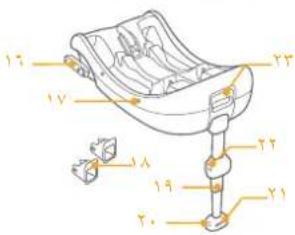
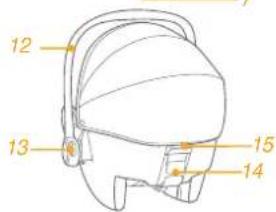
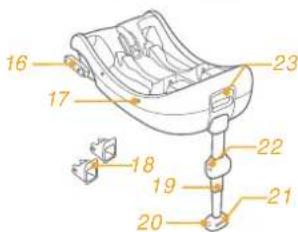
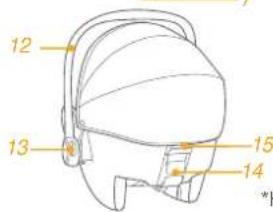
Parts List
Please make sure there are no missing parts. Please contact the retailer if anything is missing.
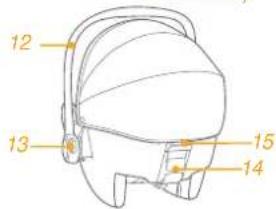
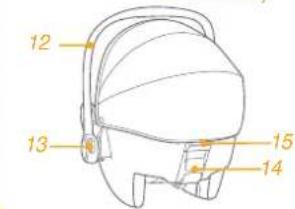
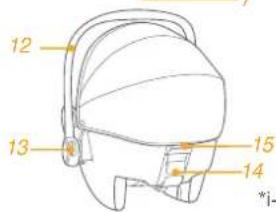
1 Head Support
2 Seat Pad
3 Stroller Fix Release Button A
4 Side Guide
5 Infant Insert
6 Adjustment Webbing
7 Harness Adjustment Button
8 Shoulder Harness
9 Canopy
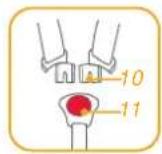
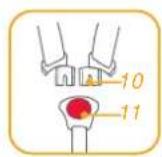
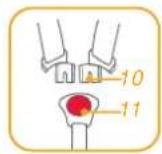
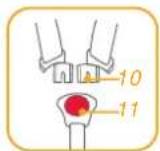
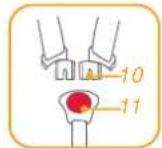
10 Harness Connectors
11 Harness Buckle
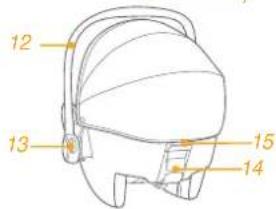
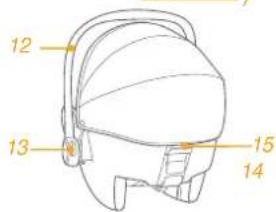
12 Handle
13 Handle Button
14 Rear Guide
15 Stroller Fix Release Button B
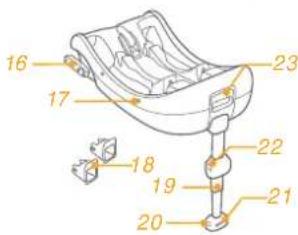
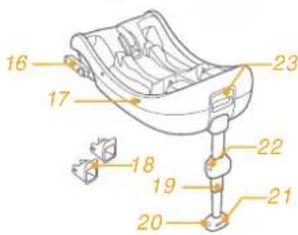
16 ISOFIX Connector
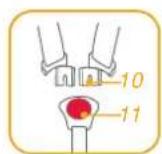
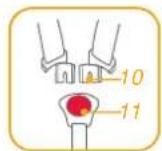
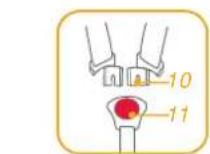
17 Shell Indicator
18 ISOFIX Guides
19 Load Leg
20 Load Leg Adjust Button A
21 Load Leg Indicator
22 Load Leg Adjust Button B
23 Child Restraint Release Button
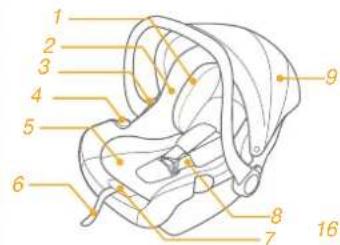

*i-Base 2 is sold separately.
WARNING
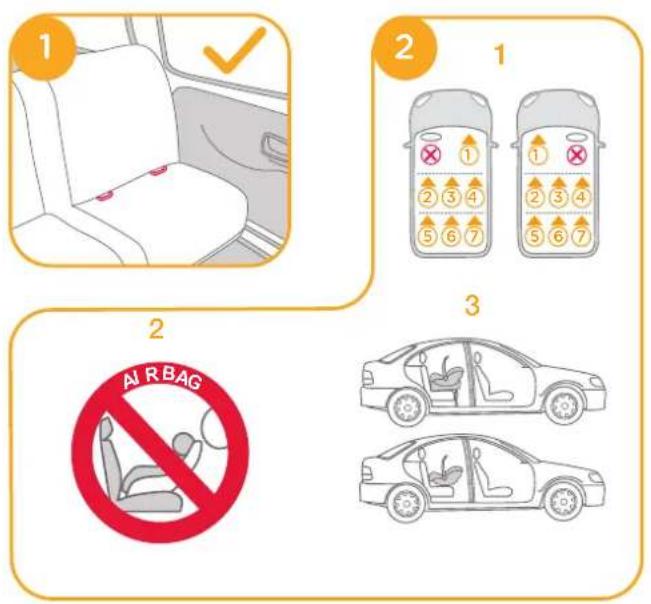
! BE cautious that the rigid items and plastic parts of the enhanced child restraint system shall be so located and installed that they are not liable to become trapped by a movable seat or in the door of the vehicle.
! DO NOT use the rearward facing enhanced child restraint systems in seating positions where there is an active frontal airbag installed.
To use this enhanced child restraint with base according to the UN Regulation No.129, your child must meet the following requirements. Child height 40cm-75cm/ Child weight ≤13kg (Child age ≤12months).
To use this infant carrier module with vehicle belt, your child must meet the following requirements. Child height 40cm-75cm/ Child weight ≤13kg (Child age ≤12months).
! The enhanced child restraint may not fit in all approved vehicles. Please refer to the fitting list included for more details.
Any straps holding the enhanced child restraint to the vehicle should be tight. that any support-leg should be in contact with the vehicle floor, that any straps or impact shields restraining the child should be adjusted to the child's body, and that straps should not be twisted.
! DO NOT use any load bearing contact points other than those described in the instructions and marked on the enhanced child restraint.
! After your child is placed in this enhanced child restraint, the safety belt must be used correctly.
This enhanced child restraint should be replaced when it has been subject to violent stresses in an accident. An accident can cause damage to it that you cannot see.
Consider the danger of making any alterations or additions to the device without approval of the adequate authority, and the danger of not following closely to the installation instructions provided by the enhanced child restraint manufacturer.
! Please keep this enhanced child restraint away from sunlight, otherwise it may be too hot for child's skin. Always touch the enhanced child restraint before placing child in it.
! DO NOT leave your child unattended in the enhanced child restraint system.
WARNING
! Any luggage or other objects liable to cause injuries in the event of a collision shall be properly secured.
! The enhanced child restraint system shall NOT BE USED without the soft goods.
The soft goods should not be replaced with any other than the one recommended by the manufacturer, because the soft goods constitutes an integral part of the restraint performance.
! Please check if this enhanced child restraint can be installed properly in your vehicle before you purchase it.
NO enhanced child restraint can guarantee full protection from injury in an accident. However, proper use of this enhanced child restraint will reduce the risk of serious injury or death to your child.
! DO NOT install this enhanced child restraint without following the instructions in this manual or you may put your child at serious risk of injury or death.
! DO NOT use this enhanced child restraint if it has damaged or missing parts.
! The instructions can be retained on the child restraint for its life period.
! For an "i-Size Enhanced Child Restraint System", the user shall also be referred to the vehicle manufacturer's handbook.
Emergency
In case of emergency or accidents, it is most important to have your child taken care of with first aid and medical treatment immediately.
DO NOT use the rearward facing enhanced child restraint systems in seating positions where there is an active frontal airbag installed.
i-Snug™ 2 infant carrier module is compatible with i-Base 2, i-Base lx 2, i-Base Advance, i-Base Encore
1. This is an "i-Size" Enhanced Child Restraint System. It is approved according to UN Regulation No.129, for use in, i-Size compatible vehicle seating positions as indicated by vehicle manufacturers in the vehicle users' manual.
2. If in doubt, consult either the Enhanced Child Restraint System manufacturer or the retailer.
i-Snug™ 2 infant carrier module is compatible with ClickFit R129, i-Base 2 with vehicle belt installation
1. This is Specific vehicle Belted Enhanced Child Restraint System.
2. If in doubt, consult either the Enhanced Child Restraint System manufacturer or the retailer.
i-Snug™ 2 infant carrier module can be used separately
1. This is Universal Belted Enhanced Child Restraint System. It is approved according to UN Regulation No.129, for use primarily in "Universal seating positions" as indicated by vehicle manufacturers in the vehicle user's manual.
2. If in doubt, consult either the Enhanced Child Restraint System manufacturer or the retailer.
Materials Plastics, metal, fabrics
Patent No. Patents pending
Choose the Installation Mode
| Figure for Installation | Suitable for |
 | Child height 40cm-75cm/Child weight≤13kg(Child age≤12 months) |
 | Child height 40cm-75cm/Child weight≤13kg(Child age≤12 months) |
 | Child height 40cm-75cm/Child weight≤13kgChild age≤12 months |
Concerns on Installation
see images 1 - 2
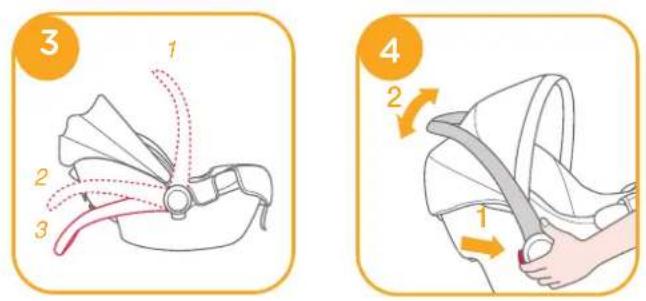
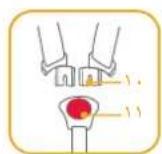
Handle Adjustment
see images 3 - 4
The handle of the infant carrier module can be adjusted to 3 positions.
! Position 1- Position for car, hand or stroller transportation.
To adjust the handle, squeeze the handle buttons on both sides to release it ④ -1, and then rotate the handle until it clicks into any of the 3 positions. ④ -2
Installation with base
see images 5 - 15
- Unfold the load leg from storage compartment. 5
- Fit the ISOFIX guides with the ISOFIX anchor points. ⑥ The ISOFIX guides can protect the surface of the vehicle seat from being torn. They can also guide the ISOFIX connectors.
- Rotate the ISOFIX connectors 180 degrees until they are pointing in the direction of the ISOFIX guides.
-
Line up the ISOFIX connectors with the ISOFIX guides, and then click both ISOFIX connectors into the ISOFIX anchor points.
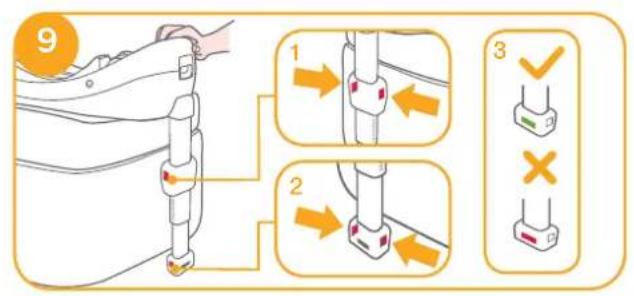
! Make sure that both ISOFIX connectors are securely attached to their ISOFIX anchor points. There should be two audible clicks and the colors of the indicators on the both ISOFIX connectors should be completely green. 8-1
! Check to make sure the base is securely installed by pulling on the both ISOFIX connectors.
-
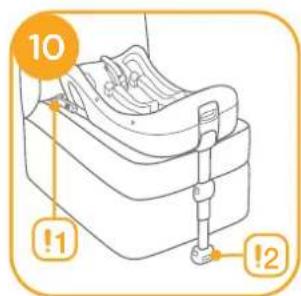
After placing the base on the vehicle seat, extend the load leg to floor ⑨. When the load leg indicator shows green means it is installed correctly, red means it is installed incorrectly. ⑨-3
! The load leg has multiple positions. When the load leg indicator shows red this means the load leg is in the wrong position.
! Make sure the load leg is in full contact with the vehicle floor pan.
! Squeeze the load leg releasing button, then shorten the load leg upwards.
The completely assembled base is shown as 10
! The ISOFIX connectors must be attached and locked onto the ISOFIX anchor points. -1
! The load leg must be installed correctly with green indicator. 10-2
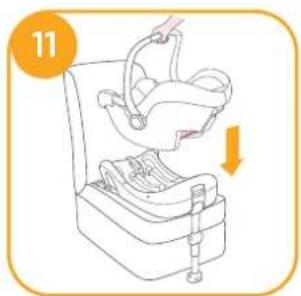
! Please install the enhanced child restraint on the rear vehicle seat and then put the child in the enhanced child restraint.
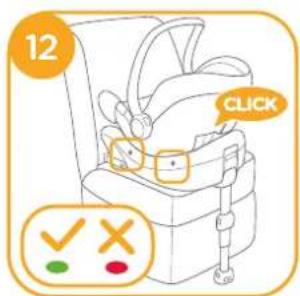
- Push the infant carrier module down into the base ^11 , if the enhanced child restraint is secure, the enhanced child restraint indicator shows green. ^12
! Pull up on the infant carrier module to be sure it is securely latched into the base.
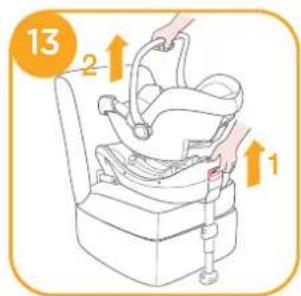
-
To release the infant carrier module, pull the infant carrier up 13-2 while squeezing the child restraint release button. 13-1
-
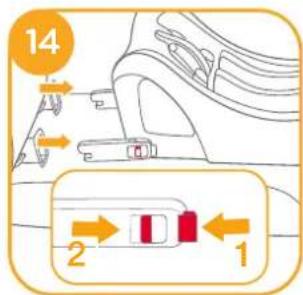
To remove the base, press the secondary lock button 14 -1 first and then the button 14 -2 on the ISOFIX connectors before removing the base from the vehicle seat. 14
-
Press the ISOFIX releasing button to fold the ISOFIX. 15
Head Support and Shoulder Harnesses
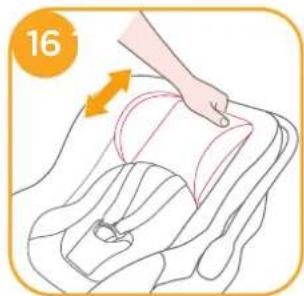
see images 16 - 17
- The head support can be adjusted according to the baby's height.
- Check that shoulder harness straps are set at the proper height.
! No matter where the head support is, the bottom of head support must be level with the highest point of child's shoulder, it is shown as
! If the shoulder harness straps are not at proper height, the child might be ejected from the enhanced child restraint if there is a crash.
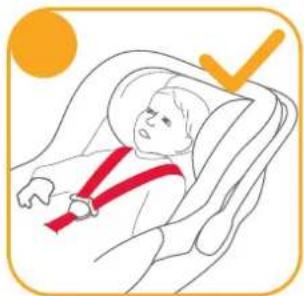
Securing Child in the Enhanced Child Restraint
see images 18 - 23
Note
- Infant insert is for children's protection. Children whose height is under 60cm are suitable to use the infant insert.
- Before using the insert, please add the foam wedge. ^18

Remove the body portion of the infant insert when the infant's shoulders no longer fit comfortably.
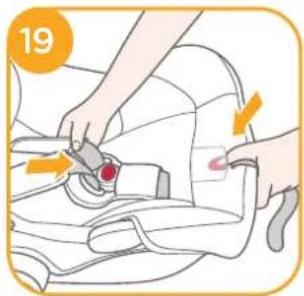
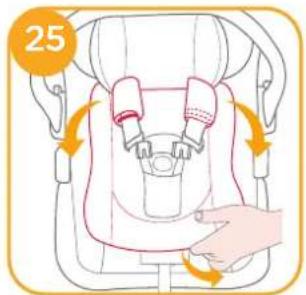
- While pressing the harness adjustment button, pull completely the two shoulder harnesses of the enhanced child restraint. ⑲
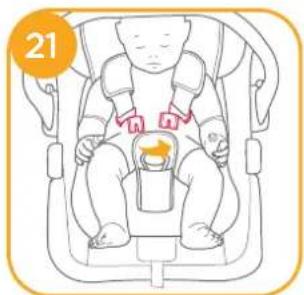
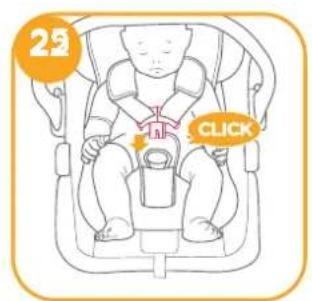
- Unlock the buckle of the harnesses by pressing the red button.
- Place child into the infant carrier module and lock the buckle. 21 & 22
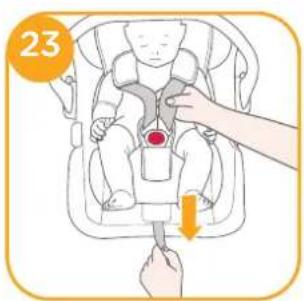
- Tighten the shoulder harnesses by pulling adjustment webbing. 23
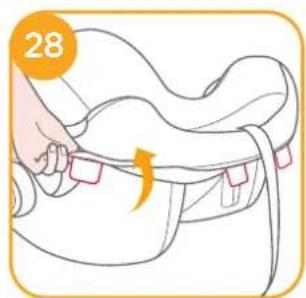
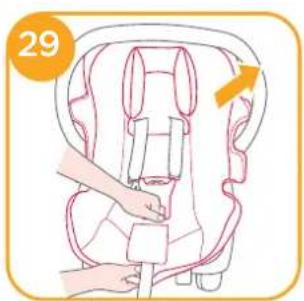
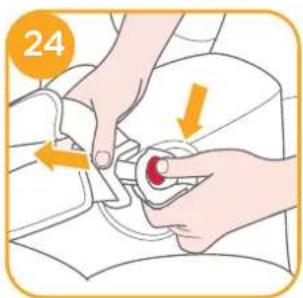
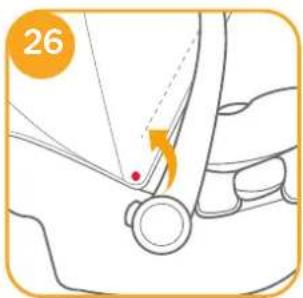
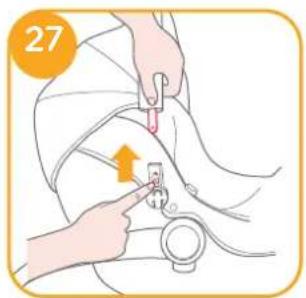
Detaching Canopy and Seat Pad
see images 24 - 29
To re-assemble the soft goods, reverse the aforementioned steps.
Installation without base
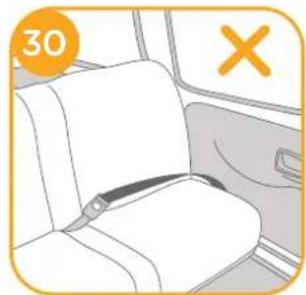
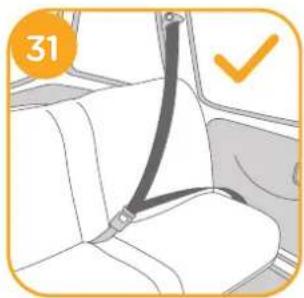
see images 30 - 57
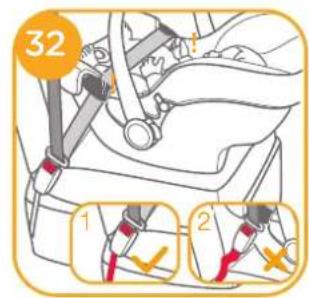
! DO NOT install this infant carrier module on vehicle seats with Lap Belts. 30
This infant carrier module is suitable for vehicle seats with a 3-point Retractor Safety Belt only.
1. Place the infant carrier module onto the vehicle seat where you wish to put it. Pull the vehicle safety belt out and lock it into the vehicle buckle, sliding the vehicle lap belt into the side guides of the infant carrier module. ^32
! The infant carrier module can not be used if the vehicle safety belt buckle (female buckle end) is too long to anchor the infant carrier module securely. 😊-2
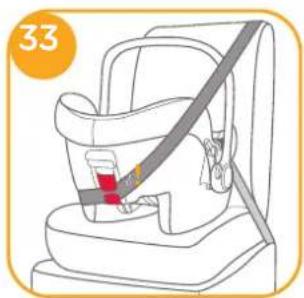
2. Slide diagonal belt into the rear guide.
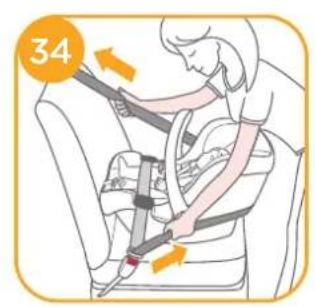
3. Pull the vehicle shoulder belt to fasten the infant carrier module tightly and securely. 34
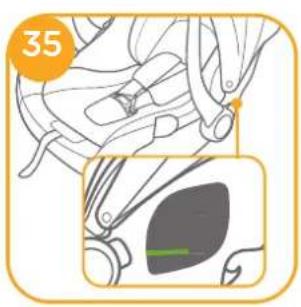
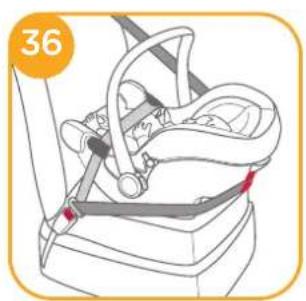
4. Level line on infant carrier module must be level to the ground when the infant carrier module is installed. 35
! Tension the vehicle safety belt as much as possible, checking that it is not loose or twisted.
! After installing the infant carrier module, always check that the vehicle belts are routed correctly and securely fastened into the vehicle buckle. ^36
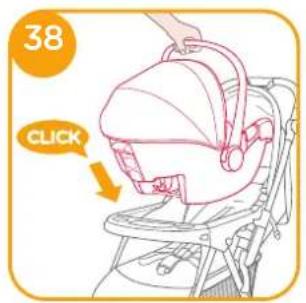
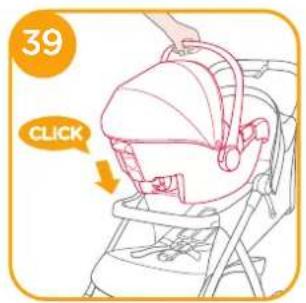
Use with Strollers
see images 38 - 47
Your infant carrier module is designed to attach to certain Joie stroller models featuring a special tray, armbar or calf support.
! Please make sure your stroller can fit the infant carrier module before purchasing it.
! Never allow more than one baby in the travel system at one time.
! Please brake your stroller before assembling the infant carrier module.
! Check that the parts used to fix the infant carrier module are securely fastened on the stroller.
! Recline the stroller seat back to the lowest position.
Use with Joie Strollers
To assemble the infant carrier module on Joie strollers, please follow these steps:
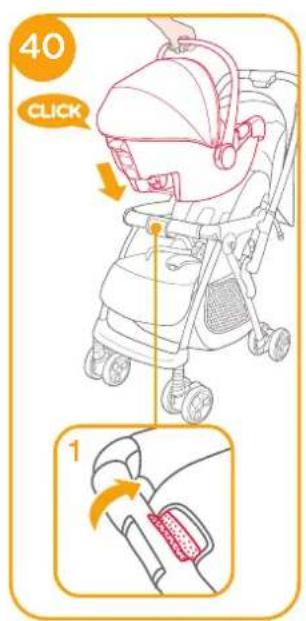
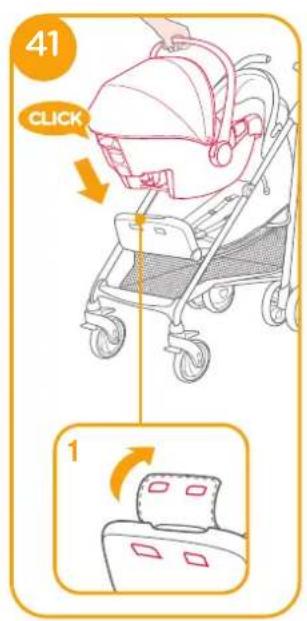
- Place infant carrier module into stroller so notches in rockers fit over edge of armbar, tray or calf support. The infant carrier module will then automatically click into place. 38 & 39 & 40 & 41
! If armbar has fabric cover, please detach the Velcro on armbar cover first. 40 -1
! For the stroller with a special calf support, please adjust the calf support to the vertical position, detach the Velcro, and then lift the fabric cover. 41 -1
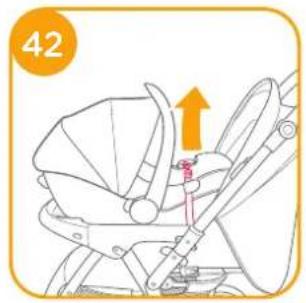
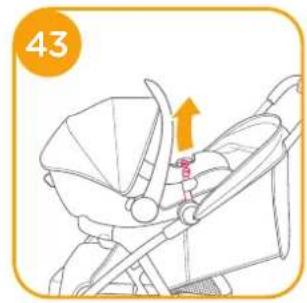
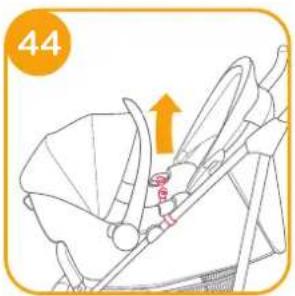
- Use the straps on both sides of stroller to fix the child restraint. 42 & 43 & 44
! Try pulling the child restraint upwards to check that it is fitted correctly.
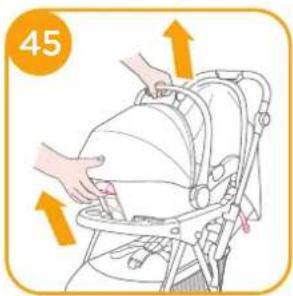
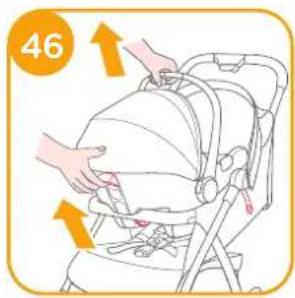
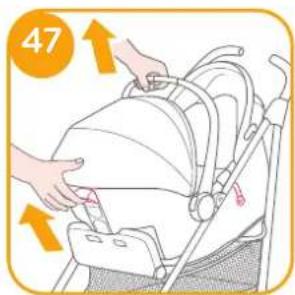
To remove the infant carrier module, release the straps from the infant carrier module, pull up the stroller release handle to release the infant carrier module from tray, armbar or calf support, and then lift infant carrier module out of stroller.
Please refer to 45 & 46 & 47.
Care and Maintenance
! After removing the foam wedge of insert, please store it somewhere that the child cannot access it.
! Please wash the seat cover and inner padding with cold water under 30°C. Please refer to the care label for instructions on cleaning the fabric parts of the infant carrier.
! Do not iron the soft goods.
! Do not bleach or dry clean the soft goods.
! Do not use undiluted detergents, gasoline or other organic solvent to wash the infant carrier module or base. It may cause damage to the enhanced child restraint.
! Do not twist the seat cover and inner padding in an attempt to dry. It may leave the seat cover and inner padding with wrinkles.
! Please hang dry the seat cover and inner padding in the shade.
! Please remove the infant carrier module and base from the vehicle seat if not in use for a long period of time. Put the enhanced child restraint in a cool, dry place and somewhere your child cannot access it.

Bem-vindo à Joie™
*i-Base 2 vendida separadamente.
AVISO AVISO


*i-Base 2 säljs separat.
WARNING WARNING
Angående installation
se bilder 1 - 2
se bilder 3 - 4


*i-Base 2 sa predáva samostatne.
VÝSTRAHA


13 Gumb ručke
14 Stražnja vodilica
15 Gumb za oslobadanje pri postavljanju na kolica B
16 ISOFIX priključak
17 Indikator školjke sjedala
18 ISOFIX vodilice
19 Potporni nogar
20 Gumb A za podešavanje potpornog nogara
21 Indikator potpornog nogara
22 Gumb B za podešavanje potpornog nogara
23 Gumb za oslobađanje dječje autosjedalice


*i-base 2 prodaje se zasebno.
UPOZORENJE


*i-Base 2 parduodamas atskirai
JSPÈJIMAS


*i-Base 2 selges separat.
ADVARSEL
Allison Baby UK Ltd,
Venture Point, Towers Business Park
Rugeley, Staffordshire, WS15 1UZ
NUNA International B.V.
Van der Valk Bourmanweg 178 C,
2352 JD Leiderdorp, The Netherlands