Sierra Plus - Soundbar Majority - Free user manual and instructions
Find the device manual for free Sierra Plus Majority in PDF.


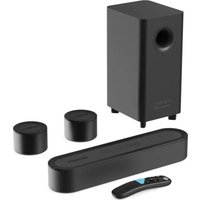
| Product type | Soundbar with wireless subwoofer |
| Brand | Majority |
| Model | Sierra Plus |
| Soundbar dimensions | 96 x 10.8 x 8.1 cm |
| Subwoofer dimensions | 30.6 x 19 x 37 cm |
| Total weight | 7.9 kg |
| Power supply | Power adapter 12V / 1A, compatible 110-240V ~ 50/60Hz |
| Bluetooth version | 5.0 (A2DP, AVRCP profiles) |
| Connectivity | HDMI ARC, HDMI IN (2 ports), optical, AUX (3.5 mm), USB (firmware update only) |
| Supported audio formats | Dolby Atmos, Dolby Digital, Dolby Digital Plus, Dolby TrueHD, PCM |
| Main features | 3D surround sound, EQ modes (Movie, Music, News, 3D), treble and bass adjustment, auto standby, wall mounting |
| Bluetooth range | Up to 8 meters (open space) |
| Remote control batteries | 2 x AAA (not included) |
| Standby consumption | Auto standby after 20 minutes without audio signal |
| Maintenance and cleaning | Unplug before cleaning; use a dry cloth only |
| Safety | Do not expose to water, excessive heat or dust; refer repairs to qualified personnel |
| Spare parts and repairability | No user-serviceable parts inside; repairs by a professional only |
| Warranty | 12 months (free extension to 24 months after registration on majority.co.uk) |
Frequently Asked Questions - Sierra Plus Majority
User questions about Sierra Plus Majority
0 question about this device. Answer the ones you know or ask your own.
Ask a new question about this device
Download the instructions for your Soundbar in PDF format for free! Find your manual Sierra Plus - Majority and take your electronic device back in hand. On this page are published all the documents necessary for the use of your device. Sierra Plus by Majority.
USER MANUAL Sierra Plus Majority
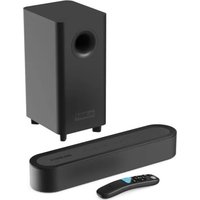
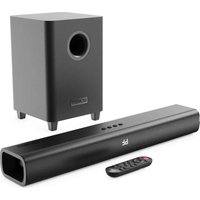
Dolby Atmos soundbar with wireless subwoofer
User Manual
MAJORITY
Preparation for use
Unpacking and installation
- Remove the audio bar from the package and remove all packing material from the audio bar. Save the packing material, if possible, in case the audio bar needs to be serviced or transported. The original carton and packing material is the only safe way to pack the audio bar and protect it from damage during transport.
- Remove a ny descriptive labels or stickers on the front or top of the cabinet. Do not remove any labels or stickers on the back or bottom of the cabinet.
- Place the audio bar on a flat surface such as a table, desk, or shelf, near a power outlet, out of direct sunlight, and away from sources of excessive heat, dirt, dust, moisture, or vibration.
- Unwind the lin e cord connecting the AC adapter and extend it to its full length.
Protect furniture
This model is equipped with non-slip rubber feet to prevent the product from moving when operating the controls. These feet are made of non-migrating rubber material specially formulated to avoid leaving marks or stains on furniture. However, some types of oil-based furniture polishes, wood preservatives or cleaning sprays may cause the rubber feet to soften and leave marks or rubber residue on the furniture. To avoid damaging your furniture, we recommend that you purchase small self-adhesive felt pads, available at hardware stores and home centers, and apply them to the base of the rubber "feet" before placing the unit.
Power Source
- This sound bar is designed to operate on 110V -240V \~ 50Hz/60Hz Important Notes
- Safety and operating instructions should be kept for future reference.
- The device should not be exposed to drops, splashes or placed in a humid atmosphere. such as a bathroom.
• Do not install the product in the following areas:
- Places e xposed to direct sunlight or near radiators.
- Above other stereo equipment that radiates too much heat - Blocking ventilation or in a dusty area.
- Areas s ubject to constant vibration.
• Damp o r wet places.
- Do no t place near candles or other flames.
- Use the product only as instructed in this manual.
- Before t urning on the device for the first time, make sure the soundbar is plugged into the power outlet.
- For safety reasons, do not remove the covers or attempt to access the inside of the unit.product. Refer any maintenance work to qualified personnel.
- Do not attempt to remove screws or open the unit casing; there are no user screws. serviceable parts inside. Refer to qualified personnel for maintenance.
Product Diagram

natural_image
Front view of a server rack unit with indicator lights and ports (no visible text or labels)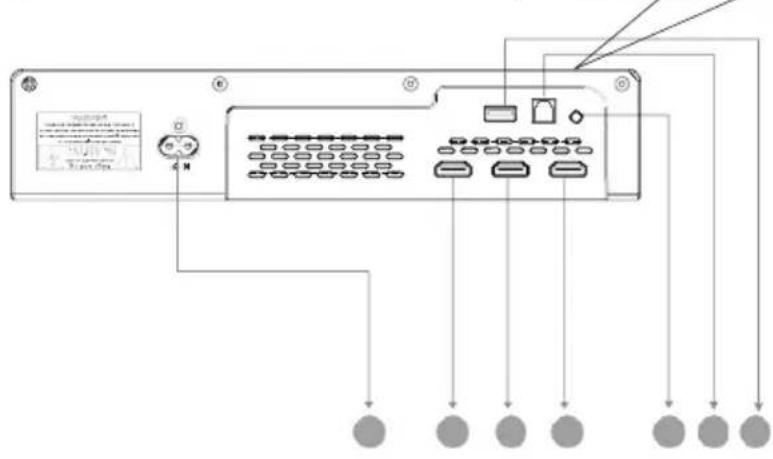
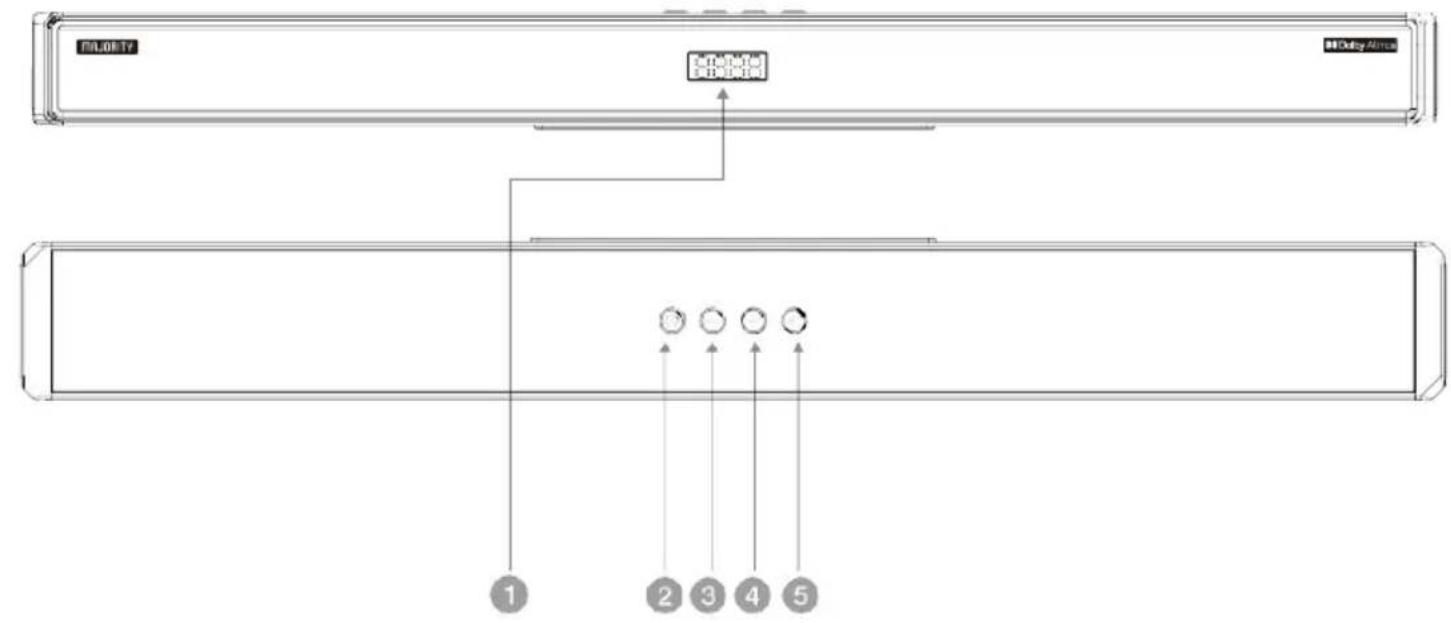
1 DISPLAY PANEL.
Standby-on: Tums on or puts the Soundbar on standby.
3 Volume: Reduces the volume.
4 Volume: Increases the volume.
5 INPUT: Select an input source for the Soundbar.
6 AC IN: Connect the power supply to power.
7 HDMI IN 2 : Connect to HDMI OUT of TV/Satellite/Network/Set-top box/BD/Blue Ray DVD/DVD player.
8 HDMI IN 1 : Connect to HDMI OUT of TV/Satellite/ Network/.Set-top box/BD/Blue Ray DVD/DVD player.
9 HDMI OUT (ARC): Connect to HDMI (ARC)/HDMI IN on TV.
10 AUX: Auxiliary Audio input from Mp3/Phone/set-top box devices.
11 OPTICAL: Connect to an optical audio output on TV or digital devices.
12 USB PORT: Audio input from a USB storage device. Update the software for this product.
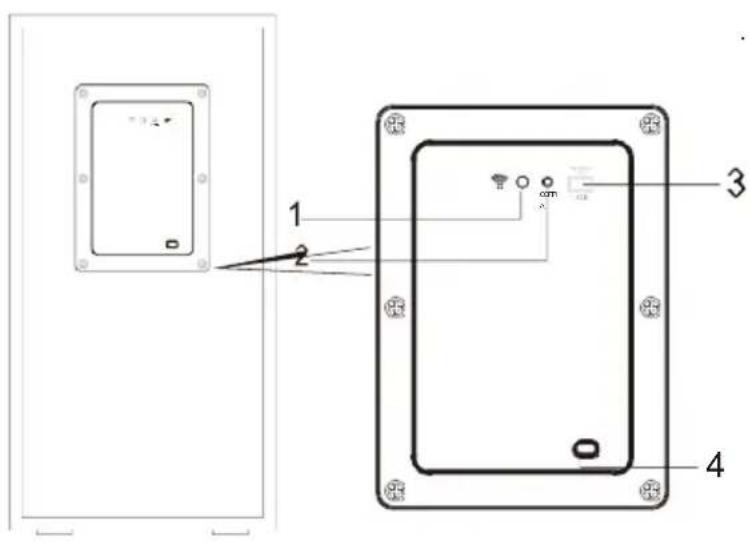
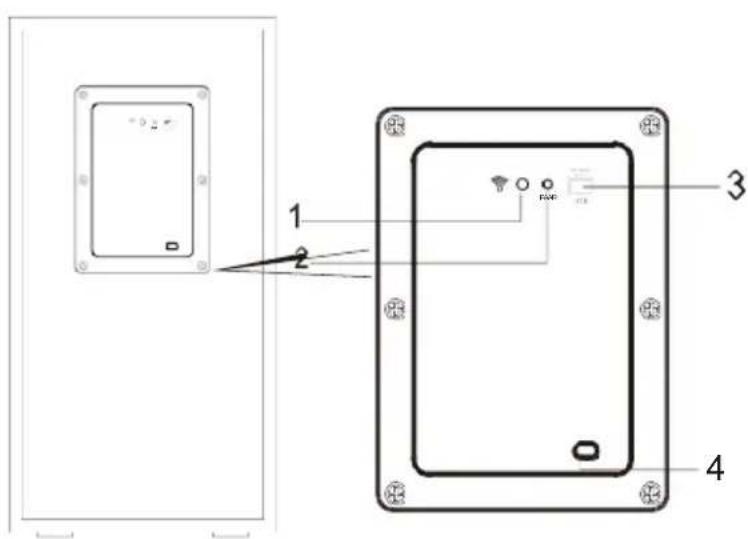
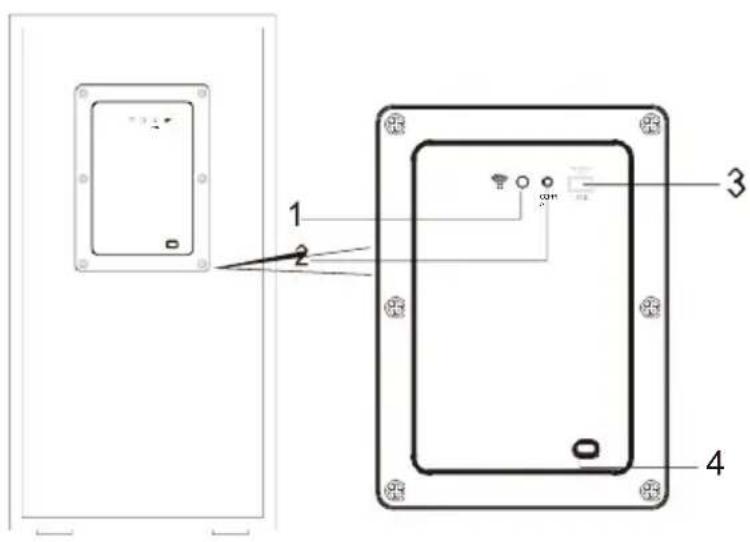
- LED Subwoofer indicator: Indicates pairing between the soundbar and subwoofer. (Make sure the soundbar and subwoofer are connected to the power supply at the same time, and then turn on the soundbar and subwoofer).
- PAIR button: Automatically pairs the soundbar with the subwoofer. Holding it down resets the connection between the sound bar and subwoofer.
- USB port (cannot play MP3 music, FOR SOFTWARE UPDATING ONLY)
- AC IN (Connect to power supply).
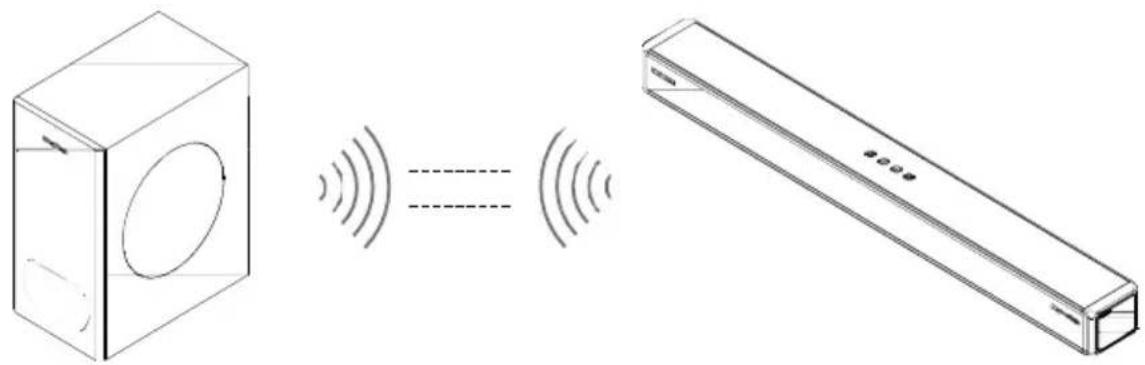
Pairing with Subwoofer
Pairing with the subwoofer
After turning on the soundbar and subwoofer at the same time, make sure the soundbar switches to BT mode. (Do not connect the Bluetooth soundbar to the device first, but wait for the soundbar to pair with the subwoofer before connecting to the device.) Usually the pairing method is faster in BT mode). When they are turned on, the subwoofer's blue indicator flashes slowly; briefly pressing the subwoofer's PAIR button causes the blue indicator to flash blinks rapidly and automatically switches to the pairing state. When the soundbar is paired with the subwoofer, the blue indicator light of the subwoofer is always on.
When the soundbar is connected to the subwoofer, it is put on standby or turned off, and the subwoofer cannot be searched by the soundbar within 5 minutes, it will be automatically put on standby,
and the indicator will turn red. When the soundbar is turned on, the subwoofer is awakened and connected to the soundbar; the blue indicator is always on.
Note:
- The maximum Bluetooth connection distance in an open space between the soundbar and subwoofer should not exceed 8 meters.
- To a void interference in sound quality caused by wireless signal interference, when using the soundbar 1000002681, please make sure it is kept at an appropriate distance from other WIFI devices to avoid wireless signal interference.
- The f lashing blue LED of the subwoofer turns red if the paired soundbar is off, in STANDBY, or not in operation.
- LLconnected to the power supply. This indicates that the subwoofer has also entered STANDBY mode.
• If pairing has failed, disconnect the subwoofer and soundbar:
• Turn off the soundbar and subwoofer by unplugging the AC plug from the outlet. - Wait 3 minutes before reinserting the AC plug into the outlet. Make sure that the soundbar and subwoofer are connected to the main power supply at the same time.
- Press a nd hold the PAIR button on the subwoofer back panel to reset the connection so that the soundbar and subwoofer are connected.
- you can reconnect the subwoofer.
natural_image
Diagram showing a 3D box connected to a rectangular panel with sound waves, illustrating signal transmission (no text or symbols present)★Software update
Note: The software (system folder) of the soundbar and subwoofer cannot be unzipped at the same time on the same USB disk, so as not to confuse the update software.
Upgrading the soundbar
Update soundbar software: Unzip the entire soundbar system software folder to the root directory of the USB disk. After plugging the soundbar's power cord into the main outlet and turning it on, insert the USB disk into the soundbar's USB port, after a while the display will show "UP", then "UPSC" after about 10 seconds, then the display will automatically go into standby and show "--". This indicates that the upgrade has been completed.
Subwoofer Update
Update the subwoofer software: Unzip the entire subwoofer system software folder to the root directory of the USB disk.
After connecting the subwoofer's power cable to the main outlet and turning on the power, the blue light will flash slowly, then insert the USB disk into the subwoofer's USB port. After the light has turned off, wait until the blue light flashes slowly again, the upgrade is complete, and then take out the USB disk.
After the soundbar and subwoofer have been fully upgraded, reconnect the power cord to the main outlets.
Before use, make sure the soundbar and subwoofer are paired together.
Usually the pairing method is faster in BT mode.
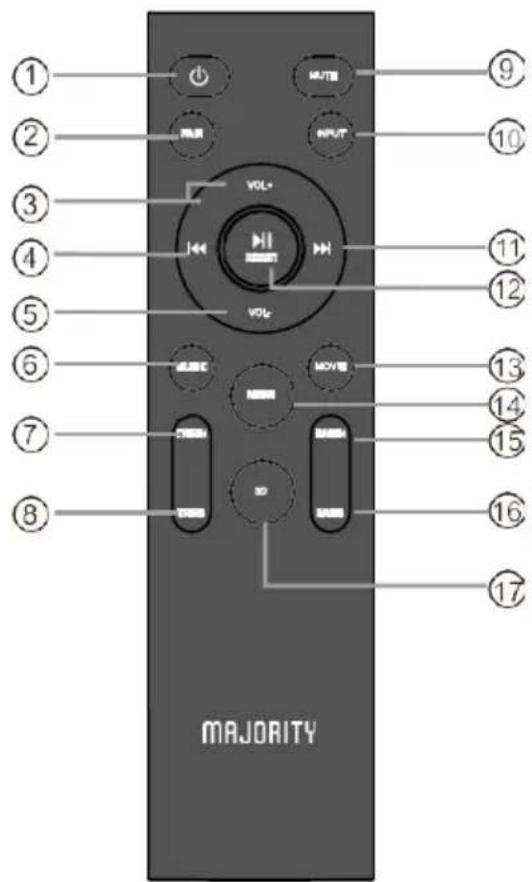
- Power button: Press to switch the sound bar on/off or standby mode.
- Pair button: long-press pair button more than 2 seconds to conect and disconnect last device. short-press pair button, the display will be shown "ON", it is indicated that the surround effectiveness is switched on. Short-press pair button again, the display will be shown "OFF", the surround effectiveness is switched off.
- VOL+: to increase the volume.
- Previous button: Skip to the previous track in USB & BT mode.
- VOL-: to decrease the volume.
- Music button: to select and activate the music EQ effect and mode.
- Treble-up button: to increase the treble volume.
- Treble-down button: to decrease the treble volume.
- Mute button: To temporarily turn off the sound. Press the button again to turn the sound back on.
- Source input button: to select an input source for playback: ARC:
sound from connected HDMI ARC device
Hd 1: sound from connected HDMI 1 port Hd
2: sound from connected HDMI 2 port
BLUE: sound from connected Bluetooth drive. AUX:
sound from connected Auxiliary Line-in USb: sound
from connected USB driver
OPTI: Sound from connected Digital Optical device.
- Next button: Skip to the next track in USB & BT mode.
- May/Pause button: Start, pause or resume play in USB & BT mode.
Reset button: Press and hold the button more than 2 seconds to restore factory default settings.
- Movie button: to select and activate the movie EQ effect and mode.
- News button: to select and activate the news voice EQ effect and mode.
- Bass+ button: To increase the bass.
- Bass- button: To decrease the bass.
17.3D button: to select and activate the 3D EQ effect and mode.
Remote Control Battery Replacement
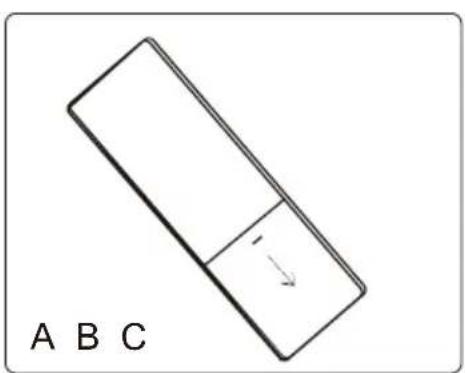
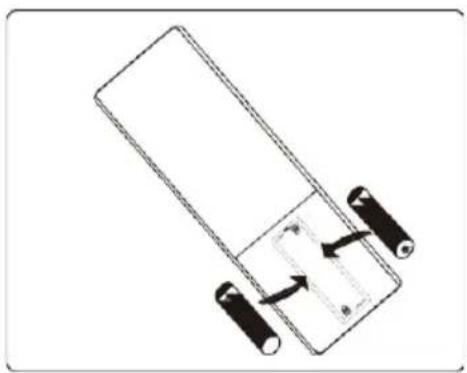
Insert the batteries as shown below
natural_image
Diagram of a battery pack with two batteries and an arrow indicating direction (no text or symbols)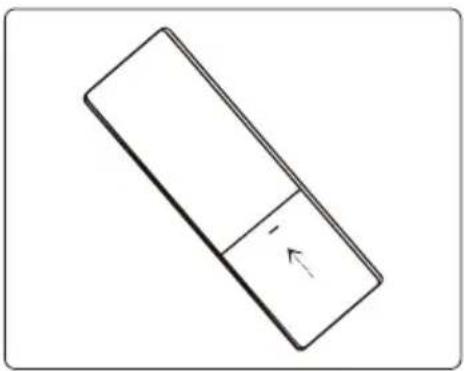
natural_image
Simple line drawing of a rectangular object with a small internal feature and an arrow, no text or symbols present.A: Remove the battery cover
B: Insert 2 AAA batteries according to the directions on the inside LLof the battery compartment.
C: Close the battery cover

WARNING
Risk of explosion if the battery is replaced with an incorrect type
Battery handling
- Improper or improper handling of batteries may cause corrosion or battery leakage, resulting in a risk of fire, personal injury, or property damage.
• Use only the type of battery indicated in this manual.
• Do not install new batteries with used batteries or mix different types of batteries. - Do not dispose of used batteries as household waste. Dispose of them in accordance with local regulations.
Handling the remote control
• Do not drop the remote control.
• Do not let anything hit the remote control.
• Do not spill water or other liquids on the remote control.
• Do not place the remote control on a wet object.
• Do not place the remote control in direct sunlight or near sources of excessive heat.
- When not using the remote control for a long period of time, remove the battery, as corrosion or battery leakage may occur, resulting in physical injury. and/or property damage and/or fire.
- When the battery is depleted, the remote control will not work.
Operating range of the remote control
- When the unit is mounted on the wall, point the remote control at the remote control sensor on the bellows panel. The supplied remote control allows you to operate the unit remotely.
• Even if the remote control is operated within the effective range of 8 meters, operation of the remote control may be impossible if there are obstacles between the unit and the remote control. - If the remote control is used in the vicinity of other products that generate infrared rays or if other remote control devices that use infrared rays are used in the vicinity of the unit, operation may not be correct. Conversely, the other products may operate incorrectly.
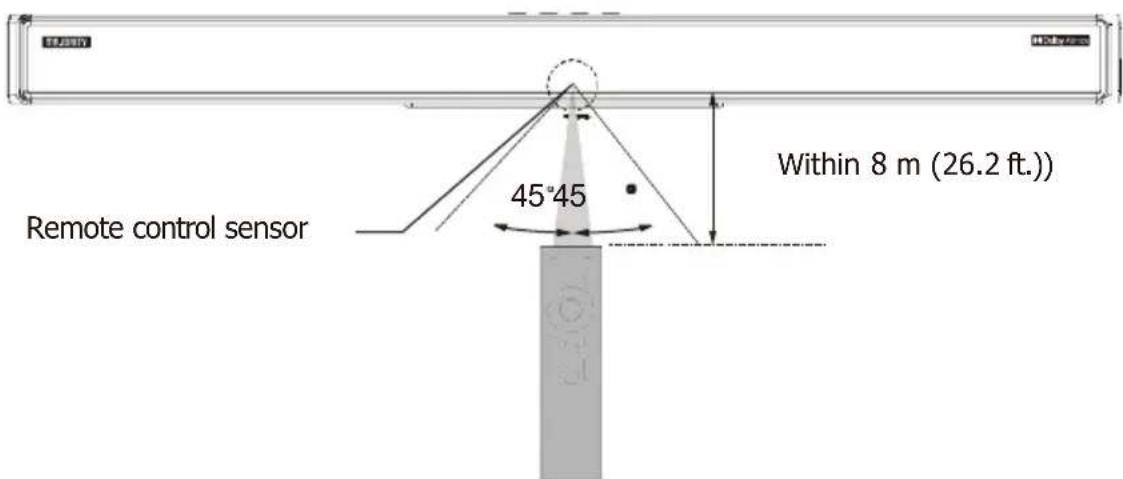
Table Placement
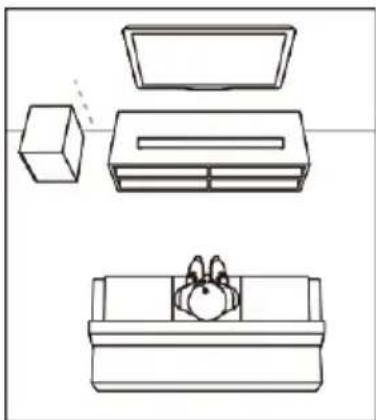
- Place the soundbar horizontally on a solid surface, such as a TV cabinet or shelf, and align it with the center of the TV screen.
- For optimal sound performance and good airflow around the soundbar, place the soundbar and subwoofer as shown to the right.
Wall installation
natural_image
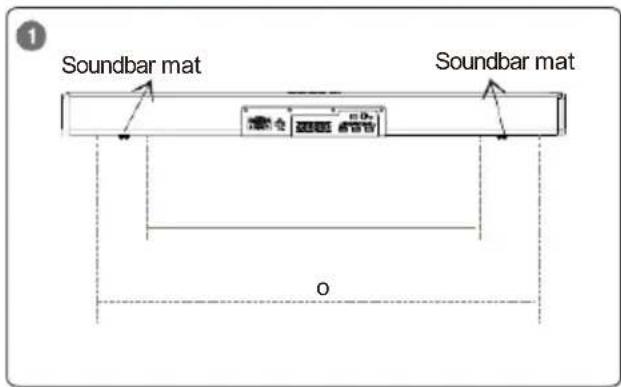
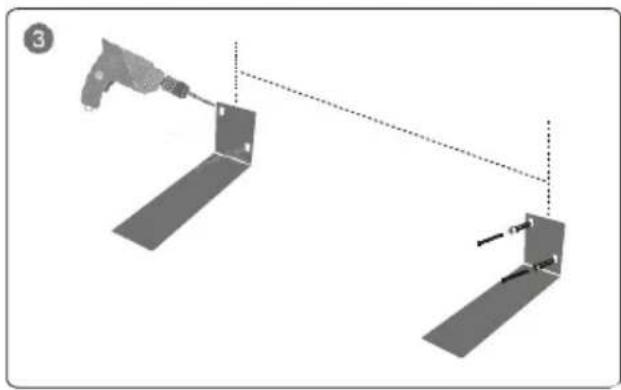
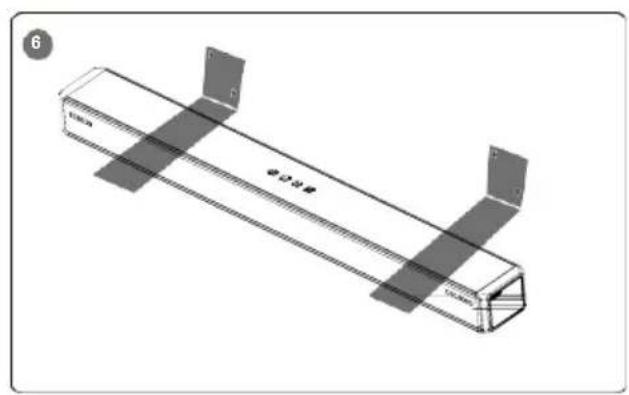
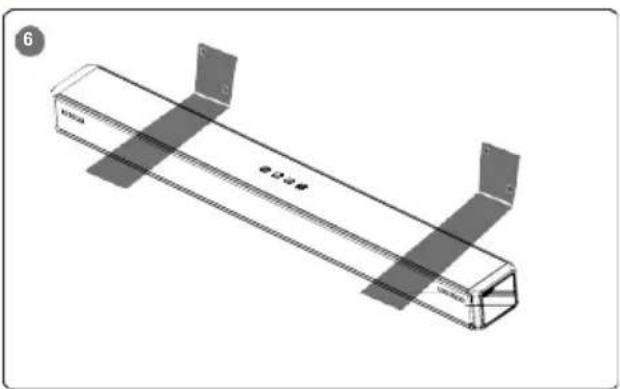
Line drawings of three furniture or objects: a box, a cabinet, and a sofa with a rabbit face (no text or symbols)- Open 4 holes in the wall by referring to the wall-mounting iron bracket, the distance between the holes in the wall corresponds to the symmetrical position of the sound bar (when measuring the position of the wall-mounting, avoid the bearings of the sound bar being applied to the iron bracket, as the bearing is not flat and does not stick well to the double-sided tape of the bracket).
- Fasten the plastic anchor into the 4 holes of the wall mounting bracket.
- Then fasten the supplied screws on the plastic anchor and tighten the screws to ensure that the wall mounting bracket does not move.
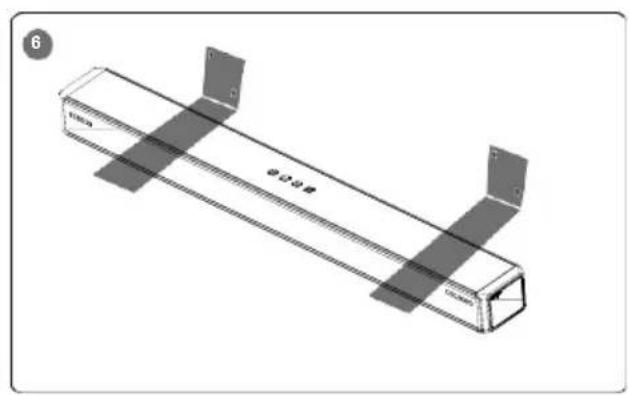
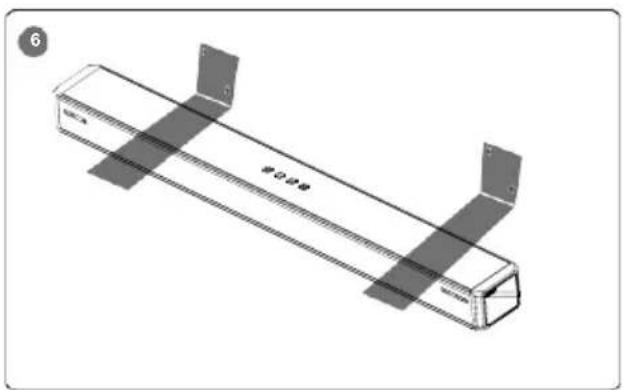
- After securing the screws, tear off one side of the two double-sided adhesive tapes in the supplied package, and glue them left and right into the extension of the wall brackets according to the appropriate location.
- Where the sound bar is mounted on the iron bracket. (Not the position of the feet of the audio bar)
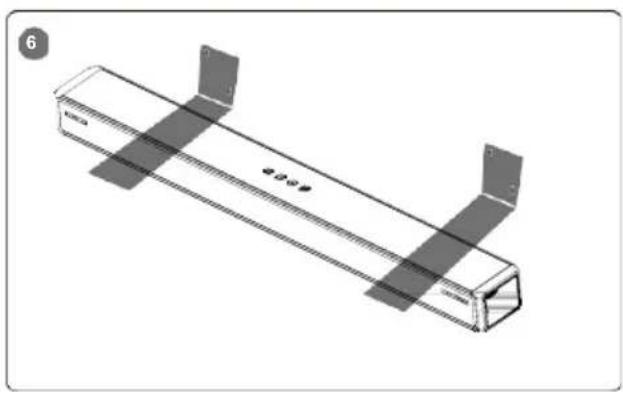
- Then tear off the other side of the double-sided tape attached to the iron bracket, place the Sound Bar on the double-sided tape over the metal fittings, press firmly and release until it is fully glued.
Please note
- Remove any traces of dirt, such as oil, from the adhesive surface of the audio bar before applying it. Make sure that the adhesive is firmly attached.
- When peeling off the release paper of the double-sided tape, be careful not to soil the surface, such as with finger oil adhesive surface.
- Be careful of deterioration of the double-sided tape due to storage conditions.
- The foot of the sound bar is not placed on the metal fittings because the pads/feet of the sound bar are not flat and do not adhere.
Mounting Instructions
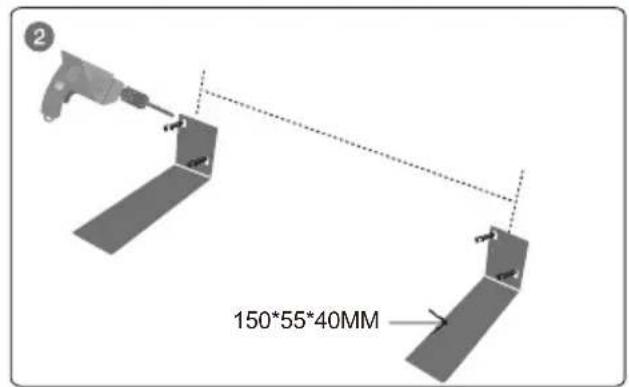
natural_image
Diagram showing a mechanical device with two vertical plates and a connecting rod, no text or symbols present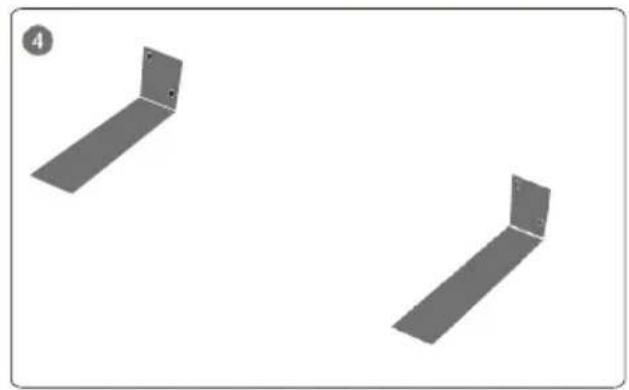
natural_image
Two gray 3D rectangular panels arranged in a V-shape on white background, no text or symbols present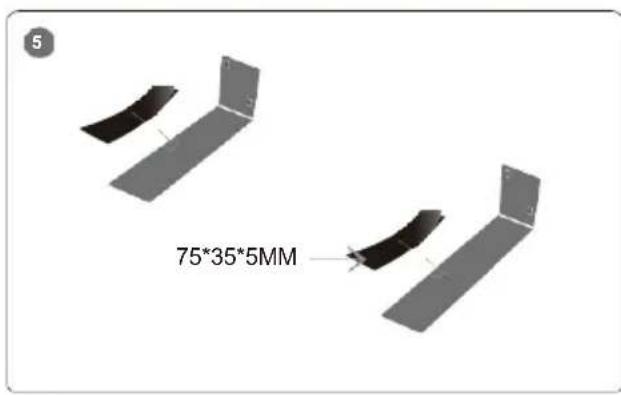
natural_image
Technical line drawing of a rectangular mechanical component with support brackets and a central dimension label (no readable text or symbols)
CAUTION
- When mounting the soundbar on the wall, all installation operations must be carried out properly. The customer should never attempt to install it without permission. Improper or inadequate installation may cause the soundbar to fall, resulting in personal injury.
• To prevent the soundbar from falling, secure it to a plasterboard wall. - Ensure that commercially available screws are used that can support the weight of the installation.
• Fix the cables in a place where they cannot come loose. If your foot or hand accidentally gets caught in
• a loose cable, the audio bar could fall off. - Do not lean on the audio bar or exert excessive force on the top of the audio bar, which could cause it to fall off.
Instruction Guide
Using the Soundbar
- Before connecting the AC power cord, be sure to complete all other connections.
- Risk of damage to the product! Make sure the power supply voltage matches the voltage indicated on the back or underside of the unit.
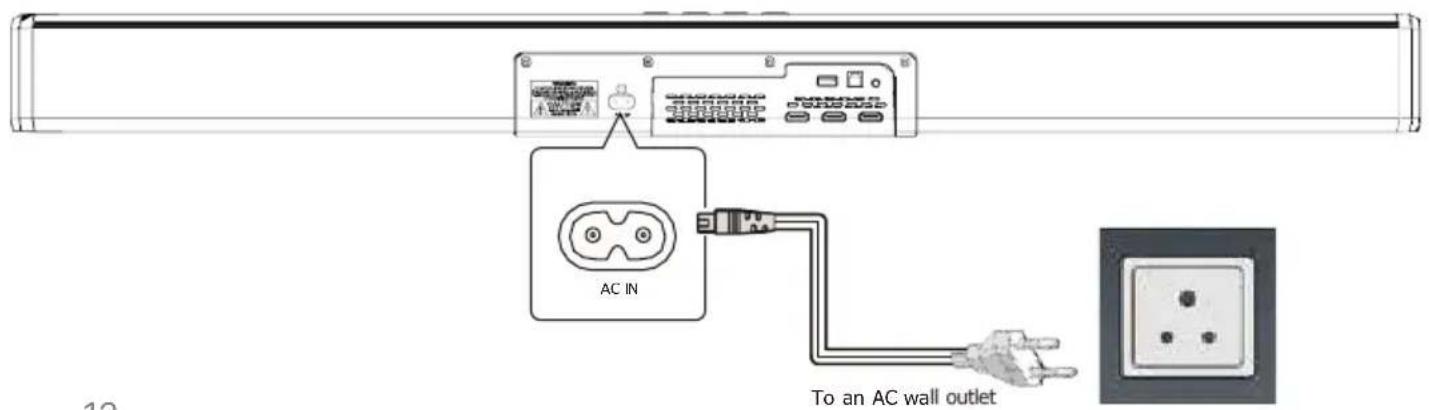
- Connect t he power cord to the AC input of the unit and then to a power outlet.
- The amount of power cord and type of plug will vary in different regions.
Basic operation
- Press the power button on the remote control or audio bar to turn on the audio bar.
- Turn on the connected device (e.g., TV, playback devices, game console, etc.).
- Press the input button on the remote control or soundbar to select the desired input source.
| Input source Description | |
| HDMI 1 E HDMI 2 | Sound from a connected device (via HDMI IN port) |
| ARC / Optical | Audio from TV (via HDMI ARC port or optical socket) |
| AUX | Sound from a connected device (via AUX port) |
| BLUETOOTH | Sound from a connected device via Bluetooth |
| USB | Sound from a USB storage device |

Note: The display mode of the soundbar must match the input source. For example, if the input source is HDMI ARC, meanwhile the display will be switched to the soundbar screen.
Turning on and off
- Plug in the power cord with one side to AC IN on sound bar and the other side to an AC wall outlet (see the following diagram). When you connect the soundbar to the main socket, the unit will be in STANDBY mode, firstly it will display --
- Switch on the sound bar by short-pressing button on sound bar or on remote controller, then it will flow display WELCOME from right to left. After 12s, the default input mode will automatically appear on display screen.
- Press and hold the ⏻ button on sound bar or on the remote controller for 2 seconds to switch it off, and then disconnect the main plug from the main socket if you want to switch the unit off completely.
Automatic standby
- The unit automatically switches to standby mode when it receives no audio signal for 20 minutes.
- The s oundbar wakes up from standby mode when any button is pressed or input is received from the source.
- If the TV or external unit is disconnected, turn them off.
- To turn off the unit completely, remove the plug from the power outlet.
- Turn off the appliance completely to save power when not in use.
- The screen will turn off for about 20 seconds without any operation; when you press the power buttons on the sound bar or
remote control or increase or decrease the volume of the phone, the display will wake up.
Select modes
-
Press the button on the soundbar repeatedly or press the INPUT button on the remote control to select. the BT mode, AUX, OPTICAL, HDMI ARC, HDMI 1, HDMI 2, USB. The selected mode is shown on the display.
-
The following are the names of the input modes that appear on the soundbar display:
-
Bluetooth pairing mode BLUE
- AUX mode AUX
• Optical mode, OPTI - HDMI 2 mode, Hd 2
- HDMI (ARC) OUT mode ARC
- USB m ode USB
HDMI in and HDMI (ARC) ports support video and audio video: maximum video content supported 1080p / 4K / HDR / 60fpsAudio: maximum audio content supported is Dolby Atmos, Dolby Digital, Dolby Digital Plus, Dolby True HD, Dolby Surround.HDMI: HDMI version 2.0

Through Bluetooth, you can connect the Soundbar system to your Bluetooth device (such as an iPad, iPhone, iPod touch, Android phone, or laptop computer) and then listen to audio files stored on the device through the Soundbar speakers.
What you need
- A B bluetooth device that supports Bluetooth A2DP and AVRCP profiles and has Bluetooth version 5.0.
- The maximum operating range between the Soundbar and a Bluetooth device is approximately 8 meters (26.2 feet).
Turn on the Soundbar and press the 📋 button on the unit or the INPUT button on the remote control repeatedly to switch to the Bluetooth model; the Soundbar LED display will flash in Bluetooth pairing mode.
On the Bluetooth device, turn on Bluetooth, search for and select Majority Sierra Plus in the list of Bluetooth devices to start the connection (refer to the Bluetooth device's user manual on how to turn on Bluetooth).
Wait until you hear the Soundbar's voice prompt. If the message has been successfully connected, BLUE it will stop flickering and appear on the display panel.
-
Select and play audio files or music on your Bluetooth device.
-
During play, if a call is coming, music play is paused. Play resumes when the call ends
-
If your Bluetooth device supports AVRCP profile, on the remote control you can press ◀◀ / ▶▶ t o skip to a track, or short-press ▶▶ to pause/ resume play; Press and hold the RESET button more than 2 seconds to restore factory default settings; Hold Pair button on the remote control for more than 2 seconds to disconnect paired BT device or connect back last disconnect BT device.
-
You can use the volume buttons on the sound bar or on the remote controller to adjust the volume to your requirements
-
To exit Bluetooth, select other relevant input source.
- When your switch back to Bluetooth mode, Bluetooth connection remains active.
- Press the VOL +/- buttons to adjust the volume to your desired level.
Notes:
- Connection problems? Remove Majority Sierra Plus from your device's Bluetooth history and make sure there are no more connection problems than 8 meters away. Then try pairing again. For best sound quality, make sure there is a clear line of sight between the connected device and the sound bar.
- If the pairing device or the connected device is turned off or disconnected manually, the sound bar will automatically enter pairing mode.
- Music streaming may be interrupted by obstacles between the device and the Soundbar, such as walls, metal enclosures covering the device, or other nearby devices operating on the same frequency.
• If you want to connect the Soundbar to another Bluetooth device, press and hold Pair on the remote control.
• to disconnect the currently connected Bluetooth device.

Connections
flowchart
graph TD
    TV["TV"] --> HDMI1["HDMI (ARC)/HDMI IN"]
    TV --> HDMI2["HDMI OUTPUT"]
    TV --> HDMI3["HDMI OUTPUT"]
    TV --> HDMI4["HDMI OUTPUT"]
    TV --> HDMI5["HDMI OUT"]
    TV --> HDMI6["HDMI OUT"]
    TV --> HDMI7["HDMI OUT"]
    TV --> HDMI8["HDMI OUT"]
    TV --> HDMI9["HDMI OUT"]
    TV --> HDMI10["HDMI OUT"]
    TV --> HDMI11["HDMI IN 2"]
    TV --> HDMI12["HDMI IN 1"]
    TV --> HDMI13["HDMI OUTPUT (ARC)"]
    TV --> HDMI14["HDMI OUTPUT"]
    TV --> HDMI15["HDMI OUTPUT"]
    TV --> HDMI16["HDMI OUTPUT"]
    TV --> HDMI17["HDMI OUTPUT"]
    TV --> HDMI18["HDMI OUTPUT"]
    TV --> HDMI19["HDMI OUTPUT"]
    TV --> HDMI20["HDMI OUTPUT"]
    TV --> HDMI21["HDMI OUTPUT"]
    TV --> HDMI22["HDMI OUTPUT"]
    TV --> HDMI23["HDMI OUTPUT"]
    TV --> HDMI24["HDMI OUTPUT"]
    TV --> HDMI25["HDMI OUTPUT"]
    TV --> HDMI26["HDMI OUTPUT"]
    TV --> HDMI27["HDMI OUTPUT"]
    TV --> HDMI28["HDMI OUTPUT"]
    TV --> HDMI29["HDMI OUTPUT"]
    TV --> HDMI30["HDMI OUTPUT"]
    TV --> HDMI31["HDMI OUTPUT"]
    TV --> HDMI32["HDMI OUTPUT"]
    TV --> HDMI33["HDMI OUTPUT"]
    TV --> HDMI34["HDMI OUTPUT"]
    TV --> HDMI35["HDMI OUTPUT"]
    TV --> HDMI36["HDMI OUTPUT"]
    TV --> HDMI37["HDMI OUTPUT"]
    TV --> HDMI38["HDMI OUTPUT"]
    TV --> HDMI39["HDMI OUTPUT"]
    TV --> HDMI40["HDMI OUTPUT"]
    TV --> HDMI41["HDMI OUTPUT"]
    TV --> HDMI42["HDMI OUTPUT"]
    TV --> HDMI43["HDMI OUTPUT"]
    TV --> HDMI44["HDMI OUTPUT"]
    TV --> HDMI45["HDMI OUTPUT"]
    TV --> HDMI46["HDMI OUTPUT"]
    TV --> HDMI47["HDMI OUTPUT"]
    TV --> HDMI48["HDMI OUTPUT"]
    TV --> HDMI49["HDMI OUTPUT"]
    TV --> HDMI50["HDMI OUTPUT"]
    TV --> HDMI51["HDMI OUTPUT"]
    TV --> HDMI52["HDMI OUTPUT"]
    TV --> HDMI53["HDMI OUTPUT"]
    TV --> HDMI54["HDMI OUTPUT"]
    TV --> HDMI55["HDMI OUTPUT"]
    TV --> HDMI56["HDMI OUTPUT"]
    TV --> HDMI57["HDMI OUTPUT"]
    TV --> HDMI58["HDMI OUTPUT"]
    TV --> HDMI59["HDMI OUTPUT"]
    TV --> HDMI60["HDMI OUTPUT"]
    TV --> HDMI61["HDMI OUTPUT"]
    TV --> HDMI62["HDMI OUTPUT"]
    TV --> HDMI63["HDMI OUTPUT"]
    TV --> HDMI64["HDMI OUTPUT"]
    TV --> HDMI65["HDMI OUTPUT"]
    TV --> HDMI66["HDMI OUTPUT"]
    TV --> HDMI67["HDMI OUTPUT"]
    TV --> HDMI68["HDMI OUTPUT"]
    TV --> HDMI69["HDMI OUTPUT"]
    TV --> HDMI70["HDMI OUTPUT"]
    TV --> HDMI71["HDMI OUTPUT"]
    TV --> HDMI72["HDMI OUTPUT"]
    TV --> HDMI73["HDMI OUTPUT"]
    TV --> HDMI74["HDMI OUTPUT"]
    TV --> HDMI75["HDMI OUTPUT"]
    TV --> HDMI76["HDMI OUTPUT"]
    TV --> HDMI77["HDMI OUTPUT"]
    TV --> HDMI78["HDMI OUTPUT"]
    TV --> HDMI79["HDMI OUTPUT"]
    TV --> HDMI80["HDMI OUTPUT"]
    TV --> HDMI81["HDMI OUTPUT"]
    TV --> HDMI82["HDMI OUTPUT"]
    TV --> HDMI83["HDMI OUTPUT"]
    TV --> HDMI84["HDMI OUTPUT"]
    TV --> HDMI85["HDMI OUTPUT"]
    TV --> HDMI86["HDMI OUTPUT"]
    TV --> HDMI87["HDMI OUTPUT"]
    TV --> HDMI88["HDMI OUTPUT"]
    TV --> HDMI89["HDMI OUTPUT"]
    TV --> HDMI90["HDMI OUTPUT"]
    TV --> HDMI91["HDMI OUTPUT"]
    TV --> HDMI92["HDMI OUTPUT"]
    TV --> HDMI93["HDMI OUTPUT"]
    TV --> HDMI94["HDMI OUTPUT"]
    TV --> HDMI95["HDMI OUTPUT"]
    TV --> HDMI96["HDMI OUTPUT"]
    TV --> HDMI97["HDMI OUTPUT"]
    TV --> HDMI98["HDMI OUTPUT"]
    TV --> HDMI99["HDMI OUTPUT"]
The sound bar automatically switches to USB input mode with the LED display USB when a USB flash drive. (this mode cannot be selected on the sound bar or remote control unless a USB flash drive is connected).
- Make sure the USB flash drive contains MP3 audio files (other file types are not supported).
- Connect the USB flash drive to the USB port of the sound bar (or your own USB extension cable connected to the USB port); the music will be played automatically with the LED display "00:00", and when the music is played, the playback time will be displayed automatically on the screen.
- Press t he VOL +/- buttons to adjust the volume to the desired level.
- During pl ayback:

Start, pause or resume playback.


Go to the previous or next track.
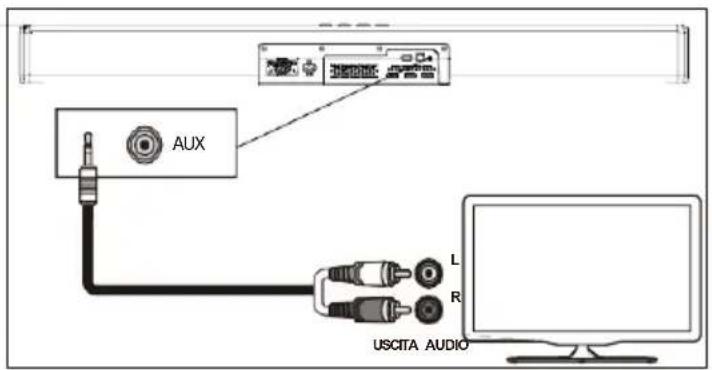
Play audio via audio input (Aux) Connection
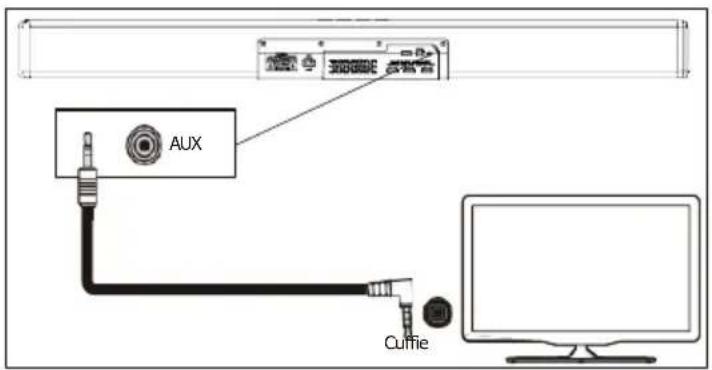
• Use a 3.5mm to 3.5mm audio cable (not included) to connect PC, tablet, smartphone and TV headphones.
• to t he soundbar's AUX jack.
- Use an RCA to 3.5 mm audio cable (included) to connect the audio output of the Blue Ray DVD player / LTV. to the AUX jack of the soundbar.
- Then briefly press the button on the soundbar or remote control to switch to the audio input mode with the LED display lighting up.
- In t his mode, playback can only be controlled by the connected device.
Note: For some computers, you may need to access the audio control panel to manually set the soundbar as the previous picture.
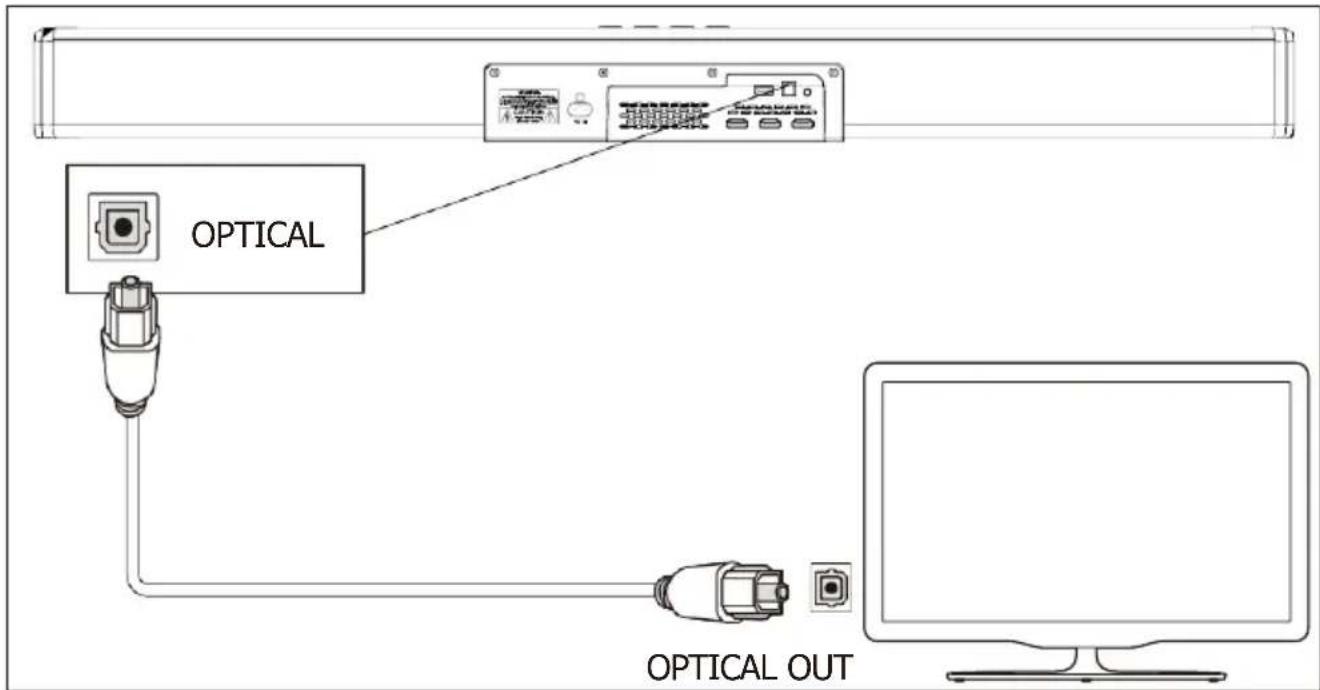
Optical mode
Using an optical cable, connect the Soundbar's OPTICAL connector (optical digital input) to the OPTICAL OUT connector on the TV or other device. The TV or other device must have an optical digital output.
Proceed as follows:
Connect the optical cable to the OPTICAL jack on the back of the soundbar.
Connect the other end of the optical cable to the audio output jack on the TV or other device.
Set the TV set to PCM Stereo or Stereo 2.0.
Connections
- Start playback on TV
- Press the source input button on the audio bar or remote control to activate the corresponding mode.
• (OPTICAL mode) to open the optical digital input on the audio bar. Once the connection is made, the LED - Display will show. For playback functions, use the audio device directly.
- Press the VOL +/- buttons to adjust the volume to the desired level.
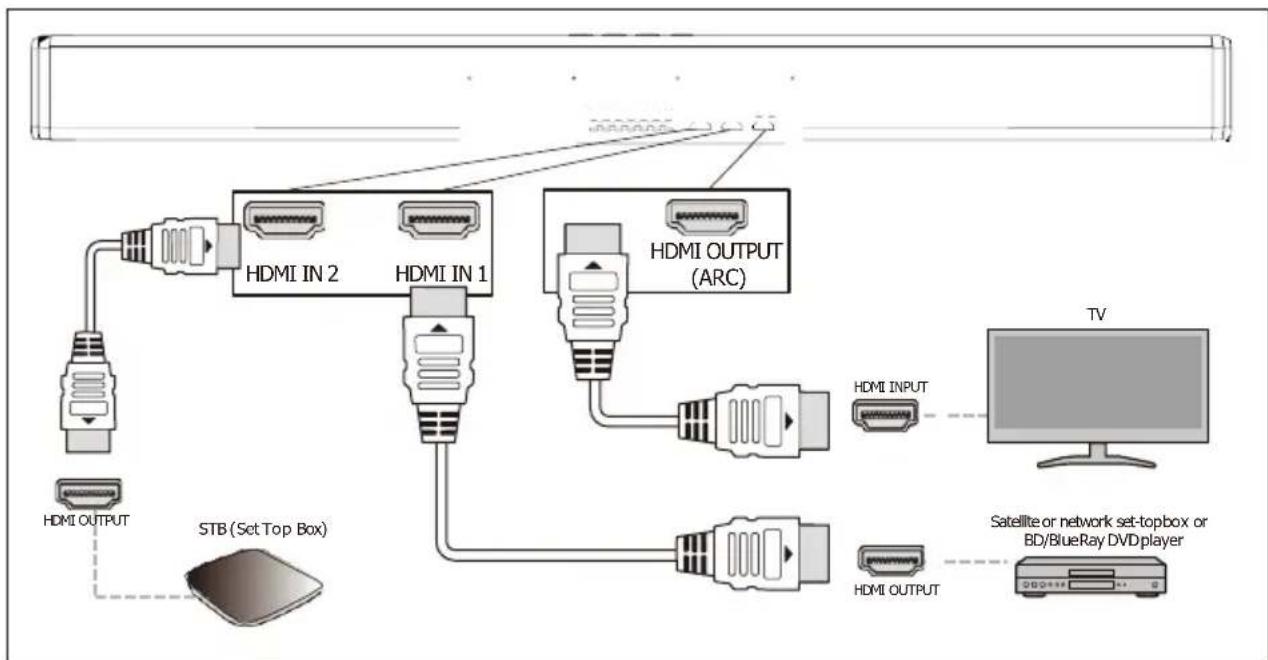
HDMI IN & HDMI MODE (ARC)

Connect to the HDMI (ARC) socket.
Some 4K HDR TVs require HDMI input or picture settings to receive HDR content. For more HDR display details, please refer to your TV's operating instructions.
Option 1: ARC (Audio Return Channel).
The Soundbar supports HDMI with Audio Return Channel (ARC). If your TV is compatible with HDMI ARC, you can hear the TV's audio through the Soundbar using a single HDMI cable.
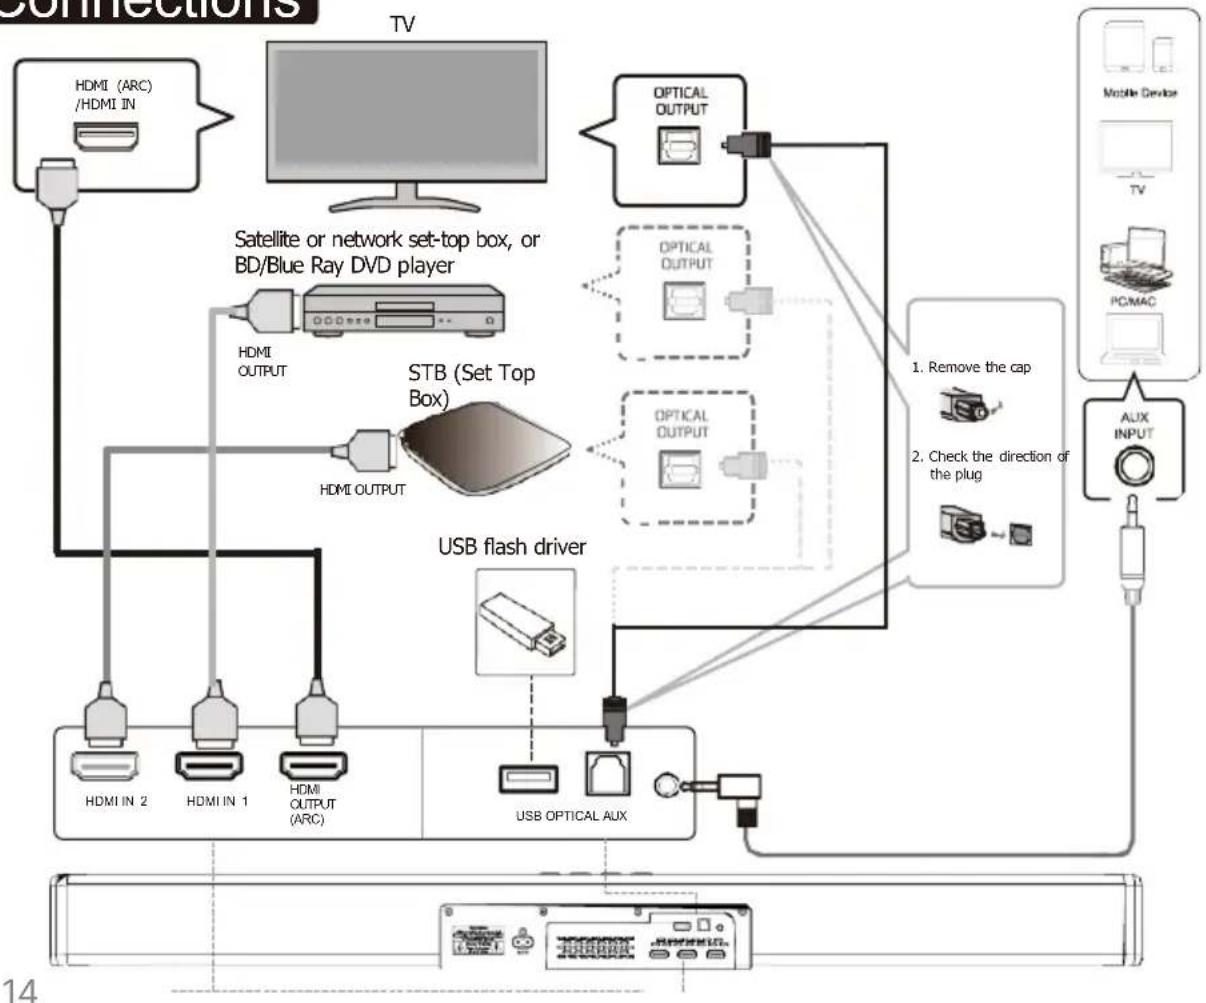
- Use a high-speed HDMI cable, connect HDMI OUT (ARC) on the Soundbar to the HDMI (ARC) connector. on the TV.
- Then briefly press the button on the soundbar or the INPUT button on the remote control to switch to HDMI (ARC) mode. After connection, the LED display will show.
- Press the VOL +/- buttons to adjust the volume to the desired level.
- If desired, you can change the audio settings using the relevant buttons on the remote control.
Note:
- The TV must support HDMI-CEC and ARC functions. HDMI-CEC and ARC must be set to on.
- The method of setting HDMI-CEC and ARC may vary depending on the TV set. For detailed information on the ARC function, please refer to the user's manual of your TV.
• Cables compatible with HDMI 1.4 or higher can support the ARC function. - The Audio Return Channel (ARC) function allows an HDMI-compatible TV to send the audio stream to another TV. HDMI OUT of the unit.

Option 2: Standard HDMI
If your TV is not compatible with HDMI ARC, connect the soundbar to the TV via a standard HDMI connection.
- Use an HDMI cable (included) to connect the HDMI OUT jack of the soundbar to the HDMI IN jack of the TV.
- Use an HDMI cable (not included) to connect the soundbar's HDMI IN jack (1 or 2) to external devices (e.g., game consoles, DVD and Blue-Ray players).
- Then briefly press the button on the sound bar or remote control to switch to HDMI mode.
Once the connection is made, the LED display will show Hd 1 or Hd 2.
Important Note:
When playing Dolby ATMOS signals from Blue-Ray/Set Top Box or other devices to the ATMOS Soundbar,
Follow the steps below:
set the audio output of these devices as auto or original code.
connect these HDMI OUT devices to the ATMOS Soundbar HDMI IN 1 (select HDMI IN 1, then press the Input button on the soundbar remote control until the HDMI 1 LED is displayed) or HDMI IN 2 (select HDMI IN 2, then press the Input button on the soundbar remote control until the HDMI 2 LED is displayed)
Connect the HDMI OUT (ARC) output of the soundbar to the HDMI IN input of the TV.
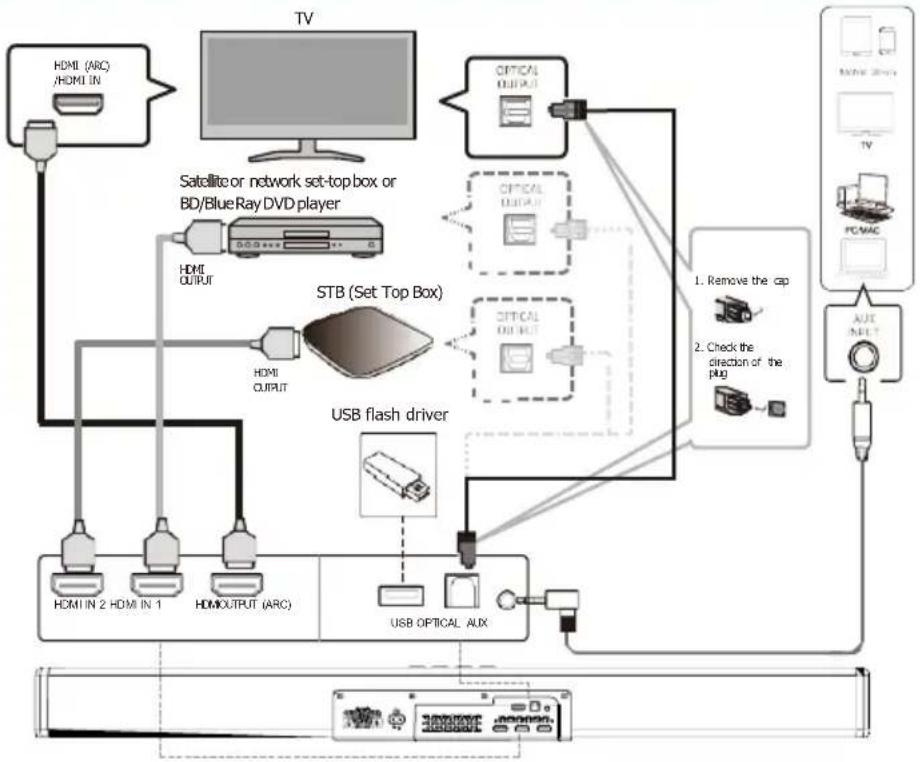
If you connect these devices to the HDMI output of the TV, then connect the HDMI ARC output of the TV to the HDMI ARC control of the ATMOS, you can share the sound with the soundbar, but only the power on/off, previous/next track, mute and volume of the soundbar can be controlled by the TV remote control. or you connect these devices to the optical output of the ATMOS soundbar, so that the sound output of the ATMOS soundbar is only the Dolby Digital Plus signal, because the bandwidth of Dolby ATMOS signals is large and cannot be transferred by the optical or HDMI ARC channels.
flowchart
graph TD
    A["StB (Set Top Box)"] --> B["HDMI OUTPUT"]
    B --> C["HDMI IN 2"]
    B --> D["HDMI IN 1"]
    C --> E["HDMI IN 2"]
    D --> F["HDMI IN 1"]
    E --> G["HDMI OUTPUT (ARC)"]
    F --> G
    G --> H["HDMI INPUT"]
    H --> I["TV"]
    I --> J["Satellite or network set-topbox or BD/BlueRay DVD player"]
    J --> K["HDMI OUTPUT"]

TIPS: (OPTICAL / HDMI ARC / HDMI 1 / HDMI 2 / DOLBY ATMOS)
While in OPTICAL/ HDMI In OPTICAL/ HDMI ARC mode, if the unit does not output any sound and the status LED display flashes, you may need to turn on the PCM or Dolby Digital signal output on the source device. (e.g., TV, DVD or Blu-ray player).
- The un it may not be able to decode all digital audio formats from the input source. In this case, the unit will
- mute. This is NOT a defect. Make sure the audio setting of the input source (e.g., TV, game console, DVD player, etc.) is set to PCM or Dolby Digital (refer to the user's manual of the input source device for details on audio setting) with HDMI 1 / HDMI 2 / HDMI ARC / optical input.
• In HDMI mode, when DOLBY ATMOS audio format is input, the Soundbar display shows DOLBY ATMOS. - When the DOLBY DIGITAL PLUS audio format is entered, the Soundbar display shows DOLBY SURROUND.
Remote control
| Problem Cause Remedy | ||
| The unit cannot be operated with the remote control. | The unit is out of operating range. | Use the remote control within the operating range. |
| The batteries are weak. | Replace the batteries with new ones. | |
| The unit's remote control sensor is exposed to direct sunlight or strong illumination. | Adjust the lighting angle or reposition the unit. | |
| The TV cannot be operated with its remote control | The unit blocks the TV remote control sensor. | Position the unit so that it does not obstruct the TV remote control sensor. |
Bluetooth
| Problem Cause Remedy | ||
| The unit cannot be connected to a Bluetooth device. | Bluetooth is not selected as an input source. | Select Bluetooth as the input source. |
| The unit is connected to another Bluetooth device. | Uncouple the currently connected Bluetooth device and pair it with the desired Bluetooth device. | |
| The unit is too far away from the Bluetooth device. | Move the Bluetooth device closer to the unit. | |
| A device that emits electromagnetic waves (such as a microwave oven, wireless device, and so on) may be nearby. | Do not use this unit near devices that emit electromagnetic waves. | |
| The Bluetooth device in use may not support the protocol. | Use a Bluetooth device that supports the protocol | |
| The connection profile registered in the Bluetooth Device may not be working properly for some reason. | Clear the connection profile in the Bluetooth device, then connect the Bluetooth device to this unit. | |
| No sound can be heard or the sound is intermittently interrupted. | The volume of the Bluetooth device may be too low. | Turn up the volume of the Bluetooth device. |
| Bluetooth is not selected as an input source. | Select Bluetooth as the input source. | |
| Playback has not been performed on the device. | Perform playback on the device. | |
| The audio output of the Bluetooth device may not be set to this unit. | Select this unit as the output destination on the Bluetooth device. | |
| The connection to the Bluetooth device has been interrupted. | Collegarsi ancora una volta al dispositivo Bluetooth. | |
| The unit may be too far away from the Bluetooth device. | Move the Bluetooth device closer to this unit. | |
| A device that emits electromagnetic waves (such as a microwave oven, wireless device, and so on) may be nearby. | Connect to the Bluetooth device once more. | |
Audio
| Problem Cause Remedy | ||
| No sound. | Another input source has been selected. | Select an appropriate input source. |
| The mute function is activated. | Cancel the mute function. | |
| The volume is too low. | Turn up the volume. | |
| The power cord of the unit is not connected properly. | Make sure the unit's power cord is firmly connected to an AC outlet. | |
| The input jacks of a playback device are connected. | Connect the input jack of the unit and the output jack of the playback device. Change the digital audio output setting on the playback device to PCM. | |
| Signals are being input that the unit cannot play. | Modificare l'impostazione dell'uscita audio digitale sul dispositivo di riproduzione in PCM. | |
| The volume decreases when the unit is turned on. | The automatic volume adjustment function is activated.To prevent excessive volume, when the unit is turned on, it automatically adjusts the volume within a certain level. | Turn up the volume as required. |
| No surround effect. | The volume is too low. | Turn up the volume. |
| The TV or playback device is set to output only 2-channel audio (e.g. PCM). | Change the digital audio output setting on the TV or playback device to BitStream. | |
| Sound is also output from the TV's built-in speakers. | Set the volume on the TV to the minimum. | |
| The listening position is too close to the unit. | The listening position should be some distance from the unit. | |
| A noise can be heard. | The unit is too close to another digital or high-frequency device. | Move these devices away from the unit. |
DOLBY ATMOS
Manufactured under license from Dolby Laboratories. Dolby, Dolby Audio, Dolby Vision, Dolby Atmos and the double-D symbol are trademarks of Dolby Laboratories.
★ What is DOLBY ATMOS®?
Dolby Atmos® transports you from the ordinary to the extraordinary with breathtaking, moving audio.
That fills the room and flows over and around you.
Dolby Atmos gives you an extraordinary experience you've never heard before with overhead audio and all the richness, clarity and power of Dolby sound.
★ Using DOLBY ATMOS®:
DOLBY ATMOS is only available in HDMI IN and HDMI OUT (ARC) mode. Please refer to the "HDMI connection" section for connection details.
To use Dolby Atmos® in HDMI 1 / HDMI 2 / HDMI ARC mode, your TV must support Dolby Atmos®.
- Make sure that "No Encoding" is selected for the bitstream in the digital audio output of the connected device external device (e.g., Blu-ray DVD player, TV, etc.).
- When entering the Dolby Atmos / Dolby Digital Plus format, the soundbar will display DOLBY ATMOS / DOLBY SURROUND.
- Set the audio output sample rate to 192 kHz if you can adjust the title.
- This soundbar supports 4K pass through and DOLBY VISION. When playing a disc that supports 4K video signal, the signal can be transmitted to the TV set.
Note:
- The full Dolby Atmos experience is only available when the Soundbar is connected to the source via an HDMI 2.0 cable.
- The Soundbar will still work when connected by other methods (such as an optical digital cable) but are unable to support all Dolby functions. For this reason, our recommendation is to connect via HDMI to ensure full Dolby support.
Select the equalizer (EQ) effect.
Select the preset sound modes to match your videos or music.
- Select the equalizer (EQ) effect.
- Select the preset sound modes to match your videos or music.
- Press the EQ button on the remote control to select the desired preset equalizer effects: Movie/Music/News/3D:
Product Information
| Music mode | Enhances treble and adds more depth to sound.music. |
| Movie mode | Intensifies bass and improves the clarity of dialogues.Improves the clarity of voices. |
| News mode | Suitable for watching TV shows and news. |
| 3D mode | Enhances background music and the full range of sports effect |
Volume adjustment
Volume value: the volume value is between 00 and 32, and the factory set value is "10". It has the memory function of the last volume.
- Press Vol+/Vol- (Volume) to increase or decrease the volume level.
• To mute the sound, press Mute.
To restore the sound, press Mute again or press Vol+/Vol- (Volume).
Adjust the bass/treble level
Adjust the treble levelPress the TREB+/TREB-button on the remote control to activate the treble level setting.
The display will show T +5 / T -5.
flowchart
graph TD
    TV["TV"] -->|HDMI (ARC)/HDMI IN| Satellite["Satellite or network set-top box or BD/BlueRay DVD player"]
    Satellite -->|HDMI OUTPUT| STB["STB (Set Top Box)"]
    STB -->|HDMI OUTPUT| USBFlashDriver["USB flash driver"]
    USBFlashDriver --> USBOPTICALAUX["USB OPTICAL AUX"]
    USBFlashDriver --> OpticalOutput1["Optical OUTPUT"]
    OpticalOutput1 --> OpticalOutput2["Optical OUTPUT"]
    OpticalOutput2 --> OpticalOutput3["Optical OUTPUT"]
    OpticalOutput3 --> OpticalOutput4["Optical OUTPUT"]
    OpticalOutput4 --> OpticalOutput5["Optical OUTPUT"]
    OpticalOutput5 --> OpticalOutput6["Optical OUTPUT"]
    OpticalOutput6 --> OpticalOutput7["Optical OUTPUT"]
    OpticalOutput7 --> OpticalOutput8["Optical OUTPUT"]
    OpticalOutput8 --> OpticalOutput9["Optical OUTPUT"]
    OpticalOutput9 --> OpticalOutput10["Optical OUTPUT"]
    OpticalOutput10 --> OpticalOutput11["Optical OUTPUT"]
    OpticalOutput11 --> OpticalOutput12["Optical OUTPUT"]
    OpticalOutput12 --> OpticalOutput13["Optical OUTPUT"]
    OpticalOutput13 --> OpticalOutput14["Optical OUTPUT"]
    OpticalOutput14 --> OpticalOutput15["Optical OUTPUT"]
    OpticalOutput15 --> OpticalOutput16["Optical OUTPUT"]
    OpticalOutput16 --> OpticalOutput17["Optical OUTPUT"]
    OpticalOutput17 --> OpticalOutput18["Optical OUTPUT"]
    OpticalOutput18 --> OpticalOutput19["Optical OUTPUT"]
    OpticalOutput19 --> OpticalOutput20["Optical OUTPUT"]
    OpticalOutput20 --> OpticalOutput21["Optical OUTPUT"]
    OpticalOutput21 --> OpticalOutput22["Optical OUTPUT"]
    OpticalOutput22 --> OpticalOutput23["Optical OUTPUT"]
    OpticalOutput23 --> OpticalOutput24["Optical OUTPUT"]
    OpticalOutput24 --> OpticalOutput25["Optical OUTPUT"]
    OpticalOutput25 --> OpticalOutput26["Optical OUTPUT"]
    OpticalOutput26 --> OpticalOutput27["Optical OUTPUT"]
    OpticalOutput27 --> OpticalOutput28["Optical OUTPUT"]
    OpticalOutput28 --> OpticalOutput29["Optical OUTPUT"]
    OpticalOutput29 --> OpticalOutput30["Optical OUTPUT"]
    OpticalOutput30 --> OpticalOutput31["Optical OUTPUT"]
    OpticalOutput31 --> OpticalOutput32["Optical OUTPUT"]
    OpticalOutput32 --> OpticalOutput33["Optical OUTPUT"]
    OpticalOutput33 --> OpticalOutput34["Optical OUTPUT"]
    OpticalOutput34 --> OpticalOutput35["Optical OUTPUT"]
    OpticalOutput35 --> OpticalOutput36["Optical OUTPUT"]
    OpticalOutput36 --> OpticalOutput37["Optical OUTPUT"]
    OpticalOutput37 --> OpticalOutput38["Optical OUTPUT"]
    OpticalOutput38 --> OpticalOutput39["Optical OUTPUT"]
    OpticalOutput39 --> OpticalOutput40["Optical OUTPUT"]
    OpticalOutput40 --> OpticalOutput41["Optical OUTPUT"]
    OpticalOutput41 --> OpticalOutput42["Optical OUTPUT"]
    OpticalOutput42 --> OpticalOutput43["Optical OUTPUT"]
    OpticalOutput43 --> OpticalOutput44["Optical OUTPUT"]
    OpticalOutput44 --> OpticalOutput45["Optical OUTPUT"]
    OpticalOutput45 --> OpticalOutput46["Optical OUTPUT"]
    OpticalOutput46 --> OpticalOutput47["Optical OUTPUT"]
    OpticalOutput47 --> OpticalOutput48["Optical OUTPUT"]
    OpticalOutput48 --> OpticalOutput49["Optical OUTPUT"]
    OpticalOutput49 --> OpticalOutput50["Optical OUTPUT"]
    OpticalOutput50 --> OpticalOutput51["Optical OUTPUT"]
    OpticalOutput51 --> OpticalOutput52["Optical OUTPUT"]
    OpticalOutput52 --> OpticalOutput53["Optical OUTPUT"]
    OpticalOutput53 --> OpticalOutput54["Optical OUTPUT"]
    OpticalOutput54 --> OpticalOutput55["Optical OUTPUT"]
    OpticalOutput55 --> OpticalOutput56["Optical OUTPUT"]
    OpticalOutput56 --> OpticalOutput57["Optical OUTPUT"]
    OpticalOutput57 --> OpticalOutput58["Optical OUTPUT"]
    OpticalOutput58 --> OpticalOutput59["Optical OUTPUT"]
    OpticalOutput59 --> OpticalOutput60["Optical OUTPUT"]
    OpticalOutput60 --> OpticalOutput61["Optical OUTPUT"]
    OpticalOutput61 --> OpticalOutput62["Optical OUTPUT"]
    OpticalOutput62 --> OpticalOutput63["Optical OUTPUT"]
    OpticalOutput63 --> OpticalOutput64["Optical OUTPUT"]
    OpticalOutput64 --> OpticalOutput65["Optical OUTPUT"]
    OpticalOutput65 --> OpticalOutput66["Optical OUTPUT"]
    OpticalOutput66 --> OpticalOutput67["Optical OUTPUT"]
    OpticalOutput67 --> OpticalOutput68["Optical OUTPUT"]
    OpticalOutput68 --> OpticalOutput69["Optical OUTPUT"]
    OpticalOutput69 --> OpticalOutput70["Optical OUTPUT"]
Warranty
All products come with a standard 12-month warranty. All items must be registered within 30 days of purchase on www.majority.co.uk for the warranty to be valid. Once on the web page, use the menu to find 'Register Your Product'. You will also be given the chance to extend your warranty for an additional 24 months, free of charge.
Technical Specifications.
| Soundbar | 96 x 10.8 x 8.1 cm |
| Subwoofer | 30.6 x 19 x 37 cm |
| Power | 12V ~ 1A |
| Weight | 7.9 kg |
| Speakers | Stereo |
| Sound Version | Dolby Atmos |
| AUX In | 3.5 mm |
| RCA Input | 3.5 mm |
Sierra Plus

natural_image
Simple line drawing of a rectangular object with a downward arrow and label 'A C' (no text or symbols on the object itself)
natural_image
Diagram of a battery with two batteries and a sliding mechanism, labeled B (no text or symbols on the diagram itself)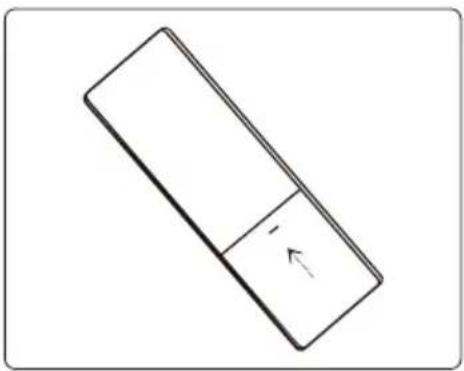
natural_image
Simple line drawing of a rectangular object with a small internal element and an arrow, no text or symbols present.VORSICHT
natural_image
Line drawings of three furniture or objects: a box, a tray, and a sofa with a rabbit head (no text or symbols)Wandmontage
natural_image
Diagram showing a robotic arm connecting two panels to a vertical rod, with no visible text or symbols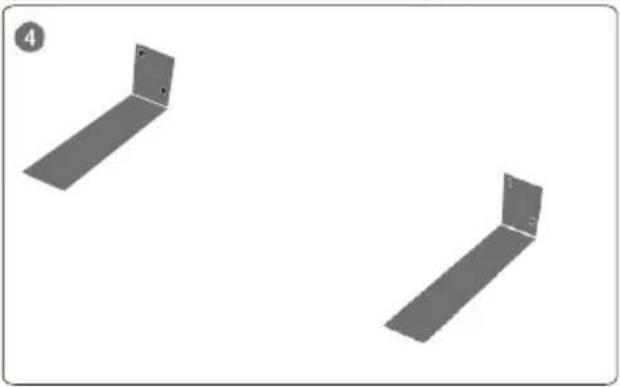
natural_image
Two gray 3D rectangular panels with mounting holes, arranged side by side on a white background (no text or symbols)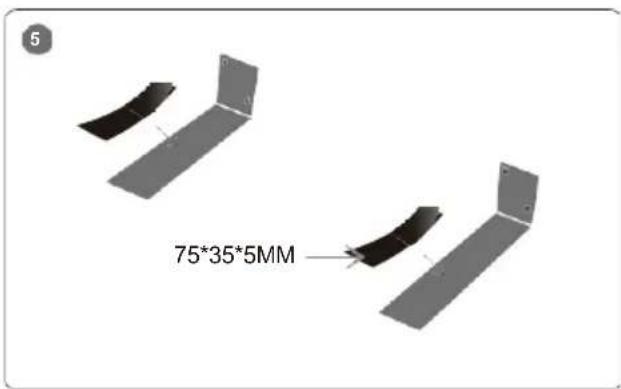
natural_image
Technical line drawing of a mechanical component with support brackets and mounting holes (no text or symbols)
CAUTION
Optischer Modus
HDMI IN & HDMI (ARC) MODUS


natural_image
Front view of a rack-mounted electronic device with control panel and buttons (no visible text or symbols)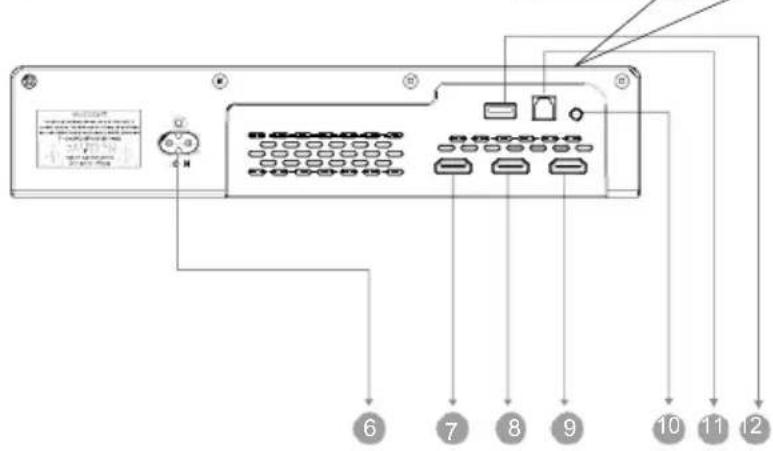

PANNEAU D'AFFICHAGE.


AC IN: Connector l'alimentation to power.

HDMI IN 2 : Connecter to HDMI OUT of TV/Satellite/ Réseau/Set-top box/BD/Blue Ray DVD/Lecteur DVD.

HDMI OUT (ARC) : Connectez to HDMI (ARC)/HDMI IN on TV.

AUX: Auxiliaire Audio input from Appareils Mp3/Phone/Set-Top . box


natural_image
Simple line drawing of a rectangular object with a downward arrow and label A (no text or symbols on the object itself)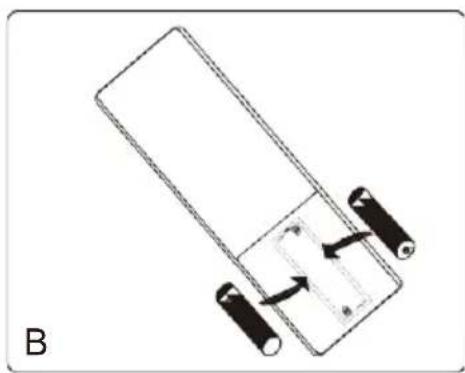
natural_image
Diagram of a battery pack with two batteries and an arrow indicating direction (no text or symbols)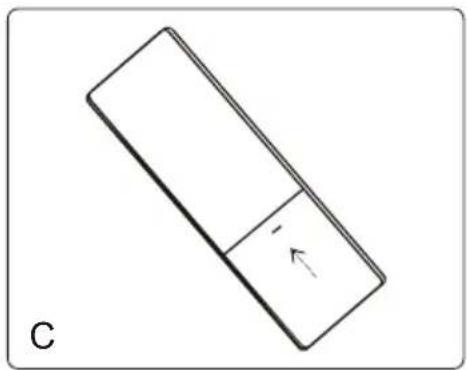
natural_image
Simple line drawing of a rectangular object with a downward arrow and label 'C' (no text or symbols on the object itself)ATTENTION
natural_image
Simple line drawings of a room layout with furniture and objects (no text or symbols)Installation du support mural
natural_image
Diagram showing a robotic arm connecting two panels to a vertical rod, with dotted lines indicating alignment or measurement (no text or symbols present)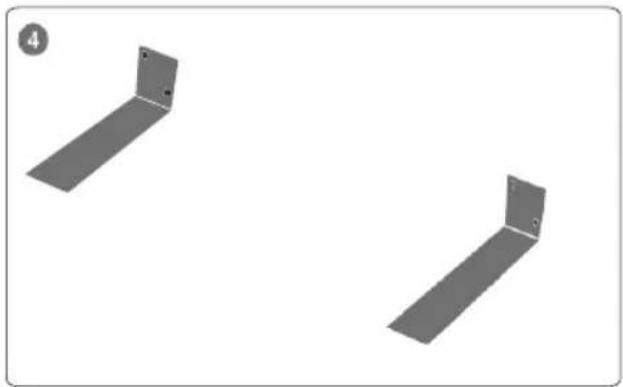
natural_image
Two gray metal L-shaped panels arranged side by side on a white background, no text or symbols present.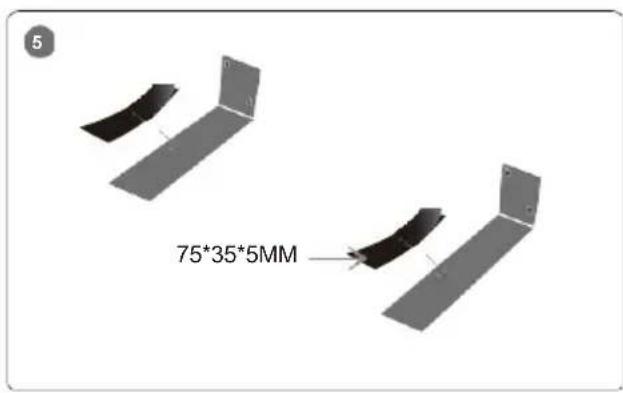
natural_image
Technical line drawing of a rectangular mechanical component with two side brackets and a central rod (no text or symbols)natural_image
Front view of a server rack unit with indicator lights and ports (no visible text or labels)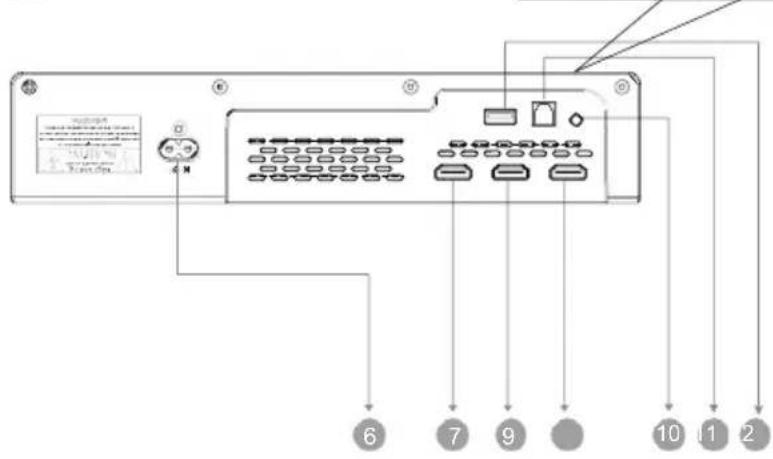
natural_image
Diagram showing a box connected to a rectangular air conditioner via wireless signals (no text or symbols present)
natural_image
Simple line drawing of a rectangular object with a downward arrow and label A (no text or symbols on the object itself)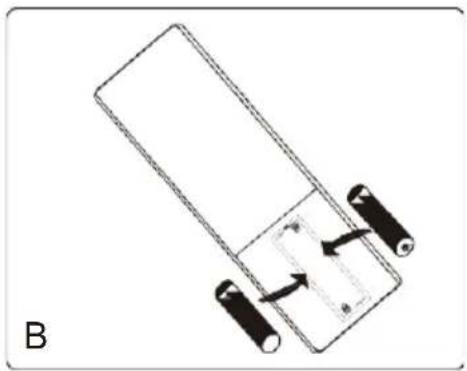
natural_image
Diagram of a battery assembly with two batteries and a sliding contact (no text or symbols)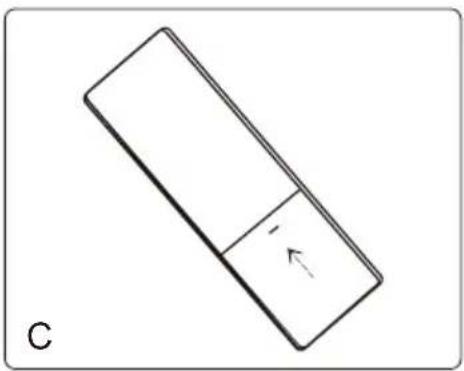
natural_image
Simple line drawing of a rectangular object with a downward arrow and label 'C' (no text or symbols on the object itself)ATTENZIONE
natural_image
Line drawing of a room layout with furniture and a rabbit face (no text or symbols)natural_image
Diagram showing a mechanical device with two vertical plates and a connecting rod, no text or symbols present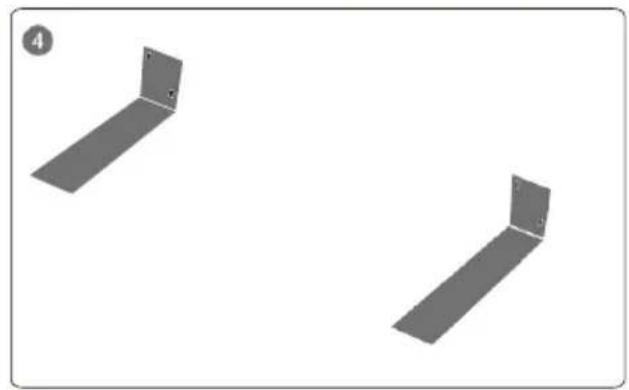
natural_image
Two gray 3D rectangular panels arranged side by side on a white background, no text or symbols present.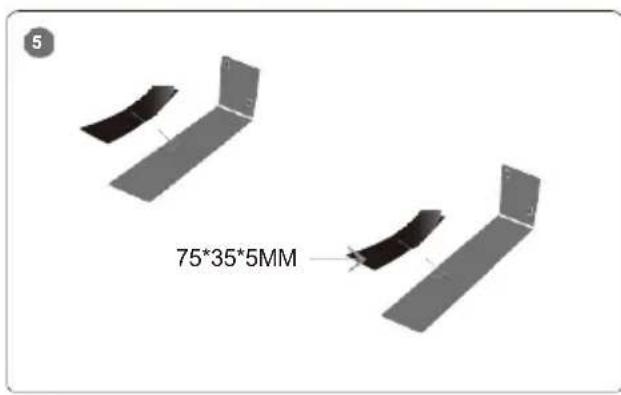
natural_image
Technical line drawing of a mechanical component with two mounting brackets and a central horizontal bar (no text or symbols)Modalità ottica
natural_image
Diagram showing a washing machine with sound waves from its side to a rectangular air conditioner (no text or symbols present)
natural_image
Simple line drawing of a rectangular object with a downward arrow and label 'A' (no text or symbols on the object itself)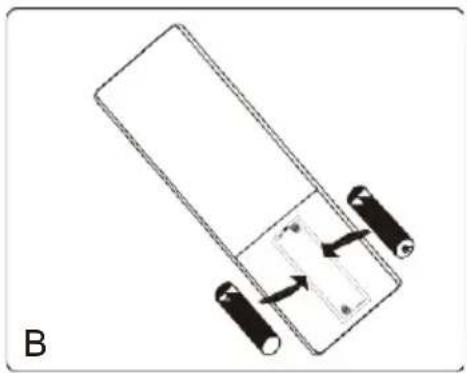
natural_image
Diagram of a battery pack with two batteries and an arrow indicating direction (no text or symbols)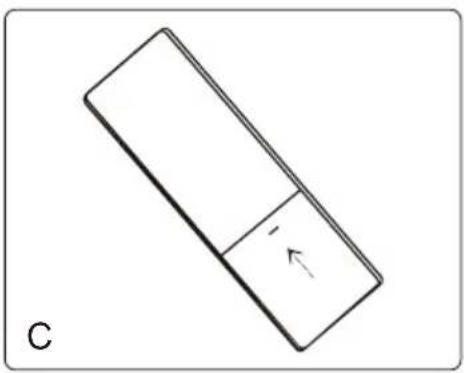
natural_image
Simple line drawing of a rectangular object with a downward arrow and label 'C' (no text or symbols on the object itself)natural_image
Line drawings of three furniture or objects: a cube, a rectangular box, and a sofa with a cat face (no text or symbols)natural_image
Diagram showing a mechanical linkage or suspension system between two vertical panels, with no visible text or symbols.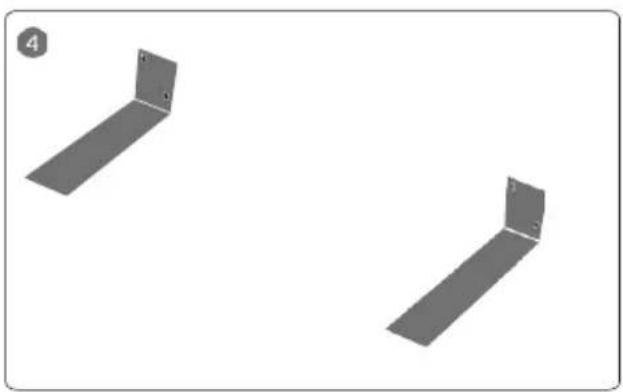
natural_image
Two gray 3D rectangular metal panels arranged side by side on a white background, no text or symbols present.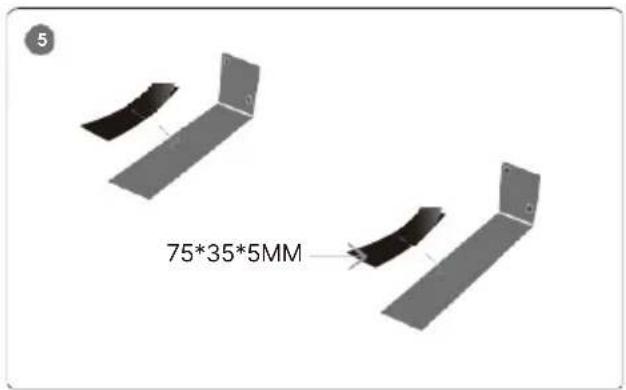
natural_image
Technical line drawing of a mechanical component with two supports and a central shaft (no text or symbols)MODO HDMI IN & HDMI (ARC)
★ Conectar a toma HDMI (ARC)
EN Safety and Usage Guidelines (All where applicable)
General Safety Information - Read and Retain: Review all safety and operating instructions before use; keep them for future reference. Follow Instructions: Adhere strictly to all safety and operational guidelines. Water Exposure: Keep the device away from water; avoid placing liquids near it. Ventilation: Ensure ventilation openings are unobstructed to prevent overheating. Heat Sources: Keep the device away from heat-emitting appliances. Wall Mounting - Installation Safety: Follow the manufacturer's instructions and use approved mounting kits only. Avoid drilling into areas with cables, gas, or water lines. Use proper tools and safety apparatus. Regular Maintenance: Inspect regularly for wear or damage, especially if wall-mounted. Relocation: Detach from the wall mount before moving. Child Safety: Keep out of children's reach and ensure heavy items are securely mounted. Seismic Precautions: Use specialized mounts in earthquake-prone areas. Electrical Safety - Power Source: Use the specified power source; consult an electrician if unsure. Cable Management: Protect the power cord from damage. Power Disconnection: Keep the main plug accessible; unplug during storms or long periods of non-use. Battery Safety - Charging: Use the manufacturer's charger; avoid extreme conditions. Heat Exposure: Keep batteries away from heat to prevent explosion or leakage. Battery Condition: Discontinue use if the battery is damaged; dispose of it properly. Replacement: Only use recommended batteries; incorrect types can cause hazards. External Batteries: Use only specified types, observing correct polarity. Battery Removal: Remove batteries if not used for an extended period. Disposal: Follow local regulations for battery disposal; do not incinerate. Connectivity Safety - Cable Connections: Power off devices before connecting or disconnecting cables. Bluetooth Pairing: Ensure a secure connection; avoid interference from other devices. Volume Control: Keep volume moderate to prevent hearing damage. Connectivity and Data Security - Wireless Security: Review privacy policies and secure your network. Software Updates: Keep software updated for security and performance. Children's Safety Warnings - Product Use: Intended for adults; keep away from children. Battery Warning: Keep batteries and items containing batteries out of children's reach. Volume Control: Maintain a safe volume level to protect children's hearing. Fire Hazard - Flammable Materials: Do not place open flames near the product. Overheating: Avoid covering the product to prevent overheating and fire risks. Disposal and Recycling - Product Disposal: Dispose of at a recycling centre according to local laws. Environmental Compliance: Follow regulations for battery and electronic waste disposal. User Maintenance - Cleaning: Unplug before cleaning; use a dry cloth only. Servicing: Only qualified personnel should perform repairs. Data Protection: Reset to factory settings before returning or disposing of the product. Disclaimer: Failure to follow these instructions may result in injury, death, or property damage. The manufacturer is not liable for damage caused by improper use.
Declaration of Conformity:
We, Izilla Ltd, Newton House, 2 Pioneer Court, Histon, Cambridge, CB24 9PT declare under our sole responsibility that the product:
Product Name: Sierra Plus Soundbar Model: 1000002680 Brand Name: Majority
To which this declaration referred is in conformity to the following harmonized standards or normative documents (CE & Rohs 2.0);
EN 55035:2017, EN 55032:2015, EN61000-3-2:2014, EN61000-3-3:2013, EEN62368-1:2004+A11:2017, ETSI EN 301 489-1 V2.2.3(2019-11), ETSI EN 301 489-17, V3.2.2(2019-12), ETSI EN 300 328 V2.2.2 (2019-07), EN 62479: 2010, IEC 62321-3-1:2013, IEC 62321-4:2013, IEC 62321-5:2013, IEC 62321-6:2015, IEC 62321-7-1:2015, IEC 62321-7-2:2017, IEC 62321-8:2017, (EC)NO 1275/2008, EN50564:2011, (EC)NO 801/2013.
Complying with the requirements or provisions of Council Directives which relate to:
EMC Directive 2014/30/EU, RED Directive 2014/53/EU, LVD Directive 2014/35/EU, Directive (2011/65/EU) and its amendment directives 2015/863/EU (RoHS 2.0) of the, European parliament, ERP Directive 2009/125/EC.
All essential test suites have been carried out.
Point of Contact: Eddie Latham | Founder
Signed:

Date of Issue: January 2024
Place of Issue: Cambridge, UK
Importer's Addresses:
UK: iZilla Ltd, Newton House, 2 Pioneer Court, Histon, Cambridge, CB24 9PT
Email: techsupport@majority.co.uk
EU RP: AR Experts, Po Box 5047, 3620 AA Breukelen, The Netherlands
Email: info@ar-experts.eu
US: iZilla Ltd C/O A.N.Deringer Inc, 19520 Wilmington Ave, Rancho Dominguez, CA, 90220
Email: techsupport@majority.co.uk





IMPORTANT: Please read all instructions carefully before use and keep for future reference
MAJORITY
www.majority.co.uk

FR

- Dolby Atmos soundbar with wireless subwoofer
- Preparation for use
- Unpacking and installation
- Protect furniture
- Power Source
- Product Diagram
- Pairing with Subwoofer
- Pairing with the subwoofer
- Note:
- ★Software update
- Remote Control Battery Replacement
- WARNING
- Battery handling
- Handling the remote control
- Operating range of the remote control
- Table Placement
- Wall installation
- Please note
- Mounting Instructions
- CAUTION
- Instruction Guide
- Using the Soundbar
- Basic operation
- Turning on and off
- Automatic standby
- Select modes
- What you need
- Notes:
- Connections
- Play audio via audio input (Aux) Connection
- Optical mode
- HDMI IN & HDMI MODE (ARC)
- Option 2: Standard HDMI
- Important Note:
- TIPS: (OPTICAL / HDMI ARC / HDMI 1 / HDMI 2 / DOLBY ATMOS)
- DOLBY ATMOS
- ★ What is DOLBY ATMOS®?
- ★ Using DOLBY ATMOS®:
- Select the equalizer (EQ) effect.
- Product Information
- Volume adjustment
- Adjust the bass/treble level
- Warranty
- Sierra Plus
- VORSICHT
- Wandmontage
- Optischer Modus
- HDMI IN & HDMI (ARC) MODUS
- ATTENTION
- Installation du support mural
- ATTENZIONE
- Modalità ottica
- MODO HDMI IN & HDMI (ARC)
- ★ Conectar a toma HDMI (ARC)
- EN Safety and Usage Guidelines (All where applicable)
- MAJORITY
Brand : Majority
Model : Sierra Plus
Category : Soundbar