USER MANUAL OV5230 Concept
natural_image
White electric air conditioner unit with black ventilation slots and wheels (no visible text or symbols)
OV5230
CZ
HULVDEFR ENSKPL
ITES
RO
concept concept
CZ
PODĚKOVÁNÍ
POPIS OVLÁDACÍHO PANELU
POPIS OVLÁDACIEHO PANELU
OPIS PANELU STEROWANIA
A VEZÉRLÓPANEL LEÍRÁSA
VADĪBAS PANELA APRAKSTS
Thank you for purchasing a Concept product. We wish you much joy with your new appliance every day you use it.
Please read the Instruction manual carefully before initial use. To refer to this manual any time you need to, we recommend you to keep it in a safe place. And please pass it to any future owner of the appliance.
| Technical specifications |
| Voltage 220-240 V, 50/60 Hz | |
| Input 80 W | |
| Sound level ≤63 dB | |
IMPORTANT
Before connecting to the mains, make a visual check to ensure that the unit is intact and that no damage occurred during transport.
IMPORTANT SAFETY PRECAUTIONS
- Do not use the appliance in any other way than as described in this manual.
- Remove all the covering and marketing materials from the appliance before the first use.
- Make sure the mains voltage corresponds to the values on the rating plate of the product.
- Place the appliance on a stable, flat surface away from other heat sources.
- Do not leave the appliance unattended when it is switched on or connected to the mains.
- When disconnecting the appliance from the wall outlet, never pull the power cord, grasp the plug end and disconnect it by removing it from the receptacle.
- Do not allow children or unauthorized people to handle the appliance, use it out of their reach.
- Persons with reduced mobility, reduced sensory perception, mental disadvantage or persons not familiar with the operation must use the appliance only under the supervision of responsible person, who is familiar with the instructions.
- Pay extra attention if the appliance is used near children.
- Do not use the appliance as a toy.
- Never put your fingers, pencils or other objects into the openings of the appliance.
EN
concept
concept
EN
- Never use the appliance without cover grids.
- Do not let small children and sick persons to be exposed to a direct air flow.
- Do not cover the appliance.
- Do not put anything on the appliance or place anything in front of it.
• The appliance must only be used in the upright position.
- Do not use the appliance near shower, bathtub, sink or pool.
- Do not use the appliance in a damp or dusty environment.
- Do not use the appliance in an environment where there are explosive gases and flammable substances (solvents, varnishes, adhesives, etc.).
- Before assembly and disassembly, disconnect the power cord from the wall outlet.
Before cleaning and after use of the appliance, switch the appliance off and disconnect it from the mains.
- Keep the appliance clean, do not allow foreign objects to into the grid openings. It could cause serious injury, short circuit, damage to the appliance or cause fire.
- Do not use coarse and chemically aggressive substances to clean the appliance.
- Do not use the appliance with a damaged cord or plug and have it repaired immediately by an authorized service centre.
- Do not use the appliance if it is not working properly, has been dropped, damaged or immersed in liquid. Have it checked and repaired by an authorized service centre.
- Do not use the appliance outdoors.
- The appliance is only suitable for home use and is not intended for commercial use.
- Do not touch the appliance with wet hands.
- Do not immerse the power cord, plug or appliance in water or any other liquid.
- Do not repair the appliance yourself. Contact an authorized service centre.
-
Once the fan has been assembled, the rotor blade guard shall no longer be removed.
-
The rotor guard must not be opened or dismantled for cleaning the rotor blades.
- Do not remove the air or water filter during humidification. This could cause dripping of water from the air outlet.
- If there is water in the tank and the appliance was tilted, you should immediately pull the cable out of the socket and allow the appliance to dry for 24 hours before turning it on again.
• After filling the appliance with water, do not tilt it when moving it to prevent water from spilling out of the tank.
- The water level in the tank must not exceed the maximum permitted level. Once the cooling or humidification mode is turned on, the water level should not fall below the minimum level.
- This appliance can be used by children aged from 8 years and above and persons with reduced physical, sensory or mental capabilities or lack of experience and knowledge if they have been given supervision or instruction concerning the use of the appliance in a safe way and understand the hazards involved. Cleaning and maintenance performed by the user must not be carried out by children unless they are at least 8 years old and under supervision. Children under the age of 8 must be kept away from the appliance and its power supply. Do not let children play with the appliance.
Damages from failure to follow the manufacturer's instructions are not covered by the warranty.
EN
concept
concept
EN
PRODUCT DESCRIPTION
A Handle
B Control panel with display
C Air outlet
D Dust filter
E Water filter
F Container lock
G Water tank
H Remote control
I Cooling box
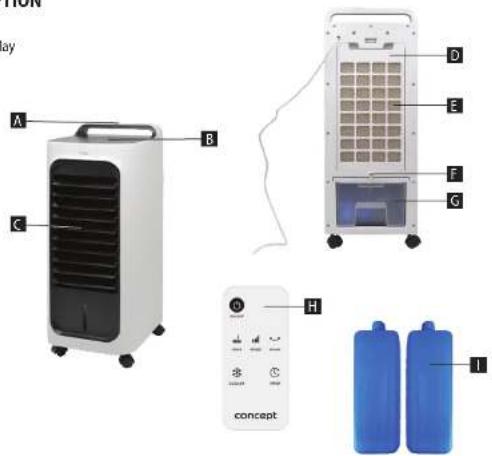
DESCRIPTION OF THE CONTROL PANEL
1 Cooling mode button
2 Oscillation button
3 Timer button
4 Airflow speed adjustment button
5 Mode setting button
6 ON/OFF switch button

flowchart
graph TD
    A["Cooler"] --> B["1"]
    C["Swing"] --> D["2"]
    E["Timer"] --> F["3"]
    G["Speed"] --> H["4"]
    I["Wind"] --> J["5"]
    K["ON/OFF"] --> L["6"]
    M["Cooler"] --> N["7"]
    O["Swing"] --> P["8"]
    Q["Timer"] --> R["9"]
    S["Speed"] --> T["10"]
    U["Wind"] --> V["11"]
    W["ON/OFF"] --> X["12"]
    Y["Cooler"] --> Z["13"]
    AA["Swing"] --> AB["14"]
    AC["Timer"] --> AD["15"]
    AE["Speed"] --> AF["16"]
    AG["Wind"] --> AH["17"]
    AI["ON/OFF"] --> AJ["18"]
Note: Functions on the control buttons of the control panel correspond to the functions of the buttons on the remote control.
40
OPERATING INSTRUCTIONS
Connect the power cord to the mains. The appliance is in standby mode.
Press the ON/OFF button to switch off the appliance. After switched on, the appliance starts at low airflow speed.
Press this button to change the airflow speed in 3 levels (the corresponding indicator always lights up on the display).
Press this button to choose from 2 saved modes:
- Sleep
a. If the appliance is on high power, the appliance will run on high natural breeze power for 30 min, after 30 min the appliance will run on medium natural breeze power and after another 30 min the appliance will run on low natural breeze power.
b. If the appliance is on medium power, the appliance will run on medium natural breeze power and after 30 min run on low natural breeze power.
c. If the appliance is on low power, the appliance will run on low natural breeze power continuously.
- Natural breeze: The appliance will alternately increase and decrease power.
Use the timer button to set the required operating time 1h, 2h and 4h.
Press this button to switch on/off the oscillation function.
Press this button to switch on/off the air cooling function.
Note: Always pour water into the water tank before starting the cooling mode!
Filling the water tank with water
Always switch off the appliance and unplug it from the mains before filling or emptying the water tank.
- Release the lock of the water tank on the back side of the appliance.
- Remove the water tank from the appliance. (In order to completely remove it, you need to release the pump locks inside the tank and remove the pump. Make sure that the pump is installed in its original position before reinstalling the tank.)
- Fill the water tank with water (we recommend using demineralized water to ensure maximum lifetime of the appliance).
- Make sure that the water level is between the MIN and MAX lines.
- Adding ice cubes or freeze packs into the water in the water tank make the air cooling function more efficient (the freeze packs can be re-frozen and reused).
• Make sure that the water level does not fall below the MIN line (applies only in active cooling mode).
• We recommend changing the water at least once a week.
EN
concept
concept
EN
CLEANING AND MAINTENANCE
Before each cleaning of the appliance, unplug the power cord from the electrical outlet!
To clean the surface of the appliance, use only a damp cloth, no detergents or hard objects, as they can damage the surface of the appliance!
Clean and inspect the input and output grids of the appliance frequently to ensure good operation of the appliance. Never clean the appliance under running water, do not rinse it or immerse it in water!
If the fan is dismantled, proceed in the reverse order of installation.
If dust is collected on the surface of the appliance, wipe it with a soft cloth. If the surface of the appliance is dirty, mix water at a temperature of up to 50°C with a neutral detergent and then wash the surface with a cloth and then dry it. Do not use gasoline, thinner or other substances that could easily damage the surface of the appliance.
Cleaning the dust and water filter
If there is too much dirt attached to the filter, it will affect the air flow. Therefore, the dust filter should be cleaned at least once a month.
- Disconnect the power cord.
- First, remove the dust filter and then remove the water filter.
- Clean the dust filter with a detergent and a soft brush.
- Leave the water filter in the cleaning solution for a few minutes and then rinse and dry it.
Cleaning the water tank
- Disconnect the power cable, turn the water tank lock to the horizontal position and remove the water tank.
- Slightly moisten the cloth with a detergent and wipe the water level gauge on the water tank. Then wash it with clean water and pour out the dirty water.
Cleaning the surface of the appliance
• The surface of the appliance can be cleaned with a damp cloth, do not rinse it directly under the water.
- Do not use corrosive cleaners or solvents for cleaning.
• Before cleaning, first switch off the appliance and disconnect the power cord, otherwise it may cause electric shock.
Installation and use after cleaning
- Install the air filter, water filter and the water tank step by step and make sure all parts are in place.
- Plug the appliance into the socket and make sure it is working properly.
Maintenance
- If you do not use the appliance for a long period of time, disconnect the power cord, cover the appliance and secure it against dust.
- The dust and water filters should be dry before packing and there should be no water in the water tank.
SERVICE CENTRE
Extensive maintenance or repair, which requires access to internal parts of the product, has to be performed by a qualified specialist or the service centre.
ENVIRONMENTAL CONCERNS
- Packaging materials and old appliances should be recycled.
- Packaging materials may be disposed of as sorted waste.
- Dispose the plastic bags made of polyethylene (PE) of as sorted waste.
Recycling of the appliance at the end of its lifespan:

This appliance is labelled in accordance with European Directive 2012/19/EU concerning used electrical and electronic appliances (waste electrical and electronic equipment - WEEE). The symbol on the product or on its packaging indicates that this product may not be treated as household waste. Instead, it should be taken to the appropriate collection point for the recycling of electrical and electronic equipment. By ensuring this product is disposed of correctly, you will help prevent potential negative consequences for the environment and human health, which could otherwise be caused by inappropriate waste handling of this product. The disposal of such material has to be done according to the recycling regulations. For more detailed information about recycling of this appliance see the authorized local office or service for household waste disposal or the shop, where you purchased the appliance.

The product meets all the necessary requirements of the EU directives applicable to the specific product.
Changes in text, design, and technical specifications are subject to change without prior notice and we reserve the right to change them.
DE
concept
concept
DE
DANKSAGUNG
Interruptor ON/OFF (6)
DESCRIEREA PANOULUI DE CONTROL