
OV5210 - Air Conditioning Concept - Free user manual and instructions
Find the device manual for free OV5210 Concept in PDF.

| Product Type | Air cooler (air conditioning) |
| Power Supply | 220–240 V ~ 50 Hz |
| Power | 65 W |
| Noise Level | 64 dB |
| Water Tank Capacity | Not specified (min/max level indicator) |
| Main Functions | Ventilation with 3 modes (continuous, natural, night), horizontal oscillation, humidification/cooling via water and cooling cartridge, timer 0.5h-10h |
| Controls | Control panel and remote control |
| Filters | Air filter and water filter (monthly cleaning recommended) |
| Cooling Cartridge | Freezable, reusable, can be replaced with ice cubes |
| Oscillation | Yes, can be activated/deactivated |
| Timer | Adjustable from 0.5h to 10h in steps of 0.5h (up to 3h) then by 1h |
| Water Level Indicator | Yes, flashes if low |
| Maintenance | Clean exterior with damp cloth, air and water filters monthly, water tank regularly |
| Safety | Automatic shut-off in case of low water level, overheat protection, protective grilles |
| Warranty | 24 months |
Frequently Asked Questions - OV5210 Concept
User questions about OV5210 Concept
0 question about this device. Answer the ones you know or ask your own.
Ask a new question about this device
Download the instructions for your Air Conditioning in PDF format for free! Find your manual OV5210 - Concept and take your electronic device back in hand. On this page are published all the documents necessary for the use of your device. OV5210 by Concept.
USER MANUAL OV5210 Concept
natural_image
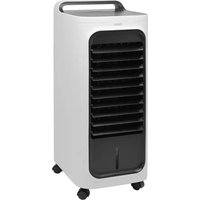
White cylindrical air conditioner unit with black ventilation grille, displayed against a plain gray background (no text or symbols on device)
concept
CZ
Poděkování
POPIS OVLÁDACÍCH PRVKŮ
natural_image
Diagram of a device with a magnified inset showing a component (no text or symbols present)Obr. 1

Obr. 2

Obr.3

Obr. 4
POPIS OVLÁDACÍCH PRVKOV
A. Tlačidlo zapnutia/vypnutia
B. Tlačidlo zmeny režimu
C. Tlačidlo oscilácie
D. Tlačidlo chladenia/zvlhčovania
E. Tlačidlo časovača
F. Tlačidlo rýchlosti průdenia vzduchu
natural_image
Diagram showing a hand holding a small object inside a container and then being inserted into a glass (no text or symbols present)obr. 1
obr. 2
obr. 3

obr. 4
OPIS ELEMENTÓW OBSŁUGI
natural_image
Diagram showing a device being processed from a U-shaped tool into a container (no text or symbols present)Rys. 1
Rys. 2

Rys. 3

Rys. 4
A KEZELŐELEMEK LEÍRÁSA
natural_image
Diagram showing a device being processed from a bottle into a glass, with an inset illustrating the process (no text or symbols present)- ábra
- ábra

3. ábra
4. ábra
VADĪBAS ELEMENTU APRAKSTS
natural_image
Diagram showing a hand holding a small object inside a container and then being inserted into a glass (no text or symbols present)- att.
- att.

3. att.

4. att.
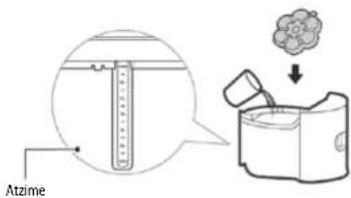
lelejiet üdeni üdens tvertnë. levërojiet atjauto üdens daudzumu, ko norāda "MIN" un "MAX" atzime, kas ir redzama uz üdens tvertnes. Üdens tvertnei var pievienot dzesëšanas kasetni.
Thank you for purchasing a Concept product. We wish you much joy with your new appliance every day you use it. Please read the instruction manual carefully before initial use. To refer to this manual any time you need to, we recommend you to keep it in a safe place. And please pass it to any future owner of the appliance.
| Technical specifications | |
| Voltage 220-240 V–50 Hz | |
| Input 65 W | |
| Sound level 64 dB | |
IMPORTANT
Before connecting to the mains, make a visual check to ensure that the unit is intact and that no damage occurred during transport.
IMPORTANT SAFETY PRECAUTIONS
- Do not use the appliance in any other way than as described in this manual.
- Remove all the covering and marketing materials from the appliance before the first use.
- Make sure the mains voltage corresponds to the values on the rating plate of the product.
- Place the appliance on a stable, flat surface away from other heat sources.
- Do not leave the appliance unattended when it is switched on or connected to the mains.
- When connecting and disconnecting the appliance from the mains, the on/off button must be turned off (positioned at 0).
- When disconnecting the unit from the wall outlet, never pull the power cord, grasp the plug end and disconnect it by removing it from the receptacle.
- Do not allow children or unauthorized people to handle the appliance, use it out of their reach.
- Persons with reduced mobility, reduced sensory perception, mental disadvantage or persons not familiar with the operation must use the appliance only under the supervision of responsible person, who is familiar with the instructions.
- Pay extra attention if the appliance is used near children.
- Do not use the appliance as a toy.
EN
concept
concept
EN
- Never put your fingers, pencils or other objects into the openings of the appliance.
- Never use the appliance without cover grids.
- Do not let small children and sick persons to be exposed to a direct air flow.
- Do not cover the appliance.
- Do not put anything on the appliance or place anything in front of it.
• The appliance must only be used in the upright position. - Do not use the appliance near shower, bathtub, sink or pool.
- Do not use the appliance in a damp or dusty environment.
- Do not use the appliance in an environment where there are explosive gases and flammable substances (solvents, varnishes, adhesives, etc.).
- Before assembly and disassembly, disconnect the power cord from the wall outlet.
- Before cleaning and after use of the appliance, switch the appliance off and disconnect it from the mains.
- Keep the appliance clean, do not allow foreign objects to into the grid openings. It could cause serious injury, short circuit, damage to the appliance or cause fire.
- Do not use coarse and chemically aggressive substances to clean the appliance.
- Do not use the appliance with a damaged cord or plug and have it repaired immediately by an authorized service centre.
- Do not use the appliance if it is not working properly, has been dropped, damaged or immersed in liquid. Have it checked and repaired by an authorized service centre.
- Do not use the appliance outdoors.
- The appliance is only suitable for home use and is not intended for commercial use.
- Do not touch the appliance with wet hands.
- Do not immerse the power cord, plug or appliance in water or any other liquid.
-
Do not repair the appliance yourself. Contact an authorized service centre.
-
This appliance can be used by children aged from 8 years and above and persons with reduced physical, sensory or mental capabilities or lack of experience and knowledge if they have been given supervision or instruction concerning the use of the appliance in a safe way and understand the hazards involved. Cleaning and maintenance performed by the user must not be carried out by children unless they are 8 years old and under supervision. Children under the age of 8 must be kept away from the appliance and its power supply. Do not let children play with the appliance.
- Once the fan has been assembled, the rotor blade guard shall no longer be removed.
- The rotor guard must not be opened or dismantled for cleaning the rotor blades.
- Do not rotate the motor blades with your hands, as this could damage the synchronous motor.
- Once the tank is filled with water, do not lift the appliance by the handle so that water does not come out from the tank. Push the handle. If there is no water in the tank, you can grab the handle and lift the appliance.
- Do not remove the air or water filter during humidification. This could cause dripping of water from the air outlet.
- If there is water in the tank and the appliance was tilted, you should immediately pull the cable out of the socket and allow the appliance to dry for 24 hours before turning it on again.
• After filling the appliance with water, do not tilt it when moving it to prevent water from spilling out of the tank. - The water level in the tank must not exceed the maximum permitted level. Once the cooling or humidification mode is turned on, the water level should not fall below the minimum level.
Damages from failure to follow the manufacturer's instructions are not covered by the warranty.
EN
concept
concept
EN
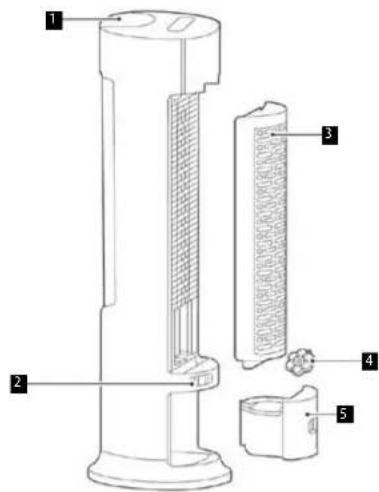
PRODUCT DESCRIPTION
- Control panel
- Power cord holder
- Filter unit
- Cooling cartridge
- Water tank
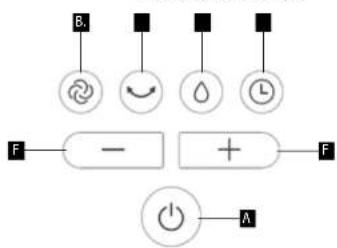
DESCRIPTION OF CONTROLS
A. Power button
B. Mode button
C. Oscillation button
D. Cooling/humidifier button
E. Timer button
F. Air flow speed button
Control panel Remote control
flowchart
graph TD
    B["Input B"] --> Circle1((Circle))
    Circle1 --> Arrow((Arrow))
    Arrow --> Dot1((Dot))
    Dot1 --> Hour((Hour))
    Hour --> Circle2((Circle))
    Circle2 --> Circle3((Circle))
    Circle3 --> Arrow2((Arrow))
    Arrow2 --> Plus["+"]
    Plus --> Circle4((Circle))
    Circle4 --> F["Output F"]
    F --> Dash["Dash"]
    Dash --> Power["Power"]
    Power --> A["A"]
    style B fill:#f9f,stroke:#333
    style Circle1 fill:#ccf,stroke:#333
    style Arrow fill:#cfc,stroke:#333
    style Dot1 fill:#fcc,stroke:#333
    style Hour fill:#cff,stroke:#333
    style Current fill:#ffc,stroke:#333
    style Dash fill:#fcc,stroke:#333
    style Power fill:#fff,stroke:#333
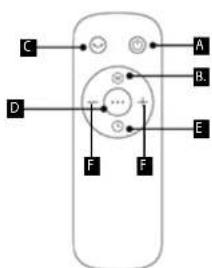
Press the Power button (A) to turn the appliance on/off.
B - Mode button
Use the Mode button (B) to select between 3 modes.
- Basic mode - cools constantly to the set air flow speed.
- Natural mode - changes the air flow speed to simulate a gentle breeze.
- Night mode - air flow speed automatically decreases from level 2 to 1.
C - Oscillation button
Use the Oscillation button (C) to turn the fan oscillation on/off.
D - Cooling/humidifier button
To activate the cooling/humidification function (D), pour water into the water tank (5). Press the button (D) to activate the cooling/humidification function - the indicator lights up on the display. Press the button (D) repeatedly to deactivate the cooling/humidification function. When the water level is low, the indicator of water level in the water tank flashes on the display (cooling/humidification function does not start).
E - Timer button
The timer can be set between 0.5 h - 10 h at intervals: from 0.5 h to 3 h in 0.5h increments and from 3 h to 10 h in 1h increments.
Caution! Setting by means of the remote control and the control panel on the appliance differs slightly.
Remote control: The timer can only be set using the Timer button (E). Press it repeatedly until the desired time is set.
Control panel: Press the Timer button (E) and use the + and - buttons to set the desired time.
F - Air flow speed buttons +/-
Use the + and - buttons to change the air flow speed.
56
OV5210OV5210
EN
concept
concept
EN
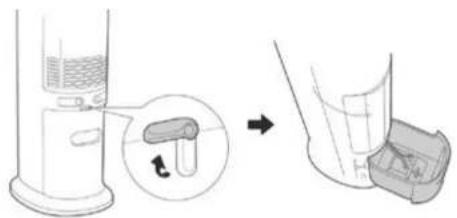
WATER TANK
Warning: Always turn off and unplug the appliance before pouring water into the water tank, pouring water out of the water tank, inserting the cooling cartridge into the water tank or handling (removing/fixing) the pump!
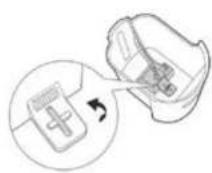
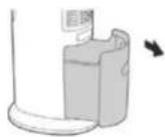
Turn the water tank cap to the horizontal position (Fig. 1). Pull out the water tank to access the pump plug at the bottom of the water tank (Fig. 2). Turn this plug 90° counter-clockwise and release the pump (Fig. 3). Pull out the water tank (Fig. 4).
natural_image
Diagram showing a device being processed from a bottle into a glass, with an inset illustrating the process (no text or symbols present)Fig. 1
Fig. 2

Fig. 3

Fig. 4
Add water to the water tank. Keep the amount of water indicated by the MIN and MAX marks on the water tank water mark. A cooling cartridge can be added to the water tank.
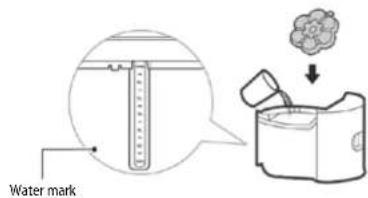
After pouring water into the water tank, put the water tank back in the appliance body. Proceed in the opposite way to removing the tank from the appliance body.
Cooling cartridge
• The cooling cartridge (4) can be repeatedly frozen.
- Adding a cooling cartridge to the water tank will keep the water in the tank cold longer.
- Never open the cooling cartridge cover. This will prevent devaluation of the cartridge.
- The cooling cartridge can be replaced with ice inserted in the water tank.
EN
concept
concept
EN
CLEANING AND MAINTENANCE
Before each cleaning of the appliance, unplug the power cord from the electrical outlet!
To clean the surface of the appliance, use only a damp cloth, no detergents or hard objects, as they can damage the surface of the appliance!
Clean and inspect the input and output grids of the appliance frequently to ensure good operation of the appliance. Never clean the appliance under running water, do not rinse it or immerse it in water!
If the fan is dismantled, proceed in the reverse order of installation.
If dust is collected on the surface of the appliance, wipe it with a soft cloth. If the surface of the appliance is dirty, mix water at a temperature of up to 50°C with a neutral detergent and then wash the surface with a cloth and then dry it. Do not use gasoline, thinner or other substances that could easily damage the surface of the appliance.
Cleaning the air and water filter
If there is too much dirt attached to the filter, it will affect the air flow. Therefore, the air filter should be cleaned at least once a month.
- Disconnect the power cord.
- First, remove the air filter and then remove the water filter.
- Clean the air filter with a detergent and a soft brush.
- Leave the water filter in the cleaning solution for a few minutes and then rinse and dry it.
Cleaning the water tank
- Unplug the power cord and remove the water tank.
- Slightly moisten the cloth with a detergent and wipe the water level gauge on the water tank. Then wash it with clean water and pour out the dirty water.
Cleaning the surface of the appliance
- The surface of the appliance can be cleaned with a damp cloth, do not rinse it directly under the water.
- Do not use corrosive cleaners or solvents for cleaning.
• Before cleaning, first switch off the appliance and disconnect the power cord, otherwise it may cause electric shock.
Installation and use after cleaning
- Gradually install the air filter, water filter and the water tank and make sure all parts are in place.
- Plug the appliance into the socket and make sure it is working properly.
Maintenance
- If you do not use the appliance for a long period of time, disconnect the power cord, cover the appliance and secure it against dust.
- The air and water filters should be dry before packing and there should be no water in the water tank.
SERVICE CENTRE
Extensive maintenance or repair, which requires access to internal parts of the product, has to be performed by a qualified specialist or the service centre.
ENVIRONMENTAL CONCERNS
- Packaging materials and old appliances should be recycled.
• Packaging materials may be disposed of as sorted waste. - Dispose the plastic bags made of polyethylene (PE) of as sorted waste.
Recycling of the appliance at the end of its lifespan:

This appliance is labelled in accordance with European Directive 2012/19/EU concerning used electrical and electronic appliances (waste electrical and electronic equipment - WEEE). The symbol on the product or on its packaging indicates that this product may not be treated as household waste. Instead it should be taken to the appropriate collection point for the recycling of electrical and electronic equipment. By ensuring this product is disposed of correctly, you will help prevent potential negative consequences for the environment and human health, which could otherwise be caused by inappropriate waste handling of this product. The disposal of such material has to be done according to the recycling regulations. For more detailed information about recycling of this product, please contact your local council, your household waste disposal service or the shop where you purchased the appliance.

The product meets all the necessary requirements of the EU directives applicable to the specific product.
Changes in text, design, and technical specifications are subject to change without prior notice and we reserve the right to change them.
Danksagung
natural_image
Diagram showing a hand holding a container with liquid and a separate inset view of a U-shaped tube (no text or symbols present)Abb. 1
Abb. 2
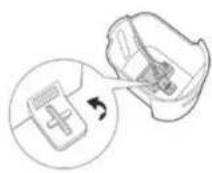
Abb. 3
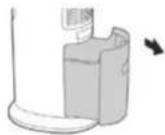
Abb. 4
natural_image
Diagram of a device with a magnified inset showing a component (no text or symbols present)Fig. 1

Fig. 2

Fig. 3
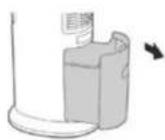
Fig. 4
natural_image
Diagram of a laboratory apparatus with a magnified inset showing a component (no text or symbols present)Fig. 1

Fig. 2

Fig. 3

Fig. 4
natural_image
Diagram showing a hand holding a small object next to a container, with an arrow indicating transformation (no text or symbols present)Fig. 1
Fig. 2
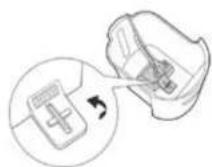
Fig. 3

Fig. 4
DESCRIEREA ELEMENTELOR DE COMANDĂ
natural_image
Diagram of a device with a magnified inset showing a component (no text or symbols present)Fig. 1
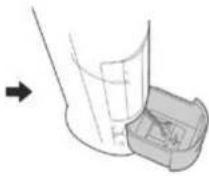
Fig. 2

Fig. 3

Fig. 4
The manufacturer (or Importer) is responsible for ensuring the product complies with the requirements of applicable legal regulations as well as those of the relevant technical standards. Moreover, they are responsible for ensuring the product has the properties the manufacturer described in documents related to the goods or those reasonably expected by the customer with regard to the nature of the goods or based on advertising produced by the manufacturer, and further they are responsible for ensuring the product is fit for the purpose proposed by the manufacturer or that a product of the same type is normally used for.
The quality warranty term is 24 months from product takeover by the customer.
The warranty does not apply to wear and tear caused by regular use. The customer shall not be entitled to any warranty claims if, prior to taking the product over, they knew the product contained a defect or if the defect is attributable to the customer.
The warranty specifically does not apply:
- if the product installation, operation and service conditions stipulated in the product operating manual have not been adhered to,
• to malfunctions caused due to mechanical, heat or chemical damage, short circuit, over voltage or incorrect installation.
• to malfunctions caused by an inexpert third-party intervention,
• to malfunctions caused by natural disaster,
• to malfunctions caused by insufficient or inappropriate maintenance in violation of the operating manual, including malfunctions caused by water and other sediments,
• to changes in colour of the heating surface or to scratching of the surface caused as a result of using the products in an unusual manner,
• to appearance and functional changes caused by exposure to sunlight, thermal radiation of water and other sediments, - if the service life of certain product parts expires, e.g. for accumulators, bulbs, etc.
The warranty does not apply to any products and services provided along with the product (gifts, promotional articles, etc.).
Filing a complaint
A complaint against a product defect must be filed as soon as identified, yet no later than before the end of the warranty term.
The customer must file a product complaint with the dealer from which they have purchased the product, or with any authorised service centre, a list of which is included in the product package, or available at www.my-concept.com.
While filing a product complaint, the product must be duly cleaned and securely packed so as to prevent any damage during its transport to an authorised service centre, where relevant, unless the product is delivered in person.
The customer must submit proof of having concluded a purchase contract for the product by producing the receipt.
While filing their complaint, the customer must indicate the noted defect and identify the preferred complaint application method.
Complaints processing
As long as the noted defect may be removed, the user has the right to have the defect duly removed free of charge on a timely basis.
Where such a procedure is not reasonable with regard to the nature of the defect, the user may require to be supplied a new defect-free product (replacement), or, where the defect applies to a part of the product only, replacement of the part concerned. However, if replacement of the product or any part thereof is not proportionate with regard to the nature of the defect, especially if the defect can be removed without undue delay, the customer has the right to have the defect removed free of charge.
If the noted defect is not removable, or if the customer becomes entitled to replacement of the product or a part thereof, yet the replacement is not possible, for example due to the product having been sold out, the customer has the right to return the product (withdrawal from the contract).
The customer shall have the right to a new product (replacement) or to replacement of a part of the product even if the defect can be removed, provided they cannot properly use the product due to repeated occurrence of the defect or due to a high number of such defects. In such a case, the customer also has the right to return the product (by withdrawing from the contract).
If the product is not returned (the customer does not withdraw from the contract), or if the customer does not apply the right to a new defect-free product (replacement), to replacement of a part thereof or to repair of the product, they may request a reasonable discount. The customer also has a right to a reasonable discount if a new defect-free product cannot be supplied to them, or if a product part cannot be replaced or the product repaired unless the situation is remedied within a reasonable time limit, or if remedying the situation would create major discomfort on the part of the customer.
The seller, authorised service centre or a staff member authorised by them must decide about each complaint immediately or within three business days in complicated cases. This term does not include a reasonable period of time, depending on the type of product concerned,
required for the defect to be assessed by an expert. A complaint, including defect removal, must be dealt with without any undue delay, yet no later than within 30 calendar days of the complaint filing date, unless the seller and the customer agree on a later deadline.
On returning the product (withdrawing from the contract) the customer must return any accessories and documents supplied along with the product.
The customer does not have the right to keep the defective parts and components of the product replaced as part of a repair of the product.
This shall be without prejudice to any other rights the customer may have in relation to the purchase of the product.
Remark: Complaints against products damaged in transport are governed by the carrier's complaints procedure.
Manufacturer
Jindrich Valenta - Concept
Vysokomýtská 1800, 565 01 Choceň
Czech Republic
tel.: +420 465 471 400
fax +420 465 473 304
Company ID No. 13216660
email: servis@my-concept.cz
www: www.my-concept.com
Product data
| Model: | |
| Production number: | |
| Date of purchase; Seal and signature of vendor: | |
concept concept
DEGARANTIEBEDINGUNGEN
Garantie
FR CONDITIONS DE GARANTIE
Garantie
CONCEPT POLSKA sp. z o.o.
Ostrowskiego 30, 53-238 Wroclaw Tel.: +48 713 390 444, Fax: 713 390 414 www.my-concept.pl

esbr Kft.
2481 Velence, Nyar u. 2/A Tel.: +36 70 881 0167, email: info@esbr.hu

Verners VT Ltd.
Piedrujas iela 5a, Riga, Latvia Tel. + 371 67021021, fakss + 371 67021000 e-pasts: info@verners.lv, www.verners.lv

Horvat elektronika d.o.o.
Dravska 8, HR-40305 Pušćine servis@horvat-elektronika.hr Hotline: +385 040 895 500

- concept
- Poděkování
- POPIS OVLÁDACÍCH PRVKŮ
- POPIS OVLÁDACÍCH PRVKOV
- OPIS ELEMENTÓW OBSŁUGI
- A KEZELŐELEMEK LEÍRÁSA
- VADĪBAS ELEMENTU APRAKSTS
- IMPORTANT
- IMPORTANT SAFETY PRECAUTIONS
- EN
- PRODUCT DESCRIPTION
- DESCRIPTION OF CONTROLS
- B - Mode button
- C - Oscillation button
- D - Cooling/humidifier button
- E - Timer button
- F - Air flow speed buttons +/-
- WATER TANK
- Cooling cartridge
- CLEANING AND MAINTENANCE
- Cleaning the air and water filter
- Cleaning the water tank
- Cleaning the surface of the appliance
- Installation and use after cleaning
- Maintenance
- SERVICE CENTRE
- ENVIRONMENTAL CONCERNS
- Recycling of the appliance at the end of its lifespan:
- Danksagung
- DESCRIEREA ELEMENTELOR DE COMANDĂ
- Filing a complaint
- Complaints processing
- Manufacturer
- concept concept
- DEGARANTIEBEDINGUNGEN
- Garantie
- FR CONDITIONS DE GARANTIE
- CONCEPT POLSKA sp. z o.o.
- esbr Kft.
- Verners VT Ltd.
- Horvat elektronika d.o.o.
Brand : Concept
Model : OV5210
Category : Air Conditioning