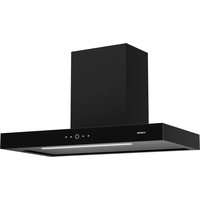
Contempo 60 - Basket Klarstein - Free user manual and instructions
Find the device manual for free Contempo 60 Klarstein in PDF.

User questions about Contempo 60 Klarstein
0 question about this device. Answer the ones you know or ask your own.
Ask a new question about this device
Download the instructions for your Basket in PDF format for free! Find your manual Contempo 60 - Klarstein and take your electronic device back in hand. On this page are published all the documents necessary for the use of your device. Contempo 60 by Klarstein.
USER MANUAL Contempo 60 Klarstein
text_image
COOKINGCO COOKINGCO KINGCOOKING KINGCOOKING COOKINGCO KINGCOOKING KINGCOOKING KINGCOOKING
KLARSTEIN
www.klarstein.com

area
| Category | Value | | -------- | ----- | | 1 | 100 | | 2 | 100 | | 3 | 100 | | 4 | 100 | | 5 | 100 | | 6 | 100 | | 7 | 100 | | 8 | 100 | | 9 | 100 | | 10 | 100 | | 11 | 100 | | 12 | 100 | | 13 | 100 | | 14 | 100 | | 15 | 100 | | 16 | 100 | | 17 | 100 | | 18 | 100 | | 19 | 100 | | 20 | 100 | | 21 | 100 | | 22 | 100 | | 23 | 100 | | 24 | 100 | | 25 | 100 | | 26 | 100 | | 27 | 100 | | 28 | 100 | | 29 | 100 | | 30 | 100 | | 31 | 100 | | 32 | 100 | | 33 | 100 | | 34 | 100 | | 35 | 100 | | 36 | 100 | | 37 | 100 | | 38 | 100 | | 39 | 100 | | 40 | 100 | | 41 | 100 | | 42 | 100 | | 43 | 100 | | 44 | 100 | | 45 | 100 | | 46 | 100 | | 47 | 100 | | 48 | 100 | | 49 | 100 | | 50 | 100 | | 51 | 100 | | 52 | 100 | | 53 | 100 | | 54 | 100 | | 55 | 100 | | 56 | 100 | | 57 | 100 | | 58 | 100 | | 59 | 100 | | 60 | 100 | | 61 | 100 | | 62 | 100 | | 63 | 100 | | 64 | 100 | | 65 | 100 | | 66 | 100 | | 67 | 100 | | 68 | 100 | | 69 | 100 | | 70 | 100 | | 71 | 100 | | 72 | 100 | | 73 | 100 | | 74 | 100 | | 75 | 100 | | 76 | 100 | | 77 | 100 | | 78 | 100 | | 79 | 100 | | 80 | 100 | | Note: The actual values are not provided in the code. I have used the label 'Value' as a placeholder for the value detection. You would need to run the code to get the actual values from the code list. Please note that the actual values would be the result of this example. You would need to run the code to get the actual values from the code list. You would need to run the code to get the actual values from the code list. You would need to run the code to get the actual values from the code list. You would need to run the code to get the actual values from the code list. You would need to run the code to get the actual values from the code list. You would need to run the code to get the actual values from the code list. You would need to run the code to get the actual values from you would need to run the code. You would need to run the code to get the actual values from you would need to run the code.text_image
QR code image containing encoded data, no visible human-readable textINHALTSVERZEICHNIS
text_image
Technical diagram of an air conditioner unit with labeled parts and exploded viewtext_image
Technical diagram showing mechanical assembly with directional arrows and component labels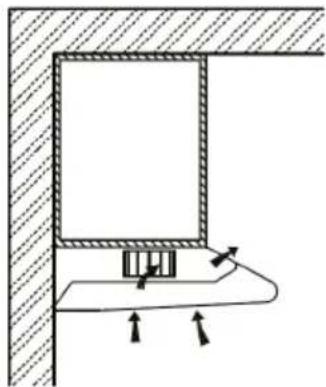
natural_image
Technical diagram of a mechanical assembly with arrows indicating force or movement (no text or symbols)text_image
Technical diagram showing internal components of an air conditioner unit with Chinese annotations and component labels| Max. Leistung | Spannung Abmessungen: 33,2 mm x 120 mm | ILCOS D Code | |
| 1.5 W 220-240 V | 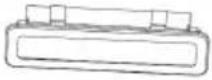 | DSH-1.5-S-33.2/120 | |
text_image
Technical diagram showing a device with labeled components and instructional text in Chinese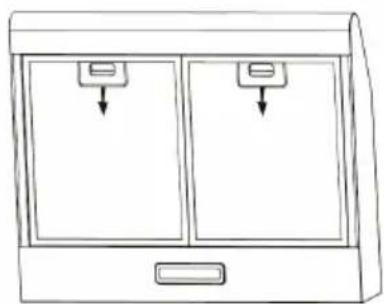
natural_image
Line drawing of a double door with two doors and a handle, no text or symbols presentINSTALLATION DES RÜCKSCHLAGVENTILS
natural_image
Technical line drawing of a mechanical component with arrows indicating motion or rotation (no text or symbols)INSTALLATION DES AKTIVKOHLEFILTERS
natural_image
Symbol of a trash bin crossed with a diagonal line, no text or numbers presentBerlin Brands Group UK Limited
PO Box 42
272 Kensington High Street
London, W8 6ND
United Kingdom
Dear customer,
Congratulations on your purchase. Please read the following instructions carefully and follow them to prevent potential damage. We accept no liability for damage caused by disregarding the instructions and improper use. Please scan the QR code to access the latest operating instructions and further information about the product.

text_image
QR code image containing encoded data, no visible human-readable textCONTENTS
Safety Instructions 24
Device overview and parts 26
Dimensions: 27
Installation 28
Control panel and button functions 32
Replacing the lamp 33
Cleaning and Care 33
Installing the non-return valve 34
Installing the activated carbon filter 35
Troubleshooting 36
Product data sheet 37
Notes on environmental protection 39
Disposal considerations 39
Manufacturer & Importer (UK) 39
TECHNICAL DATA
| Article number | 10045590, 10045591, 10045592, 10045593, 10045594, 10045595 |
| Power supply 220-240 V ~ 50/60 Hz | |
| Note: You can also purchase an activated carbon filter for this cooker hood under item number XXXXXXXX. To do so, visit our website: www.klarstein.de | |
SAFETY INSTRUCTIONS
- Read all instructions carefully before use and keep this user manual in a safe place for future reference.
- The installation work may only be carried out by an electrician or a qualified person. Before using the cooker hood, make sure that the voltage (V) and frequency (Hz) indicated on the cooker hood correspond to the voltage and frequency of the power supply in your household.
- We accept no liability for damage caused by improper use or installation.
• Children under 8 years of age must not use the cooker hood. - The appliance is intended for use in the home and similar environments only. It is not intended for commercial use.
- Clean the appliance and the filter regularly to keep the appliance working efficiently.
• Always disconnect the power plug from the socket before cleaning. - Clean the appliance exactly as indicated in the operating instructions.
- Do not use an open fire under the extractor hood.
- If the unit is not functioning normally, contact the manufacturer or a specialist company.
• Children from the age of 8 years and mentally, sensory and physically impaired persons may only use the device if they have been informed in detail about the functions and safety precautions by a supervisor responsible for them beforehand and understand the associated risks. - If the power cord is damaged, it must be replaced by the manufacturer, an authorised specialist company or a similarly qualified person.
- If the cooker hood is used with cookers that burn gas or other fuels, there must be adequate ventilation in the room.
- Do not flambé under the extractor hood.
- Caution: The surface of the unit may become hot during operation.
Important instructions for installation
- The air must not be discharged into a flue used for extracting flue gases from gas or other fuels (does not apply to appliances that only return the air to the room).
- Observe all regional regulations for the installation of ventilation systems.
Important notes on exhaust air operation

WARNING
Danger of poisoning from recirculated exhaust gases! Do not operate the appliance in extract air mode if it is operated together with a room air-dependent fireplace and sufficient air circulation is not guaranteed.
Room air-dependent fireplaces such as gas, oil, wood or coal heaters, boilers or instantaneous water heaters draw the air from the room and lead it outdoors through an exhaust pipe or chimney. In extract air mode, air is extracted from the kitchen and neighbouring rooms. Without sufficient supply air, negative pressure is created. Toxic gases from the chimney or exhaust pipe can be sucked back into the living rooms.
- Make sure that sufficient fresh air supply is guaranteed and that the air can circulate.
- A supply air/exhaust air wall box is not sufficient to ensure compliance with the limit value.
Safe operation is only possible if the negative pressure at the location of the fireplace does not exceed 4 Pa (0.04 mbar). This can be achieved if the air required for combustion can flow in through non-closable openings in doors and windows in conjunction with a supply air / exhaust air wall box. In any case, have a professional chimney sweep advise you and assess the entire ventilation system of the house. If necessary, they can tell you the necessary measure for ventilation.
If the cooker hood is used exclusively in recirculation mode, operation is possible without restriction.
Important note on dismantling the unit
- Disassembly is the same as installation/assembly in reverse order.
- Have a second person help you during disassembly to avoid injury.
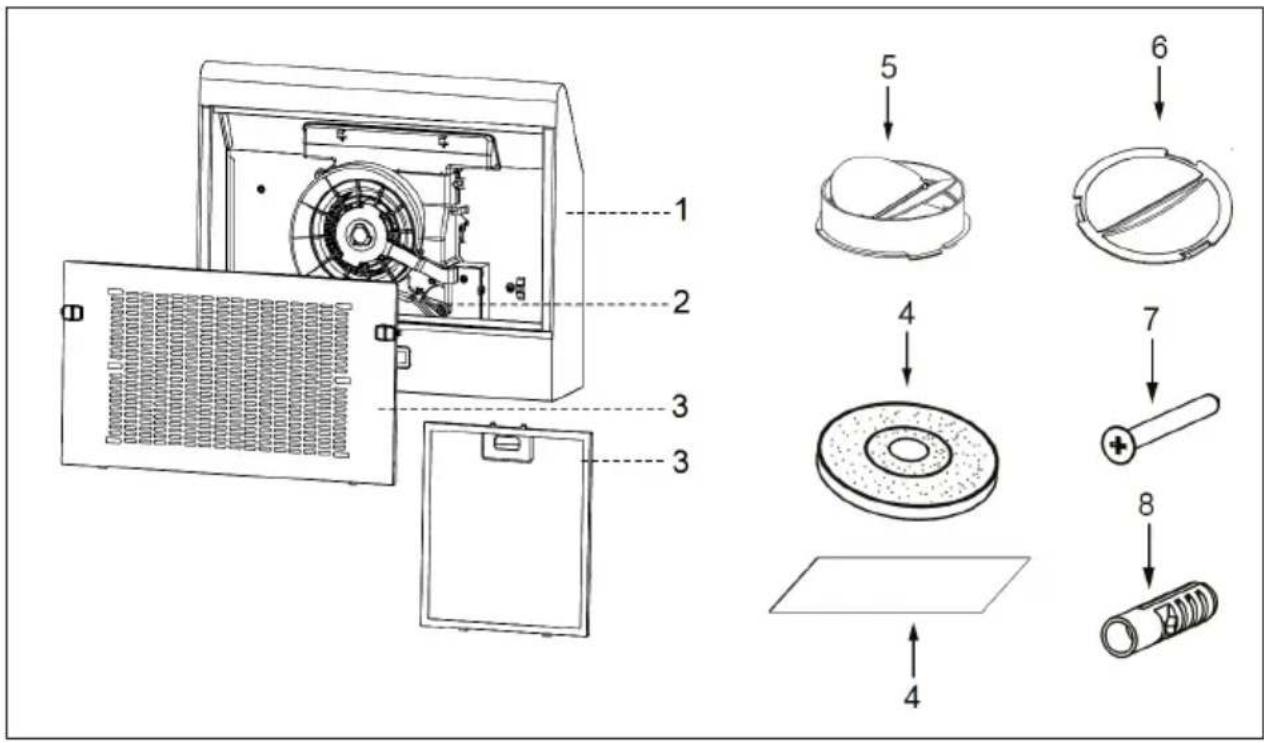
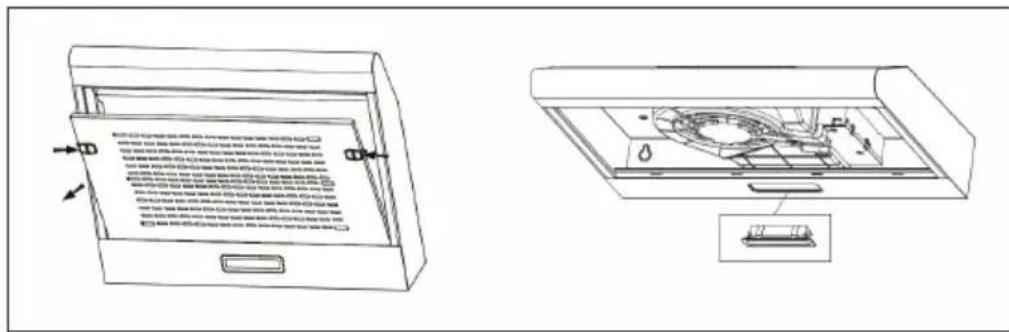
DEVICE OVERVIEW AND PARTS
text_image
Technical diagram of an air conditioner unit with labeled parts and exploded view| Designation Quantity | ||
| 1 Main housing 1 | ||
| 2 Vent button 1 | ||
| 3 Filter unit (optional 2 or 3) 1 | ||
| 4 Activated carbon filter (optional) 1 | ||
| 5 One-way valve 1 | ||
| 6 Air outlet cap 1 | ||
| 7 Screws 5*49 mm 4 | ||
| 8 Plastic dowels 4 | ||
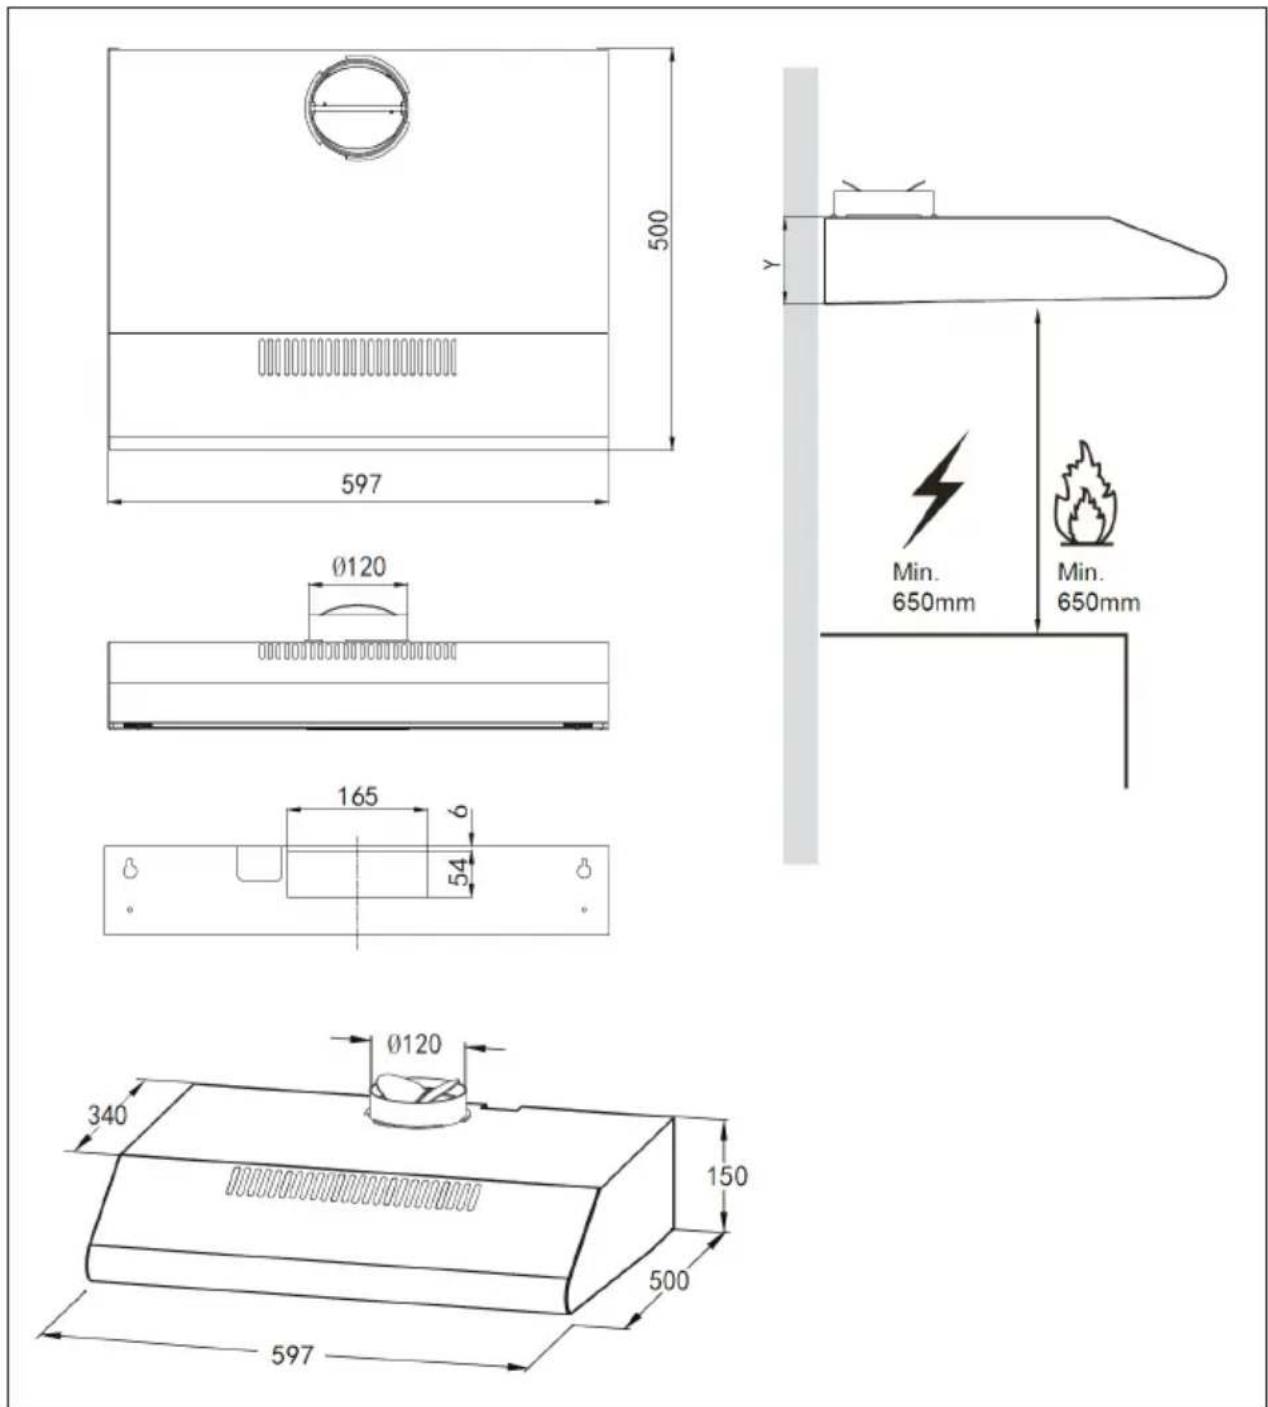
DIMENSIONS:
text_image
500 597 Ø120 165 6 54 Ø120 340 150 500 597 Y Min. 650mm Min. 650mmINSTALLATION
Wall drilling and bracket attachment
- Unpack the hood and check to see that all parts are in order. Make sure that the voltage (V) and frequency (Hz) indicated on the nameplate match the voltage and frequency at the installation location.
- Make sure the area behind the installation surface to be drilled is clear of electrical cables or pipes.
- The stainless steel and glass surfaces of the hood can easily be damaged during installation if struck or bumped by tools. Be sure to protect surfaces during installation.
- Protect the cooking surface at the bottom with cardboard or similar to prevent damage while the wall hood is being installed at the top.
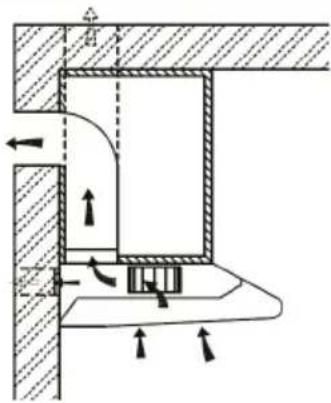
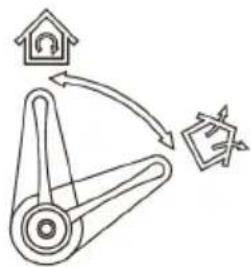
Choice of ventilation mode
text_image
Technical diagram showing mechanical assembly with directional arrows and component labels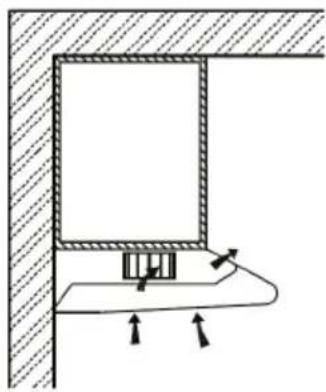
natural_image
Technical diagram of a mechanical assembly with arrows indicating force or movement (no text or symbols)Exhaust air mode Recirculation mode
flowchart
graph TD
    A["House"] --> B["Pulley"]
    B --> C["Gear"]
    C --> A
Position of the vent button
 | Exhaust air mode: Turn the ventilation knob here to this symbol. |
 | Recirculation air mode: Turn the ventilation knob here to this symbol. |
Important information about ventilation mode
- For proper combustion and the exhaust of gases through the chimney of fuel combustion systems, a sufficient amount of air is required to avoid backflow. Ductless fans must always be vented to the outside.
- When assessing the air pressure, the entire ventilation system of the house/flat must be taken into account.
- The legal regulations must be observed for exhaust air routing. If the extractor hood is operated in recirculation mode with an activated carbon filter, there are no operating restrictions.
- If you choose exhaust mode, there are two options for ventilation, namely horizontal ventilation and vertical ventilation. Please use a tool to remove the cover before use and install the check valve in the opening.
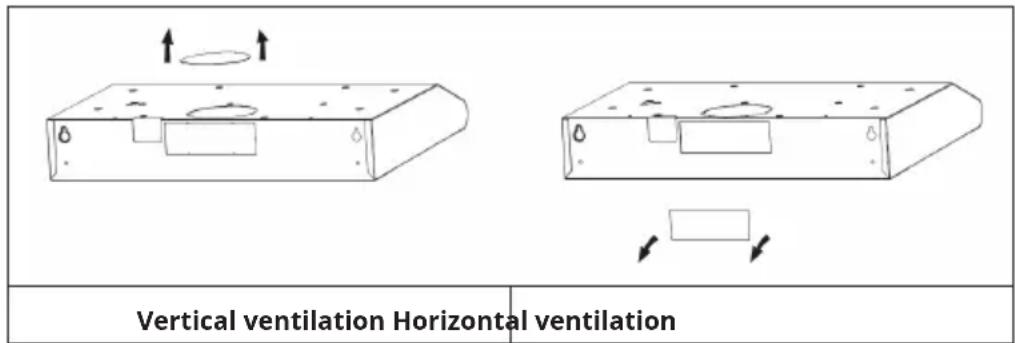
text_image
Vertical ventilation Horizontal ventilationInstallation preparations
Make sure the power is turned off before starting installation. The plugs must be mounted in places where they can be easily unplugged and plugged in. You will need two helpers to install this hood. You will need the following tools and materials to complete the installation:
• The right drill for your wall
- Phillips screwdriver
- Tape measure
- Hand saw or jigsaw
• Installation work and electrical wiring must be carried out by qualified persons in accordance with all applicable regulations and standards, including the design of the equipment.
- Do not exhaust air into a flue from other appliances that burn gas or other fuels.
- The regulations regarding exhaust air flow must be met.
- The extractor hood must be installed at a minimum distance of 65 cm above the cooking surface of a hob.
- The extractor hood must be installed at a maximum distance of 75 cm above the cooking surface of a hob.
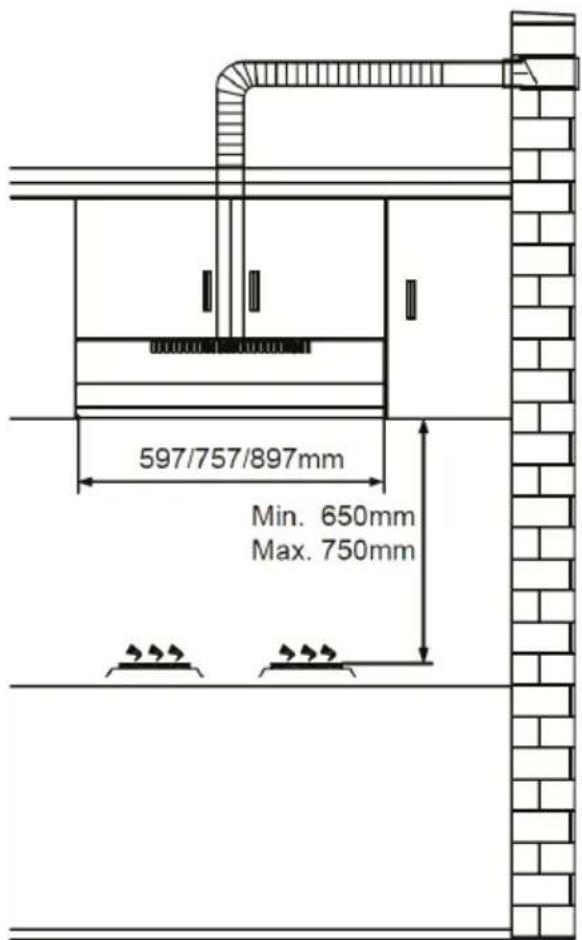
text_image
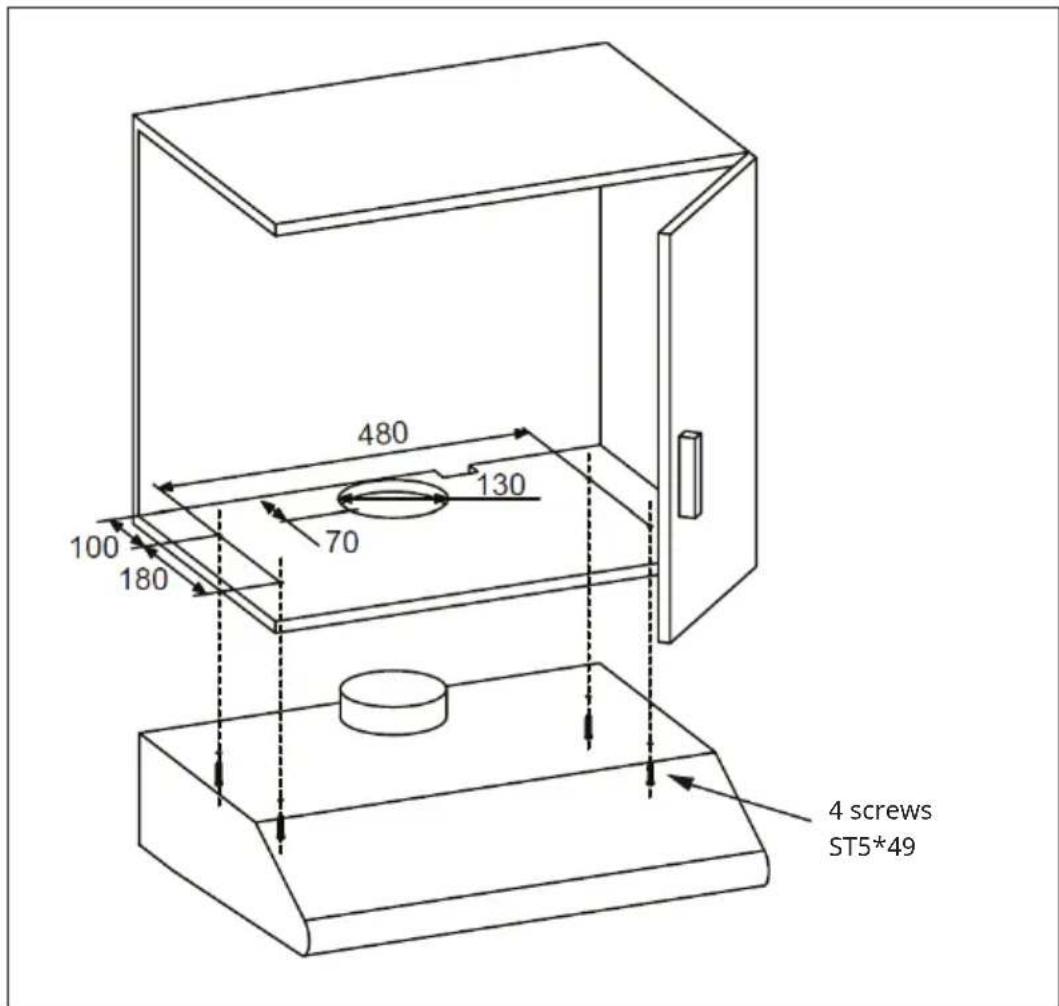
597/757/897mm Min. 650mm Max. 750mmInstallation in the cupboard
- Drill one 130 mm diameter hole and four 3.5 mm diameter holes as shown below.
- ATTENTION: If your extractor hood is running in recirculation mode, it is not necessary to drill a 130 mm diameter hole.
- Use the 4 screws to attach the cooker hood to a kitchen cabinet. Check that the screws are correctly seated by temporarily securing the cooker hood. Once properly installed, attach the hood and tighten the screws if necessary.
text_image
480 130 70 100 180 4 screws ST5*49Wall mounting
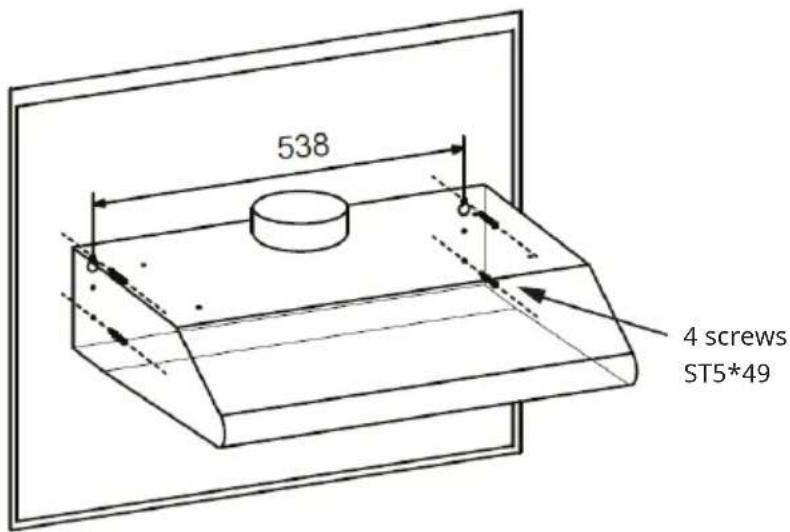
- For wall mounting, drill two 10 mm (538 mm) diameter holes with the vent hole on the top of the hood in the centre (see illustration on next page). Make sure the extractor hood is aligned directly over the hob.
- Insert two plastic dowels (supplied) into the holes.
- Insert two screws into the top two plastic dowels and tighten them so that they protrude 3 mm from the wall.
• Install the extractor hood onto the two screws and mark the two bottom screw positions. - Remove the hood, drill the bottom two screw holes and insert the plastic anchors.
• Install the hood on the top screws, insert the bottom screws and tighten all screws securely.
text_image
538 4 screws ST5*49Note: The air should not be ducted into a fume hood containing other appliances that burn gas or other fuels.
CONTROL PANEL AND BUTTON FUNCTIONS
   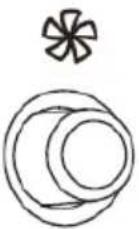  | ||||
| 1 | Press this switch to stop motor operation. | |||
| Press this switch, the motor will run at low speed. | ||||
| Press this switch, the motor will run at middle speed. | ||||
| Press this switch, the motor will run at high speed. | ||||
| Press this switch to turn on the lighting. Press it again to turn it off. | ||||
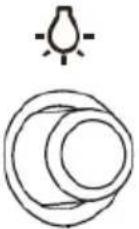
REPLACING THE LAMP
- Turn off the power by unplugging the power cord or turning off the fuse.
- Remove the grease filter.
- Remove the lamp by prying its holder out of the hood (this may require pressure).
- Unplug the light.
- Replace the light with a new light of the same type, making sure to connect the light to the light cable correctly.
- Turn the power back on by plugging in the power plug or turning on the fuse.
text_image
Technical diagram showing internal components of a refrigerator with Chinese annotations and assembly instructions| Max. power | Voltage Dimensions: 33.2 mm x 120 mm | ILCOS D Code | |
| 1.5 W 220-240 V | DSH-1.5-S-33.2/120 | ||
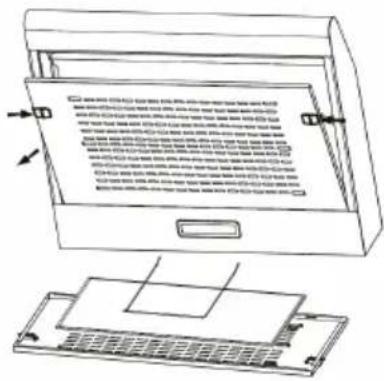
CLEANING AND CARE
- Unplug the hood before cleaning or servicing.
- Clean the surface of the hood frequently. Use mild soap or detergent to clean the hood.
- Do not use aggressive cleaning agents or abrasive cleaners.
- Avoid using dishwashing detergents.
- The grease filter can be washed with a mild soap or detergent. (Heavy grease deposits may not be easy to clean and the filter may need to be replaced).
- The activated carbon filter cannot be cleaned and must be replaced regularly.
- The cleaning water must not penetrate the electrical parts such as the motor or control switch!
Cleaning the metal filter
It is recommended to clean the metal filter every three months as follows:
- Remove the metal filter from the hood and wash it in a solution of water and neutral liquid detergent, then allow it to soak.
- Rinse thoroughly with warm water and allow to dry.
- The metal filter may change colour after several washes. This is not a reason for a complaint or for replacing the metal filter.
text_image
Technical diagram showing a device with labeled parts and annotations in Chinese, including text blocks and arrows indicating assembly or documentation.
natural_image
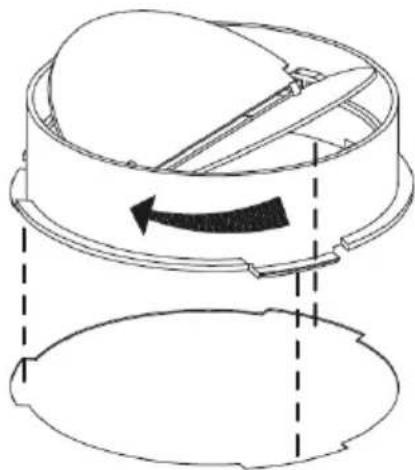
Line drawing of a double door with two doors and a handle, no text or symbols presentINSTALLING THE NON-RETURN VALVE
Hold the non-return valve with your hands and align it with the recesses. Insert the non-return valve and then turn it until it is secure. The type of mounting for external air ducts and the check valve must meet the requirements of the IEC/EN 60335-1 standard.
natural_image
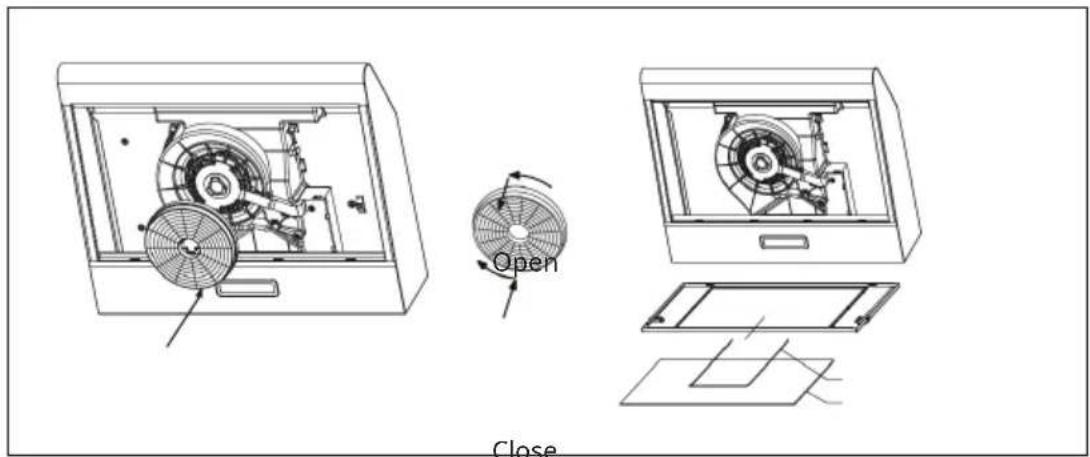
Diagram of a mechanical component with directional arrows indicating rotation or movement (no text or symbols)INSTALLING THE ACTIVATED CARBON FILTER
- Remove the grease filter and remove the iron wire.
- The filter cotton is on the metal grid and is attached by the iron wire.
- Replace the filter floss and reinsert it in the reverse order.
- Attention: The filter cotton cannot be washed or recycled. It should be replaced after approximately 2-3 months of use.
Note: The filter cotton is not included with the device (optional).
text_image
Open CloseActivated carbon filter
Iron wire
Filter floss
TROUBLESHOOTING
| Problem Potential cause | Solution | |
| The light turns on but the motor does not run. | The ventilation is blocked. | Remove the blockage. |
| The capacitor is broken. Have the capacitor replaced. | ||
| The motor is broken. Have the motor replaced. | ||
| The motor smells strange. | Have the motor replaced. | |
| The light is off and the motor does not run. | The light is broken. Have the light replaced. | |
| The plug is loose. Plug the power plug securely into the wall socket. | ||
| Oil leak The outlet and the | ventilation inlet are not tightly sealed. | Take off the outlet and seal it with glue. |
| The housing vibrates. The | rotor blade of the fan is damaged. | Replace the blade. |
| The motor is not firmly seated. | Fasten the motor. | |
| The casing is loosely hanging. | Fasten the housing. | |
| The air is not being properly extracted. | The distance between the cooker and the extractor hood is too far. | Reduce the distance. |
| Too much air circulation through open windows and doors. | Make sure that there is no draught. | |
| The machine is tilting. The | mounting screws are not tightened. | Tighten the fixing screw and set it level. |
PRODUCT DATA SHEET
Information according to Regulation (EU) No 65/2014
Measurement and calculation methods according to EN 61591:1997+A1:2006+A2:2011+A11:2014+A12:2015
| Article number 10045590 10045592, 1004559 | |||
| Designation Symbol Value Unit | |||
| Annual energy consumption AEC | hood | 33.6 kWh/year | |
| Energy efficiency class C | |||
| Fluid-dynamic efficiency FDE | hood | 9.6 | |
| Fluid dynamic efficiency class E | |||
| Lighting efficiency LE | hood | 47 Lux/W | |
| Lighting efficiency class A | |||
| Grease separation efficiency GFE | hood | 67.2 % | |
| Class for grease separation efficiency | D | ||
| Air flow at minimum and at maximum speed in normal operation, excluding operation on the intensive or fast speed setting | 201.6 m3/h | ||
| Air flow when operating on the intensive or fast speed setting | - m3/h | ||
| A-rated airborne noise emissions at minimum and maximum available speed during normal operation | 70 dB | ||
| A-rated airborne noise emissions during operation at the intensive or high-speed stage | - | dB | |
| Power consumption in off-mode | Po | 0 | W |
| Power consumption in standby mode | Ps | - | W |
| Contact details Chal-Tec GmbH, Wallstraße 16, 10179 Berlin, Germany. | |||
Information according to Regulation (EU) No 65/2014
Measurement and calculation methods according to EN 61591:1997+A1:2006+A2:2011+A11:2014+A12:2015
| Article number 10045591 10045593, 10045595 | |||
| Designation Symbol Value Unit | |||
| Annual energy consumption AEC | hood | 39.0 kWh/year | |
| Energy efficiency class C | |||
| Fluid-dynamic efficiency FDE | hood | 8.6 | |
| Fluid dynamic efficiency class E | |||
| Lighting efficiency LE | hood | 47 Lux/W | |
| Lighting efficiency class A | |||
| Grease separation efficiency GFE | hood | 63.6 % | |
| Class for grease separation efficiency | E | ||
| Air flow at minimum and at maximum speed in normal operation, excluding operation on the intensive or fast speed setting | 199.2 m3/h | ||
| Air flow when operating on the intensive or fast speed setting | - m3/h | ||
| A-rated airborne noise emissions at minimum and maximum available speed during normal operation | 70 dB | ||
| A-rated airborne noise emissions during operation at the intensive or high-speed stage | - | dB | |
| Power consumption in off-mode P | o | 0 | W |
| Power consumption in standby mode | Ps | - | W |
| Contact details Chal-Tec GmbH, Wallstraße 16, 10179 Berlin, Germany. | |||
NOTES ON ENVIRONMENTAL PROTECTION
- Make sure there is sufficient air supply during cooking so that the cooker hood can work efficiently and with low operating noise.
- Adjust the fan speed to the amount of steam produced while cooking. Use the intensive mode only when necessary. The lower the fan speed, the less energy is consumed.
- If large amounts of steam are produced when cooking, select a higher fan speed in time. If the cooking steam has already spread throughout the kitchen, the cooker hood must be operated for longer.
- Switch off the cooker hood when it is no longer needed.
- Switch off the lighting when it is no longer needed.
- Clean the filter at regular intervals and replace it if necessary to increase the effectiveness of the ventilation system and prevent fire hazards.
- Always put the lid on when cooking to reduce cooking steam and condensation.
DISPOSAL CONSIDERATIONS
natural_image
Symbol of a trash bin crossed with a diagonal line, no text or labels presentIf there is a legal regulation in your country regarding the disposal of electrical and electronic equipment, this symbol on the product or on the packaging indicates that this product must not be disposed of with household waste. Instead, it must be taken to a collection point for the recycling of electrical and electronic equipment. By disposing of this product in accordance with the regulations, you protect the environment and the health of those around you from negative consequences. For information on recycling and disposal of this product, contact your local government or household waste disposal service.
MANUFACTURER & IMPORTER (UK)
Manufacturer:
Chal-Tec GmbH, Wallstrasse 16, 10179 Berlin, Germany.
Importer for Great Britain:
Berlin Brands Group UK Limited
PO Box 42
272 Kensington High Street
London, W8 6ND
United Kingdom
Cher client, chère cliente,
text_image
QR code image containing encoded data, no visible human-readable textSOMMAIRE
text_image
Technical diagram of an air conditioner unit with labeled parts and exploded viewtext_image
Technical diagram showing mechanical assembly with directional arrows and component labels
natural_image
Technical diagram of a mechanical assembly with arrows indicating force or movement (no text or symbols)text_image
Technical diagram showing internal components of an air conditioner unit with Chinese annotations and component labelstext_image
Technical diagram showing a device with labeled parts and annotations in Chinese, including text blocks and arrows indicating assembly or documentation.
natural_image
Line drawing of a double door with two doors and a handle, no text or symbols presentINSTALLATION DU CLAPET ANTI-RETOUR
natural_image
Diagram of a mechanical component with an arrow indicating rotational motion, showing no text or symbols.natural_image
Technical line drawing of a mechanical device with internal components and exploded view (no text or symbols)FICHE DE DONNÉES PRODUIT
natural_image
Symbol of a trash bin crossed with a diagonal line, no text or labels presentBerlin Brands Group UK Ltd
PO Box 42
272 Kensington High Street
London, W8 6ND
United Kingdom
Gentile cliente,
text_image
QR code image containing encoded data, no visible human-readable textINDICE
text_image
Technical diagram of an air conditioner unit with labeled parts and exploded viewtext_image
Technical diagram showing mechanical assembly with directional arrows and component labels
natural_image
Technical diagram of a mechanical assembly with arrows indicating force or movement (no text or symbols)flowchart
graph TD
    A["House"] --> B["Gear"]
    B --> C["Arrow to House"]
    C --> D["Arrow to Gear"]
text_image
Technical diagram showing internal components of an air conditioner unit with labeled parts and instructions in Chinese.| Potenza max. | Tensione Dimensioni: 33,2 mm x 120 mm | ILCOS D Code | |
| 1,5 W 220-240 V | DSH-1.5-S-33.2/120 | ||
text_image
Technical diagram showing a device with labeled parts and annotations in Chinese, including text blocks and arrows indicating assembly or documentation.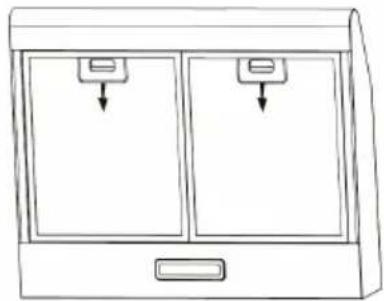
natural_image
Line drawing of a two-panel cabinet with two doors and arrows indicating direction (no text or symbols)natural_image
Diagram of a mechanical component with directional arrows indicating motion or force (no text or symbols)natural_image
Technical line drawing of a mechanical device with fan and housing (no text or symbols)natural_image
Technical line drawing of a mechanical device with internal components and exploded view (no text or symbols)Cavo di ferro
Ovatta del filtro
natural_image
Symbol of a trash bin crossed with a diagonal line, no text or numbers presentPRODUTTORE E IMPORTATORE (UK)
Produttore:
Chal-Tec GmbH, Wallstraße 16, 10179 Berlino, Germania.
Berlin Brands Group UK Limited
PO Box 42
272 Kensington High Street
London, W8 6ND
United Kingdom
Estimado cliente:
text_image
QR code image containing encoded data, no visible human-readable textÍNDICE
text_image
Technical diagram of an air conditioner unit with labeled parts including front panel, internal components, and battery packtext_image
Technical diagram showing mechanical assembly with directional arrows and component labels
natural_image
Technical diagram of a mechanical assembly with arrows indicating force or movement (no text or symbols)flowchart
graph TD
    A["House"] --> B["Pulley"]
    B --> C["Arrow to House"]
    C --> D["Arrow to House"]
    D --> E["Arrow to House"]
text_image
Technical diagram showing internal components of an air conditioner unit with Chinese annotations and component labels| Potencia máxima | Tensión Dimensiones: 33,2 mm x 120 mm | ILCOS D Code | |
| 1,5 W 220-240 V | DSH-1.5-S-33.2/120 | ||
LIMPIEZA Y CUIDADO
text_image
Technical diagram showing a device with labeled parts and annotations in Chinese, including text blocks and arrows indicating assembly or documentation.
natural_image
Line drawing of a double door with two doors and a handle, no text or symbols presentnatural_image
Diagram of a mechanical component with an arrow indicating rotational motion, showing no text or symbols.natural_image
Technical line drawing of a mechanical device with fan and housing (no text or symbols)natural_image
Technical line drawing of a mechanical device with internal components and exploded view (no text or symbols)natural_image
Symbol of a trash bin crossed with a diagonal line, no text or labels presentBerlin Brands Group UK Limited
PO Box 42
272 Kensington High Street
London, W8 6ND
Reino Unido

area
| Category | Value | | -------- | ----- | | 1 | 100 | | 2 | 100 | | 3 | 100 | | 4 | 100 | | 5 | 100 | | 6 | 100 | | 7 | 100 | | 8 | 100 | | 9 | 100 | | 10 | 100 | | 11 | 100 | | 12 | 100 | | 13 | 100 | | 14 | 100 | | 15 | 100 | | 16 | 100 | | 17 | 100 | | 18 | 100 | | 19 | 100 | | 20 | 100 | | 21 | 100 | | 22 | 100 | | 23 | 100 | | 24 | 100 | | 25 | 100 | | 26 | 100 | | 27 | 100 | | 28 | 100 | | 29 | 100 | | 30 | 100 | | 31 | 100 | | 32 | 100 | | 33 | 100 | | 34 | 100 | | 35 | 100 | | 36 | 100 | | 37 | 100 | | 38 | 100 | | 39 | 100 | | 40 | 100 | | 41 | 100 | | 42 | 100 | | 43 | 100 | | 44 | 100 | | 45 | 100 | | 46 | 100 | | 47 | 100 | | 48 | 100 | | 49 | 100 | | 50 | 100 | | 51 | 100 | | 52 | 100 | | 53 | 100 | | 54 | 100 | | 55 | 100 | | 56 | 100 | | 57 | 100 | | 58 | 100 | | 59 | 100 | | 60 | 100 | | 61 | 100 | | 62 | 100 | | 63 | 100 | | 64 | 100 | | 65 | 100 | | 66 | 100 | | 67 | 100 | | 68 | 100 | | 69 | 100 | | 70 | 100 | | 71 | 100 | | 72 | 100 | | 73 | 100 | | 74 | 100 | | 75 | 100 | | 76 | 100 | | 77 | 100 | | 78 | 100 | | 79 | 100 | | 80 | 100 | | Note: The actual values are not provided in the code. The code generates random data for the first three categories (categories) and the remaining categories (categories) from the code. | |