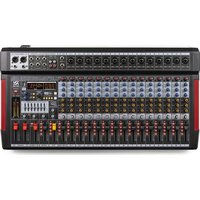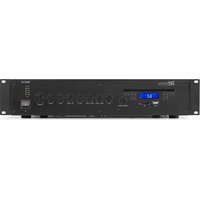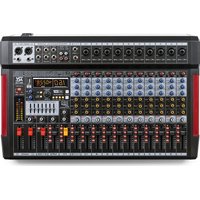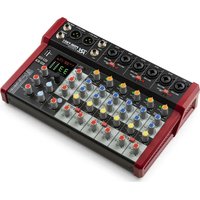
PDZM700 - Mixer Power Dynamics - Free user manual and instructions
Find the device manual for free PDZM700 Power Dynamics in PDF.


User questions about PDZM700 Power Dynamics
0 question about this device. Answer the ones you know or ask your own.
Ask a new question about this device
Download the instructions for your Mixer in PDF format for free! Find your manual PDZM700 - Power Dynamics and take your electronic device back in hand. On this page are published all the documents necessary for the use of your device. PDZM700 by Power Dynamics.
USER MANUAL PDZM700 Power Dynamics
Power Dynamics Professional Audio
PDZM700 4 Zone Mixer
Ref. nr.: 172.750
text_image
P0ZM700 RMC CHANNEL 1 ACV 1 CD 111 CHANNEL 2 ACV 1 CD 111 CHANNEL 3 ACV 1 CD 111 CHANNEL 4 ACV 1 CD 111 CHANNEL 5 ACV 1 CD 111 CHANNEL 6 ACV 1 CD 111 CHANNEL 7 ACV 1 CD 111 CHANNEL 8 ACV 1 CD 111 CHANNEL 9 ACV 1 CD 111 CHANNEL 10 ACV 1 CD 111 CHANNEL 11 ACV 1 CD 111 CHANNEL 12 ACV 1 CD 111 CHANNEL 13 ACV 1 CD 111 CHANNEL 14 ACV 1 CD 111 CHANNEL 15 ACV 1 CD 111 CHANNEL 16 ACV 1 CD 111 CHANNEL 17 ACV 1 CD 111 CHANNEL 18 ACV 1 CD 111 CHANNEL 19 ACV 1 CD 111 CHANNEL 20 ACV 1 CD 111 CHANNEL 21 ACV 1 CD 111 CHANNEL 22 ACV 1 CD 111 CHANNEL 23 ACV 1 CD 111 CHANNEL 24 ACV 1 CD 111 CHANNEL 25 ACV 1 CD 111 CHANNEL 26 ACV 1 CD 111 CHANNEL 27 ACV 1 CD 111 CHANNEL 28 ACV 1 CD 111 CHANNEL 29 ACV 1 CD 111 CHANNEL 30 ACV 1 CD 111 CHANNEL 31 ACV 1 CD 111 CHANNEL 32 ACV 1 CD 111 CHANNEL 33 ACV 1 CD 111 CHANNEL 34 ACV 1 CD 111 CHANNEL 35 ACV 1 CD 111 CHANNEL 36 ACV 1 CD 111 CHANNEL 37 ACV 1 CD 111 CHANNEL 38 ACV 1 CD 111 CHANNEL 39 ACV 1 CD 111 CHANNEL 40 ACV 1 CD 111 CHANNEL 41 ACV 1 CD 111 CHANNEL 42 ACV 1 CD 111 CHANNEL 43 ACV 1 CD 111 CHANNEL 44 ACV 1 CD 111 CHANNEL 45 ACV 1 CD 111 CHANNEL 46 ACV 1 CD 111 CHANNEL 47 ACV 1 CD 111 CHANNEL 48 ACV 1 CD 111 CHANNEL 49 ACV 1 CD 111 CHANNEL 50 ACV 1 CD 111 CHANNEL 51 ACV 1 CD 111 CHANNEL 52 ACV 1 CD 111 CHANNEL 53 ACV 1 CD 111 CHANNEL 54 ACV 1 CD 111 CHANNEL 55 ACV 1 CD 111 CHANNEL 56 ACV 1 CD 111 CHANNEL 57 ACV 1 CD 111 CHANNEL 58 ACV 1 CD 111 CHANNEL 59 ACV 1 CD 111 CHANNEL 60 ACV 1 CD 111 CHANNEL 61 ACV 1 CD 111 CHANNEL 62 ACV 1 CD 111 CHANNEL 63 ACV 1 CD 111 CHANNEL 64 ACV 1 CD 111 CHANNEL 65 ACV 1 CD 110INSTRUCTION MANUAL GEBRUIKSAANWIJZING BEDIENUNGSANLEITUNG MANUAL DE INSTRUCCIONES MANUEL D'INSTRUCTIONS
V2.0
Congratulations to the purchase of this Power Dynamics product. Please read this manual thoroughly prior to using the unit in order to benefit fully from all features.
Read the manual prior to using the unit. Follow the instructions in order not to invalidate the warranty. Take all precautions to avoid fire and/or electrical shock. Repairs must only be carried out by a qualified technician in order to avoid electrical shock. Keep the manual for future reference.
- Prior to using the unit, please ask advice from a specialist. When the unit is switched on for the first time, some smell may occur. This is normal and will disappear after a while.
- The unit contains voltage carrying parts. Therefore do NOT open the housing.
- Do not place metal objects or pour liquids into the unit This may cause electrical shock and malfunction.
- Do not place the unit near heat sources such as radiators, etc. Do not place the unit on a vibrating surface. Do not cover the ventilation holes.
- The unit is not suitable for continuous use.
- Be careful with the mains lead and do not damage it. A faulty or damaged mains lead can cause electrical shock and malfunction.
- When unplugging the unit from a mains outlet, always pull the plug, never the lead.
- Do not plug or unplug the unit with wet hands.
- If the plug and/or the mains lead are damaged, they need to be replaced by a qualified technician.
- If the unit is damaged to such an extent that internal parts are visible, do NOT plug the unit into a mains outlet and DO NOT switch the unit on. Contact your dealer. Do NOT connect the unit to a rheostat or dimmer.
- To avoid fire and shock hazard, do not expose the unit to rain and moisture.
- All repairs should be carried out by a qualified technician only.
- Connect the unit to an earthed mains outlet (220-240Vac/50Hz) protected by a 10-16A fuse.
- During a thunderstorm or if the unit will not be used for a longer period of time, unplug it from the mains. The rule is: Unplug it from the mains when not in use.
- If the unit has not been used for a longer period of time, condensation may occur. Let the unit reach room temperature before you switch it on. Never use the unit in humid rooms or outdoors.
-
To prevent accidents in companies, you must follow the applicable guide lines and follow the instructions.
-
Do not repeatedly switch the unit on and off. This shortens the life time.
- Keep the unit out of the reach of children. Do not leave the unit unattended.
- Do not use cleaning sprays to clean switches. The residues of these sprays cause deposits of dust and grease. In case of malfunction, always seek advice from a specialist.
- Do not force the controls.
- This unit is with speaker inside which can cause magnetic field. Keep this unit at least 60cm away from computer or TV.
- This unit is with built-in lead-acid rechargeable battery. Please recharge the battery every 3 months if you are not going to use the unit for a long period of time. Or the battery may be damaged.
- If the battery is damaged please replace with same specifications battery. And dispose the damaged battery environment friendly.
- If the unit has fallen, always have it checked by a qualified technician before you switch the unit on again.
- Do not use chemicals to clean the unit. They damage the varnish. Only clean the unit with a dry cloth.
- Keep away from electronic equipment that may cause interference.
- Only use original spares for repairs, otherwise serious damage and/or dangerous radiation may occur.
- Switch the unit off prior to unplugging it from the mains and/or other equipment. Unplug all leads and cables prior to moving the unit.
- Make sure that the mains lead cannot be damaged when people walk on it. Check the mains lead before every use for damages and faults!
- The mains voltage is 220-240Vac/50Hz. Check if power outlet match. If you travel, make sure that the mains voltage of the country is suitable for this unit.
- Keep the original packing material so that you can transport the unit in safe conditions.

This mark attracts the attention of the user to high voltages that are present inside the housing and that are of sufficient magnitude to cause a shock hazard.

This mark attracts the attention of the user to important instructions that are contained in the manual and that he should read and adhere to.
The unit has been certified CE. It is prohibited to make any changes to the unit. They would invalidate the CE certificate and their guarantee!
NOTE: To make sure that the unit will function normally, it must be used in rooms with a temperature between 5^ C/41°F and 35^ C/95°F.

Electric products must not be put into household waste. Please bring them to a recycling centre. Ask your local authorities or your dealer about the way to proceed. The specifications are typical. The actual values can slightly change from one unit to the other. Specifications can be changed without prior notice.
Do not attempt to make any repairs yourself. This would invalid your warranty. Do not make any changes to the unit. This would also invalid your warranty. The warranty is not applicable in case of accidents or damages caused by inappropriate use or disrespect of the warnings contained in this manual. Power Dynamics cannot be held responsible for personal injuries caused by a disrespect of the safety recommendations and warnings. This is also applicable to all damages in whatever form.
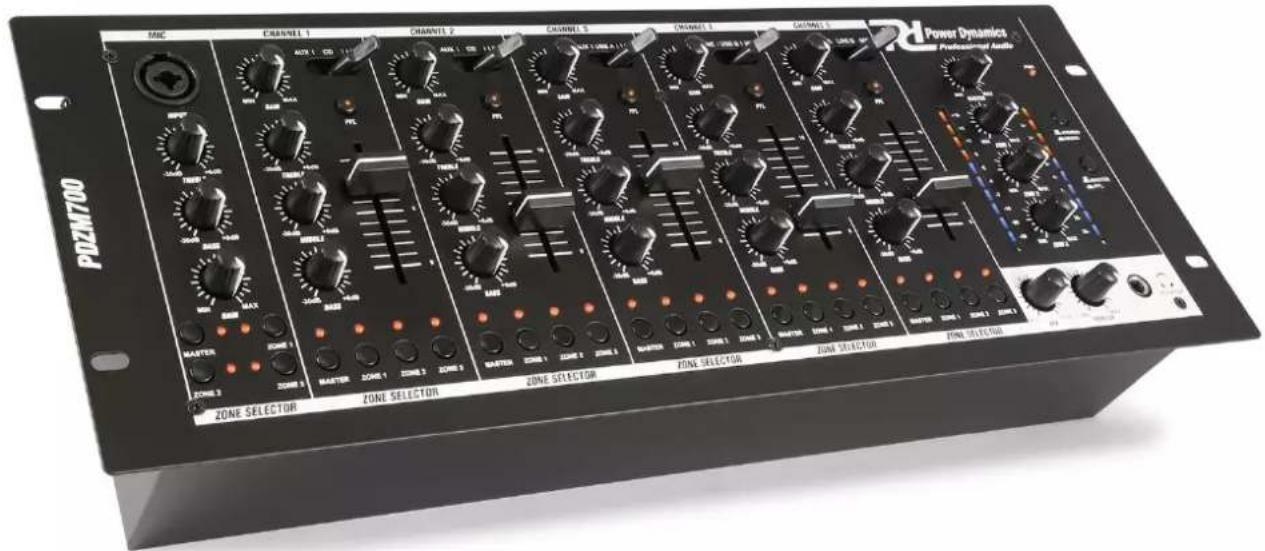
1. Power LED
This LED lights up when the mixer is turned on.
2. MIC Gain
Adjustable level of the microphone.
3. MIC Bass
Adjustable low (bass) frequencies of the microphone input.
4. MIC Treble
Adjustable high (treble) frequencies of the microphone input.
5. MIC input
Connect a microphone to this combo connector. You can use even a XLR connector and a 6.35mm jack.
6. Gain control
Adjustable preamp of the input level of the corresponding channel.
7. Treble control
Adjustable high frequencies of the corresponding channel.
8. Mid control
Adjustable mid frequencies of the corresponding channel.
9. Bass control
Adjustable low frequencies of the corresponding channel.
10. Input selector
Selects the input source to be routed to the corresponding channel. The connections for the different sources are on the back of the mixer.
11. PFL
The PFL button (Pre Fade Listening) is designed to route the corresponding channel input to the headphone/monitor section.
12. Channel Fader
Adjustable output level of the corresponding channel.
13. Master
Adjustable output level of the master volume.
14. Zone 1
Adjustable output level of the master volume Zone 1.
15. Zone 2
Adjustable output level of the master volume Zone 2.
16. Zone 3
Adjustable output level of the master volume Zone 3.
17. Stereo/Mono
When press this button the output signal of the master is mono.
18. Master/PFL
If this button is pressed you can read out the pre-fader signal of the channels where PFL is activated on the VU meters. If this button is not pressed you can read out the master signal on the VU-meters.
19. Monitor/Headphones
Connect your headphones for monitoring.
20. Monitor control
Adjustable output level of your headphones.
21. MIX
Slide this to mix the PFL channel and program mix in the headphones. When all the way to the left you hear the channel PFL input selection(s), when turned to the right you hear the master program mix output.
22. Zone 3
Select, when pressed the stereo signal of the selected channel will go to stereo Zone 3 output and the red LED is on.
23. Zone 2
Select, when pressed the stereo signal of the selected channel will go to stereo Zone 2 output and the red LED is on.
24. Zone 1
Select, when pressed the stereo signal of the selected channel will go to stereo Zone 1 output and the red LED is on.
25. Master
Select, when pressed the stereo signal of the selected channel will go to stereo Master output and the red LED is on.
26. LED VU Meters
Can indicate either the master output or cue channel input levels, depending on the position of the MASTER/PFL switch (18.)

text_image
MIC 5 INPUT 4 -30dB +6dB THREBLE 3 -30dB +6dB BASS 2 MIN GAIN MAX 25 24 MASTER ZONE 1 23 22 ZONE 2 ZONE 3 ZONE SELECTOR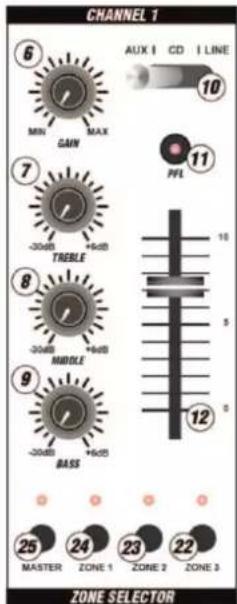
text_image
CHANNEL 1 6 MIN MAX GAIN 7 -30dB +4dB TREBLE 8 -30dB +4dB MIDDLE 9 -30dB +4dB BASS 10 PFL 11 12 25 MASTER ZONE 1 ZONE 2 ZONE 3 ZONE SELECTOR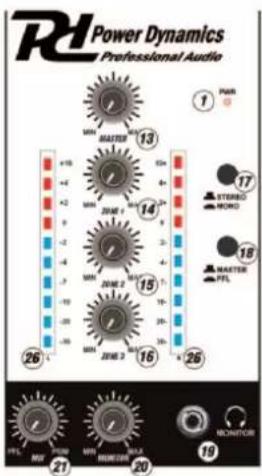
text_image
RL Power Dynamics Professional Audio 13 14 15 16 20 21 22 23 24 25 26 27 28 29 30 31 32 33 34 35 36 37 38 39 40 41 42 43 44 45 46 47 48 49 50 51 52 53 54 55 56 57 58 59 60 61 62 63 64 65 66 67 68 69 70 71 72 73 74 75 76 77 78 79 80 81 82 83 84 85 86 87 88 89 90 91 92 93 94 95 96 97 98 99 100
text_image
PDZM700 4 ZONE MIXER Power Dynamics Professional Audio OFF ON POWER IN 2019/01/2019 5/17-008 www.power-dynamics.com OUTPUTS CH 5 CH 4 CH 3 CH 2 CH 1 UDB 2 - + USB 1 - + 2 2 1 2 2 1 2 2 1 MIC 3 LINE 6 LINE 6 MIC 1 LINE 4 LINE 3 AUX 3 LINE 2 CD 3 AUX 3 LINE 1 CD 1 AUX 1 PRECAUTION: Changes for discharges of bacteria. No skin CT or other samples. Outer no discharges are shown. Attention: Image if detection. The gas is present. CNTN: Risk of dislocation. Dilt and type. ADJUSTING: Displacement in the Discharge. No other. No response to a tool is in accordance with the voltage protection requirement. Use a device to ensure that the discharge is not allowed. To prevent displacement to the discharge. Inset: E2 (Displacement from CH) / MAXA AUX 2 (in Inference) PREF. NO.: +172.750 MWD SERIAL NO.: ? CE DES180317 FAEZ E40351 INset: E2 (Displacement from CH) / MAXA AUX 2 (in Inference)- AUX inputs (RCA)
CD, DVD-players, Tape Decks and other line level devices may be connected to these jacks.
- Line inputs (RCA)
CD, DVD-players, Tape Decks and other line level devices may be connected to these inputs.
- MIC inputs
Connect microphones to these 6.35mm inputs.
- Zone 3 output (RCA)
Connect this output to amplifier, active speaker or a lighting console.
- Zone 2 output (RCA)
Connect this output to amplifier, active speaker or a lighting console.
- Zone 1 output (balanced)
Connect this output to amplifier, active speaker or a lighting console.
- Master (balanced)
Connect this output to amplifier, active speaker or a lighting console.
- USB Ports
These connections receive audio from a connected computer.
- Power Switch
Power connector
- Power In
Use the included IEC power cable to connect the mixer to a power outlet.
-
Turn on your computer and the PDZM700.
-
Use a USB cable to connect on or both ports of the PDZM700 to your computer.
-
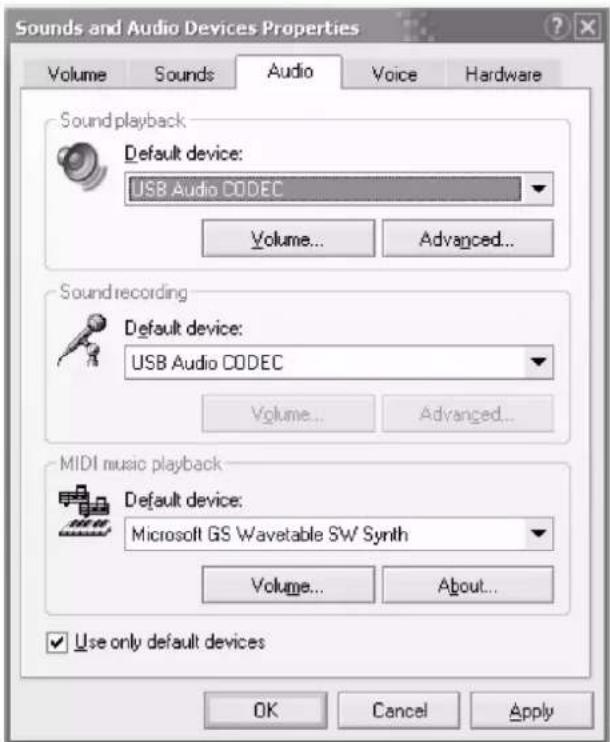
Windows will immediately recognize the mixer as a "USB Audio Device" or "USB Audio CODEC" and will automatically install any required system components. To change system audio preferences in windows, you will need to access the sounds audio devices properties, located in the control panel. The first time you connect the mixer to your computer, the mixer will be automatically assigned as the default or "preferred" device for sound playback on your computer. All of your computer's sounds will be now sent to the mixer channel indicated above the USB connection.
Note: If you have connected both USB ports to your computer, the ports will be numbered in the order they were connected. For example, if you connected USB A before USB B, USB A will appear as "USB audio CODEC" and USB B will appear as "USB audio CODEC (2)".
Tip: To prevent windows from playing systems sounds (beeps and bleeps) through the PDZM700, we highly recommend disabling these by clicking on the sounds tab and selecting no sounds from the pull-down menu.
text_image
Sounds and Audio Devices Properties Volume Sounds Audio Voice Hardware Sound playback Default device: USB Audio CODEC Volume... Advanced... Sound recording Default device: USB Audio CODEC Volume... Advanced... MIDI music playback Default device: Microsoft GS Wavetable SW Synth Volume... About... Use only default devices OK Cancel ApplyMAC CONFIGURATION
- Turn on your MAC and the PDZM700.
- Use a USB cable to connect one (or both) ports of the PDZM700 to your computer.
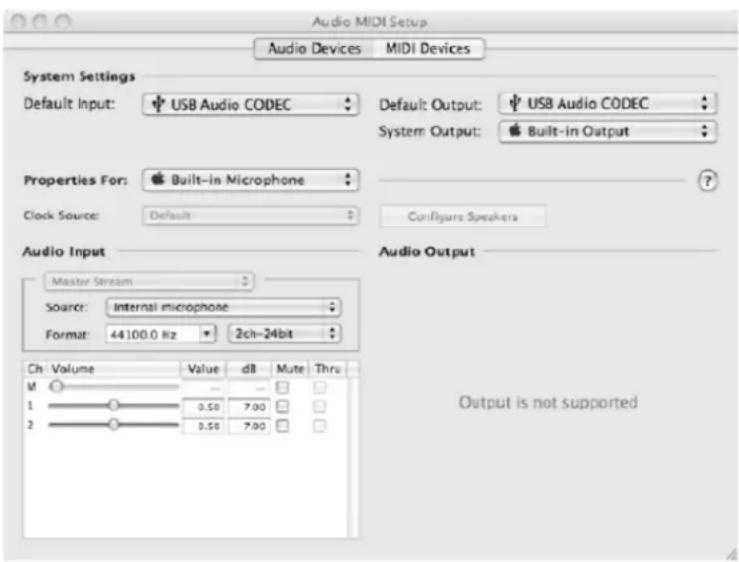
- Your MAC will immediately recognize the mixer as a "USB Audio Device" or "USB Audio CODEC". To change system audio preferences on a MAC, you will need to access the audio MIDI setup preferences located in Applications X utilities.
Note: If you have connected both USB ports to your computer, the ports will be numbered in the order they were connected. For example, if you connected USB A before USB B, USB A will appear as "USB audio CODEC" and USB B will appear as "USB audio CODEC (2)".
To send an audio from your computer into the PDZM700, select USB Audio CODEC in the default output field. This allows you to play audio from your computer into one of either of the mixer channels, depending on which USB port is used to make the connection.
text_image
Audio MIDI Setup Audio Devices MIDI Devices System Settings Default Input: USB Audio CODEC Default Output: USB Audio CODEC System Output: Built-in Output Properties For: Built-in Microphone Clock Source: Default Configure Speakers Audio Input Master Stream Source: internal microphone Format: 44100.0 Hz 2ch-24bit Ch Volume Value dB Mute Thru M 1 0.50 7.00 2 0.50 7.00 Output is not supportedIf your sound playback or recording application does not have its own audio input and output settings (for example, Apple iTunes), it will use the devices set in audio MIDI setup. Please note that these settings are loaded upon application startup, so if you change device settings while the application is open, you will to restart your application for the settings to take effect.
Using both USB ports simultaneously
Since the PDZM700 has two USB ports, you can attach a different computer to each USB jack or you can connect both jacks to a single computer. Each USB jack on the mixer will appear as a separate USB audio device to your computer. You can play two audio files simultaneously from one computer and send both of those audio streams to separate channels of your mixer by using two USB cables. If you do this, we suggest using one of the many commercially available software programs that support multiple sound cards. However, if you don't have software like that, you can use two separate software media players instead. To do this you need to start the first media player and then change the preferred audio device to the second USB port, then start your second media player.
TROUBLESHOOTING
Problem: The computer did not recognize my mixer.
- The mixer is not turned on. Turn on your mixer.
- The USB cable is not connected. Connect the USB cable to your computer and mixer.
- You have already installed a USB Audio device before. In that case, your mixer should work without any installation process. Just plug it in. You may have to change your computers default sound playback device.
Problem: I'm trying to play one song into channel 3 and the other into channel 4, but they both be mixed together into only one channel.
- The sound playback device was not set properly for one of you audio applications. Close one of the playback applications, then change you preferred sound playback device as described above, the re-open the application. Note that this technique will not work with all media player (e.g. Real Player).
- Use a dedicated audio program that supports two sound cards.
Problem: The sound is coming out of my computer speakers instead of going to may mixer.
- The sound playback device was not properly set. Close your audio playback application, the change your preferred sound playback device as describes above, the re-open the application.
Problem: My computer's system sound (beeps and bells) are going into my mixer.
• The sound playback device is still set to your mixer. Change the preferred sound playback device as describes above.
- Silence your computer's systems sound altogether by doing the following: Select sounds and audio devices in the control panel and switch to the sound tab. Under sound scheme, choose the no sounds option and click OK.
- If you have a MAC, you didn't select play alerts and sound effects through internal speakers. See the MAC section for how do this.
text_image
Audio MIDI Setup Audio Devices Mali Devices System Settings Default Input: USB Audio CODEC Default Output: USB Audio CODEC System Output: Built-in Output Properties For: Built-in Microphone Clock Source: Default Configure Speakers Audio Input Master Stream Source: Internal microphone Format: 44100.0 kHz 2ch-24bit Ch Volume Value dB Mute Thru M 1 0.50 7.00 2 0.50 7.00 Output is not supportedtext_image
Audio MIDI Setup Audio Devices MIDI Devices System Settings Default Input: USB Audio CODEC Default Output: USB Audio CODEC System Output: Built-in Output Properties For: Built-in Microphone Clock Source: Default Configure Speakers Audio Input Master Stream Source: Internal microphone Format: 44100.0 Hz 2ch-24bit Ch Volume Value d8 Mute Thru M 1 0.50 7.00 2 0.50 7.00 Output is not supportedtext_image
Audio MIDI Setup Audio Devices MIDI Devices System Settings Default Input: USB Audio CODEC Default Output: USB Audio CODEC System Output: Built-in Output Properties For: Built-in Microphone Clock Source: Default Cur-Figure Speakers Audio Input Master Stream Source: Internal microphone Format: 44100.0 Hz 2ch=24bit Ch Volume Value dI Mute Thru M 1 3.58 7.00 2 3.58 7.00 Output is not supportedtext_image
RL Power Dynamics Professional Audio 1 PWR 2 STENSO 3 MACHIN 4 STENSO 5 MACHIN 6 STENSO 7 MACHIN 8 STENSO 9 MACHIN 10 STENSO 11 MACHIN 12 STENSO 13 MACHIN 14 STENSO 15 MACHIN 16 STENSO 17 MACHIN 18 STENSO 19 MACHIN 20 STENSO 21 MACHIN 22 STENSO 23 MACHIN 24 STENSO 25 MACHIN 26 STENSO 27 MACHIN 28 STENSO 29 MACHIN 30 STENSO 31 MACHIN 32 STENSO 33 MACHIN 34 STENSO 35 MACHIN 36 STENSO 37 MACHIN 38 STENSO 39 MACHIN 40 STENSO 41 MACHIN 42 STENSO 43 MACHIN 44 STENSO 45 MACHIN 46 STENSO 47 MACHIN 48 STENSO 49 MACHIN 50 STENSO 51 MACHIN 52 STENSO 53 MACHIN 54 STENSO 55 MACHIN 56 STENSO 57 MACHIN 58 STENSO 59 MACHIN 60 STENSO 61 MACHIN 62 STENSO 63 MACHIN 64 STENSO 65 MACHIN 66 STENSO 67 MACHIN 68 STENSO 69 MACHIN 70 STENSO 71 MACHIN 72 STENSO 73 MACHIN 74 STENSO 75 MACHIN 76 STENSO 77 MACHIN 78 STENSO 79 MACHIN 80 STENSO 81 MACHIN 82 STENSO 83 STENSO 84 STENSO 85 STENSO 86 STENSO 87 STENSO 88 STENSO 89 STENSO 90 STENSO 91 STENSO 92 STENSO 93 STENSO 94 STENSO 95 STENSO 96 STENSO 97 STENSO 98 STENSO 99 STENSO
text_image
PDZM700 4 ZONE MIXER Power Dynamics Professional Audio OFF ON POWER IN POWER IN PROVINCULARS & IN www.power-dynamics.in OUTPUTS CN 5 USB 2 USB 1 CN 2 CN 1 CN 3 CN 2 CN 1 R10 2 LINS 6 LINS 6 R10 2 LINS 4 LINS 3 JAX 3 LINS 2 CD 3 AUX 3 LINS 1 CP 1 AIN 1 MATERIAL PARTS LIP RASS LIP R NATIONAL R/C R/C R/C R/C R/C R/C R/C R/C R/C R/C R/C R/C R/C R/C R/C R/C R/C R/C R/C R/C R/C R/C R/C R/C R/C R/C R/C R/C R/C R/C R/C R/C R/C R/C- Wejścia AUX (RCA)
text_image
Audio MIDI Setup Audio Devices Mali Devices System Settings Default Input: USB Audio CODEC Default Output: USB Audio CODEC System Output: Built-in Output Properties For: Built-in Microphone Clock Source: Default Configure Speakers Audio Input Master Stream Source: internal microphone Format: 44100.0 Hz 2ch-24bit Ch Volume Value dB Mute Thru M 1 0.58 7.00 2 0.58 7.00 Output is not supportedFrequency response : 15Hz – 30kHz
THD : <0.05%
Equalizer : -30dB / +6dB
Signal to noise ratio : >110dB
Dimensions : 178 x 482 x 100mm / 19" 4U
Weight : 3.8kg
The specifications are typical. The actual values can slightly change from one unit to the other. Specifications can be changed without prior notice.
The products referred to in this manual conform to the European Community Directives to which they are subject:
European Union
Tronios B.V.,
7602KR Almelo, The Netherlands
2014/35/EU
2014/30/EU
2011/65/EC

United Kingdom
Tronios Ltd.,
130 Harley Street,
London W1G 7JU, United Kingdom
S.I. 2016:1101
S.I. 2016:1091
S.I. 2012:3032

Specifications and design are subject to change without prior notice.
www.tronios.com
Copyright © 2022 by TRONIOS the Netherlands