HLS 215 - Blower Hurricane - Free user manual and instructions
Find the device manual for free HLS 215 Hurricane in PDF.

User questions about HLS 215 Hurricane
0 question about this device. Answer the ones you know or ask your own.
Ask a new question about this device
Download the instructions for your Blower in PDF format for free! Find your manual HLS 215 - Hurricane and take your electronic device back in hand. On this page are published all the documents necessary for the use of your device. HLS 215 by Hurricane.
USER MANUAL HLS 215 Hurricane
text_image
Labeled diagram of a handheld device with numbered parts for identification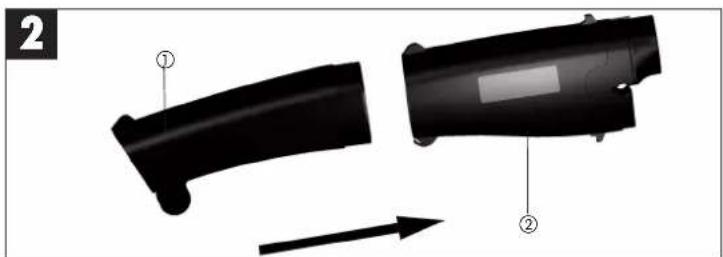
natural_image
Two black plastic components with arrows indicating direction, no text or symbols present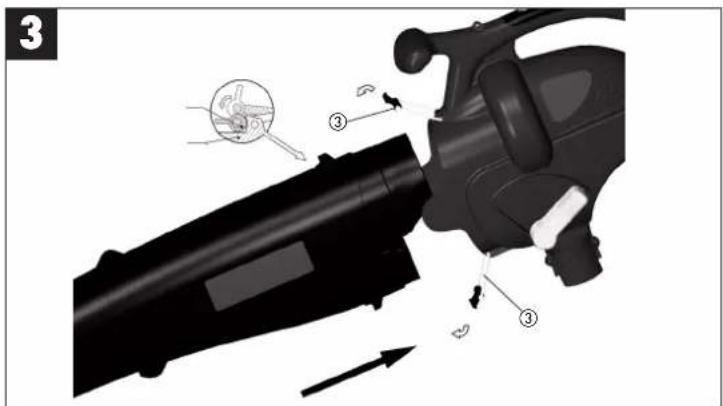
text_image
Technical diagram of a mechanical device with numbered parts and directional arrows indicating assembly or operation.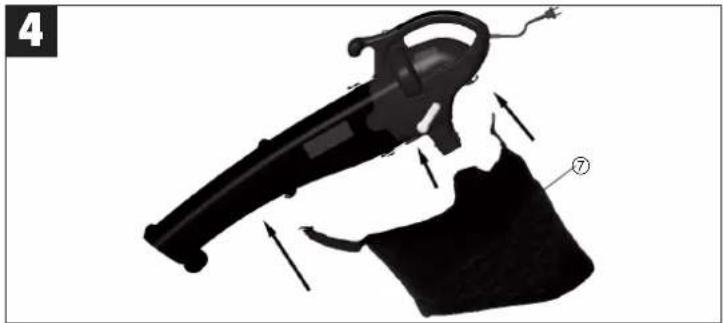
natural_image
Diagram of a handheld device with labeled parts (no text or symbols present)
natural_image
Close-up of a black handheld device with attached cable (no visible text or symbols)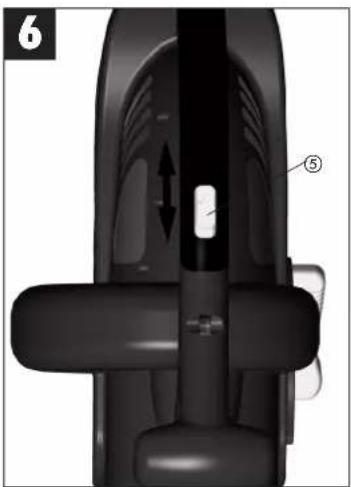
natural_image
Close-up of a mechanical component with labeled parts (6 and 5), showing internal structure and movement arrows (no readable text or symbols)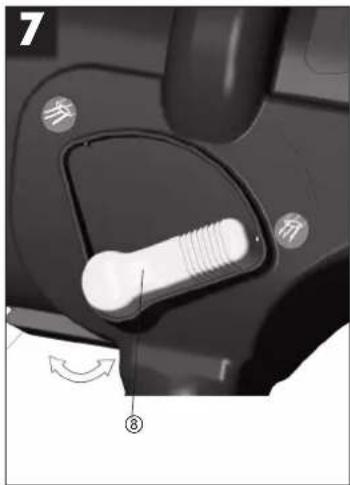
text_image
7 车 价 ⑧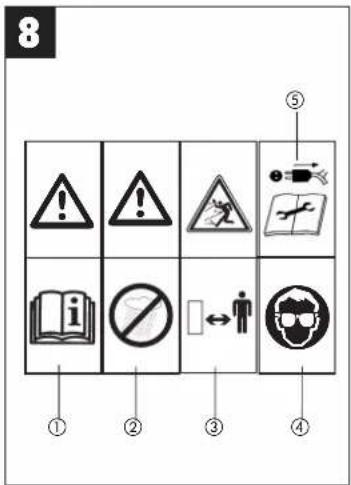
text_image
8 ① ② ③ ④ ⑤5
D
- Front suction tube
- Rear suction tube
- Clip fastener
- Carrying strap
- ON/OFF switch
- Power cord
- Debris bag
- Selector switch for vacuum/blower
- Guide roller
2.0 Proper use
◆The garden blower vac is designed to handle only foliage and garden refuse such as grass and small branches. Any other use is prohibited.
This tool is only intended for use around the home and should only be operated within its design limitations. Tools of this category which are designed for home and garden use should only be operated in such settings. Tools of this category are not suitable for use in public facilities, parks and sports centers, on farms or in the forestry sector.
3.0 Important information
Please read the directions for use carefully and observe the information provided. It is important to consult these instructions in order to acquaint yourself with the tool, its proper use and safety precautions.
Please observe the general maximum operating times as well as local regulations for tool operation.
Keep these instructions in a safe place.
Safety information
- General instructions
◆Read the complete operating manual with due care. Acquaint yourself with the controls and how to use the tool.
◆Never allow children to use the tool.
◆Never allow other persons who are not familiar with the operating instructions to use the tool. Contact your local government offices for information regarding minimum age requirements for operating the tool.
◆Never use the tool when there are people – particularly children – or pets nearby.
◆The user is responsible for any accidents or hazards suffered by third parties or their
property.
- Preparation
◆Always wear sturdy footwear and long trousers when using the tool.
◆Never wear loose fitting clothes or jewelry. They may get drawn into the suction opening. Rubber gloves and non-slip shoes are recommended when working outdoors. Wear a hair net if you have long hair.
◆Wear safety goggles while you work.
◆Use a dust mask when working on dusty jobs
◆Always check the tool, the power cable and the extension cable before using the tool. Only operate the tool when it is in good working order and is not damaged in any way. Damaged parts have to be replaced immediately by a qualified electrician.
◆Never use the tool if any of its safety devices or guards are damaged or if any safety attachments such as deflectors and/or grass catching devices are missing.
When working outdoors, use only extension cables which are approved for outdoor use. Extension cables must have a minimum cross-section of 1.5 mm². Plug connections must have earthing contacts and be protected from rainwater.
- Operation
◆Always trail the power cable behind the tool.
◆If the power cable or extension cable is damaged, pull the plug out of the socket.
◆Do not carry the tool by its power cable.
◆Always pull out the power plug:
- when the tool is not being used, when it is being transported or when you leave it unsupervised.
- when you are checking the tool, cleaning it or removing blockages.
- when you want to carry out cleaning or maintenance work on the tool or replace accessories.
- after the tool impacts with foreign bodies or you notice unusual vibrations.
◆Use the tool only in broad daylight or in well-lit conditions.
◆Do not underestimate the forces involved. Make sure you stand squarely and keep your balance at all times.
◆If possible, avoid using the tool on wet grass.
◆Ensure that you maintain a steady foothold particularly while working on slopes.
◆Always walk. Never run.
◆Always keep the ventilation opening clean.
GB
4. Maintenance and storage
◆Check that all nuts, bolts and screws are securely tightened in order to be sure that the machine is in a safe working condition.
◆Frequently check the grass catching devices for signs of wear and deformation.
◆Only use replacement cutters of the correct type.
◆For your own safety, replace worn or damaged parts without delay.
◆Electric tools should be kept in a dry place when not in use.
The tool can be plugged into any socket-outlet (with 230 V AC) that is equipped with a 10A fuse or higher. The socket-outlet has to be safeguarded by an earth-leakage circuit breaker (e.l.c.b.). The operating current must not exceed 30 mA.
Safety pictograms on the tool (Fig. 10)
- Read the directions for use before operating the tool.
- Do not use the tool in rain or snow. Do not expose the tool to wet conditions.
- Keep all other persons away from the danger zone.
- Wear goggles and ear muffs.
- Switch off the tool and pull out the power plug before carrying out any cleaning or maintenance work.
4.0 Technical data
AC motor 230V - / 50 Hz
| Output 2150 watts | |
| no load speed n_o | 13.000 min ^-1 |
| Air velocity 270 km/h | |
| Suction rate 780 m | h |
| Volume of debris bag approx. 45 l | |
| Sound volume level LWA 110 dB (A) | |
| Sound pressure level LPA 90 dB (A) | |
| Vibration ah < 2,5 m/s | ^-1 |
5.0 Assembly
5.1. Mounting the vacuum tube (Fig. 2,3)
First plug together the front suction tube (1) and the rear suction tube (2). When the two parts engage correctly they make an audible click.
Then slip the assembled suction tube in the motor housing and fasten it in place with the two clip fasteners (3).
Important: Please note that the two suction tubes must always be joined together before they are mounted on the motor housing, and that they must never be taken apart when mounted!
Important: The garden blower vac is equipped with a safety lock-off switch which only works when the suction tube is mounted on the motor housing.
5.2. Mounting the debris bag (Fig. 4)
Slip the debris bag (7) over the socket on the motor housing. It engages correctly when it makes an audible click. Then hang the two hooks on the suction tube and the motor housing.
6.0 Prior to starting up
- Start up the tool only after it is fully assembled. Always inspect the tool power cord for damage before starting up. The tool may only be used if the cord is in flawless condition.
7.0 Starting up
7.1. Sizing the strap (Fig. 1)
◆Size the length of the carrying strap (4) so that the vacuum tube just clears the ground. The guide rollers (9) at the bottom end of the suction tube will help you to maneuver the suction tube on the ground.
7.2. Connecting the tool to the power supply and switching on (Fig. 5, 6)
◆Insert the tool plug into the power cord coupling (extension).
◆Secure the power cord (6) with the sleeve provided on the tool as shown.
◆To switch on, push the ON/OFF switch (5) toward 1. To switch off, push the ON/OFF switch toward 0.
7.3 Selecting the mode of operation
7.3.1 Vacuum (Abb. 7)
◆Turn the lever (8) all the way left to "Vacuum". You can do this regardless of whether the tool is running or not.

GB
7.3.2 Blowing (Fig. 7)
◆Tum the lever (8) all the way right to "Blower".
You can do this regardless of whether the tool is running or not.
◆Channel the air stream forward and walk slowly to blow foliage or garden refuse into a pile or to clear out hard-to-reach places.
Important!
Empty the debris bag before blowing. Otherwise, the material that has been vacuumed up could drop out.
7.3.3 Emptying the debris bag and pre-screen
(Fig. 1)
Empty the debris bag (7) in good time. When the bag is heavily loaded with material, vacuum power is considerably reduced. Deposit organic refuse at a compost site.
◆Switch off the tool and pull out the plug.
◆Open the zipper on the debris bag (7) and shake out the material.
8.0 Maintenance and cleaning
IMPORTANT!
All maintenance, service and cleaning work must be performed after the power cord has been pulled out.
◆Do not use high-pressure cleaners or running water to clean the tool.
◆Do not use any aggressive cleaning agents.
◆After shaking out the debris bag, turn it inside out and thoroughly clean it in order to prevent mould and unpleasant odors from forming.
◆You can use soap and water to clean out a heavily soiled debris bag.
◆Rub a bar of dry soap across the zipper teeth if the zipper becomes difficult to pull.
◆Always keep the tool and ventilation slats clean.
◆Use a damp rag to wipe dirt marks off of the tool. Clean the vacuum/blower tube with a brush upon evidence of dirt and grime.
◆Dirt and grime can make the switch (blower/vacuum) more difficult to operate as a result of the material that swirls up off the ground. When this occurs, simply flip the switch back and forth a few times, which should bring it back to the normal feel.
9.0 Repair
Should the tool experience problems beyond those
mentioned above, let only an authorized professional or a customer service shop perform an inspection.
10.0 Disposal
The tool, accessories and packaging should be disposed of in an environmentally-friendly fashion. Plastic parts are coded for purposes of separation when recycling.
11. Ordering replacement parts
Please quote the following data when ordering replacement parts:
● Type of machine
● Article number of the machine
● Identification number of the machine
● Replacement part number of the part required
For our latest prices and information please go to www.isc-gmbh.info

12.0 Troubleshooting guide
| Fault | Possible cause | Remedy |
| Motor does not start No | electricity at the plug Check the cord and fuses | |
| Power cord defective Check the power cord | ||
| Motor terminals disconnected Have the unit checked by a customer service workshop | ||
| Suction tube not mounted correctly Mount the tube correctly | ||
GB
13
F
The product described in these instructions comes with a 5-year warranty
covering debts. This 5-year warranty period begins with the passing of net or when the customer receives the product.
For warranty claims to be accepted, the product has to receive the correct
maintenance and be put to the proper use as described in the operating
instructions.
Your statutory rights of warranty are naturally unaffected during these 5
Vogra.
This warranty applies in Germany, or in the respective country of the
manufacturer's main regional sales partner, as a supplement to local
regulations. Please note the details for contacting the customer service center-perception by your opinion on the service acknowledges later twice.
replottable for your logic of the otherwise unclear noise box.
© CERTIFICADO DE GARANTIA
Eschenstraße 6 · D-94405 Landau/Isar (Germany)
Info-Tel. 0180-5 120 509 • Telefax 0180-5 835 830
natural_image
Simple line drawing of a trash bin with two crossed lines indicating no waste or prohibition (no text or symbols)⑥ Nur für EU-Länder
Werfen Sie Elektrowerkzeuge nicht in den Hausmüll!
Gemäß europäischer Richtlinie 2002/96/EG über Elektro- und Elektronik-Altgeräte und Umsetzung in nationales Recht müssen verbrauchte Elektrowerkzeuge getrennt gesammelt werden und einer umweltgerechten Wiederverwertung zugeführt werden.
Recycling-Alternative zur Rücksendeaufforderung:
Der Eigentümer des Elektrogerätes ist alternativ anstelle Rücksendung zur Mitwirkung bei der sachgerechten Verwertung im Falle der Eigentumsaufgabe verpflichtet. Das Altgerät kann hierfür auch einer Rücknahmestelle überlassen werden, die eine Beseitigung im Sinne der nationalen Kreislaufwirtschafts- und Abfallgesetzes durchführt. Nicht betroffen sind den Altgeräten beigefügte Zubehörtelle und Hilfsmittel ohne Elektrobestandteile.
For EU countries only
Never place any electric tools in your household refuse.
To comply with European Directive 2002/96/EC concerning old electric and electronic equipment and its implementation in national laws, old electric tools have to be separated from other waste and disposed of in an environment-friendly fashion, e.g. by taking to a recycling depot.
Recycling alternative to the demand to return electrical devices:
As an alternative to returning the electrical device, the owner is obliged to cooperate in ensuring that the device is properly recycled if ownership is relinquished. This can also be done by handing over the used device to a returns center, which will dispose of it in accordance with national commercial and industrial waste management legislation. This does not apply to the accessories and auxiliary equipment without any electrical components which are included with the used device.
① Uniquement pour les pays de l'Union Européenne
Ne jetez pas les outils électriques dans les ordures ménagères.
Selon la norme européenne 2002/96/CE relative aux appareils électriques et systèmes électroniques usés et selon son application dans le droit national, les outils électriques usés doivent être récoltés à part et apportés à un recyclage respectueux de l'environnement.
Possibilité de recyclage en alternative à la demande de renvoi :
Le propriétaire de l'appareil électrique est obligé, en guise d'alternative à un envoi en retour, à contribuer à un recyclage effectué dans les règles de l'art en cas de cessation de la propriété. L'ancien appareil peut être remis à un point de collecte dans ce but. Cet organisme devra l'éliminer dans le sens de la Loi sur le cycle des matières et les déchets. Ne sont pas concernés les accessoires et ressources fournies sans composants électroniques.
The reprinting or reproduction by any other means, in whole or in part, of documentation and papers accompanying products is permitted only with the express consent of ISC GmbH.