KingKorg NEO - Synthesizer KORG - Free user manual and instructions
Find the device manual for free KingKorg NEO KORG in PDF.

User questions about KingKorg NEO KORG
0 question about this device. Answer the ones you know or ask your own.
Ask a new question about this device
Download the instructions for your Synthesizer in PDF format for free! Find your manual KingKorg NEO - KORG and take your electronic device back in hand. On this page are published all the documents necessary for the use of your device. KingKorg NEO by KORG.
USER MANUAL KingKorg NEO KORG
Sophisticated sound 4
Intuitive operation....4
Controllers and functions that support your playing ..... 4
Panel description and functions ..... 5
Front panel (Joystick/Audio) 5
Front panel (OSCILLATOR/FILTER/AMP)....6
Front panel (FX) 7
Front panel (LFO/EG) 8
Front panel (Main Control) 9
Front panel (VOCODER) 10
Rear panel....11
Making connections and turning on the power....12
Connections....12
Turning the power on/off 13
Auto power-off 13
Playing the KingKORG NEO 13
Selecting and playing a program 13
Selecting a program 14
Adding variety to the sound ..... 14
Using the controllers....14
Playing the keyboard 14
Playing arpeggios 15
Playing vocoder sounds....15
Editing the sound 16
How a program is organized 16
Basic program editing 18
About global settings 20
Other functions....20
Saving 21
Saving your settings 21
Troubleshooting....22
Specifications 23
Program list 112
About the Owner's Manual
How this manual is organized and used
The documentation for this product consists of the following:
• Precautions (printed material and PDF data)
- Quick Start Guide (printed material and PDF data)
- Owner's Manual (PDF)
- Parameter Guide (PDF)
Download the PDF data from the Korg website (www.korg.com).
Precautions
Explains how to safely and correctly use this instrument. Read this material first.
Quick Start Guide
Explains how to get started using the instrument right away.
Owner's Manual
Explains how to use this instrument in detail. Refer to the Owner's Manual whenever you have questions on how to use a certain feature or operate the controls.
The Owner's Manual also contains information on troubleshooting as well as the specifications.
Parameter Guide
This provides information about all of the KingKORG NEO's parameters.
Read this guide when you want to find out what specific parameters do.
The parameter guide is structured as follows.
- Parameters
- Effects
• MIDI
Conventions in this manual
Abbreviations for the manuals
QSG: Quick Start Guide
OM: Owner's Manual
PG: Parameter Guide
Symbol TIP
These symbols respectively indicate a point of caution or a tip.
Display indications
The values of various parameters shown in the manual are only examples; they might not match what you see on the KingKORG NEO's display.
Example of notation on the main display page
GLOBAL "g14: Power Off" page
In Global mode, the page name will be displayed on the top of the main display.
Main Features
text_image
KORG OSCILLATOR FILTER AMP PRE FX MOD FX REV/DELAY LFO EQ KingKORG NEOSophisticated sound
1. Synthesizer functionality based on XMT modeling sound generator
XMT (eXpanded Modeling Technology) is proprietary Korg technology that allows a wide range of sonic variation to be created with simple operations. The KingKORG NEO provides an extremely diverse variety of oscillator algorithms, such as the sawtooth and square waveforms typically found on an analog synthesizer, but also including noise and PCM/DWGS.
2. A filter with personality
The filter is one of the most important elements that determine the character of an analog synthesizer. The KingKORG NEO provides not only a high-quality digital filter but also faithful modeling of the analog filters found on classic synthesizers of the past, allowing aggressive shaping of the sound.
3. Vocoder
The KingKORG NEO features a vocoder function that can use your voice input via a microphone to modify the sound of the oscillator, producing an effect as though the synthesizer were talking.
4. Virtual patching
Six sets of virtual patching allow control signals such as EG, LFO, and joystick functions to be virtually connected to sound parameters such as pitch or cutoff, letting you modulate the parameters for even greater sound-creating flexibility.
5. 200 built-in programs
The KingKORG NEO contains 200 programs organized into eight categories such as synth, lead, and bass. You'll be able to immediately start playing a broad range of sounds. There's also a user area with 100 vacant spaces for you to store your own original sounds.
Intuitive operation
6. Front panel
You can edit sounds intuitively by directly using the knobs and buttons that are organized into sections on the panel.
The display also provides edit pages that allow you to edit all of the KingKORG NEO's parameters.
7. Favorites
There's a Favorites function that lets you recall your favorite programs at one touch. You can register a total of 40 programs in the eight category/favorites buttons and recall them instantly.
Controllers and functions that support your playing
8. Step arpeggiator
The step arpeggiator automatically generates an arpeggiated phrase (broken chord) when you hold down a chord on the keyboard. You can choose from six arpeggio types and specify the duration and spacing of the notes. You can also turn each step on/off to enjoy even more variety.
9. Joystick
By moving the joystick up/down/left/right you can freely control pitch bend and program parameters. You can also connect a foot switch and play while holding the joystick effect.
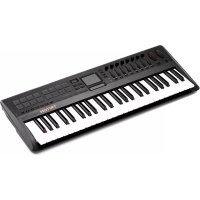
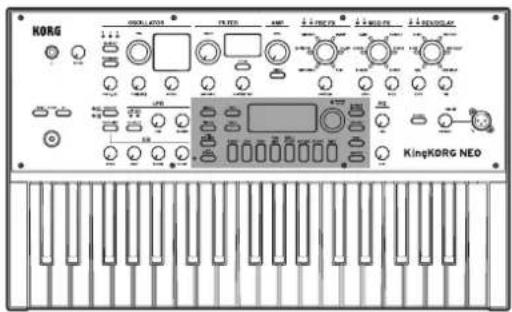
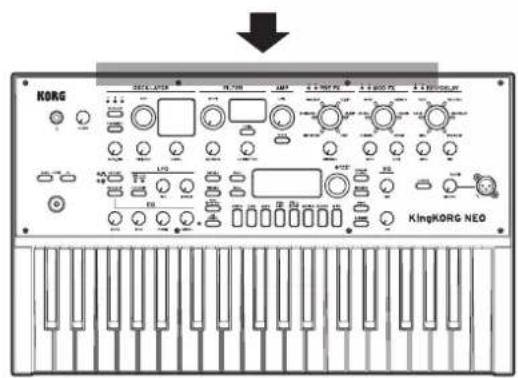
Panel description and functions
Front panel (Joystick/Audio)
text_image
KORG KingKORG NEO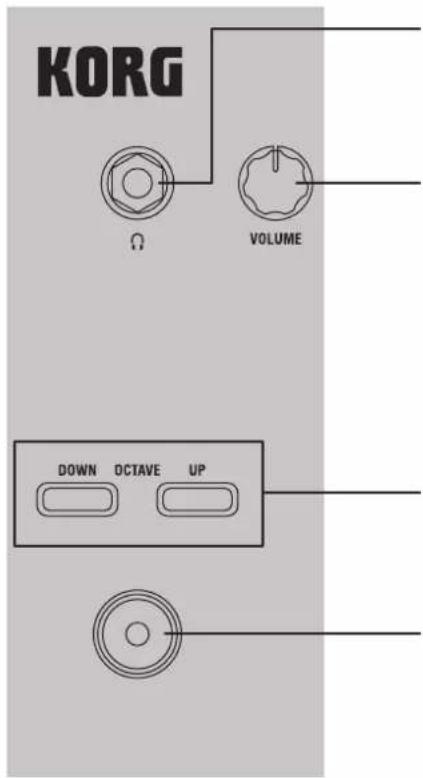
text_image
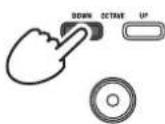
KORG Ω VOLUME DOWN OCTAVE UPHeadphone jack
Connect the plug (standard 6.3 mm (1/4") phone plug) of your headphones here. This jack will output the same signals as the OUTPUT jacks (L/MONO, R). Use the VOLUME knob to adjust the headphone volume.
VOLUME knob
This adjusts the volume of the OUTPUT jacks (L/MONO, R) and headphone jack.
OCTAVE UP/DOWN buttons
This shifts the range of notes assigned to the keyboard up or down in one-octave steps over a range of two octaves (OM: p. 14 "Playing the keyboard")
Joystick (JS)
The joystick controls pitch and the depth of modulation (expression). Moving the joystick to the left/right will control pitch bend, and moving it up/down will control modulation. You can assign separate types of modulation to the upward and downward directions.
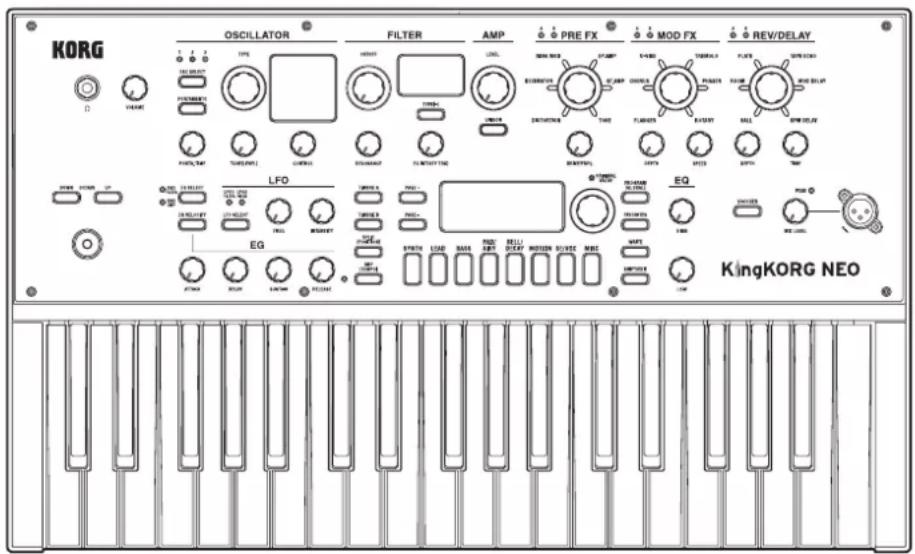
Front panel (OSCILLATOR/FILTER/AMP)
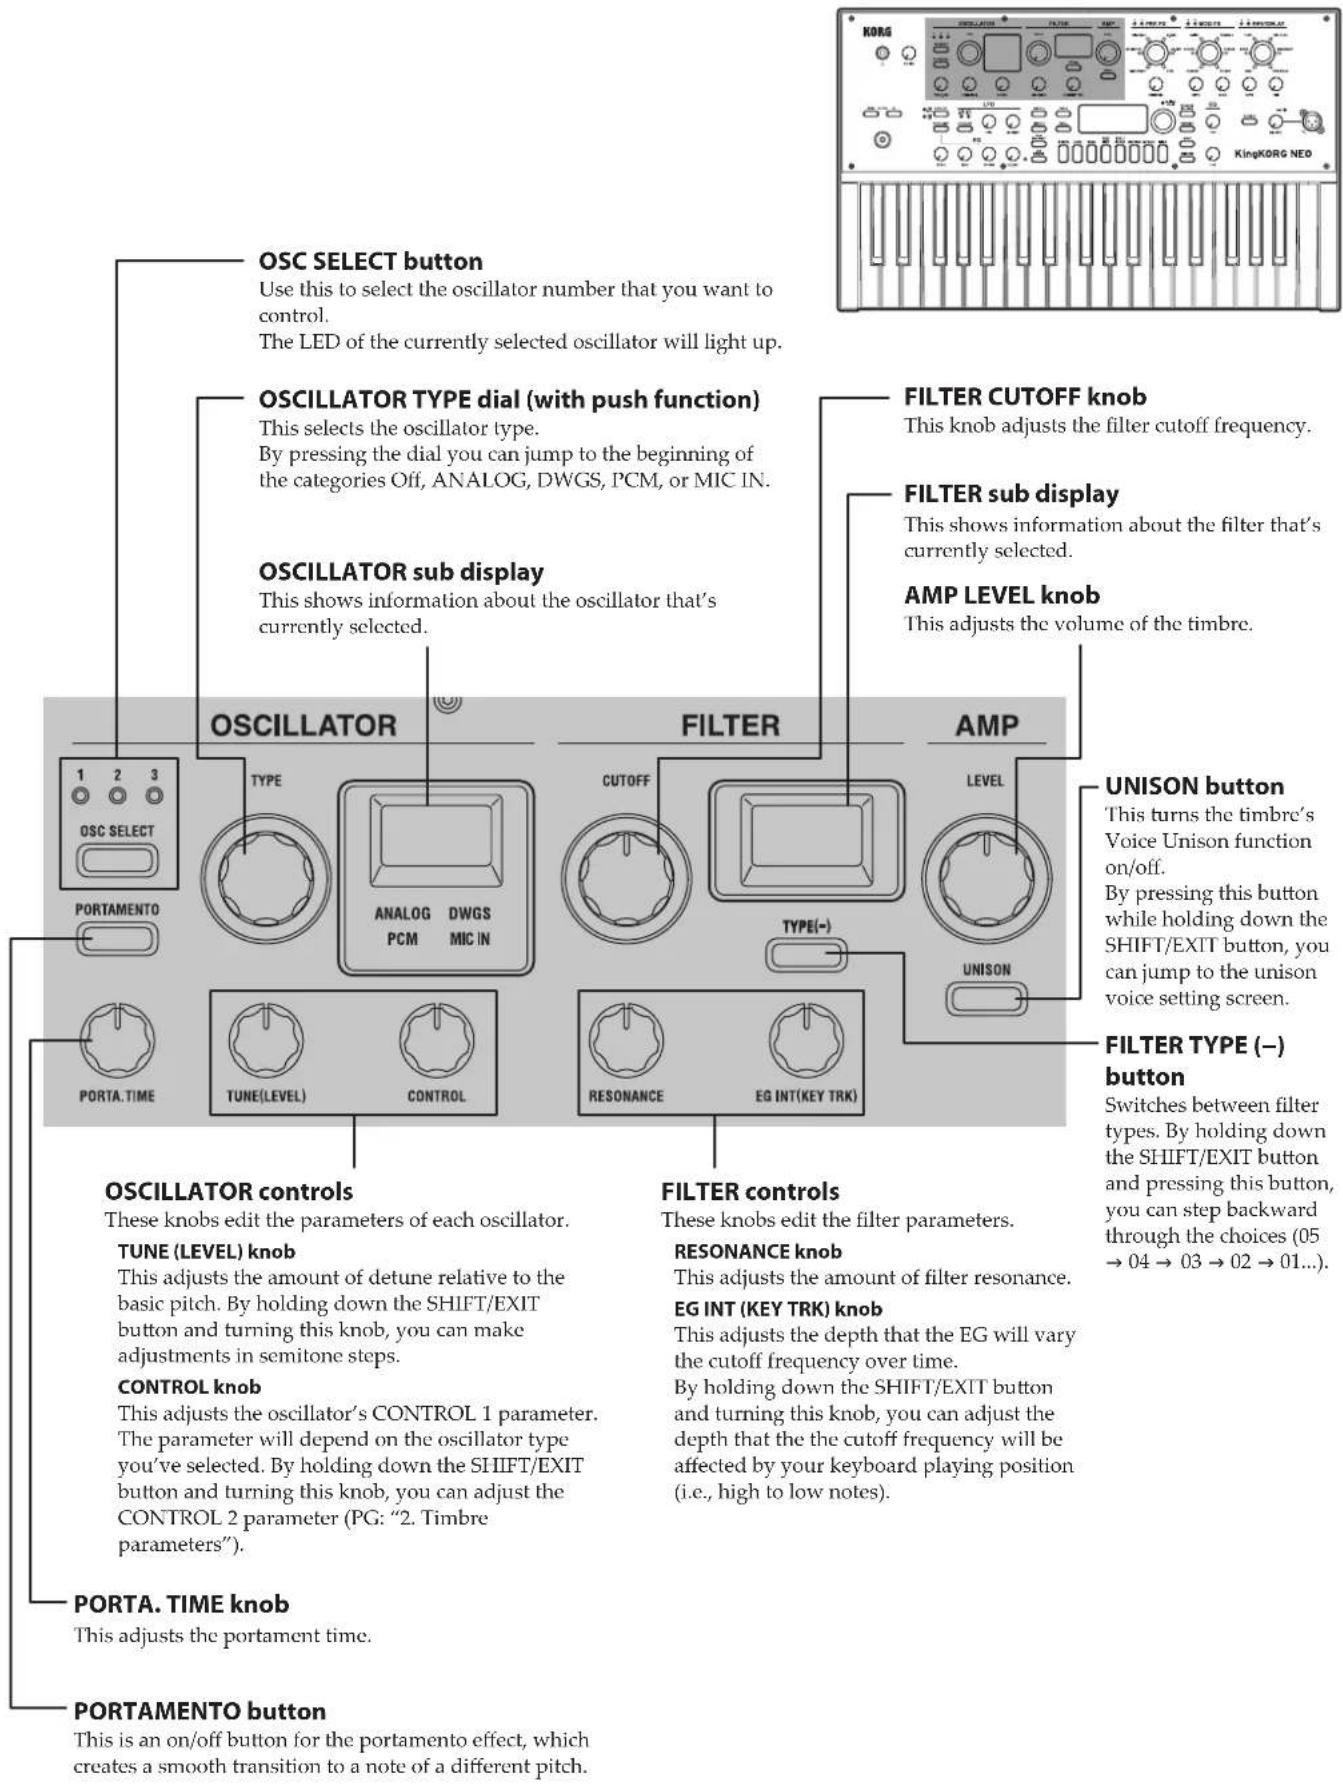
text_image
OSC SELECT button Use this to select the oscillator number that you want to control. The LED of the currently selected oscillator will light up. OSCILLATOR TYPE dial (with push function) This selects the oscillator type. By pressing the dial you can jump to the beginning of the categories Off, ANALOG, DWGS, PCM, or MIC IN. OSCILLATOR sub display This shows information about the oscillator that's currently selected. FILTER CUTOFF knob This knob adjusts the filter cutoff frequency. FILTER sub display This shows information about the filter that's currently selected. AMP LEVEL knob This adjusts the volume of the timbre. OSCILLATOR TYPE ANALOG DWGS PCM MIC IN FILTER CUTOFF TYPE(−) RESONANCE EG INT(KEY TRK) AMP LEVEL UNISON ONISON button This turns the timbre's Voice Unison function on/off. By pressing this button while holding down the SHIFT/EXIT button, you can jump to the unison voice setting screen. FILTER TYPE (−) button Switches between filter types. By holding down the SHIFT/EXIT button and pressing this button, you can step backward through the choices (05 → 04 → 03 → 02 → 01...). OSCILLATOR controls These knobs edit the parameters of each oscillator. TUNE (LEVEL) knob This adjusts the amount of detune relative to the basic pitch. By holding down the SHIFT/EXIT button and turning this knob, you can make adjustments in semitone steps. CONTROL knob This adjusts the oscillator's CONTROL 1 parameter. The parameter will depend on the oscillator type you've selected. By holding down the SHIFT/EXIT button and turning this knob, you can adjust the CONTROL 2 parameter (PG: "2. Timbre parameters"). PORTA. TIME knob This adjusts the portament time. FILTER controls These knobs edit the filter parameters. RESONANCE knob This adjusts the amount of filter resonance. EG INT (KEY TRK) knob This adjusts the depth that the EG will vary the cutoff frequency over time. By holding down the SHIFT/EXIT button and turning this knob, you can adjust the depth that the cutoff frequency will be affected by your keyboard playing position (i.e., high to low notes). PORTAMENTO button This is an on/off button for the portamento effect, which creates a smooth transition to a note of a different pitch.Front panel (FX)

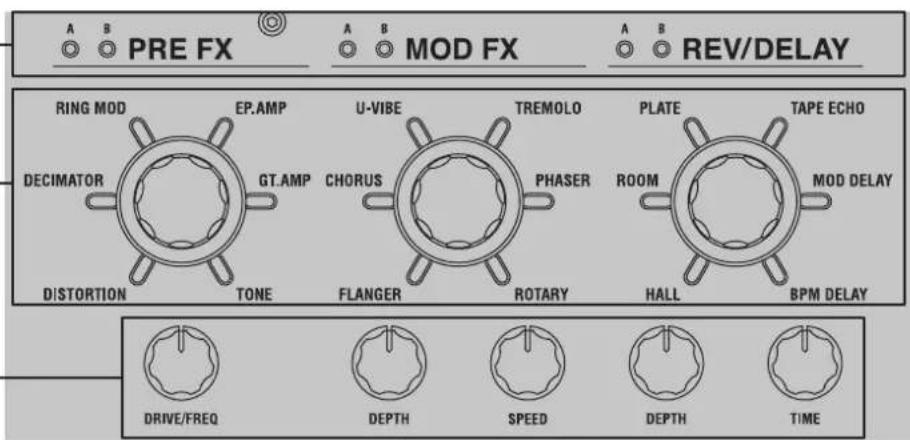
text_image
KORG KINGKORG NEOFX control knobs
These knobs adjust the PRE FX, MOD FX, and REV/DELAY parameters.
FX type select dials (with push function)
These dials select the effect types for PRE FX, MOD FX, and REV/DELAY. By pressing a dial you can switch the timbre where the effect will be applied.
Timbre LEDs
The LED of the timbre where you're applying an effect will light up.
text_image
A B PRE FX A B MOD FX A B REV/DELAY RING MOD EP.AMP U-VIBE TREMOLO PLATE TAPE ECHO DECIMATOR GT.AMP CHORUS PHASER ROOM MOD DELAY DISTORTION TONE FLANGER ROTARY HALL BPM DELAY DRIVE/FREQ DEPTH SPEED DEPTH TIMEMaster effects (MASTER FX)
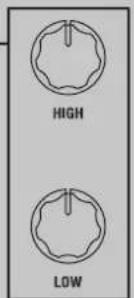
EQ controls
These adjust the high and low frequency regions of the KingKORG NEO's audio output.
HIGH knob
This knob adjusts the tone of the high-frequency region. By operating this knob while holding down the SHIFT/EXIT button, you can adjust the HIGH cutoff frequency.
LOW knob
This knob adjusts the tone of the low-frequency region. By operating this knob while holding down the SHIFT/EXIT button, you can adjust the LOW cutoff frequency.
EQ
text_image
HIGH LOWGlobal effects (GLOBAL FX)
Front panel (LFO/EG)

text_image
KORG KingKORG NEO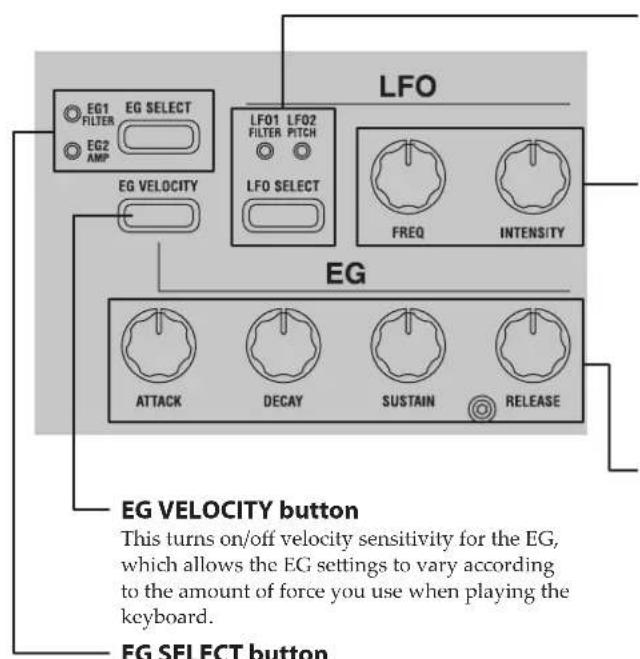
text_image
LFO EG1 EG SELECT FILTER EG2 AMP EG VELOCITY LF01 LF02 FILTER PITCH LFO SELECT FREQ INTENSITY EG ATTACK DECAY SUSTAIN RELEASE EG VELOCITY button This turns on/off velocity sensitivity for the EG, which allows the EG settings to vary according to the amount of force you use when playing the keyboard. EG SELECT buttonEG SELECT button
This selects the EG that will be edited by the EG controls. The LED of the currently selected EG will light up.
The LED will blink in synchronization with the EG's effect.
LFO SELECT button
This button selects the LFO that will be edited by the LFO controls. The LED of the currently selected LFO will light up. The LED will blink in time with the LFO frequency.
LFO controls
Use these to edit the LFO parameters.
FREQ knob
This knob adjusts the frequency of the LFO.
INTENSITY knob
This knob adjusts the depth to which the LFO will affect the filter or pitch.
EG controls
These adjust the EG parameters.
ATTACK knob
This adjusts the time from note-on (the moment you play a key) until the attack level (the maximum value of the envelope) is reached.
DECAY knob
This adjusts the time from when the attack level is reached until the sustain level is reached.
SUSTAIN knob
This adjusts the level where the volume will be held after the decay time has elapsed.
RELEASE knob
This adjusts the amount of time from note-off (the moment you release the key) until the volume has completely decayed to silence.
Front panel (Main Control)
text_image
KORG KingKORG NEO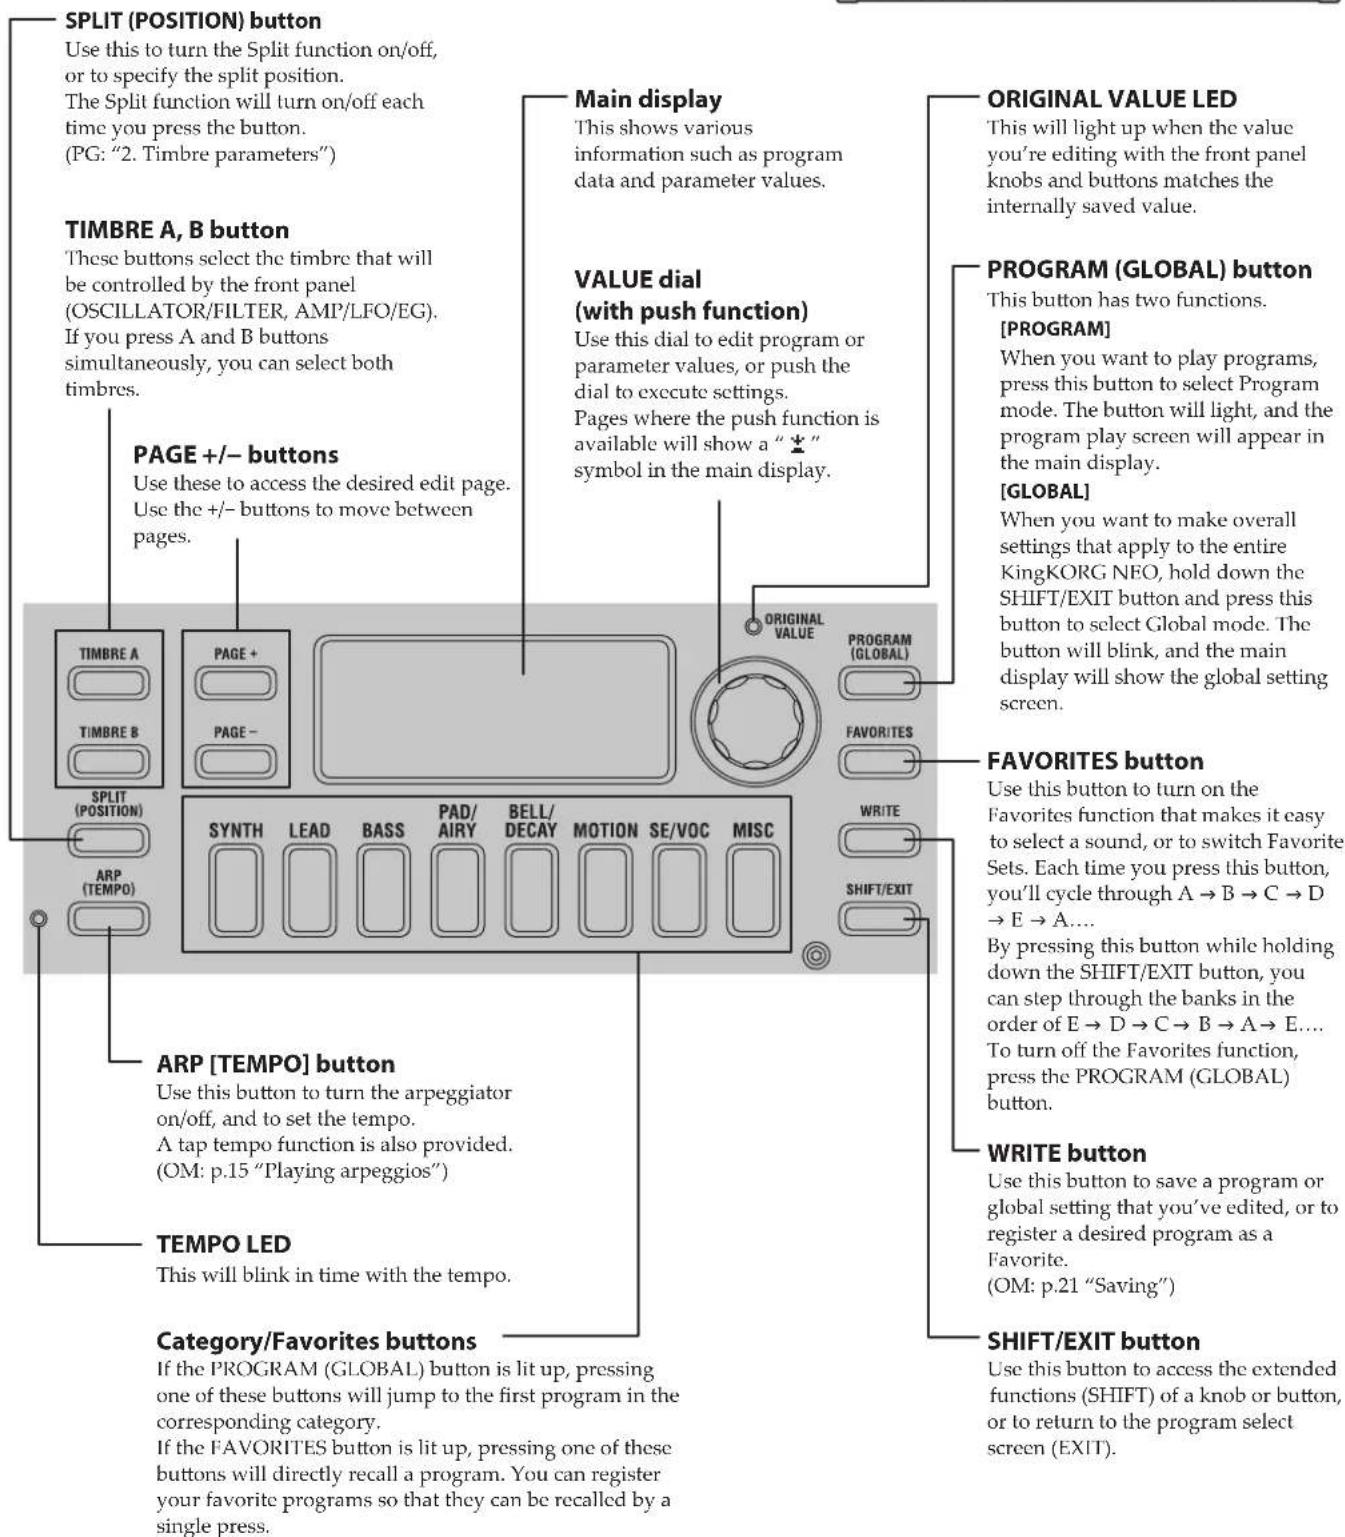
text_image
SPLIT (POSITION) button Use this to turn the Split function on/off, or to specify the split position. The Split function will turn on/off each time you press the button. (PG: "2. Timbre parameters") TIMBRE A, B button These buttons select the timbre that will be controlled by the front panel (OSCILLATOR/FILTER, AMP/LFO/EG). If you press A and B buttons simultaneously, you can select both timbres. PAGE +/- buttons Use these to access the desired edit page. Use the +/- buttons to move between pages. TIMBRE A TIMBRE B SPLIT (POSITION) ARP (TEMPO) PAGE + PAGE - SYNTH LEAD BASS PAD/ AIRY BELL/ DECAY MOTION SE/VOC MISC ORIGINAL VALUE PROGRAM (GLOBAL) FAVORITES WRITE SHIFT/EXIT ARP [TEMPO] button Use this button to turn the arpeggiator on/off, and to set the tempo. A tap tempo function is also provided. (OM: p.15 "Playing arpeggios") TEMPO LED This will blink in time with the tempo. Category/Favorites buttons If the PROGRAM (GLOBAL) button is lit up, pressing one of these buttons will jump to the first program in the corresponding category. If the FAVORITES button is lit up, pressing one of these buttons will directly recall a program. You can register your favorite programs so that they can be recalled by a single press. Main display This shows various information such as program data and parameter values. VALUE dial (with push function) Use this dial to edit program or parameter values, or push the dial to execute settings. Pages where the push function is available will show a " * " symbol in the main display. ORIGINAL VALUE LED This will light up when the value you're editing with the front panel knobs and buttons matches the internally saved value. PROGRAM (GLOBAL) button This button has two functions. [PROGRAM] When you want to play programs, press this button to select Program mode. The button will light, and the program play screen will appear in the main display. [GLOBAL] When you want to make overall settings that apply to the entire KingKORG NEO, hold down the SHIFT/EXIT button and press this button to select Global mode. The button will blink, and the main display will show the global setting screen. FAVORITES button Use this button to turn on the Favorites function that makes it easy to select a sound, or to switch Favorite Sets. Each time you press this button, you'll cycle through A → B → C → D → E → A.... By pressing this button while holding down the SHIFT/EXIT button, you can step through the banks in the order of E → D → C → B → A → E.... To turn off the Favorites function, press the PROGRAM (GLOBAL) button. WRITE button Use this button to save a program or global setting that you've edited, or to register a desired program as a Favorite. (OM: p.21 "Saving") SHIFT/EXIT button Use this button to access the extended functions (SHIFT) of a knob or button, or to return to the program select screen (EXIT).Front panel (VOCODER)
text_image
KORG KingKORG NEO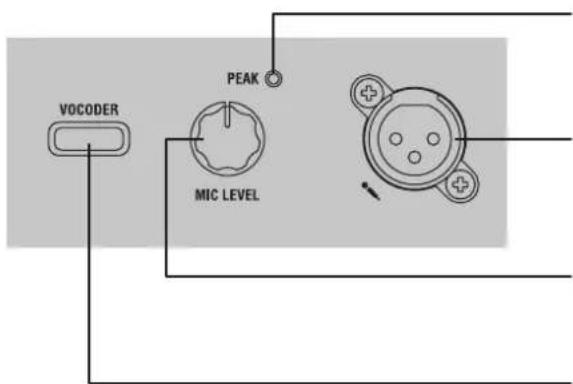
text_image
VOCODER PEAK MIC LEVELMIC LEVEL PEAK LED
This will light up when the input signal from the mic jack is distorting because of excessive level.
Mic jack
You can connect a mic here. Vocoder-type programs use this mic as the modulator audio.
MIC LEVEL knob
This knob adjusts the input level from the mic jack.
VOCODER button
This turns the vocoder function on/off.
By pressing this button while holding down the SHIFT/EXIT
button, you can turn Mic Thru on/off.
Rear panel
text_image
KORG KingKORG NEO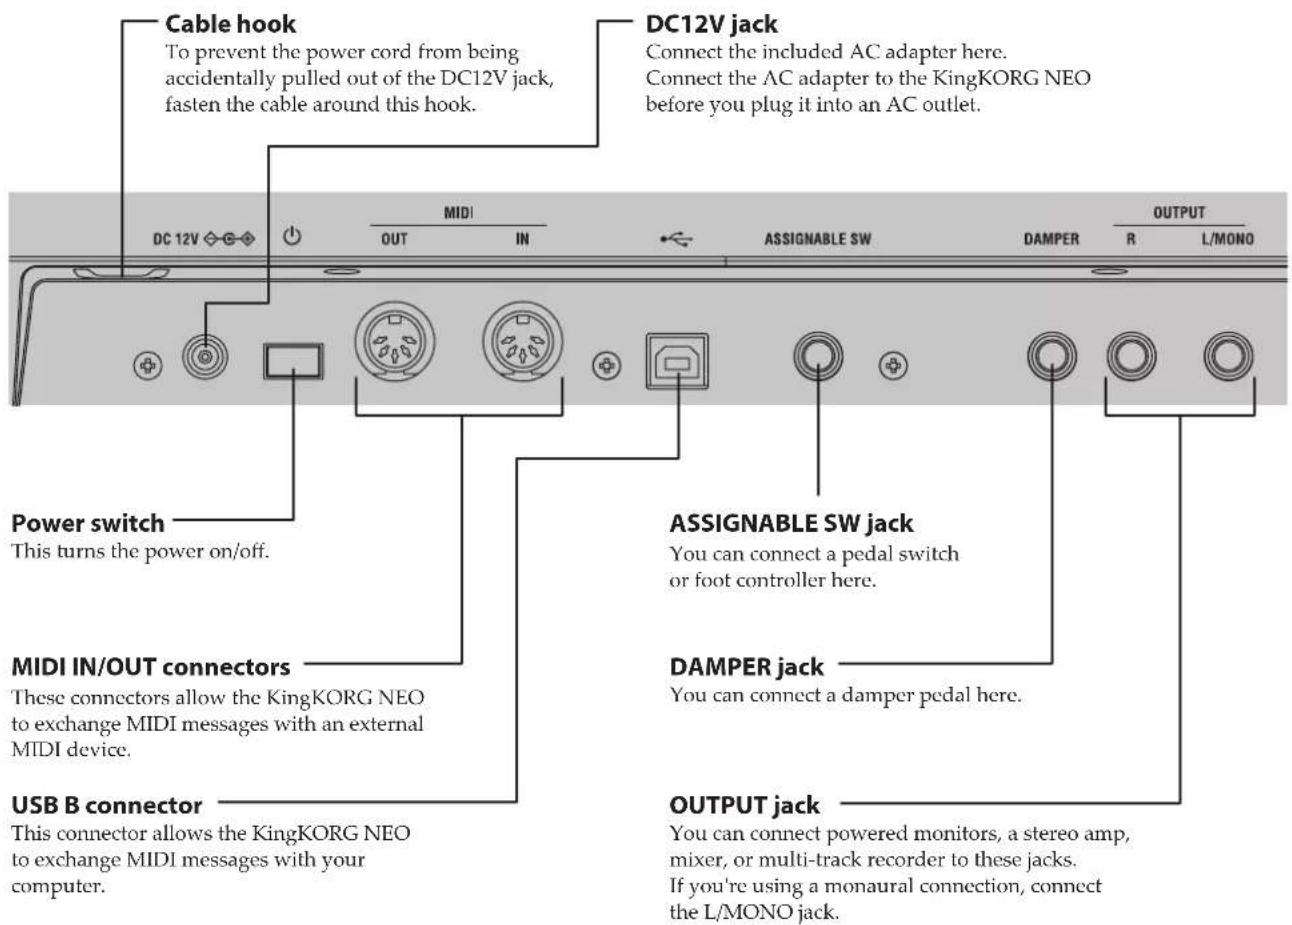
text_image
Cable hook To prevent the power cord from being accidentally pulled out of the DC12V jack, fasten the cable around this hook. DC12V jack Connect the included AC adapter here. Connect the AC adapter to the KingKORG NEO before you plug it into an AC outlet. Power switch This turns the power on/off. MIDI IN/OUT connectors These connectors allow the KingKORG NEO to exchange MIDI messages with an external MIDI device. USB B connector This connector allows the KingKORG NEO to exchange MIDI messages with your computer. ASSIGNABLE SW jack You can connect a pedal switch or foot controller here. DAMPER jack You can connect a damper pedal here. OUTPUT jack You can connect powered monitors, a stereo amp, mixer, or multi-track recorder to these jacks. If you're using a monaural connection, connect the L/MONO jack.
Note regarding power (the Auto Power-Off function)
This instrument is equipped with an auto power-off function.
The power will turn off automatically if a certain length of time elapses without any user input.
(With the factory settings, the power turns off when the instrument has not been operated for four hours.)
To disable this, change the settings in GLOBAL mode "g14: Power Off" page.

For the following terminals, use a cable of 3 m or less to prevent malfunction.
Headphone jack, DAMPER jack, ASSIGNABLE SW jack, USB B connector
Making connections and turning on the power
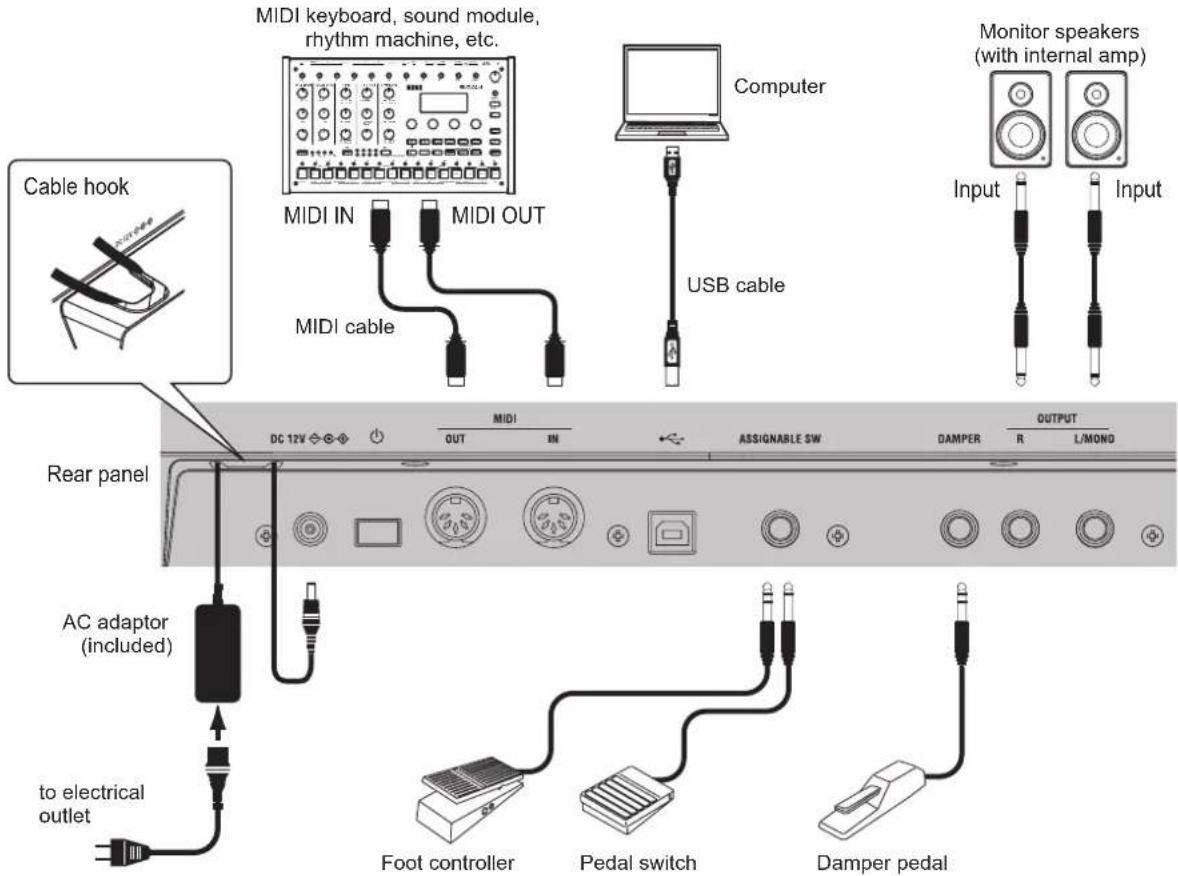
Connections
The illustration below shows a typical example of connections for the KingKORG NEO. Connect your equipment as appropriate for your needs.
text_image
MIDI keyboard, sound module, rhythm machine, etc. Computer Monitor speakers (with internal amp) Cable hook MIDI IN MIDI OUT USB cable Input Input MIDI cable DC 12V ◇ ◇ ◇ OUT IN ASSIGNABLE SW DAMPER OUTPUT R L/MOND Rear panel AC adaptor (included) to electrical outlet Foot controller Pedal switch Damper pedalYou must power-off all your equipment before making connections. If you make connections while the power is on, you might damage your speaker system or cause your equipment to malfunction or be damaged.
1. Connecting your monitor amp or speakers
Connect the KingKORG NEO's AUDIO OUTPUT jacks to the input jacks of your mixer or powered monitor speakers. If you make connections in monaural, use the L/MONO jack.
TIP: We recommend that you use the stereo outputs to take full advantage of the KingKORG NEO's sound.
2. Connecting your mic
To use the KingKORG NEO as a vocoder, connect the included vocoder mic to the front panel mic jack, so that the audio from the mic input can be used as the modulator. (OM: p.15 "Playing vocoder sounds")
Align the mic plug with the pin positions on the jack, and insert the mic's plug until you hear a click.
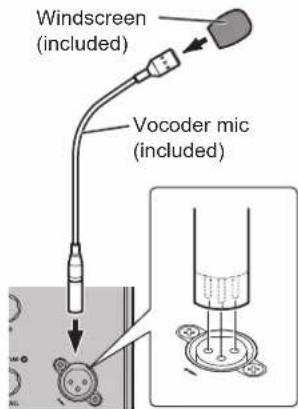
text_image
Windscreen (included) Vocoder mic (included)3. Connecting pedals and switches
Connect a foot controller and pedal switch as desired.
ASSIGNABLE SW jack
Here you can connect an optional pedal switch (PS-1/PS-3), foot controller (EXP-2), or expression/volume pedal (XVP-20). Before you use these, you must adjust the settings in Global mode to specify the type of device (switch or pedal) that you've connected. With the factory settings, this jack is set to use a switch-type device, and is assigned to the "program up" (Prog. Up) function. Different functions are available for switches and pedals. If you've specified a switch (Switch), you'll be able to change programs, switch the octave, or turn portamento on/off. Normally the function will remain on only while you continue holding down the pedal, but if desired, you can change this so that the function will toggle on/off each time you press the pedal. If you've specified a pedal (Pedal), you'll be able to control parameters such as volume, expression, and pan. (PG: "8. Foot parameters")
DAMPER jack
Here you can connect an optional DS-1H damper pedal or PS-1 pedal switch, allowing you to turn the damper effect on/off.
4. Connecting a MIDI device or computer
You'll need to make these connections if you want to use the KingKORG NEO's keyboard or controllers to control an external MIDI sound module or to use a different MIDI keyboard or a sequencer to control the KingKORG NEO's sound generator. (PG: "7. MIDI parameters")
5. Connecting the AC adaptor
Connect the included AC adapter to the DC12V jack located on the rear panel. Loop the cable around the cord hook on the rear panel of the KingKORG NEO, so that the cable doesn't get accidentally pulled out. Be careful not to apply more force than necessary to the DC plug.
You must use the included AC adaptor. Using a different AC adaptor may cause malfunctions.
Be sure that the AC outlet provides the correct voltage for your AC adaptor.
Turning the power on/off
1. Turning the power on
Before you power-on the KingKORG NEO, you must power-off any external output device such as your powered monitor speakers.
1. Turn the KingKORG NEO's VOLUME knob all the way to the left to minimize unwanted audio artifacts during startup.
2. Long-press the power switch. Once "KingKORG NEO" appears in the display, take your finger off the switch. Once the instrument turns on, the program number and name appear in the main display.
3. With the volume lowered on your monitor speakers or other external output system, turn on the power of your output system.
4. Slowly raise the KingKORG NEO's VOLUME knob while you adjust the volume of your output system.
2. Turning the power off
Never turn off the power while data is being saved. Doing so may cause the KingKORG NEO's data to be damaged.
- Lower the volume of your monitor speakers or other external output system, and turn off the power of your output system.
- Turn the KingKORG NEO's VOLUME knob all the way to the left, and press and hold the power switch until the main display goes blank.
Auto power-off
The KingKORG NEO has an auto power-off function. When a certain duration of time has elapsed without user input on the front panel buttons or knobs, or without the keyboard being played, the power will turn off automatically. With the factory settings, this is set to four hours.
If desired, you can disable this function as follows.
1. Disabling the auto power-off function
- Hold down the SHIFT/EXIT button and press the PROGRAM (GLOBAL) button to enter Global mode.
-
Use the PAGE +/- buttons to access the GLOBAL "g14: Power Off" page.
-
Turn the value dial to choose "Disable."
- Press the WRITE button to save the global settings. (OM: p.21 "1. Saving global settings")
If you turn off the power without saving, the changes you've made to the global settings will be discarded. If you want to use your edited settings in the future, be sure to save them.
Playing the KingKORG NEO
Selecting and playing a program
1. Display screen
Main display (when playing a program)
When the PROGRAM (GLOBAL) button is lit up, the main display will show the program number and program name.
When the FAVORITES button is lit up, the display will show the bank, program number and program name.
When the PROGRAM (GLOBAL) button is lit
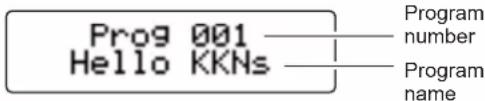
text_image
Prog 001 Hello KKNs Program number Program nameWhen the FAVORITES button is lit up

text_image
Program number 022 Fav A Tota Brass Bank Program nameMain display (when editing a program)
The display will show the page number, page name, parameter name, and value. The same contents will also be shown in the display when editing global settings (when the PROGRAM (GLOBAL) button is blinking).

text_image
Page number P03:Common VoiceMode:Single Page name Parameter valueParameter nameOSCILLATOR sub display
The display will show information about the currently selected oscillator.
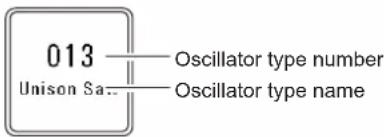
text_image
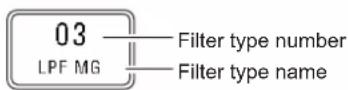
013——— Oscillator type number Unison Sa...——— Oscillator type nameFILTER sub display
The display will show information about the currently selected filter.
Selecting a program
The KingKORG NEO contains 200 distinctive programs that you can start playing immediately. So that you can select them intuitively, the programs are organized by categories of sound. Try selecting and playing various programs to experience the KingKORG NEO's sound.
1. Selecting programs by their number
-
Press the PROGRAM (GLOBAL) button to make it light up. The main display will indicate the program number and program name.
-
Turn the value dial to select the desired program.
TIP: Programs for which the SPLIT (POSITION) button is lit up have their voice mode set to split. (PG: "2. Timbre parameters")
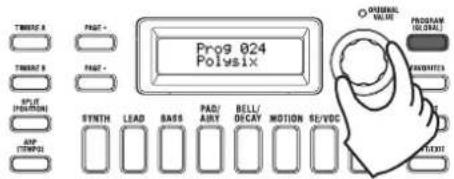
text_image
Prog 024 Polysix TRENGTH A PAST - TRENGTH B PAST - SPLIT POSITION EXP STRAW LEAD BASS PAD/ AIRY BELL/ DECAY MOTION SE/VOC INTERNAL VALUE PROGRAM GLOBAL HAPPLES START- Play the keyboard to hear the sound. You can use the OCTAVE UP/DOWN buttons to shift the range of pitches that can be played from the keyboard. (OM: p.15 "Switching octaves")
Selecting programs by category
- Press the category/favorites button that most closely matches the program (sound) you want.
The first program in the selected category will be selected, and that category/favorites button will light up.
-
Turn the value dial to select the desired program (sound).
-
Play the keyboard to hear the sound.
2. Selecting programs with the FAVORITES button
In order to select programs using the FAVORITES button, you must first have stored your favorite programs in the category/favorites buttons. (OM: p.22 "3. Registering programs in the category/favorites buttons")
- Press the FAVORITES button to make it light up; then select a bank (A-E).
The bank will change each time you press the FAVORITES button, and the main display will show the selected bank.
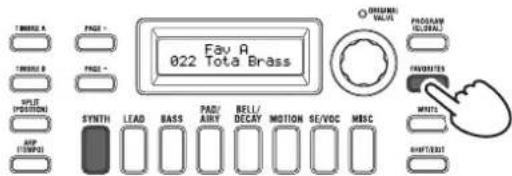
text_image
Fav A 022 Tota Brass INTERNAL VALU PROGRAM GENERAL FAVOTEN MINI MINI MINI SYNTH LEAD BASS PAD/ AIRY BELL/ DECAV MOTION SE/VOC MBC OPT POSITION SOP TEMP1TIP: By holding down the SHIFT/EXIT button and pressing the FAVORITES button you can move backward through the banks (E → D → C → B → A → E...).
- Press the category/favorites button (1–8) in which you stored the program that you want to select.
The program will be recalled, and the selected FAVORITES screen will light up.
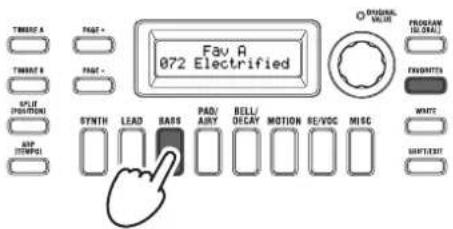
text_image
TAWNT A TAWNT B COLD POTATIONS SIP TEMP Fav A 072 Electrified SYNTH LEAD BASS PAD/ ANY BELL/ DECAY MOTION RE/DOC MISC OVERALL VOLT PROGRAM (10Ω/A) FAVORNTS WMT MINT/LET- Play the keyboard to hear the sound.
Adding variety to the sound
In addition to its keyboard, the KingKORG NEO provides numerous controllers such as the joystick, knobs, and buttons. You can vary the sound by using these controllers to control the filter, LFO, and EG in real time while you play.
Using the controllers
Joystick (JS)
You can control various parameters and effects by moving the joystick in four directions (up/down/left/right). The result will be different for each program; try each controller to hear what it does for the program you've selected.
TIP: "Joystick" is abbreviated as JS.
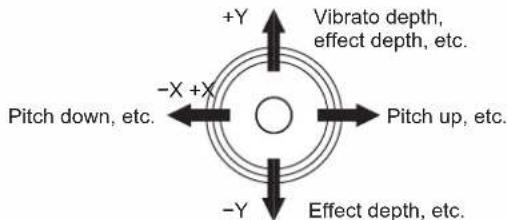
text_image
+Y Vibrato depth, effect depth, etc. -Pitch down, etc. -X +X Pitch up, etc. -Y Effect depth, etc.TIP: When you release the joystick, it will automatically return to the center position. However if you want to hold the joystick effect so that it will continue even after you take your hand off the joystick, you can assign the joystick lock function to a foot switch. (PG: "8. Foot parameters")
TIP: You can use the joystick as a virtual patch source. This lets you obtain even richer and more complex effects than those listed above. (PG: "2. Timbre parameters")
Playing the keyboard
The KingKORG NEO's keyboard lets you control the sound in the following ways.
Velocity
This allows the force (speed or velocity) of how you play a key to affect the sound. Normally, key velocity is used to control the tone or volume.
The KingKORG NEO's keyboard does not support aftertouch. Some sounds will produce little or no tonal variation in response to key velocity, or are set not to detect velocity.
Keyboard tracking
This allows the sound to be affected by the note's position on the keyboard. Normally, keyboard tracking is used to make the tone become brighter as you play higher on the keyboard, or to create a difference in volume between low and high regions of the keyboard.
TIP: Velocity and keyboard tracking can be used as a virtual patch source. (PG: "2. Timbre parameters")
Switching octaves
You can use the OCTAVE UP/DOWN buttons to shift the region of pitches assigned to the keyboard in one-octave steps over a range of +/-2 octaves.
| Keyboard range Button LED |
| C5 – C8 UP button blinking |
| C4 – C7 UP button lit |
| C3 – C6 UP/DOWN buttons unlit |
| C2 – C5 DOWN button lit |
| C1 – C4 DOWN button blinking |
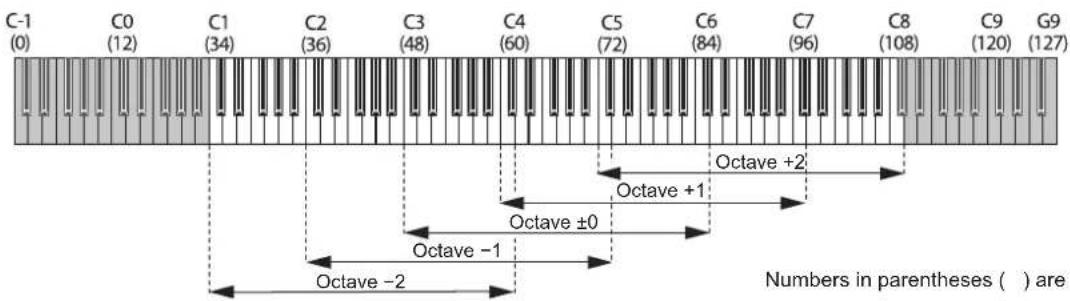
text_image
C-1 (0) C0 (12) C1 (34) C2 (36) C3 (48) C4 (60) C5 (72) C6 (84) C7 (96) C8 (108) C9 (120) G9 (127) Octave +2 Octave +1 Octave ±0 Octave -1 Octave -2 Numbers in parentheses ( ) arePlaying arpeggios
The arpeggiator is a function that automatically plays a broken chord (arpeggio) when you hold down a chord on the keyboard. The KingKORG NEO's arpeggiator provides six arpeggio types, and allows you to change various aspects of the arpeggio, such as the duration (gate time) of the notes. It also provides a "step arpeggiator" that lets you specify the on/off status for up to eight steps, giving you a wide range of performance possibilities.
- Select a program. (OM: p.14 "Selecting a program") As an example, let's select a piano sound to try out this function.
- Press the ARP (TEMPO) button to make it light up. The arpeggiator will turn on.
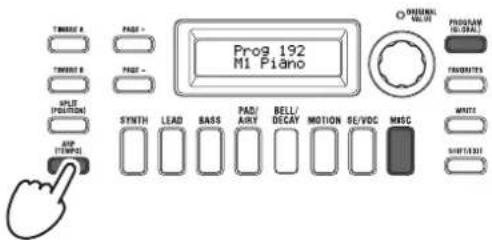
text_image
Prog 192 M1 Piano TOMES: A PAS: TOMES: B PAS: SPLIT POSITION EXP STENKS SYNTH LEAD BASS PAD/ AIRY BELL/ DECAY MOTION SE/VDC MISC ONIONAL VALVE PROGRAM HEDDER FAVORATOR WRITE SHIFT/SHOT- Hold down a chord on the keyboard; an arpeggio will start playing.
If you hold down the chord shown in the illustration below, the notes will be sounded as depicted by the notation at the right. (Arpeggio type: UP)
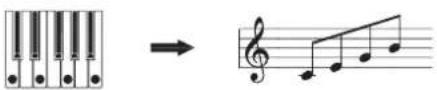
text_image
Musical notation showing a piano keyboard and its corresponding musical staff notation with treble clef.To change the tempo, hold down the SHIFT/EXIT button and press the ARP (TEMPO) button to access the PROGRAM "a02: Arp" page. Use the value dial to adjust the tempo.
TIP: The KingKORG NEO provides a tap tempo function. Hold down the SHIFT/EXIT button and repeatedly press the ARP (TEMPO) button at the desired timing interval to set the tempo.
- The arpeggio will stop sounding when you take your hand off the keys.
TIP: If desired, you can make the arpeggio continue sounding even after you release the keys. (PG: "4. Arpeggio parameters")
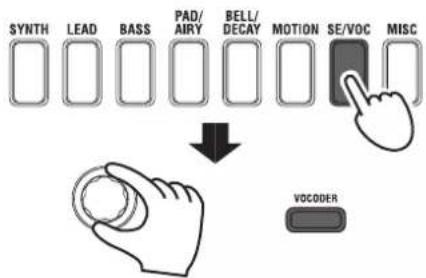
Playing vocoder sounds
The vocoder is a function that lets you vocalize into a mic while holding down notes on the keyboard to create the impression that the synthesizer is talking. As an alternative to inputting a human voice, you can create many interesting effects by inputting rhythm sounds or various waveforms.
Connecting a mic and playing the vocoder
- Turn the front panel MIC LEVEL knob all the way to the left. Connect the mic to the front panel mic jack.
- Press the PROGRAM (GLOBAL) button to make it light up.
- Press the category/favorites SE/VOC button to make it light up, and then turn the value dial to select a program (sound) for which the VOCODER button is lit up.
flowchart
graph TD
    A["SYNTH"] --> B["LEAD"]
    B --> C["BASS"]
    C --> D["PAD/ AIRY"]
    D --> E["BELL/ DECAY"]
    E --> F["MOTION"]
    F --> G["SE/VOC"]
    G --> H["MISC"]
    I["VOCODER"] --> J["Arrow pointing to the second control panel"]
- Turn the MIC LEVEL knob to adjust the mic input level.
TIP: Adjust the level so that the MIC LEVEL PEAK LED does not light up.
- While vocalizing into the mic, play the keyboard.
Try vocalizing different words and holding down different notes on the keyboard, and notice the effect that this has on the vocoder sound.
Editing the sound
How a program is organized
Before you start editing, you'll need to understand the basics of how the sounds are created. Once you understand how the KingKORG NEO's sounds are structured, you'll be able to freely create the sounds you want.
1. Synthesizer
As shown in the illustration, a synth program consists of timbres A/B, arpeggiator, vocoder and the master effects.

flowchart
graph TD
    subgraph PROGRAM
        A["MIC IN"] --> B["TIMBRE A"]
        A --> C["Arpeggiator"]
        A --> D["TIMBRE B"]
        B --> E["Vocoder Prefix FX"]
        C --> E
        D --> E
        E --> F["MOD FX"]
        F --> G["+"]
        G --> H["REV/DELAY"]
        H --> I["+"]
        I --> J["OUTPUT L/MONO, R"]
    end

    subgraph GLOBAL
        K["EQ"] --> L["+"]
        L --> M["OUTPUT L/MONO, R"]
    end

    N["TIMBRE"] --> O["Keyboard Tracking"]
        N --> P["Keyboard Velocity"]
        N --> Q["Pitch Bend (JS X)"]
        N --> R["Modulation (JS+Y/-Y)"]
        N --> S["MIDI 1~3"]
        S --> T["VIRTUAL PATCH"]
        T --> U["LFO1 LF02 EG1 EG2"]
        T --> V["Other Source"]
        T --> W["Free Assign"]
        T --> X["Modulation to Synth"]
        X --> Y["AMP"]
        Y --> Z["Cutoff"]
        Y --> AA["Level"]
        AA --> AB["MIXER"]
        AB --> AC["FILTER"]
        AC --> AD["LFO1 LF02 EG1 EG2"]
        AD --> AE["Other Source"]
        AE --> AF["MOD FX"]
        AF --> AG["+"]
    end

    N --> AH["PIDI IN"]
    AH --> AI["Pitch"]
    AI --> AJ["OSC1"]
    AI --> AK["OSC2"]
    AI --> AL["OSC3"]
    AI --> AM["MIXER"]
    AM --> AN["FILTER"]
    AN --> AO["LFO1 LF02 EG1 EG2"]
    AO --> AP["Other Source"]
    AP --> AQ["MOD FX"]
    AQ --> AR["+"]
    AR --> AS["REV/DELAY"]
    AS --> AT["+"]
    AT --> AU["OUTPUT L/MONO, R"]
    AU --> AV["LFO1 LF02 EG1 EG2"]
    AV --> AW["Cutoff"]
    AW --> AX["Level"]
    AX --> AY["AMP"]
    AY --> AZ["PAN"]
    AZ --> BA["LFO1 LF02 EG1 EG2"]
    BA --> BB["Other Source"]
    BB --> BC["MOD FX"]
    BC --> BD["+"]
    BD --> BE["REV/DELAY"]
    BE --> BF["+"]
    BF --> BG["OUTPUT L/MONO, R"]
    BG --> BH["LFO1 LF02 EG1 EG2"]
    BH --> BI["Other Source"]
    BI --> BJ["MOD FX"]
    BJ --> BK["+"]
    BK --> BL["REV/DELAY"]
    BL --> BM["+"]
    BM --> BN["OUTPUT L/MONO, R"]
    BN --> BO["LFO1 LF02 EG1 EG2"]
    BO --> BP["Cutoff"]
    BP --> BQ["Level"]
    BQ --> BR["AMP"]
    BR --> BS["PAN"]
    BS --> BT["LFO1 LF02 EG1 EG2"]
    BT --> BU["Cutoff"]
    BU --> BV["Level"]
    BV --> BW["AMP"]
    BW --> BX["PAN"]
    BX --> BY["LFO1 LF02 EG1 EG2"]
    BY --> BZ["Cutoff"]
    BZ --> CA["Level"]
    CA --> CB["PAN"]
    CB --> CC["LFO1 LF02 EG1 EG2"]
    CC --> CD["Cutoff"]
    CD --> CE["Level"]
    CE --> CF["PAN"]
    CF --> CG["LFO1 LF02 EG1 EG2"]
    CG --> CH["Cutoff"]
    CH --> CI["Level"]
    CI --> CJ["PAN"]
    CJ --> CK["LFO1 LF02 EG1 EG2"]
    CK --> CL["Cutoff"]
    CL --> CD
    CD --> CD
    CD --> DE["LFO1 LF02 EG1 EG2"]
    AE --> DF["Cutoff"]
    DF --> DC["Cutoff to Synth"]
    DC --> DD["Modulation to Synth"]
    DD --> DE
    DE --> DF
    DF --> DE
The three elements of sound: pitch, tone, and volume
Sound has three basic elements: pitch, tone, and volume. Just like the analog synthesizers of the past, the KingKORG NEO analog modeling synthesizer provides "oscillator," "filter," and "amp" (amplifier) sections that control these three elements. Edit the oscillator settings to change the pitch, the filter settings to change the tone, and the amp settings to change the volume.
The KingKORG NEO's oscillators, filter, and amp
On the KingKORG NEO, the oscillator settings are in the PROGRAM "s05-s12: Pitch" pages and the PROGRAM "s13:OSC1-s27: OSC3)" pages. Use the Pitch pages to specify the pitch of the basic waveform, and use the OSCILLATOR pages to select the waveform. The waveforms generated by these oscillators are mixed in the Mixer page. The filter settings are in the PROGRAM "s31-38: Filter" pages. On these pages, you can modify the tonal character by applying a filter to the sound being generated by the oscillators. Finally, the amp settings are in the PROGRAM "s39-42: Amp" pages, allowing you to adjust the volume. By editing in these pages, you'll create the basic sound of the program.
EG, LFO, keyboard tracking, virtual patches, and controllers
In addition to the oscillator, filter, and amp settings, the sound can be affected by change over time, by its pitch range, or by performance expressions. Such changes can be controlled by modulators and controllers such as the EG (Envelope Generator), LFO (Low Frequency Oscillator), keyboard tracking, virtual patches, and the joystick. By using these modulators and controllers you can apply complex changes to the sound.
Take a look at the illustration above. Observe the signal flow from OSC → FILTER → AMP, and notice how the EGs and LFOs can affect each section.
Timbres (TIMBRE A/B)
Each timbre consists of an oscillator, filter, amp, EG, LFO, virtual patches, and equalizer. The KingKORG NEO has two timbres, and you can combine these two timbres to create a richer-sounding program.
Oscillator (OSC1, OSC2, OSC3)
The oscillators give you a choice of 127 types of oscillator algorithms, including the sawtooth wave and square wave typically
found on an analog synthesizer, as well as noise, PCM/DWGS, and the waveform being input from the mic jack. You can also make the waveform richer and thicker by applying the unison setting.
Mixer (MIXER)
This section adjusts the volume levels of oscillator 1 (OSC1), oscillator 2 (OSC2), and oscillator 3 (OSC3), and outputs the combined signal to the filter (FILTER).
Filter (FILTER)
The filter varies the brightness of the sound by removing or boosting certain portions of the frequency spectrum of the sound generated by the oscillator. Filter settings will have a large impact on the character of the sound. In addition, you can use envelope generator 1 (EG1) to vary the cutoff frequency of each filter over time.
Amp (AMP)
This section consists of the amp (AMP) and pan (PAN) settings. The amp specifies the volume, and the pan specifies the stereo position of the sound. You can also use envelope generator 2 (EG2) to vary the volume over time.
Envelope generators (EG1, EG2)
An envelope generator applies time-variant change to parameters that make up the sound. Each envelope generator defines the "shape" of the time-variant change using four parameters: attack time, decay time, sustain level, and release time. EG1 is assigned to control the filter cutoff frequency, and EG2 is assigned to control the amp volume. You are also free to use an envelope generator in conjunction with a virtual patch as an envelope source for another parameter.
LFOs (LFO1, LFO2)
An LFO (Low Frequency Oscillator) applies cyclic change to parameters that make up the sound. Each timbre has two LFOs, each giving you a choice of five waveforms. LFO2 is assigned as the source of the pitch modulation controlled by the joystick. You are also free to use an LFO in conjunction with a virtual patch as a modulation source for another parameter.
Virtual patch (VIRTUAL PATCH)
The virtual patch functionality lets you use not only EG or LFO but also sources such as velocity (keyboard playing strength) and keyboard tracking (the keyboard region that you play) as modulation sources to control the parameters that make up the sound. This gives you a great deal of freedom in creating original sounds. For each timbre, you can create virtual patch settings for six parameters. (PG: "2. Timbre parameters")
Master effects (MASTER FX)
Each program contains three types of master effect. By applying an effect to each timbre, you can add finishing touches to the overall sound of the program.
Arpeggiator (ARPEGGIATOR)
The arpeggiator automatically generates an arpeggio (broken chord) when you hold down a chord on the keyboard. For programs that use two timbres, you can apply the arpeggiator to either or both timbres. This is a step arpeggiator with six arpeggio types.
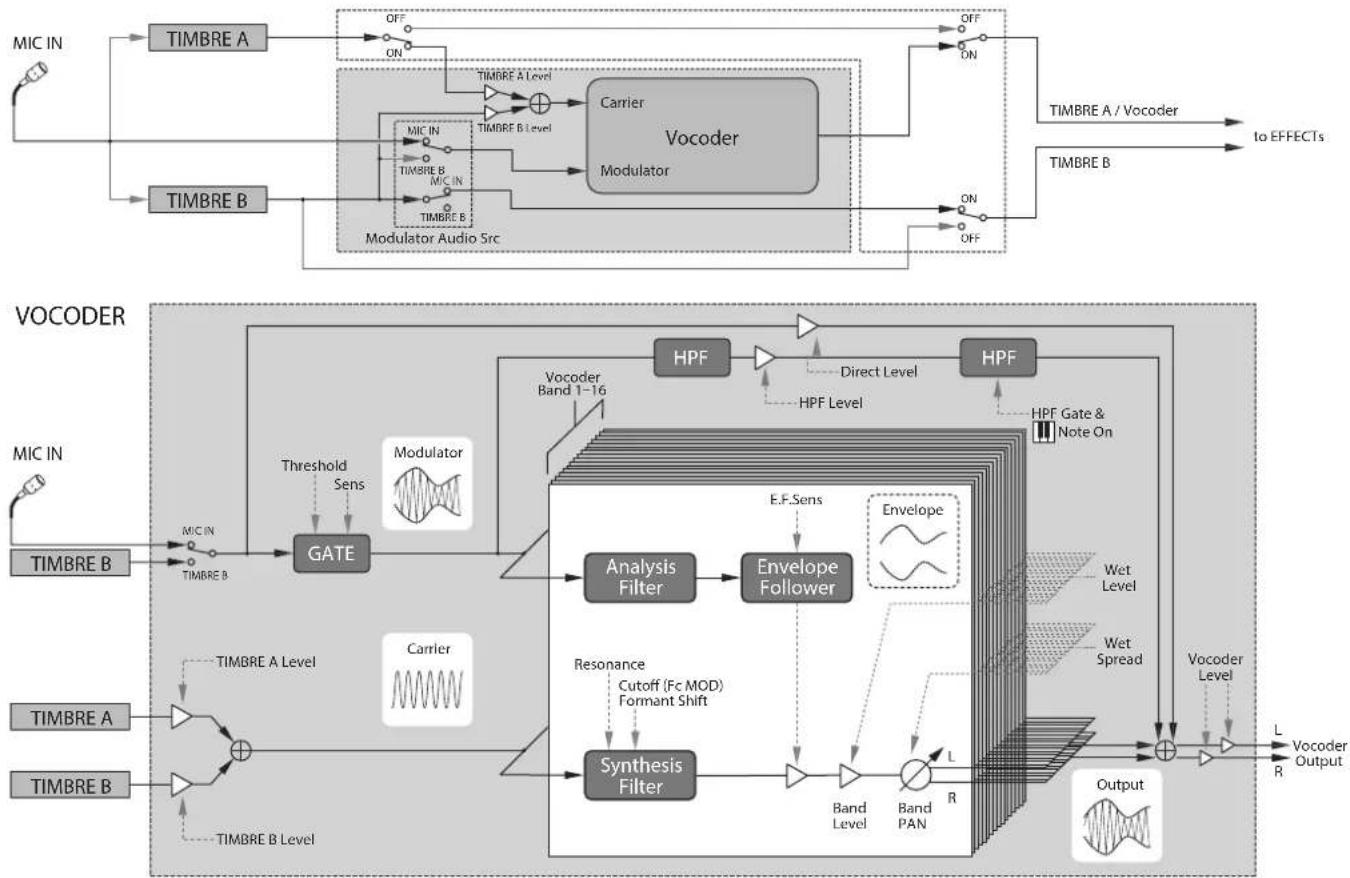
2. Vocoder (VOCODER)
A vocoder analyzes the frequency characteristics of one signal called the "modulator" (such as a human voice input via a mic) and applies these characteristics to a filter that is processing a different signal called the "carrier" (such as an oscillator waveform), thus producing distinctive effects such as an instrument that appears to be talking. The KingKORG NEO contains a sixteen-band vocoder that cannot only simulate the classic vocoder sounds of the past but it can also create original vocoder sounds where the tonal character or the level of each band can be controlled. As shown in the illustration below, the vocoder consists of the carrier (the signal being modified), the modulator (the signal that controls the modifying), and the vocoder section (VOCODER) itself.
flowchart
```mermaid
graph TD
    subgraph Top
        A["MIC IN"] --> B["TIMBRE A"]
        C["TIMBRE B"] --> D["Modulator Audio Src"]
        B --> E["OFF ON"]
        D --> F["PID"]
        E --> G["Timer B Level"]
        F --> H["Timer B Level"]
        G --> I["Carrier Vocoder Modulator"]
        H --> J["Timer B Level"]
        I --> K["Timer B Level"]
        J --> L["Timer B Level"]
        K --> M["Timer B Level"]
        L --> N["Timer B Level"]
        M --> O["Timer B Level"]
        N --> P["Timer B Level"]
        O --> Q["Timer B Level"]
        P --> R["Timer B Level"]
        Q --> S["Timer B Level"]
        R --> T["Timer B Level"]
        S --> U["Timer B Level"]
        T --> V["Timer B Level"]
        U --> W["Timer B Level"]
        V --> X["Timer B Level"]
        W --> Y["Timer B Level"]
        X --> Z["Timer B Level"]
        Y --> AA["Timer B Level"]
        Z --> AB["Timer B Level"]
    end

    subgraph Bottom
        AC["VOCODER"] --> AD["MIC IN"]
        AD --> AE["TIMBRE B"]
        AE --> AF["GATE"]
        AF --> AG["Threshold Sens"]
        AG --> AH["Modulator"]
        AH --> AI["Modulator Audio Src"]
        AI --> AJ["Timer B Level"]
        AJ --> AK["Timer B Level"]
        AK --> AL["Timer B Level"]
        AL --> AM["Timer B Level"]
        AM --> AN["Timer B Level"]
        AN --> AO["Timer B Level"]
        AO --> AP["Timer B Level"]
        AP --> AQ["Timer B Level"]
        AQ --> AR["Timer B Level"]
        AR --> AS["Timer B Level"]
        AS --> AT["Timer B Level"]
        AT --> AU["Timer B Level"]
        AU --> AV["Timer B Level"]
        AV --> AW["Timer B Level"]
    end

    subgraph Bottom
        AX["VOCODER"] --> AY["MIC IN"]
        AY --> AZ["TIMBRE A Level"]
        AZ --> BA["TIMBRE A Level"]
        BA --> BB["Carrier"]
        BB --> BC["Threshold Sens"]
        BC --> BD["Modulator"]
        BD --> BE["Modulator Audio Src"]
        BE --> BF["Timer B Level"]
        BF --> BG["TIMBRE B Level"]
        BG --> BH["Timer B Level"]
        BH --> BI["Timer B Level"]
        BI --> BJ["Timer B Level"]
        BJ --> BK["Timer B Level"]
        BK --> BL["Timer B Level"]
        BL --> BM["Timer B Level"]
        BM --> BN["Timer B Level"]
        BN --> BO["TIMBRE A Level"]
        BO --> BP["TIMBRE A Level"]
        BP --> BQ["TIMBRE A Level"]
        BQ --> BR["TIMBRE A Level"]
        BR --> BS["TIMBRE A Level"]
        BS --> BT["TIMBRE A Level"]
        BT --> BU["TIMBRE A Level"]
        BU --> BV["TIMBRE A Level"]
        BV --> BW["TIMBRE A Level"]
        BW --> BX["TIMBRE A Level"]
        BX --> BY["TIMBRE A Level"]
        BY --> BZ["TIMBRE A Level"]
        BZ --> CA["TIMBRE A Level"]
        CA --> CB["TIMBRE A Level"]
        CB --> CC["TIMBRE A Level"]
        CC --> CD["TIMBRE A Level"]
    end

    subgraph Bottom
        CE["VOCODER"] --> CF["MIC IN"]
        CF --> CG["TIMBRE B"]
        CG --> CH["GATE"]
        CH --> CI["Threshold Sens"]
        CI --> CJ["Modulator"]
        CJ --> CK["Modulator Audio Src"]
        CK --> CL["Timer B Level"]
        CL --> CM["TIMBRE B Level"]
        CM --> CN["TIMBRE A Level"]
        CN --> CO["TIMBRE A Level"]
        CO --> CP["TIMBRE A Level"]
        CP --> CQ["TIMBRE A Level"]
        CQ --> CR["TIMBRE A Level"]
    end

    subgraph Bottom
        CS["VOCODER"] --> CT["MIC IN"]
        CT --> CU["TIMBRE A Level"]
        CU --> CV["TIMBRE A Level"]
        CV --> CW["TIMBRE A Level"]
    end

    subgraph Bottom
        CX["VOCODER"] --> CY["MIC IN"]
        CY --> CZ["TIMBRE A Level"]
    end

    subgraph Bottom
        DD["VOCODER"] --> DE["MIC IN"]
        DE --> DF["TIMBRE A Level"]
    end

    subgraph Bottom
        DG["VOCODER"] --> DH["MIC IN"]
    end

    subgraph Bottom
        DI["VOCODER"] --> DJ["TIMBRE A Level"]
    DJ --> DK["TIMBRE A Level"]
    DK --> DL["TIMBRE A Level"]

    subgraph Bottom
    DN["VOCODER"] --> DO["MIC IN"]
    DO --> DOA["TIMBRE A Level"]
    DOA --> DB["TIMBRE A Level"]

    subgraph Bottom
    DC["VOCODER"] --> DD
    DC --> DDb["TIMBRE A Level"]

    subgraph Bottom
    DDb1["VOCODER"] --> DDb2["TIMBRE A Level"]

    subgraph Bottom
    DDb21["VOCODER"] --> DDb22["TIMBRE A Level"]

    subgraph Bottom
    DDb23["VOCODER"] --> DDb24["TIMBRE A Level"]

    subgraph Bottom
    DDb25["VOCODER"] --> DDb26["TIMBRE A Level"]

    subgraph Bottom
    DDb27["VOCODER"] --> DDb28["TIMBRE A Level"]

    subgraph Bottom
    DDb29["VOCODER"] --> DDb30["TIMBRE A Level"]

    subgraph Bottom
    DDb301["VOCODER"] --> DDb310["TIMBRE A Level"]

    subgraph Bottom
    DDb311["VOCODER"] --> DDb312["TIMBRE A Level"]

    subgraph Bottom
    DDb313["VOCODER"] --> DDb314["TIMBRE A Level"]

    subgraph Bottom
    DDb315["VOCODER"] --> DDb316["TIMBRE A Level"]

    subgraph Bottom
    DDb317["VOCODER"] --> DDb318["TIMBRE A Level"]

    subgraph Bottom
    DDb319["VOCODER"] --> DDb320["TIMBRE A Level"]

    subgraph Bottom
    DDb321["VOCODER"] --> DDb322["TIMBRE A Level"]

    subgraph Bottom
    DDb323["VOCODER"] --> DDb324["TIMBRE A Level"]

    subgraph Bottom
    DDb325["VOCODER"] --> DDb326["TIMBRE A Level"]

    subgraph Bottom
    DDb327["VOCODER"] --> DDb328["TIMBRE A Level"]

    subgraph Bottom
    DDb329["VOCODER"] --> DDb330["TIMBRE A Level"]

    subgraph Bottom
    DDb331["VOCODER"] --> DDb332["TIMBRE A Level"]

    subgraph Bottom
    DDb332["VOCODER"] --> DDb333["TIMBRE A Level"]

    subgraph Bottom
    DDb334["VOCODER"] --> DDb335["TIMBRE A Level"]

    subgraph Bottom
    DDb336["VOCODER"] --> DDb337["TIMBRE A Level"]

    subgraph Bottom
    DDb338["VOCODER"] --> DDb339["TIMBRE A Level"]

    subgraph Bottom
    DDb339["VOCODER"] --> DDb340["TIMBRE A Level"]

    subgraph Bottom
    DDb340["VOCODER"] --> DDb341["TIMBRE A Level"]

    subgraph Bottom
    DDb341["VOCODER"] --> DDb342["TIMBRE A Level"]

    subgraph Bottom
    DDb342["VOCODER"] --> DDb343["TIMBRE A Level"]

    subgraph Bottom
    DDb343["VOCODER"] --> DDb344["TIMBRE A Level"]

    subgraph Bottom
    DDb344["VOCODER"] --> DDb345["TIMBRE A Level"]

    subgraph Bottom
    DDb345["VOCODER"] --> DDb346["TIMBRE A Level"]

    subgraph Bottom
    DDb346["VOCODER"] --> DDb347["TIMBRE A Level"]

    subgraph Bottom
    DDb347["VOCODER"] --> DDb348["TIMBRE A Level"]

    subgraph Bottom
    DDb348["VOCODER"] --> DDb349["TIMBRE A Level"]

    subgraph Bottom
    DDb349["VOCODER"] --> DDb350["TIMBRE A Level"]

    subgraph Bottom
    DDb350["VOCODER"] --> DDb351["TIMBRE A Level"]

    subgraph Bottom
    DDb351["VOCODER"] --> DDb352["TIMBRE A Level"]

    subgraph Bottom
    DDb352["VOCODER"] --> DDb353["TIMBRE A Level"]

    subgraph Bottom
    DDb353["VOCODER"] --> DDb354["TIMBRE A Level"]

    subgraph Bottom
    DDb354["VOCODER"] --> DDb355["TIMBRE A Level"]

    subgraph Bottom
    DDb355["VOCODER"] --> DDb356["TIMBRE A Level"]

    subgraph Bottom
    DDb356["VOCODER"] --> DDb357["TIMBRE A Level"]

    subgraph Bottom
    DDb357["VOCODER"] --> DDb358["TIMBRE A Level"]

    subgraph Bottom
    DDb358["VOCODER"] --> DDb359["TIMBRE A Level"]

    subgraph Bottom
    DDb359["VOCODER"] --> DDb360["TIMBRE A Level"]

    subgraph Bottom
    DDb360["VOCODER"] --> DDb361["TIMBRE A Level"]

    subgraph Bottom
    DDb361["VOCODER"] --> DDb362["TIMBRE A Level"]

    subgraph Bottom
    DDb362["VOCODER"] --> DDb363["TIMBRE A Level"]

    subgraph Bottom
    DDb363["VOCODER"] --> DDb364["TIMBRE A Level"]

    subgraph Bottom
    DDb364["VOCODER"] --> DDb365["TIMBRE A Level"]

    subgraph Bottom
    DDb365["VOCODER"] --> DDb366["TIMBRE A Level"]

    subgraph Bottom
    DDb366["VOCODER"] --> DDb367["TIMBRE A Level"]

    subgraph Bottom
    DDb367["VOCODER"] --> DDb368["TIMBRE A Level"]

    subgraph Bottom
    DDb368["VOCODER"] --> DDb369["TIMBRE A Level"]

    subgraph Bottom
    DDb369["VOCODER"] --> DDb370["TIMBRE A Level"]

    subgraph Bottom
    DDb370["VOCODER"] --> DDb371["TIMBRE A Level"]

    subgraph Bottom
    DDb371["VOCODER"] --> DDb372["TIMBRE A Level"]

    subgraph Bottom
    DDb372["VOCODER"] --> DDb373["TIMBRE A Level"]

    subgraph Bottom
    DDb373["VOCODER"] --> DDb374["TIMBRE A Level"]

    subgraph Bottom
    DDb374["VOCODER"] --> DDb375["TIMBRE A Level"]

    subgraph Bottom
    DDb375["VOCODER"] --> DDb376["TIMBRE A Level"]

    subgraph Bottom
    DDb376["VOCODER"] --> DDb377["TIMBRE A Level"]

    subgraph Bottom
    DDb377["VOCODER"] --> DDb378["TIMBRE A Level"]

    subgraph Bottom
    DDb378["VOCODER"] --> DDb379["TIMBRE A Level"]

    subgraph Bottom
    DDb379["VOCODER"] --> DDb380["TIMBRE A Level"]

    subgraph Bottom
    DDb380["VOCODER"] --> DDb381["TIMBRE A Level"]

    subgraph Bottom
    DDb381["VOCODER"] --> DDb382["TIMBRE A Level"]

    subgraph Bottom
    DDb382["VOCODER"] --> DDb383["TIMBRE A Level"]

    subgraph Bottom
    DDb383["VOCODER"] --> DDb384["TIMBRE A Level"]

    subgraph Bottom
    DDb384["VOCODER"] --> DDb385["TIMBRE A Level"]

    subgraph Bottom
    DDb385["VOCODER"] --> DDb386["TIMBRE A Level"]

    subgraph Bottom
    DDb386["VOCODER"] --> DDb387["TIMBRE A Level"]

    subgraph Bottom
    DDb387["VOCODER"] --> DDb388["TIMBRE A Level"]

    subgraph Bottom
    DDc["BVOCO 1.0V"]
Carrier (CARRIER)
This is the basic sound (signal). The best choice for the carrier waveform is a waveform that contains large numbers of overtones, such as a sawtooth wave or a pulse wave with a fixed pulse width. The outputs of the two sources timbre A and timbre B are mixed and used as the carrier.
Modulator (MODULATOR)
This is the sound (signal) whose character is imposed on the carrier. Typically, a human voice is used as the modulator input. On the KingKORG NEO, you can select either the mic input (Input) or timbre B (Timbre B) as the modulator. If you select timbre B, the output of timbre B will be input to the vocoder's modulator.
Vocoder section (VOCODER)
This consists of two sets of sixteen bandpass filters (the analysis filter, the synthesis filter and an envelope follower). The audio signal input to the modulator is sent to sixteen filters (the analysis filter), and an envelope follower will detect the volume envelope (time-variant change) of each frequency band. The carrier signal is sent to a separate set of sixteen filters (the synthesis filter), and the envelope detected from the analysis filter is used to control the volume of each band in the synthesis filter, thus varying the tonal character of the carrier signal and producing the impression that the carrier signal is talking. It is also possible to shift the frequencies of the carrier bandpass filter. This allows you to raise or lower the frequency response while preserving the character of the modulator, creating dramatic changes in the sound.
Basic program editing
1. How to create sounds
There are two ways to edit sounds on the KingKORG NEO.
- You can select a program that's close to the sound you want, and create the desired program by making the necessary changes.
- You can start editing the program from scratch (an initialized state).
Choose a method, and get started creating and playing your own sounds!
Editing from a saved program
-
Select the program that you want to edit. (OM: p.14 "Selecting a program")
-
Operate the front panel knobs and dial. Consider how the sound you're imagining differs from the original program, and select the parameter that you need to edit.
If you select another program or turn off the power before you've written your edited program, the changes you made will be lost. (OM: p.21 "2. Saving a program")
If you want to create a program from scratch
If you want to create a program from scratch, start by initializing a program. (OM: p.20 "1. Initializing a program") This results in a set of simple and easily understandable settings, which will help you understand how each section works, and will be convenient when creating a sound from scratch.
2. Editing two timbres
In each program, you can use two timbres: TIMBRE A and TIMBRE B.
TIP: You can't select TIMBRE B if the PROGRAM "p03: Common" page Voice Mode parameter is set to "Single." If "Layer" or "Split" is selected, the TIMBRE A/B buttons will light to indicate the timbre that you're editing.
TIP: The voice mode parameter in the PROGRAM "p03: Common" page is common to the entire program.
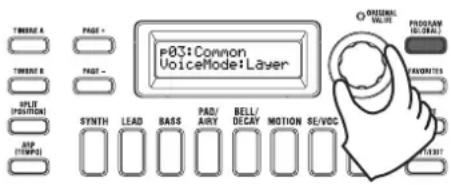
Using two timbres (Layer)
When using two timbres, you have a choice of two modes that determine how the timbres will work. In this example, we'll set the PROGRAM "p03: Common" page Voice Mode parameter to "Layer." When you set this parameter to "Layer," the two timbres will be heard simultaneously when you play the keyboard.
-
Use the PAGE +/- buttons to access the PROGRAM "p03 Common" page.
-
Turn the value dial to set the voice mode to "Layer." The TIMBRE A button and the master effect timbre LEDs will light up.
text_image
P03:Coupon VoiceMode:Layer SYNC LEAD BASS PAD/ AIRY BELL/ DECAV MOTION SE/VOC SYNTH LEAD BASS PAD/ AIRY BELL/ DECAV MOTION SE/VOC POT (POSITION) ATP (TEMP) ORIGINAL VALUE PROGRAM REDAVES FAVORITIES STARTSelecting a timbre to edit
When editing a program that uses two timbres, you'll need to select a timbre to edit.
Use the TIMBRE A/B buttons to select the timbre that you want to edit. The timbre select button you selected will light up, allowing you to edit that timbre.
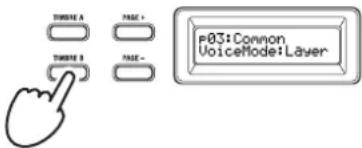
text_image
TIME A PAGE + TIME B PAGE - P03: Common VoiceMode: LayerEditing the filter and EG
On the KingKORG NEO you can use the front panel knobs and buttons to control the filter and EG in real time. You can choose one of three ways in which the knobs will work when you turn them. (PG: "6. GLOBAL parameters")
FILTER
Cutoff (CUTOFF)
This adjusts the cutoff frequency of the filter. The brightness of the sound will change. Turning the knob toward the left will darken the sound; turning it toward the right will brighten the sound.
Resonance (RESONANCE)
This adjusts the amount of resonance for the filter. Resonance adds a distinctive tonal character.
EG (Envelope Generator)
Attack (ATTACK1, ATTACK2)
This adjusts the attack time of EG1 (filter EG) and EG2 (amp EG). The attack specifies the time from note-on (the moment you press the key) until the attack level is reached. It changes the way in which EG1 and EG2 will start. Turning the knob toward the left will shorten the attack time; turning it toward the right will lengthen the attack time.
Decay (DECAY1, DECAY2)
This adjusts the decay time of EG1 (filter EG) and EG2 (amp EG). The decay specifies the time from when the attack level is reached until the sustain level is reached. Turning the knob toward the left will shorten the decay time; turning it toward the right will lengthen the decay time.
Sustain (SUSTAIN1, SUSTAIN2)
This adjusts the sustain level of EG1 (filter EG) and EG2 (amp EG). The sustain specifies the level that is reached after the decay time has elapsed and is sustained as long as you hold down the key. Turning the knob toward the left will lower the sustain level; turning it toward the right will raise the sustain level.
Release (RELEASE1, RELEASE2)
This adjusts the release time of EG1 (filter EG) and EG2 (amp EG). The release specifies the time from note-off (the moment you release the key) until the sound has decayed to silence. It will vary the release time of EG1 and EG2. Turning the knob toward the left will shorten the release time; turning it toward the right will lengthen the release time.
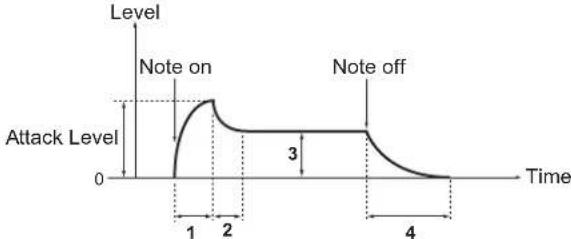
line
| Time | Level | |------|-------| | 0 | 0 | | 1 | Peak | | 2 | Peak | | 3 | 3 | | 4 | 0 |1: Attack Time 3: Sustain Level
2: Decay Time 4: Release Time
Adjusting effect settings
The KingKORG NEO provides master effects that let you apply a variety of effects to the sound, such as distorting it, modulating it, or adding reverberation. The master effects are applied to the overall sound of the two timbres.
The master effects consist of three sections (PRE FX, MOD FX, REV/DELAY), and you can choose one type of effect for each section. For example you might choose "EP.AMP" for the PRE FX section, "TREMOLO" for the MOD FX section, and "HALL" for the REV/DELAY section. For each section, you can also specify the timbre(s) where that effect will apply.
- Press an FX type select dial to select the timbre(s) where that effect will apply.
The selected timbre LED(s) will light up. If both timbre LEDs A and B are unlit, that effect will not be applied.
The timbre LED B will not light if the program's voice mode is "Single."
text_image
PRE FX RING MOD EP.AMP DECUMATOR GT.AMP DISTORTION TONE U-VIRE TREMOLD CHORAUS PHASER FLANGER ROTARY DRIVE/PREQ DEPTH SPEED ROLL DEPTH TIME REV/DELAY PLATE TAPE ECNO ROOM MOD DELAY HALL- Select an effect.
The LED of the selected effect will light.
text_image
PRE FX RING MOD EP.AMP DECIMATOR GT.AMP DISTORION TONE U-VIBE TREMOLD CHORUS PHASER FLAMGER ROTARY DRAVETYED DEPTH SPEED ROLL PEA TAPE ECHO REV/DELAY PLATE ROOM HAUL DEPTH TIME- Use the FX control knobs to adjust the parameter values.
3. Editing the vocoder
Selecting the vocoder for editing
The procedure for editing the vocoder is essentially the same as when editing a timbre, but you'll first need to turn the vocoder on and select the vocoder as the target for editing.
The "v02:Voc.Carrier-v18:Voc.Amp" pages won't appear unless you've pressed the VOCODER button to turn on the vocoder.
The parameters of the 16 band-pass filters (analysis filter and synthesis filter) and the envelope follower can be edited in the PROGRAM "v09:Voc.Filter-v18:Voc.Amp" pages.
-
Select a synth program. (OM: p.14 "Selecting a program")
-
Press the VOCODER button to make it light up. The vocoder will turn on, and will be selected as the target for editing.

- Use the PAGE +/- buttons to access the vocoder parameter editing pages.
v01:Vocoder Vocoder SW:On
TIP: If you raise the direct level in the PROGRAM "v15:Voc.Amp" page, the audio input will be output directly. Adjust this value while checking the audio input.
TIP: If you are unable to notice the effect, press the VOCODER button to make it light up, and then adjust the timbre A level in the PROGRAM "v02:Voc.Carrier" page or the vocoder level in the PROGRAM "v18:Voc.Amp" page.
Carrier (CARRIER)
The most suitable waveform for the carrier is a waveform that contains a large number of overtones, such as a sawtooth wave or a pulse wave with a fixed pulse width. These parameters can be edited in the PROGRAM "v02-v03:Voc.Carrier" pages.
TIP: To input a sawtooth wave to the carrier, edit timbre A so that its PROGRAM "s13:OSC1" page Type setting is "Saw," and edit the vocoder setting in the PROGRAM "v02:Voc.Carrier" page to specify the timbre A input level.
Modulator (MODULATOR)
A human voice is typically input as the modulator. On the KingKORG NEO, you can choose either the mic input (Input) or timbre B (Timbre B) as the modulator. You can edit these parameters in the PROGRAM "v04:Voc.Modultr" page.
4. Editing the arpeggiator
Selecting the timbre(s) to arpeggiate
For a program that uses two timbres, you can select the timbre(s) that will be played by the arpeggiator.
In the PROGRAM "a05:Arp" page you can specify the timbre(s) that will be sounded by the arpeggiator. You can make both timbres A/B be arpeggiated, or arpeggiate just one timbre.
Tonal effects synchronized with the arpeggio
Synchronizing the LFO frequency or delay time to the arpeggiator tempo
You can synchronize the frequency of LFO1 or LFO2 to the arpeggio tempo. This lets you apply modulation that's synchronized with the tempo. This also gives you the ability to specify an effect's delay time as a multiple of the tempo so that the delay time will follow even if you change the tempo of the arpeggio. You can also synchronize the KingKORG NEO's arpeggiator to an external MIDI sequencer, so that the LFO1/2 frequency or the delay time will be controlled from your external sequencer.
Modifying the arpeggio
You can modify the arpeggio by turning each arpeggio step on/off. This is called the "step arpeggiator" function.
Using the step arpeggiator to modify the arpeggio
-
Press the PROGRAM (GLOBAL) button to make it light.
-
Use the PAGE +/- buttons to access the PROGRAM "a12:Arp" page.
text_image
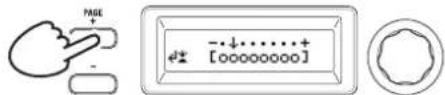
MGE a12:ArP Step[00000000]- Press the value dial.
The step setting screen will appear.
text_image
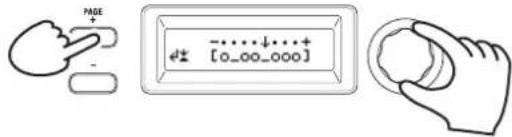
PAGE + - ↓······+ [00000000]- Use the PAGE +/- buttons to move the “.” cursor, selecting the step that you want to edit.
text_image
PAGE - -↓......+ ←± [00000000]- Turn the value dial to turn the step on or off.
In the main display, set the indication to "O" (on) for steps that you want to enable. If you select "-" (off), the note for that step will be a rest.
Repeat steps 4 and 5 to specify other steps.
- Press the value dial to confirm the on/off settings of the steps.
TIP: The number of available steps can be specified in the PROGRAM "a10: Arp" page. (PG: "4. Arpeggio parameters")
5. Restoring an edited program value to its original setting
When you set a value to the same value stored in the original preset program or saved program, the ORIGINAL VALUE LED will light up. After editing a value, you can restore that value to its original setting by turning the knob to the value that makes the ORIGINAL VALUE LED light up.
If you want to discard all the edits you've been making, and recall the content that's stored in internal memory, simply select another program without saving the current edits, and then recall the desired program once again.
About global settings
Switch to Global mode when you want to change settings that apply to the entire KingKORG NEO or when you want to make MIDI-related settings.
Global mode contains various settings such as master tune, transpose, and global MIDI channel. (PG: "6. GLOBAL parameters")
Changes you make to these settings will be lost if you turn off the power without saving. Be sure to save your settings if you want to keep them. (OM: p.21 "1. Saving global settings")
Other functions
1. Initializing a program
Here's how to initialize the settings of the selected program.
This procedure will initialize the settings of the program that's being edited. It will not change the contents stored in internal memory.
If you want to save the initialized state, save the program. (OM: p.21 "2. Saving a program")
-
Select the program that you want to initialize. (OM: p.14 "Selecting a program")
-
Use the PAGE +/- buttons to access the PROGRAM "u01: Utility" page, and press the value dial. A screen will ask you to confirm that you want to initialize the program.

text_image
MAKE Initialize Prog. OK? Push Dial?TIP: If you decide not to initialize, press the SHIFT/EXIT button.
- Press the value dial once again.
When initialization is finished, the display will indicate "Complete!" and you will automatically return to the top screen.
2. Copying a timbre
Here's how you can copy the settings of another program's timbre to a timbre (either A or B) of the currently selected program.
This operation recalls settings to a timbre of the program that's being edited. It will not change the contents stored in internal memory.
Only one timbre can be copied at a time.
-
First select the program that includes the copy-destination timbre. (OM: p.14 "Selecting a program")
-
Use the PAGE +/- buttons to access the PROGRAM "u02: Utility" page, and press the value dial.
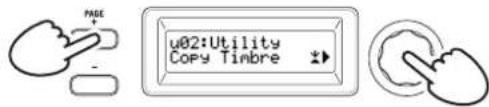
text_image
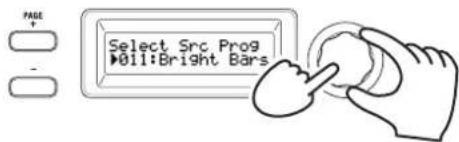
PAGE u02:Utility Copy Timbre- Turn the value dial to select the program that contains the copy-source timbre, and press the dial to confirm your selection. When selecting a program, the TIMBRE A or B button will light depending on the timbres used by the copy-source program.
text_image
PAGE Select Src Prog 011:Bright BarsThe TIMBRE A or B buttons will not respond if you press them at this time.
- Confirm the copy-source timbre.
If the copy-source program uses two timbres, the copy-source timbre button will blink. Select the desired timbre if necessary, and press the value dial to confirm your selection.
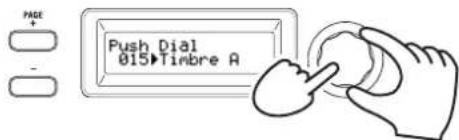
text_image
PAGE + - Push Dial 015▶Timbre ATIP: While the TIMBRE A or B button is blinking, you can also make your choice by pressing a button.
- Confirm the copy-destination timbre.
If the copy-destination program uses two timbres, the TIMBRE A or B button will blink. As necessary, turn the value dial to select the copy-destination timbre, and press the value dial to confirm your selection.
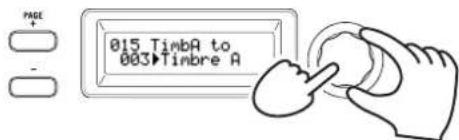
text_image
PAGE 015 TimbA to 003▶Timbre A- A confirmation screen will appear in the main display; verify the settings, and press the value dial.
When the copy is completed, the display will indicate "Complete!" and you will return to the top screen of the "u02: Utility" page.
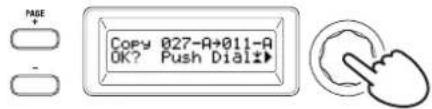
text_image
PAGE Copy 027-A+011-A OK? Push Dial!TIP: If you want to save the copied state, save the program. (OM: p.21 "2. Saving a program")
TIP: You can press the SHIFT/EXIT button to return to the previous step. If you decide not to copy a timbre, press the SHIFT/EXIT button several times.
3. Restoring the factory settings
Here's how to restore the KingKORG NEO's programs and global data settings to their factory-set condition. The factory settings are called the "preload data." To return to the factory-set state, execute the Load Preload operation.
When you execute Load Preload, the factory set data will overwrite the data you've saved in internal memory. Make sure that you don't mind losing this data.
Do not touch the KingKORG NEO's knobs or keyboard while the Preload operation is in progress. Never turn off the power during this process.
When you load the preloaded data using the "All Program" or "All Data" settings, programs 201–300 (the programs without preset data) do not return to their factory settings. Any edited programs remain if they have been saved.
Note that if you load the preloaded data using the "1Program" setting while a program from 201 to 300 is selected, the program in question returns to its factory default state.
You can't execute the Load Preload operation if memory protect is turned on. Turn off memory protect before you continue. (PG: "6. GLOBAL parameters")
1. Hold down the SHIFT/EXIT button and press the PROGRAM (GLOBAL) button.
You'll enter Global mode, and the PROGRAM (GLOBAL) button will blink.
2. Use the PAGE +/- buttons to select the GLOBAL "u01: Utility" page item Load Preload, and press the value dial.
3. Turn the value dial to select the type of data that will be restored to its factory-set condition.
Program: Data of the currently selected program
All Program: Data for programs 1–200
Global: Global data
All Data: Programs 1–200 and global data

text_image
PAGE Select Load Data All Data- Press the value dial; a confirmation screen will appear.
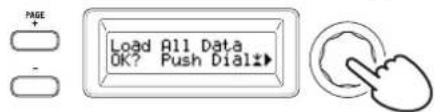
text_image
PAGE - Load All Data OK? Push Dial?TIP: If you decide not to load the data, press the SHIFT/EXIT button or the PROGRAM (GLOBAL) button.
- Press the value dial once again.
When the selected data has been loaded, the display will indicate "Completed!" and you will automatically return to the top screen.
Saving
Saving your settings
If you want to keep the global settings or programs that you've edited, you must save them to internal memory.
If you turn off the power without saving, any changes that you've made to the global settings will be lost. Be sure to save your edited settings if you want to use them in the future.
If you've edited a program, the changes you've made will be lost if you select another program or turn off the power without saving. Be sure to save your edited settings if you want to use them in the future.
You can't save your settings if memory protect is turned on. Turn off memory protect before you proceed. (PG: "6. GLOBAL parameters")
1. Saving global settings
Which settings are saved?
When you save global data, the following settings are saved.
- All parameters in the GLOBAL "g01-g37" pages
The state of the OCTAVE UP/DOWN buttons is not saved.
To save the global settings, proceed as follows in Global mode.
- Hold down the SHIFT/EXIT button and press the PROGRAM (GLOBAL) button to enter Global mode. The main display will show the global parameter edit screen, and the PROGRAM (GLOBAL) button will blink.
- Press the WRITE button. The main display will show a confirmation screen, and the WRITE button will blink.
TIP: If you decide not to save, press the SHIFT/EXIT button at this point.
- Press the WRITE button once again.
When the data has been saved, the display will indicate "Complete!" and you will return to the previous screen.
Never turn off the power while data is being saved. The data may be destroyed if you do so.
2. Saving a program
Which settings are saved?
When you save a program, the following settings are saved.
- All parameters in PROGRAM "p01-06 (Program), s01-80 (Synth), v01-18 (Vocoder), a01-12 (Arp)"
Master effect settings (PRE FX, MOD FX, REV/DELAY)
The status of some of the front panel settings will not be saved (the selected state of the TIMBRE A/B buttons, OSC SELECT button, LFO SELECT button)
The state of the OCTAVE UP/DOWN buttons will not be saved.
Since EQ is a global effect that applies to all programs in common, the settings are not saved for each program.
To save a program, proceed as follows in Program mode.
- Press the WRITE button.
The main display will show a screen allowing you to specify the save-destination, and the WRITE button will blink.
- Turn the value dial to select the storage location (program number).
TIP: If you decide not to save the program, press the SHIFT/EXIT button at this point.
- Press the WRITE button once again.
When the data has been saved, the display will indicate "Complete!" and you will return to the previous screen.
Never turn off the power while data is being saved. The data may be destroyed if you do so.
3. Registering programs in the category/favorites buttons
The KingKORG NEO provides a convenient Favorites function that lets you recall a program by pressing a single button. This can be very convenient when you're playing live. In order to use this function, you'll need to register your favorite programs in the category/favorites buttons.
-
Select a program that you want to register. (OM: p.14 "Selecting a program")
-
Hold down the WRITE button and press the FAVORITES button.
The FAVORITES button and all of the category/favorites buttons will blink.
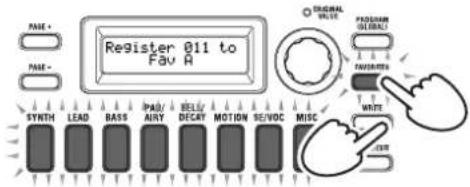
text_image
Register 011 to Fav A SYNTH LEAD BASS PAD/ AIRY BELL/ DECAY MOTION SE/VOC MISC ORIGINAL TIME PADD/SM GLOBAL FAVEMATES WRITE COM- Press the FAVORITES button to select the bank (A–E) where you want to register the program.
The FAVORITES button will light up, and the bank will change each time you press the button.
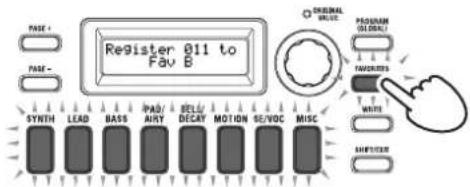
text_image
Register 011 to Fav B ORIGINAL VALUE PROGRAM GLOBAL FAVETER SYNC LEAD BASS PAD/ AIRY DELU/ DECAV MOTION SE/VOC MISC WHITE LEFTICER- Press the category/favorites button where you want to register the program.
The category/favorites button that you pressed will blink; when registration is complete, the button will be steadily illuminated.
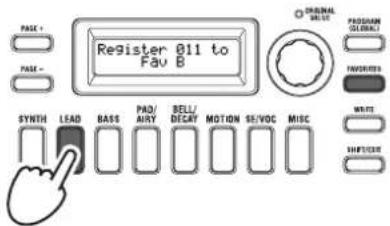
text_image
PAGE + PAGE - SYNTH LEAD BASS PAD/ AIRY BELL/ DECAY MOTION SE/VOC MISC ORIGINAL SELECT PROGRAM GENERAL FAVORS WRITE SHIFT/EXITNever turn off the power while registration is in progress. The data may be destroyed if you do so.
TIP: You are free to change a program that's registered in Favorites. Select Favorites, turn the dial to select the desired program, and then press the WRITE button.
Troubleshooting
If the KingKORG NEO does not function as you expect, check the following points.
Power does not turn on
☐ Is the AC adapter connected to an AC outlet? (OM: p.12 "Connections")
☐ Are you holding down (long-pressing) the power switch when turning the power on? (OM: p.13 "Turning the power on/off")
No sound when you play the keyboard
☐ Is your powered monitor system or headphones connected to the correct jack(s)? (OM: p.12 "Connections")
☐ Is the connected monitor system powered-on, and is the volume raised?
☐ Is the VOLUME knob set to a position where sound will be output?
☐ In the GLOBAL "g16: MIDI Basic" page, is the local control setting "On"?
☐ Were any volume-related parameters set to a value of "0"?
☐ In the PROGRAM "s32: Filter" page, could the cutoff value be "000"?
Can't input sound
☐ Is the mic connected correctly to the mic jack?
☐ Could the MIC LEVEL knob be turned all the way to the left?
☐ In a vocoder program, have you specified "Input" for the audio you're using as the modulator?
Can't edit
☐ If turning a knob does not change the parameter: In the GLOBAL "g10: Common>Knob" page, could the setting be "Catch"?
☐ If when you turn a knob, the position indicated by the knob does not match the value shown in the display: If the GLOBAL "g10: Common>Knob" page setting is set to "ValueScale," the actual parameter value may differ from the position indicated by the knob.
☐ If the sound does not change when you use a knob: Have you used the TIMBRE A/B buttons to correctly select the timbre that you want to edit?
☐ If you can't select timbre B: In the PROGRAM "p03: Common" page, could the voice mode be set to "Single"?
☐ If you can't select vocoder parameters in Edit mode: Is the VOCODER button on (lit)?
☐ If the changes you made to a program or to the global settings have not been remembered, did you turn the power off before executing the Write operation? In the case of a program, your edits will also be lost if you select a different program. Perform the Write operation to save your edits before you switch programs or turn off the power.
Can't save program settings
☐ In the GLOBAL "g11: Common" page, could the protect setting be "On"?
☐ If the program you edited is not saved, have you used the value dial to correctly specify the save-destination (program number)?
Arpeggiator will not start
☐ Is the arpeggiator on (ARP (TEMPO) button lit up)?
□ Is the arpeggiator assigned to a timbre?
☐ In the GLOBAL "g18: MIDI Basic" page, is the clock setting correct?
No response to MIDI messages sent from an external device
☐ Is the MIDI cable or USB cable connected correctly?
☐ Does the MIDI channel of the data transmitted from the external MIDI device match the MIDI channel of the KingKORG NEO?
☐ In the GLOBAL "g22-g26: MIDI Filter" page, is the setting "Enable"?
Transpose, velocity curve, and arpeggiator data is not recognized correctly
☐ In the GLOBAL "g03: Common" page, is the position setting correct?
Can't control timbres on separate MIDI channels
☐ If the PROGRAM "p03: Common" page's voice mode is set to "Single," the KingKORG NEO will receive only one MIDI channel.
Specifications
Sound generation system XMT (eXpanded Modeling Technology)
Programs
Number of programs 300 programs (200 preset / 100 user) Number of categories 8 categories Timbres Max 2 timbres (Layer / Split) Maximum Polyphony 24 voices max
Synth
Oscillator
Structure 3 oscillators (choose from analog, noise, DWGS, PCM, and MIC IN types) Number of types 138 types (32 analog and noise, 40 DWGS, 65 PCM, 1 MIC IN)
Filter
Structure 1 filter (choose from LPF, HPF, BPF) Number of types 18 types (7 LPF, 5 HPF, 6 BPF)
Modulation
Structure EG: 2 units, LFO: 2 units Routing Virtual patches: 6 sets
Effects
Sections Program effects x 3 (PRE FX, MOD FX, REV/DELAY) + EQ (2Band) Types PRE FX: 6 types (DISTORTION, DECIMATOR, RING MOD, GT.AMP, EP.AMP, TONE) MOD FX: 6 types (FLANGER, CHORUS, U-VIBE, TREMOLO, PHASER, ROTARY) REV/DELAY: 6 types (HALL, ROOM, PLATE, TAPE ECHO, MOD DELAY, BPM DELAY)
Vocoder 16-band vocoder, formant shift function, formant hold function
Arpeggiator Up to 8 steps (number of steps can be changed), 6 types (UP/DOWN/ALT1/ALT2/RANDOM/TRIGGER)
Audio
Input
Mic jack Connector XLR type (balanced) Maximum level +2 dBu
Output
OUTPUT (L/MONO, R) jacks Connectors φ6.3 mm TS phone jacks (unbalanced) L/MONO, R Load impedance 10 kΩ or higher Maximum level +5 dBu Headphone jack Connector φ6.3 mm (1/4") stereo phone jack Maximum level 60 mW + 60 mW @ 33 Ω
Displays
Main 16 x 2 character OLED display OSCILLATOR, FILTER 128 x 64 pixel OLED display
Keyboard 37 keys (velocity sensitive)
Controllers
Internal Joystick, OCTAVE UP/DOWN buttons, category/favorites buttons Inputs DAMPER jack (half-damper not supported), SWITCH/PEDAL jack External connections MIDI IN, MIDI OUT, USB B connector
Power supply AC adapter jack (DC 12 V, ◇G-◇)
Power consumption 9 W
Dimensions (width x depth x height) 565 x 338 x 92 mm / 22.24" x 13.31" x 3.62"
Weight 3.1 kg / 6.83 lb.
Operating temperature range 0 - +40 °C (non-condensing)
Included items Quick Start Guide, Precautions, AC Adapter, Vocoder mic, windscreen
Options XVP-20: Expression/volume pedal, EXP-2: Foot controller, DS-1H: Damper pedal, PS-1, PS-3: Pedal switch
KORG
KingKORG NEO
SYNTHESIZER
page GLOBAL "g14: Power Off"
Bouton SPLIT (POSITION)
text_image
P03: Common VoiceMode: Layer SYNC SYNTH LEAD BASS PAD/ AIRY BELL/ DECY MOTION SE/VOC P03: Common VOUT PROGRAM SELLER FAVORATED STARTtext_image
PAGE Initialize Prog. OK? Push Dial?text_image
PAGE Copy 027-A+011-A OK? Push Dialtext_image
PAGE Load All Data OK? Push Dial?text_image
EQ HIGH LOWGlobale Effekte (GLOBAL FX)
Oberseite (LFO/EG)

text_image
KORG KINGKORG NEO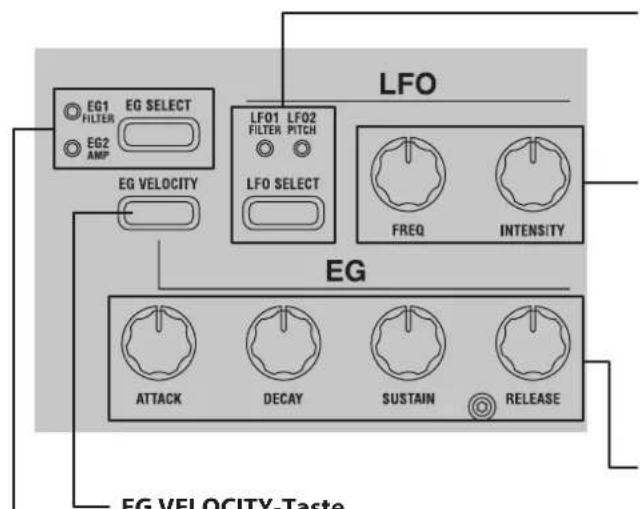
text_image
LFO EG1 EG SELECT FILTER EG2 AMP LF01 LF02 FILTER PITCH LFO SELECT EG FREQ INTENSITY EG ATTACK DECAY SUSTAIN RELEASE EG VELOCITY-TasteSPLIT (POSITION)-Taste
ASSIGNABLE SW Buchse
Release (RELEASE1, RELEASE2)
line
| Time (s) | Event | | -------- | ------------ | | 0 | Attack-Pegel | | 1 | Note on | | 2 | Note on | | 3 | Note off | | 4 | Note off |text_image
PAGE + - e+ [00000000] +text_image
PAGE - ↓ + [00000000] d‡text_image
PAGE Initialize Prog. OK? Push Dial?- Sämtliche Parameter in PROGRAM „p01–06 (Program), s01–80 (Synth), v01–18 (Vocoder), a01–12 (Arp)“
Panel frontal (Joystick/Audio) 71
Panel frontal (OSCILLATOR/FILTER/AMP) 72
Panel frontal (FX) 73
Panel frontal (LFO/EG) 74
Panel frontal (control principal) 75
Panel frontal (VOCODER)....76
Panel posterior 77
Panel frontal (Joystick/Audio)
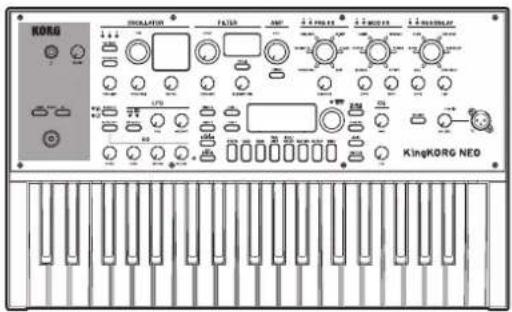
text_image
KORG INDICATOR FILTER OFF 2.4 MHz 100A 2.5 MHz 100A 2.6 MHz 100A KingKORG NEO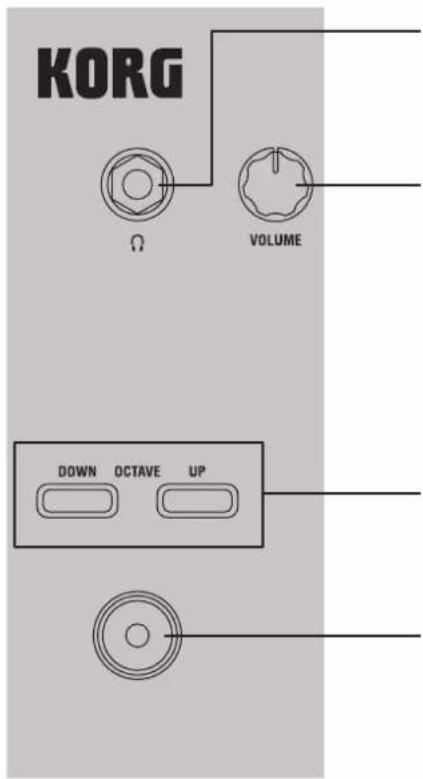
text_image
KORG Ω VOLUME DOWN OCTAVE UPJack para auriculares
Panel frontal (LFO/EG)
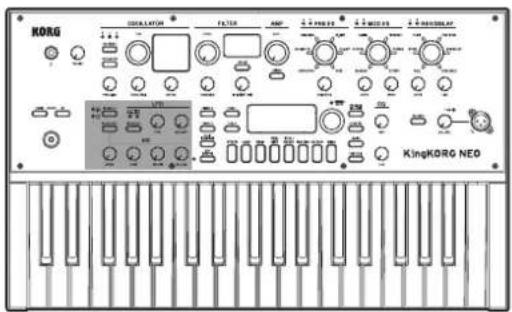
text_image
KORG KINGKORG NEO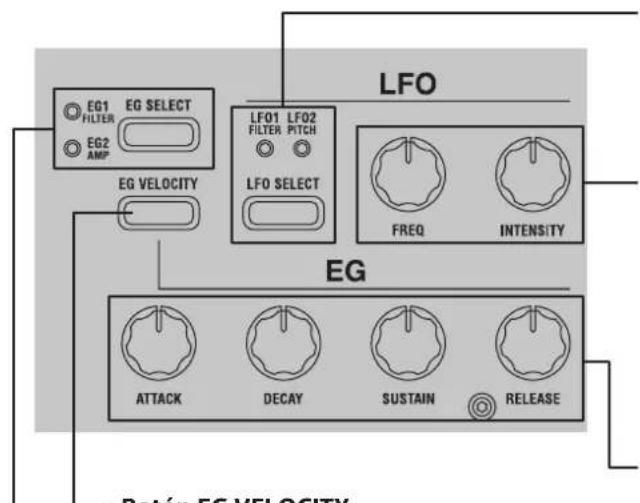
text_image
EG1 FILTER EG SELECT EG2 AMP EG VELOCITY LF01 LF02 FILTER PITCH LFO SELECT FREQ INTENSITY EG ATTACK DECAY SUSTAIN RELEASE Rotón EG VELOCITYBotón EG VELOCITY
text_image
Prog 024 Polysix SYNTH LEAD BASS PAD/ANY BELL/DECAY MOTION SE/VOC OPENING NUTTER PROGRAM SELECTED SELECTED SELECTED SELECTED SELECTED SELECTEDflowchart
graph TD
    A["SYNTH"] --> B["LEAD"]
    B --> C["BASS"]
    C --> D["PAD/ AIRY"]
    D --> E["BELL/ DECAY"]
    E --> F["MOTION"]
    F --> G["SE/VOC"]
    G --> H["MISC"]
    I["VOCODER"] --> J["Arrow pointing to the second control panel"]
text_image
PAGE - [00000000]text_image
PAGE + - Initialize Prog. OK? Push Dial12text_image
EQ HIGH LOWnatural_image
Blank rectangular frame with a thin vertical line above the center (no text or symbols)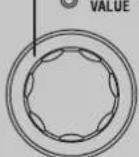
メイン・ディスプレイ
line
| Time | Level | | ---- | ----- | | 0 | 0 | | [1] | Peak | | [2] | Peak | | [3] | Stable | | [4] | Decline |[1]: Attack Time [3]: Sustain Level [2]: Decay Time [4]: Release Time
エフェクターを設定する
text_image
PAGE ↓ [00000000]text_image
PAGE - [0_00_000]text_image
PAGE Initialize Prog. OK? Push Dial?text_image
PAGE Copy 027-A+011-A OK? Push Dialtext_image
PAGE Load All Data OK? Push Dial?Program 201-300 are Initialized Program.
All Programs were made by Danz CM, Dave Polich, Henning Verlage, Kurt Ader, OscillatorSink, Richard Formidoni, Luke Edwards (Korg UK), Natalie Chami (Korg USA), and KORG Inc. For more information about the authors, please click the name and visit their website/social link.