
Triton taktile 49 - Synthesizer KORG - Free user manual and instructions
Find the device manual for free Triton taktile 49 KORG in PDF.
| Product Type | USB Controller/Synthesizer Keyboard |
| Brand | Korg |
| Model | Triton taktile 49 |
| Category | Synthesizer |
| Number of keys | 49 |
| Key type | Not specified (probably velocity-sensitive) |
| Built-in sound source | 512 sounds from the legendary Korg TRITON |
| Arpeggiator | Yes, with configurable parameters |
| Touchpad | Yes, for touch control and touch scale |
| Trigger pad | Yes, 16 pads (banks A and B) |
| Pitch Bend/Modulation wheel | Yes |
| Sliders/Controllers | 8 sliders, buttons F1~F8, value slider |
| Connectivity | USB (bus power), MIDI OUT, headphone/audio output (OUTPUT jack) |
| Pedal input | Yes, for pedal switch |
| Power supply | Via USB bus (5 V DC, 550 mA min.) or USB AC adapter (not included) |
| Power consumption | 500 mA or less |
| Operating temperature | Not specified |
| Included accessories | USB cable, user manual |
| Environment | Avoid direct sunlight, heat, humidity, dust, vibrations |
| Maintenance | Clean with a dry cloth, do not use solvents |
Frequently Asked Questions - Triton taktile 49 KORG
User questions about Triton taktile 49 KORG
0 question about this device. Answer the ones you know or ask your own.
Ask a new question about this device
Download the instructions for your Synthesizer in PDF format for free! Find your manual Triton taktile 49 - KORG and take your electronic device back in hand. On this page are published all the documents necessary for the use of your device. Triton taktile 49 by KORG.
USER MANUAL Triton taktile 49 KORG
Using the unit in the following locations can result in a malfunction.
- In direct sunlight
- Locations of extreme temperature or humidity
- Excessively dusty or dirty locations
- Locations of excessive vibration
- Close to magnetic fields
Power supply
Please connect the designated AC adapter to an AC outlet of the correct voltage. Do not connect it to an AC outlet of voltage other than that for which your unit is intended.
Interference with other electrical devices
Radios and televisions placed nearby may experience reception interference.
Operate this unit at a suitable distance from radios and televisions.
Handling
To avoid breakage, do not apply excessive force to the switches or controls.
Care
If the exterior becomes dirty, wipe it with a clean, dry cloth. Do not use liquid cleaners such as benzene or thinner, or cleaning compounds or flammable polishes.
Keep this manual
After reading this manual, please keep it for later reference.
Keeping foreign matter out of your equipment
Never set any container with liquid in it near this equipment. If liquid gets into the equipment, it could cause a breakdown, fire, or electrical shock.
Be careful not to let metal objects get into the equipment. If something does slip into the equipment, unplug the AC adapter from the wall outlet. Then contact your nearest Korg dealer or the store where the equipment was purchased.
THE FCC REGULATION WARNING (for USA)
NOTE: This equipment has been tested and found to comply with the limits for a Class B digital device, pursuant to Part 15 of the FCC Rules. These limits are designed to provide reasonable protection against harmful interference in a residential installation. This equipment generates, uses, and can radiate radio frequency energy and, if not installed and used in accordance with the instructions, may cause harmful interference to radio communications. However, there is no guarantee that interference will not occur in a particular installation. If this equipment does cause harmful interference to radio or television reception, which can be determined by turning the equipment off and on, the user is encouraged to try to correct the interference by one or more of the following measures:
- Reorient or relocate the receiving antenna.
- Increase the separation between the equipment and receiver.
- Connect the equipment into an outlet on a circuit different from that to which the receiver is connected.
- Consult the dealer or an experienced radio/TV technician for help.
If items such as cables are included with this equipment, you must use those included items.
Unauthorized changes or modification to this system can void the user's authority to operate this equipment.
DECLARATION OF CONFORMITY (for USA)
Responsible Party: KORG USA INC.
Address: 316 SOUTH SERVICE ROAD, MELVILLE, NY
Telephone: 1-631-390-6500
Equipment Type: USB CONTROLLER KEYBOARD/SYNTHESIZER
Model:TRITONtaktile-25/TRITONtaktile-49
This device complies with Part 15 of FCC Rules. Operation is subject to the following two conditions:
(1) This device may not cause harmful interference, and (2) this device must accept any interference received, including interference that may cause undesired operation.
Notice regarding disposal (for EU)

When this "crossed-out wheeled bin" symbol is displayed on the product, owner's manual, battery, or battery package, it signifies that when you wish to dispose of this product, manual, package or battery you must do so in an approved manner. Do not discard this

product, manual, package or battery along with ordinary household waste. Disposing in the correct manner will prevent harm to human health and potential damage to the environment. Since the correct disposal will depend on the applicable laws and regulations in your lease contact your local administrative body for details. If the battery heavy metals in excess of the regulated amount, a chemical symbol led below the "crossed-out wheeled bin" symbol on the battery or package.
- All product names and company names are the trademarks or registered trademarks of their respective owners.
Introduction
Thank you for purchasing the Korg TRITON tactile USB Controller Keyboard/Synthesizer.
In order to take full advantage of your new instrument, please read this instruction manual carefully and use the product as directed. You should also keep the instruction manual for future reference.
Tip For additional details about that functions and parameters of this unit, please refer to The TRITON tactile Parameter Guide. You can download The TRITON tactile Parameter Guide from the Korg website.
1. Connections

Tip When you connect the unit to your Windows computer for the first time, the driver included in the OS will be installed automatically.
When the unit is turned on, the polarity of a pedal switch (separately sold) is detected automatically. If you're using the pedal switch, it should be connected before the power is turned on. At power-on, you should not touch the pedal switch.
The standard USB-MIDI driver included in the Windows OS will not allow The TRITON tactile to be used by two or more applications simultaneously. To allow The TRITON tactile25/49 to be used by two or more applications simultaneously, you need to install the KORG USB-MIDI driver. Please download the KORG USB-MIDI driver from the Korg website, and install it following the instructions in the supplied document.
If you connect The TRITON tactile via a USB hub, it may not turn due to insufficient power. In that case, you should directly connect The TRITON tactile to the USB connector on the computer.
Use only the included USB cable.
Connect the AC Adapter
This unit uses a commercial AC adapter conforming to USB standards (DC5V 550 mA or higher), making it possible to use it as a standalone unit, without using a computer.
When using the controllers on this unit, a MIDI message is output from the MIDI OUT jack.
Be sure to use an AC adapter that conforms to USB2.0 standards. However, there may be cases where, depending on the USB AC adapter used, it will not function normally even when compatible with the standards.
When using an AC adapter, The TRITON taktile cannot be used for controlling the DAW software.
Connecting with headphones and audio equipment
Headphones, powered monitors or mixers should be connected to the OUTPUT jack on the right side of the main unit.
TIP When using a cable equipped with an adapter for conversion between standard and mini, hold the adapter when inserting or removing the plug.
When connecting a cable, do so with the device power OFF. Connecting with the power ON could cause damage to the connected equipment or cause it to malfunction. Also, be sure to turn down the volume on all devices that you want to connect.
You should avoid wearing headphones for extended periods of time at loud volume.
TRITON taktile
2. Basic Operations
Turning the power ON
This unit has no power switch. The power is turned ON by connecting the USB cable from unit to the computer USB terminal or USB AC adapter.
Turning the power OFF
The power is turned OFF when the USB cable that connects this unit to the computer or USB AC adapter is removed.
How to use the screen
- Select a desired parameter with the page / buttons.
- Specify a value for the parameter with the value slider. TIP Press the EXIT button to return to the original screen.
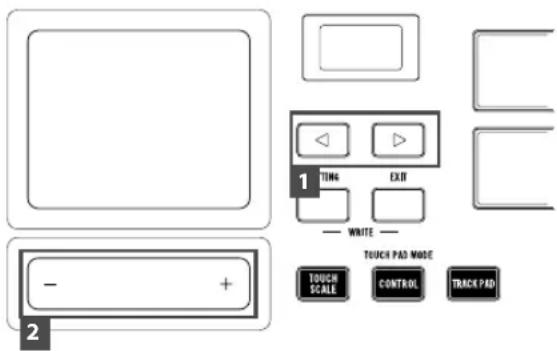
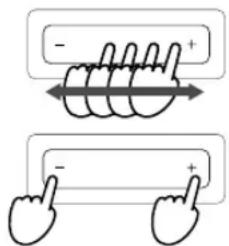
How to use the value slider
When you move a finger along the slider, a value will change continuously. To change the value one by one, press the end of the slider.
Only a fingertip should be used to control the value slider. You shouldn't use anything hard or pointed and you shouldn't be wearing gloves.
Using the built-in sound source for your performance
TRITON taktile includes 512 sounds created by tuning the program sounds mounted in the legendary KORG TRI-TON. You can easily perform with this unit without connecting to a computer.
TIP While the SOUND mode is ON, all MIDI messages will be transmitted on the Global MIDI channel regardless of which MIDI channel is specified for each controller.
1. Choosing the program
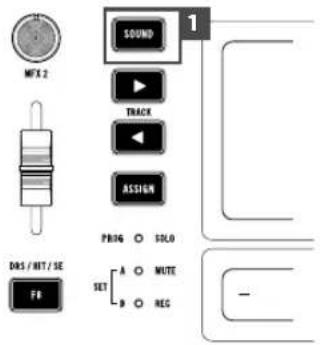
- Press the SOUND button to switch to the SOUND mode (SOUND button lights up). The program/category names are shown in the display.
- Change the program with the value slider.
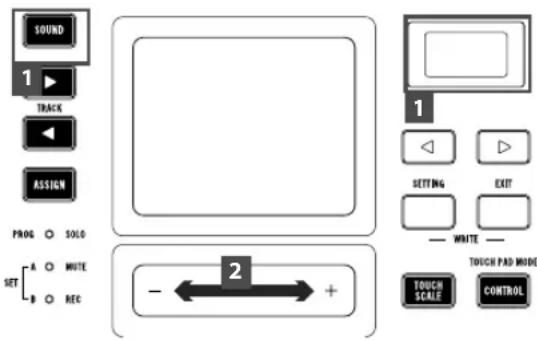
- Press the ASSIGN button to choose the category (LED lights up) and then press the F1-F8 buttons to select the lead program for the individual categories.
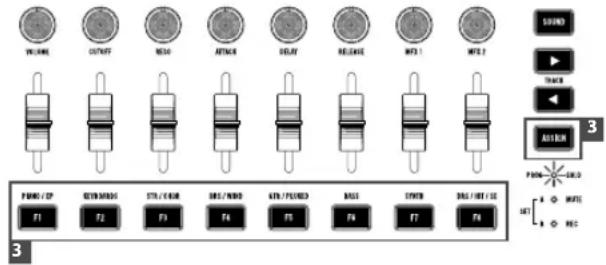
- You can perform with the keyboard, touchpad and trigger pad. You can also modify the sounds in your performance by using the pitch bend wheel or modulation wheel to alter the notes that are played.
Changing the sound of program
You can change and modulate the sound of the program you've chosen.
You can use eight sliders to adjust the parameters that are assigned to individual programs.
Tip Refer to the Parameter Guide for the contents of the parameters.
It is not possible to store the settings of changed parameters to the memory. If a program is changed, the unit will return to the initial settings that are set to each program.
Registering to favorites
You can use the F1-F8 buttons to register and easily recall your favorite programs.
- Select the program that you wish to register.
- Press the ASSIGN button and select SET A or SET B (LED lights up).
- While pressing the EXIT button, press the buttons from F1-F8 that you wish to use for registering, and register your favorites.
- If you press the F1-F8 buttons with SET A or SET B selected, it is possible to instantly select the registered programs.
2. Performing along a scale
The TRITON tactile has a function that allows you to perform along a specified scale using the touchpad or the trigger pad.
This function simplifies procedures like triggering a sound with the trigger pad (chord scale) and playing a melody or a bass line with the touchpad (touch scale).
Specifying a scale and a key
Specify a scale and a key to be assigned to the touchpad or the trigger pad.
- Choose the "Scale" or the "Key" parameter with the page k buttons, and specify a desired scale or key using the value slider.
Performing with the touchpad (touch scale)
The touch scale is a function that allows you to perform with the touchpad using the scale and key that you've specified.
- Press the TOUCH SCALE button to enter touch scale mode.
- Perform by rubbing your finger over the touchpad or tapping it.
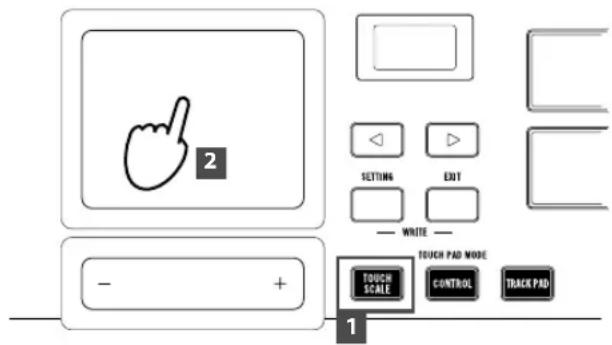
Tip You can control parameters that were set by moving your finger on the touchpad in the longitudinal did information on how to set up parameters, please refer to the Parameter Guide.
Only a fingertip should be used to control the value slider. You shouldn't use anything hard or pointed and you shouldn't be wearing gloves.
Playing chords with the trigger pad (chord scale)
The chord scale is a function that allows you to play chords with the trigger pad using a specified key and scale.
- Press the CHORD SCALE button to place the trigger pad into chord scale mode.
- Perform by tapping the trigger pad.
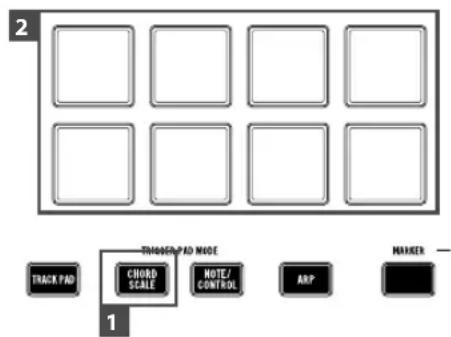
- When choosing the "Chord Variation" parameter with the page buttons, you can control the richness of the chords with the value slider.
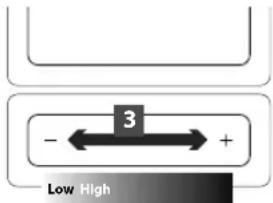
You can make your performance more expressive by controlling the Variation parameter while you play.
3. Playing a drum with the trigger pad
Press the NOTE/CONTROL button to place the trigger pad into note/control mode.
Select the drum sound program and tap the trigger pad to perform ( 1 Choosing the program).
Tip With the DRS/HIT/SE category (F8 button), you can select the drum sound program.
Tip At the factory prior to shipment, optimum note messages for the general GM-compatible drum kit are assigned to the trigger pad. When using the software synthesizer, the software may not be compliant with the GM standard. Please change the assignment referring to The TRITON tactile Parameter Guide.
Selecting a trigger pad bank
The trigger pad of The TRITON taktile has two banks: A and B. For example, you can assign drum sounds to bank A. A a#d percussion sounds to bank B, or use both A and B for up to 32 (for the TRITON taktile-25, up to 16) sample triggers.
Choose the "Pad Bank" with the page / buttons, and select a bank with the value slider.
TIP An LED for the trigger pad lights up in red for bank A, and in blue for the bank B.
Tip To select between banks A and B, you can also press the NOTE/CONTROL button again.
TRITON taktile
4. Using the arpeggiator
The arpeggiator is a function that automatically plays a broken chord (arpeggio) when you play a chord.
- Press the ARP button to turn on the arpeggiator.
- Notes played on the keyboard, the touchpad, or the trigger pad will be played by the arpeggiator.
Tip When choosing the arpeggior parameter with the page button s, you can change the arpeggior with the value slider. For parameters that can be set up, please refer to The TRITON tactile Parameter Guide.
5. Useful functions
Octave shift
Specify the range of the keyboard, the touch scale, and the chord scale in octave steps.
- Whenever you press the OCTAVE +/- buttons, the range will shift in increments of one octave up and down.
Tip When pressing the OCTAVE + button and the OCTAVE - button simultaneously, you can return the octave state to zero, where there is no shifting.
TIP Each program has an upper limit, and may not produce sound when played above that limit.
Transpose
Transpose the keyboard in semitone steps.
- Choose the "Transpose" parameter with the page K buttons, and set it up using the value slider.
Use as MIDI Controller
You can connect this unit to a computer with a USB cable and use it with a software synthesizer or DAW/MIDI synthesizer, etc.
1. About a scene
setup
Meaning of a scene
A group of settings in The TRITON tactile that suits software such as a DAW is called a scene. Up to 16 scenes can be stored in the main unit of The TRITON tactile. Settings that support representative software are incorporated in The TRITON tactile beforehand.
Tip You can also customize scene settings. For information on how to customize them, please refer to the Parameter Guide of The TRITON taktile.
How to select a scene
Choose the "Scene" parameter with the page/ buttons, and select a desired scene with the value slider. shift
2. MIDI port
KEYBOARD/CTRL, SOUND/ CTRL
MIDI messages from each controller, such as the keyboard and trigger pad of The TRITON tactile will be input. In addition, they are used when you control the built-in sound source.
DAW IN, DAW OUT
These ports are used for controlling DAW software.
MIDI I/F OUT
These ports are used as MIDI interfaces. They are used when you input MIDI messages into your computer from external MIDI equipment or when you control external MIDI equipment from your computer.
In the Windows environment, a port name, such as "TRITON tactile-49" and "MIDIIN2(TRITON tactile-49)," will not be displayed. Since it is usually displayed in the above order, please specify the corresponding port on the software. When you install the KORG USB-MIDI driver, a MIDI port name will be displayed.
3. How to Set Up DAW Software
For detailed setup and use of third party DAW software, please refer to the instruction manual of that came with your DAW software.
If the scene settings in The TRITON tactile have changed from the factory settings, it may not function as follows.
Cubase
- Display the "Scene" parameter with the page buttons, and choose "Cubase" with the value slider.
- Open the "Device Setup" window in Cubase, and add
Mackie Control to "Devices."
- Open the added Mackie Control page, and specify the DAW IN/OUT ports of The TRITON taktile in the MIDI input/output section that you want to be used by Mackie Control.
- Open the "MIDI Port Setup" page, and uncheck "In 'All MIDI Inputs" for the DAW IN/OUT ports of The TRITON taktile.
Digital Performer
- Display the "Scene" parameter with the page / buttons, and choose the scene for "DP" with the value slider.
Settings at "Audio MIDI Setup"
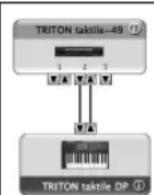
- Start "Applications" "Utilities" "Audio MIDI Setup" to open "MIDI Studio," and execute "Add Device."
- Name the added device appropriately. (e.g., TRITON taktile DP)
-
Connect the added device to The TRITON taktile as shown on the left.
TIP When using the KORG USB-MIDI driver, connect the INPUT/OUTPUT port of the device to the "DAW IN" and "DAW OUT." -
Open the "Control Surface" window in Digital Performer, and choose Mackie Control in "Driver" and "Unit."
- Choose the "DAW IN/OUT" ports of The TRITON taktile in the "MIDI" section.
Tip For Digital Performer, the CYCLE button on the transport buttons functions as an on/off button for the Memory Cycle. However, even if you turn on the Memory Cycle, the CYCLE button will not light up.
Tip For Digital Performer, the SET MARKER button does not function.
Live
- Display the "Scene" parameter with the page<@bot-tons, and choose "Live" with the value slider.
- Open the "Preferences" window, and choose Mackie Control in the "Control Surface" section.
- Specify the DAW IN/OUT ports of The TRITON tactile in the MIDI input/output section that you want to be used by Mackie Control.
GarageBand/Logic
Please download The TRITON tactile Control Surface plug-in for GarageBand/Logic from the Korg website, and set it up according to the supplied document.
Pro Tools
- Display the "Scene" parameter with the page buttons, and choose "Pro Tools" with the value slider.
- Open the "Peripherals" window in Pro Tools, and choose HUI in "Type."
- Specify the DAW IN/OUT ports of The TRITON tactile in the source and destination sections that you want to be used by the HUI.
SONAR
- Display the "Scene" parameter with the page buttons, and choose "SONAR" with the value slider.
- Open the "Preferences" window in SONAR, check off the KEYBOARD/CTRL, SOUND/CTRL port and DAW IN/OUT port of The TRITON tactile in both "Inputs" and "Outputs" on the "Devices" page, and press the Apply button.
- On the "Control Surfaces" page, open the "Control Surface Settings" dialog with the button to add a control surface, and specify "Mackie Control" in "Control Surface," and the DAW IN/OUT ports of The TRITON tactile in the "Input Port" and "Output Port" sections.
Other software
- Display the "Scene" parameter with the page buttons, and choose "Generic CC" with the value slider.
- Set up your application so that it can be controlled through the control change messages that are output by the "KEYBOARD/CTRL, SOUND/CTRL" port of The TRITON taktile.
Tip For information on how to set up your application, please added refer to the instruction manual of the application.
4. Performing with the software
synthesizer
While creating sounds, you may be required to connect the computer and load the software synthesizer beforehand on the DAW software or in order to set the track recording condition, etc. For details, refer to the User's Manual of the software you are using.
Using the keyboard for your performance
Use the keyboard to confirm that the software synthesizer is emitting sounds.
In the same way as the control operations explained in "using the sound source for your performance," use the pitch-bend wheel and modulation wheel to try changing the sound.
You can also carry out operations such as "playing according to the scale," "playing the drum with the trigger pad," or "using the arpeggiator."
TRITON taktile
5. Controlling software
- If the SOUND button is lit up, press the SOUND button to turn off its light.
- When you choose the "TRACK PAD" page with the page <buttons, the left and right sides on the value slider will function as a left click and a right click respectively.
- You can use knobs, sliders and F1-F8 buttons to control your software synthesizer, etc.
Tip For parameters that can be controlled using knobs, sliders, and F1-F8 buttons, please refer to the Parame Guide.
Tip For information on how to set up your application, please refer to the instruction manual of your software.
Using the touchpad for control
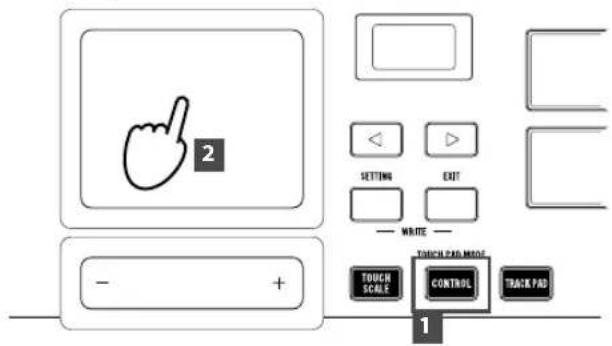
- Press the CONTROL button to place the touchpad into control mode.
- Since control change messages are transmitted when you touch the touchpad, release your finger, and move it, assign the control change messages at your software synthesizer.
Specifications
Connectors: MIDI OUT connector, ASSIGNABLE PEDAL jack, ASSIGNABLE SWITCH jack, OUTPUT jack, USB connector (B type)
Power supply: USB bus power mode
Current consumption: 500mA or less
Operating temperature:
0- +40^ (non-condensing)
Included items: USB cable, Owner's manual
- Specifications and appearance are subject to change without notice for improvement.
6. Using the Unit as the Mouse for Your Computer
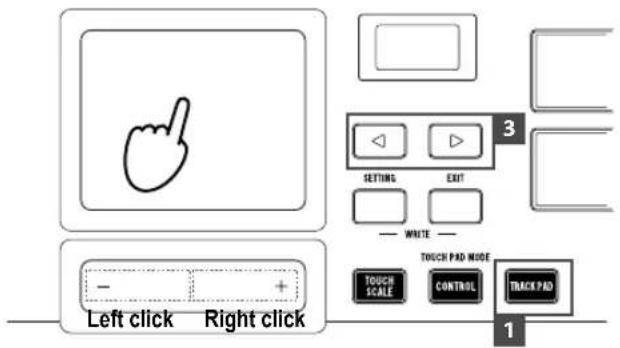
- Press the TRACK PAD button to place the touchpad into trackpad mode.
- Control the mouse cursor of your computer by rubbing your finger over the touchpad.
When you tap the touchpad, it will function as a left click. Additionally, by rubbing y our two fingers over the touchpad up and down, you can use it for scrolling the screen up and down.
Précautions
Emplacement
Prises: Prise MIDI OUT, Prise ASSIGNABLE PEDAL, Prise ASSIGNABLE SWITCH, Prise OUTPUT, Prise USB-B
0 +40^ (sans condensation)
comoutilizarlapantalla
| Display Scale | Name Scale [Key C] | |
| 1 Chromatic Chromatic C, C | #, D, D#, E, F, F#, G, G#, A, A#, B | |
| 2 Ionian Ionian C, D, E, F, G, A, B | ||
| 3 Dorian Dorian C, D, D | #, F, G, A, A# | |
| 4 Phrygian Phrygian C, C | #, D#, F, G, G#, A# | |
| 5 Lydian Lydian C, D, E, F | #, G, A, B | |
| 6 Mixolydian Mixolydian C, D, E, F, G, A, A# | ||
| 7 Aeolian Aeolian C, D, D#, F, G, G#, A# | ||
| 8 Locrian Locrian C, C#, D#, F, F#, G#, A# | ||
| 9 Harm minor Harmonic minor C, D, D#, F, G, G#, B | ||
| 10 Melo minor Melodic minor C, D, D#, F, G, A, B | ||
| 11 Major Blues Major Blues C, D, D#, E, G, A | ||
| 12 minor Blues minor Blues C, D#, F, F#, G, A# | ||
| 13 Diminished Diminished C, D, D#, F, F#, G#, A, B | ||
| 14 Com.Dim Combination Diminished C, C#, D#, E, F#, G, A, A# | ||
| 15 Major Penta Major Pentatonic C, D, E, G, A | ||
| 16 minor Penta minor Pentatonic C, D#, F, G, A# | ||
| 17 Raga1 Raga Bhairav C, C#, E, F, G, G#, B | ||
| 18 Raga2 Raga Gamanasrama C, C#, E, F#, G, A, B | ||
| 19 Raga3 Raga Todi C, C#, D#, F#, G, G#, B | ||
| 20 Arabian Arabian C, D, E, F, F#, G#, A# | ||
| 21 Spanish Spanish C, C#, D#, E, F, G, G#, A# | ||
| 22 Gypsy Gypsy C, D, D#, F#, G, G#, B | ||
| 23 Egyptian Egyptian C, D, F, G, A # | ||
| 24 Hawaiian Hawaiian C, D, D#, G, A | ||
| 25 Pelog Bali Island Pelog C, C#, D#, G, G# | ||
| 26 Japanese Japanese Miyakobushi C, F, F, G, G# | ||
| 27 Ryukyu Ryukyu C, E, F, G, B | ||
| 28 Chinese Chinese C, E, F #, G, B | ||
| 29 Bass Line Bass Line C, G, A# | ||
| 30 Whole Tone Whole Tone C, D, E, F#, G#, A# | ||
| 31 minor 3rd minor 3rd Interval C, D#, F, A | ||
| 32 Major 3rd Major 3rd Interval C, E, G# | ||
| 33 4th Interval 4th Interval C, F, A# | ||
| 34 5th Interval 5th Interval C, G | ||
| 35 Octave Octave C |
Parts of the TRITON taktile
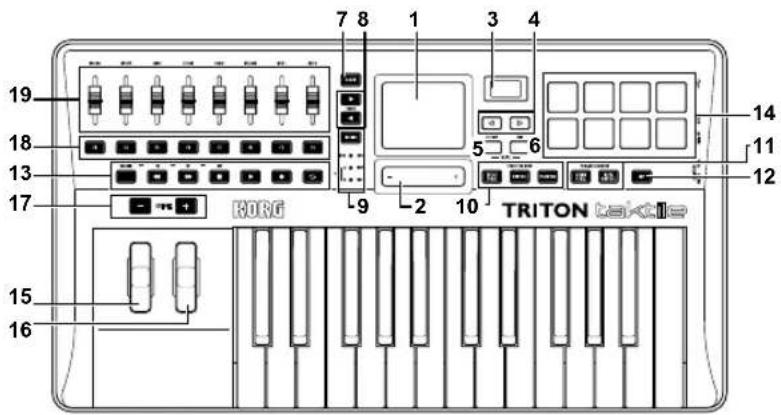

- Touchpad
- Value slider
- Display
- page k buttons
- SETTING button
- EXIT button
- SOUND button
- TRACK buttons
- ASSIGN button, LED
- TOUCH PAD MODE buttons
- TRIGGER PAD MODE buttons
- ARP button
- Transport buttons
- Trigger pad
- Pitch wheel
- Modulation wheel
- OCTAVE +/- buttons
- F1-F8 bottons
- Sliders
-
Knobs (TRITON taktile49 only)
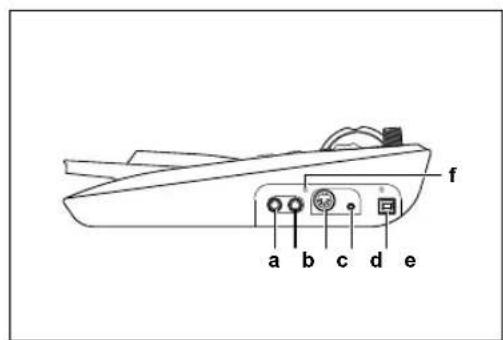
a. ASSIGNABLE SWITCH jack
b. ASSIGNABLE PEDAL jack
c. MIDI OUT connector
d. OUTPUT jack
e. USB connector (B type)
f. Functional ground terminal -
Pavé tactile
- Curseur de valeur
- Affichage
- Boutons de page
- Bouton SETTING
- Bouton EXIT
- Bouton SOUND
- Boutons TRACK
- Bouton ASSIGN, témoin d'alimentation
- Boutons de TOUCH PAD MODE
- Boutons de TRIGGER PAD MODE
- Bouton ARP
- Boutons de transport
- Pad déclencheur
- Molette de pitch bend
- Molette de modulation
- Boutons OCTAVE +/-
- Boutons F1~F8
- Curseurs
-
Commandes (TRITON taktile49 uniquement)
a. Prise ASSIGNABLE SWITCH
b. Prise ASSIGNABLE PEDAL
c. Prise MIDI OUT
d. Prise OUTPUT
e. Prise USB-B
f. Terminal de mise à la terre -
Touchpad
- Value-Slider
- Display
- page /'faster
- SETTING-Taste
- EXIT-Taste
- SOUND-Taste
- TRACK Tasten
- ASSIGN-Taste, LED
- TOUCH PAD MODE-Tasten
- TRIGGER PAD MODE-Tasten
- ARP-Taste
- Transporttasten
- Triggerpad
- Pitch-Bend-Rad
- Modulationsrad
- OCTAVE +/- Tasten
- F1-F8 Tasten
- Schieberegler
-
Regler (nur TRITON tactile 49)
a. ASSIGNABLE SWITCH-Buchse
b. ASSIGNABLE PEDAL-Buchse
c. MIDI OUT-Anschluss
d. OUTPUT-Buchse
e. USB-B-Anschluss
f. Funktionale Masseklemme -
Panel tactile
- Barra deslizante de valor
- Visualización
4.Botones de pagina 1/ - Botón SETTING
- Botón EXIT
- Botón SOUND
8.Botones TRACK - Botón ASSIGN, LED
- Botones TOUCH PAD MODE
- Botones TRIGGER PAD MODE
- Botón ARP
- Botones de transporte
- Pad de disparo
- Rueda de inflexion de tono
- Rueda de modulación
17.Botones OCTAVE + / -
18.Botones F1-F8 - Barras deslizantes
- Mandos (TRITON taktile49 solamente)
a. Jack ASSIGNABLE SWITCH
b. Jack ASSIGNABLE PEDAL
c. Conector MIDI OUT
d. Jack OUTPUT
e. Conector USB-B
f. Terminal de tierra funcional
TRITON taktile
Functional ground terminal
This is the terminal (screw) for connecting this machine to a ground. When connecting a ground, loosen this terminal (screw), and then use a ground wire to ground the machine.
After loosening the terminal (screw), be sure to tighten it. In addition, do not use the machine with this terminal (screw) removed.
Tip If this machine is connected to an audio interface, noise may be generated due to the potential difference of the ground depending on the connections of peripheral devices. The noise may be reduced by connecting a ground wire to the functional ground terminal of the audio interface.
| Number | Name Category Sub Category |
| 309Rz. Down | SYNTH Slow |
| 310FreedomPad | SYNTH Slow |
| 311Noble Pad | SYNTH Slow |
| 312Ultra Sweep | SYNTH Slow |
| 313Power Rez | SYNTH Slow |
| 314Cyclic Pad | SYNTH Slow |
| 315Pads Waves | SYNTH Slow |
| 316Gj Ice Pad | SYNTH Slow |
| 317Antartic Pad SYNTH | Slow |
| 318Harmo Pad SYNTH | Slow |
| 319JavenVibe SYNTH | Slow |
| 320Metal Pad | SYNTH Slow |
| 321Lonley Pad SYNTH | Slow |
| 322RavelianPad | SYNTH Slow |
| 323Air Pad | SYNTH Slow |
| 324Lava Lakes | SYNTH Slow |
| 325Waves Pad | SYNTH Slow |
| 326(Meditate) | SYNTH Slow |
| 327Time Warp | SYNTH Slow |
| 328Gostly Str SYNTH | Slow |
| 329Svn Ghostly | SYNTH Slow |
| 330Cloud Pad | SYNTH Slow |
| 331Pads Pad SYNTH | Slow |
| 332Wheel Pad SYNTH | Slow |
| 333SwirlingPad | SYNTH Motion |
| 334Tlinkin' Pad SYNTH | Motion |
| 335ShistarPad SYNTH | Motion |
| 336Crimson5ths | SYNTH Motion |
| 337Rizzo Pad | SYNTH Motion |
| 338GliathPad | SYNTH Motion |
| 339Water Pad | SYNTH Motion |
| 340Virtual Pad | SYNTH Motion |
| 341Flying Pad | SYNTH Motion |
| 342OXYGEN SYNTH | Motion |
| 343Transform | SYNTH Motion |
| 344MonCycles SYNTH | Motion |
| 345Bubble Pad | SYNTH Motion |
| 346Astral Pad | SYNTH Motion |
| 347Rez Sweep | SYNTH Motion |
| 348Sweeper Str SYNTH | Motion |
| 349OneNotePad | SYNTH Motion |
| 350X Sweeper | SYNTH Motion |
| 351Dial Filterz SYNTH | Motion |
| 352FilterSweep SYNTH | Motion |
| 353Mallet Pad | SYNTH Motion |
| 354Rhythm Pad | SYNTH Motion |
| 355Random Pad | SYNTH Motion |
| 356Moon Talker | SYNTH Motion |
| 357Tomorrow's | SYNTH Motion |
| 358Motion Pad | SYNTH Motion |
| 359RhythmPad SYNTH | Motion |
| 360Fenger SYNTH | Motion |
| 361Fugue L.F.O. | SYNTH Motion |
| 362Zoomator | SYNTH Motion |
| 363Space Pod | SYNTH Motion |
| 364Filter Gate SYNTH | Motion |
| 365Snow Lead | SYNTH Syn Lead |
| 366R&B Lead | SYNTH Syn Lead |
| 367ResRes One SYNTH | Syn Lead |
| 368ElectroLead | SYNTH Syn Lead |
| 369False Lead | SYNTH Syn Lead |
| 370Mni Lead | SYNTH Syn Lead |
| 371Slow Lead | SYNTH Syn Lead |
| 372SquareLead SYNTH | Syn Lead |
| Number | Name Category Sub Category | ||
| 3730 | d&Analog SYNTH Syn | Lead | |
| 3740 | d Porta SYNTH Syn Lead | ||
| 3750 | ding Squ SYNTH Syn | Lead | |
| 376T | ancerLead SYNTH Syn | Lead | |
| 377R | ch Lead SYNTH Syn Lead | ||
| 378H | hHopLead SYNTH Syn | Lead | |
| 379T | tinAnaLead SYNTH Syn | Lead | |
| 380C | t Lead SYNTH Syn Lead | ||
| 381S | e Lead 1 SYNTH Syn | Lead | |
| 382D | ance Lead SYNTH Syn | Lead | |
| 383B | ass/Lead SYNTH Syn | Lead | |
| 384P | WM Lead SYNTH Syn | Lead | |
| 385G | ide Lead SYNTH Syn | Lead | |
| 386O | to Lead SYNTH Syn Lead | ||
| 387S | pperLead SYNTH Syn | Lead | |
| 388T | chno Stat SYNTH Syn Lead | ||
| 389R | ave Stabz SYNTH Syn | Lead | |
| 390S | yn Pipes SYNTH Syn Lead | ||
| 391S | ncro City SYNTH Syn | Lead | |
| 392F | t Sync SYNTH Syn Lead | ||
| 393B | ian'sSync SYNTH Syn | Lead | |
| 394S | nc Kronic SYNTH Syn | Lead | |
| 395B | usy Sync SYNTH Syn Lead | ||
| 396X | ynced SYNTH Syn Lead | ||
| 397F | ire Wave SYNTH Syn | Lead | |
| 398X | ModRaver SYNTH Syn | Lead | |
| 399S | d Kit 1 | DRS/HIT/SE | Natural |
| 400H | use Kit DRS/HIT/SE | Dance | |
| 401P | yocho Kit | DRS/HIT/SE | Dance |
| 402O | ch&Ethno DRS/HIT/SE | Perc | |
| 403V | yo Hit | DRS/HIT/SE | Hits |
| 404Gr | Hit | DRS/HIT/SE | Hits |
| 405C | hipperHit | DRS/HIT/SE | Hits |
| 406W | ld Arp | DRS/HIT/SE | Sdecay |
| 407Es | Bell | DRS/HIT/SE | Bell |
| 408F | ture Bell DRS/HIT/SE | Bell | |
| 409D | gi Bells 1 DRS/HIT/SE | Bell | |
| 410V | Bell Boy | DRS/HIT/SE | Bell |
| 411M | alletSkulls DRS/HIT/SE | Mallet | |
| 412J | ust Do It!! | DRS/HIT/SE | Hits |
| 413L | oop-Iteria | DRS/HIT/SE | SFX |
| 414T | techno Vox DRS/HIT/SE | SFX | |
| 415M | onster | DRS/HIT/SE | SFX |
| 416S | d Kit 2 | DRS/HIT/SE | Natural |
| 417B | ush Kit | DRS/HIT/SE | Natural |
| 418P | power Kit DRS/HIT/SE | Natural | |
| 419H | pHop Kit DRS/HIT/SE | Dance | |
| 420D | n'B Kit DRS/HIT/SE | Dance | |
| 421T | icky Kit | DRS/HIT/SE | Dance |
| 422K | ing Kit | DRS/HIT/SE | Natural |
| 423J | zPitchKit DRS/HIT/SE | Natural | |
| 424U | GLY Kit | DRS/HIT/SE | Dance |
| 425V | ACKy Kit | DRS/HIT/SE | Dance |
| 426D | hBGateKit | DRS/HIT/SE | Dance |
| 427N | nasty Kit | DRS/HIT/SE | Dance |
| 428P | yPitchKit | DRS/HIT/SE | Dance |
| 429P | erc Kit | DRS/HIT/SE | Perc |
| 430B | &D/SD Kit 1 | DRS/HIT/SE | Perc |
| 431B | &D/SD Kit 2 | DRS/HIT/SE | Perc |
| 432C | mbals Kit | DRS/HIT/SE | Perc |
| 433T | hyPercKit | DRS/HIT/SE | Perc |
| 434M | MX Perc DRS/HIT/SE | Perc | |
| 435M | arc Tree | DRS/HIT/SE | Perc |
| 436G | ng | DRS/HIT/SE | Perc |
| Number | Name | Category | Sub | Category |
| 437P | zz Hit | DRS/HIT/SE | Hits | |
| 438 | lass Hit | DRS/HIT/SE | Hits | |
| 439 | gan Hit DRS/HIT/SE | Hits | ||
| 440 | recordHit 1 | DRS/HIT/SE | Hits | |
| 441 | recordHit 2 | DRS/HIT/SE | Hits | |
| 442 | techOrgHit DRS/HIT/SE | Hits | ||
| 443 | lab Hit | DRS/HIT/SE | Hits | |
| 444 | aggae Hit DRS/HIT/SE | Hits | ||
| 445 | popGtr Hit DRS/HIT/SE | Hits | ||
| 446 | angele Hit DRS/HIT/SE | Hits | ||
| 447 | Jingle Hit | DRS/HIT/SE | Hits | |
| 448 | crazy Wah DRS/HIT/SE | Hits | ||
| 449 | baMessage | DRS/HIT/SE | Hits | |
| 450 | irk Hit DRS/HIT/SE | Hits | ||
| 451 | KarmaSutra | DRS/HIT/SE | Hits | |
| 452 | India Hit DRS/HIT/SE | Hits | ||
| 453 | ega Drum | DRS/HIT/SE | Hits | |
| 454 | baster | DRS/HIT/SE | Hits | |
| 455 | lip Blip | DRS/HIT/SE | Sdecay | |
| 456 | ba Lover DRS/HIT/SE | S.decay | ||
| 457 | Tp Twins DRS/HIT/SE | S.decay | ||
| 458 | Auto Pilot DRS/HIT/SE | S.decay | ||
| 459 | tropic Bells | DRS/HIT/SE | Blll | |
| 460 | Finger Cym | DRS/HIT/SE | Blll | |
| 461 | bathyBells | DRS/HIT/SE | Blll | |
| 462 | gi Bells 2 DRS/HIT/SE | Bell | ||
| 463 | Crystal Bells DRS/HIT/SE | Bell | ||
| 464 | Bess Bell | DRS/HIT/SE | Blll | |
| 465 | Bottle Bell DRS/HIT/SE | Bell | ||
| 466 | oving Bellz | DRS/HIT/SE | Blll | |
| 467 | thin Bell | DRS/HIT/SE | Blll | |
| 468 | igi-Bell | DRS/HIT/SE | Blll | |
| 469 | Magical Bells | DRS/HIT/SE | Bell | |
| 470 | Tinkle Bells | DRS/HIT/SE | Blll | |
| 471 | hybrid Bell DRS/HIT/SE | Bell | ||
| 472 | Kalimba 1 | DRS/HIT/SE | Mallet | |
| 473 | Kalimba 2 | DRS/HIT/SE | Mallet | |
| 474 | arimba | DRS/HIT/SE | Mallet | |
| 475 | h Rimba DRS/HIT/SE | Mallet | ||
| 476 | Log Drum DRS/HIT/SE | Mallet | ||
| 477 | Dr&Bell | DRS/HIT/SE | Mallet | |
| 478 | BaliGamelon | DRS/HIT/SE | Mallet | |
| 479 | am-Gong DRS/HIT/SE | Mallet | ||
| 480 | Gamelan | DRS/HIT/SE | Mallet | |
| 481 | Steel Drum | DRS/HIT/SE | Mallet | |
| 482 | Cow/Agogo | DRS/HIT/SE | Mallet | |
| 483 | vibraphone | DRS/HIT/SE | Mallet | |
| 484 | borg Hit | DRS/HIT/SE | SFX | |
| 485 | Back Box DRS/HIT/SE | SFX | ||
| 486 | Tambo-FX | DRS/HIT/SE | SFX | |
| 487 | SpaceShip* DRS/HIT/SE | SFX | ||
| 488 | biting | DRS/HIT/SE | SFX | |
| 489 | CompuShift | DRS/HIT/SE | SFX | |
| 490 | vanishingFX DRS/HIT/SE | SFX | ||
| 491 | DistantLight | DRS/HIT/SE | SFX | |
| 492 | NewVoyage | DRS/HIT/SE | SFX | |
| 493 | CosmicToys | DRS/HIT/SE | SFX | |
| 494 | Motion FX | DRS/HIT/SE | SFX | |
| 495 | emispheres | DRS/HIT/SE | SFX | |
| 496 | soundscapes | DRS/HIT/SE | SFX | |
| 497 | onic Blast DRS/HIT/SE | SFX | ||
| 498 | teamSweep DRS/HIT/SE | SFX | ||
| 499 | eat Wall | DRS/HIT/SE | SFX | |
| 500 | cosmic FX DRS/HIT/SE | SFX |
| Number | Name Category Sub Category | ||
| 501Water FX | DRS/HIT/SE | SFX | |
| 502 | SolarSurfing | DRS/HIT/SE | SFX |
| 503Dark Night DRS/HIT/SE | SFX | ||
| 504Frozen | DRS/HIT/SE | SFX | |
| 505Opt-on | DRS/HIT/SE | SFX | |
| 506Venusian | DRS/HIT/SE | SFX | |
| 507ReverseVox | DRS/HIT/SE | SFX | |
| 508Lionie Bin DRS/HIT/SE | SFX | ||
| 509D Touch DRS/HIT/SE | SFX | ||
| 510Birds&Bugs | DRS/HIT/SE | SFX | |
| 511BadWeather | DRS/HIT/SE | SFX | |
| 512WispyWind | DRS/HIT/SE | SFX | |
IMPORTANT NOTICE TO CONSUMERS
This product has been manufactured according to strict specifications and voltage requirements that are applicable in the country in which it is intended that this product should be used. If you have purchased this product via the internet, through mail order, and/or via a telephone sale, you must verify that this product is intended to be used in the country in which you reside.
WARNING: Use of this product in any country other than that for which it is intended could be dangerous and could invalidate the manufacturer's or distributor's warranty. Please also retain your receipt as proof of purchase otherwise your product may be disqualified from the manufacturer's or distributor's warranty.
- Power supply
- Interference with other electrical devices
- Handling
- Care
- Keep this manual
- Keeping foreign matter out of your equipment
- THE FCC REGULATION WARNING (for USA)
- DECLARATION OF CONFORMITY (for USA)
- Notice regarding disposal (for EU)
- Introduction
- Connections
- Connect the AC Adapter
- Connecting with headphones and audio equipment
- TRITON taktile
- Basic Operations
- Turning the power ON
- Turning the power OFF
- How to use the screen
- How to use the value slider
- Using the built-in sound source for your performance
- Choosing the program
- Changing the sound of program
- Registering to favorites
- Performing along a scale
- Specifying a scale and a key
- Performing with the touchpad (touch scale)
- Playing chords with the trigger pad (chord scale)
- Playing a drum with the trigger pad
- Selecting a trigger pad bank
- Using the arpeggiator
- Useful functions
- Octave shift
- Transpose
- Use as MIDI Controller
- About a scene
- Meaning of a scene
- How to select a scene
- MIDI port
- KEYBOARD/CTRL, SOUND/ CTRL
- DAW IN, DAW OUT
- MIDI I/F OUT
- How to Set Up DAW Software
- Cubase
- Digital Performer
- Settings at "Audio MIDI Setup"
- Live
- GarageBand/Logic
- Pro Tools
- SONAR
- Other software
- Performing with the software
- synthesizer
- Using the keyboard for your performance
- Controlling software
- Using the touchpad for control
- Specifications
- Operating temperature:
- Using the Unit as the Mouse for Your Computer
- Précautions
- Emplacement
- comoutilizarlapantalla
- Parts of the TRITON taktile
- Functional ground terminal
- IMPORTANT NOTICE TO CONSUMERS
Brand : KORG
Model : Triton taktile 49
Category : Synthesizer