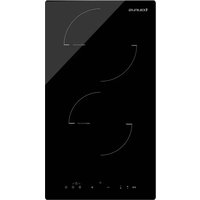
I3021T - Cooker TAURUS - Free user manual and instructions
Find the device manual for free I3021T TAURUS in PDF.


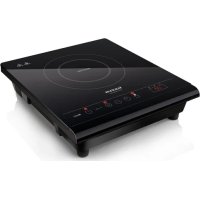
| Product type | Induction hob |
| Model | I3021T |
| Brand | Taurus |
| Dimensions (L x W x H x D) | 288 x 520 x 59 x 55 mm |
| Cutout dimensions (A x B) | 268+4 x 500+4 mm |
| Minimum worktop thickness | 30 mm |
| Power supply | 220-240 V ~ 50/60 Hz, 25 A |
| Number of cooking zones | 2 |
| Upper zone power | 2300/2600 W |
| Lower zone power | 1300/1500 W |
| Functions | Boost, Timer (99 min), Child lock, Stop&Go, Automatic safety shutdown |
| Surface type | Ceramic glass |
| Cleaning | Use a scraper and special cleaner for ceramic glass |
| Safety | Child lock, automatic shutdown, pan detection, residual heat indicator |
| Warranty | In accordance with current legislation. Taurus approved technical service |
Frequently Asked Questions - I3021T TAURUS
User questions about I3021T TAURUS
0 question about this device. Answer the ones you know or ask your own.
Ask a new question about this device
Download the instructions for your Cooker in PDF format for free! Find your manual I3021T - TAURUS and take your electronic device back in hand. On this page are published all the documents necessary for the use of your device. I3021T by TAURUS.
USER MANUAL I3021T TAURUS
natural_image
Abstract diagram of curved lines with no text or symbols, labeled 'tolus' at bottom (no readable text or symbols within the diagram itself)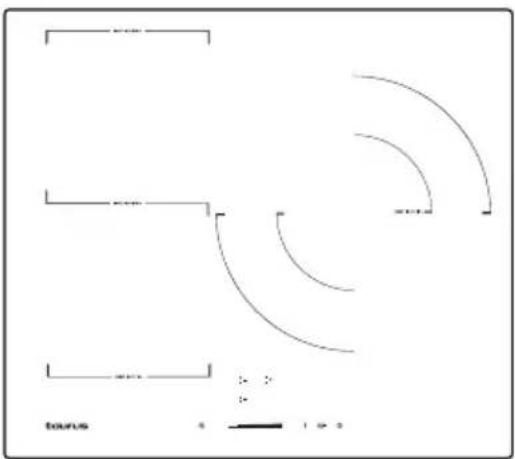
EN. Instructions for use
FR. Mode d'emploi
Downloaded by: pd-oliana on 30-01-2023 15:52 CET
INSTALACIÓN
Downloaded by: pd-oliana on 30-01-2023 15:52 CET

Downloaded by: pd-oliana on 30-01-2023 15:52 CET
MODO DE EMPLEO
USO
natural_image
Three identical cooking pots with crossed-out X marks, no text or symbols presentnatural_image
Four identical cooking pots with crossed-out X marks, shown in a row (no text or symbols)natural_image
Two cooking pots with directional arrows indicating heating or cooling (no text or symbols)Downloaded by: pd-oliana on 30-01-2023 15:52 CET

natural_image
Simple line drawing of a cooking pot with a handle (no text or symbols)Downloaded by: pd-oliana on 30-01-2023 15:52 CET
natural_image
Two simple geometric shapes: a rectangle with a vertical line and a circle, both without any text or symbols.natural_image
Simple diagram with a black circle and a circle, no text or symbols present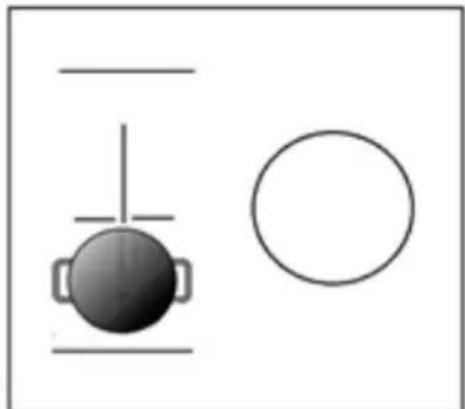
natural_image
Simple diagram with a black circle, horizontal lines, and a circle (no text or symbols)Downloaded by: pd-oliana on 30-01-2023 15:52 CET
natural_image
Simple diagram with two oval shapes and a circle, no text or symbols presentnatural_image
Illustration of a hand using a paintbrush to brush residue in a container (no text or symbols)A. Cooking area 1800/2000W
B. Cooking area 1300/1500W
C. Vitro ceramic Glass Surface
D. Control Panel
Control panel:

a. On/Off control
b. Timer selection control
c. BOOST power selection control
d. Child lock selection control (C+B Control)
g. + Power control increase power and time
f. - Power control reduce power and time
G. Top cooking area selection control
h. Bottom cooking area selection control
i. "Stop&Go" selection control
j. Time display (timer mode)
1603T
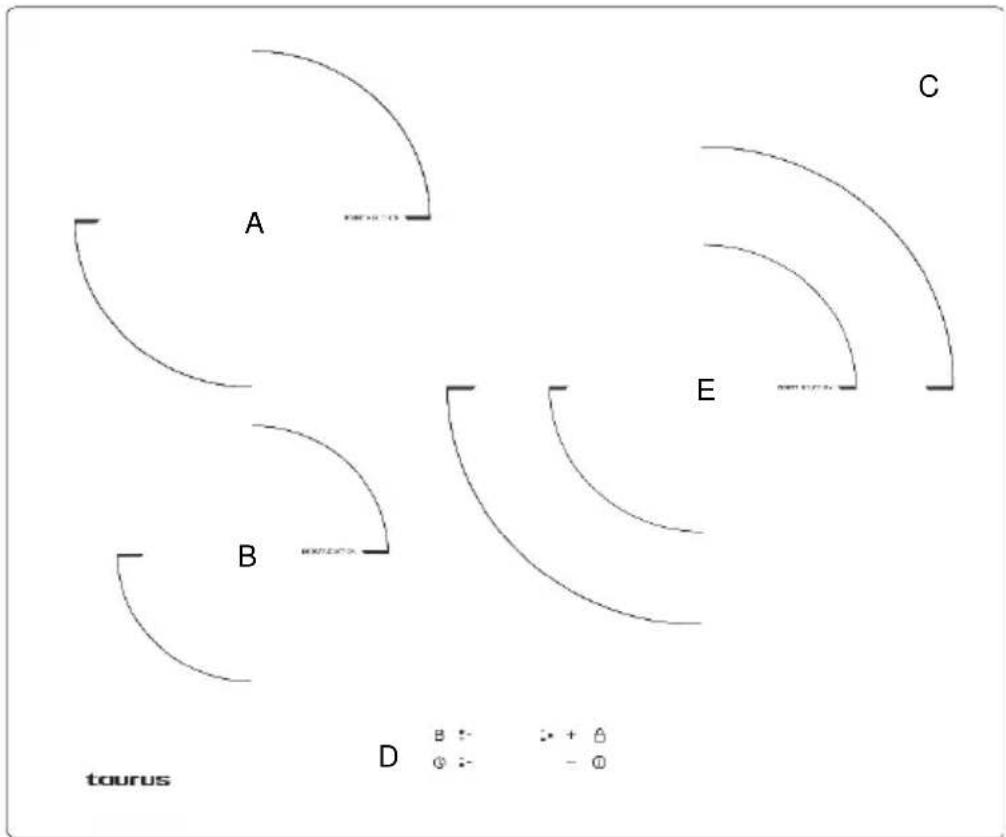
A. Cooking area 2300/2600W
B. Cooking area 1300/1500W
C. Vitro ceramic Glass Surface
D. Control Panel
E. Right cooking area 3000/3600W
Control panel:
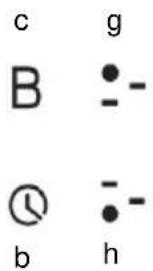
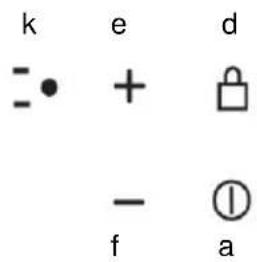
a. On/Off control
b. Timer selection control
c. BOOST power selection control
d. Child lock selection control
g. + Power control increase power and time
f. – Power control reduce power and time
g. Top cooking area selection control 2300/2600W
h. Bottom cooking area selection control 1300/1500W
k. Right cooking area selection control 3000/3600W
I603F
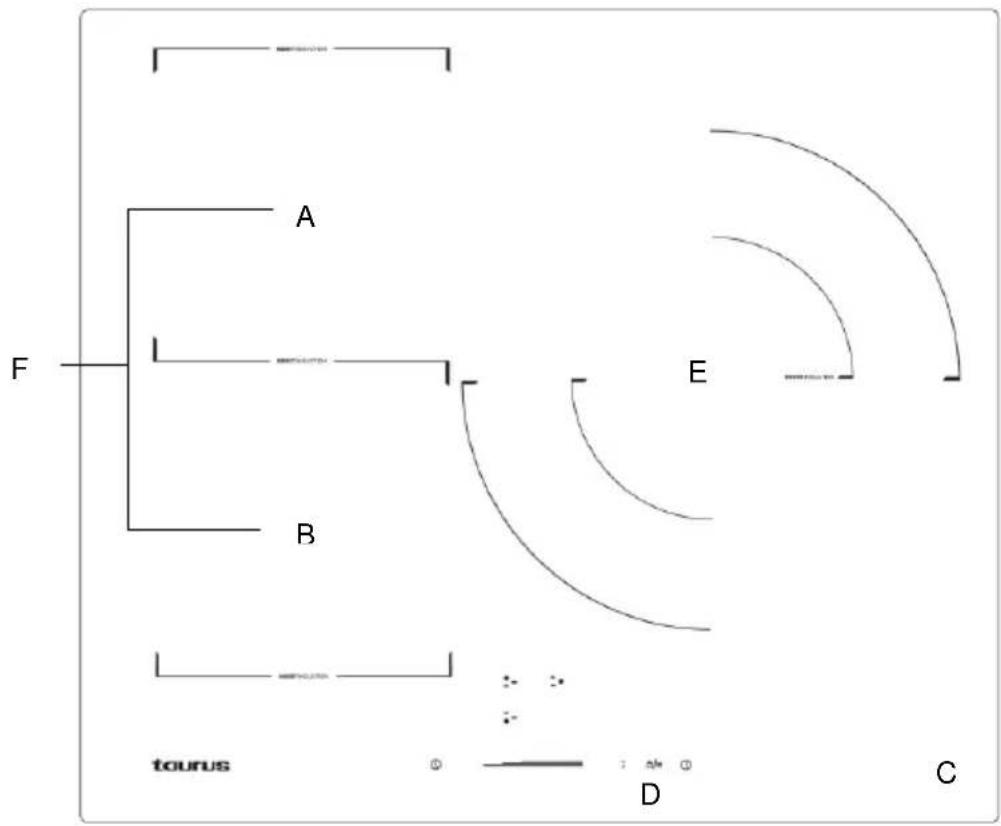
flowchart
graph TD
    A["A"] --> F["F"]
    B["B"] --> F["F"]
    C["E"] --> E["E"]
    D["D"] --> E["E"]
    style A fill:#f9f,stroke:#333
    style B fill:#f9f,stroke:#333
    style C fill:#f9f,stroke:#333
    style D fill:#ccf,stroke:#333
    style E fill:#ccf,stroke:#333
A. Cooking area
1500/2000W
B. Cooking area
1500/2000W
E. Cooking area
3000/3600W
F. Flex area
3000/3500W
C. Vitro ceramic
Glass Surface
D. Control Panel
Control panel:
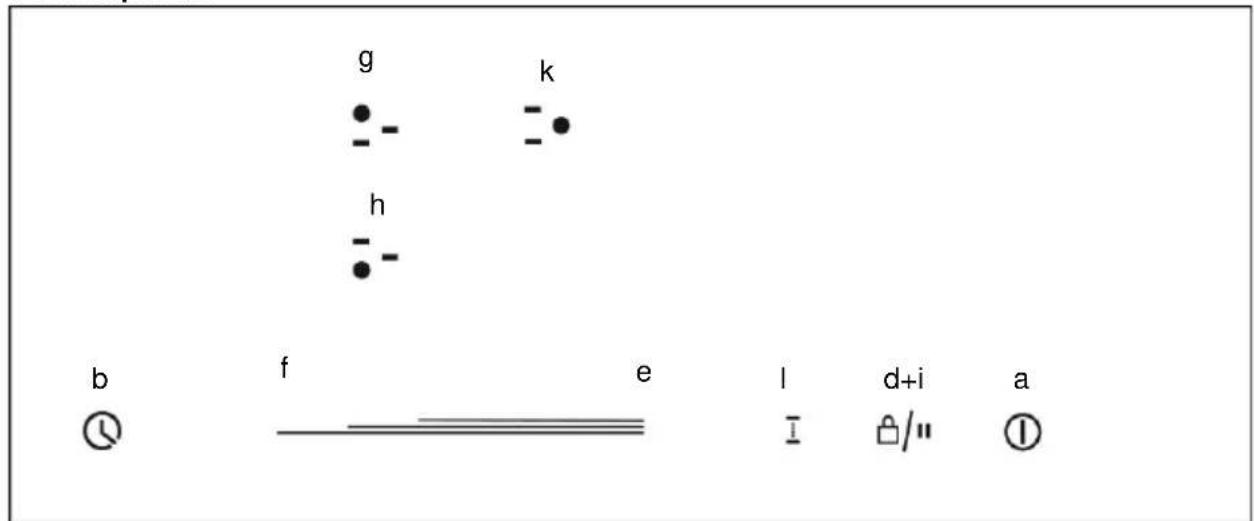
a. On/Off control
b. Timer selection control(Press 1 time)
d. Child lock selection control (Keep pressing)
i. "Stop&Go" selection control
g. "Slide" + Power control increase power and time
f. "Slide" – Power control reduce power and time
g. Top cooking area selection control 1500/2000W
h. Bottom cooking area selection control 1500/2000W
k. Right cooking area selection control 3000/3600W
I. Flex cooking area selection control (g+h) 3000/3500W
Downloaded by: pd-oliana on 30-01-2023 15:52 CET
PRACTICAL TIPS
Use the correct cooking utensil for the size of the hob.
Do not use excess water when cooking. The more water used, the more energy needed.
Whenever possible, use a pressure cooker, it saves time and energy.
Only switch the hobs on when the cookware is ready and turn the hobs off before removing the cookware.
Cookware must be flat bottomed.
Use the right sized cookware for the quantity being cooked. Using large sized cookware for small amounts increases energy consumption.
Cooking without using the lid on the cookware increases energy consumption.
USE AND CARE
Do not use the appliance if the ON/OFF switch does not work.
Switch the appliance off when not in use and before undertaking any cleaning task.
Never place combustible material on the appliance.
CAUTION: The appliance and its accessible parts become hot during use. Do not touch hot components.
CAUTION: If the surface is cracked, disconnect the appliance from the mains power supply to prevent the risk of electric shock. Call the technical support service.
CAUTION: Water condensation may appear on surfaces and objects around this appliance.
In order to minimise the production of acrylamide while frying food, do not overbrown the fried food and remove any burnt remains from the oil pan. Starchy food (such as potatoes and cereals) should not be fried at temperatures lower than 170^ C.
INDUCTION OPERATION
Induction cooking is a safe, advanced, efficient and economical cooking technology. It generates electromagnetic vibrations that directly heat the pot, rather than indirectly heating the glass surface. The glass only becomes hot because the pan eventually heats it up indirectly.
BEFORE INSTALLING:
Make sure that all the product's packaging material has been removed.
Make sure the worktop surface is level and square, and that no structural elements interfere with the required space.
Make sure the worktop is made of heat resistant material.
If the hob is installed above an oven, the oven has to have a built-in fan.
The installation has to comply with all required space requirements and applicable standards and regulations.
A suitable isolation switch must be incorporated into the permanent wiring to provide complete disconnection from the main power source. This must be positioned and mounted in compliance with local wiring rules and regulations.
The isolation switch must be easily accessible with the hob installed.
If in doubt about the installation, check with the local authorities and bylaws.
Use heat-resistant, easy-to-clean finishes on the wall surfaces that surround the hob.
To prevent accidents, contact a qualified technician if the power cable is damaged and needs to be replaced.
Make sure that the electric cable is not bent or crushed.
INSTALLATION
The appliance must be installed by a professional. Do not install it yourself.
The appliance must be installed and connected in accordance with current regulations.
After unpacking the appliance, check for any visible signs of damage. If it has been damaged in transit, DO NOT USE IT, and contact the shop where it was purchased.
Downloaded by: pd-oliana on 30-01-2023 15:52 CET
An incorrectly installed appliance may void the warranty.
Do not cover or obstruct any of the appliance's openings.
Do not install the appliance directly above a dishwasher, refrigerator, freezer, washing machine or dryer.
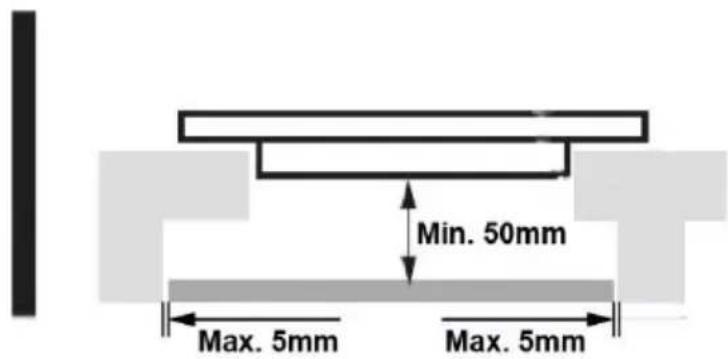
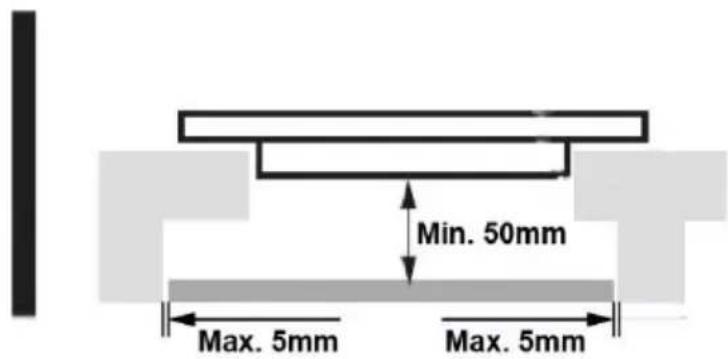
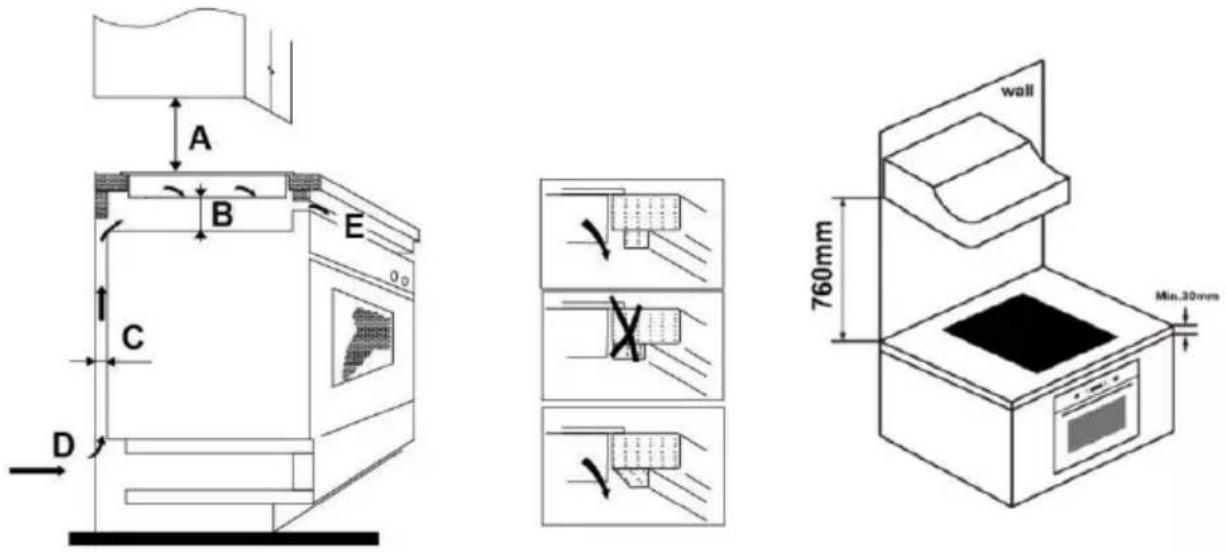
-Cut the worktop as per the sizes shown in the diagram.
-For assembly and use, leave a space of at least 5 cm around the hole.
-Make sure the worktop is at least 30mm thick. To prevent the heat given off by the hob from deforming the worktop, the worktop must be made of a heat-resistant material.
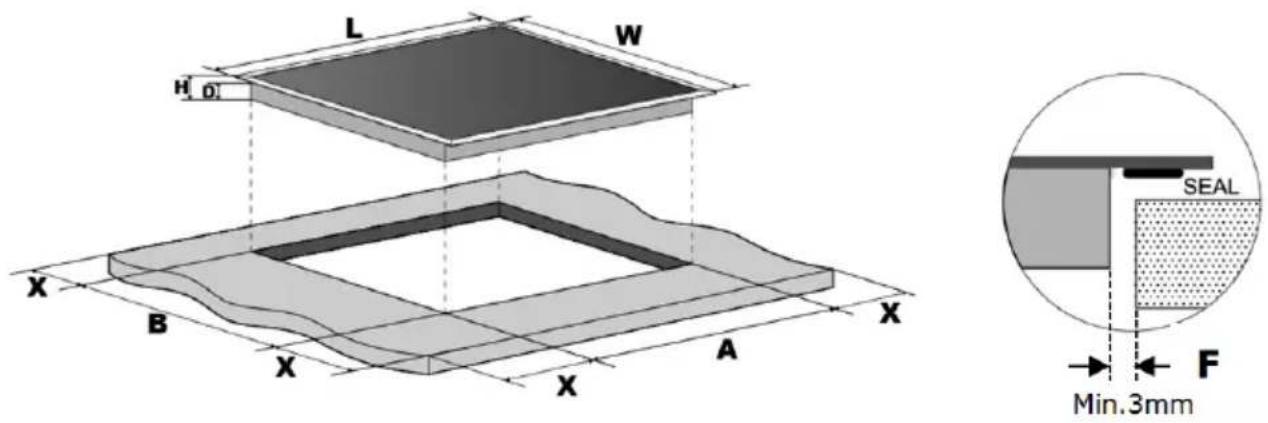
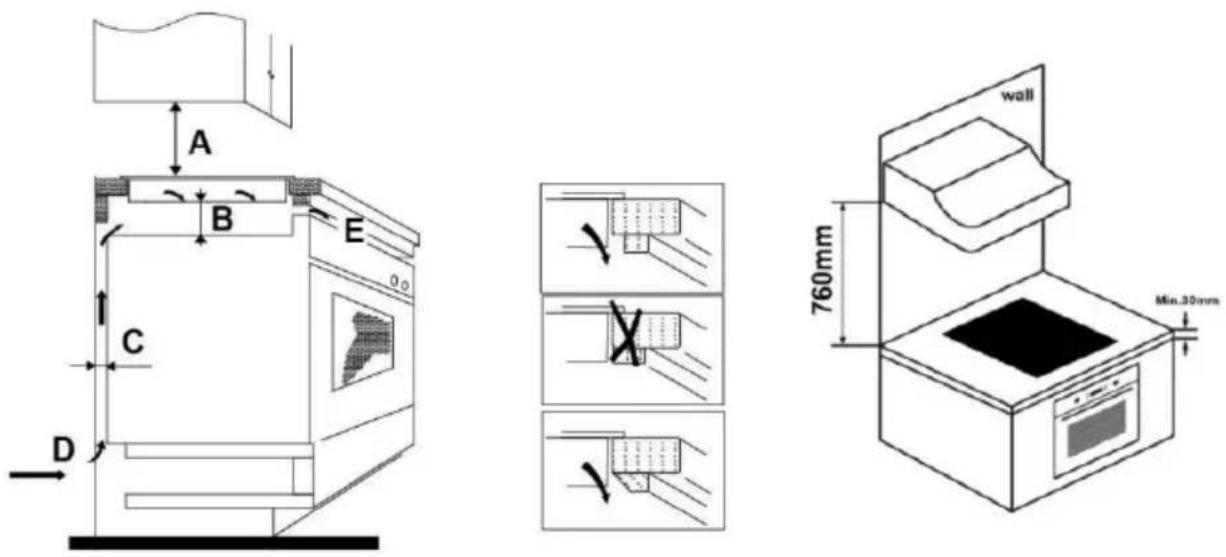
Check that the hob is properly ventilated, that the air inlet and outlet are not blocked and that it operates correctly.
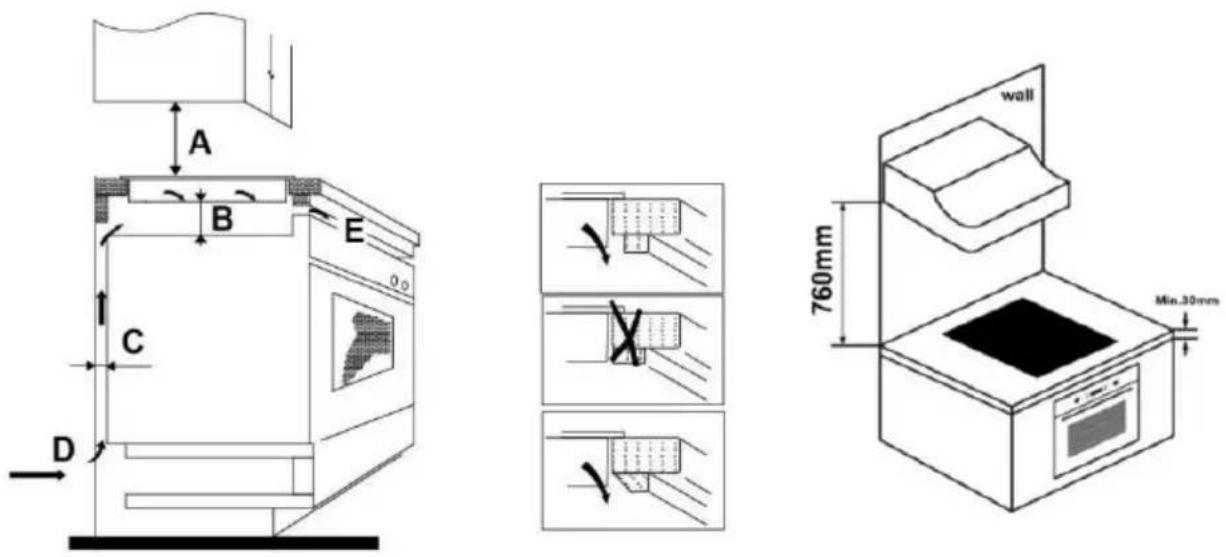
Note: There must be at least a 760 mm safety distance between the hob and any cabinet located above the hob.
| Model | L(mm) | W(mm) | H(mm) | D(mm) | A(mm) | B(mm) | X(mm) | F(mm) |
| I3021T | 288 | 520 | 59 | 55 | 268+4 | 500+4 | 50 min. | 3 min. |
| I603T | 590 | 520 | 62 | 58 | 560+4 | 490+4 | 50 min. | 3 min. |
| I603F | 590 | 520 | 60 | 56 | 560+4 | 490+4 | 50 min. | 3 min. |
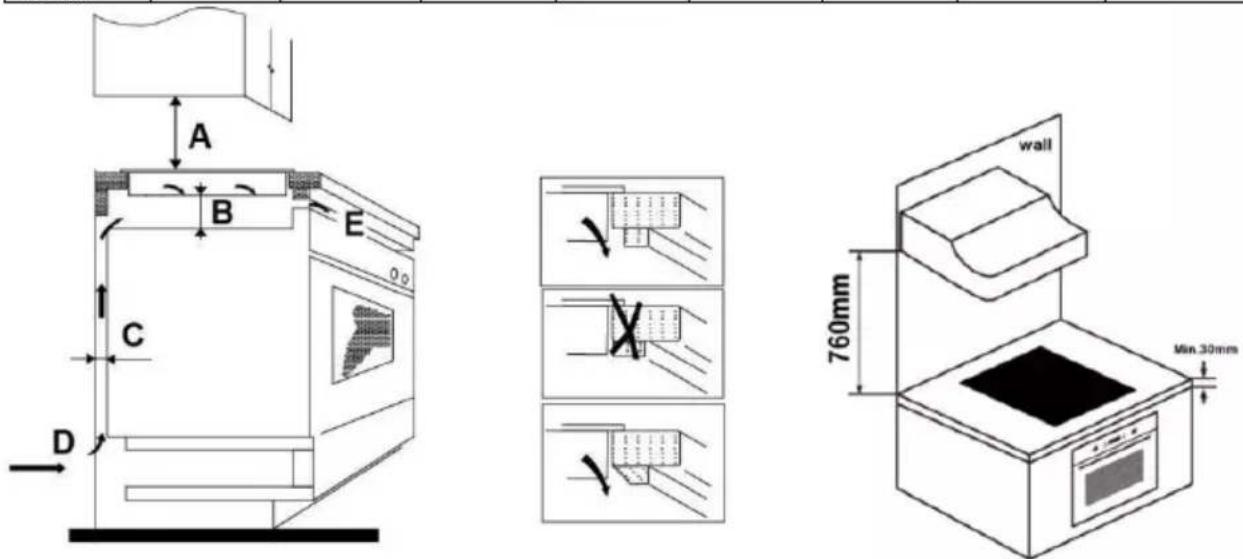
Downloaded by: pd-oliana on 30-01-2023 15:52 CET
| A(mm) | B(mm) | C(mm) | D | E |
| 760 | 50 Min. | 20 Min. | Air Inlet | 5mm Air Outlet |
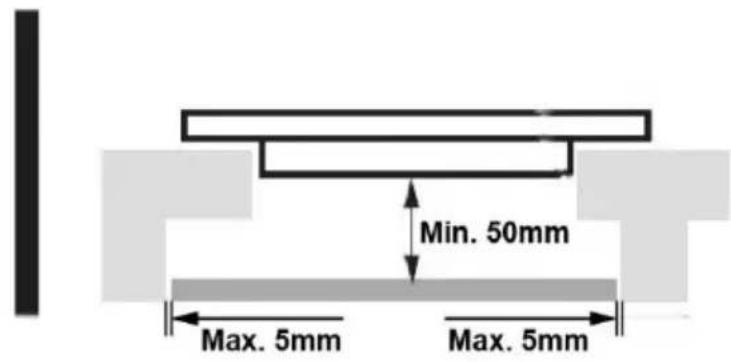
Make sure that the induction hob is well ventilated and that neither the air inlet and outlets are blocked.
natural_image
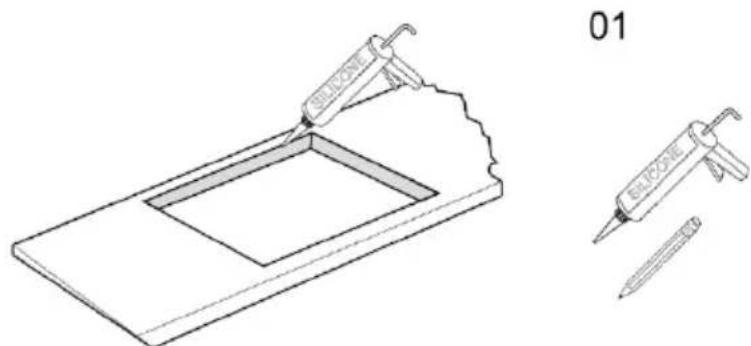
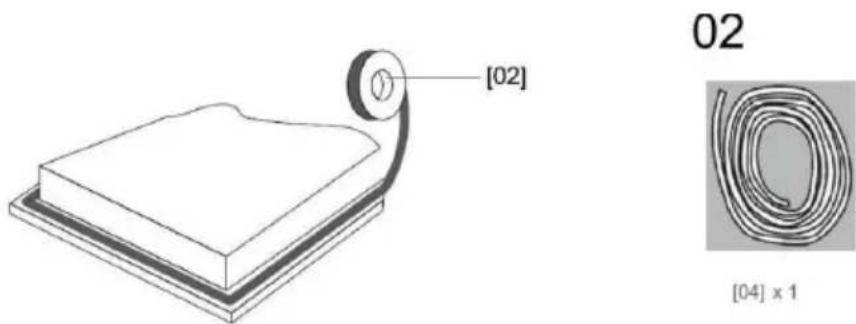
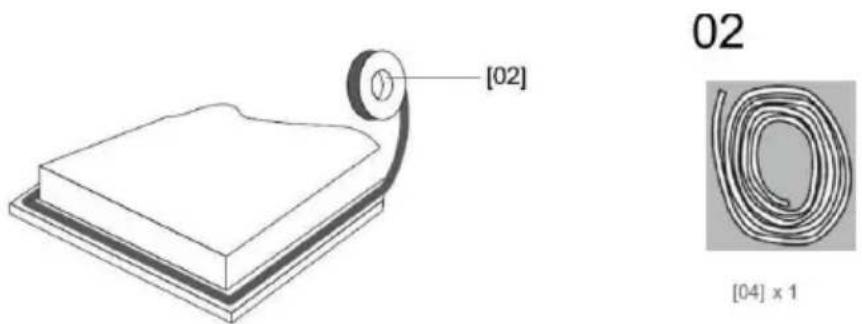
Technical line drawing of a laboratory setup with two syringes and a tray, no text or symbols presentUse the appropriate to cut the worktop as per the sizes shown in the diagram. Use Silicone or PTFE to seal the edges of the cut surface and allow it to dry before fitting the hob.
![[02] 02 [04] x 1](/content/2026/04/665784/images/4a2de15093269b7c064d9879a51569c87d431a1a749463bcafac8d6624e2ac7c.jpg)
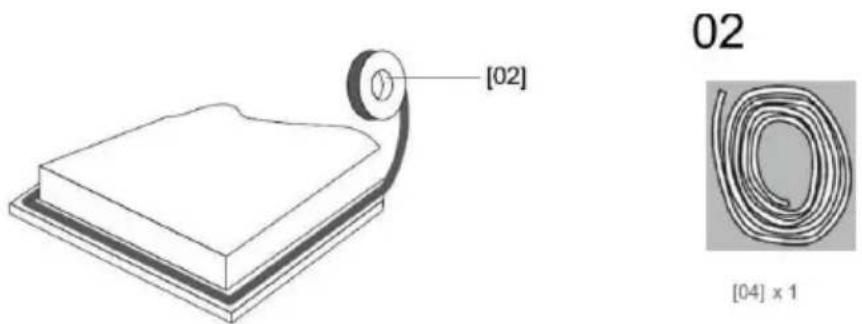
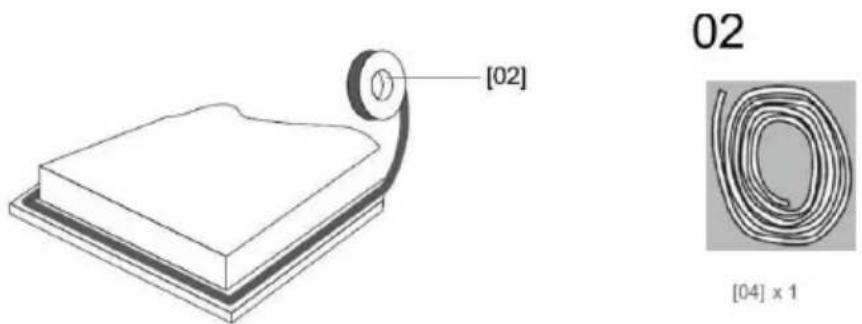
Run the protective strip around the underside of the hob, making sure that the ends overlap. Do not fit the hob into position without applying the protective foam.
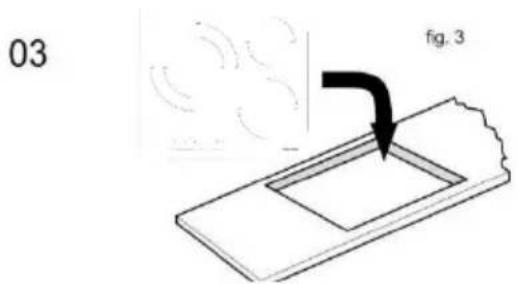
Do not use adhesives to stick the hob onto the worktop. Once the protective strip has been fixed to the underside of the hob, place it into the hole made in the worktop. Carefully apply pressure to fit the hob into the space, ensuring a good seal on the outer edge.
MAINS CONNECTION
This is a high power appliance and the electrical connection must be carried out by a qualified electrician.
This appliance must be connected to the domestic power circuit by qualified personnel.
Before connecting the hob to the electric supply, check that:
The home wiring can handle the power of the hob.
The voltage corresponds to the value stated on the label on the bottom of the appliance.
The cable cross section is capable of withstanding the load specified on the hob's label. Do not use adapters, reducers or bypass devices to connect the appliance to the power supply, as these may lead to overheating and fire.
The power cable must not be in contact with any hot part and be positioned in such a way that at no point does its temperature exceed 75^ C.
Ask the electrician whether the home wiring system is adequate or needs to be modified. Any modifications must be made by a qualified electrician.
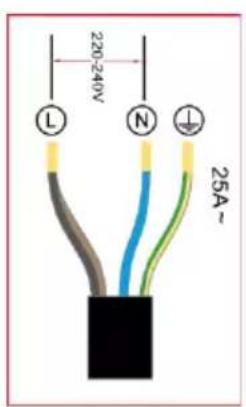
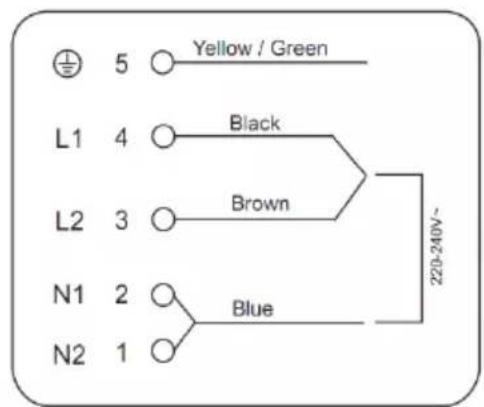
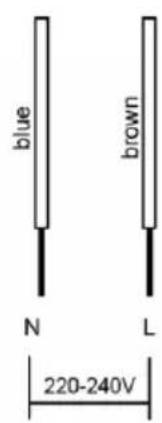
Black/brown = L or phase
Blue = N or neutral
Green/yellow = E or earth

AFTER INSTALLING:
Check that the cable for the hob is not accessible through any doors or cabinets.
Check that there is adequate circulation of fresh air from the outside to the base of the worktop
If the hob is installed on top of a cabinet or drawer, install thermal protection under the base of the hob.
The isolation switch must be readily accessible to the user.
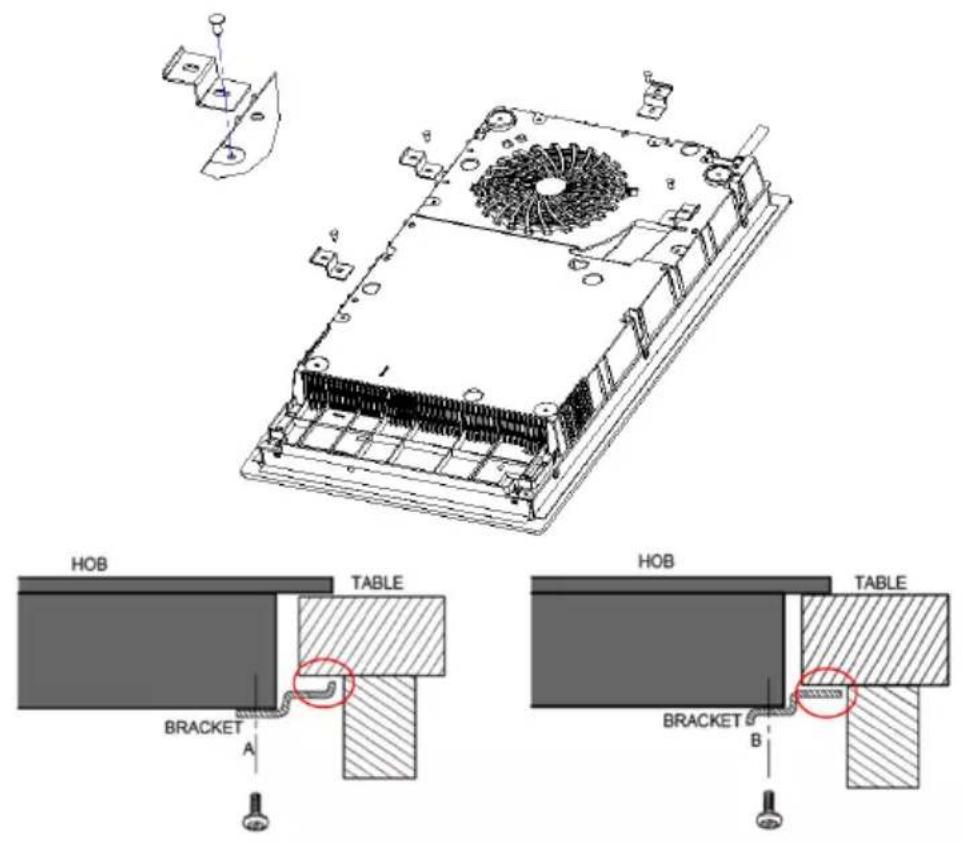
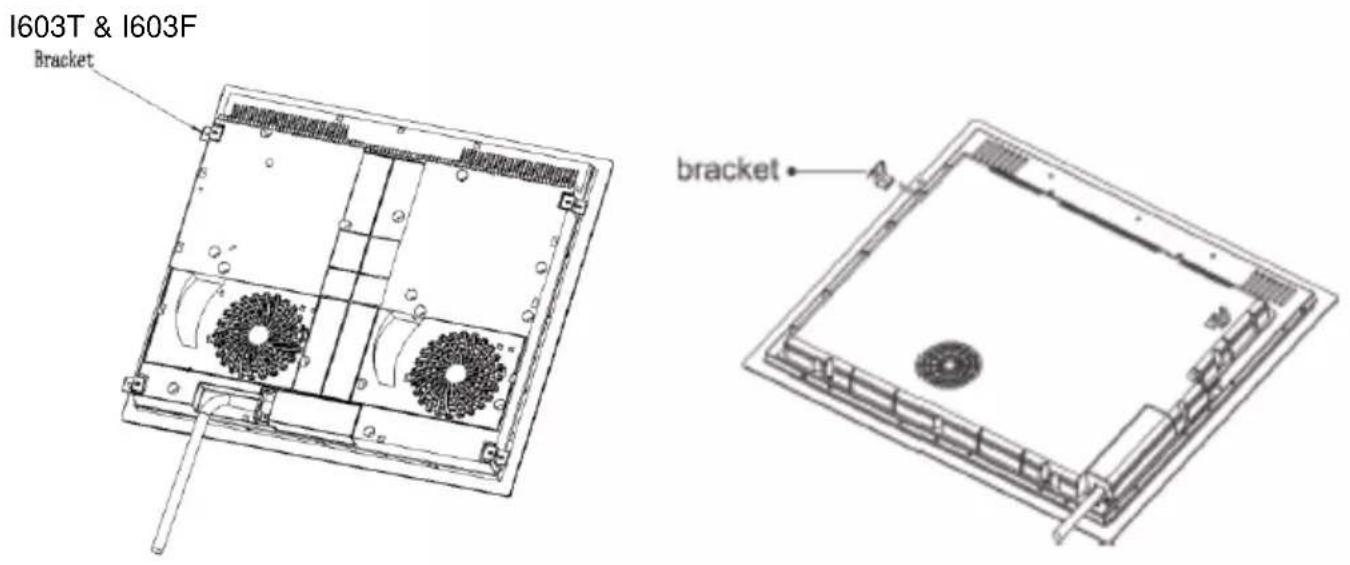
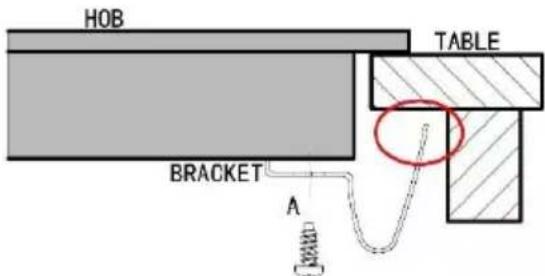
The hob can be fixed to the worktop by using the included metal brackets, as shown in the images.
CAUTION: The metal brackets must not touch the inside surface of the worktop (see images).
I3021T:
Downloaded by: pd-oliana on 30-01-2023 15:52 CET
INSTRUCTIONS
USE
Place the appropriate cookware on the cooking area that you want to use.
Make sure that the bottom of the cookware and surface are dry and clean.
Switch the device on by pressing the On/Off button and wait until “--” appears on the displays. Depending on the area where the cookware is placed, press the appropriate cooking area selection control. Press the + or - buttons to select the desired power setting. On model I603F slide the slider control from left to right to increase power up to the booster function. The power control goes from 0 to 9, increasing the power in numerical order. If no power setting is selected, the hob will switch off automatically. The power setting can be changed any time during cooking. When you wish to stop cooking, select the active cooking area and lower the heat to power setting 0. The On/Off control can be used to stop cooking in all areas.
The H symbol remains visible as long as the particular area is too hot for contact. The symbol disappears once the temperature in the cooking area drops to a safe level.
If the symbol appears, this means that:
- The cookware has not been placed in the correct cooking area based on its size.
- The cookware used is not suitable for induction
- The cookware is too small.
In all of these cases, the cookware will not heat up. The signal automatically disappears after 2 minutes if no suitable cookware is placed on the hob.
Notes: When a control is pressed, the hob emits an audible signal.
If the power supply is interrupted during cooking, all selections made are cancelled.
USE OF THE TOUCH CONTROLS
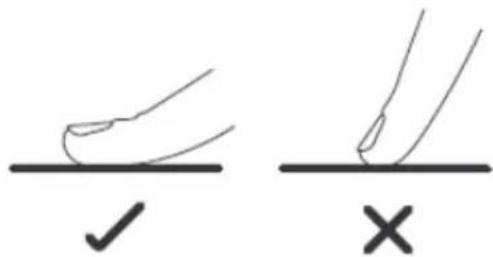
The controls respond to touch, so there is no need to apply any pressure.
Use the flat of the finger, not the tip.
A beep is emitted each time a touch control is used.
Make sure that the controls are kept clean and dry and that there are no objects covering them (e.g., a kitchen utensils or cloths). Even a thin coating of water can make the controls difficult to operate.
COOKWARE
It is important to only use metal pots and pans specifically designed and/or approved for use on vitro-ceramic induction hobs. Never allow melamine or plastic containers to come into contact with the heated areas.
Do not use cookware with uneven edges or convex bases.
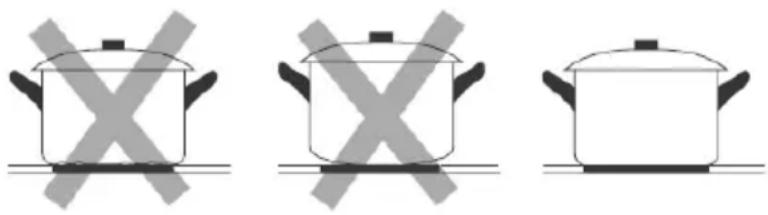
Make sure that the base of the cookware is smooth, sits flat on the hob and is the same size as the cooking area. If smaller diameter cookware is used, efficiency may be lower than expected. Always place the cookware in the centre of the cooking area.
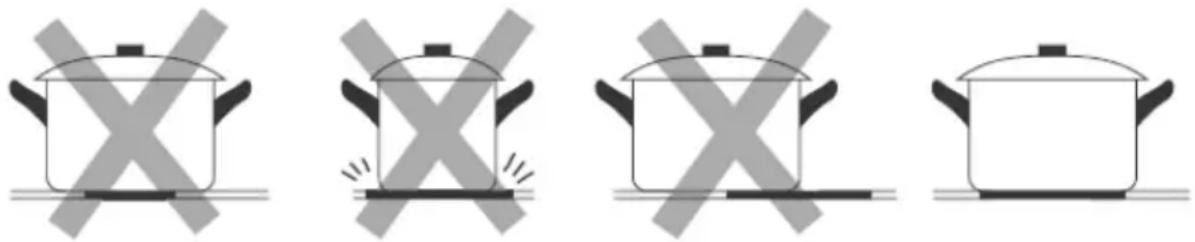
Always lift the cookware, do not slide it as this may scratch the glass.
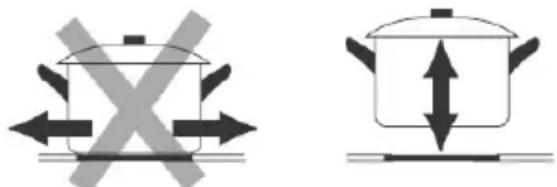
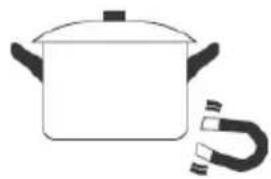
Only use cookware with a base suitable for induction, look for the symbol on the packaging or on the bottom of the cookware.
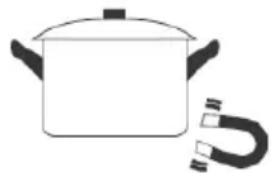
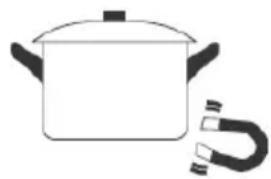
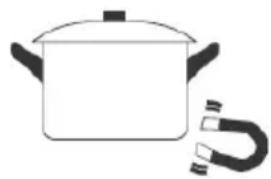
A magnet can be used to check the cookware. If the magnet is attracted to the base, then the cookware is suitable for induction.
natural_image
Simple line drawing of a cooking pot with a U-shaped tube attached (no text or symbols)Some cookware is not suitable for induction because only certain parts of the bottom are made of magnetic material. Areas with no magnetic material may heat up differently, resulting in poorly cooked food. Occasionally, the hob may not recognize the cookware and the cooking area in question may fail to switch on.
TIMER FUNCTION
The appliance's operating time can be controlled up to 99 minutes.
1 Select the corresponding cooking area by using the corresponding area selection button
2 Press the timer selection control
3 To program in an operating time, simply use the + button the + - buttons to change the timer setting. The programmed time or remaining time will be displayed. Use the + - buttons to change the timer setting.
4 Once the time is selected, the countdown starts immediately. After 5 seconds the indicator returns to showing the power indicator. A red dot appears next to it to show that area is using the timer.
5 If you need to check or modify the time, repeat steps 1 and 2
Downloaded by: pd-oliana on 30-01-2023 15:52 CET
6 When the countdown ends, the corresponding cooking area switches off. The other areas, if they are switched on, will continue to operate normally.
7 If no area is selected in step 1, the timer will not switch off any cooking area when the timer finishes. In this case, the timer only functions as a time reminder, beeping when the indicated time has elapsed.
CHILD LOCK FUNCTION
The controls can be locked to prevent accidental use of the hob.
When the controls are locked, all controls except the Off control are disabled.
Press and hold the child lock button until you hear a beep. The time indicator will show "Lo"
To unlock the controls, press and hold the child lock button until the controls are unlocked.
On the I3021T model the child lock control is activated by pressing the Boost and timer function controls simultaneously.

BOOST FUNCTION
The boost function can be applied to any area, but not all areas simultaneously. The boost function applies maximum power to the indicated cooking area.
With the hob switched on, select the cooking area to which you want to apply the boost function.
Press the boost button (B) and the display will show the "B" or "P" symbol depending on the model.
For the I603F model
If you wish to cancel the boost function, lower the cooking power and it will return to the power setting it was at before activating the boost function.
The boost function automatically deactivates after 5 minutes, returning to the power to what it was at before activating boost function.
STOP & GO FUNCTION
Cooking can be stopped momentarily without having to turn off the hob. When Stop&Go mode is enabled all controls are locked except On/Off and Stop&Go. Activate Stop&Go mode by using button (i), and the controls will display 11. Press it again to switch off Stop&Go mode.
If the hob is not used for 10 minutes, it switches off automatically.
ONLY FOR I603F
FLEXIBLE AREA
- This zone can be used as a single zone or two separate zones, depending on the cooking needs at the time.
- The flexible area comprises two independent inductor hobs that can be controlled separately.
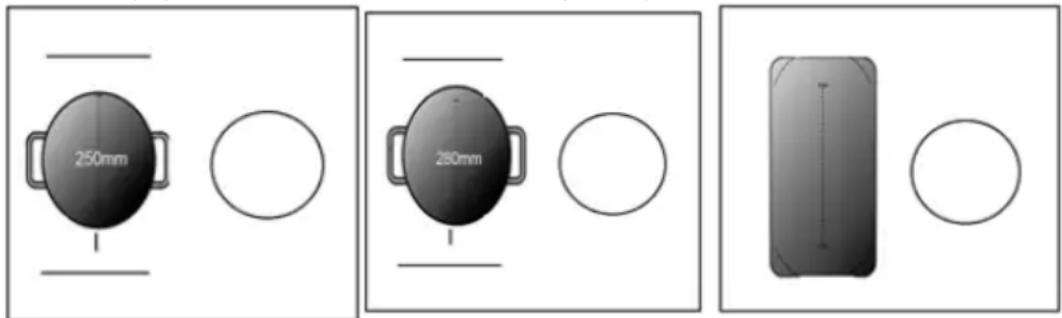
As one large area
- To activate the flexible area as a single large zone, touch the flexible area control (I).
- With the large zone, we suggest using the following: Cookware: 250mm or 280mm diameter (square or oval cookware is acceptable).
Downloaded by: pd-oliana on 30-01-2023 15:52 CET
- We do not recommend other operations except for the three mentioned previously, as they may affect how the appliance heats.
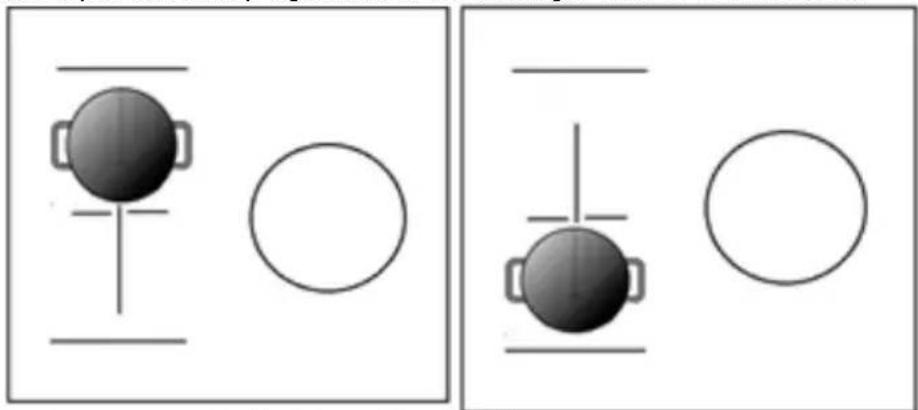
As two separate areas
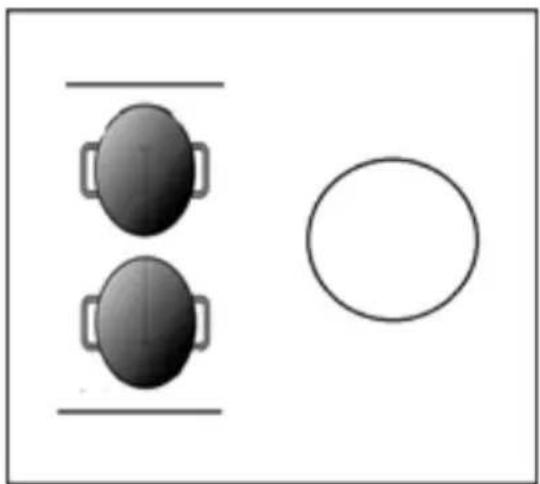
- When using the flexible area as two different zones, there are two heating options.
- Place a pot on the top right side or bottom right side of the flex area.
natural_image
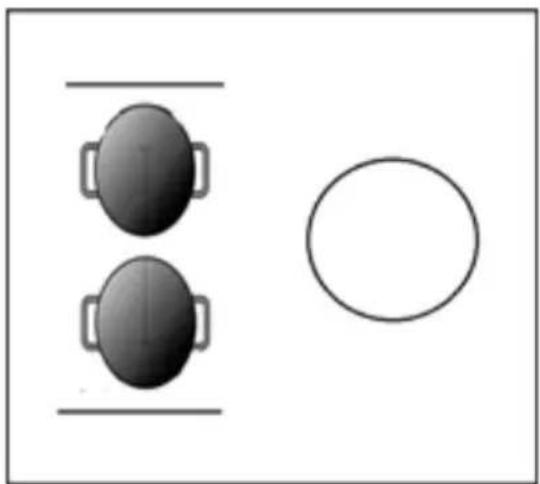
Two identical diagrams showing a central circle with side brackets and a vertical line, flanked by horizontal lines (no text or symbols)- Place two pans on both sides of the flexible area.
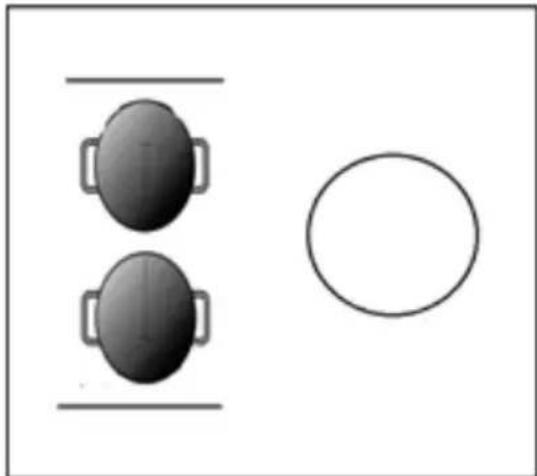
natural_image
Simple diagram with two oval shapes and a circle, no text or symbols present- Caution: Make sure that the pan is larger than 12 cm.
COOKING TIPS
Be careful when frying, as oil and fat heat up very quickly, especially when using the Boost function. At extremely high temperatures oil and grease ignite spontaneously, posing a serious fire hazard.
- When food boils, reduce the temperature setting.
- Using a lid reduces cooking times as well as saving energy by retaining heat.
- To reduce cooking times keep the amounts of liquid or fat used to a minimum.
- Begin cooking on a high setting and then reduce the setting once the food has heated through.
How to cook a grilled steak:
- Let the meat stand at room temperature for about 20 minutes before cooking.
- Heat a heavy-bottomed pan.
- Brush both sides of the steak with oil. Drizzle a little oil into the hot pan, then put the meat into the hot pan.
- Turn the steak only once during cooking. Exact cooking times depend on the thickness of the steak and how well you want it done. The time varies between 2 and 8 minutes per side. Press the steak to gauge how done it is - the firmer it is, the more cooked it is.
- Let the steak rest on a hot plate for a few minutes to allow the meat to relax and soften before serving.
Sautéing:
- Choose a flat-bottom induction-compatible wok or a large frying pan.
- Have all ingredients and equipment prepped. The frying has to be done quickly. If cooking large quantities, cook the food in several smaller batches.
- Briefly preheat the pan and then add two tablespoons of oil.
- Cook then meat first, then set it aside and keep it warm.
- Sauté the vegetables. When the vegetables are hot but still crisp, lower the power setting for the cooking area, put the meat back into the pan and add your sauce.
- Gently stir the ingredients so they are heated thoroughly.
- Serve immediately.
Small cookware detection:
Whenever an unsuitable or non-magnetic pan (e.g., aluminium), or some other small item (e.g., knife, fork, key, undersized coffee pot, etc.) is left on the hob, it automatically switches to standby mode after 1 minute. The fan will continue to run on the hob for 1 minute more.
Power guides
The following settings are only approximate guides. The exact settings depend on a number of factors, such as how much food is being cooked. Experiment with the settings to discover the ones that work best for you.
| Setting | Type of cooking |
| 1 - 2 | Gently heat up small amounts of foodMelt chocolate, butter, and foods that burn easilyCook on a low heatHeat slowly |
| 3 - 4 | ReheatSimmerCook rice |
| 5 - 6 | Pancakes |
| 7 - 8 | SautéCook pasta |
| 9 | Stir fryBrownBoil water, soups, etc. |
AUTOMATIC OPERATING TIME, SAFETY AUTO-OFF.
The induction hob has an auto-off safety function. It switches off automatically should you forget to do it yourself. The default operating times for the various power levels are shown in the table below:
| POWER | 1 | 2button. | 3 | 4 | 5 | 6 | 7 | 8 | 9 |
| AUTO-OFF (HOURS) | 8 | 8 | 8 | 4 | 4 | 4 | 2button. | 2button. | 2button. |
The hob automatically stops heating whenever the cookware is removed from the cooking area. The hob then switches off automatically after 2 minutes.
CAUTION: Never leave the appliance switched on and unattended. Unsupervised cooking can be dangerous and could cause a fire.
CAUTION:
CLEANING AND MAINTENANCE
Before carrying out any maintenance or cleaning tasks, disconnect the appliance from the mains and make sure that it is completely cold.
Avoid scratching the hob with abrasives, the bottom of the cookware, etc., as this will eventually leave marks on the glass.
Clean the surface of the appliance regularly to prevent a build-up of residues.
The hob should be cleaned after use.
Different types of dirt can be cleaned as follows:
| Type of dirt | Cleaning method | Cleaning material |
| Everyday dirt on the glass (fingerprints, marks, food stains or sugar-free spills) | 1. Switch off the hob.2. Apply a hob cleaner while the glass is still slightly warm (not scorching!)3. Rinse and dry with a clean cloth or a paper towel. | - When power to the hob is switched off, there will be no “hot surface” indicator, however, the cooking area may still be hot. Be very careful.- Hard or nylon scouring pads and abrasive cleaners can scratch the glass.Always read the label on the cleaning product to see if it is suitable.- Never leave cleaning residues on the hob: these may stain the glass |
| Spills, melted food and hot sugary stains. | Remove immediately using a scraper or spatula suitable for glass induction hobs, but be careful with hot surfaces inside the cooking area:1. Switch off the power to the hob2. Hold the blade or utensil at a 30° angle and scrape the dirt or spillage towards a cool area on the hob.3. Use a tea towel or paper towel to wipe away the dirt or spill.4. Follow steps 2 to 4 in the “Everyday dirt on the glass” section. | - Remove stains left by melted and/or sugary foods or spills as soon and as quickly as possible. Allowing them to cool on the glass makes them more difficult to remove and may even permanently damage the surface of the glass.- Cutting hazard: the scraper blade is very sharp once the safety cover is removed. Use with extreme care and always store it away safely, out of the reach of children. |
| Spills on the control panel | 1. Switch off the power to the hob2. Mop up the spill3. Clean the touch control area with a clean, damp cloth or sponge.4. Dry the area thoroughly using a paper towel.5. Switch on the power to the hob. | - The hob may emit a beep and then switch off, and the touch controls might not work while there is liquid on them.- Make sure to dry the area around the touch controls |
Downloaded by: pd-oliana on 30-01-2023 15:52 CET
| before switching the hob back on again. |
To prevent any damage to the surface of the hob, use a suitable scraper to immediately remove any remains of kitchen foil, food, splashed fat, sugar stains and other sugary foods. Then use a towel and a suitable product to clean the surface, rinse with water and dry with a clean cloth. Do not use abrasive sponges or cloths and avoid using harsh chemical detergents.

natural_image
Illustration of a hand using a paintbrush to brush residue on a surface (no text or symbols)TROUBLESHOOTING
| Problem | Possible causes | What to do |
| The induction hob will not switch on. | No power | Make sure that the induction hob is connected to the power supply and that it is switched on.Check for a power outage in your home or area. If after checking everything the problem persists, call a technician. |
| The accessory power board and display board fail to connect. | Check the connection. | |
| The accessory power board is damaged. | Replace the accessory power board. | |
| The touch controls do not work. | The controls are locked. | Disable the child lock as explained in the instructions. |
| Heating stops suddenly during use and the display screen flashes “u”. | Wrong type of pot. | Use the correct pot (consult the instruction manual). |
| The pot diameter is too small. | ||
| The pot has overheated | The unit has overheated Wait for temperature to return to normal. | |
| Touch controls are difficult to operate. | There may be a thin film of water on the controls. You may be using the tip of your finger when touching the control. | Make sure the touch control area is dry and use the flat of your finger when touching the controls. |
| The glass is becoming scratched. | Use of an unsuitable and/or abrasive scouring pad.Cookware with a rough base. | Use cookware with a smooth, flat base. Check the cleaning and maintenance section. |
| Certain cookware makes popping and cracking sounds | This may be due to the way the cookware is made (layers of different metals vibrating differently). | This is normal and not considered a problem. |
| The induction hob hums slightly when used at high temperature. | This is due to the technology used for induction cooking. | This is normal, the noise should decrease or disappear completely when the temperature lowered. |
| Fan noise coming from the induction hob. | The induction hob's built-in cooling fan has switched on to prevent the electronics from overheating. | This is normal and requires no action. You can continue cooking while the fan is running. There is no need to switch the appliance off. |
| Motor fan is making a strange noise | The fan is damaged | Replace the motor fan. |
| The cookware does not get hot and does not appear on the display. | The cookware is not suitable for induction cooking or either too small for the hob or not centred. | Use induction cookware, centre it on the cooking area and make sure that the base is suitable. |
| The induction hob or a cooking area has switched off automatically. A sound is emitted and an error code is displayed (usually alternating with one or two digits on the timer display). | Technical fault. | Make a note of the error and switch off the power to the induction hob. Contact a qualified technician. |
| Some buttons do not work or the LED display is not normal. | The display board is damaged. | Replace the display board. |
| The cooking mode indicator lights up but heating does not start. | Hob is too hot. | Ambient temperature may be too high. The air inlet or outlet could be blocked. |
| The cooking mode indicator lights up but heating does not start.Heating stops suddenly during use and the display screen flashes “u”. | There is something wrong with the fan. | Make sure the fan works properly; if not, replace the fan. |
| The power board is damaged. | Replace the power supply board. | |
| Wrong type of cookware. | Use the correct cookware (consult the instruction manual). | |
| Heating stops suddenly during use and the | Cookware diameter is too small. | Use the correct cookware (consult the instruction manual). |
| The hob has overheated | ||
| display screen flashes “u”. Heating areas on one side (first or second area) display “u”. | The unit has overheated Wait for temperature to return to normal. Press the “ON/OFF” button to restart the unit. | |
| The detection circuit is damaged. | Replace the power supply board. | |
| Power board and display board connection fault | Check the connection. | |
| Heating areas on one side (first or second area) display “u”. | The screen communication board is damaged. | Replace the display board. |
| The main board is damaged. | Replace the main board. | |
Never dismantle the hob yourself.
Before calling customer services, make sure that the hob is connected correctly. The warranty does not cover any of the following cases:
Damage caused by incorrect installation.
Damage caused by unauthorised dismantling and/or repair.
Damage caused by misuse.
Use of the hob for commercial purposes.
The following are the error codes that may appear on the hob in the event of a fault:
| Code | Problem | Solution |
| I3021T | ||
| E1 | Temperature sensor error - open circuit | Check the connection or replace the hob's temperature sensor |
| E2 | Temperature sensor error - short-circuit | |
| E7 | Temperature sensor error | |
| C1 | Sensor temperature too high | Wait for the hob temperature to return to normal.Touch the “ON/OFF” button to restart the unit. |
| E3 | IGBT temperature sensor error - Open circuit | Replace the power supply board. |
| E4 | IGBT temperature sensor error - short-circuit | |
| C2 | IGBT temperature too high | Wait until the IGBT temperature returns to normal Use the “ON/OFF” control to restart the appliance. Check that the fan is working correctly.Otherwise replace the fan. |
| EL | Supply voltage is lower than the rated voltage. | Check to see whether the power supply is normal. Switch on after the power supply returns to normal. |
| EH | Supply voltage is higher than the rated voltage. | |
| EU | Communication error | Reattach the connection between the power supply panel and the display |
| Code | Problem | Solution |
| I603T | ||
| E1 | Temperature sensor error - open circuit | Check the connection or replace the hob's temperature sensor |
| E2 | Temperature sensor error - short-circuit | |
| Eb | Temperature sensor error | |
| E3 | Sensor temperature too high | Wait until the IGBT temperature returns to normal Use the “ON/OFF” control to restart the appliance. Check that the fan is working correctly. Otherwise replace the fan. |
| E4 | IGBT temperature sensor error - Open circuit | Replace the power supply board. |
| E5 | IGBT temperature sensor error - Short-circuit | |
| E6 | IGBT temperature too high | Wait until the IGBT temperature returns to normal Use the “ON/OFF” control to restart the appliance. Check that the fan is working correctly. Otherwise replace the fan. |
| E7 | Supply voltage is lower than the rated voltage. | Check to see whether the power supply is normal. Switch on after the power supply returns to normal. |
| E8 | Supply voltage is higher than the rated voltage. | |
| U1 | Communication error | Reattach the connection between the power supply panel and the display |
| Code | Problem | Solution |
| I603F | ||
| SELF-RECOVERY | ||
| E1 | Supply voltage is higher than the correct voltage. | Check to see whether the power supply is normal.Switch on after the power supply returns to normal. |
| E2 | Supply voltage is lower than the correct voltage. | |
| E3 | Sensor temperature too high | Wait for the hob temperature to return to normal.Touch the “ON/OFF” button to restart the unit. |
| E4 | Sensor temperature too high | |
| E5 | IGBT temperature too high | Wait until the IGBT temperature returns to normalTouch the “ON/OFF” button to restart the unit.Check if the fan operates correctly;If not, replace the fan. |
| E6 | IGBT temperature too high | |
| WITHOUT SELF-RECOVERY | ||
| F3/F6 | Hob temperature sensor Short-circuit fault. (F3 for 1#,F6 for 2#) | Check the connection or replace the hob's temperature sensor. |
| F4/F7 | Hob temperature sensor Open-circuit fault. (F4 for 1#,F7 for2#) | |
| F5/F8 | Ceramic hob temperature probe fault - invalid (F5 for 1#,F8 for 2#) | |
| F9/FA | IGBT Temperature sensor fault. Short-circuit/open circuit for 1#) | Replace the power supply board. |
| FC /FD | IGBT Temperature sensor fault. (short-circuit/open circuit for 2#) | |
To avoid damage and risks, do not try to dismantle the hob yourself.
PLAQUES VITROCÉRAMIQUES À INDUCTION
I3021T
I603T
I603F
DESCRIPTION
I3021T
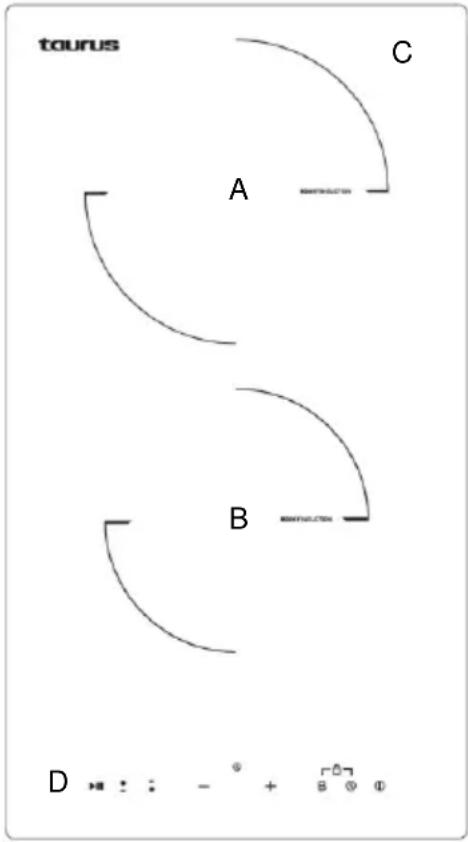
A. Zone de cuisson 1800/2000 W
B. Zone de cuisson 1300/1500 W
Downloaded by: pd-oliana on 30-01-2023 15:52 CET
Downloaded by: pd-oliana on 30-01-2023 15:52 CET
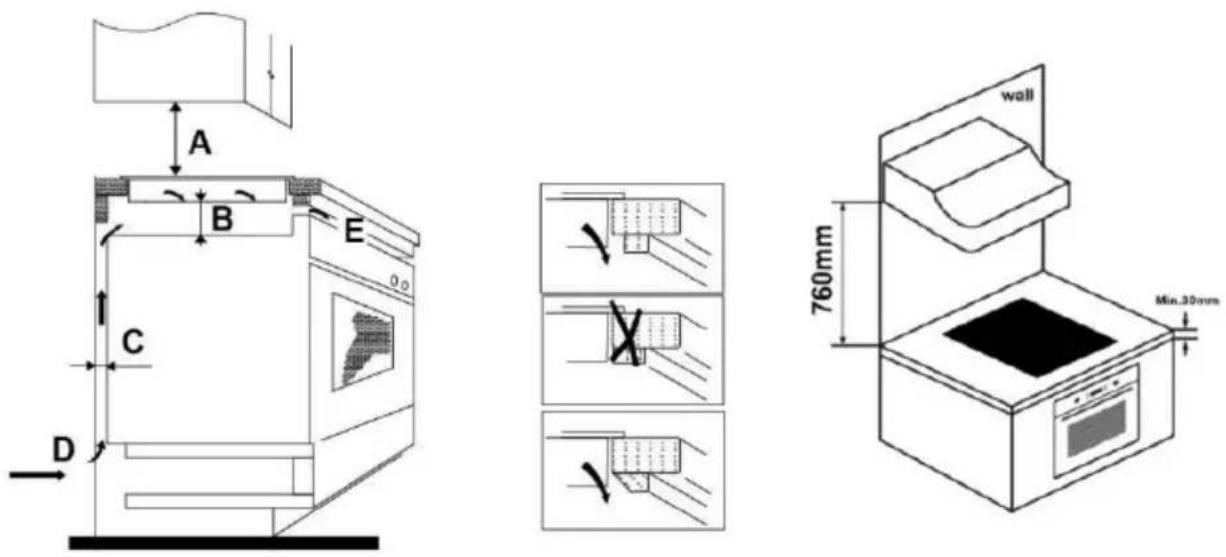
| A (mm) | B (mm) | C (mm) | D | E |
| 760 | 50 min. | 20 min. | Entrée d'air | Sortie d'air de 5 mm |
natural_image
Technical line drawing of a laboratory setup with two syringers and a tray, no text or symbols presentDownloaded by: pd-oliana on 30-01-2023 15:52 CET
Downloaded by: pd-oliana on 30-01-2023 15:52 CET
RECIPIENTS DE CUISINE :
natural_image
Three identical cooking pots with crossed-out X marks, no text or symbols presentnatural_image
Four identical cooking pots with crossed-out X marks, no text or symbols presentDownloaded by: pd-oliana on 30-01-2023 15:52 CET
natural_image
Simple line drawing of a cooking pot with a handle (no text or symbols)Downloaded by: pd-oliana on 30-01-2023 15:52 CET
natural_image
Simple diagram showing a rectangular object with a vertical line and a circle, no text or symbols present.natural_image
Simple diagram with a circular object and a circle, no text or symbols present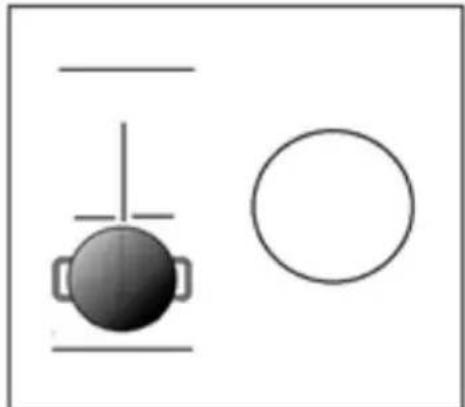
natural_image
Simple diagram with a black sphere and two horizontal lines, next to a circle (no text or symbols)natural_image
Simple diagram with two oval shapes and a circle, no text or symbols presentDownloaded by: pd-oliana on 30-01-2023 15:52 CET
Downloaded by: pd-oliana on 30-01-2023 15:52 CET
natural_image
Illustration of a hand using a paintbrush to brush residue on a surface (no text or symbols)Downloaded by: pd-oliana on 30-01-2023 15:52 CET
Downloaded by: pd-oliana on 30-01-2023 15:52 CET
Downloaded by: pd-oliana on 30-01-2023 15:52 CET
natural_image
Technical line drawing of a laboratory setup with two syringers and a tray, no text or symbols presentDownloaded by: pd-oliana on 30-01-2023 15:52 CET
Downloaded by: pd-oliana on 30-01-2023 15:52 CET
UTENSÍLIOS DE COZINHA
natural_image
Three identical cooking pots with crossed X marks, no text or symbols presentnatural_image
Four identical cooking pots with crossed-out X marks, shown in different orientations (no text or symbols)natural_image
Two cooking pots with opposing directional arrows indicating heating or cooling (no text or symbols)Downloaded by: pd-oliana on 30-01-2023 15:52 CET
natural_image
Simple line drawing of a cooking pot with a U-shaped tube attached (no text or symbols)Downloaded by: pd-oliana on 30-01-2023 15:52 CET
natural_image
Two simple geometric shapes: a rectangular prism with a vertical line and a circle, both without any text or symbols.natural_image
Simple diagram with a black circle and a circle, no text or symbols present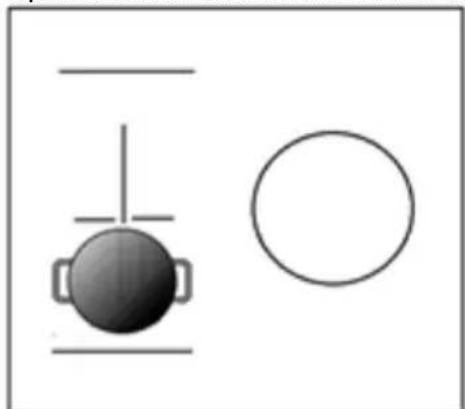
natural_image
Simple diagram with a circular object and horizontal lines, no text or symbols presentnatural_image
Simple diagram with two oval shapes and a circle, no text or symbols presentDownloaded by: pd-oliana on 30-01-2023 15:52 CET
Downloaded by: pd-oliana on 30-01-2023 15:52 CET
natural_image
Illustration of a hand using a paintbrush to brush residue in a bowl (no text or symbols)Downloaded by: pd-oliana on 30-01-2023 15:52 CET
Downloaded by: pd-oliana on 30-01-2023 15:52 CET
| A(mm) | B(mm) | C(mm) | D | E |
| 760 | 50 min. | 20 min. | Entrada d'aire | Sortida d'aire 5mm |
natural_image
Technical line drawing of a laboratory setup with two syringes and a tray, no text or symbols presentDownloaded by: pd-oliana on 30-01-2023 15:52 CET
INSTRUCCIONS D'ÚS
ÚS
RECIPIENTS DE CUINA
natural_image
Three identical cooking pots with crossed-out X marks, no text or symbols presentnatural_image
Four identical cooking pots with crossed-out X marks, shown in a row (no text or symbols)natural_image
Two cooking pots with directional arrows indicating heating or cooling (no text or symbols)Downloaded by: pd-oliana on 30-01-2023 15:52 CET
natural_image
Simple line drawing of a cooking pot with a handle (no text or symbols)Downloaded by: pd-oliana on 30-01-2023 15:52 CET
Al cap de 10 minuts la placa s'apagarà completament si no la feu servir.
NOMÉS PER A I603F
ÀREA FLEXIBLE
natural_image
Two simple geometric shapes: a rectangular prism with a vertical line and a circle, both without any text or symbols.natural_image
Simple diagram with a black circle and a circle, no text or symbols present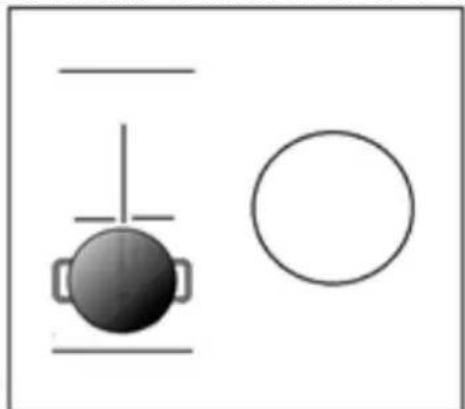
natural_image
Simple diagram with a black circle and a circle, no text or symbols present- Posar dues paelles als dos costats de la zona flexible.
natural_image
Simple diagram with two oval shapes and a circle, no text or symbols presentDownloaded by: pd-oliana on 30-01-2023 15:52 CET
Guies de potència
natural_image
Illustration of a hand using a paintbrush to brush residue in a container (no text or symbols)Downloaded by: pd-oliana on 30-01-2023 15:52 CET
Downloaded by: pd-oliana on 30-01-2023 15:52 CET
| I603F | 590 | 520 | 60 | 56 | 560+4 | 490+4 | 50 мин. | 3 мин. |
natural_image
Technical line drawing of a mechanical assembly with two labeled parts (01 and an unlabeled right view), no readable text or symbols present.Downloaded by: pd-oliana on 30-01-2023 15:52 CET

natural_image
Diagram of a layered electronic component with a labeled section [02] (no text or symbols on the diagram itself)02
[04] × 1
Downloaded by: pd-oliana on 30-01-2023 15:52 CET
СЪДОВЕ ЗА ГОТВЕНЕ
natural_image
Three identical cooking pots with crossed-out X marks, no text or symbols presentnatural_image
Four identical cooking pots with crossed-out X marks, shown in sequence (no text or symbols)Downloaded by: pd-oliana on 30-01-2023 15:52 CET
natural_image
Simple line drawing of a cooking pot with a handle (no text or symbols)Downloaded by: pd-oliana on 30-01-2023 15:52 CET
natural_image
Two simple geometric shapes: a rectangular prism with a vertical line and a circle, both without any text or symbols.natural_image
Simple diagram with a black circle and a circle, no text or symbols present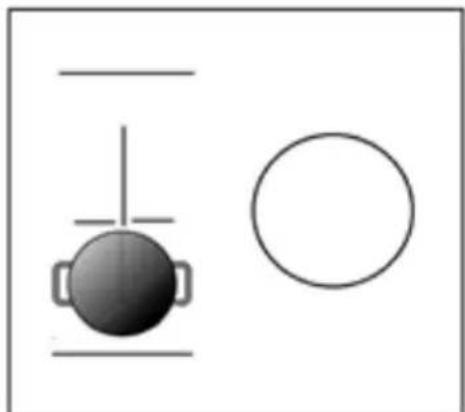
natural_image
Simple diagram with a black sphere and two horizontal lines, next to a circle (no text or symbols)natural_image
Simple diagram with two oval shapes and a circle, no text or symbols present- Внимание: Asegúrese de que la sartén es mayor de 12 cm
СЪВЕТИ ЗА ГОТВЕНЕ:
natural_image
Illustration of a hand using a paintbrush to brush residue in a bowl (no text or symbols)РАЗРЕШАВАНЕ НА ВЪЗНИКНАЛИ ПРОБЛЕМИ
This product enjoys the recognition and protection of the legal guarantee in accordance with current legislation. To enforce your rights or interests you must go to any of our official technical assistance services.
You can find the closest one by accessing the following web link: http://taurus-home.com/
You can also request related information by contacting us.
You can download this instruction manual and its updates at http://taurus-home.com/
FR
GARANTIE ET ASSISTANCE TECHNIQUE
Downloaded by: pd-oliana on 30-01-2023 15:52 CET
COUNTRY ADDRESS PHONE
| Algeria Zone d'Activite, N° 62, Constantine 213770777756 | ||
| Argentina Av. del Libertador 1298,(B1638BEY), Vicente López (Pcia. Buenos Aires) | 541153685223 | |
| Belgium Mariëndonkstraat 5, 5154 EG, Elshout 31620401500 | ||
| Benin 359 Av. Steinmetz, 1930, Cotonou 0299-21313798 | ||
| Bulgaria 265,Okolovrasten Pat, Mladost 4, 1766, Sofia | 35929211120 / 35929211193 | |
| Burkina Faso Avenue Bassawarga, 01 BP915, Ouagadougou | 226 25301038 | |
| Congo (Republic of) | 98 Blvd General Charles de Gaulle, Pointe Noire | 242066776656 |
| Cyprus 20, Bethlehem Str. / P.O.Box 20430, 2033, Strovolos | 35722711300 | |
| Czech Republic Milady Horakove 357/4, 568 02, Svitavy 420 461 540 130 | ||
| Democratic Republic of the Congo | AV. Pont Canale N° 3440, Kinshasa | 00243-991223232 |
| Equatorial Guinea | SN Av Patricio Lumumba y C/ Jesus B, Bata | 00240 333 082958 / 00240 333 082453 |
| Equatorial Guinea | Calle de las Naciones Unidas, PO box 762, Malabo | 240333082958 / 240333082453 |
| España | Avda Barcelona, S/N, 25790 Oliana (Lleida) atencioncliente@taurus.es | 902 118 050 |
| Ethiopia Lideta Sub City Kebele 10 H.NO 124, Addis Ababa | +251 11 5518300 | |
| France | Za les bas musats 18, 89100, Malay-le-Grand | 03 86 83 90 90 |
| Gabon | BP 574, Port-Gentil Centre-ville | 24101552689 / 24101560698 |
| Ghana | Ederick Place, Accra-Ghana | 302682448 / 302682404 |
| Gibraltar | 11 Horse Barrack Lane, 54000, Gibraltar | 00350 200 75397 / 00350 200 41023 |
| Greece Sapfous 7-9, 10553, Athens +30 21 0373 7000 | ||
| Guinea BP 206, GN, Conakry (224) 622204545 | ||
| Hong Kong | Unit H,13/F., World Tech Centre, Hong kong | (852) 2448 0116 / 9197 3519 |
| Hungary Késmárk utca 11-13, 1158, Budapest +36 1 370 4519 | ||
| India C-175, Sector-63, Noida, Gautam Budh Nagar - 201301, Delhi | (+91) 120 4016200 | |
| Ivory Coast 01 Rue Des Carrossiers-Zone 3, B.P 3747, Abidjan 01 (RCI) | 22521251820 / 225 21 353494 | |
| Jordan 28 Basman St Down town, Amman +962 6 46 222 68 | ||
| Kuwait P.O. BOX 3379 hawally, 32034, Hawally +965 2200 1010 | ||
| Lebanon Damascus Highway; Sciale Building, Ja-mhour | 9615922963 | |
| Luxembourg | Mariëndonkstraat 5, 5154 EG, Elshout | 31620401500 |
| Mali | BP E2900, Dravela Bolibana | 223227216 / 223227259 |
| Marruecos | Big distribution society 4 Rue 13 Lot. Smara Oulfa, Casablanca | (+212) 522 89 40 21 |
| Mauritania | 134 Avenue Gamal Abdener Ilot D, Nouak-chott | 2225254469 / 2225251258 |
| Mexico Rosas Moreno N° 4-203 Colonia de San Rafael C.P. 06470 – Delegación Cuauhtémoc, Ciudad de México | (+52) 55 55468162 | |
| Montenegro Rastovac bb, 81400, Niksic | +382 40 217 055 | |
| Netherlands | Mariëndonkstraat 5, 5154 EG, Elshout | 31620401500 |
| Nigeria 8, Isaac; John Str,G.R.A Ikeja Lagos 23408023360099 | ||
| Paraguay | Denis Roa 155 c/ Guido Spano, Asunción | 21665100 |
| Peru | Calle los Negocios 428, Surquillo, Lima | (511) 421 6047 |
| Portugal Avenida Rainha D. Amélia, n°12-B, 1600-677, Lisboa | +351 210966324 | |
| Romania | Dudesti Pantelimon 23, 410554, Bucharest | 031.805.49.58 |
| Serbia | Rastovac bb, 81400, Niksic | +382 40 217 055 |
| Slovakia Milady Horakove 357/4, 568 02, Svitavy | 420 461 540 130 | |
| Southafrica | Unit 25 & 26, San Croy Office Park, Die Agora Road, Croydon, Kempton Park, 1619, Johannesburg | (+27) 011 392 5652 |
| Tunisia | 2, Rue de Turquie, Tunis | 21671333066 |
| Ukraine | Block 6, Ap Housing Estate Topol-2, B, 49000, Dnepropetrovsk | 380563704161 / 380563704161 |
| United Arab Emi-rates | P.O.BOX 8543, Dubai | 14506246200 |
| Uruguay Luis Alberto de Herrera 3468, 11600, Mon-tevideo | 598 2209 28 00 | |
| Vietnam | Lot 7 Ind. Zone for, Ha Noi | 84437658111 / 84437658110 |
taurus
www.taurus-home.com
- Downloaded by: pd-oliana on 30-01-2023 15:52 CET
- INSTALACIÓN
- MODO DE EMPLEO
- USO
- PRACTICAL TIPS
- USE AND CARE
- INDUCTION OPERATION
- BEFORE INSTALLING:
- INSTALLATION
- MAINS CONNECTION
- AFTER INSTALLING:
- INSTRUCTIONS
- USE
- USE OF THE TOUCH CONTROLS
- COOKWARE
- TIMER FUNCTION
- CHILD LOCK FUNCTION
- BOOST FUNCTION
- STOP & GO FUNCTION
- ONLY FOR I603F
- FLEXIBLE AREA
- As one large area
- As two separate areas
- COOKING TIPS
- How to cook a grilled steak:
- Sautéing:
- Small cookware detection:
- Power guides
- AUTOMATIC OPERATING TIME, SAFETY AUTO-OFF.
- CLEANING AND MAINTENANCE
- PLAQUES VITROCÉRAMIQUES À INDUCTION
- DESCRIPTION
- RECIPIENTS DE CUISINE :
- UTENSÍLIOS DE COZINHA
- INSTRUCCIONS D'ÚS
- ÚS
- RECIPIENTS DE CUINA
- NOMÉS PER A I603F
- ÀREA FLEXIBLE
- Guies de potència
- СЪДОВЕ ЗА ГОТВЕНЕ
- СЪВЕТИ ЗА ГОТВЕНЕ:
- FR
- GARANTIE ET ASSISTANCE TECHNIQUE
- taurus
Brand : TAURUS
Model : I3021T
Category : Cooker