
UFZS 1800 - Saw Herkules - Free user manual and instructions
Find the device manual for free UFZS 1800 Herkules in PDF.

| Brand | Herkules |
| Model | UFZS 1800 |
| Category | Circular table saw / pull-through saw on frame |
| Nominal power (S1) | 1500 W |
| Maximum power (S6 40%) | 1800 W |
| Voltage / Frequency | 230-240 V / 50 Hz |
| No-load speed | 4300 rpm |
| Saw blade | ∅ 250 x ∅ 30 x 2.4 mm, 48 teeth, carbide |
| Table dimensions | 660 x 456 mm |
| Pull length | 220 mm |
| Max. cutting height | 73 mm (0°), 50 mm (45°) |
| Height adjustment range | 0 - 73 mm (continuous) |
| Blade tilt range | -2° to +47° (continuous) |
| Dust extraction connection | ∅ 35 mm |
| Net weight | 33 kg |
| Sound pressure level (operation) | 97.7 dB(A) |
| Sound power level (operation) | 109.3 dB(A) |
| Vibration | 2.07 m/s² |
| Parallel stop | Yes, with double-height rail |
| Cross stop | Yes, angle-adjustable |
| Blade guard | Movable protective hood |
| Riving knife | Yes, adjustable |
| Push stick included | Yes |
| Warranty | 5 years (according to conditions) |
Frequently Asked Questions - UFZS 1800 Herkules
User questions about UFZS 1800 Herkules
0 question about this device. Answer the ones you know or ask your own.
Ask a new question about this device
Download the instructions for your Saw in PDF format for free! Find your manual UFZS 1800 - Herkules and take your electronic device back in hand. On this page are published all the documents necessary for the use of your device. UFZS 1800 by Herkules.
USER MANUAL UFZS 1800 Herkules
natural_image
Close-up of a hand holding a small object over a metal bracket, no visible text or symbols
natural_image
Mechanical assembly showing a workpiece with a wrench and gear mechanism (no text or symbols visible)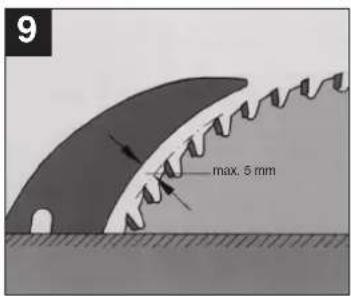
natural_image
Mechanical assembly showing a workpiece with a wrench and gear mechanism (no text or symbols visible)

natural_image
Mechanical device with labeled parts (22, 25), no visible text or symbols beyond labels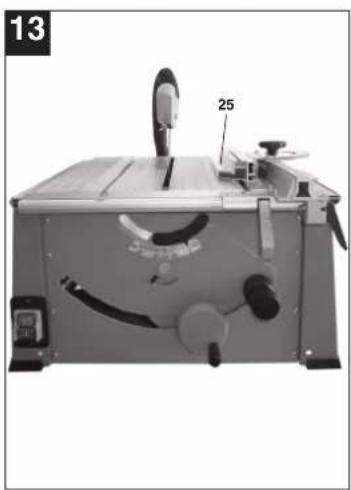
natural_image
Exterior view of a mechanical device with labeled parts (no readable text or symbols)
5
natural_image
Close-up of hands operating a mechanical component with a 36-degree angle标注 (no readable text or symbols)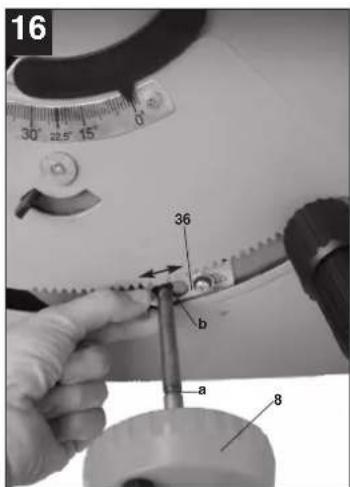
natural_image
Interior view of a mechanical device with labeled parts (no readable text or symbols)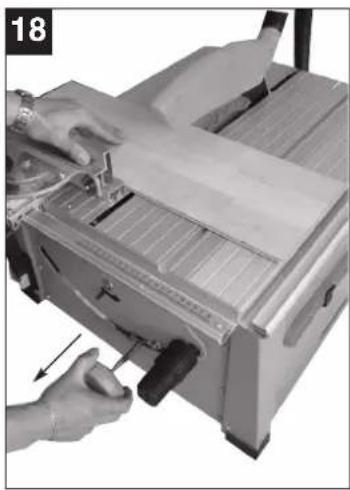
natural_image
Close-up of hands operating a machine with a tool, no visible text or symbols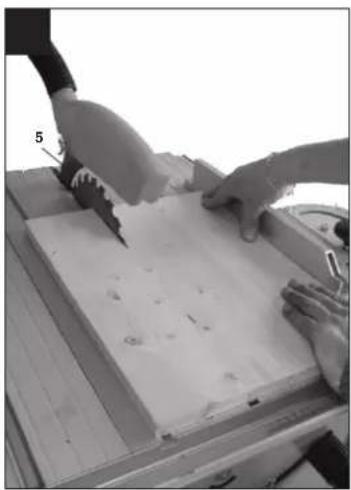
natural_image
Person using a tool to cut or mark a wooden block, no visible text or symbols
natural_image
Mechanical device with labeled parts, no visible text or symbols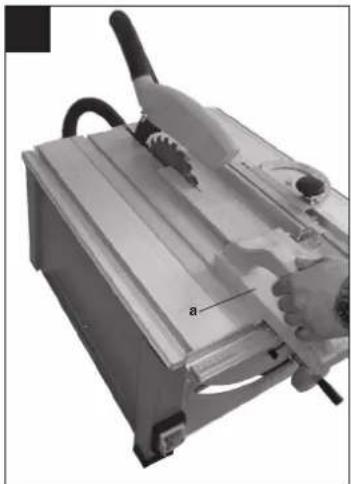
natural_image
Close-up of a mechanical device with a tool and labeled component 'a' (no readable text or symbols beyond label)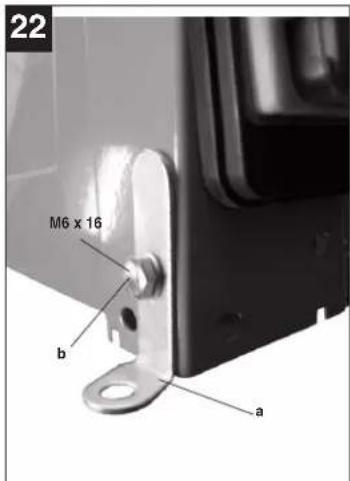
natural_image
Industrial machine with handle and control panel (no visible text or symbols)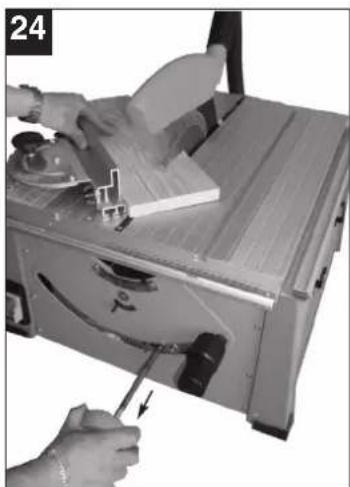
natural_image
Close-up of hands operating a machine tool with a screwdriver inserted (no visible text or symbols)8
D
● Underswing drag saw
● Carbide-tipped saw blade
- Universal stop
- Cross stop
- Push stick
3. Proper use
The bench-type circular saw is designed for the slitting and cross-cutting (only with the cross stop) of all types of timber, commensurate with the machine's size.
The machine is not to be used for cutting any type of roundwood.
The machine is to be used only for its prescribed purpose.
Any other use is deemed to be a case of misuse. The user/operator and not the manufacturer will be hold liable for damage and/or injuries of any kind that result from such misuse. The machine is to be operated only with suitable saw blades (saw blades made of HM or CV) It is prohibited to use any type of HSS saw blade and cutting-off wheel. To use the machine properly you must also observe the safety regulations, the assembly instructions and the operating Instructions to be found in this manual.
All persons who use and service the machine have to be acquainted with this manual and must be informed about the machine's potential hazards. It is also imperative to observe the accident prevention regulations in force in your area. The same applies for the general rules of occupational health and safety.
The manufacturer shall not be liable for any changes made to the machine nor for any damage resulting from such changes.
Even when the machine is used as prescribed it is
still impossible to eliminate certain residual risk factors. The following hazards may arise in connection with the machine's construction and design:
- Contact with the saw blade in the uncovered saw zone.
● Reaching into the running saw blade (cut injuries).
● Kick-back of workpieces and parts of workpieces.
● Saw blade fracturing.
● Catapulting of faulty carbide tips from the saw blade.
● Damage to hearing if ear-muffs are not used as necessary.
● Harmful emissions of wood dust when used in closed rooms.
4. Important information
Please read the directions for use carefully and observe the information provided. It is important to consult these instructions in order to acquaint yourself with the machine, its proper use and safety precautions.

Safety information
● Warning: When using electric tools it is imperative to take the following basic safety precautions in order to reduce the risk of electric shock, injury and fire.
● Take due note of all this information before and while working with the saw.
● Do not lose these safety regulations.
● Guard against electric shock Avoid body contact with earthed parts.
- When equipment is not being used it should be kept in a dry, closed place out of children's reach.
- Keep mounted attachments sharp and clean to enable you to work well and safely.
- Check the power cable regularly and have it replaced by an authorized specialist at the first sign of any damage.
- Check your extension cables regularly and replace them if damaged.
- When working outdoors, use only extension cables that are approved for outdoor use and which are marked accordingly.
- Concentrate on what you are doing. Use common sense. Do not operate the tool if your mind is not on your work.
● Never use an electric tool with a switch that cannot be turned on and off.
● Warning! The use of plug-in tools and
GB
accessories other than those intended may put you at risk of injury.
● Always pull the plug out of the power socket before adjusting or servicing the machine.
● Give these safety regulations to all persons who work on the machine.
● Do not use this saw to cut fire wood.
● Do not use this saw to cross-cut roundwood.
● Caution! Hands and fingers may be injured on the rotating saw blade.
● The machine is equipped with a safety circuit-breaker (11) to prevent it starting up again after a voltage drop.
● Before you use the machine for the first time, check that the voltage marked on the rating plate is the same as your mains voltage.
- If you need to use an extension cable, make sure its conductor cross-section is big enough for the saw's power consumption. Minimum cross-section: 1mm^2 .
- If you use a cable reel, the complete cable has to be pulled off the reel.
● Do not carry the tool by its cable.
- Check the power cable. Never use a faulty or damaged power cable.
- Do not use the cable to pull the plug out of the socket. Protect the cable from heat, oil and sharp edges.
- Do not leave the saw in the rain and never use it in damp or wet conditions.
● Provide good lighting.
- Do not saw near flammable liquids or gases.
● Wear suitable work clothes! Loose garments or jewelry may become caught up in the rotating saw blade.
● Non-slip shoes are recommended when working outdoors.
● Wear a hair net if you have long hair.
● Avoid abnormal working postures.
● Operators have to be at least 18 years of age. Trainees of at least 16 years of age are allowed to use the machine under supervision.
- Keep children away from the machine when it is connected to the power supply.
- Keep your workplace clean of wood scrap and any unnecessary objects.
● An untidy work area invites accidents.
- Do not allow other persons, especially children, to touch the tool or cable. Keep them out of your work area.
● Persons working on the machine should not be distracted.
● Note the direction of rotation of the motor and saw blade. Use only blades whose permissible maximum speed is not lower than the maximum spindle speed of the bench-type circular saw
and of the material to be cut.
● After you have switched off the motor, never slow down the saw blade (4) by applying pressure to its side.
● Fit only blades (4) which are well sharpened and have no cracks or deformations.
- Do not use circular saw blades (4) made of high-alloy high-speed steel (HSS).
- Use only blades which are recommended by the manufacturer, comply with EN 847-1 and come with a warning notice. When changing the blade, make sure that the cutting width is not smaller and the saw plate not bigger than the thickness of the splitter.
● Faulty saw blades (4) have to be replaced immediately.
● Never use saw blades which do not comply with the data specified in this manual.
● Never wedge the hinged guard hood (2) in open position. Use the upper blade guard and set it to the correct position.
- Never dismantle the machine's safety devices (2, 5) or put them out of operation.
- If the table insert is worn, replace it.
- Use the splitter correctly and set it to the correct position. The splitter (5) is an important safety device. Not only does it guide the workpiece, it also prevents the kerf closing behind the blade so that there is no kickback from the workpiece. Note the thickness of the splitter.
● The guard hood (2) has to be lowered over the workpiece for each cut.
- Be sure to use a push stick (3) when slitting narrow workpieces (smaller than 120 mm in width). Keep the push stick or handle for a push block at the machine at all times, even when you are not using them.
● Never cut workpieces which are too small to hold securely in your hand.
● Important: It is prohibited to use this saw to make plunge cuts.
● Always stand to the side of the saw blade when working with the saw.
● Never load the machine so much that it cuts out.
● Always press the workpiece firmly against the saw table (1).
● Make sure that off-cuts do not catch on the saw blade crown. Risk of catapulting!
● Never remove loose splinters, chips or jammed pieces of wood when the saw blade is running.
● To rectify faults or remove jammed pieces of wood, always switch off the machine first. - Pull out the power plug!
- If the sawing gap is worn, replace the table insert (6). - Pull out the power plug!
● Carry out conversions, adjustments,
GB
measurements and cleaning jobs only when the
motor is switched off. - Pull out the power plug!
● Before switching on, make sure that all keys and wrenches have been removed from the tool.
- Switch off the motor and pull out the power plug before you leave the workplace.
● Refit all guards and safety devices immediately after you have completed any repairs or maintenance work.
- Be sure to observe the safety information and operating and maintenance instructions issued by the manufacturer, as well as the dimensions listed in the Technical Data.
● It is imperative to observe the accident prevention regulations in force in your area as well as all other generally recognized rules of safety.
● Note the information published by your professional associations.
- Connect up the dust extraction system on all jobs. Circular saws have to be connected to a dust collecting device when used to saw wood. The operator has to be informed about the conditions with an influence on dust development, e.g. the type of material being processed (source and collection of the dust), the significance of local separation arrangements, and the correct setting of hoods, baffle plates and guides.
● To prevent injuries from flying debris from the workpiece, operate the saw only with a suitable extraction system or a standard industrial vacuum cleaner.
● The bench-type saw has to be connected to a 230 V socket-outlet with earthing contact and minimum fusing of 10 A.
- Do not use any low-powered machines for heavy duty work.
● Do not mis-use the cable
● Make sure you stand squarely and keep your balance at all times.
- Check the tool for damage
● Each time before re-using the tool, carefully check that the guards or any slightly damaged parts are working as intended.
- Check that the moving parts are in good working order, that they do not jam, and that no parts are damaged. Make sure that all parts are fitted correctly and that all other operating conditions are properly fulfilled.
● Unless otherwise stated in the operating instructions, damaged safety devices and parts have to be repaired or replaced by an authorized service center.
● Have damaged switches replaced by a customer service workshop.
● This electric tool complies with the pertinent safety regulations. Repairs are to be carried out only by a qualified electrician using original replacement parts or the user may suffer an accident.
- If necessary, wear suitable personal protection equipment. This could consist of:
- Ear-muffs to prevent the risk of damaging your hearing
- A breathing mask to prevent the risk of inhaling hazardous dust
● Always wear gloves when handling saw blades and rough materials. Whenever practicable, saw blades must be carried in a container.
● The operator has to be informed about the conditions with an influence on noise development (e.g. blades designed to reduce noise emission, caring for blades and saws).
● Faults on the machine or its guards, safety devices and blade have to be reported to the person in charge as soon as they are discovered.
- Use only the transport devices to move the machine. Never use the guards for handling and moving the machine.
● While you are moving the machine it is best to cover the top part of the blade, e.g. with the guard.
- Do not cut rebates or grooves without fitting a suitable guard, e.g. a tunnel-type guard, over the saw table.
● Circular saws must not be used for slotting jobs (cutting grooves which end in the workpiece).

Important:
Risk of injury!
Never reach into the running saw blade.

Wear goggles

Wear ear-muffs

Wear a breathing mask
Noise emission values
Idle mode
| Sound pressure level LPA | 97,7 dB(A) | 93,2 dB(A) |
| Sound power level LWA | 109,3 dB(A) | 96,3 dB(A) |
The quoted values are emission values and not necessarily reliable workplace values. Although there is a correlation between emission and immission levels it is impossible to draw any certain conclusions as to the need for additional precautions. Factors with a potential influence on the actual immission level at the workplace include the duration of impact, the type of room, and other sources of noise etc., e.g. the number of machines and other neighboring operations. Reliable workplace values may also vary from country to country. With this information the user should at least be able to make a better assessment of the dangers and risks involved.
- Technical data
| AC motor | 230V - 240V ~ 50Hz |
| Power P | S1 1500 W S6 40% 1800 W |
| Idle speed n_L | 4300 min ^-1 |
| Cutting-off wheel 250 x 30 x 2.4 mm | |
| Number of teeth 48 | |
| Table size 660 x 456 mm | |
| Drag length 220 mm | |
| Cutting height max. 73 mm / 0° | |
| 50 mm / 45° | |
| Height adjustment infinite 0 -73 mm | |
| Tilting saw blade Infinite -2° -47° | |
| Extractor socket 35 mm | |
| Weight | 33 |
| Vibration | 2.07 ^2 |
6. Before putting the machine into operation
● Unpack the bench-type circular saw and check it for damage which may have occurred in transit
● The machine has to be set up where it can stand firmly, e.g. on a work bench, or it must be bolted to a strong base.
● All covers and safety devices have to be properly fitted before the machine is switched on.
- It must be possible for the saw blade to run freely.
- When working with wood that has been processed before, watch out for foreign bodies
such as nails or screws etc.
- Before you actuate the On/Off switch, make sure that the saw blade is correctly fitted and that the machine's moving parts run smoothly.
● Before you connect the machine to the power supply, make sure the data on the rating plate is the same as that for your mains.
7. Assembly
Important! Pull out the power plug before carrying out any maintenance, resetting or assembly work on the cutting-off machine!
7.1 Assembly
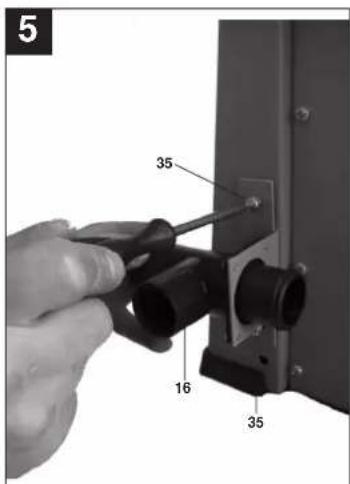
● Place the saw on a flat and firm surface.
● Fasten the extractor adapter (16) with the 2 screws (35) to the back of the saw as shown in Fig. 5.
● Fit the extension pipe (50) for the lower dust extraction device and the short extractor hose (51) to the extractor adapter and extension pipe.
7.2 Fitting / removing the saw blade guard (Fig. 2/3)
● Mount the saw blade guard (2) on the splitter (5) so that the screw fits through the hole (44) in the splitter.
- Do not tighten the screw (15) too far – the blade guard must be able to move freely.
- Fasten the extractor hose (13) to the extractor adapter (16) and to the extractor socket of the blade guard (2).
● A suitable extractor system has to be connected to the outlet of the extractor adapter (16).
● To remove the saw blade guard, proceed in reverse order. Important! kg
The guard hood (2) must always be lowered over the workpiece before you begin to cut.
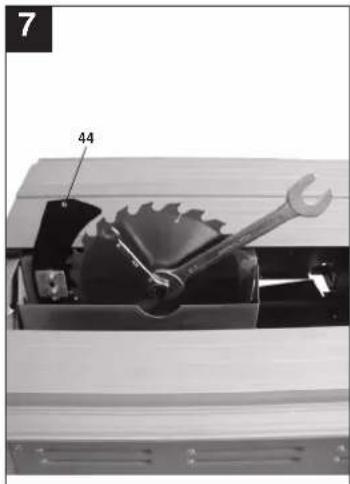
7.3. Setting the splitter (Fig. 8/9)
● Important! Pull out the power plug.
- Set the blade (4) to max. cutting depth, move to 0" position and lock in place.
- Remove the saw blade guard (see 7.3).
● Take out the table insert (6) (see 7.5).
● Slacken the fixing screw (20).
7.3.1. Setting for maximum cuts (Fig. 6/7/8)
● Push up the splitter (5) until the gap between the
● saw table (1) and the upper edge of the splitter (5) equals approx. 10 cm.
● The distance between the blade (4) and the splitter (5) should be 3-8 mm.
● Retighten the screw (20) and mount the table
GB
insert (6) (Fig. 7).
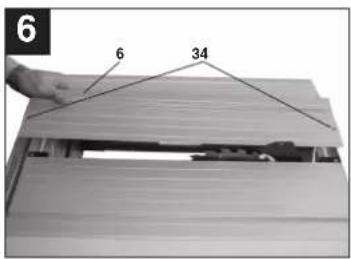
7.4 Changing the table insert (Figure 6)
● To prevent increased likelihood of injury the table insert should be changed whenever it is worn or damaged.
- Remove the saw blade guard (2).
- Remove the 2 countersunk head screws (34).
● Take out the worn table insert (6)
● To fit the replacement table insert, proceed in reverse order.
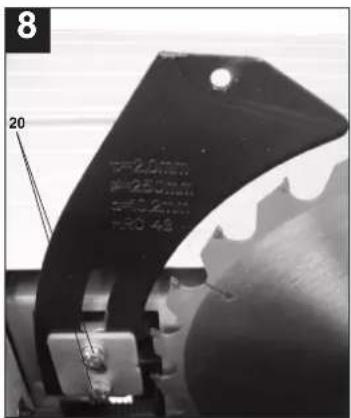
7.5 Fitting/replacing the blade (Fig. 7)
● Important! Pull out the power plug first.
- Remove the table insert by undoing the two countersunk head screws (see 7.5).
- Undo the nut with a size 24 wrench on the nut itself and a second fork wrench (size 13) on the motor shaft (a) to apply counter-pressure.
● Important! Turn the nut in the direction of rotation of the saw blade.
● Take off the outer flange and pull the old saw blade off the inner flange by dropping the blade at an angle.
● Clean the blade flange thoroughly before fitting the new blade.
● Mount and fasten the new saw blade in reverse order.
● Important! Note the running direction. The cutting angle of the teeth must point in running direction, i.e. forwards (see the arrow on the blade guard).
- Refit and set the splitter (5) and the saw guard (2) (see 7.3., 7.4.)
- Check to make sure that all safety devices are properly mounted and in good working condition before you begin working with the saw again.
8.0. Operation
The underswing drag saw can be used as a drag circular saw or as a bench-type circular saw.
- It is used as a drag circular saw to make precise and safe cuts in stationary workpieces, i.e. the saw unit is moved.
- It is used as a bench-type circular saw to make longitudinal cuts in larger workpieces, i.e. the saw unit is fixed and the workpiece is moved.
8.1. ON/OFF switch (Fig. 4)
● To turn the saw on, press the green button .I. . Wait for the blade to reach its maximum speed of rotation before commencing with the cut.
- To turn the machine off again, press the red button "0".
8.2. Cutting depth (Fig. 4)
● Turn the hand crank (8) to set the blade (4) to the required cutting depth.
Tum anti-clockwise: larger cutting depth
Turn clockwise: smaller cutting depth
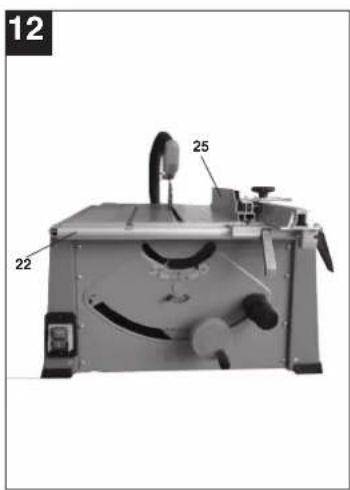
8.3. Parallel stop
8.3.1. Stop height
● The parallel stop (7) supplied with the bench-type circular saw has two different guide faces.
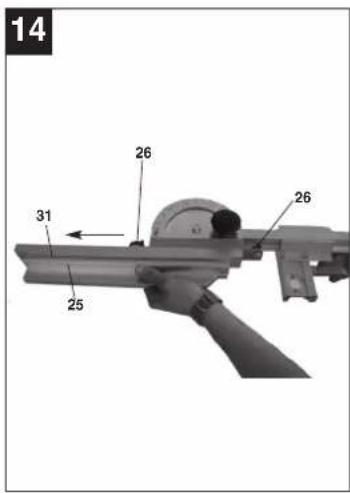
- For thick material you must use the stop rail (25) as shown in Fig. 12, for thin material you must use the stop rail as shown in Fig.11.
● To change over the stop rail (25) to the lower guide face you have to slacken the two knurled screws (26) in order to disconnect the stop rail (25) from the holder (24).
- Remove the two knurled screws (26) through the one slot (27) in the stop rail (25) and insert in the other slot (31).
● Remount the stop rail (25) on the holder (24).
● The procedure for changing over to the high guide face is similar.
8.3.2. Cutting width:
● The parallel stop (7) has to be used when making longitudinal cuts in wooden workpieces.
● The parallel stop (7) can be mounted on either side of the saw table (1).
● The parallel stop (7) has to be mounted in the guide rail (22) of the saw table (1).
● The parallel stop (7) can be set to the required dimension with the help of the scale (23) on the guide rail (1).
● You can clamp the parallel stop in the required position by pressing the eccentric lever (12).
8.3.3. Setting the stop length (Fig. 11)
● The stop rail (25) can be moved in longitudinal direction in order to prevent the workpiece from becoming jammed.
- Rule of thumb: The rear end of the stop comes up against an imaginary line that begins roughly at the center of the blade and runs at an angle of 45^ to the rear.
- Set the required cutting width
- Slacken the knurled screws (26) and push the stop rail (25) forward until it touches the imaginary 45^ line.
- Retighten the knurled screws (26).
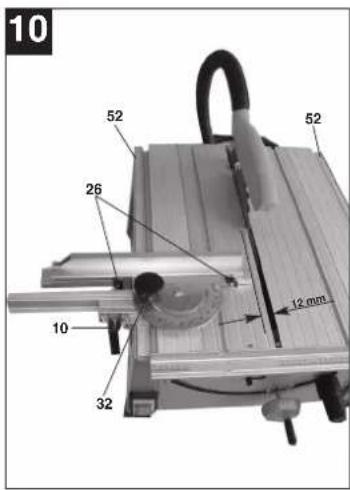
8.4. Cross stop (Figure 10)
● Use the eccentric lever (12) to clamp the universal stop in the required position in the left
or right guide rail (52).
- Release the clamping lever (10) to set the stop to the required lateral position and then secure the lever again.
- Undo the knurled screw (32) to set the required angle on the cross stop and then tighten the knurled screw again. The angle setting device has notched positions for all standard angle sizes.
● The stop rail can be adjusted by undoing the two thumb screws (26).
Important!
- Do not push the stop rail (25) too far toward the blade.
● The distance between the stop rail (25) and the blade (4) should be approx. 12 mm.
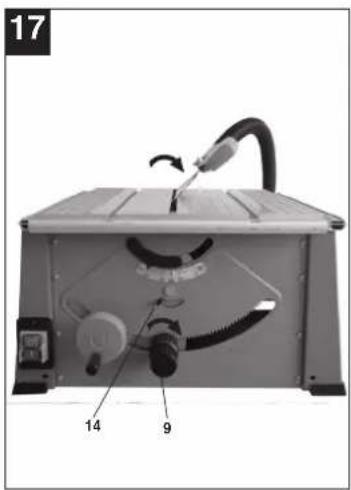
8.5. Setting the angle (Fig. 17)
● Undo the fixing handle (9).
● Turn the handle to set the desired angle on the scale.
- Lock the fixing handle again in the required angle position.
● The saw comes with an angle stop (14).
- When the angle stop is in the left position (Fig. 17), the stop is active at 0^ or 45^ .
- When the angle stop is in the right position you can set a saw blade angle up to max. -2° or +47°.
8.6 Use as an underswing drag saw
For use as an underswing draw saw the lock (36) of the saw unit has to be released.
This is done by pulling the drag device (8) slightly outwards and releasing the lock (Fig. 16).
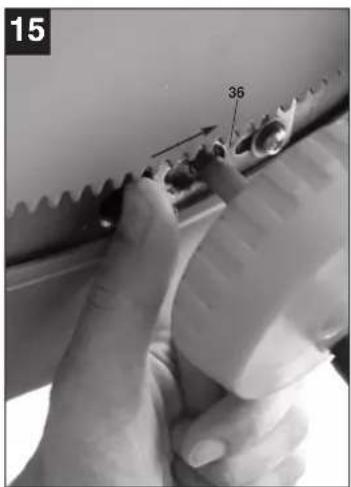
8.7 Use as a bench-type circular saw
For use as a bench-type circular saw the saw unit has to be fixed in place.
● This is done by engaging the lock in one of the two grooves (a/b) of the draw bar (Fig.15/16). After the lock (36) latches in place, check that it is effective.
- If the saw unit is fixed in the middle groove (b) you will have a larger workpiece support on the rear side of the table.
9.0. Operation
Important!!
● After every new adjustment we recommend you to make a trial cut in order to check the new settings.
● After switching on the saw, wait for the blade to reach its maximum speed of rotation before
commencing with the cut.
● Take extra care when starting the cut!
● Before use, the saw must be screwed securely to the metal angle brackets (a) supplied! To do this, the metal bracket (a) must be secured to the machine body with the screws (b) as shown in Fig. 22.
9.1. Making longitudinal cuts (Figure 19)
Longitudinal cutting (also known as slitting) is when you use the saw to cut along the grain of the wood. Important! The saw unit must be fixed in place. Press one edge of the workpiece against the parallel stop (7) while the flat side lies on the saw table (1). The guard hood (2) must always be lowered over the workpiece.
When you make a longitudinal cut, never adopt a working position that is in line with the cutting direction.
- Set the parallel stop (7) in accordance with the workpiece height and the desired width. (See 8.3.)
- Switch on the saw.
- Place your hands (with fingers closed) flat on the workpiece and push the workpiece along the parallel stop (7) and into the blade (4).
● Guide at the side with your left or right hand (depending on the position of the parallel stop) only as far as the front edge of the guard hood.
● Always push the workpiece through to the end of the splitter (5).
● The offcut piece remains on the saw table (1) until the blade (4) is back in its position of rest. - Secure long workpieces against falling off at the end of the cut (e.g. with a roller stand etc.).
9.1.2. Cutting narrow workpieces (Fig. 20)
- Be sure to use a push stick (3) when making longitudinal cuts in workpieces smaller than 120 mm in width. A push block is supplied with the saw! Replace a worn or damaged push stick immediately.
9.1.3. Cutting extremely narrow workpieces (Fig. 21)
- Be sure to use a push block when making longitudinal cuts in very narrow workpieces with a width of 30 mm and less.
- The low guide face of the parallel stop is best used in this case. There is no push block supplied with the saw! (Available from your specialist dealer) Replace the push block without delay when it becomes worn.
GB
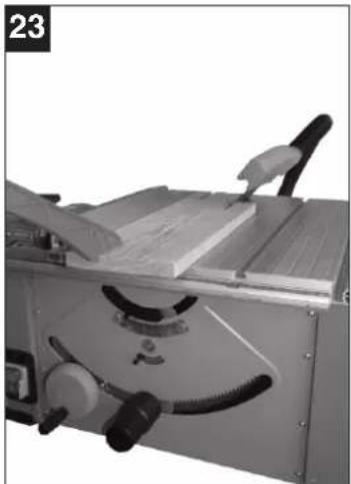
9.1.4. Making bevel cuts (Fig. 17/23)
Bevel cuts must always be used using the parallel stop (7).
● Set the blade (4) to the desired angle. (See 8.5.)
- Set the parallel stop (7) in accordance with the workpiece width and height (see 8.3.1)
● Carry out the cut in accordance with the workpiece width (see 9.1.1., 9.1.2 and 9.1.3.)
9.1.5. Making cross cuts (Fig. 18/24)
● Cross cuts are made with the help of the drag function.
- Set the saw blade to the desired angle (Section 8.5).
- Use the universal stop as explained in Section 8.4.
● Hold the workpiece firmly with one hand and press it against the stop rail.
- With the other hand slowly pull the saw blade on the drag device (8) forwards through the workpiece.
- When you have finished the cut, do not allow the saw unit to jump back into starting position on its own but guide it back slowly by hand.
● Switch off the saw again
- Do not remove the offcut until the blade has stopped rotating.
10.0. Maintenance
● Important! Pull out the power plug first.
- Remove dust and dirt regularly from the machine. Cleaning is best carried out with a fine brush or a cloth.
● Never use caustic agents to clean plastic parts.
- Keep the saw unit drag device clean and lubricate it in regular intervals.
11.0. Ordering replacement parts
Please provide the following information on all orders for replacement parts:
● Model/type of device
● Article number of the device
● ID number of device
● Number of the required replacement part
For our latest prices and information please go to www.isc-gmbh.info
The product described in these instructions comes with a 5-year warranty covering defects. This 5-year warranty period begins with the passing of risk or when the customer receives the product.
For warranty claims to be accepted, the product has to receive the cancer maintenance and be put to the proper use as described in the operating instructions.
Your statutory rights of warranty are naturally unaffected during these 5 years.
This warranty applies in Germany, or in the respective country of the manufacturer's main regional sales partner, as a supplement to local regulations. Please note the details for contacting the customer service center responsible for your region or the service address listed below.
① CERTIFICADO DE GARANTIA
natural_image
Simple line drawing of a trash bin with crossed lines indicating no waste or plastic (no text or symbols)⑥ Nur für EU-Länder
For EU countries only
Never place any electric tools in your household refuse.
To comply with European Directive 2002/96/EC concerning old electric and electronic equipment and its implementation in national laws, old electric tools have to be separated from other waste and disposed of in an environment-friendly fashion, e.g. by taking to a recycling depot.
Recycling alternative to the demand to return electrical devices:
As an alternative to returning the electrical device, the owner is obliged to cooperate in ensuring that the device is properly recycled if ownership is relinquished. This can also be done by handing over the used device to a returns center, which will dispose of it in accordance with national commercial and industrial waste management legislation. This does not apply to the accessories and auxiliary equipment without any electrical components which are included with the used device.
The reprinting or reproduction by any other means, in whole or in part, of documentation and papers accompanying products is permitted only with the express consent of ISC GmbH.
F


- D
- Proper use
- The machine is to be used only for its prescribed purpose.
- Important information
- Safety information
- GB
- Before putting the machine into operation
- Assembly
- Assembly
- Fitting / removing the saw blade guard (Fig. 2/3)
- Setting the splitter (Fig. 8/9)
- Setting for maximum cuts (Fig. 6/7/8)
- Changing the table insert (Figure 6)
- Fitting/replacing the blade (Fig. 7)
- Operation
- ON/OFF switch (Fig. 4)
- Cutting depth (Fig. 4)
- Parallel stop
- Stop height
- Cutting width:
- Setting the stop length (Fig. 11)
- Cross stop (Figure 10)
- Important!
- Setting the angle (Fig. 17)
- Use as an underswing drag saw
- Use as a bench-type circular saw
- Operation
- Important!!
- Making longitudinal cuts (Figure 19)
- Cutting narrow workpieces (Fig. 20)
- Making bevel cuts (Fig. 17/23)
- Making cross cuts (Fig. 18/24)
- Maintenance
- Ordering replacement parts
- ① CERTIFICADO DE GARANTIA
- F
Brand : Herkules
Model : UFZS 1800
Category : Saw